
FP360 - Car seat Foppapedretti - Free user manual and instructions
Find the device manual for free FP360 Foppapedretti in PDF.
| Product type | Car seat |
| Brand | Foppapedretti |
| Model | FP360 quick i-Size |
| Approval | ECE R129/03 i-Size |
| Child height | 40 cm to 150 cm |
| Recommended age | From birth to approximately 12 years |
| Installation direction | Rear-facing (40-105 cm) and forward-facing (76-150 cm) |
| Attachment method | ISOFIX + Top Tether (up to 105 cm); ISOFIX + 3-point belt or belt alone (100-150 cm) |
| Integrated restraint system | 5-point harness (40-105 cm), then vehicle 3-point belt (100-150 cm) |
| Seat rotation | Yes, 360° with locking in forward-facing and rear-facing positions |
| Seat inclination | 4 positions (rear-facing: position 4 only; forward-facing: positions 1-3 for 76-105 cm, position 1 for 100-150 cm) |
| Headrest adjustment | Yes, coupled with strap height |
| Removable insert | For children up to 75 cm |
| Side protection | Integrated |
| Cover | Removable and machine washable at 30°C |
| Materials | Plastic, textile |
| Warranty | 12 months (manufacturer's conventional warranty) |
| Included accessories | Infant insert, chest pads, ISOFIX guides, Top Tether, Kid-Pad |
| Vehicle compatibility | i-Size and ISOFIX seats (consult manufacturer list) |
| Safety | Do not use on front seat with active airbag; deactivate airbag in rear-facing position |
Frequently Asked Questions - FP360 Foppapedretti
User questions about FP360 Foppapedretti
0 question about this device. Answer the ones you know or ask your own.
Ask a new question about this device
Download the instructions for your Car seat in PDF format for free! Find your manual FP360 - Foppapedretti and take your electronic device back in hand. On this page are published all the documents necessary for the use of your device. FP360 by Foppapedretti.
USER MANUAL FP360 Foppapedretti
natural_image
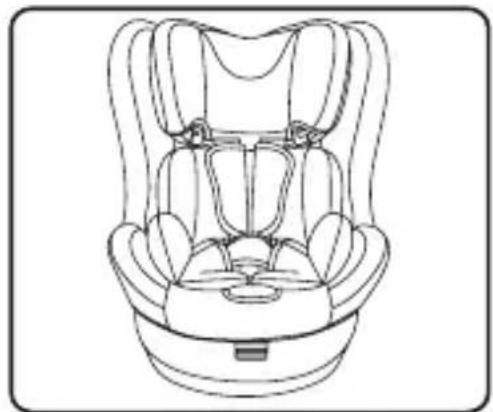
Line drawing of a baby car seat with adjustable seat, no text or symbols presentEN CAR SEAT - Assembly instructions
natural_image
Simple icon of a person sitting in a car seat, enclosed in a rounded square frame (no text or symbols)ECE R129-03
IT. IMPORTANTE - LEGGERE ATTENTAMENTE E CONSERVARE PER FUTURO RIFERIMENTO
EN. IMPORTANT! READ THE INSTRUCTIONS CAREFULLY AND KEEP FOR FUTURE REFERENCE
FR. IMPORTANT! LIRE ATTENTIVEMENT ET CONSERVER SOIGNEUSEMENT A PORTEE DE MAIN POUR UNE UTILISATION ULTERIEURE


natural_image
Hand holding a clipboard with a red arrow pointing downward (no text or symbols)
natural_image
Illustration of a car seat with arrows indicating movement or force (no text or symbols)natural_image
Line drawing of a baby car seat with a hand adjusting the seatbelt (no text or symbols)natural_image
Line drawing of a car seatbelt with red motion arrows indicating movement (no text or symbols)③
natural_image
Diagram showing a vehicle interior with yellow lockers and directional arrows, labeled A2 (no text or symbols on diagram)

natural_image
Two line drawings of a car seat assembly, one showing internal components and the other showing a highlighted seat with a red arrow (no text or symbols)natural_image
Line drawing of a baby car seat with an inset showing hand positioning and red arrows indicating movement (no text or symbols)
natural_image
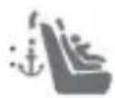
Two circular icons showing a person relaxing with a curved arm and a small boat, no text or symbols present.natural_image
Illustration of a hand using a tool to lift a cable, showing red arrows indicating direction (no text or symbols)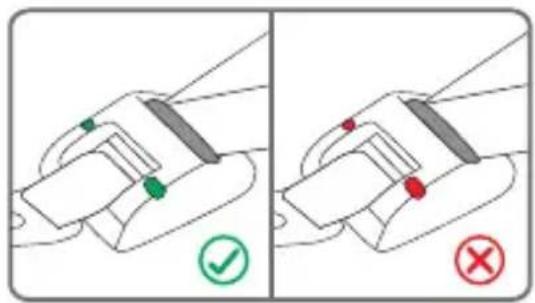
natural_image
Line drawing of a car seat assembly with no text or symbolsnatural_image
Illustration of a hand holding a small object with a red arrow indicating direction, no text or symbols presentnatural_image
Line drawing of a baby car seat with a red arrow indicating the seatbelt (no text or symbols present)
natural_image
Line drawing of a baby car seat with a magnified inset showing the seatbelt adjustment (no text or symbols)

natural_image
Diagram showing a door with yellow electrical switches and two circular insets highlighting directional arrows (no text or symbols)
natural_image
Illustration of a hand using a tool to lift a curved blade, with red arrows indicating direction (no text or symbols)
natural_image
Line drawing of a car seat with seats and seatbelt, no text or symbols present
natural_image
Line drawing of a car comfort seat with seatbelt and seat, no text or symbols presentnatural_image
Illustration of a hand holding a small object with a red arrow indicating direction, no text or symbols presentnatural_image
Line drawing of a baby car seat with a red arrow indicating the seatbelt (no text or symbols present)natural_image
Two-panel illustration showing hands holding red and green bars with a tool, labeled D3D4 (no text or symbols on the diagrams themselves)natural_image
Line drawing of a child seated in a car seat, no text or symbols present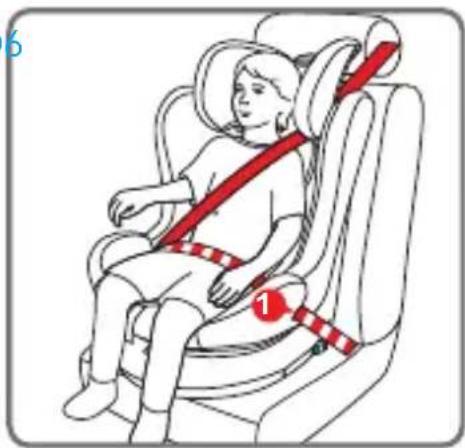
natural_image
Illustration of a child wearing a seatbelt and red belt, sitting inside an airplane (no text or symbols)
natural_image
Illustration of a hand pressing down on a curved object with red arrows indicating downward motion (no text or symbols)natural_image
Illustration of a child seated in a car seat with red safety belt and red arrow indicating pressure point (no text or symbols)natural_image
Line drawing of a car seat with a magnified inset showing the seat being adjusted for a finger (no text or symbols present)
natural_image
Diagram of a mechanical device with a magnified inset showing internal components and red arrows indicating motion (no text or symbols)
natural_image
Diagram showing a door with yellow clip switches and a magnified inset of two yellow clip switches (no text or symbols)natural_image
Line drawing of a car seat with a red X mark indicating no text or symbols on the seat itself
natural_image
Line drawing of a car seat with a red circle indicating a location or safety symbol (no text or labels present)natural_image
Illustration of a hand holding a car seat with a magnified inset showing the cable being adjusted (no text or symbols)natural_image
Line drawing of a car seat assembly with a red arrow indicating rotation (no text or symbols)natural_image
Diagram of a car seatbelt with a red arrow indicating clockwise motion (no text or symbols)natural_image
Line drawing of a car seat assembly with a magnified inset showing a finger insertion (no text or symbols)natural_image
Line drawing of a car comfort seat with labeled parts G1 and G2 (no text or symbols on the diagram itself)
natural_image
Diagram of a car seatbelt mechanism with a red arrow indicating the direction (no text or symbols present)natural_image
Line drawing of a car seat with a close-up inset showing the right-hand rule for adjusting the seat (no text or symbols present)natural_image
Line drawing of a car seat assembly (no text or symbols)natural_image
Illustration of a hand holding a car seat with a magnified inset showing the cable being inserted (no text or symbols)natural_image
Illustration of a hand using a tool to lift a car head (no text or symbols visible)

natural_image
Line drawing of a car seatbelt with a black bandage and feather accessory (no text or symbols)

natural_image
Line drawing of a hand inserting into a device into a container, with a red arrow indicating the insertion point (no text or symbols present)- Before use, it is recommended that you carefully read the instructions, which you will need to follow strictly in order to have the highest levels of product safety.
- Store these instructions carefully for future reference. These instructions can be stored in the special compartment on the car seat during the period of use.
- Failure to follow the car seat installation instructions carefully could pose a risk to your baby.
- Do not use a car seat on the front seat where active airbags are fitted, as this can be dangerous. This risk does not apply to the side airbags.
- WARNING! Deactivate the passenger airbag when the child is in the front seat in the rear facing direction.
-
This car seat is approved according to the ECE R129/03 regulation for the transport of children between 40 cm and 150 cm in height, and can be installed:
-
In the rear-facing position (children between 40 and 105 cm in height), with the ISOFIX anchoring system + Top Tether.
- In the forward-facing position (children between 76 and 105 cm in height), with the ISOFIX anchoring system + Top Tether.
-
In the forward-facing position (children between 100 and 150 cm in height), with the ISOFIX anchoring system + the vehicle 3-point seat belt or with the vehicle 3-point seat belt only.
-
IMPORTANT: Do not use forward facing before the child's age exceeds 15 months. The car seat can be installed facing forward once the child is at least 76 cm tall.
- NOTICE: This is an i-Size Enhanced Child Restraint System. It is approved according to UN Regulation No. 129, for use in, i-Size compatible vehicle seating positions as indicated by vehicle manufacturers in the vehicle users' manual. If in doubt, consult either the Enhanced Child Restraint System manufacturer or the retailer.
- NOTICE: This is a i-Size booster seat Enhanced Child Restraint System. It is approved according to UN Regulation No. 129. for use primarily in "i-Size seating positions" as indicated by vehicle manufacturers in the vehicle user's manual. If in doubt, consult either the Enhanced Child Restraint System manufacturer or the retailer.
- WARNING: NEVER leave your child unattended – your child's safety is your responsibility.
- WARNING: Adult assembly required.
WARNING
- WARNING: The child car seat must be fitted in accordance with the manufacturer's instructions. Incorrect installation could be dangerous.
- WARNING: Always ensure that new or occasional users [e.g. grandparents] have read the instructions or been taught the correct installation by someone who has read and understood the instructions.
- WARNING: Always keep this instruction manual with the child car seat, or in the vehicle in which you are carrying the child car seat. Some models of child car seat have a pocket to store the instructions.
- WARNING: If in doubt regarding the installation and correct use of the car seat, contact the manufacturer of the child restraint device.
BEFORE STARTING
- WARNING: Do not fit the child car seat in a rearward facing position
- WARNING: Before installing the child car seat ensure that the passenger seat you are using is locked in the upright position.
- WARNING: Do not use the child car seat in the home - it has only been designed to be used in the car.
- WARNING: Do not leave loose/unsecured objects on the back seat of your car or the parcel shelf. They may be dangerous to your child if you are forced to brake suddenly.
WHEN USING THE CHILD CAR SEAT
- WARNING: WARNING: Make sure that the child car seat is placed somewhere so that rigid items and plastic parts do not become trapped in doors or movable seat units when the seat is in everyday use.
- WARNING: Always use the vehicle's door child safety lock system, if one is available, to make it impossible for the child to open the car doors from inside.
- WARNING: Allow the child a break during long car journeys and make sure they don't get out of the car seat unaided and without supervision.
- WARNING: NEVER leave your child unattended – your child's safety is your responsibility.
- WARNING: Ensure that the child car seat is secured to the car seat at all times even when not in use.
- WARNING: The child car seat must be fitted securely to the passenger seat. Ensure that it is not loose or wobbly after you have fitted it.
- WARNING: The child seat shall not be used without the cover.
- WARNING: The seat cover should not be replaced with any other than the
WARNING
one recommended by the manufacturer, because the cover constitutes an integral part of the restraint performance.
- WARNING: Allow the child a break during long car journeys and make sure they don't get out of the car seat unaided and without supervision.
- WARNING: In the event of an emergency it is important to be able to release the child quickly (as defined by British Standards). This means that seat buckle cannot be fully tamper proof and you should actively discourage your child from playing with or using the buckle.
- You should actively discourage your child from playing with or using the buckle.
SEAT BELT
- WARNING: NEVER use any load bearing contact points other than those described in these instructions.
- WARNING: Ensure that the lap section of the seatbelt or harness is worn low down, so that pelvis is firmly engaged. The harness must be tight enough, the space between the pectoral belt and the child's chest must not be more than two fingers thick. The abdominal belt of the harness should be in the lowest possible position to adequately restrain the child's pelvis.
- WARNING: Make sure that ALL the passengers in your vehicle have their seatbelts fastened, as unrestrained people can be very dangerous to the child in an accident..
- WARNING: NEVER use a seatbelt routing scheme that differs from these instructions.
- WARNING: The lap and diagonal seatbelt must be used at all times when your child is in the child car seat.
SUNLIGHT/HOT DAYS
- WARNING: Do not leave your child in the child car seat while parked in direct sunlight or on a hot day.
- WARNING: Do not subject the child car seat to prolonged direct sunlight as this may be dangerous for your child (the metal and plastic fittings could become hot) and may cause the fabric to fade. You can reduce this problem by covering the child car seat with a sheet when not in use.
SECOND HAND OR DAMAGED CHILD CAR SEATS AND SEATBELTS
- WARNING: Never buy a second hand child car seat. It may have unseen damage.
WARNING
- WARNING: The manufacturer only guarantees this product when the original owner uses it.
- WARNING: You MUST replace the child car seat and your vehicles seatbelts if they become badly worn or amaged.
- WARNING: You MUST replace the child car seat if it is involved in an accident it may have unseen damage and may not protect your child as well as it should. At the very least send the child car seat to your retailer for inspection, together with the accident report.
- The FOPPAPEDRETTI company declines all responsibility for improper use of the product and for any use that does not comply with these instructions.
IMPORTANT WARNING
from 40 to 105 cm (i-Size universal ISOFIX)
- This is an i-Size Enhanced Child Restraint System. It is approved according to UN Regulation No. 129, for use in, i-Size compatible vehicle seating positions as indicated by vehicle manufacturers in the vehicle users' manual. "FP360 quick i-Size" can be used in all i-Size seating positions and in any ISOFIX seating positions. If in doubt, consult either the Enhanced Child Restraint System manufacturer or the retailer.
- From 40 cm to 105 cm it must be installed on seats equipped with the Isofix System and Top Tether.
From 100 cm to 150 cm (i-Size booster seat).
- This is a i-Size booster seat Enhanced Child Restraint System. It is approved according to UN Regulation No. 129, for use primarily in “i-Size seating positions” as indicated by vehicle manufacturers in the vehicle user’s manual. “FP360 quick i-Size” can be used in all i-Size seating positions and, it can be used also in any UNIVERSAL seating position provided that it does not conflict with the interior of the car. If in doubt, consult either the Enhanced Child Restraint System manufacturer or the retailer.
WARNING! DO NOT use the Top Tether from 100 to 150 cm.
- If the vehicle is not fitted with Isofix anchorage, the "FP360 quick i-Size" can be installed (in the 100-150 cm configuration) front-facing with a 3-point adult safety belt, approved according to UN/ECE Regulation No. 16 or equivalent.
- WARNING! When using the 3-point adult safety belt, make sure that the lap portion is positioned correctly on the pelvic area.
| WARNING | PAG 47 |
| IMPORTANT WARNING | PAG 50 |
| Overview | PAG 52 |
| Restrictions and requirements regarding the use of the product and vehicle seat | PAG 53 |
| Correct use of the car seat | PAG 55 |
| Adjusting the height of the headrest and straps | PAG 56 |
| Using the buckle | PAG 57 |
| Unlocking the ISOFIX system and Top Tether | PAG 57 |
| Adjusting the seat belt (harness) | PAG 58 |
| Reclining the seat | PAG 59 |
| Rotating the seat | PAG 60 |
| How to install the ISOFIX system | PAG 61 |
| Using the reducer for the first months | PAG 62 |
| REARWARD-FACING INSTALLATION | PAG 62 |
| (Children between 40 and 105 cm, ISOFIX + Top Tether + harness) | |
| INSTALLATION IN THE DIRECTION OF FORWARD TRAVEL | PAG 69 |
| (Children between 76 and 105 cm, ISOFIX + Top Tether + harness) | |
| INSTALLATION IN THE DIRECTION OF TRAVEL | PAG 75 |
| (Children between 100 and 150 cm) | |
| INSTALLATION 1 - Installation of the car seat, using only the 3-point belt supplied with the vehicle. | PAG 76 |
| INSTALLATION 2 - Installing the seat with the 3-point seat belt and ISOFIX connectors. | PAG 79 |
| Removing the 5-point belt | PAG 81 |
| Replacement of the 5-point belt for use in the 40-105 cm range | PAG 82 |
| KID-PAD installation | PAG 83 |
| Remove the cover | PAG 84 |
| Cleaning and maintenance | PAG 85 |
| Formal guarantee | PAG 86 |
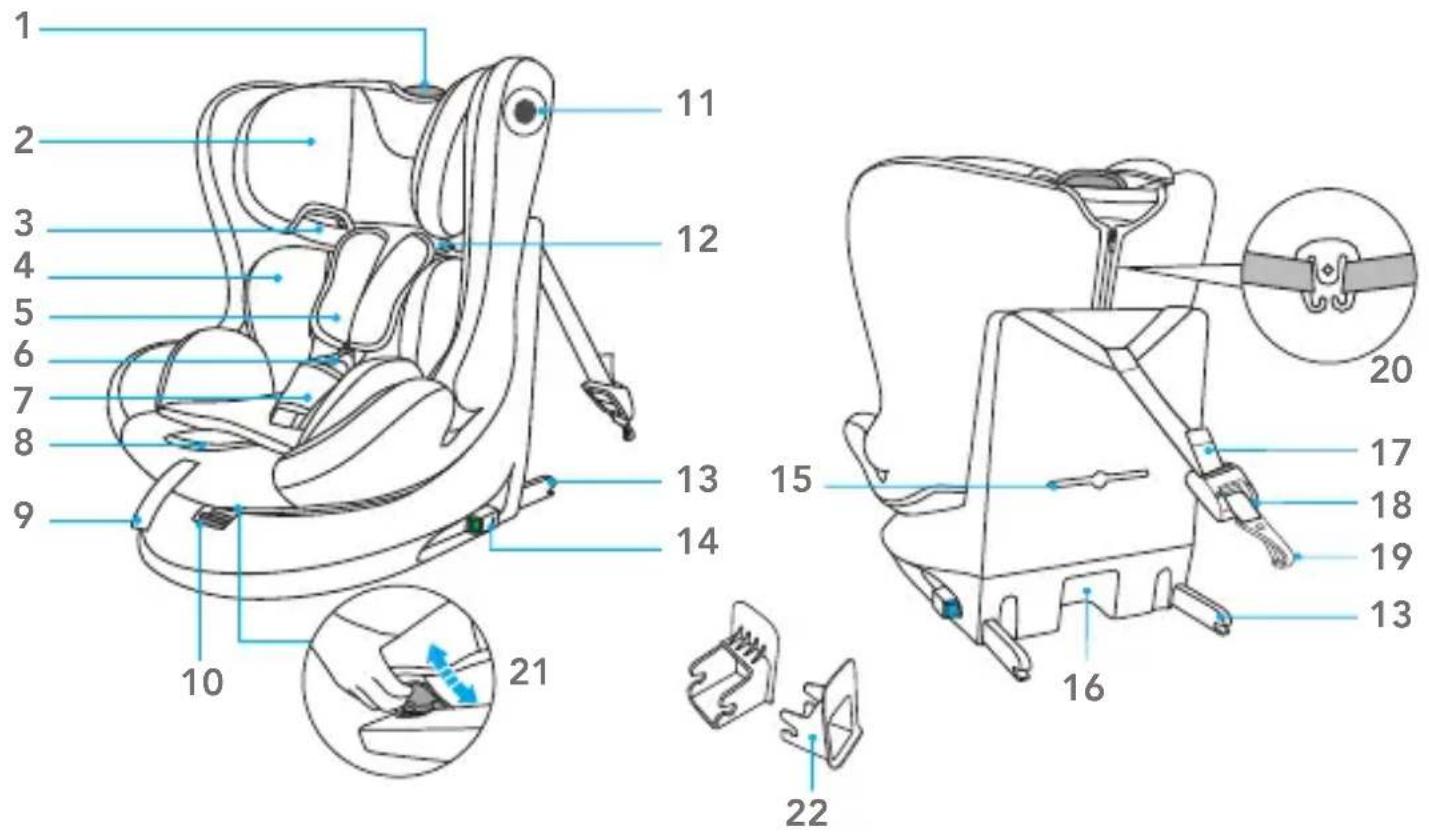
- Headrest adjustment lever
- Headrest
- Chest belt loop
- Reducer
- Chest belt protection
- Buckle
- Crotch protection
- Shoulder strap adjustment button
- Shoulder strap adjustment belt
- Seat rotation button
-
Side protection
-
Shoulder straps
- ISOFIX connector
- ISOFIX release button
- Instruction compartment
- Storage compartment
- Top Tether
- Top Tether adjuster
- Top Tether anchoring carabiner
- Connector of shoulder pad
- Seat reclining adjustment lever
- ISOFIX insert guider
GENERAL INFORMATION
RESTRICTIONS AND REQUIREMENTS REGARDING THE USE OF THE PRODUCTAND VEHICLE SEAT
WARNING! Follow the restrictions at all times:
- This child car seat can be installed so that it faces opposite of the car driving direction. The car seat can be installed in the rear facing position when the height of the child is between 40 cm and 105 cm. The car seat can be installed facing forward once the child is at least 76 cm tall.
IMPORTANT! Do not use forward facing before the child's age exceeds 15 months. - WARNING! Deactivate the passenger airbag when the child is in the front seat in the rear facing direction.
- The car seat can be used on all i-Size approved vehicle seats (check the vehicle's instruction manual) and on seats of vehicles included in the "Vehicle compatibility list" given with the car seat. The vehicle seat must be forward facing. Never use this car seat on vehicle seats facing the sides or opposite to the direction of the driver's seat.
| CAR SEAT | GROUP ORIENTATION INSTALLATION METHODS TYPE | |||
| FP360 quick i-Size | 40 - 105 cm | Rear-facing | ISOFIX + Top Tether | i-Size |
| FP360 quick i-Size | 76 - 105 cm | Forward-facing | ISOFIX + Top Tether | i-Size |
| FP360 quick i-Size | 100 - 150 cm | Forward-facing | ISOFIX + 3-point Seat Belt | i-Size booster seat |
| FP360 quick i-Size | Forward-facing100 | - 150 3-point Seat Belt | i-Size booster seat | |
natural_image
Diagram showing a green checkmark on a mechanical component with no readable text or symbols
The car seat can be fitted only if the vehicles considered as suitable are equipped with 3-point seat belts approved pursuant to Regulation UN/ECE n.16 or other equivalent standards.
USING THE CAR SEAT
Installation

A - ISOFIX attachments
B - 3-point seat belt
Correct use of the car seat

| • In the direction of travel | YES |
| • In the opposite direction to the direction of travel | YES |
| • The vehicle is equipped solely with 2-point seat belts |  |
| • The vehicle is equipped with 3-point seat belts | YES |
| • Passenger seat | YES (?1) |
| • Rear seat | YES |
| • Central rear seat with 3-point seat belt | YES (?2) |
(You must comply with local regulations in force in your country of residence).
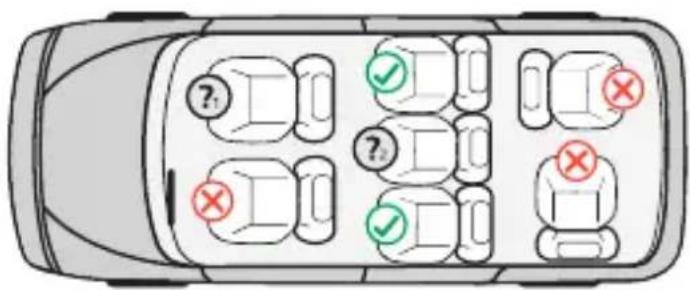

Fitting allowed

Fitting not allowed

Do not fit the car seat to the front seat with the airbag enabled

Fitting allowed only if the seat is equipped with a 3-point seat belt
USING THE CAR SEAT
| 40-105 cm ≤ 18 kgRearward facing | 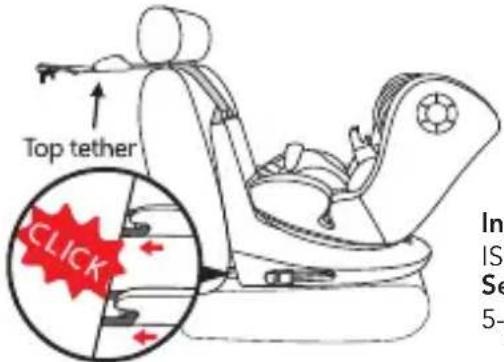 | stallation:OFIX + Top Tether systemsecuring the child with:point harness |
| 76-105 cm ≤ 18 kgForward facing | 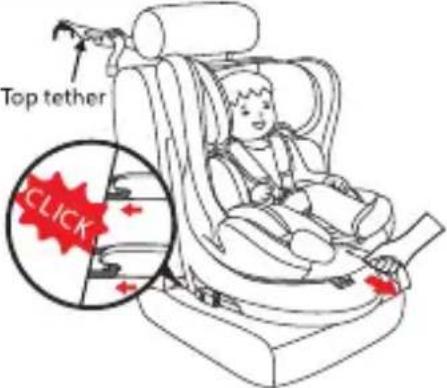 | Installation:ISOFIX + Top Tether systemSecuring the child with:5-point harness |
| 100-150 cmForward facing | 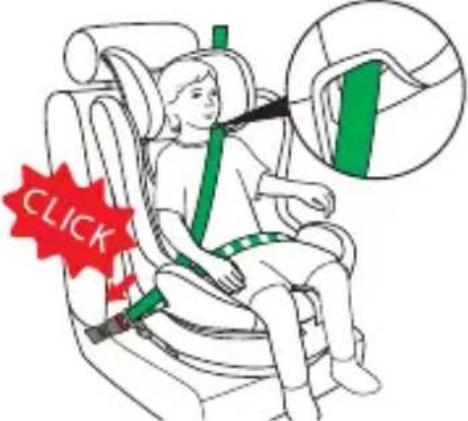 | Installation 1:3-point vehicle seat beltSecuring the child with:3-point seat belt |
 | Installation 2:ISOFIX system with3-point vehicle seat beltSecuring the child with:3-point seat belt |
orientation
Approved according to ECE R 129/03 i-Size Height / Installation
USING THE CAR SEAT
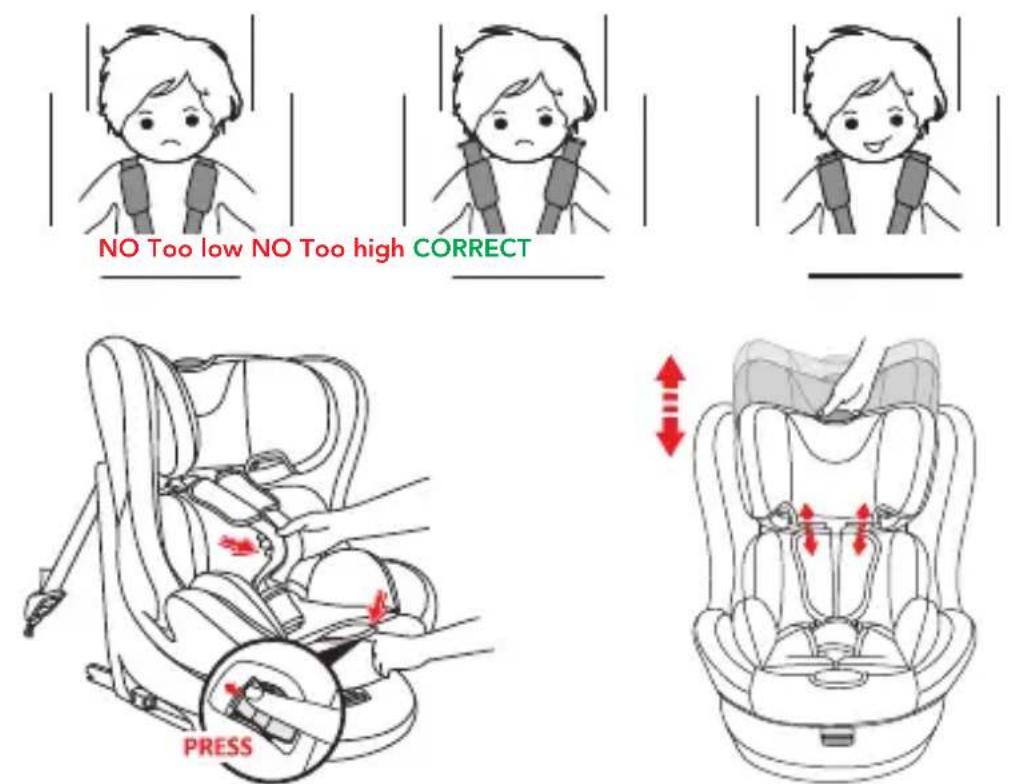
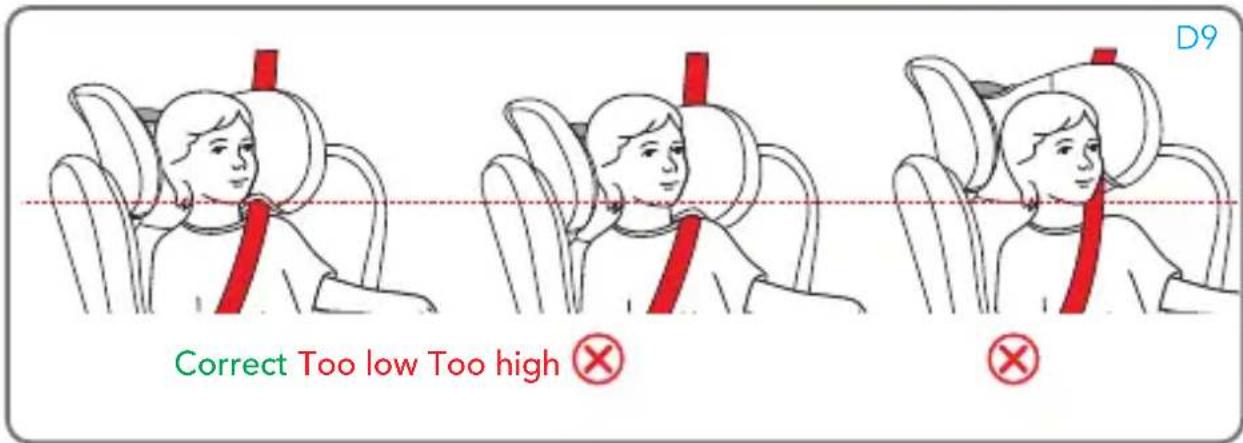
Adjusting the height of the headrest and straps
Adjusting the headrest correctly ensures maximum protection for your child when inside the car seat.
From 40 to 105 cm
With the use of the 5-point harness: When using the 5-point harness, the headrest must be adjusted so that there is a 1-finger (1 cm) space between the shoulder straps and the top of the shoulders.
IMPORTANT: Loosen the shoulder straps before adjusting the headrest. Adjusting the straps to a position lower or higher than the child's shoulders can compromise your child's safety.
100 to 150 ~cm
With the use of the vehicle's 3-point seat belt: When using the 3-point vehicle seat belt, the headrest must be adjusted so that there is a two-finger space between the headrest and the child's shoulders. Make sure that the diagonal belt, when passing through the "diagonal belt guide loop" on the side of the headrest, is positioned at the shoulders and not at the child's neck.
To loosen the harness: Press the adjustment button and at the same time grip the straps (chest belts) at the bottom, under the pads of the chest protectors, and pull them forwards to loosen them.
IMPORTANT: Do not pull on the shoulder pads.
Headrest adjustment: Press the button and raise or lower the headrest, adjusting it according to the child's height.
From 40 to 105 cm, the adjustment of the headrest also changes the height of the shoulder straps.
USING THE CAR SEAT
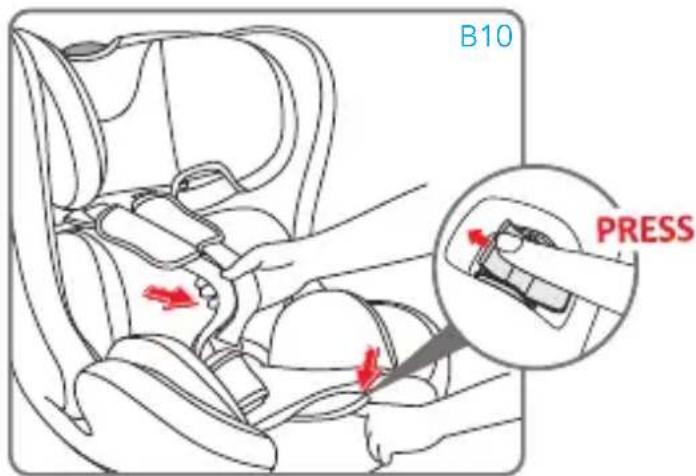
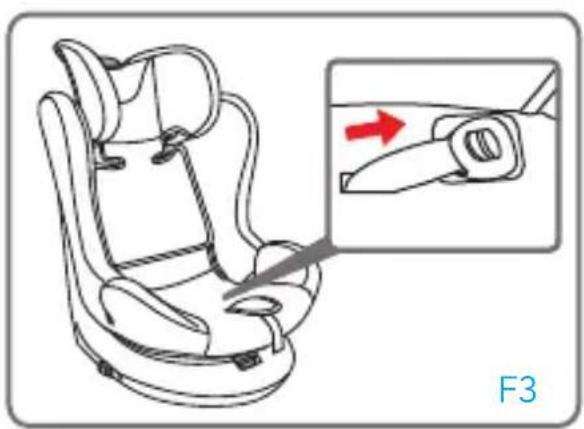
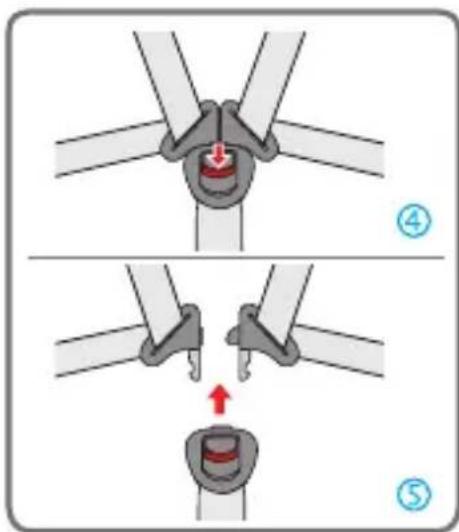
Using the buckle
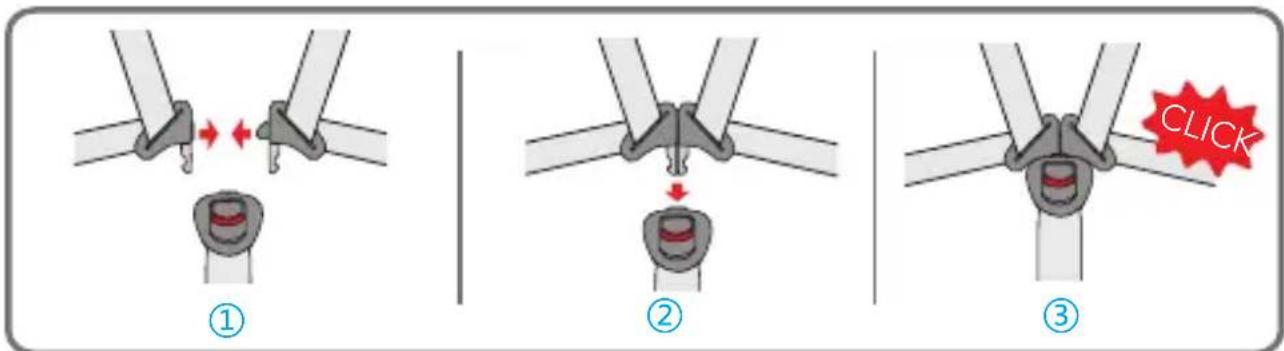

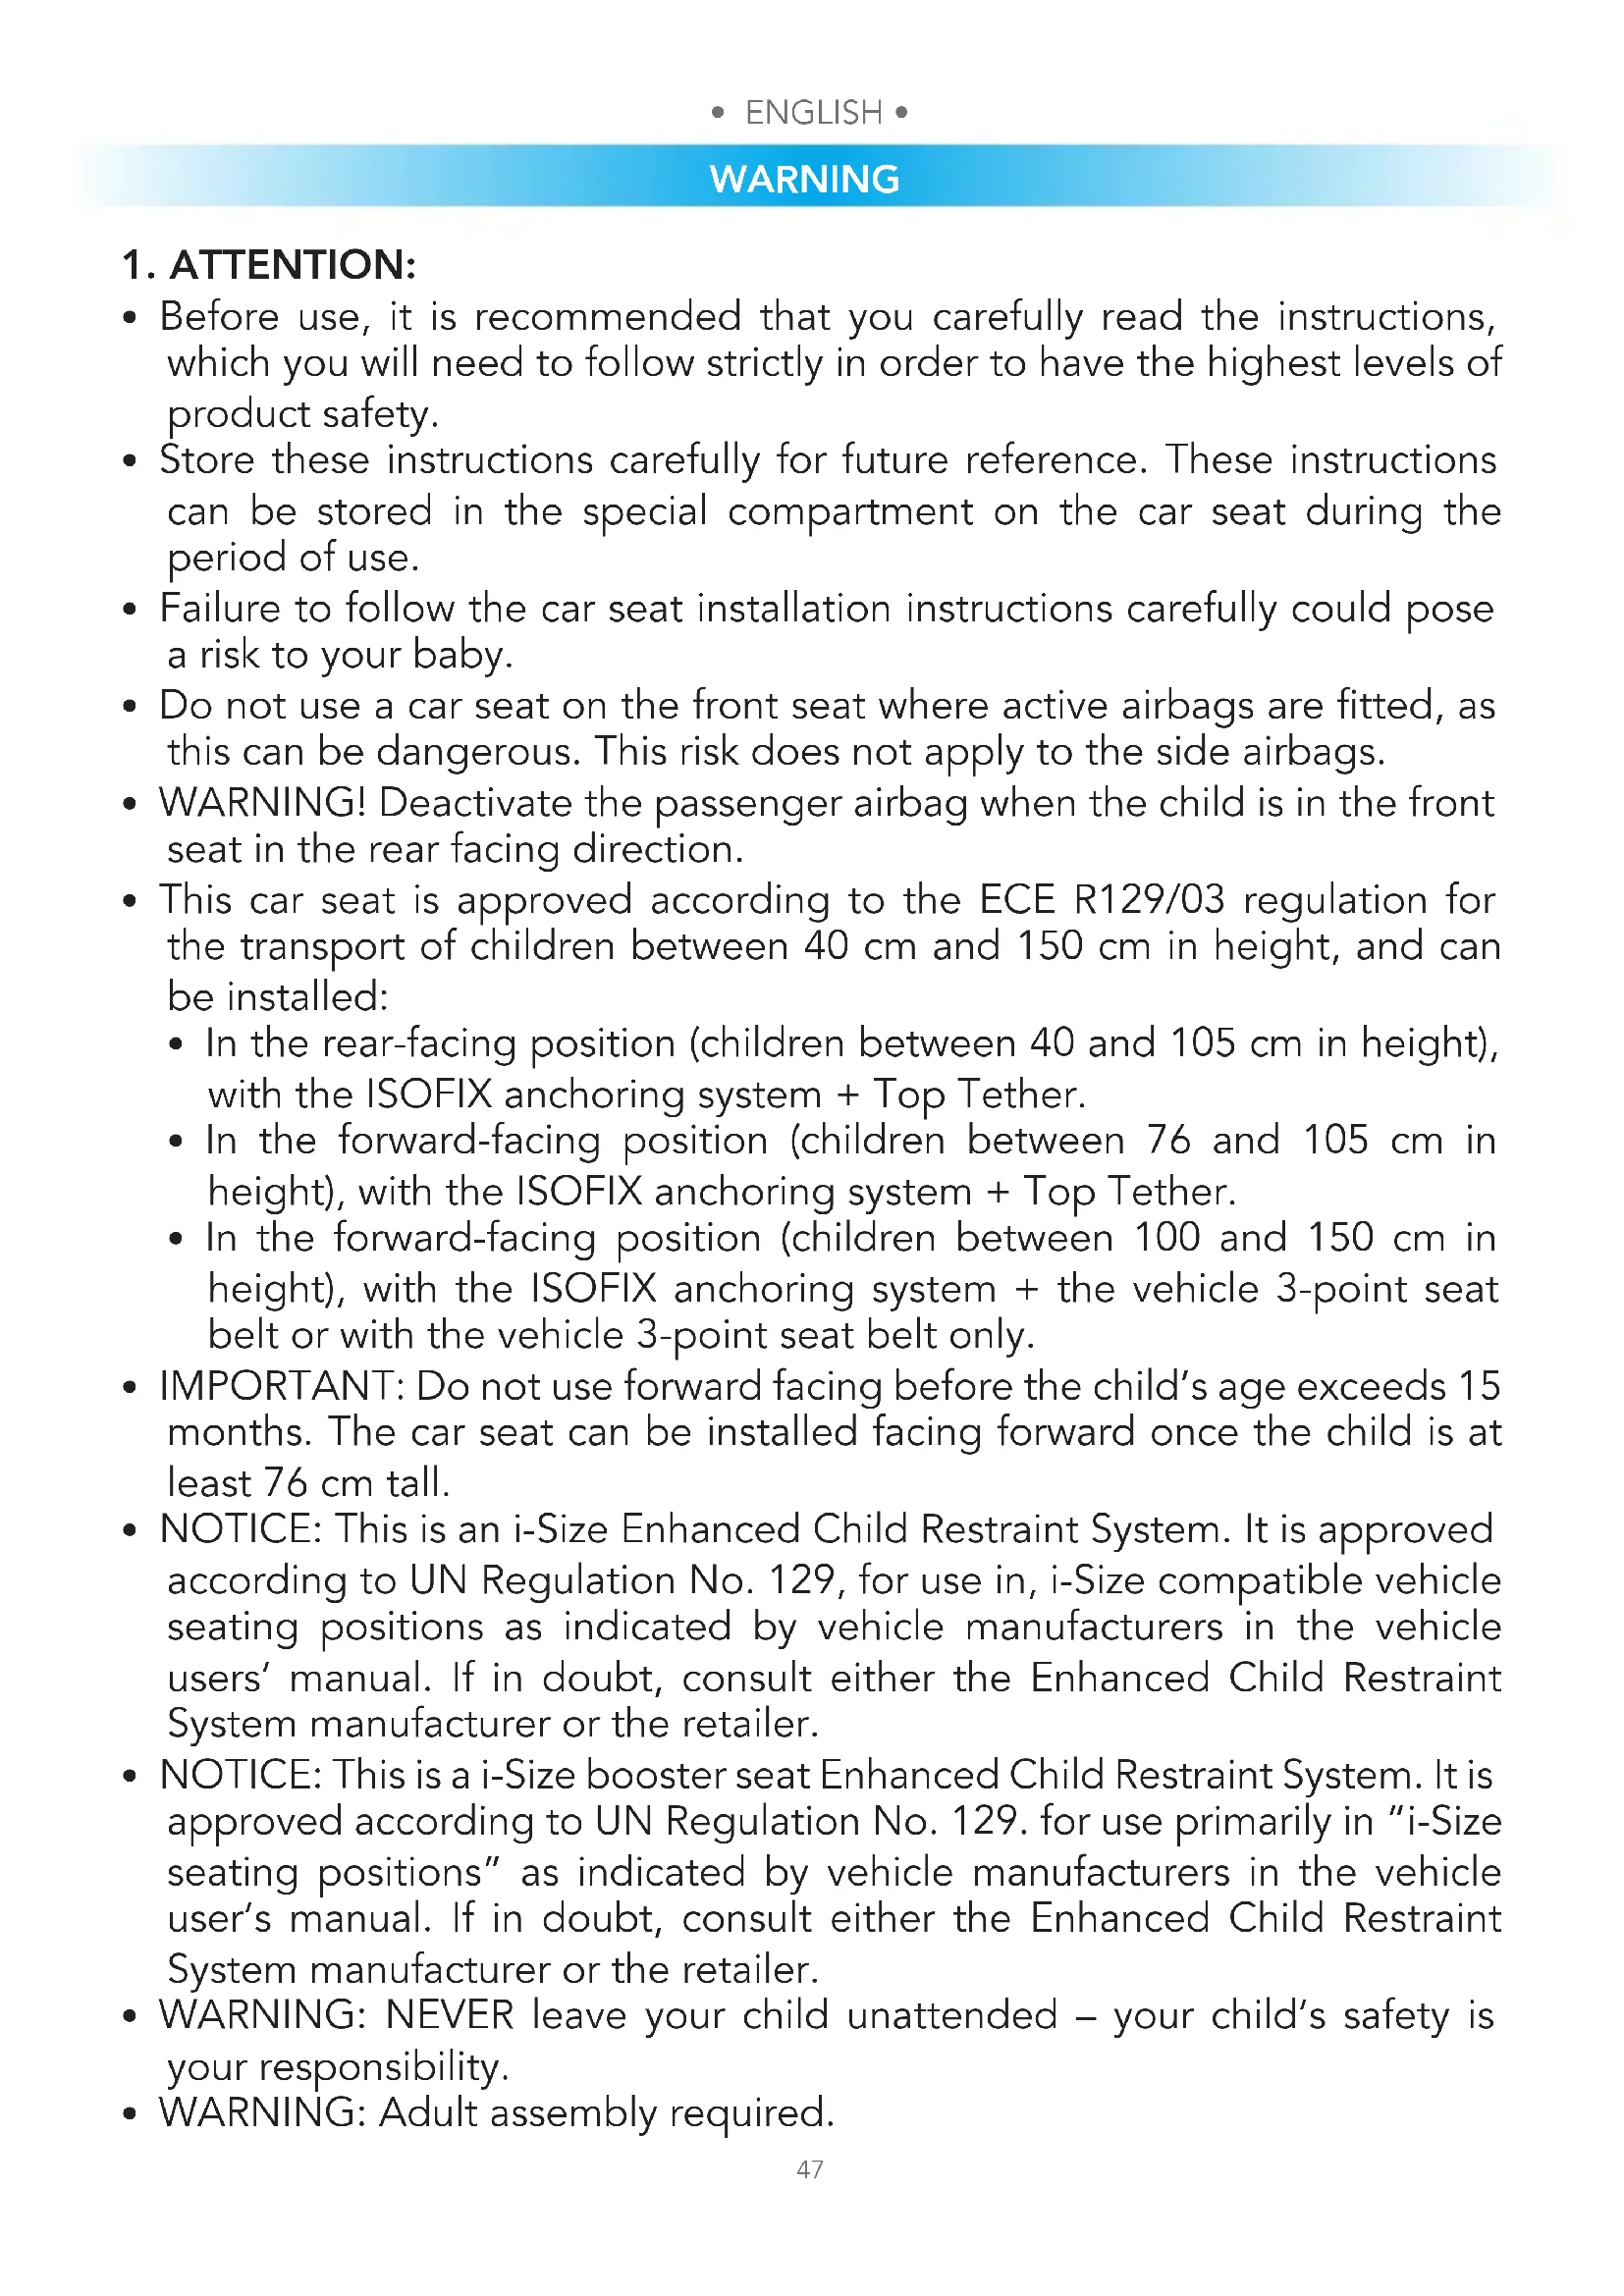
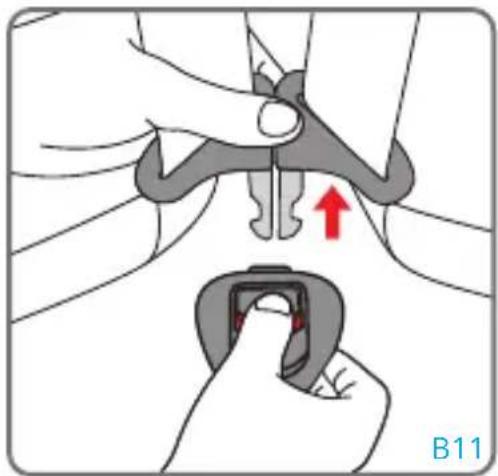
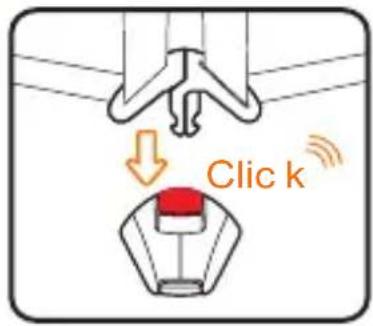
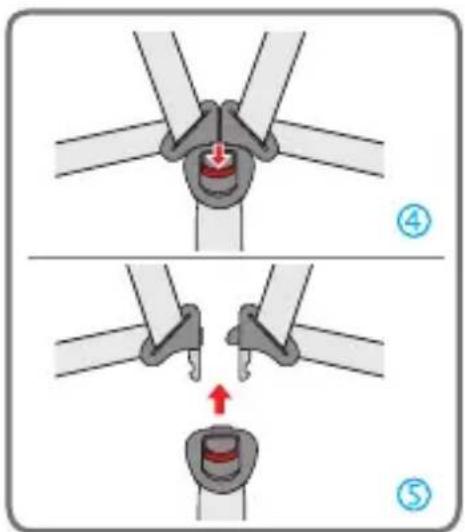
To attach the buckle: Hold together the central buckle tabs (fig. 1-2) and insert them in the special slot inside the harness buckle. A "click" will indicate that it has attached correctly (fig. 3).
NOTE: to attach the buckle, it is necessary to insert both tabs.
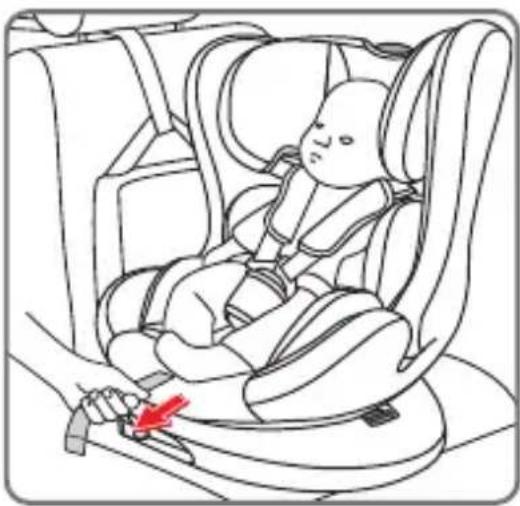
To release the buckle: Press the red button to remove the tabs from the central buckle (fig. 4-5).
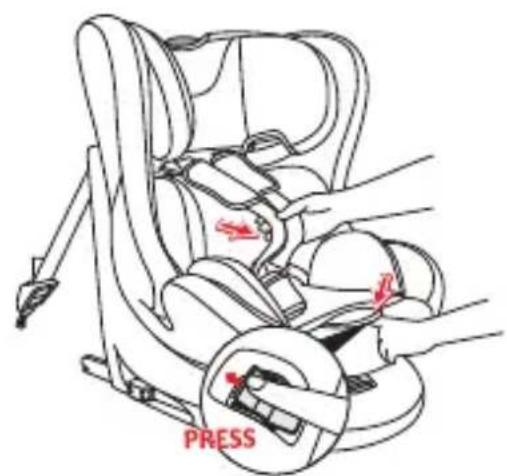
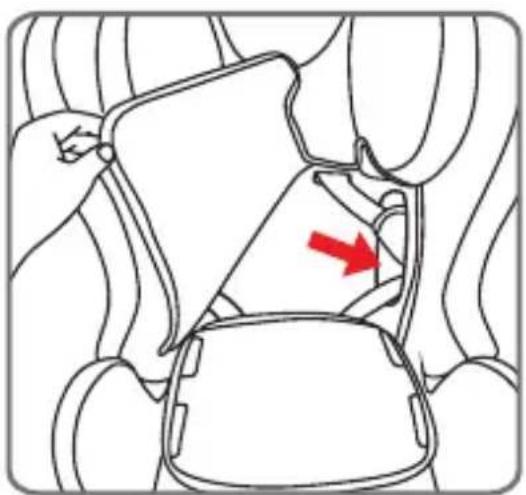
Unlocking the ISOFIX system and Top Tether
Releasing the Top Tether
To release the TOP Tether strap, press the button on the Top Tether strap tension adjuster and loosen the strap to reduce the tension. Unhook the strap anchoring carabiner.
USING THE CAR SEAT
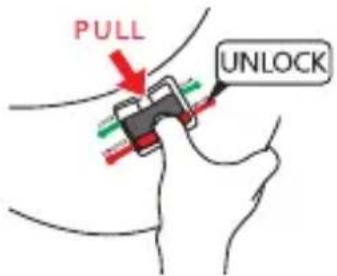
Unlocking the ISOFIX system
natural_image
Hand holding a clipboard with a red arrow pointing downward (no text or symbols)

natural_image
Line drawing of a car seat with red arrows indicating seat movement (no text or symbols)Press both sides of the button simultaneously, the ISOFIX indicator will turn red (fig. 1). Repeat this process on both ISOFIX release buttons.
Once the ISOFIX connectors have been released, slide the connectors along the car seat shell to retract them (fig. 2). Removing the car seat (fig. 3).
Adjusting the seat belt (harness)
natural_image
Line drawing of a baby car seat with a hand adjusting the seat (no text or symbols)To loosen the harness: Press the adjustment button and at the same time grip the straps (chest belts) at the bottom, under the pads of the chest protectors, and pull them forwards to loosen them.
IMPORTANT: Do not pull on the shoulder pads.
Tightening the harness: Pull the harness adjustment strap so as to tighten it properly against the body of the child. The harness is correctly tightened when the gap between the harness and the child is no greater than the thickness of your finger (1 cm).
NOTE: check that the buckle is secured by tugging the shoulder and waist straps.
ATTENTION: Do not twist or overlap the harness straps.
USING THE CAR SEAT
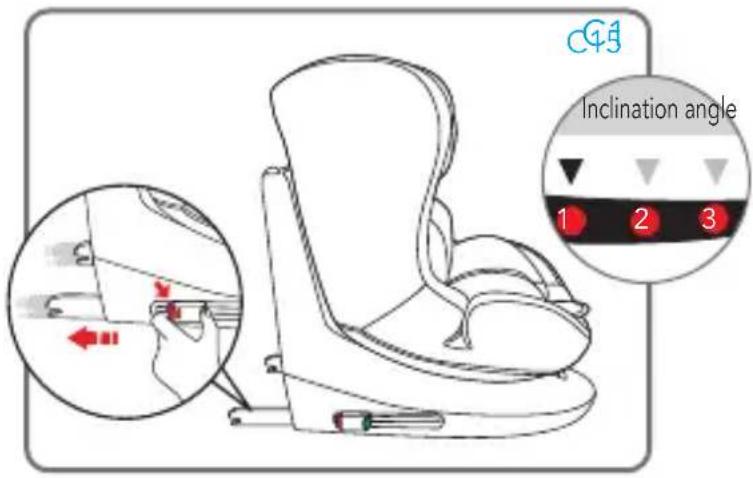
Reclining the seat
- Rear-facing (40-105 cm) the seat must only be tilted in the most reclined position (pos. 4).
- Forward-facing (76-105 cm) the seat of the car seat can be reclined in 4 different positions, (pos. 1,2,3)
- Forward-facing (100-150 cm) the seat of the car seat can be reclined only in 1 position, Vertical position (1).
To adjust the tilt: Press the adjustment handle located under the front of the car seat and, holding it down, pull or push the seat forwards or backwards. Release the handle when the seat is in the desired position and make sure that it is locked correctly; you will hear a "click" when the seat has attached.
USING THE CAR SEAT
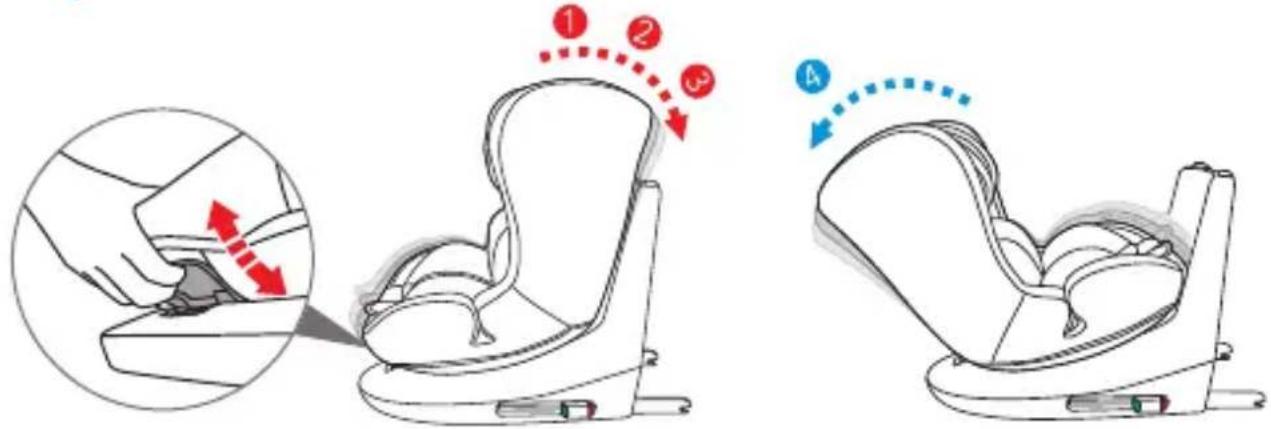
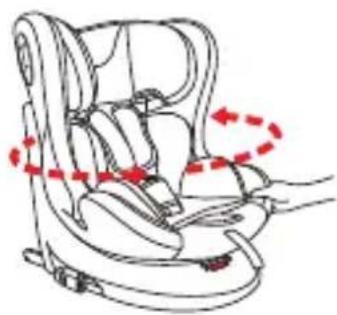
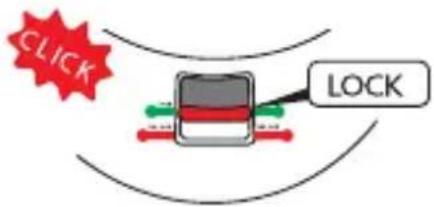
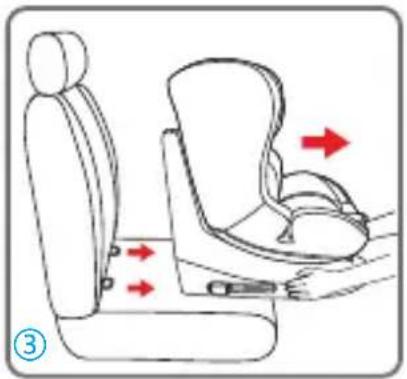
Rotating the seat
①
②
natural_image
Line drawing of a car seatbelt with red motion arrows indicating movement (no text or symbols)③
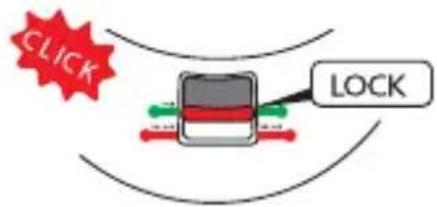
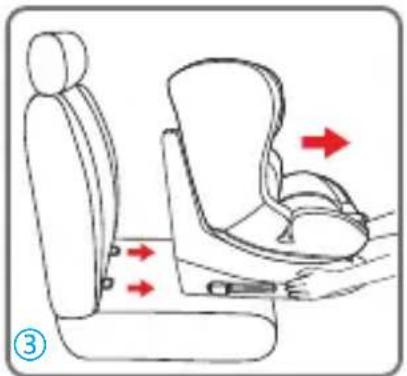
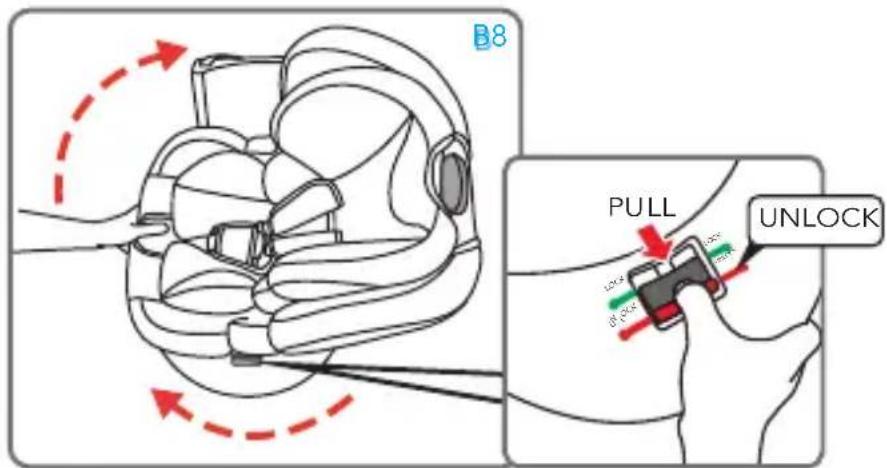
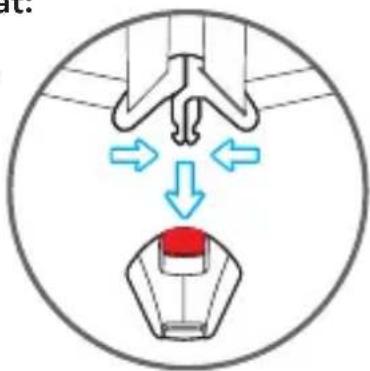
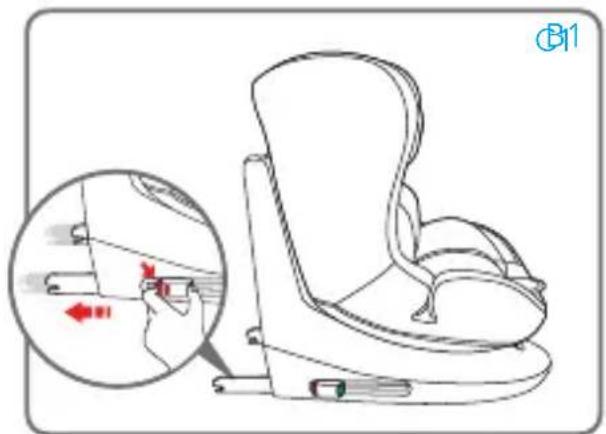
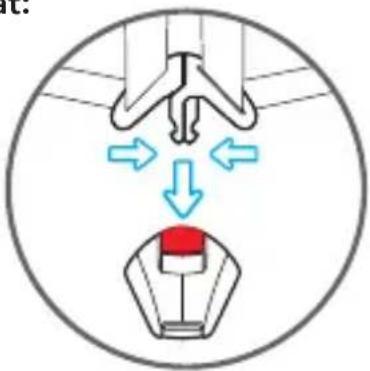
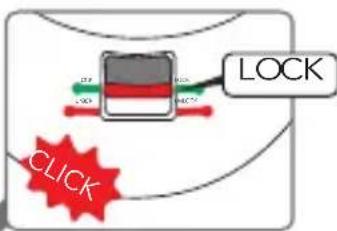
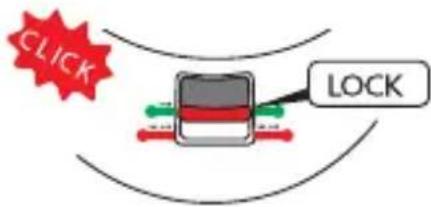
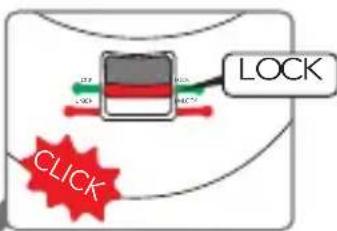
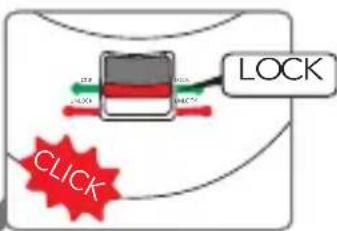
Step 1: Move the rotation lock button to the 'UNLOCK' unlock position.
Step 2: With the other hand rotate the car seat.
Step 3: Turn the seat in the direction of travel or in the opposite direction to the direction of travel, a "click" will indicate that the seat is locked.
WARNING: Make sure that the locking button is in the "LOCK" position. NOTE: Check by pushing the locking button in the "LOCK" direction that it is correctly in the locking seat.
WARNING: Before starting the car, make sure that the seat is locked facing in the direction of travel or in the opposite direction and that it cannot rotate.
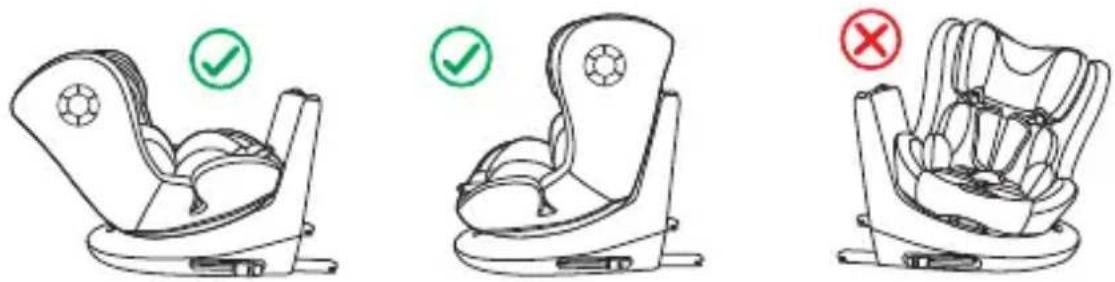
WARNING: When the vehicle is in motion, the seat cannot be positioned facing the door. The door-facing seating position does not protect the child in the event of an accident. The seat only locks when it is facing in or against the direction of travel; the rotation lock does not activate when the seat is facing the door.
INSTALLING THE CAR SEAT IN THE VEHICLE
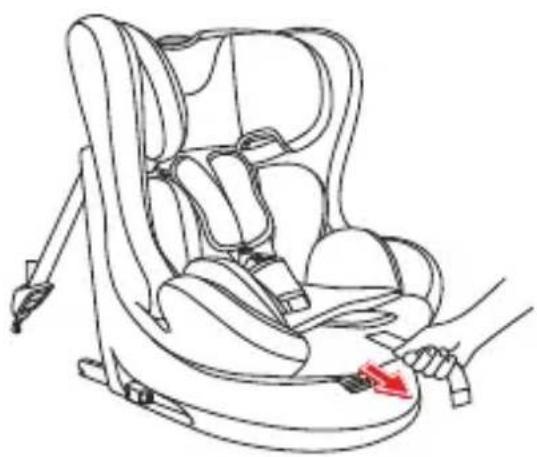
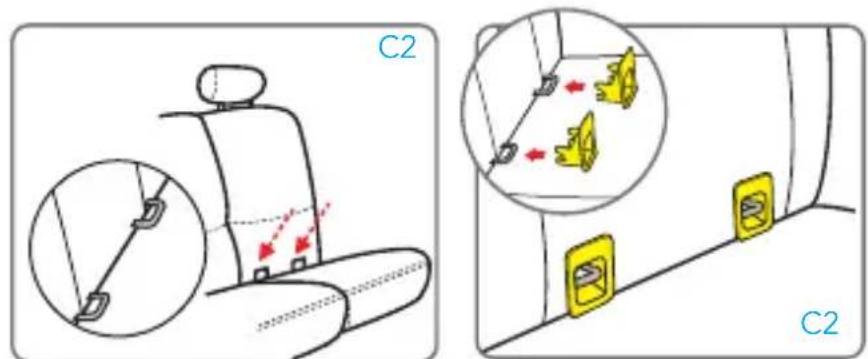
How to install the ISOFIX system
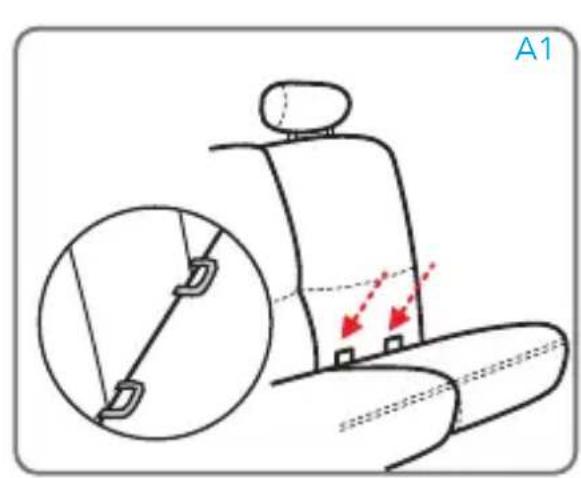
If your car does not have standard ISOFIX connector guides, insert those supplied with the car seat with the recess facing upwards in the two ISOFIX anchoring points in the car.
SUGGESTION: The ISOFIX anchoring points are located between the seat and the backrest of the passenger seat.
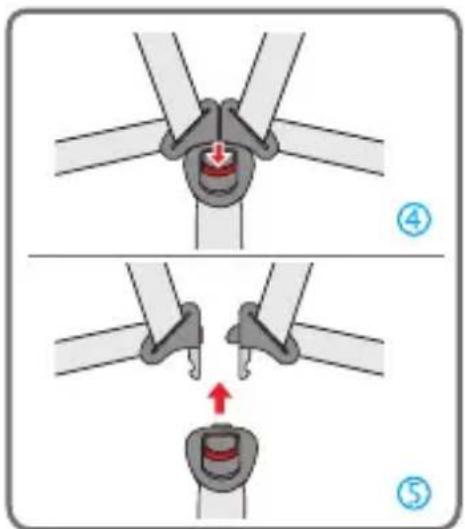
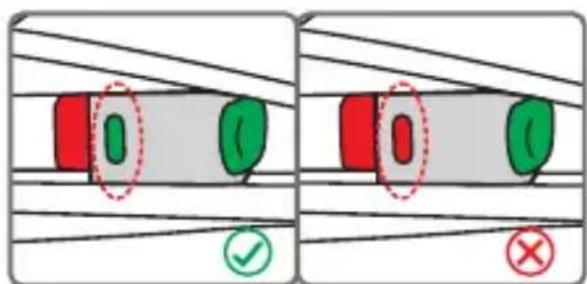
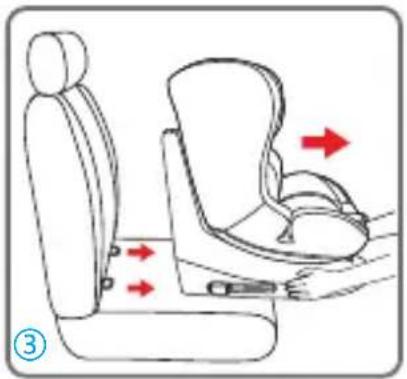
Align the ISOFIX connectors with the anchoring points fixed to the vehicle passenger seat and press until you hear a "click". The indicator on both brackets will turn green, confirming that they have attached. Check that both brackets are correctly fastened. Shake the car seat to be sure it is correctly fixed in place.
Push the car seat against the passengerseat, making sure that both ISOFIX connectors are extended in the same position.
natural_image
Diagram of a car seat assembly with highlighted parts and red arrows indicating movement (no text or symbols)


INSTALLING THE CAR SEAT IN THE VEHICLE
Using the reducer for the first months
The seat reducer is designed for use with infants, to provide them with greater comfort and stability and to allow a more relaxed position, preventing the head from falling forward. The complete reducer must be used until the child reaches 75 cm.
natural_image
Line drawing of a car seat with no text or symbols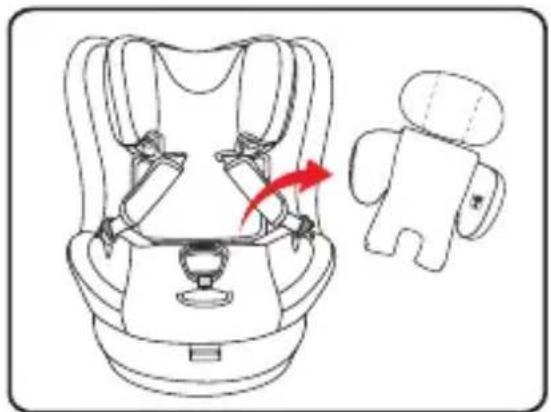
natural_image
Line drawing of a car seat assembly with a red arrow indicating rotation (no text or symbols)REARWARD-FACING INSTALLATION (Children between 40 and 105 ~cm , ISOFIX + Top Tether + harness)
WARNING! Installation in the opposite direction of travel is mandatory until the child is older than 15 months. Rearward-facing installation remains the safest, even once this limit has been exceeded, so we recommend using the car seat rearward-facing for as long as possible.
DO NOT install the car seat on the passenger side seat with an active airbag: this can cause Serious, IF NOT LETHAL, INJURIES.
Make sure the car seat is fully reclined (position 4) before turning it against the direction of travel.
INSTALLING THE CAR SEAT IN THE VEHICLE
natural_image
Line drawing of a baby car seat with a close-up inset showing the seatbelt mechanism (no text or symbols)

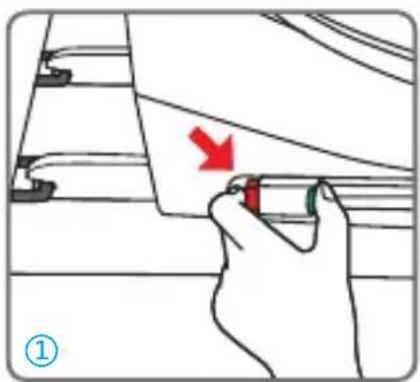
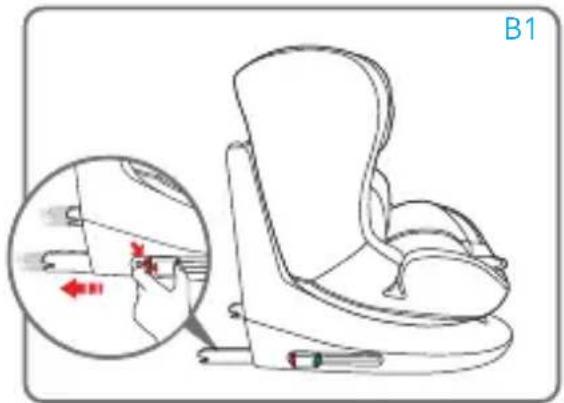
Press both sides of the adjustment/release button on the ISOFIX connectors simultaneously and extend the ISOFIX connectors.
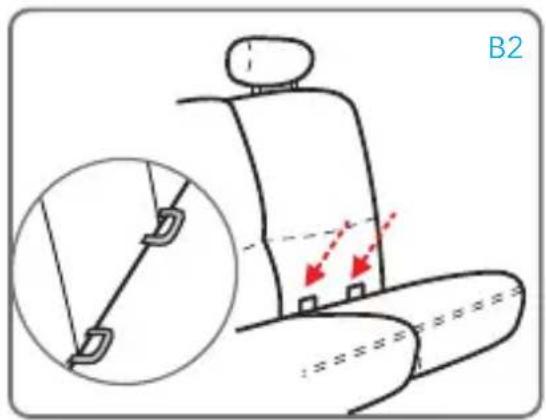
Locate the ISOFIX attachments supplied with the vehicle (B2). Press both sides of the adjustment/release button on the ISOFIX connectors simultaneously and extend the ISOFIX connectors.
Align the ISOFIX connectors with the anchoring points fixed to the vehicle passenger seat
and press until you hear a "click". The indicator on both brackets will turn green, confirming that they have attached. Ensure that both brackets are correctly fastened. Shake the car seat to be sure it is correctly fixed in place.
INSTALLING THE CAR SEAT IN THE VEHICLE
Push the car seat against the passenger seat, making sure that both ISOFIX connectors are extended in the same position. There must not be any space between the backrest of the passenger seat and the car seat.
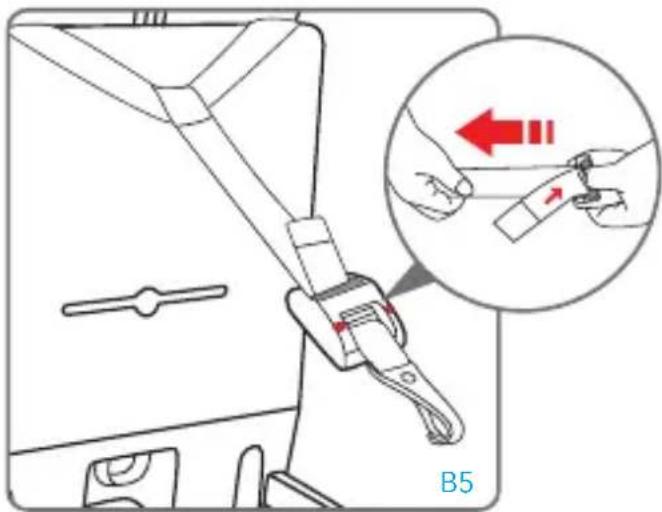
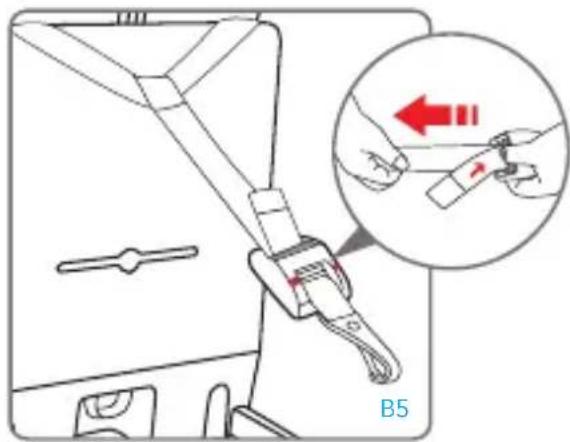
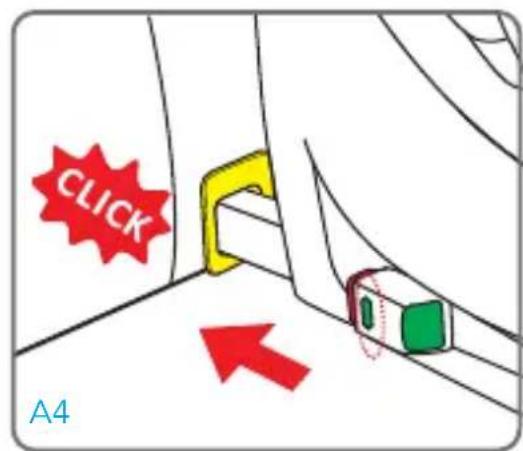
Grasp the Top Tether belt and, if necessary, lengthen the strap by pressing the appropriate locking button, extending it to the desired length (fig. B5).
Attach the upper fixing device of the "Top Tether" to the anchoring point indicated in the vehicle user manual (fig. B6). Check that this icon is present inside the passenger compartment.

Y SEAT IN THE VEHICLE
natural_image
Illustration of a hand using a tool to lift a cable, showing red arrows indicating direction (no text or symbols)
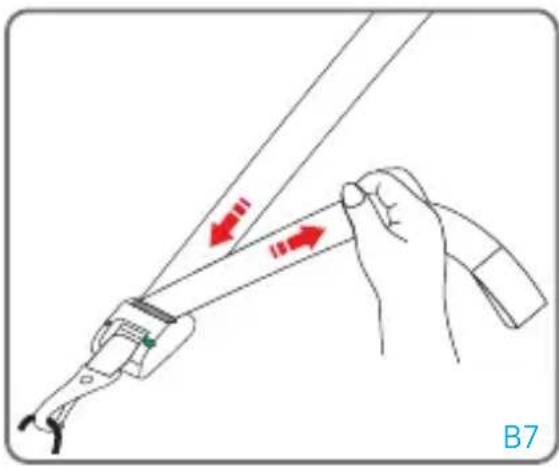
Tighten the Top Tether belt until the indicator turns green. This indicates that the belt is tightened correctly. The Top Tether belt must pass over the backrest of the vehicle passenger seat, it must never pass over the headrest. If necessary, lift up or remove the headrest from the passenger seat.
! Roll up the excess Top Tether belt and hide it away, to prevent your child from picking it up and playing with it, as it could be extremely dangerous.

natural_image
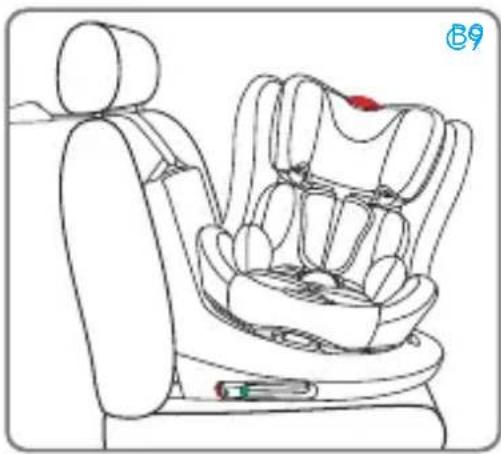
Line drawing of a car seat with seats and seatbelt, no text or symbols presentPress the rotation button and turn the car seat towards the door (fig. B8, B9).
INSTALLING THE CAR SEAT IN THE VEHICLE
Press the adjustment button and at the same time grip the straps (chest belts) at the bottom, under the pads of the chest protectors, and pull them forwards to loosen them.
IMPORTANT: Do not pull on the shoulder pads.
natural_image
Illustration of a hand holding a small object with a red arrow indicating direction, no text or symbols presentPress the red button on the central buckle to release the shoulder straps.
Place the shoulder straps on the sides of the car seat.

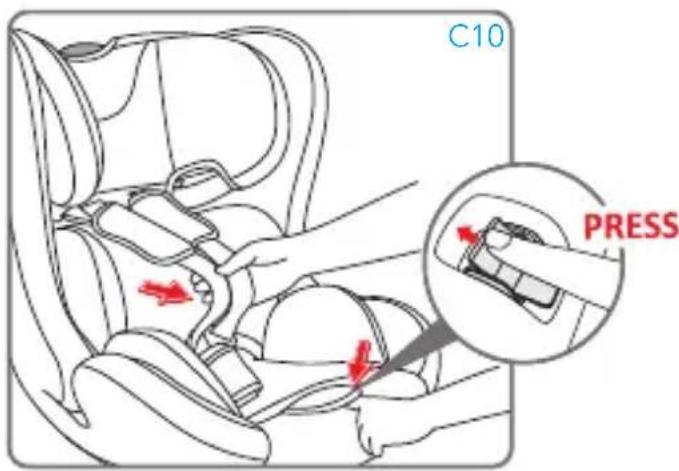
Place the child into the car seat. Place the straps over the child's shoulders, join together the two belt tabs and hook them to the buckle.
IMPORTANT! Correct adjustment of the headrest ensures maximum protection for your child when they are inside the car seat. When using the 5-point harness, the headrest must be adjusted so that there is 1 finger (1 cm) gap between the shoulder straps and the top of the shoulders.
IMPORTANT: Loosen the shoulder straps before adjusting the headrest
INSTALLING THE CAR SEAT IN THE VEHICLE
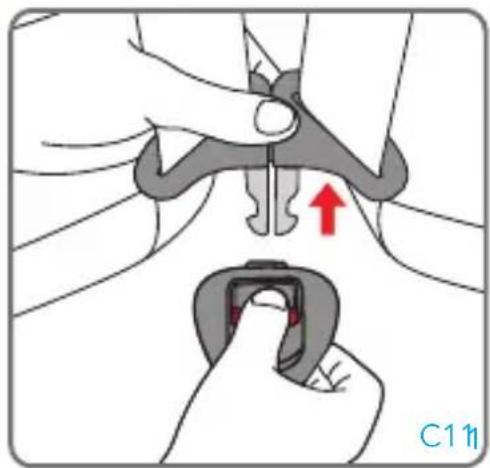
To attach the buckle: Hold together the central buckle tabs and insert them in the special slot inside the harness buckle.
A "click" will indicate that it has attached correctly.
NOTE: to attach the buckle, it is necessary to insert both tabs.
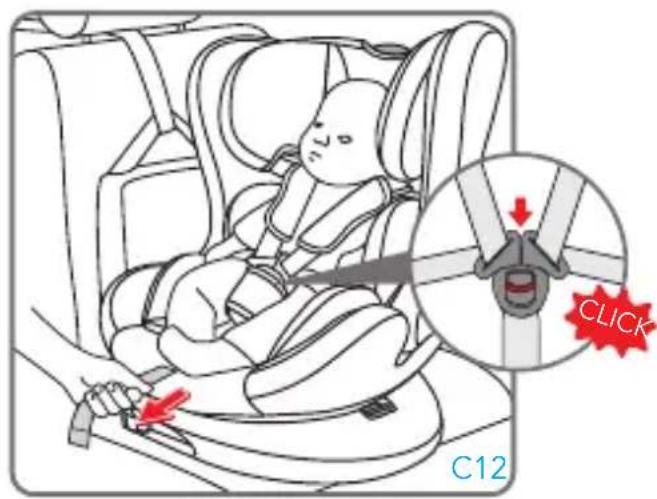
To release the buckle: Press the red button to remove the tabs from the central buckle.
natural_image
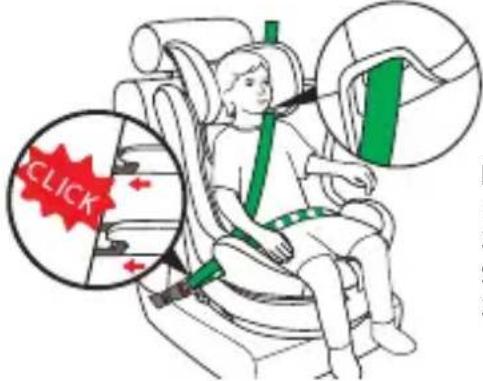
Line drawing of a baby car seat with a red arrow indicating the seatbelt (no text or symbols present)Tightening the harness: Pull the harness adjustment strap so as to tighten it properly against the body of the child. The harness is correctly tightened when the gap between the harness and the child is no greater than the thickness of your finger (1 cm).
NOTE: check that the buckle is secured by tugging the shoulder and waist straps.
ATTENTION: Do not twist or overlap the harness straps.
Precautions to make sure you have correctly fastened the car seat harness
IMPORTANT

For the safety of your child, always make sure that:
- The harness belts are correctly adjusted according to the child's height, and are correctly tightened;
- The chest straps are adjusted in the correct position;
• The harness belts are not twisted;
- The tabs are properly engaged in the buckle
natural_image
Diagram showing a mechanical component with arrows indicating motion or force direction (no text or symbols)INSTALLING THE CAR SEAT IN THE VEHICLE
natural_image
Diagram of a baby car seat with directional arrows indicating movement or force (no text or symbols)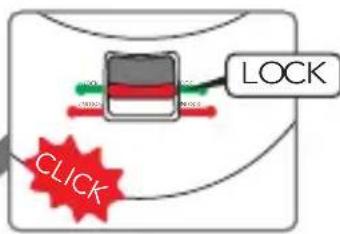
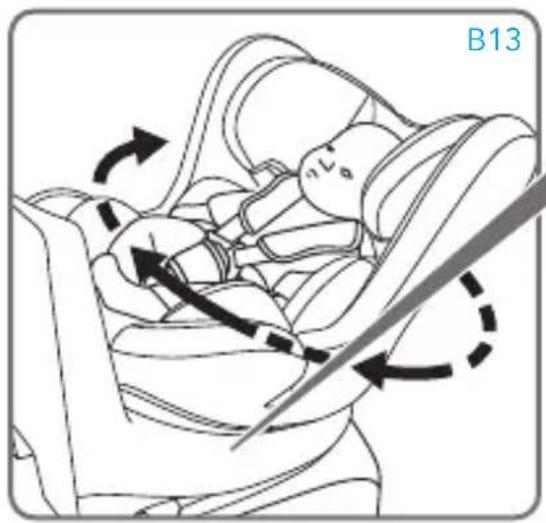
Rotate the seat into the rear-facing position, a "click" will indicate that it is locked.
Make sure that the button is in the "locked" position.
IMPORTANT: Before starting the engine make sure that the seat is locked in the rear-facing position.
When driving, it is forbidden to have the car seat in other positions because the child will not be protected in the event of an impact.
Notes:
- the car seat is locked only when in the forward-facing or rear-facing position.
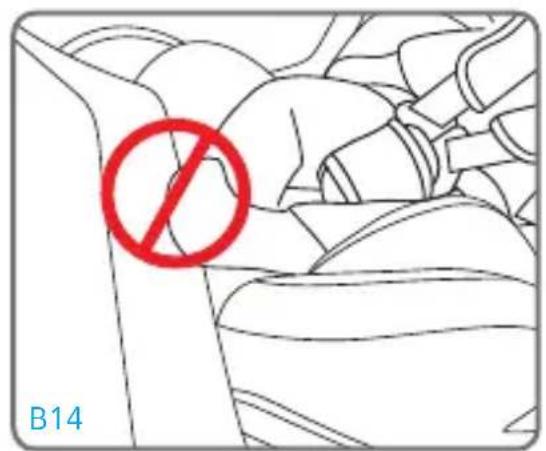
- pay attention to your child's legs while turning the car seat (B14).
Press the adjustment handle located under the front of the car seat and, holding it down, pull or push the seat forwards or backwards. Release the handle when the seat is in the desired position and make sure that it is locked correctly; you will hear a “click” when the seat has attached.
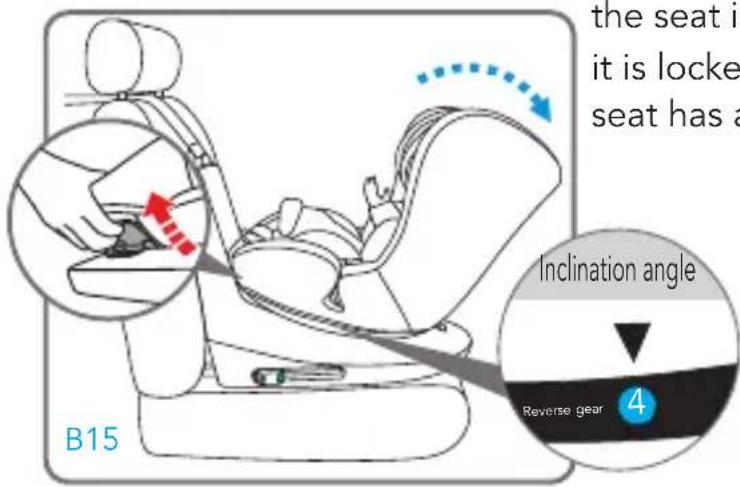
CAUTION! The car seat can only be reclined in the most horizontal inclination (4) when it is installed in the rear-facing position. The use of other inclinations is not allowed.
INSTALLING THE CAR SEAT IN THE VEHICLE
INSTALLATION IN THE DIRECTION OF FORWARD TRAVEL
(Children between 76 and 105 cm, ISOFIX + Top Tether + harness)
WARNING! Use of the car seat in the direction of travel is allowed with children aged over 15 months and with a height of at least 76 cm. To ensure the highest level of protection, however, it is advisable to keep the seat rear-facing for as long as possible, unless there is not enough leg room for the child in the vehicle.
natural_image
Line drawing of a baby car seat with a magnified inset showing the seat being adjusted for a knot (no text or symbols present)
natural_image
Two circular icons showing a person relaxing in a seat with an anchor symbol (no text or numbers present)Press both sides of the adjustment/release button on the ISOFIX connectors simultaneously and extend the ISOFIX connectors.
Locate the ISOFIX attachments supplied with the vehicle (C2).
If your car does not have standard ISOFIX connector guides, insert those supplied with the car seat with the
recess facing upwards in the two ISOFIX anchoring points in the car.

Align the ISOFIX connectors with the anchoring points fixed to the vehicle passenger seat and press until you hear a "click". The indicator on both brackets will turn green, confirming that they have attached. Ensure that both brackets
are correctly fastened. Shake the car seat to be sure it is correctly fixed in place.
INSTALLING THE CAR SEAT IN THE VEHICLE
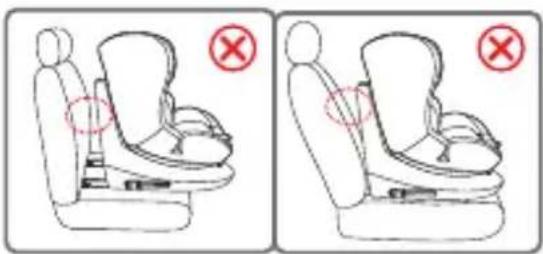
Push the car seat against the passenger seat, making sure that both ISOFIX connectors are extended in the same position. There must not be any space between the backrest of the passenger seat and the car seat.

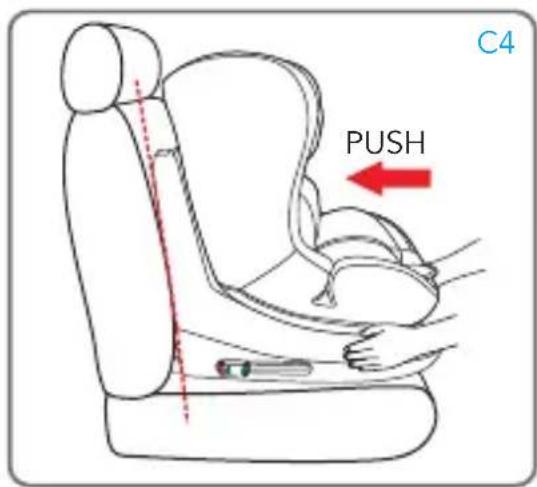
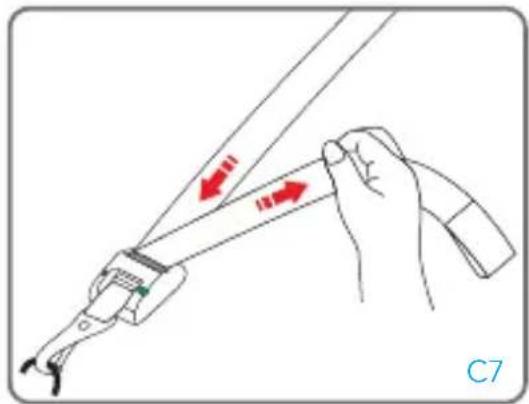
Grasp the Top Tether belt and, if necessary, lengthen the strap by pressing the appropriate locking button, extending it to the desired length (fig. C5).
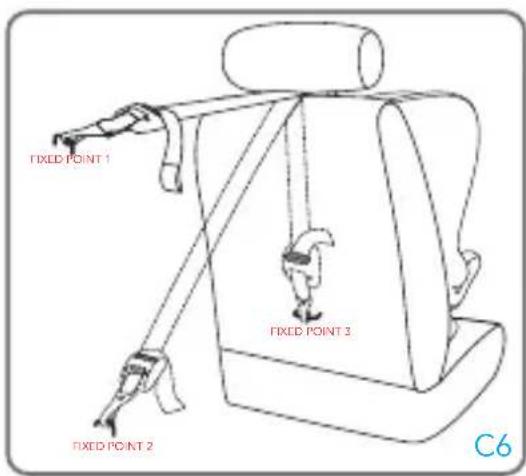
Attach the upper fixing device of the "Top Tether" to the anchoring point indicated in the vehicle user manual (fig. C6). Check that this icon is present inside the passenger compartment.
natural_image
Illustration of a hand using a tool to lift a curved blade, with red arrows indicating direction (no text or symbols)
Tighten the Top Tether belt until the indicator turns green. This indicates that the belt is tightened correctly. The Top Tether belt
INSTALLING THE CAR SEAT IN THE VEHICLE
must pass over the backrest of the vehicle passenger seat, it must never pass over the headrest. If necessary, lift up or remove the headrest from the passenger seat.
! Roll up the excess Top Tether belt and hide it away, to prevent your child from picking it up and playing with it, as it could be extremely dangerous.
natural_image
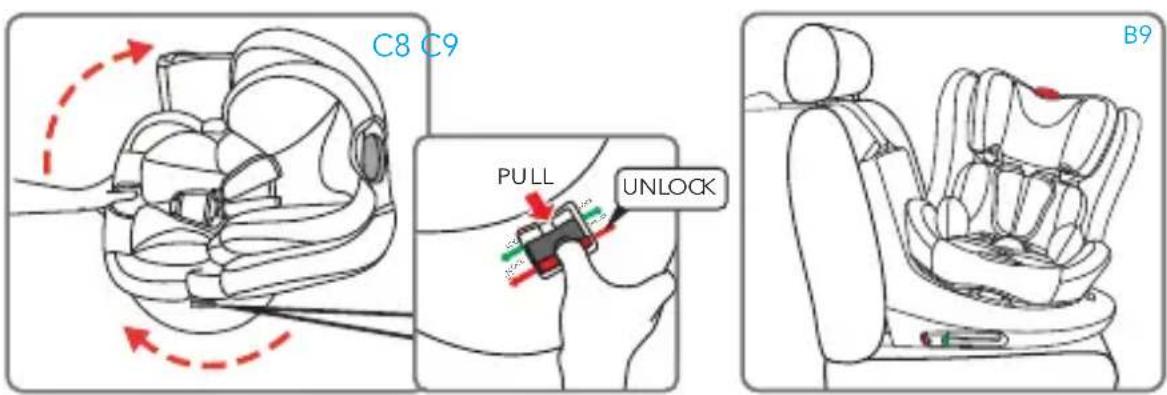
Line drawing of a car comfort seat with seatbelt and seat, no text or symbols presentPress the rotation button and turn the car seat towards the door (fig. C8, C9).
Press the adjustment button and at the same time grip the straps (chest belts) at the bottom, under the pads of the chest protectors, and pull them forwards to loosen them.
IMPORTANT: Do not pull on the shoulder pads.
INSTALLING THE CAR SEAT IN THE VEHICLE
natural_image
Illustration of a hand holding a small object with a red arrow indicating direction (no text or symbols)Press the red button on the central buckle to release the shoulder straps.
Place the shoulder straps on the sides of the car seat.
Place the child into the car seat. Place the straps over the child's shoulders, join together the two belt tabs and hook them to the buckle.
IMPORTANT! Correct adjustment of the headrest ensures maximum protection for your child when they are inside the car seat.
When using the 5-point harness, the headrest must be adjusted so that there is 1 finger (1 cm) gap between the shoulder straps and the top of the shoulders.
IMPORTANT: Loosen the shoulder straps before adjusting the headrest
To attach the buckle: Hold together the central buckle tabs and insert them in the special slot inside the harness buckle.
A "click" will indicate that it has attached correctly.
NOTE: to attach the buckle, it is necessary to insert both tabs.
To release the buckle: Press the red button to remove the tabs from the central buckle.
INSTALLING THE CAR SEAT IN THE VEHICLE

natural_image
Line drawing of a baby car seat with a red arrow indicating the seatbelt (no text or symbols present)Tightening the harness: Pull the harness adjustment strap so as to tighten it properly against the body of the child. The harness is correctly tightened when the gap between the harness and the child is no greater than the thickness of your finger (1 cm).
NOTE: check that the buckle is secured by tugging the shoulder and waist straps.
ATTENTION: Do not twist or overlap the harness straps.
Precautions to make sure you have correctly fastened the car seat harness
IMPORTANT

For the safety of your child, always make sure that:
- The harness belts are correctly adjusted according to the child's height, and are correctly tightened;
- The chest straps are adjusted in the correct position;
• The harness belts are not twisted;
- The tabs are properly engaged in the buckle
natural_image
Diagram showing airflow or movement between two mechanical components, no text or symbols present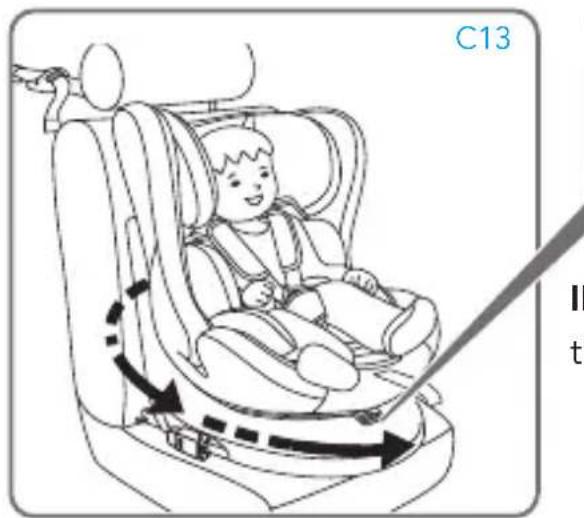
Rotate the seat into the facing position, a "click" will indicate that it is locked.
Make sure that the button is in the "locked" position.
IMPORTANT: Before starting the engine make sure that the seat is locked in the facing position.
INSTALLING THE CAR SEAT IN THE VEHICLE
IMPORTANT: When driving, it is forbidden to have the car seat in other positions because the child will not be protected in the event of an impact.

Notes:
-
the car seat is locked only when in the forward-facing or rear-facing position.
-
pay attention to your child's legs while turning the car seat.
Press the adjustment handle located under the front of the car seat and, holding it down, pull or push the seat forwards or backwards. Release the handle when the seat is in the desired position and make sure that it is locked correctly; you will hear a "click" when the seat has attached.
The seat in the range of use with children from 76 to 105 cm can be reclined in positions 1,2,3.
INSTALLING THE CAR SEAT IN THE VEHICLE
INSTALLATION IN THE DIRECTION OF TRAVEL (Children between 100 and 150 cm)
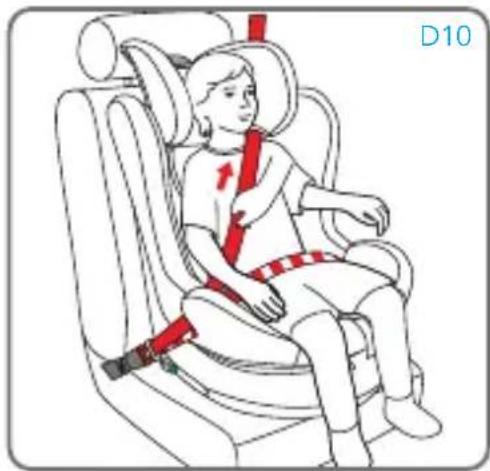
We recommend using the 5-point belt for as long as possible. When the child grows to a height of 100 cm the car seat must be converted for use with children between 100 and 150 cm tall. In this configuration the 5-point-belt (harness) supplied with the car seat must be removed. See section 'Removing the 5-point belt'.
It is possible to install the car seat:
Installation of the car seat, using only the 3-point belt supplied with the vehicle.
Only suitable for use in vehicles equipped with 3-point, static or retractor seat belts approved to UN/ECE Regulation No. 16 or other equivalent standards.
Using only the vehicle's 3-point seat belt 'Installation 1'.
Using the ISOFIX system with the vehicle's 3-point seat belt 'Installation 2'.
INSTALLING THE CAR SEAT IN THE VEHICLE
INSTALLATION 1 - Installation of the car seat, using only the 3-point belt supplied with the vehicle.
Only suitable for use in vehicles equipped with 3-point, static or retractor seat belts approved to UN/ECE Regulation No. 16 or other equivalent standards.
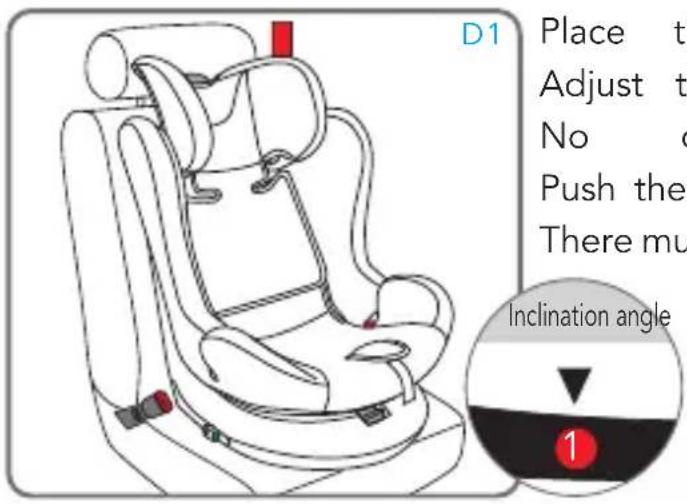
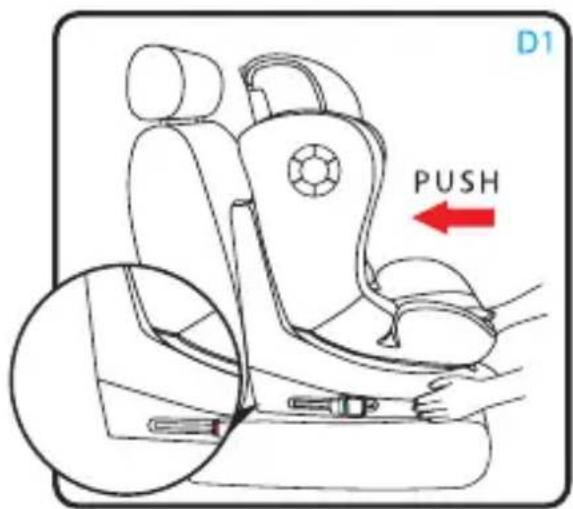
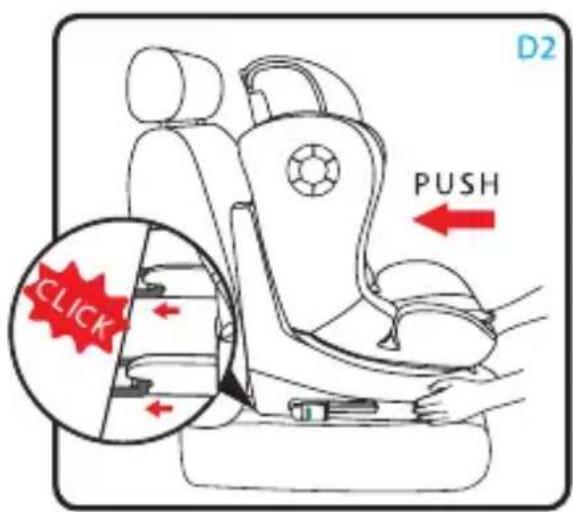
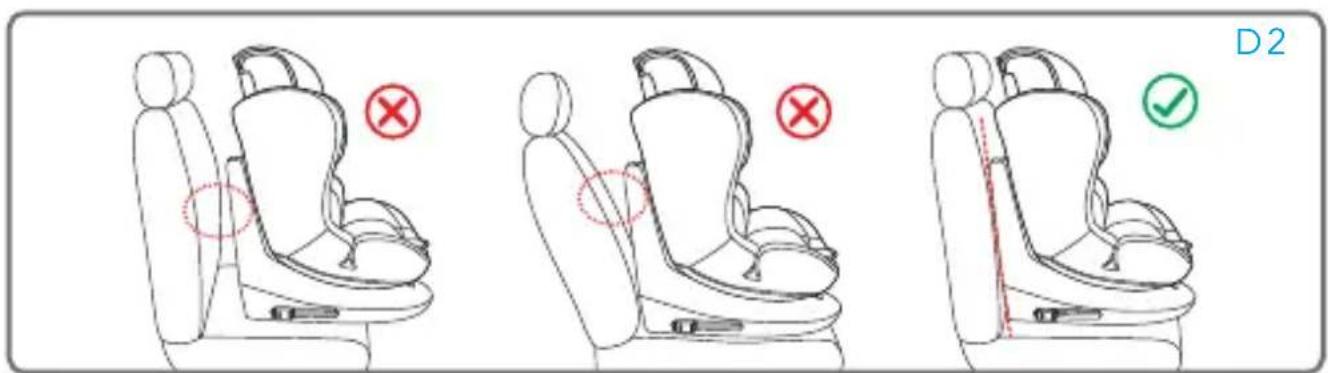
Place the car seat on the vehicle seat. Adjust the seat inclination to position 1 only. No other inclinations are allowed. Push the car seat against the backrest of the seat. There must be no space between the car seat backrest and the car seat (D2).
SEAT IN THE VEHICLE
natural_image
Illustration of hands holding red and green strips with a tool, no text or symbols present
natural_image
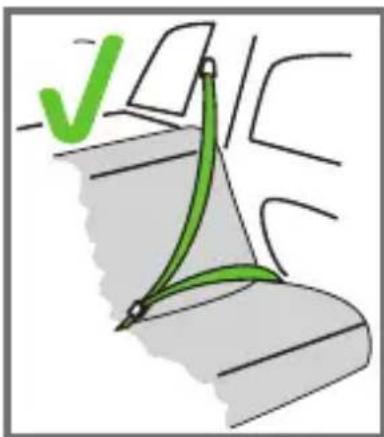
Pure mechanical linkage diagram with green and red components, no text or symbols presentAs shown in figure, pass the diagonal part of the 3-point belt through the green diagonal belt guide located in the lower part of the headrest, from the retractor side. Place the child into the car seat.
natural_image
Line drawing of a child seated in a car seat, no text or symbols present
natural_image
Illustration of a child wearing a seatbelt and red belt, no text or symbols present
Collocare il bambino nel seggiolino auto. Pull out the 3-point seat belt of the vehicle and, passing it over the front of your child, attach the vehicle's seat belt by inserting the tip into the buckle. A "click" will indicate that it is attached correctly.
Make sure that the 3-point seat belt is placed correctly through the "pos. 1", "pos. 2", and "pos. 3" green chest belt guides.

natural_image
Illustration of a hand pressing down on a curved object with red arrows indicating movement or pressure direction (no text or symbols)Press the button and raise or lower the headrest, adjusting it according to the child's height.
Make sure that it is correctly locked in the chosen position.
INSTALLING THE CAR SEAT IN THE VEHICLE
When using the 3-point vehicle seat belt, the headrest must be adjusted so that there is a two-finger space between the headrest and the child's shoulders. Make sure that the diagonal belt, when passing through the "diagonal belt guide loop" on the side of the headrest, is positioned at the shoulders and not at the child's neck.
natural_image
Illustration of a child seated in a car seat with red safety belt and red arrow indicating pressure point (no text or symbols)Tighten the belt as shown in the figure.
Make sure that you have positioned the lap belt as low as possible on the child's pelvis, and that it has been inserted in the belt guides of the lap seat belt and that you have correctly attached the buckle.
The diagonal belt must pass through the diagonal belt guide.
Y SEAT IN THE VEHICLE
INSTALLATION 2 - Installing the seat with the 3-point seat belt and ISOFIX connectors
It is recommended that you use the 5-point harness for as long as possible.
Remove the reducer to use the car seat in the GROUP 1 configuration for a longer time. When your child has outgrown the group 1 (9-18kg) configuration and you wish to use the seat for a child in either group 2 (15 - 25kg) or group 3 (22-36kg) then you will need to remove the child car seats integral 5-point harness. See paragraph "Remove the 5-point harness".
natural_image
Line drawing of a car seat with a magnified inset showing the seat being adjusted for a finger (no text or symbols present)
natural_image
Two circular icons showing a person sliding down a wave with an anchor symbol, no text or numbers present.Press both sides of the adjustment/release button on the ISOFIX connectors simultaneously and extend the ISOFIX connectors.
natural_image
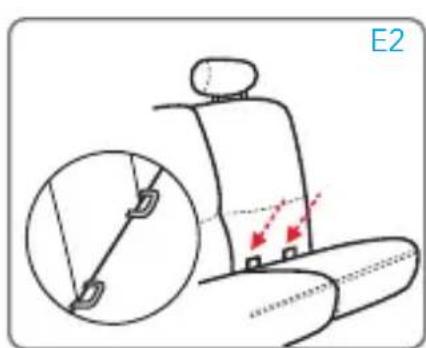
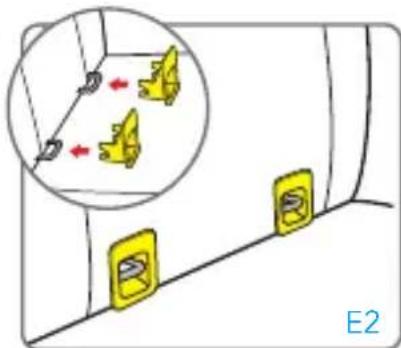
Diagram showing a vehicle interior with yellow bracket switches and a magnified inset highlighting two yellow objects (no text or symbols)Locate the ISOFIX attachments supplied with the vehicle (E2). If your car does not have standard ISOFIX connector guides, insert those supplied with the car seat with the recess facing upwards in the two ISOFIX anchoring points in the car.

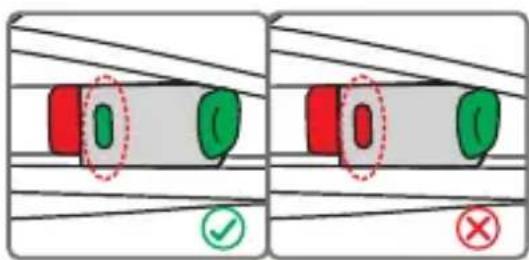
Align the ISOFIX connectors with the anchoring points fixed to the vehicle passenger seat and press until you hear a "click". The indicator on both brackets will turn green, confirming that they have attached. Ensure that both brackets are correctly
fastened. Shake the car seat to be sure it is correctly fixed in place.
INSTALLING THE CAR SEAT IN THE VEHICLE
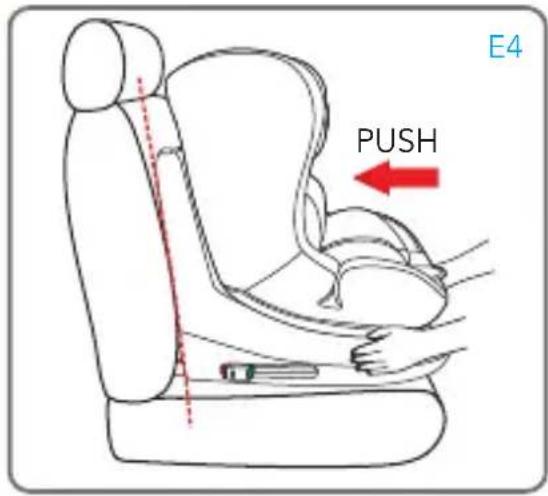
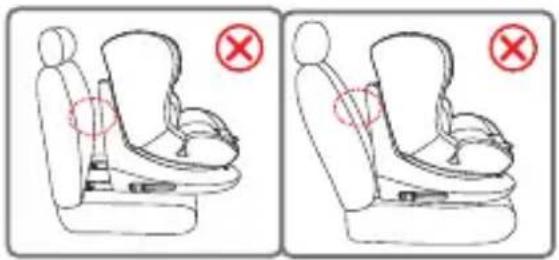
Push the car seat against the passenger seat, making sure that both ISOFIX connectors are extended in the same position. There must not be any space between the backrest of the passenger seat and the car seat.
Follow the instructions given in the paragraph "Installing the car seat, using only the 3-point belt supplied with the vehicle" to place the child in the car seat, and secure them with the 3-point seat belt.
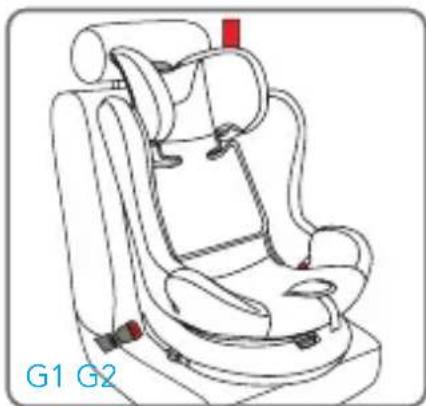
REMOVE THE 5-POINT HARNESS
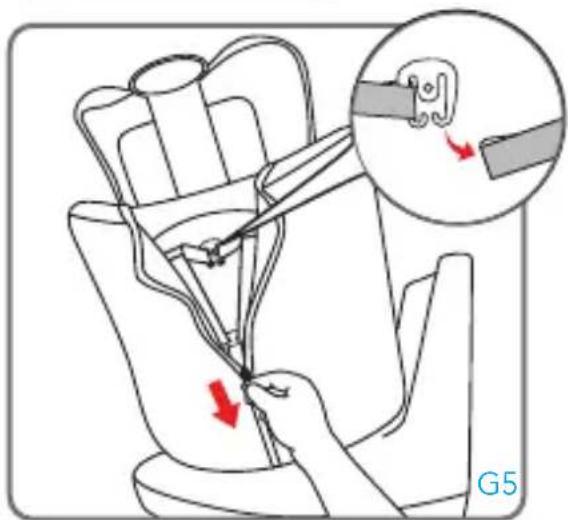
Removing the 5-point belt

natural_image
Illustration of a hand holding a device with a close-up inset showing a cable being inserted (no text or symbols)Unhook the chest protector straps from the hook (fig. F1).
IMPORTANT: Do not detach the chest belts from the belt-tightening bracket.

natural_image
Line drawing of a car seat assembly with a red arrow indicating rotation (no text or symbols)Remove and store the reducer and crotch protection.
natural_image
Diagram of a car seatbelt with a red arrow indicating a specific area (no text or symbols present)Lift up the fabric lining from the backrest and insert the chest belt with the respective ends into the specific left side and right side compartment.
natural_image
Line drawing of a car seat assembly with an inset showing a cable being inserted (no text or symbols)Lift up the seat lining and place the buckle in the compartment on the left side.
Replace the fabric on the backrest and seat.
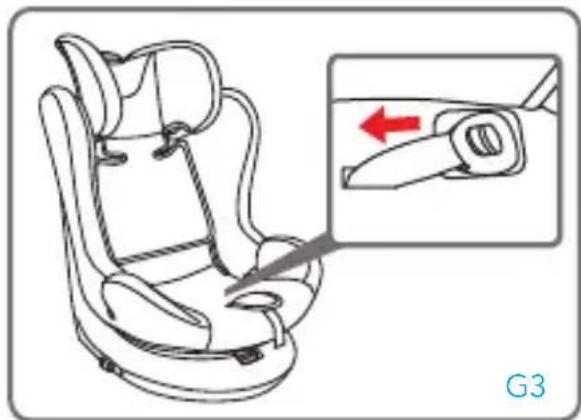
REPLACING THE 5-POINT HARNESS
Replacement of the 5-point belt for use in the 40-105 cm range
natural_image
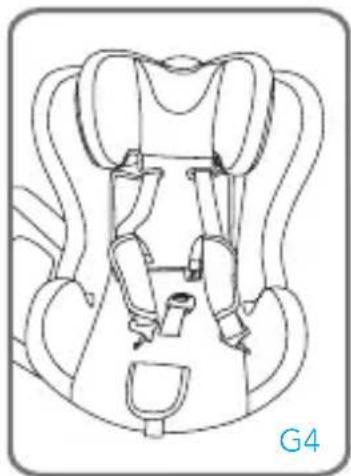
Line drawing of a car seat assembly with labeled parts G1 and G2 (no text or symbols on the diagram itself)
natural_image
Diagram of a car seatbelt mechanism showing a red arrow indicating clockwise motion (no text or symbols present)Lift up the fabric lining from the backrest. Remove the chest belts from the right and left compartment. Replace the fabric on the backrest.
natural_image
Line drawing of a car seat assembly with a close-up inset showing the cable being inserted (no text or symbols)Lift up the seat lining and remove the crotch belt from its housing compartment.
natural_image
Line drawing of a car seat assembly (no text or symbols)Replace the fabric on the backrest and seat. Thread the buckle with crotch strap through the slot on the seat. Thread the chest protector straps through the slots in the backrest fabric and through the slots in the shell.
natural_image
Illustration of a hand fastening a car seatbelt, showing the cable being inserted and adjusting its seatbelt (no text or symbols present)Hook the straps of the chest protectors together. Close the zip.
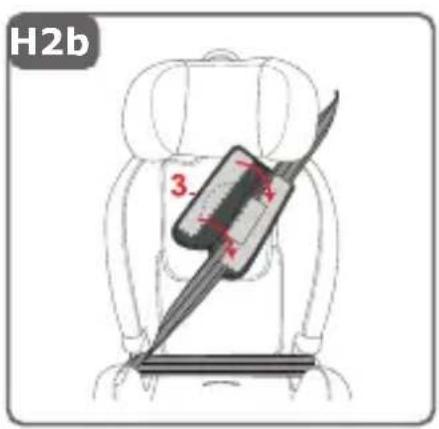
KID-PAD INSTALLATION
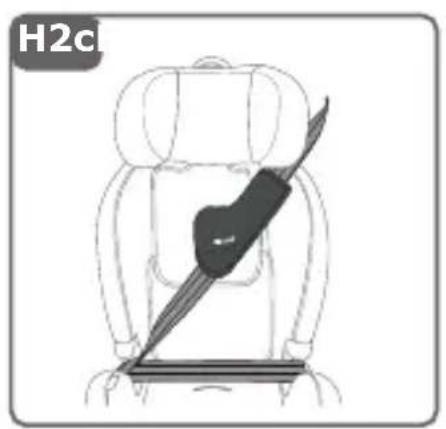
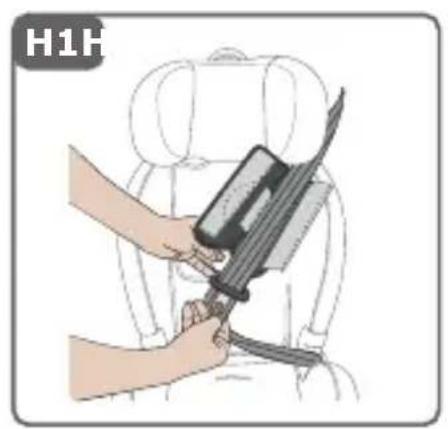
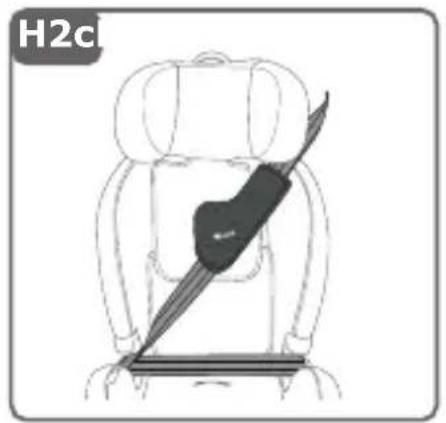
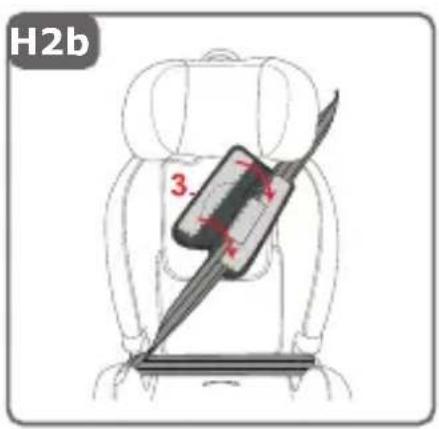
The KID-PAD is a device that must ALWAYS be installed on the diagonal vehicle seat belt to ensure proper protection in the event of an impact.
Position the diagonal belt under the two Velcro straps of the KID-PAD (H1), close the KID-PAD on itself (H2a, H2b, H2c) making sure that the shaped part is positioned between the chin and the chest of the child (H32).
WARNING! The KID-PAD must ALWAYS be used.
natural_image
Illustration of a hand holding a tool over a seated person wearing a headlamp (no text or symbols visible)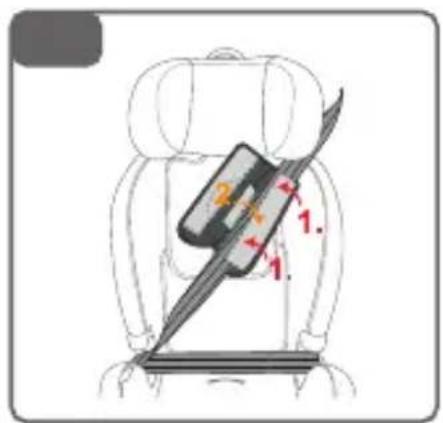


natural_image
Line drawing of a car seatbelt with a black triangular seatbelt and diagonal stripe (no text or symbols)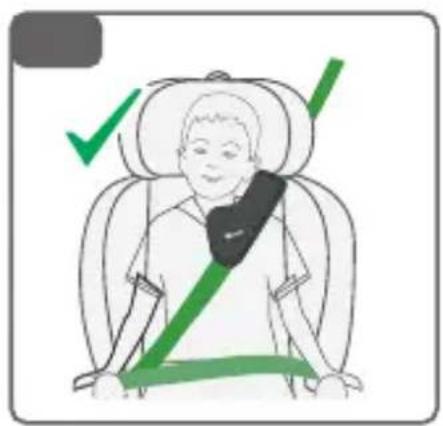

REMOVING / ASSEMBLING THE LINING
Remove the cover
Loosen the harness if present and remove the reducer.
Lift the headrest and release the side elastics that secure the fabric to the frame.
Carefully remove the fabric from the headrest.
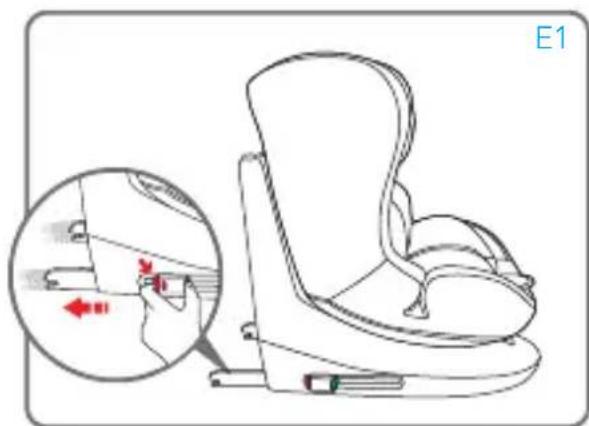
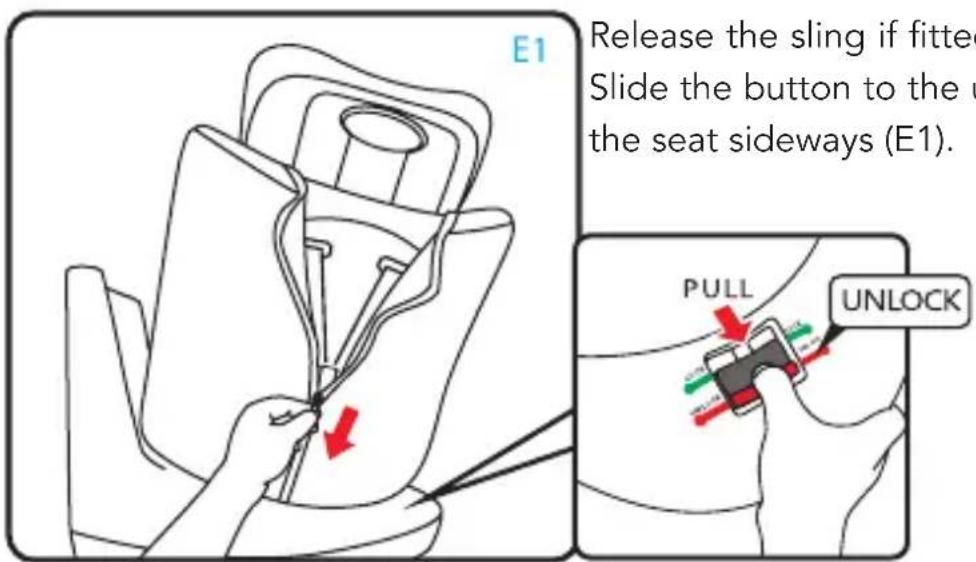
Move the button to the rotational release position turn the seat sideways (E1).
Open the zip on the back of the seat fabric.
Undo the snap fasteners on the underside of the backrest and the front of the seat.
Carefully remove the fabric starting from one side, taking care while unzipping the fabric from the side protection.
Unfasten the leg belt from the upholstery and remove the fabric.
Replace the fabric
Place the seat cover on the car seat and thread the leg protection belt through the slot. Carefully replace the cover along the side in its place. Take care while fitting the fabric around the side protectors and the lap belt passage.
Close the zip on the back side.
Fasten the snaps on the front and back of the seat fabric.
Position the headrest cover by hooking the elastic bands to the side.
Ensure that the harness straps are not twisted.
CLEANING AND MAINTENANCE
Cleaning and maintenance
Cleaning
It is recommended to use only original linings, as these components are fundamental for the car seat to function correctly.
Do not use the car seat without the supplied lining.
- The lining can be removed and washed in a washing machine with a mild detergent, using the delicate fabric cycle (30°C). Follow the washing instructions shown on the label. The colours may fade if washed at temperatures above 30°C. Never spin dry or tumble dry (as the fabric could become detached from the padding).
- The plastic parts may be cleaned with water and soap. Do not use harsh detergents (such as solvents).
- The harness may be washed with soap and warm water. Warning! Never remove the tabs of the buckles from the straps.
IMPORTANT: The lining is a fundamental component for your child's safety. Never use the car seat without the lining, nor replace it with other products which have not been approved, so as to avoid endangering the child's safety or compromising the proper functioning of the device.

Hand wash in water at a temperature of less than 30^ C
Do not bleach Dry clean without the use of solvents except for trichloroethylene


Do not tumble dry Do not iron
The contents of this document as stated below will come into effect as from 01.01.2005 and replace, on every account and in full, any previous message referring to the guarantee provided by Foppa Pedretti S.p.A.
FORMAL GUARANTEE
Foppa Pedretti S.p.A. the head office of which is located at n. 11 Via Volta, Grumello del Monte (Italy), guarantees directly to the Consumer that this brand new product is free of faults with regard to the materials, design and manufacture and that it complies with the characteristics as declared by the manufacturer.
This formal guarantee is valid in all Member Countries of the European Union and it neither excludes nor limits the Consumer's rights in accordance with mandatory measures provided for by the law with regard to the Retailer of the Product.
To take advantage of this formal guarantee, the Consumer must return the faulty
product to the Retailer, presenting to the same the proof of purchase of the Product which must
clearly show the Retailer's address, the date of purchase of the Product with the Retailer's stamp and signature and an indication of the Product itself or, alternatively, the receipt which must not have been altered and which must clearly show the same information as that referred to above.
The manufacturer's formal guarantee is valid for twelve (12) months from the date of purchase of the Product. During this period, Foppa Pedretti S.p.A. will repair or replace the faulty product, at its own discretion.
The formal guarantee is granted to the end buyer of the Product (Consumer) and it neither excludes nor limits the mandatory rights of the Consumer as provided for by the law and/or the rights that the Consumer may have with regard to the Dealer/Retailer of the Product.
EXCLUSIONS TO THE FORMAL GUARANTEE.
The formal guarantee is excluded in the case of damage caused to the Product for the following reasons: if the product is used in a way that does not comply with the information contained in the use and assembly instruction sheet, if the product is knocked or dropped, if the Product is exposed to humidity or extreme heat or environmental conditions, or to sudden changes in the same, corrosion, oxidization, unauthorized alterations or repairs to the Product, repairs using unauthorised spare parts, improper use, improper maintenance or failure to carry out the same, improper maintenance compared to the information given on the use and assembly instruction sheet, incorrect assembly, accidents, damage caused by food or drink, damage caused by chemical products, cases of force majeure.
In any case, Foppa Pedretti S.p.A. declines all responsibility for damage caused to persons or to property, other than the Product, when such damage is caused by a failure to comply with the instructions/advice/warnings cont a ined in the manual or, alternatively, in the use and assembly instruction sheet provided with each Product for the owner/user. (Purely as an example, in the case of a cot: "Check your baby constantly. Make sure that the sheets and blankets do not cover the baby's head...").
Furthermore, Foppa Pedretti S.p.A. declines all responsibility for damage to persons and to property when the breakage of its products is due to a deterioration in the components of the Product that are subject to wear. All the components of the Product made of plastic are considered to be components subject to wear.
AVERTISSEMENT
1. ATTENTION:
natural_image
Diagram showing a green checkmark on a curved surface with no readable text or symbols

Pose autorisée

Pose non autorisée

natural_image
Hand holding a clipboard with a red arrow pointing downward (no text or symbols)

natural_image
Line drawing of a car seat and seat assembly with red arrows indicating movement or force (no text or symbols)natural_image
Line drawing of a baby car seat with a hand adjusting the seat (no text or symbols)natural_image
Line drawing of a baby car seat with hand placement and red dashed arrows indicating movement (no text or symbols)③
natural_image
Diagram showing a vehicle interior with yellow lockers and directional arrows, labeled A2 (no text or symbols on diagram)
natural_image
Two line drawings of a car seat assembly, one showing internal components and the other showing a highlighted seat with a red arrow (no text or symbols)natural_image
Line drawing of a baby car seat with a magnified inset showing the seat being adjusted for a finger (no text or symbols present)
natural_image
Two circular icons showing a person riding a car with a curved ramp and a small boat icon, no text or symbols present.natural_image
Illustration of a hand using a tool to lift a cable, showing red arrows indicating direction (no text or symbols)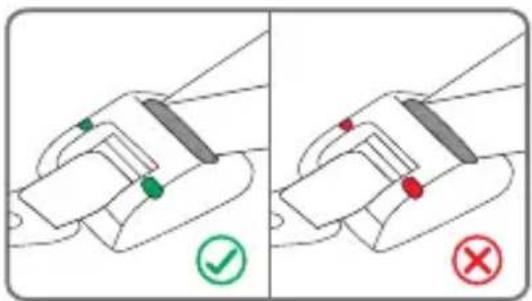
natural_image
Illustration of a hand holding a small object with a red arrow indicating motion or force (no text or symbols)natural_image
Line drawing of a baby car seat with a red arrow indicating the seatbelt (no text or symbols present)natural_image
Diagram showing a mechanical component with directional arrows indicating motion or force (no text or symbols)natural_image
Line drawing of a car seat with a magnified inset showing the seat being adjusted for a finger (no text or symbols present)
natural_image
Diagram of a car seat assembly with a magnified inset showing internal components (no text or labels)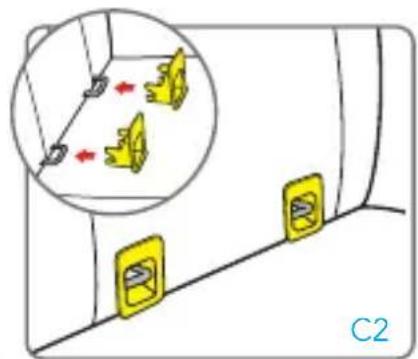
natural_image
Diagram showing a vehicle interior with yellow bracket switches and a magnified inset of two yellow objects (no text or symbols)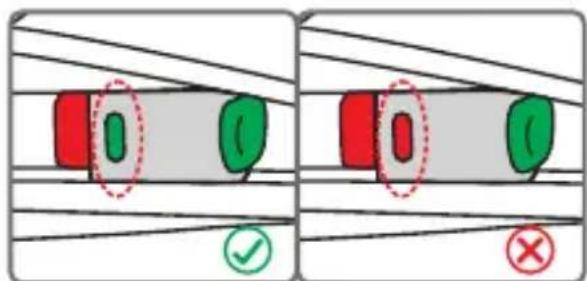
natural_image
Illustration of a hand using a tool to lift a curved blade, with red arrows indicating direction (no text or symbols)
natural_image
Line drawing of a car seat with seats and seatbelt, no text or symbols present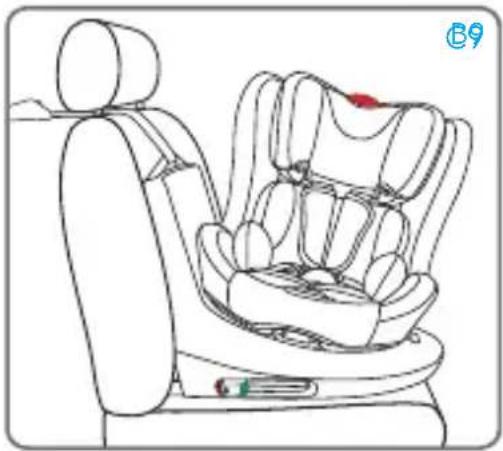
natural_image
Line drawing of a car comfort seat with seatbelt and seat, no text or symbols presentnatural_image
Illustration of a hand holding a small object with a red arrow indicating direction (no text or symbols)natural_image
Line drawing of a baby car seat with a hand adjusting the seatbelt (no text or symbols)natural_image
Diagram showing a mechanical assembly with arrows indicating motion or force direction (no text or symbols)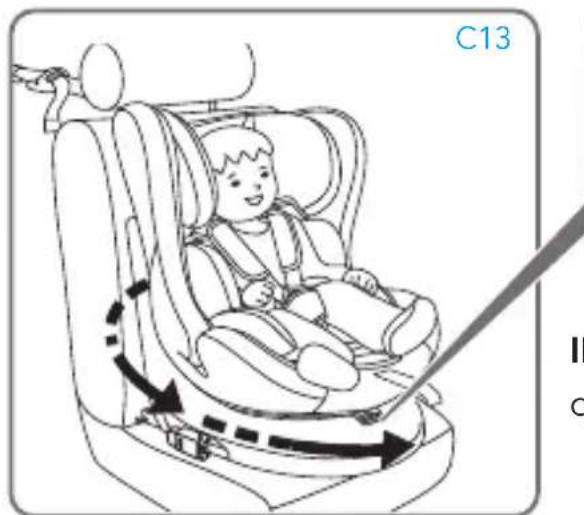
natural_image
Illustration of hands using a tool to draw red and green strips (no text or symbols)
natural_image
Pure mechanical linkage diagram with green and red components, no text or symbols presentnatural_image
Line drawing of a child seated in a car seat, no text or symbols present
natural_image
Illustration of a child wearing a seatbelt and red belt, sitting inside an airplane (no text or symbols)
natural_image
Illustration of a hand pressing down on a curved object with red arrows indicating downward motion (no text or symbols)natural_image
Illustration of a child seated in a car seat with red safety belt and red arrow indicating pressure point (no text or symbols)natural_image
Line drawing of a car seat with a magnified inset showing hand positioning and red arrows indicating movement (no text or symbols)
natural_image
Diagram showing a door with two yellow clips and red directional arrows, labeled E2 (no text or symbols on the diagram itself)natural_image
Line drawing of a car seat with a red X mark indicating no text or symbols on the seat itself
natural_image
Line drawing of a car seat with a red circle highlighting the seat area and a red X symbol (no text or labels)natural_image
Illustration of a hand gripping a device with a magnified inset showing the cable being inserted (no text or symbols)natural_image
Line drawing of a car seat assembly with a red arrow indicating rotation (no text or symbols)natural_image
Diagram of a car seatbelt with a red arrow indicating clockwise motion (no text or symbols)natural_image
Line drawing of a car seat assembly with labeled parts G1 and G2 (no text or symbols on the diagram itself)
natural_image
Diagram of a car seatbelt mechanism showing a red arrow indicating clockwise motion (no text or symbols present)natural_image
Line drawing of a car seat assembly with a magnified inset showing the cable being inserted (no text or symbols)natural_image
Line drawing of a car seat assembly (no text or symbols)natural_image
Illustration of a hand fastening a wrist with a magnified inset showing the cable being inserted (no text or symbols)natural_image
Illustration of a hand using a tool to adjust or install a device on a vehicle head (no text or symbols visible)
natural_image
Line drawing of a car seatbelt with a knife inserted, labeled H2c (no text or symbols on the diagram itself)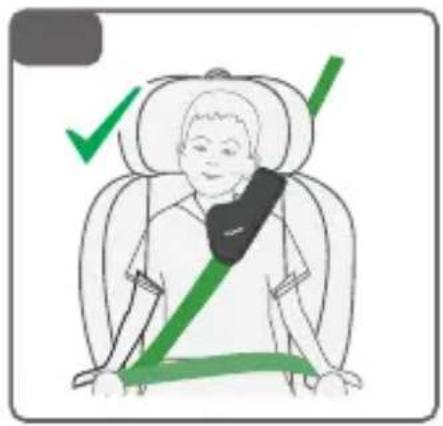

RETIRER / MONTER LA HOUSSE
natural_image
Line drawing of a hand inserting into a device into a container, with a red arrow indicating the insertion point (no text or symbols present)EXCLUSIONS DE LA GARANTIE CONVENTIONNELLE.

Zulässiger Einbau
natural_image
Line drawing of a car seat with red directional arrows indicating movement or force (no text or symbols)
natural_image
Hand holding a clipboard with a red arrow pointing downward (no text or symbols)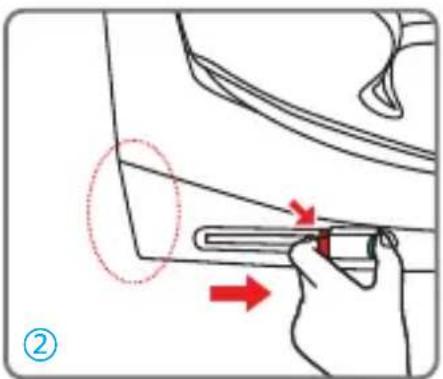
natural_image
Line drawing of a car seat and seat assembly with directional arrows indicating movement (no text or symbols)natural_image
Line drawing of a baby car seat with a hand adjusting the seat (no text or symbols)natural_image
Line drawing of a car seatbelt with red dashed arrows indicating movement or adjustment (no text or symbols)③

natural_image
Two line drawings of a car seat assembly, one showing internal components and the other showing a highlighted seat with a red arrow (no text or symbols)natural_image
Line drawing of a baby car seat with a magnified inset showing the seat being adjusted for size (no text or symbols)
natural_image
Two circular icons showing a person sleeping with a curved line and a hand, no text or symbols present.natural_image
Illustration of a hand using a tool to lift a cable, showing red arrows indicating direction (no text or symbols)
natural_image
Line drawing of a car seat with a red accent, no text or symbols presentnatural_image
Illustration of a hand holding a small object with a red arrow indicating direction, no text or symbols presentnatural_image
Line drawing of a baby car seatbelt with a red arrow indicating the seatbelt (no text or symbols present)natural_image
Diagram showing a hand holding a device with blue arrows indicating flow or movement, and a red button inside a circular frame (no text or symbols)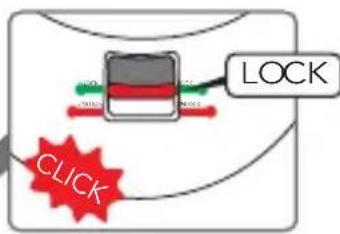
natural_image
Line drawing of a baby car seat with a magnified inset showing the seat being adjusted for a finger (no text or symbols present)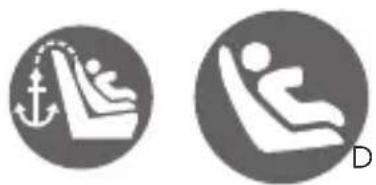
natural_image
Two circular icons showing a person riding a car with an anchor symbol (no text or numbers present)natural_image
Illustration of a hand using a tool to lift a curved blade, with red arrows indicating direction (no text or symbols)
natural_image
Line drawing of a car comfort seat with seatbelt and seat, no text or symbols presentnatural_image
Illustration of a hand holding a small object with a red arrow indicating direction (no text or symbols)natural_image
Line drawing of a baby car seat with a red arrow indicating the seatbelt (no text or symbols present)natural_image
Diagram showing a hand holding a device with blue arrows indicating direction, no text or symbols present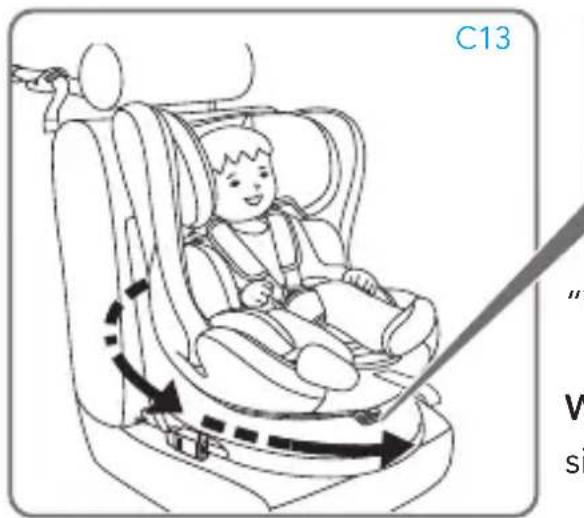
"Verriegeln" steht.
natural_image
Illustration of hands using a tool to draw red and green strips (no text or symbols)
natural_image
Pure mechanical linkage diagram with green and red components, no text or symbols presentnatural_image
Line drawing of a child seated in a car seat, no text or symbols present
natural_image
Illustration of a child wearing a seatbelt and red belt, sitting inside an airplane (no text or symbols)
natural_image
Illustration of a hand pressing down on a curved object with red arrows indicating downward motion (no text or symbols)natural_image
Illustration of a child seated in a car seat with red safety belt and red headband (no text or symbols)natural_image
Line drawing of a car seat with a magnified inset showing the seat being adjusted for size (no text or symbols)

natural_image
Line drawing of a car seat with a red X mark indicating no text or symbols on the seat itself
natural_image
Line drawing of a car seat with a red circle indicating a location or safety symbol (no text or labels present)natural_image
Illustration of a hand gripping a car seat with a magnified inset showing the cable being adjusted (no text or symbols)natural_image
Line drawing of a car seat assembly with a red arrow indicating rotation (no text or symbols)natural_image
Diagram of a car seatbelt buckle with a red arrow indicating clockwise motion (no text or symbols)natural_image
Line drawing of a car seat assembly with a magnified inset showing a finger insertion (no text or symbols)natural_image
Line drawing of a car seat assembly (no text or symbols)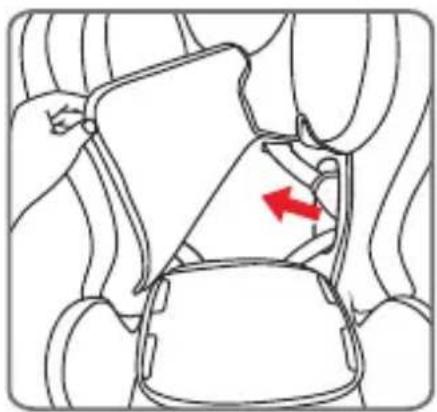
natural_image
Diagram of a car seatbelt mechanism with a red arrow indicating the direction (no text or symbols present)natural_image
Line drawing of a car seat with a close-up inset showing the right-hand rule for adjusting the seat (no text or symbols present)natural_image
Line drawing of a car seat assembly (no text or symbols)natural_image
Illustration of a hand holding a car seat with a magnified inset showing the cable being inserted (no text or symbols)natural_image
Illustration of a hand using a tool to lift a car seatbelt, no text or symbols present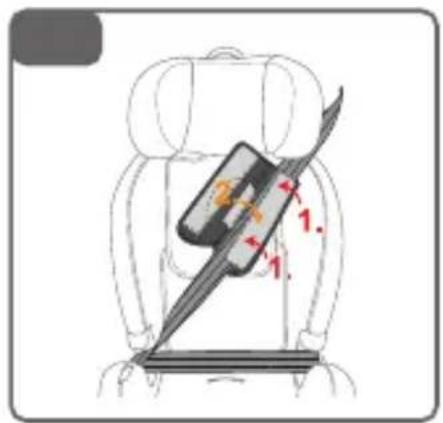

natural_image
Line drawing of a car seatbelt with a black bowtie and seat, labeled H2c (no text or symbols on the diagram itself)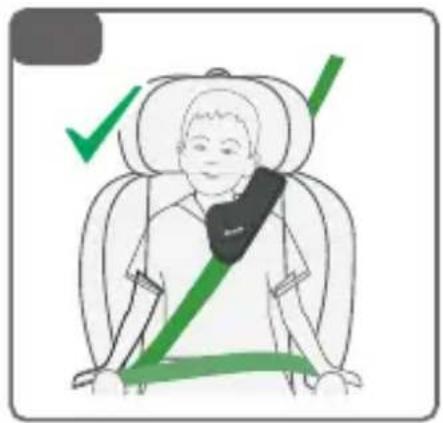

natural_image
Line drawing of a hand inserting into a device into a container, with a red arrow indicating the insertion point (no text or symbols present)
natural_image
Hand holding a clipboard with a red arrow pointing downward (no text or symbols)

natural_image
Line drawing of a car seat and seat assembly with red arrows indicating movement or force (no text or symbols)natural_image
Line drawing of a baby car seat with a hand adjusting the seat (no text or symbols)natural_image
Line drawing of a car seatbelt with red motion arrows indicating movement (no text or symbols)③
natural_image
Line drawing of a baby car seat with a green checkmark indicating the upper limit (no text or symbols present)
natural_image
Line drawing of a baby car seat with a green checkmark (no text or symbols)
natural_image
Line drawing of a car seat with a red X mark indicating cancellation (no text or symbols present)natural_image
Diagram of a car seat assembly with highlighted parts and red arrows indicating movement (no text or symbols)
natural_image
Diagram showing a vehicle interior with yellow lockers and directional arrows, no text or symbols present

natural_image
Two line drawings of a car seat assembly, one showing internal components and the other showing a small object with a red arrow indicating motion (no text or symbols)natural_image
Line drawing of a baby car seat with an inset showing the left side of the seat (no text or symbols)
natural_image
Two circular icons showing a person in a boat and a person in a car, both without any text or symbols.natural_image
Line drawing of a car seat with a red circle highlighting the seat area and a red X mark indicating no text or symbols.
natural_image
Illustration of a car seat with a red circle highlighting the seat area, marked with a red X (no text or symbols present)natural_image
Illustration of a hand using a tool to lift a cable, showing red arrows indicating direction (no text or symbols)
natural_image
Line drawing of a car seat assembly with no text or symbolsnatural_image
Illustration of a hand holding a small object with a red arrow indicating direction, no text or symbols presentnatural_image
Line drawing of a baby car seat with a red arrow indicating the seatbelt (no text or symbols present)natural_image
Line drawing of a car seat with a magnified inset showing the seat being adjusted for a finger (no text or symbols present)

natural_image
Diagram of a mechanical device with a magnified inset showing internal components and red arrows indicating motion (no text or symbols)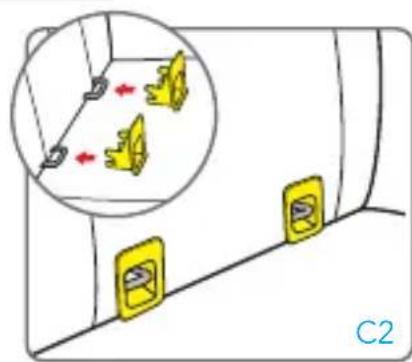
natural_image
Diagram showing two yellow plastic clips mounted on a wall, with an inset magnified view highlighting the corner features (no text or symbols)natural_image
Illustration of a hand using a tool to lift a curved blade, with red arrows indicating direction (no text or symbols)
natural_image
Line drawing of a car seat with seats and seatbelt, no text or symbols present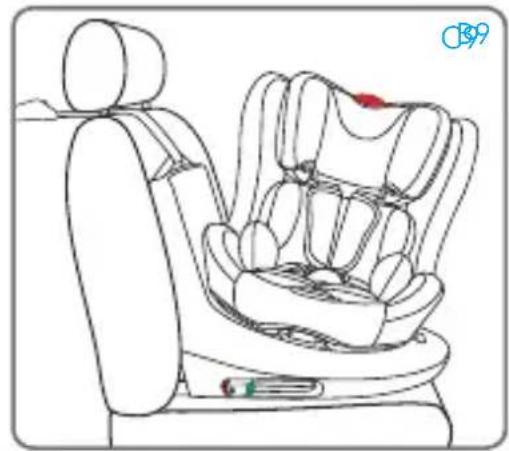
natural_image
Line drawing of a car seat with a red accent, no text or symbols presentnatural_image
Medical illustration showing a hand holding a clip and a close-up of the grip, with no visible text or symbols.natural_image
Line drawing of a baby car seat with a hand adjusting the seatbelt (no text or symbols)
natural_image
Two-step diagram showing hands holding red and green bars, no text or symbols presentnatural_image
Line drawing of a person seated in a car seat, no text or symbols present
natural_image
Illustration of a child wearing a seatbelt and red belt, no text or symbols present
natural_image
Illustration of a hand pressing down on a curved object with red arrows indicating downward motion (no text or symbols)natural_image
Illustration of a child wearing a seatbelt and red belt, seated in a car (no text or symbols)natural_image
Line drawing of a car seat with a magnified inset showing the seat being adjusted for a finger (no text or symbols present)
natural_image
Two circular icons showing a person relaxing on a slide and a curved arrow, both without any text or symbols.natural_image
Diagram showing a window with yellow switches and a magnified inset of two yellow switches (no text or symbols)natural_image
Line drawing of a car seat with a red X mark indicating no text or symbols on the diagram itself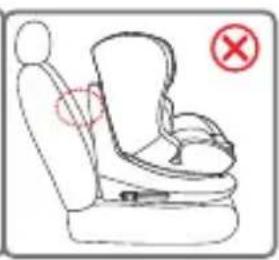
natural_image
Line drawing of a car seat with a red circle and a red X mark indicating no text or symbols on the seat itself.natural_image
Illustration of a hand holding a device with a magnified inset showing a close-up of the cable being inserted (no text or symbols present)natural_image
Line drawing of a car seat assembly with a red arrow indicating rotation (no text or symbols)natural_image
Diagram of a car seatbelt with a red arrow indicating clockwise motion (no text or symbols)natural_image
Line drawing of a car seat assembly with labeled parts G1 and G2 (no text or symbols on the diagram itself)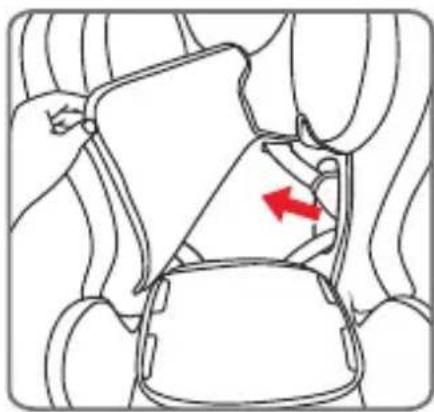
natural_image
Diagram of a car seatbelt mechanism showing a red arrow indicating clockwise motion (no text or symbols present)natural_image
Line drawing of a car seat assembly with a magnified inset showing the cable being inserted (no text or symbols)natural_image
Line drawing of a car seat assembly (no text or symbols)natural_image
Illustration of a hand fastening a car seatbelt, showing the cable being inserted and adjusting its seatbelt (no text or symbols present)natural_image
Illustration of a hand using a tool to adjust or install a device on a car seat (no text or symbols visible)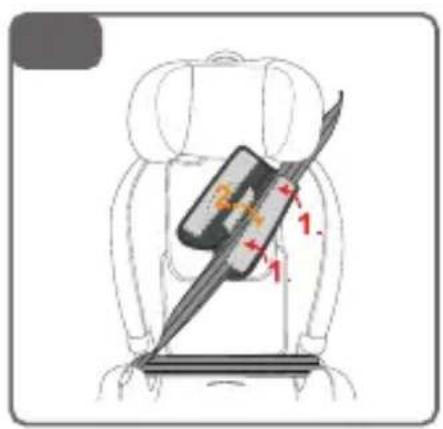

natural_image
Line drawing of a car seatbelt with a black bandage and label H2c (no text or symbols on the diagram itself)

natural_image
Line drawing of a hand inserting a plug into a device component, with a red arrow indicating the insertion point (no text or symbols present)Dos 100 cm ate os 150 cm (i-Size booster seat)
natural_image
Diagram showing a green checkmark on a curved surface with no readable text or symbols
natural_image
Line drawing of a car seat with red directional arrows indicating movement or pressure points (no text or symbols)
natural_image
Hand holding a clipboard with a red arrow pointing downward (no text or symbols)
natural_image
Line drawing of a car seat and seat assembly with directional arrows indicating movement (no text or symbols)natural_image
Line drawing of a car seat assembly with a hand adjusting the seat (no text or symbols)natural_image
Line drawing of a car seatbelt with red motion arrows indicating movement (no text or symbols)③

natural_image
Diagram of a car seat assembly with highlighted parts and red arrows indicating movement (no text or symbols)
natural_image
Diagram showing a vehicle interior with yellow lockers and directional arrows, labeled A2 (no text or symbols on diagram)

natural_image
Two line drawings of a car seat assembly, one showing internal components and the other showing a highlighted seat with a red arrow (no text or symbols)INSTALAÇÃO VIRADA PARA A RETAGUARDA
natural_image
Line drawing of a car seat with a magnified inset showing hand positioning and red arrows indicating movement (no text or symbols)
natural_image
Two circular icons showing a person in a boat and a person in a car, both without any text or symbols.natural_image
Illustration of a hand using a tool to lift a cable, showing red arrows indicating direction (no text or symbols)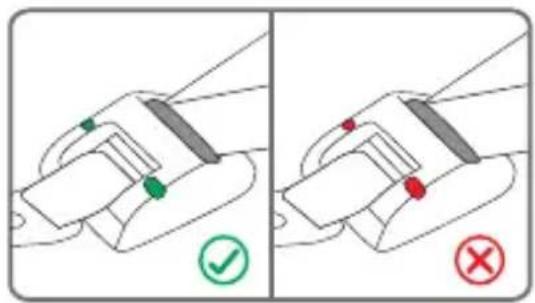
natural_image
Line drawing of a car seat with a red accent marking on the seat (no text or symbols)natural_image
Illustration of a hand holding a small object with a red arrow indicating direction, no text or symbols presentnatural_image
Line drawing of a baby car seat with a red arrow indicating the seatbelt (no text or symbols present)natural_image
Diagram of a baby car seat with directional arrows indicating movement or force (no text or symbols)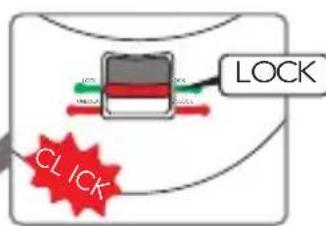
natural_image
Line drawing of a baby car seat with a magnified inset showing the seat being adjusted for a finger (no text or symbols present)
natural_image
Two circular icons showing a person riding a car with an anchor symbol (no text or numbers present)natural_image
Illustration of a hand using a tool to lift a curved blade, with red arrows indicating direction (no text or symbols)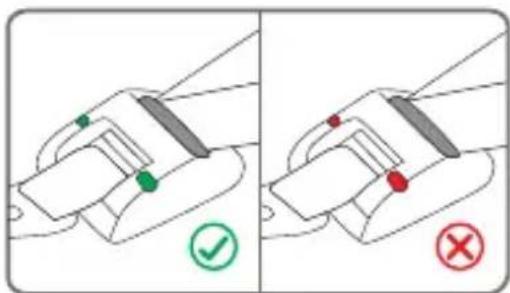
natural_image
Line drawing of a car comfort seat with seatbelt and seat, no text or symbols presentnatural_image
Illustration of a hand holding a small object with a red arrow indicating motion or force (no text or symbols)natural_image
Line drawing of a baby car seat with a red arrow indicating the seatbelt (no text or symbols present)natural_image
Two-step diagram showing hands holding red and green bars, no text or symbols presentnatural_image
Line drawing of a person seated in a car seat, no text or symbols present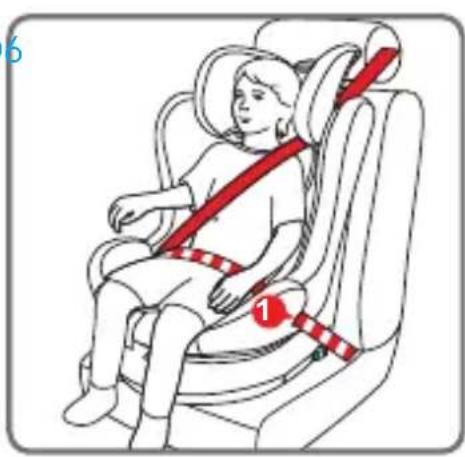
natural_image
Illustration of a child wearing a seatbelt and red belt, no text or symbols present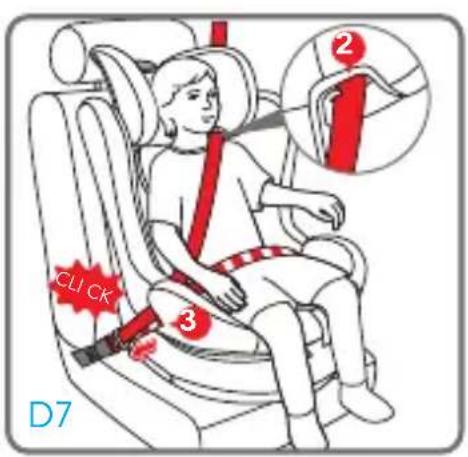
natural_image
Illustration of a hand pressing down on a curved object with red directional arrows indicating movement or pressure (no text or symbols)natural_image
Illustration of a child wearing a seatbelt and red belt, seated in a car (no text or symbols)natural_image
Line drawing of a car seat assembly with a magnified inset showing hand positioning and red arrows indicating movement (no text or symbols)
natural_image
Two circular icons showing a person relaxing with a curved arm and a small anchor symbol (no text or numbers)natural_image
Illustration of a hand holding a wristbelt with a magnified inset showing the cable being inserted (no text or symbols)natural_image
Line drawing of a car seat assembly with a red arrow indicating rotation (no text or symbols)natural_image
Diagram of a car seatbelt with a red arrow indicating clockwise motion (no text or symbols)natural_image
Line drawing of a car seat assembly with an inset showing a close-up of the handle (no text or symbols)natural_image
Line drawing of a car comfort seat with labeled parts G1 and G2 (no text or symbols on the diagram itself)
natural_image
Diagram of a car seatbelt mechanism with a red arrow indicating the direction (no text or symbols present)natural_image
Line drawing of a car seat with a close-up inset showing the right-hand rule for adjusting the seat (no text or symbols present)natural_image
Line drawing of a car seat assembly (no text or symbols)natural_image
Illustration of a hand fastening a car seatbelt, showing the cable being inserted and adjusting its seatbelt (no text or symbols present)natural_image
Illustration of a hand using a tool to adjust or install a device on a person's head (no text or symbols visible)
natural_image
Line drawing of a car seatbelt with a black bandage, labeled H2c (no text or symbols on the diagram itself)

natural_image
Line drawing of a hand inserting a plug into a device component, with a red arrow indicating the insertion point (no text or symbols present)natural_image
Diagram showing a green checkmark on a curved surface with no text or symbols
natural_image
Line drawing of a car seat with red directional arrows indicating motion or movement (no text or symbols)
natural_image
Hand holding a clipboard with a red arrow pointing downward (no text or symbols)
natural_image
Hand holding a tool with red arrows indicating movement or force (no text or symbols present)
natural_image
Line drawing of a car seat assembly with red arrows indicating movement or force (no text or symbols)natural_image
Line drawing of a baby car seat with a hand adjusting the seat (no text or symbols)natural_image
Line drawing of a car seat with red arrows indicating movement or change (no text or symbols)natural_image
Line drawing of a baby car seat with a green checkmark indicating the number of seats (no text or symbols present)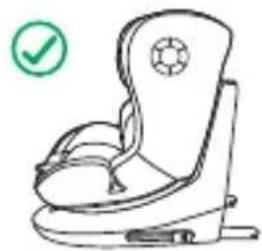
natural_image
Line drawing of a baby car seat with a green checkmark (no text or symbols on the car itself)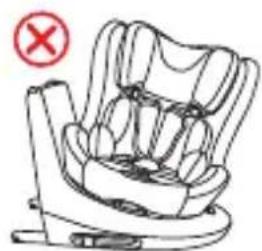
natural_image
Line drawing of a car seat with a red X mark indicating no text or symbols on the diagram itselfnatural_image
Diagram showing a vehicle interior with yellow directional arrows and a magnified inset of two yellow objects (no text or symbols)

natural_image
Line drawing of a car seat with no text or symbols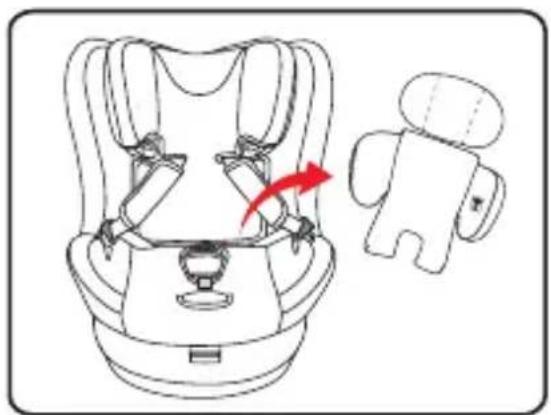
natural_image
Line drawing of a car seat assembly with a red arrow indicating rotation (no text or symbols)natural_image
Line drawing of a car seat assembly with a magnified inset showing the seatbelt mechanism (no text or symbols)
natural_image
Two circular icons showing a person riding a car with a curved ramp and a small boat icon, no text or symbols present.natural_image
Line drawing of a car seat with a red circular mark and a red X symbol (no text or labels)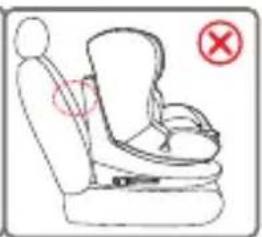
natural_image
Line drawing of a car seat with a red X mark indicating no text or symbols on the seat itselfnatural_image
Illustration of a hand using a tool to lift a cable, showing red arrows indicating direction (no text or symbols)
natural_image
Line drawing of a car seat with a red accent marking on the seat (no text or symbols)natural_image
Illustration of a hand holding a small object with a red arrow indicating direction, no text or symbols presentnatural_image
Line drawing of a baby car seat with a red arrow indicating the seatbelt (no text or symbols present)natural_image
Diagram showing a hand holding a device with blue arrows indicating flow or movement, no text or symbols present.natural_image
Diagram of a car seat assembly with a magnified inset showing internal components (no text or labels)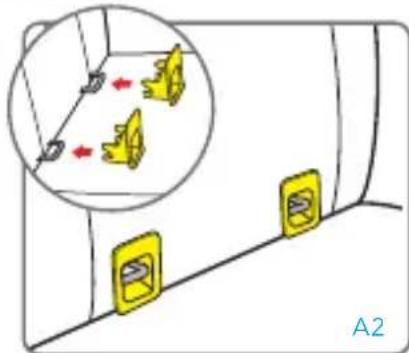
natural_image
Diagram showing a vehicle interior with two yellow directional arrows and a magnified inset of a vehicle (no text or symbols)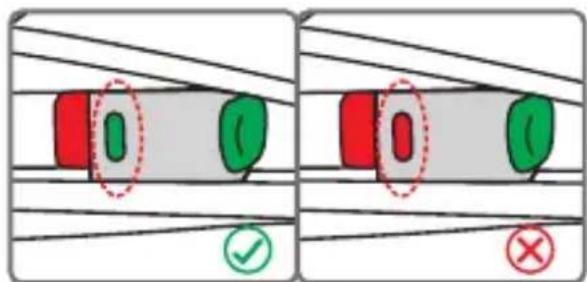
natural_image
Line drawing of a car seat with a red X mark indicating no text or symbols on the seat itself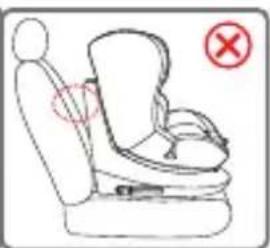
natural_image
Line drawing of a car seat with a red circle and a red X mark indicating no text or symbols on the seat itself.natural_image
Illustration of a hand using a tool to lift a curved blade, with red arrows indicating direction (no text or symbols)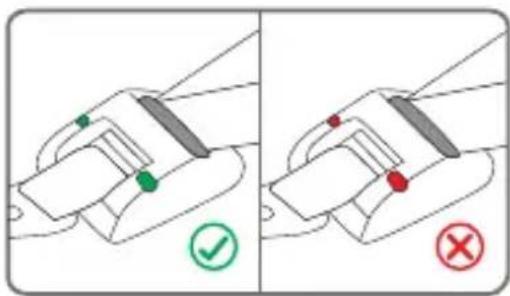
natural_image
Line drawing of a car seat with seats and seatbelt, no text or symbols presentnatural_image
Illustration of a medical procedure showing hand positioning and a highlighted anatomical component (no text or symbols)natural_image
Line drawing of a baby car seat with a red arrow indicating the seatbelt (no text or symbols present)natural_image
Diagram showing a hand holding a device with directional arrows indicating movement or force (no text or symbols present)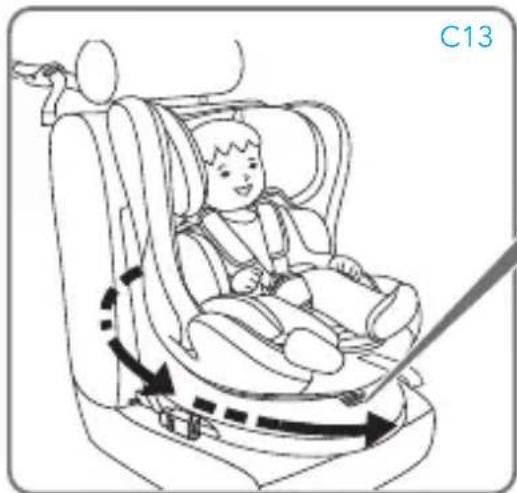
natural_image
Line drawing of a baby car seat with a diagonal guide bar and label C13 (no text or symbols on the diagram itself)C13
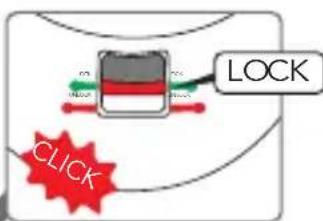
natural_image
Illustration of hands using a tool to draw red and green strips (no text or symbols)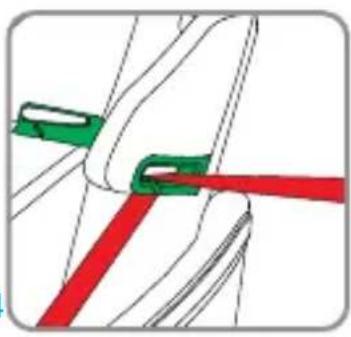
natural_image
Pure mechanical linkage diagram with green and red components, no text or symbols presentnatural_image
Line drawing of a child seated in a car seat, no text or symbols present
natural_image
Illustration of a child wearing a seatbelt and red belt, sitting inside an airplane (no text or symbols)
natural_image
Illustration of a hand pressing down on a curved object with red directional arrows indicating movement or pressure (no text or symbols)natural_image
Illustration of a child seated in a car seat with red safety belt and red arrow indicating pressure point (no text or symbols)natural_image
Line drawing of a baby car seat with a magnified inset showing the left side of the seat (no text or symbols)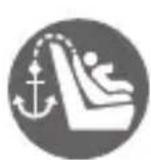

natural_image
Diagram of a device with a magnified inset showing internal components and red arrows indicating motion (no text or symbols)
natural_image
Diagram showing a door with yellow bracket and two inset views of a yellow object, labeled E2 (no text or symbols on main elements)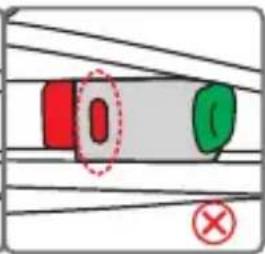
natural_image
Illustration of a hand holding a wristbelt with a magnified inset showing the cable being inserted (no text or symbols)natural_image
Line drawing of a car seat assembly with a red arrow indicating rotation (no text or symbols)natural_image
Diagram of a car seatbelt with a red arrow indicating clockwise motion (no text or symbols)natural_image
Line drawing of a car seat assembly with an inset showing a close-up of the handle (no text or symbols)natural_image
Line drawing of a car comfort seat with labeled parts G1 and G2 (no text or symbols on the diagram itself)
natural_image
Diagram of a car seatbelt mechanism showing a red arrow indicating clockwise motion (no text or symbols present)natural_image
Line drawing of a car seat assembly with a magnified inset showing the cable being inserted (no text or symbols)natural_image
Line drawing of a car seat assembly (no text or symbols)natural_image
Illustration of a hand fastening a car seatbelt, showing the cable being inserted and adjusting its seatbelt (no text or symbols present)natural_image
Illustration of a hand using a tool to adjust or install a device on a person's head (no text or symbols visible)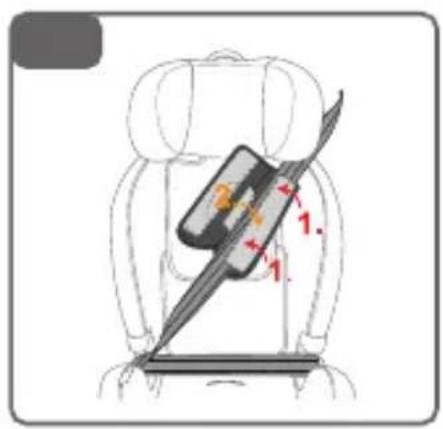
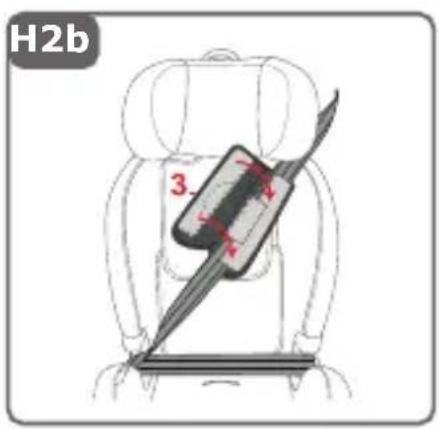

natural_image
Line drawing of a car seatbelt with a black bandage and a white collar, no text or symbols present

natural_image
Line drawing of a hand inserting a plug into a device component, with a red arrow indicating the insertion point (no text or symbols present)

natural_image
Line drawing of a car comfort seat with red directional arrows indicating movement or pressure points (no text or symbols)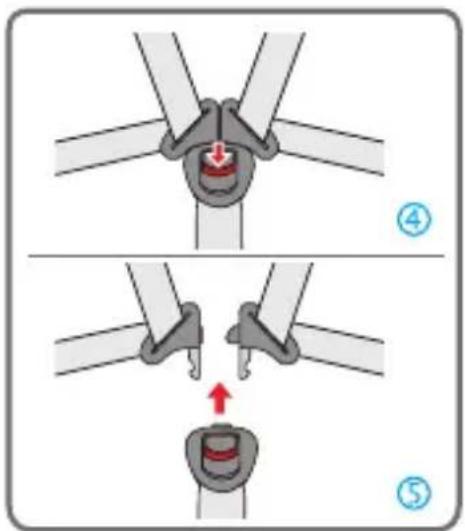
natural_image
Hand holding a clipboard with a red arrow pointing downward (no text or symbols)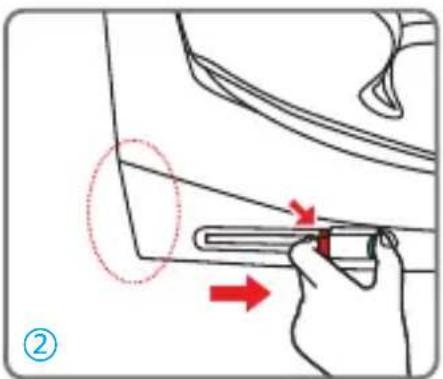

natural_image
Line drawing of a car seat assembly with arrows indicating movement or force (no text or symbols)natural_image
Line drawing of a baby car seat with a hand adjusting the seatbelt (no text or symbols)natural_image
Line drawing of a car seatbelt with red arrows indicating rotation or movement (no text or symbols)natural_image
Diagram showing a vehicle interior with yellow lockers and a magnified inset of two yellow objects, labeled A2 (no text or symbols on main elements)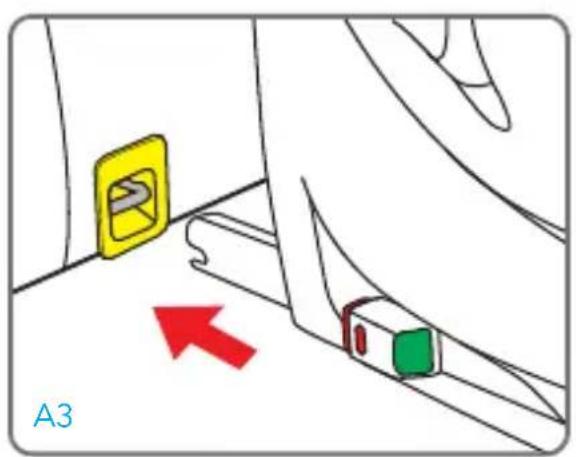

natural_image
Two line drawings of a car seat assembly, one showing internal components and the other showing a highlighted seat (no text or symbols)natural_image
Line drawing of a baby car seat with a magnified inset showing the seat being adjusted for size (no text or symbols)
natural_image
Two circular icons showing a person sleeping with a curved line and a small boat, no text or symbols present.natural_image
Illustration of a hand using a tool to lift a cable, showing red arrows indicating direction (no text or symbols)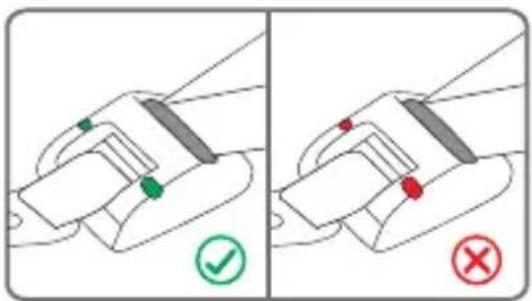
natural_image
Line drawing of a car comfort seat with seatbelt and seat, no text or symbols presentnatural_image
Illustration of a hand holding a small object with a red arrow indicating direction, no text or symbols presentnatural_image
Line drawing of a baby car seat with a red arrow indicating the seatbelt (no text or symbols present)natural_image
Diagram showing a hand holding a device with blue arrows indicating flow or movement, no text or symbols present.natural_image
Line drawing of a baby car seat with a magnified inset showing the seatbelt adjustment (no text or symbols)
natural_image
Line drawing of a car seat with a red X mark indicating no text or symbols on the diagram itself
natural_image
Line drawing of a car seat with a red circle and a red X mark indicating no text or symbols on the seat itself.natural_image
Illustration of a hand using a tool to lift a curved blade, with red arrows indicating direction (no text or symbols)
natural_image
Line drawing of a car comfort seat with seatbelt and seat, no text or symbols present
natural_image
Line drawing of a car seat with a red accent marking on the seat (no text or symbols)natural_image
Medical illustration showing a hand holding a clip and a close-up of the grip (no text or symbols)natural_image
Line drawing of a baby car seatbelt being locked, with a red arrow indicating the lock (no text or symbols present)natural_image
Diagram showing a hand holding a device with blue arrows indicating direction, no text or symbols present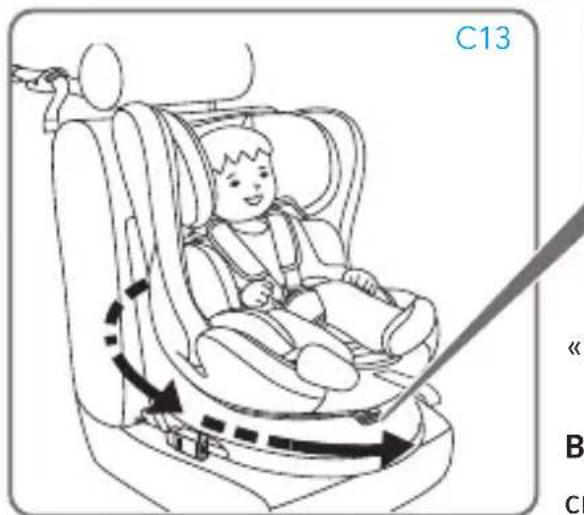

natural_image
Illustration of hands using a tool to tie red and green strips (no text or symbols)
natural_image
Pure mechanical linkage diagram with green and red components, no text or symbols presentnatural_image
Line drawing of a child seated in a car seat, no text or symbols present
natural_image
Illustration of a child wearing a seatbelt and red belt, sitting inside an airplane (no text or symbols)
natural_image
Illustration of a hand pressing down on a curved object with red arrows indicating movement or pressure direction (no text or symbols)natural_image
Illustration of a child seated in a car seat with red safety belt and red arrow indicating pressure point (no text or symbols)natural_image
Line drawing of a car seat with a magnified inset showing the seat being adjusted for size (no text or symbols)

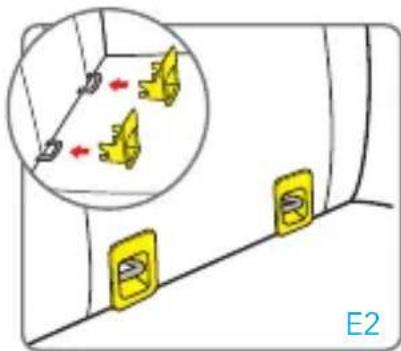
natural_image
Diagram showing a door with yellow bracket clips and a magnified inset highlighting a mechanical component (no text or symbols)natural_image
Line drawing of a car seat with a red X mark indicating no text or symbols on the seat itself
natural_image
Line drawing of a car seat with a red circle and a red X mark indicating no text or symbols on the seat itself.natural_image
Illustration of a hand holding a car seat with a tool, showing a red arrow indicating force or movement (no text or symbols present)natural_image
Line drawing of a car seat assembly with a red arrow indicating rotation (no text or symbols)natural_image
Diagram of a car seatbelt buckle with a red arrow indicating clockwise motion (no text or symbols)natural_image
Line drawing of a car seat assembly with a magnified inset showing a finger insertion (no text or symbols)natural_image
Line drawing of a car seat assembly (no text or symbols)
natural_image
Diagram of a car seatbelt mechanism with a red arrow indicating the direction (no text or symbols present)natural_image
Line drawing of a car seat assembly with a close-up inset showing the blade being inserted (no text or symbols)natural_image
Line drawing of a car seat assembly (no text or symbols)natural_image
Illustration of a hand using a tool to adjust or install a car seatbelt, with a magnified inset showing the cable being inserted (no text or symbols present)natural_image
Illustration of a hand using a tool to lift a device into a seated vehicle (no text or symbols visible)
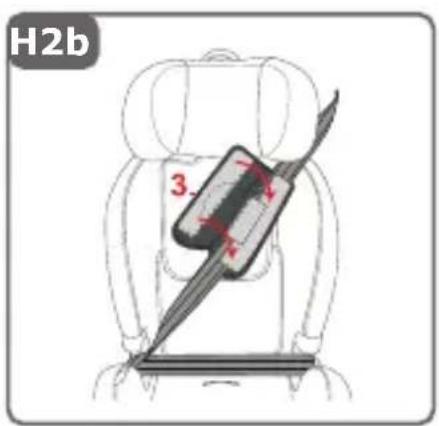
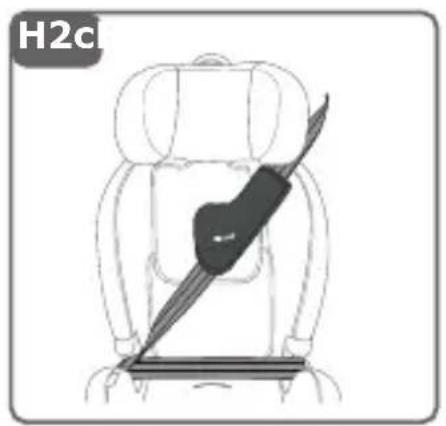
natural_image
Line drawing of a car seatbelt with a black bandage, labeled H2c (no text or symbols on the diagram itself)
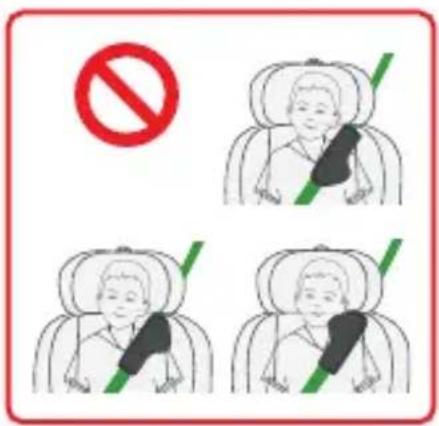
natural_image
Line drawing of a hand inserting a component into a device, with a red arrow indicating the insertion point (no text or symbols present)natural_image
Diagram showing a green checkmark on a curved surface with no text or symbols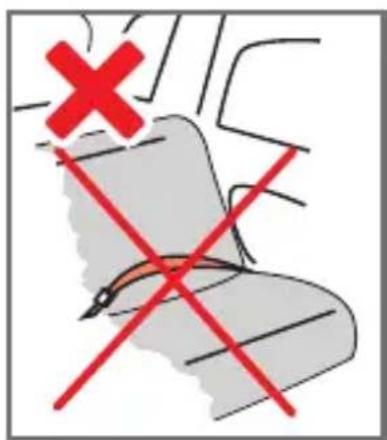

Montimi lejohet

Montimi nuk lejohet


Zbërtheni Top Tether-in
natural_image
Hand holding a clipboard with a red arrow pointing downward (no text or symbols)
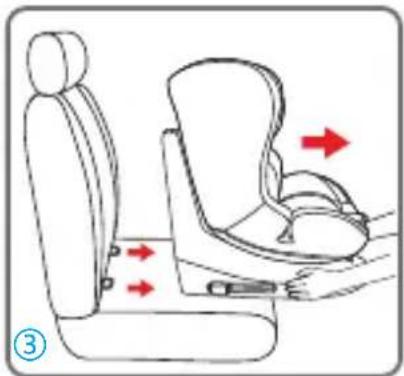
natural_image
Illustration of a car seat with red arrows indicating movement or force (no text or symbols)natural_image
Line drawing of a baby car seat with a hand adjusting the seat (no text or symbols)natural_image
Line drawing of a car seatbelt with red motion arrows indicating movement (no text or symbols)natural_image
Line drawing of a baby car seat with a green checkmark indicating the upper limit (no text or symbols present)
natural_image
Line drawing of a baby car seat with a green checkmark and circular emblem (no text or symbols)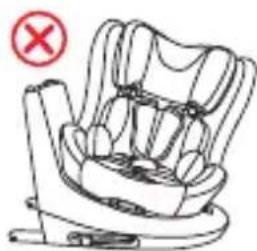
natural_image
Line drawing of a car seat with a red X mark indicating cancellation (no text or symbols present)natural_image
Diagram of a car interior showing a seatbelt, seatbelt connector, and red arrows indicating movement or force (no text or symbols)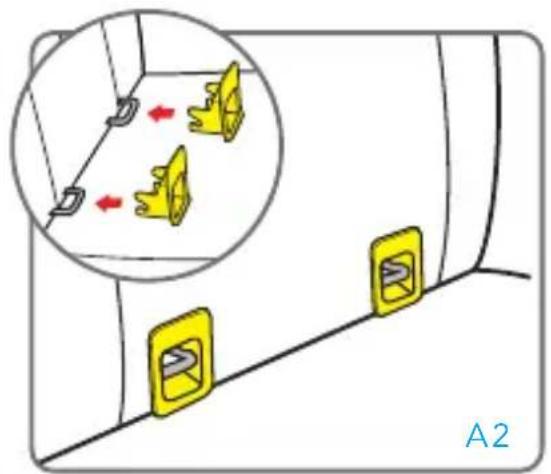
natural_image
Diagram showing a vehicle interior with yellow directional arrows and a magnified inset of two yellow objects (no text or symbols)

MONTIMI NË MAKINË
natural_image
Two line drawings of a car seat assembly, one showing internal components and the other showing a highlighted seat with a red arrow (no text or symbols)natural_image
Line drawing of a baby car seat with a magnified inset showing the seat being adjusted for size (no text or symbols)
natural_image
Two circular icons showing a person sleeping with a curved line and a hand, no text or symbols present.natural_image
Illustration of a hand using a tool to lift a cable, showing red arrows indicating direction (no text or symbols)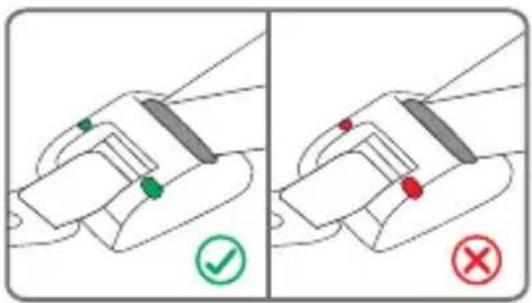
natural_image
Line drawing of a car seat with a red accent marking on the seat (no text or symbols)natural_image
Illustration of a hand holding a small object with a red arrow indicating direction, no text or symbols presentnatural_image
Line drawing of a baby car seat with a red arrow indicating the seatbelt (no text or symbols present)natural_image
Line drawing of a baby car seat with a magnified inset showing the seatbelt adjustment (no text or symbols)

natural_image
Diagram of a vehicle interior with yellow switches and a magnified inset showing two yellow switches (no text or symbols)
natural_image
Illustration of a hand using a tool to lift a curved blade, with red arrows indicating direction (no text or symbols)
natural_image
Line drawing of a car seat with seats and seatbelt, no text or symbols presentnatural_image
Illustration of a hand holding a small mechanical component with a red arrow indicating direction (no text or symbols)natural_image
Line drawing of a baby car seat with a red arrow indicating the seatbelt (no text or symbols present)
natural_image
Two-panel illustration showing hands holding red and green bars with a tool, labeled D3D4 (no text or symbols on the diagrams themselves)natural_image
Line drawing of a child seated in a car seat, no text or symbols present
natural_image
Illustration of a child wearing a seatbelt and red belt, sitting inside an airplane (no text or symbols)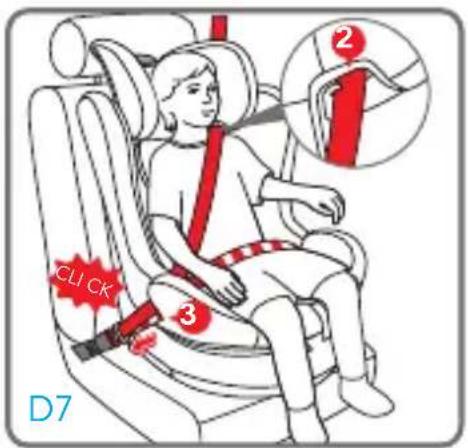
natural_image
Illustration of a hand pressing down on a curved object with red directional arrows indicating movement or pressure (no text or symbols)natural_image
Illustration of a child seated in a car seat with red safety belt and red arrow indicating pressure point (no text or symbols)natural_image
Line drawing of a car seat with a magnified inset showing the seat being adjusted for a finger (no text or symbols present)

natural_image
Diagram of a car interior showing seat, seatbelt, and seatbelt with red arrows indicating movement or force (no text or symbols)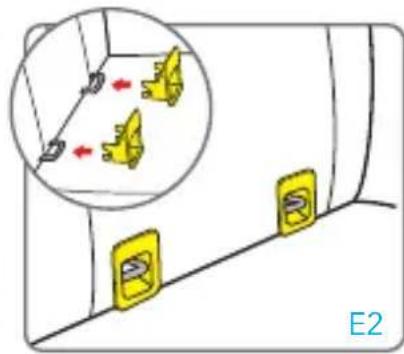
natural_image
Diagram showing a door with yellow clip switches and a magnified inset of two yellow clip switches (no text or symbols)natural_image
Line drawing of a car seat with a red X mark indicating no text or symbols on the seat itself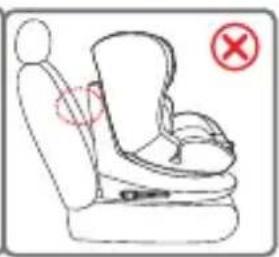
natural_image
Line drawing of a car seat with a red circle indicating a location or safety symbol (no text or labels present)natural_image
Illustration of a hand using a tool to adjust or install a car seatbelt, with an inset showing the cable being adjusted (no text or symbols present)natural_image
Line drawing of a car seat assembly with a red arrow indicating rotation (no text or symbols)natural_image
Diagram of a car seatbelt with a red arrow indicating clockwise motion (no text or symbols)natural_image
Line drawing of a car seat assembly with a magnified inset showing a finger insertion (no text or symbols)natural_image
Line drawing of a car comfort seat with labeled parts G1 and G2 (no text or symbols on the diagram itself)
natural_image
Diagram of a car seatbelt mechanism with a red arrow indicating the direction (no text or symbols present)natural_image
Line drawing of a car seat with a close-up inset showing the right-hand rule for adjusting the seat (no text or symbols present)natural_image
Line drawing of a car seat assembly (no text or symbols)natural_image
Illustration of a hand fastening a car seatbelt, showing the cable being inserted and adjusting its seatbelt (no text or symbols present)natural_image
Illustration of a hand using a tool to lift a car seat, no text or symbols present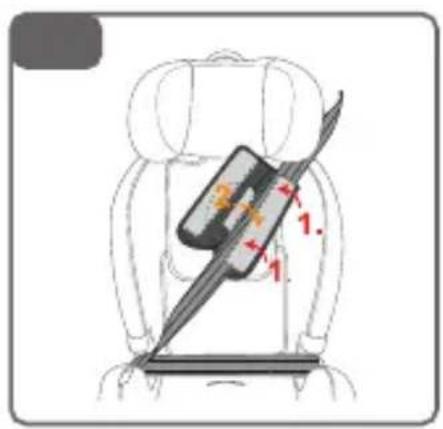
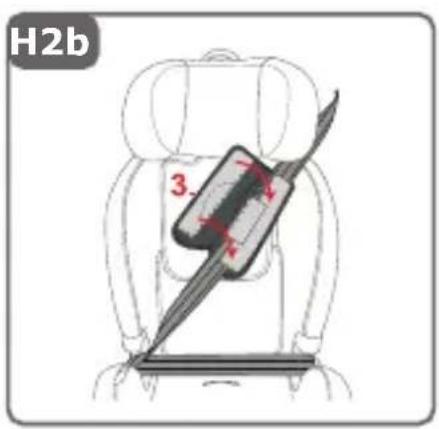
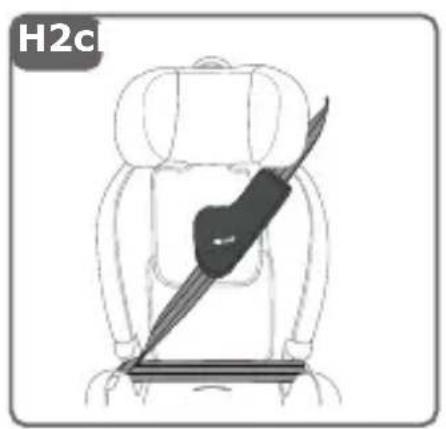
natural_image
Line drawing of a car seatbelt with a black bandage and feather accessory (no text or symbols)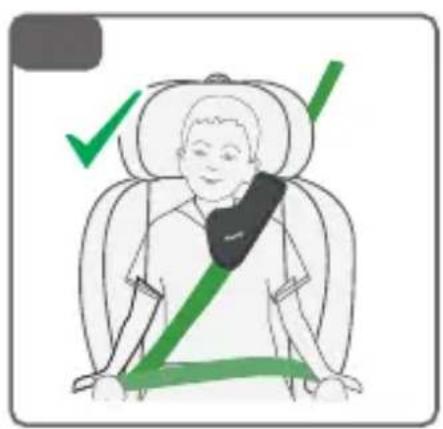

MONTIMI / ÇMONTIMI I MBULESËS
Heqja e mbulesës
natural_image
Line drawing of a hand inserting into a device into a container, with a red arrow indicating the insertion point (no text or symbols present)م Expected (i-Size) م Expected (i-Size) في Components 1. I-Size: I-Size, Exporting Software (I-Size), Exporting Software (I-Size), Exporting Software (I-Size), Exporting Software (I-Size), Exporting Software (I-Size), Exporting Software (I-Size), Exporting Software (I-Size), Exporting Software (I-Size), Exporting Software (I-Size), Exporting Software (I-Size), Exporting Software (I-Size), Exporting Software (I-Size), Exporting Software (I-Size), Exporting Software(1).
natural_image
Diagram showing a green checkmark on a curved surface with no readable text or symbols
التركيب المسموح به
natural_image
Line drawing of a car seat with red directional arrows indicating movement or force (no text or symbols)
natural_image
Hand holding a clipboard with a red arrow pointing downward (no text or symbols)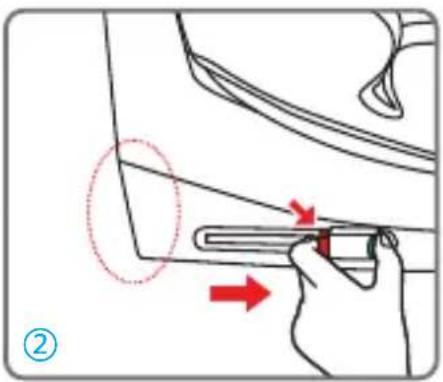

natural_image
Line drawing of a car seat assembly with arrows indicating movement or force (no text or symbols)natural_image
Line drawing of a baby car seat with a hand adjusting the seatbelt (no text or symbols)• .فقط,
•(1.2.3
• 1 فقط
natural_image
Line drawing of a car seatbelt with red arrows indicating movement or adjustment (no text or symbols)natural_image
Line drawing of a baby car seat with a green checkmark indicating the number of seats (no text or symbols present)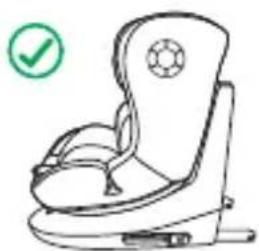
natural_image
Line drawing of a baby car seat with a green checkmark indicating selection (no text or symbols on the chair itself)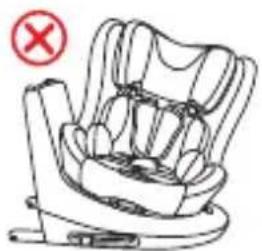
natural_image
Line drawing of a car seat with a red X mark indicating cancellation (no text or symbols present)natural_image
Diagram showing two yellow objects on a wall with red arrows indicating movement, labeled A2 (no text or symbols on objects)
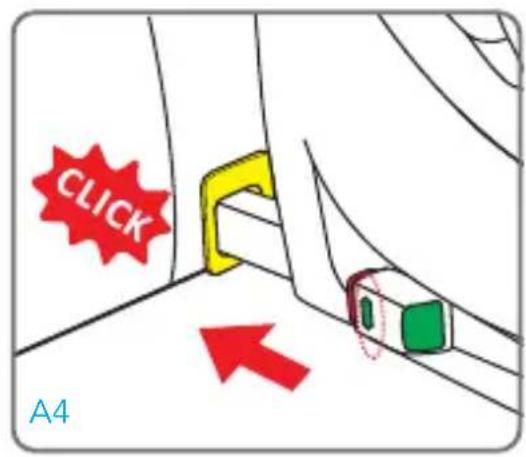
التركيب في السيارة
natural_image
Line drawing of a car seat assembly (no text or symbols)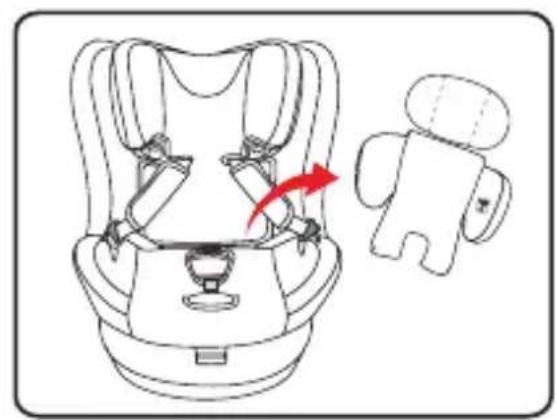
natural_image
Line drawing of a car seat assembly with a red arrow indicating motion (no text or symbols)natural_image
Line drawing of a car seat with a magnified inset showing hand positioning and red arrows indicating movement (no text or symbols)
natural_image
Two circular icons showing a person relaxing with a curved arm and a small boat, no text or symbols present.natural_image
Line drawing of a car seat with a red X mark indicating no text or symbols on the diagram itself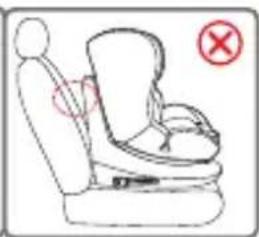
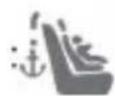
natural_image
Illustration of a hand using a tool to lift a cable, showing red arrows indicating direction (no text or symbols)
natural_image
Line drawing of a car seat assembly with a red accent marking on the upper side (no text or symbols)natural_image
Illustration of a hand holding a buckle buckle with a red arrow indicating the point of change (no text or symbols present)natural_image
Line drawing of a baby car seat with a red arrow indicating the seatbelt (no text or symbols present)natural_image
Diagram showing a hand holding a device with directional arrows indicating movement or force (no text or symbols present)التركيب في السيارة
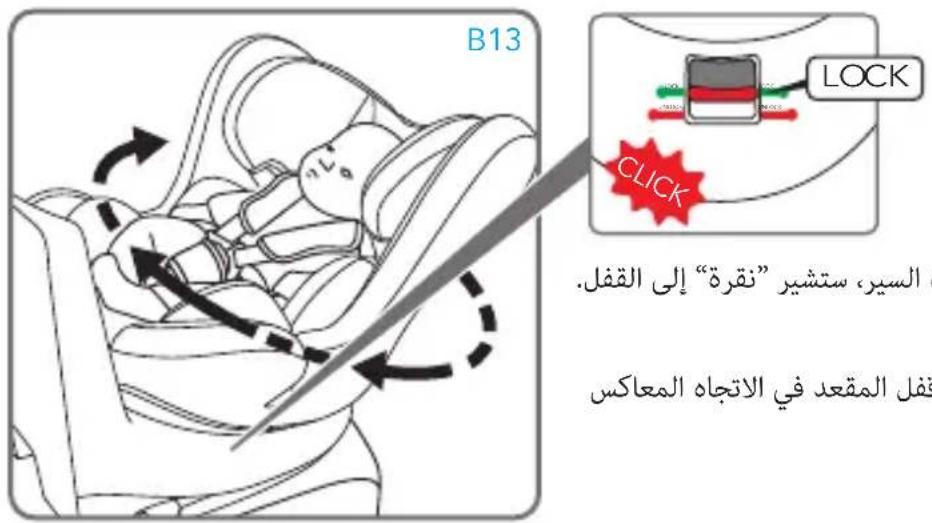
natural_image
Line drawing of a baby car seat with a magnified inset showing the seat being adjusted for a finger (no text or symbols present)
natural_image
Diagram showing a door with yellow electrical outlets and two hanging yellow switches, one circled in red (no text or symbols)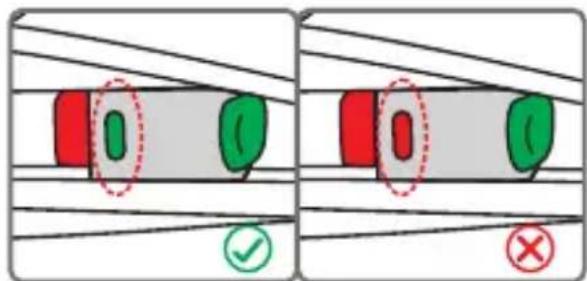
natural_image
Line drawing of a car seat with a red X mark indicating no text or symbols on the diagram itself
natural_image
Line drawing of a car seat with a red circle and a red X mark indicating no text or symbols on the seat itself.Oman Expected Syria.
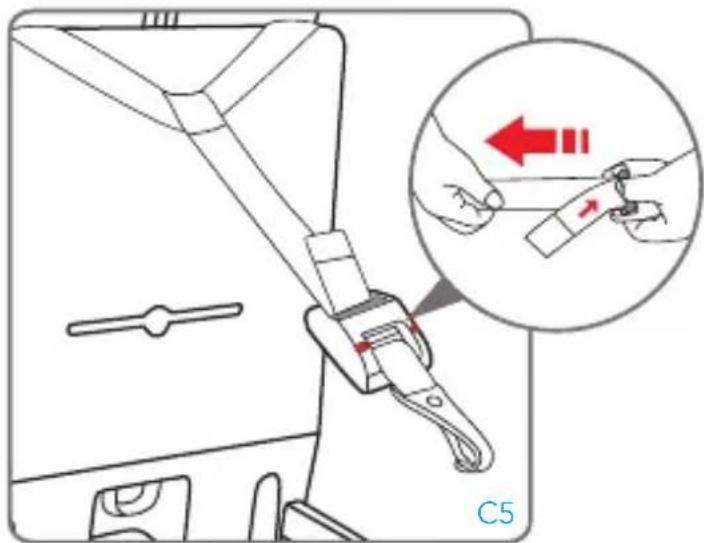
natural_image
Illustration of a hand using a tool to lift a cable, with red arrows indicating direction (no text or symbols)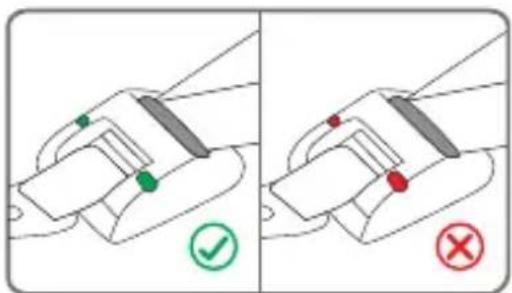
natural_image
Line drawing of a car seat with seats and seatbelt, no text or symbols present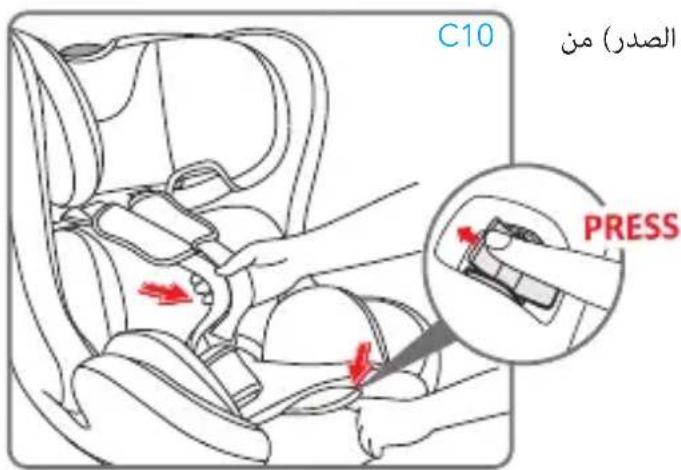
natural_image
Illustration of a medical procedure showing hand positioning and insertion of a device (no text or symbols)natural_image
Line drawing of a baby car seat with a red arrow indicating the seatbelt (no text or symbols present)natural_image
Diagram showing airflow or movement between two mechanical components, one with red center and blue arrows indicating direction (no text or symbols)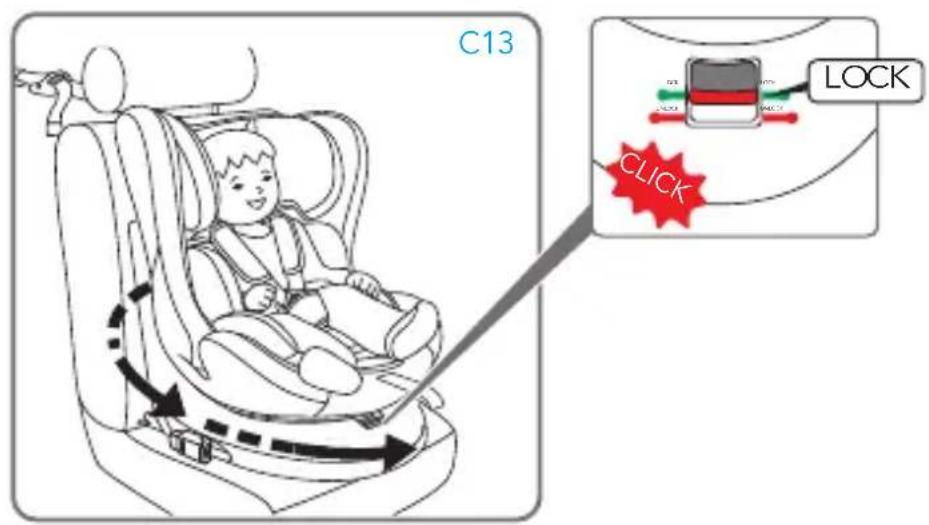
natural_image
Illustration of hands using a tool to tie red and green strips (no text or symbols)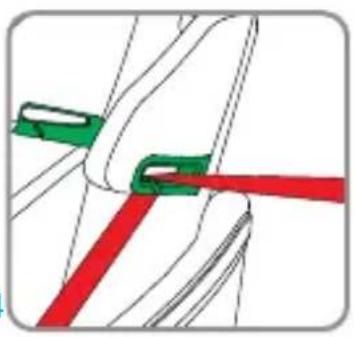
natural_image
Diagram of two colored cable or wire components with green and red connectors, no text or symbols presentnatural_image
Line drawing of a child seated in a car seat, no text or symbols present
natural_image
Illustration of a child wearing a seatbelt and red belt, sitting inside an airplane (no text or symbols)
natural_image
Illustration of a hand pressing down on a curved object with red arrows indicating downward motion (no text or symbols)natural_image
Illustration of a child seated in a car seat with red safety belt and red arrow indicating pressure point (no text or symbols)natural_image
Line drawing of a car seat with a magnified inset showing the seat being adjusted for a hand (no text or symbols present)

natural_image
Diagram of a car interior showing seat, seatbelt, and seatbelt with red arrows indicating movement or force (no text or symbols)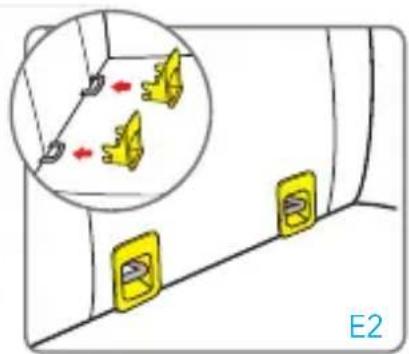
natural_image
Diagram showing two yellow objects on a wall with red arrows indicating movement, enclosed in an inset circle (no text or symbols)natural_image
Simple diagram of a cylindrical object with red and green sections, marked with a red dashed oval and a green checkmark (no text or symbols)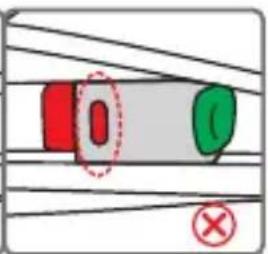
natural_image
Line drawing of a car seat with a red X mark indicating no text or symbols on the diagram itself
natural_image
Line drawing of a car seat with a red X mark indicating no text or symbols on the diagram itselfnatural_image
Illustration of a hand using a tool to adjust or install a device, showing a red arrow indicating the process (no text or symbols present)natural_image
Line drawing of a car seat assembly with a red arrow indicating rotation (no text or symbols)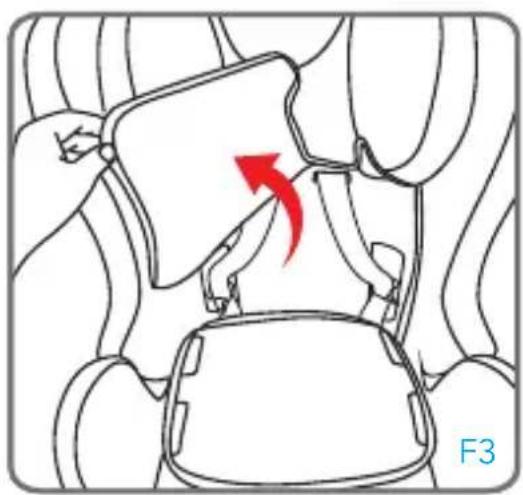
natural_image
Diagram of a car seatbelt with a red arrow indicating clockwise motion (no text or symbols)natural_image
Line drawing of a car seat assembly with an inset showing a close-up of the handle (no text or symbols)natural_image
Line drawing of a car comfort seat with labeled parts G1 and G2 (no text or symbols on the diagram itself)
natural_image
Diagram of a car seatbelt mechanism with a red arrow indicating the direction (no text or symbols present)natural_image
Line drawing of a car seat with a close-up inset showing the right-hand rule for adjusting the seat (no text or symbols present)natural_image
Line drawing of a car seat assembly (no text or symbols)natural_image
Illustration of a hand fastening a seatbelt with a magnified inset showing the cable being inserted (no text or symbols)natural_image
Illustration of a person using a hairdryer to clean the head (no text or symbols visible)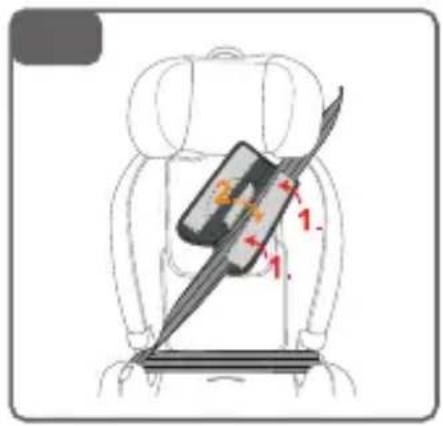
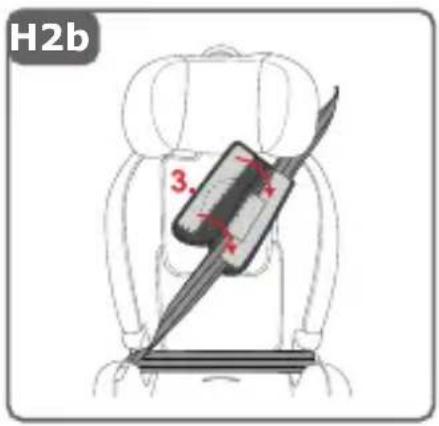
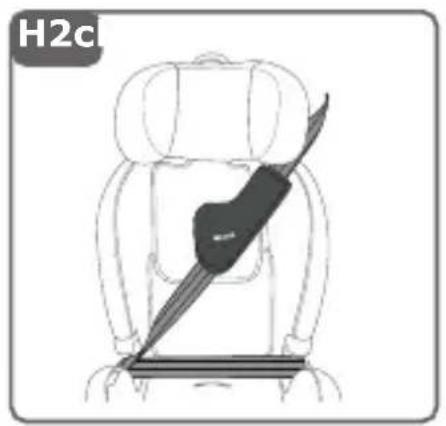
natural_image
Line drawing of a car seatbelt with a knife inserted, labeled H2c (no text or symbols on the diagram itself)

natural_image
Icon depicting a person sitting in a chair, enclosed in a square frame (no text or symbols)ECE R129-03
IT LISTA VEICOLI
EN VEHICLE LIST
FR LISTE DES VOITURES
DE AUTOLISTE
ES LISTA AUTOMÓVILES
PT LISTA DE AUTOMÓVEIS
SQ LISTA E AUTOMJETEVE
EL KATAΛΟΓΟΣ ΑΥΤΟΚΙΝΗΤΩΝ
RU СПИСОК АВТОТРАНСПОРТНЫХ СРЕДСТВ
قائمة pesticides
AR
ISO/R2 - SO/F2X
ISO/B2
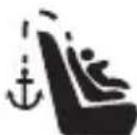

natural_image
Simple icon of a person sitting in a car seat, enclosed in a rounded square frame (no text or symbols)
natural_image
Simple icon of a person sitting in a car seat, enclosed in a rounded square frame (no text or symbols)Cars approved for the FP360 quick i-Size car seat, provided the car is equipped with the ISOFIX system.
- FP360 quick i-Size is a universal child restraint device. It is approved under the R129 regulation for use in all vehicle positions marked with the i-Size logo. The FP360 quick i-Size car seat is also suitable for attachment in the seating positions of the cars listed below, provided that the approved ISOFIX points are present and available.
-
The seating positions in other cars may also be suitable to accommodate this child restraint device, however we have not yet tested these cars in conjunction with the FP360 quick i-Size. If in doubt, consult either the enhanced child restraint system manufacturer or the retailer.
-
The ISOFIX anchoring points on the passenger seat (position 1) are normally available as an option, therefore, this may or may not be the case for this position, depending on the model. Installation on the rear passenger seat of the car may limit the space for the passenger in the front seat.
- Always check the compatibility of the "FP360 quick i-Size" car seat with your car to verify that the available space is adequate.
- Please note that this list undergoes ongoing revision procedures, with changes and additions of vehicles accordingly.
- The up to date list can be consulted on our web site: www. foppapedretti.it

Warning: Do NOT use on a passenger seat fitted with an activated front airbag.
INFORMATION
Please consult with the vehicle manufacturer regarding access to ISOFIX points.
WARNING: before purchasing, consult the vehicle Use and Maintenance Guide to ensure the ISOFIX anchor is present, as this could be an optional.

natural_image
Simple icon of a person sitting in a chair, no text or symbols present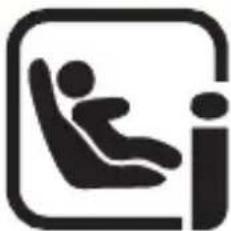
natural_image
Simple icon of a person sitting in a car seat, enclosed in a rounded square frame (no text or symbols)
natural_image
Simple icon of a person sitting in a car seat, enclosed in a rounded square frame (no text or symbols)
natural_image
Simple icon of a person sitting in a car seat, enclosed in a rounded square frame (no text or symbols)
natural_image
Simple icon of a person sitting in a car seat, enclosed in a rounded square frame (no text or symbols)
natural_image
Icon depicting a person sitting in a car seat, enclosed in a rounded square frame (no text or symbols)
natural_image
Simple icon of a person sitting in a car seat, enclosed in a rounded square frame (no text or symbols)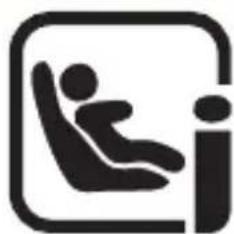
natural_image
Simple icon of a person sitting in a car seat, enclosed in a rounded square frame (no text or symbols)| Since ISC |  |  |  |  | ||
| ALFA ROMEO | ||||||
| ALFA ROMEO GIULIA | 2016 NO | YES | NO | YESYES | ||
| ALFA ROMEO GIULIETTA | 2010 NO | YES | NO | YESYES | ||
| 156 SPORTWAGON/CROSSWAGON Q4 | 1997-2006 NO | YES | NO | YESYES | ||
| ALFA ROMEO 159 | 2005-2011 NO | YES | NO | YESYES | ||
| GT SPORTCOUPE | 2004-2011 NO | YES | NO | YESYES | ||
| ALFA ROMEO MITO | 2008 YES | YES | NO | YESYES | ||
| ALFA ROMEO STELVIO | 2017 NO | YES | NO | YESYES | ||
| AUDI | ||||||
| AUDI A1 (FACELIFT 2015) | 2015 NO | YES | NO | YESYES | ||
| AUDI A1 SPORTBACK | 2011 NO | YES | NO | YESYES | ||
| AUDI A3 | 2003 NO | YES | NO | YESYES | ||
| AUDI A3 CABRIO | 2008 YES | YES | NO | YESYES | ||
| AUDI A3 SEDAN | 2013 NO | YES | NO | YESYES | ||
| AUDI A3 SPORTBACK (8V) | 2004 NO | YES | NO | YESYES | ||
| AUDI A4 | 2004 NO | YES | NO | YESYES | ||
| AUDI A4 ALLROAD | 2009 YES | YES | NO | YESYES | ||
| AUDI A4 AVANT (FACELIFT 2011) | 2011 NO | YES | NO | YESYES | ||
| AUDI A5 | 2007 NO | YES | NO | YESYES | ||
| AUDI A5 CABRIO | 2009 NO | YES | NO | YESYES | ||
| AUDI A5 SPORTBACK | 2009 NO | YES | NO | YESYES | ||
| AUDI A6 | 2010 NO | YES | NO | YESYES | ||
| AUDI A6 ALLROAD | 2006 NO | YES | NO | YESYES | ||
| AUDI A6 AVANT | 2005 NO | YES | NO | YESYES | ||
| AUDI A7 SPORTBACK | 2010 NO | YES | NO | YESYES | ||
| AUDI | ||||||
| A8 (4H) | 2005 NO | YES | NO | YESYES | ||
| AUDI Q2 | 2016 NO | YES | NO | YESYES | ||
| AUDI Q3 | 2011 NO | YES | NO | YESYES | ||
| Q5 | 2008-2017 NO | YES | NO | YESYES | ||
| Q5 | 2016 NO | YES | NO | YESYES | ||
| Q7 | 2005-2015 NO | YES | NO | YESYES | ||
| Q7 | 2015 NO | YES | NO | YESYES | ||
| AUDI TT COUPÈ | 2008 NO | YES | NO | YESYES | ||
| BENTLEY | ||||||
| BENTAYGA | 2015 NO | YES | NO | YESYES | ||
| CONTINENTAL GT | 2003 NO | YES | NO | YESYES | ||
| FLYING SPUR | 2013 NO | YES | NO | YESYES | ||
| MULSANNE | 2010 | NO | YES | NO | YESYES | |
| BMW | ||||||
| I3 | 2013 NO | YES | NO | YESYES | ||
| I8 | 2014 NO | YES | NO | YESYES | ||
| BMW SERIES 1 | 2005-2011 NO | YES | NO | YESYES | ||
| BMW SERIES 1 | 2012 NO | YES | NO | YESYES | ||
| BMW 2 ACTIVE TOURER | 2014 NO | YES | NO | YESYES | ||
| BMW SERIES 2 CABRIO | 2015 NO | YES | NO | YESYES | ||
| BMW SERIES 2 COUPÉ | 2013 NO | YES | NO | YESYES | ||
| BMW SERIES 2 GRAN TOURER | 2015 NO | YES | NO | YESYES | ||
| BMW SERIES 3 | 2005-2012 NO | YES | NO | YESYES | ||
| BMW SERIES 3 | 2011 no | YES | NO | YESYES | ||
| BMW SERIES 3 GT (GRAN TURISMO) | 2013 no | YES | NO | YESYES | ||
| BMW SERIES 3 TOURING | 2008-2012 no | YES | NO | YESYES | ||
| BMW | ||||||
| BMW SERIES 3 TOURING | 2012 NO | YES | NO | YESYES | ||
| BMW SERIES 4 CABRIO | 2014 NO | YES | NO | YESYES | ||
| BMW SERIES 4 COUPÉ | 2013 NO | YES | NO | YESYES | ||
| BMW SERIES 4 GRAN COUPÉ | 2014 NO | YES | NO | YESYES | ||
| BMW SERIES 5 | 2010 NO | YES | NO | YESYES | ||
| BMW SERIES 5 TOURING | 2010 NO | YES | NO | YESYES | ||
| BMW SERIES 6 CABRIO | 2004 NO | YES | NO | YESYES | ||
| BMW SERIES 6 COUPÉ | 2003 NO | YES | NO | YESYES | ||
| BMW SERIES 6 GRAN COUPÉ | 2011 NO | YES | NO | YESYES | ||
| BMW SERIES 6 GRAN TURISMO | 2017 NO | YES | NO | YESYES | ||
| BMW SERIES 7 | 2015 NO | YES | NO | YESYES | ||
| X1 | 2009-2015 NO | YES | NO | YESYES | ||
| X1 | 2015 NO | YES | NO | YESYES | ||
| X2 | 2017 NO | YES | NO | YESYES | ||
| X3 | 2003-2010 NO | YES | NO | YESYES | ||
| X3 | 2010 NO | YES | NO | YESYES | ||
| X4 | 2014 NO | YES | NO | YESYES | ||
| X5 | 2006-2013 NO | YES | NO | YESYES | ||
| X5 | 2013 NO | YES | NO | YESYES | ||
| X6 | 2006 NO | YES | NO | YESYES | ||
| CHEVROLET | ||||||
| AVEO | 2008-2011 NO | YES | NO | YESYES | ||
| AVEO | 2011-2015 NO | YES | NO | YESYES | ||
| CAPTIVA | 2006-2011 NO | YES | NO | YESYES | ||
| CAPTIVA | 2011-2015 NO | YES | NO | YESYES | ||
| CRUZE | 2009-2015 NO | YES | NO | YESYES | ||
| CHEVROLET | ||||||
| MATIZ | 2005-2009 NO | YES | NO | YESYES | ||
| ORLANDO(KL1Y) | 2010-2015 NO | YES | NO | YESYES | ||
| SPARK | 2009-2015 NO | YES | NO | YESYES | ||
| TRAX(KL1B) | 2013-2015 NO | YES | NO | YESYES | ||
| VOLT(D1JCI) | 2011-2014 NO | YES | NO | YESYES | ||
| CITROEN | ||||||
| BERLINGO | 2008 YES | YES | NO | YESYES | ||
| C-CROSSER(V) | 2007-2013 NO | YES | NO | YESYES | ||
| C-ELYSÉE | 2016 NO | YES | NO | YESYES | ||
| C-ZERO | 2010 NO | YES | NO | YESYES | ||
| C1 | 2005-2014 NO | YES | NO | YESYES | ||
| C1 | 2014 NO | YES | NO | YESYES | ||
| C3 | 2009-2016 NO | YES | NO | YESYES | ||
| C3 | 2016 NO | YES | NO | YESYES | ||
| C3 PICASSO | 2008 NO | YES | NO | YESYES | ||
| C4 | 2004-2010 NO | YES | NO | YESYES | ||
| C4 | 2010 NO | YES | NO | YESYES | ||
| C4 AIRCROSS | 2012 NO | YES | NO | YESYES | ||
| C4 CACTUS | 2014 NO | YES | NO | YESYES | ||
| C4 PICASSO | 2007-2013 NO | YES | YES | YESYES | ||
| C4 PICASSO (U) | 2013 NO | YES | YES | YESYES | ||
| E-MEHARI | 2016 NO | YES | YES | YESYES | ||
| C4 GRAND PICASSO | 2013 NO | YES | YES | YESYES | ||
| C5 | 2004-2008 NO | YES | YES | YESYES | ||
| C5 | 2008 NO | YES | YES | YESYES | ||
| DS3(S) | 2009 NOSince ISO |  | YES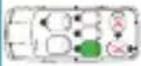 | NO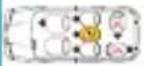 | YESYES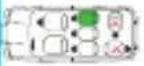 | |
| CITROEN | ||||||
| DS4(N) | 2011 NO | YES | NO | YESYES | ||
| DS5(K) | 2011 NO | YES | NO | YESYES | ||
| NEMO(A) | 2007 NO | YES | NO | YESYES | ||
| DACIA | ||||||
| DOKKER (SD) | 2012 NO | YES | NO | YES | YES | |
| DUSTER | 2010 NO | YES | NO | YESYES | ||
| LODGY | 2012 NO | YES | NO | YESYES | ||
| LOGAN | 2008-2012 NO | YES | NO | YESYES | ||
| LOGAN | 2013 NO | YES | NO | YESYES | ||
| SANDERO | 2008-2013 NO | YES | NO | YESYES | ||
| SANDERO | 2012 NO | YES | NO | YESYES | ||
| FIAT | ||||||
| FIAT 500 | 2007 NO | YES | NO | YESYES | ||
| FIAT 500 CABRIO | 2009 NO | YES | NO | YESYES | ||
| FIAT 500 L | 2012 NO | YES | NO | YESYES | ||
| FIAT 500 L LIVING | 2013 NO | YES | NO | YESYES | ||
| FIAT 500X | 2014 NO | YES | NO | YESYES | ||
| BRAVO | 2007-2015 NO | YES | NO | YESYES | ||
| CHROMA | 2005-2011 NO | YES | NO | YESYES | ||
| B-MAX | 2009 NO | YES | NO | YESYES | ||
| FIAT FULLBACK | 2016 NO | YES | NO | YESYES | ||
| FIAT PANDA | 2003-2013 NO | YES | NO | YESYES | ||
| FIAT PANDA | 2014 NO | YES | NO | YESYES | ||
| FIAT PUNTO | 2011 NO | YES | NO | YESYES | ||
| GRANDE PUNTO(199) | 2005-2012 NO | YES | NO | YESYES | ||
| Since ISOFIX | ||||||
| FIAT | ||||||
| FIAT PUNTO EVO | 2009-2013 NOYESNOYESYES | |||||
| FIAT SEDICI | 2006-2015 NO | YES | NO | YESYES | ||
| FIAT QUBO(255) | 2008 NO | YES | NO | YESYES | ||
| FIAT TIPO | 2015 NO | YES | NO | YESYES | ||
| FIAT TIPO SW | 2016 NO | YES | NO | YESYES | ||
| FIAT FREEMONT | 2011 NO | YES | NO | YESYES | ||
| FORD | ||||||
| B-MAX | 2012 NOYESNOYESYES | |||||
| C-MAX | 2007-2010 NO | YES | NO | YESYES | ||
| C-MAX | 2010 NO | YES | NO | YESYES | ||
| ECOSPORT | 2013 NO | YES | NO | YESYES | ||
| EDGE | 2016 NO | YES | NO | YESYES | ||
| FIESTA | 2008 NO | YES | NO | YESYES | ||
| FOCUS | 2003-2008 NOYESNOYESYES | |||||
| FOCUS | 2007-2011 NO | YES | NO | YESYES | ||
| FOCUS TURMIER | 2011 NO | YES | NO | YESYES | ||
| FOCUS STATION WAGON | 2011 NO | YES | NO | YESYES | ||
| GALAXY | 2006-2015 NO | YES | NO | YESYES | ||
| KA | 2008 NO | YES | NO | YESYES | ||
| KUGA | 2012 NOYESNOYESYES | |||||
| MONDEO | 2007-2014 NO | YES | NO | YESYES | ||
| MONDEO | 2014 NO | YES | NO | YESYES | ||
| MONDEO S WAGON | 2014 NO | YES | NO | YESYES | ||
| RANGER | 2011 NO | YES | NO | YESYES | ||
| S-MAX | 2006-2015 NO | YES | NO | YESYES | ||
| S-MAX | 2015 NO | YES | NO | YESYES | ||
| TOURNEO | 2012 NO | YES | NO | YESYES | ||
| Since ISC |  | 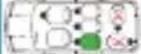 | 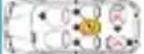 |  | ||
| HONDA | ||||||
| ACCORD (FACELIFT 2011) | 2008-2015 NO | YES | NO | YESYES | ||
| CIVIC | 2005-2012 NO | YES | NO | YESYES | ||
| CIVIC | 2012 NO | YES | NO | YESYES | ||
| CR-V | 2007-2012 NO | YES | NO | YESYES | ||
| CR-V | 2010-2013 NO | YES | NO | YESYES | ||
| CR-V | 2012 NO | YES | NO | YESYES | ||
| HR-V | 2015 NO | YES | NO | YESYES | ||
| JAZZ | 2008 NO | YES | NO | YESYES | ||
| HYUNDAI | ||||||
| ACCENT | 2006-2009 NO | YES | NO | YESYES | ||
| COUPE | 2002-2009 NO | YES | NO | YESYES | ||
| ELANTRA | 2000-2007 NO | YES | NO | YESYES | ||
| GETZ | 2002-2009 NO | YES | NO | YESYES | ||
| H1 | 2007 NO | YES | NO | YESYES | ||
| I10 | 2008-2014 NO | YES | NO | YESYES | ||
| I10 | 2013 NO | YES | NO | YESYES | ||
| I20 | 2009 NO | YES | NO | YESYES | ||
| I20 COUPE | 2015 NO | YES | NO | YESYES | ||
| I30 | 2007-2012 NO | YES | NO | YESYES | ||
| I30 | 2012 NO | YES | NO | YESYES | ||
| I30 SW | 2008-2012 NO | YES | NO | YESYES | ||
| I30 SW | 2012 NO | YES | NO | YESYES | ||
| I30 SW | 2011 NO | YES | NO | YESYES | ||
| I40 SW | 2011 NO | YES | NO | YESYES | ||
| IX35(ELH) | 2009 NO | YES | NO | YESYES | ||
| IONIQ | 2016 NO | YES | NO | YESYES | ||
| HYUNDAI | ||||||
| KONA | 2017 NO | YES | NO | YESYES | ||
| SANTA Fe | 2012 NO | YES | NO | YESYES | ||
| TUCSON | 2004-2010 NO | YES | NO | YESYES | ||
| VELOSTER(FS) | 2011-2014 NO | YES | NO | YESYES | ||
| INFINITI | ||||||
| EX | 2008-2013 NO | YES | NO | YESYES | ||
| FX | 2008-2013 NO | YES | NO | YESYES | ||
| G | 2008-2013 NO YES NO YES YES | |||||
| M | 2008-2013 NO | YES | NO | YESYES | ||
| Q50 | 2013 NO | YES | NO | YESYES | ||
| Q70 | 2014 NO | YES | NO | YESYES | ||
| QX50 | 2013 NO | YES | NO | YESYES | ||
| QX70 | 2013 NO | YES | NO | YESYES | ||
| JAGUAR | ||||||
| E-PACE | 2017 NO | YES | NO | YESYES | ||
| F-PACE | 2015 NO | YES | NO | YESYES | ||
| XE | 2014 NO | YES | NO | YESYES | ||
| XF | 2007-2015 NO | YES | NO | YESYES | ||
| XF (X260) | 2015 NO | YES | NO | YESYES | ||
| XF SPORTBRAKE | 2012 NO | YES | NO | YESYES | ||
| XJ | 2009 NO | YES | NO | YESYES | ||
| JEEP | ||||||
| CHEROKEE | 2008 NO | YES | NO | YESYES | ||
| COMPASS | 2006 NO | YES | NO | YESYES | ||
| GRAND CHEROKEE | 2010 NO | YES | NO | YESYES | ||
| RENEGADE | 2014 NOSince ISO |  | YES | NO | YESYES | |
| KIA | ||||||
| CARENS | 2006 NO | YES | NO | YESYES | ||
| CARNIVAL | 2006-2010 NO | YES | NO | YESYES | ||
| CEE'D | 2007-2012 NO | YES | NO | YESYES | ||
| CEE'D | 2012 NO | YES | NO | YESYES | ||
| CEE'D SW | 2007-2012 NO | YES | NO | YESYES | ||
| CEE'D SW | 2012 NO | YES | NO | YESYES | ||
| CERATO | 2004-2008 NO | YES | NO | YESYES | ||
| MAGENTIS | 2006-2009 NO | YES | NO | YESYES | ||
| NIRO | 2016 NO | YES | NO | YESYES | ||
| OPIRUS | 2003-2008 NO | YES | NO | YESYES | ||
| OPTIMA | 2016 NO | YES | NO | YESYES | ||
| OPTIMA SPORTSWAGON | 2016 NO | YES | NO | YESYES | ||
| PICANTO(SA) | 2008-2011 NO | YES | NO | YESYES | ||
| PICANTO | 2011 NO | YES | NO | YESYES | ||
| PRO CEE'D | 2008-2011 NO | YES | NO | YESYES | ||
| RIO | 2005-2009 NO | YES | NO | YESYES | ||
| RIO | 2011 NO | YES | NO | YESYES | ||
| SORENTO | 2009 NO | YES | NO | YESYES | ||
| SOUL | 2009-2014 NO | YES | NO | YESYES | ||
| SOUL | 2014 NO | YES | NO | YESYES | ||
| SPORTAGE | 2010-2015 NO | YES | NO | YESYES | ||
| SPORTAGE | 2016 NO | YES | NO | YESYES | ||
| SONIC | 2017 NO | YES | NO | YESYES | ||
| VENGA | 2010 NOSince ISC |  | YES | NO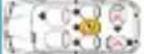 | YESYES | |
| LANCIA | ||||||
| YPSILON | 2007 NO | YES | NO | YES | YES | |
| LAND ROVER | ||||||
| DISCOVERY | 2009 NO | YES | NO | YESYES | ||
| DISCOVERY | 2014 NO | YES | NO | YESYES | ||
| FREELANDER II | 2006-2015 NO | YES | NO | YESYES | ||
| RANGE ROVER | 2012 NO | YES | NO | YESYES | ||
| RANGE ROVER EVOQUE | 2011 NO | YES | NO | YESYES | ||
| RANGE ROVER EVOQUE CABRIO | 2015 NO | YES | NO | YESYES | ||
| RANGE ROVER SPORT | 2013 NO | YES | NO | YESYES | ||
| RANGE ROVER VELAR | 2017 NO | YES | NO | YESYES | ||
| LEXUS | ||||||
| CT | 2010 NO | YES | NO | YESYES | ||
| GS | 2012 NO | YES | NO | YESYES | ||
| IS | 2005-2012 NO | YES | NO | YESYES | ||
| IS | 2013 NO | YES | NO | YESYES | ||
| LC | 2017 NO | YES | NO | YESYES | ||
| LS | 2009-2012 NO | YES | NO | YESYES | ||
| NX | 2014 NO | YES | NO | YESYES | ||
| RC | 2015 NO | YES | NO | YESYES | ||
| RX | 2003-2009 NO | YES | NO | YESYES | ||
| RX | 2009 NO | YES | NO | YESYES | ||
| RX | 2015 NO | YES | NO | YESYES | ||
| MAZDA | ||||||
| MAZDA2 | 2003-2007 NO | YES | NO | YES | YES | |
| MAZDA2 | 2007-2014 NO | YES | NO | YES | YES | |
| MAZDA2 | 2014 NO | YES | NO | YES | YES | |
| MAZDA | ||||||
| MAZDA3 | 2009-2013 NO | YES | NO | YESYES | ||
| MAZDA3 | 2013 NO | YES | NO | YESYES | ||
| MAZDA5 | 2005-2010 NO | YES | NO | YESYES | ||
| MAZDA5 | 2000-2013 NO | YES | NO | YESYES | ||
| MAZDA6 | 2002-2008 NO | YES | NO | YESYES | ||
| MAZDA6 | 2008-2013 NO | YES | NO | YESYES | ||
| MAZDA6 | 2013 NO | YES | NO | YESYES | ||
| CX-3 | 2015 NO | YES | NO | YESYES | ||
| CX-5 | 2012 NO | YES | NO | YESYES | ||
| CX-7 | 2007-2013 NO | YES | NO | YESYES | ||
| MX 5 (5) | 2005 NO | YES | NO | YESYES | ||
| RX 8 | 2003-2012 NO | YES | NO | YESYES | ||
| MERCEDES | ||||||
| A (W169) | 2005-2013 NO | YES | NO | YESYES | ||
| A(W176) | 2012 NO | YES | NO | YESYES | ||
| B | 2005-2013 NO | YES | NO | YESYES | ||
| B | 2011 NO | YES | NO | YESYES | ||
| C | 2007-2014 NO | YES | NO | YESYES | ||
| C | 2013 NO | YES | NO | YESYES | ||
| C CABRIO | 2016 NO | YES | NO | YESYES | ||
| C COUPÈ | 2011 NO | YES | NO | YESYES | ||
| C SW | 2014 NO | YES | NO | YESYES | ||
| CLA | 2013 NO | YES | NO | YESYES | ||
| CLA SHOOTING BRAKE | 2015 NO | YES | NO | YESYES | ||
| CLS | 2010 NO | YES | NO | YESYES | ||
| CLS SHOOTING BRAKE | 2012 NO | YES | NO | YESYES | ||
| MERCEDES | ||||||
| E | 2009 NO | YES | NO | YESYES | ||
| E | 2016 NO | YES | NO | YESYES | ||
| E CABRIO | 2010 NO | YES | NO | YESYES | ||
| E COUPÈ | 2009 NO | YES | NO | YESYES | ||
| E SW | 2009 NO | YES | NO | YESYES | ||
| GLA | 2013 NO | YES | NO | YESYES | ||
| GLC | 2015 NO | YES | NO | YESYES | ||
| GLC COUPÈ | 2016 NO | YES | NO | YESYES | ||
| GLE | 2015 NO | YES | NO | YESYES | ||
| GLE COUPÈ | 2015 NO | YES | NO | YESYES | ||
| GLS | 2015 NO | YES | NO | YESYES | ||
| GLK | 2008 NO | YES | NO | YESYES | ||
| MAYBACH S | 2014 NO | YES | NO | YESYES | ||
| ML(W164) | 2005-2012 NO | YES | NO | YESYES | ||
| R(W251/V251) | 2005-2013 NO | YES | NO | YESYES | ||
| S | 2013 NO | YES | NO | YESYES | ||
| S CABRIO | 2015 NO | YES | NO | YESYES | ||
| S COUPÈ | 2014 NO | YES | NO | YESYES | ||
| SL | 2011 NO | YES | NO | YESYES | ||
| SLC | 2016 NO | YES | NO | YESYES | ||
| X | 2017 NO | YES | NO | YESYES | ||
| MINI - BMW | ||||||
| CABRIO | 2009 NO | YES | NO | YESYES | ||
| CLUBMAN | 2007-2014 NO | YES | NO | YESYES | ||
| CLUBMAN (R55) | 2015 NO | YES | NO | YESYES | ||
| COUNTRYMAN | 2010 NO | YES | NO | YESYES | ||
| MINI - BMW | ||||||
| COUNTRYMAN | 2016 NO | YES | NO | YESYES | ||
| MINI | 2006-2014 NO | YES | NO | YESYES | ||
| MINI (F55) | 2013 NO | YES | NO | YESYES | ||
| MINI (F56) | 2014 NO | YES | NO | YESYES | ||
| MITSUBISHI | ||||||
| ASX | 2010 NO | YES | NO | YESYES | ||
| ECLIPSE | 2017 NO | YES | NO | YESYES | ||
| I-MIEV | 2010 NO | YES | NO | YESYES | ||
| L200 | 2006 NO | YES | NO | YESYES | ||
| OUTLANDER 7 | 2010 NO | YES | NO | YESYES | ||
| PAJERO | 2006 NO | YES | NO | YESYES | ||
| NISSAN | ||||||
| EVALIA | 2011 NO | YES | NO | YESYES | ||
| JUKE | 2010 NO | YES | NO | YESYES | ||
| LEAF | 2011 NO | YES | NO | YESYES | ||
| MICRA | 2016 NO | YES | NO | YESYES | ||
| MICRA | 2016 NO | YES | NO | YESYES | ||
| MURANO(Z51) | 2004-2008 NO | YES | NO | YESYES | ||
| MURANO(Z51)(FACELIFT) | 2008-2013 NO | YES | NO | YESYES | ||
| NAVARA | 2010 NO | YES | NO | YESYES | ||
| NAVARA | 2015 NO | YES | NO | YESYES | ||
| NOTE | 2006-2013 NO | YES | NO | YESYES | ||
| NOTE | 2013 NO | YES | NO | YESYES | ||
| PULSAR | 2014 NO | YES | NO | YESYES | ||
| QASHQAI+2(J10)(FACELIFT) | 2008-2013 NO | YES | NO | YESYES | ||
| QASHQAI (FACELIFT 2010) | 2013 NO | YES | NO | YESYES | ||
| NISSAN | ||||||
| X-TRAIL | 2007-2014 NO | YES | NO | YESYES | ||
| X-TRAIL | 2014 NO | YES | NO | YESYES | ||
| OPEL | ||||||
| ADAM | 2012 NO | YES | NO | YESYES | ||
| AGILA | 2007-2015 NO | YES | NO | YESYES | ||
| AMPERA | 2012-2015 NO | YES | NO | YESYES | ||
| ASTRA | 2009 NO | YES | NO | YESYES | ||
| ASTRA J (PJ-SW) | 2015 NO | YES | NO | YESYES | ||
| ASTRA GTC | 2011 NO | YES | NO | YESYES | ||
| ANTARA(L-A)(FACELIFT) | 2006 NO | YES | NO | YESYES | ||
| CASCADA | 2013 NO | YES | NO | YESYES | ||
| COMBO TOUR | 2012 NO | YES | NO | YESYES | ||
| CORSA | 2014 NO | YES | NO | YESYES | ||
| CROSSLAND X | 2017 NO | YES | NO | YESYES | ||
| GRANDLAND X | 2017 NO | YES | NO | YESYES | ||
| INSIGNIA | 2008 NO | YES | NO | YESYES | ||
| INSIGNIA SW | 2008 NO | YES | NO | YESYES | ||
| KARL | 2015 NO | YES | NO | YESYES | ||
| MERIVA | 2003-2010 NO | YES | NO | YESYES | ||
| MERIVA | 2010 NO | YES | NO | YESYES | ||
| MOKKA | 2012 NO | YES | NO | YESYES | ||
| ZAFIRA | 2005-2015 NO | YES | NO | YESYES | ||
| ZAFIRA | 2016 NO | YES | NO | YESYES | ||
| ZAFIRA TOURER | 2011 NO | YES | NO | YESYES | ||
| PEUGEOT | ||||||
| PEUGEOT 108 | 2014 NO | YES | NO | YESYES | ||
| PEUGEOT 2008 | 2013 NO | YES | NO | YESYES | ||
| PEUGEOT 208 | 2012 NO | YES | NO | YESYES | ||
| PEUGEOT 3008 | 2009 NO | YES | NO | YESYES | ||
| PEUGEOT 308 | 2013 YES | YES | NO | YESYES | ||
| PEUGEOT 308 SW | 2014 YES | YES | NO | YESYES | ||
| PEUGEOT 5008 | 2009 NO | YES | NO | YESYES | ||
| PEUGEOT 508 | 2010 NO | YES | NO | YESYES | ||
| BIPPER TEPEE | 2007 NO | YES | NO | YESYES | ||
| ION | 2010 NO | YES | NO | YESYES | ||
| PORSCHE | ||||||
| CAYENNE | 2010 NO | YES | NO | YESYES | ||
| MACAN | 2013 NO | YES | NO | YESYES | ||
| PANAMERA | 2013 NO | YES | NO | YESYES | ||
| RENAULT | ||||||
| ALASKAN | 2017 NO | YES | NO | YESYES | ||
| CAPTUR | 2013 YES | YES | NO | YESYES | ||
| CLIO | 2012 NO | YES | NO | YESYES | ||
| CLIO SPORTOUR | 2013 NO | YES | NO | YESYES | ||
| ESPACE | 2002-2010 NO | YES | NO | YESYES | ||
| ESPACE | 2015 NO | YES | NO | YESYES | ||
| GRAND KANGOO | 2012 NO | YES | NO | YESYES | ||
| GRAND SÉNIC | 2004-2009 NO | YES | NO | YESYES | ||
| KADJAR | 2015 NO | YES | NO | YESYES | ||
| KANGOO | 2008 YES | YES | NO | YESYES | ||
| KOLEOS | 2008 NO | YES | NO | YESYES | ||
| RENAULT | ||||||
| MÉGANE SERIE 4 | 2008 NO | YES | NO | YESYES | ||
| MÉGANE GRAND COUPÉ | 2008 NO | YES | NO | YESYES | ||
| MÉGANE SPORTOUR | 2009 NO | YES | NO | YESYES | ||
| SCÉNIC | 2009 YES | YES | NO | YESYES | ||
| SCENIC X-MOD | 2009-2012 NO | YES | NO | YESYES | ||
| TALISMAN | 2015 NO | YES | NO | YESYES | ||
| TALISMAN SPORTOUR | 2016 NO | YES | NO | YESYES | ||
| TWINGO | 2007-2015 YES | YES | NO | YESYES | ||
| TWINGO | 2014 YES | YES | NO | YESYES | ||
| ZOE | 2013 YES | YES | NO | YESYES | ||
| SEAT | ||||||
| ALHAMBRA | 2010 NO | YES | NO | YESYES | ||
| ALTEA | 2004-2014 NO | YES | NO | YESYES | ||
| ARONA | 2017 NO | YES | NO | YESYES | ||
| ATECA | 2016 NO | YES | NO | YESYES | ||
| IBIZA | 2008 NO | YES | NO | YESYES | ||
| LEON | 2005-2013 NO | YES | NO | YESYES | ||
| LEON | 2012 NO | YES | NO | YESYES | ||
| LEON SC | 2013 NO | YES | NO | YESYES | ||
| LEON ST | 2013 NO | YES | NO | YESYES | ||
| SEAT MII | 2012 NO | YES | NO | YESYES | ||
| SKODA | ||||||
| CITIGO | 2012 NO | YES | NO | YESYES | ||
| FABIA | 2007-2015 NO | YES | NO | YESYES | ||
| FABIA | 2014 NO | YES | NO | YESYES | ||
| FABIA WAGON | 2007 NO | YES | NO | YESYES | ||
| SKODA | ||||||
| KAROQ | 2017 NO | YES | NO | YESYES | ||
| KODIAQ | 2016 NO | YES | NO | YESYES | ||
| OCTAVIA II | 2004-2013 NO | YES | NO | YESYES | ||
| OCTAVIA III | 2013 NO | YES | NO | YESYES | ||
| OCTAVIA STATION WAGON | 2004-2013 NO | YES | NO | YESYES | ||
| OCTAVIA STATION WAGON | 2013 NO | YES | NO | YESYES | ||
| OCTAVIA SCOUT | 2007-2012 NO | YES | NO | YESYES | ||
| RAPID | 2012-2014 NO | YES | NO | YESYES | ||
| ROOMSTER (+FACELIFT) | 2006-2015 NO | YES | NO | YESYES | ||
| SUPERB I | 2001-2008 NO | YES | NO | YESYES | ||
| SUPERB II | 2008 NO | YES | NO | YESYES | ||
| SUPERB WAGON | 2009 NO | YES | NO | YESYES | ||
| YETI | 2009 NO | YES | NO | YESYES | ||
| SMART | ||||||
| SMART FORFOUR | 2014 NO | YES | NO | YESYES | ||
| FORTWO | 2007-2015 YES | NO | NO | NO YES | ||
| FORTWO | 2014 YES | NO | NO | NO YES | ||
| FORTWO CABRIO | 2007-2015 YES | NO | NO | NO YES | ||
| SUBARU | ||||||
| BRZ | 2012 NO | YES | NO | YESYES | ||
| FORESTER | 2008-2013 NO | YES | NO | YESYES | ||
| IMPREZA | 2007-2012 NO | YES | NO | YESYES | ||
| LEGACY | 2003-2009 NO | YES | NO | YESYES | ||
| LEVORG | 2015 NO | YES | NO | YESYES | ||
| OUTBACK | 2003-2009 NO | YES | NO | YESYES | ||
| OUTBACK | 2009 NO | YES | NO | YESYES | ||
| SUBARU | ||||||
| TREZIA | 2011-2014 NO | YES | NO | YESYES | ||
| WRX | 2010-2014 NO | YES | NO | YESYES | ||
| XV | 2012 NO | YES | NO | YESYES | ||
| SUZUKI | ||||||
| ALTO | 2009-2015 NO | YES | NO | YESYES | ||
| BALENO | 2016 NO | YES | NO | YESYES | ||
| CELERIO | 2014 NO | YES | NO | YESYES | ||
| IGNIS | 2016 NO | YES | NO | YESYES | ||
| S-CROSS | 2013 NO | YES | NO | YESYES | ||
| SWIFT | 2010 NO | YES | NO | YESYES | ||
| VITARA | 2015 NO | YES | NO | YESYES | ||
| TOYOTA | ||||||
| ARURIS | 2007-2012 NO | YES | NO | YESYES | ||
| ARURIS HYBRID | 2012 NO | YES | NO | YESYES | ||
| AVENSIS (T25) | 2003-2009 NO | YES | NO | YESYES | ||
| AVENSIS (T27) | 2009 NO | YES | NO | YESYES | ||
| AYGO | 2014 NO | YES | NO | YESYES | ||
| COROLLA | 2004-2009 NO | YES | NO | YESYES | ||
| C-HR | 2016 NO | YES | NO | YESYES | ||
| GT86 | 2012 NO | YES | NO | YESYES | ||
| IQ | 2008-2014 NO | YES | NO | YESYES | ||
| LANDD CRUISER | 2002-2009 NO | YES | NO | YESYES | ||
| LANDD CRUISER | 2009 NO | YES | NO | YESYES | ||
| PREVIA | 2001-2006 NO | YES | NO | YESYES | ||
| PRIUS | 2003-2009 NO | YES | NO | YESYES | ||
| PRIUS | 2009 NO | YES | NO | YESYES | ||
| TOYOTA | ||||||
| RAV4 | 2000-2006 NO | YES | NO | YESYES | ||
| RAV4 | 2006-2013 NO | YES | NO | YESYES | ||
| URBAN CRUISER | 2009-2014 NO | YES | NO | YESYES | ||
| VERSO | 2009 NO | YES | NO | YESYES | ||
| YARIS | 2011 NO | YES | NO | YESYES | ||
| VOLKSWAGEN | ||||||
| ARTEON | 2017 NO | YES | NO | YESYES | ||
| CADDY | 2010-2015 NO | YES | NO | YESYES | ||
| CADDY | 2015 NO | YES | NO | YESYES | ||
| GOLF IV | 1999-2004 NO | YES | NO | YESYES | ||
| GOLF V | 2003-2008 | NO | YES | NO | YESYES | |
| GOLF VI | 2008-2013 NO | YES | NO | YESYES | ||
| GOLF VII | 2012 NO | YES | NO | YESYES | ||
| GOLF VARIANT | 1999-2006 NO | YES | NO | YESYES | ||
| GOLF VARIANT | 2007-2010 NO | YES | NO | YESYES | ||
| GOLF VARIANT | 2009-2014 NO | YES | NO | YESYES | ||
| GOLF VARIANT | 2013 NO | YES | NO | YESYES | ||
| MAGGIOLINO | 2011 NO | YES | NO | YESYES | ||
| MAGGIOLINO CABRIO | 2012 NO | YES | NO | YESYES | ||
| PASSAT | 2005-2010 NO | YES | NO | YESYES | ||
| PASSAT | 2010-2014 NO | YES | NO | YESYES | ||
| PASSAT | 2014 NO | YES | NO | YESYES | ||
| POLO | 2009 NO | YES | NO | YESYES | ||
| SHARAN | 2004-2009 NO | YES | NO | YESYES | ||
| SHARAN | 2010 NO | YES | NO | YESYES | ||
| T-ROC | 2017 NO | YES | NO | YESYES | ||
| VOLKSWAGEN | ||||||
| TIGUAN | 2007 NO | YES | NO | YESYES | ||
| TIGUAN | 2016 NO | YES | NO | YESYES | ||
| TOUAREG | 2004-2010 NO | YES | NO | YESYES | ||
| TOUAREG | 2010 NO | YES | NO | YESYES | ||
| TOURAN | 2004-2010 NO | YES | NO | YESYES | ||
| TOURAN | 2010-2015 NO | YES | NO | YESYES | ||
| TOURAN | 2015 NO | YES | NO | YESYES | ||
| UP | 2011 NO | YES | NO | YESYES | ||
| VOLVO | ||||||
| C 30 | 2006-2012 NO | YES | NO | YESYES | ||
| C 70 | 2005-2013 NO | YES | NO | YESYES | ||
| S 40 | 2004-2012 NO | YES | NO | YESYES | ||
| S 60 | 2000-2009 NO | YES | NO | YESYES | ||
| S 60 | 2010 NO | YES | NO | YESYES | ||
| S 80 | 1998-2006 NO | YES | NO | YESYES | ||
| S 80 (+FACELIFT) | 2006 NO | YES | NO | YESYES | ||
| V 40 | 2012 NO | YES | NO | YESYES | ||
| V 50 | 2004-2012 NO | YES | NO | YESYES | ||
| V 60 | 2010 NO | YES | NO | YESYES | ||
| V 70 | 2000-2007 NO | YES | NO | YESYES | ||
| V 70 / XC70 (+FACELIFT) | 2007 NO | YES | NO | YESYES | ||
| XC 60 | 2008 NO | YES | NO | YESYES | ||
| XC 70 | 2007 NO | YES | NO | YESYES | ||
| XC 90 | 2004-2014 NO | YES | NO | YESYES | ||
| XC 90 | 2014 NO | YES | NO | YESYES | ||
Importato da:
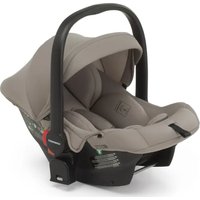
- WARNING
- BEFORE STARTING
- WHEN USING THE CHILD CAR SEAT
- SEAT BELT
- SUNLIGHT/HOT DAYS
- SECOND HAND OR DAMAGED CHILD CAR SEATS AND SEATBELTS
- IMPORTANT WARNING
- from 40 to 105 cm (i-Size universal ISOFIX)
- From 100 cm to 150 cm (i-Size booster seat).
- GENERAL INFORMATION
- RESTRICTIONS AND REQUIREMENTS REGARDING THE USE OF THE PRODUCTAND VEHICLE SEAT
- WARNING! Follow the restrictions at all times:
- USING THE CAR SEAT
- Installation
- Correct use of the car seat
- Adjusting the height of the headrest and straps
- From 40 to 105 cm
- to 150 ~cm
- Using the buckle
- Unlocking the ISOFIX system and Top Tether
- Releasing the Top Tether
- Unlocking the ISOFIX system
- Adjusting the seat belt (harness)
- Reclining the seat
- Rotating the seat
- INSTALLING THE CAR SEAT IN THE VEHICLE
- How to install the ISOFIX system
- Using the reducer for the first months
- Y SEAT IN THE VEHICLE
- Precautions to make sure you have correctly fastened the car seat harness
- IMPORTANT
- For the safety of your child, always make sure that:
- Notes:
- INSTALLATION IN THE DIRECTION OF FORWARD TRAVEL
- INSTALLATION IN THE DIRECTION OF TRAVEL (Children between 100 and 150 cm)
- Installation of the car seat, using only the 3-point belt supplied with the vehicle.
- INSTALLATION 1 - Installation of the car seat, using only the 3-point belt supplied with the vehicle.
- SEAT IN THE VEHICLE
- INSTALLATION 2 - Installing the seat with the 3-point seat belt and ISOFIX connectors
- REMOVE THE 5-POINT HARNESS
- Removing the 5-point belt
- REPLACING THE 5-POINT HARNESS
- Replacement of the 5-point belt for use in the 40-105 cm range
- KID-PAD INSTALLATION
- REMOVING / ASSEMBLING THE LINING
- Remove the cover
- Replace the fabric
- CLEANING AND MAINTENANCE
- Cleaning
- FORMAL GUARANTEE
- EXCLUSIONS TO THE FORMAL GUARANTEE.
- AVERTISSEMENT
- ATTENTION:
- RETIRER / MONTER LA HOUSSE
- EXCLUSIONS DE LA GARANTIE CONVENTIONNELLE.
- Dos 100 cm ate os 150 cm (i-Size booster seat)
- INSTALAÇÃO VIRADA PARA A RETAGUARDA
- Zbërtheni Top Tether-in
- MONTIMI NË MAKINË
- MONTIMI / ÇMONTIMI I MBULESËS
- Heqja e mbulesës
- التركيب في السيارة
- INFORMATION
Brand : Foppapedretti
Model : FP360
Category : Car seat