
QH4001 - Fan Concept - Free user manual and instructions
Find the device manual for free QH4001 Concept in PDF.

| Product type | Wall-mounted fan heater |
| Brand | Concept |
| Model | QH4001 |
| Supply voltage | 220-240 V ~ 50/60 Hz |
| Maximum power | 2000 W |
| Minimum power | 1000 W |
| Sound power level | 45 dB |
| Protection class | IP22 |
| Minimum room area | 4 m² |
| Safety distance | 100 cm from flammable materials |
| Operating modes | Warm air (1000 W), Hot air (2000 W), Fan only |
| Adjustable thermostat | Yes, from 10 to 49 °C |
| Daily timer | Yes, up to 24 hours |
| Weekly timer | Yes, programmable day by day |
| Open window function | Yes, automatic shutdown if temperature drops |
| Child lock | Yes |
| Remote control | Yes, with CR2025 battery included |
| Display | LED screen |
| Mounting | Wall-mounted (minimum height 2 m from floor) |
| Cleaning | Damp sponge, do not immerse or use abrasive products |
| Warranty | 24 months |
Frequently Asked Questions - QH4001 Concept
User questions about QH4001 Concept
0 question about this device. Answer the ones you know or ask your own.
Ask a new question about this device
Download the instructions for your Fan in PDF format for free! Find your manual QH4001 - Concept and take your electronic device back in hand. On this page are published all the documents necessary for the use of your device. QH4001 by Concept.
USER MANUAL QH4001 Concept
Wall-mounted ceramic heater
Wandkeramikheizing
Thank you for purchasing a Concept product. We wish you much joy with your new appliance every day you use it. Please read the instruction manual carefully before initial use. To refer to this manual any time you need to, we recommend you to keep it in a safe place. And please pass it to any future owner of the appliance.
| Technical specifications | |
| Voltage 220-240 V, 50/60 Hz | |
| Input 2000 W | |
| Sound performance level 45 dB | |
| IP code IP22 | |
IMPORTANT
Before connecting to the mains, make a visual check to ensure that the unit is intact and that no damage occurred during transport.
IMPORTANT SAFETY PRECAUTIONS
- Do not use the appliance in any other way than as described in this manual.
- Remove all the covering and marketing materials from the appliance before the first use.
- Make sure the mains voltage corresponds to the values on the rating plate of the product. Do not connect the appliance to the distribution sockets and extension leads.
- Do not use this appliance with a program, timer, or any other component that automatically switches the appliance on, because a fire may occur if the appliance is covered or incorrectly placed.
- Only place the appliance on a stable and heat-resistant surface away from other heat sources.
- When connecting and disconnecting the appliance from the electrical outlet, the function selector must be in position OFF (or 0).
- When disconnecting the appliance from the wall outlet, never pull the power cord, grasp the plug end and disconnect it by removing it from the receptacle.
- The appliance must not be placed directly under the electrical socket.
- The appliance must be positioned so that its plug is always accessible.
- Observe the safe distance of the appliance at least 100cm from flammable materials such as furniture, curtains, blankets, paper, clothing, etc.
- Do not use the appliance in rooms of area of less than 4m^2
EN
concept
concept
- Never place any objects in the air outlet. This could result in short circuits and possible damage to the appliance.
- Do not bend or place heavy objects on the power cord. A short circuit could occur.
- Leave the air inlet and outlet grids free (at least 100cm in front of and 50cm behind the appliance).
- Caution! The outlet grid reaches a temperature above 80^ during operation. Do not touch it, there is a risk of burns.
- Do not carry the appliance when it is switched on, or if it is hot.
- Do not touch the hot surface. Use handles and buttons.
- Do not allow children or unauthorized people to handle the appliance, use it out of their reach.
- Persons with reduced mobility, reduced sensory perception, mental disadvantage or persons not familiar with the operation must use the appliance only under the supervision of responsible person, who is familiar with the instructions.
- Pay extra attention if the appliance is used near children.
- Do not use the appliance as a toy.
- Do not cover the appliance, there is a risk of overheating. Do not use it to dry the laundry.
- Do not put anything on the appliance or place anything in front of it.
- Do not use the appliance in any other way than as described in this manual.
- The appliance must be always used only in the upright position.
- Do not use the appliance near shower, bathtub, sink or pool.
- Do not use the appliance in an environment where there are explosive gases and flammable substances (solvents, varnishes, adhesives, etc.).
- Before cleaning and after use of the appliance, switch the appliance off, disconnect it from the mains and allow it to cool down.
- Keep the appliance clean, do not allow foreign objects to into the grid openings. It could cause short circuit, damage to the appliance or cause fire.
- Do not use coarse and chemically aggressive substances to clean the appliance.
-
Do not use the appliance with a damaged cord or plug and have it repaired immediately by an authorized service centre.
-
Do not use the appliance if it is not working properly, has been dropped, damaged or immersed in liquid. Have it checked and repaired by an authorized service centre.
- Do not use the appliance outdoors.
- The appliance is only suitable for home use and is not intended for commercial use.
- Do not touch the appliance with wet hands.
- Do not immerse the power cord, plug or appliance in water or any other liquid.
- The appliance must not be used in vehicles.
- Do not repair the appliance yourself. Contact an authorized service centre.
- This appliance can be used by children aged from 8 years and above and persons with reduced physical, sensory or mental capabilities or lack of experience and knowledge if they have been given supervision or instruction concerning the use of the appliance in a safe way and understand the hazards involved. Cleaning and maintenance performed by the user must not be carried out by children unless they are 8 years old and under supervision. Children aged under 8 years of age must be kept away from the appliance and its power cord. Do not let children play with the appliance.
- Children aged under 3 years of age must be prevented from accessing the appliance unless they are permanently supervised.
- WARNING: Some parts of this product can be very hot and cause burns. Take special care in the presence of vulnerable persons or children.
- Children from the age of 3 and under 8 may switch the appliance on or off only if the appliance is in its place or installed in its normal operating position and they are supervised or instructed how to use the appliance safely and they understand the risks that are associated with it. Children from the age of 3 and under 8 may not connect, regulate or clean the appliance, or perform maintenance by the user.
- This product is only suitable for well-insulated rooms or occasional use.
Damages from failure to follow the manufacturer's instructions are not covered by the warranty.
concept
concept
PRODUCT DESCRIPTION
1 Main switch 0/1(on/off)
2 Outlet grille
3 Display
4 Remote control
5 START/STOP button (manual start without using the remote control)
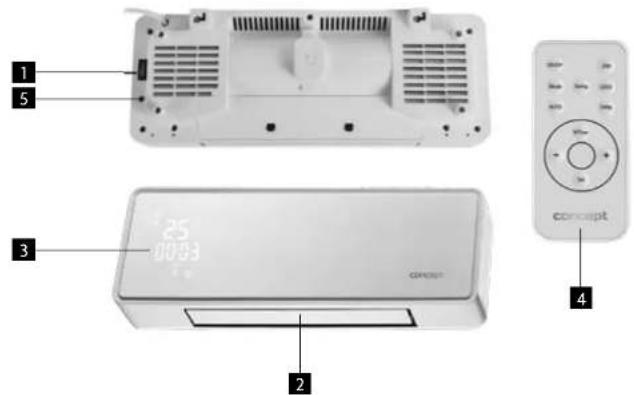
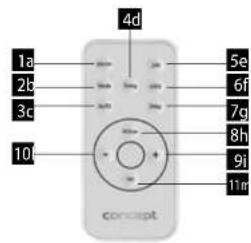
Remote control
1a On/Off
2b Power setting
3c Open window function
4d Oscillation
5e Day tin
6f Child lock function
79Week timer temperature
8h Week timer
91 + button
101 - button
11m Time/date setting
The remote control comes with a battery (type
CR2025, 3 V). Remove the protective film before
first use.
MOUNTING THE DEVICE ON THE WALL
The appliance is designed to be wall-mounted. Installation may only be performed by a qualified person.
Before installing the appliance, make sure that there are no electrical cables or water pipes in the place of installation.
Place the appliance at least 2m above the floor, 25~cm from the corner of the room and 20~cm below the ceiling. Air outlet hole must be directed downwards (see Fig. 1).
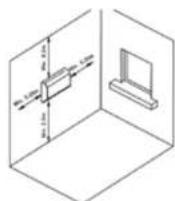
Fig.1
Drill two holes in the wall according to the holes for hanging on the back of the device.
Insert the dowels into the holes and screw the screws into them so that they protrude 5mm from the holes.
Hang the appliance on the screws and make sure that it is properly installed.
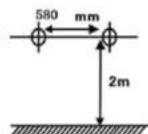
Fig.2
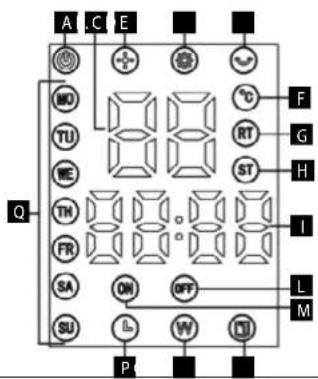
Display
A Power supply
B Temperature
C Minimum input
D Maximum input
E Oscillation
F Temperature indicator
G Ambient temperature
H Set temperature
Hours/Minutes
OFFindicator
M ONindicator
N Open window function
0 Week timer
P Day timer
Q Days of the week (MO-Monday, TU-Tuesday,
WE-Wednesday,TH-Thursday,FR-Friday,SA
Saturday, SU-Sunday)
QH4000|QH4001QH4000|QH4001
EN
concept
concept
OPERATING INSTRUCTIONS
- Before plugging in the appliance, make sure that the main switch I/O is in the O (Off) position.
- Place the heater on a solid stable surface and switch the main switch to the I position (On). You will hear a sound signal, the device is in the standby mode.
- Press the On/Off button on the remote control or START/STOP directly on the appliance to turn on the heater operating mode.
Time and date setting (only in operating mode)
- Press the Set button (11m) and by pressing the +/- buttons (9i/10l) set the day.
- Press the Set button for the second time (11m) and by pressing the + / - buttons (9I/10I) set the hour.
- Press the Set button for the third time (11m) and by pressing the +/- buttons (9i/10l) set the minute.
- Press the Set button for the fourth time (11m) - time and date are saved.
Note: If there is a delay of more than 5 seconds between each pressings of the buttons, the current setting will be saved automatically.
Warning: When the appliance is turned off by pressing the main button O/I, due to a power failure or unplugged power cord, the time and date settings will be lost.
Manual operating mode setting (only in operating mode)
- Press the On/Off button (1a) and put the device into operating mode.
- Press the Mode button (2b) and select the desired mode:
Warm air, power 1000 W (C)
Hot air power 2000 W (D)
Fan function (no icon on the display)
- Press the Swing button (4d) to activate/deactivate automatic air oscillation.
Automatic operating mode setting (only in operating mode)
In this mode the appliance automatically selects the desired mode according to the set/ambient room temperature.
- Press the +/- buttons(9i/10) to select the desired temperature from 10 to 49^ . The ST icon is active during setting (H).
- The selected option is automatically saved after 5 seconds. The ST icon (H) goes out, the RT icon lights up (G)
Note: If the temperature drops 2 degrees below the set temperature, the heater switches to warm airflow (1000 W). If the temperature drops 4 degrees below the set temperature, the heater switches to hot airflow (2000 W). If the temperature rises 1 or more degrees above the set temperature, the heater switches to cold airflow.
Day timer setting (only in operating mode)
- Press the 24H button (5e) and by repeated pressings of the button set the desired shut down time (1 - 24 hours).
- The day timer is active if the clock icon is lit on the display (P).
- To deactivate the timer, press the 24H button again (Se) until the time 00 appears on the display, the clock icon (P) is inactive.
Week timer setting (only in operating mode)
The week timer allows you to set the temperature and mode for each day of the week.
- Press the W-Timer button (8h) and by pressing the +/- buttons (9i/10l) select the day (MO-SU).
- Press the W-Timer button for the second time (8h) a and by pressing the +/- buttons (9I/10I) select the hour of start (00-24).
- Press the W-Timer button for the third time (8h) by pressing the +/- buttons (9i/10i) select the minute of start (00-59).
- Press the W-Timer button for the fourth time (8h) a by pressing the +/- buttons (9i/10i) select the hour of shut down (00-24).
- Press the W-Timer button for the fifth time (8h) a and by pressing the +/- buttons (9i/10i) select the minute of shut down (00-59).
- Wait 5 seconds, the W icon (0) is active.
Note: You can set all days of the week in the same way.
- Press the Delay button to set the temperature (7g) and by pressing the +/- buttons (91/101) select the desired temperature (10-49°C)
- The week time is active if the W icon is lit on the display (O) and the current ON/OFF status (L/M) appears on the display.
- Press the W-Timer button to deactivate the week timer (8h). The ON, ON (OFF) icons are inactive.
Warning: When the appliance is turned off by pressing the main button 0/1 , due to a power failure or unplugged power cord, the time and date settings will be lost.
Warning: If there is a delay of more than 5 seconds, the current setting is automatically saved.
Open window function setting (only in operating mode)
This function stops the operation of the appliance if the ambient temperature drops by at least 3^ within 1 minute.
- Press the AUTO button to activate it (3c). The open window icon (P) will appear on the display.
- Press the AUTO button to deactivate it (3c). The open window icon (P) goes out.
Child lock setting (only in operating mode)
- Press the Lock button to activate it (6f). Only one icon is lit on the display (A).
- In this mode, only the ON/OFF (1a) and Lock (6f) buttons work.
- Press the Lock button to deactivate it (6f).
N
concept
concept
Table of local electric heater data P
| Model identification no.: QH4000/4001_BPT-2000B S406L | |||||
| Parameter | Symbol | Value | Unit | Parameter | Unit |
| Rated heat output: Temperature entering methods, only for electric storage heaters (select one) | |||||
| Rated heat output | Pnom | 2.0 | kW | Manual regulation of accumulated heat with integrated thermostat | [no] |
| Minimum heating capacity (indicated) | Pmin 10 kW Manual regulation of accumulated heat according to room temperature and / or outdoor temperature | [no] | |||
| Maximum continuous heating power | Pmax | 2.0 | kW | Electronic regulation of accumulated heat according to room temperature and / or outdoor temperature | [no] |
| Additional electricity consumption | Heat output with fan | [no] | |||
| At rated heating output | elmax 0 | kW Type of heat output / room temperature control (select one) | |||
| With minimum heat output | elmin | 0 | kW | Single mode heat output without room temperature control | [no] |
| In standby mode | eIS8 | 0.0005 | kW | Two or more modes set manually, without room temperature control | [no] |
| With room temperature control by mechanical thermostat | [no] | ||||
| With electronic room temperature control | [no] | ||||
| Electronic temperature room control with daily timer | [no] | ||||
| Electronic temperature room control with weekly timer | [yes] | ||||
| More control options (multiple choices) | |||||
| Room temperature control with person presence detection | [no] | ||||
| Room temperature control with open window detection | [yes] | ||||
| With remote control | [no] | ||||
| With adaptive on/off mode | [no] | ||||
| With reduced operating hours | [yes] | ||||
| With infrared sensor | [no] | ||||
| Contact: Jindrich Valenta - Concept Vysakomyska 1800 S65 D1 Chocen, CZECH REPUBLIC | |||||
| Note: The measured seasonal energy efficiency of heating of local electric heaters shall not be lower than the declared value at the nominal heating capacity of the unit. | |||||
| Seasonal energy efficiency of all local heaters except commercial, nS (%) | 38 | ||||
CLEANING AND MAINTENANCE
Caution!
Before each cleaning of the appliance, unplug the power cord from the electrical outlet!
Make sure the appliance has cooled before handling it!
To clean the surface of the appliance, use only a damp cloth, no detergents or hard objects, as they can damage the surface of the appliance!
Clean and inspect the inlet and outlet grids of the appliance frequently to ensure good operation of the appliance and to prevent overheating.
The dust in the appliance can be blown or vacuumed.
Never clean the appliance under running water, do not rinse it or immerse it in water!
CAUTION for cleaning: Do not use gasoline, benzene, thinner, aggressive detergents, etc., as this may damage the appliance. Never use alcohol or solvents.
TROUBLESHOOTING
The appliance is equipped with a safety fuse which, in the event of overheating, interrupts the power supply of the heater and, once cooled, switches it on again. If this occurs during normal operation, check the cleanliness of the inlet and outlet grids, or change the position of the appliance to improve the airflow inside and around the appliance.
SERVICE CENTRE
Extensive maintenance or repair, which requires access to internal parts of the product, has to be performed by a qualified specialist or the service centre.
ENVIRONMENTAL CONCERNS
- Packaging materials and old appliances should be recycled.
- Packaging materials may be disposed of as sorted waste.
- Dispose the plastic bags made of polyethylene (PE) of as sorted waste.
Recycling of the appliance at the end of its lifespan:

This appliance is labelled in accordance with European Directive 2012/19/EU concerning used electrical and electronic appliances (waste electrical and electronic equipment - WEEE). The symbol on the product or on its packaging indicates that this product may not be treated as household waste. Instead it should be taken to the appropriate collection point for the recycling of electrical and electronic equipment. By ensuring this product is disposed of correctly, you will help prevent potential negative consequences for the environment and human health, which could otherwise be caused by inappropriate waste handling of this product. The disposal of such material has to be done according to the recycling regulations. For more detailed information about recycling of this product, please contact your local council, your household waste disposal service or the shop where you purchased the appliance.

The product meets all the necessary requirements of the EU directives applicable to the specific product.
Changes in text, design, and technical specifications are subject to change without prior notice and we reserve the right to change them.
Danksagung
Ak相关政策的法规,如:
A) An indication of the legal basis for the construction of a new building.
B) An indication of the construction of a new building.
CONCEPT POLSKA sp. z o.o.
ul Ostrowskiego 30, 53-238 Wroclaw
tel:+48713390444,fax:713390414
The manufacturer (or importer) is responsible for ensuring the product complies with the requirements of applicable legal regulations as well as those of the relevant technical standards. Moreover, they are responsible for ensuring the product has the properties the manufacturer described in documents related to the goods or those reasonably expected by the customer with regard to the nature of the goods or based on advertising produced by the manufacturer, and further they are responsible for ensuring the product is fit for the purpose proposed by the manufacturer or that a product of the same type is normally used for.
The quality warranty term is 24 months from product takeover by the customer.
The warranty does not apply to wear and tear caused by regular use. The customer shall not be entitled to any warranty claims it, prior to taking the product over, they knew the product contained a defect or if the defect is attributable to the customer.
The warranty specifically does not apply:
- if the product installation, operation and service conditions stipulated in the product operating manual have not been adhered to.
to malfunctions caused due to mechanical, heat or chemical damage, short circuit, over voltage or incorrect installation.
to malfunctions caused by an inexpert third-party intervention,
to malfunctions caused by natural disaster,
to malfunctions caused by insufficient or inappropriate maintenance in violation of the operating manual, including malfunctions caused by water and other sediments. - to changes in colour of the heating surface or to scratching of the surface caused as a result of using the products in an unusual manner,
to appearance and functional changes caused by exposure to sunlight, thermal radiation of water and other sediments. - if the service life of certain product parts expires, e.g. for accumulators, bulbs, etc.
The warranty does not apply to any products and services provided along with the product (gifts, promotional articles, etc.).
Filing a complaint
A complaint against a product defect must be filed as soon as identified, yet no later than before the end of the warranty term.
The customer must file a product complaint with the dealer from which they have purchased the product, or with any authorised service centre, a list of which is included in the product package, or available at www.my-concept.com.
While filing a product complaint, the product must be duly cleaned and securely packed so as to prevent any damage during its transport to an authorised service centre, where relevant, unless the product is delivered in person.
The customer must submit proof of having concluded a purchase contract for the product by producing the receipt.
While filing their complaint, the customer must indicate the noted defect and identify the preferred complaint application method.
Complaints processing
As long as the noted defect may be removed, the user has the right to have the defect duly removed free of charge on a timely basis.
Where such a procedure is not reasonable with regard to the nature of the defect, the user may require to be supplied a new defect-free product (replacement), or, where the defect applies to a part of the product only, replacement of the part concerned. However, if replacement of the product or any part thereof is not proportionate with regard to the nature of the defect, especially if the defect can be removed without undue delay, the customer has the right to have the defect removed free of charge.
If the noted defect is not removable, or if the customer becomes entitled to replacement of the product or a part thereof, yet the replacement is not possible, for example due to the product having been sold out, the customer has the right to return the product (withdrawal from the contract).
The customer shall have the right to a new product (replacement) or to replacement of a part of the product even if the defect can be removed, provided they cannot properly use the product due to repeated occurrence of the defect or due to a high number of such defects. In such a case, the customer also has the right to return the product (by withdrawing from the contract).
If the product is not returned the customer does not withdraw from the contract), or if the customer does not apply the right to a new defect-free product (replacement), to replacement of a part thereof or to repair of the product, they may request a reasonable discount. The customer also has a right to a reasonable discount if a new defect-free product cannot be supplied to them, or if a product part cannot be replaced or the product repaired unless the situation is remedied within a reasonable time limit, or if remedying the situation would create major discomfort on the part of the customer.
The seller, authorised service centre or a staff member authorised by them must decide about each complaint immediately or within three business days in complicated cases. This term does not include a reasonable period of time, depending on the type of product concerned,
required for the defect to be assessed by an expert. A complaint, including defect removal, must be dealt with without any undue delay, yet no later than within 30 calendar days of the complaint filing date, unless the seller and the customer agree on a later deadline.
On returning the product (withdrawing from the contract) the customer must return any accessories and documents supplied along with the product.
The customer does not have the right to keep the defective parts and components of the product replaced as part of a repair of the product.
This shall be without prejudice to any other rights the customer may have in relation to the purchase of the product.
Remark: Complaints against products damaged in transport are governed by the carrier's complaints procedure.
Manufacturer
Jindrich Valenta - Concept
Vysokomytska 1800,565 01 Chocen
Czech Republic
tel: +420 465 471 400
fax+420465473304
Company ID No.13216660
email: servis@my-concept.cz
www: www.my-concept.com
Product data
| Model: | |
| Production number: | |
| Date of purchase: Seal and signature of vendor: | |
concept concept
DE GARANTIEBEDINGUNGEN
Garantie
FR CONDITIONS DE GARANTIE
Garantie
www.www.my-concept.com
Date despite produs
CONCEPT POLSKA sp. z o.o.
Ostrowskiego 30, 53-238 Wroclaw
Tel.: +48 713 390 444, Fax: 713 390 414
www.my-concept.pl

ASPICO KFT

- IMPORTANT
- IMPORTANT SAFETY PRECAUTIONS
- EN
- concept
- PRODUCT DESCRIPTION
- Remote control
- MOUNTING THE DEVICE ON THE WALL
- Display
- OPERATING INSTRUCTIONS
- N
- CLEANING AND MAINTENANCE
- TROUBLESHOOTING
- SERVICE CENTRE
- ENVIRONMENTAL CONCERNS
- Recycling of the appliance at the end of its lifespan:
- Danksagung
- Filing a complaint
- Complaints processing
- Manufacturer
- concept concept
- DE GARANTIEBEDINGUNGEN
- Garantie
- FR CONDITIONS DE GARANTIE
- CONCEPT POLSKA sp. z o.o.
- ASPICO KFT
Brand : Concept
Model : QH4001
Category : Fan