
USSW 300 B2 - Voltage converter ULTIMATE SPEED - Free user manual and instructions
Find the device manual for free USSW 300 B2 ULTIMATE SPEED in PDF.
| Product type | Voltage converter / inverter |
| Brand | Ultimate Speed |
| Model | USSW 300 B2 |
| Input voltage | 12 V DC (max. 14.8 V) |
| Output voltage | 230 V AC / 50 Hz |
| Maximum continuous power | 300 W |
| Peak power | 330 W (0.1 s) |
| Maximum output current | 1.30 A |
| USB port | 2 × USB 5 V / 1 A max. |
| Output wave type | Modified sine wave |
| Efficiency | > 75% |
| Overload protection | ≥ 330 W |
| Thermal trigger | 65 °C ±5 °C |
| Low voltage trigger | 10.5 V ±0.3 V |
| High voltage trigger | 14.8 V ±0.3 V |
| Integrated fuses | 2 × 20 A blade fuse (car) + 1 × 10 A glass fuse (cigarette lighter socket) |
| Weight (without cables) | Approx. 450 g |
| Operating temperature | 5 °C to 40 °C |
| Operating humidity | 0 – 80% (non-condensing) |
| Included accessories | Cable with clamps (red/black) + 12 V cigarette lighter cable |
| Mounting | Mounting holes for fixed installation in vehicle |
| Use | Indoors only, on 12 V battery or cigarette lighter socket |
| Compliance | CE, EMC directives, low voltage, RoHS |
Frequently Asked Questions - USSW 300 B2 ULTIMATE SPEED
User questions about USSW 300 B2 ULTIMATE SPEED
0 question about this device. Answer the ones you know or ask your own.
Ask a new question about this device
Download the instructions for your Voltage converter in PDF format for free! Find your manual USSW 300 B2 - ULTIMATE SPEED and take your electronic device back in hand. On this page are published all the documents necessary for the use of your device. USSW 300 B2 by ULTIMATE SPEED.
USER MANUAL USSW 300 B2 ULTIMATE SPEED
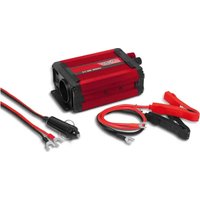
CAR POWER INVERTER 300W USSW 300 B2 SPANNUNGSWANDLER 300W USSW 300 B2 CONVERTISSEUR ALLUME-CIGARE 300W USSW 300 B2
GBIE NI CYMTAT
CAR POWER INVERTER
Operation and Safety Notes Translation of the original instructions
FR BE CH
CONVERTISSEUR ALLUME-CIGARE
Before reading, unfold the page containing the illustrations and familiarise yourself with all functions of the device.
DE AT CH
GB/IE/NI/Operation and Safety Notes Page 5
CY/MT
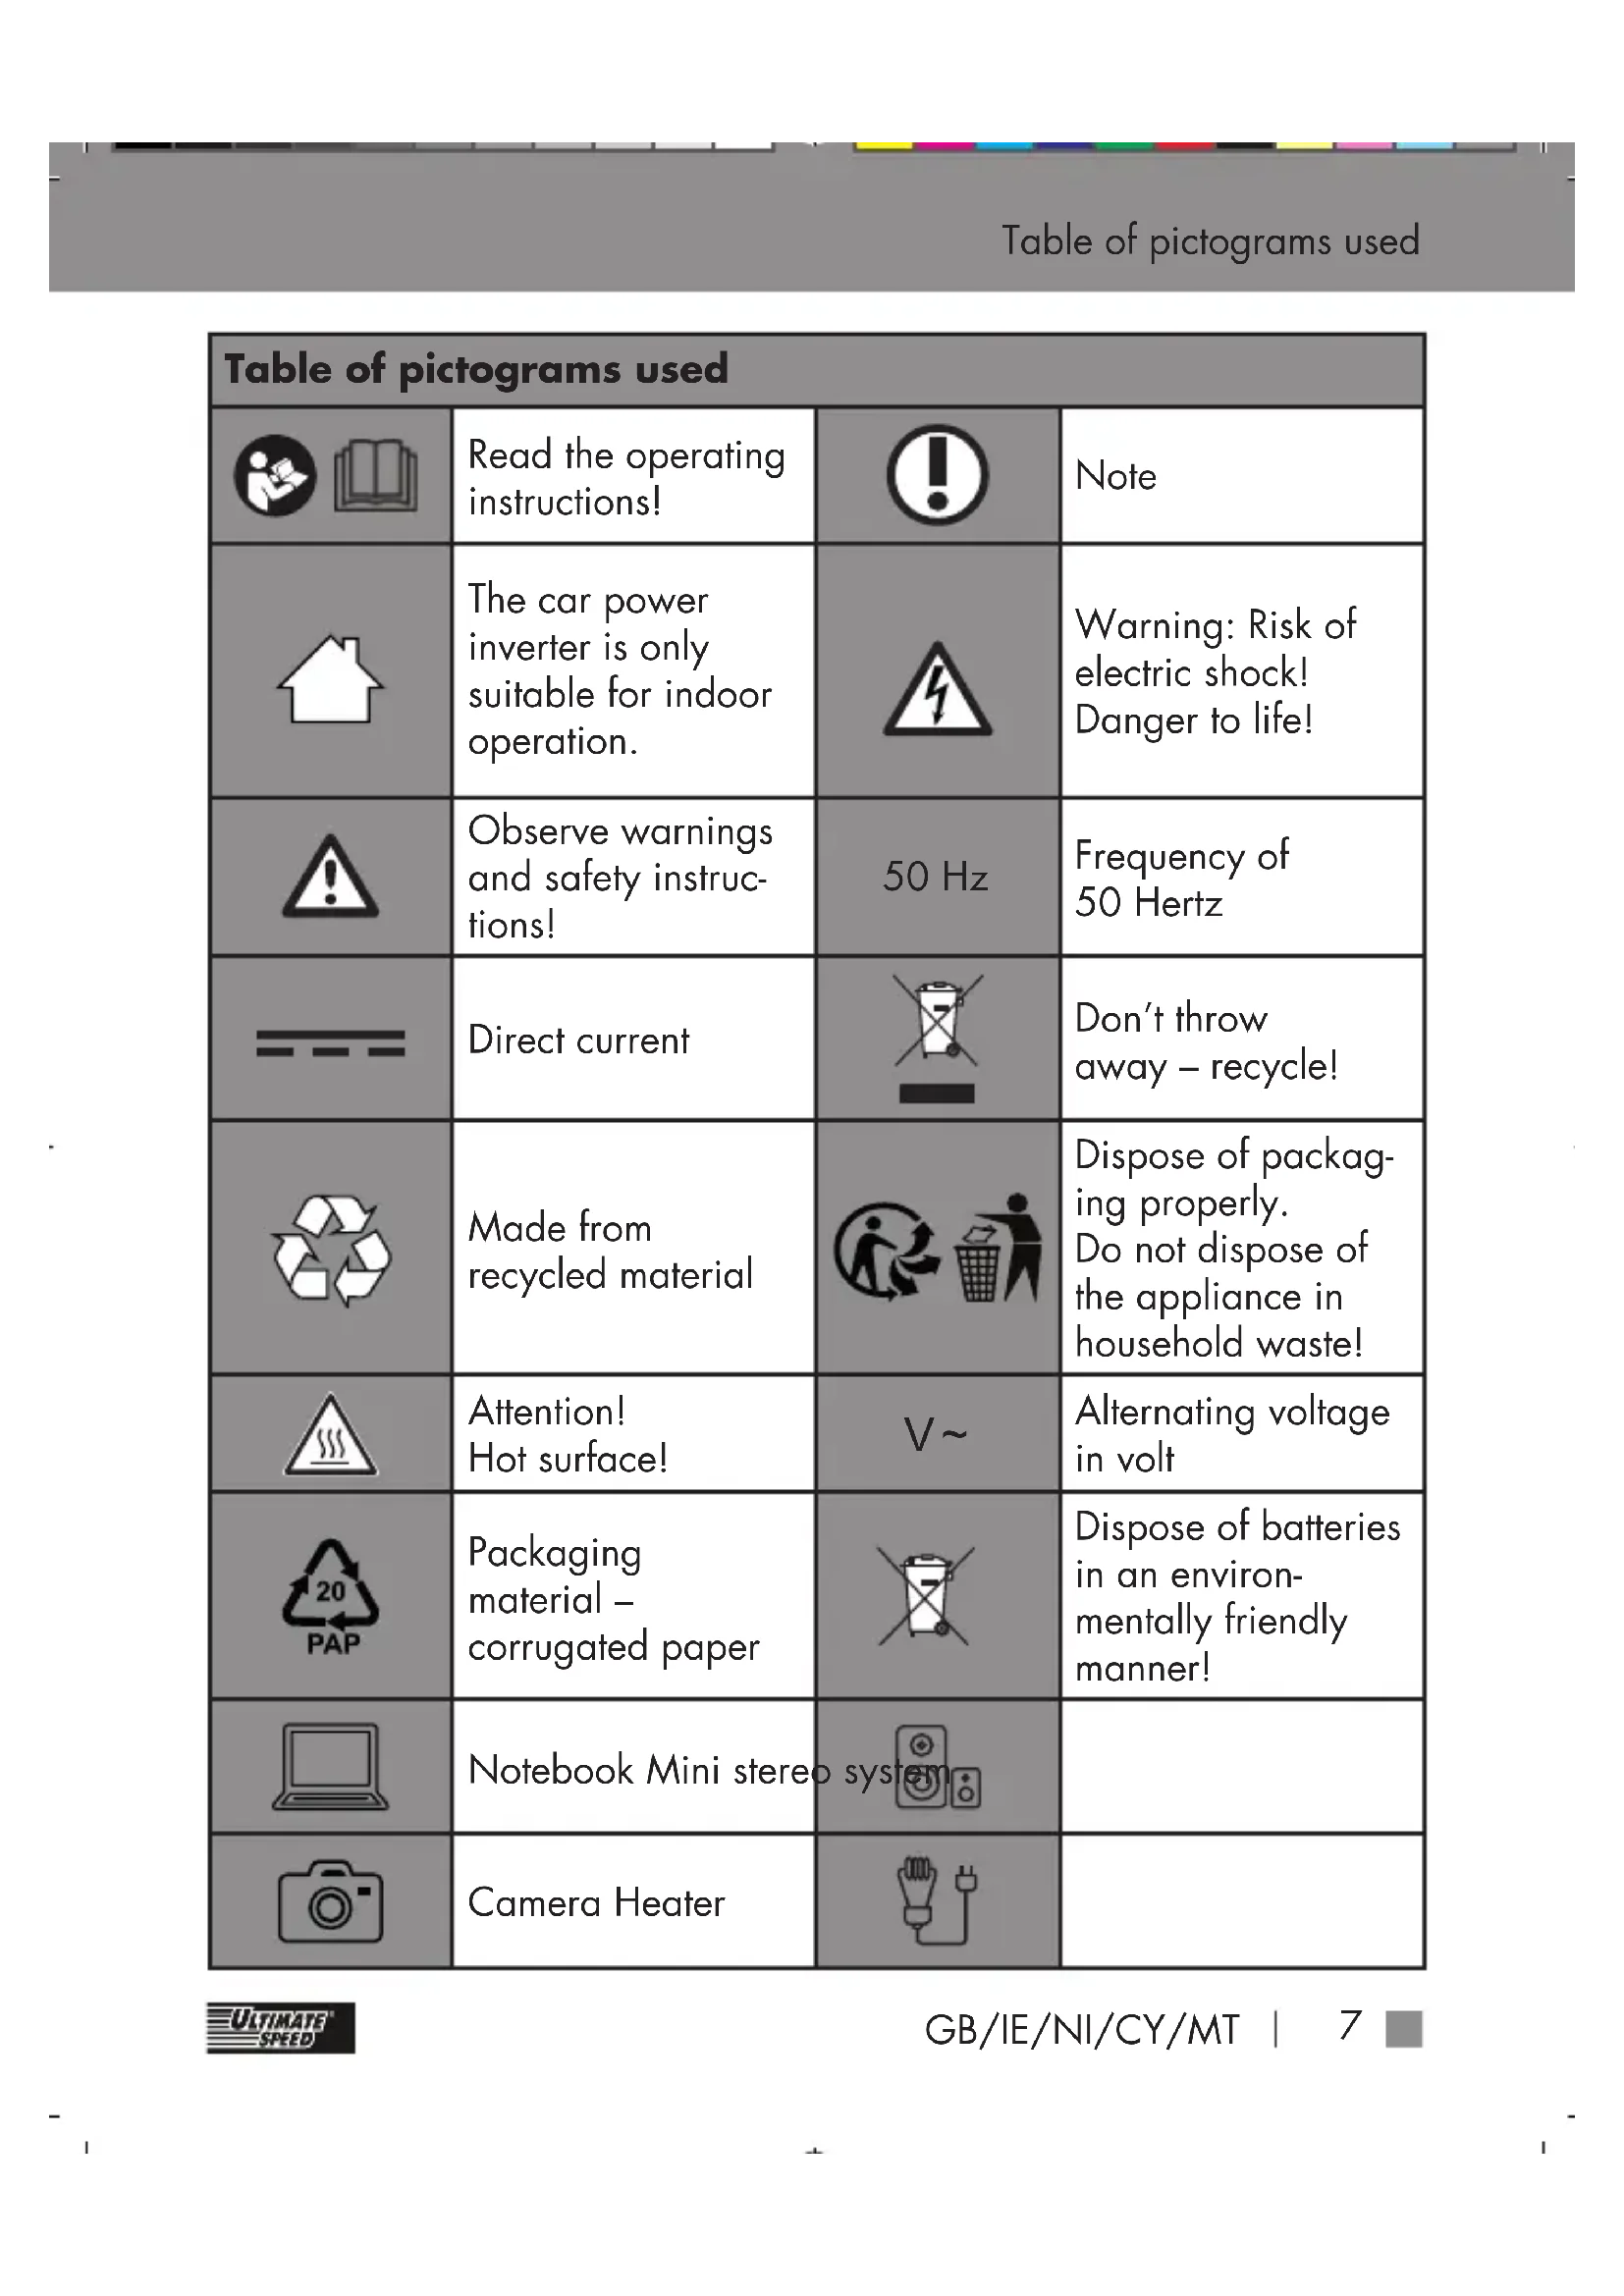
Table of pictograms used
Introduction
Intended use Page 8
Package contents . Page 9
Parts description . Page 10
Technical specifications.. Page 10
Safety instructions Page 12
Specific safety instructions.. Page 17
Using the device.. Page 17
Instructions for operation.. Page 18
Install and secure . Page 18
Operation in a vehicle.. Page 19
Connecting to a voltage supply.. Page 19
Connecting to a 12 V motor vehicle cigarette lighter socket...Page 20
Connecting to a car battery.. Page 20
Connecting and operating a load/device . Page 21
Instructions for operating devices .Page 22
Signal if the battery voltage is low . Page 23
Charge USB device.. Page 23
Replacing the fuses.. Page 23
Troubleshooting Page 25
Cleaning and maintenance.. Page 27
Information about recycling and disposal.. Page 28
EU Declaration of Conformity . Page 29
Warranty and service information.. Page 30
Warranty conditions.. Page 30
Warranty period and statutory claims for defects .......Page 31
Table of contents
Extent of warranty.. Page 31
Processing of warranty claims.. Page 32
| Table of pictograms used | |||
| Read the operating instructions! | Note | ||
| The car power inverter is only suitable for indoor operation. | Warning: Risk of electric shock! Danger to life! | ||
| Observe warnings and safety instruc-tions! | 50 Hz | Frequency of 50 Hertz | |
| Direct current | Don’t throw away – recycle! | ||
| Made from recycled material | Dispose of packaging properly. Do not dispose of the appliance in household waste! | ||
| Attention! Hot surface! | V~ | Alternating voltage in volt | |
| 20 PAP | Packaging material – corrugated paper | Disposition of batteries in an environ-mentally friendly manner! | |
| Notebook Mini stereo system | |||
| Camera Heater | |||
| Appliance class II Shaver | |||
| USB charger Cool box | |||
CAR POWER INVERTER 300W USSW 300 B2
Introduction
Congratulations! You have purchased one of our high-quality products. Please familiarise yourself with the product before using it for the first time. To do so, please read through the following operating and safety instructions carefully.
KEEP OUT OF THE REACH OF CHILDREN!
- Intended use
This car power inverter is designed to operate 230 V devices with maximum 300 W power draw or USB devices with maximum 1A current draw in the car with a 12 V connection. The car power inverter can either be connected to the cigarette lighter of the vehicle using the cigarette lighter adapter cable delivered with the device or connected directly to the battery using the adapter cable with clamps delivered with the device. If the car power inverter is connected directly to the battery using the adapter cable with clamps, then the car power inverter can only be used with a stationary vehicle. The manufacturer is not
liable for any injury or damage resulting from improper use or incorrect operation. This car power inverter is not suitable for commercial use. Commercial use will void the guarantee. The device has been developed for consumer use and is not suitable for use in a commercial or industrial environment. The product must only be started up initially by people who have been trained to do so.

Note!
The output power depends on the temperature and voltage.
The output voltage varies depending on the load and input voltage.

Attention!
Devices with sensitive electronics should not be operated using the car power inverter, as the output
voltage may not be sufficiently constant for these devices. These devices could be damaged. If you have any doubts, please contact the manufacturer of the connected device.
Package contents
After unpacking the product, please check that all of the package contents are present and that the car power inverter is in perfect condition. Do not use the device if it is defective.
| 1 Car power inverter | |
| 2 | Cable with connecting clamp (1x red 40 cm, 1x black 40 cm) |
| 1 | Cable with 12 V motor vehicle cigarette lighter plug (2 m) |
| 1 | Operating instructions |
- Parts description
1 Car power inverter
2 Operating LED (green)
3 Overload display (red)
4 On/Off switch "0" means "OFF" "1" means "ON"
5 230V socket
6 2× 1 A USB connector
12 V screw connector, red +
8 12 V screw connector, black -
9 2x fuse holder
10 Cable with red connecting clamp
1 Cable with black connecting clamp
12 Cable with 12 V motor vehicle cigarette lighter plug
13 2× 20 A flat motor vehicle fuses
4 Fan
Mounting holes for fixed installation
Red nut
7 Black nut
Cigarette lighter plug
19 10 A glass fuse
10 | GB/IE/NI/CY/MT
20 Contact pin
21 Fuse screw plug
Note: The use of the term
'product' or device' in the following text refers to the car power inverter described in these operating instructions.
- Technical specifications
Input:
| Voltage: 12 V | --- |
| Max. voltage: 14 | 8 V --- |
| Max. current draw: | 40 A |
| Undervoltage switch-off: | at 10.5 V ± 0.3 V |
| Overvoltage switch-off: | at 14.8 V ± 0.3 V |
Output:
| Voltage: | 230 V~ / 50 Hz |
| Output current: 1. | 30 A |
| Continuous output: | max. 300 W |
| Efficiency (η): > 75% | |
| Output waveform: | modified sine wave |
| Overload protection: | >= 330 W |
| Temperature switch-off | at 65°C ± 5°C |
| Peak output: | max. 330W / 0.1s |
USB connector:
| Voltage: | 5 V --- |
| Output current: max. | 1 A |
Fuse:
| Flat fuse in the car power inverter: | 2 x 20 A flat motor vehicle fuse |
| Glass fuse in the 12 V motor vehicle cigarette lighter plug: | 10 A |
General data:
| Weight (without cable): | approx. 450 g |
| Operating temperature: | 5 °C – 40 °C |
| Operating humidity (relative air humidity – no condensation): | 0–80 % |
Changes to technical and visual aspects of the product may be made as part of future developments without notice. Accordingly, no warranty is offered for the physical dimensions, information and specifications in these operating instructions. The operating
instructions cannot therefore be used as the basis for asserting a legal claim.
- Safety instructions
PLEASE READ THROUGH THE OPERATING INSTRUCTIONS CAREFULLY BEFORE USE. THESE FORM PART OF THE PRODUCT AND MUST BE AVAILABLE AT ALL TIMES!
This section covers the basic safety instructions applicable when working with the device.
Personal safety!
This device may be used by children aged 16 years and older, and by persons with reduced physical, sensory or
mental capacities, or a lack of experience and knowledge, if they are supervised or have been instructed in how to use the device safely and understand the dangers that may arise when using it. Do not allow children to play with the device.
Cleaning and day-to-day maintenance must not be performed by children without supervision.
Children must be supervised to ensure that they do not play with the device.
- Keep the device away from people - especially children - and household pets.
Within the working area, the user is responsible for any damage or injury to third parties that was caused by the use of the device.
During operation, never point the device at yourself or other individuals, and keep the device well way from your ears and eyes. There is a risk of injury!
Do not leave the device running unattended.
- Keep the device in a dry location and out of the reach of children.
In order to avoid dangers, before using or cleaning the car power inverter each time, unplug it from the car's electrical system or remove the connecting clamps from the car battery.
Only connect the car power inverter to the car battery when the engine is switched off! There is a risk of injury through moving parts!
The car power inverter must always be accessible
so that the device can be quickly disconnected from the battery in case of emergency.
How to avoid damage to the device and any harm to persons that may result from such damage:
Risk of electric shock!
Only connect the car power inverter to a 12 V car battery/electrical system. Connecting to a 24 V voltage can damage the device.
When connecting the car power inverter using the 12 V motor vehicle cigarette lighter plug makes sure that the polarity of the motor vehicle cigarette lighter plug matches the socket of the car's electrical system. The socket of the electrical
system must have internal positive polarity, i.e. the positive terminal of a vehicle battery must not be connected to the chassis of the vehicle.
Before connecting the inverter, check that the socket for the electrical system is sufficiently fused. This fuse protection must not be bypassed or altered, under any circumstances.
Only use the connection cable delivered with the product.
You must not open or repair the housing of the device. If you do, then the safety of the device is no longer assured and the guarantee will be null and void.

The device is only suitable for use
indoors.
Fire hazard!
Do not use the device near hot surfaces.
Do not position the device in places which are exposed to direct sunlight. Otherwise it could overheat and be damaged beyond repair. Do not use the device in a vehicle which is parked in the sun.
Never leave the device unattended when it is being used.
Do not cover the ventilation slots of the fan when the device is switched on.
- Do not place any open ignition sources such as, for example, candles on the device.
- Both connection cables can get warm under high loading.
Due to the high transfer resistances, using the cable with 12V motor
vehicle cigarette lighter plug can lead to the plug connection heating up. Therefore when working with high loads, always use the connection cable with the connecting clamps.
Notes on disconnecting from the power supply!
The On/Off switch of this device does not completely disconnect the device from the electrical system or battery. When the motor vehicle cigarette lighter plug is connected, the device takes power. In order to disconnect the device completely from the car's electrical system, the 12 V motor vehicle cigarette lighter plug must be unplugged from the socket of the electrical system/the connecting
clamps must be removed from the car battery.
Working with the device
Before setup or first use, check the device for any damage and do not use unless in perfect working order.
- Do not expose the device to rain or wet weather.
Do not let the device come into contact with water. Do not immerse the device in water. There is a risk of electric shock!
- Keep all openings of the device free during operation. Do not block the openings with your hands or fingers, and do not cover the device. There is a risk of overheating!
In hot weather, do not leave the device in a car. This could permanently damage the device.
The device becomes warm during use. There is a risk of burn injuries from touching the hot surfaces.
Take care to ensure that sand, dust and other small foreign objects cannot enter the air inlet or air outlet openings.
- Do not operate the device near to flammable liquids or gases. Do not use the device to draw in hot fumes. Failure to do so risks causing a fire or explosion!
- Switch the device off and disconnect the device from the voltage supply:
- When you are not using the device;
If you are leaving the device unsupervised; - If you are doing cleaning work;
- If the connection cable is damaged;
- If foreign objects have got into the device or
you notice unusual noises.
Only use the accessories supplied and recommended by the manufacturer.
- Do not disassemble or modify the device. This device must only be repaired by a maintenance technician.
Do not store in places where the temperature can exceed 65^
Only use in an ambient temperature between 5^ and 40^
Only use the adapter cable as supplied with the device.

CAUTION:
How to avoid accidents and injuries resulting from electric shock:
Electrical safety
Do not use the device if the switch cannot be
switched on and off.
Arrange for damaged switches to be replaced.
- Do not carry the device by the cable. Do not unplug the plug from the socket by pulling on the cable. Protect the cable from heat, oil and sharp edges.
If the cable of the device is damaged, disconnect it from the voltage supply immediately.
- Specific safety instructions
A slightly higher operating temperature is absolutely normal and not a malfunction.
- Protect the car power inverter from moisture and high temperatures, including fires.
Store the car power inverter in a dry place and protect the device
from moisture and corrosion.
Do not drop the device.
Using the device
Take all parts from the packaging and check whether the car power inverter or parts show any damage. If this is the case, do not use the car power inverter. Contact the manufacturer via the indicated service address. Remove all protective films and other transport packaging. Check that the delivery is complete.

Attention:
Do not allow small children to play with the packaging film. There is a risk of suffocation!
- Instructions for operation
For continuous operation of devices using the car power inverter 1 the socket for the electrical system must have a voltage between 10.5V and 14.8V . Before connecting the car power inverter 1, check whether the voltage supply provides sufficient power for operation. The power required for operation can be calculated as follows:
Current draw (A) =
Operating output of the load (W) Efficiency (n) Input voltage (V)
Example:
$$ \begin{array}{r l} & (\frac {3 0 0 \mathrm {W}}{0 . 7 5}) \ & \frac {\mathrm {1 2 V}}{1 2 \mathrm {V}} = 3 3. 3 \mathrm {A} \end{array} $$
The voltage supply should provide at least 33.3 A for a continuous load of 300 W.
Note:
12 V sockets for the electrical system provide max. 10 A, therefore in this example, the car power inverter must be connected directly to the car battery using the connecting clamps. This is the only way to ensure continuous output of 300 W.

Attention!
Never connect the car power inverter 1 to a 24V electrical system. Otherwise the device will be damaged. The device must only be connected to a voltage supply with a nominal voltage of 12V .
Install and secure
The car power inverter should be positioned on a flat, even surface. Make sure that there is at least 1 cm free space around the car power inverter for air circulation.
A gap of 50~cm must be maintained behind the ventilation slots of the fan 14.
There are holes in the plastic base of the car power inverter so that it can mounted securely in a vehicle. Using suitable screws, the car power inverter can be securely mounted. When doing this make sure you maintain the space for air circulation as stated above.
Due to vehicle-specific factors, it is not possible to include fittings which fit all situations.
If you are unsure, contact your motor vehicle garage.
Operation in a vehicle
If you are operating the car power inverter in a vehicle, make sure that the installation does not impair your driving. You should therefore always lay the cable so that it does not touch any moving
parts inside the vehicle and does not obstruct your vision.
Note:
The car power inverter can also be operated with the engine switched off. But please note that the car power inverter may possibly not work when you are starting up the engine.
- Connecting to a voltage supply
Attention!
Before connecting the car power inverter 1 to a voltage supply, make sure that the On/Off switch 4 of the device is in the "0" (OFF) position. You can connect the car power inverter 1 to a 12V socket for the electrical system using the 12V plug 12 or clamp the cables with 10 and 11 connecting clamps directly to a car battery.
- Connecting to a 12 V motor vehicle cigarette lighter socket
Unscrew the red nut on the car power inverter 1. Guide the red eyelet of the cable with 12V motor vehicle cigarette lighter plug 2 with the opening over the screw connector 7 (see Fig. 1). Make sure that the washer is positioned between the eyelet and the nut 16.
Tighten the red nla such that the eyelet is held in place.
Unscrew the black on the car power inverter 1.
Guide the black eyelet of the cable with 12 V motor vehicle cigarette lighter plug with the opening over the 12 V screw connector (see
Fig. 1). Make sure that the washer is positioned between the eyelet and the nut
- Tighten the black slit such that the eyelet is held in place.
Plug the cable with 12 V motor vehicle cigarette lighter plug into a motor vehicle cigarette lighter socket.
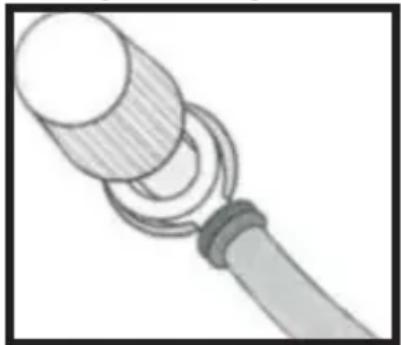
Fig. 1
Note:
Due to the high transfer resistances, using the cable with 12 V motor vehicle cigarette lighter plug 12 can lead to the plug connection heating up. Therefore when working with high loads, use the connection cable with the 10 and 11 connecting clamps.
- Connecting to a car battery
Unscrew the red nut 16 on the car power inverter 1 Guide the red eyelet of the cable with
the red connecting clamp 10 over the 12V screw connector 7 (see Fig. 1). Make sure that the washer is positioned between the eyelet and the nut 16.
- Tighten the red rule such that the eyelet is held in place.
Unscrew the black nut on the car power inverter 1.
Guide the black eyelet of the cable with the black connecting clamp over the screw connector (see Fig. 1).
Make sure that the washer is positioned between the eyelet and the nut 17.
- Tighten the black slit such that the eyelet is held in place.
-
First connect the red clamp to the positive terminal of the car battery and then connect the black clamp to the negative terminal of the car battery.
-
Connecting and operating a load/device
Attention!
Before connecting a load/device to the car power inverter 1, make sure that the On/Off switch 4 of the device is in the "0" (OFF) position.
Make sure that the output of the connected load/connected device does not exceed the maximum continuous output of the car power inverter 1.

Attention!
Do not switch on the load/device to be operated yet!.
Connect the plug of the load to be connected/device to be operated to the 230 V socket 5 of the car power inverter 1
Switch the car power inverter on, by moving the On/Off
switch 4 to the "1" (ON) position. You will hear a short beep and the overload display 3 (red) lights up briefly. After that the operating LED 2 (green) lights up, if the car power inverter 1 is properly connected to a charged battery.
Now switch on the load/ device to be operated.
Note:
If you hear a beep and the overload display 3 lights up red, the input voltage is too low, or output of the load/device connected to the car power inverter 1 is too high.
- Instructions for operatingdevices
General notes:
Information about the power consumption in Ampere (A) or the power draw in Watt (W) is usually shown on the rating plate of
devices. Before using the device, please make sure that the maximum current draw is not higher than 1.30 A and the maximum continuous output is not more than 300 W.
- Loads with a high internal resistance can be operated very effectively using the car power inverter, whereas loads with a low internal resistance, such as, for example, heating and cooking devices, generally have a power draw in Watt which is too high.
Inductive loads such as, for example, televisions or stereo devices (devices with a coil or a transformer) often require a start-up current which is many times higher than resistive loads with the same given power draw in Watt. When switching on, televisions require a power draw which is many times higher than the value given on the rating plate.
Because of this you may need to switch the car power inverter on and off several times, in order to be able to switch a television on.
If you have any doubts, please contact the manufacturer of the connected device.
- Signal if the battery voltage is low
If the battery voltage sinks below 10.5V the car power inverter switches off 1 and the overload display 3 lights up red.A warning beep sounds.
- Charge USB device
Attention!
Before connection, make sure that the current draw of the USB device is not higher than 1A. For more detailed information, please refer to the operating instructions for your USB device.
Plug the USB plug of the USB device to the USB connection 6 of the car power inverter 1.
If necessary, switch the USB device on.
Note: The 230 V socket and the USB connection can be used at the same time.
- Replacing the fuses

Danger to life through electric shock!
Before replacing the fuse, disconnect the car power inverter from the power supply. Also remove any device connected to the car power inverter. Replace the fuse with one of equal value with the same cut-off characteristics (20 A), as given in the technical specifications.

Attention!
You must not use a fuse with a different value!
Before switching the car power inverter 1 back on, ascertain why the fuse tripped.
In order to replace the 20 A flat motor vehicle fuse [13], proceed as follows:
Pull the flat motor vehicle fuse 13 out of the fuse holder 9.
You can easily pull the fuse out using a motor vehicle fuse puller (see Fig. E). This is not included with the delivery.

Insert a new fuse of equal value.
In order to replace the 10 A glass fuse in the cigarette lighter plug, proceed as follows:
Unscrew the fuse screw plug 21. The fuse is located below this plug.
When doing this, make sure you do not lose the loosely inserted contact pin 20.
Remove the defective 10 A glass fuse 19
Insert a new 10 A glass fuse of equal value 19
Insert the contact into the fuse screw plug 21 and screw the fuse screw plug 21 back onto the 12V cigarette lighter plug 18.
- Troubleshooting
| Problem Possible cause | Solution: | |
| No output voltage The car power inverter 1 is overloaded. | Reduce the load until it no longer exceeds the maximum load given in the technical specifications. | |
| The input voltage is below 10.5 V. | Keep the input voltage of the car power inverter over 10.5 V, in order to maintain an output voltage. | |
| Low output voltage The input voltage is below 12 V. | Keep the input voltage of the car power inverter over 12 V, in order to maintain a constant output voltage. | |
| The signal for low battery voltage sounds repeatedly. | The battery is defective. | Replace the battery. |
| Insufficient voltage supply or power supply. | Check the condition of the socket for the electrical system and the 12 V motor vehicle cigarette lighter plug 12 and clean them if necessary. |
Troubleshooting
| Problem Possible cause | Solution: | |
| No output power The | car power inverter 1 is not completely warmed up due to low environmental temperatures (e.g. with temperatures below 10°C in the winter). | Switch the car power inverter 1 on and back off, until the device connected to the car power inverter 1 is supplied with power. Repeat this procedure in order to be able to switch the device on. |
| The ignition must be switched on in order for the socket for the car's electrical system to have power. | Switch the motor vehicle ignition on or move to the "1" (ON) position. | |
| The car power inverter 1 is overloaded. | Reduce the load until it no longer exceeds the maximum load given in the technical specifications. | |
| The car power inverter 1 has overheated. | Wait until the device has cooled off. Make sure that there is sufficient ventilation clearance. Make sure that the connected load does not continuously exceed the maximum loading, in order to avoid the device overheating again. |
| Problem Possible cause Solution: | |
| The fuse in the device has blown. | Replace the fuse, as described in the "Replacing the fuses" chapter. Make sure that the car power inverter 1 is connected to the power supply using the right polarity. |
Televisions:
The car power inverter 1 is screened and outputs a modified sine wave.
However if reception from television channels is extremely weak, this can lead to interference or picture distortion.
In this case, position the car power inverter 1 as far from the television, aerial cable and aerial as possible.
Align the car power inverter 1, television, aerial cable and the to one another, until the reception improves.
If possible, use a high-quality, screened aerial cable.
Audio systems:
Some audio/video systems emit a humming noise through the speaker when they are operated using the car power inverter 1.
This is due to the fact that these devices cannot filter the modified sine wave of the car power inverter and is not a defect of the car power inverter.
- Cleaning and maintenance
Attention: The device must not come into
contact with water or be placed in water. There is a
Cleaning and maintenance / Information about recycling and disposal
risk of injury due to electric shock if moisture enters the device.
Before cleaning, always disconnect the car power inverter from the motor vehicle cigarette lighter socket/remove the connecting clamps from the car battery. Also remove any device connected to the car power inverter.
Clean the surface of the housing and accessories with a slightly damp cloth. Never use petrol, solvents or cleaners as these can corrode the surface of the device! If the ventilation slots are dusty, clean them with a soft brush.
Information about recycling and disposal
Don't throw away - recycle!
According to European Directive 2012/19/EU, used electrical devices must be collected separately for environmentally compatible recycling or recovery. Please return this device to an approved waste management company or use your municipal waste collection service. Please ensure you comply with local regulations. If you have any questions, please contact your local authority or waste management company.

Please return this device, accessories and packaging to your local recycling depot.
Do not dispose of electrical appliances in household waste!
As the consumer you are legally obliged (by the
German Battery Ordinance) to return any and all used batteries. Batteries containing harmful substances are labelled with the
adjacent symbol, which indicates the prohibition on disposal in household waste. The abbreviations for the relevant heavy metals are: Cd = cadmium, Hg = mercury, Pb = lead.
Take used batteries to a waste management company in your city or community or return them to your dealer. This satisfies your legal obligations while also making an important contribution to protecting the environment.
EU Declaration of Conformity
We,
C. M. C. GmbH
Responsible for documentation:
Dr. Christian Weyler
Katharina-Loth-Str. 15
66386 St. Ingbert
GERMANY
hereby take sole responsibility for declaring that the product
Car power inverter
IAN: 351562_2007
Art.no.: 2325
Year of manufacture: 2021/15
Model: USSW 300 B2
meets the basic safety requirements as specified in the European Directives
Electromagnetic
Compatibility:
(2014/30/EU)
Low Voltage Directive:
(2014/35/EU)
RoHS Directive:
(2011/65/EU+2015/863/EU)
and the amendments to these Directives.
The object of the declaration described above meets the requirements of Directive 2011/65/EU of the European Parliament and of the Council of 8 June 2011 on the restriction of the use of certain hazardous substances in electrical and electronic equipment.
This conformity assessment is based on the following harmonised standards:
EN 62368-1:2014/
A11:2017
EN 50498:2011
St. Ingbert, 01/10/2020
pp Dr Christian Weyler - Quality Assurance -
Warranty and service information
Warranty from Creative Marketing & Consulting GmbH
Dear Customer,
The warranty for this equipment is 3 years from the date of purchase. In the event of product defects, you have legal rights against the retailer of this product. Your statu
tory rights are not affected in any way by our warranty conditions, which are described below.
Warranty conditions
The warranty period begins on the date of purchase. Please retain the original sales receipt. This document is required as your proof of purchase.
Should this product show any defect in materials or manufacture within 3 years from the date of purchase, we will repair or replace it - at our discretion - free of charge. This warranty service requires that you retain proof of purchase (sales receipt) for the defective device for the three year period and that you briefly explain in writing what the fault entails and when it occurred. If the defect is covered by our warranty, we will repair and return your product or send you a replacement. The original warranty
period is not extended when a device is repair or replaced.
Warranty period and statutory claims for defects
The warranty period is not extended by the guarantee. This also applies to replaced and repaired parts. Any damages or defects detected at the time of purchase must be reported immediately after unpacking. Any incidental repairs after the warranty period are subject to a fee.
- Extent of warranty
This device has been manufactured according to strict quality guidelines and carefully inspected before delivery.
The warranty applies to material and manufacturing defects only. This warranty does not extend to
product parts, which are subject to normal wear and tear and can thus be regarded as consumable parts, or for damages to fragile parts, e.g. switches, rechargeable batteries or parts made from glass.
This warranty is voided if the product becomes damaged or is improperly used or maintained. For proper use of the product, all of the instructions given in the operating instructions must be followed precisely. If the operating instructions advise you or warn you against certain uses or actions, these must be avoided in all circumstances.
The product is for consumer use only and is not intended for commercial or trade use. The warranty becomes void in the event of misuse and improper use, use of force, and any work on the device that has not been carried out by our authorised service branch.
- Processing of warranty claims
To ensure prompt processing of your claim, please follow the instructions given below.
Please retain proof of purchase and the article number (e.g. IAN) for all inquiries.
The product number can be found on the type plate, an engraving, the cover page of your instructions (bottom left), or the sticker on the back or underside of the device. In the event of malfunctions or other defects, please first contact our service department below by phone or email. If your product is found to be defective, you can then send your product with proof of purchase (till receipt) and a statement describing what the fault involves and when it occurred free of charge to the service address given.

Note:
You can download this handbook and many more, as well as product videos and software at www.lidl-service.com.
With this QR code you can gain immediate access to the Lidl Service page (www.lidl-service.com) and you can open your operating instructions by entering the article number (IAN) 351562.

How to contact us:
GB, IE, NI, CY, MT
Name: C. M. C. GmbH
Website: www.cmc-creative.de
E-mail: service.gb@cmc-creative.de
Phone: 0-808-189-0652
Registered office: Germany
IAN 351562_2007
Please note that the following address is not a service address. Please first contact the service point given above.
Address:
C. M. C. GmbH
Katharina-Loth-Str. 15
66386 St. Ingbert
GERMANY
Ordering spare parts:
Dr. Christian Weyler
service.de@cmc-creative.de
service.at@cmc-creative.de
service.ch@cmc-creative.de
Telefon:
+49 (0) 6894/ 9989750
Hg = mercure, Pb = plomb.
Dr. Christian Weyler
Katharina-Loth-Str. 15
DE-66386 St. Ingbert
ALLEMAGNE
Site web: www.cmc-creative.de
E-mail:service.fr@cmc-creative.de
Telephone:
Dr. Christian Weyler
Katharina-Loth-Str. 15
DE-66386 St. Ingbert
DUITSLAND
Dr. Christian Weyler
Katharina-Loth-Str. 15
DE-66386 St. Ingbert
NÉMECKO
GTX Service Sp. z o.o. Sp.k.
Dr. Christian Weyler
Katharina-Loth-Str. 15
DE-66386 St. Ingbert
NEMECKO
Dr. Christian Weyler
Katharina-Loth-Str. 15
66386 St. Ingbert
ALEMANIA
Dr. Christian Weyler
Katharina-Loth-Str. 15
DE-66386 St. Ingbert
TYSKLAND
Spendingstransformer
IAN: 351562_2007
Art.-nr.: 2325


- CAR POWER INVERTER 300W USSW 300 B2 SPANNUNGSWANDLER 300W USSW 300 B2 CONVERTISSEUR ALLUME-CIGARE 300W USSW 300 B2
- CAR POWER INVERTER
- CONVERTISSEUR ALLUME-CIGARE
- DE AT CH
- Table of pictograms used
- Introduction
- Safety instructions Page 12
- Specific safety instructions.. Page 17
- Using the device.. Page 17
- Instructions for operation.. Page 18
- Troubleshooting Page 25
- Cleaning and maintenance.. Page 27
- Information about recycling and disposal.. Page 28
- EU Declaration of Conformity . Page 29
- Warranty and service information.. Page 30
- Table of contents
- CAR POWER INVERTER 300W USSW 300 B2
- KEEP OUT OF THE REACH OF CHILDREN!
- - Intended use
- Note!
- Attention!
- Package contents
- - Parts description
- - Technical specifications
- Input:
- Output:
- USB connector:
- Fuse:
- General data:
- - Safety instructions
- PLEASE READ THROUGH THE OPERATING INSTRUCTIONS CAREFULLY BEFORE USE. THESE FORM PART OF THE PRODUCT AND MUST BE AVAILABLE AT ALL TIMES!
- Personal safety!
- Risk of electric shock!
- Fire hazard!
- Notes on disconnecting from the power supply!
- Working with the device
- CAUTION:
- Electrical safety
- - Specific safety instructions
- Using the device
- Attention:
- - Instructions for operation
- Example:
- Note:
- Install and secure
- Operation in a vehicle
- - Connecting to a voltage supply
- - Connecting to a 12 V motor vehicle cigarette lighter socket
- - Connecting to a car battery
- - Instructions for operatingdevices
- General notes:
- - Signal if the battery voltage is low
- - Charge USB device
- - Replacing the fuses
- Danger to life through electric shock!
- - Troubleshooting
- Troubleshooting
- Televisions:
- Audio systems:
- - Cleaning and maintenance
- Cleaning and maintenance / Information about recycling and disposal
- Information about recycling and disposal
- EU Declaration of Conformity
- M. C. GmbH
- Warranty and service information
- Warranty from Creative Marketing & Consulting GmbH
- Warranty conditions
- Warranty period and statutory claims for defects
- - Extent of warranty
- - Processing of warranty claims
- How to contact us:
- IAN 351562_2007
- Address:
- Ordering spare parts:
- Spendingstransformer
Brand : ULTIMATE SPEED
Model : USSW 300 B2
Category : Voltage converter