DryFix 20 PRO - Dehumidifier SUNTEC - Free user manual and instructions
Find the device manual for free DryFix 20 PRO SUNTEC in PDF.
User questions about DryFix 20 PRO SUNTEC
0 question about this device. Answer the ones you know or ask your own.
Ask a new question about this device
Download the instructions for your Dehumidifier in PDF format for free! Find your manual DryFix 20 PRO - SUNTEC and take your electronic device back in hand. On this page are published all the documents necessary for the use of your device. DryFix 20 PRO by SUNTEC.
USER MANUAL DryFix 20 PRO SUNTEC
This appliance can be used by children aged from 8 years and above and persons with reduced physical, sensory and mental capabilities or lack of experience and knowledge if they have been given supervision or instruction concerning use of the appliance in a safe way and understand the hazards involved. Cleaning and user maintenance shall not be made by children without supervision. Children of less than 3 years should be kept away unless continuously supervised.
Children aged from 3 years and less than 8 years shall only switch on/off the appliance provided that it has been placed or installed in its intended normal operating position and they have been given supervision or instruction concerning use of the appliance in a safe way and understand the hazards involved.
Children aged from 3 years and less than 8 years shall not plug in, regulate and clean the appliance or perform user maintenance.
- Use the appliance with care.
- This appliance is for indoor use only and intended for use in a domestic environment only. Any other use is not recommended by the manufacturer and may cause fire, electrical shocks or other injury to user or property.
-
This unit must be only connected to an outlet with a rated voltage of AC 220-240V / 50Hz. Should you have any doubts regarding the suitability of your electrical supply, have it checked by a qualified electrician.
-
Disconnect the power plug from socket before dismantling, assembling or cleaning.
- Avoid touching any moving parts of the appliance. Never insert fingers, pencils or any other objects through the guard.
- Do not clean the unit by spraying it or immersing it in water.
- Please do not use an extension cord to connect the unit.
- Never operate this appliance if the cord, power adapter or plug is damaged.
- Please ensure the power cord is not stretched or exposed to sharp object/edges.
- Please refrain from further usage if the power cord, power plug or the appliance are damaged and contact your seller.
- Do not leave the appliance unattended.
- Do not attempt to repair, disassemble or change the appliance by yourself.
- The use of accessory not recommended by SUNTEC may cause harm.
- Do not use the appliance for any other purposes than its intended use.
- Do not tilt the unit while in use. The unit is designed to work only in vertical position.
- This dehumidifier must always be stored and transported upright, otherwise irreparable damage may be caused to the compressor.
- Avoid restarting the unit unless 5 minutes have passed since being turned off. This prevents damage to the compressor.
- Never use the mains plug as a switch to start and turn off the dehumidifier. Use the ON/OFF switch located on the
control panel.
- Always place the unit on a dry and stable surface.
- The appliance should not be installed in laundry or wet rooms where the humidity is higher than 85% RH.
- Do not dry laundry above the unit. Place the laundry at least 1 meter away from your dehumidifier.
- Do not place the unit next to heat sources (e.g. electrical fires, fireplaces, etc.).
- Avoid mishandling the dehumidifier. Dropping, throwing the unit can cause damage to its internals and increases the risks of operating it.
- Do not store or use gasoline, petrol, paint, solvents or other flammable vapors or liquids in the vicinity of this dehumidifier or any other appliance.
- This dehumidifier must not be used in spaces where there is a high concentration of gases, solvent or other volatile organic compounds; in very dusty environments; in any domestic, commercial or industrial environment where air composition is flammable.
Energy saving and unit safety protection tips
- Do not cover or restrict the airflow from the outlet or inlet grills.
- For maximum performance the minimum distance from a wall or objects should be 20~cm .
- Keep the filters or grills of the unit clean. Under normal conditions, filters or grills should be cleaned once every three weeks (approximately). Since the filters remove airborne particles, more frequent cleaning may be necessary, depending on the air quality.
Installation
- In order to save energy, do not open windows or doors while the unit is running.
- Place the unit on a hard / flat surface.
- On first use run the unit continuously for 24 hrs.
- Place a piece of carpet or a rubber mat under the unit, to reduce any vibrations while the unit is running.
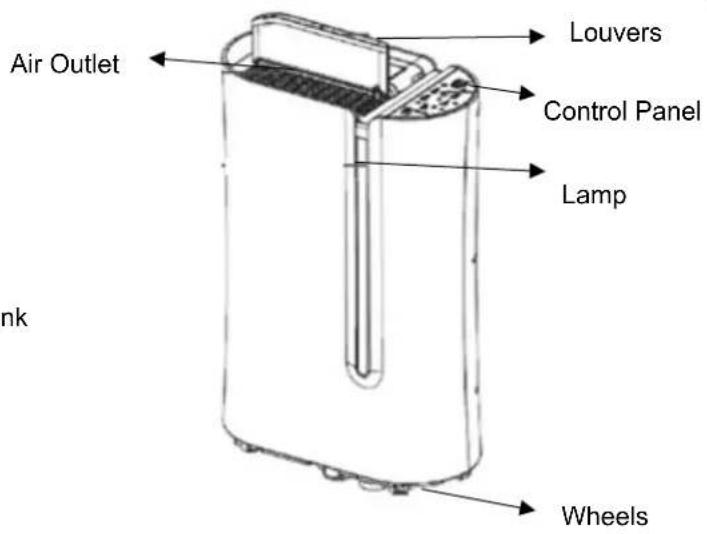
Parts
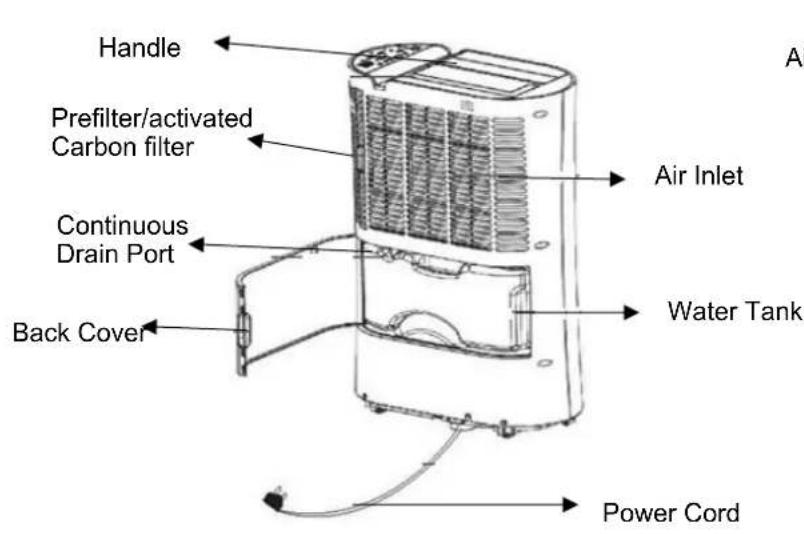
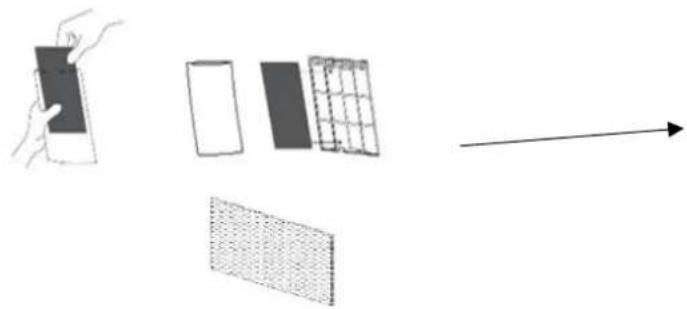
Activated Carbon Filter:
Take out the carbon filter from the bag and insert it in the filter housing. We always suggest to change the carbon filter every 3 months. It keeps the room fresh.
Control Panel
POWER: Use this button to turn on or turn off the appliance.
MODE CONTROL: Use this button to select the function of this unit: AUTO/HIGH/LOW or FAN. The appliance will start with the AUTO-function until you choose another function. The AUTO-Modus is ideal for domestic environment humidity of 50 - 55% RH and for saving electricity.
You can choose between HIGH or LOW. If you choose the "FAN"-function the fan will work without dehumidification.
LAMP: Please press this button to activate or deactivate the lamp. The indicator light colour will change according to the humidity condition:
Red: high humidity, RH ≥70%
Green: comfortable 70%-40% RH
Orange: dry, RH<40%
Note: It can take about 2 minutes until the indicator will change the colour.
OSCILLATION: Use this function, if you need to set the Tank-full indicator position of the lovers. There are 3 different directions:
45^ 90^ or swing mode between 45^ and 90^ .Press the button for the swing mode. If you continue pressing the button, the louvers will change to 45^ or 90^ .Do not operate the unit if the self-opening louvers do not open on power on.
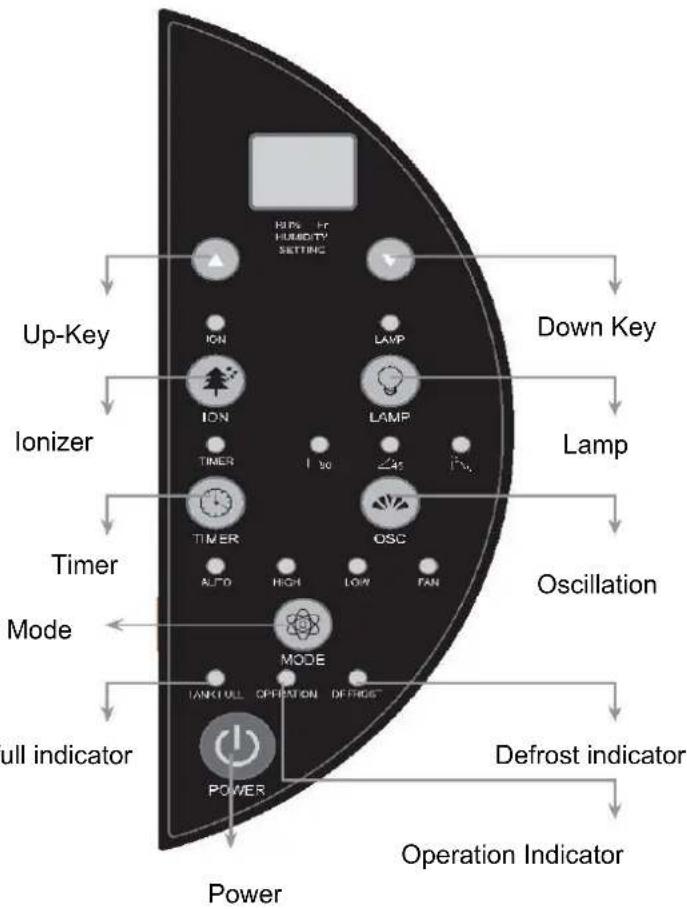
UP/DOWN key: Press UP/DOWN key to select the desired humidity level. Default relative humidity is 55% . If you select 35% , the compressor will not stop until the water tank is full. The humidity level can be set within a range of 35% RH to 80% RH in 5% increments. The compressor will work until the desired humidity is measured. The FAN-modus will change automatically and will move the air around the room ensuring the entire air in the room is processed.
TIMER:
Power-off function:
- Press the Timer-button, while the device is on.
- Use the "up" or "down" key to set the time period (0-24 hours)
Power-on function: - Press the Timer-button, while the device is off.
- Use the "up" or "down" key to set the time period (0-24 hours)
DEFROST: The appliance will defrost automatically as programmed once the coil sensor detects temperature. The indicator will light up at the same time. Once defrosting finishes, the appliance will recover to its previous running mode. When the unit is in a room where the temperature is between 5^ and 12^ , the defrost mode enters every 30 minutes. When the unit is in a room where the temperature is between 12^ and 20^ , the defrost mode enters every 45 minutes.
TANK-FULL INDICATOR: Red light will be on and the unit will beep when the tank is ready to be emptied or when the tank is removed or not replaced in the proper position.
IONIZATION FUNCTION: Use the Ionization function, to refresh the air in the room. As soon as you press the "ION"-key, the light will come on.
Display:
-
When the unit is plugged in, it will indicate the room humidity level.
-
When the humidity level is selected, it will indicate the set humidity.
-
As soon as you activate the timer, the set time will be shown on the display for a few seconds and then the humidity level in the room will appear on the display.
Note: If ambient humidity is lower than 20% , it will show "LO". If ambient humidity is higher than 90% it will show "HI".
Compressor: When the selected humidity is 2% lower than the user selected humidistat setting; the compressor will be
shut off automatically, but the fan will still move to ensure air is not stale in the room. The unit will use only a minimal amount of energy in fan mode.
When the humidity is equal or higher than user selected humidity the compressor will restart once the 3-minute delay compressor protection expires.
We recommend you to leave the unit to rest for about 10 minutes before using it again, to protect the compressor.
Auto-Restart: If the unit stops off unexpectedly due to the power cut, it will restart with the previous function selected.
Laundry: Set the humidity level to 35% - 50% RH. 35% is very dry and the unit will work until water tank is full. Set the fan to HIGH-function and the louvres to swing mode or 45^ , directing the airflow onto clothes / laundry dryer. Please do not place your laundry directly on the device. Make sure that there is nothing blocking the hot air exhaust airflow and place them 1,5 meters away from the device.
Condensation Drainage
Water Tank:
- When the tank is full the indicator light will flash and the unit will beep.
- Turn the device off and unplug the unit.
- Slowly pull out and empty the water tank.
- Reinsert it into the dehumidifier.
Note: To prevent growth of mould, mildew and bacteria, clean the tank every few weeks. Fill the tank with clean water and add a little mild detergent. Swish it around and then empty the tank and rinse. Do not use a dishwasher to clean the tank.
Continuous Draining:
- Please find on the back of the unit the drain outlet.
- Remove the plastic bung.
- Please insert the pipe (not included) into the drain outlet, direct the pipe to a suitable drainage point and let the water flow out smoothly.
- Make sure that the connection between the pipe and the drain outlet is tight, so that there is no leak.
Maintenance and care
- Please turn the device off.
- Unplug the unit from the power outlet before cleaning.
-
To clean the dust filter, please follow the instructions:
-
Remove the filter housing from the unit and pull out the filter from the frame.
- If the filter is dusty, use a vacuum attachment or a soft brush to clean.
- Wash the filter with warm water and dry it with a soft cloth.
-
Leave it to dry before reinserting it into the filter frame.
-
Clean the unit with a wet cloth and then wipe it with a dry cloth.
- Please do not use any chemical solvents or hot water.
- If the unit will not be used for a long time period, turn it off, unplug it, cover the unit and keep it in a dry and safe place.
Troubleshooting
| Issue | Cause | Solution |
| The dehumidifier does not extract much water if the temperature is low. | Normal Operation | The compressor works best in temperatures above 15°C. If the temperature is lower than 15°C and the air is dryer than the setting on the unit, the device will not extract water. |
| Cold and/or hot air comes out from the air outlet. | Normal Operation | When the unit is in dehumidifying mode it absorbs humid air from the room and freezes it to reduce humidity in the room. |
| Is the tank-full indicator activated? | Tank full or the tank has not been properly inserted. | Empty the tank and make sure the tank is properly inserted in the unit. |
| No function. | Is the plug properly inserted in the socket? | Insert the plug into the socket and press the POWER-button. |
| Front louvres do not open. | Louvre motor is blocked | Check if anything is blocking the louvre. Try to move gently the louvres up and down, while the unit is off. If failed, return the unit to your seller. |
| Dehumidifier does not extract water. | Is the unit set to a humidity level lower than the one in the room? | Please check the humidity level settings. |
| Is the temperature in the room too low for water extraction to be efficient? | Please increase the temperature in the room or reposition the unit. | |
| Is the air outlet grill blocked? Is the unit too close to walls? | Please ensure a distance of at least 20 cm between the unit and the walls. | |
| Airflow seems weak. | Is the filter dirty or clogged? | Please clean the filters regularly as per user manual. |
| Unit is noisy during operation. | Is the unit on uneven surface? | Please place the unit on a flat horizontal surface. |
| Is filter clogged? | Please clean the filters regularly as per user manual. | |
| E3 oder E4 | Humidity sensor error | Unplug the unit, rest and plug it back in. If error repeats, contact your seller. |
| E1 oder E2 | Temperature sensor error | Unplug the unit, rest and plug it back in. If error repeats, contact your seller. |
| E5 oder E6 | Abnormal coil sensor temperature | Unplug the unit, rest and plug it back in. If error repeats, contact your seller. |
| Defrost light on and unit stops regularly. | Unit is defrosting | Allow the unit to automatically defrost. The protection will clear after the unit self-defrosts. Increase temperature in the room if this repeats too often. |
Technical Data
| MODEL TECHN. DATA | DryFix 20 PRO |
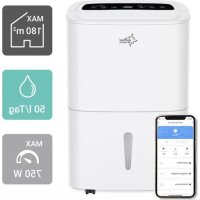
| Dehumidifying capacity (Liter/day, at 30 °C / 80% RH) | 20 l |
| Rated Power | 365W |
| Rated voltage | 220V-240V/50Hz |
| Dimensions | 380 x 580 x 195 mm |
| Weight | 14,3 Kg |
| Refrigerant | R290 |
| Amperage | 1,2A |
| Humidity level setting | 35% – 80% |
Refrigerant
(CE) N 842/2006: This dehumidifier contains the refrigerant R143A. The amount of refrigerant is less than 1kg , and is in a closed cooling circuit. The coolant does have zero ozone depletion potential, but is a so-called greenhouse gases under the Kyoto Protocol and may thus contribute to global warming, if it is released to the atmosphere. Therefore, only trained technicians with refrigerant certificate make a filling or emptying. Suntec your dehumidifier does not have to use if used properly and undamaged coolant circuit can be refilled with refrigerant.
R290, GWP: 3, 75g = 0.000225t CO2e
EC-Declaration of Conformity
The unit complies with the essential health and safety requirements of the European Union. The EC declaration of conformity is the basis for the CE marking of this unit. With the publication of this manual, all previous are not valid. SUNTEC, SUNTEC Wellness, KLIAMTRONIC and the Sun logo are registered trademarks. © 2020/01 SUNTEC WELLNESS GMBH
Note concerning protection of environment
This product must not be disposed of via normal household waste after its service life but must be taken to a collection station for the recycling of electrical and electronic devices. The symbol on the product, the operating instructions or the packaging indicate such disposal procedures. The materials are recyclable in accordance with their respective symbols. By means of re-use, material recycling or any other form of recycling old appliances you are making an important contribution to the protection of our environment. Please ask your local council where your nearest disposal station is located.
No liability is assumed for printing errors and mistakes.
KlIMATRONIC
DryFix 20 PRO
Deshumidificador
For this appliance we assure 24 months warranty.
During the 24 months warranty we guarantee to repair your appliance free of charge or to provide your seller the spare parts free of charge if the appliance fails to work due to production failure.
Other claims are excluded from this warranty. We will not be liable for any defects caused by acts of nature, improper use, negligence of the instruction manual, damage from continuous use and damages during transportation.
This warranty card is only applicable with the according invoice.
In case of service please bring your purchased product to your seller.
Product name:
Serial number:
Name of buyer:
Date of purchase:
Stamp and signature of seller:
Manufacturer:
Suntec Wellness GmbH
Holzstraße 2
40221 Dusseldorf
Germany