DryFix 16 EQ - Dehumidifier SUNTEC - Free user manual and instructions
Find the device manual for free DryFix 16 EQ SUNTEC in PDF.
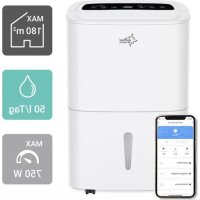
| Product type | Dehumidifier |
| Brand | Suntec |
| Model | DryFix 16 EQ |
| Refrigerant | R290 (GWP 3, 55 g) |
| Power supply | 220-240 V, 50 Hz |
| Operating temperature range | 5 °C to 32 °C |
| Operating humidity range | 10 % to 90 % |
| Minimum distance from wall | 50 cm |
| Operating modes | Manual, continuous, powerful dehumidification, laundry drying, ventilation |
| Humidity setting | 30 % to 80 % (in manual mode) |
| Ventilation speed | Low and high |
| Timer | 0 to 24 hours |
| Child lock | Yes (button lock) |
| Frost protection | Yes (automatic activation) |
| Humidity indicator light | Blue (<50%), green (50-70%), red (>70%) |
| Water tank capacity | Not specified (estimated 2-3 L) |
| Continuous drainage | Possible via drainage hose |
| Filter cleaning | Wash with water and neutral detergent, dry before reinstalling |
| Storage | Vertical, out of sunlight, tank emptied and filter clean |
| Weight | Not specified (estimated 10-12 kg) |
| Dimensions (L x W x H) | Not specified (estimated 35 x 25 x 50 cm) |
Frequently Asked Questions - DryFix 16 EQ SUNTEC
User questions about DryFix 16 EQ SUNTEC
0 question about this device. Answer the ones you know or ask your own.
Ask a new question about this device
Download the instructions for your Dehumidifier in PDF format for free! Find your manual DryFix 16 EQ - SUNTEC and take your electronic device back in hand. On this page are published all the documents necessary for the use of your device. DryFix 16 EQ by SUNTEC.
USER MANUAL DryFix 16 EQ SUNTEC
- Please place the appliance on a stable flat surface to avoid loud noises and vibrations.
- Please do not operate the appliance near heating appliances and flammable or hazardous objects.
- If the dehumidifier is used in a room with appliances that emit gas, the room must be regularly and frequently ventilated.
- Please empty and dry the water tank and the appliance if it is not used for a long time. This will prevent mould growth and unpleasant odours inside the appliance.
- Please do not place heavy objects on the appliance.
- Please do not hang curtains or wet clothes directly in front of the air outlet, this will cause the unit to overload.
- Do not lead the drainage tube outside when the temperature is low.
Please empty the water tank before moving the unit to avoid water spillage.
- Please do not tip the appliance as leaking water may cause damage to the appliance.
- If the connection cable has been damaged, please do not use the drain hose outside.
If the connection cable has been damaged, please contact your supplier to avoid danger.
- Please do not operate the appliance outside. Sun, rain, or low temperature may cause damage to the unit or electric shock.
- Please never cover the outlet or inlet of the unit.
- The unit should be placed at least 50~cm away from the wall or other obstacles/objects.
- Please keep the dust filter and air outlet/inlet grilles
clean. They should be cleaned regularly to ensure best performance.
Important.
The appliance must always be stored and transported in an upright position.
If in doubt, we recommend that you wait at
least 24 hours before switching the
hours before switching the unit on again.
Installation
- To save energy and ensure optimal performance of the appliance, please close all doors and windows in the room.
- Please place the appliance on a flat level surface.
- To avoid loud noises and vibrations, you can place a small carpet or rubber mat under the unit.
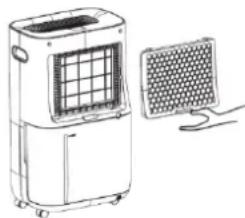
Parts (pic. 1)
1 Control panel
4 Water tank
2 Humidity control light/colour indicator
5 Handles
3 Air inlet with dust filter
6 Drainage hole
Control Panel (pic. 2)
Buttons:
1 child lock
2 timer
3 ventilation speed
4 sleep mode
5 fan
6 humidity
7 mode selection
8 On/Off
Light indicators:
9 low ventilation speed
10 high ventilation speed
11 child Lock
12 timers
13 frost protection
14 water tank full
15 strong dehumidification
16 sleep mode
17 ventilation mode
18 continuous dehumidification
19 manual dehumidification
20 laundry drying
Functions
On/off:
- Please plug in the unit.
- Please make sure that the water tank is empty before switching on.
- Please press the On/Off button (8) to switch the unit on or off.
- The unit starts automatically with the previous setting.
Mode:
After switching on the device, please press the mode button (7) to choose between manual dehumidification (19), laundry drying (20), continuous dehumidification (18) or strong dehumidification (15).
Manual dehumidification:
- Please press the mode button (7) to switch on the manual dehumidification function. The manual dehumidification indicator (19) lights up. In this mode you can set the desired degree of dehumidification and the ventilation speed.
- Please use the humidity button (6) to set the air dehumidification from 30% - 80% .
- Please press ventilation speed button (3) to choose between low and high ventilation speed
Strong dehumidification:
- Please press the mode button (7) to switch on the "strong dehumidification" function. The strong dehumidification indicator (15) lights up.
- The ventilation speed and humidity level cannot be adjusted in this mode, the device dehumidifies automatically and with a high ventilation speed
Continuous dehumidification:
- Please press the mode button (7) to switch on the continuous dehumidification function. The continuous dehumidification indicator (18) lights up.
The ventilation speed and humidity level cannot be set in this mode.
Laundry drying function:
- Please press mode button (7) to switch on the laundry drying function. The corresponding mode indication (20) lights up.
The ventilation speed and humidity level are set automatically and cannot be set manually, the appliance dehumidifies automatically and with high wind speed.
This function helps you to dry clothes, shoes or rugs faster.
Fan mode:
- Please press the "Fan speed" button (3) to switch on the ventilation mode. The corresponding mode indication lights up.
- In this mode, only the fan is working, dehumidification function is not available.
- For low fan speed, press the fan speed button once, the low fan speed indication (9) and the fan mode indication (17) light up.
- For a high fan speed, press the fan speed key again. The high fan speed indication (10) and the fan mode indication (17) light up.
Timer:
- Please press the timer button (2) to set the timer from 0 to 24 hours, the timer indication lights up.
- When the unit is switched on, press the timer button to set the shut-off time as described above.
- When the unit is switched off, press the timer key to set the switch-on time as described before.
Sleep mode:
- Please press the sleep mode button (4) to switch on the sleep mode. All indication lights (except sleep mode 16) and the display are switched off. The "Water tank full" light will light up in case the water tank should be emptied.
Child lock:
- For child lock, please press the child lock button (1) for 5 seconds. The child lock indicator (11) lights up and all buttons are locked for operation. To deactivate the child lock, please press the child lock button for another 5 seconds.
Colour light indication:
If the humidity of the ambient air is below 50% , the indicator light lights up in blue.
If the humidity is between 50% and 70% , the indicator light is green.
If the humidity is above 70% , the indicator light is red.
Frost protection:
- The device has frost protection. If the temperatures are too low, the device exits the mode you have selected and automatically switches to frost protection mode. Please do not switch off the device or remove it from the power supply.
Drainage (pic. 3)
Water tank:
- As soon as the water tank is full, the unit stops working, a warning signal sounds and the 'water tank full' indication (14) lights up on the display.
- Please switch off and unplug the unit.
- Carefully pull out the water tank and tip out the water by using the handle.
- Please clean and dry the empty tank, and carefully place it back into the machine.
Continuous drainage:
- Please pull the plug out of the outlet.
- Please remove the water tank from the appliance as described above and remove the drainage hose.
- Carefully push the water tank back into the appliance without the drainage hose.
- You will find the drainage opening on the back of the machine.
- Please insert the drainage hose into the opening and place the other end of the hose into a container so that the water can drain off continuously.
- Please make sure that the hose is connected tightly to prevent the water from leaking.
Cleaning and maintenance
To avoid injury, please switch off and unplug the appliance before starting service or cleaning.
Cleaning:
- Please unplug the unit.
-
Please clean the unit with a dry and soft cloth. For heavy dirt, please use a slightly damp cloth.
-
Please do not use any chemical products (such as petrol, alcohol, etc.). The unit's housing and the unit's surface may be damaged.
Cleaning the dust filter:
- Please open the filter cover on the backside of the unit and carefully remove the filter.
To remove dust from this filter, please use a vacuum cleaner or to tap it out carefully. - If the filter is very dirty, wash it in water with neutral detergent, rinse well with water and let it dry.
- Carefully put the filter back into the unit and close the filter cover.
Storage
- Please unplug the unit and bundle the power cord.
- Please empty the water tank, wipe out the tank with a cloth and reinstall it.
- Please clean the air filter as described above and then reinstall it in the unit.
- For storage, place the unit in an upright position and avoid direct sunlight.
Troubleshooting
| problem | cause | solution |
| The unit is not working | Is the unit connected to the power source? | Plug-in the unit. |
| Is the 'water tank full' indicator lighting up (water tank is full or incorrectly placed)? | Empty the water tank and install it correctly. | |
| Is the water tank installed correctly? | Please check the position of the water tank. | |
| Are the air outlet slats open? | Please open the air outlet slats. | |
| The unit is in defrost mode. | This is a normal process and helps to protect internal parts. Once the process is complete, the unit returns to normal operation. | |
| The dehumidification performance is insufficient | Is the air inlet or outlet blocked? | Check the air inlet and outlet and remove any obstructing objects |
| Is the air filter dirty? | Clean the air filter as described in the operating instructions | |
| Does the unit operate in the fan mode? | Please switch to dehumidification mode. | |
| Is the room temperature/humidity too low high? | The unit should be operated at the air temperature of 5°C - 32°C and a humidity of 10%-90%. The unit cannot dehumidify the air optimally at ambient temperature and/or humidity level below/above this. | |
| Humidity does not drop | Is the room size too large? | Please observe the recommended room size indicated on the packaging. |
| Are all windows and doors in the room closed? | Please close all doors and windows if necessary. | |
| Loud noises during start-up | Does the unit stand upright on the stable surface? | Please check the position of the unit. |
| The circulation of the refrigerant inside may cause noise. | The noises disappear as soon as the refrigerant circuit has stabilised. | |
| Unpleasant smells during start-up. | This is not a defect. | Unpleasant smells during start up are normal and will disappear after a short time. If the surrounding objects are heavily soiled, e.g. by cigarette smoke, this can also lead to unpleasant smells from the air outlet. |
| The start-up is interrupted. | Is the room temperature higher than the operating temperature? | The unit restarts automatically as soon as the ambient temperature has dropped. |
| The clothes do not get dry. | Is the laundry too far away from the unit? | Please make sure the laundry is exposed to the air flow. |
| Is the room temperature lower than the operating temperature? | The laundry dries more slowly when the ambient temperature is low. Try drying your laundry in another room. | |
| There is water in the water tank (before the first start-up). | This is not a defect. | Some water may remain after the factory function test has been carried out. |
Refrigerant
(CE) N 842/2006: This dehumidifier contains the refrigerant R290. The amount of refrigerant is less than 1kg and is in a closed cooling circuit. The coolant does have zero ozone depletion potential, but is a so-called greenhouse gases under the Kyoto Protocol and may thus contribute to global warming, if it is released to the atmosphere. Therefore, only trained technicians with refrigerant certificate make a filling or emptying. Suntec your dehumidifier does not have to use if used properly and undamaged coolant circuit can be refilled with refrigerant.
R290, GWP: 3, 55g = 0.000165t CO2e
Composants (Image 1)
Vremenski programator:
- Za podesavanje vremena od 0-24 sata molimo pritsnite tipku za vremenski programator (2), uključuje se svjetlosni indicator za vremenski programator (12).
Kada je uredaj uključen, pritisnite tipku vremenskog programatora da podesite vrijeme isključivanja na prethodno opisan nacin.
Kada je uredaj iskljucen, pritisnite tipku vremenskog programatora da podesite vrijeme uključivanja na prethodno opisan nacin.