VT 5 - Fan STEBA - Free user manual and instructions
Find the device manual for free VT 5 STEBA in PDF.

| Brand | Steba |
| Model | VT 5 |
| Product type | Pedestal fan |
| Maximum air flow | 69.95 m³/min |
| Power consumption | 56.6 W |
| Service value | 1.24 (m³/min)/W |
| Standby consumption | 0.41 W |
| Sound power level | 60.5 dB(A) |
| Maximum air speed | 2.99 m/s |
| Number of speeds | 3 (I, II, III) |
| Timer | 1 to 7 hours |
| Oscillation | Yes |
| Sleep mode | Yes |
| Interval ventilation | Yes (60 s cycle) |
| Adjustable tilt | Yes |
| Power supply | Mains (220-240 V ~ 50 Hz) |
| Blade material | Plastic |
| Cleaning | Damp cloth; grilles with vacuum cleaner |
| Safety | Unplug before cleaning; do not immerse |
| Spare parts | Safety grilles, blades, safety nut |
| Repairability | Repair by qualified electrician |
| Weight | Approximately 4.5 kg |
Frequently Asked Questions - VT 5 STEBA
User questions about VT 5 STEBA
0 question about this device. Answer the ones you know or ask your own.
Ask a new question about this device
Download the instructions for your Fan in PDF format for free! Find your manual VT 5 - STEBA and take your electronic device back in hand. On this page are published all the documents necessary for the use of your device. VT 5 by STEBA.
USER MANUAL VT 5 STEBA
natural_image
Exterior view of a Sheba air fan with four blades and a central hub (no text or symbols visible)220 - 240 V\~; 50 Hz; 54 W
Ventilator
VT 5
Instructions for use 10
Mode d'emploi 16
natural_image
Diagram of a camera lens system with an arrow indicating rotational direction (no text or symbols present)This appliance is for private use only and must not be used commercially. Please read the instruction manual carefully and keep it at a safe place. When the appliance is given to another person the instruction manual should be passed to that person, too.
Only use the appliance as described in the instruction manual and pay attention to the safety information. No liability for damages or accidents will be accepted, which are caused by not paying attention to the instruction manual.
Safety information
- Connect and operate the appliance only in accordance with the specifications on the rating plate.
- Do not use if the cord or appliance is damaged. Always check before using the appliance! Only the appropriate connector must be used.
- The appliance is to be connected to a socket-outlet having an earthing contact.
This appliance is not intended for use by persons (including children) with reduced physical, sensory, or mental capacities, or lack of experience and knowledge, unless they have been given supervision or instruction concerning use of the appliance by a person responsible for their safety
- Children should be supervised to ensure that they do not play with the appliance.
- After using the appliance or if the appliance malfunctions, always pull out the plug.
- Never pull at the cord set. Do not chafe it over edges or squeeze it.
- Keep the power supply cord away from hot parts.
- Move switch to „O“ when device is not being used
- Do not leave the apliance outdoors or in a damp area.
- Never immerse the appliance in water.
- Do not operate the appliance if it is damaged (for example if it felt over).
- The manufacturer is not liable for damage occurred by using the appliance in another way than described or if a mistake in operating has been made
- To prevent injury, repairs such as replacing a damaged cord, should only be carried out by customer service.
- The appliance is not intended to be operated by means of an external timer or separate remote control system.
Do not direct the air flow from the device at flames (e.g. fireplaces, candles etc.), on babies or patients. Do not cover the intake or the outlet. - Never plug something into the safe guard while the device is running.
Cleaning and maintainance:
- Unplug the device.
- Never immerse the device in water!
• Use a humid cloth with a little bit of detergent to clean it. - Clean dusty ventilation grilles with a vacuum cleaner.
Safety instructions when using the device:
• Always connect the device to a safety socket
- Do not use the device unless it is fully assembled.
- Route connecting cable in such a way as to avoid unintentional contact, stumble or pulling during operation.
- Unplug device from socket before moving its location.
- Disconnect mains plug after use and before cleaning.
Working place:
Place this device on a even and stable surface. Do not place the device near objects that may be sucked in (such as curtains)
- Do not place the device directly in front of people or animals.
- For your health's sake, please select the correct air speed.
Assembly:
Before every assembly or disassembly the device must be turned off!

text_image
Bulge Space Lower stand tube Base Screw and plane washer Figure 1 Fig.2 Turning in a clockwise direction Upper stand tube ThreadAssembly of the base and the stand
- Insert the lower stand into the hole at the base. Tighten the stand with the 4 screws on the base (Fi. 1).
- Afterwards, insert the upper stand to the lower one and clockwise screw tightly (Fig. 2).
text_image
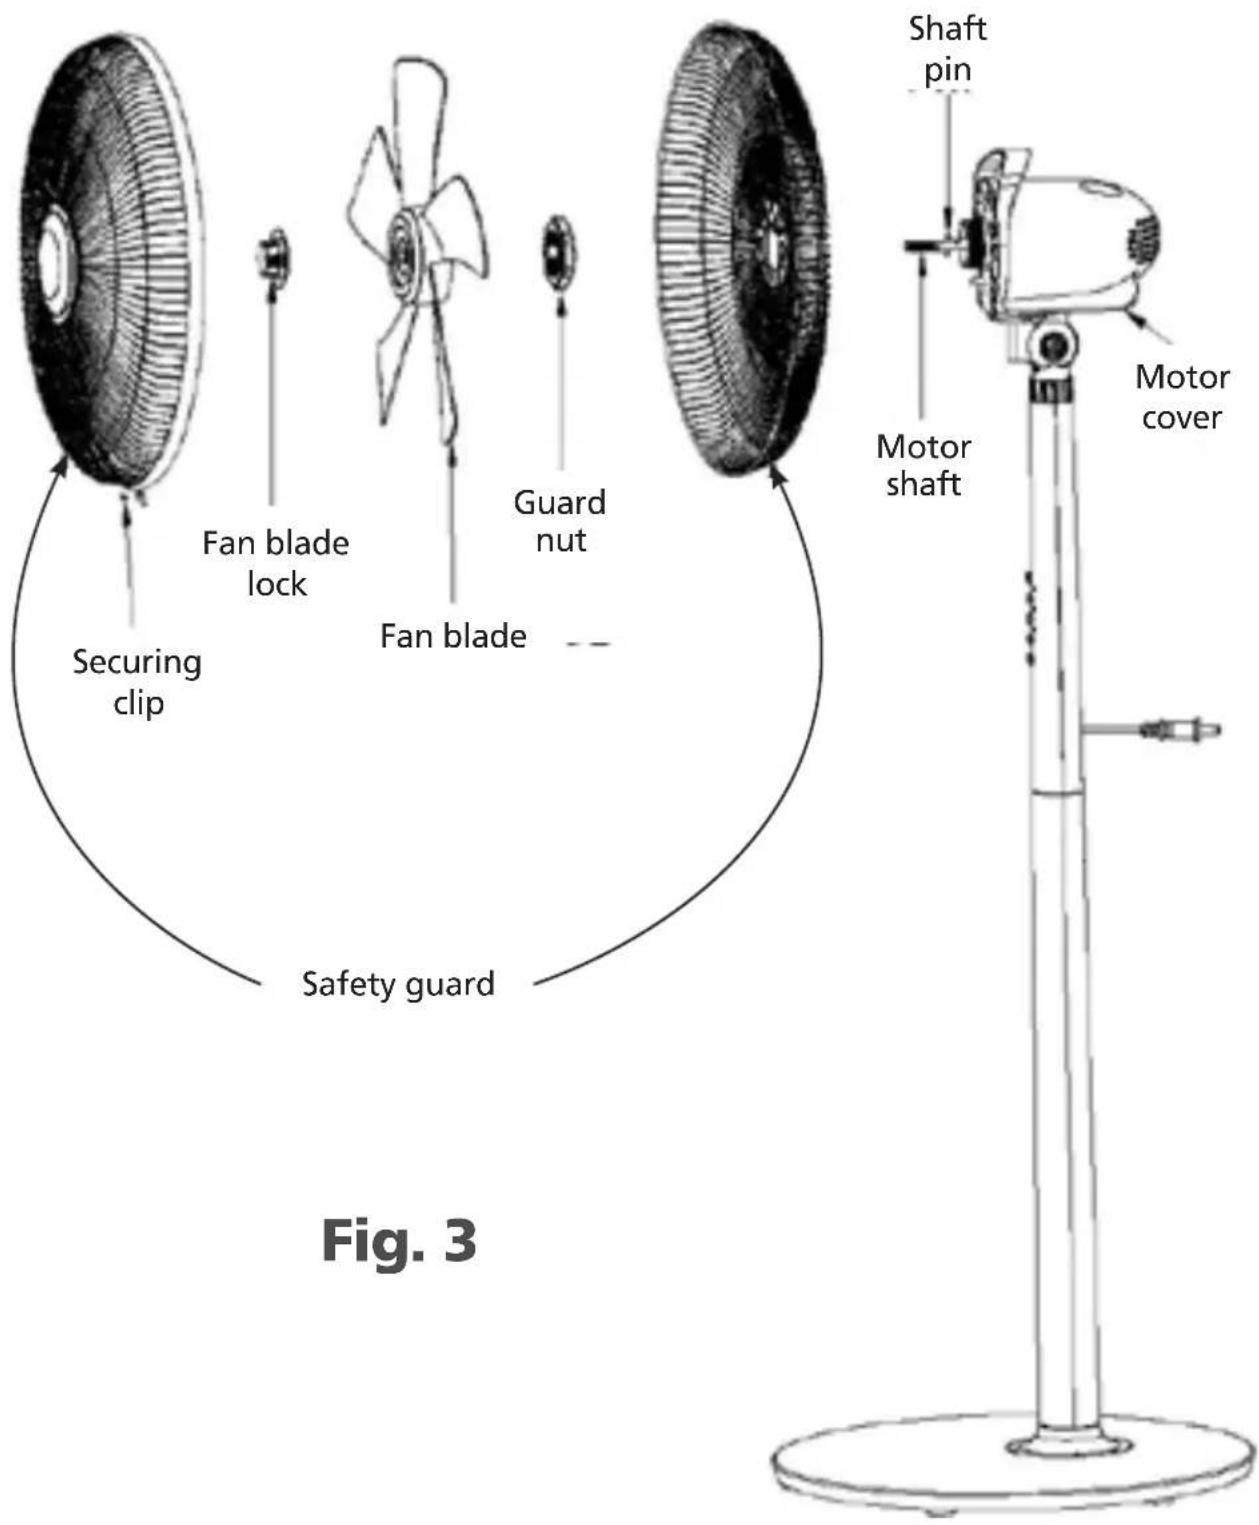
Securing clip Fan blade lock Fan blade Guard nut Safety guard Shaft pin Motor shaft Motor cover Fig. 3Assembly of the fan blades and the safety guard
-
Remove the fan blade lock and the guard nut from the moto shaft. Place the rear safety guard onto the shaft pin. Tighten the safety guard with the guard nut at the motor (Fig. 3).
-
Push the fan blade onto the motor shaft by aligning the slots on the base of the fan blades with the shaft pin. Tighten the fan blades with the fan blade lock. This lock must be tightened counterclockwise. Check that the fan blades rotate freely by slightly turning them.
-
Open the securing clip and loosen the screw on the lower side of the front safety guard. Position the front guard at the upper side of the rear guard. Press the front guard onto the rear guard and close the securing clip. Tighten the crew.
Functions
ON/OFF
The device starts at low speed. The symbol I and 📋 shine.

By pressing this button you can change the ventilation performance:
- Level II – medium
- Level III – fast
The device runs continuously.

Setting the time from 1 – 7 hours.
After the time run out, the device turns off.

Oscillation

Function mode

Uninterrupted service

Interval ventilation
This setting should simulate natural winds. The different wind flows repeat every 60 seconds as long as the set time runs out.
Level I: low airflow
Level II: medium airflow
Level III: high airflow

Sleeping mode
The tilt angle can be adjusted.

natural_image
Diagram of a camera or projector with a rotating lens and directional arrows indicating rotation (no text or symbols)Information requirements
| Steba VT 5 | |||
| Description Symbol Value Unit | |||
| Maximum fan flow rate | F | 69,95 | m^3/min |
| Fan power input P 56,6 W | |||
| Service value | SV | 1,24 | (m^3/min)/W |
| Standby power consumption P | _SB 0,41 W | ||
| Fan sound power level | L_WA | 60,5 | dB(A) |
| Maximum air velocity | c | 2,99 | meters/sec |
| Measurement standard for service value | IEC 60879:1986(CORR.1992) | ||
| Contact details for obtaining more information | Steba Elektrogeräte GmbH & Co.KG Pointstr. 296129 Strullendorf | ||
Correct Disposal of this product

This marking indicates that this product should not be disposed with other household wastes throughout the EU. To prevent possible harm to the environment or human health from uncontrolled waste disposal, recycle it responsibly to promote the sustainable reuse of material resources. To return your used device, please use the return and collection systems or contact the retailer where the product was purchased. They can take this product for environmental safe recycling.
Packaging disposal: Do not throw away the package materials. Please put it in the recycling bin.

PS

PP

PE
Gift box: Paper, should be put to the old paper collection point.
Plastic packaging material and foils should be collected in the special collection containers.
Service and Repair:
If the appliance must be repaired, please get in touch with your trader or with the manufacturer:
natural_image
Diagram of a mechanical device with a circular component and rotating arrow, no visible text or symbols- The appliance is to be connected to a socket-outlet having an earthing contact
natural_image
Diagram of a camera lens assembly with no visible text or symbolsInformationskrav