5CB28010 - Fridge BLAUPUNKT - Free user manual and instructions
Find the device manual for free 5CB28010 BLAUPUNKT in PDF.
| Product type | Built-in combined refrigerator-freezer |
| Brand | Blaupunkt |
| Model | 5CB28010 |
| Dimensions (H x W x D) | 176.5 cm x 54 cm x 54 cm |
| Net weight | 54 kg |
| Total volume | 250 L (185 L refrigerator + 65 L freezer) |
| Energy class | A+ |
| Annual energy consumption | 263 kWh/year |
| Power supply | 220-240 V~ / 50 Hz, 115 W, 0.75 A |
| Freezing capacity | 3 kg/24 h |
| Power failure autonomy | 17 hours |
| Climate class | N, ST (+16°C to +38°C) |
| Noise level | 42 dB(A) |
| Refrigerant | R600a (isobutane), 62 g |
| Main functions | Temperature adjustment, Super mode, Smart mode, automatic refrigerator defrost, quick freezing |
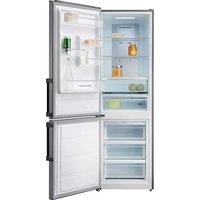
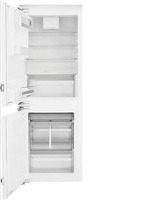
| Interior equipment | 3 glass shelves, 2 vegetable bins, 3 door balconies, 2 large freezer drawers, 1 small drawer, 1 egg balcony, 1 ice cube tray |
| Reversible door | Yes (reversible) |
| Refrigerator defrost | Automatic (periodic defrost) |
| Freezer defrost | Manual (recommended when frost layer exceeds 5 mm) |
| Cleaning and maintenance | Clean interior with soapy water, check door seals, clean drain with provided rod |
| Safety | Child lock not mentioned, but safety instructions to avoid electrical and explosion risks |
| Spare parts and repairability | Repairs by authorized after-sales service only; spare parts available from manufacturer |
Frequently Asked Questions - 5CB28010 BLAUPUNKT
User questions about 5CB28010 BLAUPUNKT
0 question about this device. Answer the ones you know or ask your own.
Ask a new question about this device
Download the instructions for your Fridge in PDF format for free! Find your manual 5CB28010 - BLAUPUNKT and take your electronic device back in hand. On this page are published all the documents necessary for the use of your device. 5CB28010 by BLAUPUNKT.
USER MANUAL 5CB28010 BLAUPUNKT
Scope of delivery. 29
Checking the delivery. 29
Appliance parts / controls. 30
For your own safety. 31
Intended use 31
Explanation of terms. 31
Safety instructions 31
Operation 36
Requirements for safe use. 36
Switching the appliance on/off 36
Shelves and door shelves 36
Setting the temperature 36
Refrigerating food. 38
Refrigeration tips. 38
Preserving quality. 38
Freezing food /
storing frozen food 39
Freezing. 40
Storing frozen food. 41
Defrosting food. 41
Preparing ice cubes 41
Care and maintenance. 42
Inspecting and cleaning the door seals ....42
Cleaning the refrigerator compartment.....42
Defrosting the refrigerator compartment ....43
Defrosting and cleaning the freezer compartment. 43
Start-up 44
Transportation and unpacking 44
Selecting a suitable location 45
Installation. 46
Basic cleaning. 48
Using the appliance for the first time. 48
Changing the door hinge 49
Troubleshooting table. 51
Environmental protection 52
Disposing of the appliance. 52
Our contribution to protecting the ozone layer
52
Data sheet. 53
Our service department. 236
Support, ordering and complaints 236
Repairs and spare parts 236

You can find information the installation and start-up starting on page 44.

Before you use the appliance, please first read through the safety instructions and
the instruction manual carefully. Only then can you use all of the functions safely and reliably. In addition, please observe the national regulations of your country which are applicable in addition to the regulations named in these instructions.
Keep all safety instructions and instructions for use for future reference. Pass on all safety instructions and instructions for use to the subsequent user of the product.
Delivery
Packaging tips

If space permits, we recommend that you keep the packaging at least during
the warranty period. If the appliance has to be sent for repair, it is only sufficiently protected in the original packaging.
If you wish to dispose of the packaging, please do so in an environmentally friendly manner.
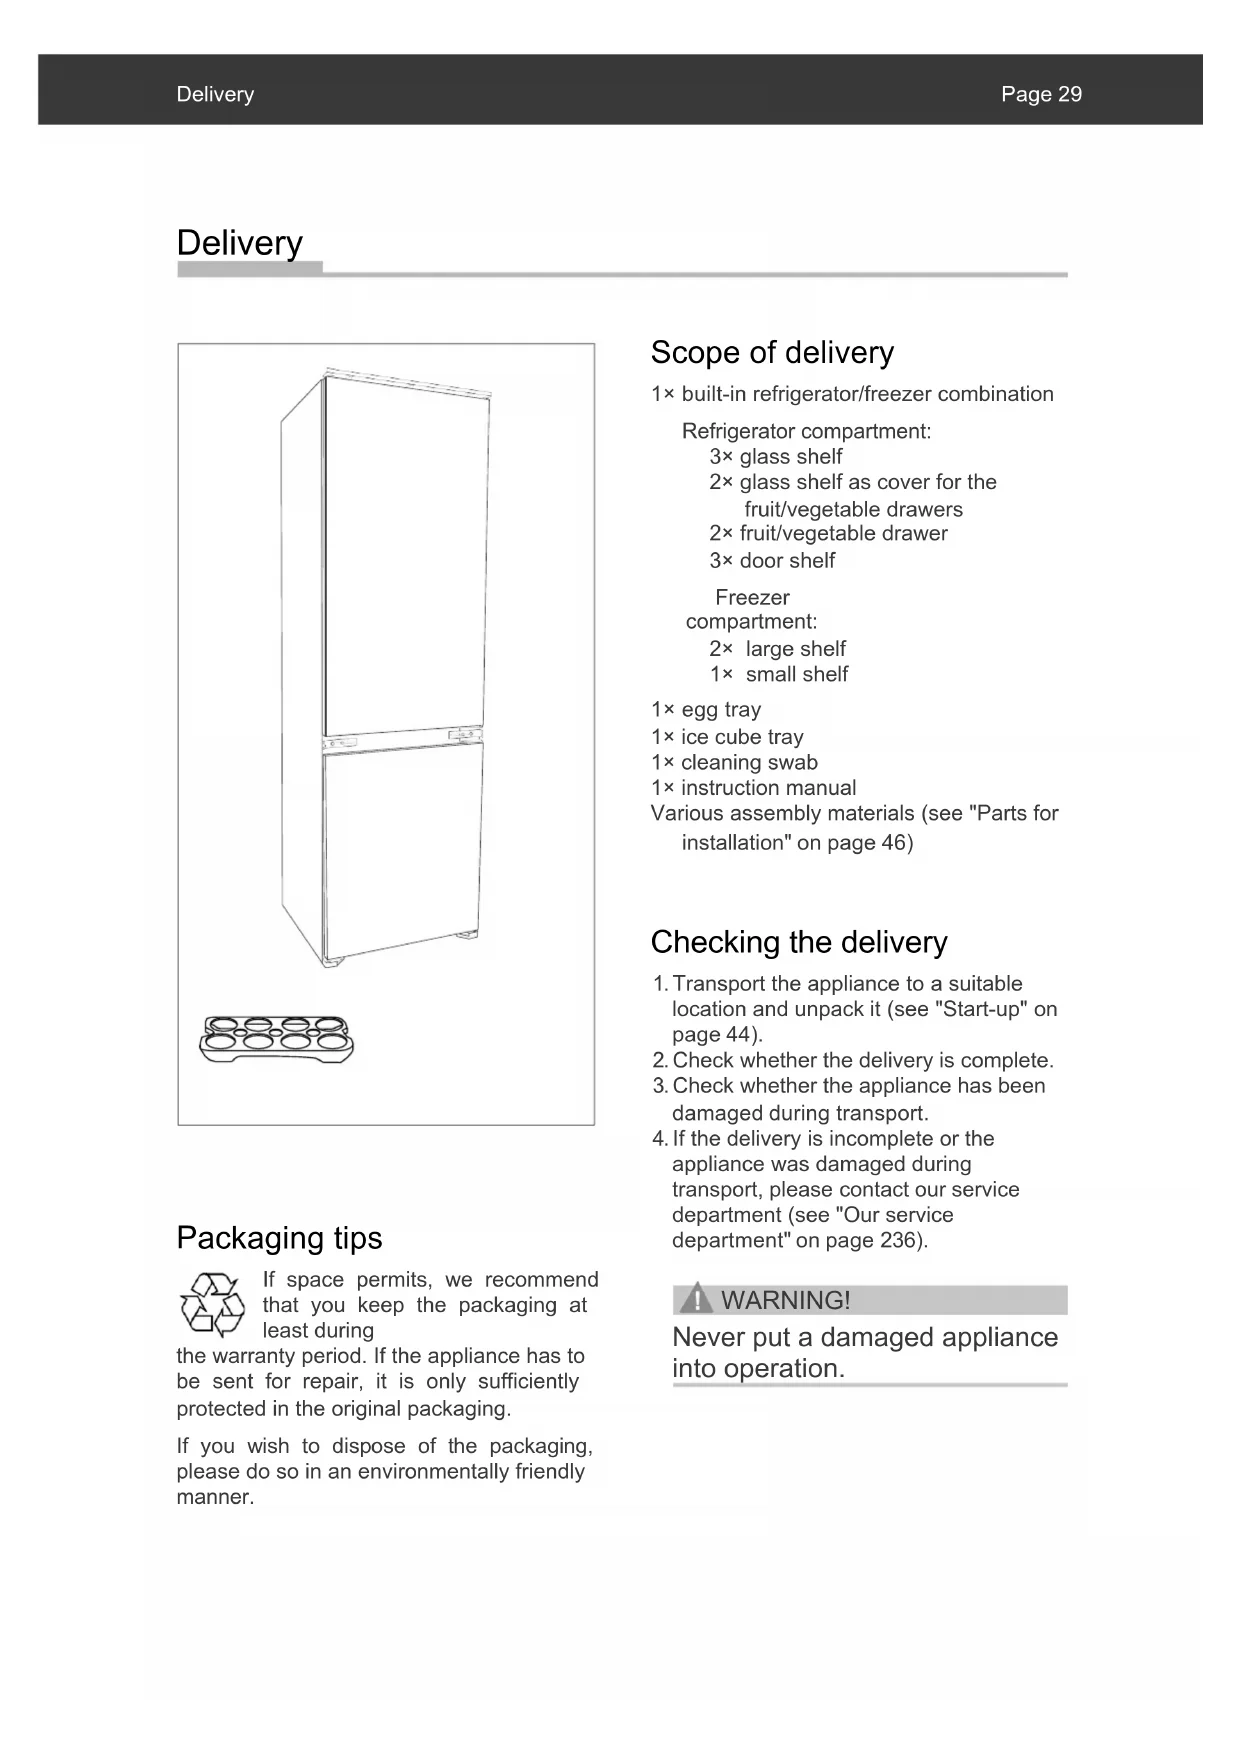
Scope of delivery
1 × built-in refrigerator/freezer combination
Refrigerator compartment:
3 × glass shelf
2 × glass shelf as cover for the
fruit/vegetable drawers
2× fruit/vegetable drawer
3 × door shelf
Freezer
compartment:
2 × large shelf
1 × small shelf
1 × egg tray
1 × ice cube tray
1 × cleaning swab
1 × instruction manual
Various assembly materials (see "Parts for installation" on page 46)
Checking the delivery
- Transport the appliance to a suitable location and unpack it (see "Start-up" on page 44).
- Check whether the delivery is complete.
- Check whether the appliance has been damaged during transport.
- If the delivery is incomplete or the appliance was damaged during transport, please contact our service department (see "Our service department" on page 236).

WARNING!
Never put a damaged appliance into operation.
Appliance parts / controls
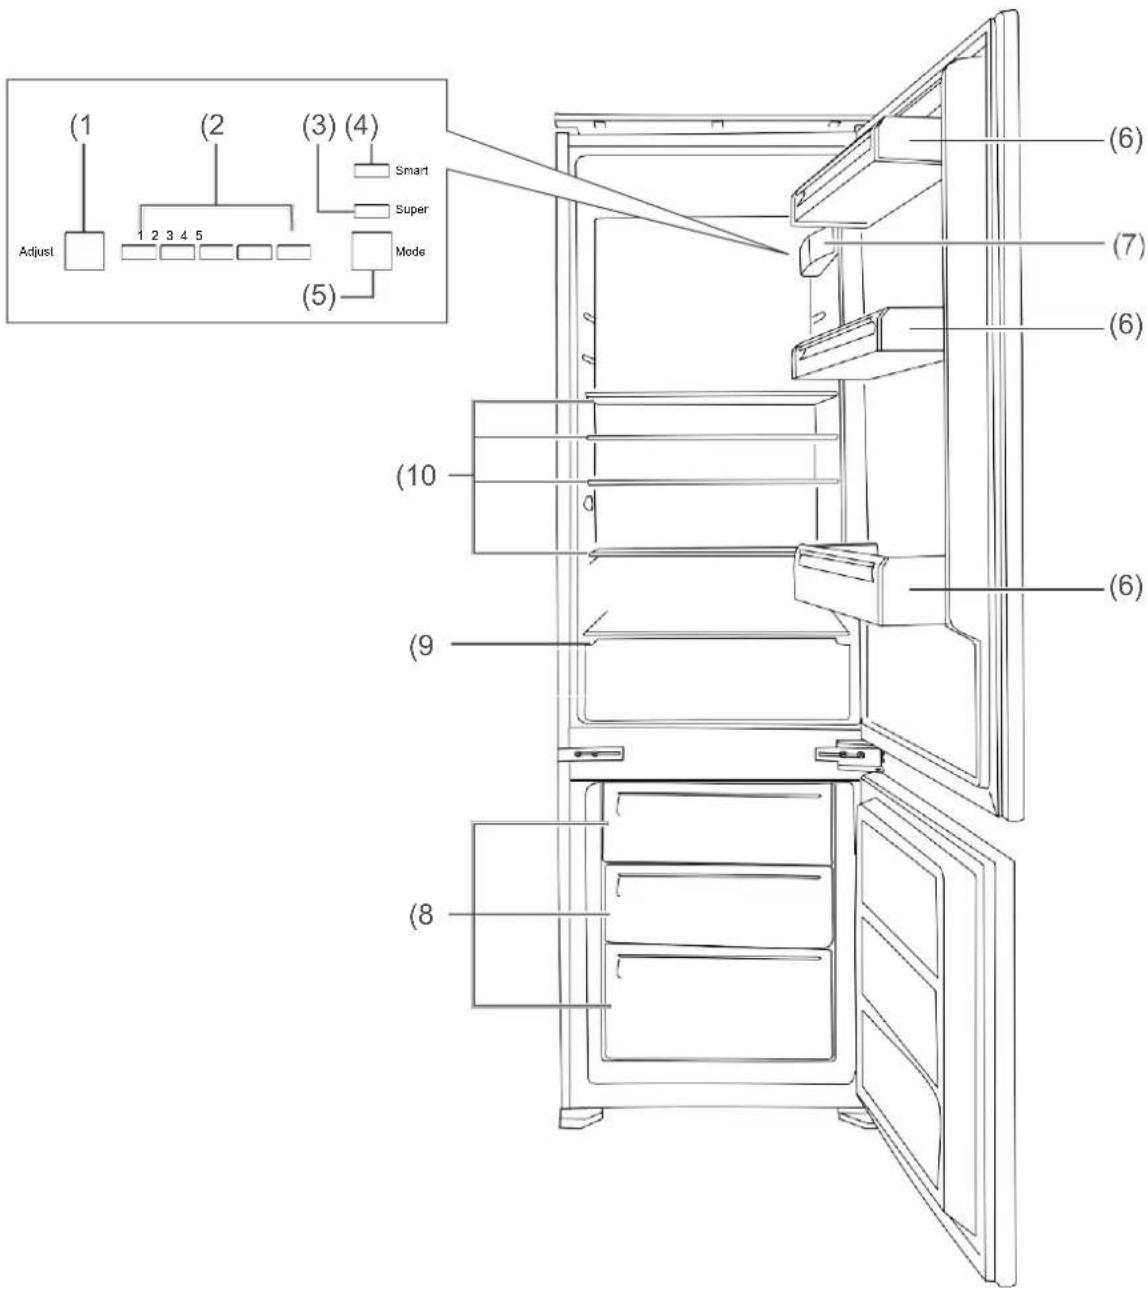
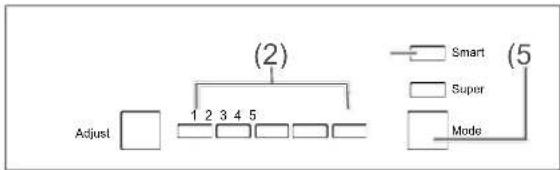
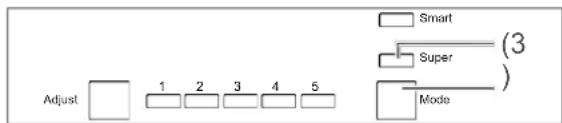
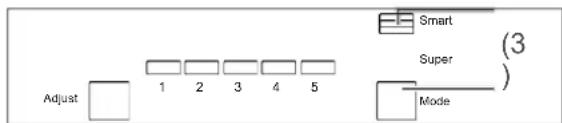
(1)Adjust: Press briefly: Set the temperature in the refrigerator compartment. Press and hold for 5 sec.: Switch appliance on/off.
(2)Temperature display in the refrigerator compartment
(3)Super: Lower the temperature in the freezer compartment further
(4)Smart: Automatic mode
(5)Mode: Set "Super" or "Smart"
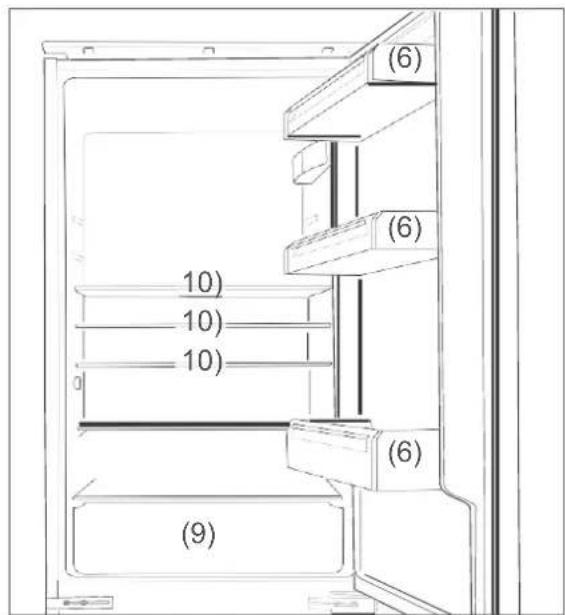
(6)Door shelves
(7)Control and refrigerator lighting
(8)Freezer drawers
(9)Vegetable drawers
(10)Glass shelves
For your own safety
Intended use
The appliance is suitable for the refrigeration of fresh food, for the storage of frozen food, for freezing fresh food at room temperature and for ice preparation.
It may only be operated if it is installed properly in a suitable built-in cabinet.
The appliance is solely intended for use in private households.
Only use the appliance as described in this instruction manual. Any other use is regarded as improper use and may result in damage or even personal injury.
The manufacturer assumes no liability for damage resulting from improper use.
Explanation of terms
The following signal words are used in this instruction manual.

WARNING
This signal word indicates a hazard with a medium level of risk that, if not avoided, could result in death or serious injury.

CAUTION
This signal word indicates a hazard with a low level of risk that, if not avoided, could result in minor or moderate injury.

NOTE
This signal word warns of possible damage to property.

This symbol refers to useful additional information.
Safety instructions
This chapter provides you with general safety instructions that you must observe at all times for your own protection and for the protection of third parties. Please also observe the warnings in the individual chapters about operation, start-up, etc.

WARNING
Risks when handling household electrical appliances Risk of electrical shock!
Touching live parts may result in serious injury or death.
- Only use the appliance indoors. Not operate the appliance in damp locations or in the rain.
-
Do not put the appliance into operation or continue to operate it if
-
there is visible damage on it, e.g. the connection cable is defective,
- if it emits smoke or gives off a burning smell,
- makes unusual noises.
In such a case, pull out the power plug or switch off the fuse and contact our service department (see "Our service department" on page 236).
If the appliance power plug is damaged, it must be replaced by the manufacturer, its customer service or a qualified specialist.
The appliance may only be modified or repaired by authorized specialists (see "Our service department" on page 236). Unauthorized repairs to the appliance may cause damage and personal injury and result in the forfeiting of all liability and guarantee claims. Never attempt to repair a defective – or supposedly defective – appliance yourself.
- Only parts that match the original appliance data may be used for repairs. This appliance contains electrical and mechanical parts that are essential to protect against potential hazards.
The appliance meets the requirements of protection class 1 and may only be connected to a socket with properly installed protective earth conductor. It is not permitted to connect the appliance to a power strip, multiple socket, time switch or a separate telecontrol system for remote monitoring and control.
If the power plug is no longer accessible after installation, an all-pole separator that meets overvoltage category III must be connected in the domestic installation with a contact clearance of at least 3mm ; this includes fuses, circuit breakers and contactors. appliance, as they may cause ignitable gas/air mixtures to explode.
- Do not kink or clamp the power cable or place it over sharp edges.
- Keep the appliance, power plug and power cable away from open flames and hot surfaces.
Always pull the power plug itself, not the power cable. - Never touch the power plug with wet hands.
- Never immerse the power cable and plug in water or other liquids.
- Do not insert objects into or through the housing openings and ensure that children are also prevented from inserting objects.
In case of a fault or before performing extensive cleaning work, pull out the power plug or switch off the fuse.
Risks for children
Risk of suffocation!
- Do not allow children to play with the packaging film. They may get entangled or suffocate.
- Prevent children from pulling out small parts from the appliance or the accessory bag and inserting them in the mouth.
Risks when handling chemical substances Risk of explosion! The improper handling of chemical substances may cause explosions.
- Do not store explosive substances or spray cans with flammable propellants in the
- Never use defroster sprays for defrosting. They may generate explosive gases.

CAUTION
Risks for certain group of persons
Risks for children and persons with limited physical, sensory or mental abilities!
This appliance can be used by children from the age of 8 years and persons with reduced physical, sensory or mental abilities or a lack of experience and/or knowledge if they are supervised or if they are instructed in the safe use of the appliance and have understood the resulting hazards.
Children must not carry out cleaning or maintenance unless supervised.
Children must not play with the appliance.
Risks when handling refrigerators and freezers
Risk of fire!
The improper handling of the appliance may cause fire and damage.
In order to ensure adequate air circulation, do not close the ventilation openings in the appliance housing or installation housing.
Comply with the minimum dimensions of the built-in cabinet (see "Installation" on page 46).
Risks from refrigerants!
The refrigerant circuit of your appliance contains the environmentally friendly, but flammable refrigerant R600a (isobutane).
Only authorized specialists are allowed to make mechanical modifications to the refrigerating system.
- Do not damage the refrigerant circuit, e.g. by piercing the refrigerant channels of the evaporator with sharp objects, bending pipes, etc.
- Escaping refrigerant is flammable and can cause eye damage. In this case, flush the eyes with cold water and consult a physician immediately.
- To prevent an ignitable gas/air mixture in the event of a leak of the refrigerant circuit, the installation room must have a minimum size of 1m_3 per 8g of refrigerant according to DIN standard EN 378. Please refer to the data sheet for the amount of refrigerant in your appliance (see "Data sheet" on page 53).
Risk of injury!
The improper handling of the appliance may cause injury.
The appliance is heavy and unwieldy. During transport and installation, get the help of another person.
- Do not use the base, drawers, doors etc. as a step or support.
Hazards to health!
Improper handling, insufficient refrigeration or overstocking may cause the stored food to spoil. If spoiled food is consumed, there is a risk of food poisoning!
- Ensure in particular that raw meat and fish are adequately packed to prevent adjacent food from becoming contaminated by salmonella or other contaminants.
Comply with the shelf life recommendations of food manufacturers.
Note that the shelf life of frozen food may decrease due to an increase in temperature inside the appliance (defrosting, cleaning or power failure). - Remove the stored frozen products from the appliance - even if only temporarily switching it off - and store in a sufficiently cool room or another refrigerator.
- Do not refreeze, but rather immediately consume fully or partially thawed food.
After a possible power failure, check whether the stored food is still fit for consumption.
The appliance may not function properly if it is exposed to an excessively low ambient temperature for a long period. This may result in a temperature increase in the interior.
Comply with the intended ambient temperature (see line "Climate class" on page 53).
Risk of injury from frozen goods! The improper handling of the appliance may cause injury. There is a risk of burns from low temperatures.
The food and the inside walls of the freezer compartment have a very low temperature. Never touch with wet hands. This may cause skin injuries. Skin damage is event possible if the skin is dry.
- Do not put ice cubes or ice pops in your mouth directly after taking them from the freezer compartment.
NOTE
Risk of damage!
If the refrigerator was transported in a horizontal position, lubricant from the compressor may have entered the refrigerator circuit.
- Wherever possible, do not tilt the refrigerator into a horizontal position.
After transporting the refrigerator, allow it to stand in its normal position for approx. 2 hours before connecting it. This gives the lubricant enough time to flow back into the compressor.
The improper handling of the appliance may cause damage.
-
Do not store glass or metal containers containing liquid in the freezer compartment. The containers may burst.
-
Do not use the doors or handles to pull or lift the appliance
- Do not use any sharp or pointed objects when unpacking the appliance.
- Do not operate any electrical equipment inside the appliance that does not correspond to the construction type recommended by the manufacturer.
-
Do not use mechanical devices or other tools other than those recommended by the manufacturer.
Only use original accessories.
After switching off the appliance, wait 5 minutes before you switch it on again.
In order to remove the odour typical of all new appliances, wipe out the inside with lukewarm vinegar/water solution.
Only use the refrigerator lighting to illuminate the refrigerator compartment. It is not suitable as room lighting. -
Do not use additional means to accelerate the defrosting process, e.g. electrical heaters, knives or devices with an open flame (e.g. candles, blowlamps, etc.). The thermal insulation and the inner container are sensitive to scratches and heat and may be damaged.
Note the following when cleaning: -
Never use aggressive, granular or abrasive cleaning agents or those containing soda, acid or solvent. We recommend all-purpose cleaners with a neutral pH value.
- Door seals and plastic appliance parts are sensitive to oil and grease. Remove any contaminants as quickly as possible.
- Only use soft cloths.
Operation
Requirements for safe use
- You have read the chapter "For your own safety" on page 5 and have understood all the safety instructions.
- The appliance has been installed and connected as described in the chapter "Start-up" on page 44.
Switching the appliance on/off
The appliance is switched on as soon as you plug the power plug into the socket.
If the appliance makes disturbing noises after switching it on, make sure it is stable and fitted correctly.
To switch the appliance on and off, press and hold the Adjust (1) button for 5 seconds.
Shelves and door shelves
The glass and door shelves can be removed and arranged differently as needed.
To remove the door shelves, raise them up slightly in the back.
- Pull the door shelves upwards to remove them.
Setting the temperature

CAUTION
Health hazard!
The appliance may not function properly if it is exposed to an excessively low ambient temperature for a long period. A temperature increase in the refrigerator and freezer compartments may result.
Always comply with the prescribed ambient temperature (see "Climate class" on page 53).
Setting the temperature in the refrigerator compartment
In order to monitor the cooling capacity, you ideally require 2 refrigerator/freezer thermometers.
Place one
- above the upper vegetable drawer in the refrigerator compartment; the correct temperature here is +6^ .
- in the freezer compartment; the ideal storage temperature here is min. -18°C.
Manual temperature setting

- You can set the temperature for the refrigerator compartment by pressing the Adjust button (1) repeatedly. The selected setting is indicated by the temperature display (2).

- Display 1 lights up only: minimum refrigeration.

-
Displays 1-5 light up: maximum refrigeration.
-
Adjust the setting to the ambient temperature. First select a medium setting and then readjust where necessary.
Automatic temperature setting
- Press the Mode button (5) until the Smart display (4) lights up.
The temperature will now be set automatically. You can check the currently set temperature on the display (2).
Setting the temperature in the freezer compartment
The temperature in the freezer compartment is held automatically at -18^
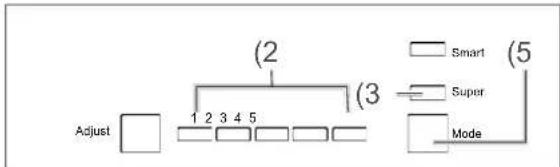
- To further lower the temperature, press the Mode button (5) until the Super display (3) lights up.
This further lowers the temperature in the freezer compartment, which generates additional freezing capacity for when you wish to freeze large amounts of fresh goods.
In order to switch off the Super setting again, press the Mode button (5) until the Super display (3) is no longer lit.
The Super setting remains active for a maximum of 54 hours. After this time, it switches off automatically.
Refrigerating food

WARNING
Risk of explosion!
The improper handling of the appliance may cause explosions.
- Do not store explosive substances or spray cans with flammable propellants in the appliance, as they may cause ignitable gas/air mixtures to explode.
Refrigeration tips
Stock the refrigerator compartment in a way that optimally exploits the internal temperature conditions.
- Place spreadable butter and cheese in the upper door shelf (6). The temperature is the highest there.
- Store preserves, glasses and eggs in the other door shelves. It is best to store eggs in the egg tray provided.
-
Small bottles and tubes also belong in the door shelves.
-
Place beverage cartons and bottles in the lower door shelf. Place full containers closer to the hinge to reduce the stress on the door.
- Place cooked and baked food on the glass shelves (10).
- Place fresh meat, game, poultry, bacon, sausages and raw fish on the glass shelf over the upper vegetable drawer. The temperature is the lowest there.
-
Place fresh fruit and vegetables in the vegetable drawers.
-
Only store high-percentage alcohol in a vertical position and tightly closed.
- Allow hot food to cool before you place it in the refrigerator compartment.
The temperatures in the appliance and thus your energy consumption may rise if the doors are opened frequently or for a long time. - if the room temperature is above or below the prescribed room temperature.
- The energy consumption also depends on the location selected (for more information, see page 35).
Preserving quality
To ensure that food retains its aroma and freshness in the refrigerator compartment, make sure that the food you wish to refrigerate in the refrigerator compartment is always packed. Use special plastic containers or commercially available foils for food.
- Place the food
- in the refrigerator compartment in such a way that the air can circulate freely. Do not cover the shelves with paper or other materials.
not directly on the back wall. It may otherwise freeze to the back wall.
Freezing food / storing frozen food

WARNING
Risk of explosion!
The improper handling of the appliance may cause an explosion.
- Do not store explosive substances or spray cans with flammable propellants in the appliance, as they may cause ignitable gas/air mixtures to explode.

CAUTION
Health hazard!
Improper handling, insufficient refrigeration or overstocking may cause the stored food to spoil. If spoiled food is consumed, there is a risk of food poisoning.
-
Ensure in particular that raw meat and fish are adequately packed to prevent adjacent food from becoming contaminated by salmonella or other contaminants.
-
Comply with the shelf life recommendations of food manufacturers. Note that the shelf life of frozen food may decrease due to an increase in temperature inside the appliance (defrosting, cleaning or power failure).
In the event of an extended power failure or a malfunction of the appliance, remove the stored frozen products from the appliance and store in a sufficiently cool room or another refrigerator (max. storage time in case of malfunction: 16 hours).
After a malfunction, check whether the stored food is still fit for consumption. Do not refreeze, but rather immediately consume fully or partially thawed food.

CAUTION
Risk of injury!
The improper handling of the appliance may cause injury. Risk of burns from low temperatures.
The food and the inside walls of the freezer compartment have a very low temperature. Never touch with wet hands. This may cause skin injuries. Skin damage is event possible if the skin is dry.
- Prior to consumption, allow ice cubes or ice pops to thaw a little. Do not put them in your mouth directly after taking them from the freezer compartment.
Freezing
Freezing means thoroughly freezing - ideally "shock-freezing" - fresh food at room temperature to the core. If cooled too slowly, the food "freezes to death", i.e. its structure is destroyed. Retaining consistency, taste and nutritional value demands a uniform storage temperature of -18^ .
Preparing food
- Only freeze food of acceptable quality.
- Freeze fresh and prepared meals unsalted and unseasoned. Food frozen when unsalted has a longer shelf life.
- Allow prepared food to cool before you freeze it. This not only saves energy, but also prevents excessive frost formation in the freezer compartment.
Carbonated beverages are not suitable for freezing as the carbon dioxide escapes when frozen.
The right packaging
Packaging is important when deep-freezing. It should protect against oxidation, microbes, the transmission of odours and flavours and desiccation (freeze burn).
- Only use packaging material that is durable, impermeable to air and liquids, not too rigid and that can be labelled. It should be identified as freezer packaging.
Portioning
- Wherever possible, create flat portions, as they freeze through to the core more quickly.
- Stroke out the air from the freezer bag, as it encourages desiccation and takes away space.
-
To close the bags, use plastic clips, rubber bands or adhesive tape.
-
Fill liquid containers 34 maximum, as liquids expand when frozen.
- Do not store glass or metal containers containing liquid. The containers may burst.
- Only freeze high-percentage alcohol when tightly closed.
- Label frozen goods according to the type, amount, freezing date and use-by date. Wherever possible, use smudge-proof felt-tip pens or adhesive labels.
How to stock properly Maximum freezing capacity
Comply with the maximum freezing capacity. You can find the "Freezing capacity in kg/24h" in the data sheet on page 53.
Freezing smaller quantities
- Up to 2 kg: As soon as the temperature in the freezer compartment reaches -18 °C, you can freeze fresh food at room temperature.
Over 2 kg: The fresh goods must not come into contact with the frozen goods already in storage, as they may otherwise thaw. If it is impossible to prevent contact with the stored frozen goods, we recommend generating additional freezing capacity in the freezer compartment prior to freezing the fresh goods.
After storing the fresh goods, the temperature will temporarily rise in the freezer compartment. After a further 24 hours, the goods will be frozen to the core.
Storing frozen food
The deep-freeze chain must not be interrupted on the way from the manufacturer to your freezer. The temperature of the frozen goods must never exceed -18^ .
For this reason, never purchase goods
- located in frosted, very icy freezers
stacked above the prescribed mark
that are partially clumped together (which is especially easy to tell with berries and vegetables)
that exhibit traces of snow and juice.
Transport frozen goods in special boxes made of polystyrene or in insulation bags.
Observe the storage conditions and times on the packaging.
Preparing ice cubes
- Fill 34 of the included ice cube tray with fresh drinking water and place it horizontally in the freezer. The ice cubes are released most easily if you twist the ice cube tray or hold it briefly under running water.
Defrosting food
Observe the following basic rules when defrosting food:
- To defrost food, take it out of the freezer and allow it to defrost, optimally at room temperature or in the refrigerator.
- To defrost food quickly, use the defrost function of your microwave, for example. Observe the manufacturer specifications and bear in mind that defrosting may result in the proliferation of bacteria and germs.
- Prepare defrosted food as quickly as s possible.
- Dispose of the defrosting liquid.
- If you only wish to defrost part of a package, remove the part and close the package again immediately. This prevents "freezer burn" and reduces the formation of ice on the remaining food.
- Always defrost meat, poultry and fish in the refrigerator. Make sure that the frozen food is not resting in its own defrosting liquid.
Care and maintenance

WARNING
Risk of electrical shock!
Touching live parts may result in serious injury or death.
Before cleaning, pull out the power plug or switch off the fuse.
- When pulling out the power plug, always pull the plug itself, not the cable.

CAUTION
Risks for children and persons with limited physical, sensory or mental abilities!
Children must not carry out cleaning or user maintenance unless supervised.

NOTE
The surfaces and appliance parts are damaged by improper handling.
- Never use aggressive or abrasive cleaning agents or those containing soda, acid or solvent. Such agents attack the plastic surfaces. We recommend all-purpose cleaners with a neutral pH value.
Only use care products for the outer surfaces. - Door seals and plastic appliance parts are sensitive to oil and grease. Remove any contaminants as quickly as possible.
Only use soft cloths.
Inspecting the door seals
The door seals must be inspected regularly to ensure that no warm air enters the appliance.
- To inspect the door seals, stick in thin pieces of paper at different positions. The paper must be equally hard to pull through at all the positions.
- If the seal does not make even contact everywhere: Heat the seal at the relevant positions carefully with a hair dryer and pull it out a little with your fingers.
Cleaning the refrigerator compartment
- Pull out the power plug or switch off the fuse.
- Remove the chilled goods and place them in a cool room.
- Take out the vegetable drawers, the door shelves and the glass shelves and clean all the parts in lukewarm dishwater. Then dry all the parts thoroughly.
- Wipe off the interior with a cloth dampened slightly with dishwater. Ensure that no liquid enters the control and the refrigerator lighting.
- When wiping again, add a few drops of vinegar to the water to prevent mould formation. Wipe the interior dry and leave the door open for a while to allow ventilation.
- Clean the opening of the condensation drain using the provided cleaning swab. The condensation drain is located below the lower vegetable drawer.
-
Clean the door seals with clear water only; they are sensitive to oil and grease.
-
Re-insert the shelves and drawers.
- Put the food back in the refrigerator compartment.
- Plug the power plug back in the socket or switch on the fuse again.
- Set the desired temperature or automatic mode (Smart).
It is unnecessary to defrost the refrigerator compartment, as frost and ice are automatically defrosted in your appliance. The condensation is conducted outwards and collected in a condensation tray above the compressor, where it evaporates due to the waste heat.
Defrosting and cleaning the freezer compartment

WARNING
Risk of explosion!
The improper handling of the appliance may cause a deflagration/explosion!
- Never use defroster sprays. They may generate explosive gases.

NOTE
- Defrost the appliance in due time before an ice and frost layer of over 5mm forms. If too much ice forms, the power consumption rises, the drawers become stiff and the door may no longer close tight.
- Do not use any other means to accelerate the defrosting process than
those recommended by the manufacturer.
For example, do not use electrical heaters, knives or devices with an open flame, e.g. candles. The thermal insulation and the inner container are sensitive to scratches and heat and may melt.
Note the following when cleaning:
- Never use aggressive, granular or abrasive cleaning agents or those containing soda or solvent. We recommend all-purpose cleaners with a neutral pH value.
The door seal is sensitive to oil and grease, which cause the rubber to become porous and brittle. - The surfaces are damaged by unsuitable cleaning agents. Only use care products for the outer surfaces.
Only use soft cloths.
Wherever possible, defrost the appliance in the winter, when the outside temperature is low. Then you can store the food on the balcony during the defrosting process, for example.
Alternatively, you can wrap up the frozen food tightly in newspaper and store it in a cool room or an insulation bag.
-
Before defrosting, generate additional freezing capacity by setting the freezer compartment to Super (3) for 3 hours by means of the Mode button (5)
-
Afterwards, pull out the power plug from the socket or switch off the fuse.
- Take out the food from the refrigerator and the frozen food from the freezer compartment.
- Ensure that your food remains sufficiently cooled.
- Remove the drawers from the freezer compartment. Wash them off with warm dishwater and then dry them thoroughly.
- Place a bowl with hot, but not boiling water in the freezer compartment. This accelerates the defrosting process.
-
Leave the door open during the defrosting process and place a cleaning rag in front of the appliance to absorb leaking condensation. The defrosting time depends on the thickness of the ice layer. Based on experience, you can begin with the cleaning of the appliance after approx. 1 hour.
-
Wipe out the interior with warm dishwater.
When wiping again, add a few drops of vinegar to the water to prevent mould formation. - Clean the door seal with clear water only; it is sensitive to oil and grease.
- Wipe everything completely dry, including the door seal, and aerate briefly.
- Replace the drawers and place the food back in the refrigerator and freezer compartments.
- Plug the power plug back in the socket or switch on the fuse again.
- Set the desired temperature or automatic mode (Smart).
Start-up
Transportation and unpacking

WARNING
Risk of suffocation!
- Do not allow children to play with the packaging film. They may get entangled or suffocate.
- Prevent children from pulling out small parts from the appliance or the accessory bag and inserting them in the mouth.

CAUTION
Risk of injury!
The improper handling of the appliance may cause injury.
The appliance is heavy and unwieldy. During transport and installation, get the help of another person.
- Do not use the base, drawers, doors etc. as a step or support.
CAUTION
Risks from refrigerants!
- Do not damage the refrigerant circuit, e.g. by piercing the refrigerant channels of the evaporator with sharp objects, bending pipes, etc.
- Escaping refrigerant is flammable and can cause eye damage. In this case, flush the eyes with cold water and consult a physician immediately.
!NOTE
Risk of damage! The improper handling of the appliance may cause damage.
- Wherever possible, do not tilt the refrigerator into a horizontal position.
After transporting the refrigerator, allow it to stand in its normal position for approx. 2 hours before connecting it. - Do not use any sharp or pointed objects to unpack the appliance.
- Use a trolley or seek the assistance of a second person when transporting the appliance.
- Unpack the appliance and carefully remove all packaging parts, plastic profiles, adhesive strips, protective film and foam padding on the inside, outside and on the back of the appliance.
Selecting a suitable location
NOTE
Risk of damage!
The appliance may not function properly if it is exposed to an excessively low ambient temperature for a long period. This may result in a temperature increase in the interior.
- Ensure that the prescribed ambient temperature is complied with (see "Climate class" on page 53).
To prevent an ignitable gas/air mixture in the event of a leak of the refrigerant circuit, the installation room must have a minimum size of 1m^3 per 8 g of refrigerant according to DIN standard EN 378. For this appliance, this results in a minimum room size of 8m^3 .
Suitable locations are dry, well ventilated and, if possible, cool rooms.
Unsuitable locations are those situated directly in the sunlight or immediately next to a stove, oven or heater.
Installation
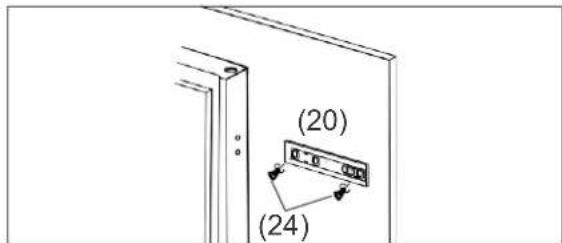
Parts for the installation
(18) 4. slider for attachment

to the appliance door
(19) 4 × cover for slider (18)
(20) 4x drag rail for
attachment to the cabinet door
(21) 4 × cover for drag rail (20)
(22) cover for centre hinge
(23) 2 × 8 crew, long
(24) 2 screw, short
(25)1x 1
Built-in cabinet and ventilation
The built-in cabinet must meet the following requirements:
Installation
dimensions:
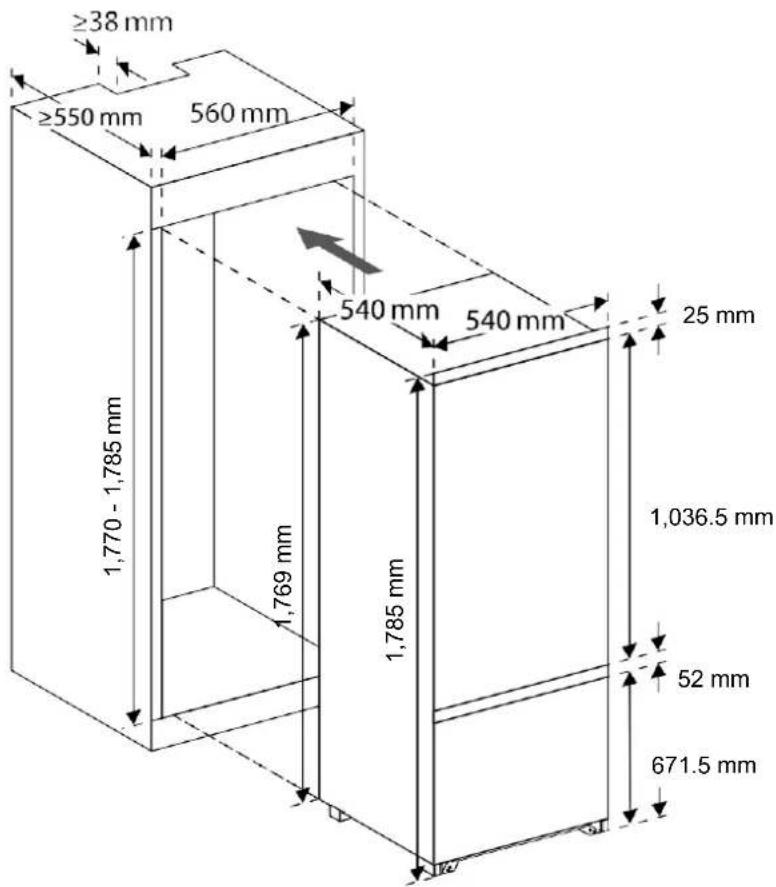
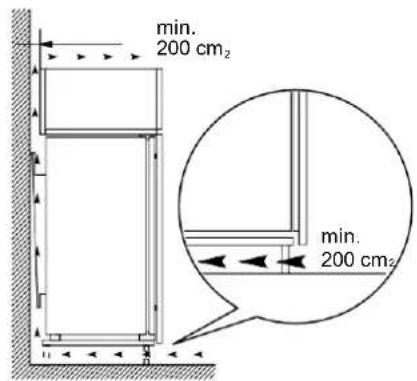
Ventilation cross-section:
Installing the appliance
Prior to installation, check whether the door hinge is on the correct side. If necessary, change the door hinge (see "Changing the door hinge" on page 49).
For the installation, you will require a PH2 Phillips screwdriver.
- Switch off the fuse for the designated socket. Then plug the power plug into the socket.
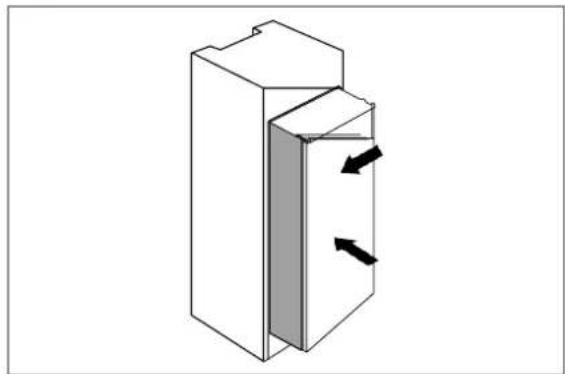
- Slowly and cautiously push the refrigerator into the built-in cabinet. When doing this, ensure that the side to be opened is located as close to the cabinet wall as possible.
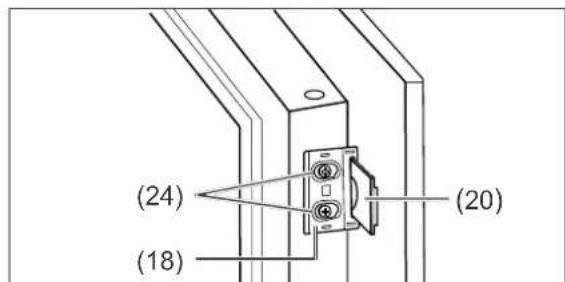
- Holes are pre-drilled in the outer edges of the appliance doors for attaching the sliders (18). Screw 2 sliders per door to the sides to be opened using the short screws (24).
- Push the drag rails (20) into the sliders (18). Close and open the cabinet doors to check whether they can be closed completely and easily.
If necessary, correct the position of the refrigerator.
- Open the doors of the appliance and the cabinet at the same time. Then mark the optimum positions of the drag rail s inside the cabinet doors.
- Remove the drag rails from the sliders.
- Screw the drag rails to the marked positions on the insides of the cabinet doors using 2 short screws (24) each.
- Press the covers (21) onto the drag rails.
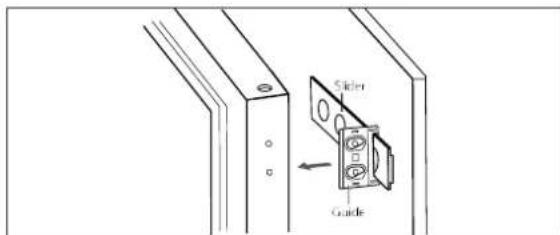
- Unscrew the sliders again and push them on the attached drag rails.
- Screw the sliders to the refrigerator door again.
- Press the covers (19) onto the sliders.
- Check whether the doors open and close smoothly and whether the refrigerator doors close tightly. If necessary, adjust the standing position of the refrigerator and the position of the sliders and drag rails.
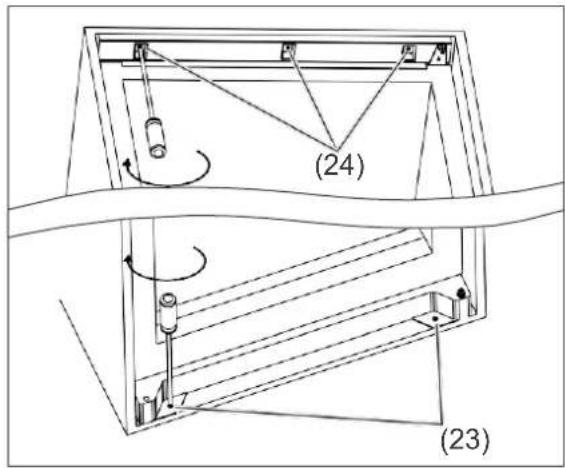
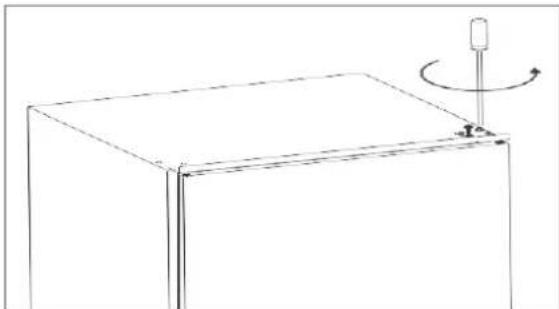
- If the doors can be opened and closed without difficulty, screw the refrigerator to the built-in cabinet. For this purpose, use 3 short screws (24) for the top and the two long screws (23) for the bottom.
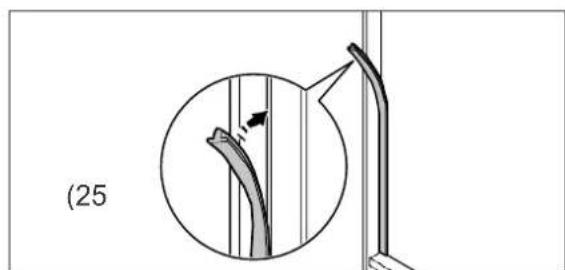
- With open refrigerator doors, press the sealing strip into the gap between the refrigerator and the built-in cabinet.
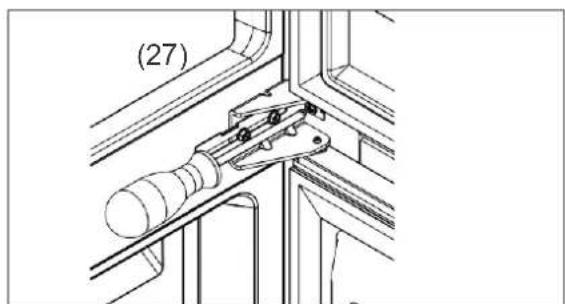
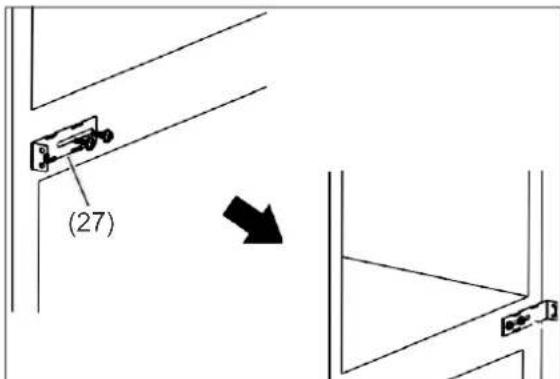
- Finally, screw the two mounting brackets (27) to the built-in cabinet between the upper and lower door. Use the short screws (24) for this purpose. The installation is then complete.
Basic cleaning
In order to remove the odour typical of all new appliances, clean the appliance before you use it (see "Cleaning the refrigerator compartment" on page 42 and "Defrosting and cleaning the freezer compartment" on page 43).
Using the appliance for the first time
NOTE
Risk of damage!
If the refrigerator was transported in a horizontal position, lubricant from the compressor may have entered the refrigerator circuit.
- Wherever possible, do not tilt the refrigerator into a horizontal position.
After transporting the refrigerator, allow it to stand in its normal position for approx. 2 hours before switching it on. This gives the lubricant enough time to flow back into the compressor. - Switch on the fuse for the socket to which the appliance is connected. The interior lighting will now switch on when the door is opened.
You can find all the important information about operation starting on page 36
Changing the door hinge
If necessary, you can change the door hinge of your refrigerator. This procedure requires manual dexterity. Please read through the following work steps completely before beginning work.
You need the following tools:
PH2 Phillips screwdriver
-8mmwrench
- Ensure that the appliance is not connected to the power supply.
- Close both doors.
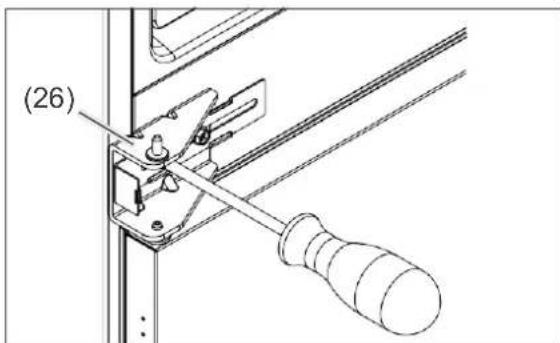
- Disassemble the upper hinge plate. To remove the screws, use an 8 mm wrench or a Phillips screwdriver.
- Take out the door of the refrigerator compartment.
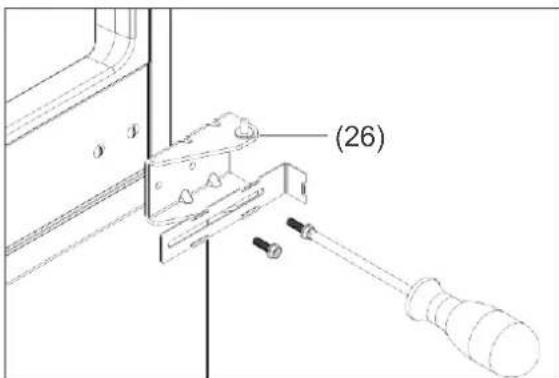
- Disassemble the centre hinge (26).
- Disassemble the mounting bracket (27) and screw it again to the opposite side.
- Take out the door of the freezer compartment.
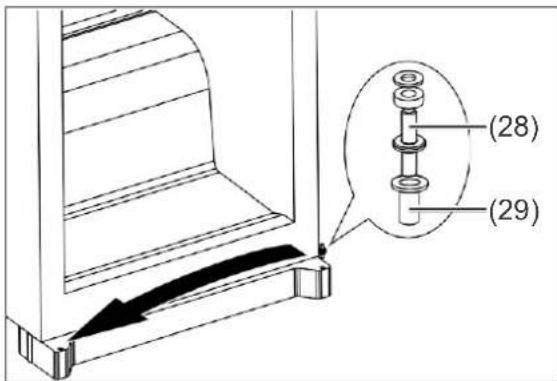
- Move over the lower hinge (28) pin. Ensure that you move the holding sleeve (29) for the hinge pin along with it.
- Insert the door for the freezer compartment again and close it.
-
Reattach the centre hinge (26) on the opposite side.
-
Insert the door for the refrigerator compartment again and close it.
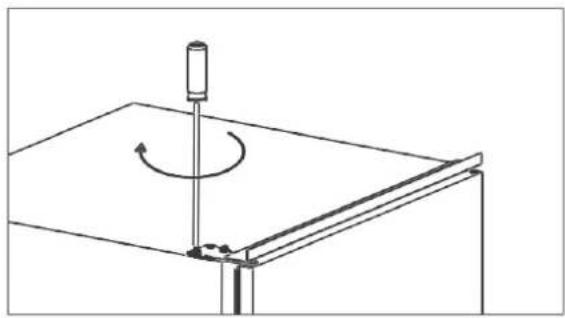
- Reattach the upper hinge plate. The door hinge change is now complete.
Troubleshooting table
Faults can occur with any electrical appliance. Such faults are not necessarily defects in the appliance. For this reason, please use the table to verify whether you can remedy the fault.

WARNING
Risk of electrical shock due to improper repair!
Never attempt to repair a defective – or supposedly defective – appliance yourself. You may thereby put yourself and future users at risk. Only authorized specialists may carry out these repairs.
| Problem | Possible cause | Solutions, tips, explanations |
| Compressor off, interior lighting off. | Socket without electricity. | Check the socket with another device. |
| Power plug loose. | Make sure the power plug is inserted correctly. | |
| Compressor off, interior lighting on. | The desired temperature has been reached. | Additional refrigeration is unnecessary. If the internal temperature rises, the compressor switches on automatically. |
| Excessive refrigeration in the appliance. | The temperature regulator is set too high. | Select a lower setting (see "Setting the temperature" on page 36). |
| Insufficient refrigeration in the appliance. | The temperature regulator is set too low. | Select a higher setting (see "Setting the temperature" on page 36). |
| The door is not closed tightly or the door seal is not making full contact everywhere. | See "Inspecting and cleaning the door seals" on page 42. | |
| The appliance is located in the vicinity of a source of heat. | Place an insulation panel between the appliance and the heat source or change the location. | |
| Warm food stored in the appliance. | Only store cooled food. | |
| Too many goods placed in freezer. | Place a maximum of 3 kg in the freezer at one time. | |
| The ambient temperature is too low or too high. | Adjust the ambient temperature to the climate class (see "Data sheet" on page 53). | |
| The compressor appears to be defective. | Set the appliance to maximum refrigeration (see "Setting the temperature" on page 36). If the compressor does not switch on within an hour, notify our service department (see page 236). | |
| The appliance is generating noises. | Operating noises are related to the functioning of the appliance and do not indicate a fault. | Continuous noise: The refrigeration unit is running. |
| Flow noises: Refrigerant is flowing through the pipes. | ||
| Clicking: The compressor is switching on or off. | ||
| Disturbing noises. | Inspect installation and readjust if necessary. | |
| Water has collected at the bottom of the refrigerator compartment. | The condensation drain below the lower vegetable drawer is blocked. | Remove the blockage of the condensation drain using the provided cleaning swab. |
Environmental protection
Disposing of the appliance
Used appliances must not be disposed of with household waste!
If the appliance is no longer used, every consumer is obligated to dispose of used appliances separately from household waste and to bring it to a collection point of his/her municipality or district, for example. Waste electrical equipment is accepted there free of charge. This ensures that old appliances are recycled properly and prevents negative impacts on the environment.
For this reason, electronic appliances are marked with the symbol shown here.
You can also find more information about this topic in the Service pages of our current catalogue and on our website under "Service".
Our contribution to protecting the ozone layer

100% CFC and PFC-free refrigerants and foaming agents are used in this appliance. This protects the
ozone layer and reduces the greenhouse effect.
Our packaging is manufactured from environmentally friendly, recyclable materials.
- Outer packaging made of cardboard
- Moulded parts made of foamed, CFC-free polystyrene (PS)
- Films and bags made of polyethylene (PE)
- Tightening straps made of polypropylene (PP)
- Saving on energy also protects our earth from excessive heat. Thanks to it's environmentally friendly insulation and its technology, your new appliance consumes little energy.
Sticker "OK"
(not all models)
The "OK" temperature monitor
can be used to determine temperatures
below +4^ . Gradually reduce
the temperature if the sticker
does not indicate "OK".
Note
When the appliance is switched on, it may take 12 hours until
the temperature is reached.

Correct setting
Data sheet
Data sheet for household electrical refrigerators and freezers and their combinations according to Regulation (EU) No. 1060/2010, 643/2009 and DIN EN 62552
| Manufacturer | Blaupunkt | |
| Appliance designation | Built-in refrigerator/freezer combination | |
| Model / article number | 5CB28010 | |
| Category of refrigerator | 7, refrigerator-freezer | |
| Energy efficiency class 1) | A+ | |
| Annual energy consumption 2) | kWh/year 263 | |
| Net capacity | Freezer compartment / star rating of refrigerator compartment (frost-free) | 65 L / 185 L |
| Storage time in case of malfunction | 17 hours | |
| Freezing capacity | 3 kg / 24 hours | |
| Climate classes 3) / Limit values of ambient temperature for which the refrigerator/freezer combination is designed | N, ST +16 °C to +38 °C | |
| Airborne acoustical noise 4) | 42 dB(A) re 1pW | |
| Built-in appliance | yes | |
| Connected load | 115 W | |
| Supply voltage | 220–240 V~ / 50 Hz | |
| Power consumption | 0.75 A | |
| Appliance dimensions (height x width x depth) | 176.5 cm x 54 cm x 54 cm | |
| Empty weight | 54 kg | |
| Refrigerant | R600a (isobutane) | |
| Refrigerant fill quantity | 62 g | |
| Foaming agent | cyclopentane | |
This appliance is designed for the storage of food and meets the requirements of the German Food and Feed Code.
This appliance was designed, manufactured and put on the market according to the following directives: Safety requirements of the Low Voltage Directive 2006/95/EC and the Electromagnetic Compatibility Directive 2004/108/EC.
Observe the country-specific standards and rules!
1) Rating from A + + + (= low consumption) to D (= high consumption).
2) On the basis of results of the standard 24-hour test. The actual consumption depends on the usage and the location of the appliance. Determined according to standard EN 153
3) The climate class means that the appliance is designed for operation at the named ambient temperature. If a combination is specified in the climate class information, this means for an appliance for which e.g. the combination SN-ST is specified that it is
suitable for temperatures of +10^ to +38^ . If the room temperature falls significantly below this, the appliance will not switch on as frequently. This means that an undesirable temperature increase may result. If the appliance is located in a warm room, it must switch on more frequently to maintain the low temperatures inside the appliance.
For this reason, please ensure compliance with the ambient temperature.
Ambient temperature per climate
class: SN: +10 °C to +32 °C
N: +16 °C to +32 °C
ST: +16°C to +38°C
T: +16 °C to +43 °C
4) Determined according to Directive 86/594/EEC
The data provided here refers to the ambient conditions exactly specified in the test standard. For this reason, the values in your household may differ from the data provided here.
Table des matieres
Frysa in små mangder
Alternatively, you can use the aliments to prepare condiments. For example, you could use the condiments in the preparation of a salad. Alternatively, you could use the condiments in the preparation of a salad. Alternatively, you could use the condiments in the preparation of a salad. Alternatively, you could use the condiments in the preparation of a salad. Alternatively, you could use the condiments in the preparation of a salad. Alternatively, you could use the condiments in the preparation of a salad. Alternatively, you could use the condiments in the preparation of a salad. Alternatively, you could use the condiments in the Preparation of a salad. Alternatively, you could use the condiments in the Preparation of a salad. Alternatively, you could use the condiments in the Preparation of a salad. Alternatively, you could use the condiments in the Preparation of a salad. Alternatively, you could use the condiments in the Preparation of a salad. Alternatively, you could use the condiments in the Preparation of a salad. Alternatively, you could use the condiments in the Preparation of a salad. Alternatively, you could use
Alternatively, I could do the following.
- Alternatively, I could do the following.
- Alternatively, I could do the following.
- Alternatively, I could do the following.