S450 - Humidifier BONECO - Free user manual and instructions
Find the device manual for free S450 BONECO in PDF.
User questions about S450 BONECO
0 question about this device. Answer the ones you know or ask your own.
Ask a new question about this device
Download the instructions for your Humidifier in PDF format for free! Find your manual S450 - BONECO and take your electronic device back in hand. On this page are published all the documents necessary for the use of your device. S450 by BONECO.
USER MANUAL S450 BONECO
natural_image
Line drawing of a portable electric heater with control panel and display (no text or symbols)S450
natural_image
Illustration of a hand pressing down on a 3D-printed cube with a lightning bolt and star symbol (no text or labels)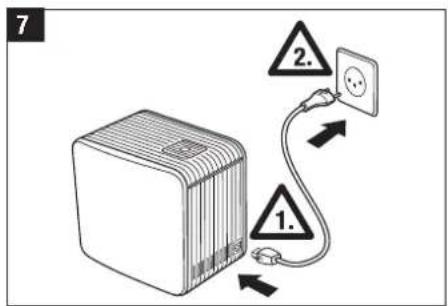
text_image
7 1. 2.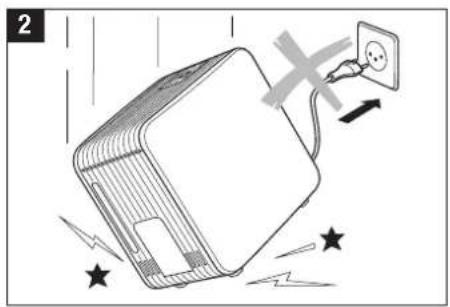
text_image
2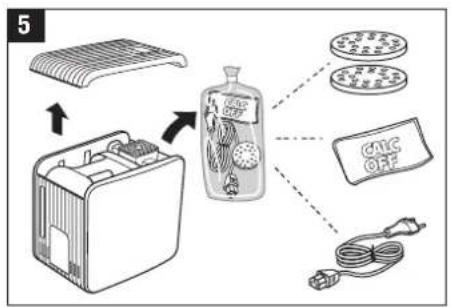
flowchart
graph TD
    A["Electricifier"] --> B["Heater"]
    B --> C["Fuel Cell"]
    C --> D["Power Cord"]
    D -.-> E["Electricizer"]
    style A fill:#f9f,stroke:#333
    style B fill:#ccf,stroke:#333
    style C fill:#cfc,stroke:#333
    style D fill:#fcc,stroke:#333
    style E fill:#ffc,stroke:#333
natural_image
Two identical diagrams of a device with a grid base and connecting cables, no text or symbols present.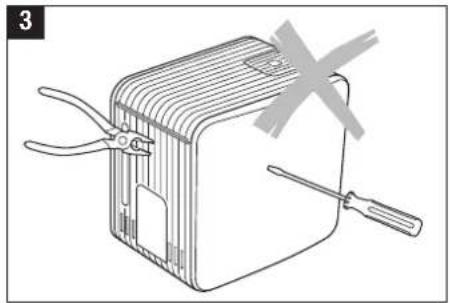
natural_image
Line drawing of a rectangular device with two blades and a screwdriver, no text or symbols present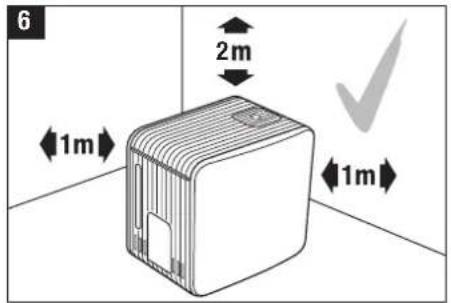
text_image
6 2m 1m 1m
text_image
9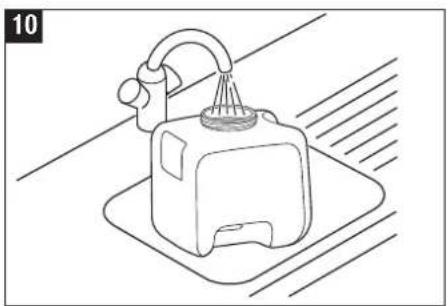
natural_image
Line drawing of a washing machine on a tray (no text or symbols)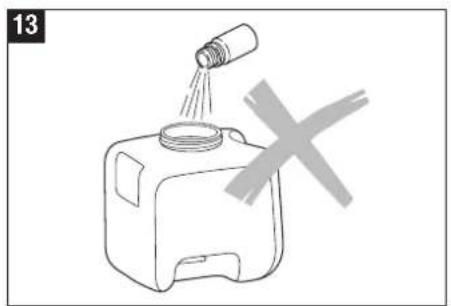
natural_image
Simple line drawing of a water dispenser with a spray bottle and a cross mark, no text or symbols present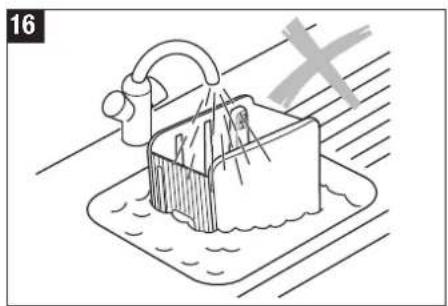
natural_image
Simple line drawing of a rectangular object submerged in water with a handle, no text or symbols present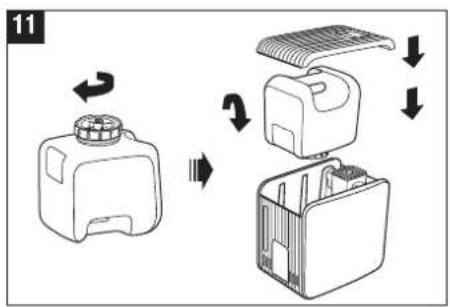
flowchart
graph TD
    A["Container with lid"] --> B["Internal component with fan or folder"]
    B --> C["Final container with side panel"]
text_image
14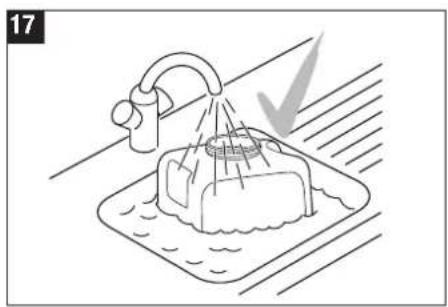
natural_image
Line drawing of a showerhead spraying water onto a surface, with no text or symbols present.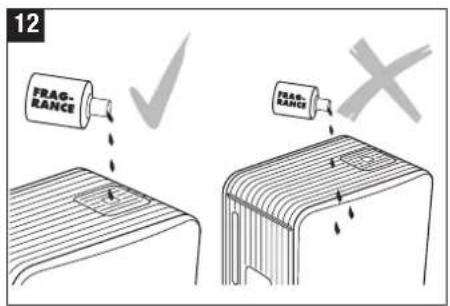
text_image
12 FRAGRANCE FRAGRANCE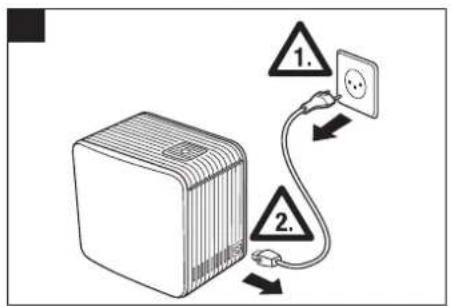
text_image
1. 2.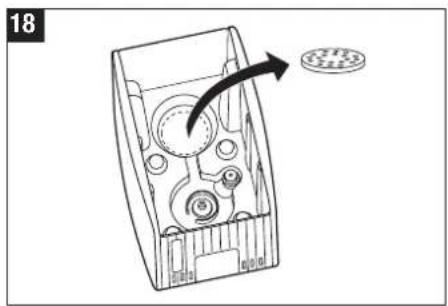
natural_image
Diagram of a mechanical device with a rotating component and a circular inset showing a ring (no text or symbols)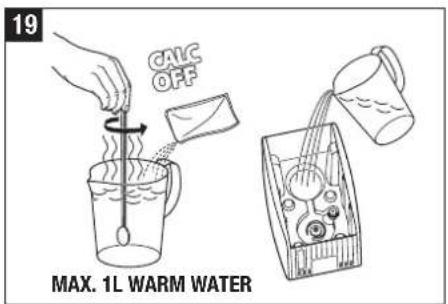
text_image
19 CNC OFF MAX. 1L WARM WATER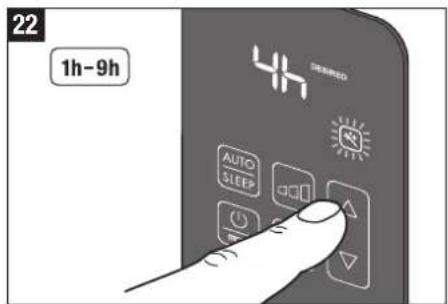
text_image
22 1h-9h 4h DEBINED AUTO SLEEP AUTO DEBINED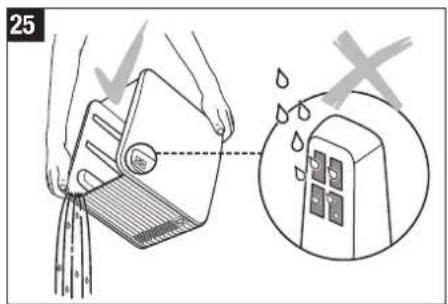
text_image
25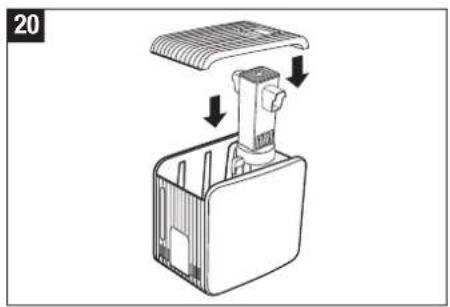
natural_image
Diagram of a device with a lid and internal components, showing directional arrows (no text or symbols)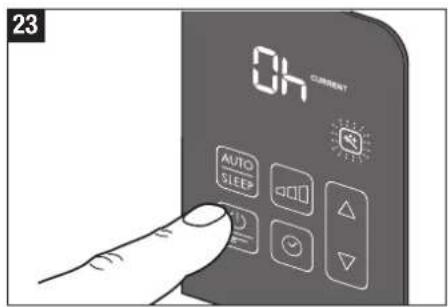
text_image
23 OH CURRENT AUTO SLEEP AUTO SLEEP AUTO AUTO AUTO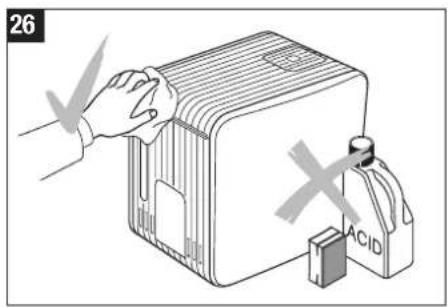
text_image
26 ACID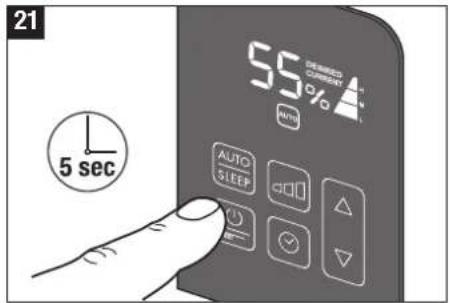
text_image
21 5 sec 55%
text_image
24 MAX. 1L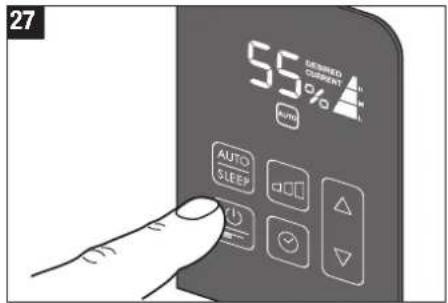
text_image
27 55% DEDicated CURRENT Auto AUTO SLEEP OK ✓ ✓Gebrauchsanweisung
Vorwort
text_image
L I J B A E 45% DESired CURRENT H G F K C DA) Ein/Ausschalten
Instructions for use
Foreword
Congratulations on choosing the S450 appliance. In doing so, you have taken an important step towards healthy indoor air and more wellbeing.
Proper use:
The appliance must only be used for the humidification of the air indoors.

Caution: Hot steam and boiling water!
Do not allow the appliance to be used by children. Steam and boiling water can lead to burns.
Safety instructions
- Read the operating instructions carefully before using the appliance and keep them in a safe place for later reference.
- Connect the appliance only to AC – with voltage indicated on the rating label.
- Always plug the power cord into the appliance first before connecting it to the electrical outlet. CAUTION: A sound from the unit indicates that the appliance is supplied with power.
- Only use the appliance indoors and within the parameters stated in the technical specifications. Using the appliance for a purpose for which it is not intended could pose a serious hazard to health and life.
- This appliance is not to be used by persons (including children) with impaired physical, sensory or mental capacities or insufficient experience and knowledge, unless they are supervised by someone who is responsible for their safety or given assistance with the use of this appliance. Children should be supervised to ensure that they do not play with the appliance (fig. 1).
- Never use the appliance if there is any damage to the appliance or cable, after malfunction has occurred, after the appliance has been dropped (2) or damaged in any other way.
-
Only use the original power cord.
-
In case the power cord is damaged, it must be replaced by the manufacturer, an authorized service dealer or a similarly qualified person, in order to avoid a hazard.
- Only operate the appliance when it is completely assembled.
- Repairs to electrical appliances may only be carried out by qualified service engineers (3). Improper repair work can pose a considerable hazard to the user.
- Never pull the plug from the mains socket by the cable or with wet hands.
- Do not operate the appliance with wet hands.
• Always place the appliance on a dry, level surface. - Do not immerse the main body in water or other liquids (16).
- Position the appliance where it cannot be easily knocked over (4).
- Do not run the power cord under a carpet or other objects. Position the appliance so that you will not trip over the cord.
- Do not use the appliance in areas where combustible materials, gases or vapours are present.
- Ventilation openings must be kept free of obstructions.
- Do not sit, stand or place any heavy objects on the appliance (keep the steam outlet clear).
- Caution: The surfaces of the unit are hot during operation.
- During operation, do not put the power cable on top of the appliance because of danger of fire and short circuit.
- Do not use an extension cord.
- Do not place the unit on hot surfaces or near open flames. Keep a minimum distance of 1m.
- Never immerse the appliance or cable into water or any other liquids because of danger of injury, fire or electro shock.
- Only use original spare parts.
- Before cleaning, unplug the power cord and let the unit cool completely off.
- Do not move the appliance during operation.
- The manufacturer rejects all liability for damage caused by nonobservance of these instructions for use.
Unpacking
- Carefully remove the unit from its box.
- Remove the unit from the plastic wrapping. Note: the top cover of the unit is loose.
- Remove the accessories from inside the unit (5).
- Remove all packaging materials.
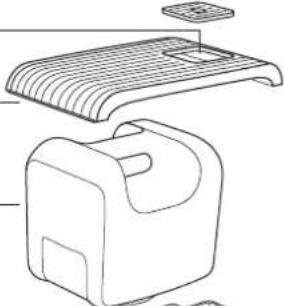
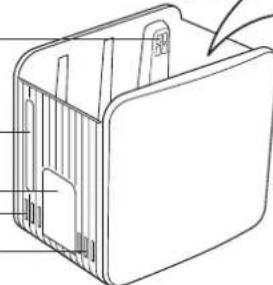
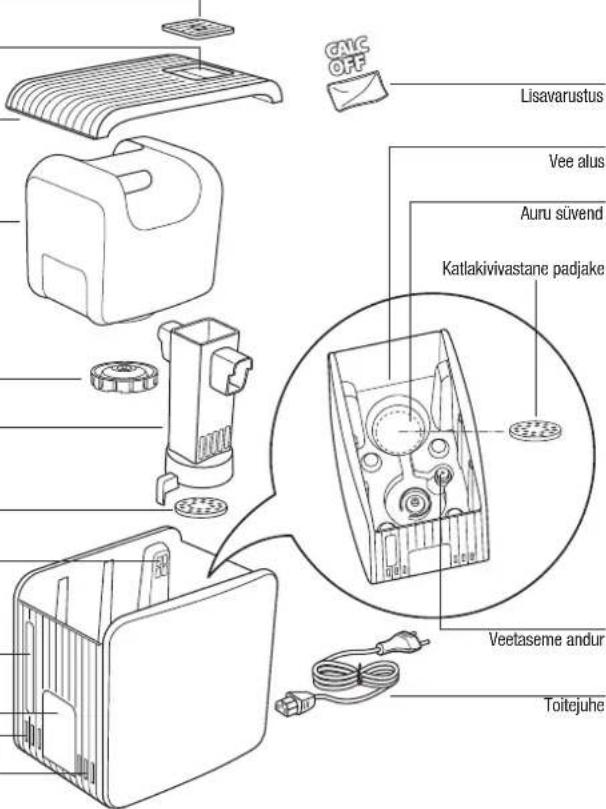
Description of the appliance/Scope of delivery

Only operate the appliance when it is completely assembled.
Steam pipe cover with fragrance container
Steam outlet
Top cover
Water tank
Water tank cap
Steam pipe
Anti-Mineral-Pad
Ventilation opening
Water level indicator
Control Panel
Ventilation openings
natural_image
Line drawing of a portable electronic device with a flat top and a rectangular case (no text or symbols)Optional
natural_image
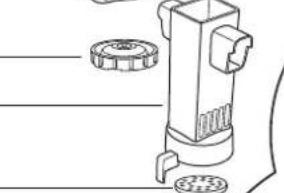
Technical line drawing of a mechanical device with gears and base components (no text or symbols)
Water base
Steam tray
Anti-Mineral-Pad

natural_image
Technical line drawing of a mechanical component with no visible text or symbolsWater level sensor
natural_image
Technical line drawing of a mechanical component with internal parts and a curved arrow indicating direction (no text or symbols)Power cord
Putting into operation

Please make sure to observe all safety instructions!

Use the appliance only on flat, stable, water-and heat-resistant surfaces. Keep a minimum distance of 1m from walls, furniture, and curtains (risk of moisture damage) (6). Caution: Knocking the unit over can cause scalding due to hot water.

Always plug the power cord into the appliance first, before connecting it to the electrical outlet (7). Caution: Insert the plug fully into the unit! A sound from the unit indicates that the appliance is supplied with power.

Please note that the appliance will produce louder operating noises for the first few minutes during commissioning.
Filling and refilling the tank with water

Caution: Only fill the water tank with fresh, cold tap water. Do not use carbonated mineral water or any other liquids.

Caution: Hot after usage!

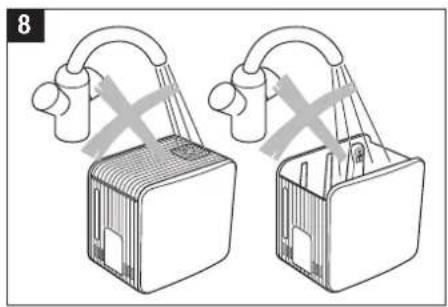
Caution: Never pour any water into the ventilation openings since this can damage the appliance.
Always fill water right into the tank. Never pour water directly into the unit or into the steam pipe (8).

• Make sure that the unit is turned off.
- Remove the top cover of the unit (Note: formation of condensation may occur after use on the inside of the cover) and take the water tank from the unit by using the tank handle (9).
- Turn the water tank upside down, unscrew the cap and fill with water (9 – 10).
- Close the tank cap securely, place the tank into the unit and put the cover back on (11).
Operation S450
text_image
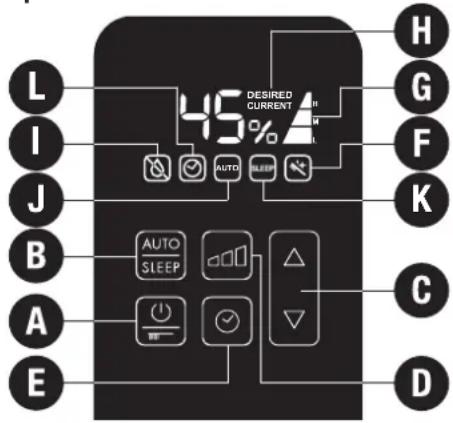
L I J B A E 45% DESired CURRENT H G F K C DA) Switch on/off
Pressing button A switches the appliance either on or off. Button A is also used to start the decalcification mode. See the section about «Decalcification Mode» (18 – 25). After the unit is switched on, it is in AUTO-Mode (symbol J).
B) AUTO-/SLEEP-Mode
AUTO-Mode:
After the unit is switched on, it is in AUTO-Mode (symbol J). The desired relative humidity (rH) is preset to 50%. The unit chooses the appropriate output level Low «L» / Medium «M» / High «H» (symbol G), in order to attain the value of 50% rH as quickly as possible.
In AUTO-Mode, the rH can be changed at any time by using button C; see C) Setting humidity level. If the output level is changed by using button D, the AUTO-Mode turns off and the unit is operated manually; see D) Manual operation. By pressing button B, the AUTO-Mode can be reactivated.
SLEEP-Mode
By pressing button B, the AUTO-Mode can be changed to SLEEP-Mode (symbol K) and vise versa. In the SLEEP-Mode, the desired relative humidity (rH) is preset to 45%. The unit chooses the appropriate output level Low «L» / Medium «M» (symbol G), in order to attain the value of 45% rH as energy-efficiently as possible.
In SLEEP-Mode, the rH can be changed at any time by using button C; see C) Setting humidity level. If the output level is changed by using button D, the SLEEP-Mode turns off and the unit is operated manually; see D) Manual operation. By pressing button B two times, the SLEEP-Mode can be reactivated.
C) Setting humidity level
The appliance is fitted with a hygrostat. This measures the relative humidity and switches the appliance off automatically when the desired value is reached. The internal ventilation remains turned on, to ensure an accurate reading of the relative humidity. If the relative humidity falls below the desired value, humidification resumes automatically. The desired relative humidity can be adjusted in steps of 5% by pressing button B. While selecting the desired humidity output, the value display is blinking. The word DESIRED appears on the display (symbol H). After a few seconds, the display automatically changes to show the current value (symbol H). Upon reaching the desired relative humidity, the display shows DESIRED and CURRENT.
A relative humidity of between 40 and 60% is recommended. The setting for the relative humidity ranges from a minimum of 30% to a maximum of 70% relative humidity or «CO» continuous mode.
Symbol E2
When the display shows «E2», the current relative humidity has reached 90%. For safety reasons, the appliance switches off automatically. The appliance switches back on, when the relative humidity falls below 85%.
Quick display of the current relative humidity
When the unit is switched off (power cable is connected), the current relative humidity can be shown on the display by briefly pressing one of the C buttons. This display goes out automatically after a few seconds.
D) Manual operation
The appliance can be operated on 3 levels. The output levels Low «L» (night operation), Medium «M» (normal operation), and High «H» (power operation) can be selected by pressing button D (AUTO- and SLEEP-Mode are deactivated). The desired output level is shown on the display via symbol G.
E) Timer
The appliance has an OFF- and an ON-Timer.
OFF-Timer:
The OFF-Timer is set by pressing button E on the switched-on appliance. The blinking display shows the hours until the unit will be switched off: 0h. By pressing button C, the switch-off time can be selected from between 0h -9h. Without any input, the set value is enabled after 3 seconds and symbol L indicates that the timer is turned on. The display once again shows the current relative humidity. By pressing button E, the remaining time until switch-off is displayed and can also be adjusted.
ON-Timer
By pressing button E on the turned-off appliance, the ON-timer is set. The blinking display now shows the hours until the unit will be switched on: 0h. By pressing button C, the switch-on time can be selected from between 0h-9h. Without any input, the set value is enabled after 3 seconds. The display shows the set switch-on time and the symbol L is blinking. After the unit is switched on, the unit is in AUTO-Mode (symbol J).
F) Cleaning symbol (see also section about Decalcification-Mode)
The letter F in the display indicates that the appliance must be cleaned. The symbol appears until the Decalcification-Mode is completed. By pressing both C buttons simultaneously and holding them down for approx. 5 seconds, the cleaning symbol can be manually reset.
G) Output level symbol
H) Current and desired relative humidity symbol
I) Automatic shut-off «Water Tank empty»
If the water level falls below minimum level, the humidification switches off automatically. The red blinking symbol I appears on the display. If water is not added within 5 minutes, the display turns off, except for the symbol I. If water is added, symbol I turns off and the appliance continues operating.
J) AUTO-Mode symbol
K) SLEEP-Mode symbol
L) Timer symbol
Fragrance container
- The steam pipe cover contains an integrated fragrance container.
- Fill only a small amount of fragrance into the fragrance container and do not overfill (12).
- Caution! Do not put any fragrance directly into the water tank, water base or steam tray, as this can damage the material and consequently the appliance (13).
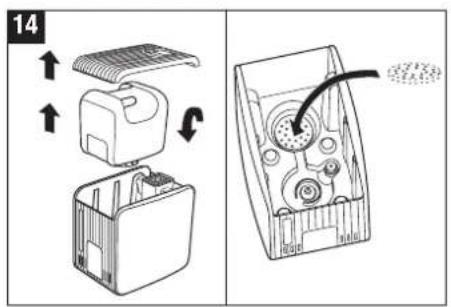
Anti-Mineral-Pad
CAUTION: The steam tray contains boiling water! Remove the Anti-Mineral-Pad only when the water in the steam tray has cooled off. Place only one Anti-Mineral-Pad into the steam tray.
The Anti-Mineral-Pad absorbs a large part of the resulting lime while in operation. The Anti-Mineral-Pad reduces excessive calcification of the steam tray as well as the frequency of necessary decalcification. In order to insert the Anti-Mineral-Pad, remove the top cover as well as the water tank and the steam pipe from the unit (14). Now insert the supplied Anti-Mineral-Pad directly into the steam tray and reassemble the appliance in the reversed order (14). The Anti-Mineral-Pad needs to be replaced as soon as it is completely full of lime (Anti-Mineral-Pad hardens). Depending on the hardness of the water, this needs to be done every 2 to 4 weeks. The Anti-Mineral Pad can be disposed with the Household waste.
Cleaning

Always disconnect the power plug of the appliance, before cleaning or rinsing (15).

The unit has to be completely emptied and cooled off. Caution: Danger of burning!

Caution: Never pour any water into the ventilation openings since this can damage the appliance (24 - 25).

Important: Do not use any abrasive objects (knives etc.) or sponges to clean the steam tray.

Never immerse the appliance in water or any other liquids (16).
- Regular cleaning is essential for hygienic, fault-free operation.
- Depending on water quality, regular decalcification of the appliance is recommended (see Decalcification-Mode).
Cleaning of water tank and covers – weekly (15 – 25)

Clean the water tank, top cover, fragrance container and steam pipe with a soft plastic brush and dish detergent and rinse well (17).
Decalcification-Mode
Only use CalcOff for decalcification. Damage that is caused by the use of other cleaning agents is not covered by the warranty.
The Decalcification-Mode enables simple cleaning and decalcification of the steam tray, water base, and steam pipe.
The Anti-Mineral-Pad needs to be removed, before starting the Decalcification-Mode (18) (see section about Anti-Mineral-Pad). Dissolve the CalcOff decalcification agent in 1 L of hot water and pour into the water base (19). Then reinsert the steam pipe and top cover (20). Pressing and holding button A for 5 seconds switches the appliance to Decalcification-Mode (21). Decalcification-Mode is shown on the display by the flashing symbol E (22). The value «4h» is shown flashing on the display. Button C can be used to change the decalcification period from 1h to 9h, depending on the level of soiling (22). After 3 seconds without further input, the set value is taken as «desired value» and the flashing display changes back to «CURRENT». The unit heats up the CalcOff-water solution during Decalcification-Mode and shuts off after it is finished. The heating of the water takes place every 30 minutes while the Decalcification-Mode is active. The cleaning period is now permanently displayed and switches to minutes when the time falls below the 1 hour mark. The cleaning period can be changed at any time by pressing button C. At the end of the cleaning period, a short double signal is sounded, the display shows the value «Oh» and the cleaning symbol E will rapidly flash (23). Pressing button A ends the Decalcification-Mode and switches off the appliance (23).
CAUTION: The water base must now be emptied of the CalcOff and rinsed (24 – 25). Make sure no water enters through the ventilation opening (25). Tip: In case of very tough lime, decalcify overnight (12 to 15 hours).
Cleaning the housing – once or twice annually (26).
Clean the housing with a damp cleaning rag and wipe it dry; use a cleaning agent suitable for plastic if needed.
After usage
- Switch the appliance off by pressing button A (27).
- Disconnect power plug (15).
- Wait until the appliance has completely cooled off.
- Empty any remaining water and clean the water tank and the water base. Decalcify if necessary.
- Let the appliance dry.
Storing the appliance for extended periods
Clean the appliance as described earlier and allow to dry thoroughly. Preferably store the appliance in its original box, in a dry place away from high temperatures.
Disposal
Return your worn out unit to your dealer for proper disposal. You can obtain information on other ways to dispose of the unit from your local district or town council.
Accessories
You can purchase any accessories from your specialized retailer and replace them yourself. Only original parts from the manufacturer must be used.
Warranty
The warranty conditions are defined by our representative in the country of sale. Please contact your dealer if, despite strict quality control, your appliance becomes defective. You must present your original receipt when making a claim under the warranty. Repairs to electric appliances can only be carried out by specialists. Through improper repairs, considerable danger for the operator can result and warranty claims lapse.
Legal information
The unit is CE compliant and adheres to the following guidelines:
• 2006/95/EG for electric safety
• 2004/108/EG for electromagnetic compatibility
- 2011/65/EU for the restriction of the use of certain hazardous substances in electrical and electronic equipment
• 2002/96/EG concerning waste electrical and electronic equipment
• 2004/40/EG for electromagnetic fields
Serial number
The serial number is placed on the bottom of the appliance.
Technical data
| Mains voltage 230 V ~ 50 Hz | |
| Power consumption 160 / 360 / 480 W | |
| Humidity output up to 550 g/h | |
| Suitable for rooms up to 60 m | ^2 / 150 m^3 |
| Water capacity 7 litres | |
| Dimensions 355 x 240 x 334 mm | |
| Weight (empty) 4.5 kg | |
| Operating noise level 35 / 39 / 42 dB(A) | |
| Accessories Anti-Mineral-Pad A451 CalcOff A7417 | |
text_image
L I J B A E 45% DESired CURRENT H G F K C Dtext_image
L I J B A E 45% DESired CURRENT H G F K C Dtext_image
L I J B A E 45% DESIRED CURRENT AUTO SLEEP AUTO SLEEP H G F K C Dtext_image
L I J B A E 45% DESired CURRENT H G F K C Dtext_image
L I J B A E 45% DESired CURRENT H G F K C DA) Be-/kikapcsolás
text_image
L I J B A E H G F K C D 45% DESIRED CURRENTtext_image
L I J B A E 45% DESired CURRENT H G F K C DImportant: Do not use any abrasive objects (knives etc.) or sponges to clean the steam tray.

text_image
L I J B A E 45% DESired CURRENT H G F K C Dtext_image
L I J B A E 45% DESired CURRENT H G F K C DVeetaseme indikaator
Juhtpaneel
Ventilatsiooniavad
text_image
Lisavarustus Vee alus Auru süvend Katlakivivastane padjake Veetaseme andur ToitejuheKasutusele võtmine

text_image
L I J B A E 45% DESIRED CURRENT AUTO SLEEP AUTO SLEEP H G F K C DA) Toitelüliti
text_image
L I J B A E 45% DESired CURRENT H G F K C Dtext_image
L I J B A E H G F K C D 45% DESIRED CURRENT AUTO SLEEPA)开关键
BONECO is a registered trademark of BONECO AG, Switzerland