PCICM 1140 - Ice machine PROFICOOK - Free user manual and instructions
Find the device manual for free PCICM 1140 PROFICOOK in PDF.
| Product Type | Ice Cream Machine |
| Brand | ProfiCook |
| Model | PCICM 1140 |
| Maximum Capacity | Approximately 900 ml |
| Rated Power | 12 W |
| Power Supply | 220-240 V~, 50 Hz |
| Net Weight | Approximately 2.95 kg |
| Protection Class | II |
| Time Setting | 5 to 45 minutes |
| Indicative Number of Portions | 5 portions |
| Included Accessories | Motor, lid, drive shaft, mixing attachment, locking ring, container, housing |
| Cleaning | By hand, do not immerse the motor, no abrasive products |
| Safety | Automatic shut-off, unplug before cleaning, keep out of reach of children under 8 years |
| Storage | Dry and ventilated place, out of reach of children |
| Repairs | Contact a qualified professional |
| Power Consumption | 12 W |
Frequently Asked Questions - PCICM 1140 PROFICOOK
User questions about PCICM 1140 PROFICOOK
0 question about this device. Answer the ones you know or ask your own.
Ask a new question about this device
Download the instructions for your Ice machine in PDF format for free! Find your manual PCICM 1140 - PROFICOOK and take your electronic device back in hand. On this page are published all the documents necessary for the use of your device. PCICM 1140 by PROFICOOK.
USER MANUAL PCICM 1140 PROFICOOK
natural_image
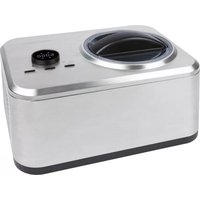
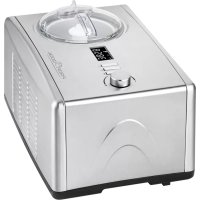
Exterior view of a stainless steel rice cooker with digital display and 'PROFITBOOK' branding (no text-heavy elements)Eiscreme-Maker PC-ICM 1140
Ijsmaker • Machine à crème glacée • Máquina de helados Gelatiera • Ice cream maker • Urzadzenie do wyrobu lodów • Fagylalt készítő gép Машина мороженого • ماكينة صفح الآيس كريم
natural_image
Technical line drawing of a mechanical component with an open lid and a base, showing internal structure (no text or symbols)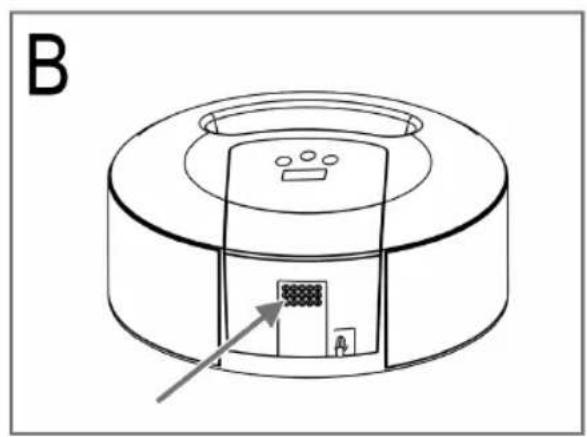
natural_image
Diagram of a circular device with internal components and an arrow pointing to a small structure (no text or symbols)Bedienungsanleitung
Thank you for choosing our product. We hope you will enjoy using the appliance.
Symbols in these Instructions for Use
Important information for your safety is specially marked. It is essential to comply with these instructions in order to avoid accidents and prevent damage to the appliance:

WARNING:
This warns you of dangers to your health and indicates possible injury risks.

CAUTION:
This refers to possible hazards to the appliance or other objects.

NOTE: This highlights tips and information.
Contents
Overview of the Components .... 3
General Notes 30
Special Safety Instructions for this Appliance.... 30
Overview of the Components / Delivery Scope.... 32
Unpacking the Appliance 32
Preparations....32
Notes on Use 32
Using the Appliance 32
Recipes 33
Cleaning....34
Storage....34
Technical Data....34
Disposal....34
General Notes
Read the operating instructions carefully before putting the appliance into operation and keep the instructions including the warranty, the receipt and, if possible, the box with the internal packing. If you give this appliance to other people please also pass on the operating instructions.
- The appliance is designed exclusively for private use and for the envisaged purpose. This appliance is not fit for commercial use.
- Do not use it outdoors. Keep it away from sources of heat, direct sunlight, humidity (never dip it into any liquid) and sharp edges. Do not use the appliance with wet hands. If the appliance is humid or wet, unplug it immediately.
- When cleaning or putting it away, switch off the appliance and always pull out the plug from the socket (pull the plug itself, not the lead) if the appliance is not being used and remove the attached accessories.
- Do not operate the appliance without supervision. If you leave the room you should always turn the appliance off. Remove the plug from the socket.
- The appliance and the mains lead have to be checked regularly for signs of damage. If damage is found the appliance must not be used.
- Use only original spare parts.
- In order to ensure your children's safety, please keep all packaging (plastic bags, boxes, polystyrene etc.) out of their reach.

WARNING:
Don't let small children play with foils for danger of suffocation!
Special Safety Instructions for this Appliance

WARNING:
- Always disconnect the appliance from the supply if it is left unattended and before assembling, disassembling or cleaning.
- Prior to replacing accessories or attachments that are moved during operation, the appliance must be shut off and separated from the mains.

WARNING:
- Do not repair the appliance by yourself. Please contact authorized personnel. If the supply cord is damaged, it must be replaced by the manufacturer, its service agent or similarly qualified persons in order to avoid a hazard.
- This appliance is suitable for use by children aged 8 years and above, if they have been given supervision or instructions regarding the safe use of the appliance and understand the hazards involved.
- Cleaning and user maintenance shall not be made by children, unless they are older than 8 years and supervised.
- Keep the appliance and its cord out of reach of children less than 8 years.
• Children shall not play with the appliance. - Appliances can be used by persons with reduced physical, sensory or mental capabilities or lack of experience and knowledge if they have been given supervision or instruction concerning use of the appliance in a safe way and if they understand the hazards involved.

CAUTION:
This appliance is not intended to be immersed in water during cleaning. Please observe the instructions that we have included in the chapter "Cleaning".
- Do not touch any moving parts of the appliance and always wait for it to stop.
- Do not remove the lid during operation.
Overview of the Components / Delivery Scope
1 Motor with display and control buttons
Button ☑ On / Off)
Button (reduce time)
Button ▶(increase time)
2 Lid with filler hole
3 Shaft
4 Stirring attachment
5 Locking ring
6 Container
7 Housing
Unpacking the Appliance
- Remove the appliance from its packaging.
- Remove all packaging material such as plastic films, filler material, cable ties and cardboard packaging.
- Check the content for any missing parts.
i NOTE:
There may be dust and production residue on the appliance. We recommend cleaning the appliance as described under "Cleaning".
Preparations
- Check the bowl for any damage. Do not use the container if leaking. Leaking cooling agent is not poisonous, but a leaking container will affect the result of the ice cream making process.
- Put the bowl into the freezer for at least 8 - 12 hours The freezer or freezer compartment should maintain a temperature of at least - 18 °C.
i NOTE:
- The container must be dry.
-
Make sure the container stands upright. The cooling agent inside the bowl must settle evenly.
-
Prepare an ice cream mixture. Ideal amount: approx 900 ml.
-
Sugar must have dissolved completely.
- When making ice cream with fruits, only use soft, seedless fruits that are mashed (puréed). You may also add fruit juice.
- If you wish to add pieces of fruits, nuts, brittle or alcohol, only add these ingredients to the finished ice cream. Let the stirring tool stir a few more times.
i NOTE:
Alcohol impairs the freezing process.
- Put the ice cream mixture into the fridge until starting the ice cream making process. Having a temperature of less than +10 °C will shorten the time of the ice cream making.
Notes on Use
- The appliance is switched on and off with the button ⏻
- The appliance must be assembled completely and switched on before filling the ice cream mixture into the bowl. That prevents the ice cream mixture from freezing to the inner walls of the bowl.
- Do not overfill the bowl! Ideal amount: approx. 900 ml. The volume of the ice cream will increase during the freezing process.
- Do not insert any objects such as fingers, spoons or similar into the filler hole while the appliance is operating.
• Preparation time varies, depending on:
-the recipe,
-the ambient temperature,
-the temperature of the ice cream mixture,
-the desired consistency.
- Do not leave the appliance unattended during operation.
Check the consistency of the ice cream permanently.
• The ice cream must not be too hard.
i IMPORTANT:
Immediately turn off the appliance in case
- the stirring attachment slows down or does not turn any more,
• hearing loud motor noise.
In these cases, proceed as described under "Using the appliance"→"End of operation".
Using the Appliance
WARNING: Risk of burning from cold!
Protect your hands for example with oven gloves when taking the bowl from the freezer or when carrying it.
- Remove the chilled bowl from the freezer.
- Place the bowl into the locking ring. The latch of the locking ring must face up.
- Raise both together and place them into the housing. Turn both together, so that the locking ring locks.
- Set the motor into the lid. It must engage.
- First, insert the shaft from below into the motor, and then push the stirring attachment onto the shaft.
-
Set the lid with the motor onto the locking ring (see page 3, Fig. A). The motor must engage.
-
Connection to the mains:
-
Before plugging in the appliance, check if the mains voltage matches. Refer to the rating label for the specifications of the appliance.
-
Connect the appliance to a certified wall socket only.
-
Turn the appliance on with the button ⏻The display will show "40:00" minutes. You can set the time with the buttons and between 5 and 45 minutes. The motor starts running after approx. 3 seconds.
i NOTE:
While running, the time no longer can be changed!
- Fill the chilled ice cream mixture through the filler hole into the bowl.
End of Operation
The appliance stops stirring automatically when the time runs out.
If you wish to stop stirring, press the button ⏻
- Pull the mains plug from the receptacle.
-
Unlock the motor by pressing the button (see page 3, Fig. B). Pull the motor with the lid upwards to remove it.
-
Remove the stirring attachment from the ice cream in order for it not to freeze.
-
Remove the entire ice cream, using a silicone or wooden spoon, so that it does not freeze to the edge.

CAUTION:
Do not use a metal spoon, as this may scratch the coating of the containers.
After Use
- Store ready-made ice cream that you want to eat later in the freezer.
- Do not freeze ice cream once thawed.
- Clean the appliance after each use as described under "Cleaning".
Recipes
- When making the ice cream mixture, please refer to chapter "Preparations - point 3".
- Quantities provided in the recipes are for reference only. Adjust individual mixtures as desired.
• Refer to other recipe books or the internet for more recipes.
Vanilla Ice Cream
(Approx. 5 servings)
Vanilla extract 1-2 teaspoons
Whole milk 300 ml
Cream 450 ml
Sugar 125g
Use a hand mixer and mix all ingredients in a bowl until the sugar has dissolved. Fill the chilled mixture into the ice cream container.
Preparation time with the ice cream maker: approx. 25-30 minutes
Chocolate Ice Cream
(Approx. 5 servings)
Vanilla extract 1 teaspoon
Whole milk 250 ml
Cream 250 ml
Sugar 125g
Chocolate bar, bitter or dark 225 g, crushed to small pieces
Cook the milk and cream together with the chocolate and sugar. Stir with a mixer suitable for hot foods. Let the ice cream mixture cool down and then keep in the fridge for 24 hours. Before filling the chilled ice cream mixture into the ice cream container, stir it one more time.
Preparation time with the ice cream maker: approx. 20 - 30 minutes
Strawberry Ice Cream
(Approx. 5 servings)
Strawberries, fresh, ripe, sliced 250 g
Lemon juice, fresh squeezed 1 ½ tablespoon
Vanilla extract 1 teaspoon
Whole milk 250 ml
Cream 250 ml
Sugar 125g
Mix the strawberries with lemon juice and approx. 80 g of sugar. Leave the mixture to stand for 2 hours in order for the juice to separate.
Use a hand mixer and mix the remaining sugar and milk at lowest setting, until the sugar has dissolved. Then stir the cream, strawberry juice and vanilla extract into the milk.
Fill the chilled ice cream mixture into the ice cream container.
Preparation time with the ice cream maker:
approx. 25 - 30 minutes
Add the strawberries during the last 10 minutes of the freezing operation.
Sorbet Basic Recipe
Fruit juice / fruits, puréed 600 - 700 ml
Sugar (depending on the fruits) 75 - 100 g
Egg white 1-2 tablespoons
Use a hand mixer and mix all ingredients in a bowl until the sugar has dissolved. Fill the chilled ice cream mixture into the ice cream container.
Preparation time with the ice cream maker:
approx. 25 - 30 minutes
Refine the taste by adding 1 tablespoon of liqueur, cognac, raspberry brandy or similar at the end of the freezing operation.
Sorbet should be eaten quite quickly to prevent it from getting liquid again.
Cleaning

WARNING:
- Before cleaning always disconnect from mains power supply.
- Never immerse the motor in water to clean it. Otherwise this might result in an electric shock or fire.

CAUTION:
- Do not use a wire brush or any abrasive items.
- Do not use any acidic or abrasive detergents.
• None of the parts are dishwasher-safe.
Motor
- Separate the motor from the lid. To do this, press the button on the motor and pull the motor up to remove it.
- Wipe the motor only with a moist cloth.
Accessories
- Clean all other parts by hand in soapy water.
- Wait for all parts to be dry before reassembling the appliance!
Storage
- Clean the appliance as described. Let the accessories dry completely.
• We recommend that you store the appliance in its original packaging when it is not to be used for a longer period.
• Always store the appliance at a well ventilated and dry place outside the reach of children.
Technical Data
Model: PC-ICM 1140
Power supply: 220 - 240 V\~, 50 Hz
Power consumption: 12W
Protection class:......II
Net weight: .... approx. 2.95 kg
The right to make technical and design modifications in the course of continuous product development remains reserved.
This appliance complies with all current CE directives, such as electromagnetic compatibility and low voltage directive and is manufactured according to the latest safety regulations.
Disposal
Meaning of the "Wheelie Bin" Symbol
Take care of our environment, do not dispose of electrical appliances via the household waste.
Dispose of obsolete or defective electrical appliances via municipal collection points.
Please help to avoid potential environmental and health impacts through improper waste disposal.
You contribute to recycling and other forms of utilization of old electric and electronic appliances.
Your municipality provides you with information about collecting points.
Instrukcja obsługi
CTC Clatronic Sp. zo.o.
Ul. Brzeska 1
45-960 Opole
Usuwanie
• These should be in the statements of the information, and they should be in the information.
Downloaded from www.vandenborre.be
Downloaded from www.vandenborre.be
Downloaded from www.vandenborre.be
Downloaded from www.vandenborre.be
GARANTIEKARTE
warranty card · garantiekaart · carte de garantie · scheda di garanzia · tarjeta de garantía · cartão de garantia · garantikort · karta gwarancyjna · záruční list · kartica jamstva · carte de garanție · Гаранционна карта · záručný list · garancijski list · garanciajegy · гарантійнийформуляр · Гарантийный талон ·
بطاقة ضمان
PC-ICM 1140
24 Monate Garantie gemäß Garantieerklärung - 24 months warranty according to warranty declaration - 24 maanden garantie volgens garantieverklaring - 24 mois de garantie selon la déclaration de garantie - 24 mesi de garanzia secondo la dichiarazione di garanzia - 24 meses de garantia de acuerdo con la declaración de garantia - 24 meses de garantia, de acordo com a declaração de garantia - 24 mäneders garanti i henhold til garantibetingelsene - 24 miesiące gwarancji na podstawie oświadczenia gwarancyjnego - záruka 24 měsiců podle prohlásení o záruce - 24 mjesečno jamstvo u skladu s jamstvenom deklaracijom - 24 luni garantje conform declarației de garantie - 24 месеца гаранция в съответствие с гаранционната декларация - 24-mesačná záruka podľa vyhlásenia o záruke - 24-mesečna garancija, skladno z garancijsko izjavo - 24 hónap garancia a garanciafeltételekben leirtak szerint - гаранția на 24 місяці відповідно заяві про гаранțiю - Гарантия 24 месяца согласно заявленным гарантийным правилам - ضCAS-1973-24-28-00-00-00
Kaufdatum, Händlerstempel, Unterschrift : date of purchase, dealer stamp, signature - sankoopdatum, dealerstempel, handtekening : date d'achat, tampon du concessionnaire, signature - data di acquisto, timbro del rivenditore, firma : fecha de compra, sello del distribuidor, firma : data de compra, carimbo do distribuidor, assinatura - kepsdato, forhandlerstempel, signatur - data zakupu, pieczęz sprzedawcy, podpis - datum zakouperi, razitko prodejce, podpis - datum kupovine, zig trgovca, podpis - data de achizije, tampila furnizorului, seminatura - Dara na покупata, Пlevant на 'продавача', Подпис - datum nákupu, pediataka obchodnika/predajcu, podpis - datum nakupa, zig trgovca, podpis - vásárias dátuma, keresikeð belyegzője, aláírás - data prijedbanня, печatka prodavza, підпис - Дата приобретення, Штамп продавца, Подпись -
PROFI COOK®
www.proficook.de
PROFI COOK
Internet: www.proficook.de
Made in P.R.C.