PC-ICM 1268 - Ice machine PROFICOOK - Free user manual and instructions
Find the device manual for free PC-ICM 1268 PROFICOOK in PDF.
| Product type | Combined ice cream maker and yogurt maker |
| Brand | ProfiCook |
| Model | PC-ICM 1268 |
| Maximum capacity | 1500 ml |
| Ice cream capacity | 1000 ml max |
| Yogurt capacity | 1400 ml max |
| Power supply | 220 – 240 V~, 50 Hz |
| Cooling power | 120 W |
| Heating power | 22.8 W |
| Refrigerant | R600a (isobutane), 24 g |
| Net weight | approx. 9 kg |
| Available programs | Ice cream, Yogurt, Stirring only, Cooling only |
| Adjustable timer | Ice cream: 5 to 60 minutes; Yogurt: 4 to 24 hours |
| Post-cooling function | Yes, 1 hour after the program |
| Motor protection | Automatic shutdown if ice cream is too hard |
| Overheat protection | Yes, compressor shutdown, wait 30 minutes |
| Cleaning of removable parts | Hand wash with warm water and dish soap (not dishwasher safe) |
| Package contents | Base unit, container, transparent lid, stirring tool, ice cream spatula, measuring cup |
| Warranty | 2 years (conforming to legal requirements) |
Frequently Asked Questions - PC-ICM 1268 PROFICOOK
User questions about PC-ICM 1268 PROFICOOK
0 question about this device. Answer the ones you know or ask your own.
Ask a new question about this device
Download the instructions for your Ice machine in PDF format for free! Find your manual PC-ICM 1268 - PROFICOOK and take your electronic device back in hand. On this page are published all the documents necessary for the use of your device. PC-ICM 1268 by PROFICOOK.
USER MANUAL PC-ICM 1268 PROFICOOK
natural_image
Exterior view of a modern stainless steel microwave oven with control panel and digital display (no visible text or symbols)Eiscreme-/Joghurt-Maker PC-ICM 1268
Ice Cream Maker / Yogurt Maker • IJsmachine / Yoghurtmaker • Glacière / Yaourtière
Heladera / Yogurtera • Gelatiera / Yogurtiera • Maszyna do lodów / Jogurtownica
Fagylaltgép / Joghurtkészítő • Мороженица / Йогуртница • ماکینة صınع الآیس کريم والزيادي
CE
Bedienungsanleitung......Seite 4
Instruction Manual...... Page 10
Gebruiksaanwijzing......Pagina 16
Mode d'emploi.... Page 22
Manual de instrucciones ...... Página 28
Istruzioni per l'uso....Pagina 34
Instrukcja obsługi......Strona 40
Használati utasítás .... Oldal 47
Руководство по эксплуатации ...... стр. 53
63 صفحة ____ دليل التعليمات
WICHTIG:
Be sure to read the separately enclosed safety instructions first.
Instruction Manual
Thank you for choosing our product. We hope you will enjoy using the appliance.
Read the instruction manual and the separately enclosed safety instructions very carefully before using this appliance. Keep these documents, including the warranty certificate, receipt and, if possible, the box with the inner packaging in a safe place. If you pass the appliance on to a third party, always include all the relevant documents.
Symbols in this Instruction Manual
Important information for your safety is specially marked. It is essential to comply with these instructions in order to avoid accidents and prevent damage to the appliance:

WARNING:
This warns you of dangers to your health and indicates possible injury risks.

CAUTION:
This refers to possible hazards to the appliance or other objects.
Content
Overview of the Components....3
Unpacking the Appliance....10
Overview of the Components / Scope of Delivery......10
Warnings for the Use of the Appliance ....10
If the Refrigerant Circuit is Damaged.... 11
Notes for Use....11
Location.... 11
Electrical Connection 11
Indications on the Display 11
Functions of the Buttons 11
Preparation Time.... 11
Protective Functions During Ice Cream Preparation.....11
Preparation for Making Ice Cream....12
Preparation for Making Yoghurt....12
Operation 12
Removing Ice Cream 12
Removing Yoghurt....13
Recipes for Ice Cream Preparation....13
Cleaning....14
Storage....14
Troubleshooting....14
Technical Data....15
Disposal 15
Meaning of the "Dustbin" Symbol 15
Unpacking the Appliance
- Remove the appliance from its packaging.
- Remove all packaging material, such as foils, filling material, cable ties and cardboard packaging.
- Check the scope of delivery for completeness.
- If the contents of the packaging are incomplete or if damage can be detected, do not operate the appliance. Return it to the dealer immediately.
- There may still be dust or production residues on the appliance. We recommend that you clean the appliance as described under "Cleaning".
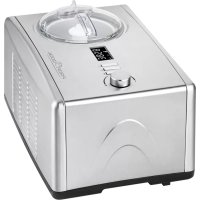
Overview of the Components / Scope of Delivery
1 Motor housing for the stirring tool
2 Unlock for the motor housing
3 Drive shaft
4 Transparent cover
5 Stirring tool
6 Container
7 Contacts for the motor housing
8 Trough of the base unit
9 Basic unit with compressor
10 Ventilation openings
11 Rotary control + / -
12 MENU button (programme selection)
13 POWER button (switch appliance on / off)
14 Control lamp (yoghurt preparation)
15 Control lamp (ice preparation)
16 Display
17 Control lamp (stirring tool)
18 Control lamp (cooling)
19 START/PAUSE button (start / interrupt programme)
Without Illustration
Ice spatula
Measuring cup
Warnings for the Use of the Appliance
WARNING:
The appliance contains the refrigerant isobutane (R600a) in the refrigerant circuit, a natural gas with high environmental compatibility, which is flammable. When transporting and setting up the appliance, make sure that the appliance does not fall down. The refrigerant circuit should not be damaged.

CAUTION:
- Be sure to observe the waiting time of 2 hours when using the appliance for the first time or after transport, so that the refrigerant can settle. Otherwise, the refrigeration compressor would be damaged.
- Do not use a metal spoon when removing the ice cream or yoghurt so as not to scratch the coating in the container.
- Use gloves to protect your hands when removing the container after making ice cream. There is a risk of burns from the cold!
If the Refrigerant Circuit is Damaged
- Avoid open flames and sources of ignition at all costs.
- Pull the appliance's mains plug out of the socket.
- Ventilate the room in which the appliance is located.
Notes for Use
Location
- Place the appliance on a stable, horizontal and level surface. Keep a distance of at least 15 cm from walls or objects.
- Do not place the appliance on or in the immediate vicinity of heat sources such as stoves, radiators, etc.
Electrical Connection
Before you plug the mains plug into the socket, check that the mains voltage you intend to use matches that of the appliance. You will find the information on the type plate.
Indications on the Display
 | Standby mode(the symbol flashes) |
| Ice preparation(stirring tool and cooling active) | |
| Cooling active | |
 | Stirring tool active |
| Yoghurt preparation (heating active) | |
| Post-cooling function active |
Functions of the Buttons
- Use the POWER button to switch the appliance on and off.
-
Use the MENU button to select a programme.
-
You can start the selected programme with the START/PAUSE button.
- You can interrupt the activated programme with the START/PAUSE button. When preparing ice, the compressor continues to cool for 1 minute. Press the button again to continue the programme.
- If you want to cancel a programme, press the POWER button. The appliance switches off.
- If the 🔔 or ✕ programme has been cancelled with the POWER button, maintain at least 5 minutes before restarting the appliance. This ensures that the pressure in the refrigerant circuit can relax.
Preparation Time
- The preparation time of ice cream or yoghurt varies. It depends on the following factors:
- the recipe,
- the temperature of the mixture,
- the ambient temperature,
- the desired consistency.
- Do not leave the appliance unattended during operation.
- Ice Preparation:
- When preparing ice cream, constantly check the consistency of the mixture.
- The ice cream mixture should not be too thin or too thick.
- Yoghurt Preparation:
- The preparation time depends on your individual preferences.
Check the yoghurt after a few hours. If necessary, reduce or increase the pre-set time. To do this, first press the START/PAUSE button and then change the time with the rotary control. Then restart the appliance. - The consistency of the yoghurt becomes firmer when it is placed in the refrigerator after preparation.
Protective Functions During Ice Cream Preparation
- If the stirring tool stops during operation because the ice cream mass has become too solid, the motor will stall.
- Switch off the appliance immediately. Pull the mains plug out of the socket.
-
Remove the ice cream.
-
You can start another operation immediately after preparing ice cream. For protection, the compressor only switches on after about 3 minutes.
- When preparing several portions of ice cream in succession, overheating protection may be activated. The compressor does not switch on. Allow the appliance to cool down for about 30 minutes before using it again.
Preparation for Making Ice Cream
-
Make sure that the container is completely dry before you insert it. Place the container in the well of the base unit.
-
Fill the desired ingredients into the container.
-
Do not fill more than 1000 ml into the container!
- Use ingredients that have a refrigerator temperature of 6–8°C.
- The ingredients should not be frozen. This could cause the motor to block.
- If you want to prepare fruit ice cream, use only soft, seedless fruit that you have crushed (puréed) beforehand. You can also add fruit juices.
- If you want to refine the ice cream with solid pieces of fruit, nuts, brittle or alcohol, only add these ingredients at the end of the freezing time.
- Alcohol inhibits the freezing process.
-
Fit the transparent lid to the motor housing. Make sure that both latches of the motor housing engage with a "click" on the lid.
-
Put the stirring tool onto the drive shaft on the motor. The stirring tool must engage with a "click".
-
Place the motor housing with lid and stirring tool so that the arrow ▶ on the cover points in the direction of the symbol ▶.
-
Close the lid by turning it in the direction of the symbol 🔒.
Preparation for Making Yoghurt
You need pasteurised milk (UHT milk) and natural yoghurt in a mixing ratio of 100 ml : 15 ml.
- Choose the location so that the appliance does not have to be moved during yoghurt preparation and is not exposed to vibrations. The yoghurt will otherwise remain liquid.
- Heat the UHT milk in a pot to about 45 °C and mix in the natural yoghurt or the yoghurt culture. If you want to use fresh milk, boil it first and let it cool down to about 45 °C.
- Place the container in the well of the base unit.
- Pour the already heated mixture into the container.
- Do not fill more than 1400 ml into the container!
- If you want to refine the yoghurt with fruit, nuts, jam or similar, add these ingredients only after preparation.
- Separate the transparent lid from the motor housing: If fitted, first remove the stirring tool from the drive shaft. Press both catches on the motor housing inwards to remove the lid.
- Put on the transparent lid without the motor housing. This keeps the heat inside the appliance.
Operation
- Connect the appliance to a properly installed earthed socket.
- Switch on the appliance with the POWER button.
- Select the desired programme with the MENU button:
| Programme | Function Preset Time | |
| Ice preparation | 60:00(Minutes) | |
| Stir only | 30:00(Minutes) | |
| Cooling only | 10:00(Minutes) | |
| Yoghurt preparation | 16H(Hours) |
You can change the pre-set time with the rotary control:
-
5 - 60 minutes at the programmes /
• 4 – 24 hours at the programme -
Confirm your selection with the START/PAUSE button. The programme starts.
-
After the time has elapsed, you will hear 10 beeps.
- The appliance is equipped with a post-cooling function. This is activated for 1 hour after the end of the and programmes. The compressor switches off for 10 minutes and then runs again for 4 minutes. is displayed. After 60 minutes, the appliance switches to standby mode. We recommend removing the contents immediately so that the ice cream or yoghurt does not freeze to the container.
Removing Ice Cream
- Switch off the appliance with the POWER button.
- Pull the mains plug out of the socket.
- Turn the motor housing in the direction of the symbol. Remove the motor housing together with the lid and stirring tool.
- Remove the container.
WARNING: Danger of Burns from Cold! Protect your hands with gloves when touching the container.
- Remove the ice cream from the container with the enclosed ice cream spatula or with a silicone or wooden spoon.
- Do not use a metal spoon to avoid scratching the coating in the container.
-
Fill the ice cream into a pre-cooled container with a lid.
-
The ice cream tastes best fresh.
- If the ice cream is not intended for direct consumption, we recommend cooling the finished ice cream further in a freezer.
- Do not refreeze thawed or defrosted ice cream!
Removing Yoghurt
- Switch off the appliance with the POWER button.
- Pull the mains plug out of the socket.
- Turn the lid towards the symbol.
- Remove the container.
- Remove the yoghurt from the container with the spatula provided or with a silicone or wooden spoon.
- Do not use a metal spoon to avoid scratching the coating in the container.
-
Fill the yoghurt into a thoroughly cleaned container with a lid and place it in the refrigerator.
-
The storage life of the yoghurt depends on how you prepare it. The cleaner you work, the longer it will take for the yoghurt to go off. However, you should not store the yoghurt for longer than a week.
- Add fruit and the like only shortly before eating.
- 150 ml of the finished yoghurt can be reused as a starter culture. Do not use this starter culture more than 20 times, as the effect wears off over time.
Recipes for Ice Cream Preparation
- When preparing the ice cream mixture, please refer to the notes in the chapter "Preparation for Making Ice Cream".
- You can use the measuring cup included in the scope of delivery for help.
- The quantities given in the recipes are only guidelines. Try out your individual mixture.
- If you want to increase the quantities to a maximum of 1000 ml, adjust the ingredients in the correct ratio. The preparation time will increase accordingly.
- You can find more recipes in cookbooks or on the internet.
Vanilla Ice Cream
(Makes approx. 5 servings)
Vanilla extract 1–2 teaspoons
Whole milk 600 ml
Cream 400 ml
Sugar 200 g
- Mix all the ingredients in a bowl with a hand mixer until the sugar is dissolved. Pour the chilled ice cream mixture into the container.
- Preparation time in the ice cream maker: approx. 40–45 minutes
Chocolate Ice Cream
(Makes approx. 4 servings)
Vanilla extract 1 teaspoon
Whole milk 250 ml
Cream 250 ml
Sugar 125g
Chocolate bar,
dark or semi-sweet 225 g, in small pieces
- Bring whole milk and cream to the boil with chocolate and sugar. Blend with a mixer that can be used for hot dishes. Allow the ice cream mixture to cool and chill in the refrigerator for 24 hours. Before pouring the chilled ice cream mixture into the container, stir it again.
- Preparation time in the ice cream maker: approx. 30–40 minutes
Strawberry Ice Cream
(Makes approx. 4 servings)
Strawberries,
fresh, ripe, sliced 250g
Lemon juice,
freshly squeezed 1½ tablespoons
Vanilla extract 1 teaspoon
Whole milk 250 ml
Cream 250 ml
Sugar 125g
- Mix the strawberries with the lemon juice and approx. 80 g sugar. Let the mixture rest for 2 hours so that juice forms.
- Stir the remaining sugar into the milk with a hand mixer on the lowest speed setting until the sugar is dissolved.
- Stir the cream, the juice of the strawberries and the vanilla extract into the milk.
- Pour the chilled ice cream mixture into the container.
- Preparation time in the ice cream maker: approx. 30–40 minutes.
- Add the strawberries in the last 10 minutes of the freezing process.
Basic Sorbet Recipe
Fruit juice / fruit, puréed 600–700ml
Sugar 75–100g
(depending on type of fruit)
Egg white 1–2 tablespoon
- Mix all the ingredients in a bowl with a hand mixer until the sugar is dissolved. Pour the chilled ice cream mixture into the container.
- Preparation time in the ice cream maker: approx. 35–45 minutes.
- To refine, 1 tablespoon of liqueur, cognac, raspberry brandy or similar can be added at the end of the freezing process.
- Sorbet should be consumed relatively quickly so that it does not become liquid again.
Cleaning

WARNING:
- Always switch off the appliance and disconnect the mains plug from the socket before cleaning.
- Do not immerse the appliance in water! It could cause an electric shock or fire.

CAUTION:
- Do not use a wire brush or other abrasive objects.
- Do not use harsh or abrasive cleaners.
- Do not use chemicals, acids, petrol or oil.
- The container, the stirring tool and the lid are not suitable for cleaning in the dishwasher. Exposure to heat and harsh cleaners could cause them to warp or discolour.
- You can clean the container, the stirring tool and the lid in warm rinsing water with a little hand dishwashing liquid added. Dry the accessories well afterwards.
- Clean the base unit and the bowl with a damp cloth.
Storage
- Clean the appliance as described and allow it to dry completely.
- We recommend storing the appliance in its original packaging if you do not intend to use it for a long period of time.
• Always store the appliance out of the reach of children in a well-ventilated and dry place.
Troubleshooting
| Problem Possible Cause Remedy | ||
| The appliance has no function. The appliance has no power supply. | Check the power socket with another appliance. | |
| Insert the mains plug correctly. | ||
| Check the house fuse. | ||
| The appliance is defective. Contact our service or a specialist. | ||
| The lid does not close. The container is not inserted correctly into the tray. | Turn the container a little when inserting it. | |
| The appliance is in standby mode although ice preparation was not finished. | The power supply has been interrupted. | Restart the programme for the remaining time. |
| The compressor makes abnormal noises. | The voltage is too low. Switch off the appliance and check the mains voltage. | |
| The stirring tool stops during the programme. | The ice cream is too hard. Blockage of the motor (protective function). | Switch off the appliance and disconnect the mains plug from the socket. Remove the ice cream. |
| The display shows the symbol. The compressor does not switch on. | The overheating protection is activated. | Let the appliance cool down for approx. 30 minutes before starting again. |
Technical Data
Model: PC-ICM 1268
Power supply: 220 - 240 V\~, 50 Hz
Power consumption
Cooling power: 120 W
Heating power: 22.8 W
Refrigerant: R600a/24g
Insulation blowing gas: C5H10
Maximum capacity: 1500 ml
Maximum filling capacity
Ice cream preparation: 1000 ml
Yoghurt preparation: 1400 ml
Protection class:....I
Net weight: .... approx. 9 kg
The right to make technical and design modifications in the course of continuous product development remains reserved.
This appliance has been tested according to all applicable, current CE directives and built according to the latest safety regulations.
Disposal
Meaning of the "Dustbin" Symbol
Protect our environment: do not dispose of electrical equipment in the domestic waste.
Please return any electrical equipment that you will no longer use to the collection points provided for their disposal.
This helps avoid the potential effects of incorrect disposal on the environment and human health.
This will contribute to the recycling and other forms of re-utilisation of electrical and electronic equipment.
Information concerning where the equipment can be disposed of can be obtained from your local authority. Your dealer and contractual partner is also obliged to take back the old appliance free of charge.
BELANGRIJK:
(Environ 5 portions)
(Environ 4 portions)
(Environ 4 portions)
CTC Clatronic Sp. z o.o
Ul. Brzeska 1
45-960 Opole