
Blend X Fresh BLP406 - Food Processor KENWOOD - Free user manual and instructions
Find the device manual for free Blend X Fresh BLP406 KENWOOD in PDF.
| Product type | Food processor (blender with accessories) |
| Brand | Kenwood |
| Model | Blend X Fresh BLP406 |
| Power supply | Electric, 220-240 V ~ 50/60 Hz |
| Blender bowl capacity | 1.6 litres |
| Maximum liquid capacity (soups, drinks) | 1.6 litres |
| Capacity for foams and milkshakes | 1 litre |
| Main functions | Blend, chop, grind, grate, crush ice |
| Included accessories | Blender, multi-mill, grinding mill, grating mill (depending on version) |
| Blender bowl material | Plastic |
| Blades | Stainless steel |
| Safety | Safety lock: the appliance only works if the blender is correctly installed |
| Maintenance and cleaning | Hand wash for blade assemblies; filling cap, lid, jug and sealing rings are dishwasher safe |
| Spare parts and repairability | Kenwood authorized repair centers; spare parts available via after-sales service |
| General information | Legal warranty; made in China; compliant with CE regulations |
Frequently Asked Questions - Blend X Fresh BLP406 KENWOOD
User questions about Blend X Fresh BLP406 KENWOOD
0 question about this device. Answer the ones you know or ask your own.
Ask a new question about this device
Download the instructions for your Food Processor in PDF format for free! Find your manual Blend X Fresh BLP406 - KENWOOD and take your electronic device back in hand. On this page are published all the documents necessary for the use of your device. Blend X Fresh BLP406 by KENWOOD.
USER MANUAL Blend X Fresh BLP406 KENWOOD
- Read these instructions carefully and retain for future reference.
- Remove all packaging and any labels.
If the cord is damaged it must, for safety reasons, be replaced by KENWOOD or an authorised KENWOOD repairer.
DO NOT process hot ingredients.
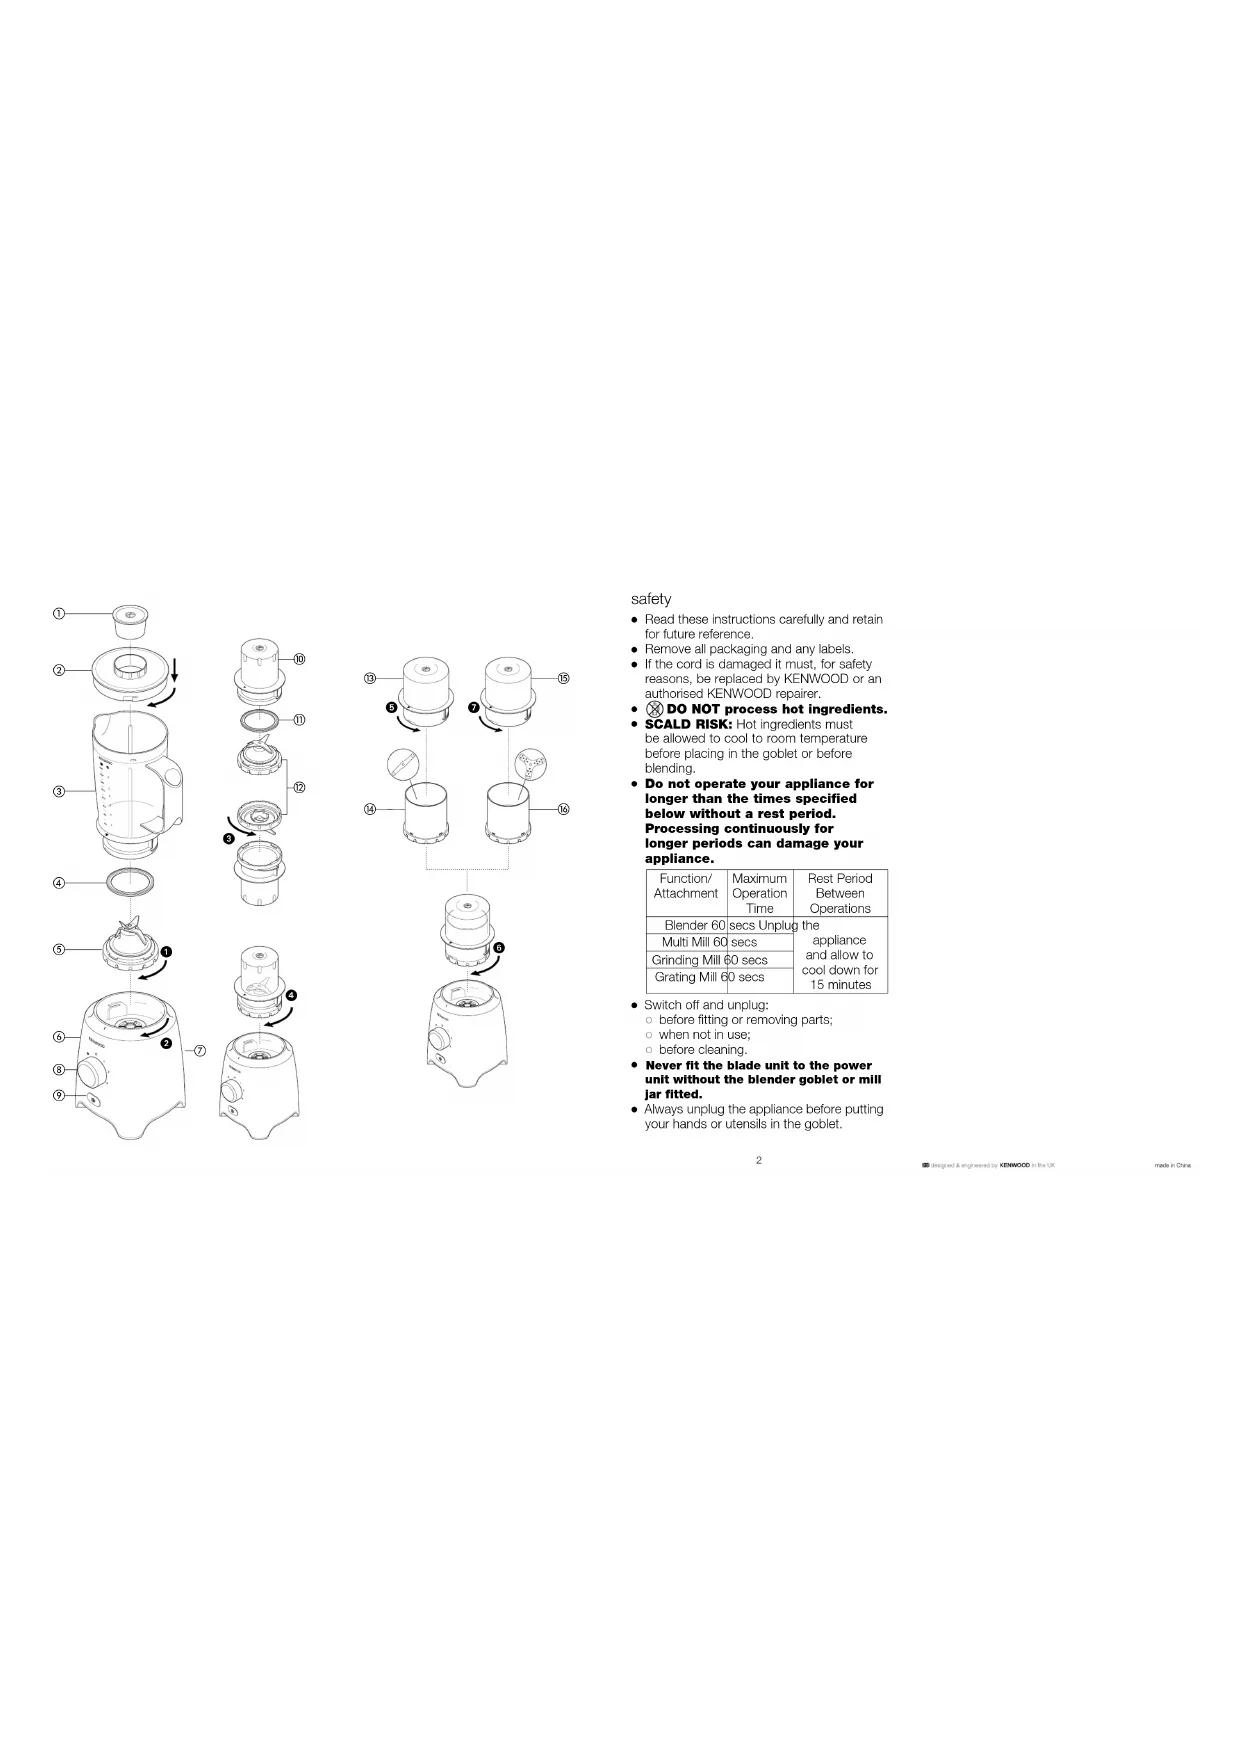
SCALD RISK: Hot ingredients must be allowed to cool to room temperature before placing in the goblet or before blending. - Do not operate your appliance for longer than the times specified below without a rest period. Processing continuously for longer periods can damage your appliance.
| Function/ Attachment | Maximum Operation Time | Rest Period Between Operations |
| Blender 60 secs Unplug the appliance and allow to cool down for 15 minutes | ||
| Multi Mill 60 secs | ||
| Grinding Mill 60 secs | ||
| Grating Mill 60 secs | ||
- Switch off and unplug:
before fitting or removing parts;
when not in use;
before cleaning. -
Never fit the blade unit to the power unit without the blender goblet or mill Jar fitted.
Always unplig the appliance before putting your hands or utensils in the goblet. -
Always take care when handling the blade assembly and avoid touching the cutting edge of the blades when cleaning.
-
Only operate the blender with the lid in place.
-
Only use the goblet with the blade assembly supplied.
-
Never let the power unit, cord or plug get wet.
-
Never use a damaged appliance. Get it checked or repaired: see 'service and customer care'.
-
Never use an unauthorised attachment.
-
Never leave the appliance unattended when it is operating.
-
When removing the blender or mill from the power unit:
wait until the blades have completely stopped;
do not accidentally unscrew the goblet or mill jar/lid from the blade assembly.
-
Never run the blender empty.
-
Never blend more than the maximum capacity stated in the recommended usage chart.
-
Smoothie recipes - never blend frozen ingredients that have formed a solid mass during freezing, break it up before adding to the goblet.
-
Do not process hard spices such as Nutmeg or Turmeric root as they may damage the blade.
-
Do not use the blender as a storage container. Keep it empty before and after use.
-
Always use the blender on a secure, dry level surface.
-
Never place this appliance on or near a hot gas or electric burner or where it could touch a heated appliance.
- Misuse of your appliance can result in injury.
- This appliance shall not be used by children. Keep the appliance and its cord out of reach of children.
- Appliances can be used by persons with reduced physical, sensory or mental capabilities or lack of experience and knowledge if they have been given supervision or instruction concerning use of the appliance in a safe way and if they understand the hazards involved.
- Only use the appliance for its intended domestic use. Kenwood will not accept any liability if the appliance is subject to improper use, or failure to comply with these instructions.
before plugging in
- Make sure your electricity supply is the same as the one shown on the underside of the appliance.
- This appliance conforms to EC Regulation 1935/2004 on materials and articles intended to come into contact with food.
before using for the first time
- Wash the parts: see 'care and cleaning'.
key
blender
① filler cap
② locking lid
③ goblet
④ blender sealing ring
⑤ blender blade unit
⑥ power unit
⑦ cord storage
⑧ speed + pulse control
⑨ ice crushing button
multi mill (if supplied)
10 multi mill jar
11 multi mill sealing ring
② multi mill blade unit
grinding mill (if supplied)
⑬ mill lid
⑭ grinding mill blade assembly
grating mill (if supplied)
⑮ mill lid
grating mill blade assembly
to use your blender
Use your blender for soups, drinks, pâtés, mayonnaise, breadcrumbs, biscuit crumbs, chopping nuts and crushing ice.
1 Fit the blender sealing ring ④ into the blender blade unit ⑤ - ensuring the seal is located correctly in the grooved area.
- Leaking will occur if the seal is damaged or incorrectly fitted.
2 Screw the blade assembly onto the goblet - ensuring the blade assembly is fully tightened 1. Refer to the graphics on the underside of the blade unit as follows:
-
unlocked position
-
locked position
3 Put your ingredients into the goblet.
4 Put the filler cap in the lid.
5 Fit the lid to the goblet and turn clockwise to lock.
6 Place the blender onto the power unit with the handle situated to the right hand side and lock by turning clockwise until you hear a "click"
2.
- The appliance will not work if the blender is incorrectly fitted.
7 Select a speed (refer to the recommended usage chart).
blender hints
- To blend dry ingredients - cut into pieces, remove the filler cap, then with the appliance running, drop the pieces down one by one. Keep your hand over the opening. For best results empty regularly.
- The processing of spices is not recommended as they may damage the plastic parts.
- When making mayonnaise, put all the ingredients, except the oil, into the blender. Remove the filler cap. Then, with the appliance running, add the oil slowly through the hole in the lid.
- Thick mixtures, e.g. pâtés and dips, may need scraping down. If the mixture is difficult to process, add more liquid.
| blender recommended usage chart Do not operate your appliance for longer than the times specified below without a rest period. Processing continuously for longer periods can damage your appliance. | ||
| speed | usage/food items max. quantity | |
| 1 Froth Light mixes scramb | ing milk 1 litre | |
| mixes e.g. batters, milkshakes, ed egg 1 litre | ||
| 2 - 3 Thicker Mayonna | Soups & drinks mixes e.g. pâtés | 1.6 litres |
| aise 3 eggs + | 450ml oil | |
| Smooth Place the fresh fruit and liquid ingredients in first (includes yoghurt, milk and fruit juices) then add ice or frozen ingredients (includes frozen fruit, ice or ice cream) | ||
| * | Ice crushing - operate in short bursts until crushed to the desired consistency. | 6 cubes (125g) |
| (P) pulse | Operates the motor in a start/stop action. The pulse will operate for as long as it is held in position. | - |
to use your multi mill (if supplied)
Use your multi mill for milling herbs, nuts, coffee beans and purees.
1 Put your ingredients into the jar (10). Fill it no more than half full.
2 Fit the multi mill sealing ring ⑪ into the multi mill blade unit ⑫ - ensuring the seal is located correctly in the grooved area.
- Ensure that the seal is fitted correctly.
3 Turn the blade unit ② upside down. Lower it into the jar, blades down 3. Turn anti-clockwise to lock.
4 Place the mill onto the power unit and lock by turning clockwise until you hear a "click" 4.
5 Select a speed or use the pulse control.
to use your grinding mill (if supplied)
Suitable for grinding spices, coffee beans and processing ginger, garlic and chillies.
1 Place your ingredients into the blade assembly ⑭.
2 Fit the lid ⑬ and turn anticlockwise to lock ⑤.
3 Place the mill onto the power unit and lock by turning clockwise until you hear a "click" 6.
4 Select a speed or use the pulse (P) control.
to use your grating mill (if supplied)
Suitable for grating parmesan cheese, nutmeg, coconut and dried fruit.
1 Place your ingredients into the blade assembly (16).
2 Fit the lid ⑤ and turn a clockwise to lock ⑦.
3 Place the mill onto the power unit and lock by turning clockwise until you hear a "click" 6.
4 Select a speed or use the pulse (P) control.
| mill recommended usage chart Do not operate your appliance for longer than the times specified below without a rest period. Processing continuously for longer periods can damage your appliance. | ||||
| ingredients mill max time | qty speed operating | |||
| Herbs - best chopped Multi 15g 3 5 - 10 when clean and dry | secs | |||
| Nuts Multi or Grinding 50g 3 10 - 15 secs | ||||
| Coffee Beans | Multi or Grinding | 50g 3 | 30 secs | |
| Baby Foods & Purees | Multi 50g 3 | 30 secs | ||
| Spices - such as black peppercorns, cardamom seeds, cumin seeds, coriander seeds, fennel seeds, whole cloves etc. | Grinding | 50g | 3 | 30 - 60 secs |
| Chillies | Grinding | 30g 3 | 10 secs | |
| Fresh Root Ginger | Grinding | 30g | 3 | 10 secs |
| Garlic | Grinding | 4 cloves | 3 | 10 secs |
| Parmesan Cheese - cut into 1cm cubes | Grating 60g 3 | 10secs | ||
| Dried Fruit | Grating | 50g 3 | 10 secs | |
| Coconut | Grating | 50g 3 | 20 secs | |
| Nutmeg | Grating | 2 | 3 | 40 secs |
Hints
- For optimum performance when processing spices we recommend that you do not process more than 50g at a time in the mill.
Whole spices retain their flavour for a much longer time than ground spices so it is best to grind a small quantity fresh at a time to retain the flavour.
To release the maximum flavour and essential oils whole spices are best roasted prior to milling. - Baby food/purees - allow cooked food to cool to room temperature before processing in the mill.
care and cleaning
Always switch off, unplug and dismantle before cleaning.
- Empty the goblet before unscrewing it from the blade unit.
- Do not immerse the blade unit in water.
power unit
- Wipe with a damp cloth, then dry.
- Do not immerse the power unit in water.
- Store excess cord in the storage area at the back of the power unit ⑦.
blade assembliesblender and multi mill
- Remove the blade unit from the goblet or mill by turning to the unlock position to release.
grinding and grating mills
- Remove the lid from the blade assembly by turning in a clockwise direction.
1 blender/multi mill: remove and wash the sealing ring.
2 Do not touch the sharp blades - brush them clean using hot soapy water, then rinse thoroughly under the tap. Do not immerse the blade unit in water.
3 Leave to dry upside down.
other parts
Wash by hand, then dry.
| Item Suitable for | dishwashing |
| Filler cap | 4 |
| Locking lid | 4 |
| Goblet | 4 |
| Blender sealing ring | 4 |
| Multi mill sealing ring | 4 |
| Blade unit | 8 |
| Multi mill jar | 4 |
| Mill lid | 4 |
| Grinding mill blade assembly | 8 |
| Grating mill blade assembly | 8 |
service and customer care
If you experience any problems with the operation of your appliance, before requesting assistance refer to the "troubleshooting guide" section in the manual or visit www.kenwoodworld.com.
Please note that your product is covered by a warranty, which complies with all legal provisions concerning any existing warranty and consumer rights in the country where the product was purchased.
If your Kenwood product malfunctions or you find any defects, please send it or bring it to an authorised KENWOOD Service Centre. To find up to date details of your nearest authorised KENWOOD Service centre visit www.kenwoodworld.com or the website specific to your Country.
1 Designed and engineered by Kenwood in the UK.
1 Made in China.

IMPORTANT INFORMATION FOR CORRECT DISPOSAL OF THE PRODUCT IN ACCORDANCE WITH THE EUROPEAN DIRECTIVE ON WASTE ELECTRICAL AND ELECTRONIC EQUIPMENT (WEEE)
At the end of its working life, the product must not be disposed of as urban waste.
It must be taken to a special local authority differentiated waste collection centre or to a dealer providing this service.
Disposing of a household appliance separately avoids possible negative consequences for the environment and health deriving from inappropriate disposal and enables the constituent materials to be recovered to obtain significant savings in energy and resources. As a reminder of the need to dispose of household appliances separately, the product is marked with a crossed-out wheeled dustbin.
troubleshooting guide
Problem Cause Solution
The Blender will not No Power Check blender
operate. plugged in.
Blender not assembled Check blade unit is
correctly. fully tightened to
the goblet.
Blender leaking from blade Seal missing. Check seal is fitted
assembly. Seal incorrectly fitted. correctly and not
Seal damaged. damaged.To obtain
a replacement seal
see "service &
customer care".
Blender seal missing from
blade unit when removed
from packaging.
To obtain a
replacement seal
see "service &
customer care".
The seal is packed
pre-fitted to the blade
unit.
Unscrew goblet and
check that seal is
fitted to blade unit.
If none of the above solve the problem see "Service & Customer Care".
Nederlandsls
XpnoToumuLou TOnaTTawx npoewv (eav TApexEtaI)
XpnoiopoToinote to uAo TOnAaTawv xpoeewyia va aEoTe BoTava, npouc KapTOUC, KOKOUc KaPe kai Toupe.
1 ToTtOeTnOte Ta UAIka eOa 0To BacoM Nv To yEmuIcTe TnapaTavw aTTO muo.
2 ToTTOEETNOTE TO dAKTUALIO TEYavOTIOINOG TOU MULO TOLAAATWv XPOEwV 10TN MOvAbAeTIIDwV TOU MULO ② - DIAOpaIcOVTAC OTIO BAKTUALIOCS TEYavOTIOINOG EIVAI OWTa TOTIOeTnMEVOC OTNV AUAAKWTN TEPIOXn.
Bεβαιωθειτοι o δακτύλιος οτέγανοποησόχει τοῦθετηδει σωτά.
3 FupioTe Tn movadaae iiodow ② avantob. ToTOnoetnoTe Tn OTO KATW heoC Tou doxeiou, TIC aeioec oTpaumevc TPOc Ta KATw ③. TpEpyTe Tnv apiotepoOToPoa yia va aaoaiaoei OTn theon Tns.
4 ToTTOEETnToMuAo TAVw OTn MOvabα MOTep KAI aOφaALIOTe Tov OTn θeAn Tou, OTpερoVTAC TOV δεξiooTPOpa Eωc OTou AKoUoTE EvxapakTnpiOTIKo Nxo «KIAK
4.
5 Eπλεξτe Taxutnta n xρησιμοτοιnοτε to puθμiσtn παλμωv.
xpnon Toumuou aEoataoc (eav npexetai)
KaTaalnloa yia va aaleoETe
Paxapika, kokkouc kafe,
Tivzep, oKOpO KAI TITTEPIEC
ToiI.
1 ToTioTeIIOTe Ta UAIka Otn movadaa EITIDwV 14.
2 ToTIOEETNOTE TO KAII KAI OTppeyTe TO apIOTEpOToPOqa YIA va aOpaAioEi OTN ΘeON Tou 5.
3 ToTnOeTnOteToMuAoTavw Otn Movada oTeP KAI aOgAiaOTe Tov OTn 0EaTou, OtpEpoVtac Tov oTPOpa EwC otUaKoOeTE EvaXapakTnpiTiko Nxo KAIK) 6.
4 Eπλεξτe taxutnta n xρησιμοτοιοτε tnv παλμική λειουργia (P).
XpnoToumuLou Tpiipatoc (av npexetai)
KataaAanao yia va Tpiye TAPeZava,ooxokapuO, KAPUba kai aTNOxnpaEv a PpouTa.
1 ToTOnoTeTnToTe Ta UAIka Otn Movadaa EITIDOWV 16.
2 ToTIOeTnOte TO KATIaKl ⑤ KAI OTpEeTe TO apIoTePoOToPpOa YIA VA aOpaAioEi OTn ΘeON Tou 7.
3 ToTIOeTnOteToMuAoTTAVW Otn MovadTaPoofoaiaKai aoPaiote Tov OTn θeOn Tou, OTPeovvTac Tov dEiooTPoopa EwC OTOU AKOUeTE EvxapakntpiOTIKo Nxo «KIAI» 6.
4 Eπλεξτe Taxutnta n xρησιμοτοιατε ηδιακεκομένη λειουργia (P).
He BCTaHOBJIOnTe HOxOBn 6JOK Ha 6JOK eIeKTPoDvRyHa 6e3 cTaKaHy 6JeHdepa a6o yawi noDi6HOBaay.
3aBxDn BiDKnHouaTe npnaD BiD MepeKi eNeKtpoNocTauaHHa nepeD Tm, k onyCTiTn pyKn a6o KuxOHHi npnaJaDo qaSi.
-
ПовдьТecь оберекно i3 HOЖOBиM 6лOKOM, пд час чишени He TopkaIТecь ROCTpIX Лe3 руКamN.
-
YmkaTn 6JIeHdep MOxHa JIiSe i3 3aKpntOIO KpNtKOHO.
-
Eксп Nyataця 6лeндар розволяеть сг Тык i3 HOжOBиM 6лOKOM, lo BXODNTbdo KOMПЛeКТY.
He donyckaTe nonadaHnBaBolOrnHa 6Iok eIeKtpoDbnryHa, uHyp a6o BnIky.
He BnKOpNCTOBuYTe N0sKOJxHn npnilad. IpeBipka a6o peMOHT 3diIcHIOUToBcra y cneiaJIbHnx ceHTpax: INB. PO3dIIN «cepBicHe O6cLyroByBaHHa}.
He BnKOpNCTOBuYTe HaCaAdKn, 1o He npn3NaueHi DnI yBoRo npnJaDy.
He 3aIIuIe npIaI, 10 npaIoe, 6e3 HaIy.
-Якwo Bamnotpi6Ho 3HraTn 6JeHdep a6o noDpi6HOBauch i3 6IOKy eNeKtpoDbuRgamma:
OdoekaiTecb NOBHOI 3yHHKn HoxkoBOrO 6JIOKY;
CπiДКуITe 3a Tm, ΚO6n BnnaKOBHe BiDkpyTITN qAsy a6o qAsyNoDpi6HIOBaay/KpUShky BiD HoxKOBO6JOKy.
- Hikon He BmkaTe npoxhIe 6JeHep.
He nepeBnUyIte MaKcImMaJIbHOI notyxHocTi,Яka Bka3aHa y Ta6IuCi peKOMeHdaui. - ΦpykTOBi KOKTei - He nepemiiyTe 3amopOkeHi iHrpEiEcHTn, IIO nepetBOpINcra Ha TBepy Macy NiI quac 3amopOzKn. POnpi6HITb CuO macy Ha HeVeJIki ShMaToUckn, a Notim NokJaDiTb ix Do yau.
He o6po6JIaTn TBepdi cpei, TaKi Jk MyckaTHn ropix a6o KopiHn KypKymn, OCKIbKn BOHn MoKyTb NOsKOdNTn DnCK.
He BnKOpNcTObyIe 6JeHdep dIa 36epirAHn npOdykTiB. BJeHdep Mae 6ytI npOxHIM Do Ta nicIe kCpIpyatauii.
3aBxDn BCTaHOBJIIOte 6JeHdep Ha 6e3neuHy cyxy pIBHy NOBepXHIO.
He cTaBTe npiJaHa ra3OBy a6o eIeKtpnHy pIHTy qH NOpUy 3 HmM, a TAKoJy Micx, De BIn MoXe TOPKaTnCay iHsOro Harpitoro npiJaMy.
HeBipHe BnKOpNCTaHHa YbOTo npIaMy MoKe npNBecTn Do TpaBM. - Zei npilad He npn3naeHn IJRA BIKOPnCTaHHa DITbMn. TpmaTe npnilad i shyp noanl BiD ditei.
He pekomeHnyeTbcra KopnCTyBaTncra cIIM npnilaIOM oc6am i3 o6MeJxHmN fizHnMn a6o MeHTaJIbHmM MOJINBOCTaMn a6o TIm, XTO MaE HeIOCTaTHbo DoCBiDy B Ioro ekCpIpyataci. BnueHa3BaHm oc6am
UcyeHHa HeCnpaBHOCTe
aill a 1c aiabll g
clll alacolil lgal (gall)
gloag jaii
4
0
()p
gall glll gll lll
a ③ a b 100
5
aoll aagc aiaall gaa 1
aclll aac sljglg (gog)
gao lawg jao go
6 aebsb
oioi oaiol aoll 0o (P)
sueiaiieholl 1 (la
oljio 10000000000000000000000000000000000000000000000000000000000
Llly Jldydligso 1
JoluljwJdsJooiahbl alg
Jauill Jde Jy Loy Jdlo! 10.
aibbll aolil pks yIddo
Sdc I cI oIoluiuoi 1
Loludiiuai Jssio iaiball j
pKdy Jda Jraewo Jo Siill Go ⑫
Jals Kya Jka Jgao
sI 1 1 1 1 1 1 1 1 1 1 1 1 1 1 1 1 1 1 1 1 1 1 1 1
12 15
J
3 J
aclll jsc slg
g aal g aal 1c gall llal 0
Jaaall gao gao clll alac o jai
(ogall) aoall oao gao
jai all oai jai all jai
gai all oai jai all
gai all
1 1 1 1 1 1 1 1 1 1 1 1 1 1 1 1 1 1 1 1 1 1 1 1 1 1 1 1 1 1 1 1 1 1 1 1 1
jlll lglb- aalglo 1
aill ll bie j piay
laai y gl gabag
aill ay gl ie j. jall
e jlll Jl al 10 all
Jk bi y jall
Ljdl jy jall
jy jall
jz jn jn jn jn jn jn jn jn jn jn jn jn jn jn jn jn jn jn jn jn jn jn jn jn jn jn jn jn jn jn jn jn jn jn jn jn jn jn jn jn jn jn jn jn jn jn jn jn jn jn j
J
J ①
S J ②
J ③
jU L kJg ④
jU U Jg ⑤
JU U Jg ⑥
JU U Jg ⑦
+ aJg ⑧
JU Jg ⑨
LoluiyIossiaiaiball (LaagjAALL )
LolaiiyIossioiaiballcog 10
ssioiaiballpKolia
LolaiyI ①
ssioiaiballJg ②
(laagjaiy)pajll aabos 13
aiball golll Ubi 14
paiaaba cyaacgso 14
(laagjaiy)yaiiaab 16
iaiball golll Ubi 16
eai
LALLJLLIJIALLI 1
JLLALLCLLALL,ALGLSS
LILLLALLALLALLAL
LILLLALLALLALLAL
LILLLALLALLALLAL
4 JLLALLALLLAL L
SLLALLO-⑤ JLLALLALALG
LGLGgOgOgOgOgOgOgOgOgOgOgOgOgOgOgOgOgOgOgOgOgOgOgOgOgOgOgOgOgOgOgOgOgOgOgOgOgOgOgOgOgOgOgOgOgOgOgOgOgOgOg0
JGJLLALLALLALLALLAL
JLLLLALLALLALLAL
JLLLLALLALLALLAL
JLLLLALLALLALLAL
JLLLLALLALLALLAL
J 1 J 1
Jb1 Jb2 Jb3 Jb4
y j 1 j 1 j 1 j 1 j 1 j 1 j 1 j 1 j 1 j 1 j 1 j 1 j 1 j 1 j 1 j 1 j 1 j 1 j 1 j 1 j 1 j 1 j 1 j 1 j 1 j 1 j 1 j 1 j 1 j 1 j 1 j 1 j 1 j 1
J 10000000000000000000000000000000000000000000000000
gaiy jai jai jai iuiu J 1
jai:laue gauoai jai L uci
. auii y liuai jiu
J 1
Jl l 100000000000000000000000000000000000000000000000000000000000
1221 1000000000000000000000000000000000000000000000000000
•
•
g 1 g j 1 1 1 1 1 1 1 1 1 1 1
1
1
1
.
"
.
:alll g jolll j! sic .
| r1| = | r2| = 1
.
1
ggl 1j gagaoaal aagaaal
1
1
…gall
Jia all jgll 10
1
1
L
1
aannnnnnae
1
1
KENWOOD
.KENWOOD
s
·
a
1
.
J 1
aallll 1
aal
JgJ 1