
GoProjector - Projector AIPTEK - Free user manual and instructions
Find the device manual for free GoProjector AIPTEK in PDF.
| Product type | Pico projector (mini projector) |
| Brand | Aiptek |
| Model | GoProjector |
| Optical technology | DLP (Digital Light Processing) |
| Light source | RGB LED |
| Native resolution | 640 x 480 pixels (VGA) |
| Luminous flux | Up to 35 ANSI lumens |
| Projected image size | 6 to 60 inches (152 mm to 1524 mm diagonal) |
| Video input | MHL (via included cable) or HDMI (via included adapter) |
| Input power | 5 V / 2 A (via micro USB) |
| Output power (MHL charging) | 5 V / 500 mA |
| Battery type | Rechargeable Li-polymer built-in |
| Battery capacity | 1850 mAh |
| Projection battery life | Up to 100 minutes |
| Power consumption (projection) | 7 W |
| Power consumption (MHL charging) | 2.5 W |
| Operating temperature | 5 °C to 35 °C |
| Maximum relative humidity | 80% (between 5 °C and 35 °C, non-condensing) |
| Dimensions (L x W x H) | 132 x 71 x 14 mm |
| Weight | 165 g |
| Built-in speaker | Yes |
| Focus | Manual (wheel) |
| Display formats | Pan & Scan (4:3), Theme (4:3), Letterbox (16:9) |
| Box contents | Projector, USB cable, HDMI adapter, carrying pouch, user manual |
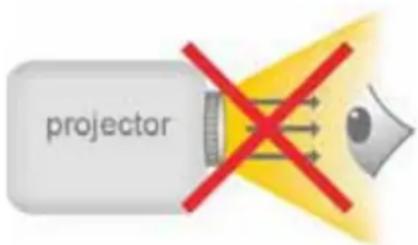
| Safety instructions | Do not look directly at the lens; avoid water; ambient temperature 5–35 °C; do not disassemble |
| Maintenance | Clean the lens with a soft, dry cloth; store in a dry place |
| Repairability | Not user serviceable; contact customer support |
Frequently Asked Questions - GoProjector AIPTEK
User questions about GoProjector AIPTEK
0 question about this device. Answer the ones you know or ask your own.
Ask a new question about this device
Download the instructions for your Projector in PDF format for free! Find your manual GoProjector - AIPTEK and take your electronic device back in hand. On this page are published all the documents necessary for the use of your device. GoProjector by AIPTEK.
USER MANUAL GoProjector AIPTEK
Care and Safety Information
- Keep the device and packaging materials out of the reach of infants and children.
- Avoid subjecting the power adapter and other contacts to dripping or splashing water and dry your hands before you use it. Do not place objects filled with liquids such as vases, etc. on or near the device.
- Make sure that the used power outlet is always readily available and never hidden. In case of emergency, use the power adapter to separate the device from the power network.
- Keep your device away from all flames such as candles and do not set them up in the vicinity of the device.
- Keep the unit at least 10cm away from other objects. Make sure the ventilation is not covered by newspapers, tablecloths, curtains, etc.
- For your own safety, do not use the projector during thunderstorms or lightning.
- Relative Humidity is 5 35^ 80% Max.)non-condensing.
- The battery is integrated with the device. Do not disassemble and modify. The battery should be replaced by qualified service staff only.
- Ensure that the ambient room temperature is within -10 55^
- During the operation, this product may heat lightly, which is normal.
- Wait before using if the device has been moved from a cold location into a warm one. Any condensation that has formed may in certain circumstances destroy the device. As soon as the device has reached room temperature it can be used without risk.
- Handle the product with care. Avoid contact with sharp objects. Keep device away from metallic objects.
- Place the projector on a flat surface. Any collision or falling to the ground is likely to damage the product.
- Do not drop or disassemble the product otherwise the warranty voids. Opening or removing covers may expose you to dangerous voltage or other hazards. Refer all servicing to qualified service personnel.
- Use only the accessories supplied by the manufacturer.
- Both product and user's manual are subject to further improvement or supplement without further notice.
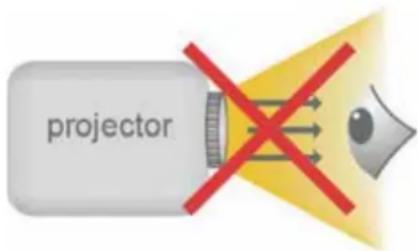
- Avoid facing directly into the projector's lens.
FCC Compliance Statement:
This device complies with Part 15 of the FCC Rules. Operation is subjected to the following two conditions: (1) this device may not cause harmful interference, and (2) this device must accept any interference received, including interference that may cause undesired operation.

This equipment has been tested and found to comply with limits for a Class B digital device, pursuant to Part 15 of the FCC rules. These limits are designed to provide reasonable protection against harmful interference in residential installations. This equipment generates, uses, and can radiate radio frequency energy, and if not installed and used in accordance with the instructions, may cause harmful interference to radio communications.
However, there is no guarantee that interference will not occur in a particular installation. If this equipment does cause interference to radio or television equipment reception, which can be determined by turning the equipment off and on, the user is encouraged to try to correct the interference by one or more of the following measures:
- Reorient or relocate the receiving antenna.
- Move the equipment away from the receiver.
- Plug the equipment into an outlet on a circuit different from that to which the receiver is connected.
- Consult the dealer or an experienced radio/television technician for additional suggestions.
You are cautioned that any change or modifications to the equipment not expressly approved by the party responsible for compliance could void your authority to operate such equipment.


(EN)
If the time arises to throw away your product, please recycle all the components possible.
Batteries and rechargeable batteries are not to be disposed in your domestic waste! Please recycle them at your local recycling point.
Together we can help to protect the environment.

(DE)
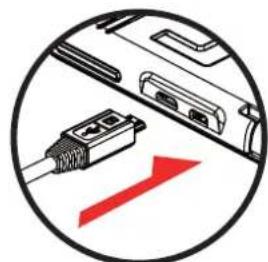
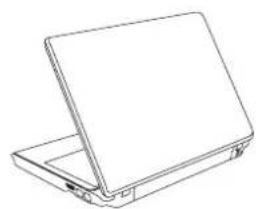
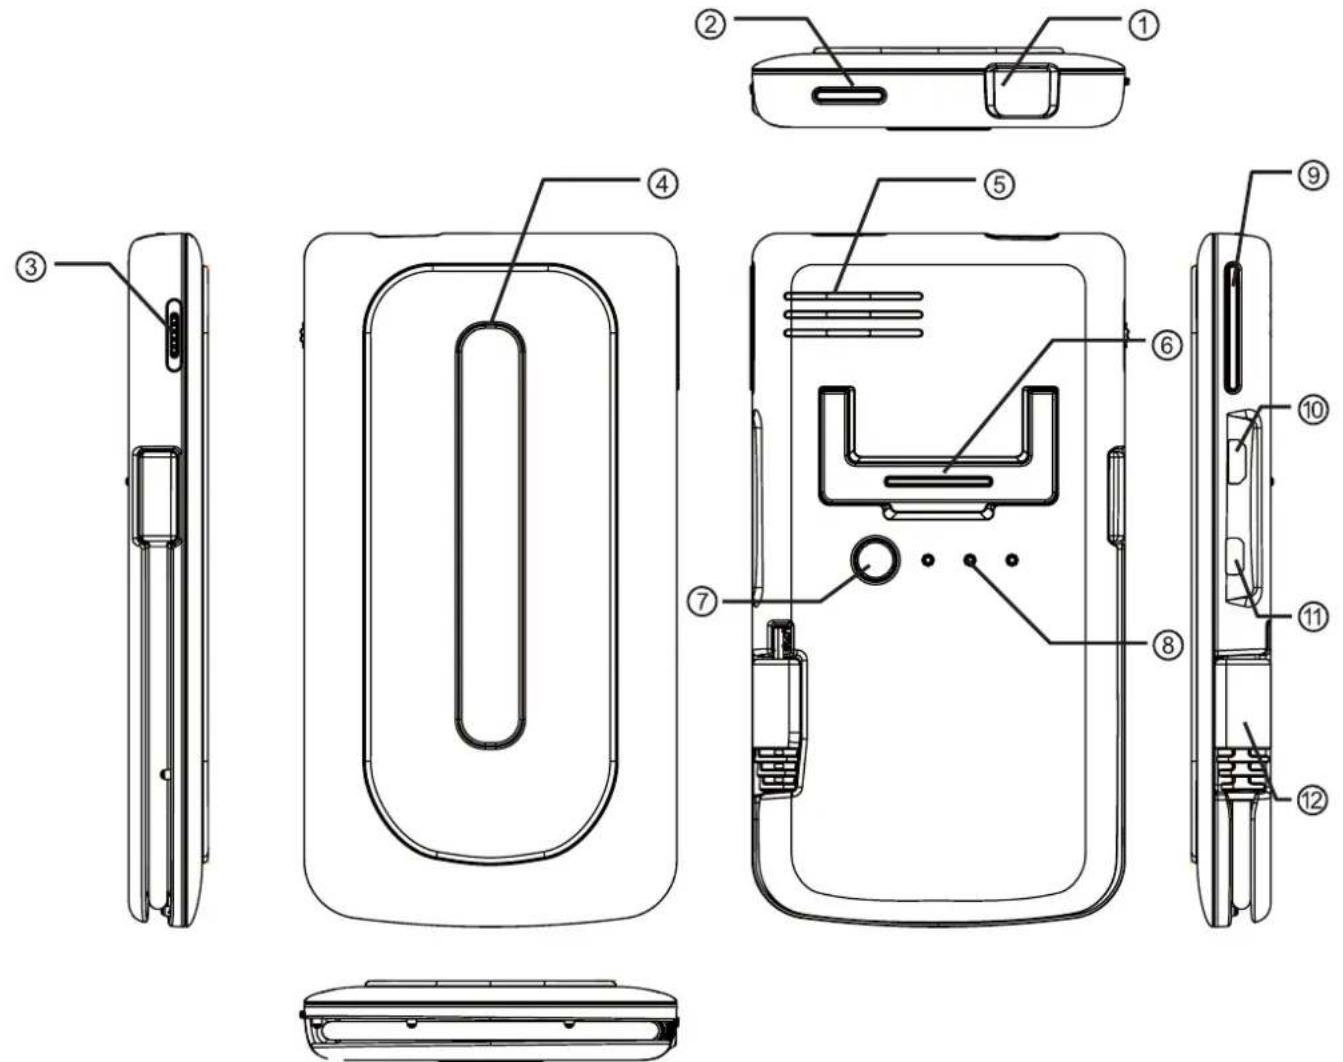
① Projector Lens
② Projection On/Off Button
③ Focus Wheel
②③ Anti-Slip Pad
- You can put your cell phone on top of the projector for convenience usage.
⑤ Speaker
②⑤ Stand
⑦ Charging Mode
⑧ LED Indicator
Projection Mode/Up & Down
Micro USB Charging Port
Micro HDMI port
MHL Cable (5 pin)
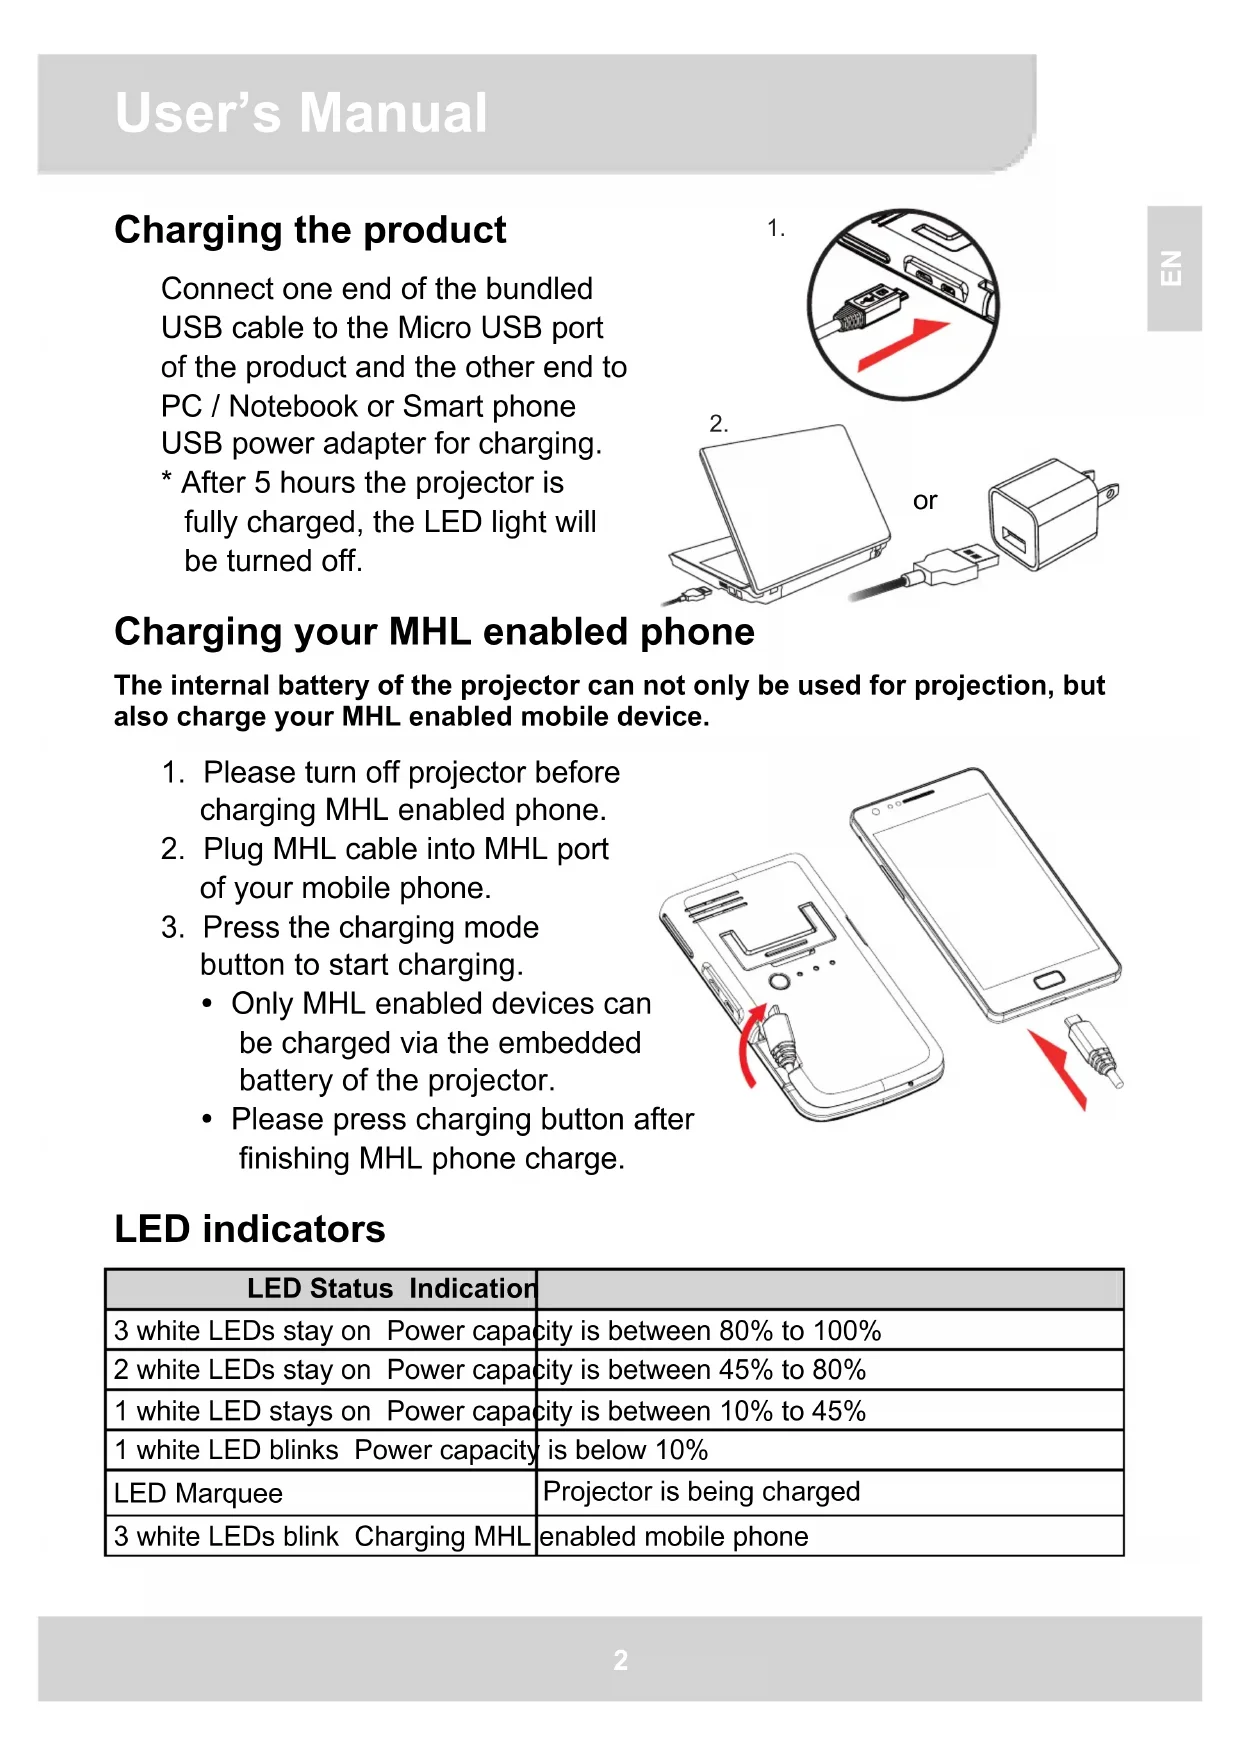
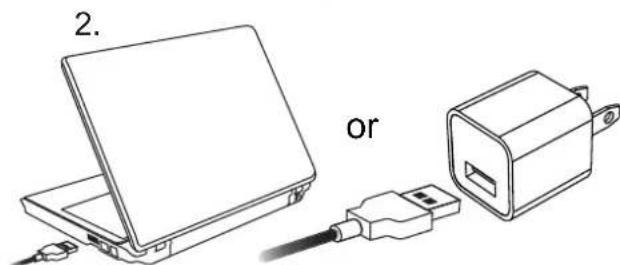
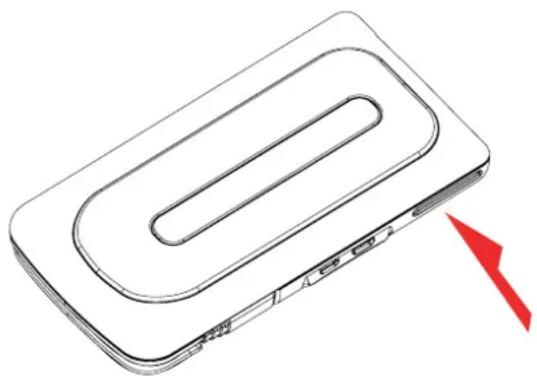
Charging the product
Connect one end of the bundled USB cable to the Micro USB port of the product and the other end to PC / Notebook or Smart phone USB power adapter for charging.
- After 5 hours the projector is fully charged, the LED light will be turned off.
1.
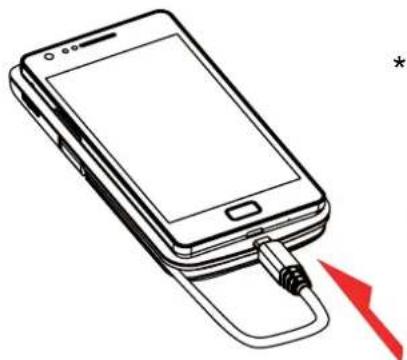
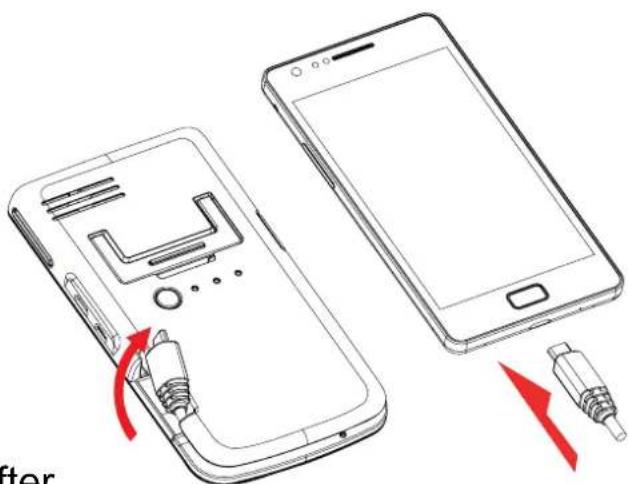
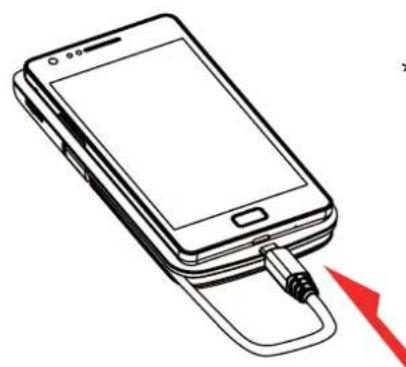
Charging your MHL enabled phone
The internal battery of the projector can not only be used for projection, but also charge your MHL enabled mobile device.
- Please turn off projector before charging MHL enabled phone.
- Plug MHL cable into MHL port of your mobile phone.
-
Press the charging mode button to start charging.
-
Only MHL enabled devices can be charged via the embedded battery of the projector.
- Please press charging button after finishing MHL phone charge.
LED indicators
| LED Status Indication | |
| 3 white LEDs stay on Power capacity is between 80% to 100% | |
| 2 white LEDs stay on Power capacity is between 45% to 80% | |
| 1 white LED stays on Power capacity is between 10% to 45% | |
| 1 white LED blinks Power capacity is below 10% | |
| LED Marquee | Projector is being charged |
| 3 white LEDs blink Charging MHL enabled mobile phone | |
艺
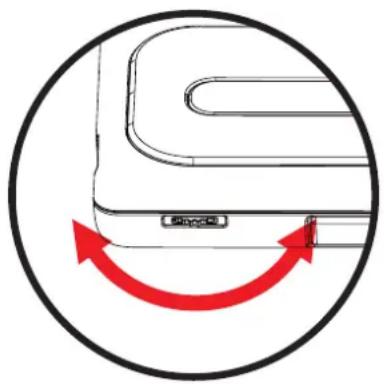
Turning on/off the projector
Press the Projection On/Off button for 3 seconds to turn ON or turn OFF the projector.
-
It's normal that the device will get warm due to it's high performance.
-
Projector time different as source differences.

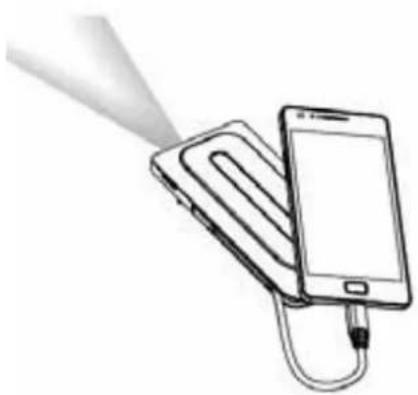
Connecting projector with your Devices
- MHL enabled mobile phones
Simply plug the embedded MHL cable into the MHL port of your mobile phone. The phone will automatically detect the projector and project the image after a few seconds.
-
Please don't pull the MHL cable hardly.
-
You can use MHL extension cable (optional accessory) to extend the built-in MHL cable for operation friendly.
-
HDMI device
Use the HDMI adapter and optional HDMI cable to connect your HDMI-out device with the MicroHDMI port of the projector. The projection will start after a few seconds automatically.
- HDMI cables are not included in the package.


Type A to Type D
HDMI cable

Type A to Type A
Adjusting the focus
Adjust the focus by using the focus wheel to get a sharp and clear picture.
Volume control
Please use your source device to adjust the volume. In case the volume of source device is not adjustable, press Charging Mode for one second till volume bar is displayed on the screen. Use Up/Down button to adjust the volume.
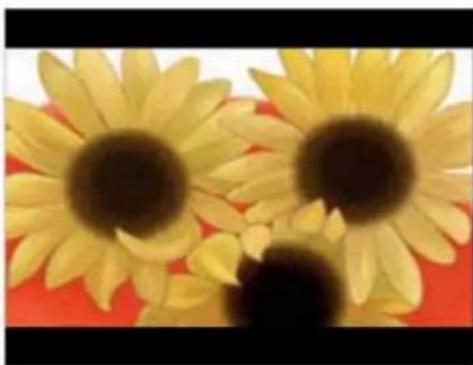
Adjust Aspect Ratio
If the picture is stretched or not display in correct format the output format of your playback device is different from the input settings of the projector. Use the Projection Mode button to switch between following Aspect ratios:
(1) 4:3 Pan and Scan: Image ratio is 4:3, it will cut the both side edge to enlarge central image.
(2) 4:3 Theme: Image ratio is 4:3, it will keep central ratio and compress the image ratio for both side edge.
(3) 16:9 Letterbox: Image ration is 16:9, it will be scaled down, to display completed 16:9 original image.
芸
| Illustration for the three kinds of Projection mode: | |
| Smartphone (Source) Screen | Projection Screen |
| 16:9 Aspect Ratio | Pan & Scan (4:3) |
| Letterbox (16:9) | |
| Theme mode (4:3) | |
Product specifications
| Item Description | |
| Optical Technology DLP | |
| Light Source RGB LED | |
| Resolution 640 x 480 Pixels (VGA) | |
| Luminous Flux Up to ANSI | 35 lumens |
| Projection Image Size 152 | mm ~ 1524 mm (6” ~ 60” Diagonal) |
| Projection Source MHL or HDMI interface | |
| Power Input 5V / 2A | |
| Power Output 5V / 500mA | |
| Battery Type Embedded 18 | 50 mAh, Li-polymer rechargeable battery |
| Battery Life | Projection mode: up to 100 min Charging mode: 70% (Samsung Galaxy S2) |
| Power Consumption | Projection mode: 7W Charging mode: 2.5W |
| Operation Temperature | 5 °C ~ 35 °C |
| Dimension (L x W x H) | 132 mm x 71 mm x 14 mm |
| Weight | 165 g |
| Package Content | Pico Projector, USB cable, HDMI-adapter, Pouch, User's Manual |
- We reserve the right for technical changes and mistakes.
Troubleshooting
| Symptom Check Point | |
| The projector can not be turned on. | Ensure the battery is fully charged. |
| The projecting image is too dark. | * Use the Projector in a darker environment. * Decrease the size of projecting image. |
| The projecting image is too blurry. | Adjust the focus by using focus wheel. |
| The temperature of the projector's surface is warm. | It is normal that this projector to generate moderate heat during operation. |
| The projector can't project from or charge MHL devices | MHL supported product list can be found: http://www.mhlconsortium.org/productlist/It's not a guarantee to 100% compatible as the MHL interface design may vary by each mobile device vendor. It's recommended to check the compatibility. |
| The projector cannot be charged. | Please check if the projector's 3 LED indicators are in Marquee. If not and they are blinking, please press charging mode button again to exit the charging mode for MHL device. |
| The projector is turned on, but the video can not be projected. | Please check your device if it supports MHL or HDMI interface. If yes, please check the source resolution of your device output. Please refer the supporting resolution to Appendix 1 and modify your device output resolution. |
Appendix 1:
| Resolution For MHL input For HDMI input | ||
| 640x480p 60fps v v | ||
| 720x480p 60fps v v | ||
| 1280x720p 60fps v v | ||
| 1920x1080i 60fps v v | ||
| 1920x1080p 60fps - v | ||
| 720x576p 50fps v v | ||
| 1280x720p 50fps v v | ||
| 1920x1080i 50fps v v | ||
| 1920x1080p 50fps - v | ||
Produktübersicht
品

| Resolução Para | entrade MHL Para entra | ada HDMI |
| 640x480p 60fps v v | ||
| 720x480p 60fps v v | ||
| 1280x720p 60fps v v | ||
| 1920x1080i 60fps v v | ||
| 1920x1080p 60fps - v | ||
| 720x576p 50fps v v | ||
| 1280x720p 50fps v v | ||
| 1920x1080i 50fps v v | ||
| 1920x1080p 50fps - v |
HΦopMaζη no yxody n Texnke 6e3oNaChocTn:
- YcTpoIcTBO u ynaKOBOuHbI MaTePnAblI DOJXHbI HaxOdntbcr BHe DocraeMOCTn MJaDeHcEb N DeTei.
2.БLOK nHTaHnI npOuHe KOHTaKTbI He DOJXHbI NOBBePraTbCRA BO3DeIcTBIO BODbl. Ipeed INx NcNoJIb3OBaHNem Heo6xoDmO BbICyUHTb pyKn. He CTaBBTe PAnOM C yCTpOJCTBOM pPeDMtbl, HANOJIHeHHbIe BODoI, TAKne KaK Ba3bl I T.D. - Y6eIHTecb B TOM, yTO nCNoB3yEma ITeNcEhbHa PO3eTKa NITAHn IocTyHnHa n He cKpbIta. B 3KCTpeHHoN CNTyaUuN OTcoEduHnte 6JOK NITAHnYCTPOICTBa OT CETn NITAHn.
- XpaHnte yCTpOInCTBO BdaJIN OT NCTOHNKOB ORH, TAKNX KAK CBeu IN He YCTaHaBJIbAaTe INX B HENOCpeDCTBEHHOH 6JN3OCTN OT YCTPOINCTBa.
- UcpoCTBO DOJXHO HAXOHTbCn Ha pacctoHmMHNmym 10 cm ot pyrnx npedMeTOB. Y6eNTecb, YTO BEHTINRAUHOHHbIe OTBepCTnI He 3aKpbITbI r3eToN, cKaTePbIO, WTOPOI N T. I.
- B ueJx oecpeHnIuHoi 6e3oNaChocTn He nCNoJIb3yIte npoeKtop Bo BpEma rpo3bl nn MoHNn.
- OTHOCHTeJIbHaB BnaxKHOCTb: 5 ~ 35°C, 80% (MaKc.), 6e3 o6pa3OBaHnKaOHDeHCata.
8.БатaperьВстpoehaВустpoиCTBO.3anpeuzaeTcra pa3bnpaTbИ BHOCTb И3MeHeHnI. 3amEny batapein pa3peuaeTcra npOn3BODNTb TOnbKO KBaINΦnIpuOBaHHOMy TexHnueckomy nepcoHaIy. - Y6eIntecb, yTO TemnepaTypa OkpykaHoueN CpeBb HaxoDNTcB B npedeJax -10\~55 ^ C
- Bo Bpemr 3KcPnPyatau nn daHbI np6op moXeT cnerKa HArpeBaTbcra. 3To HopMaJIbHOe paOooyee COCTOaHne.
- Ecnn npnbop 6bln nepemeuen H3 XOJODHOro NOMEeHnB TcNIOe, To nepeedero nCnoJIb3OBaHNem Heo6XoDIMO NOOxJaTb HeKOTOpoe BpEm. Oba3yUoIcnS KOnDeHcAT B ONpeJeIeHHbIX ycNoBnX MoKeT CTAb TnpuHNOBbIXOda yCTpoiCTBa n3 cTpor. Korda yCTpoiCTBO DOCTINHT KOMHaTHOH TemnepaTypbl, erO MOxHO nCnoJIb3OBaTb 6e3 pNcKa.
12.ObpaaItecB c yctpoiCTbOM aKKypaTHo. I36eraIe KOHTaKTa C OCTpbIMn npedMeTAMN. YcTPOIcTBO DOJXHO HAXOINbC BdaJIH OT MeTAJIInueCKNX npedMetOB. - YcTaHaBnBaIte npoeKTop Ha poBHOJ NOBepXHocTn. JIObOy UAp IIN NaDeHne Ha non MoKeT CTaTB pNCHOH NOBpeKdEHNr np6Opa.
14.He 6pocaiTe n He pa3bpaTne npnbop.B npotNBHom cnyae rapaHTn 6ydet aHHynpoBaHa. Pn BCKpbTn Nnn ChrTn KpbIweK Bo3HNkae TnCK nopaxehn 3JIeKTPnuYeCKm TOKOM n npOyne onachoctn.ДЯ BbINOJIHeHn OBcJyXnBaHn oBpaauTeCb K KBaJIuФnUPOBaHHbIM CpeuaJIncTaM.
15.ИспόньзуйTe TOnьКо пиНадлесХOCТи, NOCTaВЛЯЕмbie npOu3BODIteJIeM yCTpoIcTBA. - Пибор И руковдъно Экплuyaразци MoryT 6ыт bИЗMeHbI IПИ ДОПЛHсьI 6e3 yBeДOMJIeHЯ.
- He cmoTpuTe HEnocpeIcTBeHNo B oBbeKtNB npoeKTopa.


Ecn npuilo Bpem ytnn3aun np6opa, cdaTe B npneMhI pyHKT BCE ero KOMnoHeTbI dJa nepepa60Tk.
BaTapeN n aKKymyJrTOpbI He CJIeNyET yTnIn3nPoBaTb BMeCTe C 6bITOBbIMN OTXoJam! DocTaBbTe INX B MeCTHbI INyHKT NO nepepa60tke OTXoIDOB.
BmeTeMbICMOXeM3aUNTNTb OKpykaIOUcpey.
无
O63op npoodykTa
① OБъektнв пpoektopa
② Khonka BkIIOueHn/BBIKIOueHn npoeKTopa
③ Koneco Дя рergулровкн Фокуca
*Дяудобства NCПОЛьЗOBAHЯ MOЖHO NOLOXNTb COTOBИ TENEФОн Ha BepxHIOU YacTb npoeKTopa.
④ ПpenЯТСТВУЮцая
СКОЛБЖЕHNIO HaKnaДka
⑤ДиHAmNK
(6) Повставka
⑦ Pexim 3apdKn
⑧ CBeToIIOHbI INHdNkATOp
9 PeKIM npoeKun/BBepx IN BHN3
10 Pa3bem Micro-USB ДяЗардкн
(11) Pa3bem Micro-;DMI
⑫ Ka6eJb M;L (5-KoHTaKTHbI)
3apяДka yctpoIcTba
CBeToIIOHbIe NHdNkaTOpbl
I3meHeHne COOTHOseHnA CTOpOH
Ecni n3o6paXeHne paCTaHyTo nIIOTO6paXaETcB HnPaBnIbHomΦopMaTe, 3NaHT, BbIXoHOn ΦOpMaTBOcPOn3BeDeHnY UcTPOiCTBaOTIIuHaETcO T BXoDhIx HaCTpoEk IpoekTopa. NcNoJb3yIte KHOkkypeKIma IpoekCINДЯ N3MeHeHnCOOTHOUeHn CTOpOH.
Illustration for the three kinds of Projection mode:
Smartphone (Source) Screen
Projection Screen
Pan & Scan (4:3)

16:9 Aspect Ratio

Letterbox (16:9)

Theme mode (4:3)
TexHnueckne xapaKTepeNCTnKn ycTpoNCTBa

- Care and Safety Information
- FCC Compliance Statement:
- (EN)
- (DE)
- Charging the product
- Charging your MHL enabled phone
- LED indicators
- Turning on/off the projector
- Connecting projector with your Devices
- Adjusting the focus
- Volume control
- Adjust Aspect Ratio
- Produktübersicht
- HΦopMaζη no yxody n Texnke 6e3oNaChocTn:
- 无
- O63op npoodykTa
- 3apяДka yctpoIcTba
- CBeToIIOHbIe NHdNkaTOpbl
- I3meHeHne COOTHOseHnA CTOpOH
Brand : AIPTEK
Model : GoProjector
Category : Projector