USER MANUAL Mi Vacuum Cleaner Light Xiaomi
Mi Vacuum Cleaner Light User Manual
This product is for household use only. Read this manual carefully before use, and retain it for future reference.
- This appliance can be used by children aged from 8 years and above and persons with reduced physical, sensory or mental capabilities or lack of experience and knowledge if they have been given supervision or instruction concerning use of the appliance in a safe way and understand the hazards involved. Children shall not play with the appliance. Cleaning and user maintenance shall not be made by children without supervision.
- The appliance is only to be used with the power supply unit provided with the appliance.
- This appliance contains batteries that are non-replaceable.
- If the power adapter is damaged, it must be replaced by a special cord or assembly available from the manufacturer or its service agent.
- The vacuum cleaner is not a toy. Children may not play with or operate this product. Please exercise caution when using the vacuum cleaner near children.
- Do not allow children to clean or maintain the vacuum cleaner unless supervised by a parent or guardian.
- Only use the vacuum cleaner on dry indoor surfaces. Do not install, charge, or use this product outdoors, such as in bathrooms, or near a pool.
- Do not touch the plug or any part of the vacuum cleaner with wet hands.
- To reduce the risk of fire, explosion, or personal injury, check to make sure the lithium-ion battery and charger are undamaged before use. Do not use the vacuum cleaner if either the battery or charger is damaged.
- The electric floor brush, extension rod, and the vacuum cleaner are electrically conductive and should not be immersed in water or other liquid. Make sure all parts are thoroughly dry after you carry out cleaning on them.
- To prevent injury caused by moving parts, turn off the vacuum cleaner before cleaning the Electric floor brush. The Electric floor brush, dust compartment, and filter must all be properly installed before using the vacuum cleaner.
- Do not use the vacuum cleaner to pick up flammable or combustible liquids, such as gasoline, bleach, ammonia, or drain cleaners; nor other liquids like water.
- Do not use the vacuum cleaner to pick up drywall particles, ashes like fireplace ash, or smoking or burning materials such as coal, cigarette butts or matches.
- Do not use the vacuum cleaner to pick up sharp or hard objects, such as glass, nails, screws, or coins, which may damage the product.
-
Keep hair, loose clothing, fingers, and other parts of the body away from the vacuum cleaner's openings and moving parts. Do not point the suction opening, extension rod, or other accessories at your eyes or ears or put them in your mouth.
-
Do not put any object into the vacuum cleaner's openings, nor use the vacuum cleaner with any opening blocked. Keep free of dust, lint, hair, or other items which may reduce airflow.
- Do not rest the vacuum cleaner against a chair, table, or other unstable surfaces, as this may cause damage to the product or personal injury. If the vacuum cleaner malfunctions because of being knocked over or damaged, please contact the authorized service department. Never attempt to disassemble the vacuum cleaner on your own.
- Only use the original charger to charge the product in environments with an ambient temperature of 0^ to 35^ . Otherwise, the battery may damage.
- The dust compartment, filter cotton, cyclone separator, and filter must all be properly installed prior to using the vacuum cleaner.
- Make sure the vacuum cleaner is unplugged when not used for extended periods as well as prior to performing any maintenance or repairs.
- Please be extra careful when using the vacuum cleaner to clean stairs.
WARNING: Do not apply any type of fragrance to the vacuum cleaner's filter. These types of products are known to contain flammable chemicals which may cause the vacuum cleaner to catch fire.
. DO NOT expose the appliance to fire as it may cause explosion.
DO NOT expose or submerge the appliance in any water, salt water, or other liquids.
- Please strictly follow the instructions in this user manual when using the vacuum cleaner. Users are responsible for any loss or damage that may arise from improper use of the vacuum cleaner.
For detailed e-manual, please go to www.mi.com/global/service/userguide
CE
We Guangdong Deerma Technology Co., Ltd., hereby, declare that this equipment is in compliance with the applicable Directives and European Norms, and amendments. The full text of the EU declaration of conformity is available at the following internet address:
http://www.mi.com/global/service/support/declaration.html
Equipped with a high-speed brushless motor, the Mi Vacuum Cleaner Light boasts the features including the powerful suction and a high-efficiency filtration system.
- High-speed brushless motor: Run rapidly with a stable output of strong suction for quick vacuuming.
- Powerful suction: Fast suction of small and large particles with high efficiency to deep clean the whole house.
- High-efficiency filtration: The cyclonic separation system which is composed of fine steel mesh, filter cotton, and a filter, separates the large particle dust from the fine dust, then traps the dust so that it doesn't come back out to prevent secondary pollutants.
- Lightweight and multi-purpose: The compact and lightweight vacuum cleaner works with accessories such as a light metal extension rod, electric floor brush, flat nozzle, and long nozzle to clean the whole house easily and efficiently.
Package Contents
| QuantityName |
| Vacuum cleaner | 1 |
| Extension rod | 1 |
| Electric floor brush | 1 |
| Flat nozzle | 1 |
| Long nozzle | 1 |
| User manual | 1 |
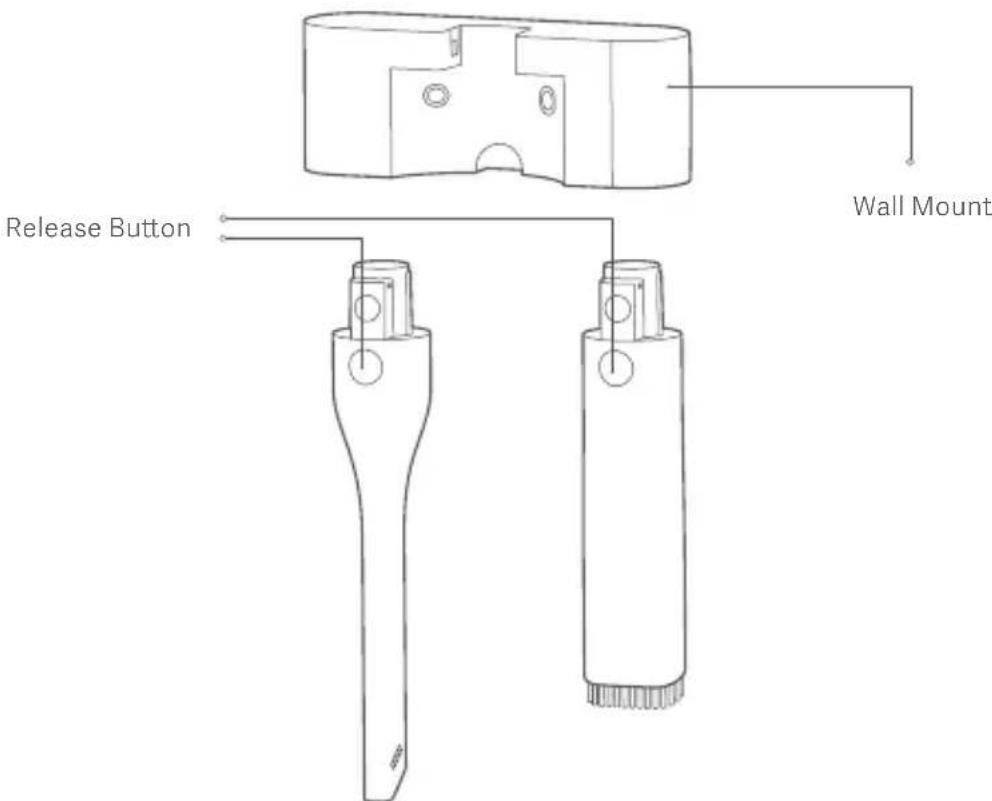
| Wall Mount | 1 |
| Power adapter | 1 |
| Wall plug | 2 |
| Screw | 2 |
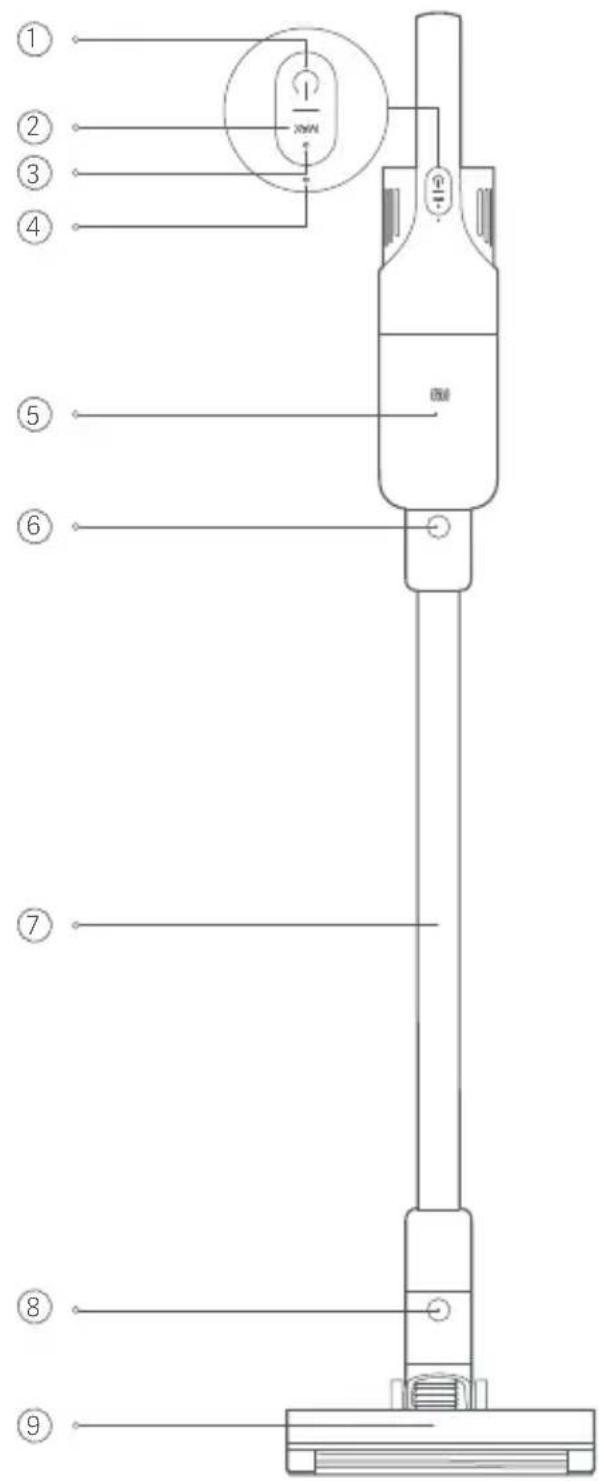
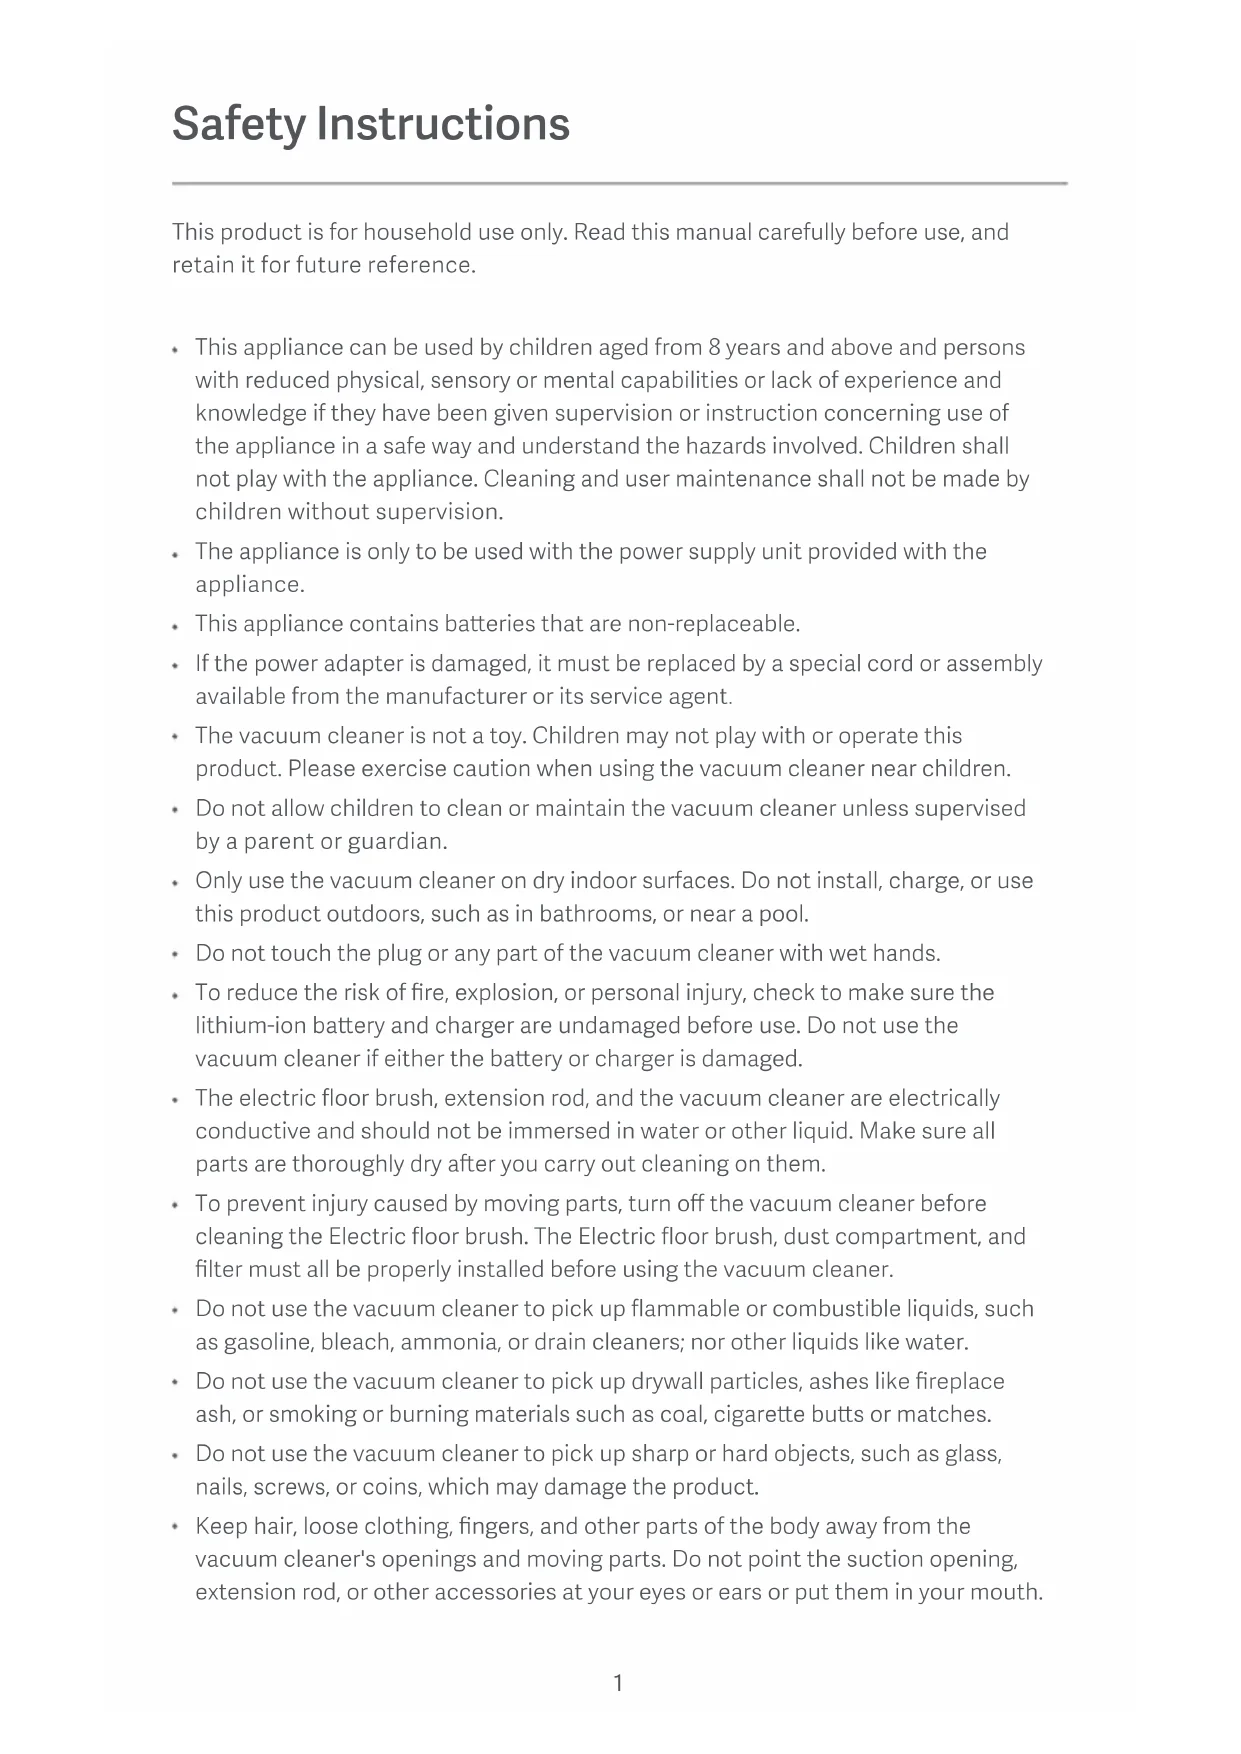
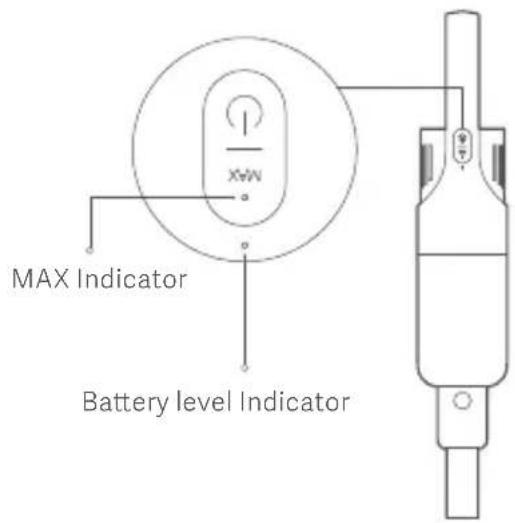
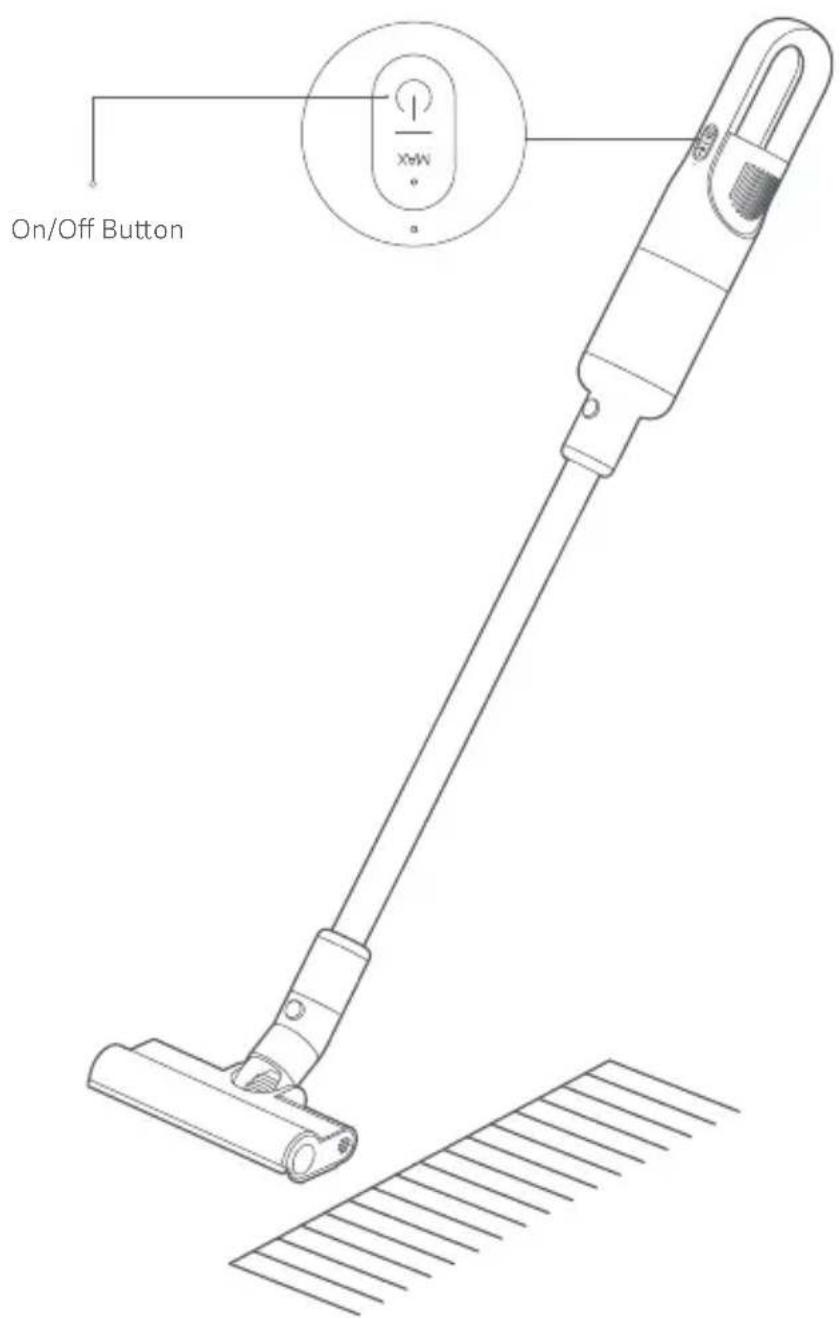
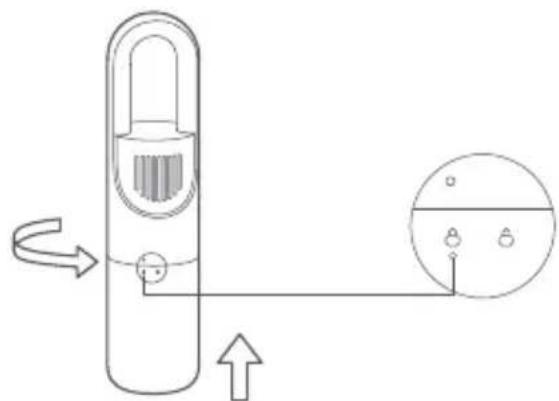
1On/Off Button
② Suction Level Button
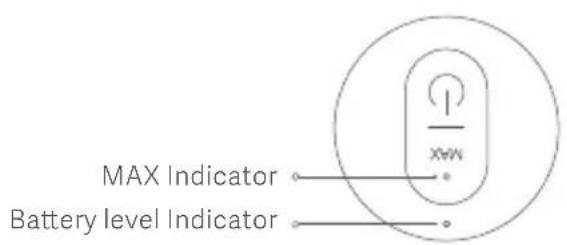
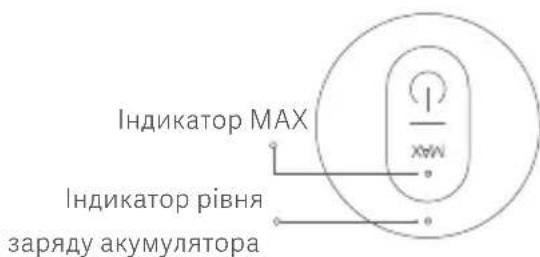
3 MAX Indicator
4Battery Level Indicator
5Dust Compartment 6 Extension Rod Release Button
7 Extension Rod 8 Electric Floor Brush Release Button
9 Floor Brush Window
10 Wheels
⑪ Roller Brush
12Cleaning Soft Brush
⑬Roller Brush Button
14Dust Compartment Window
15Vacuum Cleaner Charging Port
16 Anti-slip Strip
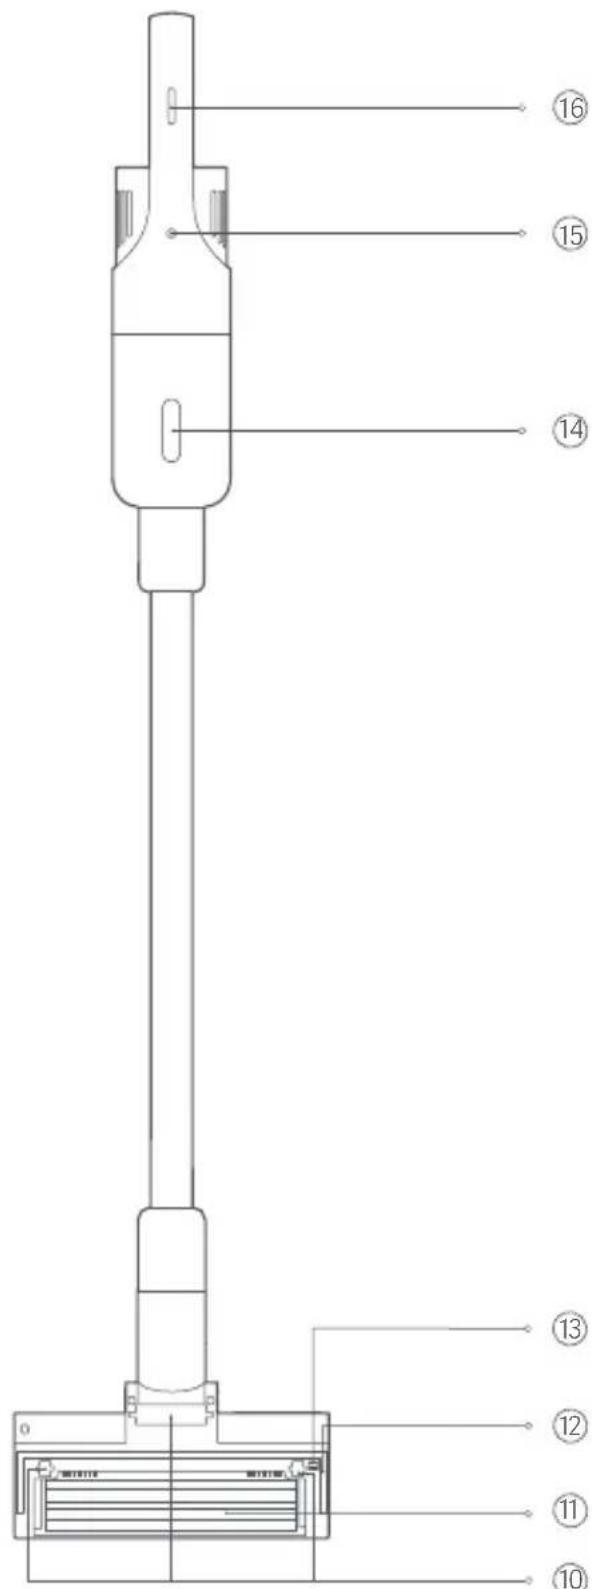
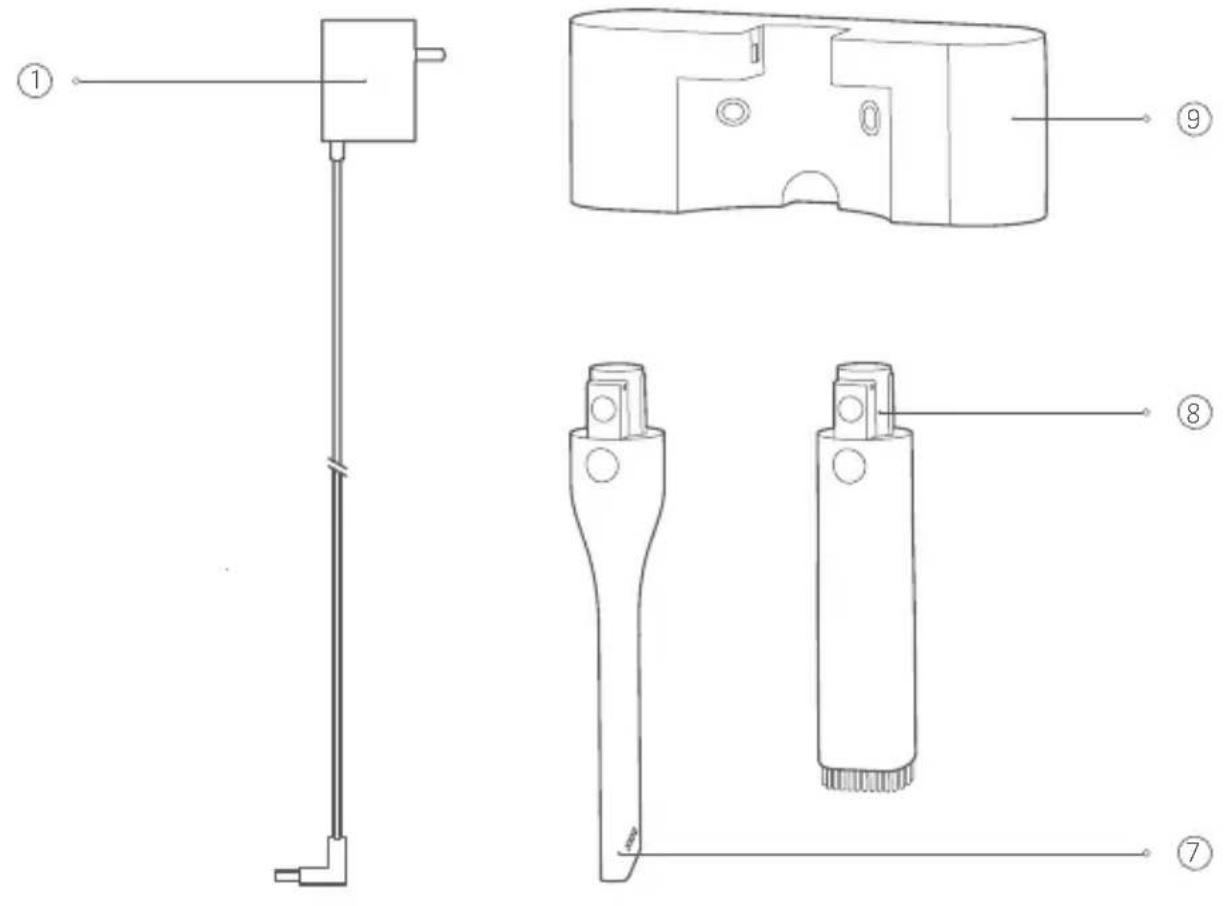
① Power Adapter
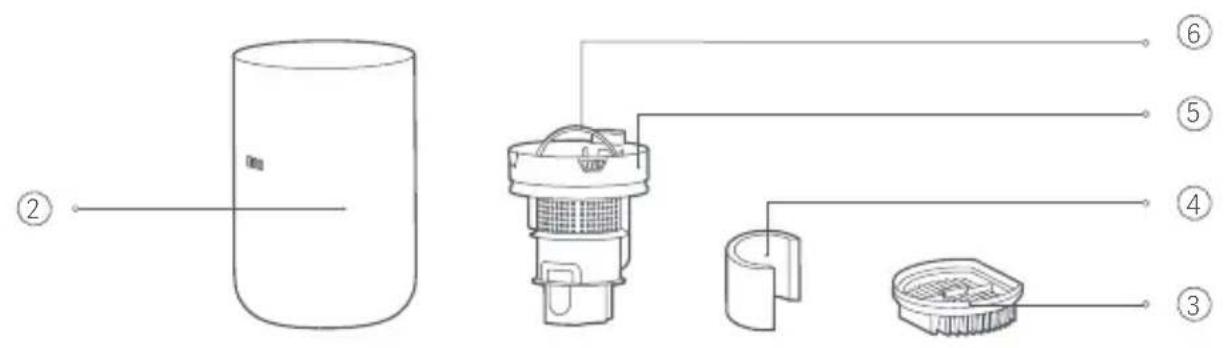
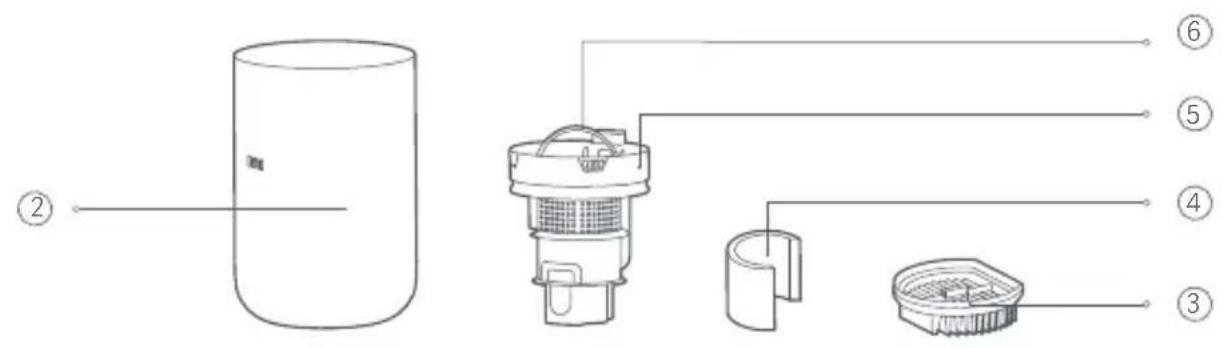
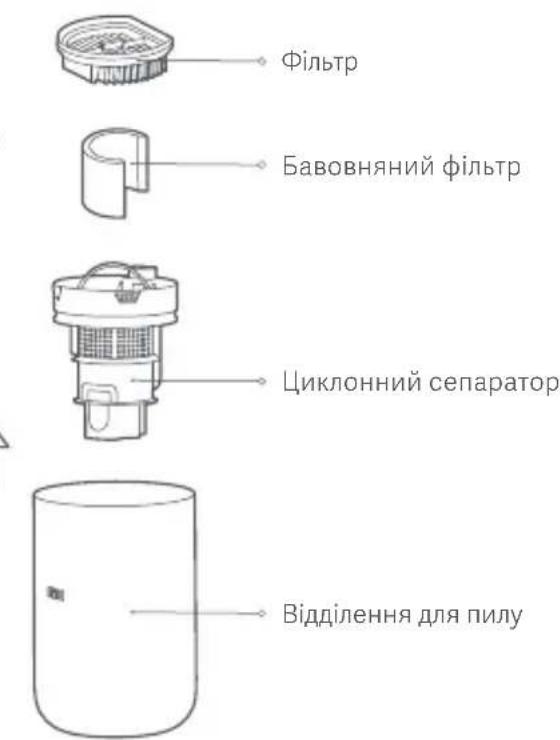
4Filter Cotton
⑦Long Nozzle
Dust Compartment
⑤ Cyclone Separator
8 Flat Nozzle
③ Filter
⑥ Cyclone Separator Handle
9Wall Mount
Assembling the Vacuum Cleaner
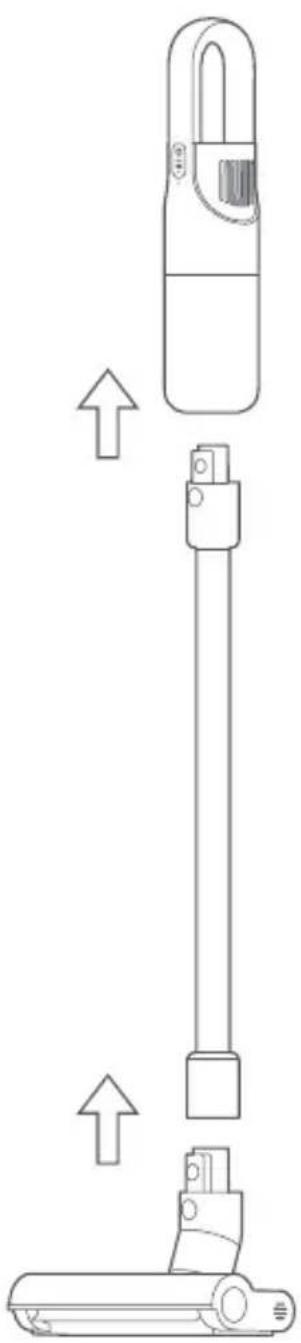
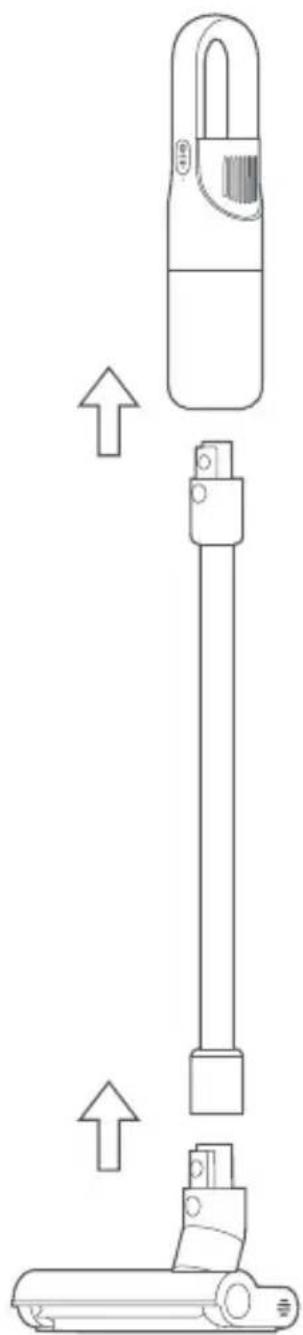
- Connect the extension rod to the vacuum cleaner, as illustrated, until you hear a click.
- Connect the electric floor brush to the extension rod, as illustrated, until you hear a click.
Installing the Accessories
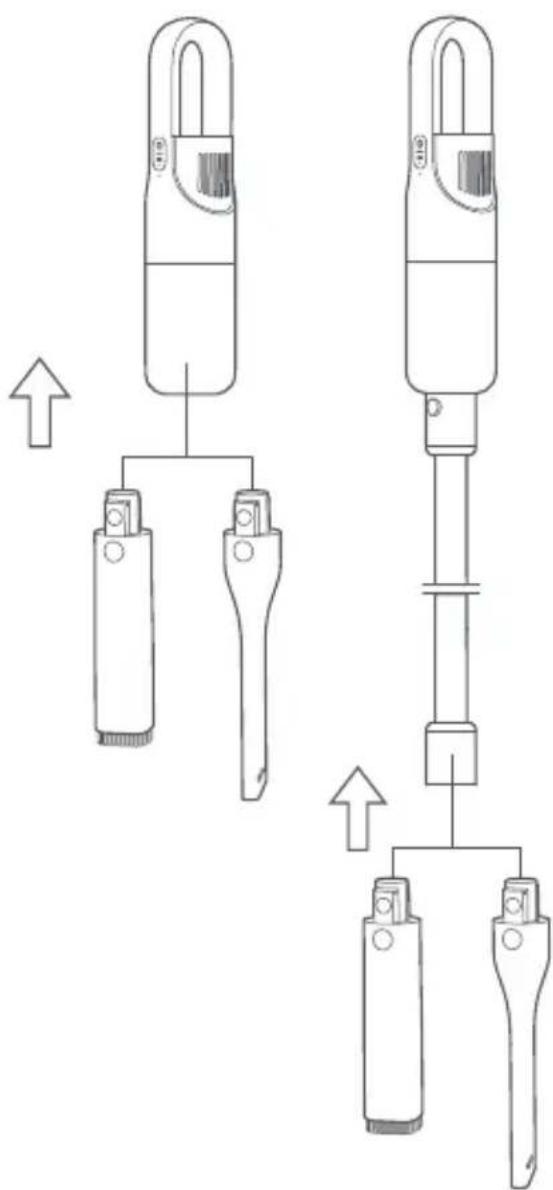
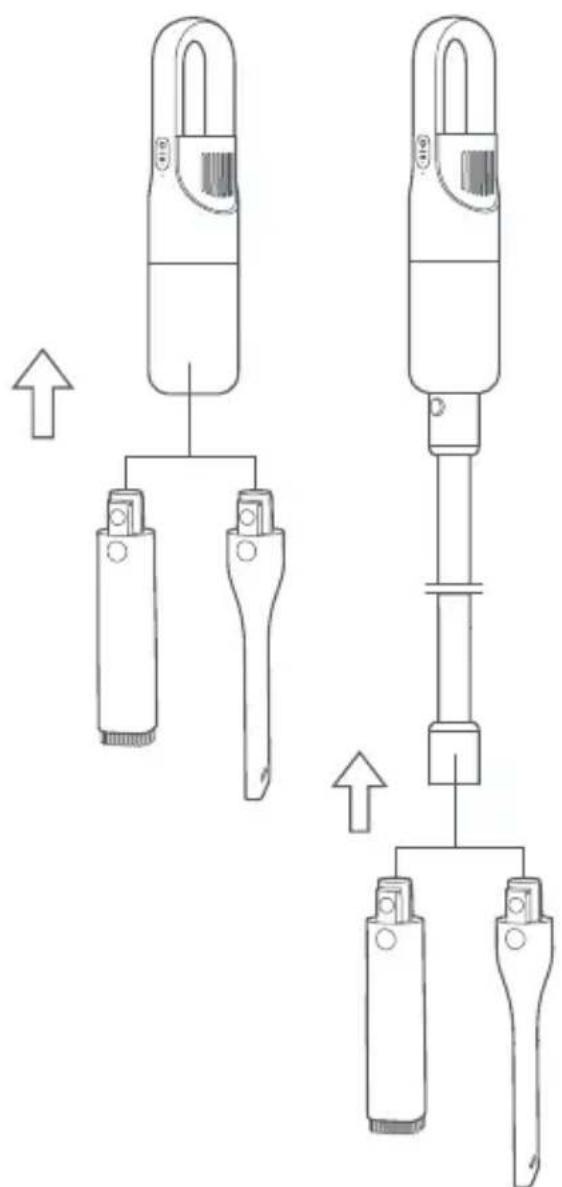
- The long nozzle and flat nozzle can be connected directly to the vacuum cleaner or the extension rod.
- Insert the long nozzle or flat nozzle into the vacuum cleaner or extension rod vertically, as illustrated, until you hear a click.
Note: The long nozzle is suitable for cleaning dust from narrow gaps such as doors, windows, stairs and corners. The flat nozzle is perfect for cleaning dust from sofa seats, cabinets, and desk or console surfaces.
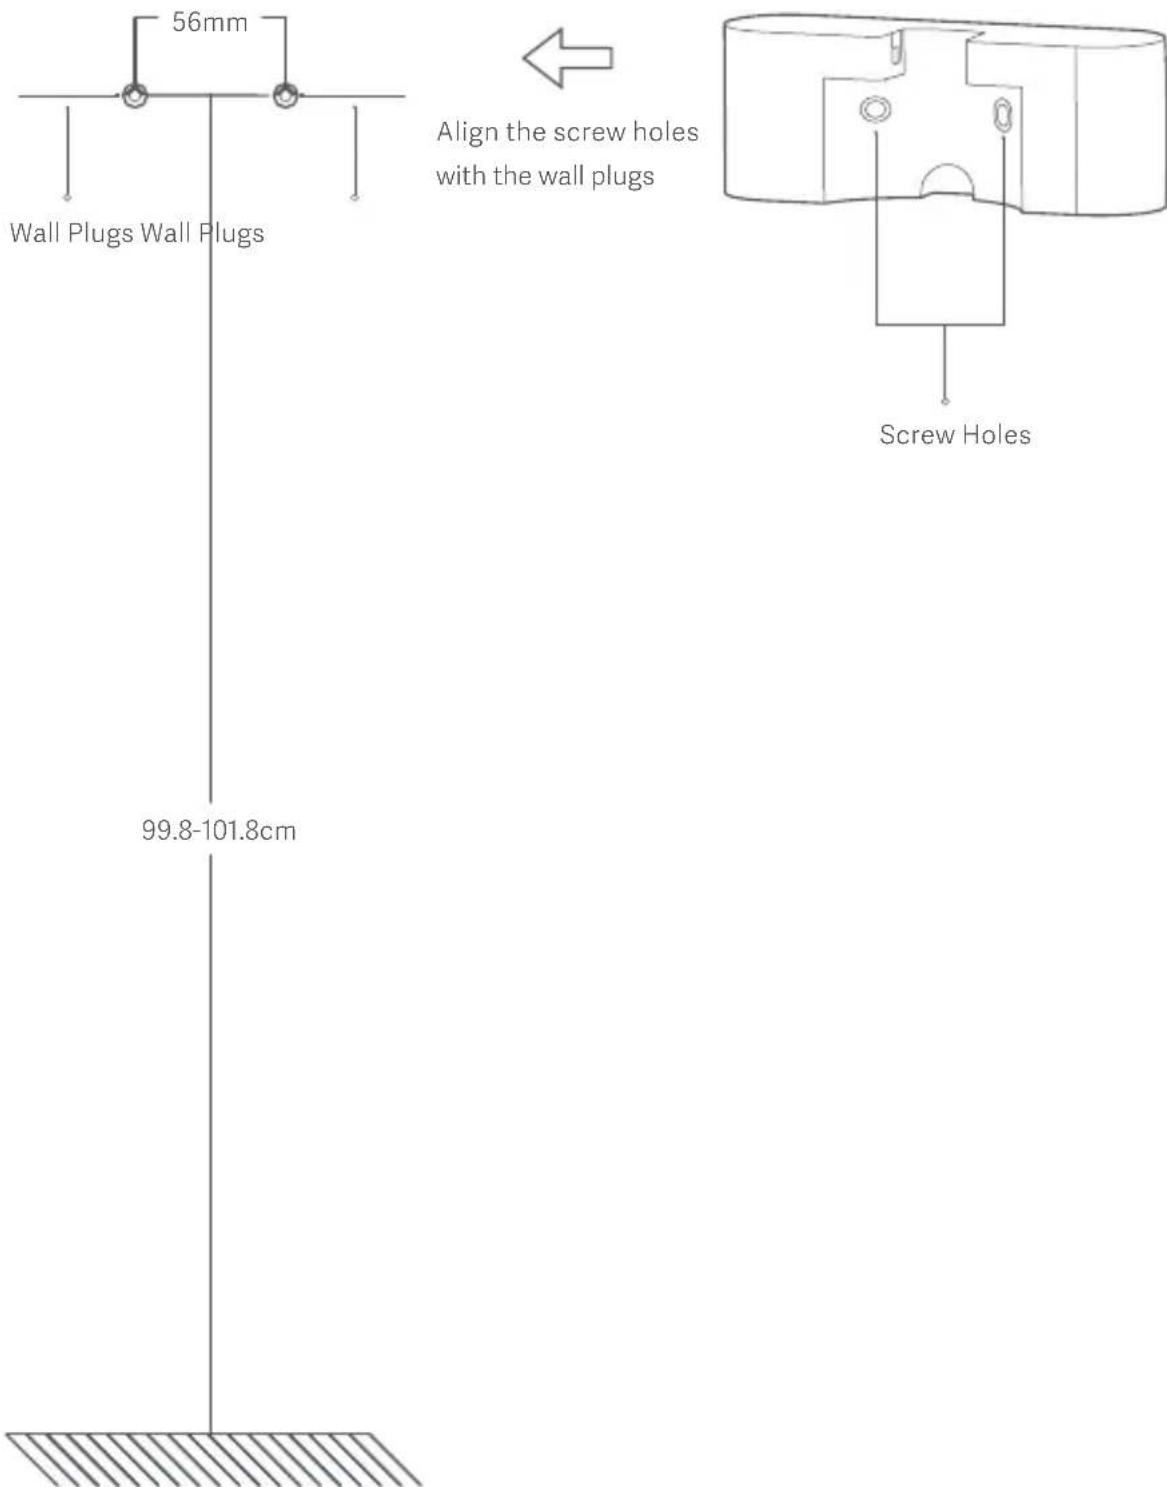
Fixing the Wall Mount
- Drill two holes with each diameter of 6mm on the wall at the height of
99.8-101.8 cm above the ground, and ensure there is a distance of 56 mm between two holes, then insert two wall plugs into the holes.
- Align the screw holes in the wall mount with the wall plugs, then use two screws (4 × 20 ~mm) to firmly secure the wall mount to the wall.
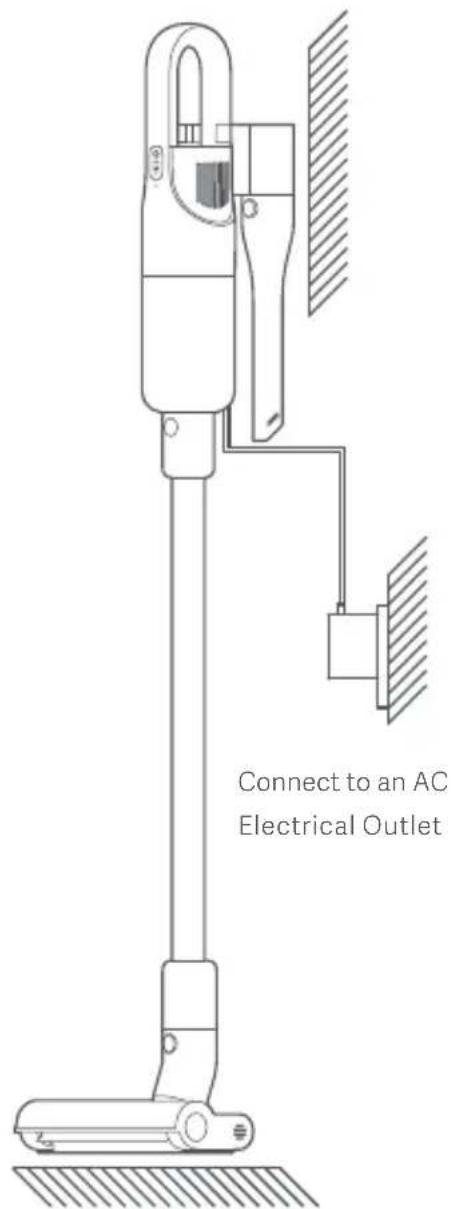
Note: It is recommended to fix the wall mount near an electrical outlet so that it can easily connect to the power.
- Tuning on/off: Press and hold the on/off button for 1 second, then the vacuum cleaner starts working and it runs on the standard mode by default. Press the on/off button again to stop the vacuum cleaner.
- Switch mode: When the vacuum cleaner is running, press the suction level button to switch to the turbo mode (MAX level); meanwhile, the MAX indicator will be white. Press the suction level button again to switch to the standard mode.
- Battery level indicator: When the battery level is sufficient, the battery level indicator is white. When the vacuum cleaner runs at a low battery level, the indicator is red; if so, the vacuum cleaner cannot be switched to the turbo mode. When the battery runs out, the vacuum cleaner automatically turns off.
Charging method
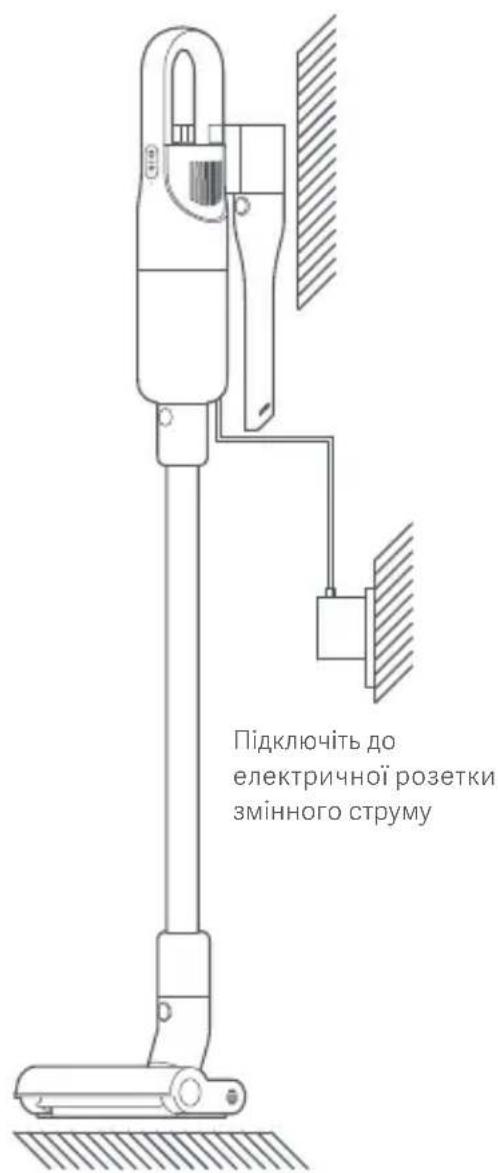
- Before charging, make sure that the power adapter is well connected to the electrical outlet and the vacuum cleaner.
- When charging, the battery level indicator is breathing. Once the battery is fully charged, the battery level indicator goes off.
- If you charge the vacuum cleaner while its battery is full, the battery level indicator will breath 20 seconds then go off.
Turning On/Off & Vacuuming
- Press and hold the on/off button (for 1 second, then the vacuum cleaner starts working and it runs on the standard mode by default. You can switch the mode as needed.
- Hold the handle of the vacuum cleaner by pushing it back and forth to vacuum and clean the floor with the floor brush. You can also use the long nozzle or flat nozzle according to your needs.
- Press the on/off button again to stop the vacuum cleaner.
When the Vacuum Cleaner is Working
- When the battery level is low, the battery level indicator will blink red, please recharge the vacuum cleaner soon. If the vacuum cleaner runs on the standard mode, it cannot be switched to the turbo mode.
- If it is not recharged in time, the battery voltage will get too low, then the vacuum cleaner will automatically turn off to protect the battery.
- If the vacuum cleaner turns off due to running out of the battery, please recharge it in a timely manner. Otherwise, the battery may damage because of its over-discharging if it is not used for an extended period of time.
Notes
- There is a small amount of battery in the vacuum cleaner when you get it. It is recommended to connect the power adapter to fully charge the vacuum cleaner before its first use.
- When charging, the vacuum cleaner cannot be used.
Storing Accessories
The accessories can be stored on the wall mount when not in use. Vertically insert the long nozzle or flat nozzle into the wall mount until you hear a click, with the release button as the direction shown in the figure. To remove the accessories from the wall mount, press the release button and simultaneously pull them down vertically.
Note: Before cleaning or doing maintenance on the vacuum cleaner, turn it off and unplug it.
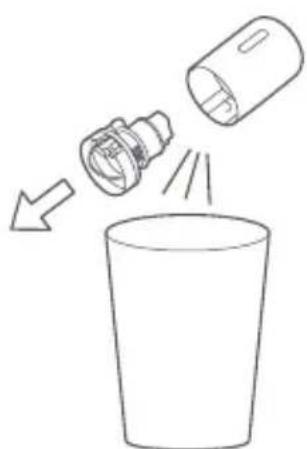
- Clean the dust compartment regularly to avoid the buildup of dust that could cause blockage and affect the suction.
- To prevent dust from falling on the floor, hold the dust compartment over a trash can to remove it.
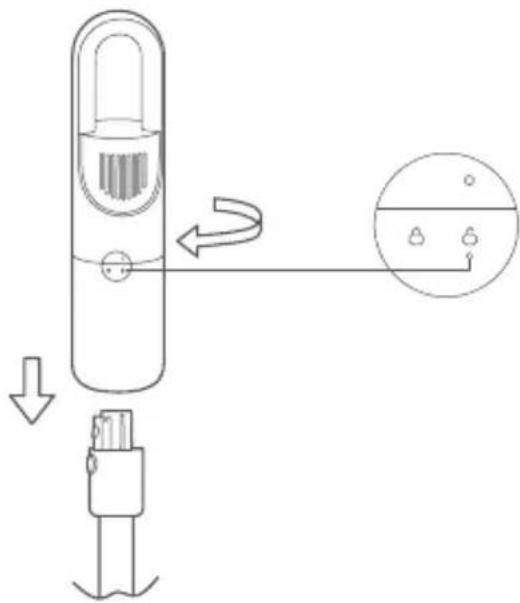
Removing & Installing the Dust Compartment
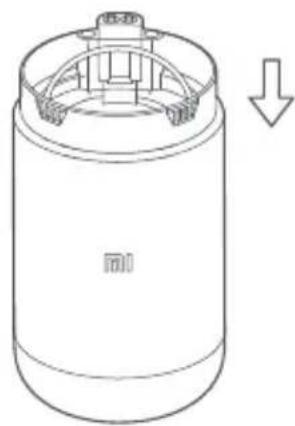
- After vacuuming or when the dust compartment is full, pull out the extension rod and rotate the dust compartment in the direction shown in the figure. When " is lined up with the unlock symbol " , the dust compartment can be removed from the vacuum cleaner.

-
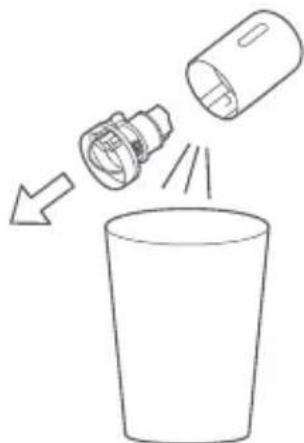
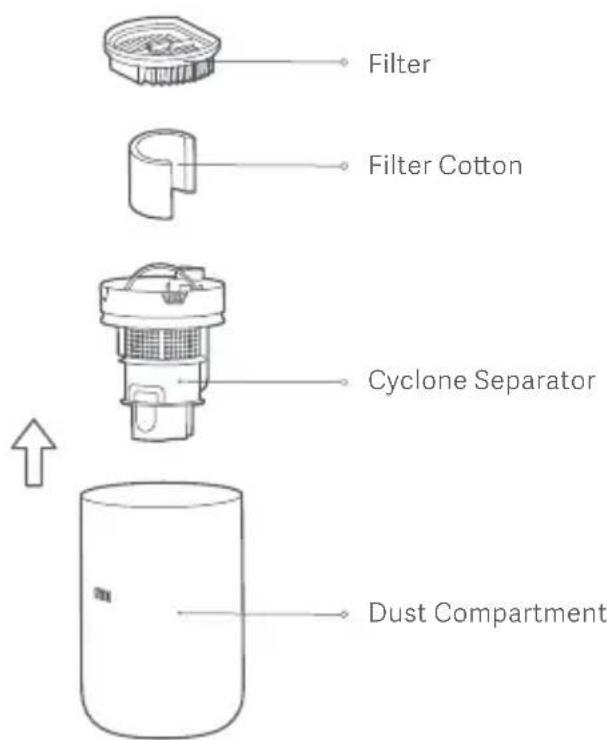
Take the filter out of the dust compartment as shown in the figure, then remove the dust from its surface.
-
Flip the cyclone separator handle over the trash can to remove the cyclone separator from the dust compartment, as shown in the figure. Empty the content in the dust compartment and clear any dust from the surface of the cyclone separator.
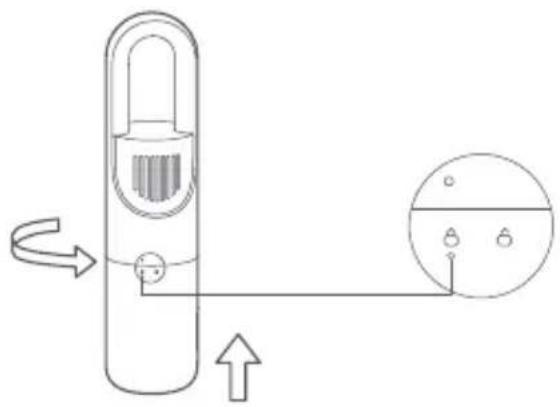
- Place the cyclone separator and filter back into the dust compartment when the cleaning is completed. Align the unlock symbol "B" with "O" then rotate the dust compartment in the direction shown in the figure until "8" is lined up with the lock symbol "B". Once you hear a click, the duct compartment is securely installed onto the vacuum cleaner.
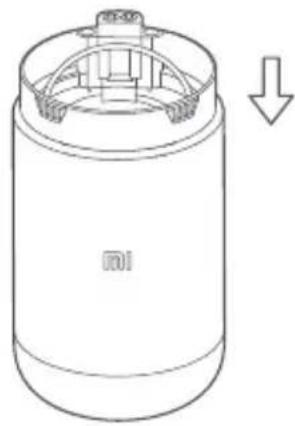
Installing the Cyclone Separator
Press the cyclone separator straight downwards until it reaches the end of the dust compartment.
Cleaning the Dust Compartment & Filter Assembly
Take the filter, filter cotton, and cyclone separator successively out of the dust compartment. Remove any dust on their surface, then rinse them with clean water. Make sure they are thoroughly dry in a well-ventilated place away from direct sunlight before use. If necessary, you can replace the filter with the specified model of the filter.
Cleaning the Roller Brush
-
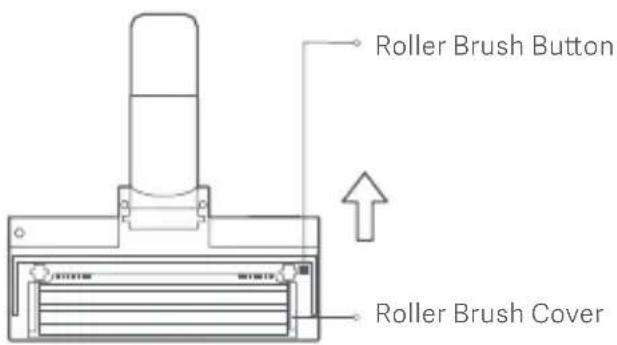
Press the roller brush button as shown in the figure to pop open the roller brush cover, then pull out the roller brush to clean it. After it has been cleaned, put the roller brush back and close the cover until you hear a click.
-
Cut off the hair and fibers attached to the roller brush and remove them.
- When cleaning the vacuum cleaner, use a dry cloth. Do not use chemical solvents such as gasoline, alcohol, or lacquer thinner, as these will cause the shell to crack or fade.
- Make sure you turn off the vacuum cleaner before cleaning or performing maintenance.
- When the dust compartment is full, please empty it immediately. Otherwise, it may be blocked by the dirt, affecting the suction performance and causing the motor over-heated.
- It is recommended to replace the filter every 2–3 months. You may need to change it more often if it is used frequently.
Troubleshooting
| Issue | | SolutionPossible Cause |
| The vacuum cleaner does not work. | 1. The battery level is low.
2. The vacuum cleaner is running for a long time so that it is overheated.
3. The vacuum cleaner is not powered on.
4. When the air duct has been clogged for eight seconds, the motor will stop running to protect overheating.
5. The motor or battery is damaged. | 1. Charge the vacuum cleaner.
2. Cool the vacuum cleaner down, then use it again.
3. Power on the vacuum cleaner.
4. Clear the foreign objects in the air duct, electric floor brush, extension rod, or dust compartment.
5. Please contact the after-sales service department for help. |
| The suction level decreases. | 1. The dust compartment is full.
2. The electric floor brush is blocked by foreign objects.
3. The filter is blocked or not thoroughly dry after cleaning. | 1. Empty the content in the dust compartment.
2. Remove the foreign objects in the electric floor brush.
3. Clean the filter or thoroughly dry it. |
| The noise is extremely loud. | 1. The dust compartment is full.
2. The air duct is clogged up. | 1. Empty the content in the dust compartment.
2. Clear the foreign objects in the air duct, electric floor brush, extension rod, or dust compartment. |
| The electric floor brush stops running. | 1. The electric floor brush is clogged so that it stops running for protection.
2. The electric floor brush does not work after connecting to power. | 1. Remove the objects tangled around the electric floor brush.
2. Please contact the after-sales service department for help. |
| The vacuum cleaner cannot be charged. | 1. It is not well connected between the power adapter and the electrical outlet.
2. It is not well connected between the power adapter and the vacuum cleaner charging port.
3. The power adapter is damaged. | 1. Firmly plug the power adapter into the electrical outlet.
2. Securely connect the power adapter with the charging port.
3. Please contact the after-sales service department for help. |
| The battery level Indicator is blinking red and white alternately. | The power adapter is not compatible with the vacuum cleaner. | Only use the included power adapter to charge the vacuum cleaner. |
Note: Any issue occurred during use, please refer to the troubleshooting above for the solution. If the problem still persists, please stop using the vacuum cleaner immediately and contact the after-sales service for help.
Specifications
| Mi Vacuum Cleaner Light |
| MJWXCQ03DYM | Model | 240 × 148 × 1132 mmltem Dim Nomin |
| Approx. 2.3 kgNet Weight | 2500 mAhBattery Charging T |
| 0.5 AlInput Current | Approx. 5 hoursCharging |
| 220 WOperating Power Put Voltage 26.0 V | = = |
| ≤ 79 dBNoise Emission | |
| Battery Service Life (excl. electric floor brush) | 45 minutes on standard mode |
| 13 minutes on turbo mode |
| Electric Floor Brush |
| Model | MJWXCQ03DY-DS |
| Operating Power | 15 W | Operating Voltage | 21.6 V--- |
| Power Adapter |
| Model | BLJ15W260050P-VA | | 84.6%Average Ac |
| Input | 100-240 V~ 50/60 Hz 0.5 A | Efficiency at Low Load (10%) | 71.43% |
| Output | 26.0 V ~ 0.5 A 13.0 W | No-load Power Consumption | 0.10 W |
| Zhongshan Baolijin Electronic Co., Ltd.Manufactured By |
All products bearing this symbol are waste electrical and electronic equipment (WEEE as in directive 2012/19/EU) which should not be mixed with unsorted household waste. Instead, you should protect human health and the environment by handing over your waste equipment to a designated collection point for the recycling of waste
electrical and electronic equipment, appointed by the government or local authorities. Correct disposal and recycling will help prevent potential negative consequences to the environment and human health. Please contact the installer or local authorities for more information about the location as well as terms and conditions of such collection points.
- The vacuum cleaner is in standby mode and cannot be used during charging.
- The lithium-on battery pack contains substances that are hazardous to the environment. Before disposing of the vacuum cleaner, please first remove the battery pack, then discard, or recycle it in accordance with local laws and regulations of the country or region it is used in.
Note: The vacuum cleaner must be turned off before removing the battery.
The battery should be disposed of in a safe manner.
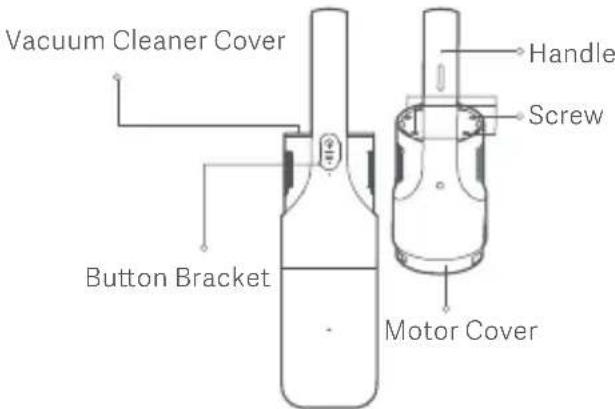
How to Remove the Battery
- Use a straight screwdriver to remove the on/off button and the button bracket, then use a tool to pray open the vacuum cleaner cover. Next, use a screwdriver to unscrew the four screws. Then you can pull the handle and motor cover to separate the battery pack.
- Remove the battery protective cover, then release the four screws on the cover with a screwdriver. Use a scissor to cut off the tin plate connecting the battery and PCB board.
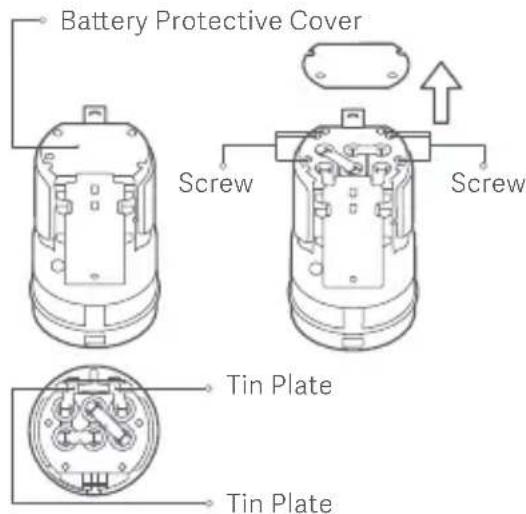
- After removing the up-bracket, the battery pack can be taken out of from the down-bracket. Then you can dispose of the battery in accordance with local laws and regulations.

http://www.mi.com/global/service/support/declaration.html
http://www.mi.com/global/service/support/declaration.html
http://www.mi.com/global/service/support/declaration.html
OchaueHHbI BvICOKOCKOPoCTHbIM 6ecuTeOHbIM DnBraTeJIeM, JERKIN nbIEcOC Mi MoKET NOXBactaTbcra TaKIMN yHKUaMn, KaK MOUHOE BCacbBAHne N BBICOKO3ΦeKTNBHaCnCTema nJbTpaun.
- BbICOKoCKOpocTHoH 6ecIeToHbI dBnraTeIb: bIcTpa r pa6Ota co cTa6nIbHOI npOn3BOdnteJIbHoCTbIO CnJIbHOr BCaCbIBaHNr dIra 6blCTpoy y6OpKn.
- Moцhoe BCacbBaHne: BbICTpoe n BBICOKOaΦeKTHBHOe BCacbBaHne MeJKNx IN KpynHbIX YactuДЯ rIy60kO OUcTKn BCero Doma.
- BbICOKo3ΦΦeKTHBHa ΦnIbTpauŋa: CnCTema zukloHNo cenapaun, coctOaJn3 MeIkoI CTaJIbHOI CeTKN, xIONKOBOrO ΦnIbTpα N ΦnIbTp, OTdJIeT KpynHyIO nbIb OT MeIkoI nbIIN, a 3aTeM yIaNBAeT nbIb, YTO6bl OHa He BbIXOДnla O6paTHO, YTO6bl IpeDOrBpAITb BToPnUHoe 3aRpr3HeHne.
- JERKn yHnBepcaIbHbI: KOMnakTHbI n JERKn nbIeCoc pa6oTaET c taKIMn akceccyapam, KaK ydInHntelbHbI CTepeXeH bN 3 JERKOrO MeTaNla, 3JIeKTpUeCKa IeTKa IJnIPO, NIOcka HacAdKa N DInHHa HacAdKa, YTO6bl JERKO n 3ΦΦeKTHBHO ONUCTHTB BEcB DOM.
KoMnJIeKT noCTaBKn
http://www.mi.com/global/service/support/declaration.html
Bir AC Elektrik Prizine takin
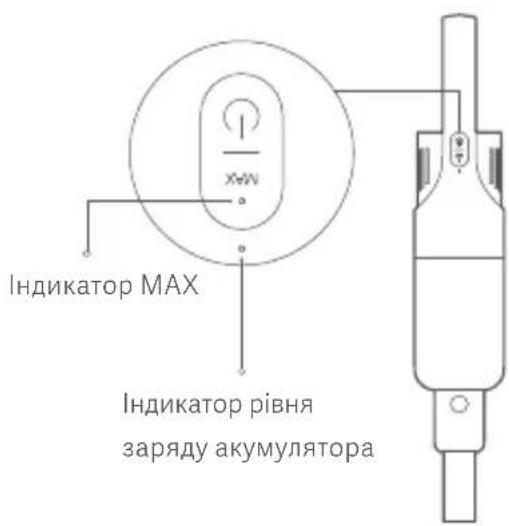
MAKS GÖstergesi
Pil Düseyi Göstergesi
4HnkaTop pIBHy aKymyIToPA
5Biicik nny
6 KhoNka BnBilbHeHHaNoOBxkyBaIbHOrO CTpnXHH
⑦IOnOdBxByBaJbHnCTpnjKeHb
8 KhoNka BnBilbHeHH eNeKtpuHoi itkn dny
9Bikho ⅢTkn dny
10Koniataka
12M'ka zitka dny ouuuneHHA
3 KhoNka polnkoBoi itkn
15 NopT 3apJxHnHnnococy
16 IpoTnKOB3Ka cTpiuKa
11Pojnkobaa
14 BiKHO BIDcIKy dny nny
1AanTepeKnBneHH
2BidineHnIy3inbtp
O 6 Puyka uKloHoro cenapatopa
4BaOBHHnΦIbTp
5)LukHOHHn cenapaTOp
9HactHHn KPOHHTeH
7IOBraHacdaKa8IpaKaHacdaKa
36ipka nnilococy
1.Пд'еднаite noobkybaNBn CTpnxkeHbdo nIOLOOCy,ЯK noka3aHO Ha iIOCTpaui,doKn He nouyete KnauaHHa.
2.Пд'еднaite eileKtpnHy uiTy dny do noobkByaIbHOro cTpnxHry, k noka3aHo Ha iIOCTpaui, Dokn He nouyete KlacaHHa.
BcTaHOBJIeHHaKcecyapiB
1.ДOBra hacaKa nPnacka hacaKa MoKyTb NiI'EDHyBaTnC6e3NocepeHbO Do NnloocCy a6o Do noNdoBxByBaJbHOrO CTpnXnH.
2.BCTABTe DOBry HacaKy a6o Pnacky HacaKy B Nnlooc o abo NOOBkyBaIbHn CTpnXeHb BepTKaIbHO,ЯK NOKa3aHO Ha IInOCTpaui,doKN He Nooyete KnaUHHa. PnpMitka. DOBra HacaKa NiXoNtB dJa npnbpaHHa Nnly 3 By3bKnx UJIINH, TaKnx kIbepi, BiKHa, CxOuTa KyTn. Pnacka HacaKa iDeaIbHo NiIXoNtB dJa npnbpaHHa Nnly 3 DiVBaHIB, WaΦ, a TaKoK IOBepxoHb cToLy a6o KOHcOJeN.
3aikpinenHHnHaCTiHHoro KpoHtEnHy
- PpocBepdIitb y CTiHi Dba OTBOpn IaMeTpom 6 MM KOKeH Ha Bucoti 99,8-101,8 cm Na iDIOHO. MIX DBOMA OTBopAMN OOB'3KOBO Mae 6yTN BiIcTaHb 56 MM. NotIM BCTaBTE B CI OTBOpn DBA IIO6EJI.
- BnpiBnHrTe OTbOp nIra rBnHTiB y HactiHHomy KPOHHTeHi 3 IIO6eMaN, notim 3a
doNOMoTO DBOX rBnHTiB (4 × 20 MM) MiUHO 3akpinitb HactIHNI KPOHHTeHN Ha CTHI.
PiPIMtKa. PekomeHdyETbcra BCTaHOBIOBaTN KPOHHTeHN dJIra cTIHN 6JIra eNEKTPuHoi
po3eKn, 06 Bnpi6 MoXHa 6yIo JeKo NiKJIIOHTn Do JxKepeJa XINBJIeHHN.

- YbIMKHeHHaBIMKHeHHaTnCHiB i yTpmyTe KhONky bIMKHeHHaBIMKHeHH npotrom 1 cekyHn, nicra yoro nIIOOC noUHe npaioBaTu, i 3a 3amOByBaHHaM BIn npaioe B cTaHapTHOMy peKmI. NobTOHO HATnCHiB KHONky YbIMK./BIMK., 306 3ynnHHTn nIIOOC.
- Pechim nepemukhaHa: Koli nnilococ npaue, HATNCHTb KHONky pIBHBAOKTyBaHHa, 06 nepemkHyTu Ha pexum Typ6o (pIBeHb MAX); y ueyac iHnkaTOp MAX cBITNTmEtbcra 6iIm. HATNCHTb KHONky pIBH BAOKTyBaHHa NOBTOHO, 06 nepemkHyTu npncptiHa cTaHapTHny pexum.
IHINKATOP pIBH 3apAkyakymyIaTopa:KoINpIBH 3apAkyakymyIaTopaIOCTaTHbO,INIKATOP pIBH 3apAkyakymyIaTopa e6iIM.KoINPiNOCoc npaioe Ha Hn3bKOMypBHI 3apAky 6atapei, INIKATOP cepBOHNI;RAIOUe TaK, NIOOCOC He MoXHaIpeBoDHTN B TybpopeJHM. KOn 6atapepo3PJAKaETbcra, NIOOCoc aBTOMaTHHOBNMUKaETbcra.
Meto3apJkaHH
1.ДоЗарджанняпеконтесьВTomy,цo
аадANTepЖИВLEHнHaJIeЖинHom
niДКЛIOчЕНДо eIeKTPnUHOrOpo3'Emy Ta
ПИLOOCOу.
2.ПичacЗapдкВiбуваetbсnyьcaця iHДNKATopa pIBнзэрду akymлгетopa.PICЯ NOBHorO 3apdkaHn6batapei iHДNKATOp pIBH3apdY BmNkaeTbC.
3.ЯкwoBn 3apJkaTe nIococ,KoN6aTapei NOBHicTIO 3apJxHeHa,IHnKaTOp pIBHra 3apJdy 6aTapei 6ynde dnxatn 20 cekyn,a notim BNMKHETbcR.
YbIMKHeHHBIMKHeHHH npn6npaHHnnococom
- Hatnchitb i ytpmyte KhoNky yBIMKHeHH / BIMKHeHH npotraom 1 cekyHn, nicna Yoro nnlococ nohe npaioBaTu, i 3a 3amOBvBaHHm Bin npaioe B ctaHapTHomy pexmi. Bn moxete nepemukatnpexm 3a notpe6n.
TpmaTe pyky nIococa nepeMiuyte ii Bnpei-Ha3ad, 06 BVKOHyBaTH npnbapHHraOuHcHnpiNIOr3a DOnOMoTO uITKn IJnPiNOrn. Bu TakoK MoKeTe cKOpNCtATnCRA DOBROH hAcADKOIO a6o PnackoH hAcADKOIO, 3aJIeXHO Bi CBOix notpe6.
- NobtopHO HATNCHTb KHONKy yBIMK./BIMK, 306 3yNHNHTn NINOCOC.

KoJI nnlococ npaioe
- Pn Hn3bKOMy pBHi 3apAkyakymJrTopa iHdkatop pBnA 3apAkyakymJrTopa 6IIMae YepBOHm. Lc O3Nauee IIO CNIckOPO 3apAHTN NINOOC. RaIO NIOLOOC npauoe B CTAHdAPTHOMy peXmI, Ioro He MOxHa nepeMKHyTN B peXm Tpy6o.
- RaKuo Noro BuacHo He 3apAaHTn, HAnpyra aKymyIaTopa CInbHO 3Hn3ntbcra. B cei HaC INIOOC aBtOMaTHo BUMKaetbcra, 06 3axNCTHTn aKymyIaTOp.
- RaKuo nnlococ BmNkaCTbcraYepe3 Te, 0o 3akHnBCra 3aprA akymyIaTopa, CBOeacHO BnKOHaTe 3apJxKaHH. Y iHwOmy pa3i MoKe BnHKHyTN NOsKOdKeHHaKMyJIaTopa Yepe3 HaMipHy 3apRky, RaKuo npuJaH He BnKOpNUCTOBvBaBCra IOBn Yac.
Ppumitkn
- Pn KyniBni nnlococ akymylaTOp 3apJxKeHO HeBeNkoIO KjIbKicTIO eHepri. PeKomeHnyetbcr NiKlnuHTn aadTep XNBHeHHa I NobHicTIO 3apJantn nnlococdo Noro nepoTO BnKOpNCtAHH.
-ПиLOOCOM He MoXHa KOpNUCTyBaTnCnIiД.Yac 3apJxKaHHa.
36epirahnnaakcecyapib
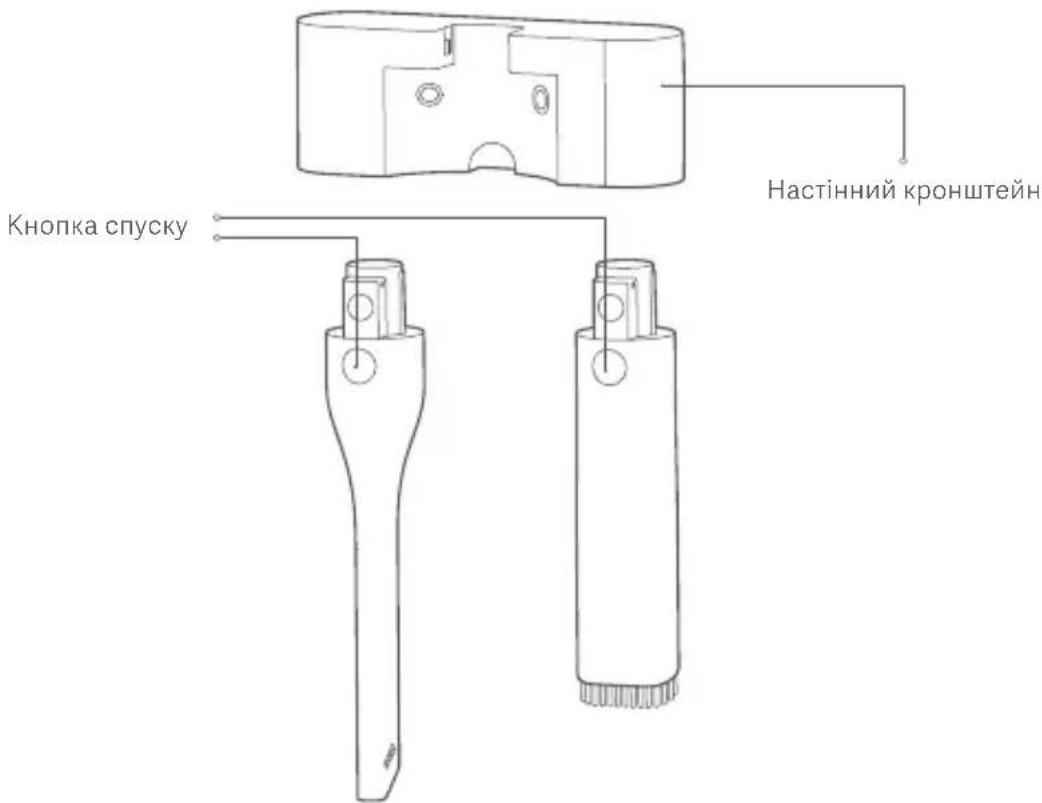
KoJIn akcecyapn He BnKOpncTOBvOToBcra,ix MoXHa 36epiratn Ha HactiHHomy KpoHsTeHi. BeptkaIbHO BCTaBte DoBry HacaKy a6o PnaCKy HacaKy B HactiHHn KPOHsTeH,doKn He Nouyete KlaaHHe, npu c6omy KhoNky BnBiJIbHeHHa RK Hanpymok Noka3aHo Ha pucyHKy. U6 3HrTn akcecyapn i3 HactiHHoro KpiInneHHa HatNCHTb KHONky po36loKyBaHHa Ta oJHOUacHO NotarHITb ix BeptkaJIbHO BHn3.
Ppimitka. Oo ouhieneHH a6o BnKoHaHH oepaui i3 TexHOrO 6cnyroBaHH nnlococy BmKHiTb NOrO N BuTgHtB BNk Ky 3 p03eTKN.
Perynepno BnKohyTe OunuHnBicky dny nny, yOb yNkHyTu HaKoNuHnBeNKoi KJIbKOcTi nny, kA MoKe np3BecTu Do 3aKyOpUbaHH Ta BnHnHuHaBCMOKtyBaHH.
- Ⅲo6 He donyctntn naHnHa nIy, npn BuaJIeHHi BiCiKy dny nnly 3 npuJaTy TpMaTe NOrO HaKD KoUkOM dny cmTT.
BndaJIeHNa Ta BcTaHOBHeHHaIciKy dIy nIy
1.ПсЯ npi6upaHn 3aДОNOMOIOI
NIIOCCy a6o KOnBicIK dIy NlNy
3aONBHeH, BNTaHITb
NoOBxUBAJIbHn CTpIXKeHb i
NOBePTaIe BiDcIK dIy NlNy B HApPmKy,
NOKa3aHOMy Ha pncuHky.KOn «
BnpiBHaETbcra BiHOcHcO CmBOJy
po36LOKByAHnRA « BiDcIK dIy NlNy
MOxHa BVdaJIHTn 3 NlNOOCy.
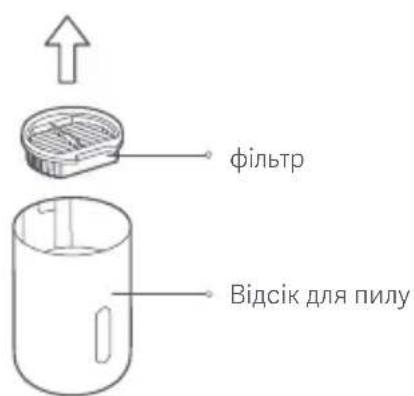

2.ВигнітБФИьTp3BIDciKуДЯпИУ,яКу nOKa3aHoHaPnCyHKy,NOTIM BnJaIbTbПИ i3 nobepxhi.
- Pizko nobopyw itb puyk y uKnoHoro cenapatopa had cmitteBm 6akom, 0o6 BnTartu uKnoHnn cenapatop i3 BiDineHHa Iy, k Noka3aHo Ha maIohky. BnnpoxhItb BMicty BiDineHHa Iy Ta BndaIITb Nl 3 NOBepxHi uKnoHoro cenapatopa.
4.BCTaHOBIb cIKKIOHn cenapatop i ΦIbTp hazad y BIDcIK dny, KOIN OuyueHHy 6yde 3aBepweHo. BnpIBHnTe CIMBOJ po36LOkyBaHHN « BiDHOcHO «, NOTIM NOBepTaIe BiCik dny B HApymKy, NOKa3AHOMy Ha pncyHKy, DOKN « He BnpIBHReTbcra BiHOcHO CIMBOJy 6NoKvBaHHN « . KOni nouyete KlaCaHHN, ce O3Haue, 10 BiCik dny nIIy MiHO BCTaHOBJIeHO B PNILOCOci.
BcTaHOBLeHnI cIKIOHOro ceNapaTopa
HaTnCKaIte zIKNoHHn cenapatop npraMo Bn3, nOKn BiH He DoCraHne KInzraBiiDIIeHHn dnniNy.
OuHHeHH BiiDilneHHI Ia NnIy Ta fIbItpaB 360pi
BnIMtB fIbTp, 6aBOBHNH NfIbTp Ta
UKNIOHN cenapatop nocJIOBHO 3
BIDINENHЯ dIy. BnJaITb nn 3 ix
NOBepxHi, a NOTIM npOMnTe iX uNCTOIO BOHO.
Ipeed BVKOpNCtAHNM nepekoHaNTecra, IO
BOHn peTbHO BnCyWeHi y Do6pe
npoBITpOBaHomy Mici Iodani BiD npamix
COHryHnx IpomehiB. 3a Heo6xIdNoCTi BN
MOxKeTe 3aMInTu IbTp Ha Bka3aHy MoJeB
fIbTpTa.
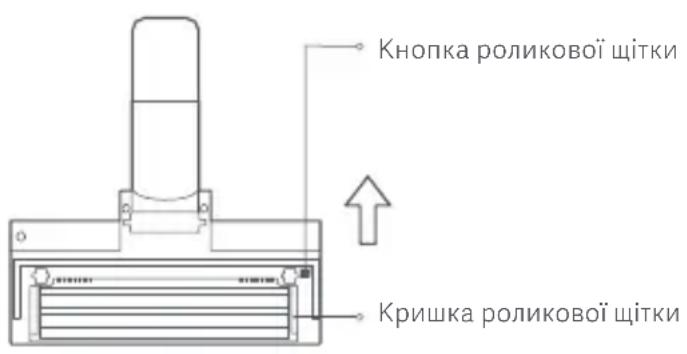
OuHcHnHpaNkoBoi tKn
- Hatnchitb KhoNkpy polNKoBOoi tIKn,ЯK noka3aHo Ha pncyHky, 06b BiIDkpntu KpIshky polNKoBOoi tIKn,notIM BNTarHtB polNKoby tIKy dIaII oUHennr. PicJry ouHsEHn BCTaHOBiTb polNKOBy tIKyHa micne J 3akpnTe KpIshky,doKn He noCyTe KnaauHHn.
2.3piKTe BOLOccs i BOLOkHa, npNKpIJIeHi Do polNkoBoi 1tKn, i BnDaJIITb ix.
- Пи очишени плосoca корисуитес сухою Тканною. He Викорисову te ximiuhi po3uHHNK, takiaяк boeH3nH, cnpt a6o po3uHHNK laky, ockibkn zi peoyuH npn3BeDyTB do po3tpickyBaHHa O6OJohKn a6o BtpaTn HeI O Kolbopy.
O6OB'3KOBO BnMKHITb NlOcOC neped YNueHHa 6oTexHiHm O6cnyroByBaHHaM.
- Пи заловени BiDciKу Дяплу HeraHо cnopoxHITb Ioro. Y iHOMy pa3i BIn Moke 6ytN 3a6IokOBaHn 6pydOm, lo BnInHe Ha npOdyKTHBHiCTb BCMOKTyBaHHa Ta npu3BeDe Do nepeerpibAHHa DBnHyHa.
- PekomeHdyetybca 3amHOBaTn ΦIbTp KoxHi 2-3 Mica.у pa3i iHTeHcNBIwO BnKOpNCtAHNa Bam MoKe 3HaIObNTuCra 3amHOBaTn NOro Yactiwe.
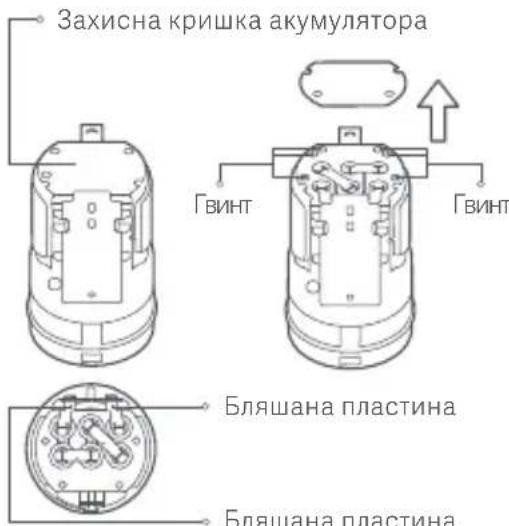
K BuandaunTu akymyIaTOp
- 3a DONOMOROIO npraMOI BnKpyTKN BnDaJIb KHOKNy yBIMKHeHHY/BnMKHeHHN KPOHHTeHN KHOKN,NOTIM 3a DONOMOROIO IHCTpymEnTa BiIDkpNIte KpNShKy NIILOCoca.Дani 3a DONOMOROIO BnKpyTKN BnRbHNTiB qOTnpn rBnHTN. IOTIM Bi MoXKeTe NOTARHyTa 3a pykny KpNShKy DnRgamma,Io6 BiIDOKpeMNTn aKymyJIrTOPhy 6aTapeH.
- BndaJIb 3axnchy Kpnkky
akymylatopa,notIM BnrbnHTtB qOTnpi
rBNHTn Ha Kpnu3a DOonomoIOBnpyTKN.3a DOonomoIO HOKNUp
po3piTe JecTaNHy nlaCTnHy,Io 3'edHye
akymylatop i npykOBaHy nlaTy.

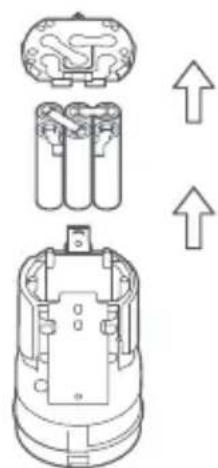
3.Пись Видалени Верхнбогor Kронштейну можна 3нгту akymларophу батацю 3 Нжнбогor Kронштейну.пись zufo ro mokha ytni3ybaTu akymларop BiДnobiДно Do MicseBOrO 3akOHODaBCTBa HOpMaTINBHO-празвOBnx aKTIB.
Este produit destiná-se apenas a uso dométrico. Leia este manual com atençao antes de utilizes o produits e guarde-o para referencia futura.
http://www.mi.com/global/service/support/declaration.html
http://www.mi.com/global/service/support/declaration.html
Manufactured for: Xiaomi Communications Co., Ltd.
Manufactured by: Guangdong Deerma Technology Co., Ltd.
(a Mi Ecosystem company)
Address: No.4-1 Longhui Road, Malong Village Commit tee, Beijiao Town, Shunde District, Foshan City, Guangdong Province, China
For further information, please go to www.mi.com
Adresse: No.4-1 Longhui Road, Malong Village Commit tee, Beijiao Town, Shunde District,
Foshan City, Guangdong Province, China
Indirizzo: No.4-1 Longhui Road, Malong Village Commit tee, Beijiao Town, Shunde District,
Foshan City, Guangdong Province, China
Indirizzo: No.4-1 Longhui Road, Malong Village Commit tee, Beijiao Town, Shunde District,
Foshan City, Guangdong Province, China
Indirizzo: No.4-1 Longhui Road, Malong Village Commit tee, Beijiao Town, Shunde District,
Foshan City, Guangdong Province, China
Dirección: No.4-1 Longhui Road, Malong Village Committee, Beijiao Town, Shunde District,
Foshan City, Guangdong Province, China
Adres: No.4-1 Longhui Road, Malong Village Commit tee, Beijiao Town, Shunde District,
Foshan City, Guangdong Province, China
Wiecej informaci: www.mi.com
Adres: No.4-1 Longhui Road, Malong Village Commit tee, Beijiao Town, Shunde District, Foshan City, Guangdong Province, China
Ampeca: No.4-1 Longhui Road, Malong Village Committee, Beijiao Town, Shunde District, Foshan City, Guangdong Province, China
Lio6 di3natnc 6inbe, biBidaTe caT www.mi.com
Fabricado para: Xiaomi Communications Co., Ltd.
Fabricante: Guangdong Deerma Technology Co., Ltd. (UmaEmpresa do Ecosistema Mi)
Morada: No.4-1 Longhui Road, Malong Village Commit tee, Beijiao Town, Shunde District, Foshan City, Guangdong Province, China
Adres: No.4-1 Longhui Road, Malong Village Commit tee, Beijiao Town, Shunde District, Foshan City, Guangdong Province, China
Adres: No.4-1 Longhui Road, Malong Village Commit tee, Beijiao Town, Shunde District, Foshan City, Guangdong Province, China