Monsun 6000 - Humidifier SUNTEC - Free user manual and instructions
Find the device manual for free Monsun 6000 SUNTEC in PDF.
User questions about Monsun 6000 SUNTEC
0 question about this device. Answer the ones you know or ask your own.
Ask a new question about this device
Download the instructions for your Humidifier in PDF format for free! Find your manual Monsun 6000 - SUNTEC and take your electronic device back in hand. On this page are published all the documents necessary for the use of your device. Monsun 6000 by SUNTEC.
USER MANUAL Monsun 6000 SUNTEC
This appliance can be used by children aged from 8 years and above and persons with reduced physical, sensory and mental capabilities or lack of experience and knowledge if they have been given supervision or instruction concerning use of the appliance in a safe way and understand the hazards involved. Cleaning and user maintenance shall not be made by children without supervision. Children of less than 3 years should be kept away unless continuously supervised.
Children aged from 3 years and less than 8 years shall only switch on/off the appliance provided that it has been placed or installed in its intended normal operating position and they have been given supervision or instruction concerning use of the appliance in a safe way and understand the hazards involved. Children aged from 3 years and less than 8 years shall not plug in, regulate and clean the appliance or perform user maintenance.
- Before connecting the appliance to the power supply, check that the voltage indicated on the appliance corresponds with the voltage at your home.
- Please refrain from further usage if the power cord, power plug or the appliance are damaged or if you notice abnormal noises and odours from the unit. If a repair is necessary, contact your seller.
- Do not attempt to repair, disassemble or change the appliance by yourself.
-
Do not use the appliance for other than its intended use. For domestic indoor use only.
-
Only operate the appliance on a flat, stable and dry surface. Please do not tilt the unit, otherwise water may leak out.
- Remove the appliance from the wall socket when it is not in use, before cleaning, in case of malfunctions and when emptying or filling the water tank.
- Do not insert any objects into the appliance as this may cause electric shocks, fire or damages to the appliance.
- Do not leave the appliance unattended.
- Please make sure that the mist outlet is not blocked and free from dust or foreign objects.
- Please do not fill water into the mist outlet.
- Please do not reach into the water during operation and do not touch any parts that are in the water.
- Do not pull on the power cord, but on the power plug when removing the appliance from the power outlet. Please make sure your hands are dry.
- Please maintain a minimum distance of 2m from other electrical appliances and furniture and do not place the unit near curtains and drapes as they may get wet.
- Please do not immerse the appliance in water or other liquids to avoid electric shock.
- Do not use the unit near flammable materials, gases or vapours.
- Please do not operate the appliance when the water tank is empty.
- Please make sure that no water can enter the base to prevent damage to the appliance.
- The water temperature when filling the water tank should not exceed 40^ , otherwise the water may
cause discoloration and deformation.
-
Please keep the unit away from heat sources such as ovens and avoid direct sunlight.
-
Please do not use the device at cold ambient temperatures below 5^ C to prevent damage to the device. If water is frozen in the unit, remove or melt the ice before operation. The ideal operating temperature is between 5^ C and 40^ C .
-
Please do not add any additives to the water. Aroma oils may only be put in the aroma oil container, not directly in the water.
Components
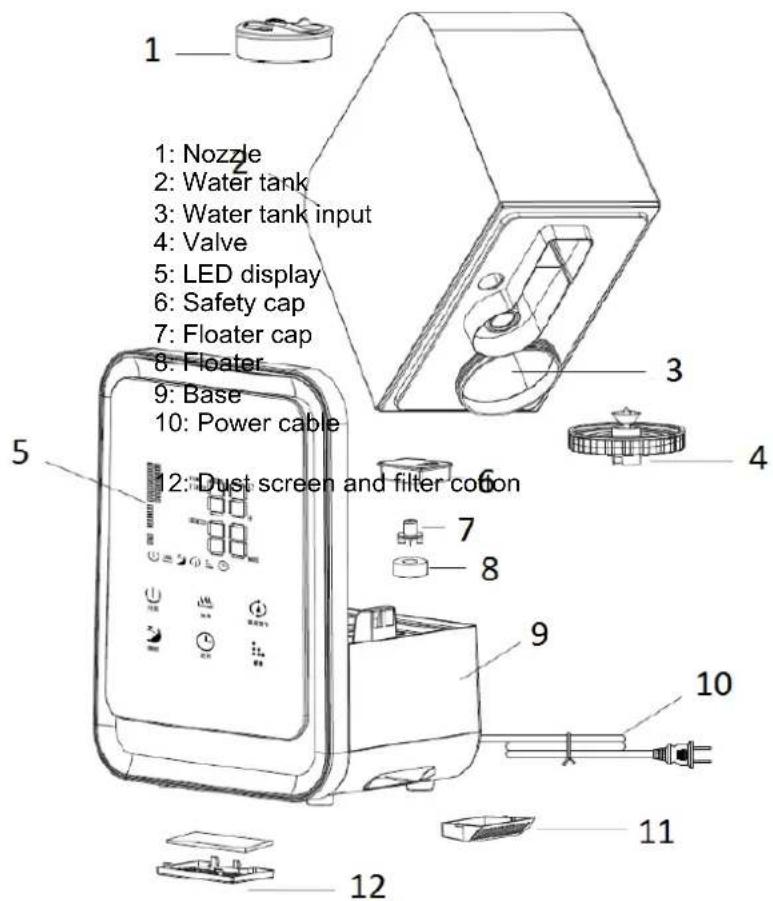
11: Aroma oil container with fabric
Operation
Power supply: 100-240V\~, 50/60Hz, 40W
- The ultrasonic humidifier atomizes the water by high-frequency oscillation into ultra-fine particles of 1-3 m. These are released into the air as fine water mist by compressed air. The result is an even air humidification.
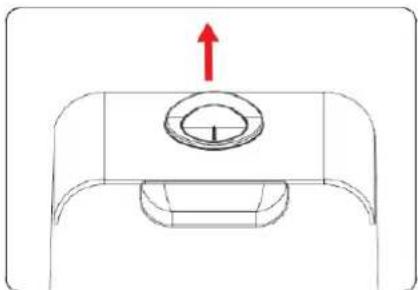
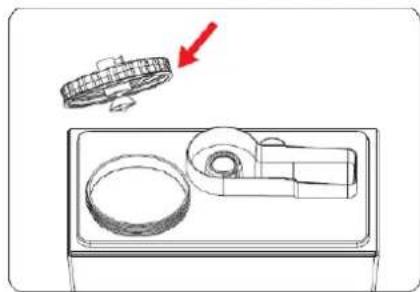
- Please fill the water tank with purified water. In order to do so, lift the water tank with both hands from the base (see picture 1) and turn it upside down. Please unscrew the water tank cap (see picture 2) and fill in the water (see picture 3). Afterwards, please close the water tank with the cap and put the water tank back on the base.
If you want to use aroma oils, pull out the aroma oil container on the side of the appliance (see picture 4) and fill it until the fabric is soaked with the aroma oil. Please insert the aroma oil container back into the appliance once done. Please wash the fabric and aroma oil container with detergent and dry it before
using a new aroma oil. Alternatively, you can put the oil directly into the aroma oil container, but not directly into the water tank.
Picture 1 Picture 2
Picture 3 Picture 4
Please be careful when moving the appliance. Since the appliance uses compressed air to generate the water mist, the base of the appliance is not sealed airtightly. Therefore, always keep the appliance straight to avoid leaking water.
- Please connect the appliance to the power supply. The indicator lights light up for one second and the appliance enters the standby mode. You can use the control panel on the appliance or the remote control for further operations. Both have the same functions.
- Press the on-/off-button on the control panel to start the appliance. The standard setting with high mist output level is activated. In addition, the environmental temperature in ^ C and the current relative air humidity in % are shown on the LED display.
- Mist output level control "Humidity": To change the mist output level, use the mist output level control. The appliance has three mist output levels (high, medium and low), which are indicated by the number of bars on the LED display: high - full bar blocks, medium - three bar blocks, low - one bar block.
- Timer function "Timer": To activate the timer function, press the timer button. You can choose between 1-12 hours. Once you have selected your desired time, wait five seconds until the number stops blinking. The active timer is indicated by an indication light on the LED display. The display also shows the environmental temperature and the remaining hours in alternation, as well as the relative humidity in %. If you hold down the timer button for two seconds, both the LED display and all indication lights will go out except for the blue lamp in the water tank. To switch them on again, press any button. When the set time is over, the appliance will turn off automatically.
If you want to switch off the timer function, press the timer button again. The timer indication light disappears from the display.
Heating function "Heat": By pressing the heating function button, the water within the water tank will be heated. Once the appliance has heated the water, the mist will leave the nozzle 2 - 3^ warmer than room temperature, which prevents the room temperature from sinking during operation.
- Sleep mode "Sleep": When the sleep mode button is pressed, all indicator lights will go out except for the indicators for the on-/off-button and for the sleep mode. The previous set mist output level will be changed to the lowest mist output level. When pressing the button again, the sleep mode will be deactivated and previous settings will be restored.
- Humidity regulation "Humidity Setting": Press the button for the humidity regulation to set your desired air humidity in%. You can choose between 40 - 80% . A comfortable air humidity is achieved with 40 - 60% . Please wait five seconds after selecting until the appliance has accepted the setting. When the humidity regulation is activated, the corresponding indication light is shown on the display. As soon as the current air humidity has reached your set, desired air humidity level, the appliance automatically switches to standby mode. If the current air humidity level drops below the set air humidity, the appliance switches back to the operating mode. If you want to turn off the humidity regulation, press the button again and select "- -". Please wait five seconds until the indication light on the display goes out. The humidity regulation is deactivated and the appliance enters the continuous operation until it is turned off by the timer or manually.
- The appliance will turn off automatically when there is no water in the water tank.
Cleaning
- Always disconnect the appliance from the power outlet and let it cool before cleaning. Never immerse the appliance in water to prevent electric shocks.
- Wipe over the exterior of the appliance with a soft cloth moistened with warm water (below 40^ ) and then wipe dry with a dry cloth.
- Do not use aggressive or chemical cleaning agents or abrasive cleaning agents such as steel wool.
- The water tank should be cleaned every 2-3 weeks. Please remove the water tank from the base and open the water tank cap. Wipe off any residues with a soft cloth and rinse the tank and cap with water. Please make sure that the area around the floater is clean.
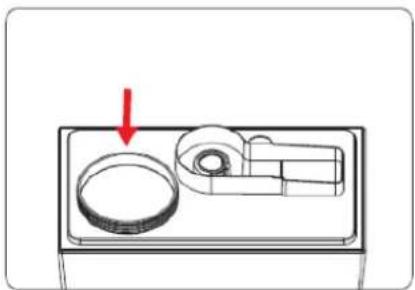
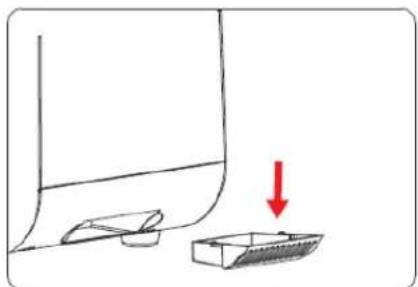
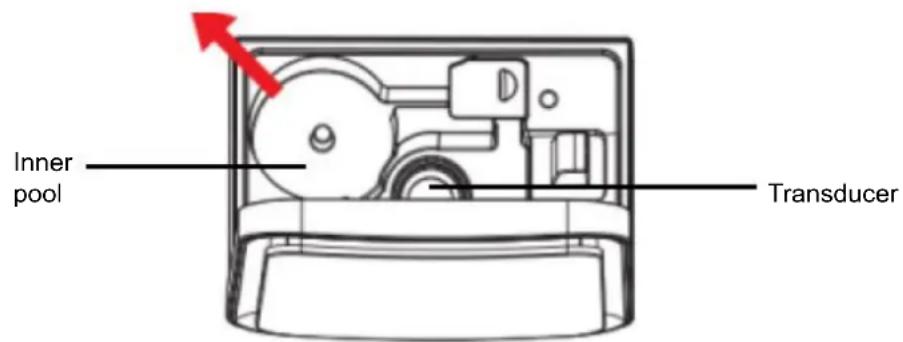
- The base should be cleaned once a week. To do so, please let the water, that has collected within the inner pool, flow out (see picture 5) and wipe the base carefully with a soft cloth. This is necessary in order to prevent water flowing inside the electrical components of the appliance.
Picture 5
To clean the transducer, apply a baking powder-water mixture or vinegar-water mixture to the surface of the oscillator and let it sit for 5 minutes. Afterwards clean the surface with a brush and rinse the transducer with plenty of water.
- The water filter within the water tank should be replaced every three to four months. Please remove the water tank and unscrew the cap. The water filter is located at the cap. Please separate both by unscrewing the cap and then screw the cap to the new water filter. Please insert the new water filter with cap into the water tank and screw it tightly. You can buy replacement water filters from your seller:
Item no.: 14062
Item description: Monsun 6000 black water filter
Brand: Suntec
In case of complaint
- You can claim the device within 24 months from date of purchase (receipt).
- A free replacement or repair will be excluded from prior improper product handling.
- Defects in wear parts, consumables, as well as cleaning, maintenance or replacement of said parts are therefore with costs.
If you want to make a complaint, please bring the entire device in its original packaging and with proof of purchase to your dealer. For a timely and convenient service register, visit our website www.suntec-wellness.de and learn more. - Without a proof of purchase, generally there will be no repair or replacement.
- In the event that the complaint case is analogous to our terms of service, all defects of the device or its accessories due to material or manufacturing defects will be eliminated by repair or, at our discretion, replacing the unit.
- The damage of accessories does not automatically lead to a free exchange of the whole device. In these cases, please contact your dealer. Glass breakage, or breakage of plastic parts are always to charge.
The dealer or repair service can perform the repair after the expiration of warranty against charge.
Note concerning protection of environment
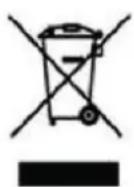
This product must not be disposed of via normal household waste after its service life, but must be taken to a collection station for the recycling of electrical and electronic devices. The symbol on the product, the operating instructions or the packaging indicates such disposal procedures. The materials are recyclable in accordance with their respective symbols. By means of re-use, material recycling or any other form of recycling old appliances you are making an important contribution to the protection of our environment.
Please ask your local council where your nearest disposal station is located.
As part of our extended producer responsibility, this product is indicated in accordance to the European Directive 2012/19/EU on Waste Electrical and Electronic Equipment (WEEE). The aim is to avoid, reduce, and
environmentally friendly disposal of electronic waste. Please help actively to protect the environment and dispose electronic waste through local collection points. The packaging and this manual can be recycled.
EC declaration of conformity
The device meets the essential health and safety requirements of the European Union. The EC declaration of conformity is the basis for CE marking this unit.
With publication of this manual supersedes all previous their validity. SUNTEC, SUNTEC Wellness, KLIMATRONIC and the Sun-Logo are registered trademarks. © 2019/01 SUNTEC WELLNESS GMBH
Liability is excluded for all printing errors and omissions.

Regulator intensity oparu (3stupne)
For this appliance we assure 24 months warranty.
During the 24 months warranty we guarantee to repair your appliance free of charge or to provide your seller the spare parts free of charge if the appliance fails to work due to production failure.
Other claims are excluded from this warranty. We will not be liable for any defects caused by acts of nature, improper use, negligence of the instruction manual, damage from continuous use and damages during transportation.
This warranty card is only applicable with the according invoice.
In case of service please bring your purchased product to your seller.
Product name:
Serial number:
Name of buyer:
Date of purchase:
Stamp and signature of seller:
Manufacturer:
Suntec Wellness GmbH
Holzstraße 2
40221 Dusseldorf
Germany