
VPLSW620C - Projector SONY - Free user manual and instructions
Find the device manual for free VPLSW620C SONY in PDF.
| Brand | Sony |
| Model | VPL-SW620C |
| Product type | Ultra-short throw LCD projector |
| Light source | High-pressure mercury lamp (LMP-E220, not supplied) |
| Power supply | AC 100-240 V, 50/60 Hz (built-in AC adapter) |
| Power consumption | Approx. 300 W (standby mode < 0.5 W) |
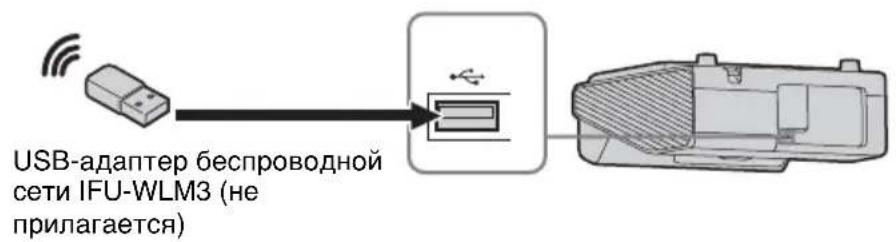
| Input connectors | RGB (D-sub 15-pin), HDMI, USB type B, USB type A, LAN (RJ45), USB type A (for Wi-Fi module) |
| Network connectivity | Wired LAN (RJ45) and wireless via IFU-WLM3 module (not supplied) |
| Interactive features | Interactive pen (primary and secondary) with auto/manual calibration, Whiteboard mode, Desktop mode |
| Native resolution | WXGA (1280 x 800) – estimate based on the range |
| Brightness | 3200 lumens (estimated) |
| Projection ratio | Ultra-short throw (very short projection distance) |
| Keystone correction | Vertical electronic correction (via KEYSTONE button or menu) |
| Image functions | Optical block shift adjustment (H/V), focus, zoom, aspect, APA (automatic pixel alignment), test pattern |
| Maintenance and cleaning | Clean the cabinet with a soft, slightly damp cloth; do not touch the projection window; clean the air filter with a vacuum cleaner |
| Lamp replacement | Replacement lamp LMP-E220; wait 1 hour after turning off; unscrew the cover and remove it by the grip point |
| Spare parts and repairability | Lamp, air filter, optional Wi-Fi module; repair by an authorized Sony technician |
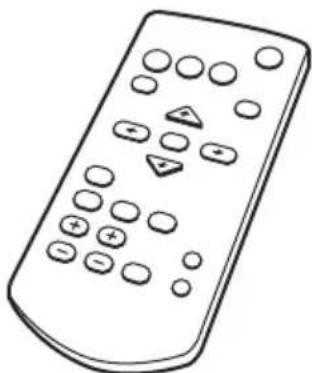
| Included accessories | Remote control RM-PJ8 (with CR2025 battery), AAA batteries (x4 for pen), power cord, CD-ROM instruction manual, quick reference guide |
| Safety | Mandatory grounding; do not block ventilation openings; horizontal installation (max tilt 15°); use at altitudes >1500 m requires specific setting |
| Dimensions (approx.) | Approx. 500 x 400 x 150 mm (without projections) |
| Weight (approx.) | Approx. 6.5 kg |
Frequently Asked Questions - VPLSW620C SONY
User questions about VPLSW620C SONY
0 question about this device. Answer the ones you know or ask your own.
Ask a new question about this device
Download the instructions for your Projector in PDF format for free! Find your manual VPLSW620C - SONY and take your electronic device back in hand. On this page are published all the documents necessary for the use of your device. VPLSW620C by SONY.
USER MANUAL VPLSW620C SONY
Sony Corporation Printed in China
VPL-SW635C/SW630C/SW620C/SW630/SW620 VPL-SX630
图上(九)范志志04号

© 2014 Sony Corporation

安全のたてに
Projector Station for Network
Presentation 4
(CD-ROM) (1 枚)
INTARALKTEIIPENDEVIAS (IFU-
PN250A/PN250B) (2) (VPL-
SW635C/SW630C/SW620C
http://PWPresenterpixelworks.com

This机能 to use the time is on anpuon a tive. Interactive Presentation Utility 2 to inns To-1sultotheeotneefi. Interactive Presentation Utility 2 nofTwAeapd Tepetoe.
http://www.sony.jp/vpl/support/download/index.html
注意
To reduce the risk of fire or electric shock, do not expose this apparatus to rain or moisture.
To avoid electrical shock, do not open the cabinet. Refer servicing to qualified personnel only.
WARNING
THIS APPARATUS MUST BE EARTHED.
WARNING
When installing the unit, incorporate a readily accessible disconnect device in the fixed wiring, or connect the power plug to an easily accessible socket-outlet near the unit. If a fault should occur during operation of the unit, operate the disconnect device to switch the power supply off, or disconnect the power plug.
CAUTION
About the LAN connector
For safety, do not connect the connector for peripheral device wiring that might have excessive voltage to this port.
WARNING: THIS WARNING IS
APPLICABLE FOR USA ONLY.
If used in USA, use the UL LISTED power cord specified below.
DO NOT USE ANY OTHER POWER CORD.
Plug Cap Parallel blade with ground pin (NEMA 5-15P Configuration)
Cord Type SJT, three 16 or 18 AWG wires
Length Minimum 1.5m (4 ft. 11 in.), Less than 4.5m (14 ft. 9 in.)
Rating Minimum 10 A, 125 V
Using this unit at a voltage other than 120V may require the use of a different line cord or attachment plug, or both. To reduce the risk of fire or electric shock, refer servicing to qualified service personnel.
WARNING: THIS WARNING IS APPLICABLE FOR OTHER COUNTRIES.
1 Use the approved Power Cord (3-core mains lead) / Appliance Connector / Plug with earthing-contacts that conforms to the safety regulations of each country if applicable.
2 Use the Power Cord (3-core mains lead) / Appliance Connector / Plug conforming to the proper ratings (Voltage, Ampere).
If you have questions on the use of the above Power Cord / Appliance Connector / Plug, please consult a qualified service personnel.
IMPORTANT
The nameplate is located on the bottom.
For kundene i Norge
Dette utstyret kan kobles til et ITströmfordelingsystem.
For the customers in the U.S.A.
This equipment has been tested and found to comply with the limits for a Class B digital device, pursuant to part 15 of the FCC Rules. These limits are designed to provide reasonable protection against harmful interference in a residential installation. This equipment generates, uses and can radiate radio frequency energy and, if not installed and used in accordance with the instructions, may cause harmful interference to radio communications. However, there is no guarantee that interference will not occur in a particular installation. If this equipment does cause harmful interference to radio or television reception, which can be determined by turning the equipment off and on, the user is encouraged to try to correct the interference by one or more of the following measures:
- Reorient or relocate the receiving antenna.
- Increase the separation between the equipment and receiver.
- Connect the equipment into an outlet on a circuit different from that to which the receiver is connected.
- Consult the dealer or an experienced radio/TV technician for help.
If you have any questions about this product, you may call; Sony Customer Information Service Center 1-800-222-7669 or
http://www.sony.com/
Declaration of Conformity
Trade Name : SONY
| Model : VPL-SW635C | |
| VPL-SW630C | |
| VPL-SW620C | |
| VPL-SW630 | |
| VPL-SW620 | |
| VPL-SX630 |
Responsible party : Sony Electronics Inc.
Address: 16530 Via Esprillo,
San Diego, CA
92127 U.S.A.
Telephone Number: 858-942-2230
This device complies with part 15 of the FCC Rules. Operation is subject to the following two conditions: (1) This device may not cause harmful interference, and (2) this device must accept any interference received, including interference that may cause undesired operation.
You are cautioned that any changes or modifications not expressly approved in this manual could void your authority to operate this equipment.
All interface cables used to connect peripherals must be shielded in order to comply with the limits for a digital device pursuant to Subpart B of part 15 of FCC Rules.
This device complies with part 15 of the FCC Rules. Operation is subject to the following two conditions: (1) This device may not cause harmful interference, and (2) this device must accept any interference received, including interference that may cause undesired operation.
For the customers in Canada
CANICES-3 (B)/NMB-3(B)
For the customers in Europe
This product has been manufactured by or on behalf of Sony Corporation, 1-7-1 Konan Minato-ku Tokyo, 108-0075 Japan. Inquiries related to product compliance based on European Union legislation shall be addressed to the authorized representative, Sony Deutschland GmbH, Hedelfinger Strasse 61, 70327 Stuttgart, Germany. For any service or guarantee matters, please refer to the addresses provided in the separate service or guarantee documents.
For the customers in the U.S.A.
SONY LIMITED WARRANTY - Please visit http://www.sony.com/psa/warranty for important information and complete terms and conditions of Sony's limited warranty applicable to this product.
For the customers in Canada
SONY LIMITED WARRANTY - Please visit http://www.sonybiz.ca/solutions/ Support.do for important information and complete terms and conditions of Sony's limited warranty applicable to this product.
For the customers in Europe
Sony Professional Solutions Europe - Standard Warranty and Exceptions on Standard Warranty. Please visit http://www.pro.sony.eu/ warranty for important information and complete terms and conditions.
For the customers in Korea
SONY LIMITED WARRANTY - Please visit http://bpeng.sony.co.kr/handler/BPAS-Start for important information and complete terms and conditions of Sony's limited warranty applicable to this product.
For the customers in Taiwan only

廢電池請回收
For the State of California, USA only
Perchlorate Material - special handling may apply, See www.dtsc.ca.gov/hazardouswaste/perchlorate
For the Customers in Brazil only DESCARTE DE PILHAS E BATORIAS

- Check that the operating voltage of your unit is identical with the voltage of your local power supply. If voltage adaptation is required, consult with qualified Sony personnel.
- Should any liquid or solid object fall into the cabinet, unplug the unit and have it checked by qualified Sony personnel before operating it further.
- Unplug the unit from the wall outlet if it is not to be used for several days.
- To disconnect the cord, pull it out by the plug. Never pull the cord itself.
- The wall outlet should be near the unit and easily accessible.
- The unit is not disconnected from the AC power source (mains) as long as it is connected to the wall outlet, even if the unit itself has been turned off.
- Do not look into the projection window while the lamp is on.
- Do not place your hand or objects near the ventilation holes — the air coming out is hot.
- Be careful not to catch your fingers by the foot when you adjust the height of the unit. Do not push hard on the top of the unit with the foot out.
- Avoid using an extension cord with a low voltage limited since it may cause the short-circuit and physical incidents.
- Do not catch your finger between the unit and surface of the floor when moving the projector installed on the floor.
- Do not carry the projector with the cabinet on and with its cover open.
-
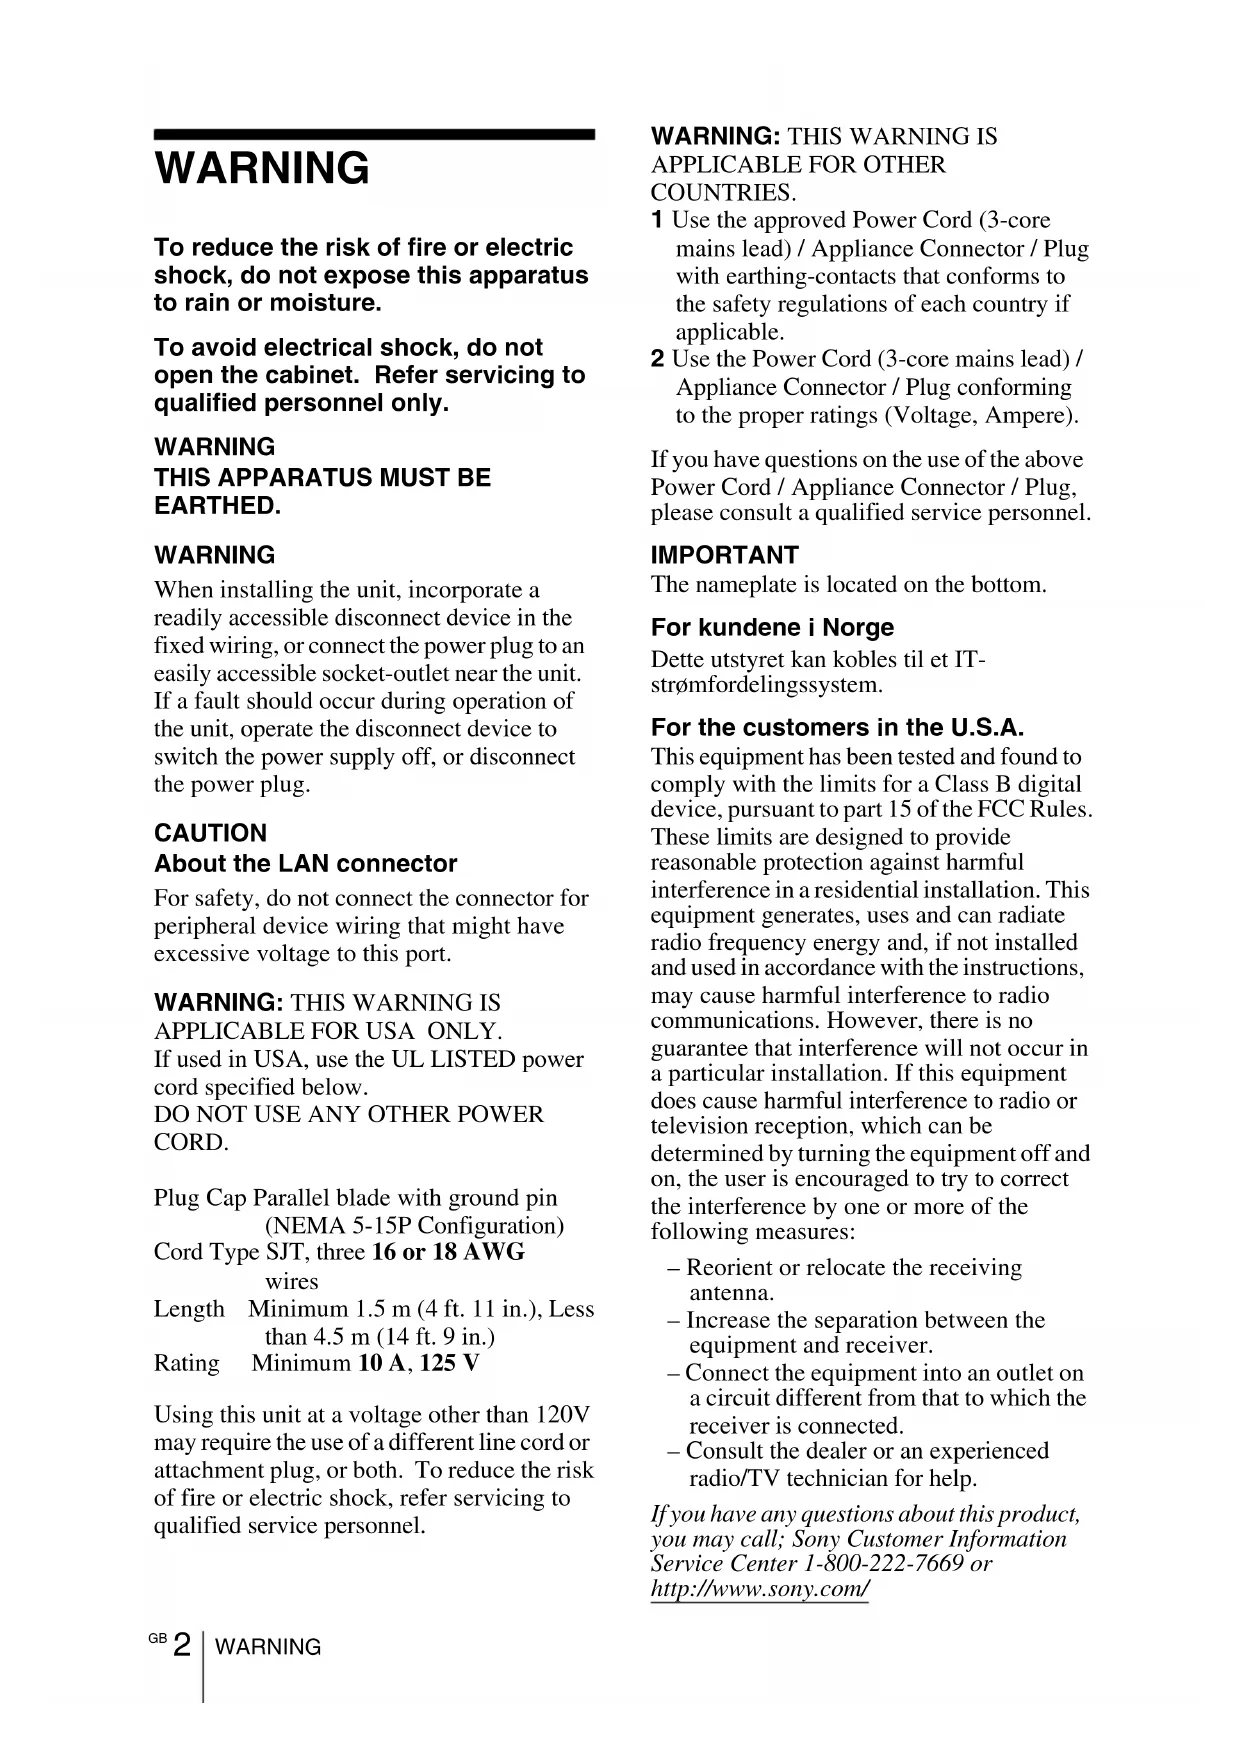
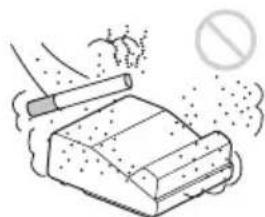
Do not install the unit in a location near heat sources such as radiators or air ducts, or in a place subject to direct sunlight, excessive dust or humidity, mechanical vibration or shock.
-
If the ventilation holes are blocked, internal heat builds up, and it may cause a fire or damage the unit. To allow adequate air circulation and prevent internal heat build-up, follow the items below:
-
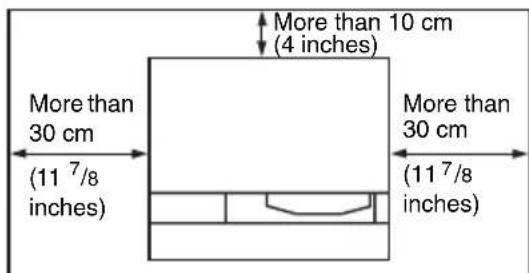
Leave space around the unit (page 6).
- Avoid using something to cover the ventilation holes (exhaust/intake).
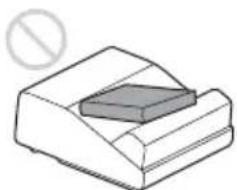
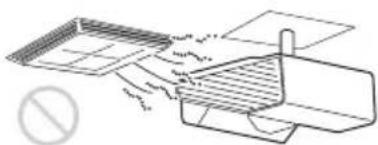
- Do not place the unit on surfaces such as an original packing sheet, soft cloth, papers, rugs, or scraps of paper. The ventilation holes may take in such materials.
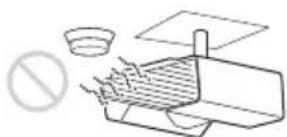
- Do not place any object just in front of the projection window that may block the light during projection. Heat from the light may damage the object. Use the picture muting function to cut off the picture.
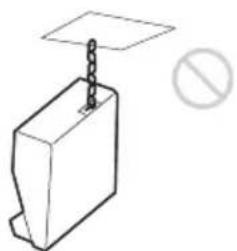
- Do not use the Security bar for the purpose of preventing theft for transporting or installing the unit. If you lift the unit by the Security bar or hang the unit by this bar, it may cause the unit to fall and be damaged, and may result in personal injury.
For dealers
- Make sure the projector is installed on the wall securely; otherwise, it may fall and cause death or serious injury. Be sure to use Sony's Projector Wall Mount.
- Be sure to secure the cabinet cover firmly when installing to the wall firmly.
Safety precautions for installing the unit
- Never mount or move the projector by yourself. Be sure to consult with your Sony dealer or a qualified installer.
- When installing the unit on a wall or ceiling, be sure to use a safety wire, etc., to prevent the unit from falling. Entrust the installation to a Sony dealer or qualified installer.
- Before installing the unit on a wall or ceiling, make sure that the mounting surface is strong enough. If you install the unit without first confirming that the mounting surface is strong enough, the unit may fall.
On Installation
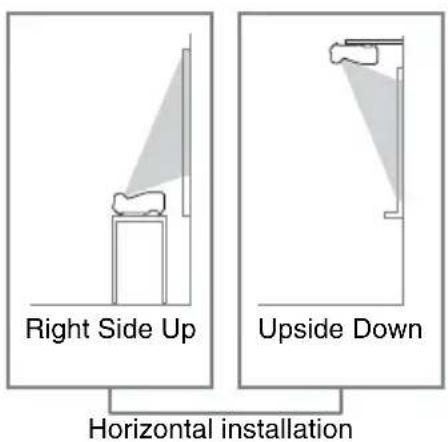
- When installing the unit, leave space between any walls, etc. and the unit as illustrated.
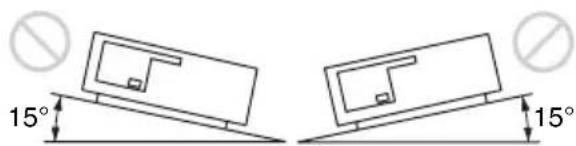
- Avoid using if the unit is tilted more than 15 degrees horizontally.
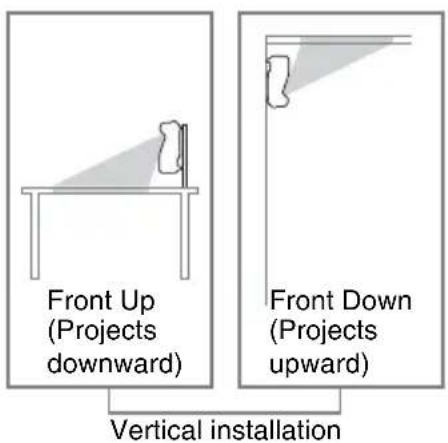
- Always install the unit horizontally or vertically. Otherwise the projected image may be unevenly colored or the lamp life may be deteriorated.
- Avoid using the unit in a location where the temperature or humidity is very high, or temperature is very low.
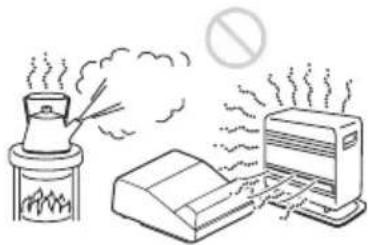
- Avoid installing the unit in a location subject to direct cool or warm air from an air-conditioner. Installing in such a location may cause malfunction of the unit due to moisture condensation or rise in temperature.
- Avoid installing the unit in a location near a heat or smoke sensor. Installing in such a location may cause malfunction of the sensor.
- Avoid installing the unit in a very dusty or extremely smoky environment. Otherwise, the air filter will become obstructed, and this may cause a malfunction of the unit or damage it.

-
When using the unit at an altitude of 1,500 m or higher, set "High Altitude Mode" to "On" in the Installation menu. Failing to set this mode when using the unit at high altitudes could have adverse effects, such as reducing the reliability of certain components.
-
Set "Installation Attitude" on the Installation menu correctly to suit to the Installation angle. Continuing to use the wrong setting may affect component reliability.
On cleaning the projection window and the cabinet
- Be sure to disconnect the AC power cord from the AC outlet before cleaning.
- If you rub on the unit with a stained cloth, the cabinet may be scratched.
- If the unit is exposed to volatile materials such as insecticide, or the unit is in contact with a rubber or vinyl resin product for a long period of time, the unit may deteriorate or the coating may come off.
- Do not touch the projection window with bare hands.
- On cleaning the projection window surface:
Wipe the projection window gently-with a soft cloth, such as a glass cleaning cloth. Stubborn stains may be removed with a soft cloth lightly dampened with water. Never use solvent such as alcohol, benzene or thinner, or acid, alkaline or abrasive detergent, or a chemical cleaning cloth.
- On cleaning the cabinet: Clean the cabinet gently with a soft cloth. Stubborn stains may be removed with a soft cloth lightly dampened with mild detergent solution and wrung, followed by wiping with a soft dry cloth. Never use solvent such as alcohol, benzene or thinner, or acid, alkaline or abrasive detergent, or a chemical cleaning cloth.
On Illumination
To obtain the best picture, the front of the screen should not be exposed to direct lighting or sunlight.
On Heat Dissipation
The temperature of the projector's cabinet may increase during or immediately after use; however, this is not a malfunction.
On Screen
Use a screen with an even surface.
On Fan
Since the projector is equipped with a fan inside to prevent internal temperature from rising, there may be some noise. This is a normal result of the manufacturing process and does not indicate a malfunction. If, however, in a case of abnormal noise, consult with qualified Sony personnel.
On Lamp
The lamp used as a light source contains mercury that has high internal pressure. A high-pressure mercury lamp has the following characteristics:
- Brightness of the lamp will be lowered as the elapse of time used.
- The lamp may break with a loud noise as a result of shock, damage, or deterioration caused by the elapse of time. The lamp may become unfit and may burn out.
- The lamp life varies with individual differences or usage conditions of each lamp. Therefore, it may break or will not light even before the specified replacement time.
- It may possibly break after the replacement time has elapsed. Replace the lamp with a new one as soon as possible if a message displayed on the projected image, even if the lamp normally lights.
For carrying
This unit is precision equipment. When carrying the unit, do not subject the unit to shocks, or fall. It may damage the unit.
On LCD Projector
The LCD projector is manufactured using high-precision technology. You may, however, see tiny black points and/or bright points (red, blue, or green) that continuously appear on the LCD projector. This is a normal result of the manufacturing process and does not indicate a malfunction. Also, when you use multiple LCD projectors to project onto a screen, even if they are of the same model, the color reproduction among projectors may vary, since color balance may be set differently from one projector to the next.
On Condensation
If the room temperature where the projector is installed changes rapidly, or if the projector is moved suddenly from a cold to a warm place, condensation in the projector may occur. As the condensation may cause malfunction, be careful in adjusting temperature settings of the air conditioner. If condensation occurs, leave the projector turned on for about two hours before use.
- SONY WILL NOT BE LIABLE FOR DAMAGES OF ANY KIND RESULTING FROM A FAILURE TO IMPLEMENT PROPER SECURITY MEASURES ON TRANSMISSION DEVICES, UNAVOIDABLE DATA LEAKS RESULTING FROM TRANSMISSION SPECIFICATIONS, OR SECURITY PROBLEMS OF ANY KIND.
- Depending on the operating environment, unauthorized third parties on the network may be able to access the unit. When connecting the unit to the network, be sure to confirm that the network is protected securely.
-
Communication content may be unknowingly intercepted by unauthorized third parties in the vicinity of the signals. When using wireless LAN communication, implement security measures properly to protect the communication content.
-
From a safety standpoint, when using the unit connected with the network, it is strongly recommended to access the Control window via a Web browser and change the access limitation settings from the factory preset values. Changing the password regularly is also recommended.
- Do not browse any other website in the Web browser while making settings or after making settings. Since the login status remains in the Web browser, close the Web browser when you complete the settings to prevent unauthorized third parties from using the unit or harmful programs from running.
Notes
- Always make a test recording, and verify that it was recorded successfully. SONY WILL NOT BE LIABLE FOR DAMAGES OF ANY KIND INCLUDING, BUT NOT LIMITED TO, COMPENSATION OR REIMBURSEMENT ON ACCOUNT OF FAILURE OF THIS UNIT OR ITS RECORDING MEDIA, EXTERNAL STORAGE SYSTEMS OR ANY OTHER MEDIA OR STORAGE SYSTEMS TO RECORD CONTENT OF ANY TYPE.
- Always verify that the unit is operating properly before use. SONY WILL NOT BE LIABLE FOR DAMAGES OF ANY KIND INCLUDING, BUT NOT LIMITED TO, COMPENSATION OR REIMBURSEMENT ON ACCOUNT OF THE LOSS OF PRESENT OR PROSPECTIVE PROFITS DUE TO FAILURE OF THIS UNIT, EITHER DURING THE WARRANTY PERIOD OR AFTER EXPIRATION OF THE WARRANTY, OR FOR ANY OTHER REASON WHATSOEVER.
- SONY WILL NOT BE LIABLE FOR CLAIMS OF ANY KIND MADE BY USERS OF THIS UNIT OR MADE BY THIRD PARTIES.
- SONY WILL NOT BE LIABLE FOR THE LOSS, REPAIR, OR REPRODUCTION OF ANY DATA RECORDED ON THE INTERNAL STORAGE SYSTEM, RECORDING MEDIA, EXTERNAL STORAGE SYSTEMS OR ANY OTHER MEDIA OR STORAGE SYSTEMS.
- SONY WILL NOT BE LIABLE FOR THE TERMINATION OR DISCONTINUATION OF ANY SERVICES RELATED TO THIS UNIT THAT MAY RESULT DUE TO CIRCUMSTANCES OF ANY KIND.
Checking the Supplied Accessories
RM-PJ8 Remote Commander (1)
Lithium battery (CR2025) (1)
The battery is already installed. Before using the remote commander, remove the insulation film.
AC power cord (1)
Quick Reference Manual (this manual) (1)
Operating Instructions (CD-ROM) (1)
Projector Station for Network Presentation application (CD-ROM) (1)
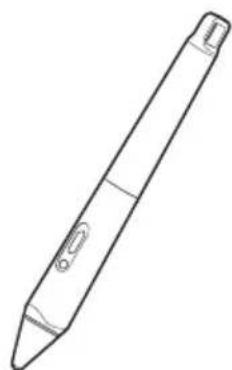
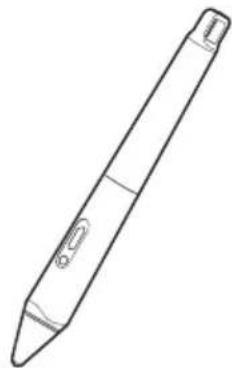
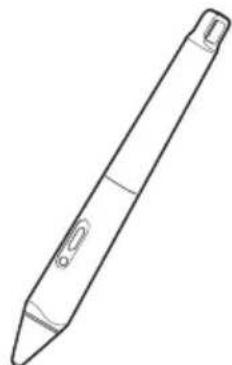
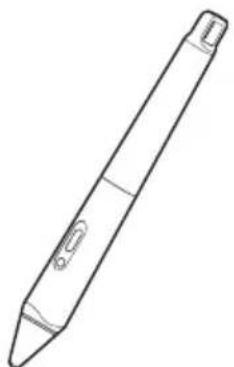
IFU-PN250A/IFU-PN250B Interactive Pen
Device (2) (VPL-SW635C/SW630C/ SW620C only)
Size AAA (R03) manganese batteries (4)
(VPL-SW635C/SW630C/SW620C only)
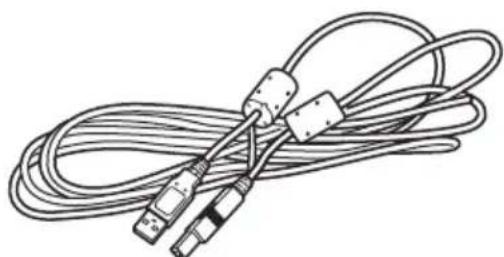
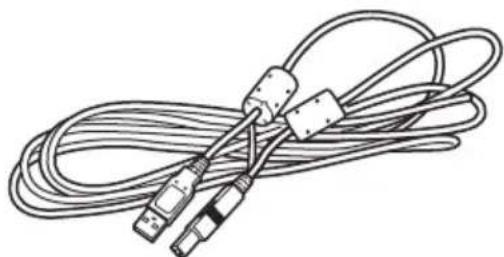
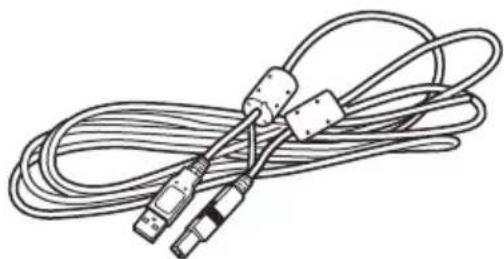
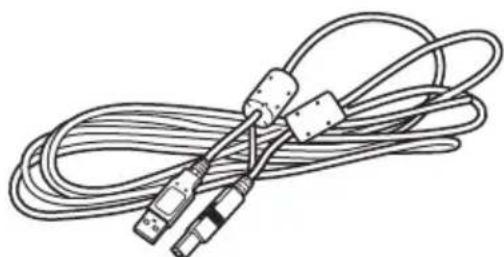
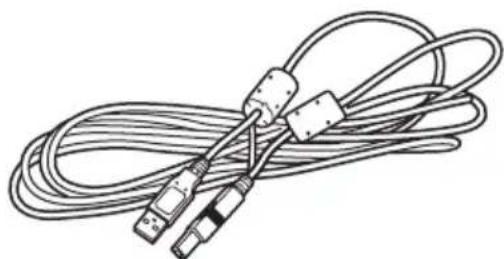
USB A-B cable (5m) (1) (VPL-SW635C/ SW630C/SW620C only)
Interactive Presentation Utility 2 application
(CD-ROM) (1) (VPL-SW635C/SW630C/
SW620C only)
Using the CD-ROM Manuals
Insert the supplied CD-ROM into the CD-ROM drive of your computer, and the CD-ROM will start automatically in a few moments. Select the Operating Instructions you want to read. If the CD-ROM does not start automatically, open the "index.htm" file on the CD-ROM.
You must have Adobe Acrobat Reader 5.0 or higher installed in your computer to read the Operating Instructions stored on the CD-ROM.
Installing Projector Station for Network Presentation
1 Close all running applications.
2 Insert the supplied CD-ROM into the CD-ROM drive of the computer.
3 Open the CD-ROM and run the executable file that is appropriate for your OS.
Windows: when the message "User Account Control" is displayed, click "Allow" or "Yes."
4 Follow the on-screen instructions to install the software.
Installing Batteries
Remote Commander
1 Pull out the lithium battery compartment.
Pull out the battery compartment with a stick as shown in the illustration.
2 Insert a lithium battery.
3 Close the lithium battery compartment.
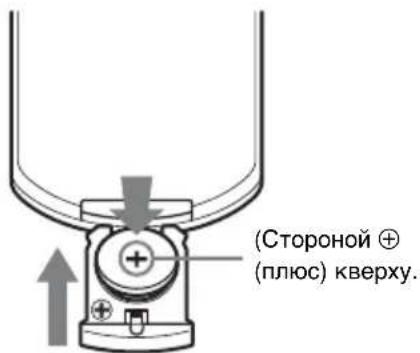
Installing batteries
One lithium battery (CR2025) is supplied for the RM-PJ8 Remote Commander. To avoid risk of explosion, use a lithium battery (CR2025).
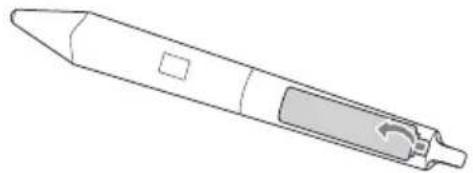
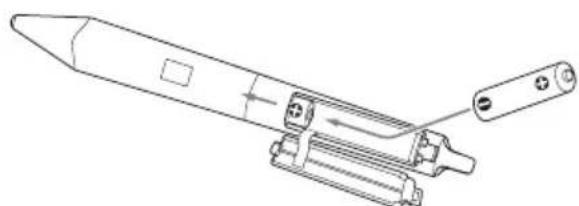
Interactive Pen Device
1 Remove the battery cover.
The battery cover is attached to the Interactive Pen Device by a small strap. Be careful not to break the strap when opening the battery cover.
2 Insert two size AAA batteries.
3 Re-attach the battery cover.
Installing batteries
Four size AAA (R03) batteries are supplied for the IFU-PN250A/IFU-PN250B Interactive Pen Device. To avoid risk of explosion, use size AAA (R03) manganese or alkaline batteries.
CAUTION
Danger of explosion if battery is incorrectly replaced.
Replace only with the same or equivalent type recommended by the manufacturer. When you dispose of the battery, you must obey the law in the relative area or country.
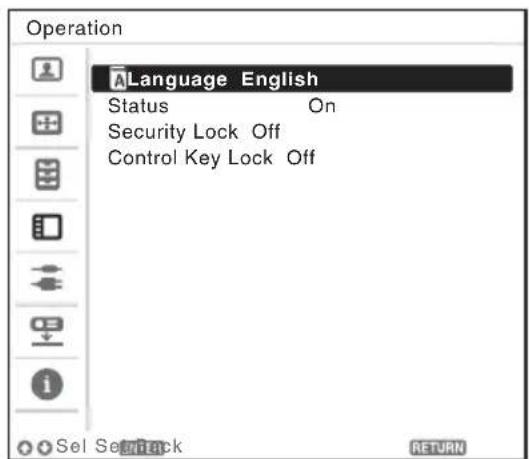
Selecting the Menu Language
The factory setting for the language for displaying menus, messages, etc. is English. To change the on-screen language, proceed as follows:

1 Plug in the AC power cord into a wall outlet.
2 Turn on the projector. Press the / key.
3 Press the MENU key to display the menu. If the display cannot be properly seen, adjust the focus, size, and position of the projected image (page 17).
4 Select the menu language. ① Press the or key to select the Operation (menu then press the ENTER key.
② Press the or key to select "Language (A then press the ENTER key.

③ Press the / / / key to select a language, then press the ENTER key.
5 Press the MENU key to turn off the menu screen.
Connecting the Projector
You can connect the projector to external devices with an RGB or HDMI output terminal. In addition, you can use the following methods to connect the projector to external devices:
USB terminal (Type B) ( )
For connecting to a computer with a USB terminal ("Playing Video and Audio using USB Connection").

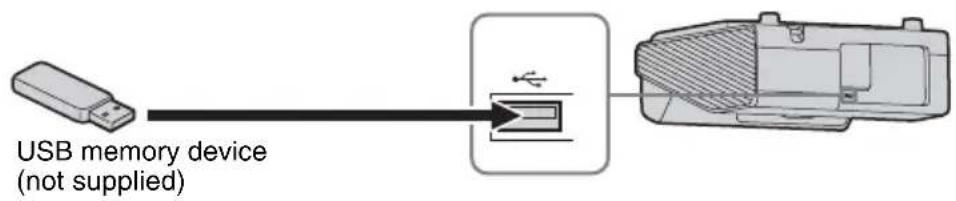
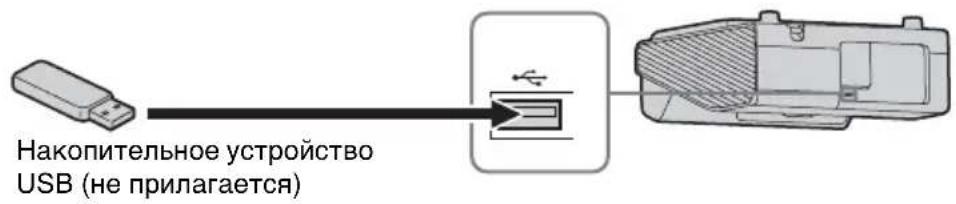
USB terminal (Type A) ( )
For connecting a USB memory device ("Using USB Media Viewer").
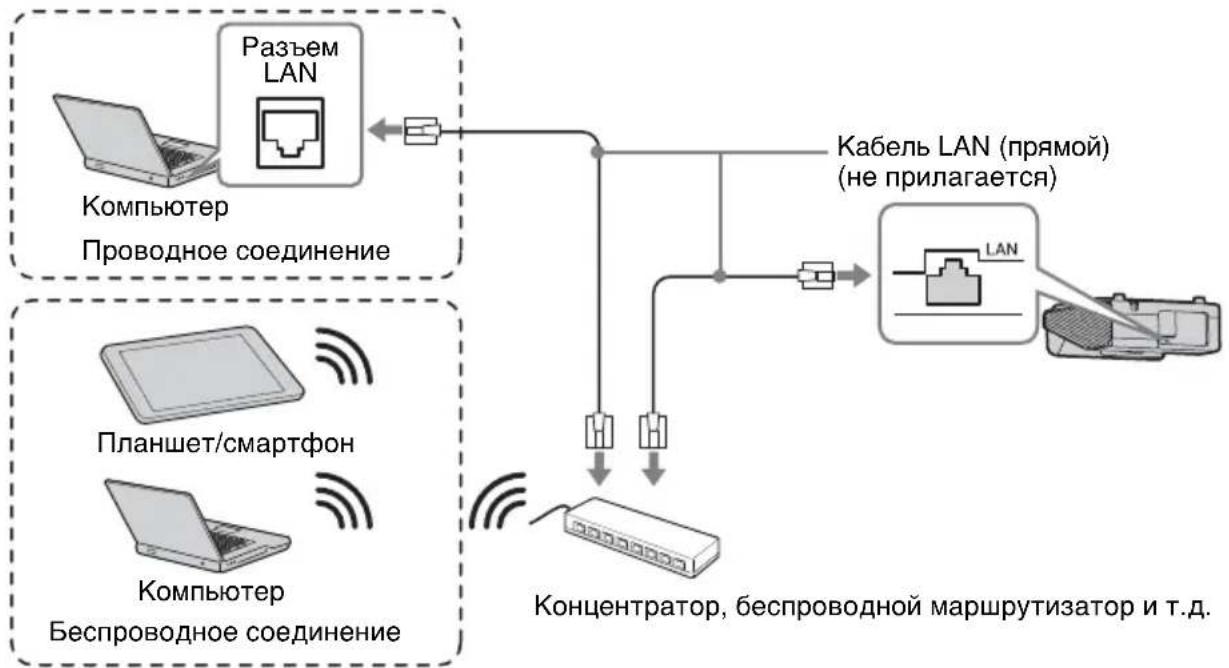
LAN terminal
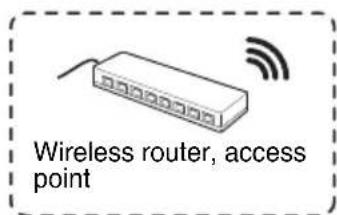
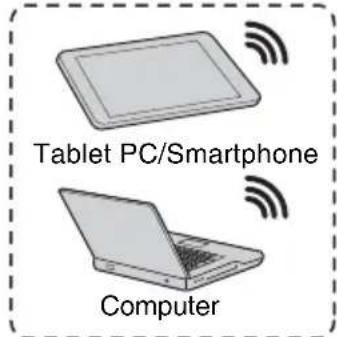
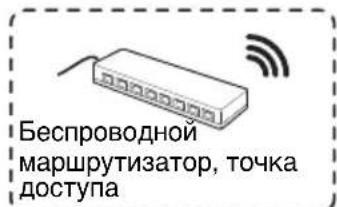
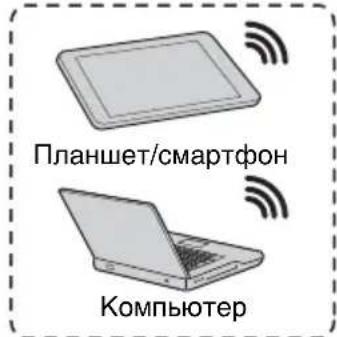
For connecting to a computer, tablet PC, or smartphone via a hub or router ("Presentation Function via Network").
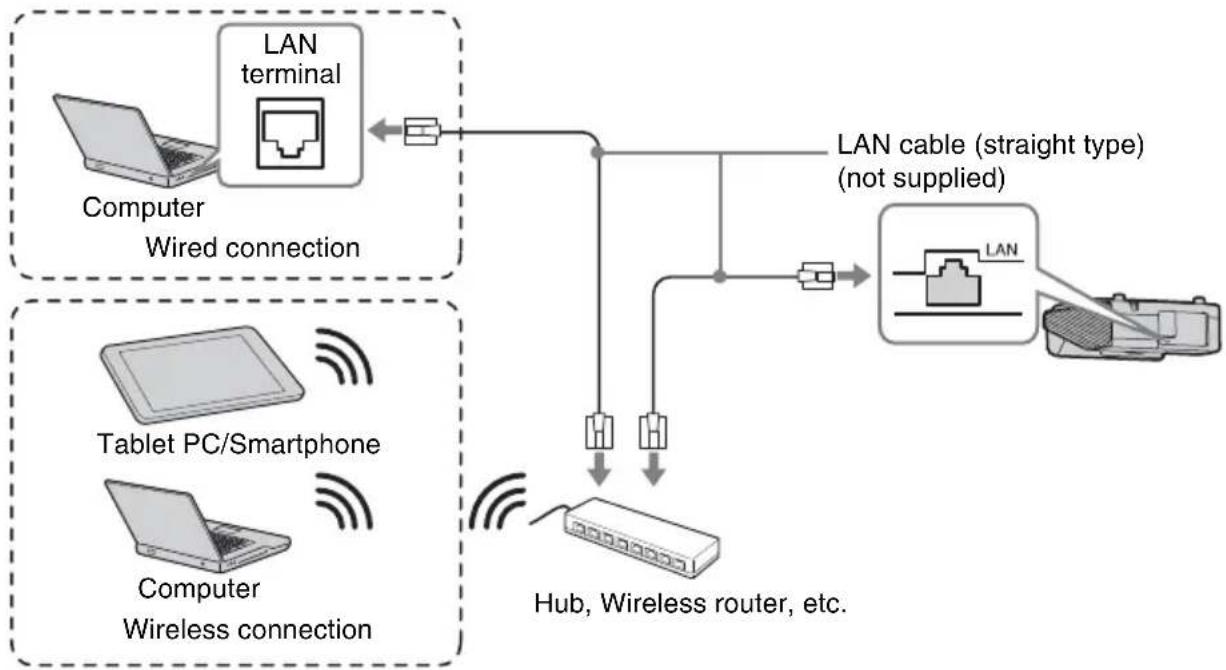
USB terminal (Type A) ()
For connecting a USB wireless LAN module IFU-WLM3 (not supplied) ("Presentation Function via Network").
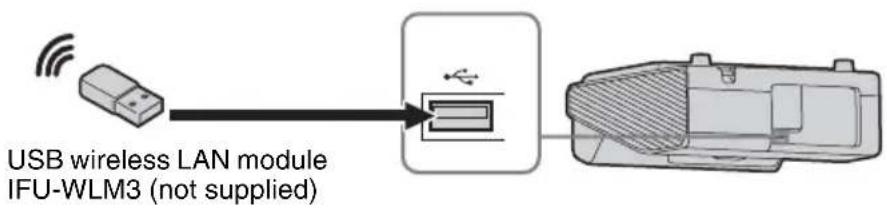
Notes
- Undesignated USB wireless LAN modules do not work.
- When connecting/disconnecting the USB wireless LAN module, make sure that the projector is in Standby mode (Standby Mode: "Low"), or the AC power cord is unplugged from the wall outlet.
- When wirelessly connecting a tablet PC/smarphone to the projector via USB wireless LAN module IFU-WLM3 (not supplied), set "WLAN Network" to "Access Pt. (Manual)" in the projector's "WLAN Settings".
- For connecting to the access point, access to the Web browser, and input the settings for the access point to connect. For details, see "Setting the WLAN Network of the projector".
The factory default settings for "Access Pt. (Manual)" are as follows.
SSID: VPL + MAC address for LAN
Security Method: WEP(64bit)
Password: sony1
Projecting an Image
The size of a projected image depends on the distance between the projector and screen. Install the projector so that the projected image fits the screen size. For details on projection distances and projected image sizes, see "Projection Distance and Lens Shift Range".
Notes
- Due to the characteristics of ultra short throw projector, the image may appear uneven on a projection surface that is not absolutely flat. This is not a malfunction of the projector.
- Project the image on a flat surface.
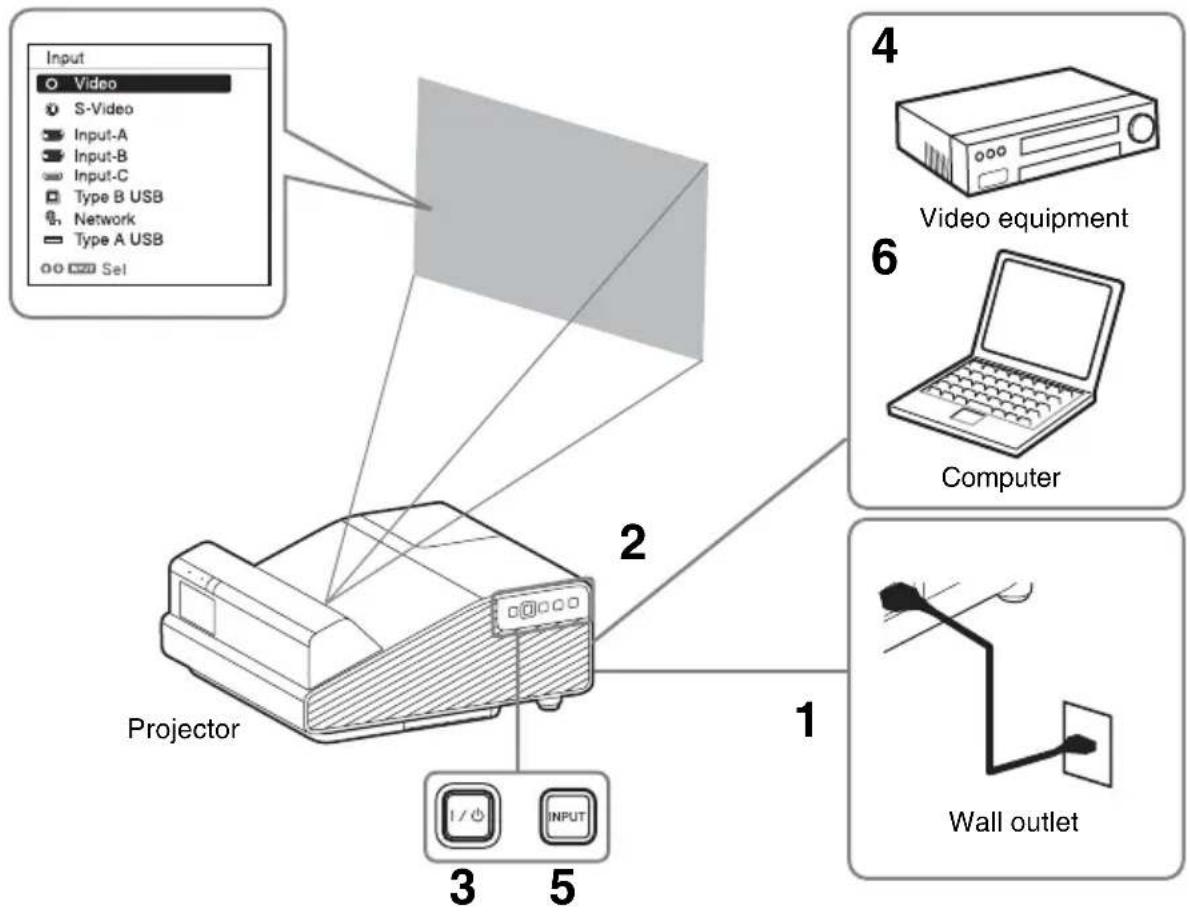
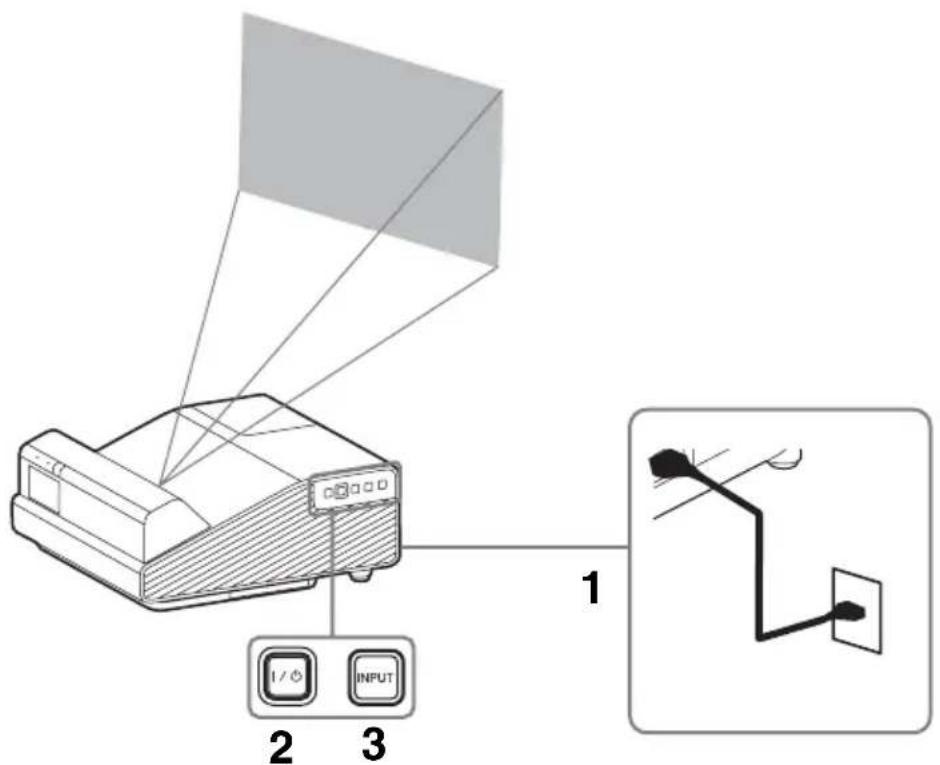
1 Plug the AC power cord into the wall outlet.
2 Connect all equipment to the projector.
3 Press the I/ key to turn on the unit.
4 Turn on the connected equipment.
5 Select the input source.
Press the INPUT key on the projector to display the menu for switching input signal on the screen. Press the INPUT key repeatedly, or press the / key to select an image to be projected.
6 When projecting a computer image switch your computer's output to external display.
The method to switch the output varies depending on the type of computer.
(Example)

To project image files stored in a USB memory device, see "USB Media Viewer". To play video and audio using USB Connection, see "Playing Video and Audio using USB Connection". To use Presentation Function via Network, see "Presentation Function via Network".
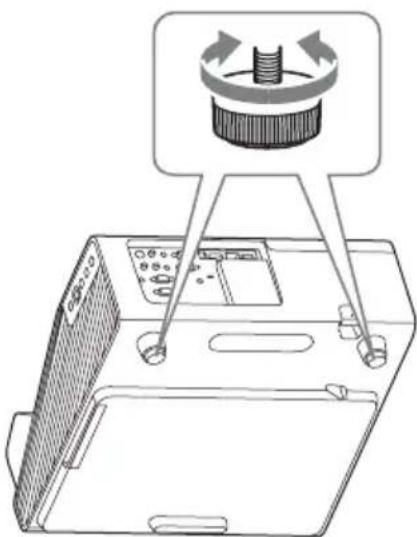
7 Adjust the focus, size and position of the projected image (page 17).
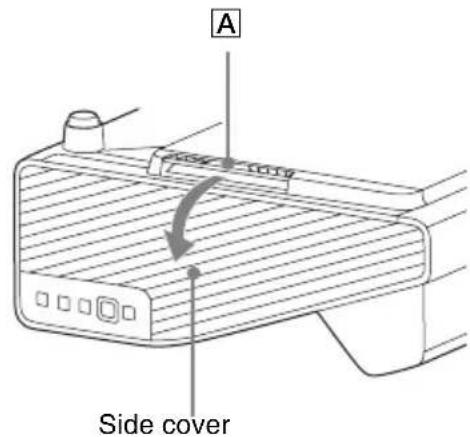
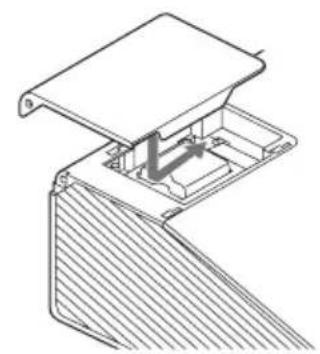
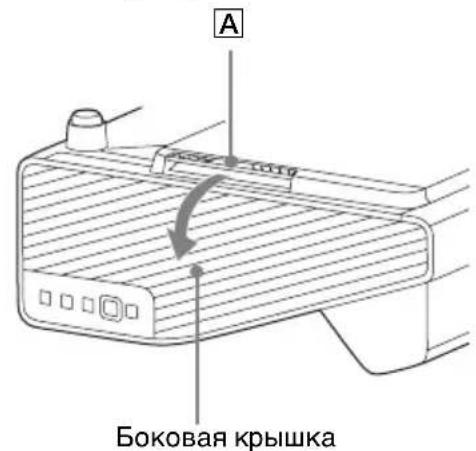
Open the side cover, and adjust the lens shift dials, focus lever and zoom lever.
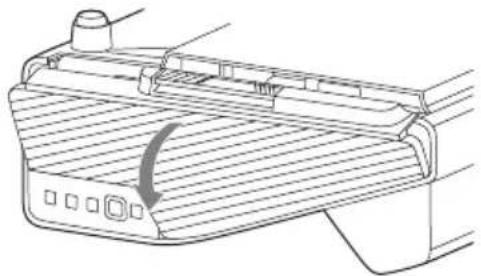
Open the side cover
Press A and open the side cover in the direction of the arrow shown on the illustration below.
Displaying Images or Files Sent from a Tablet PC/ Smartphone
You can project JPEG images, PDF files, etc. stored in a tablet PC/smarphone wirelessly by using a specific application.*1
For downloading ^*2 or detailed method of using the application, access the following URL.
http://PWPresenterpixelworks.com

*1: To use the application, one of the following conditions is required.
-
Connected to network where wireless connection can be established (page 13).
-
Connected to a wireless network via USB wireless LAN module IFU-WLM3 (not supplied) that is connected to the projector (page 14).
*2: Depending on your Internet connection, a data communication fee may apply.
Adjusting the Projected image
| Focus Size (Zoom) | |
| ↓ Focus lever | Zoom lever |
| Position (Lens shift) | Position |
| Lemshift dial H Lens shift dial V For adjusting lens shift, turn each dial with your hand, screwdriver, etc. | Foot |
Adjusting the tilt of the projector with the feet
You can adjust the height of the projector using the feet.
By changing the tilt of the projector with feet, you can adjust the position of the projected image.
Notes
- Be careful not to let the projector down on your fingers.
- Do not push hard on the top of the projector with the foot extended.
Changing the aspect ratio of the projected image
Press the ASPECT key on the remote commander to change the aspect ratio of the projected image. You can also change the setting in Aspect of the Screen menu.
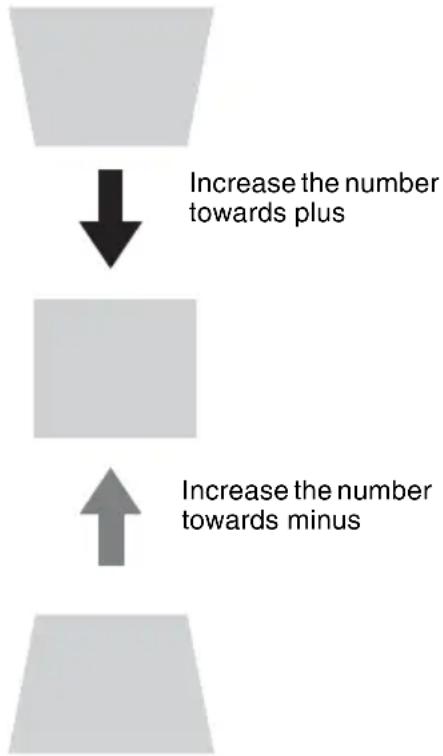
Correcting trapezoidal distortion of the projected image (Keystone feature)
If the image becomes trapezoidal, set the keystone manually.
1 Press the KEYSTONE key on the remote commander or select V Keystone in the Installation menu.
2 Use the / / / keys to set the value. The higher the value, narrower the top of the projected image. The lower the value, the narrower the bottom.
Notes
- Since the Keystone adjustment is an electronic correction, the image may be deteriorated.
- Depending on the position adjusted with the lens shift feature, the aspect ratio of the image may change from the original or projected image may be distorted with Keystone adjustment.
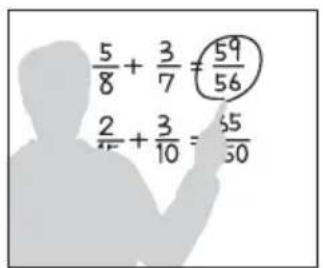
- If you perform keystone adjustment and use mouse mode, the position of the Interactive Pen Device and the computer cursor may not match. In this case, perform the calibration again. (VPL-SW635C only)
Displaying a pattern
You can display a pattern for adjusting the projected image or a grid pattern with the PATTERN key on the remote commander. Press the PATTERN key again to restore the previous image. You can use a grid pattern as a guide to write text or to draw lines and shapes on the whiteboard or blackboard without using a computer.
Note
You cannot use this key when "Type A USB", "Type B USB" or "Network" is selected as the input.
Automatically adjusts Phase, Pitch and Shift of projected image while a signal is input from a computer (APA (Auto Pixel Alignment))
Press the APA key on the remote commander. Press again to cancel adjusting during the setting. You can also set APA in the Screen Menu. If Smart APA in the Function menu is set to "On", executes APA automatically when a signal is input.
Turning Off the Power
1 Press the I/ key on the unit or the remote commander.
The projector starts shutdown and turns off. If you press the / key within 10 seconds again, shutdown is cancelled.
Note
Do not turn off the projector soon after the lamp lights. It may cause a malfunction of the lamp (does not light, etc.).
2 Unplug the AC power cord from the wall outlet.
To turn off without displaying confirmation message
Press and hold the 1 / 0 key on the unit for a few seconds.
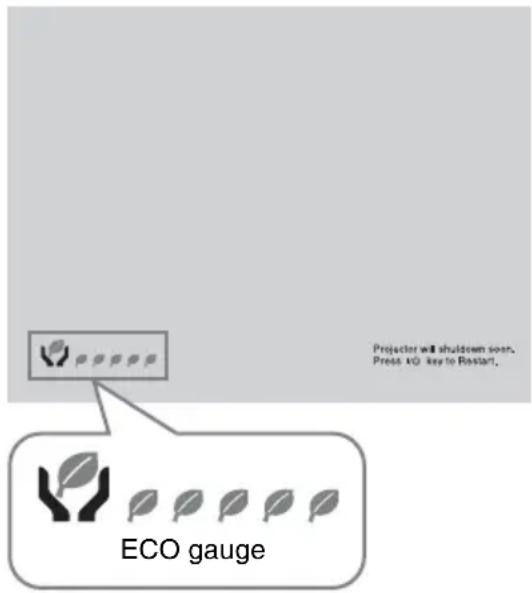
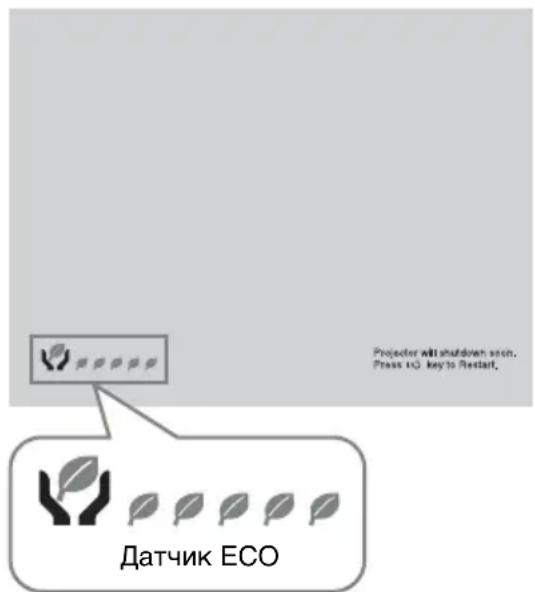
ECO gauge
This gauge indicates the current effectiveness of the projector's ECO function. (For details on the ECO function, see "ECO MODE key" and "ECO".)
The leaf icons are displayed when the projector is shut down. The number of displayed icons varies according to how much energy is saved as a result of using the ECO function.
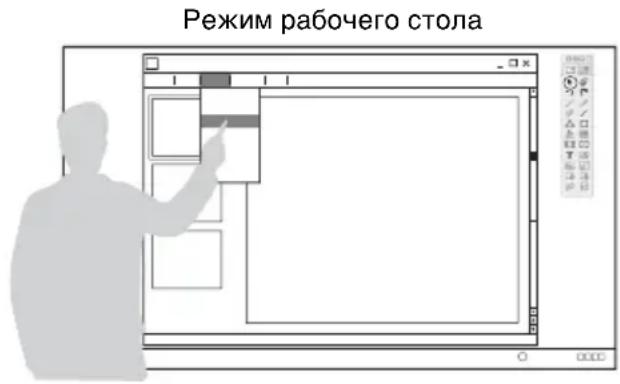
Using Interactive Presentation Utility 2 (VPL-SW635C/SW630C/SW620C only)
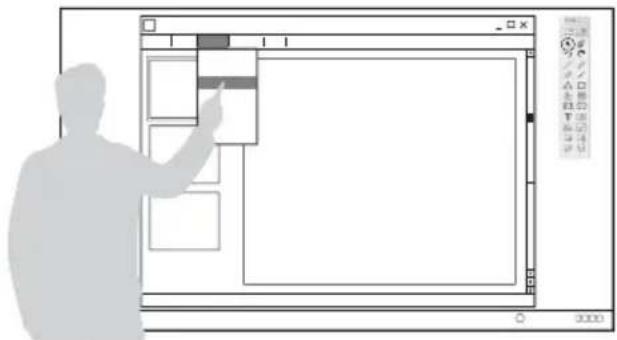
In the desktop mode, by using the Interactive Pen Device (main: IFU-PN250A, sub: IFUPN250B) and the application Interactive Presentation Utility 2, this projector can be used more effectively for a wide range of purposes.
Using the mouse function of the Interactive Pen Device (main only), you can control a computer and applications on the projected screen just like a mouse. Also when employing the drawing function of a different application, you can use the Interactive Pen Device to directly draw onto the projected file, and save the drawings.
Desktop mode
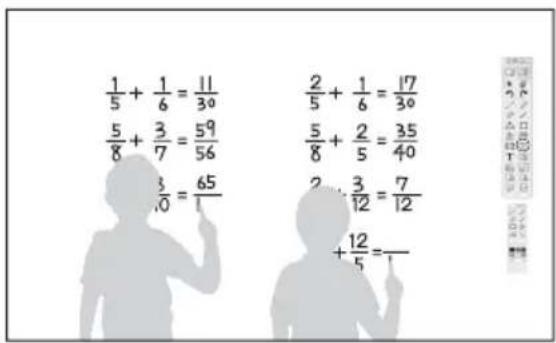
Whiteboard mode
How to operate the mouse function of the Interactive Pen Device (main only)
- Left-click: tap the screen with the tip of the Interactive Pen Device.
- Double-click: tap the screen twice with the tip of the Interactive Pen Device.
- Drag and drop: move the Interactive Pen Device while touching the screen.
By starting Interactive Presentation Utility 2, you can use the Interactive Pen Device to draw lines and shapes on the projected screen. In the whiteboard mode, the projected screen can be used as an electronic whiteboard and you can select the background image from your photo library or the template.
draw Erase Save
By using both the main and sub Interactive Pen Device, two people can draw on the projected screen simultaneously. The main device can use all the functions, whereas the sub device can use only the drawing function.
Use of these functions requires installation of Interactive Presentation Utility 2. For Interactive Presentation Utility 2 software update, visit Sony's web site.
https://www.serviceplus.se1.sony.com/
http://pro.sony.eu/InteractiveUtility
Notes
-
The interactive function works by a detector in the projector, which picks up infrared rays emitted from the tip of the Interactive Pen Device. Observe the precautions noted below.
-
Avoid placing the projector where the Interactive Pen detector is directly exposed to fluorescent light or other strong light.
- Do not cover the pen tip of the Interactive Pen Device or the Interactive Pen detector.
-
Infrared data communication or noise from another device may cause improper operation.
-
Observe the precautions noted below during the calibration.
-
Avoid placing obstacles between the interactive detector and the screen.
-
Do not move the projector and the screen.
-
If Calibration Auto does not calibrate properly, try the following methods.
-
Shield the screen from strong, direct outside light.
-
Reduce the ambient light while Calibration Auto is performed.
-
If Calibration (Auto) still does not calibrate properly after reducing the lighting as suggested above, click Calibration (Manual(Main)) or Calibration (Manual(Sub)), then calibrate manually.
-
If you use a screen which is not white, Calibration Auto may be inaccurate.
-
The maximum screen size at which the Interactive function works is 100 inches.
- Images may not be projected properly depending on the operating environment or the application. Use Input-A, Input-B, or Input-C to project the images properly.
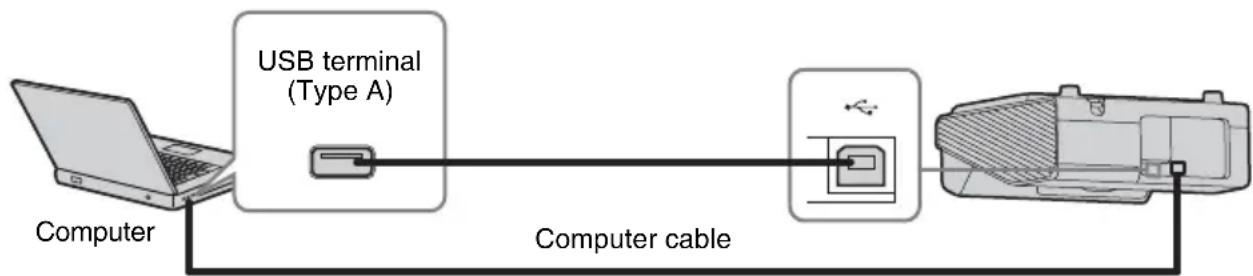
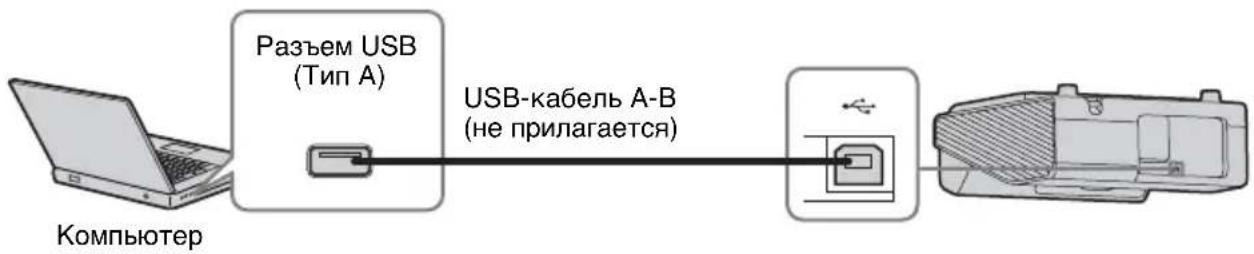
Connecting a Computer with a USB Cable
Make sure your computer and the projector are connected with a computer cable. For details on connecting the projector to a computer, see "Connecting the Projector".
For Windows
Installing Interactive Presentation Utility 2
System Requirements
CPU: Celeron 2.1GHz or faster
- Memory: 256MB or more (512MB recommend)
Available hard drive space: 1GB or more
OS:
Windows XP/Vista/Windows 7/Windows 8^1
*1: 32bit edition and 64bit edition
1 Close all running applications.
2 Insert the supplied CD-ROM into the CD-ROM drive of the computer.
Open the CD-ROM and double-click "Interactive Presentation Utility 2.exe".
3 Follow the on-screen instructions to install the software. To uninstall Interactive Presentation Utility 2, click [Start]-[All Programs]-[Interactive Presentation Utility 2]-[Uninstall].
Setting Interactive Presentation Utility 2
1 Connect the projector and computer with the computer cables and a USB cable (page 22), and project the image with the projector. For details on connecting the projector to a computer, see "Connecting the Projector".
2 Set "Whiteboard Data" to "Retrieve to computer" in "Interactive." (VPL-SW635C only)
3 In "Assign Type B USB", select the same input terminal as the one selected in "Input" (a menu for switching input signals) on the screen (page 15) to select the image for using Interactive Presentation Utility 2. (VPL-SW635C only)
The settings of each item for using Interactive Presentation Utility 2 are the following two methods (a and b).
| PC Free Interactive | Whiteboard Data | Selected input terminal on “Input” (menu for switching input signal) | Assign Type B USB | Interactive Presentation Utility 2 | |
| a | O n R e t r computer | “Input-A,” “Input-B,”t o “Input-C,” “Type USB B,” or “Network” | Same as the input terminal selected on the left | Activating | |
| b Off Retrieve to computer | “Input-A,” “Input-B,” “Input-C,” “Type USB B,” or “Network” | Same as the input terminal selected on the left | Activating | ||
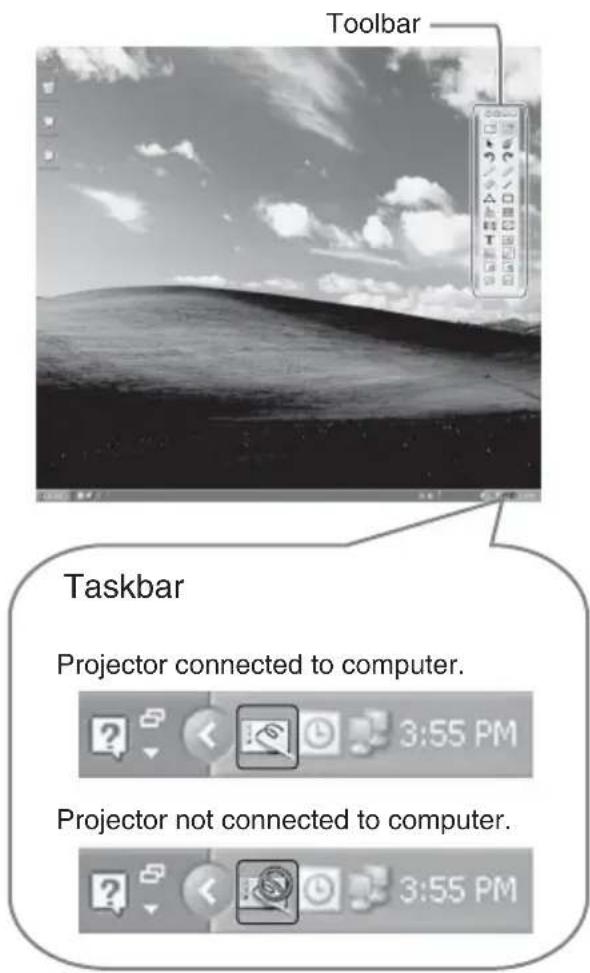
4 Start Interactive Presentation Utility 2.
To start Interactive Presentation Utility 2, click [Start]-[All Programs]-[Interactive Presentation Utility 2]-[Interactive Presentation Utility 2].
After the application starts, the icon appears in the taskbar, and the toolbar appears on the screen.
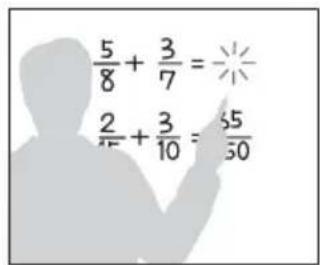
Calibration Auto/Manual
Calibration aligns the points where the pen (Main and Sub) is pointing and where the projector displays the cursor on the screen. "Calibration Auto" allows you to execute the calibration automatically.
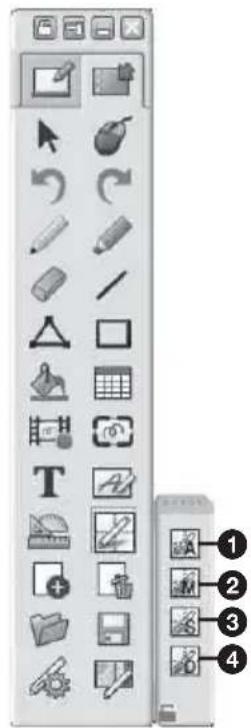
Main Pen toolbar
Calibration (Auto)
Calibration (Manual (Main))
Calibration (Manual (Sub))
Saving calibration data
Click "Calibration" to select "Calibration Auto." The calibration starts automatically.
Operating with the Interactive Pen Device
With the Interactive Pen Device, you can use the functions of the toolbar on the screen. See "User's Guide of Interactive Presentation Utility 2" for details.
Closing Interactive Presentation Utility 2
Click the icon in the Taskbar to display the pop-up menu, then select [Exit].
Installing Interactive Presentation Utility 2
System Requirements
- CPU: Pertium III or faster
- Memory: 256MB or more (512MB Recommend)
Available hard drive space: 250MB - OS: Mac OS X 10.6.x/10.7.x/10.8.x/10.9.x/10.10.x
Use of the interactive function requires installation of Interactive Presentation Utility 2.
1 Close all running applications.
2 In the CD-ROM, double-click [Interactive Presentation Utility 2.pkg].
3 Follow the on-screen instructions to install the software. To uninstall Interactive Presentation Utility 2, from the Application folder move the [Interactive Presentation Utility 2] folder into the Trash, then empty it.
Setting Interactive Presentation Utility 2
1 Connect the projector and computer with the computer cables and a USB cable (page 22), and project the image with the projector. For details on connecting the projector to a computer, see "Connecting the Projector".
2 Set "Whiteboard Data" to "Retrieve to computer" in "Interactive." (VPL-SW635C only)
3 In "Assign Type B USB", select the same input terminal as the one selected in "Input" (a menu for switching input signals) on the screen (page 15) to select the image for using Interactive Presentation Utility 2. (VPL-SW635C only)
The settings of each item for using Interactive Presentation Utility 2 are the following two methods (a and b).
| PC Free Interactive | Whiteboard Data | Selected input terminal on “Input” (menu for switching input signal) | Assign Type B USB | Interactive Presentation Utility 2 | |
| a | O n R e t r computer | “Input-A,” “Input-B,”t o “Input-C,” “Type USB B,” or “Network” | Same as the input terminal selected on the left | Activating | |
| b Off Retrieve to computer | “Input-A,” “Input-B,” “Input-C,” “Type USB B,” or “Network” | Same as the input terminal selected on the left | Activating | ||
4 Start Interactive Presentation Utility 2.
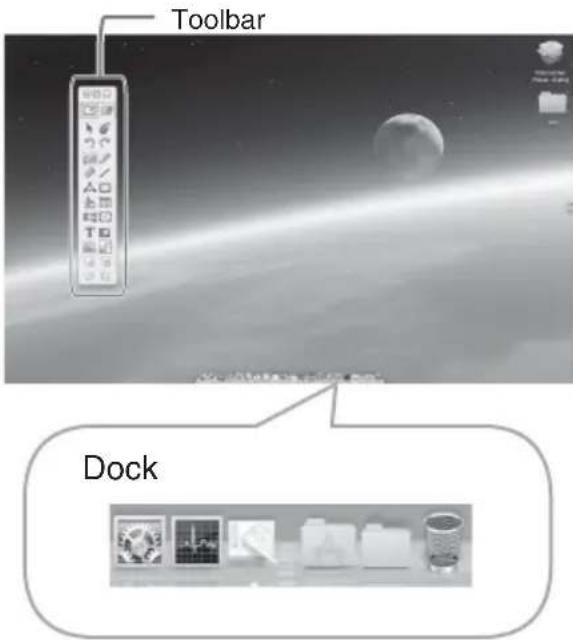
Open the folder [Application] - [Interactive Presentation Utility 2] and double-click [Interactive Presentation Utility 2.app].
After application starts, each icon appears in the Dock and the toolbar appears on the screen.

Icon for Interactive Presentation Utility 2
Calibration Auto/Manual
Calibration aligns the points where the pen (Main and Sub) is pointing and where the projector displays the cursor on the screen. "Calibration Auto" allows you to execute the calibration automatically.
Main Pen toolbar
Calibration (Auto)
Calibration (Manual (Main))
Calibration (Manual (Sub))
Saving calibration data
Click "Calibration" to select "Calibration (Auto)." The calibration starts automatically.
Operating with the Interactive Pen Device
With the Interactive Pen Device, you can use the functions of the toolbar on the screen. See "User's Guide of Interactive Presentation Utility 2" for details.
Closing Interactive Presentation Utility 2
Click the icon in the Dock to display the pop-up menu, then select [Exit].
Using the PC Free Interactive Function (VPL-SW635C only)
The PC Free Interactive function enables you to draw on the screen with the Interactive Pen Device with only the projector. The data you draw in the whiteboard mode can be saved in the projector. In the desktop mode, you can draw with the Interactive Pen Device, using an image from the external device as a background.
Setting the PC Free Interactive Function
1 Set "PC Free Interactive" to "On" in "Interactive".
2 Remove the USB cable, or set "Whiteboard Data" to "Save to projector" in the menu.
3 Perform calibration.
Calibration
Auto/Manual (Main)/Manual (Sub): Performs calibration for the PC Free Interactive function. If you select "Auto", the projector performs the calibration automatically. If you select "Manual (Main)," the calibration for the main pen will be performed manually. If you select "Manual (Sub)," the calibration for the sub pen will be performed manually.
Notes
- Before performing the calibration, the message "Do you wish to start calibration?" will be displayed. If you select "Yes", the projector performs the calibration.
- If you already have started the Interactive Presentation Utility 2 on the computer, perform the calibration of Interactive Presentation Utility 2.
- If you display the menu or the warning/ caution messages etc., are displayed during the calibration, calibration will stop. In addition, if you stop operating the calibration for more than 20 seconds, the manual calibration will also stop.
Indicators
The indicators allow checking the status and notify you of abnormal operation of the projector. If the projector exhibits abnormal status, address the problem in accordance with the table below.
ON/STANDBY indicator
| Status Meaning/Remedies |
| Lights in red The projector is in Standby mode. |
| Flashes in green • The projector is ready to operate after having been turned on. • The lamp cools after the projector is turned off. |
| Lights in green The projector's power is on. |
| Lights in orange The projector is in With No Input (Lamp Cutoff). |
| Flashes in red The projector is in abnormal status. Symptoms are indicated by number of flashes. Address the problem in accordance with the following. If the symptom is shown again, consult with qualified Sony personnel. |
| Flashes twice The internal temperature is unusually high. Check the items below. • Check if nothing is blocking the ventilation holes. • Check if the air filter is not clogged. (page 31) • Check if the Installation Attitude in the Installation menu is set correctly. |
| Flashes six times Unplug the AC power cord from a wall outlet. After checking that the ON/STANDBY indicator goes out, plug the power cord to a wall outlet again then turn on the projector. |
| Other number of flashes Consult with qualified Sony personnel. |
LAMP/COVER indicator
| Status Meaning/Remedies |
| Flashes in red Symptoms are indicated by number of flashes. Address the problem in accordance with the following. |
| Flashes twice The lamp cover is not attached securely. (page 29) |
| Flashes three times The temperature of lamp is unusually high. Turn off the power and wait for lamp to cool then turn on the power again. If the symptom is shown again, the lamp may be burnt out. In this case, replace the lamp with a new one (page 29). |
Replacing the Lamp
Replace the lamp with a new one if a message displayed on the projected image. Use an LMP-E220 projector lamp (not supplied) for replacement.
Caution
- The lamp remains hot after the projector is turned off. If you touch the lamp, you may burn your finger. When you replace the lamp, wait for at least an hour after turning off the projector for the lamp to cool sufficiently.
- Do not allow any metallic or inflammable objects into the lamp replacement slot after removing the lamp, otherwise it may cause electrical shock or fire. Do not put your hands into the slot.
Notes
- If the lamp breaks, contact qualified Sony personnel. Do not replace the lamp yourself.
- When removing the lamp, be sure to pull it out straight, by holding the designated location. If you touch a part of the lamp other than the designated location, you may be burned or injured. If you pull out the lamp while the projector is tilted, the pieces may scatter if the lamp breaks any may cause injury.
1 Turn off the projector, and disconnect the AC power cord from a wall outlet.
2 When the lamp has cooled sufficiently, open the lamp cover by loosening 1 screw.
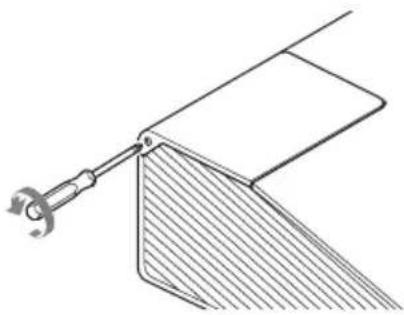
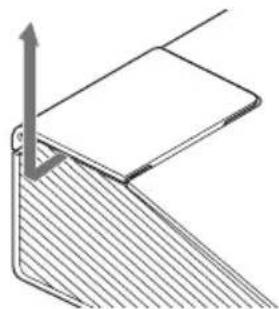
3 Loosen the three screws on the lamp (1) then pull out the lamp by its grab (2).
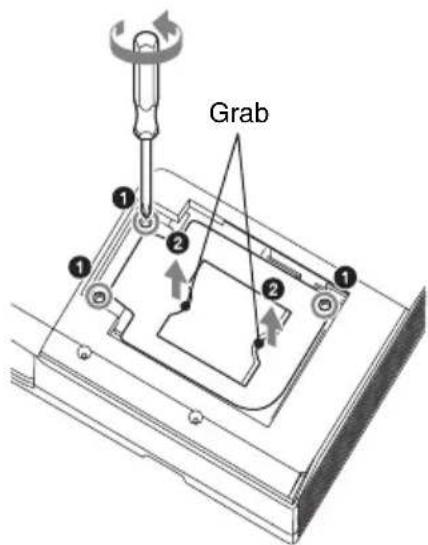
4 Insert the new lamp all the way in until it is securely in place (1). Tighten the three screws (2).

5 Close the lamp cover and tighten the 1 screw.

Note
The power will not turn on if the lamp is not secured properly.
6 Connect the AC power cord to a wall outlet and turn on the projector.
7 Reset the lamp timer for notification of the next replacement time.
Select "Lamp Timer Reset" on the Function menu then press the ENTER key. When a message appears, select "Yes" to reset the lamp timer.
Caution
Disposal of the used lamp For the customers in the USA
Lamp in this product contains mercury. Disposal of these materials may be regulated due to environmental considerations. For disposal or recycling information, please contact your local authorities or the Telecommunications Industry Association (www.eiae.org).
Cleaning the Air Filter
When a message appears on the projected image indicating time for a filter cleaning, clean the air filter (page 28).
If the dust cannot be removed from the air filter even after cleaning, replace the air filter with a new one. For details on a new air filter, consult with qualified Sony personnel.
Caution
If you continue to use the projector even after the message is displayed, dust may accumulate, clogging it. As a result, the temperature may rise inside the unit, leading to a possible malfunction or fire.
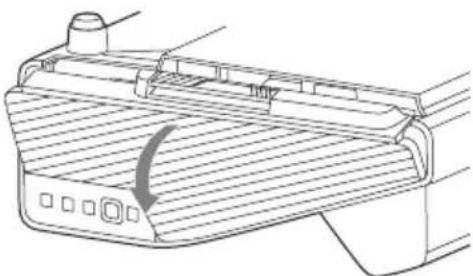
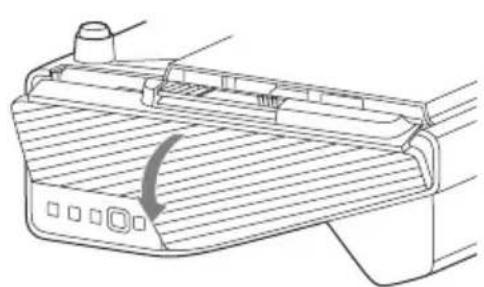
1 Turn off the projector, and disconnect the AC power cord from the AC outlet.
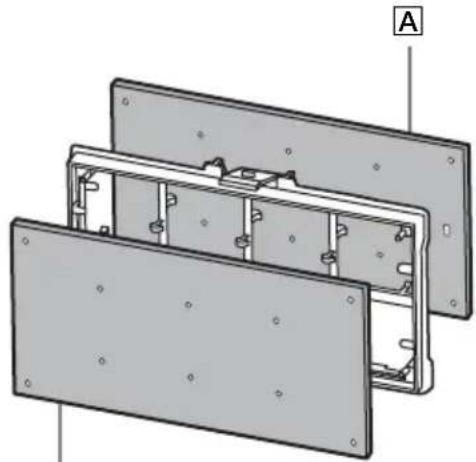
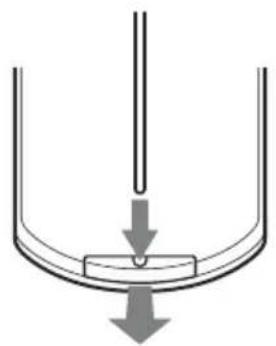
2 Open the side cover and remove the air filter holder.
Press A and open the side cover in the direction of the arrow shown on the illustration below, and remove the air filter holder.

Push B, and remove the air filter holder in the direction of the arrow.
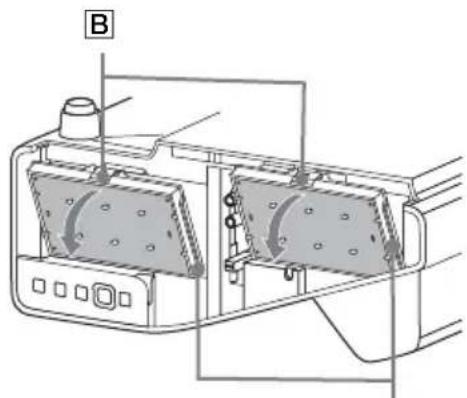
Air filter holder
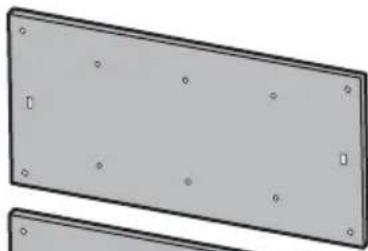
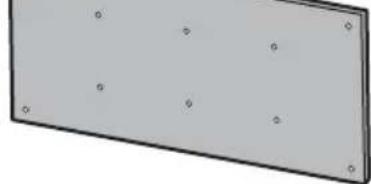
3 Clean the air filter with a vacuum cleaner.
Remove the air filter as illustrated below then clean with the vacuum cleaner.
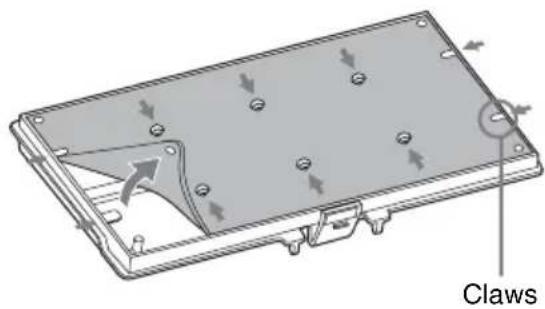
The air filter consists of 2 filters (A, B).
B
A
B
4 Reattach the side cover.
Note
Be sure to attach the air filter firmly, otherwise it may cause a malfunction.
AVENTISSEMENT
Application Projector Station for Network Presentation (CD-ROM) (1)
Stylo interactif FU-PN250A/IFU-PN250B
(2) (VPL-SW635C/SW630C/SW620C, unique)
(VPL-SW635C/SW630C/SW620C
uniquement)
Cable USB A-B (5 m) (1) (VPL-SW635C/ SW630C/SW620C uniqueness)
Application Interactive Presentation Utility 2 (CD-ROM) (1) (VPL-SW635C/SW630C/ SW620C quinquemment)
Installation de Projector Station for Network Presentation
http://PWPresenterpixelworks.com

(4) (solo VPL-SW635C/SW630C/SW620C)
Cable A-B USB (5m) 1solo VPL- SW635C/SW630C/SW620C)
- La lámpara permanece caliente afterwards de haber apagado el projector. Si toca la lámpara, pueda quemarse los dedos. Antes de sustituir la lámpara, espere al menos una hora après de haber apagado el projector para que se enfié lo suficiente.
- No permitted that you can introduce objects into the apparatus.
- No permit to use objects introduced from outside.
- No permit to use objects introduced from inside.
- No permit to use objects made of metal or plastic.
- No permit to use objects made of glass.
- No permit to use objects made of wood.
- No permit to use objects made of paper.
- No permit to use objects made of textile.
- No permit to use objects made of animal.
- No permit to use objects made of animal.
- No permit to use objects made of water.
- No permit to use objects made of food.
- No permit to use objects made of water.
Notas
Symbol fur Interactive Presentation Utility 2
Cavo USB A-B (5 m) (1) (solo VPL-SW635C/SW630C/SW620C)
Interactive Presentation Utility 2
安装Projector Station for Network Presentation
He yctaHaBJIbBaHTe ycTpoIcTBO B ycIOBHX KpaHHe 3aIIbJIeHHOCTH HJN 3aIbIMJIeHHOCTH. Bo3dyIHbIΦNJbTp MOKeT 3acOpHTbcra, YTO IIpHBeJeT K HeHCIIpaBHOCTH yCTPOIcTBA HJN eTO IOBpeKJdeHIO.
BcIyae HcIOJIb3OBAHn yCTpOncTba Ha BbICote OT 1500 M yCTaHaBJIbBaHTe IJII npaMeTp a"PeXHM BbIC.IIOJI 3HaueHHe "BKJ"BMEHIO yCTaHOBKn. EcIN IIprN 3KcIIiyatauHn Ha 3HaunTeJIbHOB BbICOTE He yCTaHOBHTb IaHHbIpeXHM,MOrY TBo3HNKaTb HeKeJIaTeJIbHbIE 9ΦΦeKTbI,TaKne KaK CHHXKeHHe HaJeXHOCTH HeKOTOpbIX KOMIOHcHTOB.
3aIaIe Heo6xOJHMOe 3HaueHne IJIa Iapametpa "IIOJox. YcTaH." B MeHIO yCTaHOBKN B COOTBeTCTBHN C yTJOM ycTaHOBKN. IcnoJIb3OBaHne HeIpaBnJIbHbIX HaCTPOeK MOKeT IOBJINrTb Ha HaeXHOCTb KOMIOHOHTOB.
OuNcTKa IINH3bI IN KOpnyca
- IpeI OUHCTKoI OTKJIIOuHTe IIHHyp IITaHnI IepMeHHORO TOKa OT 3JIeKTPnueckoI p03eTKN.
He BbITnpaIte ycTPOcTBO rpa3HO TKAHbIO - 3TO MOKeT IIpNBecTn K IIOABJIeHNIO capaIIHH Ha KopNHyce. - JIINTeJIbHbI KOHTaKT cJIeTyHMn BeIIeCTBaMn (HaIIpIMep, cpeIcTBO OT HaceKOMbIX), a TaKKe I3JeJIINrMaN I3 pe3HHbI NJI IN BHNHJa MoKet IIpNBecrN K I3MeHeHIO BHeIIHeTo BNuJa yCTpoIcTBA I IOBpeJdeHNo IOKpbITn.
He kacaTecb OKoIka IpoeIIPOBaHnroJbIMn pyKaMn.
OuHCTKa IIOBepXHOCTN OKIIKA IIPOeIINPOBaHnA KKKypaTHo IIpoTpHTe OKIIKO IIPOeIINPOBaHnMRAKoTKAHbIO, HAnPIMeP TKAHbIO JIA OUHCTKN CTekJa.3aRpy3HeHnE, KOtOpoe He yIaCTcYcTpaHHTb, MOxHo OUHCTNTb, cJIeTKa CMOHb TKAHb BOJoi. He HcIOJIb3yIte paCTBOPHTeJiN, cIINpT, 6eH3HH NJIIN KNCJOTy, IeJIIOUHbIe N a6pa3HBHbIE MOIOIIne cpeCTBa IJIIN IIPOIIHTaHHYIO TKAHb IJIa OUHCTKN.
OuHCTKa KOpIyCa: AkKypaTHO OUnCTHTe KOpIyc MraKoT KHaHbIO. 3aFpy3HeHH, KOToPbIE He yJaetcYcTpaHHTb, MoXHO OUnCTHTb, cJIeTKa CMOUHB TKAHb CJIa6bIM paCTBOPOM MOIOSeIro CpeIcTBA, IIpeIBaPHTeJIbHO OTKaB ee, a 3aTeM IIPOTepeB KOpIyc cyXoN MraKoT KHaHbIO. He IcIIIOJIb3yIte paCTBOPHTeJIN, cINPT, 6eH3HN HJIN pa36aBHTeJIb, KNCJIOTy, IIeJIIOuHbIe IN a6pa3NBbIc CpeIcTBA HJIN IIPOINTaHHyIO TKAHb IJIa OUnCTKN.
OcbeueHne
IIJIIOJUyehnI N3O6paXeHnXOpoiEro KaueCTBa Heo6xOIMo,HTO6bI 3KpaH 6bl 3aIIINHe OT IprMOrOOCBeIeHN HJIN COJIHeHOrO CBtA.
O paccenBaHn TePna
Kopnyc npoeKTopa MoKeT HArpeBaTbcr BO Bpemn cpa3y IocJIe HCIOJIb3OBAHHa, OJHaKO 3TO He YBJIeTCr HEHCIIpaBHOCTbIO.
3KpaH
Pn HcnoJIb3OBaHHN 3KpaHa c HerJaIKoIIOBepXHOCTbIO Ha 3KpaHe MOryT HHOrgIa IIOBJIaTbcI HOIOcbI, B 3aBHCIMOCTH OT paCCTOHnM MeJy 3KpaHOM N yCTPOINCTBOM, a TaKKe 3NaueHn IIpNoJInxHn. To He ABJIeTcH HeHCIIpaBHOCTbIO yCTPOINCTBa.
BentnlaTOp
IpoeKTop ochaieH BHyTppeHHIM BeHTNJrTOpOM, KOTOpbI cJyXHT IIJI CHNXeHHN BHyTpeHHe TcMIpeaTypbI. Pa6ota BeHTNJrTOpa MoKeT COIIPOBOXJaTBcra JIeKIM IyMOM. 3TOT aΦΦeKT YBJIeTcH HOpMaJIbHBIM pe3yJIbTaTOM IIPOH3BOIDCTBeHHO r IIOuCEca H He CBnJeTeJIbCTByeT O HeINcIIpaBHocTH. OJHaKO, IIPI N BbICOKOM yPoBHe IIIyMa cJIeIyET ObpaTHTbcRA K KBaJIInΦHnIpOBaHHOM IIepcoHaJIy KOMIIaHHSony.
CbeHnO Jamne
B IIpoeKTope B KaueCTBe HcToUHnKa CBETA HcIOJIb3YeTcra pTyTHa JAmIIa BBICOKO rJaBJIeHNr. XapaKTepnCTnKn pTyTHoJ IaMIIbI BBICOKO JaBJIeHNr YKa3aHbI HNKe.
- RaKoCTb JAmIbI NocTeHHO CHNXKaETcB TeueHne cPoka 3KcIIJyaTaUN.
JaAMIIa MOKeT JIOINHyTb c rPOMKIM 3BykOM Bpe3yJbTaTe yIapa, IOBpeKJdeHn IJI IN H3HOca IIO nCTeueHHn Cpoka KcIIJyaTaUHN. JaAMIIa MOKeT IIpeEcTaTb CBeHTbcr N IpePeOpTeB.
CpOK cIyK6bI JaAMIIbI 3aBnCTOT HINHnBnIyaJIbHbIX xapaKTepnCTNK JaAMIIbI JIN yCIOBn 3KcIIlyaTaun. IIO 3TOI IIpnHHe JaAMIIa MoKeT JONHyTB JIN IIpePeOpTe b IO yKa3aHHOTo Cpoka 3aMeHbI.
JaAMIIa TaKKe MoKeT JIOHHytb HocJIe HCTeueHnC pOKa 3aMeHbI.3aMeHHTe JaMIIy IPOeKTopa cpa3y HocJIe IOBJIeHn COo6uHn Ha IIpoeIupyeMOM N3O6paXeHn,JaXe ecJIN JaMIIa IPOIoJIkae T HopMaJIbHO pa6OTaTb.
Mepbl ppeoctopoxknoctn np TpaHcnpTnpOBke
JaHHoe yctpoiCTBO OTHOCHTcK TOUHOMy o6OpYIOBAHNIO. Iprn TpaHCIIOPTINPOBKE 6epeIHTe yCTPOIcTBO OT yIapOB HJN IIaJeHn. YIapbI JIIN IIaJeHHe MOrYT IOBpeIITb yCTPOIcTBO.
KndkoKpncTaJInuYeCKn npoeKTop
KK-ⅡpoEKTop co3aH c
HcIOJIb3OBaHHem BbICOKOTOHbIX
TexHOJIOrn. OHaKo, Ha əKpaHe KK
IIpoEKTopa MOrTy IepNoIueckn
IOABJIaTbcr MeJIKne YepHbIe H/IIIN
IrpKne (KpaChbIe, CInHne HJIIN 3eJIeHbIe)
TOUKn. 3TOT 30000000000000000000000000000000000000000000000000000000000000000000000000000000000000000000000000000
OKoHdEhcauN
IIpn6bICTpOM H3MeHeHH TeMnepaTpybIBIIOMeUeHH, B KOTOPOM yCTaHOBJEINPOeKTop, HJIN IIpiN 6bICTpOMIEpeMeIeHH IIpoeKTopa I3 XOJIIOHOrOB TEJIIOE MeCTO BHyTPn HeTo MOKeTeO6pa3OBaTbcra KOHJeHcaT. TaK KaK KOHJeHCaT MOKeT IIpNBecTH KHeNCIIpaBHOCTn, CO6JIHOJaTeOCTOPoXHOCTb IIpi N3MeHeHHHaCTPOeK TeMIIePaTypbI KOHJNUHOHePA.Ipn O6pa3OBaHHKOHJeHcata TpeiNcIOJB3OBaHHem IIpoeKTopa OCTaBBTeero BKJIOUChHHbIM IIp6JIIN3HTeJIbHOHa JBa Yaca.
KOMIIAHNIASONYHE HECET OTBETCTBEHHOCTNI3A KAKONbI TO HN bIJO YIIEPB,BO3HNIKIIIN BCJIEICTBNE HECOBJIOJEHENI MEP IPEIOCTOPOXHOCTNIPI NCIIOJIb3OBAHIN YCTPOINCTB IPEDAU IN DAHHbIX,HEIN3BEXKHbIX YTEUEKNHΦOPMAUIN, CB3AHHBIX CO CIIINΦUKAUIMN IPEDAUY DAHHbIX,NJIN IPOBJEM BE3OIPACHOCTNI JIOBOIPOPOJA.
B 3aBnHmocTH OT OIIepaHNOHHoI cpeIbI BO3MOKeH HecaHKIIIOHnPOBaHHbI IOCTyI IIOCTOPOHHX JINK yCTpOcTBY. IIpn IIOJIKIOUeHNN yCTpOcTBA K ceTN y6eINTecb B TOM, YTO CeTb HAnEJHO 3aIIHHeHa.
- IpepeIaBaemoc COeepKHMoe MOKeT 6bITb HeIIpeDHaMepEHHO IIepexBaueHO TpeTBHMJINUaMn, HAXODJIIMMCSB3OHe JeCTBnA cHrHaJa. IcIOJIb3y6ecNpOBOnHyIO JIOKAJIbHyIO CeTb, IIpHUMaHTe Heo6XoIMMbIE MepbI JJIa OBeCIIeueHn8 Be3OIIaCHOCTH IpepeIaCh COeepKHMOrO.
-Прии ИСПОЛБЗOBAHИУСТРОИСТВА, ПОДКЛЮЧЕНHOrO K ceTH, В IEJIЯ X 6e3ОПаСHOCTH peKOMeHДуETcA OTКрыт b OKHO yIpaBJIeHnA C ILOMOIIbIO Be6-6pay3epa HN3MeHHTb 3aBOJSCKHe HAcTPOIKNI IO yMOJIuaHnIO JJIЯ OrpaHnueHnIA NOCTYIIa. KpOME TOrO, peKOMeHДуETcA peRyJIaPHO MeHЯТь IPAOJIb.
Bo Bpem yctaHOBKn HactpoeK n IocJIe ee 3aBepHHe He 3axOJnte Ha KaKHe-Jn6o Be6-caNTbI Yepe3 Be6-6pay3ep. IocKOJIbKy COcTOrHne BXoJa coXpaHAcTcR B 6pay3pe, II 3aBepHHeHH NaCTPOEK 3akpoHTe Be6-6pay3ep, YTO6bl IpeIOTBpaHTb HecaHKIIHOHPOBaHHbI NocTyII IOCTOpOHHN JInI K yCTPoIcTBy IN BO3JeIcTBHe BpeIOHOCHoro IIporpaMMHO OBeCneHnI.
PnmeHn
BcerIaJeJIaIte Ipo6HyIO 3aIIncb, a TaKKe yIOcTOBepbTeCb B NaJIeJkaIeM KaueCTBe 3ToI 3aIIncn. KOMIIAHNIA SONY HE HECET OTBETCTBEHHOCTN 3A KAKOI bI TO HN bblIO YIePB, BKJIIOUyA, B YNCJIe IPOyeFO, KOMIIEHCAIINIO NJIu BO3MEIeHNE YbBITKOB BCBAICOTKA3OM JAHHOY OCTPOICTBA NJIH HOCHTEJI INHΦOPMAIIN, BHEIHIX 3AIOMINHAIOIIIX CNCTEM NJI INIIObIX IPYTHX CNCTEM HOCHTEJIEN JIN XPAHEHNAAHHBIX IN HEOCUYIeCTBJIeHNEM 3AIINCH JIOBOTO COJEPKAHNIG TIIPA.
- IpepeIeknIyatauHneIaHNOYcTPOcTBaO63aTeJIbHOIIpOBepbTeIpaBnJIbHocTbeero pa6oTbI. KOMIIAHNIA SONY HE HECETOTBETCTBEHHOCTN3A KAKON BblTOHNbIIO YIePB, BKJIOUAY, BHCJIe IIPOyeRO,KOMIEHCAIINIO JINBO3MEIeHNE YbBITKOBBCB3NCYTPATOHJIN HEIOIOJIyueHENEM IIpIBJIeN3-3A HEPABOTOCIOCOBHOCTNI 3TOFOYCTPOIcTBACAKHA IIPTJXeHNI TAPAHNTnHOI OPEHOJA, TAKIIOCSJE NCTEUEHNA CPOKA TAPAHTN, A TAKKE BCJIeIcTBHeJIIObIX INHBIX BO3MOxHbIX IPIuHN.
KOMIIAHN ASONY HE HECET OTBETCTBEHHOCTN 3A IIPETEH3HJIOBOPOPOJA, IIPEDbABJEHHbIE IOJIb3OBATEJIaMNI 3TOFO YCTPOINCTBA JIN TPETbIMN JINUAMN.
KOMIIAHNIA SONY HE HECET OTBETCTBEHHOCTU 3A IOTEPIO,HCIPABJEHNE INJIN BOCIPON3BEJEHNE JIObIX DAHHbIX,3AIINCAHHbIX BCNTEMBEHYTPEHEN IAMYTHNAHOCTEJI E INHΦOPMAIIN,BHEIHINX 3AIOMHAAIOIIHX CNTTEMAXNJIN HAJIIObIX IPYTHNX CNTTEMAX HOCHTEJIENJIN XPAHEHNI DAHHbIX.
KOMIIAHNIA SONY HE HECET OTBETCTBEHHOCTN 3A IPEKPAIIEHNE ININ IPIHOCTAHOBKY IPEIOCTABJIEHNJAIObIX YCJIVT, CBA3AHHbIX C 3TUM YCTPOINCTBOM, BHE 3ABNCIMOCTNOT OBCTOATEJBCTB.
BxoJaIeB KOMJIeKT npHaJleXHocTn
IyIbT IINCTaHIOHOHorO yIpaBJeHHRA RM-PJ8 (1)
JIHTHeBa6aTapeKa (CR2025) (1) BaTapeKa IpeBapHTeJbHo ycTaHOBJCeHa.IpeEINcNOJB3OBaHnem IIyIbTa INCTaHIOHHO yIpaBJeHHyUaJIInTe H3OJIauHNoHHyIO IIJEHKy.

Ka6eJIb IITaHnI IepMeHHOro Toka(1)
KopotKoe cnpaBOuHoe pyKOBoIcTBO (daHHoe pyKOBoIcTBO) (1)
PykoBoCTBO IO 3KcIIyataHn (Ha IIncKe CD-ROM) (1)
ПиJOжЕнe Projector Station for Network Presentation (haДиcke CD-ROM) (1)
IFU-PN250A/IFU-PN250B
IHTepaKTHBHOe Iepo (2) (TOJIbKO VPL-SW635C/SW630C/SW620C)
MapraHueBbIe 6aTapei pa3Mepa AAA (R03) (4) (ToJIbKO VPL-SW635C/ SW630C/SW620C)
USB A-B Ka6eJ (5m) (1) (ToJIbKO VPL-SW635C/SW630C/SW620C)
Interactive Presentation Utility 2 IIprJIOxKeHHe (CD-ROM) (1) (TOJIbKO VPL-SW635C/SW630C/SW620C)
IcnoJb3OBAHne pyKOBOdCTBa no 3KcPnyaTaun Ha DnCKe CD-ROM
BcTaBBTe IIpHJIaRaembI INck CD-ROM B yCTPOINCTBO YTEHnI INCKOB CD-ROM BaIIeRo KOMIIbIOTepa. CD-ROM 3aIIyCTHTcra ABTomATNueckn Ype3 HeCKOJIbKO ceKHyI. BbI6epHTe Heo6XoIHMOe pyKOBOJCTBO IIO 3KcIIyatauH. EcIn CD-ROM He 3aIIyCTHJCRA ABTomATNueckn, OTKpoIte fai "index.htm" Ha CD-ROM. TTO6BI IIPOUHTaTB pyKOBOJCTBO IIO 3KcIIyatauHa HA CD-ROM, Ha BaIIeM KOMIIbIOTepe IOJXHa 6bITb ycTaHOBJHeHa IIporpaMa Adobe Acrobat Reader 5.0 nJin 6oJIee HOBOB BepHH.
YcTaHOBKa npNIOJKeHnA Projection Station for Network Presentation
1 3aKpoITe Bce 3aIyIeHHbIe IpiJIoxKeHna.
2 BcTaBbTe IIpIIaIarMaEMbI CD-ROM BycTpoIcTBo YTeHnI INsKOB CD-ROM BaIeRo KOMIIbIOTepa.
3 BbI6epHTe ycTPOncTBo YTeHnA INCKOB CD-ROM IINBOINHBIM IeJIyKOM 3aIIyCTHte faiJ .exe. Windows: IIpN IIOBJIeHHN COO6IeHHN "KoHTpoJIb yUeTHbIX 3aIIHcEe" IueJIKNHTe "Pa3peINITb" HIn "Ja".
4 UTo6bIBBIIIOJIHNITb yCTaHOBky IporpaMMHOrO o6ecneueHnna, cJeIyIte yKa3aHnMa Ha 3KpaHe.
YcTaHOBKa 6aTapeek
Iylt DaCTaHcNOHOrO ynpabJeHnA
1 IOTHHe Ha ce6aTapeHbI OTeK. IOnDcHbTe 6aTapeHbI OTceK OCTpbIM IIpeDMeTOM, KaK IOKa3aHO Ha pncyHKe.
2 BcTaBbTe JInTHeByIO 6aTapeKy.
3 3aKpoTe 6aTapeHbI Orcek.
YctaHObKa 6aTapei
B KOMIIeKT IIOCTaBKN IIyIbTa IINCTaHIIIOHO rYnpaBJIeHNr RM-PJ8 BXOINT OHa JInTHeBA6aTapeKc (CR2025).Bo N36eKaHne OIIacHOCTN B3pbIBa HcIOJIb3yIte JInTHeByIO 6aTapeKky (CR2025).
Интуговпени.
1 CHHMMTe KpbHkky OTeKa 6aTapei.
KpbIIka oTceKa 6aTapei KpeIITcK HHTepaKaTHBHomy Iepy C IOMOIO He6oJIbIOI TeJIN. ByIbTe ocTopoXHbI, YTO6bI He IOBpeINTb IeTIO IIpi OTKpbITnKpbIIKNOTceKa 6aTapei.
2 BcTaBbTe IBe 6aTapeH pa3Mepa AAA.
3 YcTaHOBHTe KpbHIIky OTeKa 6aTapeHHa MeCTo.
YctaHObKa 6aTapei
IFU-PN250A/IFU-PN250B
HHTepaKTbHoe Iepo IIpNJlaIaOTc
YeTbIpe 6aTapei pa3Mepa AAA (R03).
YTo6bI H36eKATb OIacHOCTN B3PbIBa,
HcIOJIb3yIte MapraHueBbIe HJIN
IeJIIOuHbIe 6aTapei pa3Mepa AAA (R03).
OCTOPOXHO
Pn He npaBnJbHO 3aMeHe 3JIeMeHToB IITaHn BO3HnKaeT ONaCHOCTb B3pbIBa. NcIOJB3yIte JJIra 3aMeHbI TOJbKO HcHTNCHbc HIN 3KBnBaJIeHTHBic 3JIeMeHTbI IITaHn, peKOMeHdyEmbI E3rTOBHTeJIem.
IpyuTHJIN3aunOpTa6oTaHHbIXJIeMeHToB HHTaHnHeO6XoIMOCJIeIOBaTb IpaBnJaM,JeCtByIOUIMBCOOTBeTCTByIOUImpeRHOHeNJIn cTpaHe.
Bb6opЯ3bika MeHIO
Iyo yMOJIyAHIO IJIa OTObpaXaEMbIX MeHIO, COO6IeHN H T. I. BbI6paH aHJIINCKN J3bIK.
IIH3MeHHeHra3bika 3KpaHa BBIOJIHnTe CJeIyIOIIHe NeIcTBn:
1 BcTaBbTe IHHyp IITaHnIepeMeHHoro TOKa B po3eTKy.
2 BkJIIOHTe IpoeKTop. HaxmTe KJIaBnIy I/①.
3 HaKMnte KJIaBnIy MENU IJIa OTO6paKeHnMeHIO. EcIN 3KpaH OTO6paKaetc HecETKO, OTpeRyJInpyTe fOKyc, pa3Mep IN IOJOxKeHne IIpoeKTHpyEmoRO N3O6paKeHn (Ctp.20).
4BbI6epHTe 3bIK MeHIO. ① HaKMITE KJIaBNuY HJIN Y, TTO6bIBbI6paTb MeHIO Operation (3aTeM HaKMITE KJIaBNuY ENTER.
② HaKMITE KJIaBnIy ↑ JIN ↓, YTO6bI BbI6paTb "Language (A, a 3aTeM HaKMITE KJIaBnIy ENTER.
③ HaXImaTe KJIaBnIy / / / IJIa BbI6opa 3bIka, a 3aTeM HaxmTe ENTER.
5 HaKMITE KJIaBbHbIy MENU, TTO6bI OTKJIIOHTb 3KpaH MeHIO.
Поклоченье позерета
IpoekTOP MOxHOCeINHHTb C BHeIHHMy yCTPOcTBaMn IprN IOMOIIHN BbIXoHOro pa3beMa RGB HDMI. Bbl MoKeTe TaKKe HcIOJIb3OBaTb CJeJyIOUne MeToIbI JIII IOJKJIIOUeHnI IpoeKTopa K yKa3aHHbIM HnKe yCTPOcTBaM.
Pa3bem USB (Ttn B)
IcnoJIb3yeTcra IIIA IOKJIIOUeHnRA IPOeKToPa K KOMIIbIOTepy C IOMOIIbIO pa3beMa USB (cm. pa3JeI "BocIpOn3BeIeHne BnIeO n 3ByKa Ype3 USB-IOKJIIOUeHne").
Pazbem USB (Tun A)
IcnoJIb3yeTcra IJIa IIOKJIIOueHnHaKOINTeJIbHOrO yCTpOInCTBa USB (Cm. pa3JeI "IcnoJIb3OBaHnE IIpNJIOXeHn USB Media Viewer").
Pa3beM LAN
IIJIIIOJKIIOUeHnK KOMIIbIOTepy, IIaHIIeTy IIN cMapTfoHy Yepe3 KOHIEHTpaTop HJIM MapIpyTH3aTOP ("ФункиЯ IIpe3eHTaUNI NO cetn").
Pa3bem USB (Ttn A) ()
IcnoJIb3yeTcra IIaIOKJIIOHeHn USB-aIaITepa 6ecnpoBOHOcETN IFU-WLM3 (He npHaTaEcra) ("ФункиЯпpe3eHTaCnNo cetn").
PnmeuHna
- USB-aIaITepbI 6ecIIPOBOIHcTn, He IpeHa3HaYeHHbIe IJIa HIOJIb3OBaHHc IaHHbIM IIpoEKTOpOM, pa6oTaTB He 6yIyT.
- Pn IIOKJIIOUeHnn HIN OTKJIIOUeHNN USB-aIaITepa 6ecIIPOBOHOH cETN y6eINTecb, YTO IPOeKTop HaxoIHTCB B peXHME OXHJaHHa (PexHM OxHJaHHa: "Hn3Kn") HIN Ka6eJIb IHTaHHI IepMeHHoro TOKa OTcoEINHeH OT pO3eTKH.
-ПибспpoBOHOM IOДКЛIOUeHn IIJIaHIeTa nIIN cMaprTfoHa K IIpoeKTopy uepe3 USBaIIaIITEp 6ecnpoBOHOn CETN IFU-WLM3 (He IIprJIarAetc) yctAHOBHTe IJIЯ IIapamETpa "Cetb WLAN" 3haueHne "T-ka Jocr. (py.)" B MeHIO IIpoeKTopa "IIapamETpbI WLAN".
-ДяпОДКЛIOUeHЯКTOUKe IOCTyHa BOIINTe B Be6-6pay3ep H BBeIInTe IapaMeTpbl TOnKn IOCTyHa JIA IOKNJIIOUeHЯ.ПОДPo6HocTn Cm.B pa3JeJle "HAcTpoIka cetu WLAN IIpoEKTopa". - IJIy peKHMa "T-Ka IOcT. (pyU.)" 3aIaHbI cJIeIyIOIIne cTaIaPTHbIe 3aBOJCKHe HAcTPOIKN.
SSID: VPL + MAC-aIpec JIOJIOKaJIbHOcTeH
MeroI 6e3oIIaCh.: WEP(64bit)
Паров:sony1
HaXMMTe KJIaBnHIIY INPUT Ha IIpoeKTope, YTO6bI OTO6pa3NtB MeHIO IJIa IIepeKJIIOUeEHN BxOJHOrO CnHaJa HA 3KpaHe. HaXHMaHTe KJIaBnHIIY INPUT NIN KJIaBnHII#/4, YTO6bI BbI6paTb N3O6paKeHN IJIa IIpoeunPobAHn.
6
Ipi npoeuropoHaHn H3O6paXeHn c KOMNbIbOTepa IpeKJIIOHTe BbIBOc CNHaJa KOMNbIbOTepa Ha BHeIHn IncIIJe. CIOco6 IIpeKJIIOUeHn BbIBOda CNHaJa MOKeT OTJNUaTbcraB 3aBHCIMOCCTN OT Tnla KOMNbIbOTepa.
(Приимер)

IIra IIpoeIINPOBaHnRAH3O6paXaeHn, coIepKaIINxCra Ha HAKOIHTeJIbHOM ycTPOcTBe USB,cm. pa3JeI "USB Media Viewer".IIra BOCIIPOUN3BeIeHnRAHIEo H 3Byka C IIOMOIbIO USB-coeINHeHnCA m. pa3JeI "BocIpOn3BeIeHnE BHeo H 3BykaYepe3 USB-coeINHeHne". IIOIPO6Heo o cyHKIIHN Ipe3eHTaIIHN IIO cETn CM.B pa3JeIe "IcIOJIb3OBaHne cyHKIIHN Ipe3eHTaIIHN IO cETn".
7
HacpoTe fokycnpOBky,pa3Mep HpacIOJIOJKeHHe IpOeIUPyeMOro 1306paXKeHHa (cTp.20).
OTKpoIte 6OKOByIO KpbHikky HacTpOHTe peryJIArTOpblcBnra o6bekTHBa, pbyaKOK fOKycnPOBKn H pbyaXoK yBeJIuHeHn.
OTKpoTe 6OKOByIO KpbIiKvY
HaKMnTe A H OTKpoIte 6OKOByIO KpbIIK Ky B HaIIpaBJIeHnn CTrpeJIK, KaK IOKa3aHO Ha pncyHke HnKe.
BbI6op φopMaTHoro COOTHOseHn IpoeunpyeMOro n3O6paXeHn
HaXnMaIte KJIaBHIy ASPECT Ha IIyIbTe IINCTaHIIIOHHO yIpabJIeHNr IJIa BbI6opa opMaTHoro COOTHOIIeHnRA IpoeIINpyeMOrO H3O6paJxEHNr. Kpome TOrO, 3Ty NaCTpONKy MOJHO N3MeHHTb c IIMOUbIO IapamEtpa “OpMaT" B MeHIO "KpaH".
KoppeKtnpOBka TpaNeeJaIbHbIX NcKaJHn IpoeIpyemoro n3O6paXeHn (fynKzra TpaNeeJaIbHbIX NcKaJHn)
Ecnn n3o6paKeHne cTaHeT TpaIeueJaIbHbIM, HacToPe ΦyHKuIO KOppeKuIN TpaIeueJaIbHbIX NcKaJKeHn BpyHyIO.
1 HaKMHTe KJIaBnHUY KEYSTONE Ha IIyJIbTe IINCTaHIIOHHO yIpaBJeHHN HIN BbI6epHTe Bept.TpaII.Nck B MeHIO MoHTaK.
2 NcnoJIb3yIte KJIaBnIIH / / / IJIy yCTaHOBKN 3NaYeHH. Yem 6OJIbIIe 3HaYeHHe, TeM yKe BepXHJa YacTb IIpoeIpyEmoRo H3O6paXeHH. Yem HIXKe 3HaYeHHe, TeM yKe HIXKHe YacTb H3O6paXeHH.
PpmeaHn
- IockoJbky KoppeKuHnra TpaIeIeIaJIbHOrO nckaKeHHra YBJIaETcR 3JIeKTPOHHoN KoppeKUHe, ee HcIOJIb3OBaHHe MoKeT IIpNBecTH K CHHXKeHHIO KaueCTBa H3O6paXeHHa.
- Pn HcIOJIb3OBaHHN cyHKUHcIbHra 06beKTHBaΦopMaTHOE COOTHOIIeHne 13O6paJxHn MOxET OTJNuHaTbcr OT HcxOHNOr. Kpome TOrO, IpoeuHpyeMoE 13O6paXeHn MeKxET NcKaJaTbcR B pe3yJBTaTe KoppeKUnn TpaIeHnJaJIbHOrO NcKaJxHn.
- Pn HcIOJIb3OBAHnn INHTepaKTNBHOI Iepa BpeXmMeMbIIINIJI KOppeKTHIpOBKN TpaIeIeHJaJIbHbIX NCKaKeHN TOUKN KOHUNKOB Iepa N KypCopa MOryT He COBIIaIaTB Ha 3KpaHe. B 3TOM CJIyuae BblIOJHInTe IOBTOpHyO KaJIbOpBky (ToJIbKOVPL-SW635C).


YBeHnueHne 3HaueHnB 60JIbUyIO CTOpOHy


YBeJIuYeHHe 3HaueHnB MeHbUyIO CTOpOHy

OTo6paXeHne 7a6NoHa
C IIOMOIbIO KJIaBHIIN PATTERN Ha IIyJIte DnCTaHIOHO rIpaBJIeHnRA MOJHO OTO6pa3HTb IIIa6JIOH IIJRA HAcTPOIKN IIpoeUHPyeMOrO I3O6paXeHnRA IIIN KOOPINHAHTHyO cETKy. HaxMMTE KJIaBHIIN PATTERN IOBTOpHO, YTO6bl BOCCTaHOBTb INCXoONHOE I3O6paXeHne. KoOpINHaTHyIO cETKy MOJHO HcIOJIb3OBaTB B KAueCTBe OPHeNTnpA JaII HAIIncAHnRA TeKCTa IIIN pInCOBaHHra JInnH nΦOpMa 6eJIOn IIN YePHoI IOCKe 6e3 INIOJIb3OBaHHa KOMIIbIOTepa.
PpmeaHne
Ta KJIaBnHa He MoKet HcIOJIb3OBaTbC8,ecJIN B KaYeCTBe HcToUHnKa BbI6paHo "USB TnHa A", "USB TnHa B" nJIn "CeTb".
A B T O M A T N U C E K A p e r y n i np o B k a h a c t p o e K P a 3 a, W a r n C d b n r p p oe u p y e m o r o n3o6p a x e H N P r n n o l y u e H N C n r h a n a c K o m n b i o T e p a (A P A (a B T O M A T N U C E K O E B b i p a B H N B a H N e n o n k c e l a m))
HaJMMTe KJIaBnIy APA Ha IIyIbTe IINCTaHIOHHO yIIpaBJIeHna. IJIaOTMeHbI peRyJIInpOBKn BO BpeMraYcTaHOBKn HaJMMTe KJIaBnIy eIe pa3.
Kpome TOrO, yHKnIO APA MoXHO HacTpoNTb B MeHIO "3KpaH". EcJIN IIJIa IapamEtpa "APA BbIc.ueTK." B MeHIO "ФyHKIIa" yCTaHOBJIeHO 3HaueHHe "BkJI", yHKIIa APA BbIIIOJIHReTc aBTOMaTHueCKI IIpr IIoJaYe BXOJaIeRO cIrhJaIa.
BbIKIIOUeHne IITaHnA
1 HaKMnTe KJIaBnIy I/Ha OCHOBHOM yCTpO'cTBe HJH Ha IIyJIbTe INCTaHIIHOHHOro yIpaBJeHn.
IpoeKTop HaHHeT BbIKJIOHaTbCra, IocJIe Yero OTKJIIOHTcra IIHTaHne. EcJIH HaxKaTb KJIaBnHy I/O B TeueHne 10 cekyHd, OTKJIIOUeHne 6yJeT OTMeHEHO.
Приимецанne
He BbIKJIOaIte IPOeKTop BCKOpE IIOcJIe BKJIOUeHnJAAMIIb. 3To MoKeT IIpNBecTH K HeHCIIpaBHOCTN JAMIIb (JAMIIa MOKeT He 3aRopatbcr H T.II).
2 OToeHHTe Ka6eJIb IITaHnI IepMeHHORo TOKa OT 3JIeKTpHueCKO p03eTKN.
BbIKIIOUeHne 6e3 OTo6paXeHnA COo6uEHHa 3aInpocm Ha NOdTBePKeDeHne
HaXMMTe n yIepKnBaIte HaKaToN KJIaBnIy I/Ha ycTpoIcTBe B TeueHHe HeCKOJIbKHX ceKyHJ.
Датунк ECO
TO T IaTnK IIOKa3bIBaet əΦΦeKTnBnOcTb pa6oTbI ΦyHKnECO InpoeKtopa. (Iopno6Hee o ΦyHKnECO cm. B pa3JeJiax “KJIaBNHa ECO MODE” n“ECO”). Ipn BBIKJIIOyeHHOM InpoeKTope OTo6paKaIoTc8 3NaUKN JInCTbeB. Yem 6oJIbIIe JInCTbeB OTo6paKaEtC, TeM 6oJIbIIe 3HeprN N KOHOMHTc8 C IIMOIIbIO ΦyHKnEco.
Испосьзоване Средства ИНтейвныхпpeэнтаць 2 (ТолъкВ модалax VPL-SW635C/SW630C/SW620C)
IHTepaKTNBHoe nepo (ocHOBHe: IFU-PN250A,IOIOJIHNTeJIbHoe: IFU-PN250B) n IpnJIOxHeNe "CpeTBO HHTepaKTNBHbIX IIpe3eHTaII 2" IO3BOJIaHOT 6OJIee 3ΦΦeKTHBHO HcIOJIb3OBaTb DaHHbI IIpOeKTop B peXHMe pa6OyeO cToJIa, yIOBJeTBOPra3JIuHbIe IeJIi.
C I NOMOIIbIO ΦyHKIIN MbIIIN “IHTepaKTNBHOe Iepo” (TOJIbKO OCHOBHOe) Bbl MOKeTe yIpaBJIaTb KOMIIbIOTepOM IIpHJIOXeHHMa HA IIpoEKIIHOHOM 3KpaHe TaK JKe, KaK C I NOMOIIbIO KypcopaMbIIIN. IIpn BKJIIOUeHHN yHKIIIN pncOBaHHB INpyROM IIpHJIOXeHHN Bbl MOKeTe TaKKe HcIOJIb3OBA Tb IHTepaKTNBHOe Iepo IJIa PncOBaHHA HENOCpeIcTBeHHO Ha IIpoeIHPyEMOM aJIe I COxpaHrTb pncyHKn.

CnocobI nCnoJIb3OBAHnA yHKcI Mblu C NOMOUs HHTepaKTNBHO nepa (ToIbKO OCHOBHO)
- ΠεJIYOK JIeBOH KHOIIKOH MblH: KOCHTEcB ὈKpaHa KOHUNKOM HHTepaKTNBHORI Iepa.
- IbOHHoI IIeJIyOK: KOCHNTecb 3KpaHa KOHUNKOM HHTepaKTHBHOI Iepa IBaJkbI.
- NpeTacknBaHHe: IepemecHTe HHTepaKTHBHOe Iepo, Kacacb 3KpaHa.
3aIyCTNB CpeIcTBO HHTepaKTHBbIX IIpe3eHTaII 2, Bbl cMOKeTe hCIOJIb3OBaTB HHTepaKTHBHOE Iepo IJIpaH PCOBAH N IINHH N IINpY Ha IIpoeKIOHOHOM eKpaHe. B peJHMe 6eJIOI IOCKN IIPOeKIOHOHbI IN KpaH MOKHO hCIOJIb3OBaTB B KaueCTBe 3JIeKTPoHHOINIOCKN, a TaKKe MoKHO BbIbPaTb IOOHOe I3O6paKeHne I3 6n6JIHOteKN FOToRpaΦH INI INI IIIa6JIOna.
Pncobahne CtnpaHne CoxpanHeHne
HcIOJIb3OBAHHe KaK OCHOBHOrO, TaK IdoIOJIHNTeJIbHOrO INHTepaKTNBHOrO Iepa NaCT BO3MOJXHOCTb pncOBaTb Ha IIPOeKIIIOHHOM 3KpaHe JBym JIOJm OINHOBpeMeHHO. JIy OCHOBHOrO IIepa IOCTUHHbI BCE yHKIIHN, a JIy IIOIOJIHNTeJIbHOrO - TOJIbKO yHKIIINpNCOBaHn.
"InteractivePresentationUtility2.exe".
3 CJIeIyIte yKa3aHnM Ha əKpaHe, YTO6 ycTaHOBHTb IporpaMMy.
YTo6bI yJaJIHTb CpeIcTBo HHTepaKTHBbIX Ipe3eHTaIIH 2, HaXmITe [Iyck]--
[Bce IpoIpaMMbI]-[CpeIcTBo HHTepaKTHBbIX IIpe3eHTaIIH 2]-[YdaJIITb].
HactpoKa CpeCTBa HHTepaKTbHbIX Ppe3eHTaCn 2
1ПОДСоЕДИНITE ПОЕКТOP K KOMПБЮТЕРу c ПОМОПьЮ KOMПБЮТЕРHO Ka6eJIЯ n USB-ka6eJIЯ (cTp.25) И BOCПрОИЗВЕДЛТe ИЗОБразеHпe C ПОМОПьЮ ПОЕКТopa.
ПоДробkee o ПОДКЛЮЧЕнгпproeКТopa K KOMПьOTepу:сM.“ПОДКЛЮчЕнeпproeKТopa".
2 YcTaHOBHTe IJIa IapameTp a "IaHHbIe 6eJI. IocKn" 3HaueHHe "IpeH. Ha KOMII." B pa3JeIe "IHTep. II." (ToJIbKOVPL-SW635C).
3ДЯ"Ha3H.USB Tnna B" BbI6epHTe TOr Xe BXoJHO pa3beM,TOHДЯ MeHIO "BxoJ" (MeHIO JIAIpeKJIIOUeHnBxOJHBIX CNrHaIOB), Ha 3KpaHe (cTp.17) JIA BbI6opa H3O6paXeHnA JIA CpeIcTBA INHTepaKTTHBbIX Ipe3eHTaII2 (ToJIbKOVPL-SW635C).
HaCtpaHbA Tb KaKdbIeJIeMeHT IJIe HcIOJIb3OBaHHcpeCTBa HHTepaKTHBbIX IIpe3eHTaUH 2 MoXHO DByMa cNoCo6aMn (a n b).
A B T O M A T N U E C K A / p u h a n k a J I N 6 p o B k a
KaJIH6pOBKa IIO3BOJIaTe COBMeCTHTb TOUKN, KyaHaIIpaBJIeHbI yKa3KN (OCHOBHaN IOIOJIHNTEJIbHa), N MeCTO OTO6paXeHnI IPOeKTopOM Kypcopa Ha əKpaHe. "ABTomaTHuecka KaJIH6pOBKa" IO3BOJIaTe BblIOJIHrTb KaJIH6pOBKy B aBTOMaTHueCKOM peKIme.
PanaheIb HnCTpyMeHTOB OCHOBHO yKa3KN
1 KaIInbpoBka (ABTO)
2 KaIInbpoBka (BpyHyIO (OCH.))
3 KaIInbpoBka (BpyHyIO (dOIn.)
CoXpaHeHne KaIi6pOBOUHbIX DaHHbIX
HaKMnTe "KaJIb6pOBka" N Bbl6epHte KaJIb6pOBka (ABTO). KaJIb6pOBka HaHTHeTcA bTOMaTHueCKN.
Pa6ota c nHTepaKTHBbIM nepom
C IIOMOIbIIO HHTepaKTnBHOI Iepa BbIMOKeTe HcIOJIb3OBaTb 0yHKuIN IIaHeJINHCTpyMeHTOB Ha 3KpaHe. IOpipo6HeecM.B pa3JeIe "PyKOBOJCTBOIIOJIb3OBaTeJIa K CpeIcTByHHTepaKTnBbIX IIpe3eHTaUN2".
3aKpbItne CpeIcTba HHTepaKTNBbIX npe3eHTaun 2
IIeJIKNHTe 3HaUOK Ha IIaHeJIN 3aJaU, YTO6bI OTKpbITb BCIIJIbIBaIOJIe e MeHIO, H BbI6epHTe IyHKT MeHIO [BbIXoJ].
YcTaHOBka CpeIcTbA INHTepaKTINBbIX Ipe3eHTaCn 2
CnCTeMHbIe Tpe6oBaHHa
- PpOeCCop: Pertium III HJIN BbIIe
- OIepaTHBnaH naMaTb: 256 MB nJn 6oJIbIIe (peKOMeHnyetc 512 MB)
CBO6OJIHOe MeTo Ha JekcTkom IINcKe: 250 MB - OC: Mac OS X 10.6.x/10.7.x/10.8.x/10.9.x/10.10.x
JIЯ HcIOJIb3OBaHnI INHTepaKTINBHOJ yHKUHN HyXHO yCTaHOBTb CpeIcTBO INHTepaKTINBHbIX IIpe3eHTaUN 2.
1 3aKpoIte Bce 3aIyIeHHbIe IpiJIIOJKeHnI.
2 Ha KOMIIaKT-IIcKe IBaXI IIeJIKNITe paI [Interactive Presentation Utility 2.pkg].
3 CJIeIyIte yka3aHnM Ha 3KpaHe, YTO6 ycTaHOBHTb IporpaMMy. YTO6bl yIaJIHTb CpeIcTBo HHTepaKTHBbIX Ipe3eHTaII2, IpeMeCTHrE IIaIKN [CpeIcTBo INTEpaKTHBbIX Ipe3eHTaII2] I3 IIaIKN IIpNJIOJKeHHB KOp3HHY N OUHCITHe ee.
3aKpbItne CpeIcTba INHTepaKTbHbIX npe3eHTaun 2
1ПОДСоЕДИНITE ПОЕКТOP K KOMПБИОТЕРу c ПОМОПьIO KOMПБИOTePHERO Ka6eJIa N USB-ka6eJIa (cTp.25) n BOCПрОнЗВeДЛТe I3O6paXeHne c ПОМОПьIO IIPOEKTOPa.
ПоДрбHee O ПОДКЛЮЧЕнн ПрoeKTopa K KOMПьОТepу: сM. "ПОДКЛЮЧЕнн ПрoeKTopa".
2 YcTaHOBHTe IJIa IapAmEtpa "IaHHbIe 6eJI. IocKn" 3HaueHne "IpeH. Ha KOMII." B pa3JeJIe "IHTep. II." (ToJIbKOvPL-SW635C).
3ДЯ"Ha3H.USB Tnna B" BbI6epHTe TOT JKe BXoJHOpa3bcM, YTO HДЯ MeHOr "BxoJ" (MeHIOДЯ IIpeKJIIOUeHnBxOINbIX cHrHaIOB), Ha 3KpaHe (cTp.17) IJIa BbI6opa N3O6paXeHnAДЯ CpeIcTba INHTepaKTINbIX IIpe3eHTaIIN 2 (ToJIbKOvPL-SW635C).
3NaOc CpeICTBa HHTepaKTHBbIX npe3eHTaun 2
A B T O M A T N U E C K A / p u H A K a n i b p o B k a
KaJIb6pOBKa IIIO3BOJIaTe COBMeCTHTb TOUKN, KyaHaIIpaBJIeHbI yKa3KN (OCHOBHaa N IOIOJIHNTEJIbHaa), IMecTO OTo6paJxehn IIpoeKTopOM Kypcopa Ha 3KpaHc. "ABTomaTHueCKa KaJIb6pOBKa" IO3BOJIaTe BbIOJIHraTb KaJIb6pOBky BAETOMaTHueCKOM peKIme.

- VPL-SW635C/SW630C/SW620C/SW630/SW620 VPL-SX630
- 安全のたてに
- 注意
- WARNING
- THIS APPARATUS MUST BE EARTHED.
- CAUTION
- About the LAN connector
- WARNING: THIS WARNING IS
- IMPORTANT
- For kundene i Norge
- For the customers in the U.S.A.
- Declaration of Conformity
- For the customers in Canada
- For the customers in Europe
- For the customers in Korea
- For the customers in Taiwan only
- 廢電池請回收
- For the State of California, USA only
- For the Customers in Brazil only DESCARTE DE PILHAS E BATORIAS
- For dealers
- Safety precautions for installing the unit
- On Installation
- On cleaning the projection window and the cabinet
- On Illumination
- On Heat Dissipation
- On Screen
- On Fan
- On Lamp
- For carrying
- On LCD Projector
- On Condensation
- Notes
- Checking the Supplied Accessories
- Using the CD-ROM Manuals
- Installing Projector Station for Network Presentation
- Installing Batteries
- Remote Commander
- Interactive Pen Device
- Selecting the Menu Language
- Connecting the Projector
- USB terminal (Type B) ( )
- USB terminal (Type A) ( )
- LAN terminal
- USB terminal (Type A) ()
- Projecting an Image
- Open the side cover
- Displaying Images or Files Sent from a Tablet PC/ Smartphone
- Adjusting the Projected image
- Adjusting the tilt of the projector with the feet
- Changing the aspect ratio of the projected image
- Correcting trapezoidal distortion of the projected image (Keystone feature)
- Displaying a pattern
- Note
- Automatically adjusts Phase, Pitch and Shift of projected image while a signal is input from a computer (APA (Auto Pixel Alignment))
- Turning Off the Power
- To turn off without displaying confirmation message
- ECO gauge
- Using Interactive Presentation Utility 2 (VPL-SW635C/SW630C/SW620C only)
- How to operate the mouse function of the Interactive Pen Device (main only)
- Connecting a Computer with a USB Cable
- For Windows
- Installing Interactive Presentation Utility 2
- Setting Interactive Presentation Utility 2
- Calibration Auto/Manual
- Operating with the Interactive Pen Device
- Closing Interactive Presentation Utility 2
- Using the PC Free Interactive Function (VPL-SW635C only)
- Setting the PC Free Interactive Function
- Indicators
- ON/STANDBY indicator
- LAMP/COVER indicator
- Replacing the Lamp
- Disposal of the used lamp For the customers in the USA
- Cleaning the Air Filter
- AVENTISSEMENT
- Installation de Projector Station for Network Presentation
- Notas
- 安装Projector Station for Network Presentation
- OuNcTKa IINH3bI IN KOpnyca
- OcbeueHne
- O paccenBaHn TePna
- 3KpaH
- BentnlaTOp
- CbeHnO Jamne
- Mepbl ppeoctopoxknoctn np TpaHcnpTnpOBke
- KndkoKpncTaJInuYeCKn npoeKTop
- OKoHdEhcauN
- PnmeHn
- BxoJaIeB KOMJIeKT npHaJleXHocTn
- IcnoJb3OBAHne pyKOBOdCTBa no 3KcPnyaTaun Ha DnCKe CD-ROM
- YcTaHOBKa npNIOJKeHnA Projection Station for Network Presentation
- YcTaHOBKa 6aTapeek
- Iylt DaCTaHcNOHOrO ynpabJeHnA
- YctaHObKa 6aTapei
- Интуговпени.
- OCTOPOXHO
- Bb6opЯ3bika MeHIO
- Поклоченье позерета
- Pa3bem USB (Ttn B)
- Pazbem USB (Tun A)
- Pa3beM LAN
- Pa3bem USB (Ttn A) ()
- PnmeuHna
- OTKpoTe 6OKOByIO KpbIiKvY
- BbI6op φopMaTHoro COOTHOseHn IpoeunpyeMOro n3O6paXeHn
- KoppeKtnpOBka TpaNeeJaIbHbIX NcKaJHn IpoeIpyemoro n3O6paXeHn (fynKzra TpaNeeJaIbHbIX NcKaJHn)
- PpmeaHn
- OTo6paXeHne 7a6NoHa
- PpmeaHne
- A B T O M A T N U C E K A p e r y n i np o B k a h a c t p o e K P a 3 a, W a r n C d b n r p p oe u p y e m o r o n3o6p a x e H N P r n n o l y u e H N C n r h a n a c K o m n b i o T e p a (A P A (a B T O M A T N U C E K O E B b i p a B H N B a H N e n o n k c e l a m))
- BbIKIIOUeHne IITaHnA
- Приимецанne
- BbIKIIOUeHne 6e3 OTo6paXeHnA COo6uEHHa 3aInpocm Ha NOdTBePKeDeHne
- Датунк ECO
- Испосьзоване Средства ИНтейвныхпpeэнтаць 2 (ТолъкВ модалax VPL-SW635C/SW630C/SW620C)
- CnocobI nCnoJIb3OBAHnA yHKcI Mblu C NOMOUs HHTepaKTNBHO nepa (ToIbKO OCHOBHO)
- HactpoKa CpeCTBa HHTepaKTbHbIX Ppe3eHTaCn 2
- A B T O M A T N U E C K A / p u h a n k a J I N 6 p o B k a
- PanaheIb HnCTpyMeHTOB OCHOBHO yKa3KN
- Pa6ota c nHTepaKTHBbIM nepom
- 3aKpbItne CpeIcTba HHTepaKTNBbIX npe3eHTaun 2
- YcTaHOBka CpeIcTbA INHTepaKTINBbIX Ipe3eHTaCn 2
- 3aKpbItne CpeIcTba INHTepaKTbHbIX npe3eHTaun 2
- A B T O M A T N U E C K A / p u H A K a n i b p o B k a
Brand : SONY
Model : VPLSW620C
Category : Projector