— Docking station — Mode d'emploi PDF")
LIFE P64077 (MD 83187) - Docking station MEDION - Free user manual and instructions
Find the device manual for free LIFE P64077 (MD 83187) MEDION in PDF.
| Product type | Multimedia docking station (micro hi-fi system with iPod/iPhone dock) |
| Brand | MEDION |
| Model | LIFE P64077 (MD 83187) |
| Power supply | 230 V ~ 50 Hz, 38 W |
| Output power | 2 x 10 W RMS |
| Radio | FM 87.5 – 108 MHz, RDS, 30 presets |
| CD player | CD, CD-R, CD-RW, MP3, WMA |
| Connections | USB 2.0, SD/MMC card, line input (Cinch), headphone output 3.5 mm, FM antenna 75 Ω |
| Remote control | With CR2032 battery (included) |
| Main functions | Timer, Sleep, equalizer (Classic/Rock/Pop/Jazz/Pass), programmed playback, repeat, shuffle, intro |
| Wall mounting | Possible (keyhole slots) |
| Removable base | Yes, for placement on a shelf |
| Laser class | 1 (CD player) |
| Care and cleaning | Unplug before cleaning, soft dry cloth, no solvents |
| Safety | Automatic shutoff, short-circuit protection, accessible plug |
| Included accessories | Remote control, wire antenna, base, user manual, warranty card |
Frequently Asked Questions - LIFE P64077 (MD 83187) MEDION
User questions about LIFE P64077 (MD 83187) MEDION
0 question about this device. Answer the ones you know or ask your own.
Ask a new question about this device
Download the instructions for your Docking station in PDF format for free! Find your manual LIFE P64077 (MD 83187) - MEDION and take your electronic device back in hand. On this page are published all the documents necessary for the use of your device. LIFE P64077 (MD 83187) by MEDION.
USER MANUAL LIFE P64077 (MD 83187) MEDION
with Docking Station for iPhone*/iPod*
MEDION® LIFE® P64077 (MD 83187)
Contents
Contents. 3
Device overview 5
Left and right sides 5
Front and rear sides 6
Top 7
Back 7
Remote control 8
Safety instructions 9
Warning symbols and key words used in these instructions 9
Proper use. 10
Set-up location 10
Power supply 11
General 12
Ensure accessibility of mains power socket 12
Cleaning and care 12
Laser class 12
Information on electrostatic charge 13
Safe handling of batteries 13
Earphones 14
Preparation 14
Check package contents. 14
Inserting the battery in the remote control 14
Changing the battery 15
Set-up and connections. 15
Setting up the device. 15
Attaching the stand 15
Wall mounting. 16
Aerial connection 16
Inputs 17
Connecting headphones 18
Basic functions. 18
Sensor keys 18
Switching on/off - POWER 18
Setting the time. 19
Automatic switch-off - SLEEP 20
Switch on and off automatically - TIMER. 20
General operating functions 21
Select operating mode 21
iPod mode 22
Radio 23
Tuning 23
Search function 23
Saving and selecting stations 23
Stereo/mono reception 24
RDS reception 24
CD/USB/memory card operation 25
Playback media 25
Playable formats. 25
Inserting and removing CDs. 26
Playback functions 27
Program the playing order of tracks 29
Troubleshooting 30
Cleaning 32
Disposal 32
Technical data 33
Restricted Warranty. 35
Device overview

Left and right sides

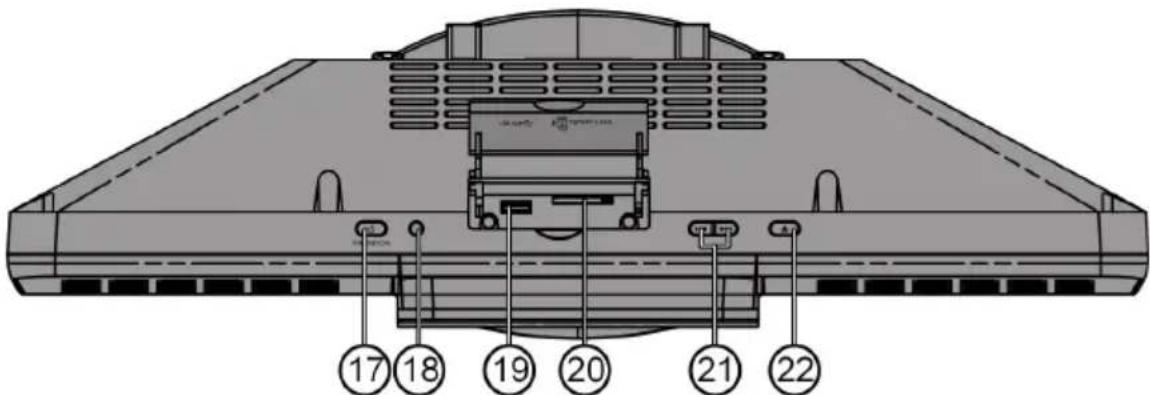
- POWER ON/OFF: Switch device on/off
- Headphone socket 3.5mm jack
- LINE IN: Audio cinch inputs L/R
- FM ANT: Aerial input
Front and rear sides
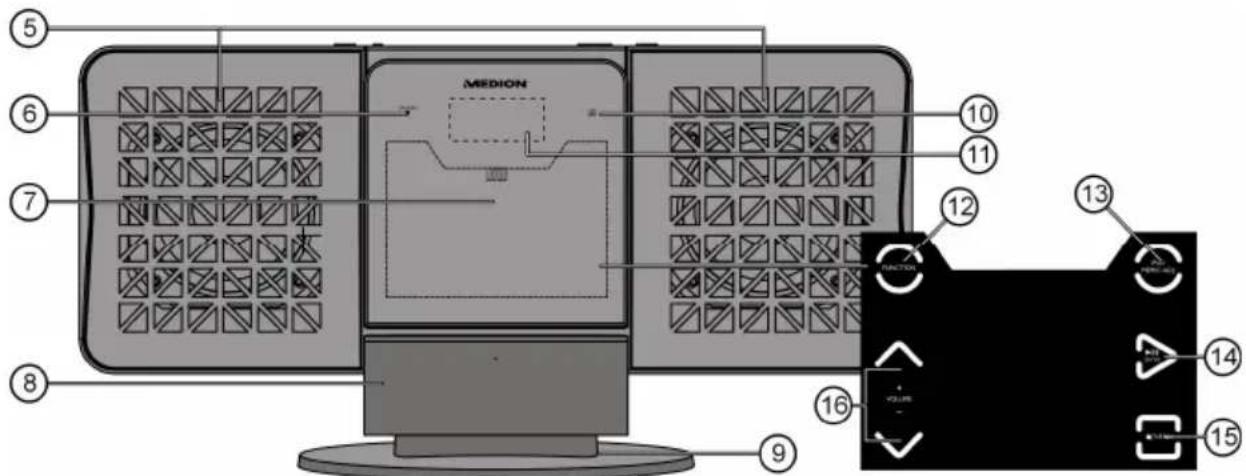
- Loudspeaker
- Standby LED
- Disc compartment
- iPod cradle: "Docking Station" for an iPod device
- Stand
- IR sensor for remote control
- Display
- FUNCTION: Select operating mode
- IPOD/MEM/C.-ADJ.: iPod menu control, programming function and setting time
- II/ENTER: Start and pause playback, confirm entry
- ■/MENU: Stop playback/open menu (iPod operation)
- VOLUME: Setting the volume
Top
- STANDBY: Switch on the device from standby mode and switch back to standby mode
- RADIO SEARCH: Search for stations using their PTY code
- USB connection
20.Card slot for SD memory cards - SKIP/TUNE SEARCH: Previous/next track, search forwards/backwards
- OPEN/CLOSE ▲: Open and close disc compartment
Back
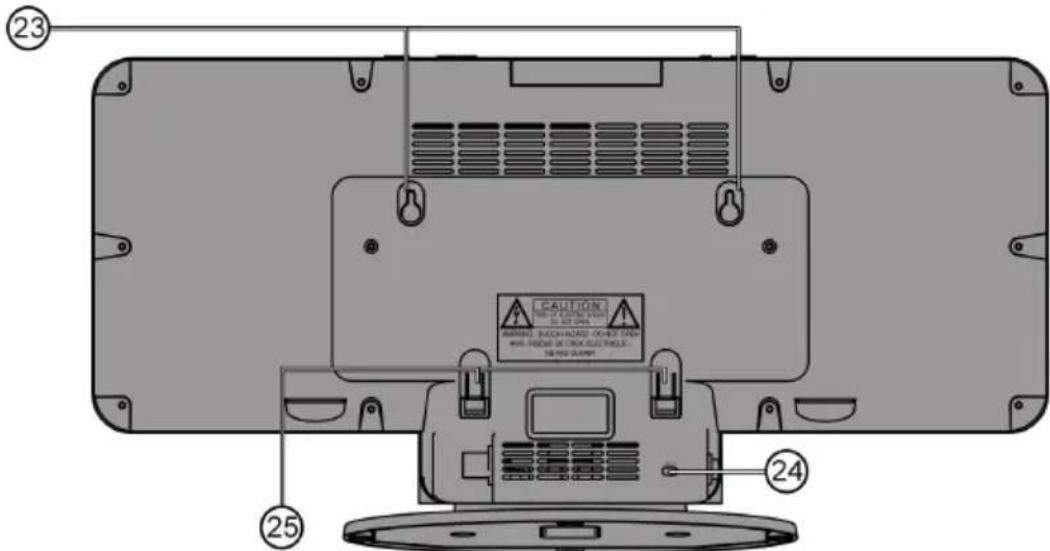
- Holes for wall mounting
- Mains cable
- Spacer (fold out for wall mounting)
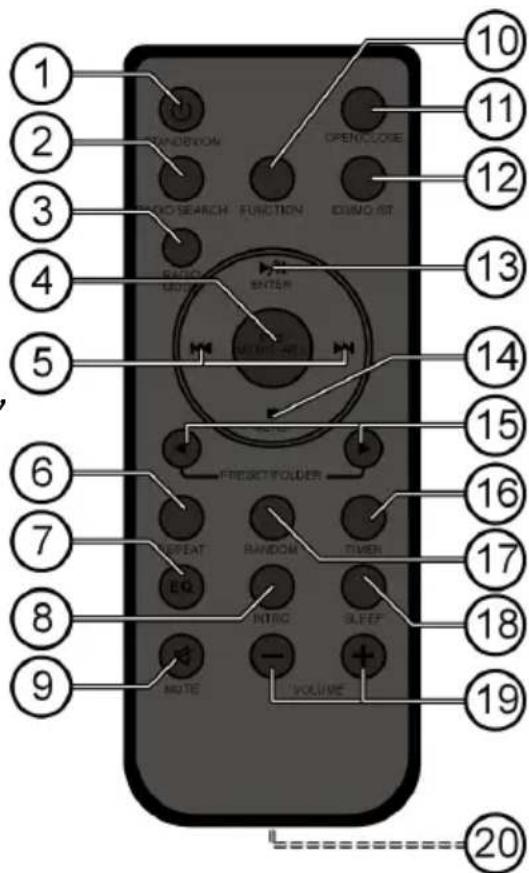
Remote control
- STANDBY: Switch on the device from standby mode and switch back to standby mode
- RADIO SEARCH: Search for stations using their PTY code
- RADIO MODE: Change RDS display
- IPOD/MEM/C.-ADJ: iPod menu control, programming function and setting time
- Media - previous/next track; In radio operation skip to next/previous saved station
- REPEAT: Set repeat function
- EQ: Setting the equaliser
- INTRO: Introduction function
- MUTE:Mute
- FUNCTION: Select operating mode
- OPEN/CLOSE: Open and close disc compartment
- ID3/MONO/ST.: Set ID3 tag for MP3 playback, stereo/mono reception in radio operation
- /ENTER: Start and pause playback
- ■/MENU: Stop playback/open menu (iPod operation)
- PRESET/FOL. : Select station memory position, select folder (MP3 playback)
- TIMER: Set timer function
- RANDOM: Set to random playback
- SLEEP: Set automatic switch-off function
- VOLUME: Setting the volume
- Battery compartment (on the rear side)
Safety instructions
EN

Please be sure to read these operating instructions carefully and follow all instructions given. The instructions will help you to operate the device reliably and help increase its service life. Always store these instructions near the device. Keep these operating instructions so that you can pass them on with the device if you sell it.
Warning symbols and key words used in these instructions
| DANGER! Warning: immediate mortal danger! WARNING! Warning: possible mortal danger and/or serious irreversible injuries | |
| CAUTION! Please follow the guidelines to avoid injuries and/or property damage! CAUTION! Please follow the guidelines to avoid property damage! | |
| PLEASE NOTE! Additional information on using the device! | |
| PLEASE NOTE! Observe the notes in the operating instructions! | |
| WARNING! Warning: danger of electric shock! |
Proper use
The device is intended for playing sound and image media (CDs, MP3 data media, USB devices and memory cards), as well as for radio reception. In addition, you can connect an iPod device to the charging cradle for charging and for the playback of audio files. Never use the device for any other purpose.
This device is not intended for use by people (including children) with reduced physical, sensory or mental abilities or by those without experience and/or knowledge, unless they are supervised by a person responsible for their safety or they have been instructed in its use by that person. Children should be supervised to ensure they do not play with this device.
Set-up location
- Set up and operate all components on a stable, level and vibration-free surface to prevent the device from falling down.
- Do not jolt or shake the device. Impacts may damage the sensitive electronics.
- Please ensure that you do not place the device near heat sources (e.g. heaters) that could affect it.
- Do not place naked flames (e.g. lit candles) on or near the device.
- Make sure that the vents are never covered so as to ensure there is always adequate ventilation.
- Do not place any objects on the cable as these could damage it.
- Ensure that there is always a minimum distance of approx. 10cm above and around the device and between the device and any walls. Ensure that ventilation is adequate.
- Do not use the device outdoors because external elements such as rain, snow, etc. could damage it.
-
Keep the device at a distance of at least one metre from high frequency or magnetic interference sources (televisions, loudspeaker boxes, mobile telephones, etc.) to avoid malfunctions.
-
Large changes in temperature or fluctuations in humidity can cause moisture build-up within the device due to condensation, which can cause an electrical short circuit.

WARNING!
Never try to open and/or repair the device yourself. There is a risk of electric shock.
Please contact our service centre if you have problems with your device.
Power supply

ATTENTION!
Even when the mains switch is off, some components of the device are live. To disconnect the power from your device or to completely isolate the device from voltage sources, unplug the device completely from the mains.
- Connect the device to convenient and easily accessible 230V 50Hz power sockets only.
- In an emergency, you need to be able to disconnect the device from the mains supply. To disconnect the device from the mains supply, always pull on the plug rather than on the cable.
- Remove the plug from the mains socket and the aerial cable from the aerial socket during thunderstorms or if the device is not going to be used for long periods.
- Remove the mains plug and aerial cable if you are away for a long period of time or there is a thunder storm.
- Unwind the cable fully when using the device.
- Do not bend or crush the mains cable.
- To avoid tripping hazards, please avoid using an extension cable.
- Please ensure that the mains cable does not come into contact with hot objects or surfaces.
General
- Do not place containers containing liquid, e.g. vases, on or near to the product, and protect all the parts from rain and water.
- The container may tip over and the liquid may impair the electrical safety of the product. If the plug, cable or device is damaged, immediately remove the plug from the power supply.
- The device is for private use only and not intended for use by companies in the heavy industry sector.
If the device has been moved from a cold to a warm room, wait a while before connecting it to the power supply. The ensuing condensation could damage the device. The device can be operated as soon as it reaches room temperature.
Ensure accessibility of mains power socket

Only connect the machine to a power socket (230 V ~ 50 Hz) that is easy to reach and close to the place where you have set up the device. The socket must be easily accessible so that you can quickly unplug the device from the mains if necessary.
Unplug the device from the mains during a storm or when it is not going to be used for an extended period.
Cleaning and care
- Before cleaning the device, always disconnect it from the mains supply.
- Only use a dry, soft cloth to clean the device. Do not use chemical solutions and cleaning products because these may damage the device's surface and/or inscriptions.
Laser class

The CD player is a class 1 laser product. The device has a safety system that prevents dangerous laser rays from escaping during normal use. In order to avoid eye injuries, never tamper with or cause damage to
the safety system of the device.
The universal remote control has a class 1M infrared diode. Never use optical devices to look at the LED.
EN
Information on electrostatic charge
If the device does not work correctly because of electrostatic charge, reset it by disconnecting it from the mains for a short period of time.
Safe handling of batteries
The remote control is battery-operated. Please observe the following instructions:
Batteries may contain combustible materials. If not handled correctly, batteries can leak, become very hot, ignite or even explode, which could damage your device and/or your health. It is very important that you follow the instructions below:
- Keep batteries away from children. If batteries are swallowed, consult your doctor immediately.
- Before inserting the batteries, check that the contacts in the device and on the batteries are clean. If necessary, clean them.
- Never charge batteries (unless they are designed to be recharged). There is a risk of explosion!
- Never short-circuit the batteries.
- Do not dismantle or deform the batteries. You could injure your hands or fingers, and battery fluid could come into contact with your eyes or skin. If this should happen, rinse the affected areas immediately with a large amount of clean water and contact your doctor immediately.
- Never expose the batteries to excessive heat (such as direct sunlight, fire or similar).
- Always observe the correct polarity. Make sure that the plus (+) and minus (-) poles are correctly inserted to avoid short-circuits.
- Remove the batteries from the device if you do not intend to use it for an extended period.
- Replace all the old batteries in a device with new batteries of the same type.

CAUTION!
Remove leaking batteries from the device immediately. Avoid contact with skin, eyes and mucous membranes. Rinse the areas affected by the battery acid immediately with plenty of clean water and contact a doctor immediately. There is a risk of chemical burning due to battery acid.
- Remove dead batteries from the device immediately. There is an increased risk of leakage. Remove the batteries from the device if you do not intend to use it for a long period of time.
Earphones

CAUTION!
Listening with earphones at a high volume can damage your hearing. Before putting on earphones, reduce the volume to minimum! Your hearing can be damaged if you listen at high volumes over a long period or if the volume is increased too suddenly.
Preparation
Check package contents

CAUTION!
Keep the packaging out of reach of children. There is a risk of suffocation.
Unpack the device and ensure that the following parts are included:
- Micro Audio System
Remote control
FM aerial
These operating instructions and warranty card
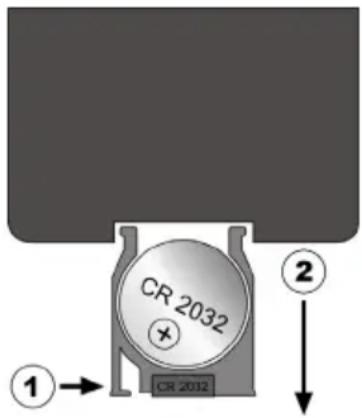
Inserting the battery in the remote control
The battery is already inserted in the remote control upon delivery. To activate the remote control, remove the insulation strip containing the notice "PLEASE REMOVE IT BEFORE USE" from the underside of the remote control.
Changing the battery
The remote control works with one 3 V button battery, type CR2032.

WARNING! Risk of explosion if batteries are replaced incorrectly. Replace batteries only with the same or equivalent type.
Press the latch and pull out the battery compartment.
- Remove the old battery and take it to a used battery collection point for proper disposal.
- Insert a fresh CR 2032 battery into the battery compartment with the positive pole facing up. Ensure the +/- terminals are correct.
Slide the compartment back into place.
Set-up and connections
Setting up the device
- Place the device on a sturdy, level surface. Please take note of the safety instructions on page 8.
Some aggressive furniture paints can corrode the device's rubber feet. If necessary, place the device on a suitable underlay.

CAUTION!
Before making a connection to an external device, unplug all devices from the mains.
Attaching the stand
If you want to position the device in an upright position, use the supplied stand.
- Place the device onto the stand with the four hooks in the corresponding notches and push the device onto the stand until it clicks into place.
To remove the stand, push the stand towards the rear of the device and then pull it from the device.
Wall mounting
You can attach the main device to a wall. To do so, you must attach two screws to the wall. The heads of the screws must fit into the keyhole notches on the back of the device.

ATTENTION!
Before drilling the holes for assembly, make sure that there are no power or supply cables or pipes in the wall.
Mark the holes to be drilled. Distance between the drill holes for device: 160mm . Drill 2 holes for 6mm wall plugs using these markings.
Insert 6mm plastic wall plugs into the drilled holes. Insert the screws into the wall plugs and tighten them with a screw driver.
Hang the device using the keyhole notches provided and fold out the spacer so that the device hangs straight on the wall.
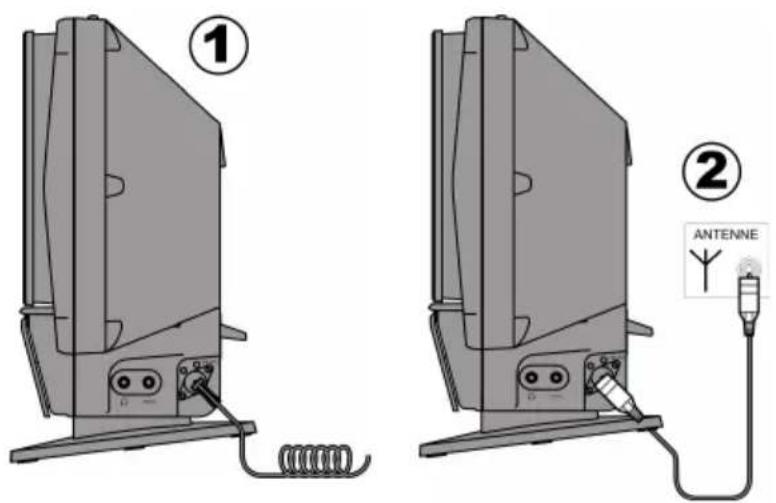
Aerial connection
Connect an aerial cable to the FM ANT Ohm aerial connection on the device to enable radio reception.
- A wire aerial is included in the delivery. Connect the wire aerial to the device and position it to achieve the best reception (1).
- Alternatively, you can connect an aerial cable to an appropriate wall socket (2).
Inputs
Playing audio signals from an external device
The device has an analogue sound input for connection to an external audio device.
Connect a 3.5mm stereo jack cable to the LINE IN socket on the device and to the corresponding outputs on the external device.
USB connection
Open the cover on the top of the device.
You can connect a USB device such as an MP3 player to the USB connection on the front of the device.
SelectUSBmode using theFUNCTION button.
PLEASE NOTE!

The playback functions are described from page 25 onwards.
SD/MMC memory cards
Open the cover on the top of the device.
Insert an SD/MMC memory card into the card slot with the bevelled corner on the left and the contacts pointing backwards.
Select CARD mode using the FUNCTION button.
PLEASE NOTE!
The playback functions are described from page 25 onwards.

Connecting headphones
Connect a set of headphones with a 3.5mm jack plug to the headphone socket. This deactivates the speakers automatically.

CAUTION!
Excessive volume when using headphones or earphones can damage your hearing. Before putting on headphones, set the volume to minimum!
Basic functions
Sensor keys
The sensor keys are touch sensitive and merely need to be touched (without applying any pressure).
Switching on/off - POWER
Use the operating switch ON/OFF on the back of the device to switch the device on. The device is now in standby mode. The STANDBY-LED on the device will light up red.
To switch on the device, press the STANDBY/ON button on the device or on the remote control. Information will appear on the display.
To switch the device off, press the STANDBY/ON button on the device or on the remote control.
The device is now in standby mode again.

PLEASE NOTE!
If you touch one of the sensor keys the time is shown in the display. After approx. 10 seconds the light will go out.
To switch the device off completely, move the operating switch to the OFF position.
Setting the time
The time is automatically set when using RDS reception and does not need to be set manually. A manually set time will be reset when using RDS reception. However, the 12/24 hour setting will remain unchanged.
To display the time during operation, press the IPOD/MEM/C.-ADJ. button for approx. 2 seconds.
How to set the time manually:
Switch the device to standby mode.
Press the IPOD/MEM/C-ADJ. button on the device. Use the or buttons to choose between 24 and 12 hour display (24 HOUR or 12 HOUR).
If you select 12 hour display, "AM" or "PM" will appear before the hour display: AM: the hours from 00:00 to 11:59; PM: the hours from 12:00 to 23:59.
Press the IPOD/MEM/C.-ADJ. button again.
The hour display flashes. Press the or buttons within 6 seconds to enter the hour.
Press the button IPOD/MEM/C-ADJ. The minute display will flash.
Press the or buttons within 6 seconds to enter the minutes.
Press the IPOD/MEM/C.-ADJ. button again. The time is now set and the figures will have stopped flashing.
Automatic switch-off - SLEEP
You can set a time after which the device will automatically switch into standby mode.
Press the SLEEP button on the remote control repeatedly to set the required time: 90 minutes >80 minutes >70 minutes, etc. down to 10 minutes. The bed symbol will appear on the display to show that the SLEEP timer has been set.
To switch off the SLEEP timer, press SLEEP until the bed symbol disappears.
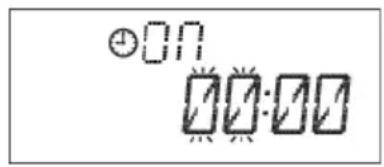
Switch on and off automatically - TIMER
You can set the player to switch on or off at a specified time (timer function).
Selecting a music source
An audio source must be present so that the device can switch on at the preprogrammed time.
- Set the required radio station and volume level for the radio function.
- Set the required sources for the other functions. Insert a CD, connect a USB device or insert a card.
Setting the timer
How to set the switch on/off time:
Press the TIMER button on the remote control to set the switch-on time. The display reads ON and the hour digit flashes.
Press or within 6 seconds to set the hour.
Press TIMER again. The minutes flash on the display.
Use or to enter the minutes.
Press the TIMER button again to set the switch-off time. The display reads OFF and the hour digit flashes.
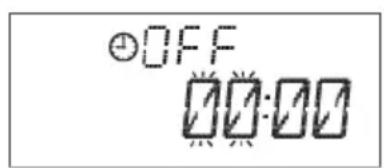
Press or to set the hour.
Press TIMER again. The minutes flash on the display.
Use or to enter the minutes.
Press TIMER again. Now use or to select the music source: TUNER > CD > USB > CARD > IPOD.
Press the TIMER button. Now use or to set the volume at which the device should switch on.
Press the TIMER button again.
The timer is now set. All the settings are now displayed once again. The time and the clock symbol for the programmed timer will appear.
Switching off the timer
Press the TIMER button on the remote control.
The clock symbol 品 disappears and the timer is switched off.
General operating functions
Volume
Press the VOLUME+ button to increase the volume.
Press the VOLUME- button to decrease the volume.
Switch sound off - MUTE
Press the button to turn the sound off completely.
Press the button again or a volume button to turn the sound back on.
Setting the equaliser
Press the EQ button repeatedly to call up the following sound effects: CLASSIC > ROCK> POP> JAZZ> PASS.
Select operating mode
Radio, CD, USB, CARD, IPOD, AUX
Select the operating mode using the FUNCTION button.
TUNER: Radio
- CD:Playback of an audio or MP3 CD
- USB: Playback from USB storage media
- CARD: Playback from a memory card
- IPOD: Playback from an iPod/iPhone
- AUX:Playback from an external device
iPod mode
Insert your iPod/iPhone into the slide-in cradle for the player.
Press the FUNCTION button a number of times until "i Pod" is shown in the display.
When the iPod has been correctly connected, IPOD will be shown in the display. The iPod playback control is active.

NOTE
The iPod mode can only be called up when an iPod is inserted into the iPod cradle. Otherwise, "NO IPOD" will be shown on the display.
- You can operate your iPod as usual. You may need to press the IPOD/MEM/C-ADJ. button in order to activate the iPod menu control. IPODMENU will appear in the display.
- You can also carry out some of the iPod functions on the docking station.
You can now operate the iPod via the following buttons on the device and on the remote control:
IPOD/MEM/C-ADJ.: Switch between iPod menu control and iPod playback control
VOLUME: Setting the volume
Operation with active iPod menu control
■/MENU: Open menu.
ENTER: Confirm selection
andove the selection in the menus
Operation with active iPod playback control
▶II/ENTER: Start playback. To stop playback, press the button again. Pressing the button once more resumes playback.
■/MENU: To stop playback.
and bld down the buttons to rewind/fast forward within a track. Touch lightly to play previous/next track.
Radio
Press the FUNCTION button a number of times until "Tuner" is shown in the display.
The current radio frequency is shown in the display.
If you have connected a wire aerial, arrange the aerial to achieve the optimum reception.

NOTE
The display always shows the RDS station name. In order to view the radio frequency, press the RADIO MODE button a number of times until the radio frequency is shown in the display.
Tuning
Press the or buttons to manually tune into a station.
Search function
Hold down the or buttons for a couple of seconds to carry out an automatic station search forwards or backwards.
Saving and selecting stations
The radio has 30 memory spaces where you can save your favourite stations.
Tune in to the station that you want to save.
In order to save the station that you are tuned to, press the IPOD/MEM/C-ADJ. button and then select the station position with the PRESET/FOL. buttons.
To complete the saving process, press the IPOD/MEM/C-ADJ. button again.
- You can call up the saved stations consecutively with the PRESET/FOL. buttons.
Stereo/mono reception
If the stereo reception is too weak, you may be able to achieve clear reception with the mono setting.
Press the ID3/MONO/ST. button on the remote control to switch between stereo and mono reception. "Mono" or "Stereo" will appear in the display.
RDS reception
If a radio station transmits RDS signals then the RDS will appear in the display.
Display RDS
Press the RADIO MODE button to show the following information in the display:
RDS NAME: Station name (if this is not available, the display will show PS NONE)
RDS TYPE: PTY code for the currently played station (if this is not available, the display will show PTY NONE)
RDS TEXT: Further information from the radio text (if this is not available, the display will show RT NONE).
- CT: The time received via RDS (if this is not available, the display will show CT NONE)
Frequency
RDS search
Press the RADIO SEARCH button to search for the station according to its PTY code.
Then select the PTY code you want to find using the PRESET/FOL. buttons.
To start the search backwards or forwards, press the or button.
The search will stop at the first station that corresponds to the code entered.
If no station is found with the corresponding code then the display will show the message "NO FOUND".
CD/USB/memory card operation
Playback media
Playable media are:
- Audio CDs, CD-Rs, CD-RWs
- USB memory stick or MP3 player (USB version 1.1 and 2.0). Please note that it is not possible to guarantee full compatibility with all memory sticks.
- SD/MMC memory card.

PLEASE NOTE!
The playback functions for these media are largely identical and have therefore been described together in these instructions.
Playable formats
The device can play MP3 and WMA media.
About MP3 and WMA
MP3 and WMA formats are Windows compression formats for audio data. WMA stands for "Windows Media Audio".
MP3 and WMA files have to be saved with the right file extension .mp3 or .wma in order to be recognised.
Media with MP3 and WMA tracks can be structured in directories, subdirectories and individual files (individual tracks). They often contain a much larger number of individual tracks than an audio CD which means that the reading and navigation time may be increased.
"ID3 tags" can be allocated when MP3 discs are made, depending on the creation programme. These ID3 tags contain information such as the name of the musicians, the name of the track and possibly other information.
The ID3 tags can be read by your device's MP3 function and then shown on the display.
Inserting and removing CDs
Information about the CD compartment
- Never insert foreign objects into the CD compartment as this could destroy the mechanism.
- To prevent the accumulation of dust in the device, do not leave the CD compartment open for long periods of time.
- Never touch the lens in the CD compartment.
- If the CD is very dirty or badly marked with fingerprints, the playback function may be delayed or the disc may start from another position.
- Dirt on the scanning lens may cause interruptions during playback or other malfunctions.
- If you want to remove dust from the CD compartment, simply use a normal blower brush (found in photographic supplies shops).
Open the CD compartment by pressing the button on the device
or the remote control. The disc compartment opens.
Insert a CD into the compartment with the label side up.
- Close the CD compartment by pressing the OPEN/CLOSE button once again or by pressing the ENTER button. The CD starts to rotate and READING appears on the display.
CD playback starts automatically. If there is no disc inserted or if the disc

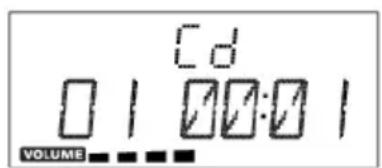

cannot be read, the display reads NO DISC.

CAUTION!
Do not open the CD compartment while the disc is still playing or rotating. Press STOP first.
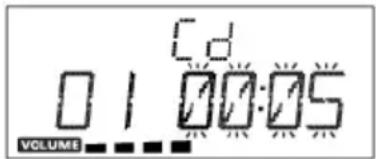
Playback functions
PLAY, PAUSE, STOP, skip
Press the ENTER button on the player or on the remote control in order to start playback.
To stop playback, press the button again. The remaining time flashes in the pause display.
Press ENTER again to continue playback from the same point.
Press /MENU to end playback. The device goes into stop mode.
To jump to the start of a track press or
Hold down or to start fast forward/rewind.
MP3/WMA folders
To change folders in MP3/WMA media, press PRESET/FOLDER or
If the tracks are written in ID3 format, you can display the information stored.
Press ID3/MONO/ST. and ID3 ON will appear on the display. The information appears in scrolling text: "TITLE" - track name - "ARTIST" - name of the artist.
If you want to exit the ID3 function, press the ID3/MO./ST. button again and ID3 OFF will appear on the display.
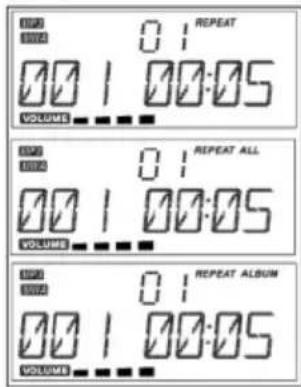
REPEAT
Press REPEAT while in stop mode or during play. REPEAT will appear in the display. The current track will then be repeated.
Press REPEAT again. The display will show REPEAT ALL. All the tracks will be repeated.
In MP3/WMA mode press REPEAT again, to repeat the whole folder.
To cancel the REPEAT function, press the REPEAT button until the word disappears from the display.
RANDOM
With the RANDOM function enabled all the tracks are played in a random order.
Press the RANDOM button on the remote control during playback or in stop mode. Random playback now starts.
Press the RANDOM button again to revert to normal playback mode.

INTRO
Press the INTRO button on the remote control during playback or in stop mode. The first 10 seconds of each track on the CD will be played.
Press the INTRO button on the remote control again to return to normal play mode.
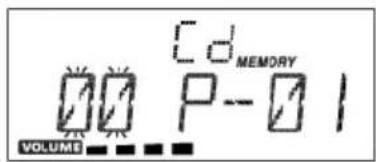
Program the playing order of tracks

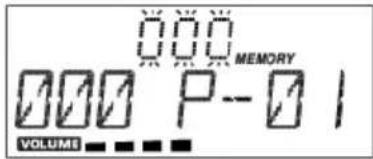
You can set a playing order for up to 32 tracks in CD mode and 64 tracks in MP3/WMA mode. The device must be in stop mode before programming can begin.
- Stop playback so that STOP appears on the display.
Press the button IPOD/MEM/C-ADJ. on the device or remote control. MEMORY and programme position p - 0 1 will appear on the display.
Track 0 0 will flash during CD playback.
Folder 0 0 will flash during MP3/WMA playback.
During CD playback, now use the or buttons to select a track.
For MP3/WMA playback, use
PRESET/FOLDER to select a folder.
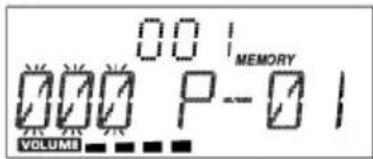
Press the button IPOD/MEM/C-ADJ. Select another track in CD playback. Now select a track in MP3/WMA playback
Press IPOD/MEM/C-ADJ. and save more tracks in the same way.
Press IPOD/MEM/C-ADJ. to go through the tracks in the list consecutively.
Press ENTER to play the list.

NOTE
You can also use the REPEAT function described above with a programmed list.
Editing a programmed list
To end playback press MENU.
Press IPOD/MEM/C-ADJ. again to make a new list.
Deleting a programmed list
A programmed list will be deleted if
- the CD compartment is opened,
- another operating mode is selected,
or the device is switched off.
Troubleshooting
If errors occur, check first whether you can correct the problem yourself. The following overview may help you.

CAUTION!
Never try to repair the device yourself. Contact our service centre or other qualified personnel if a repair is necessary.
PROBLEM POSSIBLE CAUSE / REMEDY
GENERAL
No standby display Check the mains connection: is the plug firmly inserted in the mains socket?
The player does not work
Move the POWER switch on the device to ON, then press the (STANDBY) button on the remote control. If the device has been affected by a storm, static charging or other external factor, try the following procedure: move the POWER switch on the device to the OFF position. Then pull out the mains cable and plug it back in.
The disc does not play even though (PLAY) has been pressed, or stops again immediately
Is the disc inserted with the title (printed) side facing upwards?
The device does not respond to the remote control
Check whether the disc is damaged by trying another disc. If the disc is dirty, clean it carefully, wiping it from the centre to the edge with a soft, dry cloth. If condensation has formed inside the device: leave the player for one to two hours to dry off.
Check whether the batteries need changing and have been inserted correctly. Remove anything which may be blocking the signal between the infrared transmitter, the remote control and the device's sensor. Is the distance between the remote control and the player too great?
No sound Has the sound been switched off
(MUTE)?
Cleaning
Always disconnect the device from the mains supply before cleaning it. Only use a dry, soft cloth to clean the device. Do not use chemical solutions or cleaning products because these may damage the device's surface and/or inscriptions.
Disposal
Packaging

Your device has been packaged to protect it from damage during transit. Packaging materials are raw materials and can therefore be reused or recycled.
Device

At the end of its service life, the device should not be disposed of with the household rubbish. Seek the advice of your local authority on proper environmentally friendly disposal facilities.
Batteries

Do not dispose of used batteries in the normal household rubbish. Batteries should be taken to a collection point for used batteries.
Technical data
Voltage: 230 V 50 Hz
Power consumption: 38 W
Output power 2 × 10 watts RMS
Batteries for remote control: 3 V (CR2032)
Radio
FM waveband: 87.5-108 MHz
Connections
FM aerial: 75 ohms
Headphone socket (front): 3.5 mm jack plug
USB input: Version 2.0
CD player
Laser output: Class 1 laser
Supported formats: CD-R, CD-RW, audio
CD, MP3 CD
Only play audio CDs which are labelled as follows:


Please note:
These days there are many non-standard ways of recording CDs, copy protection methods, and also a wide variety of blank CD-R and CD-RW discs. Therefore, there may occasionally be read errors or delays. This does not mean that the machine is faulty.

Subject to technical modifications.
EN
Copyright © 2010. All rights reserved.
The company Medion' owns the copyright.
Trademarks: Other trademarks used in this document are the property of their respective owners.
Subject to technical and optical changes, as well as printing errors.
Restricted Warranty
I. General Conditions of Warranty
1. General
This warranty covers defects relating to workmanship and manufacture in MEDION products. The period during which this warranty is valid and during which claims against the warranty can be made to MEDION must be in accordance with the following terms in order to be considered eligible:
- Is effective from the date of purchase or receipt of the MEDION product from an authorised seller of MEDION products; and
- expires at the end of the warranty period specified on the warranty card provided with the product.
For the warranty to be valid, you must:
- provide suitable evidence of purchase, a copy of the original purchase receipt from an authorised seller of MEDION products is preferred; or
- register your product within 28 days of purchase either online at www.MEDION.co.uk or by completing and returning the pre-paid registration card included with the product.
Please keep the original purchase receipt and the warranty card in a safe place. MEDION and its authorised sellers reserve the right to refuse a repair under warranty or a warranty confirmation if a proof of purchase [or registration of purchase] cannot be established, or has not been, submitted.
When it is necessary to return your product for repair please ensure that your product is suitably packed for transportation.
Provided that your product is still within warranty (please check the duration of the warranty period as described above) and is eligible for repair or replacement under the terms of the warranty, to return your product, please telephone MEDION on the service hotline number. You will be sent a pre-paid transportation box suitable for returning your product to MEDION. PLEASE MAKE SURE THAT YOU HAVE A BACKUP COPY OF ALL DATA ON THE PRODUCT BEFORE RETURNING THE PRODUCT TO MEDION. MEDION shall bear the costs of postage and packaging for
EN
returning the product and the transportation risk. However, if following examination of the defective product in question, MEDION, in its reasonable opinion, considers that the defect has been caused by:
- your operating and/or using the product other than as instructed in the accompanying documentation;
- damage caused in transit as a result of your negligence in packaging of the product; and/or
- otherwise than in accordance with the terms of this warranty;
This warranty shall be void and you may be required by MEDION to reimburse MEDION for the reasonable costs of postage and packaging before MEDION will return the product to you. If so and you would still like MEDION to repair or replace the product, MEDION may do so but you will be charged MEDION's standard rates for repair and replacement for this service.
Before returning the product, please contact MEDION via the service hotline or via the internet (www.MEDION.co.uk). You will receive a reference number (RMA No.) on the warranty card. Please mark the outside of your package to ensure that this reference number is clearly visible. Please submit a letter containing as much detailed information as possible and, a full description of the defect or fault.
This should include:
- a description of the fault;
- when it occurred, how long it has been evident and how frequently it occurs;
- any errors message(s) displayed when using the product;
- a description of the circumstance(s) and conditions in which the fault occurs; and
- whether it is an intermittent or persistent fault;
This will greatly assist MEDION in identifying the defect, when submitted together with the defective product.
Unless otherwise instructed by a MEDION representative in all cases, the product must be returned complete with all parts which were included with the original product. Incomplete contents of the returned package may lead to a delay in the repair or replacement. MEDION does not accept any liability for any additionally submitted material(s) which were not supplied with the original MEDION product.
This warranty does not affect your statutory rights in any way and is subject to the applicable legal statutes of the country where the product was sold to you by an authorised MEDION seller.
2. Scope
Subject to any exclusions set out within this warranty, where there is a defect in your MEDION product covered by this warranty, MEDION will repair or replace the MEDION product. The decision whether to repair or replace the product will be made solely at the discretion of MEDION. MEDION may, in its own discretion, replace the product returned for repair under warranty with a replacement product that is either identical or, in the event that such product(s) are no longer available, a product of equal or superior specification and quality.
No warranty is given for batteries or rechargeable batteries or for consumable materials subject to wear and tear, i.e. for parts which have to be replaced periodically during the normal use of the product, such as video-projector lamp.
Non critical failures that fall within industry specified tolerances e.g. noise, LCD pixels are not covered by this warranty. Please consult the appropriate section in your user or instruction manual for this product for exact specifications and tolerances.
To the extent which is permitted under law, MEDION will accept no liability for burnt-in images on plasma or LCD products as a result of normal wear and tear during the operation of the product. Please refer to your user or instruction manual for this product for detailed operating instructions for your plasma or LCD product.
The warranty does not cover errors relating to the playback of data media in an incompatible format or created with unsuitable software.
If it is found during repair or assessment that the defect concerned is not covered under warranty, MEDION reserves the right to invoice you for all reasonable costs incurred by MEDION. These costs will be in relation to the return of the product, including reasonable administration costs, plus reasonable costs for materials used and labour provided when repairing or replacing the product. This is subject to MEDION providing you with an estimate for carrying out such work prior to costs being incurred and that you have accepted the estimate.
You are entitled to seek independent advice or consultation relating to your product or any of MEDION's findings. MEDION will not be liable for any costs incurred to you when doing so.
3. Exclusion from warranty
To the extent permitted by law, this warranty shall be void in the event that defects or loss caused by:
a)failure and damage resulting from the operation of the product in an environment other than that recommended in the accompanying user or instruction manual (e.g. in direct sunlight or in a damp room);
b)accidental damage;
c) use other than in accordance with the accompanying user or instruction manual;
d)modifications, conversions, expansions, maintenance and/or repairs made to the MEDION product by unauthorised repairers or use of unauthorised third party parts;
e) negligence;
f) virus attack or software errors; or
g)improper transportation or packaging during return of the product.
This warranty will also be considered void if labels or serial numbers of the product or of a component of the product are modified or made illegible.
To the extent permitted by law, MEDION shall; only be responsible for losses which are a reasonably foreseeable consequence of the relevant defect in the product; MEDION will not be responsible for any costs incurred in relation to software configuration; economic loss; loss of opportunity; loss of income; or loss of data or software arising out of its repair or replacement of a MEDION product under this warranty
4. Service Hotline
Before returning the product to MEDION you must contact us using the service hotline or via the internet (www.MEDION.co.uk). You will receive further instructions for making your claim under warranty when you call. The service hotline is available on 362 days in the year, including Sundays and bank holidays but excluding Christmas day, New Years Day and Easter day. The service hotline is subject to [national rate] telephone call charges. These charges are subject to change. The price of your call will be stated at the beginning of the call.
II. Special warranty conditions for MEDION PC, notebook, pocket PC (PDA) and navigation devices (PNA)
The following terms apply to MEDION PC, notebook, desktop, pocket PC and laptop products and optional items included with such products. If one of these items has a fault, you also have a warranty claim for its repair or replacement, from MEDION. The warranty covers the costs of materials and labour for repairing or replacing the defective MEDION product or the optional item in question.
Hardware connected to your product that was not produced or marketed by MEDION can invalidate the warranty if MEDION can reasonably demonstrate that damage to the MEDION product or of the optional item included with the delivery was caused by such hardware. You are entitled to seek independent advice or consultation relating to your product or any of MEDION's findings. MEDION will not be liable for any costs incurred to you when doing so.
This warranty is restricted in relation to any pre-installed operating system as well as to application programme software that is included with the MEDION product in question. This warranty is restricted as follows:
For pre-installed operating system as well as to application programme software included in the MEDION product, MEDION only guarantees the data media (e.g. the diskettes and CD-ROMs) upon which this software is delivered and warrants that such data media shall be free from material and processing defects for a period of 90 days from the date of purchase of the MEDION product from an authorised seller of MEDION. MEDION will replace defective data media free of charge.
Any claims in respect of defective pre-installed operating system as well as to application programme software are hereby expressly excluded and you should contact the relevant licensor or copyright owner of the defective software in question. MEDION does not guarantee that any software supplied with MEDION products will function without interruption, will be free from errors or that it will fulfil your requirements. MEDION does not guarantee the 100% accuracy of the maps provided with the Navigation device.
It may be necessary to delete all data in the product in order to repair the MEDION product. PLEASE MAKE SURE THAT YOU HAVE A BACKUP COPY OF ALL DATA ON THE PRODUCT BEFORE RETURNING THE PRODUCT TO MEDION. To the extent permitted by law, MEDION excludes all liability for loss of data and MEDION recommends in all cases that you back up all data on your MEDION product before returning the product to MEDION.
III. Special warranty conditions for repair on site or replacement on site
If a claim for repair or replacement on site is included within the terms of the warranty card provided with the product, the special warranty conditions for repair or replacement of your MEDION product on site apply.
The following provisions must be made by you for carrying out repairs or replacements on site:
-
MEDION or its authorised personnel must have unrestricted, safe and immediate access to the products.
-
Telecommunication facilities required by MEDION or its authorised personnel for proper execution of your order, for testing and diagnostic purposes and for remedying faults are provided by you at your own expense.
-
You are responsible yourself for restoring the application software after the repair services have been carried out by MEDION or its authorised personnel.
-
You must take all other necessary steps to enable MEDION or its authorised personnel to carry out your order properly.
-
You are responsible yourself for connecting and configuring any existing external peripheral products after MEDION or its authorised personnel have carried out their repairs.
-
The free cancellation period for repairs or replacements on site is 24 hours, thereafter our reasonable costs resulting from late or missing cancellation shall be invoiced at your expense.
Inhaltsverzeichnis
Radio, CD, USB, CARD, IPOD, AUX
Radio, CD, USB, CARD, IPOD, AUX
Mode CD/USB/Carte mémoire
PROBLÈME CAUSE POSSIBLE / SOLUTION
GÉNERALITÉS
Radio, CD, USB, CARD, IPOD, AUX
PLAY, PAUSE, STOP, Salta brano
Cartelle in fornato MP3/WMA
Radio, CD, USB, CARD, IPOD, AUX
VOLUME: Volume instellen
Radio, CD, USB, CARD, IPOD, AUX
PLAY, PAUSE, STOP, spoling
Tryk på knappen ENTER på apparatet eller på fjernbetjeningen for at starte afspilningen.
Stille inn equalizer
Radio, CD, USB, CARD, IPOD, AUX
Bruk FUNCTION-tasten til a velge bruksmodus.
TUNER: Radio
CD: Spille av audio-eller MP3-CD
- USB: Spille av lyd fra en USB-enhet
Radio, CD, USB, KORT, IPOD, AUX
WMA stared for "Windows Media Audio".
Medion Electronics Ltd. 120 Faraday Park, Faraday Road, Dorcan windon SN3 5JF, Wiltshire United Kingdom
Hotline (UK & N Ireland) : 0871 37 61 020 (Costs 7p/min from a BT landline, mobile costs may be higher)
Fax: 01793 71 57 16
To contact us by email please visit the "Service and Support" section of our website at www.medion.co.uk
AT
Medion Service Center Franz-Fritsch-Str. 11 4600 Wels Osterreich
Hotline: 0810 - 001048 Fax: 07242 - 93967592 (0,10 Euro/Minute)
Medion Service Siloring 9
5606 Dintikon
Schweiz
Hotline: 0848-333332
SE
Medion Service Center
Zieger Teknik AB
Gottorpsgatan 5
582 73 Linköping
Sverige
Hotline: (+46) 77 140 0405 Fax: (+46) 77 140 0407
e-mail:
service-sweden@medion.com www.medion.com/se