— Docking station — Mode d'emploi PDF")
LIFE E61400 (MD 44400) - Docking station MEDION - Free user manual and instructions
Find the device manual for free LIFE E61400 (MD 44400) MEDION in PDF.

| Product type | Audio docking station with Bluetooth, USB player and microphone inputs |
| Brand | Medion |
| Model | LIFE E61400 (MD 44400) |
| Dimensions (W x H x D) | 260 mm x 610 mm x 260 mm |
| Weight | 8.91 kg |
| Power supply | AC 100-240 V ~ 50/60 Hz, 35 W; built-in lead-gel battery 12 V / 4000 mAh (48 Wh), battery life 3-4 h at 50% volume |
| Wireless connectivity | Bluetooth 5.0 (profiles A2DP 1.2, AVRCP 1.0), range up to 10 m |
| Ports | 1 x USB-A (MP3 playback, up to 32 GB, FAT16/32), 1 x USB-A (charging 5 V / 1 A), 1 x AUX input (3.5 mm jack), 2 x microphone inputs (6.3 mm jack) |
| Audio functions | Super Bass amplifier, preset equalizer (Flat/Classic/Rock/Pop/Jazz), echo effect for microphone, random and repeat playback, fast forward/rewind, folder selection |
| Lighting | Party LED with 5 effects, including 2 synchronized to music; volume knob backlight |
| Included microphone | Yes, 1 microphone with on/off switch, frequency response 30 Hz – 15 kHz, sensitivity -73 dB ±3 dB, impedance 600 Ω ±30% |
| Output power | 2 x 22 W RMS |
| Protection class | II (double insulation) |
| Operating temperature | +5 °C to +35 °C, relative humidity max. 85% (non-condensing) |
| Storage temperature | 0 °C to +40 °C, relative humidity max. 85% (non-condensing) |
| Cleaning | Soft, dry cloth; do not use solvents or chemicals |
| Safety | Detailed instructions in the manual: keep out of reach of children, avoid moisture, do not open the device, use only on 100-240 V mains |
| Spare parts and repairability | Built-in battery not user-replaceable; for repairs, contact Medion customer service |
| Package contents | Audio system, power cord, microphone, user manual and warranty documents |
| Warranty | Statutory warranty; Medion customer service (contact details in the manual) |
Frequently Asked Questions - LIFE E61400 (MD 44400) MEDION
User questions about LIFE E61400 (MD 44400) MEDION
0 question about this device. Answer the ones you know or ask your own.
Ask a new question about this device
Download the instructions for your Docking station in PDF format for free! Find your manual LIFE E61400 (MD 44400) - MEDION and take your electronic device back in hand. On this page are published all the documents necessary for the use of your device. LIFE E61400 (MD 44400) by MEDION.
USER MANUAL LIFE E61400 (MD 44400) MEDION
natural_image
Close-up of a black and purple textured device with two circular cutouts (no visible text or symbols)Bluetooth® Party-Soundsystem Bluetooth® Système sonore de fête Bluetooth® Party-Soundsysteem Portable Bluetooth® Sound System Bluetooth® Sistema audio party Sistema de sonido para fiestas con Bluetooth®
MEDION® LIFE® E61400 (MD 44400)
Inhaltsverzeichnis
DE
text_image
QR code image containing encoded data, no visible human-readable texttext_image
QR code image containing encoded data, no visible human-readable texttext_image
QR code image containing encoded data, no visible human-readable text1. Information about this user manual....89
1.1. Explanation of symbols 89
FR
2. Proper use
3. Safety information
NL
3.1. Installation location....92
EN
3.2. Power supply 93
IT
3.3. Ambient temperature 94
ES
3.4. If there are defects....95
4. Package contents
5. Device overview 96
5.1. Top....96
5.2. Front and back 98
5.3. Microphone....99
6. Getting started
6.1. Setting up the device....99
6.2. Mains operation – connecting the mains cable .....99
6.3. Internal rechargeable battery....100
6.4. Switch the device on/off....100
7. Connecting an external playback device.... 101
8. Inserting USB memory devices....101
9. Connecting devices via Bluetooth ^® 102
10. Operation.... 103
10.1. Adjusting the volume.... 103
10.2. Super bass....103
10.3. Equaliser 103
10.4. Party LED light 103
10.5. Starting/pausing playback.... 104
10.6. Track selection, fast forward/rewind.... 104
10.7. Playback options in USB mode 104
10.8. Repeat function 105
10.9. Random playback 105
11. Connecting a microphone.... 105
12. Charging an external device via USB 106
13. Cleaning 106
14. Storing the device when not in use.... 106
15. EU Declaration of Conformity.... 107
15.1. Trademark information 107
16. Technical specifications .... 107
17. Disposal.... 109
18. Service information.... 110
- Privacy statement 111
- Legal Notice.... 112
1. Information about this user manual

Thank you for choosing our product. We hope you enjoy using this device.
Please read the safety instructions and the user manual carefully before using the device for the first time. Note the warnings on the device and in the user manual.
Always keep the user manual close to hand. If you sell the device or give it away, please ensure that you also pass on this user manual. It is an essential component of the product.
1.1. Explanation of symbols
If a block of text is marked with one of the warning symbols listed below, the hazard described in that text must be avoided to prevent the potential consequences described there from occurring.

DANGER!
Warning: risk of fatal injury!

WARNING!
Warning: risk of possible fatal injury and/or serious irreversible injuries!

NOTICE!
Follow these instructions to prevent damage to the device!

More detailed information about using the device!

Products that feature this symbol meet the requirements of the EU directives (see chapter entitled "Declaration of conformity").

Follow the instructions in the user manual!

Protection class II
Electrical devices in protection class II are devices that have double and/or reinforced insulation throughout and do not have the option of connecting a protective earth. The housing of an electrical device in protection class II, with surrounding insulating material, might either form all of the additional or reinforced insulation, or part of it.

Symbol for direct current (DC)

Symbol for alternating current (AC)

Indicates the correct upright position of the transport packaging.
- Bullet point/information on steps during operation
▶ Instruction to be carried out
■ Safety instructions to be performed
2. Proper use
This is a home entertainment device.
The Bluetooth ^® sound system is used to play audio material which can be played via USB, Bluetooth or AUX IN.
The device can also be used as a karaoke system or announcement amplifier.
Please note that we shall not be liable in cases of improper use: Comply with all the information in this user manual, especially the safety information. Any other use is considered improper and can cause personal injury or property damage.
3. Safety information

WARNING!
Risk of injury!
There is a risk of injury to children and persons with limited physical, sensory or mental abilities (for example, partially disabled people or older people with limited physical and mental abilities) or to those without experience and knowledge (such as older children).
- Keep the device and its accessories out of the reach of children.
The device can be used by children of 8 years and older, and by people with reduced physical, sensory or mental capacity, or with a lack of experience and/or knowledge, but only with proper supervision, or if they have been told how to use the device safely, and have understood the risks involved if they use it improperly.
■ Children must not be allowed to play with the device.
■ Do not allow children to clean the device or perform maintenance tasks on it unless they are aged 8 years or older and properly supervised.
■ Do not allow children younger than 8 years old near the device and its power cable.
■ Do not modify the device without our consent and do not use any auxiliary equipment that we have not approved or supplied.
■ Only use replacement parts or accessories that we have supplied or approved.

DANGER!
Risk of choking and suffocation!
There is a risk of choking and suffocation due to swallowing or inhaling small parts or plastic wrap.
- Keep the plastic packaging out of the reach of children.
■ Do not allow children to play with the packaging material.
■ The packaging material is not a toy!
3.1. Installation location

DANGER!
Risk of electric shock!
There is a risk of electric shock due to live parts.
■ Do not place containers that are filled with liquid, e.g. vases, on or near the device and its mains cable. Such containers may tip over and the liquid may impair the electrical safety of the device.
■ Protect the device and all other devices connected to it from dampness, water drops or water spray. To prevent malfunctions, keep the device dust-free, away from sources of heat, and out of direct sunlight.
■ Do not place any objects on the cables as they may be damaged.

WARNING!
Risk of fire!
Insufficient air circulation can lead to heat accumulation, resulting in a fire.
■ Ensure that there is adequate ventilation around the device. The back panel must be located at least 5 cm away from walls or other objects and both sides of the device must be at least 1 cm away.
■ Do not cover the device (with newspapers, covers etc.) to prevent overheating.
■ Do not place open flames such as lit candles on or near the device.
■ Do not use the device in potentially explosive atmospheres. This includes petrol stations, fuel storage areas and areas where solvents are processed. This device must also not be used in areas with particle-laden air (for example flour or wood dust).

NOTICE!
Risk of damage!
Damage to the device caused by improper handling.
■ To prevent the device from falling, only install and operate it and its components on a sturdy, level, vibration-free surface. Some aggressive varnishes can corrode the rubber feet on the device. If necessary, place the device on a suitable underlay.
- Keep the device at a distance of at least one metre from sources of high-frequency or magnetic interference (televisions, other loudspeakers, mobile telephones etc.) to avoid malfunctions.
■ Do not expose the device to extreme conditions. Avoid:
– high humidity or wet conditions
– extremely high or low temperatures
- direct sunlight
- naked flames.
3.2. Power supply
■ Only operate the device from an earthed 100–240 V \~ 50/60 Hz socket. Contact the local energy supplier if you have any questions about the power supply at the installation location.
■ The socket must be near the device and easily accessible.
■ Position the cables so that no one can tread on them or trip over them.
■ To disconnect the device from the power supply, remove the plug from the mains socket. Always hold the plug firmly when unplugging it. To prevent damage, never pull on the cable.
■ All multimedia devices that are connected to the device must comply with the requirements of the Low Voltage Directive.
■ Disconnect the device from the power supply during thunderstorms or when the product will not be used for a prolonged period.
3.3. Ambient temperature
■ The device can be operated at an ambient temperature of +5°C to +35°C.
■ When switched off, the device can be stored at temperatures of between 0^ C and +40^ C.
■ Never use the device anywhere that is damp or wet.

DANGER!
Risk of electric shock!
Major changes in temperature or fluctuations in humidity can cause moisture to build up within the device due to condensation – this can cause an electrical short circuit.
■ After transporting the device, wait until it has reached ambient temperature before switching it on.
3.4. If there are defects
- Check the device and its accessories for possible damage before each use. - Do not use the sound system or mains cable if they are damaged, generate smoke or emit unusual operating noises. In this case, disconnect the power supply immediately.
■ Never try to open and/or repair a device component yourself. There is a risk of electric shock.
In the event of a fault, contact our Service Centre.
4. Package contents

DANGER!
Risk of choking and suffocation!
There is a risk of choking and suffocation if plastic film or small parts are breathed in or swallowed.
- Keep packaging away from children.
■ Do not allow children to play with the packaging material.
■ The packaging material is not a toy!
Remove the product from the packaging and remove all packaging material.
▶ Check your purchase to ensure that all items are included and in perfect condition. If anything is missing or damaged, please contact our customer service team within 14 days of purchase.
Before each use, check the sound system for any damage. Contact our Service Centre if you find any damage.
The following items are supplied with your product:
- Bluetooth® sound system
- Mains cable
- Microphone
- User manual and warranty documents
5. Device overview
5.1. Top
text_image
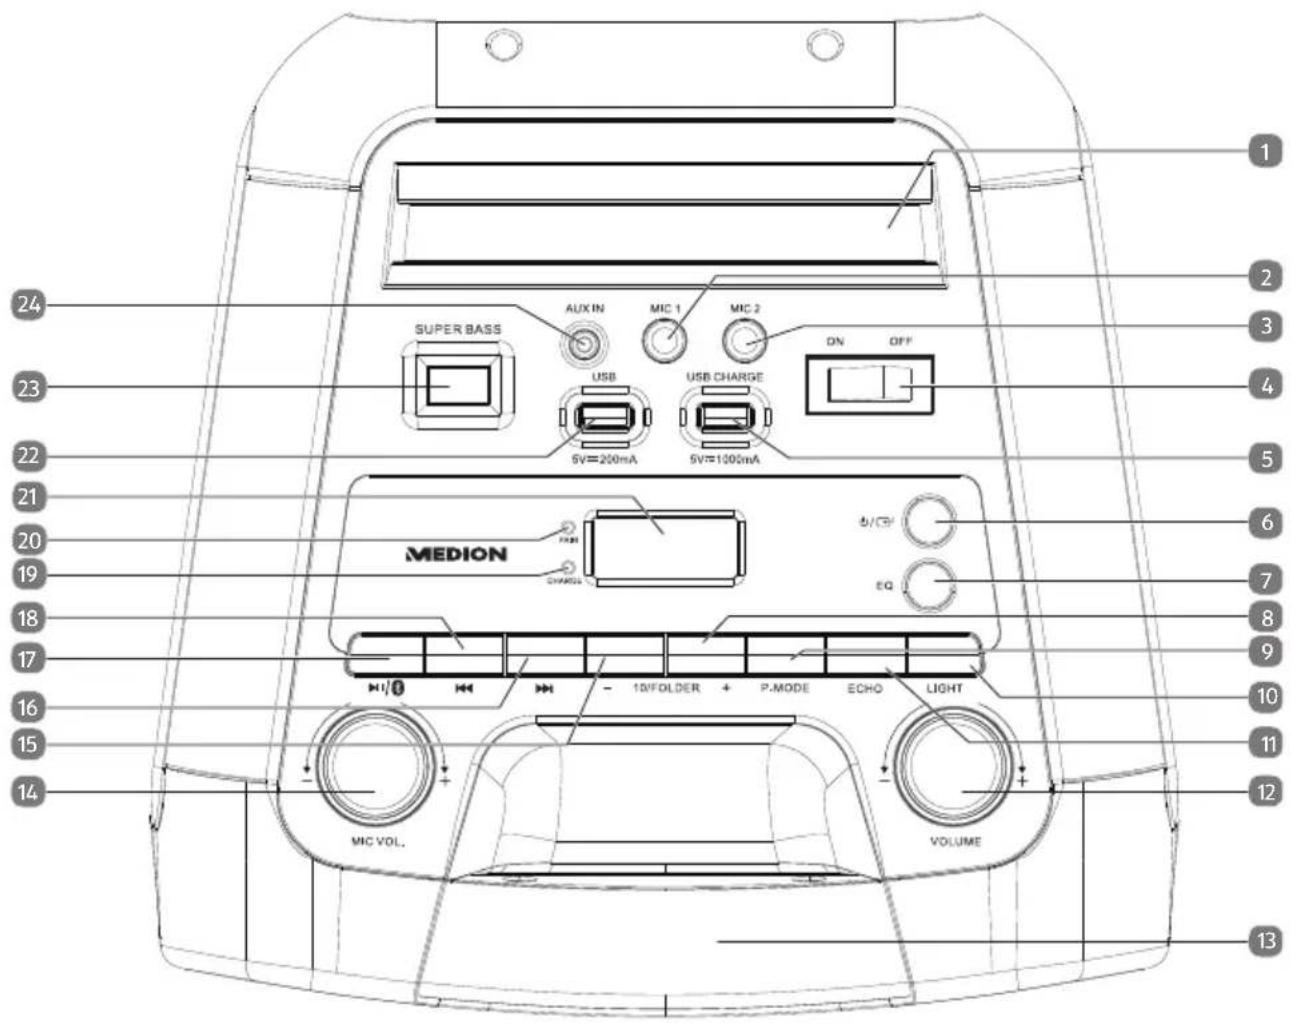
SUPER BASS AUX IN MIC 1 MIC 2 USB 5V=200mA USB CHARGE 5V=1000mA MEDION EQ 5/CP EQ 14 15 16 17 18 19 20 21 22 23 24 1 2 3 4 5 6 7 8 9 10 11 12 13 VOLUME| 1) | Tablet PC/smartphone storage | |
| 2) | MIC 1 Microphone | input(6.3 mm jack) |
| 3) | MIC 2 Microphone | input(6.3 mm jack) |
| 4) | ON/OFF Switch the | device on/off |
| 5) | USB charge | USB port for charging external devices (5 V---1000 mA) |
| 6) | Select operating mode;Switch the device back on from standby mode | |
| 7) | EQ Select equaliser | settings |
| 8) | 10/FOLDer Select | next folder;Track selection in blocks of 10 |
| 9) | P-MODE Activate repeat function/random playback | |
| 10) | LIGHT Short press: | select party LED light effect, switch on/off;Press and hold: switch lighting around the volume controller on/off |
| 11) | ECHO Switch microphone echo sound effect on/off | |
| 12) | VOL. | Volume controller |
| 13) | Upper carry handle | |
| 14) | MIC VOL. | Microphone volume controller |
| 15) | - 10/FOLDER Select previous folder;Track selection in blocks of 10 | |
| 16) | Short press: play next track; Press and hold: fast forward | |
| 17) | Short press: start playback;Press and hold: disconnect Bluetooth ^ connection | |
| 18) | Short press: play previous track; Press and hold: rewind | |
| 19) | Charge Charging LED | |
| 20) | PAIR Bluetooth LED | |
| 21) Display | ||
| 22) USB USB port for playing audio files from a USB memory device (5 V=200 mA) | ||
| 23) | SUPER BASS Switch bass amplification on/off | |
| 24) | AUX IN Audio input (3.5 mm jack) | |
5.2. Front and back

text_image
25 26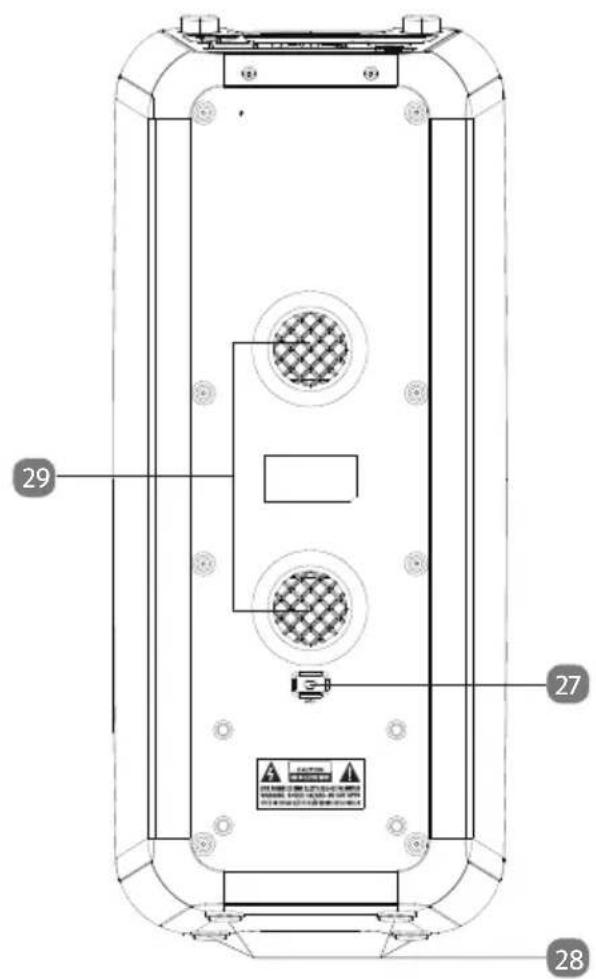
text_image
29 27 2830) On/Off Switch microphone on/off
6. Getting started
6.1. Setting up the device
Place the device on a sturdy, level surface.
Some aggressive varnishes can corrode the rubber feet on the device. If necessary, place the device on a suitable underlay.

Unplug the mains cable from the sound system before connecting it to an external device.
6.2. Mains operation – connecting the mains cable
Connect the supplied mains cable (AC 100–240 \~ 50/60 Hz) to the back of the device.
Plug the mains cable plug into an easily accessible power socket.
6.3. Internal rechargeable battery
As soon as the sound system is connected to a power socket, the built-in rechargeable battery begins charging automatically. The CHARGE LED continuously lights up red during charging.
When charging is complete and the internal built-in battery is fully charged, the CHARGE LED continuously lights up green.
If the battery charge level is too low, the CHARGE LED flashes red.

The rechargeable battery is an integral component of the device and users must not replace it themselves.
6.4. Switch the device on/off
▶ Shift the On/Off switch to the ON position to switch on the device.
The display lights up.
▶ Shift the On/Off switch to the OFF position to switch off the device.
The display turns off.
Even when switched off, the internal battery is charged until it is fully charged. As long as the sound system is connected to the power supply, it continues to consume a small amount of power even when the battery is fully charged.
▶ Disconnect the device from the power supply to switch it off completely.

If the device receives no signal in Bluetooth®/USB/AUX mode for 15 minutes, it automatically switches to standby mode.
Press the button to switch the sound system back on from automatic standby mode.

If the playback volume on the external device is set too low, the sound system may receive insufficient audio signal and automatically switches to standby mode.
In this case, increase the playback volume on the external device and re-establish the connection with the sound system.
▶ Press the button to switch the sound system back on from automatic standby mode.
7. Connecting an external playback device
Use the AUX IN jack to establish a connection with an external playback device (for example a CD player or MP3 player).
▶ Switch off the sound system.
▶ Switch off your external device.
Plug the end of a 3.5 mm jack cable (not supplied with the device) into the AUX IN jack on the top of the device.
Connect the other end of the cable to your external device.
▶ Switch on your external device.
▶ Switch on the sound system.
▶ Press the / button once or several times until AUX is shown on the display. The audio signal from your external device will now be played back.

When signals are being transmitted via a cable, it is not possible to control all operating functions using the buttons on the sound system. In this case, you have to rely on the controls on your external device.
8. Inserting USB memory devices
If necessary, remove the protective cap and insert the USB memory device into the USB port on the top of the device.
▶ Press the ⏻/⇨ button once or several times until USB is shown on the display. The first track on the USB memory device starts to play automatically.
Observe the following instructions regarding usable USB memory devices:
- As there are numerous different file systems and file formats, the connected storage media cannot be guaranteed to function.
- Depending on the size of the data medium, it may take some time for the system to be detected.
- USB memory devices with a maximum memory capacity of up to 32 GB are supported.
- Supported file systems are FAT16 and FAT32. The supported file format is MP3.
- External hard disks are not supported.
- USB extension cables are not supported.

The USB Charge port is intended exclusively for charging external devices (e.g. smartphones) using an appropriate USB charging cable (not supplied).
9. Connecting devices via Bluetooth®
In Bluetooth mode, you can receive audio signals wirelessly from an external Bluetooth-enabled audio output device. Make sure the two devices are not more than 10 metres apart.

Only one Bluetooth device can be paired with the sound system at a time.
To connect a Bluetooth-enabled audio output device, proceed as follows:
▶ Switch on the sound system.
▶ Press the ⏻/← button once or several times as required to switch back to Bluetooth mode.
bt is shown on the display and the device is in search mode. During the search, the Bluetooth LED PAIR flashes blue quickly.

The sound system attempts to automatically connect itself to the last audio output device connected via Bluetooth. If this is not possible, the device remains in search mode.
▶ Switch on the Bluetooth function on your audio output device and activate search mode on it to pair the two devices.

You will find more information about the Bluetooth function of your audio output device in its user manual.
The device name of the sound system "MD 44400" will be displayed in the device list on your audio output device as soon as the signal is found.
▶ Select the sound system and pair the two devices. If you are prompted to enter a password, enter "0000".
Device pairing is complete when the Bluetooth LED PAIR continuously lights up blue and a signal tone sounds on the sound system.
▶ Start audio playback on your audio output device or press the ▶//® button on the sound system.

When signals are being transmitted via Bluetooth, it may not be possible to control all operating functions using the buttons on the sound system.
We also recommend setting the volume on your audio output device to maximum, and fine-tuning the volume on the sound system.
▶ To disconnect an existing Bluetooth connection, press and hold the ▶//※ button.
A signal tone sounds and the Bluetooth LED PAIR flashes blue quickly. The sound system is now in search mode again and you can perform a new device pairing.
To re-establish the Bluetooth connection with the last connected audio output device, press and hold the ▶//* button again until the Bluetooth LED PAIR continuously lights up blue and a signal tone sounds on the sound system.
10. Operation
10.1. Adjusting the volume
▶ Turn the volume controller ⊖ VOL.⊕ towards ⊕ to increase the volume or towards ⊖ to decrease the volume.

Immediately after being switched on, the sound system always starts at the set volume regardless of the last volume setting.
10.2. Super bass
▶ Press the SUPER BASS button to enhance low frequencies and switch on bass amplification.
BASS appears on the display.
▶ Press the SUPER BASS button again to switch off bass amplification.
BASS disappears from the display.
10.3. Equaliser
▶ Press the EQ button once or several times to activate one of the preset equaliser settings (Flat, Classic, ROCK, Pop or JAZZ).
The selected equaliser setting is then shown on the display.
10.4. Party LED light
▶ Press the LIGHT button once or several times to activate preset party LED light effect L-1 to L-5.

Light effects L4 and L5 light up to the beat of the music played.
▶ Press the LIGHT button several times until LOFF is shown on the display to deactivate all party light effects.
▶ Press and hold the LIGHT button for approx. 2 seconds to switch on the lighting around the volume controller.
To switch off the lighting around the volume controller, press and hold the LIGHT button again for approx. 2 seconds.
10.5. Starting/pausing playback
▶ Press the Button to start playing tracks.
▶ To pause playback, press the ▶/※ button again. Press the button again to resume playback.
10.6. Track selection, fast forward/rewind
▶ Press the ◀ button to skip back to the start of the track that is currently being played. Press the button twice in quick succession to skip to the previous track.
▶ Press the ▶ button to skip to the next track.
▶ Press and hold the ◀ button to fast rewind within a track or press and hold the ▶ button to fast forward. Release the respective button at the desired point in the track to resume playback from that point.
10.7. Playback options in USB mode
Once the USB memory device is plugged in, playback of the available stored tracks in numerical order starts.
10.7.1. Folder selection for MP3 files
MP3 files can be stored in different folders on the USB memory device, if applicable.
▶ Press and hold either the -10/FOLDer or 10/FOLDer + button to change folder on an MP3 data medium.
10.7.2. Track selection in blocks of 10
If a large number of MP3 files are stored on the USB memory device used, you can skip forwards or backwards through the tracks in blocks of 10 to select a track more quickly.
▶ Press the 10/FOLDer + or - 10/FOLDer button to skip 10 tracks forwards/backwards.
If applicable, then press the ▶▶ or ◀◀ button to skip forwards or backwards by an individual track.
10.8. Repeat function
▶ Press the P-MODE button until lights up on the display to repeat the track you are currently playing.
▶ Press the P-MODE button several times until lights up on the display to continuously repeat all tracks on the USB memory device.

In case of USB memory devices where the files are stored in several folders, you also have the option to continuously repeat all tracks in the currently selected folder.
To do so, press the P-MODE button several times until FOLDER is shown on the display.
To deactivate the repeat function, press the P-MODE button until all above-mentioned indicators disappear from the display.
10.9. Random playback
▶ Press the P-MODE button several times until RAND lights up on the display to activate random playback.
▶ Press the P-MODE button again to deactivate random playback.
RAND disappears from the display.
11. Connecting a microphone
You can connect up to two microphones to the sound system at the same time. One microphone is included with the device.
Microphones can be used in all operating modes.
To connect a microphone, proceed as follows:
▶ Switch off the sound system.
Connect the microphone to microphone input MIC 1 or MIC 2.
▶ Switch on the sound system.
▶ Set the On/Off switch on the microphone to the ON position.
▶ Use the ⊖ MIC VOL. controller to set⊕ the microphone volume you require.
▶ Press the ECHO button to activate the echo sound effect for the connected microphones.
▶ Press the ECHO button again to deactivate the echo sound effect for the connected microphones.
▶ After use, set the On/Off switch on the microphone to the OFF position.
12. Charging an external device via USB
The sound system has one USB port for charging external devices (e.g. smartphones). Please note the current output voltage at the USB-CHARGE port: 5 V = max. 1000 mA
Connect the external device using a USB charging cable (not supplied) into the USB-CHARGE port on the top of the device.
The battery from your external device is now charged.
13. Cleaning
■ Before cleaning the device, always disconnect it from the power supply by unplugging the mains plug.

NOTICE! Risk of damage!
Risk of damage to the device due to improper use of the device.
■ Only use a dry, soft cloth to clean the device.
Do not use chemical solutions or cleaning products because these may damage the device's surface and/or markings.
■ Make sure that no liquid gets inside the sound system.
14. Storing the device when not in use
If you do not intend to use the device over a longer period of time, unplug it from the power supply and store in a cool, dry place.
▶ Ensure that the device is protected from dust, dirt and extreme temperature variations.
15. EU Declaration of Conformity

MEDION AG hereby declares that this device complies with the fundamental requirements and the other relevant provisions of:
• Radio Equipment Directive 2014/53/EU
• Ecodesign Directive 2009/125/EC
• RoHS Directive 2011/65/EU.
You can download the complete EU Declaration of Conformity at www.medion.com/conformity.
15.1. Trademark information
The Bluetooth ^® word mark and logos are registered trademarks of Bluetooth SIG, Inc. and are used by the manufacturer under licence.
The USB ^™ word mark and logos are registered trademarks of the USB Implementers Forum, Inc. and are used by the manufacturer under licence.
Other trademarks are the property of their respective owners.
16. Technical specifications
| General information | |
| Dimensions (WxHxD): 260 mm x 610 mm x 260 mm | |
| Ambient temperature (during operation): | +5°C to +35°C at a relative air humidity of max. 85% (non-condensing) |
| Ambient temperature (storage): | 0°C to +40°C at a relative air humidity of max. 85% (non-condensing) |
| Weight: 8.91 kg | |
| Power supply | |
| Voltage: AC 100–240 V ~ 50/60 Hz | |
| Power consumption: 35 W | |
| Power consumption in standby mode (when the battery is charged): | 0.32 W |
| Power output: 2 x 22 W RMS | |
| Degree of protection: Protection class II | |
| Integrated battery | |
| Lead gel battery: 12 V, 4000 mAh, 48 Wh | |
| Operating time at 50% volume: 3–4 hours | |
| Connections | |
| AUX input: 3.5 mm jack | |
| Microphone 1 input: 6.3 mm jack | |
| Microphone 2 input: 6.3 mm jack | |
| USB port: | Standard host 1.1 to 32 GB5 V --- max. 200 mA |
| USB charge port: 5 V max. 1000 mA | --- |
| Bluetooth® | |
| Bluetooth version: 5.0 | |
| Bluetooth profile: A2DP 1.2, AVRCP 1.0 | |
| Bluetooth frequency range: 2402–2480 MHz | |
| Max. transmission power: -7.46 dBm | |
| Range: | Up to 10 m (depending on ambient conditions) |
| Microphone | |
| Frequency response: 30 Hz–15 kHz | |
| Sensitivity: -73 dB +/- 3 dB | |
| Impedance: 600 Ω +/- 30% | |
17. Disposal

PACKAGING
Your device has been packaged to protect it from damage in transit. The packaging is made of materials that can be recycled in an environmentally friendly manner.

DEVICE
Old devices that carry the symbol illustrated may not be disposed of in ordinary household waste.
In accordance with Directive 2012/19/EU, these devices must be disposed of correctly at the end of their service life.
This involves separating the materials in the devices for the purpose of recycling and minimising the environmental impact.
Take old devices to a collection point for electrical scrap or a recycling centre.
Contact your local waste disposal company or your local authority for more information on this subject.

RECHARGEABLE BATTERY
The device is fitted with an integrated rechargeable battery. The rechargeable battery is an integral component of the device and users must not replace it themselves. At the end of its service life, do not dispose of the device in the normal household rubbish. Instead, contact your local authority to find out how to dispose of it in an environmentally friendly manner at collection points for electrical and electronic scrap.
18. Service information
Please contact our Customer Service team if your device ever stops working the way you want or expect it to. There are several ways for you to contact us:
- In our Service-Community, you can meet other users, as well as our staff, and you can exchange your experiences and pass on your knowledge there. You will find our Service-Community at community.medion.com.
• Alternatively, use our contact form at www.medion.com/contact. - You can also contact our Service team via our hotline or by post.
| Opening times Hotline number UK | |
| Mon – Fri: 08.00 – 20.00Sat – Sun: 10.00 – 16.00 | 0333 3213106 |
| Service address | |
| MEDION Electronics Ltd.120 Faraday Park, Faraday Road, DorcanSwindon SN3 5JF, WiltshireUnited Kingdom | |

text_image
QR code image containing encoded data, no visible human-readable textYou can download this and many other sets of operating instructions from our service portal at www.medionservice.com. You will also find drivers and other software for a wide range of devices there.
You can also scan the QR code on the side of the screen, to download the operating instructions onto your mobile device from the service portal.
19. Privacy statement
Dear customer,
We wish to inform you that we, MEDION AG, Am Zehnthof 77, D-45307 Essen, Germany process your personal data as a data controller.
For matters regarding data protection, we are supported by our company data protection officer who can be contacted at MEDION AG, Datenschutz, Am Zehnthof 77, D-45307 Essen; datenschutz@medion.com. We process your data for the purpose of warranty processing and associated processes (e.g. repairs) and therefore rely on processing your data for the sales contract concluded with us.
Your data will be provided to repairers contracted to us for the purpose of warranty processing and associated processes. We generally store your personal data for a period of three years in order to fulfil your legal warranty rights.
You have the right to be informed of the personal data concerned as well as the right to rectification, deletion, restriction of processing, the right to object to processing, as well as the right to data portability.
In case of access and cancellation rights, restrictions apply according to S 34 and S 35 of BDSG (Federal Data Protection Act) (Art. 23 GDPR). In addition, there is a right of appeal to a competent data protection supervisory authority (Article 77 GDPR in conjunction with S 19 BDSG). The state official for data protection and freedom of information for MEDION AG is Nordrhein Westfalen, P box 200444, 40212
Düsseldorf, Germany, www.ldi.nrw.de.
The processing of your data is necessary for warranty processing: it is not possible to process the warranty without the provision of the required data.
20. Legal Notice
Copyright © 2021
Date: 02.09.2021
All rights reserved.
These operating instructions are protected by copyright.
Mechanical, electronic and any other forms of reproduction are prohibited without the written permission of the manufacturer.
Copyright is owned by the company:
MEDION AG
Am Zehnthof 77
45307 Essen
Germany
Please note that you cannot use the address above for returns. Please always contact our Customer Service team first.