CEP 5302 B - Coffee machine BEKO - Free user manual and instructions
Find the device manual for free CEP 5302 B BEKO in PDF.
| Product Type | Manual espresso machine |
| Brand | Beko |
| Model | CEP 5302 B |
| Dimensions (W x H x D) | 14.4 x 30.8 x 42.3 cm (depth without portafilter: 32.5 cm) |
| Weight | 3.85 ± 0.5 kg |
| Power supply | 220-240 V, 50-60 Hz, 1376-1628 W |
| Water tank capacity | 1.1 L ± 5% |
| Drip tray capacity | 0.2 L |
| Filter capacity | Single: 8 g, Double: 15 g |
| Preheating time | Less than 55 seconds |
| Coffee volume (default settings) | Espresso: 30-55 ml, Double: 65-95 ml |
| Main functions | Single/double espresso brewing, milk frother (steam wand), hot water, cleaning/rinse program, automatic descaling |
| Maintenance and cleaning | Clean steam wand after each use; cleaning/rinse function for the brewing head; manual descaling with descaling solution or citric acid; drip tray and grid washable with clean water; portafilter not dishwasher safe |
| Safety | Automatic shut-off after 29 minutes of inactivity; protection against burns and scalding; shut-off when tank is empty; NTC temperature monitoring |
| Spare parts and repairability | Original spare parts available; repairs only by an authorized specialist or Beko customer service; replacement filter can be ordered if clogged |
| General information | Cable length: 90 cm; food contact materials; WEEE and RoHS compliance; household use only |
Frequently Asked Questions - CEP 5302 B BEKO
User questions about CEP 5302 B BEKO
0 question about this device. Answer the ones you know or ask your own.
Ask a new question about this device
Download the instructions for your Coffee machine in PDF format for free! Find your manual CEP 5302 B - BEKO and take your electronic device back in hand. On this page are published all the documents necessary for the use of your device. CEP 5302 B by BEKO.
USER MANUAL CEP 5302 B BEKO
Manual Espresso Machine with Integrated Milk Frother
User Manual

CEP 5302 B
EN-DE-FR-TR-ES-PL-RO-IT-CS-SK-SR-UA-AR
CONTENTS
| ENGLISH | 3-17 |
| DEUTSCH 18-35 | |
| FRANÇAIS | 36-49 |
| TÜRKÇE | 50-67 |
| ESPAÑOL 68-84 | |
| POLISH | 85-101 |
| ROMÁNă 102-120 | |
| ITALIANO 121-137 | |
| ČESKY 138-150 | |
| SLOVENSKI | 151-164 |
| CPПСКИ | 165-178 |
| УКРΑΙΝΥΚΟΙΟ | 179-195 |
Please read this user manual first!
Dear Customer,
Thank you for selecting this Beko product. We hope that you get the best results from your product, which has been manufactured to a high quality with state-of-the-art technology. Please read this entire user manual and all other accompanying documents carefully before using the product and keep them as a reference for future use. If you pass on the product to someone else, please give them the user manual as well. Please take into consideration all warnings and information in the user manual.
Explanation of symbols
The following symbols are used in the various section of this manual:

Important information or useful hints about usage.

DANGER: This warning for dangerous situations with regard to life and property.

WARNING: This warning indicates potentially dangerous situations.

CAUTION: This warning indicates the potential for material damage.

Materials are suitable for food contact
1
Important instructions for safety and environment
This section includes the safety instructions that will help providing protection against personal injury and material loss risks. Failure to follow these instructions invalidates the granted warranty.
1.1 Danger of electric current
Danger to life by electric current! Contact with live wires or components could lead to serious injury or even death!
Observe the following safety precautions to avoid electric shocks:
- Do not use the coffee machine if the connecting cable or mains plug are damaged.
- Before reusing the coffee machine, the mains cable must be renewed by a qualified electrician.
- Do not open the housing of the coffee machine. Danger of electric shock if live connections are touched and/or the electrical and mechanical configuration is changed.
1.2 Danger of burning or scalding
Parts of the coffee machine can become very hot during operation! Dispensed drinks and escaping steam are very hot!
Observe the following safety precautions to avoid burning/scalding yourself and/or others:
- Do not touch either of the metal sleeves on both coffee spouts.
- Avoid direct contact of the skin with escaping steam or hot rinsing, cleaning and descaling water.
1.3 Fundamental safety precautions
Observe the following safety precautions to ensure safe handling of the coffee machine:
- Never play with packaging material. Risk of suffocation.
- Inspect the coffee machine for visible signs of damage before use. Do not use a damaged coffee machine.
- If the supply cord is damaged, it must be replaced by the
1
Important instructions for safety and environment
manufacturer or its agent or similarly qualified person in order to avoid hazard.
- Repairs to the coffee machine must only be carried out by an authorised specialist or by the works customer service. Unqualified repairs can lead to considerable danger for the user. They will also void the warranty.
- Repairs to the coffee machine during the warranty period may only be carried out by service centres authorised by the manufacturer, otherwise the warranty will become void in the event of subsequent damage.
- Defective parts may only be replaced with original spare parts. Only original spare parts guarantee that the safety requirements are met.
- Appliances can be used by persons with reduced physical, sensory or mental capabilities or lack of experience and knowledge if they have been
given supervision or instruction concerning use of the appliance in a safe way and understand the hazards involved.
- This appliance can be used by children aged from 8 years and above if they have been given supervision or instruction concerning use of the appliance in a safe way and if they understand the hazards involved. Cleaning and user maintenance shall not be made by children unless they are older than 8 and supervised. Keep the appliance and its cord out of reach of children aged less than 8 years.
Children shall not play with the appliance.
- This appliance is intended to be used in household and similar applications such as:
- staff kitchen areas in shops, offices and other working environments;
-farm houses;
-by clients in hotels, motels and other residential environments;
1
Important instructions for safety and environment
-bed and breakfast type environments.
- Protect the coffee machine against the effects of weather such as rain, frost and direct sunlight. Do not use the coffee machine outdoors.
The appliance must not be immersed. - Do not clean the coffee machine or accessories in a dish washer.
- Do not pour any other liquids apart from water or place foodstuffs into the water tank.
- Do not fill the water tank beyond the maximum mark (lower edge of the filling hole) (1.1 litres).
- Only operate the machine when the waste container, drip tray and the cup grate are fitted.
- Do not pull the cable to remove the plug from the mains socket or touch with wet hands.
- Do not hold the coffee machine with the mains cable.
-
Keep the appliance and its cord out of reach of children aged less than 8 years.
-
Before removing the water tank to fill or empty it, always turn the machine off.
- Always place the unit on a flat, stable, heat-resistant work surface.
- Before brewing, the portafilter must be turned to the right as tight as possible to prevent the portafilter from loosening due to high pressure.
- Serious injury may result from misuse. To protect against a fire, electric shock or personal injury, do not immerse cord, electric plugs, heating base in water or other liquids. Do not operate any appliance with a damaged cord or plug, after the appliance malfunctions, or is dropped or damaged in any manner. Please contact the manufacturer or his customer service.
- Heating element surface is subject to residual heat after use, do not touch the hot surface, use the handle or the button. Always keep hands out
1
Important instructions for safety and environment
of container and machine while in use and afterward to reduce the risk of injury to persons.
- Coffee-maker shall not be placed in a cabinet when in use.
- Cleaning: Do not place the appliance in water or other liquids. Clean the housing only with a sponge/cloth moistened in warm, soapy water. Do not use harsh, abrasive cleaners. See chapter 6 for detailed cleaning instructions.
1.4 Intended use
The manual espresso machine Beko is intended for use in homes and similar applications, for instance in staff kitchens, shops, offices and similar areas or by customers in bed & breakfast, hotels, motels and other living accommodation. This coffee machine is not intended for commercial use. The machine is only intended for preparing coffee and heating milk and water. Any other use other than previously stated is considered as improper use.
Danger resulting from improper use!
If not used for its intended purpose or used in any other way, the coffee machine may be or become a source of danger.

- Therefore, the coffee machine may only be used for its intended purpose.
- Observe the procedures described in this user manual.
No claims of any kind will be accepted for damage or injury resulting from use of the coffee machine for other than its intended purpose.
The risk has to be borne solely by the machine owner.
1.5 Limitation of liability
All technical information, data and instructions on installation, operation and maintenance of the coffee machine contained in these operating instructions represent the current status at the time of printing and are based on the best possible knowledge gained by experience and knowhow.
No claims can be derived from the information, illustrations and descriptions in this user manual.
The manufacturer assumes no liability for damage or injury resulting from failure to observe the user manual, use for other than the intended purpose, unprofessional repairs, unauthorised modifications or use of non-approved spare parts.
1
Important instructions for safety and environment
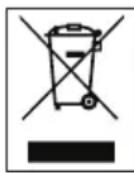
1.6 Compliance with the WEEE Directive and Disposing of the Waste Product:
This product complies with EU WEEE Directive (2012/19/EU). This product bears a classification symbol for waste electrical and electronic equipment (WEEE).
This symbol indicates that this product shall not be disposed with other household waste at the end of its service life. The used device must be returned to an official collection point
for the recycling of electrical and electronic devices. To find these collection points, please contact your local authority or retailer where the product was purchased. Each household performs an important role in the restoring and recycling of old appliances. The appropriate disposal of used appliance helps prevent potential negative consequences for the environment and human health.
1.7 Compliance with RoHS Directive
The product you have purchased complies with EU RoHS Directive (2011/65/EU). It does not contain harmful and prohibited materials specified in the Directive.
1.8 Package information

The packaging materials of the product were manufactured from recyclable materials in accordance with our National Environment Regulations. Do
not dispose of the packaging materials together with domestic or other waste. Take them to the packaging materials collection points designated by local authorities
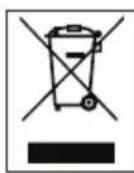
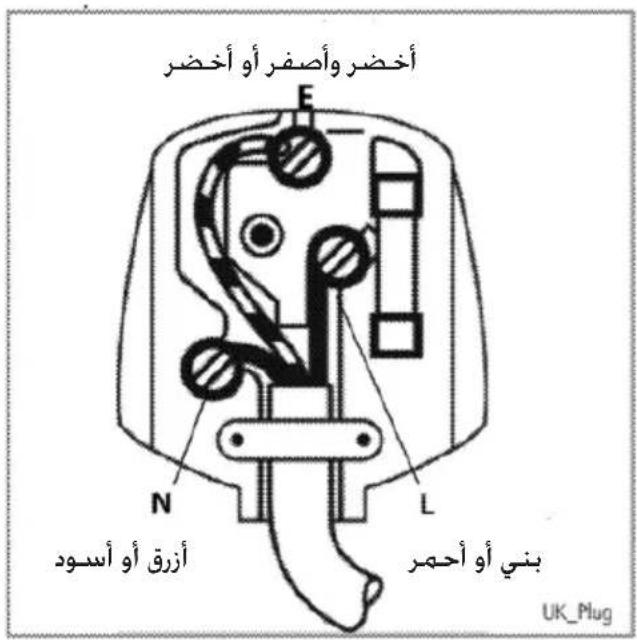
1.9 Plug Wiring
The moulded plug on this appliance incorporates a 13 A fuse. Should the fuse need to be replaced an ASTA approved BS1362 fuse of the same rating must be used. Do not forget to refit the fuse cover. In the event of losing the fuse cover, the plug must not be used until a replacement fuse cover has been fitted. Colour of the replacement fuse cover must be the same colour as that visible on the pin face of the plug Fuse covers are availabefrom any good electrical store.
- Fiting a different plug
- As the colours of the wires in the mains lead of this appliance may not correspond with the coloured markings identifying the terminals on your plug, proceed as follows:
- Brown cable = L (Live)
- Blue cable = N (Neutral)
Green/yellow cable must be connected to ground (E) line - With the alternative plugs a 13 A fuse must be fitted either in the plug or adaptore or in the main fuse box. If in doubt contact a qualified electrician.
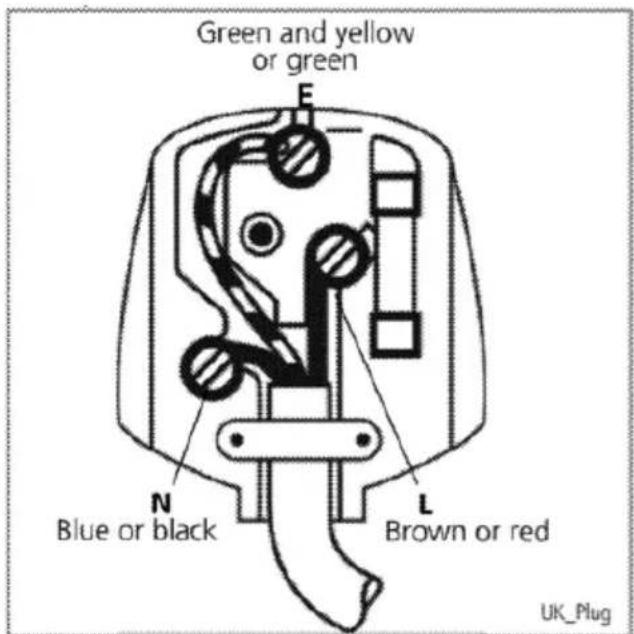
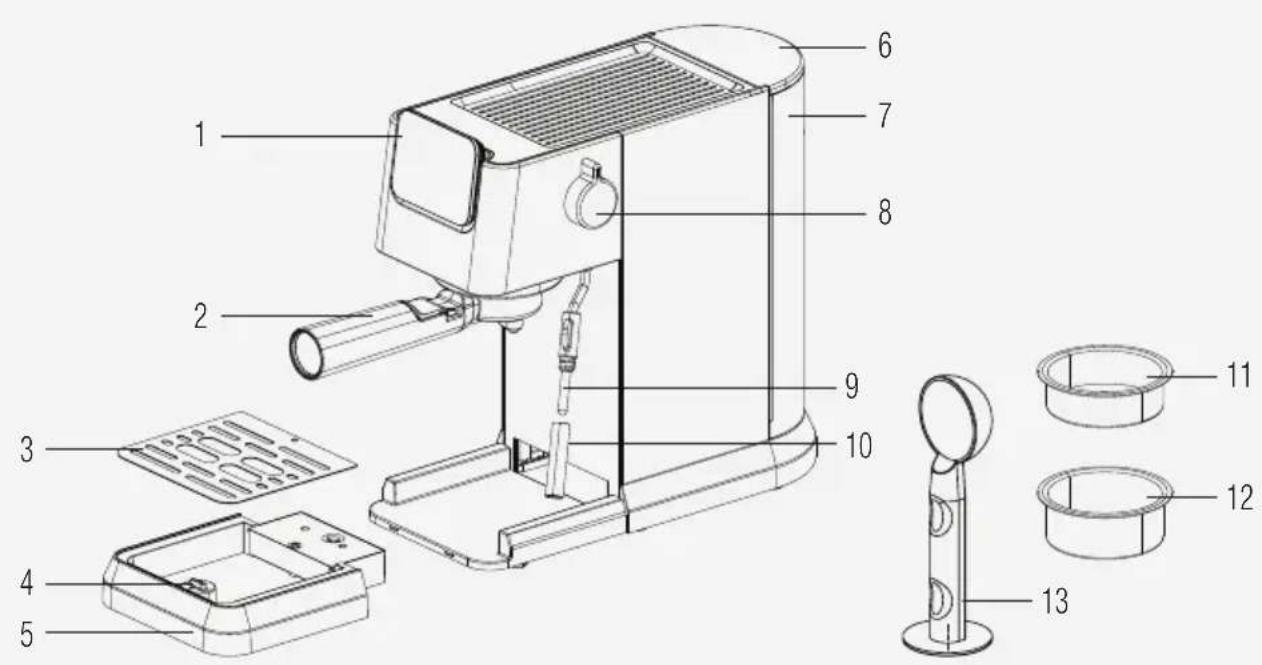
2 Overview & Control panel
- Control panel
- Portafilter
- Drip tray grid
- Floater
- Drip tray
- Water tank lid
- Water tank
- Steam/Hot Water Control Knob
- Milk frother
- Milk frother Cover
- Single espresso basket
- Double espresso basket
- Coffee Scoop / Tamper
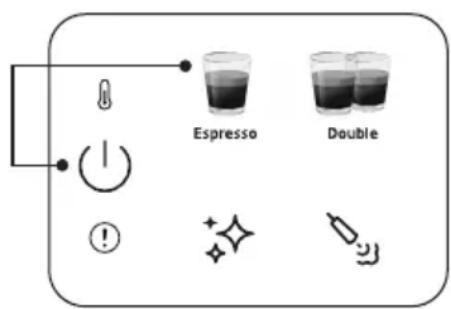
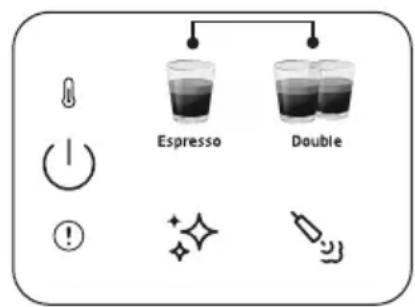
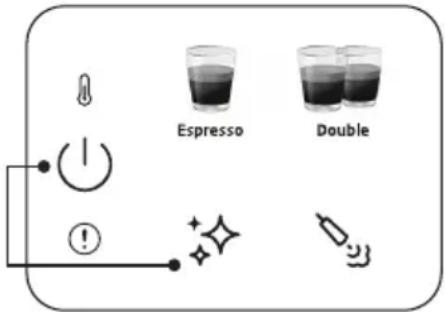
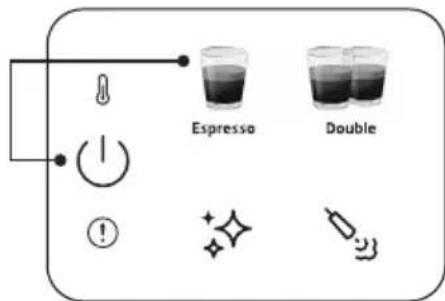
2.1 Control Panel
| 1 | Pre-heating indicator | |
| 2 | On/off & cancel button | |
| 3 | General error | |
| 4 | Cleaning and descending button | |
| 5 | Steam button |
All declared values on the product and on the printed leaflets are picked up after laboratory measurements performed according to related standards. These values may differ upon usage and ambient conditions.
Power supply: 220 - 240V ,50 - 60Hz
Power: 1376 - 1628 W
The right to make technical and design changes is reserved.
All declared values on the product and on the printed leaflets were obtained from laboratory measurements performed according to the relevant standards. These values may differ depending on usage and ambient conditions.
Product Dimensions:
14,4 cm (Width) × 30,8 cm (Height) × 42,3 cm (Depth)
[Depth w/out portafilter 32,5 cm]
Weight: 3.85 ± 0.5kg
Cable Length: >90 cm
Basket Capacities
Single: 8g
Double: 15g
Drip Tray Capacity: Up to 0.2 L
Water Tank Capacity: 1.1± 5%
Machine Pre-heating time: <55s
Volume of coffee (Default settings):
Espresso: 30-55ml
Double: 65-95ml

This button " will light up as orange when machine needs descending.

- If knob is in wrong position during machine turn on or if maximum frothing duration is reached; the red error led will blink with the steam which means steam control knob (9) should be rotated towards closed position.
- If there is an NTC error, the red error indicator will be lit and there will be no response if any button is pressed. Call customer service for support.
4 Preparation
4.1 First Time Use

Remove any protective films, stickers and any other packaging material from the appliance.
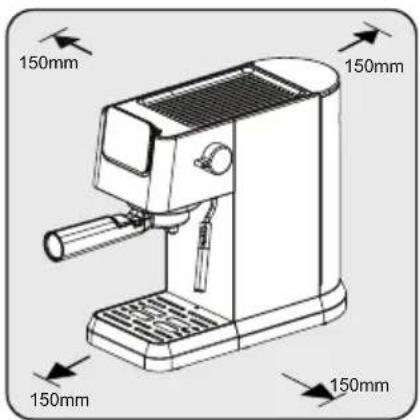
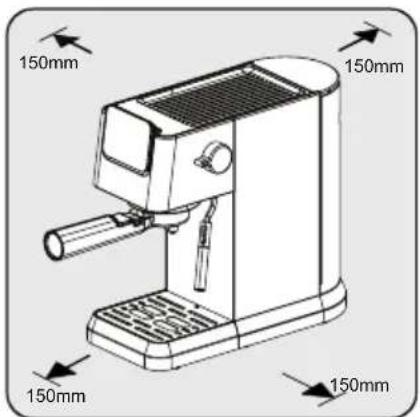
Choose a safe and stable surface with an easily reachable power supply and allow the minimum distance from the sides of the machines.
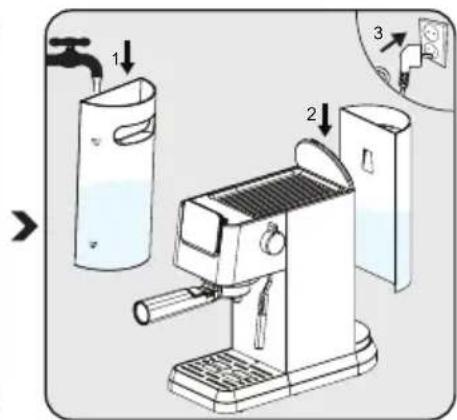
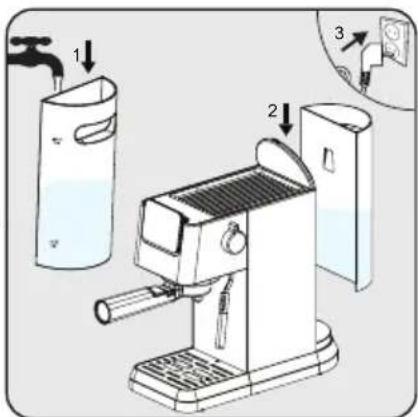
Fill the water tank with fresh, cold pure water at least up to the MIN marking and at most up to the MAX marking. (Do not add hot water)
Then insert tank on to the machine and the other end of the power cord into a wall socket with the suitable power voltage.
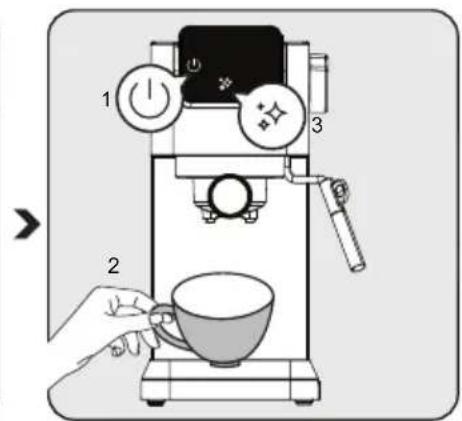
The power on/off button "on the control panel will light up. Press that button to turn on the machine. Put a cup right under the brewing head and press the cleaning button "The machine will sound one beep and start cleaning. Once completed the machine will be ready to use.
4.2 Brewing Single / Double Espresso
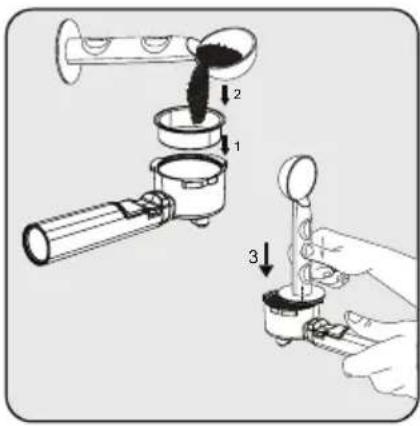
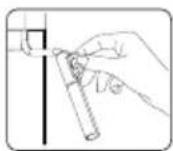
Place the single or double espresso basket into the filter holder. Fill the freshly ground coffee powder into the filter with measuring spoon (approx. 7-14g) and use the spoon to flatten the excess powder. With the tamping end of the spoon, apply around 15kg to push down the powder even and firmly.
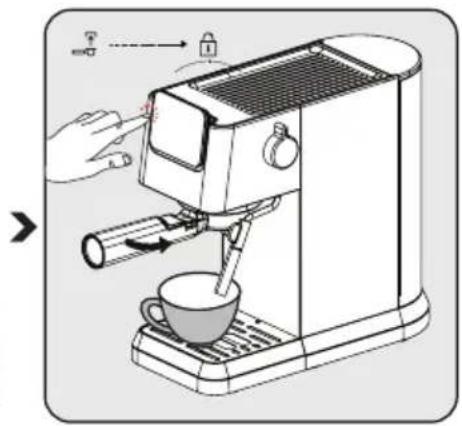
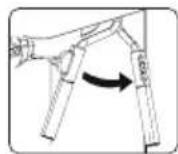
Install the portafilter under the coffee outlet. Align it with the unlock symbol, slide it into the groove, and slowly rotate it to the right to the lock symbol.
- Place a coffee cup right under the coffee outlet.
- Press the single or double button and a beep will sound.
- Selected coffee will start blinking and the beverage preparation will begin.
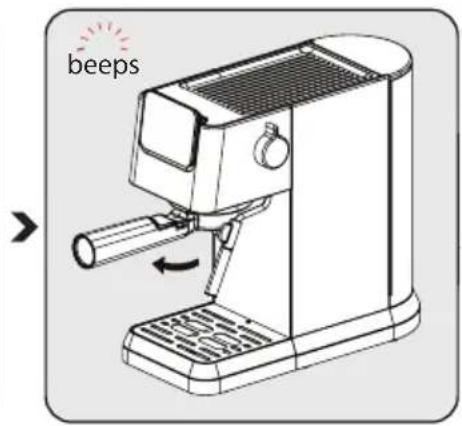
After brewing is completed, machine will sound one beep and enter idle mode. Remove the portafilter clockwise. Clean the portafilter and dry it after each use.
4 Preparation
- Wait 5 seconds after brewing and then take out the filter. This will help remove the moving filter easily.
- Coffee powder cannot be used after brewing.
Use the handle extension to knock the coffee residue out while keeping the basket in place. - To ensure your espresso stays at optimum temperature, we recommend that you preheat your cups.
- To extract the fullest flavor from your coffee beans, we recommend using whole coffee beans that have been freshly ground each time espresso is prepared.
- In addition to the coffee used, using fresh cold water that is free of chlorine, odors and other impurities will help ensure the perfect espresso.
- Store your espresso grounds in an airtight container, and in a cool, dry place to retain the flavor. Grounds should not be kept for long periods of time as the flavor will be reduced.
4.3 Preparing Frothy Milk for Coffee
In order to make beverages that require milk such as cappuccino, latte and more; milk frother should be used to froth milk. Simply add frothed milk over one or two shots of espresso based on your preference.
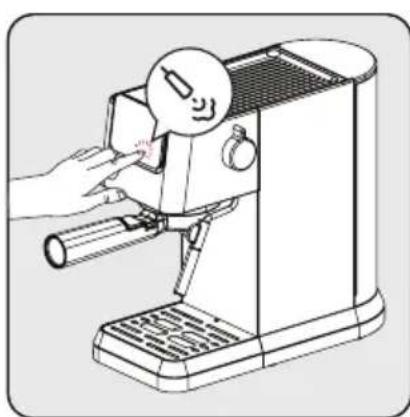
Press milk frother icon and wait for milk frother to be ready. While milk frother is pre-heating the indicator lights will flash
pre-heating the indicator lights will flash. Once ready, " will be constantly lit.
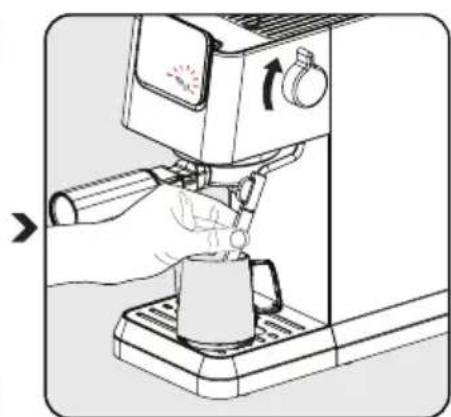
Place a milk filled cup or pitcher under the milk frother. Turn the knob into on position and froth until desired temperature/foam is obtained. To stop, turn back the knob into initial position.
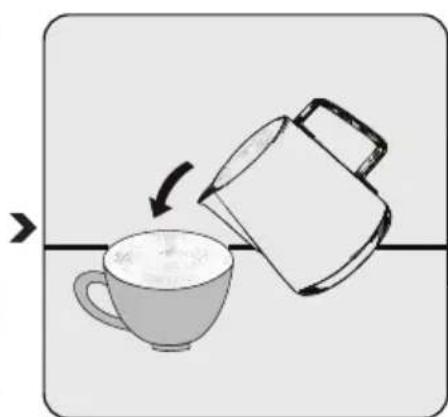
Pour the hot frothy milk onto the espresso. You can now enjoy your coffee!
4 Preparation


can be rotated towards easier handling purposes.

- After using the milk frother, please clean the nozzle of milk residue by wiping the nozzle with the wet cloth.
- The maximum duration for single use frothing is 90s.


Be aware that the cup/pitcher and milk frother can get hot during milk lease only hold the black protector after using steam function.

- Considering the milk frothing inside the cup/pitcher, do not fill it entirely.
- Do not pull away the cup/pitcher without stopping the frothing process.
- Turn the steam knob into off position before turning off the device and do not turn the steam knob into on position when the device the turned off.
4.4 Hot Water Function
The appliance can dispense hot water by simply turning the steam/hot water knob into "on" position in idle stage

- This function can be used to heat up the cup before coffee preparation. First fill the cup with hot water, then pour away the water and use this cup for preparing coffee.
- Americano can be made by adding hot water over espresso.

If steam is recently used, it is suggested to wait for cool-down before using hot water function.
4.5 Adjusting Height for Different Cup Size
For bigger cups, drip tray (6) can be removed and machine base can be used.

If drip dray is removed for bigger cups, it should be placed back into the machine right after beverage preparation is completed. If drip tray is not placed back after beverage preparation, due to internal system release, water might come to the base and would need a manual cleaning with dry cloth.
5.1 Adjusting the Volume of your Coffee
Setting amounts for Single & Double Espresso
- Select the function that is to be reprogrammed. Press the appropriate button (single or double espresso) and keep it held down. You will hear one beep. [single/double espresso programmable amounts (min: 30/60ml, max: 50/100ml)]
- Only let go of the button once the desired amount of coffee has passed through. You will hear two beeps. This amount is now saved under the corresponding function.

The adjusted beverage settings will be saved to device memory for future use until resetted or changed again.
To reset single beverage to default/factory setting:
Press and hold down any beverage and power buttons together for more than 3 seconds to reset the selected beverage amount.
To reset all beverages to default/factory setting:
Press and hold down single and double espresso buttons together for more than 3 seconds to reset the all beverage amount.

Standby time: The machine will automatically shut down after 29 minutes without any operation (or after work).
5.2 Cancelling
On-off button should be pressed once to cancel any running process.
6.1 Cleaning the Milk Frother
Use the hot water function to remove any milk residue that may accumulate on the tip of the milk frother. The milk frother cover can be detached and cleaned under water.

the milk frother with wet cloth after each use to avoid milk ensure full frothing performance.
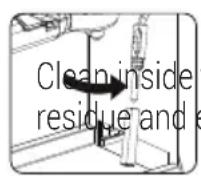
6.2 Cleaning/Rinsing Function
For cleaning the brewing head, place a container under the brewing head and press the cleaning button. Cleaning will be completed within 16 seconds and the machine will be ready to use.

- If you do not use the machine for more than 5 consecutive days, rinse and drain the water tank.
- Drip tray and its grid (6) (4) can be cleaned manually under clean water.
- Do not put the portafilter into the dishwasher.
6.3 Descale Function
When descending is required, descale icon "I will light up as orange. Place a container that can hold 1.5L under the brewing head. Pour water into the water tank until MAX level and mix with scale remover or citric acid. Press & hold descale button "for more than 3 seconds and you will hear two beep sounds which indicates that the first cycle of descending has begun. The first cycle will take around 15 minutes. Once completed, the descale icon will turn white".
Empty and replace the container under the brewing head. Clean and fill water tank until MAX level with clean water. Press & hold descale button "for more than 3 seconds and you will hear two beep sounds which indicates that the second cycle of descending has begun. The second cycle will take around 6 minutes. Once all complete, the machine will go back to idle stage and will be ready to use.
To reset descale warning status:
Press and hold power and descale button together for more than 3 seconds.

- Descale is required after predefined brewing cycle.
- Resetting descending warning status is not suggested for maintaining the best condition of the appliance.
7.1 Problems, possible causes and remedies
| Problem Cause Remedy | ||
| Coffee runs down the side of the portafilter. | Portafilter (2) is not properly inserted. | Turn the handle of the portafilter (2) further to the right. |
| Edge of sieve is not free of ground coffee | Turn off the machine, remove the portafilter (2) holder and clean the edges of the sieve. | |
| Screen inside brew head is dirty. | Clean the brew head using a wet cloth and run the cleaning function without placing the portafilter. | |
| Very little or no coffee flows through the portafilter. | No water in tank. Fill the tank with water. | |
| The screen inside the brew head is blocked. | Brew water through the screen without the portafilter (2) inserted. If no water comes through, unscrew the screen, clean and replace. | |
| The sieve is blocked. Correction: Clean the sieve, insert into the portafilter (2) and pump water through without coffee. If no water comes through the sieve call Customer Service to order a replacement sieve. | ||
| Pump does not work due to device operating with empty water tank. | Turn on the steam/hot water knob for 2 seconds and then turn it off. Then press the coffee program and the water pump will work normally. | |
| Espresso brews out only as drops. | Coffee grounds are too fine or packed down too firmly. | Do not tamp coffee grounds so firmly. Use a coarser grind of coffee. |
| Machine blocked by calcium deposits. | Descale the appliance. See page 15. | |
| Espresso brews too quickly. | Ground coffee is too coarse. Use a finer grind. | |
| Not enough coffee in the sieve. | Use more ground coffee. | |
| No crema. | Coffee old or too dry. Use fresh coffee. | |
| Coffee not pushed down firmly enough. Water pushes through the coffee too fast. | Tamp coffee grounds more firmly. Use a finer grind. | |
| Coffee too coarse. | Use a conical burr grinder to obtain a finer and more consistent grind. | |
| Coffee blend not suited to espresso coffee. | Change brand of espresso. | |
| Not enough froth when frothing milk. | Milk not fresh. Use fresh milk. | |
| Milk not suitable. Check that the milk is suitable for frothing. | ||
| Milk was too warm from the start. | Use milk straight from the refrigerator (34°F). | |
| Not enough milk to froth. Use more cold milk. | ||
| No steam from milk frother. | Milk inlet hole is blocked. | See "Cleaning the Milk Frother". If it is clear of dried milk deposits but no steam comes out, then use the descaling function. If the appliance is still blocked, call Customer Service. |
12 months breakdown and repair guarantee
Guarantor: Beko plc, 1 Greenhill Crescent, Watford, Hertfordshire. WD18 8UF
The guarantee does not in any way diminish your statutory or legal rights.
Your appliance has the benefit of our manufacturer's guarantee which covers the product for 12 months from the date of original purchase.
This gives you reassurance that if within that time, your appliance is proven to be defective because of either workmanship or materials, we will at our discretion either repair or replace your appliance.
The appliance must be correctly installed, located and operated in accordance with the instructions contained in the user manual. The guarantor disclaims any liability for accidental or consequential damage.
The Guarantee is subject to the following conditions:
Documentary proof of the original purchase date is provided.
The appliance has been installed and operated correctly and in accordance with our operating and maintenance instructions.
The appliance is used only on the electricity supply on the rating plate.
The appliance has only been used for normal domestic purposes.
The appliance has not been altered, serviced, dismantled or otherwise interfered with by any person.
The appliance is used in the United Kingdom or Republic of Ireland.
Any parts removed during repair work or any product that has been replaced becomes our property.
The guarantee is not transferrable if the product is resold.
The Guarantee does not cover:
- Transit, installation or delivery damage.
- Accidental damage.
- Misuse or abuse.
- Replacement of any consumable item or accessories. These include but are not limited to: plugs, cables, light bulbs, knobs, filters and flaps.
- Repairs or replacements required as a result of unauthorised repairs or inexpert installation that fails to meet the requirements contained in the user guide or instruction book.
Repairs to products used in commercial or non-residential household premises.
How to obtain after sales service, help or general advice
Please keep your purchase receipt or other proof of purchase in a safe place as you will need to show us this document if your product requires attention within the guarantee period.
Please also record your product details below, which will allow you to access our services more quickly and help us identify your product. The model number is printed on the front of the user guide and the serial and model number is shown on your products rating plate.
| Model number | Serial number | Purchased from | Date of purchase |
Please call our UK based Customer Service department if you need help or advice from us:
United Kingdom and Northern Ireland:
0333 207 9710
Republic of Ireland:
018623411
You can also contact us through our website:
www.beko.co.uk
Cher/Chere client(e),
Makine on Isitma suresi: <55s
Kahve miktari (varsayilan ayarlar):
Espresso: 30-55ml
Double: 65-95ml

Makinenin kirecininoczulmesi gerektiginde bu duğme "turuncu renkte yanar.

Volum cafea (Setar implicite):
Espresso: 30-55ml
Dublu: 65-95ml

PoncHeHHyMOBHnX n03HaueHb
Y pi3nix po3dianax zboRo noci6nka BnKOpncTOByoTbcra HnxueHaBeJeHi CnMBOJN:

BaxnBa iHopmaia a6o Kopnci npaDi 0do BnkOpncTaHH.

HE6E3NEKA. Lc nepeJxHn npo He6e3neuHi cnTyaui dIyXHTa MaHa.

PONEPEJXEHHa. Ie nonepdxjHnBka3ye Ha nToENiHo He6e3neuHi cnTuauii.

3ACTEPEXEHHa. Ie nonepdxHnBka3ye Ha nToHcHMy MaTePiaIbHy uKOdy.

BnKopncToByBaHi MaTePiAn npiaTHi Ira KOHTaKTu 3 XapOvBMn IpOdyKTamN
1
Вадлб Вka3iBkn 万多 6e3nekn Ta 3axnctTy HabkoJnsHbOro cepedOBnla
Y cIbOMy po3dJIi MICTaTBcI IHCTpyKci 3 texHikn 6e3neKn, kI 3a6e3peuTb 3axNCT BiD pN3NKIB OTPMaHHra TpaBM i MaTePi- aIbHnx Btpat. HeIoTPMaHHra IHCtpyKci np3BOoNTb Do anHyJIIOBaHHaHaHOI rapaHTII.
1.1 He6e3neka BpIiBy eIekTpHOrO cTpymy
He6e3nekaДЯЖИТТУеpe3 ypaJKeHЯ eJIeKTpNCHM cTpyMOM!
KoHTaKT 3 npOBoJamn abo kOM- POnHeNTamnPiHapyroU MoKe PpN3BeCTn Do cepNo3Hnx TpaBM abo HabiTb Cmepti!
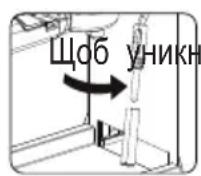
Uo6 yHnKHyTN ypaXeHHra eIek- TpNcHm CTpyMOM, DOTpIMyI- TeCra HxKHeHaBeDeHHx 3axOdiB 6e3neKn:
He BnKOpNCTOBuTe KaBOMaShnHy, JaKIo 3'eDHyBaJIbHn Ka6eIb a6o MepeXeBa BnIka NoxkoJxKeHi.
-Першни Кроростангя KabOMaunHn,обов'яЗКОВ 3amHITb shHypЖИВЛЕнгЯ 3a ДОПOMOrO KBaJIiФIKOBaHOrO eIeKTpNka.
He BIDKpNBaIte KOpnyc KaBOMaunH. IChyE He6e3neKa ypaJxHH eJeKtpuHm CTpyMOM y pa3i TOPkaHn 3'EdHaHb NiD HanpyroTo Ta/ a6o 3miHn KOHphiIrpyaui eJeKtpuHnx i MexaHicHNx qactnH.
1.2 He6e3neka onikib
Детаи Кавомашин Можуь cnьно harpiВaTися пд час po- botn! Hanoi, lo BnInBaHOTbся, i npa, lo BnPyCKaETbcry, e dujke rapaymni!
Uo6 yHnKHyTN oniKIB a6o He ownapNTn ce6e Ta/a6o iHnx, dOTpIMyIteCn HxueHaBeDeHnx 3axoDIB 6e3neKn:
He TopkaItecJxOJHOi 3 MeTaJIeBnX BtUJOK Ha OBOX HOCnKax IoJaChi KaBn.
- YHnKaIte npAmOro KOHTaKtU ShkipN 3 napoIO, 10 BnNycka-ETbCra 3 MaunHn, a60 rapyOIO BOIOIO IJI NpOcKaHHa, Hau- IeHHa YN BnJaJIeHHa HaKNy.
1
POB'ra3aHi 3 cIIM pN3IKN.
LIM npnctroeM moKytb KOpNCTyBaTnCSa DITN BIKOM BiD 8 pOKIB, kIIO BOHn nepe6yBaHTb PID HArJaDOM a6O npoIHCTpyKTOBAni 0oDo 6e3neuHOrO KOpNCTyBaHNr NpNCtPOeM, a TAKOX YCBiDOMJIouTb NOB'3aHI 3 cIM pN3nKn. Do OIepauiyauHNe Ta KOpNCTyBaZkoTcKOro TexHicHOrO 6ClyrOByBaHnA DOnyckaHTbcra TIN DI IN BID 8 pOKIB, kI pe6yBaHTb PID HarJlAmoDopocnX. 36epiraTe npncTpiTa IHO O SHUP JKNBHeHHB HeIOCTynHomy Micci dIa DiTeB BIKOM Do 8 pOKIB.
He do3B0JTe dtTm 6aBnTnCra 3 cIIM npNCTpoEeM..
- Zei npictpi npn3naeHni DJIa BnKOpNCtAHNBA DomaHix a6o noi6hnx yMObax, a came:
-y KyxohnKyTockax Mara3nHIB, ophiCIB Ta iHnX po6oynxCepeIOBn;
-yΦepeMepcbkx caiibax;
- KJIeHTaMn B rOTeJx; MOTEJx Ta iHux XHTIOBux npMii-ueHHax;
-yMiCzXHOuivBJI3iCHiDaHkOM.
3axnauTe KaBOMaunHy BiD BnNBy NOrOdHx yMOB,Ha npNKla: DoUy, MOpO3y Ta npRmNx COHyaHnx IpomehiB. He ekCnpyaTyIe KaBOMaunHy npocTo He6a. - Ппстрий He можна 3aHypBoTnВ pIDnHy.
He Do3BOJRAeTbCMAITN KaBOMaunHy a6o akcecyapn B noCydomnHi MaunHi.
He haIbaiTe B pe3epByap IJIa BOi 6yIb-ia KI iHsi pIDHH, KpIM BOi, I He KlaIITb Tyn npOdyKTI XapCyBaHHa.
He HanoBHOte pe3epByap BOIO BnIe MaKcImaJIbHOI N03HaUKN (HnxHbOro KpaH 3aJIINBHOrO OTBOpY) (1,1). - Ппстурашно до ekсплуataць Maшини Лше пicя BCTaHOB- leнна на мicuce koHTeINHepa Дя BiДхODiB,пдОна Дя 3бору кpaneь i peшiTkn Дя чшok.
1
Вадлб Вka3iBkn 万多6e3nekn Ta 3axncty HabkoJnsHbOro cepeobuza
He TargHitb 3a MepexeBn shHy, 06 BnHrTn stTe- nCeIbHy BnKy 3 pO3eTKn, i He TopKaItecry Ioro MOKpIMn py- kAmn.
He TpImaTe KaBOMaUnHy 3a shHyp XnVBJIeHHra.
36epiraTe npncpti Ta noro shHyp XnBHeHHa B HeIOCTynHomy Micci IJa DITEe BIKOM Do 8 pOKiB.
-Першних виимати pe3epByap Дя ВODи, соб наювнтп a60 cnopoжнтNiOro, obOB'ЯЗ-KOBО ВIMNKaITE MaшиHy.
3aBxDn po3TaOByIte npncTiPi Ha pIBH, CTiK, TepMoCTiKi Pioboyi NobepxHi.
- 3a06iBvIeHaHnIO nopTaipbtpa uepe3 BnCOKn TnCK, nepe3 aBapuBaHHaM NOrO Heo6xIDHO 3aTgHyTu Do ynpy xJnxOM NOBOPOTy BnpaBO.
He npabnblbne Bnkopnctahnnr MoKe np3BecTn Do cepno3- Hx TpaBM. 06 3axnctntncr Bi noxjki, ypaxeHn eke
TpHnM Ctpymom a6o TpaBM, He 3aHypIOte ShHyp, eIeK-TPnHi 7TeNCelbHi BnIKn, OCHOBy HarpIBaJIbHOro eIeMeNTa y Body Ch iHsi pIDHH. He BnKOpncTObyTE npscTpii i3 POnKOJxEHm ShHypOM a6o 7TeNCelbHOu BnIKOIO nICJr TORO, kPncTpiBnWoB i3 IaHy, yNaB a6o POnKOJNBCa 6yDb-IAkIM cHnom. IpocnMo 3BepTaTnCdo BnPo6HnKa a6o NOrO cLyXbN pIDTpImKn KJIeHTiB.
Пися ВИКОРИСТАнHAнгпьНо eIeMeHTa nДдаEcTbCS BnINBy 3aIIuKOBOrToTeNla, TOMy He TopkaIteCraPЯчоI NOBepxHi, a BVIKOpNCTOByIte pyUk y abo KhoNky. 3MeHUnTn pN3NK TineChoro ySKODKeHNe, 3aBXdI TpIMaIte pyKn IOnaJI bID KOHTeHepa Ta MaunHnPi d Yac Ta NiCnI BVIKOpNCTAHHn.
-ПдчасвИКОристанняKaBOMaшини He можна рo3Miу-ВатиВшафi.
1
Вадлб Вka3iBkn 万多 6e3nekn Ta 3axncty HabkoJnsHbOro cepeobnua
. YnueHn. He 3aHypioTe npntpiny BODy nn iNwi piDnHn. IJra OunuHnKopnyc 3acToCobYte Jnwe r6ky/raHupKy, 3MoueHy B TePNI MInbHi BOdi. He BnKOpncTObYte arpeCbHI a6pa3NBHi 3acObn IJRA YnueHn. DoknaHi IHCTpykii 7oDo OUneHn DaVB. y po3diIi 6.
1.4 BvKOpNcTaHn 3a npn3HaueHHaM
PyuHa ecnpeco-MaunHa Beko npn3NaeHa dIy BnKOpNCTaHbBOMa Ta B NOi6Hnx npmiiueHnHx, HapnKnad: Ha KuxhX dIy nepcoHany, B Mara3nHax, oicax i NOi6Hnx npmiiueHHx, a60 KJIeHTAMn B rOteJAX, MOTeJAX Ta IHnIX XHTIOBHX npmiiueHHx. Lc KaBOMaunHa He npn3Ha-He NaKomepuiHoro BnKOpNCTaHnHa. MaunHa npn3HaueHa IInSe dIy nprirotyBaHHr Kabn Ta nDirpiBaHHr MoNoka Ta Bodn. Bydb-Ke iHwe BnKOpNCTaHHr, KpIM 3a3NaeHOro BnUe, BBaKaETbcBnKOpNCTaHHM He 3a npn3NaeHHM.
He6e3neka BhacniIDOK HeHaJIexKHOBVKOpNCtAHNJa
KuO KaBOMaHnHa He BnKOpNCTOByEcTbcra 3a npMm np3HaueHHa m6o BnKOpNCTOByEcTbcra IHWM CnOCo6om, BOHa MOKe CTaHOBTn He6e3-Neky qn CTaTn DxepeJom He6e3neKn.

Tomy KabomauHny Tpe6a BHKOPNCOTOByBaTnCra TijbKn 3a npn3HaueHHam.
-Дotримупеся поцедур, onиcaHux y zuBOMy nociHnky kOpncTyBaaya.
KoDiH npTeH3i 6yDb-koTO Tnny 0do 3bntkIB a6o TpaBM, CnpuHHeHX BnKOpNCTaHHM KaBOMaunH He 3a np3HaueHHM, He npuMaOTbcra. Pn3Kn npuMae Ha ce6e BnKJIIOH O BlaChNK MaHNH.
1.5 06mexeHnBiDnOBiDaJIbHoCTi
YcraTexnichna iHOpmaia,daHni iHCTpykuii zoIOBCTaHOBHeHHa,ekCnlyatauTa Ta o6CnyROyBaHHKaBOMaunHn,HaBeJeHb CiiH nCTpykui 3 ekCnIyatauB, BIOobpaKaIOb ITOUHN CTaH Na MOMENTdpky Ta 6a3yOToBc Hn Ha HABHNx y Hac BiDOMoCTaX,OTPIMAHX 3aBDAKn IOCBIDy Ta HOY-Xay.He npnMaIObCra Do yBaHn XODHi npTeH3i a60BnMOrn Ha OCHObi iHΦopMaui, iIOCTpaui i xaPakTepnCTNK, HabeDeHNx yCbOMy NociBHKy KOpNCTyBaA.
Bnpo6HnK He Hece BiIDNOBIaIbHOCTi 3a 3bUTKn a6o TpaBMn, CnpuHHeHi HeDoTPMaHHaM BmOr, HabeJeHNx y NocibNky KopucTyBaUa, BnKOpNC-tAHNM Bnpo6y He 3a npn3HaueHHaM, HenpOpeCiiHMM pEmOHToM, HecaHKcIOHOBAHmM MoNiΦiKaζIaMn a6o BnKOpNCtAHHm HecaHKcIOHOBAHnx 3anachnx YactNH.
1
Вадлб Вka3iBkn 万多6e3nekn Ta 3axnctTy HabkoJnsHbOro cepeobnua
1.6 BiДnobiДиHicTb ДиpeKТиВi npo BiДхОдn eЛeКТрчHOrO Ta eЛeКТроHOrO oblaДнHaHHa (WEEE) Ta npaВиla yТилiЗaцii BiДхОдiB
Ley Bnipi6 Biinobidae Bumoram NipektBn EC WEEE (2012/19/EU). Ley Bnipi6 maKlnacnphi KauiHn CmBoJ 0do yTnI3aii eJeKTpHuHOrTa eJeKTpoHHoro ObnaHaHHa (WEEE).
Ley CnMBOJ Bka3yE Ha Te, 10o Bnpi6 He MoXHa BNkIaTn pa3OM 3 IHsIMN NO-6yTOBIMN BiXoDAMN NiCn 3akInueHHa Ioro TepmiH cyxkb. BnkOpncTahm npunctpiH Heo6xIDHO BiDBe3TN do ophi
ciHoro nyHKty npnomy eJektpuHnx ta eJekTPOHHx npncTroob DnI iXhboi nOdaNbwoi nepePob6Kn. 3NaTn ci NyKTH npniomy, 3BepHiBcra Do MicceBHX oprAHIB BnaIa6o npOdaBz, De6bNo npud6aHO Bnp6. KoxHe DomorocnoapCTBO BiirpaBaxNBy polb y npouecax pemOnTy npepe6Kn cTapoITexhIKn. HanexHa ytnlizacj BNkOpntaHOro npncTroo donomarae 3anobirtmoKINBIM HeratNBHM Hacnlkam IJa HaBKOJIshBoO cepedOBnua Ta 3dopOB' JIOHNH.
1.7 BiДноВiДнICTb ДиpeКТИBi RoHS
PnpD6aHn Bpi6 BiDnOBiDaE BmOram DnpeKtBn EC 0oO o6MeJHn BnKOpNCTaHH NEBHX He-6e3neuHx peObHn B eJeKtpuHOMy Ta eJeKtpoHOMy 6bnHaHHi (RoHS) (2011/65/EU).BiH HeMiCTNb ShkiDnBnx i 3a6bOpHeHx MaTePiAniB, 3a3NaueHnx y ciN DnpeKtNBi.
1.8 InΦopMaζιρo yηακOBky

Nakybalhi MaTepiAn Bnpo6y BnroTOBHeO 3 MaTepiAIB, kI nIJIraIOTb nepepo6ci BiIOBIDHO Do Haux HaioHaIbHx ekONOriHnx HOpM. He BNKIn
daIte nakyBaJIbHi MaTePIaII pa3OM i3 no6yToBnM Ta iHUnMn BiIXoJAmN. 3DaBaIe ix Do nyHKTIB npInomy naKyBaJIbHnx MaTePiJIb, npIn3HaueHnx MicSeBIMn OprHaAMN BlaIi.
- Панель керваимя
- Nopraqinbtp
- PewiTkai ndohny dny 360py kpanenb
4.ПОПЛАВКOBИ INДИΚAТОР
5.Пддондязборукpaneь - Kpnska pe3epByapa IIN BODN
- Pe3epByap nla BODn
- Puyka kepybaHH naaueo napn/rapyoi BOn
9.CniHOBaMOnoka - Kpnuka cnIHOBaça MOJOKa
- KoWNДЯ ODNHApHOro ecnpecO
- Kounik nla noDbinHoro ecnpeco
- Mipha loxka dnyo3yBaHHa/tpam6yBaHHa KaBn
2.1 Панель керваимя

6.1 OuHnHcPiHOBaHa MoIoka
Uo6 BuaNTn 6yIb-ri 3aIIuKMOK, KIO MOKyTB HAKONuYBaTnc Ha KINuKcNIOBAu MoNOKA, BnKOpNCTOByTe yHkuio rapraoi BOi. KpuiKcNIOBau MoNoka MOXHa 3HrTa OUnCTHTn iD CTpyMeHem BOi.

Tn HAKONHcHHe 3aJIuKb MOJOKa Ta 3a6e3neHTN MAKcMaJIbHy epeKTINBHCtB CNIHOBaHH, OUYUte BHYTpIHIO YACTNH CyHIIOBAa MOJOKa BOJNOTO TKAHNHOI NICJ KOKHOBO BNKOpNCaHH.
a a a a a a a a a a a a
1 1
1

1 3 2 2
111 111 111 111 111 111 111 111 111 111 111 1
3 152 100000000000000000000000000000000000000000000000000000

()29 2

5.2
j 1
aaii aaii i j j
Aao Jaleil Juyil jayll

a aagaaagagagagagagagagagagagagagagagagagagagagagagagagagagagagagagagagagagagagagagagagagagagagagagagagagagag
b1 = 2,b2 = - 4
90 8

y
jaiy jaiy jaiy jaiy jaiy

Jai JaiSly jaiy/
.
/
.
g 1
lalzo jzll jy loic jzill

jlll 4.4
"CSS"JgJgJgJgJgJgJgJgJgJgJgJgJgJgJgJgJgJgJgJgJgJgJgJgJgJgJgJgJgJgJgJgJgJgJgJgJgJgJgJgJgJgJg
jaii jaii jaii jaii jaii jaii jaii jaii jaii jaii jaii jaii jaii jaii jaii jaii jaii jaii jaii jaii jaii jaii jaii jaii jaii jaii jaii jaii jaii jaii jaii jaii jaii jaii jali jali jali jali jali jali jali jali jali jali jali jali jali jali jali jali jali jali jali jali jali jali jali jali jali jali jali jali jali jali jali jali jali jali jali jali jali jali jali jali
j 1 1 1 1 1 1 1 1 1 1 1 1 1 1 1 1 1 1 1 1 1 1 1 1 1 1 1 1 1 1 1 1 1 1 1 1 1 1 1
siky. yuyu 1g yge yjull lalll
4.1
jll j 100
i
a b 1201 1201 1201 1201 1201 1201 1201 1201 1201 1201 1201 1201 1201 1201 1201 1201 1201 1201 1201 1201 120
$$ \mu 9 0 >: \text {d} \text {d} \text {d} \text {d} \text {d} \text {d} \text {d} \text {d} \text {d} \text {d} \text {d} \text {d} \text {d} \text {d} \text {d} \text {d} \text {d} \text {d} \text {d} $$
$$ \mathrm {a d} \mathrm {a l l} \mathrm {a n a m e} $$
$$ 1 \div 8: 4 5 0 $$
$$ p \neq 1 5: a = 2, 0 $$
$$ 0. 2 \text {i} \therefore b _ {1} = \frac {1}{2} a _ {1} $$
$$ j 5 \pm 1. 1: a _ {a} $$
$$ s 5 5 < \text {:} $$
$$ : (\overrightarrow {a} \cdot \overrightarrow {a}) \cdot \overrightarrow {a} \cdot \overrightarrow {a} \cdot \overrightarrow {a} \cdot \overrightarrow {a} \cdot \overrightarrow {a} \cdot \overrightarrow {a} \cdot \overrightarrow {a} $$
$$ \text {J a} 5 5 - 3 0: \text {a s} $$
J 1 J 1 J 1 J 1 J 1 J 1 J 1 J 1 J 1 J 1 J 1 J 1 J 1 J 1 J 1
gilal gagaa 1.5
Jjlll g plilu y jn aagul y iislo Cao
jlll g jlll g Jlll l uie ailll llll
jlll g jlll g jlll g jlll g jlll g jlll g
g jlll g jlll g jlll g jlll g jlll g
g jlll g jlll g jlll g jlll g jlll g
g jlll g jlll g jlll g jlll g
g jlll g jlll g jlll g jlll g
g jlll g jlll g jlll g jlll g
g jlll g jlll g jlll g
g jlll g jlll g jlll g
g jlll g jlll g
yI aagai 1aia J y. 1gai gaoai all jyall
paiaiall iJgai gai IcJyI

a 1 1 1 1 1 1 1 1 1 1 1 1 1 1 1 1 1 1 1 1 1 1 1 1 1 1 1 1 1 1 1
aai jz 1g
.1.1)
1
J 1
Jll Jls no gall 1sL Jy
18 8
jgl jie
gaae 120000000000000000000000000000000000000000000
15 15
yg( 2) = yg( 1)
J 1
1.3
Jolal jolal ailll 100
1
.
i 1
aaii 1
all aolal 120! slls 15.
g 15 g 1 aal
Jblll jll l
joo 1
i 1
J 1
J 1
aaii aiee
g
.
aai 1 jj j j
b 1
L
g a g a d n nn nnnn
aegall g jgagaa aia
cldllg 1 jilllalb ylaill l kaii
aaii iiaaiy
C
1.1
1
1
1
aalll aaii iil lalll
原不等式成立
1
S ACD = S COD + S_ DCE
1
i 1
a 1
Joo
·
( 1 + u) + ·s + ( 1 + z) + ( 1 + 1) < ( 1 + u) u + ·s + 1 + z + 1
S木弟形 COBD = S COD + S BDO = S BOC +
1.2
1j 1i i j 8g 8iSlo jz jn j
J 1
14
i j 1
1 1
·
gg = = A_gg^
jg 2
JdI 100000000000000000000000000000000000000
1 1

i 1

i 1

.

pabll 1

beko
a
111 1
piaaai

CEP 5302B
AR