
K6K5S - Bed Vevor - Free user manual and instructions
Find the device manual for free K6K5S Vevor in PDF.

User questions about K6K5S Vevor
0 question about this device. Answer the ones you know or ask your own.
Ask a new question about this device
Download the instructions for your Bed in PDF format for free! Find your manual K6K5S - Vevor and take your electronic device back in hand. On this page are published all the documents necessary for the use of your device. K6K5S by Vevor.
USER MANUAL K6K5S Vevor
Technical Support and E-Warranty Certificate .wewor. com/support
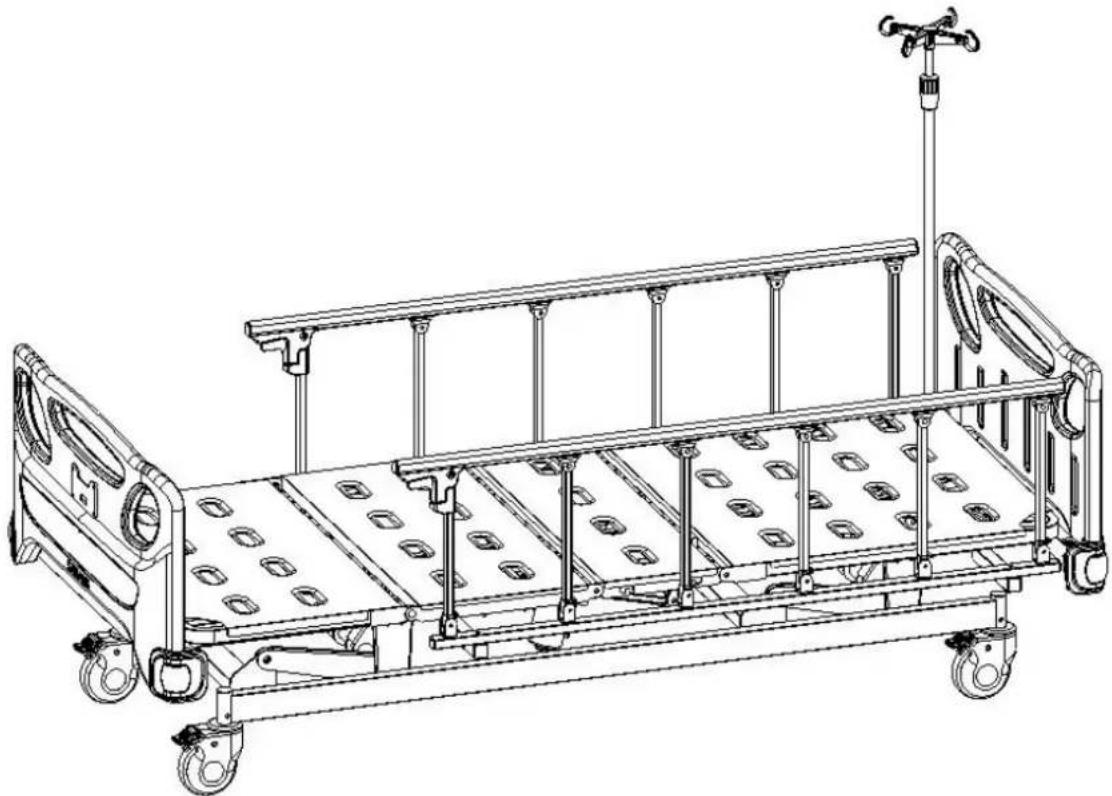
SICK BED
MODEL: K6K5S
We continue to be committed to provide you tools with competitive "Save Half", "Half Price" or any other similar expressions used by represents an estimate of savings you might benefit from buying certa with us compared to the major top brands and not necessarily mean to cover all categories of tools offered .by us You are kindly reminded to verify carefully when you are placing an us if you are actually saving half in comparison with the top major
MODEL:K6K5S
NEED HELP? CONTACT US!
Have product questions? Need technical support? Please feel free to contact us Technical Support and E-Warranty Certificate
www. vvor. com/support
This is the original instruction, please read all manual instructions care operating. VEVOR reserves a clear interpretation of our user. māheal appearance of the product shall be subject to the product you Pēzasev forgive us that we won't inform you again if there are any technology updates on our product
Manual Introduction
Hospital beds are essential equipment for the well-being, treatment and recovery of bedridden patients. Hospital beds allow patients to remain in more comfortable positions as well as in pos sometimes recommended by doctors, which would be very difficult in a normal bed, where one would always have to be placing or removing supports. Hospital beds can be manual or autom The automatic hospital bed has its functions controlled by buttons on the side panels of the bed via remote control. The manual hospital bed has 3 movements triggered by remote control, hav the elevation of the headboard, which facilitates the moment of feeding, also avoiding refluxes a facilitating breathing and also has elevation of the part of the feet that will cause it to improve blood circulation of the lower limbs, in view of the long period that the patient will spend lying On the other hand, patient safety is very important at this time of recovery, so all of our bed side protection rails, preventing the patient from going at night and running risks of falling.
Note:
Please carefully read this manual and strictly follow the steps before installing and using. We require all users to have the knowledge of user's manual and all the cautions.
This manual is applicable to K6k electric hospital bed. It contains the installation method, operating instructions and maintenance check points.
The graphics in this manual are for users' reference only. In actual use, please refer to the object.
This user manual includes the description, instruction, maintenance and technical parameters of the product.
Any questions, please contact the after-sale service center or distributor.
Anyone using or operating this product should read and comply with it.
Except for some unexpected situations, users are required to be familiar with the usage and precautions.
1. Installing guide
After opening the packing case, please check whether the following parts are complete the packing case:
Table a:
| NO. | Name | Picture | Specification | QTY | Unit |
| 1 | Head board | Hook distance: L910*H55mm | 1 | pc | |
| 2 | Foot board | Hook distance: L910*H55mm | 1 | pc | |
| 3 | Side rail | Sixth side rail | 2 | pcs | |
| 4 | Caster | 5 inch covered caste | 4 | pcs | |
| 5 | IV pole | Φ16-19mm/off white hook | 1 | pc | |
| 6 | Bed platform | L1925*W820mm | 1 | pc | |
| 7 | Screw | / | Refer to Table a.1 | 1 | set |
Table a.1:
| NO. | Name | Picture | Specification | QTY | Unit |
| 1 | PP mattress holde | PP | 2 | pcs | |
| 2 | Hexagon screw | M8*70mm | 4 | pcs | |
| 3 | Flat washer | Φ8*Φ16*H1.2mm | 4 | pcs | |
| 4 | Spring washer | Φ8*Φ14*H2.5mm | 4 | pcs | |
| 5 | Nut | M8mm | 4 | pcs | |
| 6 | Hexagon screw | M8*16mm | 8 | pcs | |
| 7 | Flat washer | Φ8*Φ16*H1.2mm | 8 | pcs | |
| 8 | Spring washer | Φ8*Φ14*H2.5mm | 8 | pcs |
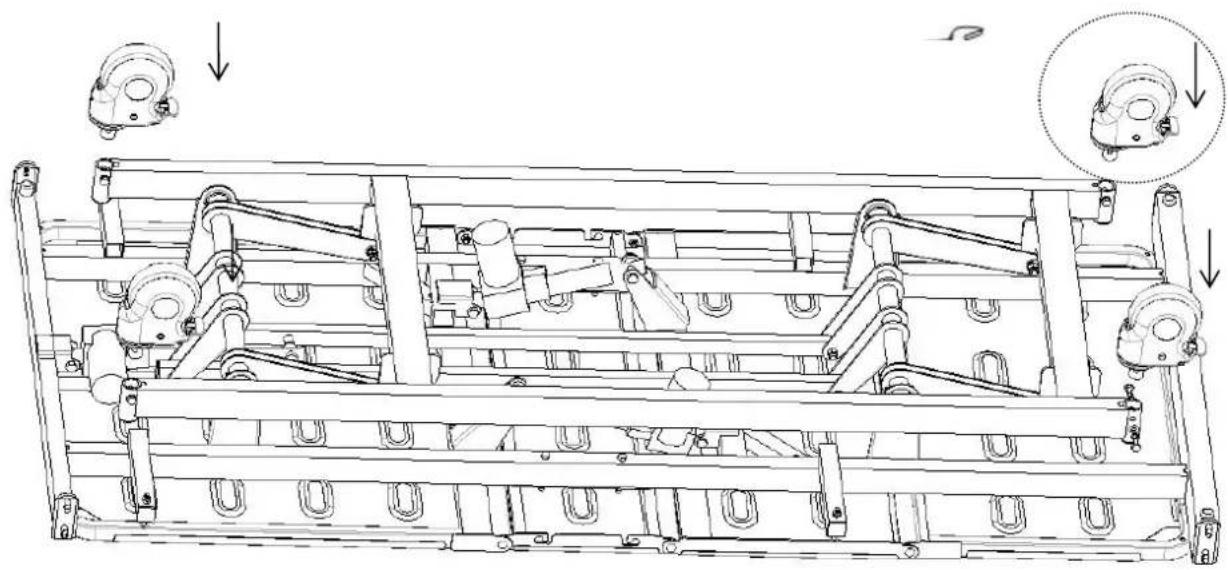
1.2 Casters installation
Lay a protective pad and put the bed body upside down;
Remove the screw as shown below, and use a 14-inch hex wrench.
Flat washer 8^ 16^H1.2
Spring washer 8^ 14^H2.5
Hexagon screw M8*16
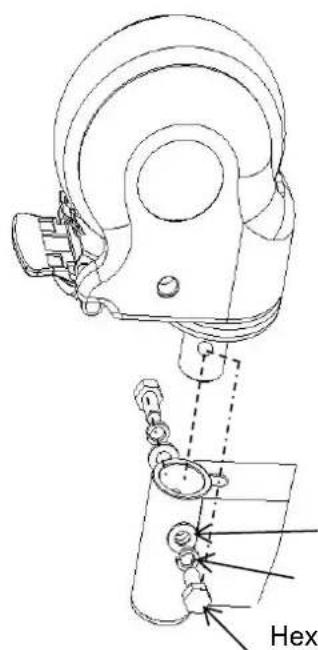
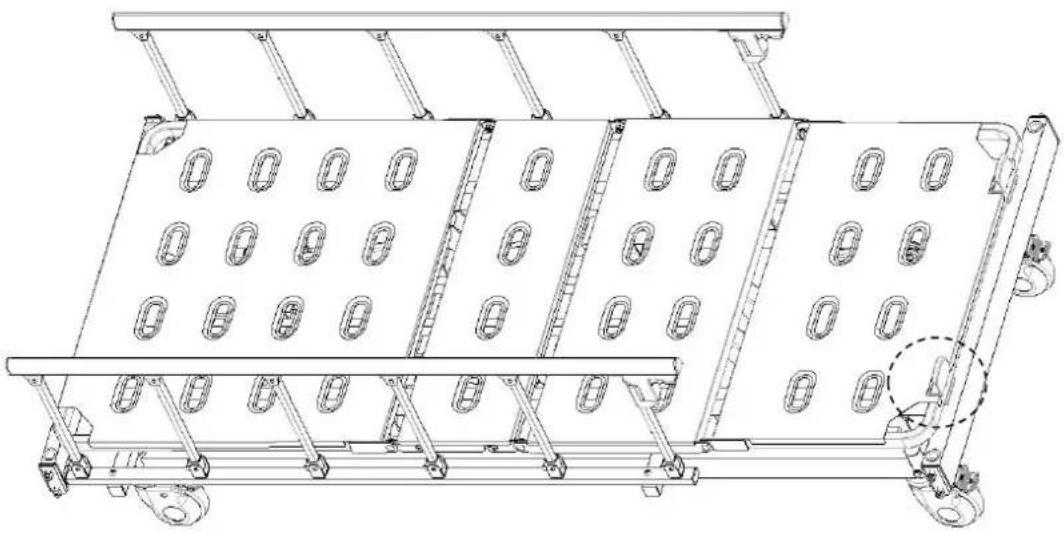
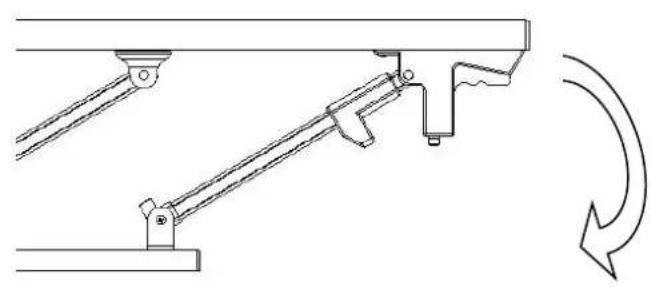
1.3 Side guardrails installation
Place the bed upright and install the guardrail. (The picture may not exactly match the real product, is only for installation instructions)
Take out the screw as shown below, and use a 14-inch hex wrench.
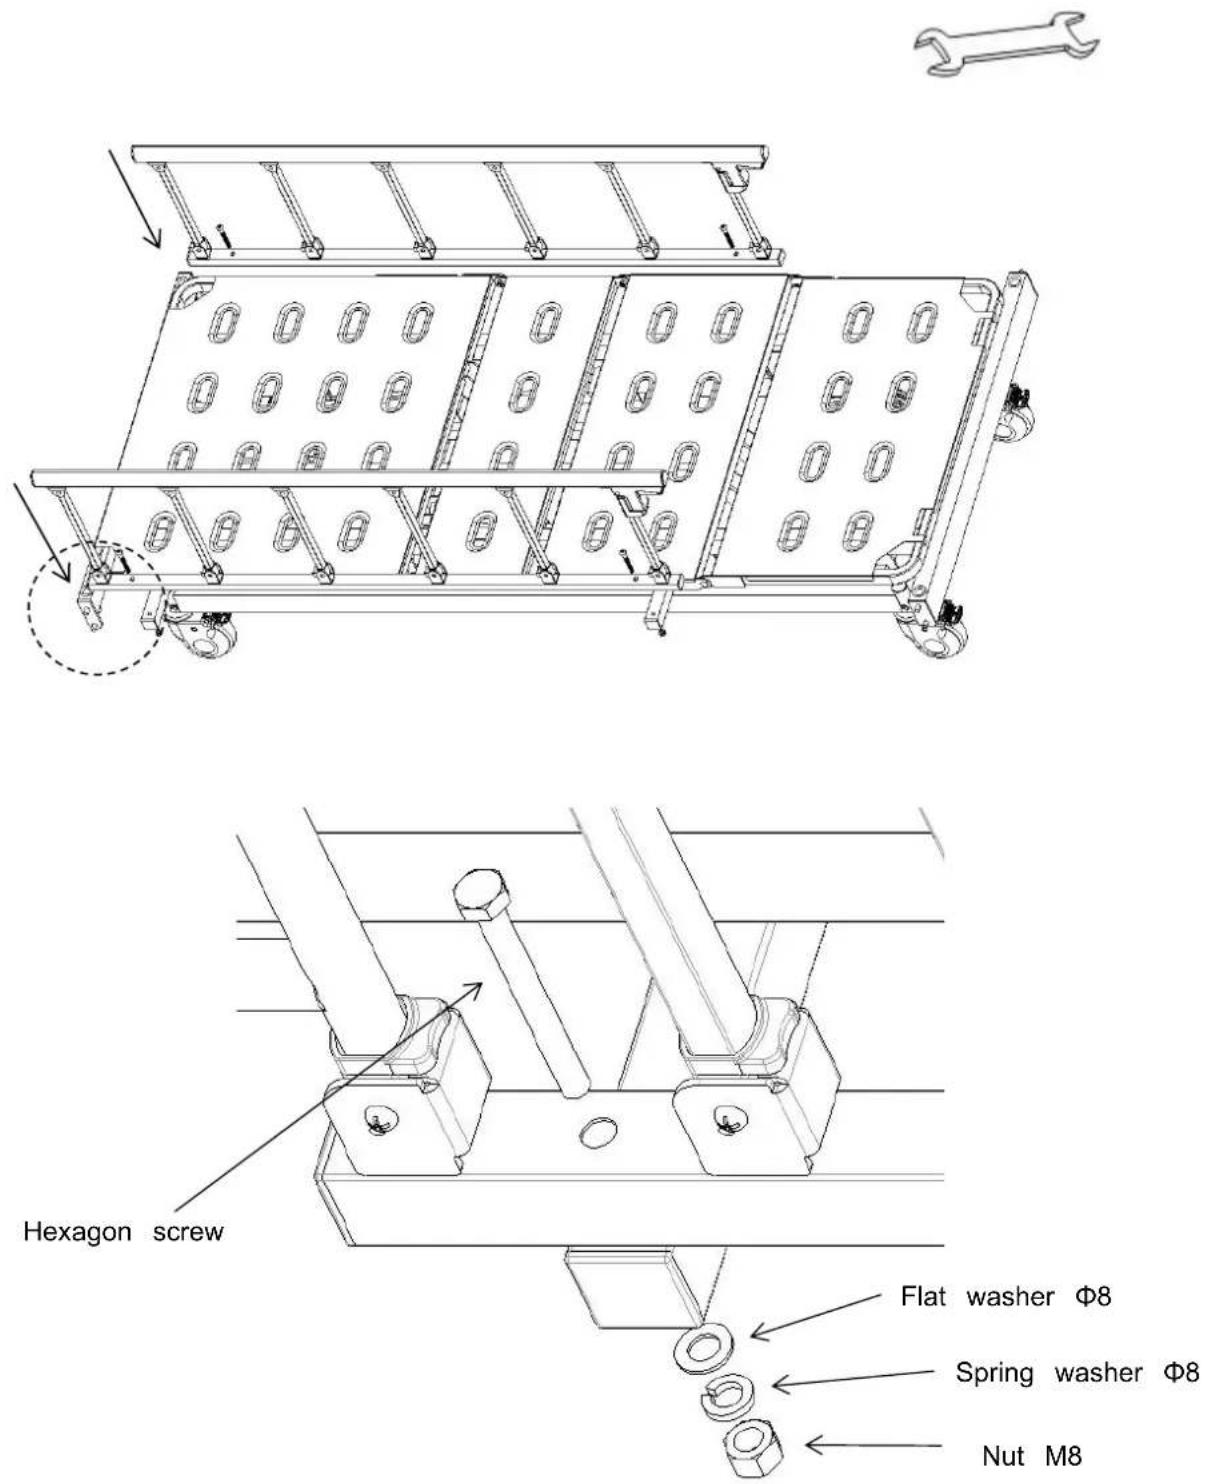
1.4 PP mattress holder installation
1
2

3
4
1.5 Head board & Foot board assembly method
(The picture does not exactly match the real product, only for the installation instructions)
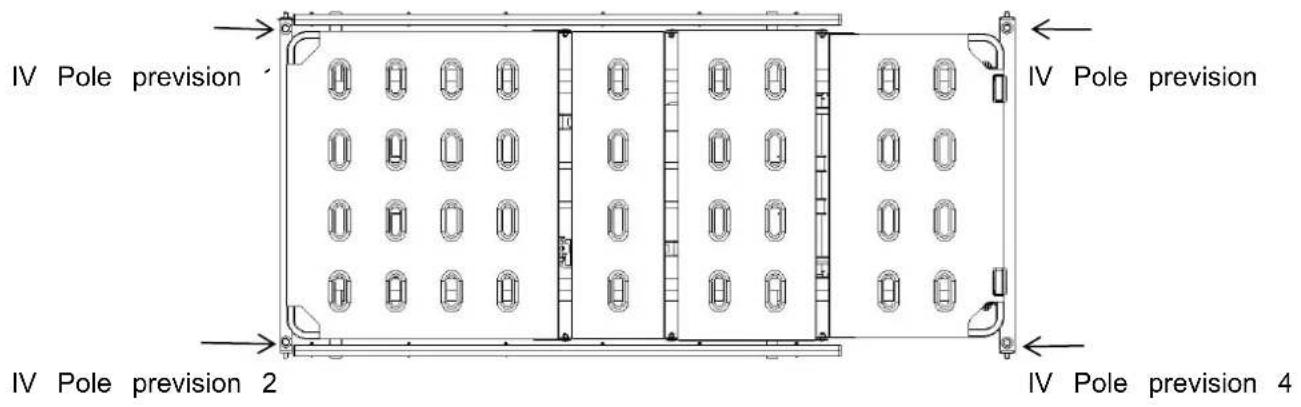
1.6 IV pole installation
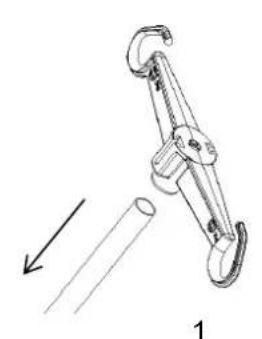
Female part installation: Press the plastic hook (female part) down on the 16mm stainless steel pip
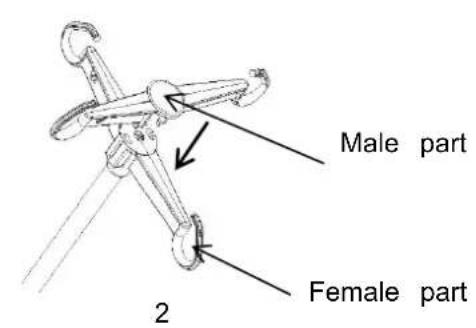
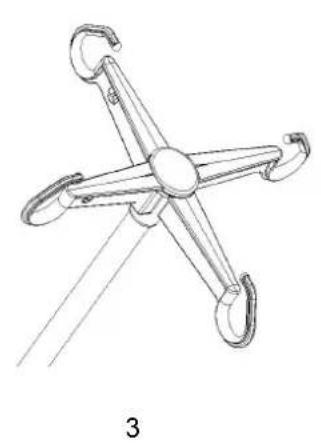
Male part installation: Place the plastic hook (male part) directly above the female part in a cross slit and then aligns the buckles on the male part with the slots on the female part and press down. A hearing a "click", check whether the end of the buckle is tight, if it is tight, then complete the installation, if not, continue to press down until the buckle is tight.
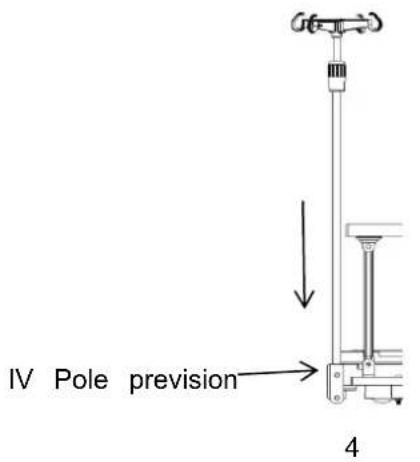
Insert the installed IV pole vertically into the IV pole prevision. (The arrow in the picture shows the pole prevision)
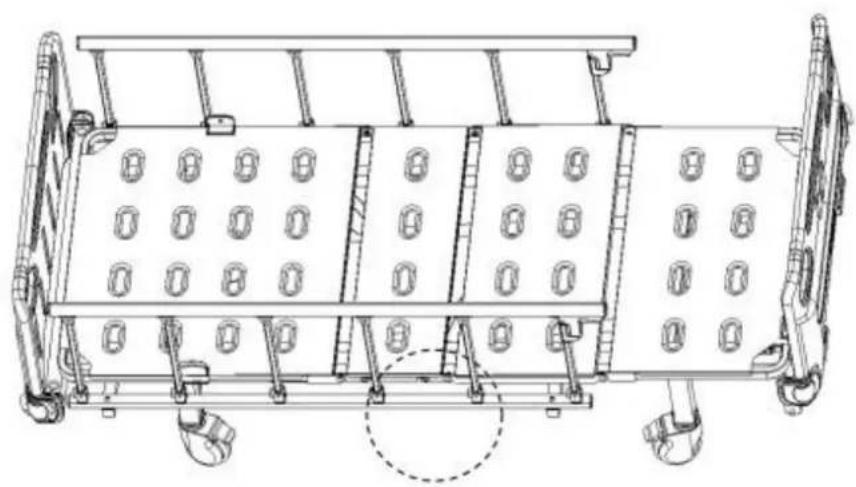
2. Use method

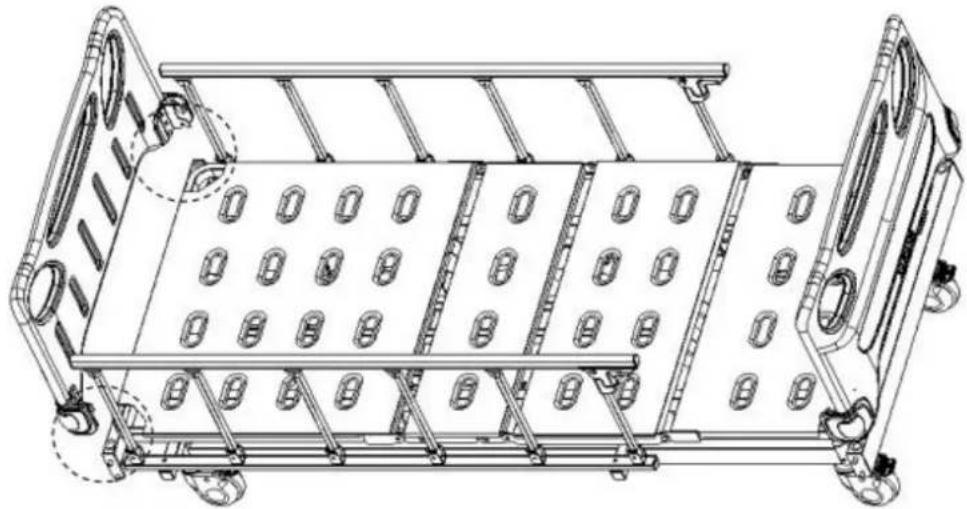
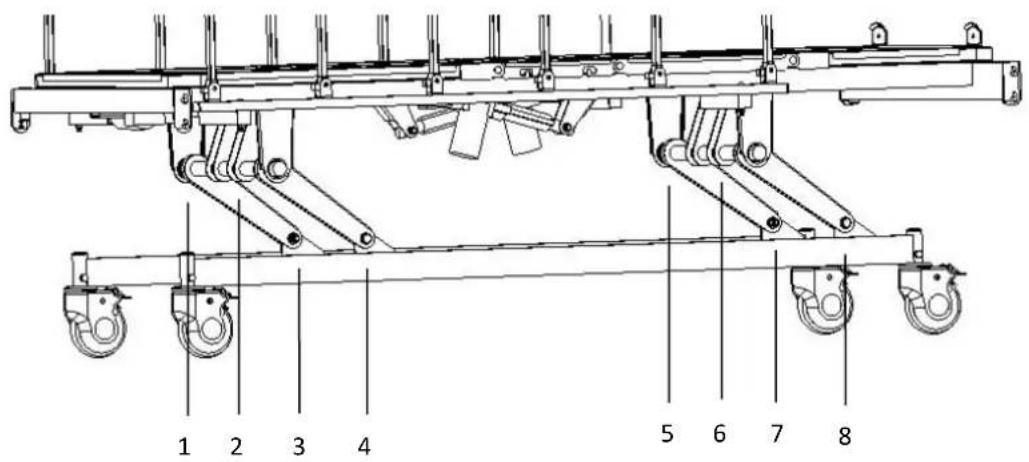
1-Foot board 2-Casters 3-Guardrail 4-Bed surface board
5-Drainage hook 6-Bed frame 7-Mattress holder 8-Foot board
| Bed surface size | Length | mm | 1920±10 |
| width | 820±10 | ||
| The lowest height of the bed from the grou | 400-710±10 | ||
| Dimensions | Length | 2105±10 | |
| Width | 980±10 | ||
| Height | 400-710±10 | ||
| Tilt range | Back board | / | 0-84±5° |
| Leg board | 0-47±5° | ||
| Weight | Safe working load | KG | 200 |
2.1 Use method of casters

When there is a patient on the bed, the guardrail should be raised before moving the bed.

Except when the bed must be moved, the caster brake must be stepped on during the rest of Need to depress all four wheel brakes.
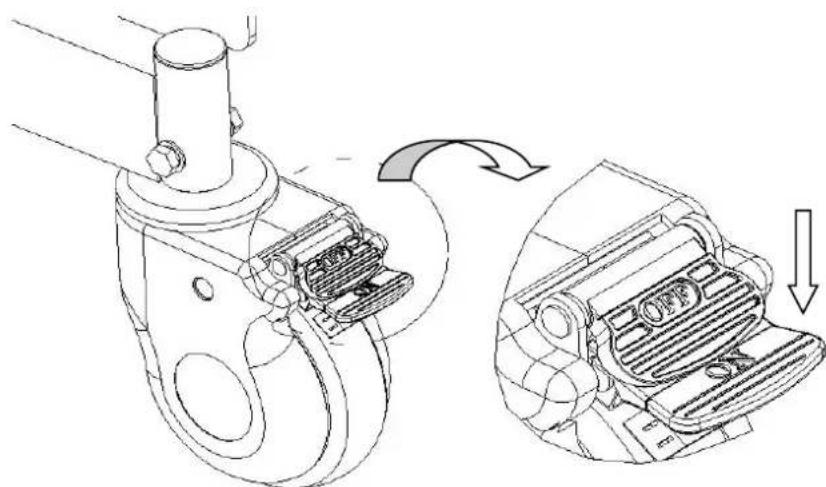
2.1.1 Lock the caster: After pushing the bed to the desired position, press the ON button with your foot and lock the caster when you hear a "click", as shown in figure below.
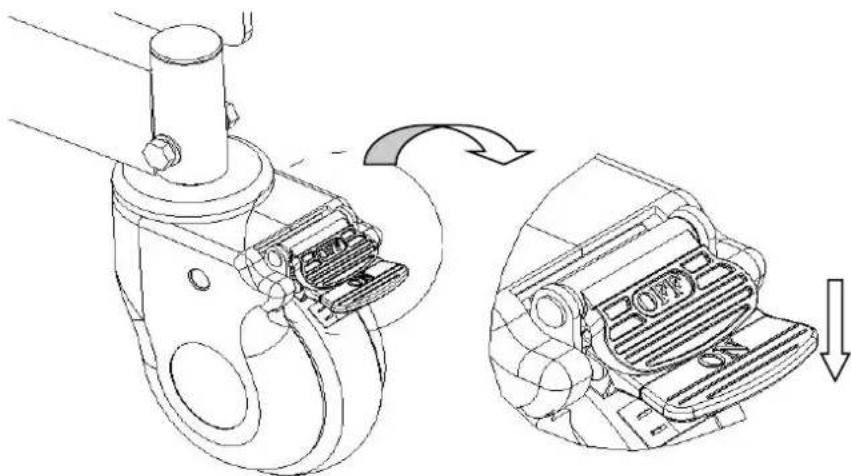
2.1.2 Unlock the caster: Press the OFF button with your foot and unlock the case when you hear a "click".
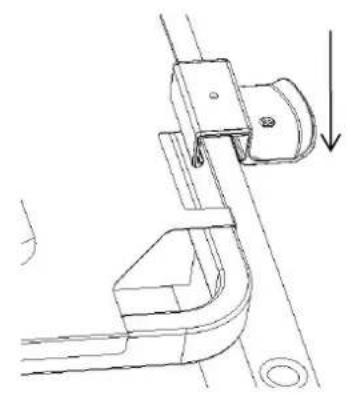
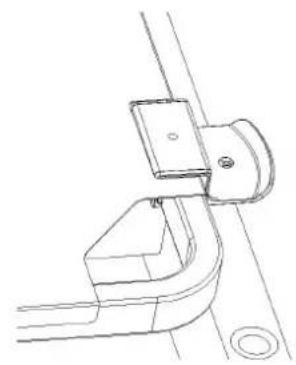
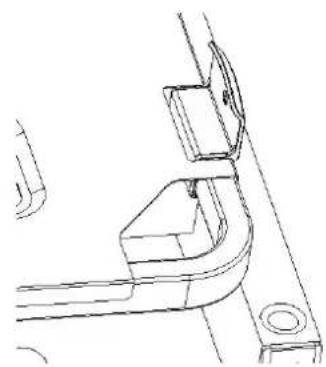
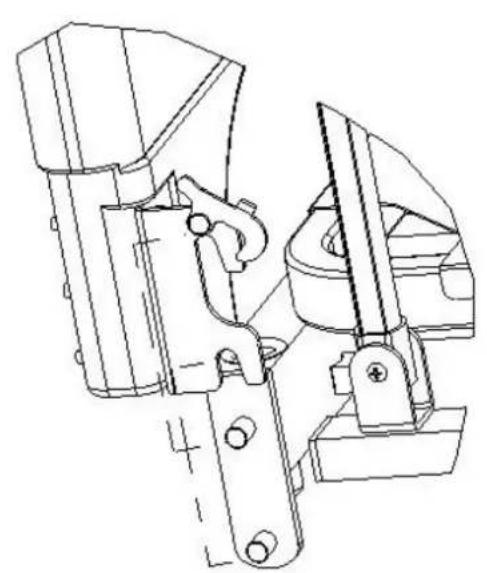
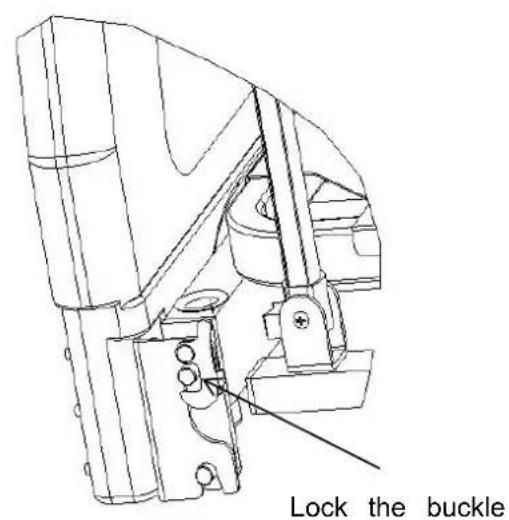
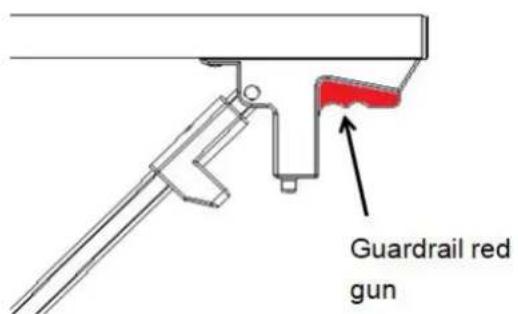
2.2 Use method of guardrails
2.2.1 Raising and lowering the guardrail
Raise the guardrail: Hold the red gun of the guardrail and lift it up. When you hear the sound of means the guardrail is locked.
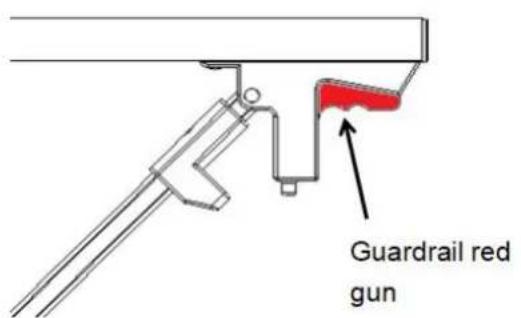
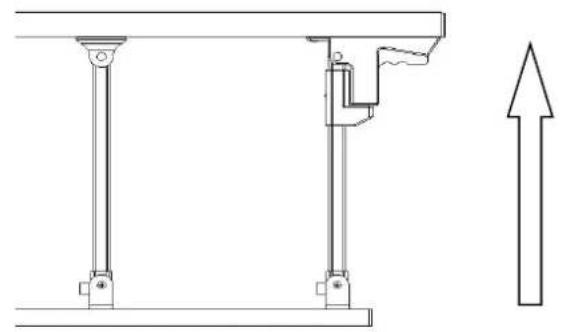
Lower the guardrail: Hold the guardrail red gun and slowly lay down.
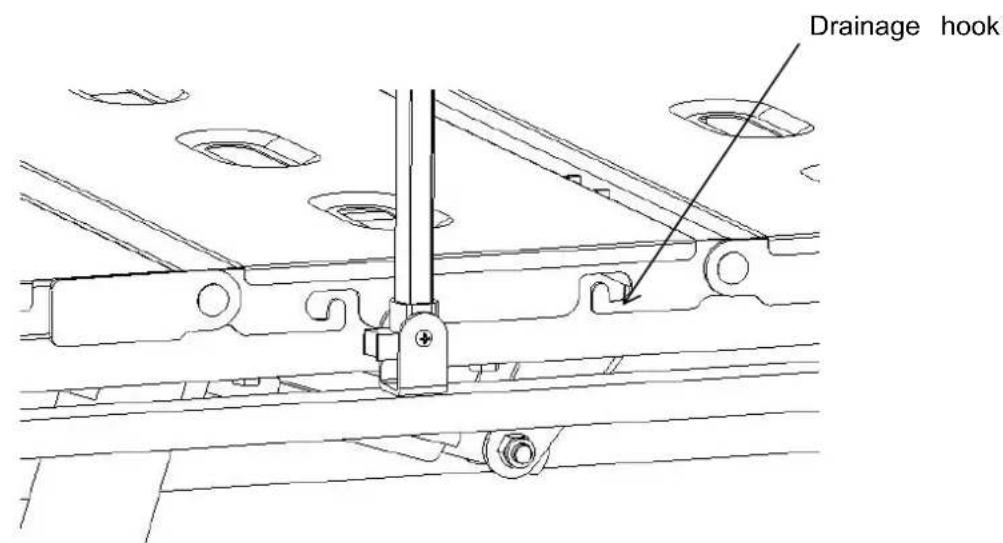
2.3 Use method of drainage hooks
The drainage hooks as shown in the figure.
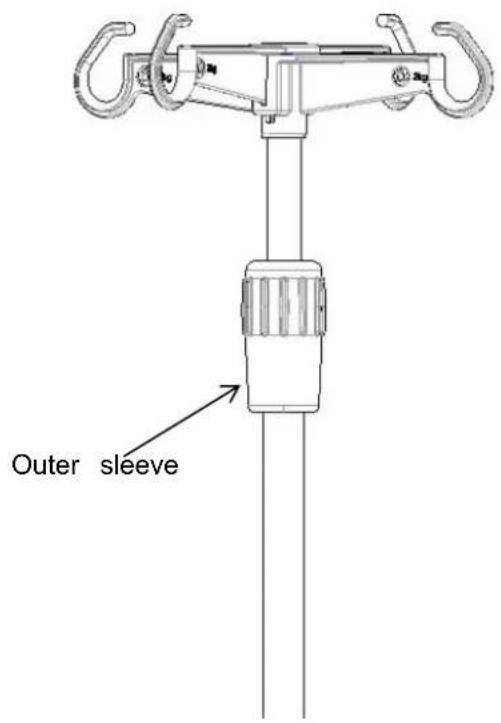
2.4 Use method of IV pole
Adjusting the height of the IV pole:
- First loosen the outer sleeve counter clock carefully, insert the inner tube of the IV pole into the sleeve, and then adjust the length of the extension rod up and down;
- Second adjust the required length, and then tighten the outer sleeve clock carefully. The maximum bearing of each hook is 2kg , a total of 8kg .
(Height Adjustment :890--1540mm)
2.5 Use method of hand controller
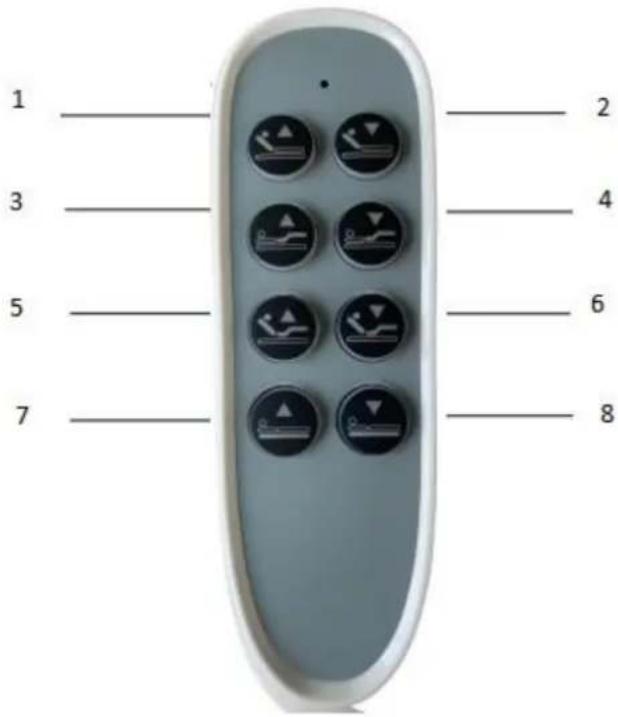
1: Back up button
2: Back down button
3: Leg up button
4: Leg down button
5: Back and leg linkage up (auto-contour) button
6: Back and leg linkage down (auto-contour) button
7: Whole bed up button
8: Whole down Button
3. Spare part replacement and maintenance
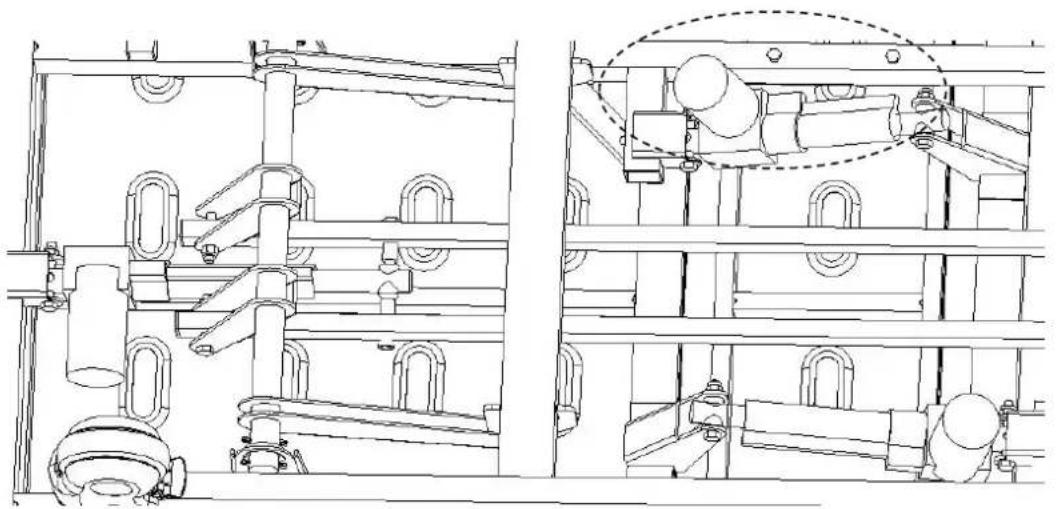
Use 2pcs 17-inch Allen wrenches to unscrew the motor, take out the bolt, and replace the motor. When the replacement is completed, install the bolts in the order shown in the figure, and use wrench to tighten the knot.

4. Faults exclusion
| Common failures | Probable reasons | Exclusion methods |
| Difficult to move the whole bed | 1. The caster is locked without releasing the brake2. The caster is damaged | 1. Release the brake,check 2.12. Replace the caster,check1.1 |
| Guardrail easy to loosen | The guardrail is not stuck in place | Lift the guardrail upward again let go of the hand after hearing "click" |
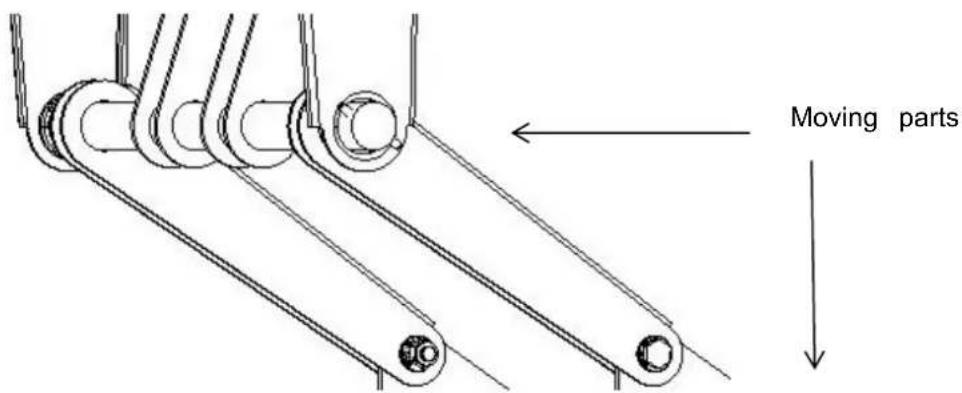
| Loud noise when the bed board moves up and down | The moving parts are rusted and lubrication is insufficient | Add proper amount of lubricating oil at the joint of moving parts |
| Part of the bed does work | The hand controller button fails | Replace the hand controller |
| The electric bed does not work | Unplugged and no power on | Insert the plug and turn on the power |
5. Bed-maintenance
-
In order to use the bed safely, safety inspections must be done regularly. Conduct a comprehens inspection every six months, to ensure that there is no looseness in the connection parts and the function of up&down for the bed can be operated normally.
-
At the joints of the frequently moving parts of the bed, an appropriate amount of lubricating oil r to be added during daily inspection; if serious wear is found, it should be replaced immediately to e safety, add lubricated parts as show.
- Avoid hitting the bed and scratching the coating on the bed with sharp objects.
- Please avoid inhaling moisture into the bed and mattress, which will cause rust, abnormal noise a bacteria breeding. If water adheres, wipe it off immediately.
- When the bed frame ages and it reaches a certain servicing time, which the metal part of the bed, the plastic parts of the headboard or footboard, guardrail can be recycle.
6. Bed-cleaning
- When cleaning, please wring out the cloth soaked in neutral detergent diluted with water and wipe then wring out the cloth soaked in water to wipe off the remaining detergent ingredients, and finally dry wipe dry with a cloth.
- Do not use volatile substances (thinner, volatile agent, gasoline, etc.), which may cause chemical reactions and damage the bed.
- When using a disinfectant to clean, be sure to dilute it according to its specified concentration be use. Depending on the composition of the disinfectant, it may corrode metal parts, resin parts, etc., causing undesirable phenomena such as discoloration and deformation. Therefore, the content of the disinfectant is recommended as follows:
0.05 0.2% ammonium chloride disinfectant
0.05~0.2% Chlorinated phenyl disinfectant
0.05% diclofenac ethane solution
0.05 0.2% sodium hypochlorite disinfectant
Do not use smoking sterilizers, autoclaves, and do not use methyl (phenol) to clean the headboard a foot of the bed. It may cause corrosion, discoloration and deterioration.
Note: When cleaning the bed or changing the bedclothes, please pay attention to the corners, edges and screws of the frame to prevent scratches.
7. Mattress-cleaning and maintenance
-
When using it, avoid scratching the fabric with sharp-angled tools or knives, cover it with sheets cleaning pads, and clean it frequently to protect it from dryness.
-
Clean the mattress regularly with a vacuum cleaner, Mattress cover can be washed in 100^
- Expose the mattress often to keep the sleep fresh and comfortable, but be careful not to expose mattress to too long.
- If the fabric is accidentally stained, please refer to the corresponding recommended cleaning method in the instructions, do not use corrosive chemicals to clean the fabric.
- If accidentally the chewing gum or other jellies get on the fabric, do not wipe it forcibly. Use an to allow it harden and gently peel it off.
-
If the thread is found to be loose due to wear and tear, do not pull it off by hand, use scissors together.
-
If your order does not have a mattress, please refer to the contract configuration.
8. Caster-detection and maintenance
- Regularly check the casters to avoid hitting or overloading, which will cause damage to the caster.
- Grease the casters or wheels on a regularly, and the frequency of addition should be determined according to the specific actual use conditions. In general, lubricating grease is added every six mon
- After cleaning the caster equipment, pay attention to adding grease. The selection of lubricating grease should be based on the actual use environment, special high temperature and special low temperature environment, and the corresponding lubricating grease should be selected.
- It is forbidden to force the casters to brake when braking, which will cause damage to the brake system.
- The wear of the tire surface of the wheel can be detected by visual inspection. Some thread sp yarn and other accumulations may be wrapped around the wheel, remove the bolts and nuts of the wheel, clean up the debris, and check whether the bearing of the wheel is damaged. If the parts a damaged, can be reassembled and used.
- Judging whether the caster is replaced according to the time used, wear and tear, you can replace wheels and make sure that the axles bolt and nuts are well put together and connected. If possible a lock washers or locknuts to help you with this process.
- For the casters equipped with brakes, it is necessary to regularly check whether the brakes are working properly. Check the brakes once a day or before each use. For a hospital bed equipped with multiple brake casters, only one brake caster can be locked at a time which will allow you to try a the bed also check whether one of the brake performance of each caster is good. If the function of brake fails due to wear or damage to the wheels, immediately replace the wheels and then retest the brake system.
- If the mechanism of the brake system of the caster is damaged, and the brake needs to be replaced, please contact our after-sales service department or authorized dealer provide by our
company. Every time the brakes are replaced, the brake performance of the casters must be retested
9. Guardrail-maintenance
- Please check whether the side rails are installed correctly to prevent the lying patient from shifting and rolling down.
- Please always check the screws of the total position of the guardrail and the wire to prevent loc and falling off.
- Please use the red plastic parts of the guardrail switch correctly, and do not use brute force pre from damaging the guardrail.
10.Spare part list
| No. | Name | Model No | Picture | Specification |
| 1 | A900/PP/Head foot board | S0FJBT010019 | Hook distance: 910*55mm | |
| 2 | Side rail | BKLLGH105931 | Left side | |
| 3 | Side rail | BKLLGH105932 | Right side | |
| 4 | IV pole | S0FJSY010003 | Φ16-19/off-white | |
| 5 | 5 inch caster | LGPLU101TS014 | φ24 | |
| 6 | Caster square se | GPSL101TS297 | 50*50mm | |
| 7 | HJ motor 100 | LGPDJ101TS575 | HJA58/ Stroke 100mm/ Installation distance 275mm | |
| 8 | HJ motor 150 | LGPDJ101TS574 | HJA58/ Stroke 150mm/ Installation distance 325mm | |
| 9 | HJ motor 200 | LGPDJ101TS573 | HJA58/ Stroke 200mm/ Installation distance 375mm | |
| 10 | HJ control box | LGPDJ101TS576 | / | HJT13E Switch power supply/100-240V/50/60Hz/w hite |
| 11 | HJ hand controlled | LGPDJ101TS577 | HJH18 remote control | |
| 12 | HJ power line | LGPDJ101TS578 | Straight line 3m/white | |
| 13 | HJ signal line | LGPDJ101TS579 | W971 signal line/white | |
| 14 | Drainage hook | GPSL101TS437 | 55*61mm | |
| 15 | Name card | GPSL101TS184 | / |
Note: Due to product updates, parts of the original product may not be available for life.
(The company ensures that the sold products can provide the parts that need to be replaced within years after the end of their production)
11. Packaging, transport, storage
- The packaging of electric bed is carried out according to the contract or product standard.
- Avoid rushing out, violent vibration, and prevent from sunlight and rain during the transportation of electric bed.
- The electric bed should be stored:
a) Ambient temperature: +5^ C +40^ C .
b) Relative humidity: ≤ 85% .
c) Atmospheric pressure: 70kPa 106kPa .
d) Power voltage: AC 100-220±22V;
e)Power frequency: 50 ± 5 ~Hz
- The equipment is with internal power supply, and the protection type is Type B.
A) Working voltage: DC 24V.
B) Input power: 300VA.
C) Fuse model and rating: F3AL 250V, 5 × 20 ~mm
D) Working schedule: intermittent loading and continuous operation
E) Ingress protection :IPX4
F) Non-AP /APG devices
Symbol Interpretation:

Note! Check the file that comes with the bed IPX4 Ingress protection

Class II equipment Protective grounding

12. After-sales service
- Please keep the files that comes with the machine and invoices of this product properly, and you to present these files when the company performs warranty and maintenance for the product.
- If there is any problem in the process of using, please contact our company in time, so that our company can provide you with accurate and fast technical support and maintenance services in a timely manner.
- From the date of sale, if the product is broken or damaged due to the correct installation and u according to the specification, the product will enjoy one-year free warranty and lifelong maintenance service with the "certificate" or invoice.
- Do not disassemble the internal device of this product by yourself to avoid unnecessary damage. You find that the use is affected due to quality problems, please contact our after-sales service department or our authorized dealer.
- From the date of purchase, if it is indeed damaged or does not work normally due to quality pr within one year, the company will provide to the users a free repairing of the product.
JIANGSU SAIKANG MEDICAL EQUIPMENT CO LTD.
Correct Disposal

This product is subject to the provision of european Directive 2012/19/EU. The symbol s wing a wheelie bin crossed through indicates that the product requires separate refuse cction in the European Union. This applies to the product and all accessories marked w
this symbol. Products marked as such may not be discarded with normal domestic waste, but I be taken to a collection point for recycling electrical and electronic devices.
JIANGSU SAIKANG MEDICAL EQUIPMENT CO LTD.
Imported to AUS: SIHAO PTY LTD.
1 ROKEVA STREETEASTWOOD NSW 2122 Australia
Imported to USA: Sanven Technology Ltd.
Suite 250, 9166 Anaheim Place, Rancho Cucamonga, CA 91730

REP
YH CONSULTING LIMITED.
C/O YH Consulting Limited Office 147,
Centurion House, London Road,
Staines-upon-Thames, Surrey, TW18 4AX
REP
E-CrossStu GmbH
Mainzer Landstr.69,
60329 Frankfurt am Main.
VEVOR
TOUGH TOOLS, HALF PRICE
Technical Support and E-Warranty Certificate
www. vvor. com/support
VEVOR®
TOUGH TOOLS, HALF PRICE
Assistance technique et certificate de garantie electronique www. vvor. com/support
LIT DE MALADIE
MODELE:K6K5S
11. Emballage, transport, stockage
1 ROKEVA STREET EASTWOOD NSW 2122 Australia
Suite 250, 9166 Anaheim Place, Rancho Cucamonga, CA 91730
YH CONSULTING LIMITEE.
C/O YH Consulting Limited Bureau 147,
Staines-upon-Thames, Surrey, TW18 4AX
E-CrossStu GmbH
69, rue Mainzer Landstr.,
Suite 250, 9166 Anaheim Place, Rancho Cucamonga, CA 91730

YH CONSULTING LIMITED.
C/O YH Consulting Limited Office 147,
Centurion House, London Road,
Staines-upon-Thames, Surrey, TW18 4AX

E-CrossStu GmbH
Mainzer Landstr.69,
60329 Frankfurt am Main.
VEVOR
TOUGH TOOLS, HALF PRICE
www.vevor.com/support
VEVOR®
TOUGH TOOLS, HALF PRICE
elettronica www.vevor.com/support
Importato in AUS: SIHAO PTY LTD.
1 ROKEVA STREET EASTWOOD NSW 2122 Australia
Suite 250, 9166 Anaheim Place, Rancho Cucamonga, CA 91730

CONSULENZAHYLIMITATA.
C/O YH Consulting Limited Ufficio 147,
Casa del centurione, London Road,
Staines-upon-Thames, Surrey, TW18 4AX

E-CrossStu GmbH
Via Magonza 69,
elettronica www.vevor.com/support
VEVOR®
TOUGH TOOLS, HALF PRICE
Soporte专业技术o y certificate de garantia electrònica www.vevor.com/support
CAMA DE ENFERMO
MODELO: K6K5S
1 ROKEVA STREET EASTWOOD NSW 2122 Australia
Suite 250, 9166 Anaheim Place, Rancho Cucamonga, CA 91730

YH CONSULTING LIMITADA.
C/O YH Consulting Limited Oficina 147,
Casa Centurión, London Road,
Staines-upon-Thames, Surrey, TW18 4AX

E-CrossStu GmbH
Calle Mainz Landstr.69,
1 ROKEVA STREETEASTWOOD NSW 2122 Australia
Importowane do USA: Sanven Technology Ltd.
Apartment 250, 9166 Anaheim Place, Rancho Cucamonga, CA 91730

YH CONSULTING LIMITED.
C/O YH Consulting Limited Biuro 147, Dom Centuriona, London Road,
Staines-upon-Thames, Surrey, TW18 4AX

E-CrossStu GmbH
Mainzer Landstr.69,
60329 Frankfurt nad Menem.
VEVOR®
TOUGH TOOLS, HALF PRICE
HULP NODIG? NEEM CONTACT MET ONS OP!
garantiecertificaat www.vevor.com/support
1 ROKEVA STRAAT EASTWOOD NSW 2122 Australie
Suite 250, 9166 Anaheim Place, Rancho Cucamonga, CA 91730

EP
YH CONSULTING LIMITED.
C/O YH Consulting Limited Kantoor 147,
Centurionhuis, Londen Road,
Staines-upon-Thames, Surrey, TW18 4AX
E-CrossStu GmbH
Mainzer Landstr.69,
60329 Frankfurt am Main.
VEVOR
TOUGH TOOLS, HALF PRICE
garantiecertificaat www.vevor.com/support
VEVOR®
TOUGH TOOLS, HALF PRICE
Suite 250, 9166 Anaheim Place, Rancho Cucamonga, CA 91730

REP
YH CONSULTING LIMITED.
C/O YH Consulting Limited Office 147,
Centurion House, London Road,
Staines-upon-Thames, Surrey, TW18 4AX

REP
E-CrossStu GmbH
Mainzer Landstr.69,
60329 Frankfurt am Main.
VEVOR
TOUGH TOOLS, HALF PRICE


