
SF 30M22 - Screwdriver HILTI - Free user manual and instructions
Find the device manual for free SF 30M22 HILTI in PDF.
| Product type | Cordless magnetic core drill |
| Brand | Hilti |
| Model | SF 30M22 |
| Rated voltage | 21.6 V |
| No-load speed (clockwise rotation) | 520 rpm |
| No-load speed (counterclockwise rotation) | 280 rpm |
| Weight (without battery) | 12.9 kg |
| Operating temperature | -17 °C … 60 °C |
| Storage temperature | -20 °C … 70 °C |
| Battery type | Li-Ion Nuron B 22 series |
| Drilling capacity (core bit) | Up to Ø 35 mm in steel (thickness ≤ 50 mm) |
| Drilling capacity (twist drill) | Up to Ø 18 mm |
| Tapping capacity | Up to M14 |
| Speed levels | 6 levels (200 to 520 rpm) |
| Safety | Electronic emergency stop ATC |
| Displays | LED: magnet, warning, speed levels |
| Magnetic foot | Activation by lever (positions 30 % and 100 %) |
| Safety strap | Included |
| Sound pressure level | 83 dB(A) |
| Sound power level | 92 dB(A) |
| Compatible materials | Steel and ferrous metals (magnetic surface) |
| Maintenance | Clean with a damp cloth; soft brush for ventilation slots |
| Warranty | Contact Hilti service center |
Frequently Asked Questions - SF 30M22 HILTI
User questions about SF 30M22 HILTI
0 question about this device. Answer the ones you know or ask your own.
Ask a new question about this device
Download the instructions for your Screwdriver in PDF format for free! Find your manual SF 30M22 - HILTI and take your electronic device back in hand. On this page are published all the documents necessary for the use of your device. SF 30M22 by HILTI.
USER MANUAL SF 30M22 HILTI
natural_image
Mechanical assembly diagram showing a drill bit with tool handle and motion arrows (no text or symbols)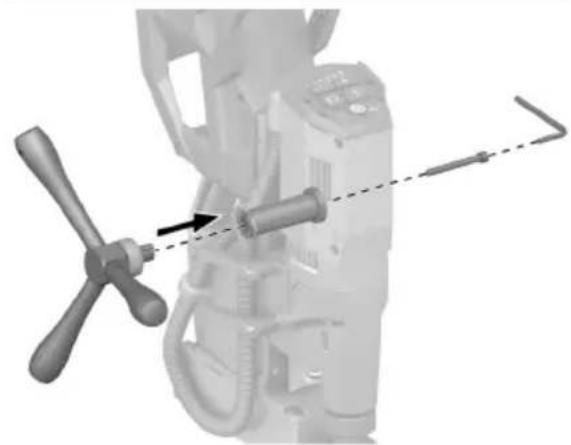
natural_image
Mechanical assembly diagram showing a lever mechanism with a dashed line indicating alignment (no text or symbols present)
3
4
natural_image
Mechanical component with a drill bit and threaded rod, no visible text or symbols5
natural_image
Mechanical assembly diagram showing a motor with hoses and a rotating wheel (no text or symbols)6
7
8
9
natural_image
Close-up of a CNC machine tool with a highlighted circular component, no visible text or symbols10
natural_image
Mechanical device with mechanical components and mounting bracket (no visible text or symbols)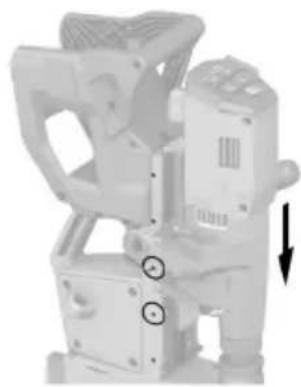
natural_image
Mechanical device with attached components and directional arrow (no visible text or symbols)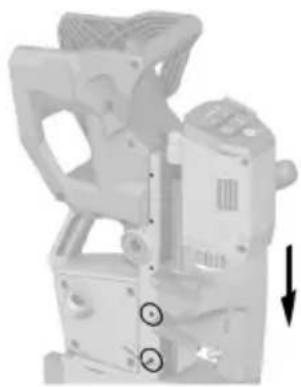
natural_image
Mechanical device with attached components and a downward arrow indicator (no visible text or symbols)Information about the operating instructions
About these operating instructions
- Warning! Read and understand all accompanying documentation, including but not limited to instructions, safety warnings, illustrations, and specifications provided with this product. Familiarize yourself with all the instructions, safety warnings, illustrations, specifications, components, and functions of the product before use. Failure to do so may result in electric shock, fire, and/or serious injury. Save all warnings and instructions for future reference.
- HILTI products are designed for professional users and only trained, authorized personnel are permitted to operate, service and maintain the products. This personnel must be specifically informed about the possible hazards. The product and its ancillary equipment can present hazards if used incorrectly by untrained personnel or if used not in accordance with the intended use.
- The accompanying documentation corresponds to the current state of the art at the time of printing. Please always check for the latest version on the product's page on Hilti's website. To do this, follow the link or scan the QR code in this documentation, marked with the symbol 📋
- Ensure that these operating instructions are with the product when it is given to other persons.
Explanation of symbols
Warnings
Warnings alert persons to hazards that occur when handling or using the product. The following signal words are used:

DANGER
DANGER!
- Draws attention to imminent danger that will lead to serious personal injury or fatality.

WARNING
WARNING!
- Draws attention to a potential threat of danger that can lead to serious injury or fatality.

CAUTION
CAUTION!
- Draws attention to a potentially dangerous situation that could lead to personal injury or damage to the equipment or other property.
Symbols in the operating instructions
The following symbols are used in these operating instructions:


Symbols in illustrations
The following symbols are used in illustrations:

3


These numbers refer to the illustrations at the beginning of these operating instructions.
The numbers in illustrations refer to important work steps or to components important for the work steps. In the text, the corresponding numbers draw attention to these work steps or components, e.g. (3).
Item reference numbers are used in the overview illustration and refer to the numbers used in the key in the product overview section.
This symbol is intended to draw your special attention to certain points for handling the product.
Product-dependent symbols
General symbols
Symbols used in relation to the product.

Li-Ion
The product supports near-field communication (NFC) technology compatible with iOS and Android platforms.
Li-ion battery
 | Never use the battery as a striking tool. |
 | Do not drop the battery. Never use a battery that has suffered an impact or is damaged in any other way. |
Warning signs
Warning symbols are warnings of hazards.

Prohibition symbols
Prohibition symbols indicate "must not do" actions.

"Must do" symbols
Obligation symbols indicate "must do" actions.

Safety
General power tool safety warnings
WARNING Read all safety warnings, instructions, illustrations and specifications provided with this power tool. Failure to follow all instructions listed below may result in electric shock, fire and/or serious injury.
Save all warnings and instructions for future reference.
The term "power tool" in the warnings refers to your mains-operated (corded) power tool or battery-operated (cordless) power tool.
Work area safety
- Keep work area clean and well lit. Cluttered or dark areas invite accidents.
▶ Do not operate power tools in explosive atmospheres, such as in the presence of flammable liquids, gases or dust. Power tools create sparks which may ignite the dust or fumes.
▶ Keep children and bystanders away while operating a power tool. Distractions can cause you to lose control.
Electrical safety
▶ Power tool plugs must match the outlet. Never modify the plug in any way. Do not use any adapter plugs with earthed (grounded) power tools. Unmodified plugs and matching outlets will reduce risk of electric shock.
- Avoid body contact with earthed or grounded surfaces, such as pipes, radiators, ranges and refrigerators. There is an increased risk of electric shock if your body is earthed or grounded.
▶ Do not expose power tools to rain or wet conditions. Water entering a power tool will increase the risk of electric shock.
Do not abuse the cord. Never use the cord for carrying, pulling or unplugging the power tool. Keep cord away from heat, oil, sharp edges or moving parts. Damaged or entangled cords increase the risk of electric shock.
When operating a power tool outdoors, use an extension cord suitable for outdoor use. Use of a cord suitable for outdoor use reduces the risk of electric shock.
If operating a power tool in a damp location is unavoidable, use a residual current device (RCD) protected supply. Use of an RCD reduces the risk of electric shock.
Personal safety
Stay alert, watch what you are doing and use common sense when operating a power tool. Do not use a power tool while you are tired or under the influence of drugs, alcohol or medication. A moment of inattention while operating power tools may result in serious personal injury.
▶ Use personal protective equipment. Always wear eye protection. Protective equipment such as a dust mask, non-skid safety shoes, hard hat or hearing protection used for appropriate conditions will reduce personal injuries.
▶ Prevent unintentional starting. Ensure the switch is in the off-position before connecting to power source and/or battery pack, picking up or carrying the tool. Carrying power tools with your finger on the switch or energising power tools that have the switch on invites accidents.
Remove any adjusting key or wrench before turning the power tool on. A wrench or a key left attached to a rotating part of the power tool may result in personal injury.
▶ Do not overreach. Keep proper footing and balance at all times. This enables better control of the power tool in unexpected situations.
▶ Dress properly. Do not wear loose clothing or jewellery. Keep your hair and clothing away from moving parts. Loose clothes, jewellery or long hair can be caught in moving parts.
If devices are provided for the connection of dust extraction and collection facilities, ensure these are connected and properly used. Use of dust collection can reduce dust-related hazards.
Do not let familiarity gained from frequent use of tools allow you to become complacent and ignore tool safety principles. A careless action can cause severe injury within a fraction of a second.
Power tool use and care
Do not force the power tool. Use the correct power tool for your application. The correct power tool will do the job better and safer at the rate for which it was designed.
- Do not use the power tool if the switch does not turn it on and off. Any power tool that cannot be controlled with the switch is dangerous and must be repaired.
HILTI
▶ Disconnect the plug from the power source and/or remove the battery pack, if detachable, from the power tool before making any adjustments, changing accessories, or storing power tools. Such preventive safety measures reduce the risk of starting the power tool accidentally.
- Store idle power tools out of the reach of children and do not allow persons unfamiliar with the power tool or these instructions to operate the power tool. Power tools are dangerous in the hands of untrained users.
- Maintain power tools and accessories. Check for misalignment or binding of moving parts, breakage of parts and any other condition that may affect the power tool's operation. If damaged, have the power tool repaired before use. Many accidents are caused by poorly maintained power tools.
- Keep cutting tools sharp and clean. Properly maintained cutting tools with sharp cutting edges are less likely to bind and are easier to control.
▶ Use the power tool, accessories and tool bits etc. in accordance with these instructions, taking into account the working conditions and the work to be performed. Use of the power tool for operations different from those intended could result in a hazardous situation.
- Keep handles and grasping surfaces dry, clean and free from oil and grease. Slippery handles and grasping surfaces do not allow for safe handling and control of the tool in unexpected situations.
Battery tool use and care
▶ Recharge only with the charger specified by the manufacturer. A charger that is suitable for one type of battery pack may create a risk of fire when used with another battery pack.
▶ Use power tools only with specifically designated battery packs. Use of any other battery packs may create a risk of injury and fire.
When battery pack is not in use, keep it away from other metal objects, like paper clips, coins, keys, nails, screws or other small metal objects, that can make a connection from one terminal to another. Shorting the battery terminals together may cause burns or a fire.
▶ Under abusive conditions, liquid may be ejected from the battery; avoid contact. If contact accidentally occurs, flush with water. If liquid contacts eyes, additionally seek medical help. Liquid ejected from the battery may cause irritation or burns.
- Do not use a battery pack or tool that is damaged or modified. Damaged or modified batteries may exhibit unpredictable behaviour resulting in fire, explosion or risk of injury.
- Do not expose a battery pack or tool to fire or excessive temperature. Exposure to fire or temperature above 130^ (265 °F) may cause explosion.
▶ Follow all charging instructions and do not charge the battery pack or tool outside the temperature range specified in the instructions. Charging improperly or at temperatures outside the specified range may damage the battery and increase the risk of fire.
Service
▶ Have your power tool serviced by a qualified repair person using only identical replacement parts. This will ensure that the safety of the power tool is maintained.
▶ Never service damaged battery packs. Service of battery packs should only be performed by the manufacturer or authorized service providers.
Safety instructions for magnetic drills
Do not use this tool if you or any bystanders have a cardiac pacemaker or other medical implants. Cardiac pacemakers and other medical implants may malfunction due to magnetic fields emitted by the tool, which may result in personal injury.
▶ Always check the safety strap for wear or damage before each use. A worn or damaged safety strap may fail unexpectedly during use and may result in personal injury.
▶ Only attach the magnetic drill to ferrous metal. The magnetic base will not secure properly to non-ferrous metals, such as non-magnetic grades of stainless steel.
Clean the surface before attaching the drill stand to the work surface. Paint, rust or scale decrease the holding strength of the magnet. Chips, burrs, dirt and other foreign matter on the surface of the magnetic base will also decrease holding power.
▶ Always secure the magnetic base on a smooth, flat work surface. If the workpiece is uneven and not smooth or flat, the magnetic base may release from the workpiece, causing unexpected movement of the tool or workpiece and personal injury.
▶ Use clamps or other practical ways to secure and support the workpiece to a stable platform. It is important to support the workpiece properly to minimise body exposure, binding, or loss of control.
▶ Always use the safety strap provided or recommended to secure the tool to the workpiece before turning on the drill motor. The magnetic base may release from the workpiece, causing unexpected movement of the tool or workpiece and personal injury.
▶ Always activate the magnetic base and make sure it is securely attached to the workpiece before turning on the drill motor. Failure to secure the magnetic base to the workpiece may cause unexpected movement of the tool or workpiece and personal injury.
▶ Always ensure the workpiece is in a fixed or stable position. Unexpected movement of the workpiece may result in personal injury.
▶ Make sure you are in a stable position and able to control the tool while releasing the tool from the workpiece. A loss of control upon releasing the tool from the workpiece may result in personal injury.
- Keep your hands out of the drilling area while the tool is running. Contact with rotating parts or chips may result in personal injury.
Do not use excessive feed force while drilling. Use of excessive feed force may cause the magnetic base to release from the workpiece, causing unexpected movement of the tool or workpiece and personal injury.
- Avoid generating long chips by regularly interrupting downward pressure. Sharp metal chips may cause entanglement and personal injuries.
▶ Never remove chips from the drilling area while the tool is running. To remove chips, move the bit away from the workpiece, switch off the drill motor and wait for the bit to stop moving. Use tools such as a brush or hook to remove chips. Contact with rotating parts or chips may result in personal injury.
When performing drilling that requires the use of cutting fluid, route the cutting fluid away from the operator's work area or use a liquid collection device. Such precautionary measures keep the operator's work area dry and reduce the risk of electric shock.
- When the bit is jammed, stop applying downward pressure and turn off the tool. Investigate and take corrective actions to eliminate the cause of bit jamming.
- When restarting a drill in the workpiece, check that the bit rotates freely before starting. If the bit is bound it may not start, may overload the tool, or may cause the drill stand release from the workpiece.
Do not deactivate the magnetic base until the tool is turned off and the bit has come to a complete stop. Premature deactivation of the magnetic base may cause unexpected movement of the tool or workpiece and personal injury.
Additional safety instructions
Personal safety
▶ Use the product and accessories only when they are in perfect working order.
- Do not touch the accessory tool or the tool holder directly after operation, because they can be extremely hot and cause burns to the skin. Make sure there is nobody in the work area where the chips are ejected.
- Do not use the product on the same workpiece on which electric welders are in use.
▶ To help avoid the risk of injury, do not hold the workpiece by hand.
▶ Comply with national, local and jobsite-specific health and safety requirements.
▶ Never tamper with or modify the product or accessories in any way.
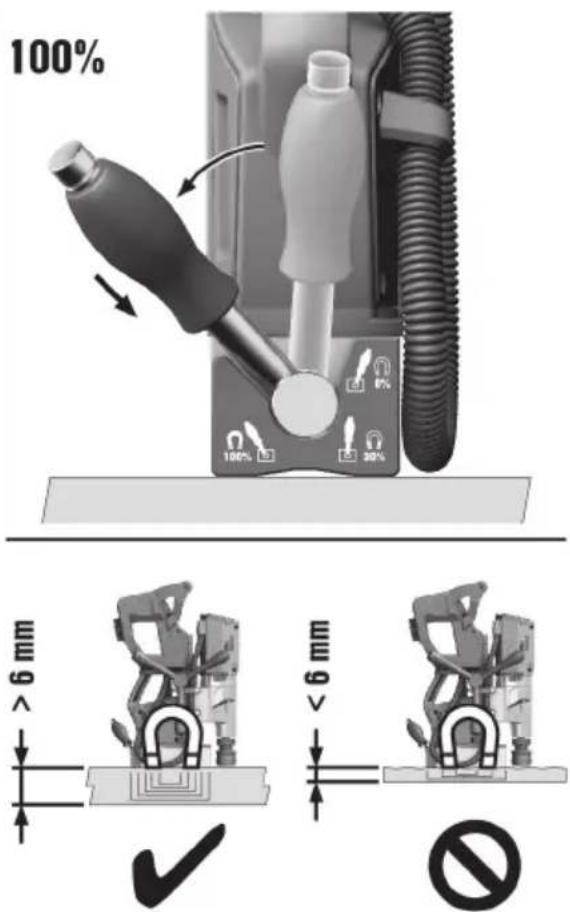
The magnetic foot is suitable for use on steel of thickness > 6 mm, without visible air gap between the underside of the magnet and the material. An air gap is produced by coats of paint and surface irregularities. Keep the air gap as narrow as possible. Air gaps between the magnet and the material weaken the magnetic adhesive force.
▶ Always set the magnetic foot on a flat surface (e.g. rectangular-section pipe or steel flat). Do not clamp the magnetic foot to small or irregularly shaped objects.
▶ Do not use the hand wheel and the magnet hand lever to lift the product.
Risk of injury by falling accessory tools and/or falling accessories. Before starting work, check that the battery and installed accessories are secure.
- Keep the air vents clear at all times. Risk of burn injuries due to blocked air vents!
The user and the other persons in the vicinity must wear suitable eye protection, a hard hat and ear protection while the product is in use.
▶ Take frequent breaks and do physical exercises to improve the blood circulation in your fingers. High vibration during long periods of work can lead to disorders of the blood vessels and nervous system in the fingers, hands and wrists.
When you are not using the product, position it such that it does not constitute a trip hazard or fall hazard. Secure the product throughout use, setup and transport such that it cannot tip over.
- Keep clear of the danger zone below the activated magnetic foot. Never activate the magnetic foot when it is not in contact with the subbase material.
- Do not place a finger or other body parts between the magnetic foot and the subbase material.
▶ Do not touch rotating parts. Risk of injury.
▶ Never activate the magnetic foot when it is not in contact with the subbase material. The magnetic foot can unexpectedly snap into contact with the subbase material and this can lead to an injury.
The product described is not suitable for hand-guided operation.
- When adjusting stroke, hold the motor housing firmly to prevent uncontrolled movements due to the weight of the motor unit.
▶ Make sure that the securing screws of the slide rails are sufficiently tightened before you raise, transport or use the product.
Do not use accessory tools that do not comply with the information given in the section headed "Intended use". 17
When undertaking break-through work, implement appropriate safety measures at the rear of the workpiece. Parts breaking away can fall out and/or fall down and injure other persons.
▶ Never drill into reinforcement or other load-bearing structures without prior consultation with the person in charge of the building project or the structural engineer.
▶ Risk of cut injuries. The cutting teeth of the accessory tool are sharp.
The product produces high torque. The user must be prepared for sudden sticking or stalling of the accessory tool, under which circumstances the product can rotate round its own axis.
▶ Wear protective gloves when changing accessory tool or tool holder. There is a danger of cut injuries or burns when the accessory tool or the tool holder is touched.
▶ After the drilling operation, there is a risk of burn injuries if the sharp edges of the accessory tool, the chips or the workpiece are touched.
▶ Check the accessory tool before starting work and use only accessory tools that are undamaged and not deformed. Damaged or deformed accessory tools can cause serious injuries.
- Switch the product off immediately if the accessory tool jams. Under these circumstances, ascertain the cause and implement measures to eliminate the jam.
If you want to restart the product that is engaged in the workpiece, before switching on check that the accessory tool rotates freely. If the accessory tool sticks or stalls it might not rotate and this can lead to overloading of the product or to the product disengaging from the workpiece.
Electrical safety
Before beginning work, check the working area for concealed electric cables or gas and water pipes. External metal parts of the product could give you an electric shock or cause an explosion if you accidentally damage an electric cable or a gas or water pipe.
Use and handling of the power tool
▶ Never use solvents or other aggressive chemicals to clean the non-metallic parts of the product. These chemicals can attack the plastics used in these parts. Use only a cloth moistened with water and mild soap. Do not permit liquid to enter into the interior of the product. Do not dip parts of the product into liquid.
▶ After switching off the power supply to the magnet, wait until the product has come to a complete standstill before you detach the magnetic foot from the workpiece. The magnetic foot adheres to the workpiece for a moment before the magnetic foot detaches. A light tap with your hand detaches the magnetic foot from the workpiece.
▶ Always use the speed recommended for the accessory tool and the material.
HILTI
▶ Never drill without cutting oil or other suitable cooling liquid.
▶ Excessive pressure on the hand wheel causes the magnet to break free.
- Keep the product, especially its gripping surfaces, clean and free from oil and grease.
Careful handling and use of batteries
▶ Comply with the following safety instructions for the safe handling and use of Li-ion batteries. Failure to comply can lead to skin irritation, severe corrosive injury, chemical burns, fire and/or explosion.
▶ Use only batteries that are in perfect working order.
▶ Treat batteries with care in order to avoid damage and prevent leakage of fluids that are extremely harmful to health!
▶ Do not under any circumstances modify or tamper with batteries!
▶ Do not disassemble, crush or incinerate batteries and do not subject them to temperatures over 80 °C (176 °F).
▶ Never use or charge a battery that has suffered an impact or been damaged in any other way. Check your batteries regularly for signs of damage.
▶ Never use recycled or repaired batteries.
▶ Never use the battery or a battery-operated power tool as a striking tool.
▶ Never expose batteries to the direct rays of the sun, elevated temperature, sparking, or open flame. This can lead to explosions.
▶ Do not touch the battery poles with your fingers, tools, jewelry, or other electrically conductive objects. This can damage the battery and also cause material damage and personal injury.
▶ Keep batteries away from rain, moisture and liquids. Penetrating moisture can cause short circuits, electric shock, burns, fire and explosions.
▶ Use only chargers and power tools approved for the specific battery type. Read and follow the relevant operating instructions.
▶ Do not use or store the battery in explosive environments.
If the battery is too hot to touch, it may be defective. Put the battery in a place where it is clearly visible and where there is no risk of fire, at an adequate distance from flammable materials. Allow the battery to cool down. If it is still too hot to touch after an hour, the battery is faulty. Consult Hilti Service or read the document entitled "Instructions on safety and use for Hilti Li-ion batteries".

Observe the special guidelines applicable to the transport, storage and use of lithium-ion batteries. 22
Read the instructions on safety and use of Hilti Li-ion batteries that you can access by scanning the QR code at the end of these operating instructions.
Description
Product overview
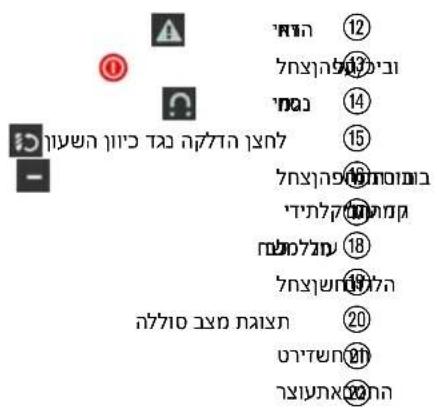
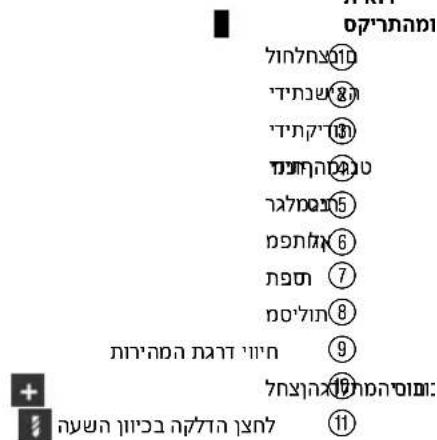
① Buttons panel
② Carrying handle
③ Hand wheel
④ Magnet hand lever
⑤ Magnetic foot
⑥ Hex key
⑦ Tool holder
⑧ Slide rails
⑨ Indicator, speed stages
⑩ Increase speed button+
⑪ button, switch on for clockwise rotation
⑫ indicator, warning
⑬ Activate/deactivate button
⑭ indicator, magnet
⑮ button, switch on for counter-clockwise rotation
⑯ Reduce speed button—
⑰ Locking lever for stroke adjustment
⑱ Motor supply line
⑲ Battery release button
⑳ Battery status indicator
⑳ Ejector wedge
⑳ Clamping strap
Intended use
The product described is a magnetic core drilling machine. It is designed for drilling with core drill bits and twist drill bits, for countersinking and reaming, and for thread cutting. Permitted materials are steel and other metallic materials having a surface which enables secure magnetic attachment of the magnetic foot.
Maximum dimensions of the applications:
- Core drill bits for metal with a diameter up to 35 mm in steel up to a thickness of 50 mm.
- Countersinks for metal with a diameter up to 31 mm.
- Twist drills for metal with a diameter up to 18 mm.
- Reamers for metal with a diameter up to 18 mm.
- Thread taps for metal with a diameter up to M14
- For this product, use only Hilti Nuron lithium-ion batteries of the B 22 series. For optimum performance, Hilti recommends the batteries stated in the table at the end of these operating instructions for this product.
- For these batteries, use only Hilti chargers of the type series stated in the table at the end of these operating instructions.
Items supplied
Magnetic core drilling machine, clamping strap, ejector wedge, operating instructions
Other system products approved for use with this product can be found at your local Hilti Store or at: www.hilti.group
ATC
The product is equipped with the ATC (Active Torque Control) quick-acting electronic cut-out.
If the accessory tool sticks or stalls, the product will suddenly pivot about its own axis in the opposite direction. ATC detects this sudden pivoting movement of the product and switches the drill motor off immediately.

For ATC to function correctly, the drill motor must be free to pivot.
After an ATC cut-out, free the stuck accessory tool. The product is ready for use.
LED indicators
| Status Meaning | |
| The Magnet indicator shows steady green. | The magnetic foot is activated. |
| The Magnet indicator shows steady red. | The magnetic foot is deactivated. |
| The Warning indicator flashes. | ATC has been triggered. Free the stuck accessory tool. The product is ready for use. |
| The Warning indicator shows steady. | The overload protection function has been triggered. If applicable, free the stuck accessory tool. Do not apply excessive pressure to the accessory tool. The product is ready for use. |
| Speed stages. Speed is indicated in stages. One LED corresponds to one speed stage. The more LEDs showing, the higher the speed. 19 | |
Status indicators of the Li-ion battery
Hilti Nuron Li-ion batteries can indicate state of charge, fault messages and the battery's state of health.
Indicators for state of charge and fault messages

WARNING
Risk of injury by a falling battery!
▶ If the release button is pressed with a battery inserted in the product, subsequently check that the battery is correctly re-engaged and secure.
Short-press the release button of the battery to get whichever of the following status indications is applicable at the time.
State of charge and, if applicable, faults are indicated constantly as long as the connected product is switched on.
| Status Meaning | |
| Four (4) LEDs show constantly green State of charge: 100 % to 71 % | |
| Three (3) LEDs show constantly green State of charge: 70 % to 51 % | |
| Two (2) LEDs show constantly green State of charge: 50 % to 26 % | |
| One (1) LED shows constantly green State of charge: 25 % to 10 % | |
| One (1) LED slow-flashes green State of charge: < 10 % | |
| One (1) LED quick-flashes green The Li-ion battery is completely discharged. Recharge the battery.If the LED again starts quick-flashing after the battery has been charged, consult Hilti Service. | |
| One (1) LED quick-flashes yellow The Li-ion battery or the product in which it is inserted is overload-ed, too hot or too cold, or experiencing some other fault.Bring the product and the battery to the recommended working temperature and do not overload the product when it is in use.If the message persists, consult Hilti Service. | |
| One (1) LED shows yellow | The Li-ion battery and the product in which it is inserted are not compatible. Consult Hilti Service. |
| One (1) LED quick-flashes red | The Li-ion battery is locked and cannot be used. Consult Hilti Service. |
Indicators showing the battery's state of health
To check the battery's state of health, press the release button and hold it down for longer than three seconds. The system does not detect a potential malfunction of the battery due to misuse, for example battery dropped or pierced, external heat damage, etc.
| Status Meaning | |
| All LEDs show in sequence, followed by one (1) LED showing constantly green. | The battery can remain in use. |
| All LEDs show in sequence, followed by one (1) LED quick-flashing yellow. | The check to ascertain the battery's state of health did not complete. Repeat the procedure, or consultHilti Service. |
| All LEDs show in sequence, followed by one (1) LED showing constantly red. | cdh-a connected product can still be used, the remaining battery capacity is below 50%.If a connected product can no longer be used, the battery has reached the end of its useful life and has to be replaced. ConsultHilti Service. |
Technical data Technical data
| Weight in accordance with EPTA Procedure 01, without battery | 12.9 kg |
| No-load speed (Forward rotation) | 520 /min |
| No-load speed (Reverse rotation) | 280 /min |
| Rated voltage | 21.6 V |
| Ambient temperature for operation | -17 °C ... 60 °C |
| Storage temperature | -20 °C ... 70 °C |
Battery
| Battery operating voltage | 21.6 V |
| Weight, battery | See the end of these operating instructions |
| Ambient temperature for operation | -17 °C ... 60 °C |
| Storage temperature | -20 °C ... 40 °C |
| Battery charging starting temperature | -10 °C ... 45 °C |
Speed stages (revolutions per minute)
| Stage 1 (idling speed) | 200 /min |
| Stage 2 (idling speed) | 280 /min |
| Stage 3 (idling speed) | 350 /min |
| Stage 4 (idling speed) | 420 /min |
| Stage 5 (idling speed) | 470 /min |
| Stage 6 (idling speed) | 520 /min |
Noise information
The sound pressure values given in these instructions have been measured in accordance with a standardized test and may be used to compare one power tool with another. They can also be used for a preliminary assessment of exposure.
The data given represents the main applications of the power tool. However, if the power tool is used for different applications, with different accessory tools or is poorly maintained, the data may vary. This may significantly increase exposure over the total working period.
An accurate estimation of exposure should also take into account the times when the power tool is switched off, or when it is running but not actually being used for a job. This can significantly reduce exposure over the total working period.
Identify additional safety measures to protect the operator from the effects of noise such as: maintaining the power tool and accessory tools, keeping the hands warm, organization of work patterns.

Detailed information on the versions of the EN 62841 standards applied here is to be found in the reproduction of the declaration of conformity 206.
Noise information
| Sound power level ( J_VA ) | 92 dB(A) |
| Emission sound pressure level ( J_A ) | 83 dB(A) |
| Uncertainty (noise values) ( K_A and K_WA ) | 3 dB(A) |
Preparations at the workplace

WARNING
Risk of injury by inadvertent starting!
▶ Before inserting the battery, make sure that the product is switched off.
Remove the battery before making any adjustments to the power tool or before changing accessories.
Observe the safety instructions and warnings in this documentation and on the product.
Charging the battery
- Before charging the battery, read the operating instructions for the charger.
- Make sure that the contacts on the battery and the contacts on the charger are clean and dry.
- Use an approved charger to charge the battery. 17
Inserting the battery

WARNING
Risk of injury by short circuit or falling battery!
Before inserting the battery, make sure that the contacts on the battery and the contacts on the product are free of foreign matter.
▶ Make sure that the battery always engages correctly.
- Charge the battery fully before using it for the first time.
-
Push the battery into the product until it engages with an audible click.
-
Check that the battery is seated securely.
Removing the battery
- Press the battery release button.
- Remove the battery from the product.
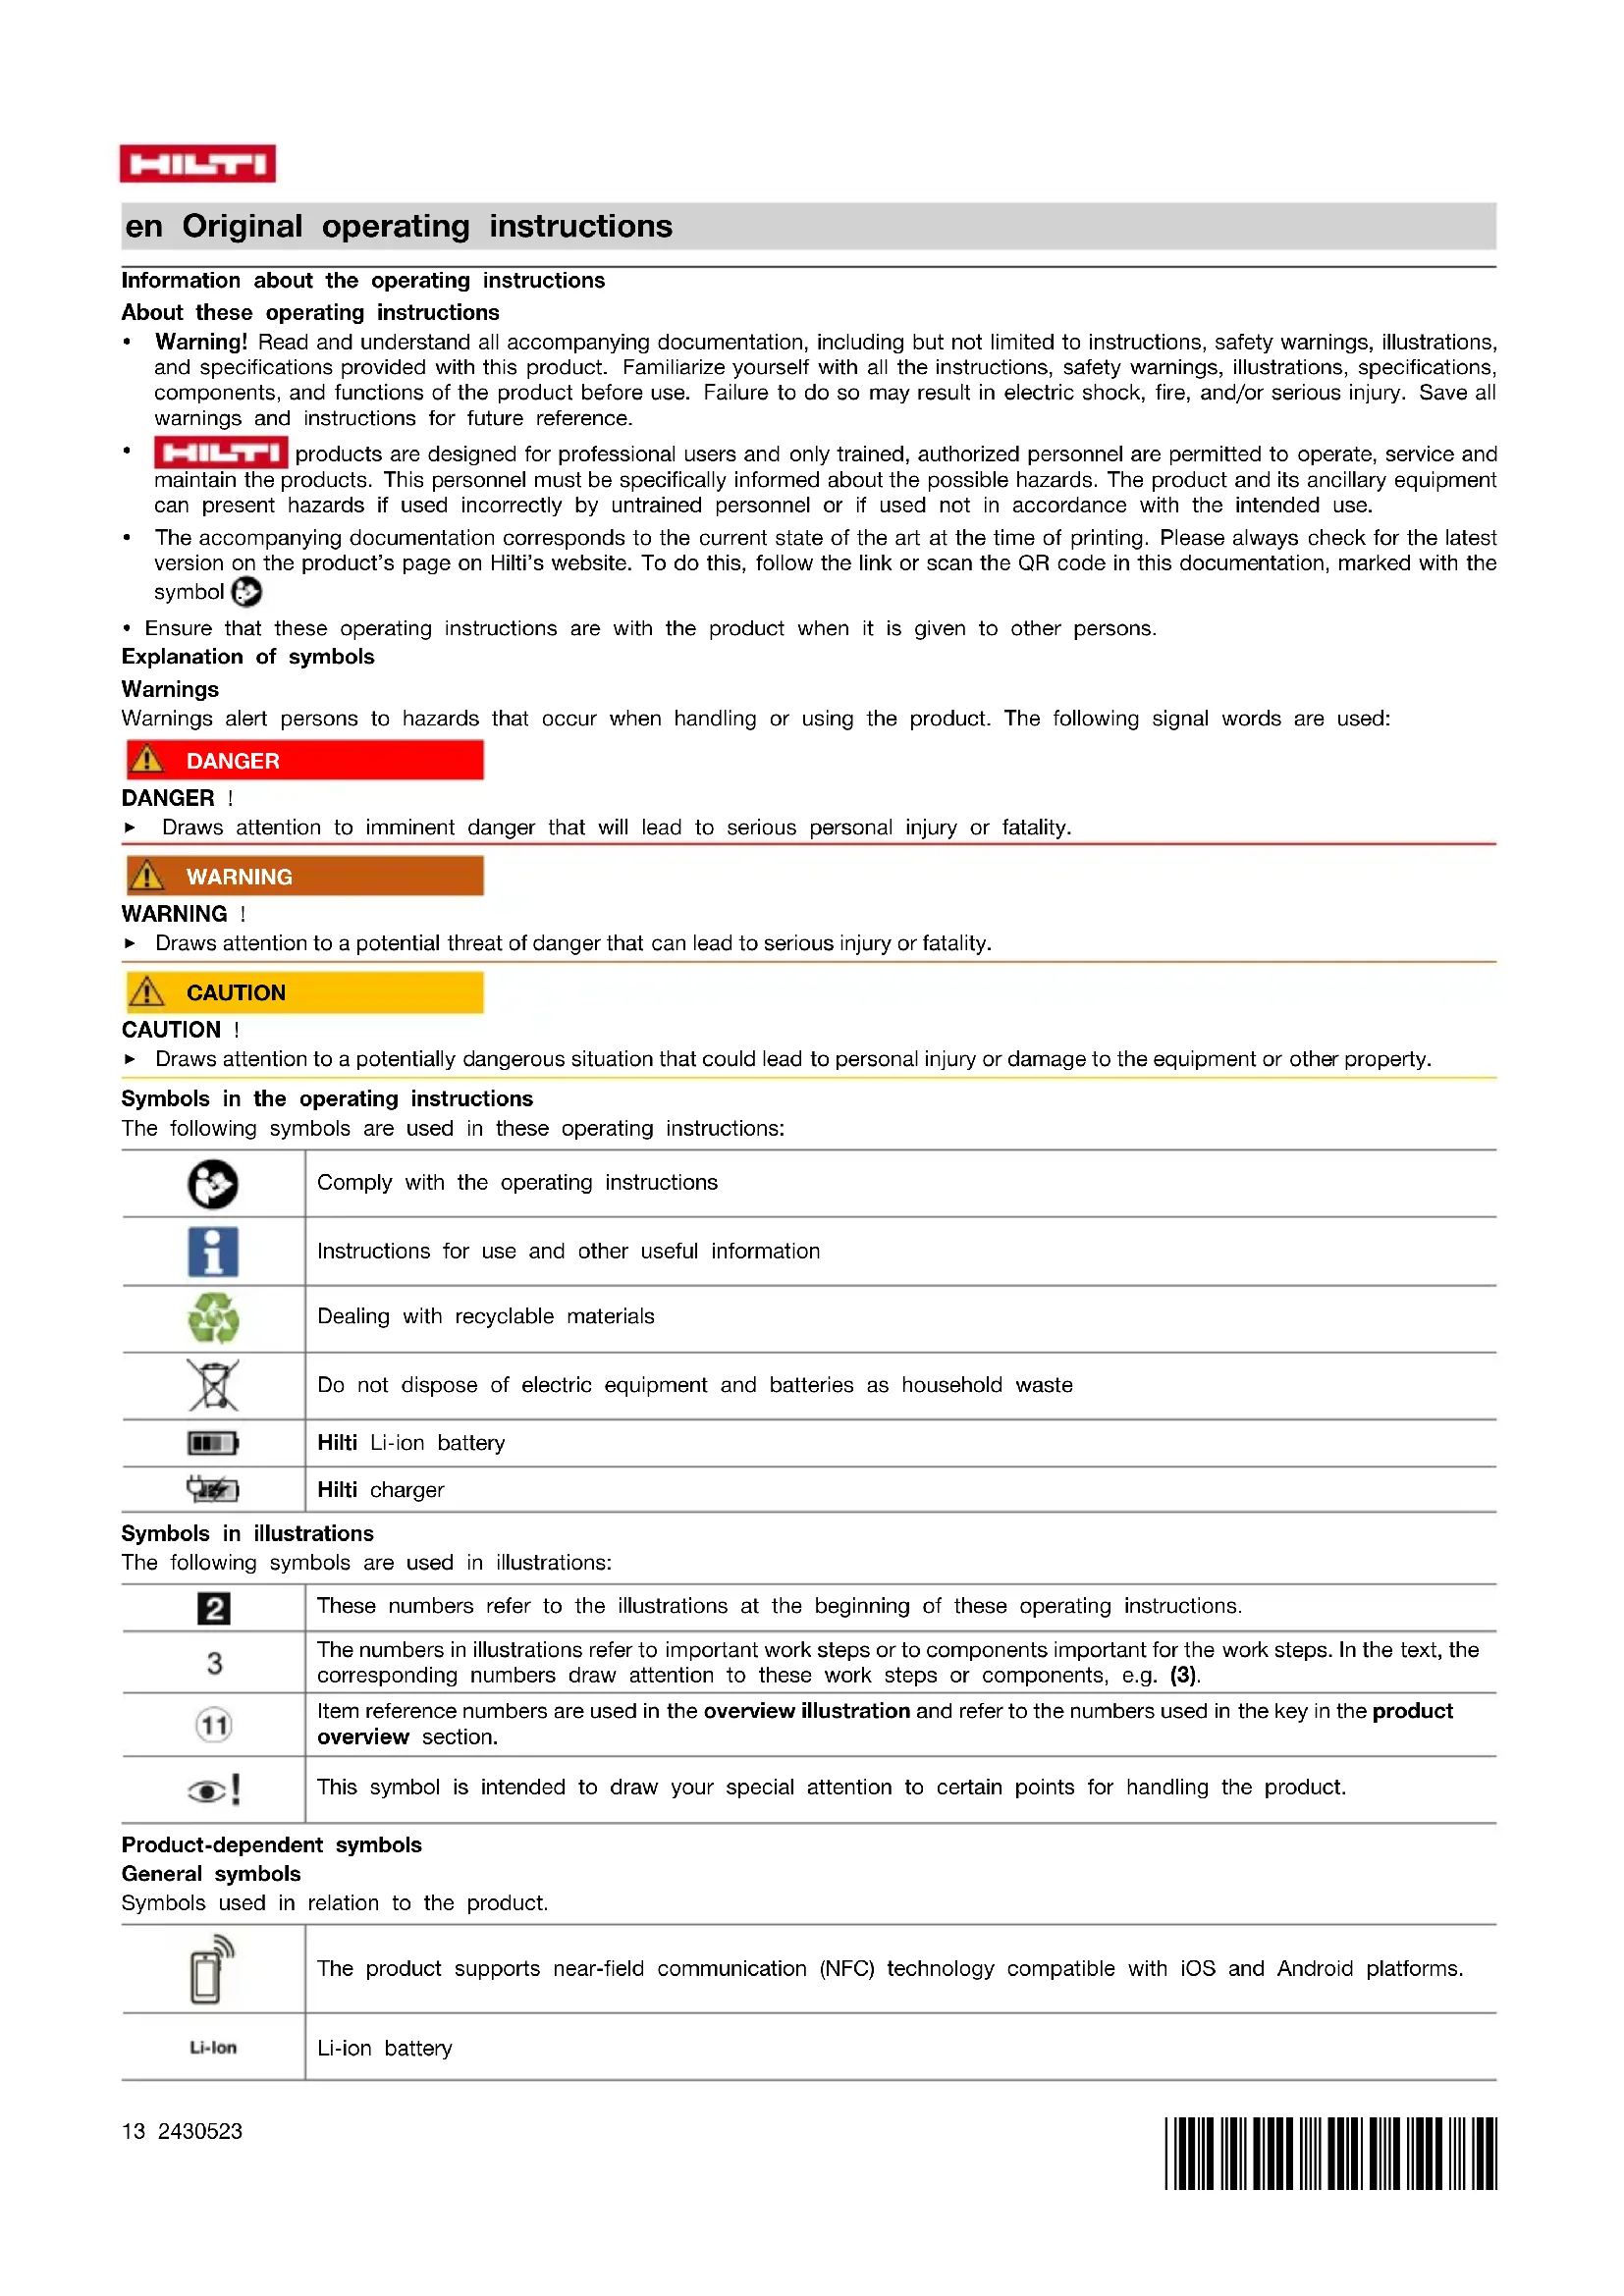
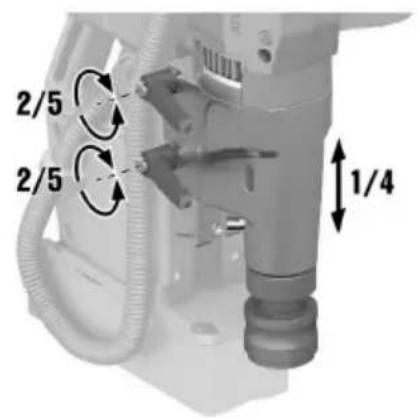
Installing the hand wheel

The hand wheel can be installed on the left or the right side.
- Position the hand wheel on the desired side.
The feed scale can be used with "cm" or "inch".
▶ Set the feed scale, turned in the desired direction, on the hand wheel.
- Insert the securing screw on the opposite side.
- Use the hex key to tighten the securing screw until it is hand-tight.
Changing the accessory tool
Inserting core bi
- Slip the centering pin into the core bit.
- Pull the clamping sleeve of the tool holder down.
- Insert the core bit with the centering pin into the tool holder.
- Check that the core bit holds securely.
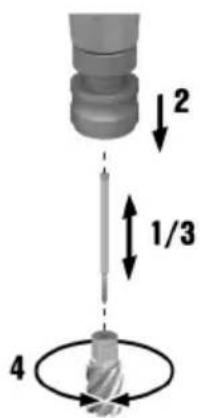
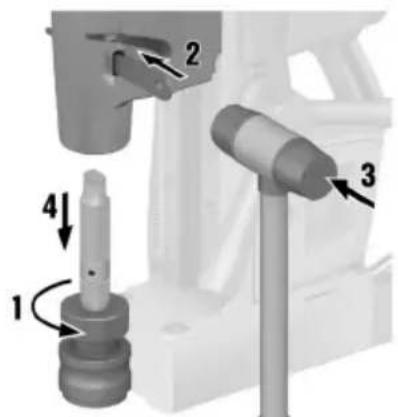
Inserting drill bit
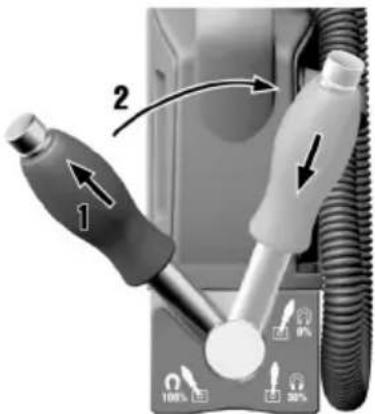
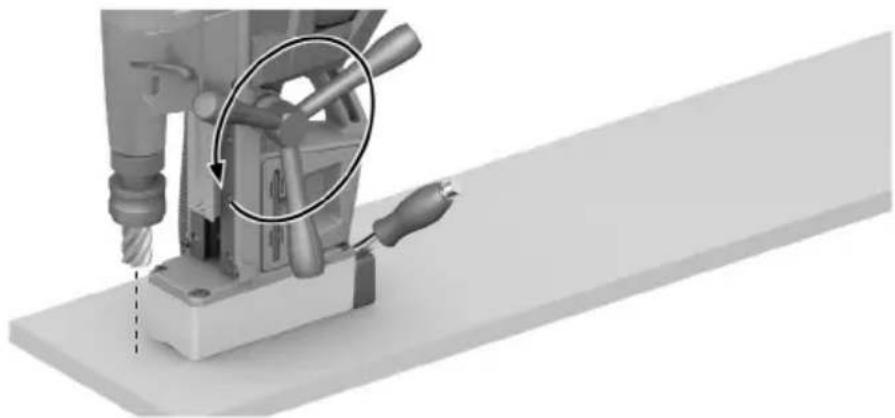
- Loosen the left-hand thread of the tool holder by turning it clockwise (1).
- Turn the tool holder until the opening of the drive shaft is in line with the opening in the housing.
- Insert the ejector wedge (2).
- Tap the ejector wedge with a hammer (3).
▶ The tool holder is released.
-
Remove the tool holder (4).
-
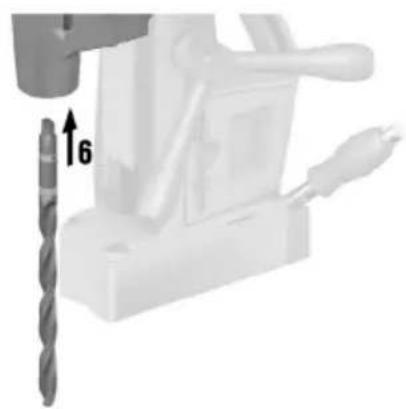
Clean the internal taper of the output shaft.
-
Insert the drill bit and check that it holds securely (6).

Re-insert the tool holder:
- Insert the tool holder (MK2, MT2, CM2) and check that it is secure (undo step 5).
- Tighten the tool holder's left-hand thread by turning the tool holder counter-clockwise (undo step 1).
Operation
Observe the safety instructions and warnings in this documentation and on the product.
Activating magnetic fool

WARNING
Risk of injury due to inadequate magnetic adhesive force. The product can detach from the subbase material and fall.
▶ Make sure that the set-down surface for the magnetic foot is flat, clean, free of rust and free of ice. Remove layers of paint, layers of mastic and filler and other materials.
▶ Check that there is no swarf or other dirt on the magnetic foot.
- Do not permit a gap between magnetic foot and set-down surface. A gap reduces the magnetic adhesive force.
To prevent long-term weakening of the magnetic adhesive force, use the magnetic foot only on surfaces that do not exceed the maximum temperature of 60 °C (140 °F).
▶ Observe the minimum thickness of the subbase material and the measures necessary if the minimum thickness is not sufficient.
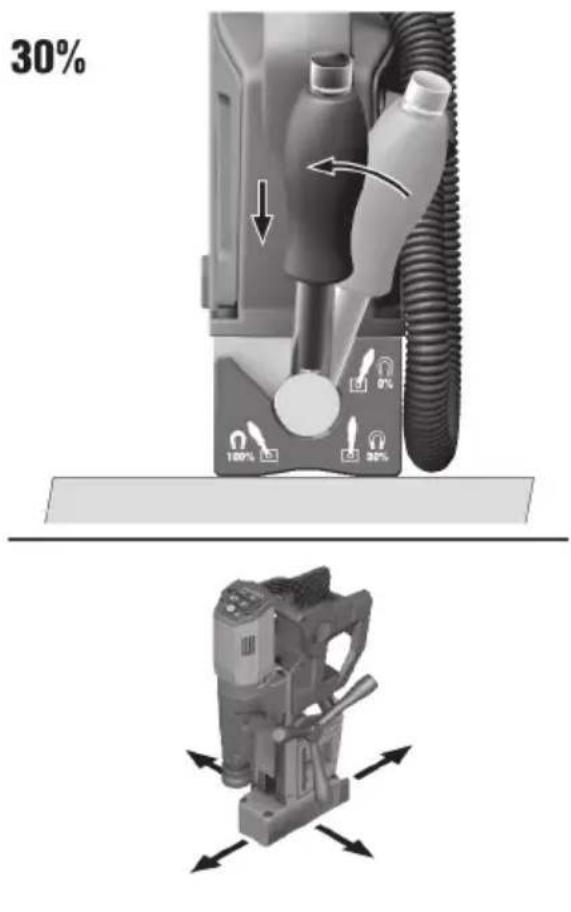
▶ Never operate the product when the magnet hand lever is not at the 100 % position.

Make sure that the magnetic adhesive force is sufficient. When working on steel materials with a material thickness less than 6 mm, the workpiece must be strengthened with an extra steel plate to ensure compliance with the minimum requirement of > 6 mm.
- When working, always use the magnetic foot.
If the magnet indicator on the control panel shows green, the magnetic foot is activated. Note that the magnet indicator gives no indication of the strength of the magnetic adhesive force to the subbase material!
▶ If the magnet indicator on the control panel shows red, the magnetic foot is not activated.
-
Set the magnet hand lever to the 30 % position for positioning the magnetic core drilling machine.
-
Set the magnet hand lever to the 100 % position for securing and switching on the magnetic core drilling machine.

If 10 minutes pass without input via the control panel, the magnetic core drilling machine switches to sleep mode. The magnetic foot remains activated.
HILTI
Deactivating magnetic foo
-
Push the hand lever sleeve up.
-
Set the hand lever to the 0 % position.
▶ The grip sleeve returns automatically to the initial position.
Attaching clamping strand

WARNING
Risk of injury due to inadequate magnetic adhesive force. The product can detach from the subbase material and fall down.
Before every use, check the clamping strap for wear and damage. Replace the clamping strap as necessary.
- Secure the product against falling by always attaching the clamping strap in addition to using the magnetic foot.
▶ Always attach the clamping strap before using the product.
▶ Use of the product is not permitted if the length of the clamping strap is insufficient for securing the product.
▶ Do not use the clamping strap in proximity to acids or bleaching agents.
▶ Do not use the clamping strap for lifting above head height.
▶ Do not use the clamping strap if the clamping strap is damaged.
▶ Protect the clamping strap from sharp edges.
- Pass the clamping strap through the opening above the magnetic foot.
- Loop the clamping strap round the workpiece and close the clamping strap.
- Tighten the clamping strap.
- Check that the product is held securely.
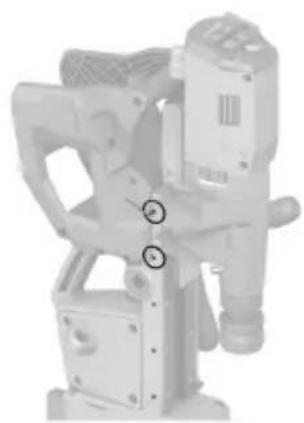
Adjusting the stroke
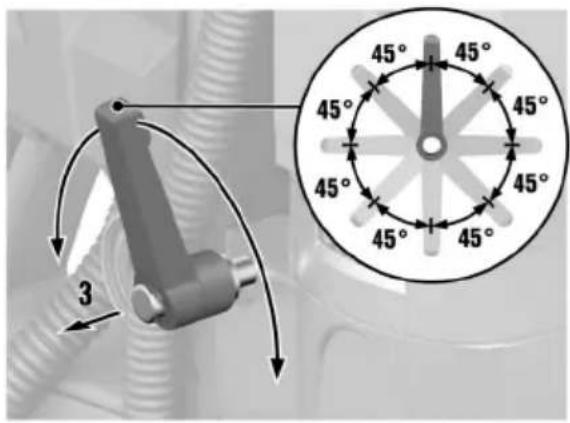
- Keep a firm grip on the motor unit with one hand before you disengage the two locking levers.
- With the other hand, disengage the two locking levers.
- To move the locking levers one above the other, pull one locking lever out and then turn the locking lever in 45° steps.
- Set the desired stroke range.
- Re-tighten the two locking levers.
- Check that the unit hold securely. It is not permissible for the motor unit to move by itself.
Setting speed
- Activate the product by pressing the Activate/Deactivate button.
- To reduce speed, press the button.
- To increase speed, press the button.

The speed setting you select is automatically saved in memory and is retained as the preset when you deactivate the product.
Starting and stopping drill motor
- Activate the product by pressing the Activate/Deactivate button.
▶ The speed last set is indicated. - If necessary, set the desired speed 21
- Start the drill motor in clockwise rotation by pressing the button.

In the event of overload, the motor switches off automatically and has to be restarted.
- To stop the drill motor, press either the button or one or other of the buttons.
▶ Do not stop the drill motor during the drilling operation. First retract the accessory tool from the workpiece by turning the handwheel. - To start the drill motor in counter-clockwise rotation, press and hold down the button.
The drill motor runs for as long as the button is pressed. - Deactivate the product by pressing the Activate/Deactivate button.
Drilling
Feed
▶ Turn the hand wheel while the drill motor is switched on and advance the accessory tool into the workpiece.
▶ Always work with only the necessary pressure. Excessive pressure can lead to breakage of the core bit and/or loss of the magnetic adhesive force.
Drilling operation
- Do not stop the motor during the drilling operation. Turn the hand wheel and retract the accessory tool out of the workpiece before stopping the drill motor.
- If the accessory tool snags, stop the motor and carefully turn the accessory tool counter-clockwise and out.
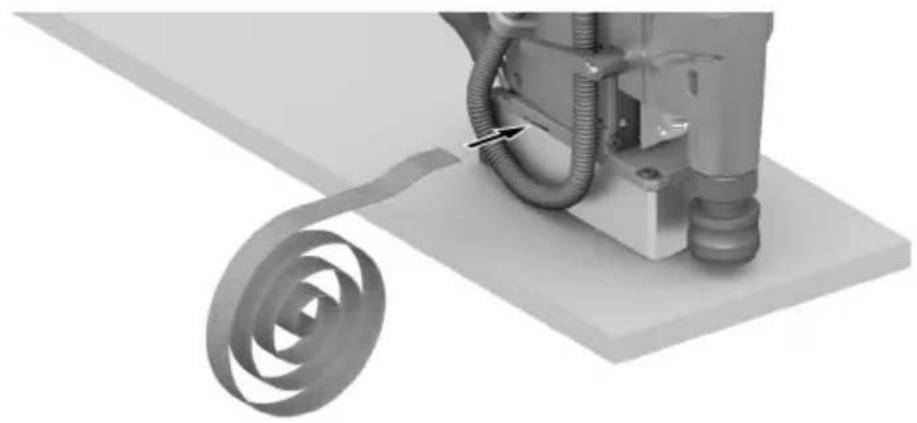
- Remove the chips from the drillhole and from the workpiece after every drilling operation. Wear cut-resistant gloves or use a suitable hook.
- For drilling in coated materials, use a suitable accessory tool.
Sleep mode
If 10 minutes pass without input via the control panel, the magnetic core drilling machine switches to sleep mode.
▶ To deactivate sleep mode, press any button on the control panel.
Care and maintenance

WARNING
Risk of injury with battery inserted!
▶ Always remove the battery before carrying out care and maintenance tasks!
Care of the product
- Carefully remove stubborn dirt.
- Carefully clean the air vents, if present, with a dry, soft brush.
• Use only a slightly damp cloth to clean the housing. Do not use cleaning agents containing silicone as these can attack the plastic parts. - Use a dry, clean cloth to clean the contacts of the product.
Care of the Li-ion batteries
- Never use a battery with clogged air vents. Clean the air vents carefully using a dry, soft brush.
- Avoid unnecessary exposure of the battery to dust and dirt. Never expose the battery to high levels of moisture (e.g. by being dipped in water or left in the rain).
If a battery has been soaked by moisture, treat it as a damaged battery. Isolate it in a non-flammable container and consult Hilti Service.
- Keep the battery free of extraneous oil and grease. Do not permit dust or dirt to accumulate unnecessarily on the battery. Clean the battery with a dry, soft brush or a clean, dry cloth. Do not use cleaning agents containing silicone as these can attack the plastic parts.
Do not touch the contacts of the battery and do not remove the factory-applied grease from the contacts.
• Use only a slightly damp cloth to clean the housing. Do not use cleaning agents containing silicone as these can attack the plastic parts.
Maintenance

WARNING
Danger of electric shock! Improper repairs to electrical components may lead to serious injuries including burns.
▶ Repairs to the electrical section of the tool or appliance may be carried out only by trained electrical specialists.
- Check all visible parts and controls for signs of damage at regular intervals and make sure that they all function correctly.
- Do not use the product if signs of damage are found or if parts malfunction. Immediately have the product repaired by Hilti Service.
• After cleaning and maintenance, install all guards and protective devices and check that they are in full working order.

To help ensure safe and reliable operation, use only genuine Hilti spare parts, consumables and accessories. Spare parts, consumables and accessories approved by Hilti for use with your product can be found at your Hilti Store or online at: www.hilti.group
Adjusting slide rails
After several operating hours the play in the slide rails can increase, in which case the motor unit is no longer held firmly enough. If this happens the motor unit can slip down, causing damage to the accessory tool.
- Remove the accessory tool.
- Set up the product such that the motor unit can be moved over the entire travel of the slide rails. If necessary, position the product with the tool holder above an edge.
- On metal subbase material activate the magnetic foot or secure the product against movement/falling with the aid of the clamping strap.
- Move the motor unit in the range of the locking levers to line up at the securing screws you want to tighten.
- Retighten the securing screws of the slide rails.
Materials
Hex key, 2.5 mm
- Move the motor unit gradually within the slide rails to line up with the securing screws until you have retightened all the securing screws.
The securing screws of the slide rails are ideally tightened when the motor unit can be moved easily by hand, but does not move by itself.
Transport and storage
Transport of cordless power tools and batteries

CAUTION
Accidental starting during transport!
▶ Always transport your products with the batteries removed!
▶ Remove the battery/batteries.
▶ Never transport batteries loose and unprotected. During transport, batteries should be protected from excessive shock and vibration and isolated from any conductive materials or other batteries that may come in contact with the terminals and cause a short circuit. Comply with the locally applicable regulations for transporting batteries.
- Do not send batteries through the mail. Consult your shipper for instructions on how to ship undamaged batteries.
▶ Prior to each use and before and after prolonged transport, check the product and the batteries for damage.
Storage of cordless power tools and batteries

WARNING
Accidental damage caused by defective or leaking batteries!
▶ Always store your products with the batteries removed!
Store the product and the batteries in a cool and dry place. Comply with the temperature limits stated in the technical data 19.
- Do not store batteries on the charger. Always remove the battery from the charger when the charging operation has completed.
▶ Never leave batteries in direct sunlight, on sources of heat, or behind glass.
- Store the product and batteries where they cannot be accessed by children or unauthorized persons.
▶ Prior to each use and before and after prolonged storage, check the product and the batteries for damage.
Troubleshooting
If a problem occurs, always observe the status indicator of the battery and the indicators on the control panel. See the section headed Status indicators of the Li-ion battery 18.
If the trouble you are experiencing is not listed in this table or you are unable to rectify the problem by yourself, contact Hilti Service.
| Trouble or fault Possible cause Action to be taken | ||
| LEDs of the battery show nothing | Battery faulty. | ▸ Contact Hilti Service. |
| The battery runs down more quickly than usual. | Very low ambient temperature. | ▸ Allow the battery to warm up slowly to room temperature. |
| Battery does not engage with an audible click. | - The retaining lug on the battery is dirty. | ▸ Clean the retaining lug and re-insert the battery. |
| The product or battery gets very hot. | Electrical fault. | ▸ Switch the product off immediately, remove the battery, keep it under observation, allow it to cool down and contact Hilti Service. |
Disposal

WARNING
Risk of injury due to incorrect disposal! Health hazards due to escaping gases or liquids.
▶ DO NOT send batteries through the mail!
▶ Cover the terminals with a non-conductive material (such as electrical tape) to prevent short circuiting.
▶ Dispose of your battery out of the reach of children.
- Dispose of the battery at your Hilti Store, or consult your local governmental garbage disposal or public health and safety resources for disposal instructions.
Most of the materials from which Hilti products are manufactured can be recycled. The materials must be correctly separated before they can be recycled. In many countries, your old tools, machines or appliances can be returned to Hilti for recycling. Ask Hilti Service or your Hilti sales representative for further information.

- Do not dispose of power tools, electronic equipment or batteries as household waste!
Manufacturer's warranty
▶ Please contact your local Hilti representative if you have questions about the warranty conditions.
Further information
For more information on operation, technology, environment and recycling, follow this link: qr.hilti.com/manual/?id=2430523&id=2430525
This link is also to be found at the end of the operating instructions, in the form of a QR code.
Ajustar as calhas de desli
.הכלההוּרָה,הכלההוּרָה,הכלההוּרָה,הכלההוּרָה,הכלההוּרָה,הכלההוּרָה,הכלההוּרָה,הכלההוּרָה,הכלההוּרָה,הכלה
| .הכלהה,הכלה,הכלה,הכלה,הכלה,הכלה,הכלה,הכלה,הכלה,הכלה,הכלה,הכלה,הכלה,הכלה,הכלה,הכלה,הכלה,הכלה,הכלה,הכלה,הכלה,הכלה,הכלה,הכלה,הכלה,הכלה,הכchia,הכchia,הכchia,הכchia,הכchia,הכchia,הכchia,הכchia,הכchia,הכchia,הכchia,הכchia,הכchia,הכchia,הכchia,הכchia,הכchia,הכchia,הכchia,הכchia,הכchia,הכchia,הכchia,הכchia,הכchia,הכeria,הכeria,הכeria,הכeria,הכeria,הכeria,הכeria,הכeria,הכeria,הכeria,הכeria,הכeria,הכeria,הכeria,הכeria,הכeria,הכeria,הכeria,הכeria,הכeria,הכeria,הכeria,הכeria,הכeria,הכeria,הכalia,הכalia,הכalia,הכalia,הכalia,הכalia,הכalia,הכalia,הכalia,הכalia,הכalia,הכalia,הכalia,הכalia,הכalia,הכalia,הכalia,הכalia,הכalia,הכalia,הכalia,הכalia,הכalia,הכalia,הכalia,הכemia,הכemia,הכemia,הכemia,הכemia,הכemia,הכemia,הכemia,הכemia,הכemia,הכemia,הכemia,הכemia,הכemia,הכemia,הכemia,הכemia,הכemia,הכemia,הכemia,הכemia,הכemia,הכemia,הכemia,הכemia,הכalia,הכalia,הכalia,הכalia,הכalia,הכalia,הכalia,הכalia,הכalia,הכalia,הכalia,הכalia,הכalia,הכalia,הכalia,הכalia,הכalia,הכalia,הכalia,הכalia,הכalia,הכalia,הכalia,הכalia,הכ Race,הכ Race,הכ Race,הכ Race,הכ Race,הכ Race,הכ Race,הכ Race,הכ Race,הכ Race,הכ Race,הכ Race,הכ Race,הכ Race,הכ Race,הכ Race,הכ Race,הכ Race,הכ Race,הכ Race,הכ Race,הכ Race,הכ Race,הכ Race,הכ Race,הכ race,הכ race,הכ race,הכ race,הכ race,הכ race,הכ race,הכ race,הכ race,הכ race,הכ race,הכ race,הכ race,הכ race,הכ race,הכ race,הכ race,הכ race,הכ race,הכ race,הכ race,הכ race,הכ race,הכ race,הכ race,הכ Race,הכ Race,הכ Race,הכ Race,הכ Race,הכ Race,הכ Race,הכ Race,הכ Race,הכ Race,הכ Race,הכ Race,הכ Race,הכ Race,הכ Race,הכ Race,הכ Race,הכ Race,הכ Race,הכ Race,הכ Race,הכ Race,הכ Race,הכ Race,הכRace,הכ Race,הכ Race,הכ Race,הכ Race,הכ Race,הכ Race,הכ Race,הכ Race,הכ Race,הכ Race,הכ Race,הכ Race,הכ Race,הכ Race,הכ Race,הכ Race,הכ Race,הכ Race,הכ Race,הכ Race,הכ Race,הכ Race,הכ Race,הכ Race,הכ Party,הכ Party,הכ Party,הכ Party,הכ Party,הכ Party,הכ Party,הכ Party,הכ Party,הכ Party,הכ Party,הכ Party,הכ Party,הכ Party,הכ Party,הכ Party,הכ Party,הכ Party,הכ Party,הכ Party,הכ Party,הכ Party,הכ Party,הכ Party,הכ Party,הכParty,הכParty,הכParty,הכParty,הכParty,הכParty,הכParty,הכParty,הכParty,הכParty,הכParty,הכParty,הכParty,הכParty,הכParty,הכParty,הכParty,הכParty,הכParty,הכParty,הכParty,הכParty,הכParty,הכParty,הכParty,הכ Party,הכ Party,הכ Party,הכ Party,הכ Party,הכ Party,הכ Party,הכ Party,הכ Party,הכ Party,הכ Party,הכ Party,הכ Party,הכ Party,הכ Party,הכ Party,הכ Party,הכ Party,הכ Party,הכ Party,הכ Party,הכ Party,הכ Party,הכ Party,הכ party,הכ party,הכ party,הכ party,הכ party,הכ party,הכ party,הכ party,הכ party,הכ party,הכ party,הכ party,הכ party,הכ party,הכ party,הכ party,הכ party,הכ party,הכ party,הכ party,הכ party,הכ party,הכ party,הכ party,הכ party,הכ Party,הכ Party,הכ Party,הכ Party,הכ Party,הכ Party,הכ Party,הכ Party,הכ Party,הכ Party,הכ Party,הכ Party,הכ Party,הכ Party,הכ Party,הכ Party,הכ Party,הכ Party,הכ Party,הכ Party,הכ Party,הכ Party,הכ Party,הכ Party,הכ Political Party,הכ Political Party,הכ Political Party,הכ Political Party,הכ Political Party,הכ Political Party,הכ Political Party,הכ Political Party,הכ Political Party,הכ Political Party,הכ Political Party,הכ Political Party,הכ Political Party,הכ Political Party,הכ Political Party,הכ Political Party,הכ Political Party,הכ Political Party,הכ Political Party,הכ Political Party,הכPolitical Party,הכ Political Party,הכ Political Party,הכ Political Party,הכ Political Party,הכ Political Party,הכ Political Party,הכ Political Party,הכ Political Party,הכ Political Party,הכ Political Party,הכ Political Party,הכ Political Party,הכ Political Party,הכ Political Party,הכ Political Party,הכ Political Party,הכ Political Party,הכ Political Party,הכ Political Party,הכ political Party,הכ political Party,הכ political Party,הכ political Party,הכ political Party,הכ political Party,הכ political Party,הכ political Party,הכ political Party,הכ political Party,הכ political Party,הכ political Party,הכ political Party,הכ political Party,הכ political Party,הכ political Party,הכ political Party,הכ political Party,הכ political Party,הכ political Party,הכ Political Party,הכ political Party,הכ political Party,הכ political Party,הכ political Party,הכ political Party,הכ political Party,הכ political Party,הכ political Party,הכ political Party,הכ political Party,הכ political Party,הכ political Party,הכ political Party,הכ political Party,הכ political Party,הכ political Party,הכ political Party,הכ political Party,הכ Political Party,הכ Political Party,הכ Political Party,הכ Political Party,הכ Political Party,הכ Political Party,הכ Political Party,הכ Political Party,הכ Political Party,הכ Political Party,הכ Political Party,הכ Political Party,הכ Political Party,הכ Political Party,הכ Political Party,הכ Political Party,הכ Political Party,הכ Political Party,הכ Political Party,הכ National Party,הכ National Party,הכ National Party,הכ National Party,הכ National Party,הכ National Party,הכ National Party,הכ National Party,הכ National Party,הכ National Party,הכ National Party,הכ National Party,הכ National Party,הכ National Party,הכ National Party,הכ National Party,הכ National Party,הכ National Party,הכ National Party,הכ National Party,הכNational Party,הכNational Party,הכNational Party,הכNational Party,הכNational Party,הכNational Party,הכNational Party,הכNational Party,הכNational Party,הכNational Party,הכNational Party,הכNational Party,הכNational Party,הכNational Party,הכNational Party,הכNational Party,הכNational Party,הכNational Party,הכNational Party,הכNational Party,הכ National Party,הכ National Party,הכ National Party,הכ National Party,הכ National Party,הכ National Party,הכ National Party,הכ National Party,הכ National Party,הכ National Party,הכ National Party,הכ National Party,הכ National Party,הכ National Party,הכ National Party,הכ National Party,הכ National Party,הכ National Party,הכ National Party,הכ Natural Party,הכ Natural Party,הכ Natural Party,הכ Natural Party,הכ Natural Party,הכ Natural Party,הכ Natural Party,הכ Natural Party,הכ Natural Party,הכ Natural Party,הכ Natural Party,הכ Natural Party,הכ Natural Party,הכ Natural Party,הכ Natural Party,הכ Natural Party,הכ Natural Party,הכ Natural Party,הכ Natural Party,הכ Natural Party,הכNatural Party,הכNatural Party,הכNatural Party,הכNatural Party,הכNatural Party,הכNatural Party,הכNatural Party,הכNatural Party,הכNatural Party,הכNatural Party,הכNatural Party,הכNatural Party,הכNatural Party,הכNatural Party,הכNatural Party,הכNatural Party,הכNatural Party,הכNatural Party,הכNatural Party,הכNatural Party,הכ Natural Party,הכ Natural Party,הכ Natural Party,הכ Natural Party,הכ Natural Party,הכ Natural Party,הכ Natural Party,הכ Natural Party,הכ Natural Party,הכ Natural Party,הכ Natural Party,הכ Natural Party,הכ Natural Party,הכ Natural Party,הכ Natural Party,הכ Natural Party,הכ Natural Party,הכ Natural Party,הכ Natural Party,הכ Animal Party,הכ Animal Party,הכ Animal Party,הכ Animal Party,הכ Animal Party,הכ Animal Party,הכ Animal Party,הכ Animal Party,הכ Animal Party,הכ Animal Party,הכ Animal Party,הכ Animal Party,הכ Animal Party,הכ Animal Party,הכ Animal Party,הכ Animal Party,הכ Animal Party,הכ Animal Party,הכ Animal Party,הכ Animal Party,הכAnimal Party,הכAnimal Party,הכAnimal Party,הכAnimal Party,הכAnimal Party,הכAnimal Party,הכAnimal Party,הכAnimal Party,הכAnimal Party,הכAnimal Party,הכAnimal Party,הכAnimal Party,הכAnimal Party,הכAnimal Party,הכAnimal Party,הכAnimal Party,הכAnimal Party,הכAnimal Party,הכAnimal Party,הכAnimal Party,הכ Animal Party,הכ Animal Party,הכ Animal Party,הכ Animal Party,הכ Animal Party,הכ Animal Party,הכ Animal Party,הכ Animal Party,הכ Animal Party,הכ Animal Party,הכ Animal Party,הכ Animal Party,הכ Animal Party,הכ Animal Party,הכ Animal Party,הכ Animal Party,הכ Animal Party,הכ Animal Party,הכ Animal Party,הכ animal Party,הכ animal Party,הכ animal Party,הכ animal Party,הכ animal Party,הכ animal Party,הכ animal Party,הכ animal Party,הכ animal Party,הכ animal Party,הכ animal Party,הכ animal Party,הכ animal Party,הכ animal Party,הכ animal Party,הכ animal Party,הכ animal Party,הכ animal Party,הכ animal Party,הכ animal Party,הכ Animal Party,הכ Animal Party,הכ Animal Party,הכ Animal Party,הכ Animal Party,הכ Animal Party,הכ Animal Party,הכ Animal Party,הכ Animal Party,הכ Animal Party,הכ Animal Party,הכ Animal Party,הכ Animal Party,הכ Animal Party,הכ Animal Party,הכ Animal Party,הכ Animal Party,הכ Animal Party,הכ Animal Party,הכanimal Party,הכanimal Party,הכanimal Party,הכanimal Party,הכanimal Party,הכanimal Party,הכanimal Party,הכanimal Party,הכanimal Party,הכanimal Party,הכanimal Party,הכanimal Party,הכanimal Party,הכanimal Party,הכanimal Party,הכanimal Party,הכanimal Party,הכanimal Party,הכanimal Party,הכanimal Party,הכ Animal Party,הכ Animal Party,הכ Animal Party,הכ Animal Party,הכ Animal Party,הכ Animal Party,הכ Animal Party,הכ Animal Party,הכ Animal Party,הכ Animal Party,הכ Animal Party,הכ Animal Party,הכ Animal Party,הכ Animal Party,הכ Animal Party,הכ Animal Party,הכ Animal Party,הכ Animal Party,הכ Animal Party,הכnatural Party,הכnatural Party,הכnatural Party,הכnatural Party,הכnatural Party,הכnatural Party,הכnatural Party,הכnatural Party,הכnatural Party,הכnatural Party,הכnatural Party,הכnatural Party,הכnatural Party,הכnatural Party,הכnatural Party,הכnatural Party,הכnatural Party,הכnatural Party,הכnatural Party,הכnatural Party,הכ natural Party,הכ natural Party,הכ natural Party,הכ natural Party,הכ natural Party,הכ natural Party,הכ natural Party,הכ natural Party,הכ natural Party,הכ natural Party,הכ natural Party,הכ natural Party,הכ natural Party,הכ natural Party,הכ natural Party,הכ natural Party,הכ natural Party,הכ natural Party,הכ natural Party,הכ natural Party,הכnatural Party,הכnatural Party,הכnatural Party,הכnatural Party,הכnatural Party,הכnatural Party,הכnatural Party,הכnatural Party,הכnatural Party,הכnatural Party,הכnatural Party,הכnatural Party,הכnatural Party,הכnatural Party,הכnatural Party,הכnatural Party,הכnatural Party,הכnatural Party,הכnatural Party,הכnormal Party,הnormal Party,הnormal Party,הnormal Party,הnormal Party,הnormal Party,הnormal Party,הnormal Party,הnormal Party,הnormal Party,הnormal Party,הnormal Party,הnormal Party,הnormal Party,הnormal Party,הnormal Party, |
.הכלההוּרָהוּרָהוּרָהוּרָהוּרָהוּרָהוּרָהוּרָהוּרָהוּרָהוּרָהוּרָהוּרָהוּרָהוּרָה
.ATC (Active Torque Control)
The image is too blurry to recognize any text content.
.הכלההוּרָהוּרָהוּרָהוּרָהוּרָהוּרָהוּרָהוּרָהוּרָהוּרָהוּרָהוּרָהוּרָהוּרָהוּרָה
.תְבָרִיַעֹרִיַעֹרִיַעֹרִיַעֹרִיַעֹרִיַעֹרִיַעֹרִיַעֹרִיַעֹרִיַעֹרִיַעֹרִיַעֹשׁ
.הכלההוּרָהוּרָהוּרָהוּרָהוּרָהוּרָהוּרָהוּרָהוּרָהוּרָהוּרָהוּרָהוּרָהוּרָהוּרָה
Declaration of conformity
Declaration of conformity
The manufacturer declares, on his sole responsibility, that the product described here complies with the applicable legislation and standards.
The technical documentation is filed here:
Hilti Entwicklungsgesellschaft mbH | Tool Certification | Hiltistrasse 6 | D-86916 Kaufering, Germany
Product information
| Cordless magnetic core drilling machine SF 30M-22 | |
| Generation 01 | |
| Serial no. 1-99999999999 |
EN 62841-1: 2015, AC: 2015, A11: 2022
EN IEC 55014-1:2021
EN IEC 55014-2: 2021
Schaan, 15.10.2024

Dr. Tahar Zrilli
Head of Quality and Process Management
Business Area Electric Tools & Accessories

Edward-Louis Przybylowicz
Head of BU Power Tool & Accessories
Business Area Electric Tools & Accessories
UK CA
UK Declaration of Conformity
Declaration of conformity
The manufacturer declares, on his sole responsibility, that the product described here complies with the applicable legislation and standards.
The technical documentation is filed here:
Hilti Entwicklungsgesellschaft mbH | Tool Certification | Hiltistrasse 6 | D-86916 Kaufering, Germany
Product information
| Cordless magnetic core drilling machine SF 30M-22 | |
| Generation 01 | |
| Serial no. 1-999999999999 |
Manufacturer:
Hilti Corporation
Supply of Machinery (Safety) Regulations 2008
Electromagnetic Compatibility Regulations 2016
The Restriction of the Use of Certain Hazardous Substances in Electrical and Electronic Equipment Regulations 2012
UK Importer:
Hilti (Gt. Britain) Limited
No. 1 Circle Square, 3 Symphony Park
Manchester, England, M1 7FS
EN 62841-1: 2015, AC: 2015, A11: 2022
EN IEC 55014-1:2021

EN IEC 55014-2: 2021
Schaan, 15.10.2024

Dr. Tahar Zrilli
Head of Quality and Process Management
Business Area Electric Tools & Accessories

Edward-Louis Przybylowicz
Head of BU Power Tool & Accessories
Business Area Electric Tools & Accessories
NURON
| B 22-170 (01) | 1,34 kg | 2.95 lb |
| B 22-255 (01) | 1,87 kg | 4.12 lb |

C 4-22
C 6-22
C 8-22


Hilti Corporation
LI-9494 Schaan
Tel.:+423 234 21 11
Fax:+423 234 29 65
www.hilti.group


- Information about the operating instructions
- About these operating instructions
- Explanation of symbols
- Warnings
- DANGER
- DANGER!
- WARNING
- WARNING!
- CAUTION
- CAUTION!
- Symbols in the operating instructions
- Symbols in illustrations
- Product-dependent symbols
- General symbols
- Warning signs
- Prohibition symbols
- "Must do" symbols
- Safety
- Work area safety
- Electrical safety
- Personal safety
- Power tool use and care
- HILTI
- Battery tool use and care
- Service
- Safety instructions for magnetic drills
- Additional safety instructions
- Use and handling of the power tool
- Careful handling and use of batteries
- Description
- Product overview
- Intended use
- Items supplied
- ATC
- Status indicators of the Li-ion battery
- Indicators for state of charge and fault messages
- Risk of injury by a falling battery!
- Indicators showing the battery's state of health
- Noise information
- Preparations at the workplace
- Risk of injury by inadvertent starting!
- Charging the battery
- Inserting the battery
- Risk of injury by short circuit or falling battery!
- Removing the battery
- Changing the accessory tool
- Inserting core bi
- Inserting drill bit
- Operation
- Activating magnetic fool
- Deactivating magnetic foo
- Attaching clamping strand
- Adjusting the stroke
- Setting speed
- Starting and stopping drill motor
- Drilling
- Feed
- Drilling operation
- Sleep mode
- Care and maintenance
- Risk of injury with battery inserted!
- Care of the product
- Care of the Li-ion batteries
- Maintenance
- Adjusting slide rails
- Transport and storage
- Transport of cordless power tools and batteries
- Accidental starting during transport!
- Storage of cordless power tools and batteries
- Accidental damage caused by defective or leaking batteries!
- Troubleshooting
- Disposal
- Manufacturer's warranty
- Further information
- Ajustar as calhas de desli
- Declaration of conformity
- UK CA
- UK Declaration of Conformity
- Manufacturer:
- Hilti Corporation
- UK Importer:
- Hilti (Gt. Britain) Limited
- Dr. Tahar Zrilli
- Edward-Louis Przybylowicz
Brand : HILTI
Model : SF 30M22
Category : Screwdriver