
Easy Fry Max EZ2458 - Deep fryer MOULINEX - Free user manual and instructions
Find the device manual for free Easy Fry Max EZ2458 MOULINEX in PDF.
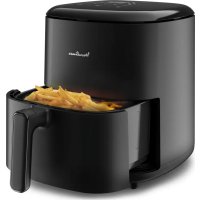



| Product type | Hot air fryer |
| Brand | Moulinex |
| Model | Easy Fry Max EZ2458 |
| Capacity | Approximately 5.5 L (max fries quantity: 800 g) |
| Power | 1800 W (estimate) |
| Temperature range | 70 °C to 200 °C |
| Timer | 0 to 60 minutes |
| Screen | Digital touch screen with time/temperature display |
| Automatic cooking modes | Fries, Steak, Nuggets, Fish, Roast Chicken, Vegetables, Bacon, Shrimp, Pizza, Desserts |
| Dimensions (L x D x H) | Approximately 35 x 30 x 35 cm (estimate) |
| Weight | Approximately 5 kg |
| Tank material | Steel with non-stick coating |
| Removable grid | Yes, dishwasher safe |
| Features | Hot air cooking, manual time and temperature adjustment, automatic shut-off, audible signal |
| Maintenance and cleaning | Tank and grid dishwasher safe; exterior wiped with a damp cloth |
| Safety | Overheat protection; 15 cm clearance required around |
| Spare parts and repairability | Tank and grid available; after-sales service via Moulinex website |
| Warranty | Worldwide warranty (see booklet) |
Frequently Asked Questions - Easy Fry Max EZ2458 MOULINEX
User questions about Easy Fry Max EZ2458 MOULINEX
0 question about this device. Answer the ones you know or ask your own.
Ask a new question about this device
Download the instructions for your Deep fryer in PDF format for free! Find your manual Easy Fry Max EZ2458 - MOULINEX and take your electronic device back in hand. On this page are published all the documents necessary for the use of your device. Easy Fry Max EZ2458 by MOULINEX.
USER MANUAL Easy Fry Max EZ2458 MOULINEX
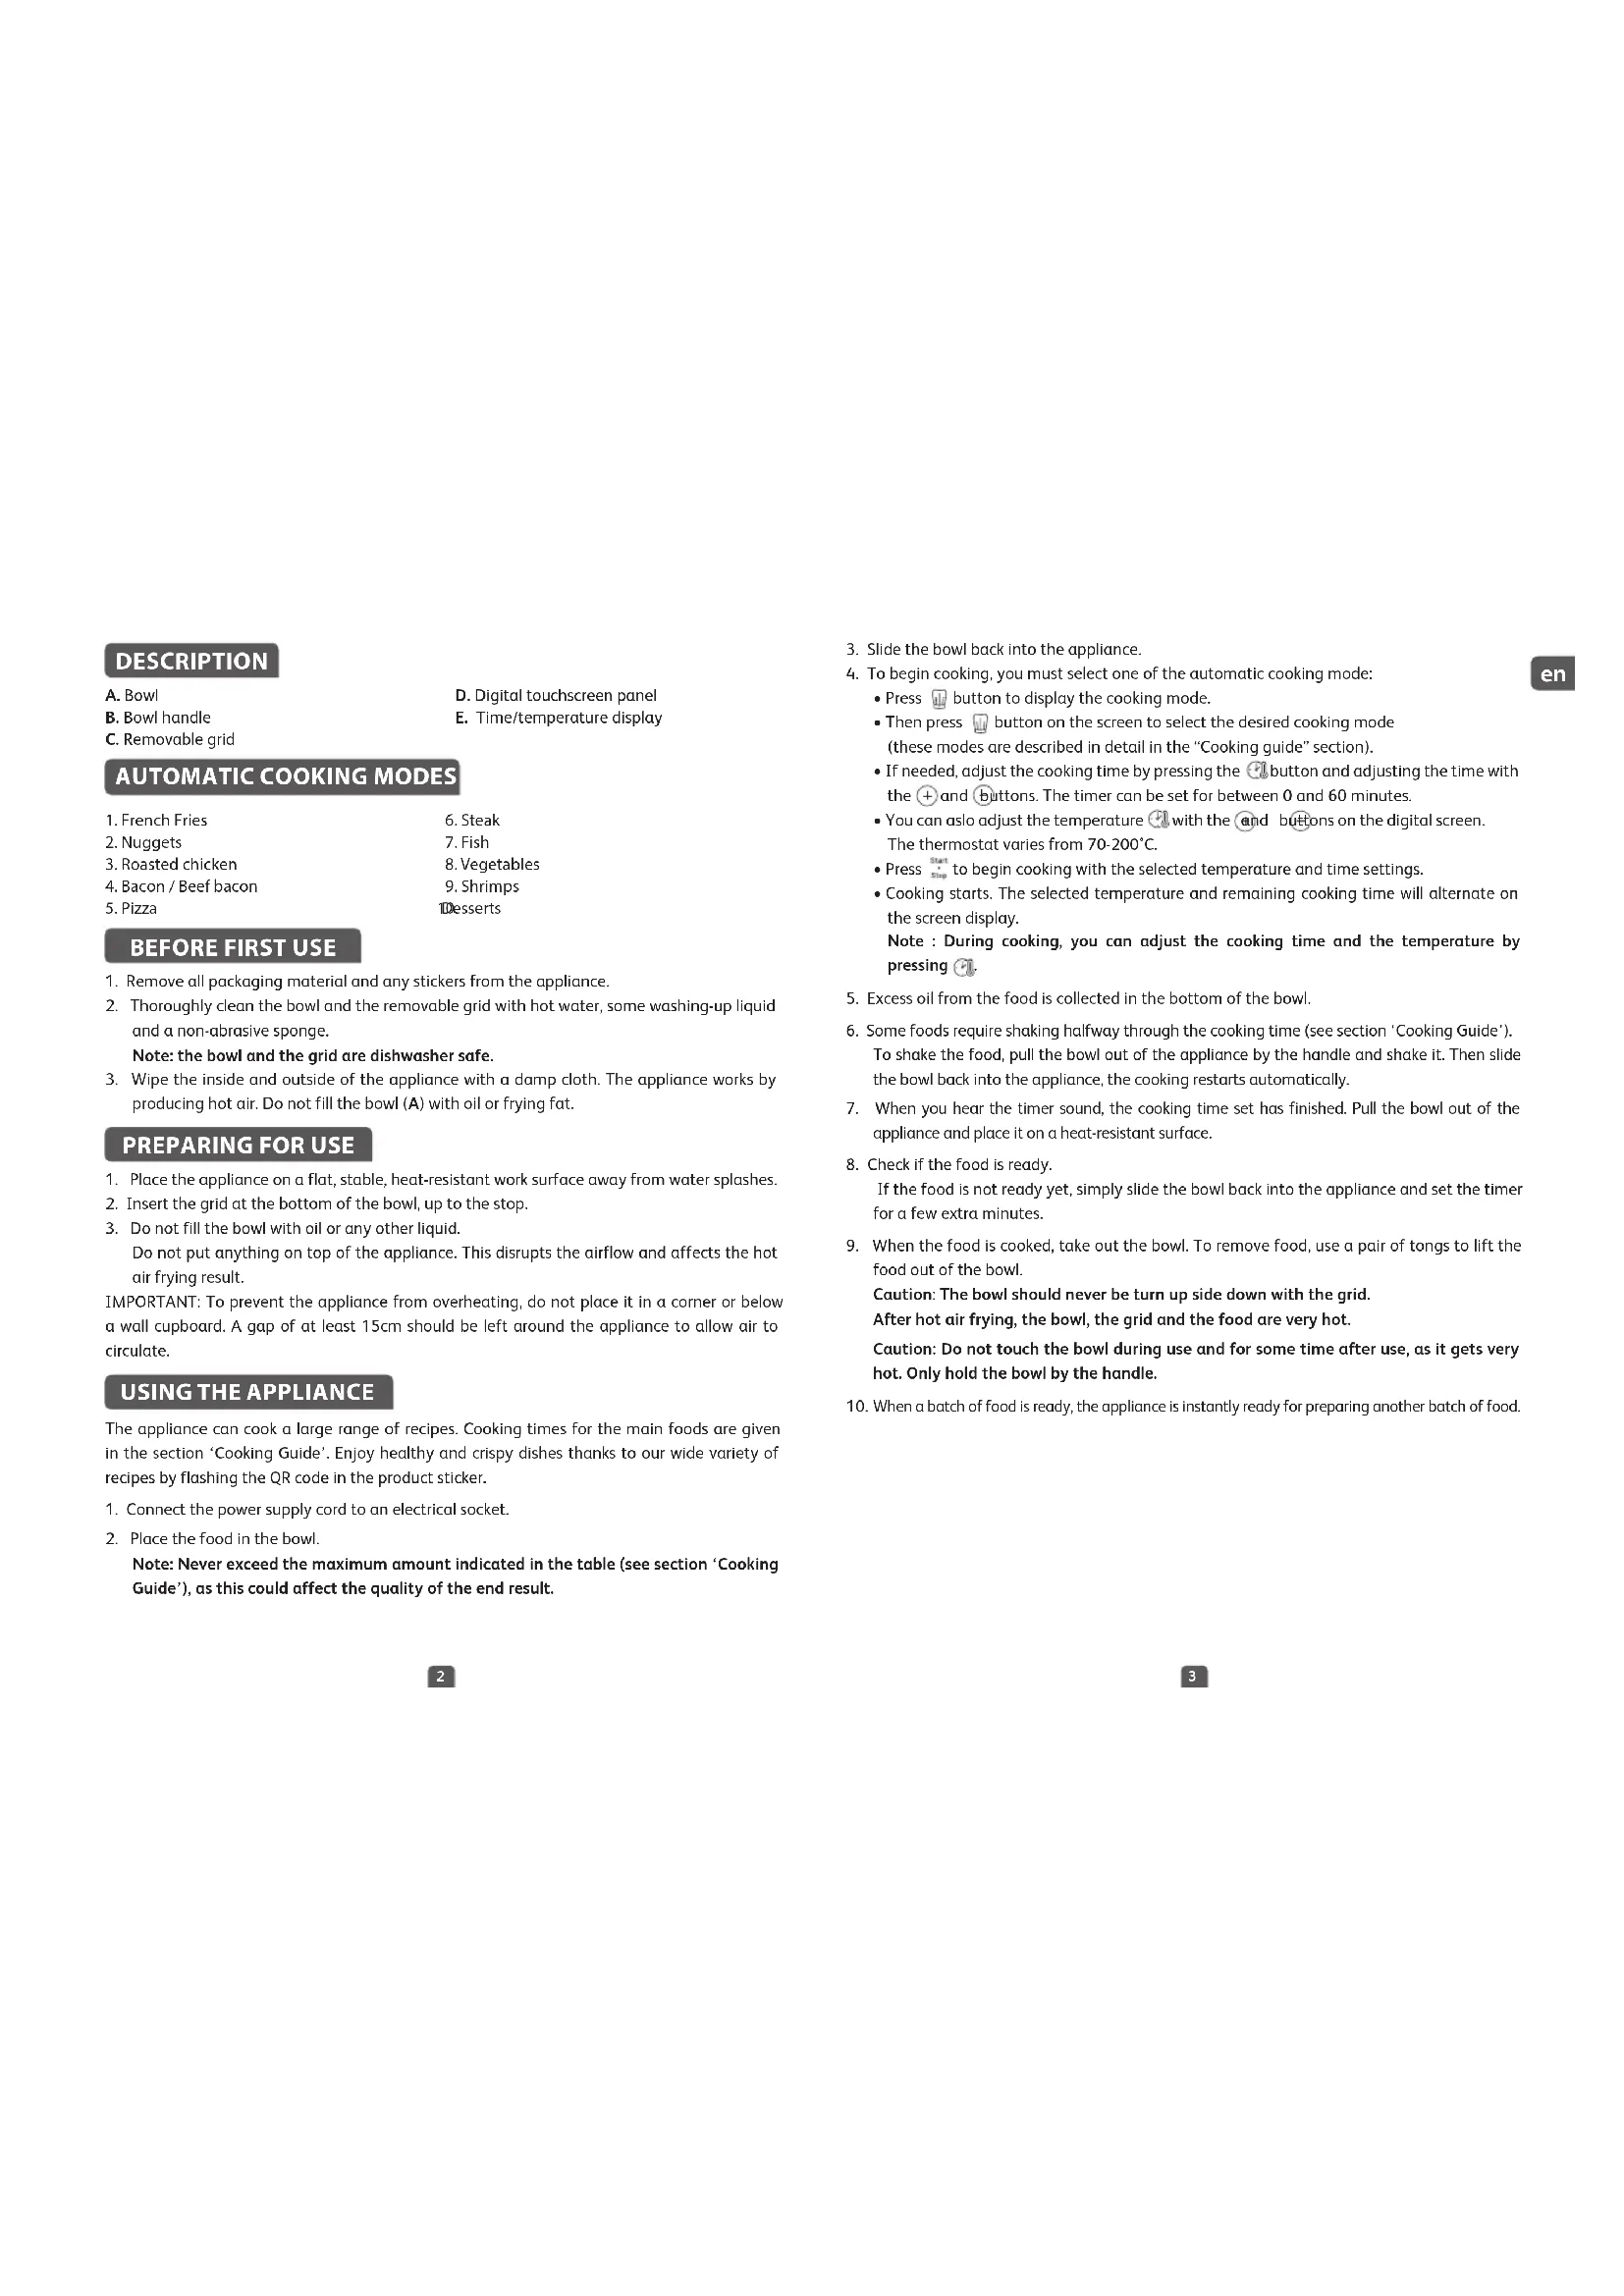
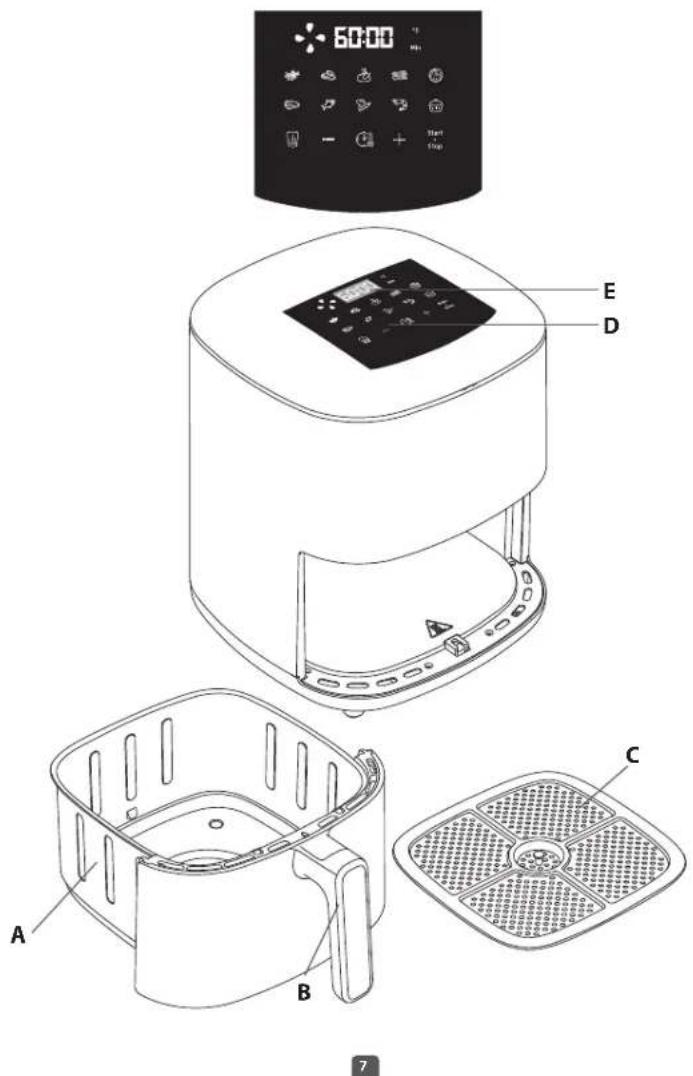
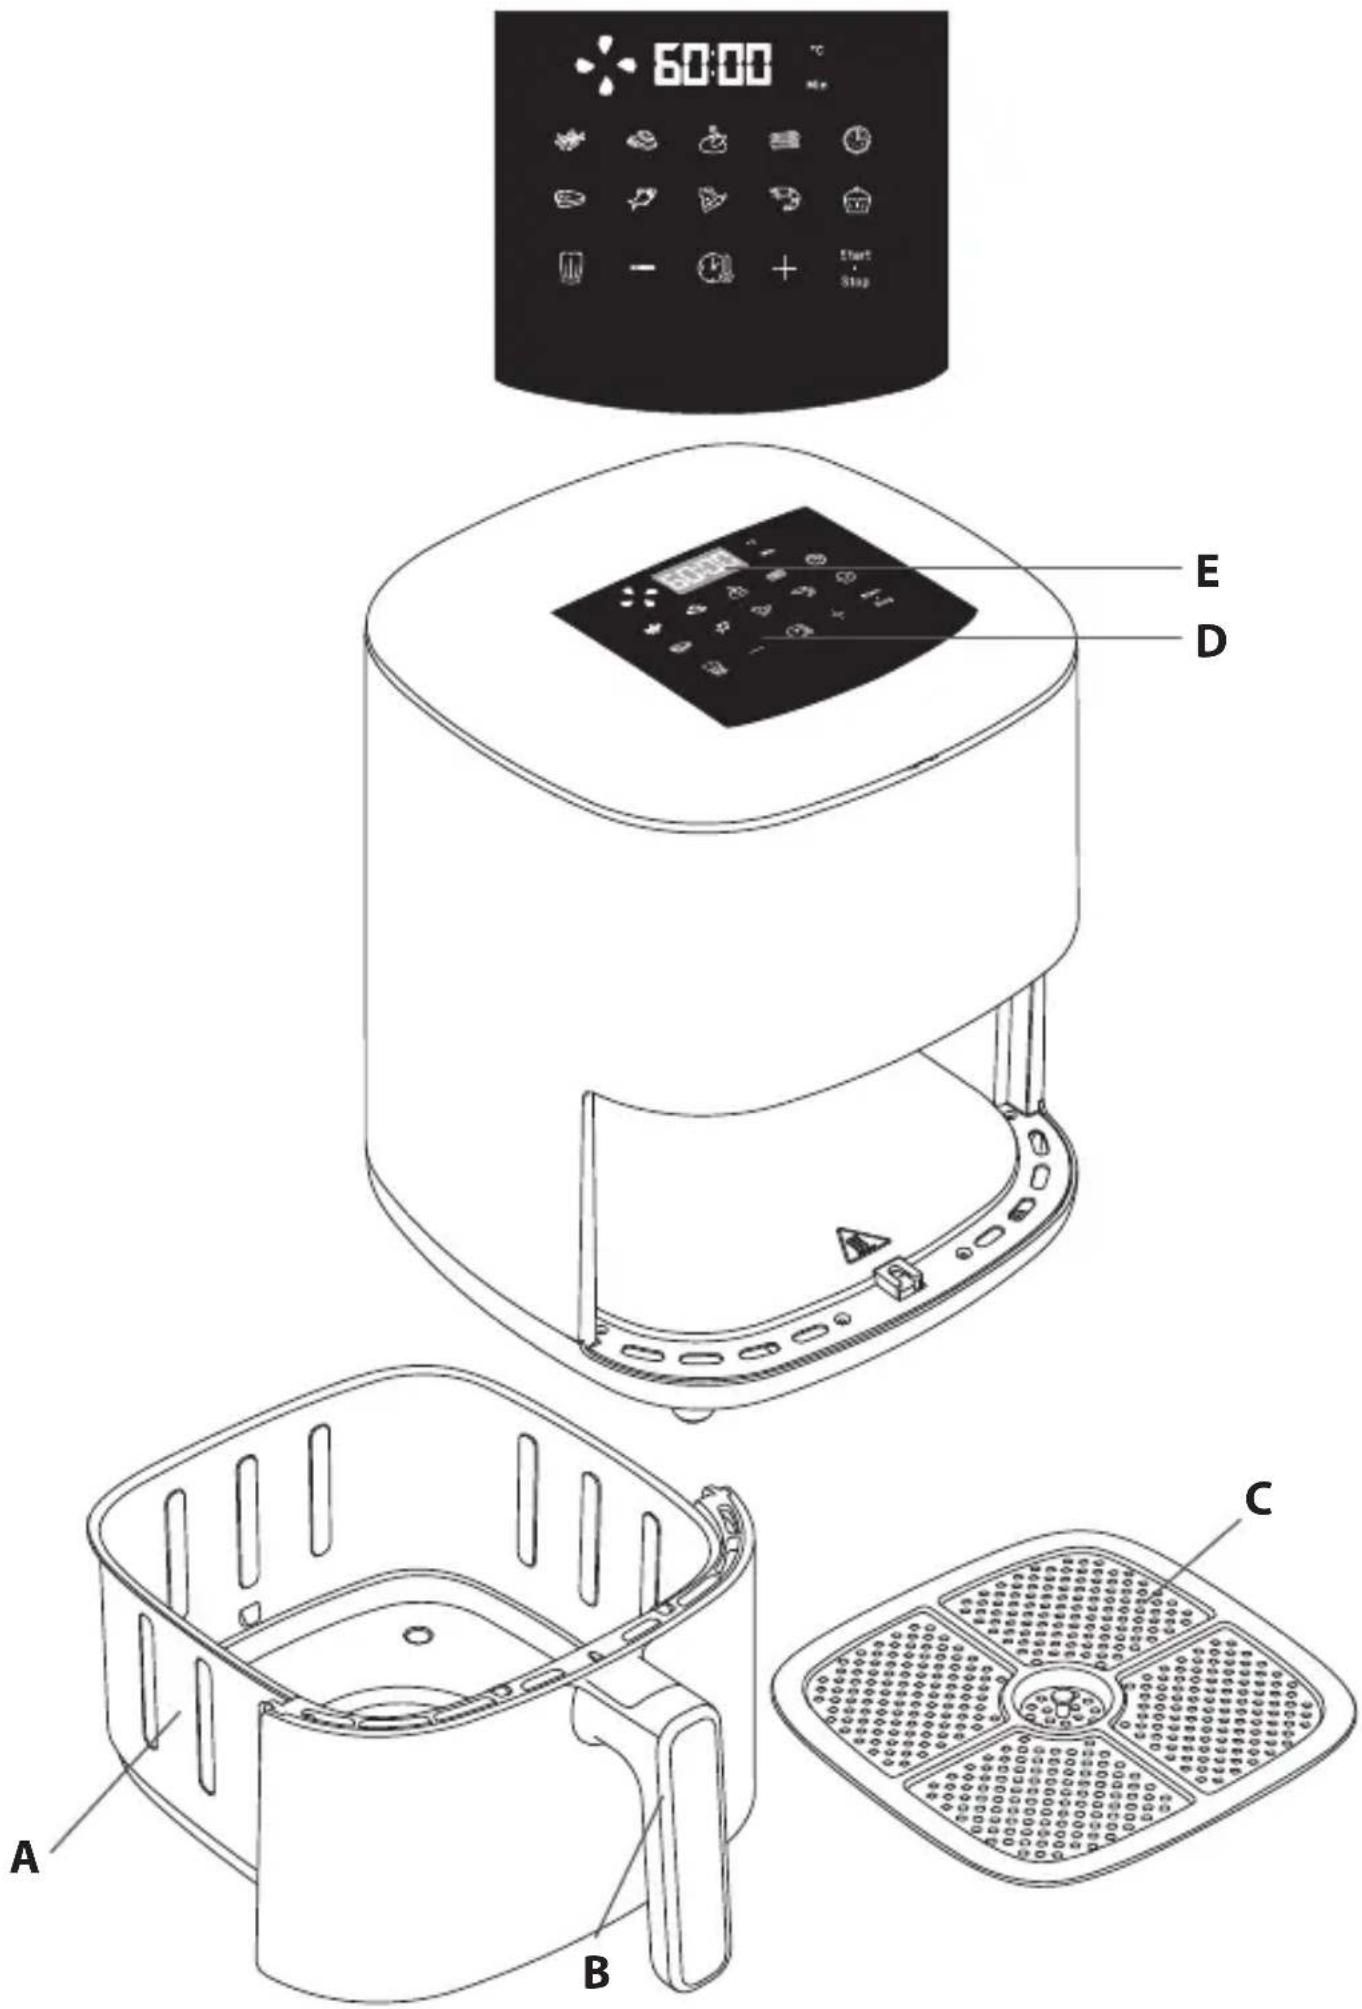
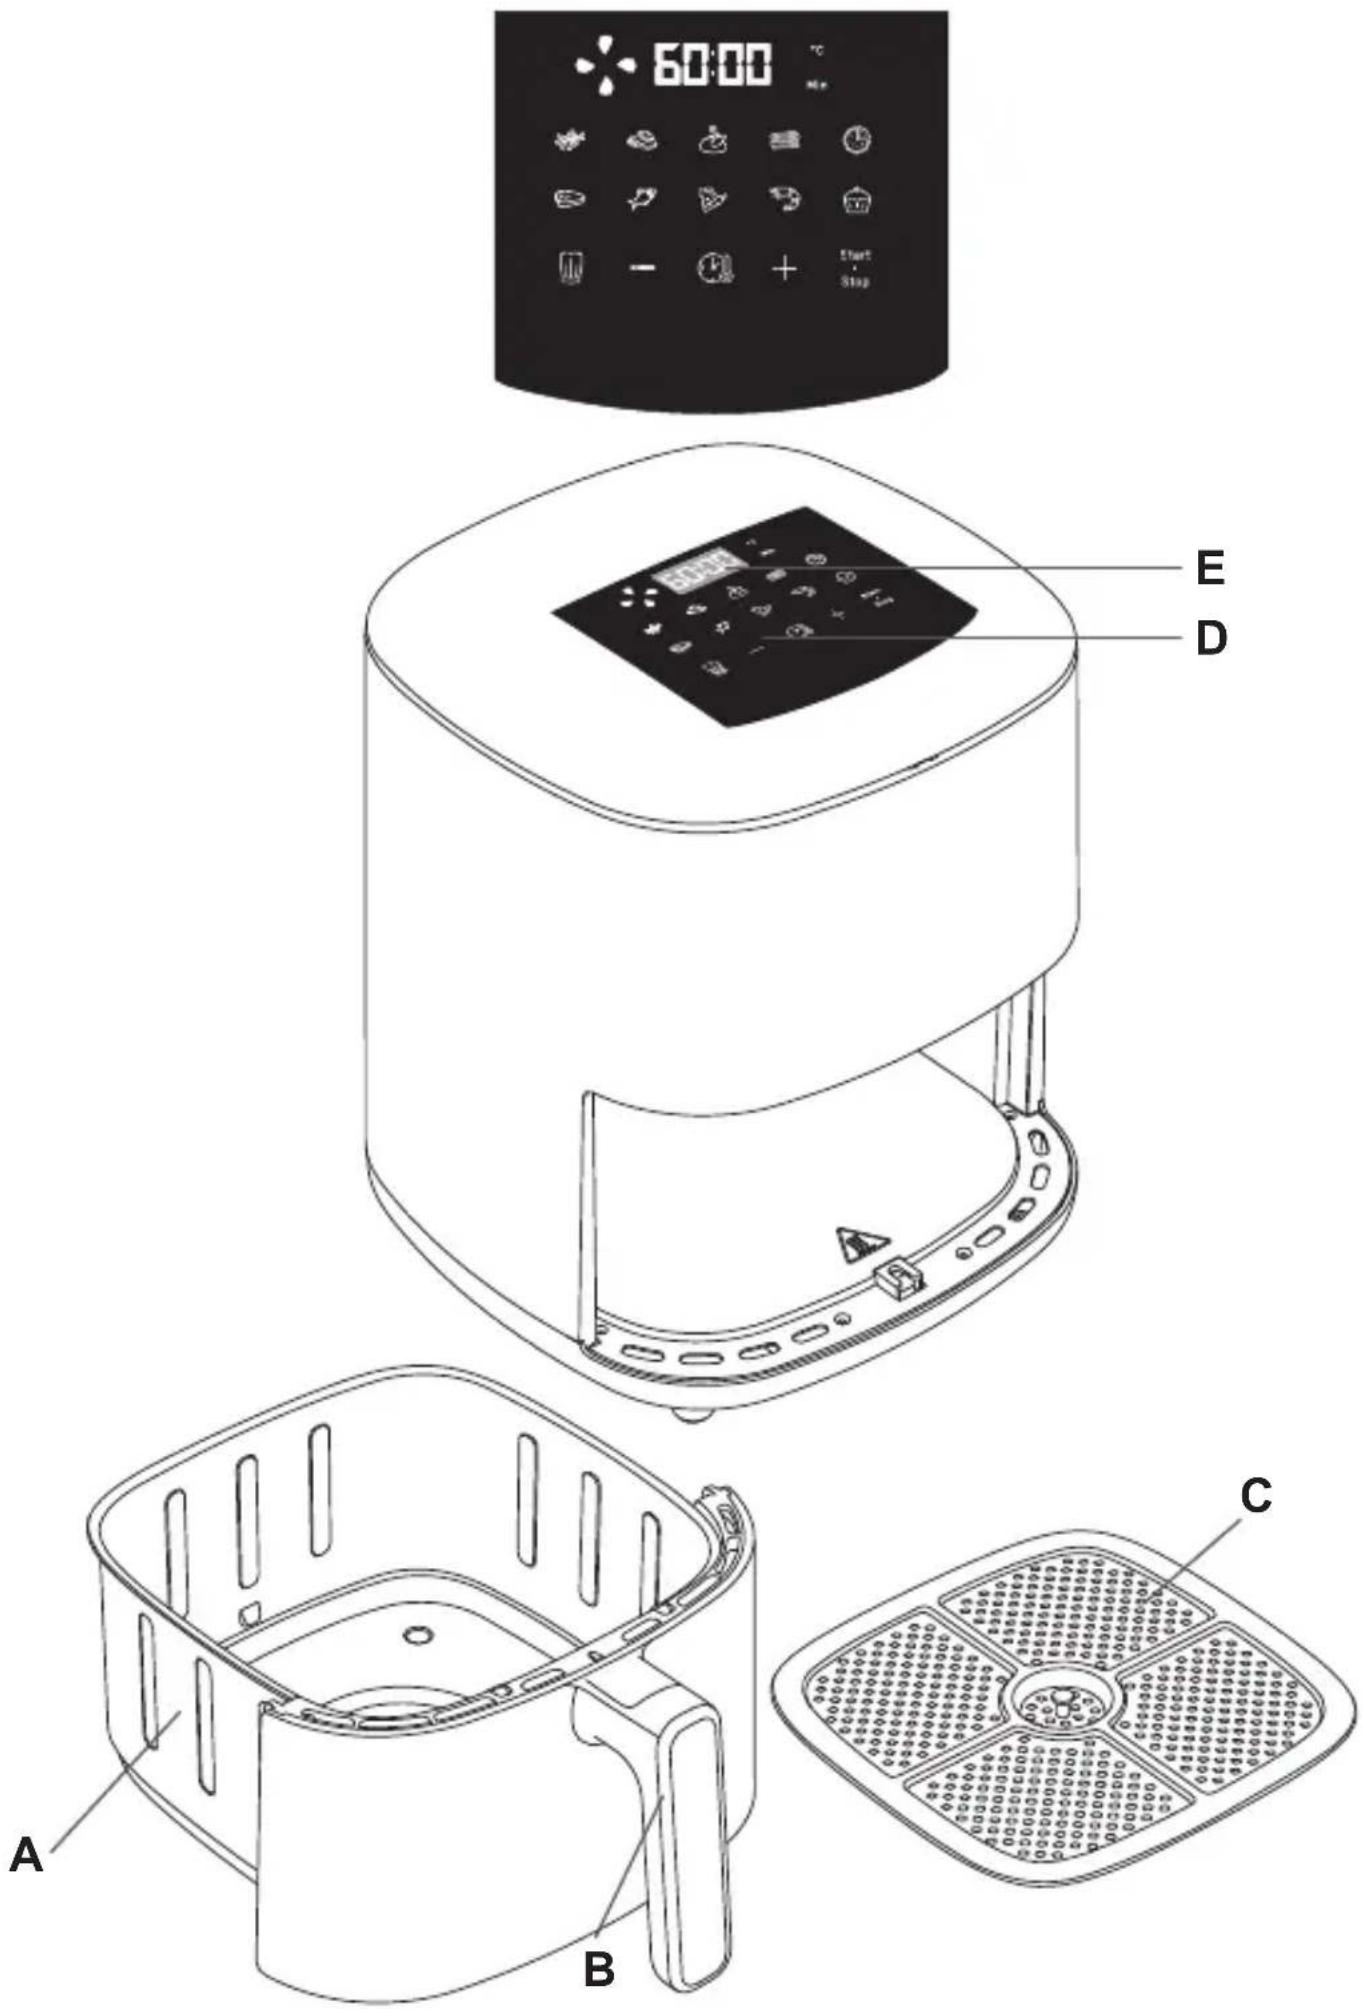
A. Bowl B. Bowl handle C. Removable grid
D. Digital touchscreen panel E. Time/temperature display
AUTOMATIC COOKING MODES
- French Fries
- Nuggets 3. Roasted chicken
- Bacon / Beef bacon 5. Pizza
- Steak 7. Fish
- Vegetables
- Shrimps Desserts
BEFORE FIRST USE
- Remove all packaging material and any stickers from the appliance.
- Thoroughly clean the bowl and the removable grid with hot water, some washing-up liquid and a non-abrasive sponge.
Note: the bowl and the grid are dishwasher safe.
- Wipe the inside and outside of the appliance with a damp cloth. The appliance works by producing hot air. Do not fill the bowl (A) with oil or frying fat.
PREPARING FOR USE
- Place the appliance on a flat, stable, heat-resistant work surface away from water splashes.
- Insert the grid at the bottom of the bowl, up to the stop.
- Do not fill the bowl with oil or any other liquid.
Do not put anything on top of the appliance. This disrupts the airflow and affects the hot air frying result.
IMPORTANT: To prevent the appliance from overheating, do not place it in a corner or below a wall cupboard. A gap of at least 15cm should be left around the appliance to allow air to circulate.
USING THE APPLIANCE
The appliance can cook a large range of recipes. Cooking times for the main foods are given in the section 'Cooking Guide'. Enjoy healthy and crispy dishes thanks to our wide variety of recipes by flashing the QR code in the product sticker.
- Connect the power supply cord to an electrical socket.
- Place the food in the bowl.
Note: Never exceed the maximum amount indicated in the table (see section 'Cooking Guide'), as this could affect the quality of the end result.
- Slide the bowl back into the appliance.
- To begin cooking, you must select one of the automatic cooking modes:
- Press button to display the cooking mode.
- Then press button on the screen to select the desired cooking mode (these modes are described in detail in the "Cooking guide" section).
- If needed, adjust the cooking time by pressing the button and adjusting the time with the + and buttons. The timer can be set for between 0 and 60 minutes.
- You can also adjust the temperature with the end buttons on the digital screen. The thermostat varies from 70-200°C.
Press to begin cooking with the selected temperature and time settings. - Cooking starts. The selected temperature and remaining cooking time will alternate on the screen display.
Note: During cooking, you can adjust the cooking time and the temperature by pressing.
- Excess oil from the food is collected in the bottom of the bowl.
- Some foods require shaking halfway through the cooking time (see section 'Cooking Guide'). To shake the food, pull the bowl out of the appliance by the handle and shake it. Then slide the bowl back into the appliance, the cooking restarts automatically.
- When you hear the timer sound, the cooking time set has finished. Pull the bowl out of the appliance and place it on a heat-resistant surface.
- Check if the food is ready.
If the food is not ready yet, simply slide the bowl back into the appliance and set the timer for a few extra minutes.
- When the food is cooked, take out the bowl. To remove food, use a pair of tongs to lift the food out of the bowl.
Caution: The bowl should never be turned upside down with the grid.
After hot air frying, the bowl, the grid and the food are very hot.
Caution: Do not touch the bowl during use and for some time after use, as it gets very hot. Only hold the bowl by the handle.
- When a batch of food is ready, the appliance is instantly ready for preparing another batch of food.
2
3
en
COOKING GUIDE
The table below helps you to select the basic settings for the food you want to prepare. Note: The cooking times below are only a guide and may vary according to the variety and batch of potatoes used. For other food the size, shape and brand may affect results. Therefore, you may need to adjust the cooking time slightly.
| Quantity | Approx Time(min) | Temperature(℃) | Shake* | Extra information | ||
| Potatoes & fries | ||||||
| Frozen chips (10 mm x 10 mm standard thickness) | 300 - 800 g | 20 - 30 min | 180°C | Yes | ||
| HomemadeFries (8 x 8 mm) | 300 - 800 g | 22 - 27 min | 180°C | Yes | Add 1 tbsp of oil | |
| Frozenpotato wedges | 300 - 800 g | 22 - 27 min | 180°C | Yes | Add 1 tbsp of oil | |
| Meat & Poultry | ||||||
| Steak | 100 - 500 g | 6 - 10 min | 180°C | Yes | Flip at mid-cooking | |
| Chicken breastfillets (boneless) | 100 - 500 g | 12 - 19 min | 180°C | Yes | Flip at mid-cooking | |
| Chicken (whole) | 1000 g | 45 min | 200°C | |||
| Bacon / Beef bacon | 150 g(10 slices) | 8 min | 180°C | Yes Flip | at mid-cooking | |
| Fish | ||||||
| Salmon fillet | 350 g | 15 - 17 min | 140°C | |||
| Prawns | 12 pieces | min | 170°C | |||
| Snacks | ||||||
| Frozen chicken nuggets | 100 - 600 g | 7 - 15 min | 200°C | Yes | ||
| Frozen chicken wings | 300 g 16 | - 20min | 200°C | Yes | ||
| Frozen cheese sticks | 125 g(5 pieces) | 7 - 9 min | 180°C | |||
| Frozen onion rings | 200 g(10 pieces) | 8 - 10 min | 200°C | Yes | ||
| Pizza | 400g | 7 min | 190°C | |||
| Vegetables | ||||||
| Zucchini | 400 - 700 g | min | 180°C | |||
| Baking | ||||||
| Muffins | 7 pieces | 5 - 10min | 180°C | Use a bakingtir/oven dish** | ||
| Cake | 300 g | 30 min | 160°C | |||
- Shake at least half way through cooking. Tips: in order to improve the cooking result, do not hesitate to shake 2-3 times when cooking. IMPORTANT: To avoid damaging your appliance, never exceed the maximum quantities of ingredients and liquids indicated in the instruction manual and in the recipes. Place the cake tin/oven dish in the bowl. When you use mixtures that rise (such as with cake, quiche or muffins) the oven dish should not be filled more than halfway.

TIPS
- Smaller food will require a slightly shorter cooking time than larger size food. If you are unsure, you can open the bowl at any point of cooking to check progress.
- Shaking food halfway through the cooking time improves the end result and can help prevent uneven cooking. To make your potatoes extra crispy, try adding a small amount of oil before cooking and shake to evenly cover. We recommend 14 ml of oil.
- Snacks that can be cooked in an oven can also be cooked in the appliance. The optimal recommended quantity for cooking fries is 700 grams.
- Use ready made puff and shortcrust pastry to make filled snacks quickly and easily.
- Place an oven dish in the appliance's bowl if you want to bake a cake or quiche or if you want to fry delicate ingredients or filled ingredients. You can use an oven dish in silicon, stainless steel, aluminium, terracotta.
- You can also use the appliance to reheat food. To reheat food, set the temperature to 160°C for up to 10 minutes. Cooking time could be adjusted depending on food quantity in order to fully reheat the food.
MAKING HOME-MADE CHIPS
If you want to make home-made chips, follow the steps below.
- Choose a variety of potato recommended for making chips. Peel the potatoes and cut them into equal thickness chips.
- Soak the potato chips in cold water for at least 30 minutes, drain them and dry them with a clean, highly absorbent tea towel. Then pat with paper kitchen towel. The chips must be thoroughly dry before cooking.
- Pour 1 tablespoon of oil (vegetable, sunflower or olive) in a dry bowl, put the chips on top and mix until they are coated with oil.
- Remove the chips from the bowl with your fingers or a kitchen utensil so that any excess oil stays behind in the bowl. Place the chips in the bowl. Note: Do not tip the container of oil coated chips directly into the bowl in one go, otherwise excess oil will end up at the bottom of the bowl.
- Fry the chips according to the instructions in the section Cooking guide.
CLEANING
Clean the appliance after every use.
The bowl and the grid have a non-stick coating. Do not use metal kitchen utensils or abrasive cleaning materials to clean them, as this may damage the nonstick coating.
- Remove the mains plug from the wall socket and let the appliance cool down. Note: Remove the bowl to let the appliance cool down more quickly.
- Wipe the outside of the appliance with a damp cloth.
- Clean the bowl and grid with hot water, some washing-up liquid and a non-abrasive sponge. You can use a degreasing liquid to remove any remaining dirt.
Note: the bowl and the grid are dishwasher safe.
Tip: If food debris/residue is stuck at the bottom of the bowl and the grid, fill them with hot water and some washing-up liquid. Let the bowl and the grid soak for approximately 10 minutes. Then rinse clean and dry.

- Wipe inside of the appliance with hot water and a damp cloth.
- Clean the heating element with a dry, cleaning brush to remove any food residues.
- Do not immerse the appliance in water or any other liquid.
STORAGE
- Unplug the appliance and let it cool down.
- Make sure all parts are clean and dry.
GUARANTEE AND SERVICE
If you need service or information or if you have a problem, please visit the brand website (see cover page of this document) or contact the brand Consumer Care Centre in your country. You can find the phone number in the worldwide guarantee leaflet. If there is no Consumer Care Centre in your country, go to your local dealer.
TROUBLESHOOTING
If you encounter problems with the appliance, visit the brand website (see cover page of this document) for a list of frequently asked questions or contact the Consumer Care Centre in your country.

DESCRIPTION
D. Digital touch panel
E. Temperature/time display
AUTOMATIC COOKING MODES
- French fries
6. Meat
- Pepitas
- Fish
- Roast chicken
- Vegetables
- Bacon
- Shrimp
5. Pizza
- Desserts
BEFORE FIRST USE
- Frying
- Chicken nuggets
- Fried chicken
- Ham
- Pizza
- Steak
- Fish
- Vegetables
- Shrimp Date
BEFORE FIRST USE
COOKWARE
A. Container B. Container handle
C. Removable grid
D. Touch-sensitive digital display E. Time/temperature display
AUTOMATIC FOOD PREPARATION MODES
- French fries 2. Chicken medallions
- Roast chicken
- Bacon 5. Pizza
- Steak 7. Fish
- Vegetables
- Shrimp Dessert
BEFORE FIRST USE
- Remove all packaging and all labels from the appliance.
- Thoroughly clean the drawer and removable grids with hot water, dishwashing liquid, and a non-abrasive sponge.
The drawers and grids can be washed in the dishwasher. 3. Wipe the inside and outside of the appliance with a damp cloth. The appliance works by generating hot air. Do not fill the drawer with oil or frying fat.
PREPARATION FOR USE
- Place the appliance on a flat, stable, heat-resistant work surface away from water splashes.
- Insert the rack into the bottom of the pan until it stops.
- Do not fill the tray with oil or other liquids.
AUTOMATIC PROGRAMS
1. Potatoes 2. Chicken wings 3. Whole chicken 4. Bacon 5. Pizza
- Steak 7. Fish 8. Vegetables 9. Shrimp Desserts
BEFORE FIRST USE
- Remove all packaging materials from the appliance and all accessories.
- Carefully clean the pan and the removable racks in warm water with a small amount of dishwashing liquid and a sponge without abrasive coating.
The pan and racks can be washed in the dishwasher.
3. Wipe the inside and outside surfaces of the appliance with a damp cloth. Dry the appliance with hot air. Do not pour oil or fat into the pan.
PREPARATION FOR USE
- Place the appliance on a flat, stable, heat-resistant work surface away from water splashes.
- Place the rack on the bottom of the pan. 3. Do not fill the pan with oil or other liquids. Do not place anything on top of the appliance. This may cause damage and affect the air circulation and cooking results.
WARNING! Do not place the appliance against a wall or in a cabinet. There must be a gap of at least 15 cm around the appliance so that air can circulate freely.
USING ONLY ONE COOKING ZONE
The appliance can cook a large quantity of dishes. The cooking time for the main dishes is indicated in the section 'Table of cooking times for dishes'. Scan the QR code to enjoy healthy and crispy dishes from the recipe book.
- Connect the power plug to an electrical outlet.
- Place the food in the bowl. Never exceed the maximum level indicated in the table (see in the section 'Table of cooking times for dishes'), as this may affect the quality of the final cooking result.
- Close the lid of the appliance.
- Before starting cooking, it is necessary to select a preset cooking mode.
Press the button to select the cooking mode. Then press the button on the display to select the desired cooking mode (the icons are described in detail in the section 'Table of cooking times for dishes'). The cooking time can be changed by pressing the button and adjusting the desired value with the + and - buttons. The timer can be set from 0 to 60 minutes. Adjust the temperature with the buttons or on the display. The temperature can be adjusted from 70°C to 200°C. Press the Start button to start cooking with the selected temperature and time. Cooking starts and the remaining cooking time is displayed. Note: During cooking, you can adjust the cooking time and temperature by pressing
5. Oil may collect at the bottom of the bowl.
- Some products need to be stirred halfway through the cooking time to obtain optimal results (see the section 'Table of cooking times for dishes'). To stir the ingredients, remove the bowl from the appliance, stir, then place it back into the appliance; cooking continues automatically.
- When the audible signal sounds, the set cooking time is finished. Remove the bowl from the appliance and place it on a heat-resistant surface.
8. Check the doneness of the dish. If the food is not yet ready, simply put the bowl back into the appliance and set the timer for a few more minutes. 9. As soon as the dish is ready, remove the bowl. Remove the food from the bowl with tongs. Caution! Do not turn the bowl over with the food in it. After cooking, the bowl, the grate, and the dish itself are very hot. Be careful not to touch the bowl during use and for some time after, as it heats up strongly. Hold the bowl only by the handle. 10. Once the food is cooked, the appliance is immediately ready for cooking the next batch.
TABLE OF COOKING TIMES FOR DISHES
The cooking time may vary depending on the type of potatoes. The size, shape, and brand of other products may affect the final cooking result. You may need to slightly adjust the cooking time.
Attention! The lid can be washed in the dishwasher.
Tip. If the lower part of the lid and the grate are stuck with dirt, pour hot water with a cleaning agent inside, and leave for about 10 minutes.
Then rinse and dry.
- Wipe the inner surface of the device with a damp cloth, previously moistened with hot water.
- Dry the heating element and the grate thoroughly to remove any food residue.
- Do not immerse the device in water or other liquids.
STORAGE
- Unplug the device and let it cool down.
- Make sure all parts of the device are clean and dry.
WARRANTY AND SERVICE
If you require service or information or if you have problems, visit the brand's website or contact its consumer support center in your country. The phone number is indicated on the international warranty card. If there is no consumer support center in your country, contact the local brand dealer.
TROUBLESHOOTING
If you have problems with the device, visit the brand's website (see the title page in this manual) to see a list of frequently asked questions, or contact the consumer support center in your country.
DESCRIPTION
A. yawa
B. Container lid
C. Winter grate
D. Digital sensor panel
E. Display of service
Temperatures
AUTOMATIC COOKING MODES
1. Fry
- Chicken
3. Chicken breast
- Bacon
- Nuggets
- Steak
__SUPPIMER__
Recept
BEFORE FIRST USE
- Completely remove the packaging from the device and from the device all labels.
- Thoroughly wash the containers, lids, using warm water, mild detergent and a non-abrasive sponge.
The containers and lids can be washed in a dishwasher.
- Wipe the inside and outside of the device with a damp cloth. After each use, rinse with clean water. Do not fill the container above the maximum level.
PREPARATION FOR USE
1. Place the device on a flat, stable work surface, away from water. 2. Insert the lid into the base until it clicks. 3. Do not fill the container above the maximum level.
Do not place the device near heat sources or open flames, as this may affect the results of cooking with hot air.
IMPORTANT INFORMATION. To avoid overheating, do not place the device in a corner or on a heat-sensitive surface. Leave at least 15 cm of free space around the device for air circulation.
USE ONLY ONE CONTAINER OF THE DEVICE
The appliance is designed for cooking. The cooking time for the main dishes is given in the section Recommendations for cooking with the pressure cooker. Use fresh and frozen foods, scan the QR code on the product label.
1. Plug the appliance into a power outlet. 2. Place the food into the container.
Note. Do not exceed the maximum quantity indicated in the table (see section Recommendations for cooking), as this may affect the quality of the result.
- Push the container back into the appliance.
- To start cooking, you must first select the cooking mode.
Press the button to select the cooking mode. Then press the button to select the desired cooking mode (detailed modes are described in the section «Recommendations for cooking»). You can adjust the cooking time by pressing the buttons or using the timer. Set the desired time. The temperature is set using the buttons on the touch screen. The thermostat temperature varies from 70 to 200°C. - To start cooking with a delayed start, set the time and press the button - The cooking process will start. The cooking time, set, will be displayed on the screen.
Note: during cooking, you can adjust the cooking time and temperature by pressing
5. The valve will close automatically when the pressure builds up. 6. For even cooking, it is necessary to stir the food to ensure optimal results (see section Recommendations for cooking). To stir, pull the handle out of the appliance and stir. Then set it back into the appliance, and cooking will continue automatically. 7. When the valve drops with a characteristic sound, it means that the cooking time is over. Remove the handle from the appliance and place it on a heat-resistant surface. 8. Check the readiness of the food.
If the food is not ready, simply set the handle back into the appliance and set the timer for a few more minutes.
- When the food is ready, remove it. To remove the container from the appliance, use the handle. Warning! Under no circumstances should you turn the container over with the food. The food is very hot. Warning! When using and cleaning the appliance, be careful as it will be hot. Hold the handle firmly.
- When the cooking is done, the appliance is immediately ready for cooking the next dish.
RECOMMENDATIONS FOR COOKING
The table below shows the main settings for cooking dishes. Note. The cooking time may vary depending on the type and batch of products, so use the recommendations as a guide. The cooking result may be affected by the size and type of products. Therefore, you may need to adjust the cooking time slightly.
If you have any problems with the device, contact the manufacturer's company (see the end of this manual) for a list of frequently asked questions or contact the service center in your country.
ACCESSORIES
A. Grill B. Grill grate C. Baking tray
D. Sanitizing brush and cleaning brush E. Rack/Temperature probe
AUTOMATIC PROGRAMS AND MODES
1. Fry 2. Grill settings 3. Rotisserie grill 4. Bacon 5. Pizza
- Steam 7. Bake
- KekehiciTeP
- Aichiaryn
- DecepT
- Place the ingredients and the baking tray on the grill and the baking pan accordingly.
- Place the grill and the baking tray on the upper and lower racks, and use the cleaning brush to clean the inside and outside.
The device is designed for indoor use only.
- The manufacturer is not responsible for any damage caused by improper use. The user must follow all instructions carefully.
SUPPRIMER
- Do not use the device near water, in damp conditions, or with wet hands.
- Do not place the device near heat sources.
- Do not immerse the device in water. Do not use the device if it is damaged. This may cause electric shock and fire hazard.
WARNING! To prevent the device from tipping over, place it on a stable surface or secure it to the wall. Do not place it on an inclined surface.
DEVICE OPERATION
The device comes with a wide range of accessories. Basic settings are described in the user manual. For more information, scan the QR code on the packaging to access the full user manual and detailed instructions.
- Connect the device to a power outlet.
- Follow the instructions. Do not exceed the maximum power specified in the user manual (see the user manual). It is possible to cause damage to the device if used improperly.
- Follow the instructions for use.
- For first use, it is necessary to select the appropriate operating mode.
Before starting the device, read the safety instructions carefully. Follow the safety instructions and the operating instructions (for the device type) to avoid any damage. The device must be used only for its intended purpose and in accordance with the instructions. The temperature should be set within 0-60 minutes. The temperature and the device must be checked. The thermostat should be set within 70-200°C. Use the Start button to start the device with the set temperature and other parameters. - Start the device. The device will operate according to the settings.
Note: During operation, the device temperature and the device must be checked regularly.
5. Remove the product from the oven. 6. To check if it is cooked, shake the product in the device (for the device type) or check visually. To shake, remove the product from the oven, shake it. If the product is not yet cooked, the device will automatically continue. 7. Set the timer to the remaining time. Remove the product from the oven and place it on a heat-resistant surface. 8. The product is now ready.
If the product is not yet cooked, put it back in the oven and set the timer for a few more minutes.
- When the product is cooked, remove it from the oven. To remove the product, use the handles to lift it out. Be careful! The product, the oven, and the handles will be hot. After removing, place the product on a heat-resistant surface. 10. If the product is not cooked enough, put it back in the oven and cook for a few more minutes.
DEVICE OPERATION
The table below shows the basic parameters for cooking various products. Expert. The cooking times in the table are for reference only and may vary depending on the product. For best results, follow the instructions and adjust the time as needed. The cooking time can be adjusted as needed.
| Menglerei | Балламы угду (min) | Tempepatуа (℃) | шайкay* | Косьмда akтарat | ||
| Кapтон по却不рп | ||||||
| Мydатыган Фри (10mm x 10mm) | 300 - 800 g | 20 - 30 min | 180°C | иa | ||
| Yidze kaskanangфpr Каробу (8x8mm) | 300 - 800 g | 22 - 27 min | 180°C | иa | 1 ac kaskan mair Kocobipra | |
| Мydатыган Kapto Kocobotepi | 300 - 800 g | 22 - 27 min | 180°C | иa | 1 ac kaskan mair Kocobipra | |
| Ет по КUC eti | ||||||
| Мydатыган сөгь Тaylaktsng Taeet (Cyberkdis) | 100 - 500 g | 6 - 10 min | 180°C | иa | Жартуй niçirrenhen kein aydarpinbuz | |
| 100 - 500 g | 12 - 19 min | 180°C | иa | |||
| Туас тayык eti | 1000 g | 45min | 200°C | |||
| Бекон / сөрет Бекони | 150 g | 8min | 180°C | иa | Жартуй niçirrenhen kein aydarpinbuz | |
| Балык | ||||||
| Асөрөдөдөд | 350 g | 15 - 17 min | 140°C | |||
| Acssan | 12дана | 4min | 170°C | |||
| Жehлтагамдap | ||||||
| Мydатыган Тayык Hartetcbi | 100 - 600 g | 7 - 15 min | 200°C | иa | ||
| Tayык кадлары | 300 g | 16 - 20min | 200°C | иa | ||
| Мydатыган lirimiik Tarkkuanabby | 125 g (5данa) | 7 - 9 min | 180°C | |||
| Мydатыган пьз Сыногары | 200 g (10данa) | 8 - 10 min | 200°C | иa | ||
| Пица | 400g | 7 min | 190°C | |||
| Кokhenлстер | ||||||
| ackabak | 300 g | 10min | 200°C | |||
| Пису | ||||||
| Марфим | 7дана | 15 - 18 min | 180°C | Пису're aphanran niilii'dneu tabarln ma'danalbhyt | ||
| Шokалды торлар | 300 g | 30 min | 160°C | |||
The device will operate according to the settings.
The device is equipped with a safety system that prevents overheating and short circuits. The device will automatically shut off if it overheats.
*The product may be hot.
The product may contain allergens (milk, eggs, nuts, or other allergens). Check the product label for allergen information.
WARRANTY
SERVICE AND SUPPORT
If you need service or support, or if you have any questions, visit our website or contact our customer service. You can find the contact information in the warranty card. If you do not have the contact information, contact the retailer where you purchased the product.
.
.
2
.3
.
10 10 10
logabg logabg
4 ...u 5 ... plob 6
jz
1 2
aIgJ
a d 15
.1L W J 11 11 11 11 11 11 11 11 11
g
JgU (JUU I JI U) 100000000000000000000000000000000000000000000000
. 11111111111111111111111111111
#
200 100000000000000000000000000000000000000000
a 1
ygi yglalny lglaln kgs galsl jg sas Aalej 1gla aagj 111
3 1
15 15
160 8j 8j j 8j j j j j j j j j j j j j j j j j j j j j j j j j j j j j j j j j j j j j j j j j j j j j j j j j j j j j j j j j j j j j j j j j j j j j j j j j j j j j j j
julal
aaii gaii gaii jia jia jia jia jia jia jia jia jia jia jia jia jia jia jia jia jia jia jia jia jia jia jia jia jia jia jia jia jia jia jia jia jia jia
gaglina gabag wbalal yogall wbalal jia zao a
2
g 1000000000000000000000000000000000000000000000000000000
1 4
y 10
.
A 5
∴ m : x = 1 or x = -1
a a a a a a a a a a a a a a a a a a a a a a a a a a a a a a a a a a a a a a a


- AUTOMATIC COOKING MODES
- BEFORE FIRST USE
- PREPARING FOR USE
- USING THE APPLIANCE
- COOKING GUIDE
- TIPS
- MAKING HOME-MADE CHIPS
- CLEANING
- STORAGE
- GUARANTEE AND SERVICE
- TROUBLESHOOTING
- DESCRIPTION
- COOKWARE
- AUTOMATIC FOOD PREPARATION MODES
- PREPARATION FOR USE
- AUTOMATIC PROGRAMS
- USING ONLY ONE COOKING ZONE
- TABLE OF COOKING TIMES FOR DISHES
- WARRANTY AND SERVICE
- USE ONLY ONE CONTAINER OF THE DEVICE
- RECOMMENDATIONS FOR COOKING
- ACCESSORIES
- AUTOMATIC PROGRAMS AND MODES
- SUPPRIMER
- DEVICE OPERATION
- WARRANTY
- SERVICE AND SUPPORT
- JZ
- AIGJ
- G
- JULAL
- ∴ M : X = 1 OR X
Brand : MOULINEX
Model : Easy Fry Max EZ2458
Category : Deep fryer