RCRB4DR280 - Fridge Royal Catering - Free user manual and instructions
Find the device manual for free RCRB4DR280 Royal Catering in PDF.

| Product type | Refrigerated base with 4 drawers |
| Model | RCRB4DR280 |
| Brand | Royal Catering |
| Nominal voltage | 230 V / 50 Hz |
| Nominal current | 1.27 A |
| Climate class | 4 |
| Refrigerant | R290 (85 g) |
| Insulating blowing gas | Cyclopentane |
| Dimensions (W x D x H) | 1360 x 700 x 850 mm |
| Weight | 91.2 kg |
| Load capacity per drawer | 40 kg maximum |
| Ambient temperature range | 10 to 32 °C |
| Thermostat type | Digital with display |
| Temperature adjustment | By SET key and arrows |
| Defrosting | Manual (stop the appliance) |
| Ventilation | Minimum distance of 20 cm from walls |
| Use | Indoor only |
| Power supply | Grounded plug |
| Exterior material | Stainless steel |
| Number of drawers | 4 |
| Repairability | Must be carried out by a qualified technician |
| Cleaning | With soapy water, do not use high-pressure cleaner |
| Safety | Flammable refrigerant R290, observe precautions |
Frequently Asked Questions - RCRB4DR280 Royal Catering
User questions about RCRB4DR280 Royal Catering
0 question about this device. Answer the ones you know or ask your own.
Ask a new question about this device
Download the instructions for your Fridge in PDF format for free! Find your manual RCRB4DR280 - Royal Catering and take your electronic device back in hand. On this page are published all the documents necessary for the use of your device. RCRB4DR280 by Royal Catering.
USER MANUAL RCRB4DR280 Royal Catering
natural_image
Silhouette of a lion-like creature on a blue background (no text or symbols)| DE | Produktname | Kühltisch |
| EN | Product name | Refrigeration table |
| PL | Nazwa produktu | Stół chłodniczy |
| CZ | Název výrobku | Chladicí stûl |
| FR | Nom du produit | Table de réfrigération |
| IT | Nome del prodotto | Tavolo refrigerato |
| ES | Nombre del producto | Mesa de refrigeración |
| HU | Termék neve | Hűtőasztal |
| DA | Produktnavn | Kølebord |
| FI | Tuotteen nimi | Jäähdytyspöytä |
| NL | Productnaam | Koelwerkbank |
| NO | Produktnavn | Kjølebord |
| SE | Produktnamn | Kylbord |
| PT | Nome do produto | Mesa de refrigeração |
| SK | Názov produktu | Chladiaci stôl |
| BG | Име на продукта | Хладилен плот |
| EL | Όνομα προϊόντος | Ψυκτικό τραπέζι |
| HR | Naziv proizvoda | Hladnjak stol |
| LT | Produkto pavadinimas | Šaldymo stalas |
| RO | Numele produsului | Masă frigorifică |
| SL | Ime izdelka | Hladilna miza |
| DE Modell | EN Product model | PL Model produktu | CZ Model výrobku | FR Modèle | IT Modello | ES Modelo | HU Modell | DA Model | FI Tuotteen malli | NL Productmodel | NO Produktmodell | SE Produktmodell | PT Modelo do produto | SK Model | BG Модел на продукт | EL Movtéλο προϊόντος | HR Model proizvoda | LT: Gaminio modelis | RO: Model de produs | SL: Model izdelka | RCRT-2D280RCRT-2D280RERCRT-3D420RCRT-3D420RERCRT-4D550RCRT-4D550RERCRT-1D2DR280RCRB-4DR280RCRB-2D2DR280RCRB-6DR420RCRT-2D280GRCRT-3D420G | |
| DE Hersteller | EN Manufacturer | PL Producent | CZ Výrobce | FR Fabricant | IT Produttore | ES Fabricante | HU Termelő | DA Producent | FI Valmistaja | NL Producent | NO Produsent | SE Tillverkare | PT Fabricante | SK Výrobca | BG Производител | EL Κατασκευαστής | HR Proizvođač | LT Gamintojas | RO Producător | SL Proizvajalec | expondo Polska sp. z o.o. sp. k. | |
| DE Anschrift des Herstellers | EN Manufacturer Address | PL Adres producenta | CZ Adresa výrobce | FR Adresse du fabricant | IT Indirizzo del produttore | ES Dirección del fabricante | HU A gyártó címe | DA Producentens adresse | FI Valmistajan osoite | NL Adres producent | NO Produsentens adresse | SE Tillverkarens adress | PT Endereço do fabricante | SK Adresa výrobcu | BG Адрес на производителя | EL: Διεύθυνση κατασκευαστή | HR Adresa proizvođača | LT Gamintojo adresas | RO Adresa producătorului | SL Naslov proizvajalca | ul. Nowy Kisielin – Innowacyjna 7, 66-002 Zielona Góra | Poland, EU | |

text_image
① ② ③ ④ SET 8.8 ⑤ aux DixellThis User Manual has been translated for your convenience using machine translation. Reasonable efforts have been made to provide an accurate translation; however, no automated translation is perfect nor is it intended to replace human translators. The official User Manual is the English version. Any discrepancies or differences created in the translation are not binding and have no legal effect for compliance or enforcement purposes. If any questions arise related to the accuracy of the information contained in the User Manual, please refer to the English version of those contents which is the official version.
Technical data
| Parameter description | Parameter value | ||
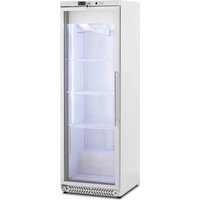
| Product name | Refrigeration table with 2 doors | Refrigeration table with 2 doors | Refrigeration table with 3 doors |
| Model | RCRT-2D280 | RCRT-2D280RE | RCRT-3D420 |
| Rated voltage [V~] / Frequency [Hz] | 230 / 50 | ||
| Rated Current [A] | 1.27 | ||
| Climate class | 4 | ||
| Insulation blowing gas | Cyclopentane | ||
| Refrigerant | R290/85g | R290/85g | R290/95g |
| Dimensions [Width x Depth x Height; mm] | 1360 x 700 x 850 | 1360 x 700 x 950 | 1790 x 700 x 850 |
| Weight [kg] | 74 | 77.4 | 89 |
| Product name | Refrigeration table with 3 doors | Refrigeration table with 4 doors | Refrigeration table with 4 doors |
| Model | RCRT-3D420RE | RCRT-4D550 | RCRT-4D550RE |
| Rated voltage [V~] / Frequency [Hz] | 230 / 50 | ||
| Rated Current [A] | 1.27 | 1.77 | 1.77 |
| Climate class | 4 | ||
| Insulation blowing gas | Cyclopentane | ||
| Refrigerant | R290/95g | R290/115g | R290/115g |
| Dimensions [Width x Depth x Height; mm] | 1790 x 700 x 950 | 2230 x 700 x 850 | 2230 x 70 x 950 |
| Weight [kg] | 95.2 | 106.4 | 112.4 |
EN
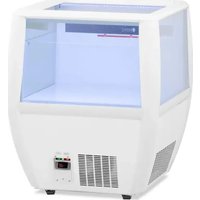
| Product name | Refrigeration base with 2 drawers and 1 door | Refrigeration base with 4 drawers | Refrigeration base with 2 drawers and 2 doors |
| Model | RCRT-1D2DR280 | RCRB-4DR280 | RCRB-2D2DR280 |
| Rated voltage [V~] / Frequency [Hz] | 230 / 50 | ||
| Rated Current [A] | 1.27 | 1.27 | 1.27 |
| Climate class | 4 | ||
| Insulation blowing gas | Cyclopentane | ||
| Refrigerant | R290/85g | R290/85g | R290/95g |
| Dimensions [Width x Depth x Height; mm] | 1360 x 700 x 850 | 1360 x 700 x 850 | 1795 x 700 x 850 |
| Weight [kg] | 82.4 | 91.2 | 95.5 |
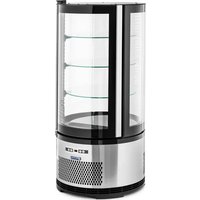
| Product name | Refrigeration base with 6 drawers | Refrigeration table with 2 glass doors | Refrigeration table with 3 glass doors |
| Model | RCRB-6DR420 | RCRT-2D280G | RCRT-3D420G |
| Rated voltage [V~] / Frequency [Hz] | 230 / 50 | ||
| Rated Current [A] | 1.27 | 1.27 | 1.27 |
| Climate class | 4 | ||
| Insulation blowing gas | Cyclopentane | ||
| Refrigerant | R290/95g | R290/85g | R290/95g |
| Dimensions [Width x Depth x Height; mm] | 1790 x 700 x 850 | 1360 x 700 x 850 | 1795 x 730 x 850 |
| Weight [kg] | 117 | 81.5 | 101 |
Introduction For your safety, read the manual carefully before assembling or using this product. Save this manual for future reference.
Please take a few moments to carefully read through this manual. Correct maintenance and operation of this machine will provide the best possible performance from your product.
Safety Tips
- Position on a flat, stable surface.
- A service agent/qualified technician should carry out installation and any repairs if required.
- Do not remove any components or service panels on this product.
- Consult Local and National Standards to comply with the following:
○ Health and Safety at Work Legislation
- Fire Precautions
○ IEE Wiring Regulations
○ Building Regulations
- The appliance is intended for normal household use or similar use (e.g., to be used by a layman in shops).
• DO NOT use the appliance outside.
• DO NOT attempt to service the item yourself.
- DO NOT use damaged appliances. If you are in any doubt, consult a service agent.
- The unit must be installed and located in accordance with the manufacturer's installation instructions.
- Installation work must be performed in accordance with the National Electric Code by qualified and authorized personnel only.
- To reduce the risk of flammability, repairs and replacement work must be performed by a qualified and authorized service professional using only genuine replacement parts (Component parts shall be replaced with like components).
- Do not use an extension cord or an adapter plug. Due to potential safety hazards, we strongly advise against using an extension cord or adapter plug.
- DO NOT use electrical appliances inside the appliance (e.g., heaters, ice-cream makers), unless recommended by the manufacturer.
- Keep ventilation openings in the appliance enclosure or built-in structure clear of obstruction.
- DO NOT use mechanical devices or other means to accelerate defrosting other than recommended by the manufacturer.
• DO NOT damage the refrigerant circuit.
- DO NOT allow oil or fat to come into contact with plastic components or the door seal. Clean immediately if contact occurs.
- DO NOT place combustion, explosive, or volatile articles, corrosive acids or alkalis, or liquids in the appliance.
• DO NOT use this appliance to store medical supplies.
• DO NOT use jet/pressure washers to clean the appliance. - DO NOT allow children to play with the packaging and destroy plastic bags safely.
- Bottles containing a high percentage of alcohol must be sealed and placed vertically in the refrigerator.
- Always carry, store, and handle the appliance in a vertical position and move by holding the base.
• Always switch off and disconnect the power supply before cleaning. - Keep all packaging away from children. Dispose of packaging following local authority regulations.
- If the supply cord is damaged, it must be replaced by the manufacturer, its service agent, or similarly qualified persons to avoid a hazard.
- This appliance is not intended for use by persons (including children) with reduced physical, sensory, or mental capabilities or lack of experience and knowledge unless supervised or instructed on use by a person responsible for their safety.
• Children should be supervised to ensure they do not play with the appliance. - To prevent suffocation and entrapment hazards, remove doors and seals from the refrigerator before disposal or discontinuing its use.
- For indoor use only. Not suitable for installation in areas where a water jet could be used. Must not be cleaned by a water jet.
- To guarantee safe operation, ensure the appliance is set up and connected as described in the instruction manual.
- Any repairs and work on the appliance should only be carried out by the customer service department.
- The key to the electrical cabinet should be kept out of reach of children and users.
- Do not install the unit in a damp place where it could be splashed with water. Incorrect insulation of electrical parts may cause fire or electric shock.
- Do not plug several appliances into the same socket, as it may cause overheating and fire.
- Keep the power plug away from the rear of the cabinet, as a damaged plug may cause overheating and fire.
-
Do not spray water directly on the interior or exterior of the appliance, as it may cause fire or electric shock.
-
Do not place containers filled with water on top of the appliance. If water spills onto electrical parts, it may lead to fire or electric shock.
- Do not attempt to repair, disassemble, or alter the appliance, as it may cause fire or abnormal operations leading to injury.
- Unplug the refrigerator before making repairs, replacing a light bulb, or cleaning.
Installation
- Remove the appliance from the packaging. Make sure that all protective plastic film and coatings are thoroughly removed from all surfaces. To prevent injury or damage to the unit, the appliance should be unpacked and set up by two people.
- Maintain a distance of 20cm between the appliance and walls or other objects for ventilation. Increase this distance if the obstacle is a heat source.
- Level the appliance by adjusting the screw feet. It should be placed on the level solid floor or base to reduce the vibration and noise.
- The temperature in the place where device is located must be between 10 and 32 °C. Avoid locating it in direct sunlight or near heat sources such as an oven or a radiator.
- Please make sure the appliance is properly ventilated.
- Power supply and voltage at the operating point must comply with the details on the rating label. The plug must be accessible after installation.
- Correctly connect and disconnect the plug. When inserting the plug, it must be plugged tightly. When pulling out the plug, hold the plug body by hand. Never pull the supply cord directly.
- If the device is to be shut down for a long period, switch it off and disconnect the plug from the socket outlet. Clean the appliance and leave the door & lid open to prevent odor.
- Important! For your personal safety, this appliance must be properly grounded.
This appliance is equipped with a cord having a grounding wire with a grounding plug. The plug must be inserted into an outlet that is properly grounded and installed. Consult a qualified electrician or service center if you do not fully understand the grounding instructions. If doubt exists as to whether the appliance is properly grounded, have a qualified electrician check the circuit to ensure the outlet is properly grounded. - If the cable does not reach the nearest socket, either rearrange your store layout or ask a qualified electrician to install a new socket.
-
If power is cut off, wait at least 3 minutes before restarting the appliance to avoid damaging the compressor.
-
When placing food storage, a maximum of one shelf weight of less than 40 kg may be placed, but it is not allowed to hang over the front and rear edges of the shelf.
Fit The Shelves
Note: If the unit has not been stored or moved in an upright position, let it stand upright for approximately 12 hours before operation.
Note: Before using the appliance for the first time, clean the shelves and interior with soapy water.
Note: This is vital for ensuring correct drainage of condensation.
- Place one set of shelf guides on either side of the cabinet at the desired height.
- Slide the shelf into place.
- Repeat for the remaining shelves.
Operation
Storing Food
To get the best results from your appliance, follow these instructions:
- Only store foodstuffs in the appliance when it has reached the correct operating temperature.
- Ensure GN container bays are full at all times, even if the GN containers are unused or empty. Empty bays will greatly reduce the efficiency of the appliance.
• Always close the door and lid when not in use. - Do not place uncovered hot food or liquid inside the appliance.
- Wrap or cover food where possible.
- Do not obstruct the fans inside the appliance.
- Avoid opening the doors for prolonged periods of time.
• The maximum load for a shelf is 40 kg. - The food must be placed into a container before being placed into the cabinet or on the shelf. Food must not be placed directly into the food cabinet.
- When wet food or vegetables are placed in the device, it is normal for ice (snow) to appear on the surface.
Turn On
- Close the door(s) of the appliance.
- Ensure the power switch is set to [O] and turn on the appliance at the socket.
-
Switch on the Power [I]. The current temperature within the appliance will be displayed.
-
The thermostat on the control panel will flash for 3 seconds.
Open/Close the Lid/Drawer
WARNING: The sliding lid does not have a locking mechanism. Always ensure that the lid is in the "half-open" position before fully opening.
Temperature setting and control
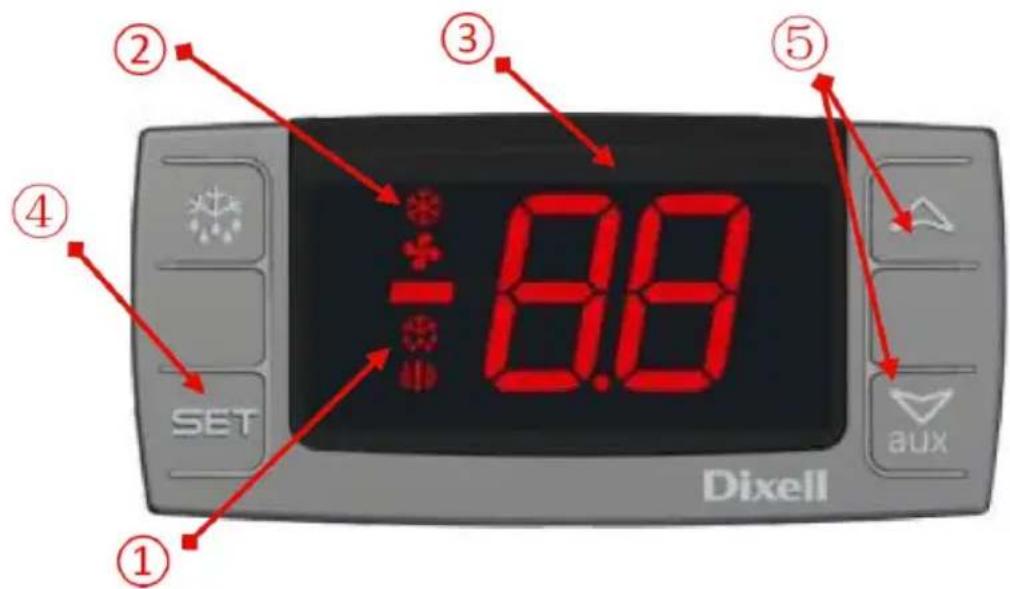
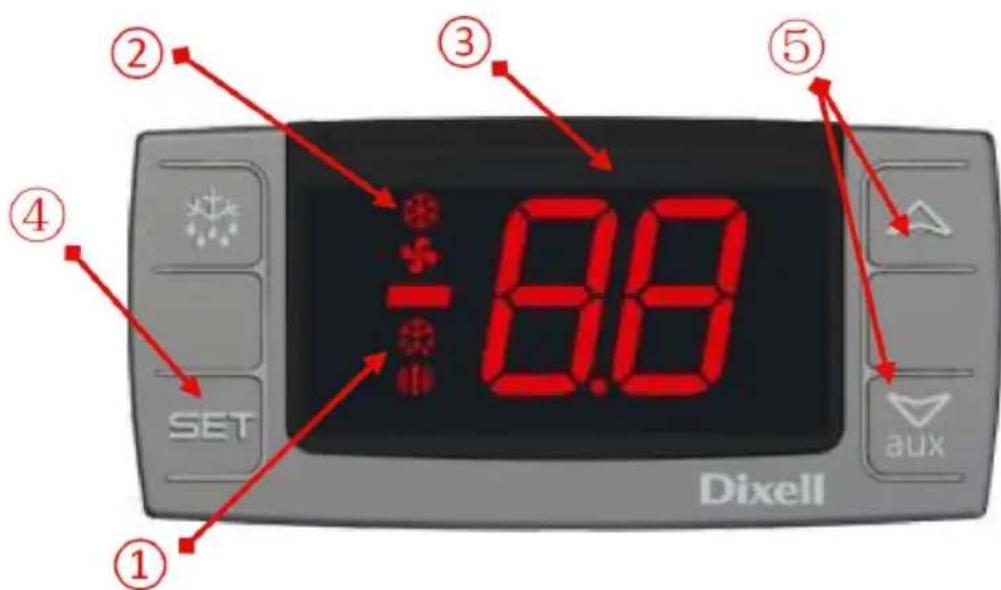
The front panel of the thermostat
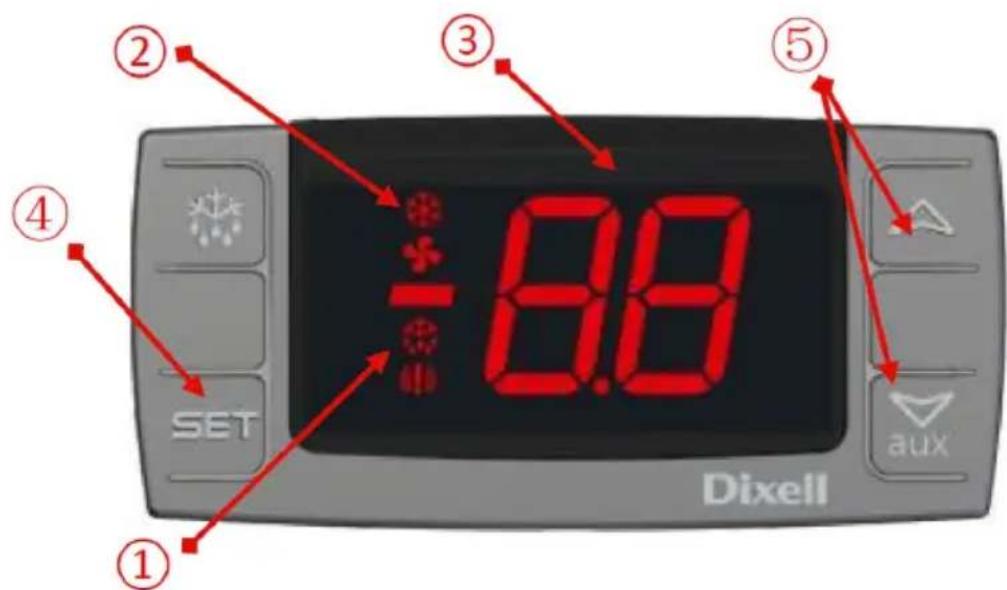
text_image
① ② ③ ④ SET 8.8 ⑤ aux Dixell①Defrosting light
②Compressor operation light
③Digital thermostat
④Programming key (not accessible to the user) Selection key
⑤Temperature modification keys
How to see the set point
- Push and immediately release the SET key, the set point will be showed;
- Push and immediately release the SET key or wait about 5s to return to normal visualization.
How to change the set point
- Push the SET key for more than 2 seconds to change the set point value.
- The value of the set point will be displayed and the "°C" starts blinking;
- To change the set value, push the UP or DOWN arrows within 10s.
- To memories the new set point value pushes the SET key again or wait 10s.
Defrosting
The refrigerator belongs to stop defrost, please manually defrost at least once a month.
Freezer with automatic defrosting function, no manual defrosting. The product automatically
removes the frost every 6h.
Note: The cycle starts from the time the appliance is initially powered up.
Manual Defrosting Instructions for Freezer:
-
Press and hold the DEFROST ✿ button for 5 seconds.
-
The defrost cycle will start immediately, and the Defrost LED will illuminate. The defrost cycle lasts 20 minutes.
Cleaning, Care & Maintenance
Routine Maintenance
- Switch off and disconnect from the power supply before cleaning.
- Clean the enclosure and interior of the appliance as often as possible.
- Wash the unit with a moist cloth. Never allow the switch, control panel, cable, or plug to get wet.
- Do not use abrasive cleaning agents. These can leave harmful residues. Use only mild soapy water.
- Clean the door seal with water only.
- Ensure that no cleaning water penetrates into the electrical components.
- Must not be cleaned by a water jet.
• Always wipe dry after cleaning with a soft cloth.
- Do not allow water used in cleaning to run through the drain hole into the evaporation pan.
• Take care when cleaning the rear of the appliance.
- An agent or qualified technician must carry out repairs if required.
- If the appliance is to be left inactive for long periods, unplug the appliance after turning the switch to the OFF position, empty the refrigerating compartment, and clean thoroughly.
Special Maintenance
The instructions given in the following paragraph are for SKILLED PERSONNEL.
Periodic Operations
- Periodically clean the condenser using suitable tools (vacuum cleaner or soft brushes).
- Check that the electrical connections are not loose.
- Check that the thermostat and the sensor are in proper working order.
• Periodically cleaning the condenser can extend the life of the appliance. - It is recommended that an agent or qualified technician clean the condenser.
- The key to the electrical cabinet should be kept out of the reach of children and users.
- Only use the key to open the lock.
Troubleshooting
| Fault | Probable Cause | Action |
| The appliance is not working | The unit is not switched on | Check the unit is plugged in correctly and switched |
| Plug and lead are demaged | Call your agent or qualified technician | |
| Power supply | Check power supply | |
| Internal wiring fault | Call your agent or qualified technician | |
| The appliance turns on, but the temperature is too high/ low | Too much ice on the evaporator | Defrost the appliance |
| Condenser blocked with dust | Call your agent or qualified technician | |
| Doors are not shut properly | Check doors are shut and seals are not damaged | |
| Appliance is located near a heat source or air flow to the condenser is being interrupted | Move the refrigerator to a more suitable location | |
| Ambient temperature is too high | Increase ventilation or move appliance to a cooler | |
| Unsuitable foodstuffs are being position stored in the appliance | Remove any excessive hot foodstuffs or blockages to the fan | |
| Appliance is overloaded | Reduce the amount of food stored in the | |
| The appliance is unusually loud | Loose nut/screw | Check and tighten all nuts and screws |
| The appliance has not been installed in a level or stable position | Check installation position and change if necessary |
EN
| The appliance is leaking water | The appliance is not properly leveled | Adjust the screw feet to level the appliance (if applicable) |
| The discharge outlet is blocked | Clear the discharge outlet | |
| Movement of water to the drain is obstructed | Clear the floor of the appliance (if applicable) | |
| The water container is damaged | Call your agent or qualified Technician | |
| The drip tray is overflowing | Empty the drip tray with sponge |
Circuit Diagram
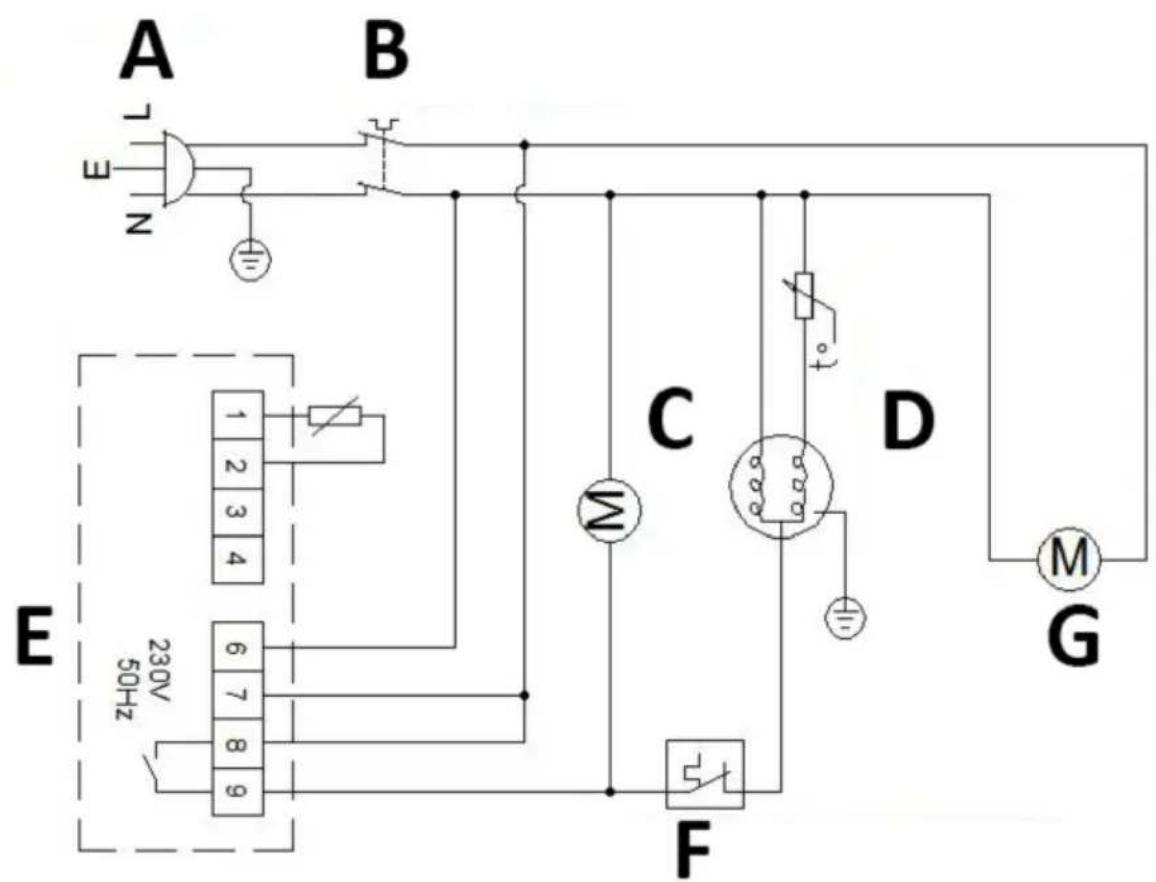
text_image
A B E L N ① ② ③ ④ 1 2 3 4 230V 50Hz 6 7 8 9 C D M G FA Power plug
B Power switch
C Condenser fan
D Compressor
E Temperature controller
F Overload protector
G Evaporator fan

text_image
① ② ③ ④ SET 8.8 ⑤ aux Dixell○ IEE Wiring Regulations
○ Stavební předpisy
Termostatens frontpanel
text_image
① ② ③ ④ SET -8.8 ⑤ aux Dixelltext_image
① ② ③ ④ SET 8.8 ⑤ aux Dixelltext_image
① ② ③ ④ SET 8.8 ⑤ aux DixellTermostatens frontpanel
text_image
① ② ③ ④ SET 8.8 ⑤ aux Dixelltext_image
A B E L N ① ② ③ ④ ⑤ 230V 50Hz E C D M G FA Strømplugg
B Strømbryter
C Kondensatorvifte
D Kompressor
E Temperaturregulator
F Overbelastningsbeskytter
G Fordampervifte

Termostatens frontpanel
text_image
① ② ③ ④ SET -8.8 ⑤ aux Dixelltext_image
A B E L N ① ② ③ ④ ⑤ 230V 50Hz E C D M G FA Strömkontakt
B Strömbrytare
C Kondensorfläkt
D Kompressor
E Temperaturregulator
Encaixe as prateleiras
text_image
A B E L N ① ② ③ ④ ⑤ 230V 50Hz E C D M G FA Napájacia zástrčka
B Vypínač napájania
C Ventilátor kondenzátora
D Kompresor
E Regulátor teploty
F Ochrana proti preťaženiu
G Ventilátor výparníka
text_image
① ② ③ ④ SET 8.8 ⑤ aux Dixelltext_image
① ② ③ ④ SET 8.8 ⑤ aux Dixelltext_image
A B E L N ① ② ③ ④ ⑤ 230V 50Hz E C D M G FENA Βύσμα ρεύματος
text_image
① ② ③ ④ SET 8.8 ⑤ aux Dixell①Svjetlo za odmrzavanje
②Svjetlo rada kompresora
③Digitalni termostat
④Tipka za programiranje (nije dostupna korisniku) Tipka za odabir
⑤Tipke za promjenu temperature
text_image
A B E L N ① ② ③ ④ ⑤ 230V 50Hz E C D M G Ftext_image
① ② ③ ④ SET 8.8 ⑤ aux DixellFor the disposal of the device please consider and act according to the national and local rules and regulations.
CONTACT
expondo Polska sp. z o.o. sp. k.