CK8000 - Multi-cooker Concept - Free user manual and instructions
Find the device manual for free CK8000 Concept in PDF.

User questions about CK8000 Concept
0 question about this device. Answer the ones you know or ask your own.
Ask a new question about this device
Download the instructions for your Multi-cooker in PDF format for free! Find your manual CK8000 - Concept and take your electronic device back in hand. On this page are published all the documents necessary for the use of your device. CK8000 by Concept.
USER MANUAL CK8000 Concept
PRODUCT ASSEMBLY WITH ACCESSORIES
PRODUKTMONTAGE MIT ZUBEHÖR
ASSEMBLAGE DU PRODUIT AVEC LES ACCESSOIRES
ASSEMBLAGGIO DEL PRODOTTO CON ACCESSORI
MONTAJE DEL PRODUCTO CON ACCESORIOS
ASAMBLAREA PRODUSULUI CU ACCESORII


concept
CZ
PODEKOVANI
Dekujeme Vam, ze jste zaukupil vryobek znacky Concept a prejeme Vam, abyste byll s naim vrobke mspokojeni po celou dobo jeho puzivani.
Pied pvrrn pouzitim prostudjue pozre cely navod k obsole a potom si je uchasejte. Zajistete, aby i ostinl osoby, tke budov s vrokem manipulovat, byly seznameni s timto navodem.
WSTEPNIE USTAWIONE PROGRAMM
Thank you for purchasing a Concept product. We wish you much joy with your new appliance every day you use it. Please read the instruction manual carefully before initial use. To refer to this manual any time you need to, we recommend you to keep it in a safe place. And please pass it to any future owner of the appliance.
| Technical specifications | |
| Voltage 220-240 V-50-60 Hz | |
| Input | 1000 W multifunction cooker 1500 W air fryer |
| Container capacity 5,6 l | |
| Adjustable temperature fryer: cooking 80-200 °C, drying 40-90 °C | |
| Timer | Pot: 1 min - 24 h fray: cooking 1 - 60 min, drying 1 - 12 h |
IMPORTANT
Before connecting to the mains, make a visual check to ensure that the unit is intact and that no damage occurred during transport.
IMPORTANT SAFETY PRECAUTIONS
- Do not use the appliance in any other way than as described in this manual.
- Remove all the covering and marketing materials from the appliance before the first use.
- Make sure the mains voltage corresponds to the values on the rating plate of the product.
- Place the appliance on a stable, flat surface away from other heat sources.
- When disconnecting the appliance from the wall outlet, never pull the power cord, grasp the plug end and disconnect it by removing it from the receptacle.
- Do not allow children or unauthorized people to handle the appliance, use it out of their reach.
- Persons with reduced mobility, reduced sensory perception, mental disadvantage or persons not familiar with the operation must use the appliance only under the supervision of responsible person, who is familiar with the instructions.
- Pay extra attention if the appliance is used near children.
- Do not use the appliance as a toy.
- Do not cover the appliance.

EN
concept
concept
- Before assembly and disassembly, disconnect the power cord from the wall outlet.
- Before cleaning and after use of the appliance, switch the appliance off and disconnect it from the mains.
- Keep the appliance clean, do not allow foreign objects to into the grid openings. It could cause serious injury, short circuit, damage to the appliance or cause fire.
- Do not use the appliance with a damaged cord or plug and have it repaired immediately by an authorized service centre.
- Do not use the appliance if it is not working properly, has been dropped, damaged or immersed in liquid. Have it checked and repaired by an authorized service centre.
- The appliance is only suitable for home use and is not intended for commercial use.
- Do not use the appliance outdoors.
- Use of an extension cord is not recommended as it may overheat and cause a fire hazard. If it is necessary to use an extension cord, make sure the electrical power is compatible with the appliance and the outlet is grounded.
- Do not move or shake the appliance during operation.
- Do not insert flammable materials (paper, plastic) into the appliance.
- Do not touch the appliance with wet hands.
- Do not immerse the power cord, plug or appliance in water or any other liquid. Do not pour water or other liquids on electrical components and connectors.
- Do not repair the appliance yourself. Contact an authorized service centre.
- This appliance can be used by children aged from 8 years and above and persons with reduced physical, sensory or mental capabilities or lack of experience and knowledge if they have been given supervision or instruction concerning the use of the appliance in a safe way and understand the hazards involved. Cleaning and maintenance performed by the user must not be carried out by children unless they are at least 8 years old and under supervision. Children aged under 8 years of age must be kept away from the appliance and its power cord. Do not let children play with the appliance.
-
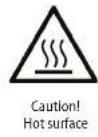
Do not touch hot surfaces.
-
Do not let the power cord hang freely over the edge of a table or kitchen unit. Do not let the power cord touch hot surfaces.
- Do not place the appliance near a gas or electric burner. Do not place the appliance on the hob. Make sure that the appliance is placed in a well-ventilated area away from hot surfaces, flammable materials (curtains, tablecloths) and damp environments.
- NOTICE: The surfaces of the appliance may be very hot. Hold the appliance only by the handle and use protective equipment such as kitchen gloves.
- Pay special attention to prevent water or other liquid from entering the appliance. This could cause an electric shock.
- Always place food in the basket of the appliance to prevent it coming into contact with the heating element.
- Never touch the inner surfaces of the appliance during operation or immediately after switching off. Allow the appliance to cool down sufficiently.
- Do not plug in or operate the appliance with wet hands.
Air fry lids: hot steam is released through the air outlets during cooking, keep your hands and face at a safe distance from the air outlets. - Pressure cooker lid: Beware of hot steam and air escaping from the pressure valve. Do not place your hands, face or any objects over the pressure hood outlet.
- Do not use the appliance if you have a pacemaker, hearing aid, etc. Consult your medical professional before using the appliance.
- Do not use accessories other than those recommended by the manufacturer.
- Do not connect the appliance to an external timer.
- Overheat protection: if the thermal fuse has reacted, the appliance will not operate. Unplug the appliance and wait until it has cooled completely before restarting.
- If you see dark smoke coming out of the appliance during operation, switch it off immediately and contact an authorized service centre.
- Before cleaning the appliance allow it to cool down for at least 30 minutes.
Damages from failure to follow the manufacturer's instructions (see safety precautions) are not covered by the warranty.

concept
concept

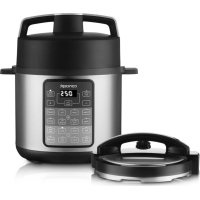
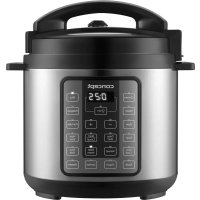
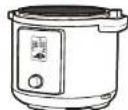
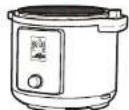
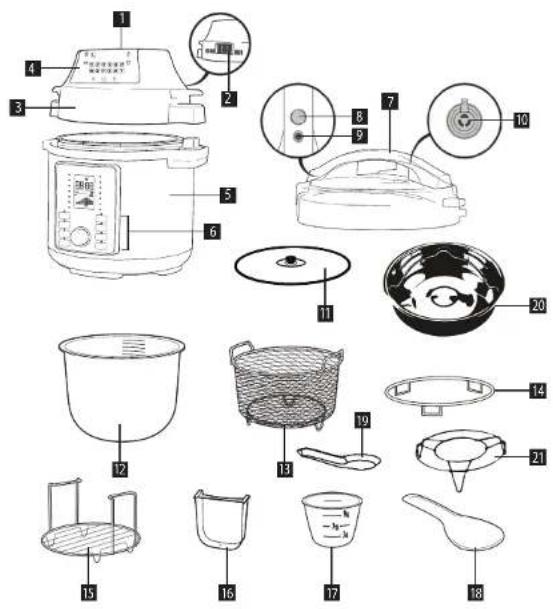
PRODUCT DESCRIPTION
1 Air supply
2 Air outlet
Hot air lid
4 Hot air lid display
5 Appliance body
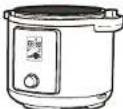
6 Control panel of the multifunction pot
7 Pressure cooker lid 2. lidocarbon aspirator
8Lid release button 1.2.1.3
9 Safety valve 10.5
10 Pressure valve
11 Glass lid
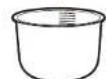
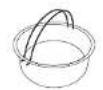
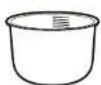
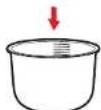
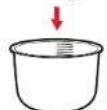
12 Inner container
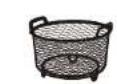
13 Frying basket
14 Lid rack
15 Stand with handles
16 Condensation container for excess water
17 Measuring cup
18. Shallow spoon
19 Deep spoon (ladle)
20. Steaming hot
26 Steamping pot 31
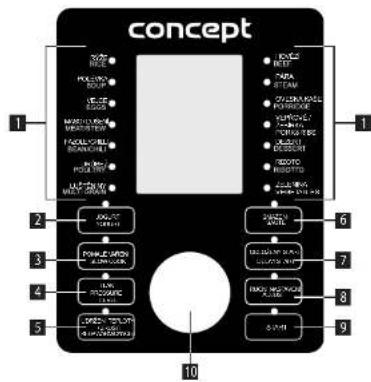
DESCRIPTION OF THE CONTROL PANEL OF THE MULTIFUNCTIONAL POT
1 Preset programs
2 Yochurt programme
3 Slow cooking
4 Low/high pressure setting
5 Temperature Hold/Cancel
6 Frying
7. Delayed start
8. Manual settings
8 Start
10 Control knob
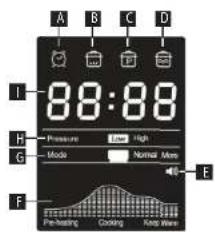
DISPLAY DESCRIPTION
A Delayed start indicator
B Preheat indicator
C Pressure Indicators
D Temperature hold indicator
Sound on/off indicator
F Progress indicator
G Mode indicator
H Pressure level indicator
Time and warning display
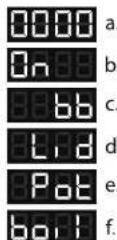
The following notifications may appear on the LED display:
a. The pot is ready to use, but the program has not been selected
b. The cooker is heating to the required temperature
c. The "Keep Warm" function - the cooker maintains the temperature
d. Lid is in the wrong position or missing
e. There is not an inner container in the cooker
f. boil, [cooking] appears in More mode for the Yoghurt programme
EN
concept
concept
EN
BEFORE FIRST USE
- Remove all packaging materials from the appliance.
- Remove all labels and stickers from the appliance.
- Wash the inner container (12) with hot water.
- Wipe the appliance thoroughly from the inside and outside with a cloth.
- Wash the accessories with hot water and soap and a non-abrasive sponge.
Note: Preheat the appliance for 10 minutes without any food. Harmless smoke and a slight odour may escape from the appliance. - Leave a minimum of 13 cm clearance around the appliance during operation.
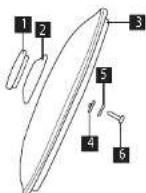
Assembling the glass lid
You can use the glass lid with the Slow Cook and Maintain Temperature functions. The assembly of the handle is shown in the picture.
1. Handle
2. Handle base
3. Glass lid body
4. Seal
5.Washer
6. Screw
OPERATING INSTRUCTIONS
USING THE COOKER WITH PRESSURE LID (7)
-
Place the appliance in a dry and level place.
-
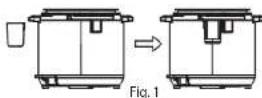
Place the condensation container for excess water (16)
on the back of the appliance, see Fig. 1
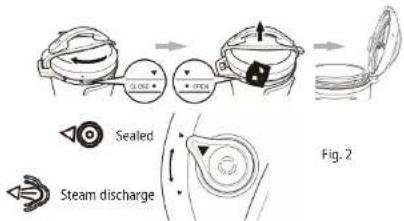
3.Prepare the pressure lid 7) as shown in the Fig.2.
Pull the metal protrusion on the underside of the lid to remove the protective cover on which the seal is fitted. The gasket can be removed and cleaned. Make sure that the seal is not damaged or torn anywhere. In case of damage, replacement is necessary. Make sure the float valve is clean and can move freely.
Note: if the pressure cooker lid has already been fitted to the appliance, remove it for preparation by pressing the red button and turning the handle anti-clockwise and lifting up.

-
Remove the inner container (12). The total volume of food and water should not exceed 2/3 of the volume of the inner container. If you will be cooking food that will increase in volume during cooking (e.g. rice), do not fill the container more than 1/2 full. Caution: Some foods such as applesauce, cranberries, oatmeal, noodles, rhubarb or spaghetti can foam and crack, clogging the pressure valve (outlet). These foods should not be cooked in the pressure cooker. Caution: do not use the pressure cooker for frying with oil.
-
Make sure the inner surface of the appliance body (5) is dry and place the inner container (12) into the appliance body (5).
-
Fit the pressure cover (7) and turn clockwise. When you hear a click, the lid is properly seated, Proper sealing of the lid is indicated by the aligned arrows on the edge of the lid and the edge of the appliance.
-
Please note that the pressure valve (10) must be freely movable for the pot to function properly.
-
Set the pressure valve to the 'Sealed' position, this makes the pot ready for use.
-
Plug the power cord into the appliance plug and then into a power outlet. The display will show "00 00".
-
Turn the control knob to scroll through the preset programmes (1) (additional programmes by pressing the corresponding programme button) or to adjust the cooking time. Confirm the selected programme (indicator lights up) with the Start button. To adjust the preset programme time, press the knob and turn to select the desired time and confirm by pressing the Start button.
Note: Press the Pressure setting button to switch between low and high pressure. The default setting is High Pressure. Adjust the pressure setting after selecting the program and cooking time, confirm the setting with the Start button. Press the Manual Settings button to select the quantity of food, switching between Less, Normal and More. The default setting is Normal.
Note: The cooking time should be adjusted according to the amount of food.
- The pot starts to heat up to the desired temperature (the display shows "On", the preheat icon is lit) and the float valve rises. Once it reaches the desired temperature, the set time starts counting down. At this point, you are already cooking under pressure (the pressure icon is lit), the lid is locked and the pot cannot be opened. NEVER TRY TO OPEN THE POT BY FORCE!
- When cooking is complete, an audible signal will sound and the cooker will automatically switch to "Keep warm" mode to keep the food warm. The display shows "bb" and the Keep Warm icon lights up.
- You can cancel the pot setting at any time by pressing the Keep Warm/Cancel button (5).
- Sound off: to change the sound mode, hold down the Keep Temperature/Cancel button for 3 seconds until the sound icon on the display changes. Safety warnings are always on.
When cooking is complete, the pressure can be released in two ways:
15-30 minutes. The float valve gradually drops, the lid unlocks and can be opened easily. If it cannot be opened, wait for a bit longer. NEVER OPEN THE COOKER BY FORCE!
2. To open the pressure cooker lid: grasp the handle and press the red button to release the lid, turn the lid counterclockwise until it releases and lift up with an upward pull. The lid can be placed on the lid rack (14).
3. When the cooking is finished, press the Hold Temperature/Cancel button (5), wear a pot holder and turn the float valve to the "Steam release" position, the float valve will drop, the lid will unlock and can be opened easily. BE VERY CAREFUL AND USE PROTECTIVE EQUIPMENT, RISK OF STEAM SCALING!
Delay Start function:
- Using the Delay Start function, you can delay the start of cooking by up to 24 hours.
- Follow the Instructions for use, turn the knob to select the desired program, then press the Delay Start button and press the button again to set the time you want to delay the start of cooking. The default setting for delayed start is 30 minutes.
- Then press the Start button. During delayed start, the delayed start icon lights up on the display and the remaining time is shown. After the set time has elapsed, the selected program starts.
Tips
- if you select Slow cooking, yoghurt or frying, you can use a pressure cooker with a lid, a glass lid or no lid. When used without a pressure cooker lid, the pressure level indicator disappears from the display.
- We recommend using the "Keep Warm" function for a maximum of 1 hour, after that the food will start to lose its quality.
EN
concept
concept
- The programs are pre-set to prepare food weighing less than 1200g . If you want to prepare larger portions, use your own custom setting.
- Use the Delay Start function only for foods that cannot spoil during this time.
- Insert and remove food into the inner container using wooden or plastic utensils, never use sharp or metal utensils to avoid damaging the surface of the container.
- Use of accessories:
- When selecting the Steam programme, insert the steaming rack (21) into the inner container (12) and then insert the steaming pot (20).
- When selecting the Fry programme, insert the steaming rack with handles (15) into the inner container (12).
- When selecting the Slow cooking, Yoghurt or Frying programme, the glass lid (11) can be used.
- When selecting the frying programme (when using the hot air lid), place the frying basket (13) in the inner container (12).
- Use the lid rack (14) to store the lids.
DESCRIPTION OF THE CONTROL PANEL OF THE HOT AIR LID
1. Digital display
- Temperature setting
- Timer setting
- Increase temperature/timer
- On/Off
- Decrease temperature/timer
- Programs
- Start/pause
- Preset program selection

USING THE COOKER WITH THE HOT-AIR LID (3)
The cooker with a hot-air lid uses hot air, never fill the cooker with oil or other frying medium.
- Place the appliance in a dry and level place.
- Plug the power cord into an electrical outlet.
- Make sure the inner surface of the appliance body (5) is dry and place the inner container (12) into the appliance body (5).
- Place the food in the inner container (12). Note: If you want to use the frying programme, place the frying basket (13) in the inner container and place the food in the basket. Do not overfill the frying basket (13) or the inner container (12).
- Place the hot air lid (3) to use the appliance as a hot air oven.
- Press the On/Off button (S) to switch on. The icons will light up and the display will show the default setting of 180 °C and 15 minutes.
- Press the preset programme selection button (9) to switch cooking presets. The selected program icon flashes and the display shows the preset temperature and program time. Press the button (9) repeatedly to switch to the next programme. To change the temperature setting, first press the temperature setting button (2)/to change the time setting, press the timer setting button (3) and then press or hold buttons 4 and 6 to adjust the temperature in 5^ intervals and the time in 1 minute intervals (only for the 30 minute drying programme).
- Confirm the selection with the Start/Pause button (8).
Note: If you start cooking when the appliance is still cold, extend the cooking time by about 2 minutes. During preheating, the display shows 'PREHEATING', after preheating it disappears from the display and only 'HEATING' is shown when the heating element is switched on.
Note: The fan icon in the top left corner lights up while the program is running. The icon will turn off when the fan stops working. -
You can pause the program at any time during cooking by pressing the Start/Pause button (B) and then pressing the button again to resume the cooking process.
-
At any time during cooking, you can remove the hot air lid (3) to check/add or remove food. The selected programme will be interrupted. When the lid is reinserted, the programme will resume where it was interrupted.
-
You will be alerted by an audible signal when the program is over and the display will only show "FINISHED" and the On/Off button (S) will flash.
-
When you have finished cooking, disconnect the appliance from the mains.
Notice: Wear oven gloves when removing the hot frying basket/internal container.
Tips
We recommend turning the food during cooking for even browning or stirring.
PRE-SET PROGRAMS
| Programmes for cooking using the pressure lid | |||
| Programs Quantity (adjust) Cooking time (min) | Possible time range | ||
| Rice Less | 8 | 1-99 min | |
| Normal | 12 | ||
| More | 15 | ||
| Soup | Less | 12 | 1-99 min |
| Normal | 15 | ||
| More | 20 | ||
| Eggs | Less | 4 | 1-99 min |
| Normal | 5 | ||
| More | 6 | ||
| Meat/Stewing | Less | 20 | 1-99 min |
| Normal | 35 | ||
| More | 45 | ||
| Beans/Chilli | Less | 25 | 1-99 min |
| Normal | 30 | ||
| More | 40 | ||
| Poultry | Less | 10 | 1-99 min |
| Normal | 15 | ||
| More | 25 | ||
| Legumes | Less | 20 | 1-99 min |
| Normal | 40 | ||
| More | 45 | ||
| Beef | Less | 30 | 1-99 min |
| Normal | 35 | ||
| More | 40 | ||
| Steam Less 12 1-99 min | |||
| Normal 15 | |||
| More 20 | |||
| Oatmeal porridge Less | 12 1-99 min | ||
| Normal 15 | |||
| More 20 | |||
| Pork/ribs Less 13 1-99 min | |||
| Normal 18 | |||
| More 25 | |||
| Dessert Less 25 1-99 min | |||
| Normal 40 | |||
| More 50 | |||
| Risotto Less 20 1-99 min | |||
| Normal 35 | |||
| More 45 | |||
| Vegetables Less 10 1-99 min | |||
| Normal 15 | |||
| More 20 | |||
| Frying Normal 30 30 min | |||
| Slow cooking Less 30 30 | 30 min - 9 h 30 min | ||
| Normal 6 h | |||
| More | 9 h 30 min | ||
| Yoghurt | Less 24 h | 6 h - 24 h | |
| Normal 8 h | |||
| More | "boil" | ||
| Programmes for cooking with a hot-air lid | |||||
| Programs | Temperature (℃) | Time | Adjustable temperature (℃) | Possible time range | |
| Frozen chips | 200 | 15 min | 80-200 | 1-60 min | |
| Fish | 160 | 15 min | 80-200 | 1-60 min | |
| Hamburger | 185 | 13 min | 80-200 | 1-60 min | |
| Pizza | 185 | 15 min | 80-200 | 1-60 min | |
| Beef steak | 175 | 25 min | 80-200 | 1-60 min | |
| Chicken legs | 200 | 22 min | 80-200 | 1-60 min | |
| Raw potato fries | 160 | 30 min | 80-200 | 1-60 min | |
| Whole chicken | 180 | 40 min | 80-200 | 1-60 min | |
| Drying | 80 | 2 hours | 40-90 | 1-12 hours | |
| Grilling | 160 | 10 min | 160 | 1-30 min | |
| Vegetables | 180 | 15 min | 80-200 | 1-60 min | |
| Defrosting | 50 | 5 min | 50 | 1-60 min |
Note: These settings are for guidance only. If you start cooking when the appliance is still cold, extend the cooking time by approx. 2 minutes.
CLEANING AND MAINTENANCE
Clean the appliance after each use.
Do not use coarse and chemically aggressive substances such as: sharp objects, scrapers, chemical solvents, thiners, etc.
- Before cleaning always disconnect the appliance from the mains. Never immerse the power cord, plug, appliance or hot air lid in water or other liquid!
Before cleaning the appliance allow it to cool down. - Wipe the outside of the appliance with a damp cloth.
- Fill the inner container with hot water and leave to stand for a while. Then it can be washed with a soft cloth in water with a detergent or in a dishwasher.
- Other parts of the appliance can be washed in water with a detergent.
Only the accessories and the inner container are dishwasher safe. - Once the parts are completely dry, assemble the appliance and store in a cool, dry place.
PROBLEM SOLVING
| Problem | Cause | Solution |
| The appliance is not working. | The appliance is not connected correctly. | Plug the appliance into a grounded socket. |
| Program or timer is not set. | Set the desired programme or timer. | |
| Lid not seated correctly. | Check that the lid is seated. | |
| The fried food is not ready. | Too much food. | Place smaller batches in the container/basket. |
| Cooking time set too short, temperature too low. | Extend cooking time, increase temperature. | |
| Food is fried unevenly. | Too large a batch of food, food lying on top of each other. | Remove some foods or shake/turn them in the middle of cooking. |
| Food not fresh or not prepared correctly. | Make sure you use fresh food and prepare it properly for frying (drizzle a few drops of oil). |
EN
concept
concept
DE
| Fried food is not crispy. | Some foods are better for use in a hot air fryer. | Use fresh food or semi-prepared foods. |
| A little oil is needed. Lightly drizzle the food with oil. | ||
| Food is moist. Dry the food before cooking. | ||
| White smoke coming from the appliance. | Food in the fryer is greasy. | This is not a defect. Dry the food of excess oil. |
| The container/basket still contains grease residue from previous use. | Clean the container/basket properly. | |
| Steam leaking around the pressure cooker lid. | The seal is not seated properly. | Stop cooking, remove the lid and check the seal for seating. |
| The pressure valve (outlet) is blocked. Clean the valve. | ||
| Steam leaking from the pressure valve. | The pressure valve (outlet) is not properly sealed. | Carefully close the valve. |
SERVICE
Extensive maintenance or repair, which requires access to internal parts of the product, has to be performed by a qualified service centre.
ENVIRONMENTAL CONCERNS
- Packaging materials and old appliances should be recycled.
- Packaging materials may be disposed of as sorted waste.
- Dispose the plastic bags made of polyethylene (PE) of as sorted waste.
Recycling of the appliance at the end of its lifespan

This appliance is labelled in accordance with European Directive 2012/19/EU concerning used electrical and electronic appliances (Waste Electrical and Electronic Equipment - WEEE). The symbol on the product or on its packaging indicates that this product may not be treated as household waste. Instead, it should be taken to the appropriate collection point for the recycling of electrical and electronic equipment. By ensuring this product is disposed of correctly, you will help prevent potential negative consequences for the environment and human health, which could otherwise be caused by inappropriate waste handling of this product. The disposal of such material has to be done according to the recycling regulations. For more detailed information about recycling of this appliance see the authorized local office or service for household waste disposal or the shop, where you purchased the appliance.

The product meets all the necessary requirements of the EU directives applicable to the specific product.
Changes in text, design, and technical specifications are subject to change without notice and we reserve the right to change them.
DANKSAGUNG

Attention! Surface chaude
IMPORTANT
12 Recipiente interior