306810 - Irrigation timer Brandson - Free user manual and instructions
Find the device manual for free 306810 Brandson in PDF.
| Product type | Automatic watering timer |
| Brand | Brandson |
| Model | 306810 |
| Main power supply | 5V DC 1A via USB cable (micro-USB) |
| Backup power supply | 4 AA 1.5V batteries (not included) |
| Maximum water flow | 0.4 L/min |
| Water pressure | 0.3 bar |
| Included hose length | 10 m |
| Hose inner diameter | 0.4 cm (0.17 inch) |
| Operating temperature range | 0 °C to 50 °C |
| Adjustable watering duration | From 20 seconds to 30 minutes |
| Adjustable watering frequency | Every 1 to 23 hours or every 1 to 7 days |
| Adjustable start delay | From 0 to 24 hours |
| Manual watering mode | Yes (long press OK) |
| Emergency water stop | Yes (press OK) |
| Number of outputs | 1 (4 mm connector) |
| Included accessories | Hose, water filter, check valve, connectors (straight, T, cross), micro-dripper, end cap, removable holder |
| Protection rating | Not waterproof, indoor or sheltered use |
| Dimensions (approx.) | Approx. 12 x 8 x 5 cm |
| Weight (approx.) | Approx. 200 g (without batteries) |
Frequently Asked Questions - 306810 Brandson
User questions about 306810 Brandson
0 question about this device. Answer the ones you know or ask your own.
Ask a new question about this device
Download the instructions for your Irrigation timer in PDF format for free! Find your manual 306810 - Brandson and take your electronic device back in hand. On this page are published all the documents necessary for the use of your device. 306810 by Brandson.
USER MANUAL 306810 Brandson
ENG: Current drivers, user manuals and other relevant documents for this product can be found on our homepage.
Thank you for purchasing a BRANDSON product. Please read the following brief instructions carefully so that you can enjoy your purchased appliance. Before using the delivered goods, check that they are complete, faultless and undamaged.
1. Scope of delivery
Water Computer + Accessories
- Quick guide
2. Technical data
| Power supply | • 5V DC 1A via USB • 4x 1.5V AA batteries |
| Inlet 4mm | |
| Outlet 4mm | |
| Water flow up to 0.4 litres / min | |
| Water pressure 0.3 Bar | |
| Hose Length: 10m; Inner diameter: 0.17 inch (0.4cm) | |
| Working temperature 0°C-50°C (37°F - 122°F) | |
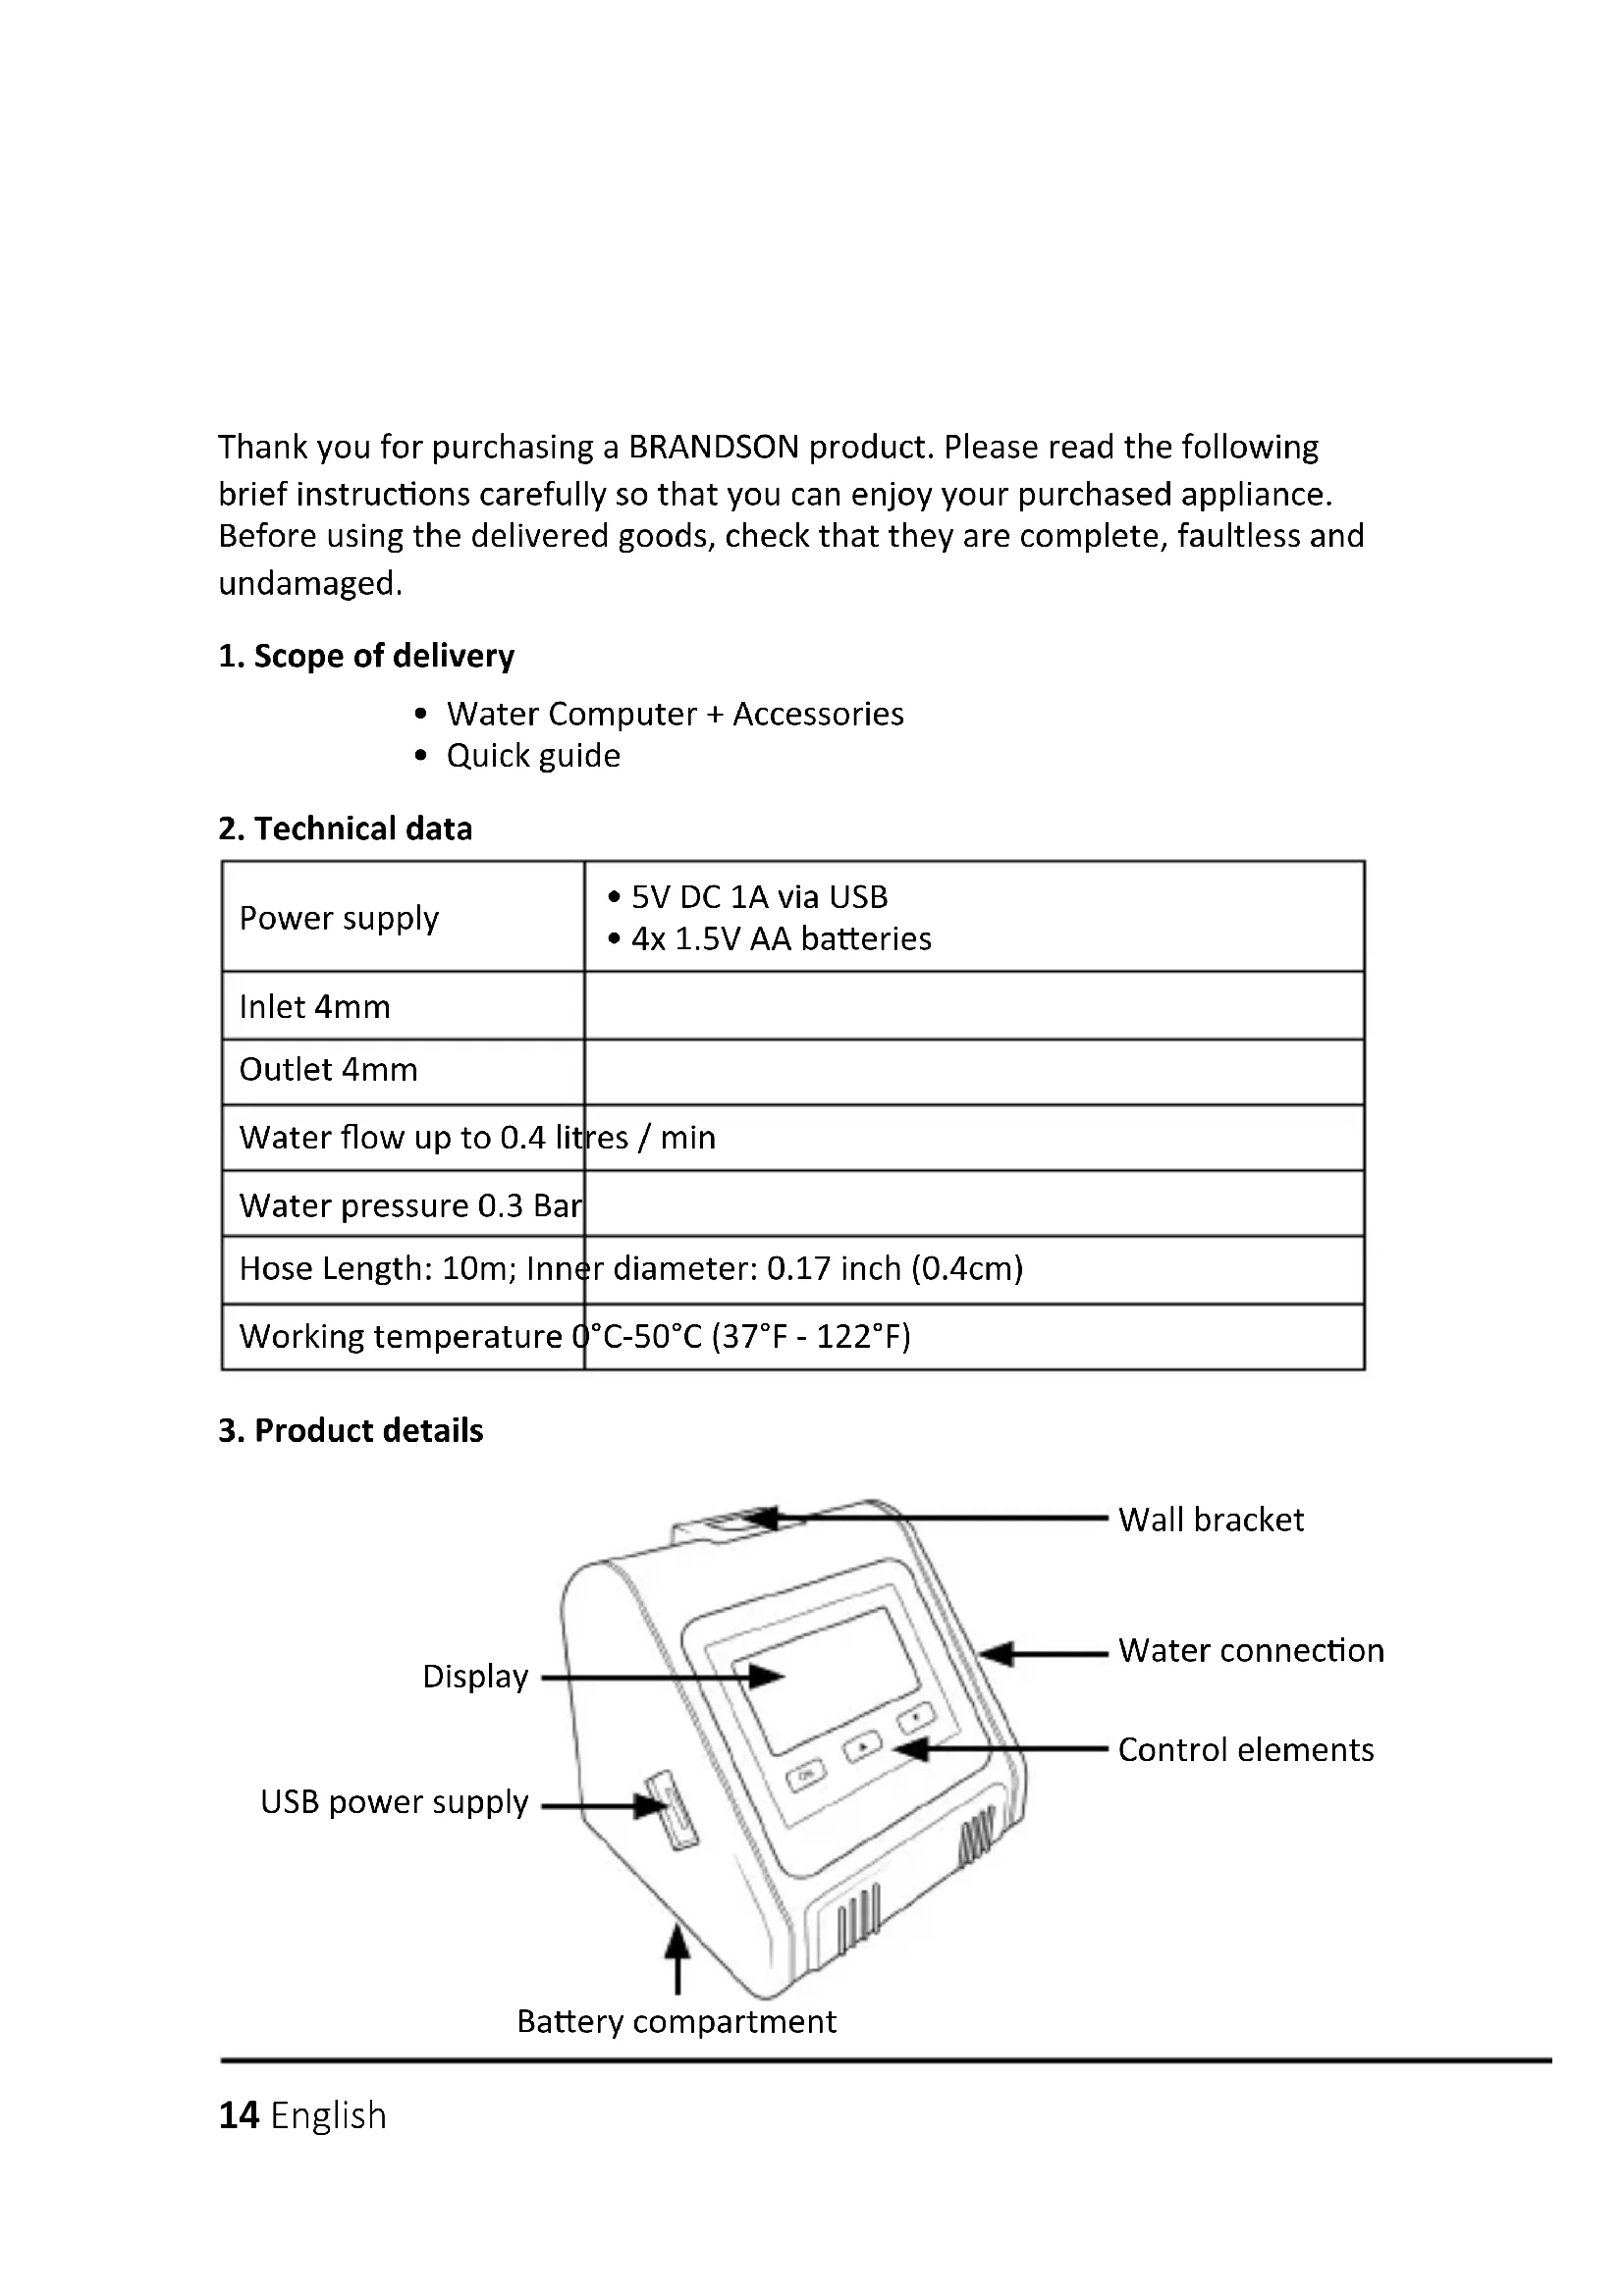
3. Product details
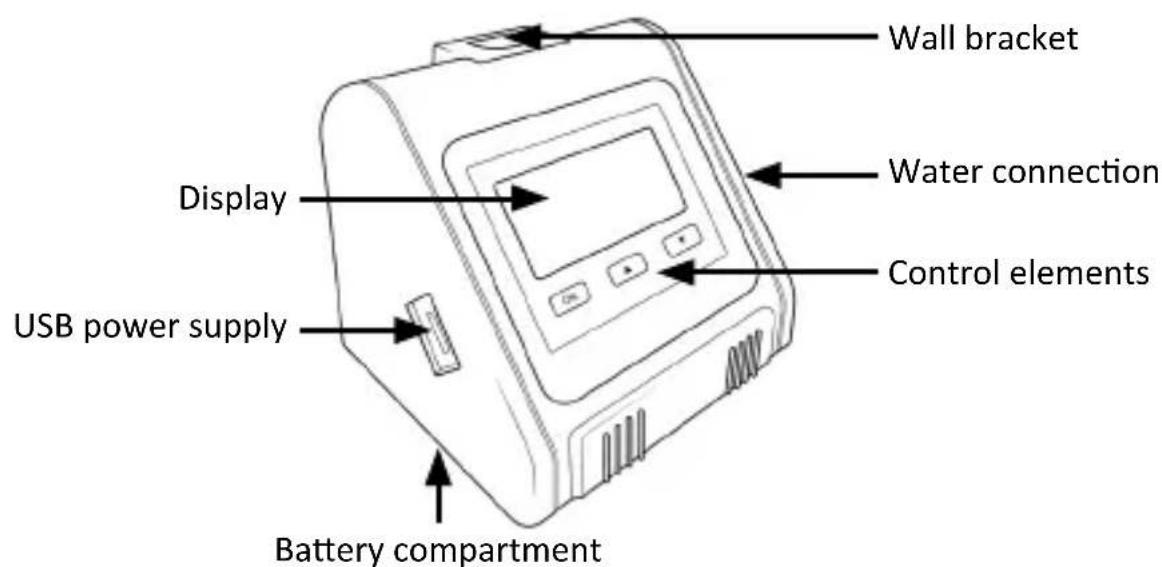
14 English
4. Additional information for this device
Do not mix alkaline, standard (carbon-zinc) or rechargeable (nickel-cadmium) batteries. Used or empty batteries must be removed from the device and disposed of properly.
5. Description of accessories
| USB cable For the power supply | ||
| Hose Water transport | ||
| Water filter For filtering the water | ||
| End cap for the water pipe | To stop the water flow at the end of the hose | |
| Cross connector | For connecting the water pipes in a cross shape | |
| Detachable bracket | Can be attached to the pump to hang it up | |
| Valve connector | for connecting the water pipes. The valve can be closed to stop the water flow | |
| Micro dripper | Is inserted into the soil to water the root directly | |
| Straight con- nector | For connecting the water pipes | |
| T-piece connector | For connecting the water pipes | |
| Non-return valve | Prevents water from backing up in the water pipe back to the pump |
6 Display and key description
6.1 Key description
| OK | • Press and hold for approx. 3 seconds to start manual watering mode. • Press briefly to enter the setting mode for the watering cycles: HOW LONG (how long) -> HOW OFTEN (how often) -> DELAY |
| ▲ | UP button: Adjustment upwards, press and hold the button for quick adjustment |
| ▼ | DOWN button: Adjustment downwards, press and hold the button for quick adjustment |
6.2 Symbol descriptions
| Irrigation active | |
| Not enough water in the tank | |
| Manual mode | |
| USB power supply connected | |
| Low battery level |
7. Commissioning
Remove the device from the packaging and remove all packaging material.
Open the battery compartment and insert 4x 1.5V AA batteries. Always ensure that the polarity of the contacts is correct. Then close the battery compartment again.

Note: Make sure that the battery compartment is properly closed. When the device is not in use, please remove the batteries from the device and store them properly. Empty batteries must be removed from the device.
As an alternative to battery operation, you can use the device with the USB cable. Ensure that the voltage of the power supply does not exceed the voltage shown on the rating plate. If the device is supplied with power via USB, the corresponding symbol lights up on the display.
Note: As soon as batteries are inserted and the USB cable is also connected to the device and a suitable USB power supply unit, the USB connection is prioritised. As soon as the cable is disconnected from the device, battery-powered mode is activated.
8. Set watering cycle (automatic watering)
HOW LONG

Press the "OK" button to access the settings for the watering cycle. Set the desired watering duration using the "UP" and "DOWN" buttons. You can set the watering duration between 20s and 30 min. Once you have set the watering duration, press the "OK" button to confirm the settings.
HOW OFTEN

You can then set the frequency of how often the device should water using the "UP" and "DOWN" buttons. You can set the frequency between 1 hour - 23 hours and between 1 day - 7 days. Once you have set the watering duration, press the "OK" button to confirm the settings.
DELAY

You can then set the delay before the appliance starts watering. Use the "UP" and "DOWN" buttons to set the delay. The delay can be set between 0 hours (no delay) - 24 hours. Confirm the entry with the "OK" button. For example, if it is 7 o'clock and you want to start the cycle at 10 o'clock, set the delay to 3 hours.
9. Installing the pump
Caution! Ensure that the pump is not installed below the water level. Make sure that the height between the plants and the pump does not exceed 2.5 metres under any circumstances, otherwise the performance of the pump may be considerably reduced.
When installing the pump, make sure that the filter is in the water tank and that the hose is fully connected to every connected object (e.g. connectors, valves or micro drippers) to prevent water leaks.
9.1 Installation diagram
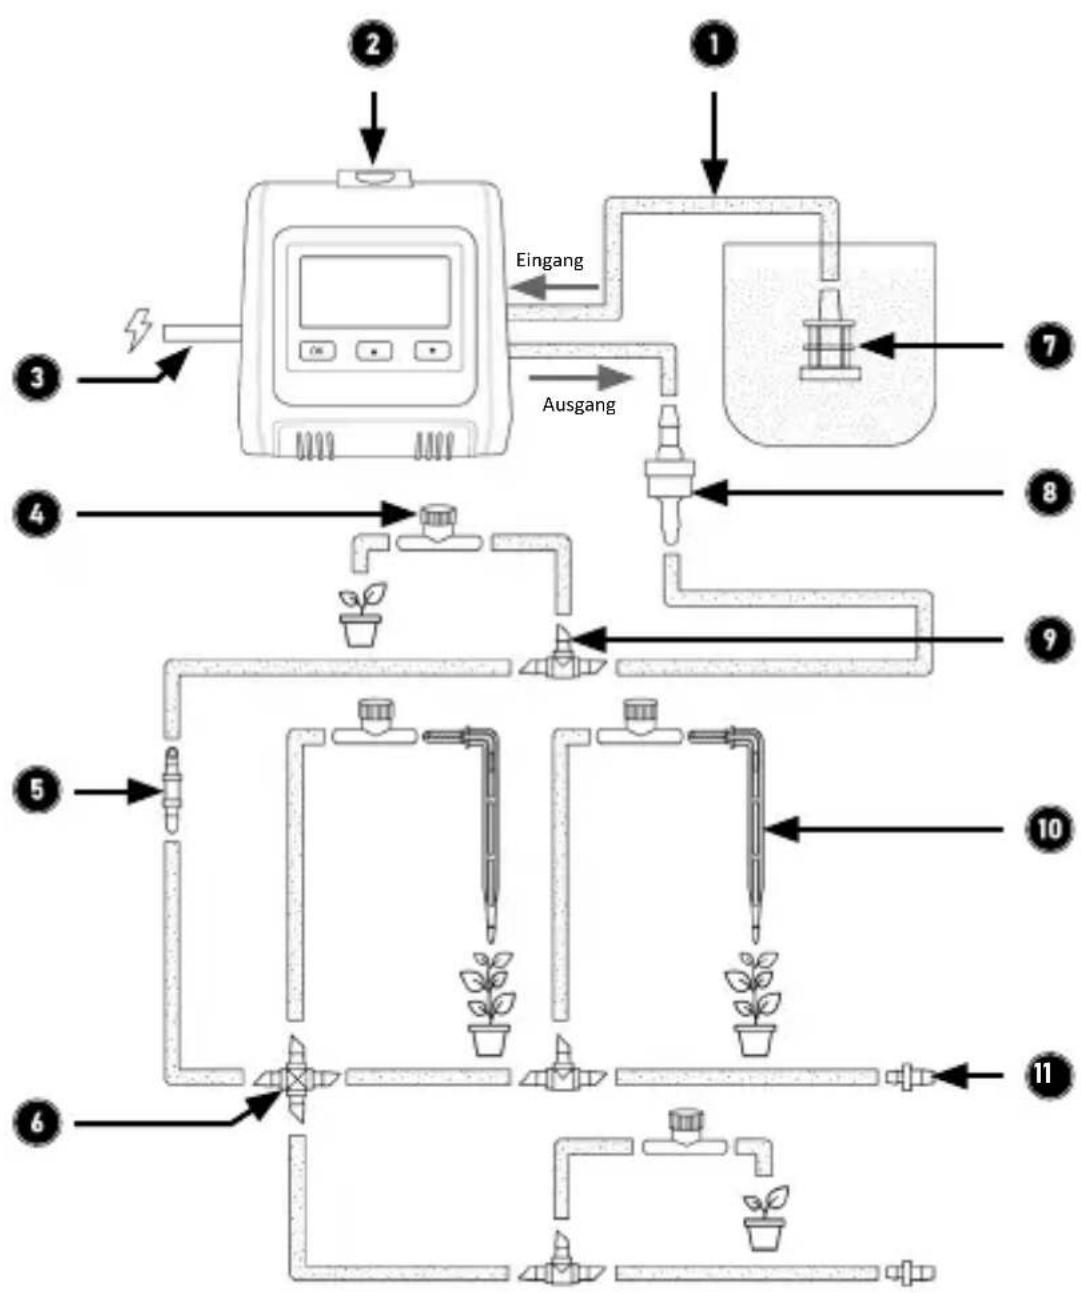
| No. Description |
| 1 Hoses |
| 2 Watering computer |
| 3 Power supply (5V DC 1A via microUSB) |
| 4 Valve connector |
| 5 Straight connector |
| 6 Cross connector |
| 7 Water filter |
| 8 Non-return valve |
| 9 T-piece connector |
| 10 Micro dripper |
| 11 End cap for the water pipe |
10. Connect hose
- Cut the hose according to the distances to the respective plants.
- Dip the ends of the individual hose pieces in hot water for about 10 seconds or apply a little vegetable oil to them to make it easier to attach the hose to the valve and/or end pieces.
- Connect the hose to the water connection and outlet of the Water Computer.
- Connect the non-return valve (8) to the water outlet near the Water Computer. Ensure that the non-return valve is installed in the correct direction.
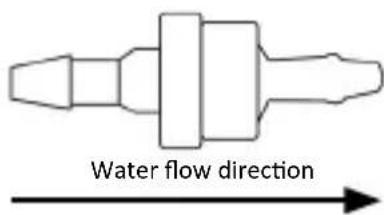
Correct installation direction (the thick side of the non-return valve must face the direction of water flow)
- Plug one end of the hose for the inlet into the water filter(7) and the other end into the inlet connection of the Water Computer (the upper hose connection (IN))
- Then connect the hoses to the plants using the appropriate connectors. If you want to use a micro dripper(10) and thus deliver water directly to the soil in the roots, you must install the micro dripper(10) at the end of the corresponding water pipe.
- If you have an open water pipe that does not water a plant, please install an end cap(11) to prevent the water from leaking.
11. Manual watering
The device offers you the option of watering manually without interrupting the programmed schedule. Manual watering is used to test the device or to run an additional watering cycle in an area. Press and hold the "OK" button for about 3 seconds to activate manual watering. Briefly press the "OK" button to cancel manual watering again.
12. Stop water flow
You can stop the water flow at any time, either during manual watering or during a programmed time. Press the "OK" button once to stop watering.
13. Troubleshooting
| Error Possible cause of | error/troubleshooting |
| Uneven water flow | Too great a distance from the pots and the water tank or pipes that are too long can reduce the pump's delivery capacity. The further away the objects to be watered are, the weaker the water flow will be at the end of the corresponding pipe. |
| Inserting or removing removal of water pipes is difficult | You can use a little vegetable oil to get the hose onto the connectors or valves better. Alternatively, you can dip the end of the hose in hot water for approx. 10 seconds. |
| Irrigation schedule Irrigation is delayed or irrigation is cancelled | • Check the water level in the water tank. If there is insufficient water, the pump may no longer be able to pump water out of the tank. Top up the water tank. • Check the set watering schedule. Create a new watering schedule if necessary. |
14. Safety instructions and disclaimer
Never attempt to open the appliance to carry out repairs or modifications. Avoid contact with the mains voltage. Do not short-circuit the product. The device is not waterproof, please only use it in dry conditions. Protect it from high humidity, water and snow. Keep the device away from high temperatures. Do not expose the device to sudden temperature changes or strong vibrations, as this could damage the electronic parts. Check the device for damage before use. The appliance should not be used if it has been knocked or damaged in any other way. Please observe the national regulations and restrictions. Do not use the device for purposes other than those described in the instructions. This product is not a toy. Keep it out of the reach of children or mentally impaired persons. Any repair or modification to the appliance that is not carried out by the original supplier will invalidate the warranty or guarantee. The appliance may only be used by persons who have read and understood these instructions. The device specifications may change without prior notice.
15. Disposal instructions
According to the European WEEE Directive, electrical and electronic devices may not be disposed of with household waste. Their components must be recycled or disposed of separately, as toxic and hazardous components can cause lasting damage to the environment if disposed of incorrectly. As a consumer, you are obliged under the Electrical and Electronic Equipment Act (ElektroG) to return electrical and electronic equipment free of charge at the end of its life to the manufacturer, the point of sale or to public collection centres set up for this purpose. Details are regulated by the respective state law. The symbol on the product, the operating instructions and/or the packaging refers to these regulations. By separating, recycling and disposing of old appliances in this way, you are making an important contribution to protecting our environment.
16. Notes on battery disposal
In connection with the sale of batteries or with the delivery of devices containing batteries, the supplier is obliged to inform the customer of the following:
The customer is legally obliged to return used batteries as the end user. He can return used batteries, which the supplier carries or has carried as new batteries in his range, free of charge to the supplier's dispatch warehouse (dispatch address). The symbols shown on the batteries have the following meaning: Pb = battery contains more than 0.004 per cent lead by mass, Cd = battery contains more than 0.002 per cent cadmium by mass, Hg = battery contains more than 0.0005 per cent mercury by mass.

The crossed-out dustbin symbol means that the battery must not be disposed of with household waste.

WEEE Directive 2012/19/EU
WEEE Register No.: DE 67896761
Hereby, WD Plus GmbH declares that the device 306810 is in compliance with the essential requirements and other relevant provisions. You can obtain a complete declaration of conformity from WD Plus GmbH, Wohlenbergstraße 16, 30179 Hannover, Germany, or at the following Internet address: https://model.ganziinfach.de/306810
(IT) +49511/13221740
(ES) +49511/13221750
MO-FR 9:30am - 18pm CET

brandson-equipment.de
WD Plus GmbH