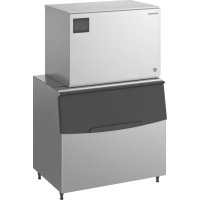
FM1200ALKER452NSB - Ice Maker Hoshizaki - Free user manual and instructions
Find the device manual for free FM1200ALKER452NSB Hoshizaki in PDF.

User questions about FM1200ALKER452NSB Hoshizaki
0 question about this device. Answer the ones you know or ask your own.
Ask a new question about this device
Download the instructions for your Ice Maker in PDF format for free! Find your manual FM1200ALKER452NSB - Hoshizaki and take your electronic device back in hand. On this page are published all the documents necessary for the use of your device. FM1200ALKER452NSB by Hoshizaki.
USER MANUAL FM1200ALKER452NSB Hoshizaki
IJSMACHINE MET LOSSE OPSLAGBUNKER
INSTRUCTION MANUAL (original instructions)
Throughout this manual, notices appear to bring your attention to situations which could result in death, serious injury, or damage to the unit. WARNING Indicates a hazardous situation which, if not avoided, could result in death or serious injury. CAUTION Indicates a hazardous situation which, if not avoided, could result in minor or moderate injury. NOTICE Indicates a hazardous situation which, if not avoided, could result in damage to the unit. HYGIENE Indicates important precautions for hygiene and food safety. IMPORTANT Indicates important information about the use and care of the unit. IMPORTANT This booklet is an integral and essential part of the product and should be kept and preserved by the user. Please read carefully the guidelines and warnings contained herein as they are intended to provide the user with essential information for the continued safe use and maintenance of the product. In addition, it provides GUIDANCE ONLY to the user on the correct services and site location of the icemaker. Please preserve this booklet for any further consultation that may be necessary. WARNING This is a commercial icemaker, and should be destined only to be used for the purpose for which it has been expressly designed and attached to a suitable storage bin as specied by Hoshizaki. Any other use should be considered improper and therefore dangerous. The manufacturer will not be held liable or responsible for any damage caused by improper, incorrect and unreasonable use. The installation, and relocation if necessary, must be carried out by qualified personnel, in accordance with current regulations, according to the manufacturer’s instructions. Keep ventilation openings, in the appliance enclosure or in the built-in structure, clear of obstruction.ENGLISH
The use of any electrical appliance involves the observance of some fundamental rules. In particular:
- Instances of high humidity and moisture increase the risk of electrical short circuits and potential electrical shocks. If in doubt, disconnect the icemaker.
- Do not damage the power cord or pull it in order to disconnect the icemaker from the electrical supply network.
- If the supply cord is damaged, it must be replaced by a replacement cord available from Hoshizaki Parts/Service Centres.
- Do not touch the electrical parts or operate the switches with damp hands.
- This appliance is not intended for use by persons (including children) with reduced physical, sensory or mental capabilities, or lack of experience and knowledge, it can however be used by children aged from 8 years and above and persons with reduced physical, sensory or mental capabilities, or lack of experience and knowledge providing they have been given supervision or instruction concerning use of the appliance by a person responsible for their safety.
- Children shall not play with the appliance.
- Cleaning and user maintenance shall not be made by children without supervision.
- Do not attempt to modify the icemaker. Only qualied personnel may disassemble or repair the appliance.ENGLISH
1. This icemaker is not intended for outdoor
use. Normal operating ambient temperature should be within 5°C to 40°C. Water connection is cold water only. Operation of the icemaker, for extended periods, outside of these normal temperature ranges may aect production capacity.
2. The icemaker should not be located next to
ovens, grills or other high heat producing equipment.
3. The location should provide a rm and level
foundation for the equipment.
4. Allow 15 cm clearance at rear and sides for
proper air circulation and ease of maintenance and/or service should they be required. Allow 60 cm clearance on top to allow for removal of the auger.
5. This appliance is not suitable for installation
in an area where a water jet could be used and where dripping is not allowed.
6. Do not place anything on top of the icemaker
or in front of the louver.
This icemaker requires an earth that meets the national and local electrical code requirements. To prevent possible severe electrical shock to individuals or extensive damage to equipment, install a proper earth wire to the icemaker. Disconnect the main power supply before any maintenance, repairs or cleaning is undertaken.
- This appliance requires a separate 220 - 240VAC, 12A supply. The electrical supply must be protected by a suitable circuit breaker.
- Usually an electrical permit and services of a licensed electrician are required. For the U.K. and the Republic of Ireland only
- The wires in the mains lead are coloured in accordance with the following code: Green & Yellow = Earth Blue = Neutral Brown = Live As the colours of the wire in the mains lead of this appliance may not correspond with the coloured markings identifying the terminals in your plug, proceed as follows: The wire which is coloured Green-and-Yellow must be connected to the terminal in the plug which is marked with the letter E or by the symbol or coloured Green or Green-and-Yellow. The wire which is coloured Blue must be connected to the terminal which is marked with the letter N or coloured Black. The wire which is coloured Brown must be connected to the terminal which is marked with the letter L or coloured Red.
- Should the socket outlets in the installation site not be suitable for the plug supplied with your product, the plug must be removed (cut o if it is moulded on plug) and an appropriate plug tted. If the non-rewirable plug has been cut from the power supply cord, it must be disposed of. There should be no attempt to reuse it. Inserting such a plug into a socket elsewhere presents a serious risk of electrical shock.
- The non-rewirable plug must never be used without a fuse cover being tted. The correct replacement for the detachable fuse cover is identifiable from the manufacturer’s reference number stamped on the plug. Supply of replacement fuse covers can be obtained from Hoshizaki Parts/Service Centres. Fuses should be rated at 12A and approved to BS 1362.
3. WATER SUPPLY AND DRAIN
CONNECTIONS WARNING Connect to potable cold water supply only.ENGLISH
Note: A plumbing permit and services of a licensed plumber may be required in some areas.
- The connections to the mains water supply must be made in accordance with the countries’ current requirements of the Water Supply or Water Fittings Regulations.
- Icemaking water must be potable water. Where scaling can be caused by water quality, installation of an external lter or softener is recommended. Contact your local water treatment professional or Hoshizaki service agent.
1. This icemaker is designed to produce and
store edible ice. To keep the icemaker hygienic:
- Wash your hands before removing ice. Use the plastic scoop provided (accessory).
- The storage bin is for ice use only. Do not store anything else in the bin.
- Clean the storage bin before use (see “III.
- Keep the scoop clean. Clean it by using a neutral cleaner and rinse thoroughly.
- Close the door after removing ice to prevent entrance of dirt, dust or insects into the storage bin.
2. All parts are factory-adjusted. Improper
adjustments may result in failure.
3. If the unit is turned o, wait for at least 3
minutes before restarting the icemaker to prevent damage to the compressor.
The installer will normally commission the icemaker to start the automatic icemaking process. To ensure continuous operation, make sure that:
- The water supply tap is on, and
- The icemaker is connected to the power supply. To start the icemaking process, check the position of the operation switch on the operation panel: “OFF” position - Move it to the “ON” position. “ON” position - Press the ice button.
Press the stop button on the operation panel. The “STOP” and “DRAIN” modes light up on the display. Then, only the “DRAIN” mode goes o.
1) Follow the instructions in “2. SHUT DOWN”.
2) Close the water supply line shut-o valve.
3) Open the drain valve.
4) Press the ice button on the operation panel to drain
5) When no more water comes out of the drain valve,
press the stop button.
6) Move the operation switch to the “OFF” position,
and disconnect the power supply.
7) Close the drain valve.
8) Remove all ice from the storage bin, and clean the
bin. Fig. 1 Operation Panel Ice Button Display Stop Button Maintenance Button (service use only) Operation SwitchENGLISH
1. Before carrying out any cleaning or
maintenance operations, disconnect the icemaker from the electrical supply network.
2. Ask a trained service person to check and
clean the condenser at least once a year.
3. This appliance must not be cleaned by use
the plastic parts with water above 40°C or in a dishwasher. [1] Machine and Bin Exterior Wipe the exterior at least once per week with a clean, soft cloth. Use a damp cloth containing a neutral cleaner to wipe o grease or dirt. [2] Scoop Cleaning/Sanitisation (Daily)
1) Either mix 1 litre of water with 4 ml of 5.25% sodium
hypochlorite solution in a suitable container, or the recommended Hoshizaki sanitiser as directed.
2) Soak the scoop in the solution for more than 3
minutes. Rinse thoroughly, and shake to remove surplus liquid. Note: Using a cloth to dry may re-contaminate. [3] Storage Bin Interior Cleaning/Sanitisation (Weekly)
1) Open the storage bin door, and remove all ice.
2) Remove the thumbscrews securing the bae.
3) Remove the bae from the bin.
4) Wash the bin liner and bae with a neutral non-
abrasive cleaner. Rinse thoroughly.
5) Either mix 5 litres of water with 18 ml of 5.25%
sodium hypochlorite solution in a suitable container, or the recommended Hoshizaki sanitiser as directed.
6) Soak a clean sponge or cloth with the solution and
wipe the bin liner surfaces and bae.
7) Ret the bae and thumbscrews. Wipe the surface
of the bin door and thumbscrews with the solution. Close the bin door.
8) The remaining solution can be used to sanitise
utensils. Note: Do not wipe dry or rinse after sanitising, but allow to air dry. [4] Storage Bin Door Clean the storage bin door at least once a week, using a neutral non-abrasive cleaner. Rinse thoroughly after cleaning and sanitise as required.
2. INSPECTION AND MAINTENANCE
IMPORTANT To achieve optimum icemaker performance, the following parts need periodic inspection and maintenance: Extruding head (upper bearing) Housing (lower bearing) Mechanical seal [1] Inspection These parts should be inspected after two years from installation or 10,000 hours of operation, whichever comes rst, and once a year afterwards. Replacement of these parts is required if wear exceeds factory recommendations. Their service life, however, depends on water quality and environment. More frequent inspection and maintenance are recommended in bad or severe water conditions. Consult with your local Hoshizaki service agent about inspection and maintenance service. [2] Replacement The extruding head (upper bearing) and mechanical seal must be replaced after four years from installation or 20,000 hours of operation, whichever comes rst, to prevent the risk of serious accidents or failures. Contact your local Hoshizaki service agent for replacement.ENGLISH
When the total operating time reaches 20,000 hours, the display ashes “PC”. Then, after 500 hours, the unit shuts down to ensure safety. Contact your local Hoshizaki service agent for replacement as soon as the display starts ashing. Once the unit shuts down after 500 hours, the operation can be resumed by turning o the operation switch and turning it back on. But the unit shuts down again after 500 hours. To resume the operation, contact your local Hoshizaki service agent for the required replacement. Replacement of the housing (lower bearing) may be required depending on water quality and wear condition.
WARNING Do not damage the refrigerant circuit. [1] Error Code Indication If the error code “E” is indicated on the display, before calling for service, check the following. Code Remedy E0 Possibility of water leaks. Turn OFF operation switch, and turn it ON again. If error code appears again, call for service.
Low ice production. Turn OFF operation switch, and turn it ON again. If error code appears again, call for service.
Water supply circuit failure. Turn OFF operation switch, and turn it ON again. If error code appears again, call for service.
Gear motor failure. Turn OFF operation switch, and turn it ON again after 10 minutes. If error code appears again, call for service.
Electric circuit failure. Turn OFF operation switch, and turn it ON again. If error code appears again, call for service.
Compressor could be overheated. Check that icemaker is properly installed according to installation manual. Turn OFF operation switch, and turn it ON again after 10 minutes. If error code appears again, call for service.
Electric circuit failure. Turn OFF operation switch, and turn it ON again. If error code appears again, call for service.
Electric circuit failure. Turn OFF operation switch, and turn it ON again. If error code appears again, call for service.
Electric circuit failure. Turn OFF operation switch, and turn it ON again. If error code appears again, call for service.
Gear motor failure. Turn OFF operation switch, and turn it ON again. If error code appears again, call for service.
Supply voltage is too low. Check that voltage is in required range and icemaker is not sharing a single receptacle with other appliances. Turn OFF operation switch, and turn it ON again. If error code appears again, call for service.
Electric circuit failure. Turn OFF operation switch, and turn it ON again. If error code appears again, call for service.
Bin control switch has failed. Turn OFF operation switch, and turn it ON again. If error code appears again, call for service.
Electric circuit failure. Turn OFF operation switch, and turn it ON again. If error code appears again, call for service.
Controller board failure. Turn OFF operation switch, and turn it ON again. If error code appears again, call for service. [2] No Error Code Indication If the icemaker does not work properly or does not work at all and no error code is indicated on the display, before calling for service, check that:
- The power is supplied to the unit.
- The water is turned on. For further assistance or advice, contact your local Hoshizaki service agent.
Hoshizaki warrants to the original owner/user that all Hoshizaki branded products shall be free of defects in material and/or workmanship for the duration of the “warranty period”. The warranty shall be eective for two years from the date of installation. Hoshizaki’s liability under the terms of the warranty are limited and shall exclude routine servicing, cleaning, essential maintenance and/or repairs occasioned by misuse and installations not in accordance with Hoshizaki guidelines. Warranty repairs should be completed by an approved Hoshizaki dealer or service agency using genuine Hoshizaki components. To obtain full details of your warranty and approved service agency, please contact your dealer/supplier, or the nearest Hoshizaki Service oce: Europe, Middle East, Africa Hoshizaki UK - UK, Ireland TEL: +44 845 456 0585 FAX: +44 132 283 8331 uksales@hoshizaki.uk Hoshizaki Deutschland - Germany, Switzerland, Austria, Poland, Czech Republic, Slovakia TEL: +49 5121 697370 FAX: +49 5121 6973719 vertrieb@hoshizaki.deENGLISH
Comply with local regulations regarding disposal of this appliance and its refrigerant gas. Before you scrap the appliance, take o the door to prevent children trapped. Correct disposal of this product: This marking indicates that this product should not be disposed with other household wastes throughout the EU. To prevent possible harm to the environment or human health from uncontrolled waste disposal, recycle it responsibly to promote the sustainable reuse of material resources. To return your used device, use the return and collection systems or contact the retailer where the product was purchased. They can take this product for environmental safe recycling. This product includes a hermetically sealed refrigeration system that contains uorinated greenhouse gases: R404A / GWP 3920 / 0.03kg / CO2 0.118t R452A / GWP 2140 / 0.03kg / CO2 0.065tFRANÇAIS