
KM60CHC - Ice Maker Hoshizaki - Free user manual and instructions
Find the device manual for free KM60CHC Hoshizaki in PDF.

| Product type | Professional ice machine |
| Brand | Hoshizaki |
| Model | KM60CHC |
| Ice type | Half-moon ice cubes |
| Ice production (per 24h) | 60 kg (ambient temp. 10 °C, water 10 °C) |
| Power supply | 1 phase, 220-240 V, 50 Hz |
| Power consumption | 242 W |
| Dimensions (W × D × H) | 605 × 610 × 988 mm |
| Net weight | 45 kg |
| Refrigerant | R290 (propane), 90 g |
| Ambient operating temperature | 7 °C to 38 °C |
| Water supply temperature | 7 °C to 32 °C |
| Water supply pressure | 0.07 MPa to 0.8 MPa (0.7 to 8 bar) |
| Cooling type | Air-cooled |
| Control panel | LCD display and touch keys |
| Cleaning functions | Automatic water cleaning, automated chemical cleaning |
| Warranty | 2 years (parts and labor) |
| Accessories included | Ice scoop, legs, power cord, cleaning kit |
| Insulation material | HFC-free, cyclopentane gas foam |
| Regular maintenance | Clean air filter every 2 weeks, descale water circuit |
| Safety | Mandatory grounding, flammable refrigerant, child protection |
Frequently Asked Questions - KM60CHC Hoshizaki
User questions about KM60CHC Hoshizaki
0 question about this device. Answer the ones you know or ask your own.
Ask a new question about this device
Download the instructions for your Ice Maker in PDF format for free! Find your manual KM60CHC - Hoshizaki and take your electronic device back in hand. On this page are published all the documents necessary for the use of your device. KM60CHC by Hoshizaki.
USER MANUAL KM60CHC Hoshizaki
SELF-CONTAINED CRESCENT CUBER
MACHINE A GLACONS CROISSANT AUTONOME
(original instructions)
NOTICE D'UTILISATION
III. VEDLIKEHOLD 113
- RENGJØRING 113
- FØR DU RINGER ETTER SERVICE 115
- KASSERING 115
4.GARANI 116
SPESIFIKASJONER 117
IMPORTANT SAFETY INFORMATION
Throughout this manual, notices appear to bring your attention to situations which could result in death, serious injury, or damage to the unit.
| ▲WARNING | Indicates a hazardous situation which, if not avoided, could result in death or serious injury. |
| ▲CAUTION | Indicates a hazardous situation which, if not avoided, could result in minor or moderate injury. |
| NOTICE | Indicates a hazardous situation which, if not avoided, could result in damage to the unit. |
| ▲HYGIENE | Indicates important precautions for hygiene and food safety. |
| IMPORTANT | Indicates important information about the use and care of the unit. |
This icemaker uses HFC-free refrigerant (propane) that is a non-ozone-depleting and environmentally sustainable material having very low global warming potential.
| ▲WARNING |
| This icemaker contains flammable refrigerant in its cooling unit; installation, handling, servicing and disposal must therefore only be carried out by authorized technicians. |
| The refrigerant contained in this icemaker is flammable and sealed in the refrigeration system. Although the refrigerant does not leak out under normal usage, take utmost care when handling this icemaker so as not to cause any damages to the system. |
| In the case of accidental damage to the refrigeration system causing refrigerant leak:* Do not create a source of ignition in the area.* Do not operate electrical switches or plugs in the area.* Do not use naked flame.* Immediately ventilate the area by opening doors and/or windows.* Call service engineer. |
| IMPORTANT |
| This booklet is an integral and essential part of the product and should be kept and preserved by the user. |
| Please read carefully the guidelines and warnings contained herein as they are intended to provide the installer/user with essential information for the proper installation and the continued safe use and maintenance of the product. |
| Please preserve this booklet for any further consultation that may be necessary. |
| ▲WARNING |
| This is a commercial icemaker, and should be destined only to be used for the purpose for which it has been expressly designed. Any other use should be considered improper and therefore dangerous. The manufacturer will not be held liable or responsible for any damage caused by improper, incorrect and unreasonable use. |
| The installation, and relocation if necessary, must be carried out by qualified personnel, in accordance with current regulations, according to the manufacturer's instructions. |
| Keep ventilation openings, in the appliance enclosure or in the built-in structure, clear of obstruction. |
| Do not use mechanical devices or other means to accelerate the defrosting process, other than those recommended by the manufacturer. |
| The use of any electrical appliance involves the observance of some fundamental rules. In particular: * Instances of high humidity and moisture increase the risk of electrical short circuits and potential electrical shocks. If in doubt, disconnect the icemaker. * Do not damage the power cord or pull it in order to disconnect the icemaker from the electrical supply network. * If the supply cord is damaged, it must be replaced by a replacement cord available from Hoshizaki Parts/Service Centres. * Do not touch the electrical parts or operate the switches with damp hands. * This appliance is not intended for use by persons (including children) with reduced physical, sensory or mental capabilities, or lack of experience and knowledge, it can however be used by children aged from 8 years and above and persons with reduced physical, sensory or mental capabilities, or lack of experience and knowledge providing they have been given supervision or instruction concerning use of the appliance by a person responsible for their safety. * Children shall not play with the appliance. * Cleaning and user maintenance shall not be made by children without supervision. * Do not attempt to modify the icemaker. Only qualified personnel may disassemble or repair the appliance. |
| When positioning the appliance, ensure the supply cord is not trapped or damaged. |
| Do not locate multiple portable socket-outlets or portable power supplies at the rear of the appliance. |
I. INSTALLATION INSTRUCTIONS
1. CONSTRUCTION
KM-40/60/80C-HC
KM-140C-HC
2. ACCESSORIES
| KM-40C-HC KM-60C-HC KM-80C-HC | KM-140C-HC | KM-40C-HC-W KM-60C-HC-W KM-80C-HC-W | KM-140C-HC-W | |
| Instruction Manual 1 1 1 | ||||
| Scoop 1 1 1 | ||||
| Leg 4 4 4 4 | ||||
| Power Supply Cord (Continental) | 1 1 1 1 | |||
| Power Supply Cord (UK) | 1 1 1 1 | |||
| Pan Head Screw with Washer (M4 x 30) (louver fixing) | 2--- | |||
| Thumbscrew (louver fixing) | --2 1 | |||
| Spacer (M4) (louver fixing) | --2 - | |||
| Cleaning Pack Assy --1 | 1 |

Thumbscrew
Spacer Cleaning Pack Assy
3.UNPACKING
| ▲WARNING |
| Children should not be allowed in reach of the packaging elements (plastic bags and expanded polystyrene) as they are potential sources of danger. |
| ▲CAUTION |
| Do not lift or manoeuvre the carton by using the shipping bands. |
| When moving the unit by hand, remove the louver and hold the unit bottom. Do not hold the top panel or door. It may come off and cause injury. |
| Always wear protective gloves when carrying the unit. |
| When handling the carton or the unpacked unit, work in pairs to prevent injury. |
NOTICE
Remove shipping carton, tape(s) and packing. If packing material is left in the icemaker, it will not work properly.
1) After removing the packaging, make sure that the icemaker is in good condition. If in doubt, please do not use the icemaker but apply to professionally qualified personnel.
2) Remove the shipping tape holding the door and separator.
3) Remove the protective plastic film from the exterior. If the icemaker is exposed to the sun or to heat, remove the film after the icemaker cools.
4) Remove the package of accessories. Check the contents according to "2. ACCESSORIES".
4. LOCATION
| ▲WARNING |
| This icemaker is not intended for outdoor use. |
| The icemaker should not be located next to ovens, grills or other high heat producing equipment. |
| This appliance is not suitable for installation in an area where a water jet could be used. |
| ▲CAUTION |
| The location should provide a firm and level foundation for the icemaker. |
| NOTICE |
| Do not place anything on top of the icemaker or in front of the louver. |
| IMPORTANT | |
| Normal operating ambient temperature should be within 7°C to 38°C. Normal operating water temperature should be within 7°C to 32°C. Operation of the icemaker, for extended periods, outside of these normal temperature ranges may affect production capacity. | |
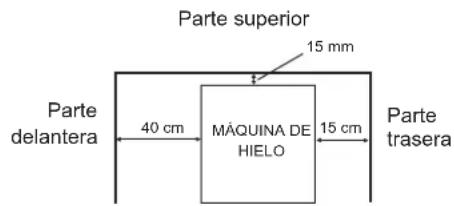
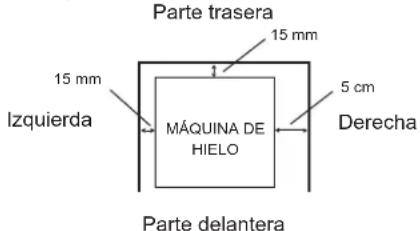
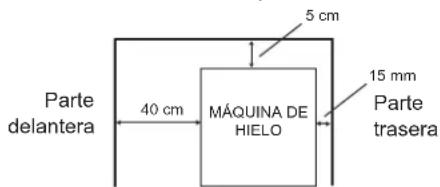
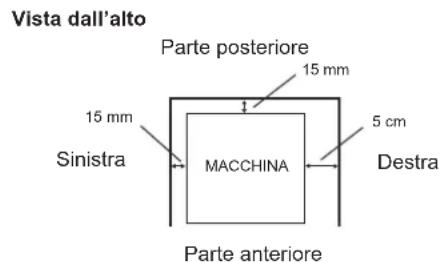
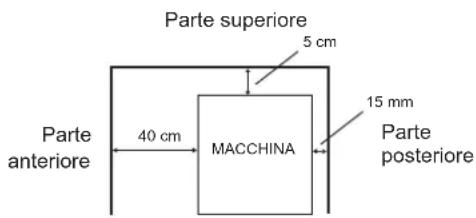
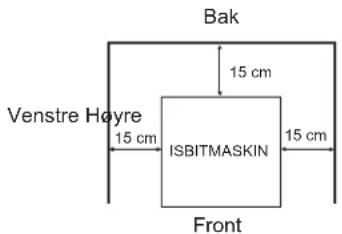
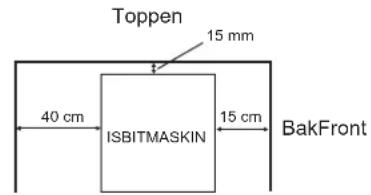
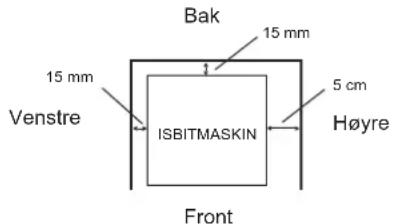
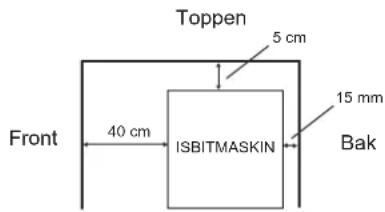
| Allow the clearance specified below for proper air circulation and ease of maintenance and/or service should they be required. [KM-40/60/80C-HC(-W)] Top View Side View Rear Left 15 cm ICEMAKER 15 cm Right Front Top 15 mm Top 40 cm ICEMAKER 15 cm Rear [KM-140C-HC(-W)] Top View Side View Rear 15 mm Left 15 mm ICEMAKER 15 cm Right Front Top 5 cm ICEMAKER 15 mm Rear In some high humidity environments, condensation may form inside the machine and drip onto the floor. Do not install where the floor can be affected by water. | |
| Avoid prolonged exposure of the appliance to direct sunlight. |
5. INSTALLATION
CAUTION
Incorrect installation can cause harm to people, animals or other items, for which the manufacturer cannot be held responsible.
- Place the icemaker in the selected permanent site.
- The appliance must be positioned so that the plug is accessible.
- Level the icemaker in both the left-to-right and front-to-rear directions by adjusting the legs.
6. ELECTRICAL CONNECTIONS
WARNING
THIS APPLIANCE MUST BE EARTHED
This icemaker requires an earth that meets the national and local electrical code requirements.
To prevent possible severe electrical shock to individuals or extensive damage to the unit, install a proper earth wire to the icemaker.
Disconnect the main power supply before any maintenance, repairs or cleaning is undertaken.
- This appliance requires a separate 220 - 240VAC, 10A supply. The electrical supply must be protected by a suitable circuit breaker.
- The main control box fuse is rated at 5A and should only be replaced by a qualified service engineer.
- Usually an electrical permit and services of a licensed electrician are required.
For the U.K. and the Republic of Ireland only
- The wires in the mains lead are coloured in accordance with the following code:
Green & Yellow = Earth
Blue = Neutral
Brown = Live
As the colours of the wire in the mains lead of this appliance may not correspond with the coloured markings identifying the terminals in your plug, proceed as follows:
The wire which is coloured Green-and-Yellow must be connected to the terminal in the plug which is marked with the letter E or by the symbol 12 coloured Green or Green-and-Yellow. The wire which is coloured Blue must be connected to the terminal which is marked with the letter N or coloured Black. The wire which is coloured Brown must be connected to the terminal which is marked with the letter L or coloured Red.
- Should the socket outlets in the installation site not be suitable for the plug supplied with your product, the plug must be removed (cut off if it is moulded on plug) and an appropriate plug fitted.
If the non-rewirable plug has been cut from the power supply cord, it must be disposed of. There should be no attempt to reuse it. Inserting such a plug into a socket elsewhere presents a serious risk of electrical shock.
- The non-rewirable plug must never be used without a fuse cover being fitted.
The correct replacement for the detachable fuse cover is identifiable from the manufacturer's reference number stamped on the plug.
Supply of replacement fuse covers can be obtained from Hoshizaki Parts/Service Centres.
Fuses should be rated at 10A and approved to BS 1362.
7. WATER SUPPLY AND DRAIN CONNECTIONS
WARNING
Connect to potable cold water supply only.

- The connections to the mains water supply must be made in accordance with the countries' current requirements of the Water Supply or Water Fittings Regulations.
- Icemaking water must be potable water. Where scaling can be caused by water quality, installation of an external filter or softener is recommended. Contact your local water treatment professional or Hoshizaki service agent.
- Water supply pressure should be minimum 0.07 MPa (0.7 bar) and maximum 0.8 MPa (8 bar). If the pressure exceeds 0.8 MPa (8 bar), use a proper pressure reducing valve. Do NOT throttle back the supply tap.
- A plumbing permit and services of a licensed plumber may be required in some areas.
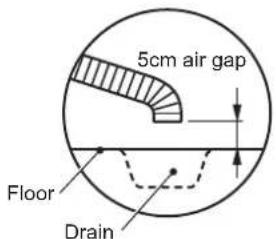
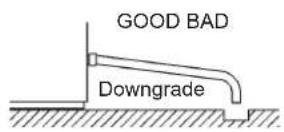
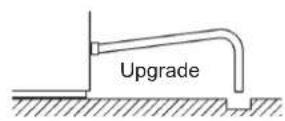
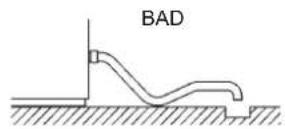
- The icemaker drain is gravity flow, so ensure drain hose has an adequate pitch or fall.
- Drain lines should not be installed directly to the sewer system. A vertical air gap of a minimum of 5 cm should be between the end of the drain hoses from the icemaker and the floor drain.
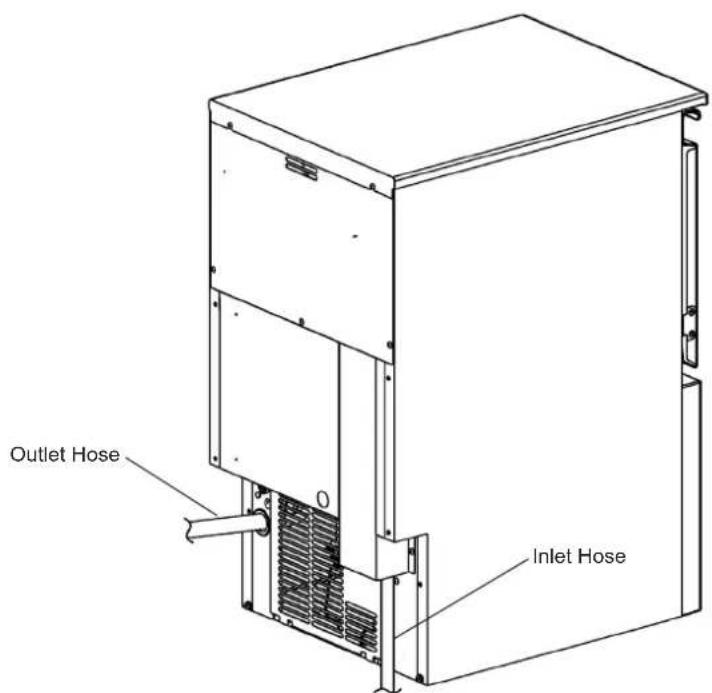
- To prevent a backflow into the storage bin, the outlet hose must be laid as shown.
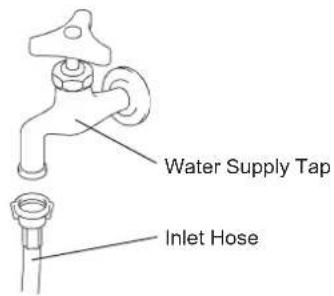
1) Attach the free end of inlet hose to the water tap, noting washer is correctly positioned. Hand tighten sufficiently to provide leak free joint. It is a wise precaution to have a stop valve within easy reach.
2) The outlet hose can be cut to length as necessary to suit position of main drain.
II. OPERATING INSTRUCTIONS
| NOTICE |
| All parts are factory-adjusted. Improper adjustments may result in failure. |
| If the unit is turned off, wait for at least 3 minutes before restarting the icemaker to prevent damage to the compressor. |
HYGIENE
This icemaker is designed to produce edible ice. To keep the icemaker hygienic:
- Wash your hands before removing ice. Use the plastic scoop provided (accessory).
- The storage bin is for ice use only. Do not store anything else in the bin nor use other electrical appliances in the bin.
- Clean the storage bin before use (see "III. 1. CLEANING").
- Keep the scoop clean. Clean it by using a neutral cleaner and rinse thoroughly.
- Close the door after removing ice to prevent entrance of dirt, dust or insects into the storage bin.
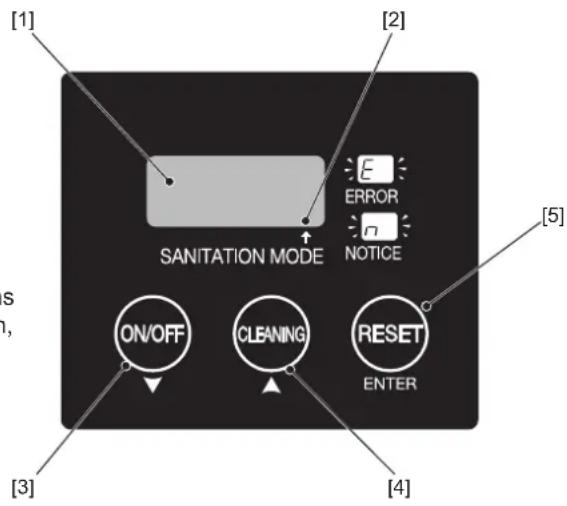
Operation Panel
[1] Display
run: Icemaking
oFF: Shut down
FUL: Bin full
cln: Cleaning
[2] Dot
Off: Normal mode
On: Sanitation mode (*)
- After 4 continued hours of inactivity, the icemaker automatically cleans and refreshes the water circuit to prevent bacterial proliferation, keeping it clean and sanitary for longer periods of time.
[3] ON/OFF Button / Down Button
[4] Cleaning Button / Up Button
[5] Reset Button / Enter Button
1. START UP
The installer will normally commission the icemaker to start the automatic icemaking process. To ensure continuous operation, make sure that:
- The water supply tap is on,
- The icemaker is connected to the power supply, and
- The display shows "run".
2. USER SETTINGS
The settings listed below are adjustable by the user.
1) Press and hold the reset button for 3 seconds to enter the user setting mode. The display shows one of the setting codes.
2) Use the up or down button until the display shows the desired setting code. Then, press the enter button.
3) Use the up or down button to adjust the setting. Then, press the enter button.
4) After finishing the settings, use the up or down button until the display shows "END". Then, press the enter button to exit the user setting mode.
| Code | tem Description Default | ||
| U.04 | Drain frequency | 0: No drain1: Every 1 cycle2: Every 2 cycles5: Every 5 cycles10: Every 10 cycles20: Every 20 cycles | 10: Every 10 cycles |
| U.44 | Automatic water cleaning frequency | 0: No automatic water cleaning5: Every 5 cycles10: Every 10 cycles15: Every 15 cycles20: Every 20 cycles40: Every 40 cycles60: Every 60 cycles | 20: Every 20 cycles |
| U.49 | Number of chemical doses (*) | When chemical doses reach set number of times, notice code "n93" appears to show no chemical is left. | KM-40: 15 timesKM-60: 13 timesKM-80: 12 timesKM-140: 16 times |
| U.50 | Fully automated chemical cleaning frequency (*) | Start fully automated chemical cleaning at set frequency.Adjustable from every 400 to 1000 cycles (in 100-cycle steps) e.g. 40 = 400 cycles | - |
| U.51 | UV-LED irradiation time (**) | Irradiate UV-LED for set period of time.None or adjustable from 10 to 30 minutes (in 1-minute steps) | - |
| U.52 | UV-LED irradiation frequency (**) | Irradiate UV-LED in freeze cycle after set period of time.Adjustable from 30 to 300 minutes (in 10-minute steps) | 120 minutes |
| U.53 | Operation mode | nor: Normal modecln: Sanitation mode (After 4 continued hours of inactivity,water circuit is automatically cleaned and refreshed to preventbacterial proliferation.) | nor: Normal mode |
| U.54 | Fully automated chemical cleaning mode (*) | When "cln" (sanitation mode) is selected, unit runs one cycle of fully automated chemical cleaning by using fully automated cleaning kit (option) regardless of frequency set by U.50. | - |
| U.55 | Reset number of chemical doses(*) | Reset notice code "n93" (no chemical is left) and number of chemical doses. | - |
| U.56 | Reset settings Reset all user settings to default. - | ||
| U.58 | Forced shut down Shut down unit under any conditions. - | ||
| U.59 | Forced drain Shut down and drain unit under any conditions. - | ||
| U.60 | Notice (e.g. maintenance) | Notice code "n99" appears after set period of time.Adjustable from 0 (none) to 6000 hours (in 100-hour steps) | 0: None |
| U.68 | Reset notice Reset counting for notice U.60. - | ||
- Applicable only to the fully automated cleaning model (-W) or when the fully automated cleaning kit (option) is used.
** Applicable only when the UV-LED (option) is used.
3. PREPARING THE ICEMAKER FOR LONG STORAGE
| NOTICE |
| This icemaker will not work at subfreezing temperatures. To prevent damage to the water supply line, drain the icemaker when air temperature is below zero. |
| ▲HYGIENE |
| When shutting down the icemaker for two or more days, drain the icemaker to prevent contamination in the water circuit. |
1) Chemically clean the water circuit according to "III. 1. [e] Icemaking Water System".
2) Press the ON/OFF buton. The display shows "oFF".
3) Press and hold the reset button for 3 seconds to enter the user setting mode.
4) Set the user setting "U.59" to "1" to drain the icemaker.
5) Unplug the icemaker or disconnect the power supply.
6) Close the water supply tap, and remove the inlet hose.
7) Remove all ice from the storage bin, and clean the bin.
8) Before resuming the use of the icemaker, clean the water circuit again with fresh water or a chemical solution according to "III. 1. [e] Icemaking Water System".
III. MAINTENANCE
1. CLEANING
| ▲WARNING |
| Before carrying out any cleaning or maintenance operations, unplug the icemaker from the electrical supply network. |
| This appliance must not be cleaned by use of a water jet. |
| ▲CAUTION |
| When using a neutral cleaner or sodium hypochlorite, thoroughly read and understand the instructions provided to prevent potential health problems. |
| NOTICE |
| Ask a trained service person to clean and sanitise the icemaker water system at least twice a year and to check and clean the condenser at least once a year. |
| To prevent possible damage, do not clean the plastic parts with water above 40°C or in a dishwasher. |
| Do not use any alcohol for cleaning/sanitisation of the icemaker. It may cause cracks on the plastic parts. |
| ▲HYGIENE |
| To ensure their effects and hygienic quality, prepare the cleaning and sanitising solutions just before their use. |
[a] Machine and Bin Exterior
Wipe the exterior at least once per week with a clean, soft cloth. Use a damp cloth containing a neutral cleaner to wipe off grease or dirt.
[b] Scoop and Storage Bin Handle Cleaning/Sanitisation (Daily)
1) Either mix 3 litres of water with 11ml of 5.25% sodium hypochlorite solution in a suitable container, or the recommended Hoshizaki sanitiser as directed.
2) Soak the scoop in the solution for more than 3 minutes. Rinse thoroughly, and shake to remove surplus liquid.
Note: Using a cloth to dry may re-contaminate.
3) Use a neutral cleaner to wash the storage bin handle. Rinse thoroughly.
4) Soak a clean cloth with the sanitising solution, and wipe the handle. Use fresh water and a clean cloth to rinse/dry.
[c] Storage Bin Interior Cleaning/Sanitisation (Weekly)
1) Open the storage bin door, and remove all ice.
2) Remove the scoop holder from the slope.
3) Wash the bin liner and scoop holder with a neutral non-abrasive cleaner. Rinse thoroughly.
4) Soak a clean cloth with the neutral cleaner, and wipe both sides of the slope and the door inner surface. Wipe off the cleaner with a clean damp cloth.
5) Either mix 3 litres of water with 11ml of 5.25% sodium hypochlorite solution in a suitable container, or the recommended Hoshizaki sanitiser as directed.
![Hoshizaki KM60CHC - [c] Storage Bin Interior Cleaning/Sanitisation (Weekly) - 1](/content/2026/03/444795/images/19cb41ebd333d78881fad57ee93179c968744bbad9596b4b15bfdcd8993bc361.jpg)
6) Soak a clean sponge or cloth with the solution, and wipe the bin liner, bin door, slope and scoop holder.
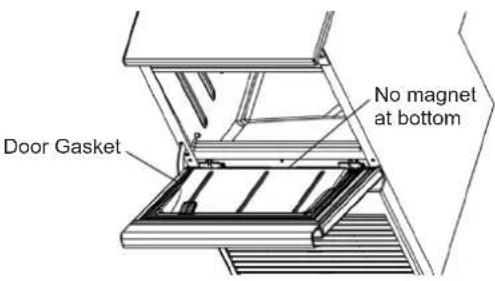
Note: Clean every surface of the door gasket which gets soiled easily. It is readily removable for cleaning.
IMPORTANT
The door gasket is provided with a magnet at the top and both sides. To ensure air tightness of the door, refit the gasket properly in its correct position.
7) The remaining solution can be used to sanitise utensils.
Note: Do not wipe dry or rinse after sanitising, but allow to air dry.
[d] Air Filter
Plastic mesh air filters remove dirt or dust from the air, and keep the condenser from getting clogged. If the filters get clogged, the icemaker's performance will be reduced. Remove and clean the air filter(s) at least twice per month:
1) Remove the air filter.
Note: Do not put your hand inside the machine compartment.
2) Clean the air filter by using a vacuum cleaner. When severely clogged, use warm water and a neutral cleaner to wash the air filter.
3) Rinse and dry the air filter thoroughly.
NOTICE
After cleaning, be sure to place the air filter back in position.
[e] Icemaking Water System
Water Cleaning
Clean the water circuit with fresh water either automatically or manually.
Automatic water cleaning: Set the user setting "U.44" to a desired frequency (see "II.2. USER SETTINGS").
Manual water cleaning: Press the cleaning button while the display does not show "oFF".
The icemaker automatically resumes icemaking operation after cleaning the water circuit.
Automated Chemical Cleaning
Effectively clean the water circuit by manually feeding a chemical.
CAUTION
Wear protective equipment (e.g. protective glasses) when using the citric acid or sodium hypochlorite solution. The solution may spout out and splash into your eyes. In that case, wash your eyes with clean water.
NOTICE
If the citric acid solution is found dripping on the sheet metal parts, wipe it off thoroughly to prevent rust.
1) Make either of the following solutions to fit the intended purpose.
Cleaning (descaling): 3.5 litres of 2% citric acid solution
Sanitising: 3.5 litres of water mixed with 13ml of 5.25% sodium hypochlorite solution
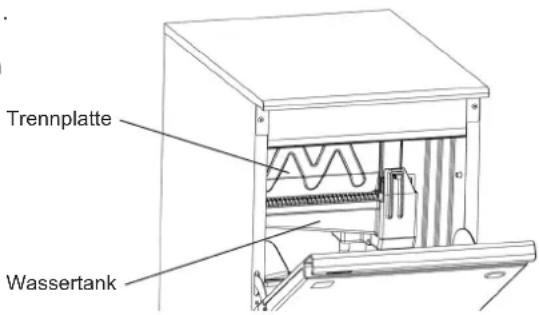
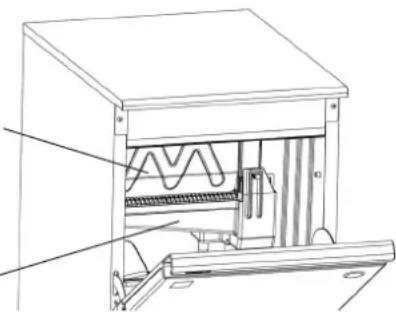
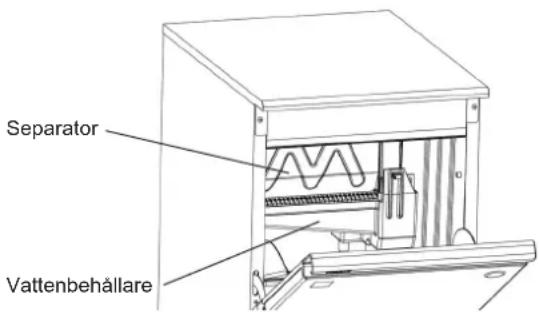
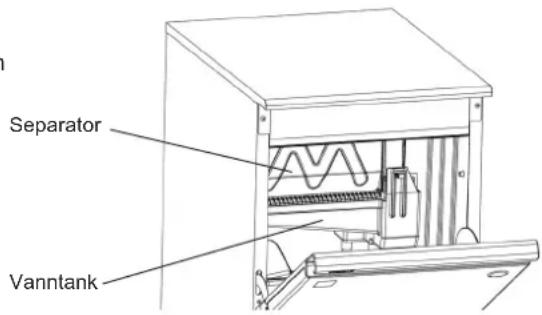
2) Open the door, and remove all ice from the storage bin. Check that the separator is attached in its correct position as shown. Otherwise, the solution may splash onto the ice in the storage bin.
3) Press and hold the cleaning button for 3 seconds. The display flashes the current mode. For example, the display showing "run" during the icemaking operation starts to flash "run".

4) When the display changes to "cln", pour the following amount of solution into the water tank carefully not to overflow it.
KM-40C-HC: 2.0 litres
KM-60C-HC:2.5 litres
KM-80C-HC: 3.0 litres
KM-140C-HC: 3.5 litres
5) Rinse the bin liner with clean water to remove any solution spilled in the storage bin. Then, close the door.
6) Press the cleaning button (or wait for 15 minutes) to start the automated chemical cleaning.
7) The unit resumes the original state when the cleaning is over.
WARNING
If the ice made after the automated chemical cleaning tastes wrong, immediately stop using the icemaker and call for service.
Fully Automated Chemical Cleaning ()
- Available only for the fully automated cleaning model (-W) or when the fully automated cleaning kit (option) is used. The fully automated cleaning kit automatically feeds a chemical (1250 ml of 40% citric acid solution) and descales the water circuit at a desired frequency. Make necessary settings according to "II. 2. USER SETTINGS". For further details, see the instruction manual of the fully automated cleaning kit ACK.
2. BEFORE CALLING FOR SERVICE
WARNING
Do not damage the refrigerant circuit.
If the icemaker does not work properly or does not work at all, before calling for service, check that:
- The power is supplied to the unit.
- The water is turned on.
- The air filter is clean.
If the problem still exists, turn off the power supply, turn it back on, and press the reset button.
If the problem persists, check whether the error code "E" is indicated on the display or the dot at the center is on, and contact your local Hoshizaki service agent.
If one of the following notice codes appears, follow the instructions below.
| Code | Description |
| n92 | Abnormal high temperature. Clean air filter. Check for proper installation according to "I. 4. LOCATION". |
| n93 | No chemical is left (when fully automated cleaning kit (option) is used). Replace or refill chemical container, and reset by user setting "U.55" (see "II. 2. USER SETTINGS"). To change frequency of notice, use user setting "U.49". |
| n99 | Period of time set by user setting "U.60" (see "II. 2. USER SETTINGS") has passed and maintenance is required. When maintenance is done, press reset button. |
For further assistance or advice, contact your local Hoshizaki service agent.
3. DISPOSAL
Comply with local regulations regarding disposal of this appliance and its refrigerant gas. Before you scrap the appliance, take off the door to prevent children trapped.
Correct disposal of this product:
This marking indicates that this product should not be disposed with other household wastes throughout the EU. To prevent possible harm to the environment or human health from uncontrolled waste disposal, recycle it responsibly to promote the sustainable reuse of material resources. To return your used device, use the return and collection systems or contact the retailer where the product was purchased. They can take this product for environmental safe recycling.
WARNING

The insulation foaming agent used for the unit body contains flammable gas cyclopentane. With this in mind, dispose of the product properly.
4. WARRANTY
Hoshizaki warrants to the original owner/user that all Hoshizaki branded products shall be free of defects in material and/or workmanship for the duration of the "warranty period". The warranty shall be effective for two years from the date of installation. Hoshizaki's liability under the terms of the warranty are limited and shall exclude routine servicing, cleaning, essential maintenance and/or repairs occasioned by misuse and installations not in accordance with Hoshizaki guidelines.
Warranty repairs should be completed by an approved Hoshizaki dealer or service agency using genuine Hoshizaki components.
To obtain full details of your warranty and approved service agency, please contact your dealer/supplier, or the nearest Hoshizaki Service office:
Europe, Middle East, Africa
Hoshizaki UK - UK, Ireland
TEL: +44 845 456 0585
FAX: +44 132 283 8331
uksales@hoshizaki.uk
Hoshizaki Middle East - Middle East
TEL: +971 48 876 612
FAX: +971 48 876 613
sales@hoshizaki.ae
Hoshizaki Deutschland - Germany, Switzerland, Austria, Poland,
Czech Republic, Slovakia
TEL: +49 5121 697370
FAX: +49 5121 6973719
Hoshizaki Benelux - Netherlands, Belgium, Luxembourg
TEL: +31 85 018 83 70
info@hoshizaki.nl
Hoshizaki France - France
TEL: +33 1 48 63 93 80
FAX: +33 1 48 63 93 88
info@hoshizaki.fr
Hoshizaki Italia - Italy
TEL: +39 344 0616467
TEL: +39 348 3022156
info@hoshizaki.it
Hoshizaki Iberia - Spain, Portugal
TEL: +34 93 478 09 52
FAX: +34 93 478 08 00
info@hoshizaki.es
Hoshizaki Europe B.V. - all other countries within Europe
and Africa
TEL: +31 20 6918499
FAX: +31 20 6918768
sales@hoshizaki.nl
SPECIFICATIONS
| Model KM-40C-HC KM-6 | OC-HC KM-80C-HC KM-1 | 40C-HC | ||
| Type Air-cooled, crescent ice Air-cooled, crescent ice Air-cooled, crescent ice | ||||
| Power Supply 1 phase 220 - 240V50Hz | 1 phase 220 - 240V50Hz | 1 phase 220 - 240V50Hz | 1 phase 220 - 240V50Hz | 1 phase 220 - 240V50Hz |
| Electric Consumption 209W 242W 299W 564W | ||||
| Ice Production per 24h 43kg(ambient 10°C, water10°C) | 60kg(ambient 10°C, water10°C) | 75kg(ambient 10°C, water10°C) | 135kg(ambient 10°C, water10°C) | |
| Dimensions 452mm(W) x610mm(D)x 988mm(H) | 605mm(W) x 610mm(D)x 988mm(H) | 605mm(W) x 712mm(D)x 988mm(H) | 630mm(W) x 719mm(D)x 1333mm(H) | |
| Refrigerant R290, 68g R290, 90g R290, 147g R290, 110g | ||||
| Insulation Foam Blowing Agent | HFC-free HFC-free HFC-free HFC-free | |||
| Weight Net: 39kg (Gross):49kg) Net: 45kg (Gross):57kg) Net: 50kg (Gross: 63kg) Net: 69kg (Gross: 81kg) | ||||
| Ambient Temp | 7 - 38°C | 7 - 38°C | 7 - 38°C | 7 - 38°C |
| Water Supply Temp | 7 - 32°C | 7 - 32°C | 7 - 32°C | 7 - 32°C |
| Water Supply Pressure | 0.07 - 0.8 MPa (0.7 - 8bar) | 0.07 - 0.8 MPa (0.7 - 8bar) | 0.07 - 0.8 MPa (0.7 - 8bar) | 0.07 - 0.8 MPa (0.7 - 8bar) |
| Voltage Range | Rated voltage ± 6% | Rated voltage ± 6% | Rated voltage ± 6% | Rated voltage ± 6% |
| Model | KM-40C-HC-W | KM-60C-HC-W | KM-80C-HC-W | KM-140C-HC-W |
| Type | Air-cooled, crescent ice, fully automated cleaning | Air-cooled, crescent ice, fully automated cleaning | Air-cooled, crescent ice, fully automated cleaning | Air-cooled, crescent ice, fully automated cleaning |
| Power Supply | 1 phase 220 - 240V 50Hz | 1 phase 220 - 240V 50Hz | 1 phase 220 - 240V 50Hz | 1 phase 220 - 240V 50Hz |
| Electric Consumption | 209W | 242W | 299W | 564W |
| Ice Production per 24h | 43kg (ambient 10°C, water 10°C) | 60kg (ambient 10°C, water 10°C) | 75kg (ambient 10°C, water 10°C) | 135kg (ambient 10°C, water 10°C) |
| Dimensions | 452mm(W) x 610mm(D) x 988mm(H) | 605mm(W) x 610mm(D) x 988mm(H) | 605mm(W) x 712mm(D) x 988mm(H) | 630mm(W) x 719mm(D) x 1333mm(H) |
| Refrigerant | R290, 68g | R290, 90g | R290, 147g | R290, 110g |
| Insulation Foam Blowing Agent | HFC-free | HFC-free | HFC-free | HFC-free |
| Weight | Net: 41kg (Gross: 51kg) | Net: 47kg (Gross: 59kg) | Net: 52kg (Gross: 65kg) | Net: 71kg (Gross: 83kg) |
| Ambient Temp | 7 - 38°C | 7 - 38°C | 7 - 38°C | 7 - 38°C |
| Water Supply Temp | 7 - 32°C | 7 - 32°C | 7 - 32°C | 7 - 32°C |
| Water Supply Pressure | 0.07 - 0.8 MPa (0.7 - 8 bar) | 0.07 - 0.8 MPa (0.7 - 8 bar) | 0.07 - 0.8 MPa (0.7 - 8 bar) | 0.07 - 0.8 MPa (0.7 - 8 bar) |
| Voltage Range | Rated voltage ± 6% | Rated voltage ± 6% | Rated voltage ± 6% | Rated voltage ± 6% |
INFORMATIONS DE SECURITE IMPORTANTES
Marron = Sous tension
Hoshizaki France - France
KM-80C-HC. 3,0 Liter
KM-140C-HC: 3,5 Liter
KM-40C-HC: 2,0 liter
KM-60C-HC: 2,5 liter
KM-80C-HC:3,0 liter
KM-140C-HC: 3,5 liter
Watergeleider
Watertank

[KM-40/60/80C-HC(-W)]
Vista superior
Vista lateral
[KM-140C-H(-W)]
Vista superior
Vista lateral
[KM-40/60/80C-HC(-W)]
Vista laterale
[KM-140C-HC(-W)]
Vista laterale
| VIGTIGT | |
| Den normale, omgivende temperatur ved brug skal ligge mellem 7°C og 38°C. Den normale vandtemperatur ved brug skal ligge mellem 7°C og 32°C. Hvis isterningmaskinen bruges i længere tid.uden forppe temperaturemårder, kan det påvirke produktionskapaciteten. | |
| Sørg for, at der er frirum som angivet herunder med henblik på korrekt luftcirkulation og let adgang til vedligeholdelse og/eller service, safremt det bliver nødvendigt. [KM-40/60/80C-HC(-W)] Vist oppefra Vist fra sidens Bag Vist oppefra Vist oppefra Vist oppefra Vist oppefra Vist oppefra Vist oppefra Vist oppefra Vist oppefra Vist oppefra Vist oppefra Vist oppefra Vist oppefra Vist oppefra Vist oppefra Vist oppefra Vist oppefra Vist oppefra Vist oppefra Vist oppefra Vist oppefra Vist oppegra Vist oppegra Vist oppegra Vist oppegra Vist oppegra Vist oppegra Vist oppegra Vist oppegra Vist oppegra Vist oppegra Vist oppegra Vist oppegra Vist oppegra Vist oppegra Vist oppegra Vist oppegra Vist oppegra Vist oppegra Vist oppegra Vist oppegra Vist oppegua Vist oppegra Vist oppegra Vist oppegra Vist oppegra Vist oppegra Vist oppegra Vist oppegra Vist oppegra Vist oppegra Vist oppegra Vist oppegra Vist oppegra Vist oppegra Vist oppegra Vist oppegra Vist oppegra Vist oppegra Vist oppegra Vist oppegra Vist oppegrave Vist oppegra Vist oppegra Vist oppegra Vist oppegra Vist oppegra Vist oppegra Vist oppegra Vist oppegra Vist oppegra Vist oppegra Vist oppegra Vist oppegra Vist oppegra Vist oppegra Vist oppegra Vist oppegra Vist oppegra Vist oppegra Vist oppegra Vist oppegrat Vist oppegra Vist oppegra Vist oppegra Vist oppegra Vist oppegra Vist oppegra Vist oppegra Vist oppegra Vist oppegra Vist oppegra Vist oppegra Vist oppegra Vist oppegra Vist oppegra Vist oppegra Vist oppegra Vist oppegra Vist oppegra Vist oppegra Vist oppegram Vist oppegra Vist oppegra Vist oppegra Vist oppegra Vist oppegra Vist oppegra Vist oppegra Vist oppegra Vist oppegra Vist oppegra Vist oppegra Vist oppegra Vist oppegra Vist oppegra Vist oppegra Vist oppegra Vist oppegra Vist oppegra Vist oppegra Vist oppegre Vist oppegra Vist oppegra Vist oppegra Vist oppegra Vist oppegra Vist oppegra Vist oppegra Vist oppegra Vist oppegra Vist oppegra Vist oppegra Vist oppegra Vist oppegra Vist oppegra Vist oppegra Vist oppegra Vist oppegra Vist oppegra Vist oppegra Vist oppegra Vist oppegra Vist oppegra Vist oppegra Vist oppegra Vist oppegra Vist oppegra Vist oppegra Vist oppegra Vist oppegra Vist oppegra Vist oppegra Vist oppegra Vist oppegra Vist oppegra Vist oppegra Vist oppegra Vist oppegra Vist oppegra Vist oppegra Vist oppepra Vist oppegra Vist oppegra Vist oppegra Vist oppegra Vist oppegra Vist oppegra Vist oppegra Vist oppegra Vist oppegra Vist oppegra Vist oppegra Vist oppegra Vist oppegra Vist oppegra Vist oppegra Vist oppegra Vist oppegra Vist oppegra Vist oppegra Vist oppestra Vist oppegra Vist oppegra Vist oppegra Vist oppegra Vist oppegra Vist oppegra Vist oppegra Vist oppegra Vist oppegra Vist oppegra Vist oppegra Vist oppegra Vist oppegra Vist oppegra Vist oppegra Vist oppegra Vist oppegra Vist oppegra Vist oppegra Vist oppetra Vist oppegra Vist oppegra Vist oppegra Vist oppegra Vist oppegra Vist oppegra Vist oppegra Vist oppegra Vist oppegra Vist oppegra Vist oppegra Vist oppegra Vist oppegra Vist oppegra Vist oppegra Vist oppegra Vist oppegra Vist oppegra Vist oppegra Vist oppebra Vist oppegra Vist oppegra Vist oppegra Vist oppegra Vist oppegra Vist oppegra Vist oppegra Vist oppegra Vist oppegra Vist oppegra Vist oppegra Vist oppegra Vist oppegra Vist oppegra Vist oppegra Vist oppegra Vist oppegra Vist oppegra Vist oppegra Vist oppeegra Vist oppegra Vist oppegra Vist oppegra Vist oppegra Vist oppegra Vist oppegra Vist oppegra Vist oppegra Vist oppegra Vist oppegra Vist oppegra Vist oppegra Vist oppegra Vist oppegra Vist oppegra Vist oppegra Vist oppegra Vist oppegra Vist oppegra Vist oppeogra Vist oppegra Vist oppegra Vist oppegra Vist oppegra Vist oppegra Vist oppegra Vist oppegra Vist oppegra Vist oppegra Vist oppegra Vist oppegra Vist oppegra Vist oppegra Vist oppegra Vist oppegra Vist oppegra Vist oppegra Vist oppegra Vist oppegra Vist opperega Vist oppegra Vist oppegra Vist oppegra Vist oppegra Vist oppegra Vist oppegra Vist oppegra Vist oppegra Vist oppegra Vist oppegra Vist oppegra Vist oppegra Vist oppegra Vist oppegra Vist oppegra Vist oppegra Vist oppegra Vist oppegra Vist oppegra Vist oppegera Vist oppegra Vist oppegra Vist oppegra Vist oppegra Vist oppegra Vist oppegra Vist oppegra Vist oppegra Vist oppegra Vist oppegra Vist oppegra Vist oppegra Vist oppegra Vist oppegra Vist oppegra Vist oppegra Vist oppegra Vist oppegra Vist oppegra Vist oppegia Vist oppegra Vist oppegra Vist oppegra Vist oppegra Vist oppegra Vist oppegra Vist oppegra Vist oppegra Vist oppegra Vist oppegra Vist oppegra Vist oppegra Vist oppegra Vist oppegra Vist oppegra Vist oppegra Vist oppegra Vist oppegra Vist oppegra Vist oppegba Vist oppegra Vist oppegra Vist oppegra Vist oppegra Vist oppegra Vist oppegra Vist oppegra Vist oppegra Vist oppegra Vist oppegra Vist oppegra Vist oppegra Vist oppegra Vist oppegra Vist oppegra Vist oppegra Vist oppegra Vist oppegra Vist oppegra Vist oppeforma Vist oppegra Vist oppegra Vist oppegra Vist oppegra Vist oppegra Vist oppegra Vist oppegra Vist oppegra Vist oppegra Vist oppegra Vist oppegra Vist oppegra Vist oppegra Vist oppegra Vist oppegra Vist oppegra Vist oppegra Vist oppegra Vist oppegra Vist opperea Vist oppegra Vist oppegra Vist oppegra Vist oppegra Vist oppegra Vist oppegra Vist oppegra Vist oppegra Vist oppegra Vist oppegra Vist oppegra Vist oppegra Vist oppegra Vist oppegra Vist oppegra Vist oppegra Vist oppegra Vist oppegra Vist oppegra Vist opperama Vist opopegra Vist opopegra Vist opopegra Vist opopegra Vist opopegra Vist opopegra Vist opopegra Vist opopegra Vist opopegra Vist opopegra Vist opopegra Vist opopegra Vist opopegra Vist opopegra Vist opopegra Vist opopegra Vist opopegra Vist opopegra Vist opopegra Vist opopegra Vist opopegua Vist opopegra Vist opopegra Vist opopegra Vist opopegra Vist opopegra Vist opopegra Vist opopegra Vist opopegra Vist opopegra Vist opopegra Vist opopegra Vist opopegra Vist opopegra Vist opopegra Vist opopegra Vist opopegra Vist opopegra Vist opopegra Vist opopegra Vist opopepra Vist opopegra Vist opopegra Vist opopegra Vist opopegra Vist opopegra Vist opopegra Vist opopegra Vist opopegra Vist opopegra Vist opopegra Vist opopegra Vist opopegra Vist opopegra Vist opopegra Vist opopegra Vist opopegra Vist opopegra Vist opopegra Vist opopegra Vist opopestra Vist opopegra Vist opopegra Vist opopegra Vist opopegra Vist opopegra Vist opopegra Vist opopegra Vist opopegra Vist opopegra Vist opopegra Vist opopegra Vist opopegra Vist opopegra Vist opopegra Vist opopegra Vist opopegra Vist opopegra Vist opopegra Vist opopegra Vist opopegrat Vist opopegra Vist opopegra Vist opopegra Vist opopegra Vist opopegra Vist opopegra Vist opopegra Vist opopegra Vist opopegra Vist opopegra Vist opopegra Vist opopegra Vist opopegra Vist opopegra Vist opopegra Vist opopegra Vist opopegra Vist opopegra Vist opopegra Vist opopegram Vist opopegra Vist opopegra Vist opopegra Vist opopegra Vist opopegra Vist opopegra Vist opopegra Vist opopegra Vist opopegra Vist opopegra Vist opopegra Vist opopegra Vist opopegra Vist opopegra Vist opopegra Vist opopegra Vist opopegra Vist opopegra Vist opopegra Vist opopegrave Viste gema | 15 mm 15 mm 15 mm 15 mm 15 mm 15 mm 15 mm 15 mm 15 mm 15 mm 15 mm 15 mm 15 mm 15 mm 15 mm 15 mm 15 mm 15 mm 15 mm 15 mm 15 mm 15 mm 15 mm 15 mm 15 mm 15 mm |
5. INSTALLATION
FORSIGTIG
Forkert installation kan medfrole skader på mennesker, dyr eller genstande. Producenten kan ikke gres ansvarlig foralandne skader.
[3] ON/OFF-knap / Ned-knap
[4] CLEANING-knap / Op-knap
[5] RESET-knap / Enter-knap

1. START
[KM-40/60/80C-HC(-W)]
Framsida
| Sedd是从ovan | Sedd是从sidan | |||
| Baksida | Ovansida | |||
| 15cm | 15mm | |||
| Vänster Högert | 15cm | 40cm | 15cm | BaksidaFramsida |
| ISMASKIN | ISMASKIN | |||
[KM-140C-HC(-W)]
Framsida
KM-40C-HC: 2,0 liter
KM-60C-HC: 2,5 liter
KM-80C-HC: 3,0 liter
KM-140C-HC: 3,5 liter
[KM-40/60/80C-HC(-W)]
Sett ovenfra
Sett fra sideren
[KM-140C-H(-W)]
Sett ovenfra
Sett fra sider
I noen omgivelser med hoy fuktiget kan det dannes kondens i maskinen som kan drype pa gulvet. Ikke installer maskinen der gulvet kan ta skade av vann.
Unngà at maskinen utsettes for direkte sollys i lengre perioder.
5. INSTALLASJON
FORSIKTIG
KM-40C-HC: 2,0 liter
KM-60C-HC: 2,5 liter
KM-80C-HC:3,0 liter
KM-140C-HC: 3,5 liter
Hoshizaki Italia - Italy
TLF.: +39 344 0616467
TLF.: +39 348 3022156
info@hoshizaki.it
Hoshizaki Deutschland - Tyskland, Sveits, Østerrike, Polen,
Tsjekkia, Slovakia
TLF.: +49 5121 697370
FAKS: +49 5121 6973719
Hoshizaki Iberia - Spain, Portugal
TLF.: +34 93 478 09 52
FAKS: +34 93 478 08 00
info@hoshizaki.es
Hoshizaki Sweden - Sverige
TLF.: +46 108 84 87 47
OrderSE@hoshizaki.dk
Hoshizaki Middle East -Midt-Østen
TLF.: +971 48 876 612
FAKS: +971 48 876 613
sales@hoshizaki.ae