
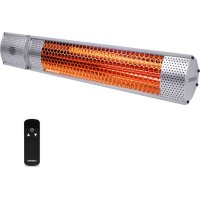
PH502AC - Heating Vonroc - Free user manual and instructions
Find the device manual for free PH502AC Vonroc in PDF.
| Brand | Vonroc |
| Model | PH502AC |
| Product type | Infrared patio heater |
| Rated voltage | 220-240 V ~ |
| Frequency | 50-60 Hz |
| Total power | 2000 W |
| Power levels | 1: 1000 W, 2: 2000 W |
| Heating element type | Low-glare lamp |
| Heat-up time | 1 second |
| Wavelength | 0.78-1.4 microns |
| Radiant efficiency | 90 % |
| Heating distance | 4 to 5 meters |
| Heating area | 10 to 12 m² |
| Color temperature | 1500 K |
| Overheat protection | Yes |
| Soft start | Yes |
| Protection rating | IP55 |
| Protection class | Class I (grounding required) |
| Weight | 1.60 kg |
| Use | Outdoor or spacious open area |
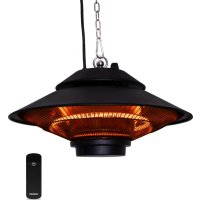
| Installation | Wall or ceiling mount, tiltable |
| Controls | Mode button on unit and remote control |
| Minimum ceiling distance | 50 cm (non-flammable), 1 m (flammable) |
| Minimum height from floor | 1.80 m |
| Cleaning | Soft cloth and soapy solution, no abrasives |
Frequently Asked Questions - PH502AC Vonroc
User questions about PH502AC Vonroc
0 question about this device. Answer the ones you know or ask your own.
Ask a new question about this device
Download the instructions for your Heating in PDF format for free! Find your manual PH502AC - Vonroc and take your electronic device back in hand. On this page are published all the documents necessary for the use of your device. PH502AC by Vonroc.
USER MANUAL PH502AC Vonroc
natural_image
Simple white icon of a table lamp with steam rising from its base (no text or symbols)EN Original Instructions 06
natural_image
Technical line drawing of a mechanical assembly with mounting brackets and a central component (no text or symbols)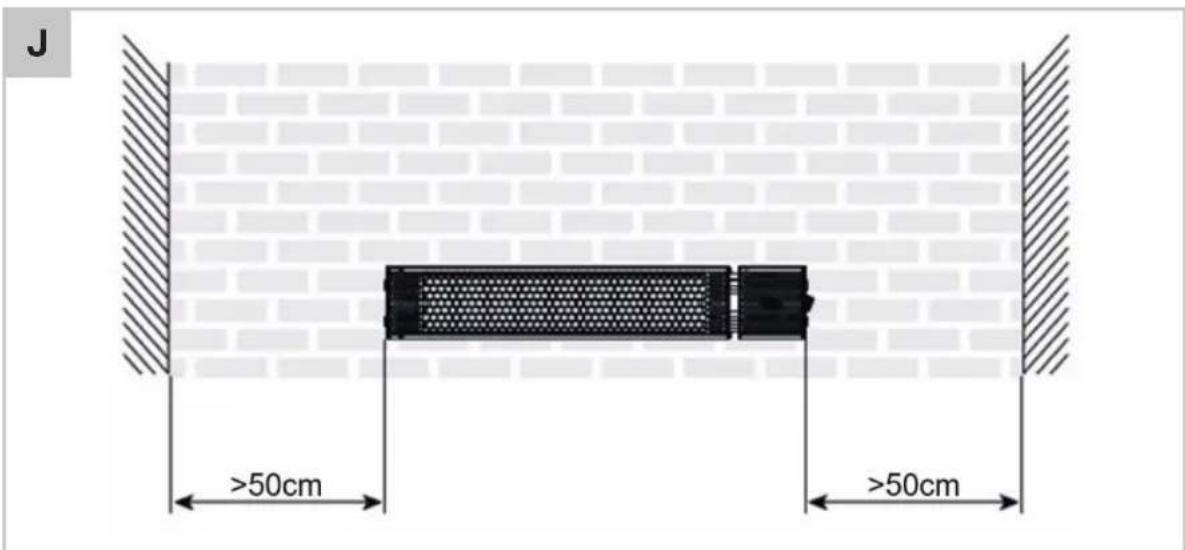
M
natural_image
Diagram showing four different mechanical or electrical components with no visible text or symbolsN
1. SAFETY INSTRUCTIONS
Read the enclosed safety warnings, the additional safety warnings and the instructions. Failure to follow the safety warnings and the instructions may result in electric shock, fire and/or serious injury. Save the safety warnings and the instructions for future reference.
The following symbols are used in the user manual or on the product:

Read the user manual.

Denotes risk of personal injury, loss of life or damage to the heater in case of nonobservance of the instructions in this manual.

Risk of electric shock.

Caution: hot surface!

Do not cover the device.

Earthing symbol. This appliance is classified as protection class I and must be connected to an earthed mains socket.

The product is in accordance with the applicable safety standards in the European directives.
GENERAL SAFETY WARNINGS THESE INSTRUCTIONS SHOULD BE READ CARE- FULLY AND RETAINED FOR FUTURE REFERENCE. The manufacturer cannot be held liable for any damages caused by failure to observe these instructions.
IMPORTANT SAFETY INSTRUCTIONS
READ CAREFULLY-The infrared heater is designed for safe operation. Nevertheless, installation, maintenance and operation of the heater can be dangerous. Observing the following procedures will reduce the risk of fire, electric shock, injury to persons and keep installation time to a minimums. Save these instructions for future used.
- Read all instruction before using this heater.
- Remove the unit from its packaging and check to make sure it is in good condition before using.
- Do not let children play with parts of package (such as plastic bags).
- Check the household voltage to ensure it matches the heater's rated specification.
- Check the power cord and plug carefully before used, to make sure that they are not damaged.
- Before unplugging the power cord, be sure to turn off the power, when energizing the unit, be sure your hands are dry to prevent from electric shock.
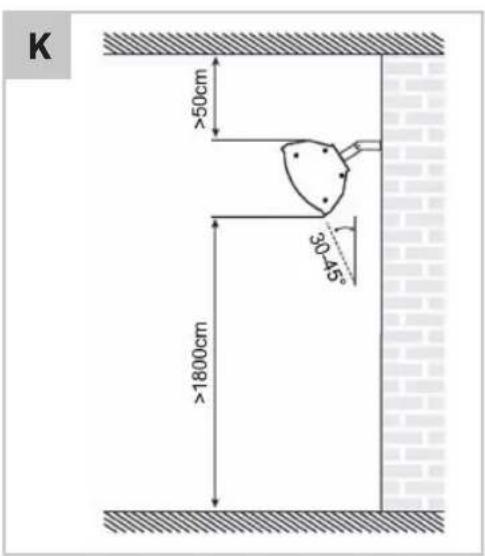
- Only use the terrace radiator outdoors or in a large open space. Keep all fl ammable objects such as tarpaulins, parasols, branches, furniture, curtains, paper etc. out of the way of the device (at least 1 meter also if they are if they are non-stationary objects!). The distance to the walls must be at least 1 meter. The head must be located at least 180 cm above the ground. If you place the device under a roof, there must be a space of at least 50 cm between the cap of the terrace radiator and the (non-fl ammable) ceiling. With a fl ammable roof (wood, plastic, tarpaulin etc.) this distance must be at least 1 meter. Always ensure good ventilation!
- Do not locate the device just above or below a wall socket (not in the immediate vicinity).
- The terrace heater is only intended for household use. You should not therefore use it on construction sites, in glasshouses, barns or stalls etc., even if they are largely open. There is usually too much fl ammable material there.
- Do not use this terrace heater as sauna heating or as a permanent space or room heater.
- Do not use this terrace heater in a kennel or any other location where animals are present.
- Do not use near or in the immediate vicinity of a bath or swimming pool or any source of liquid. Despite the fact that the device is splash proof, you need to be careful with water. Ensure that it cannot fall into the water and do not expose it to powerful jets of water. Do not touch it with wet hands and do not place the device in the area immediately around a bath, washroom, swimming pool or other water supply, as this is dangerous.
- To protect against electric shock, do not immerse cord or plug in water or any other liquid.
- Do not insert or allow foreign objects to enter any ventilation or exhaust opening, as this may
cause an electric shock, fire or damage to the heater.
- Ensure there is sufficient light. The switches on the device must be properly visible from a distance of 1 meter.
- Always unplug the heater when not in use. Never leave the device unsupervised when in use, but switch it off and unplug. Do not use the device with a programmer, timer or any other device that switches the device on automatically.
- Do not use the heater with an external voltage regulator such as dimmer, speed controller etc. This produces an electrical hazard.
- Make sure that the cord does not hang over (sharp) edges, does not make strong curves, does not touch hot surfaces. Do not wrap the cord around the device.
- Do not allow cord to overhang the counter top where it can be easily pulled by children.
- Do not put fi ngers or foreign objects into the grill while in operation.
- Do not leave the appliance unattended when in use.
- This heater is not intended for use in bathrooms, laundry and similar indoor locations, never locate the heater where it may fall into a bathtub or other water container.
- No liability can be accepted for any damage caused by non-compliance with these instructions or any other improper use or mishandling.
- This appliance can be used by children aged from 8 years and above and persons with reduced physical, sensory or mental capabilities or lack of experience and knowledge if they have been given supervision or instruction concerning use of the appliance in a safe way and understand the hazards involved. Children shall not play with the appliance. Cleaning and user maintenance shall not be made by children without supervision.
- If the device for any reason produces cracks or breaks, or if you establish any imperfection or interruption to the aluminium casing or any other part, immediately stop the operation of the device and take the plug from the socket.
- If the power cord is damaged in any way, it must be replaced by the manufacturer or its service agent or a similarly qualified person in order to avoid a hazard.
- To prevent overheating of this appliance, keep the air inlets and outlets clean and free of any-
thing that may cause blockage. Check all inlets and outlets from time to time to ensure it is clear of any dirt or dust accumulation. DO NOT COVER. The warning label not to cover the device must also be placed in a clearly visible location after installation: it should not therefore be on the back.
- Parts of the heater may exceed 200°C, contact with the heating tube, reflector, or metal parts near the heating tube, may cause severe BURNS. To avoid burns, do not let bare skin touch the hot surface.
- NEVER place hands under the heating elements. ALWAYS allow heating element to cool at least 10 minutes before touching the heating tube or adjacent parts.
- Do not store any burnable liquids or materials like paint, petrol, gas tanks etc. in the immediate surroundings of the device. Don't use the device in fl ammable ambience, such as nearby combustible gas tanks, gas tubes or spray cans. Danger of explosion and fire!
- This product contains recyclable materials. Do not dispose this product as unsorted community waste. Please contact your local authorities for the nearest collection point.
Electrical safety

Always check that the voltage of the power supply corresponds to the voltage on the rating plate.
- If the supply cord of this power tool is damaged, it must be replaced by a specially prepared supply cord available through the service organization.
- Only use extension cables that are suitable for the power rating of the machine with a minimum thickness of 1.5 mm ^2 . If you use an extension cable reel, always fully unroll the cable.
2. MACHINE INFORMATION
Intended use
This product is designed as a patio heater for domestic environments. The heater is intended for private gardens or other outdoor areas at home.
The heater may not be used to heat an indoor space, usage as a non-household outdoor space heater or for the drying of textiles or other materials. This heater is not equipped with a device to
control the room temperature so do not use this heater in spaces when they are occupied by persons not capable of leaving the room on their own, unless constant supervision is provided. The device is to be used only for its prescribed purpose. Any other use is deemed to be a case of misuse.
TECHNICAL SPECIFICATIONS
| Model No. PH502AC-PH503AC | |
| Voltage 220-240 V ~ | |
| Frequency 50-60 Hz | |
| Power 2000W | |
| Power settings | 1: 1000W2: 2000W |
| Heating element type Low glare | lamp |
| Heating time 1 second | |
| Wave length 0.78-1.4 microns | |
| Radiant effi ciency 90% | |
| Heating distance 4-5m | |
| Heating area 10-12 m^2 | |
| Colour temperature 1500K | |
| Overheat protection Yes | |
| Electronic soft start | Yes |
| Ingress protection class | IP55 |
| Protection class | Class I |
| Weight | 1.60 kg |
DESCRIPTION
The numbers in the text refer to the diagrams on page 2-5.
- Heater
- Protective grill
- Receiver for remote control
- Power cable
- On/off switch
- Mode button
- Remote control on/off switch
- Power level 1 button
- Power level 2 button
- Mounting bracket
- Sleeve anchor
- Screw with washers
- Wing nut
- Bolt
- Washer
3. ASSEMBLY

This heater should be installed by a competent person, i.e. a qualified electrician.

Always disconnected the heater from the electrical supply and allow it to cool before installation.
Installing the heater (Fig. A-N)

Always mount the device with the supplied accessories.
Before starting the installation, take the following into consideration:
- Place the device on a firm, level surface.
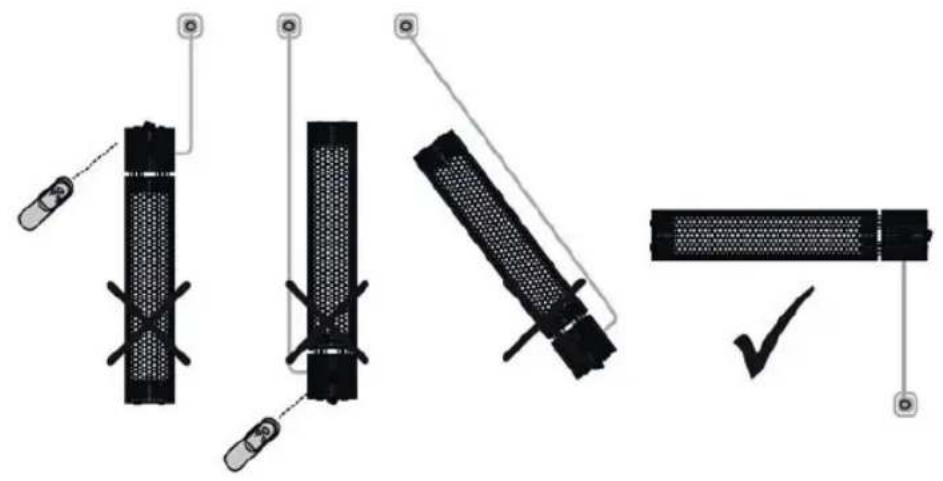
- The device must be mounted so that there is 50 cm of free space between the heater and any ceiling, tent canvas etc. There must also be at least 1.80 m between the ground and the underside of the device. Refer to Fig. J and K. The device may never be hung at an angle!
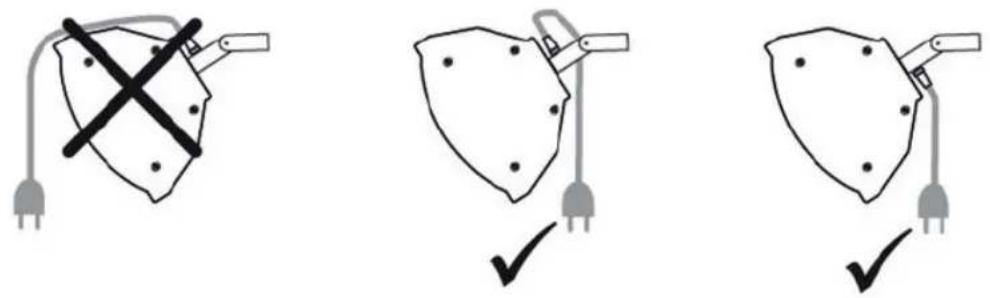
- Ensure that the power supply cable is well mounted and that it does not come into contact with reflector of the heater or that does not trail into heated area.
- Do not install the heater on an inflammable surface.
- If the heater is to be used outside, a weather-proof outlet is highly recommended.
- Before drilling ensure that there are no wires or water pipes in the area where the heater is to be installed.
To install the heater on a wall or ceiling, follow these steps:
- The device is supplied with the mounting accessories as shown in figure C.
- Drill a total of 4 holes using the dimensions in figure D. The hole diameter should be the same diameter as the anchor diameter: 8mm. Drill at least 10 to 15 mm deeper than the expected embedment. Ensure the holes are level and at exactly the same height.
- Clean out the holes of any debris.
- Set the nut flush with the top of the sleeve anchor (11), shown as step 1 in figure E.
- Insert the sleeve anchor (11) into the hole in the base material, shown as step 2 in figure E. Using a hammer, insert the sleeve anchor as far
until the washer and nut are tight against the base material.
- Now put the mounting bracket (10) on the sleeve anchors (11), and mount it using the washer and nut. Turn the nut until finger tight. Both as shown on figure F.
- Use a size 10 wrench to set the anchor by turning the nut three to four full turns.
- Mount the remaining 2 mounting brackets (10) onto the outer holes of the heater (1), as shown on figure G.
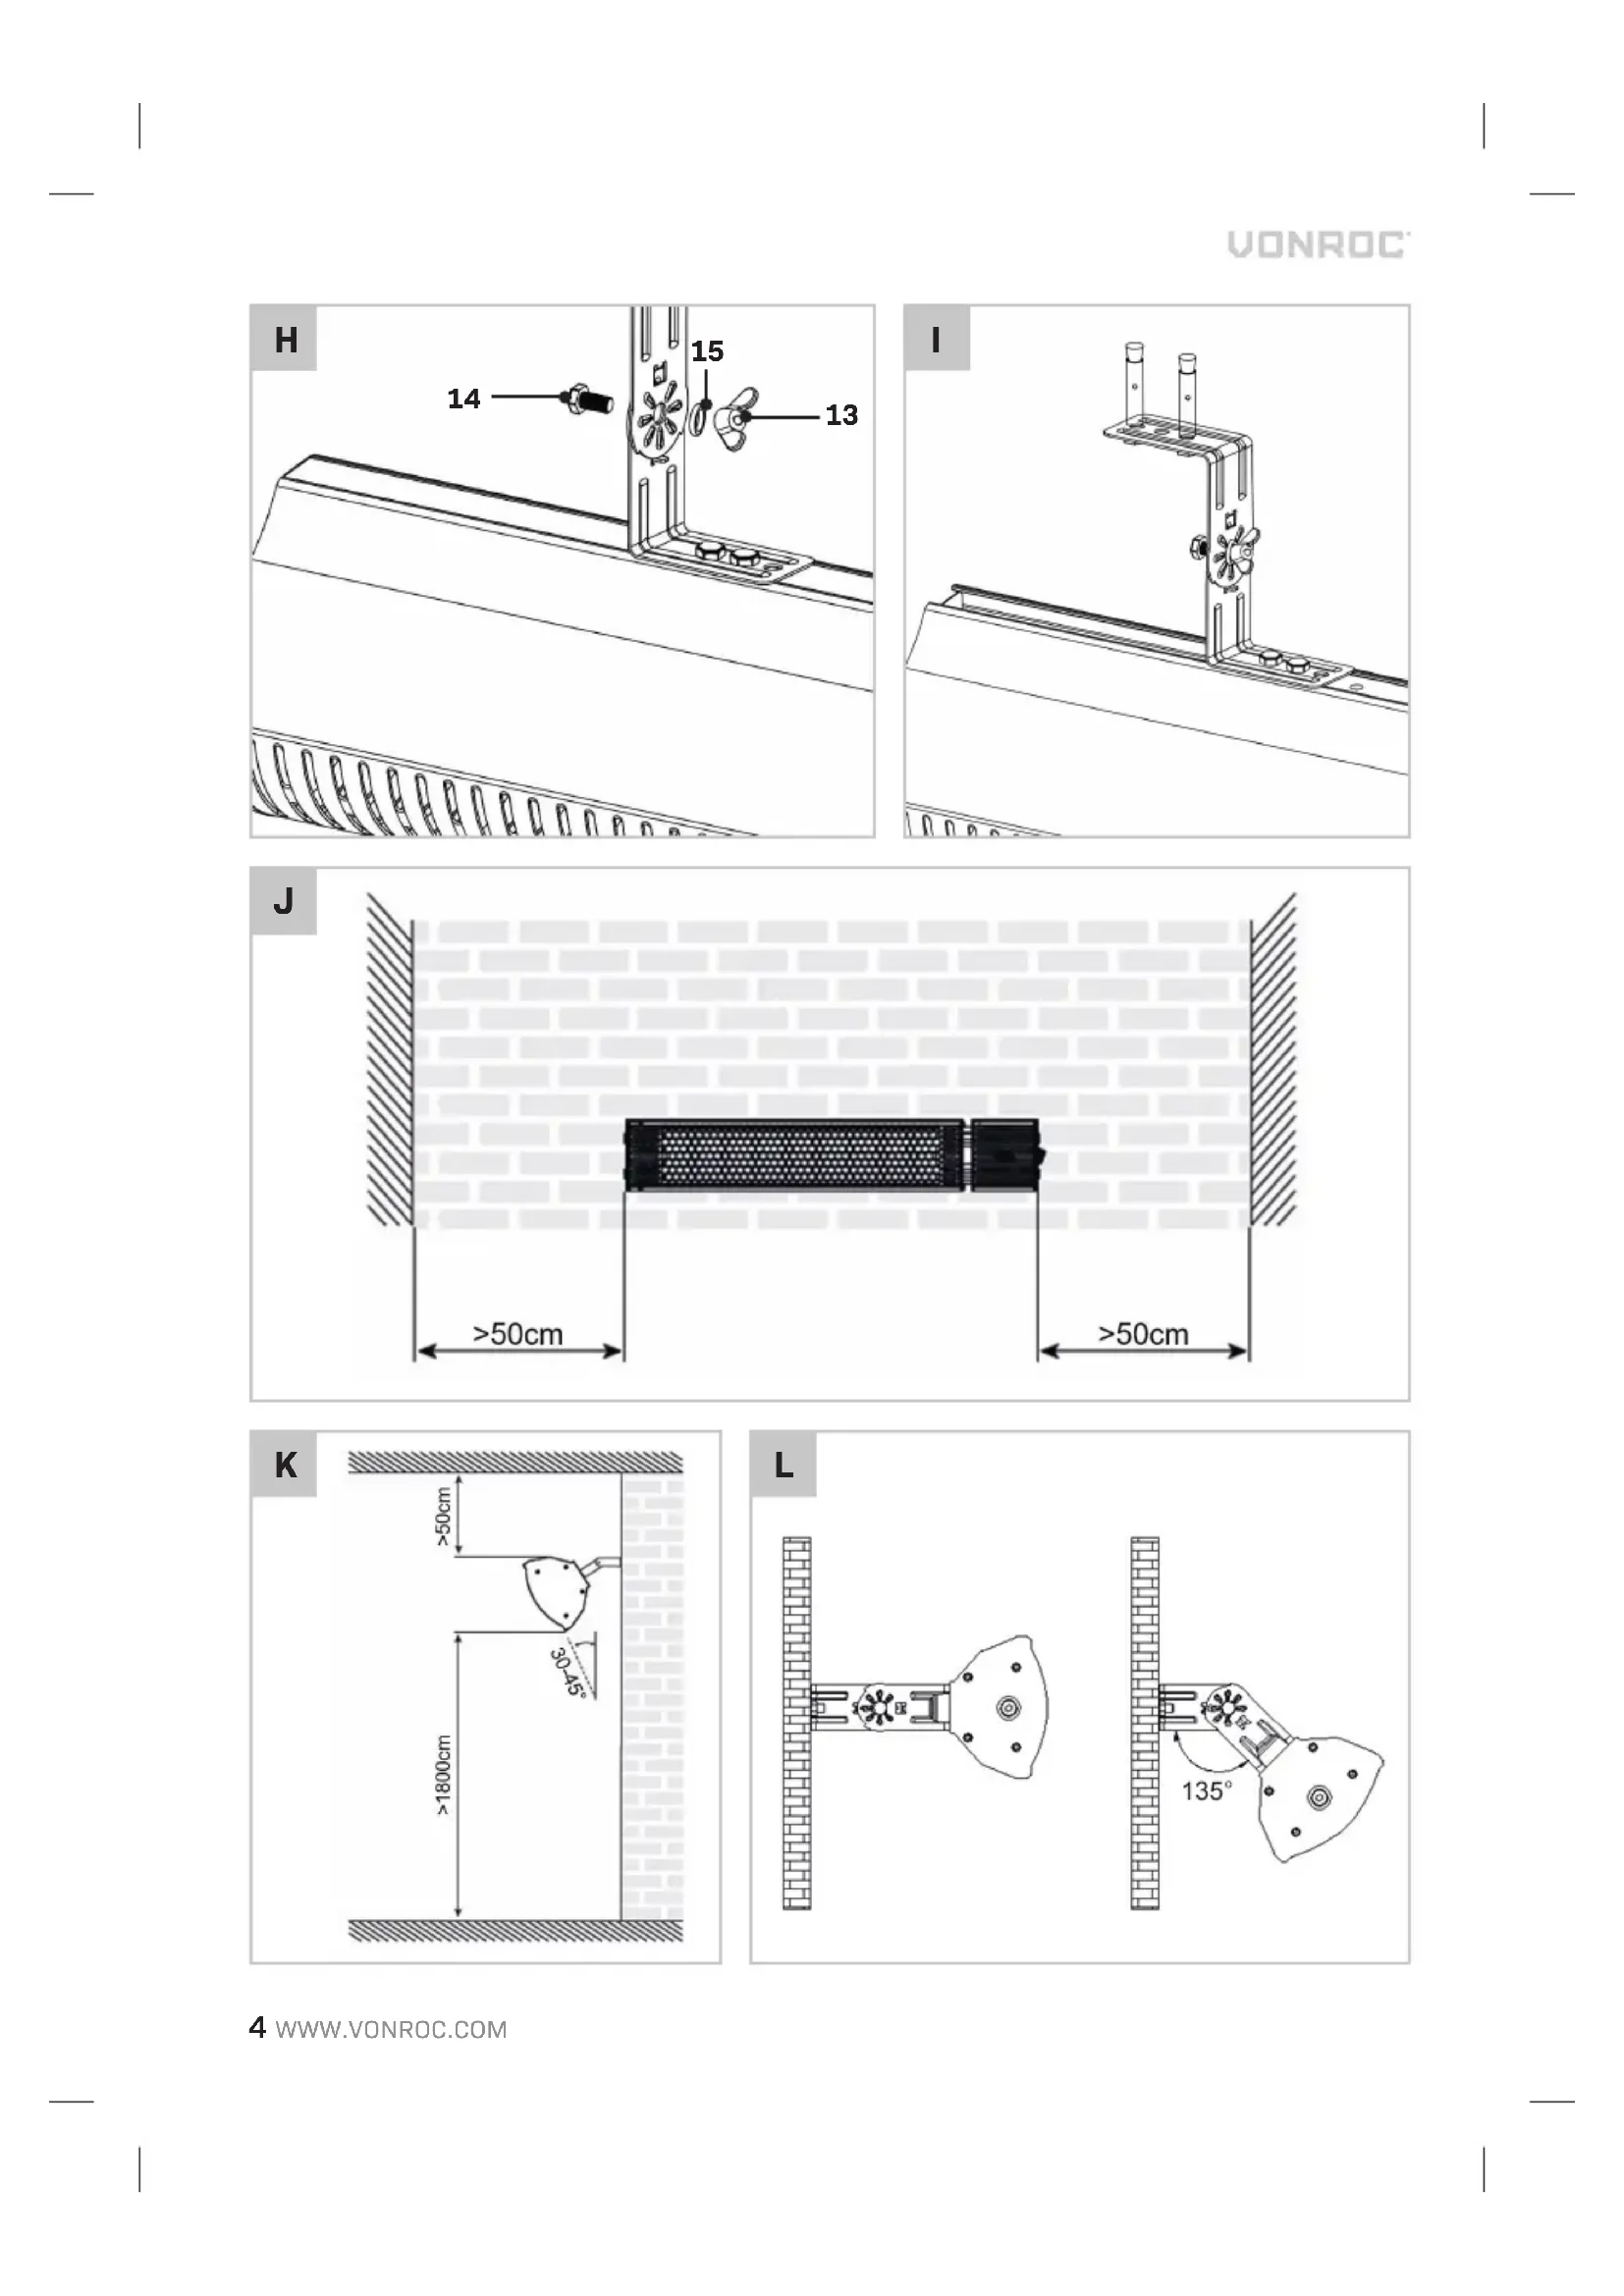
- Take the heater with the assembled brackets to the mounting brackets mounted on the wall or ceiling. Now pair both brackets with the bolt (14), washer (15) and wing nut (13), as shown on figure H.
- Figure I shows a correctly assembled mounting bracket assembly.
- Take into account the minimum distances as shown on figure J and K.
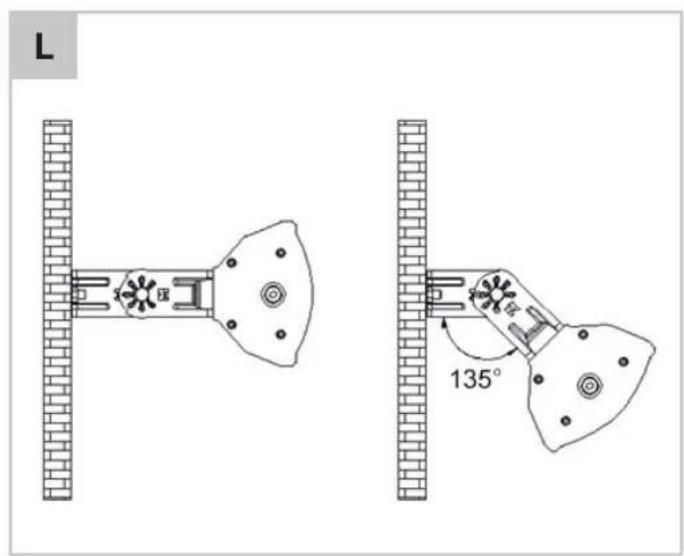
- The heater can be adjusted until the maximum angle, as shown on figure K and L.
- Plug the patio heater into a grounded power outlet. Check beforehand if the voltage rating matches the device.
- Take into account to mount the power cable in correct matter, as shown on figure M and N. Use tyraps to fixate the cable to the mounting brackets if necessary.
Note: the heater can also be mounted on a tripod or metal stand. Follow the instructions supplied with the tripod or stand, to mount the heater properly.
Assembling the remote control (Fig. B)
- Flip the remote control (8) to the backside and remove the battery cover.
- Insert 2 AAA/ Alkaline type batteries into the remote control (8) in accordance with the instructions and polarity of the batteries..
- Change the batteries in the same way depicted above.
4. OPERATION
Switching on/off (Fig. A, B)
The heater can be turned on and off using the remote control (8) or the mode button (6). Before use, the power switch (5) on the heater must first be turned on.
Using the remote control
If you do not have the remote control in your possession, please contact Vonroc customer service.
- First turn the switch (5) on the heater to the 'I' On position.
- Press the button (9) on the remote control (8) to turn the heater on.
- To turn the heater off, again press the button (9) on the remote control (8).
- Press the switch (5) on the heater to the 'O' Off position to power off
Note: Make sure to point the remote control (8) in the direction of the remote control receiver (10). All VONROC heaters and their remote controls use the same frequency, so it is possible to control several heaters with just one remote.
Using the mode button
- First turn the switch (5) on the heater to the 'I' On position.
- Press the mode button (1) to turn the heater on in level 1 – 1000W power level.
- Press the mode button (1) again to turn the heater on in level 2 - 2000W power level.
- To turn the heater off, again press the mode button (1).
Adjusting the power level (Fig. A, B)
The heater power can be adjusted in two levels:
- Level 1 - 1000W (50% power)
- Level 2 - 2000W (100% power)
The desired level can be selected using the remote control by pressing either the Power level 1 button (8) or the Power level 2 button (9). The level can also be selected by using the mode button (6), see chapter 'switching on/off'.
5. MAINTENANCE

Always make sure that the machine is not connected to the mains electricity when you carry out any maintenance of the mechanism.

CAUTION: Risk of Electric Shock. DO NOT open or try to repair the heater yourself.
Clean the machine casings regularly with a soft cloth, preferably after each use. Make sure that the ventilation openings are free of dust and dirt. Re-
move very persistent dirt using a soft cloth moistened with soapsuds. Do not use any solvents such as gasoline, alcohol, ammonia, etc. Chemicals such as these will damage the synthetic components.
- DO NOT use alcohol, gasoline, abrasive powders, furniture polish or rough brushes to clean the heater. This may cause damage or deterioration to the surface of the heater.
- DO NOT immerse the heater in water.
- Wait until the heater is completely dry before use.
ATTENTION:
- Always disconnect the heater from the electricity supply and allow it to cool before attempting to clean it.
- If the heater has collected dust or dirt inside the unit or around the heating element, have to unit cleaned by a qualified service agent. Do not operate the heater in this condition.
- The only maintenance required is cleaning of the external surfaces of the heater.
- Do not touch the heating element with bare fi ngers, as residue from your hand could affect the life of the lamp. If it is accidentally touched, remove the fi nger marks with a soft cloth moistened with mentholated spirit or alcohol.
- Do not attempt to repair or adjust any electrical or mechanical functions on this heater.
- The heater contains no user serviceable parts. Should the product suffer damage or breakdown, it must be returned to the manufacturer or its service agent.
- Damaged supply cords to be replaced by the manufacturer, service agent or similarly qualified person in order to avoid hazard.
Storage
Store the heater in a cool, dry location when not in use to prevent dust and dirt build up. Use packaging carton to store.
Trouble Shooting
If the heater will not operate, please check the following before seeking repair or service:
- Check if the power cord is plugged into an electrical outlet, if not plug in.
- Check if electricity to the main fuse is working.
- Make certain the power switches are turned on. If not, choose a setting.
ENVIRONMENT

Faulty and/or discarded electrical or electronic apparatus have to be collected at the appropriate recycling locations.
Only for EC countries
Do not dispose of power tools into domestic waste. According to the European Guideline 2012/19/EU for Waste Electrical and Electronic Equipment and its implementation into national right, power tools that are no longer usable must be collected separately and disposed of in an environmentally friendly way.
WARRANTY
VONROC products are developed to the highest quality standards and are guaranteed free of defects in both materials and workmanship for the period lawfully stipulated starting from the date of original purchase. Should the product develop any failure during this period due to defective material and/or workmanship then contact your VONROC directly.
The following circumstances are excluded from this guarantee:
- Repairs and or alterations have been made or attempted to the machine by unauthorized service centers;
- Normal wear and tear;
- The tool has been abused, misused or im-properly maintained;
- Non-original spare parts have been used.
This constitutes the sole warranty made by company either expressed or implied. There are no other warranties expressed or implied which extend beyond the face hereof, herein, including the implied warranties of merchantability and fi tness for a particular purpose. In no event shall VONROC be liable for any incidental or consequential damages. The dealers remedies shall be limited to repair or replacement of nonconforming units or parts.
The product and the user manual are subject to change. Specifications can be changed without further notice.
Attention surface chaude!

- SAFETY INSTRUCTIONS
- GENERAL SAFETY WARNINGS THESE INSTRUCTIONS SHOULD BE READ CARE- FULLY AND RETAINED FOR FUTURE REFERENCE. The manufacturer cannot be held liable for any damages caused by failure to observe these instructions.
- IMPORTANT SAFETY INSTRUCTIONS
- Electrical safety
- MACHINE INFORMATION
- Intended use
- DESCRIPTION
- ASSEMBLY
- Installing the heater (Fig. A-N)
- Assembling the remote control (Fig. B)
- OPERATION
- Switching on/off (Fig. A, B)
- Using the remote control
- Using the mode button
- Adjusting the power level (Fig. A, B)
- MAINTENANCE
- ATTENTION:
- Storage
- Trouble Shooting
- ENVIRONMENT
- Only for EC countries
- WARRANTY
- The product and the user manual are subject to change. Specifications can be changed without further notice.
Brand : Vonroc
Model : PH502AC
Category : Heating