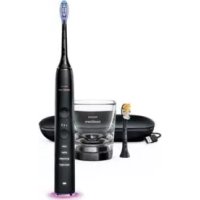
Sonicare DiamondClean Smart 9400 HX9917 - Electric toothbrush PHILIPS - Free user manual and instructions
Find the device manual for free Sonicare DiamondClean Smart 9400 HX9917 PHILIPS in PDF.
 FR
FR
 AZ
AZ
 BG
BG
 CS
CS
 DA
DA
 DE
DE
 EL
EL
 EN
EN
 ES
ES
 ET
ET
 FI
FI
 HE
HE
 HU
HU
 HY
HY
 IT
IT
 KA
KA
 KK
KK
 KY
KY
 LT
LT
 LV
LV
 MK
MK
 NL
NL
 NO
NO
 PL
PL
 PT
PT
 RU
RU
 SK
SK
 SL
SL
 SQ
SQ
 SV
SV
 TG
TG
 TK
TK
 UK
UK
 UZ
UZ
| Brand | Philips |
| Model | Sonicare DiamondClean Smart 9400 HX9917 |
| Category | Sonic electric toothbrush |
| Autonomy | 28 sessions of 2 min (≈14 days at 2 brushings/day) |
| Charging time | Up to 24 h (first charge) |
| Power supply | Integrated rechargeable Lithium-ion battery, charges via base or USB case |
| Power adapter | USB-A (5 V DC), output 5 V, 1 A (included) |
| Brushing modes | 5 modes: Clean, White+, Gum Health, Deep Clean+, Tongue Care |
| Intensity levels | 3 (Low, Medium, High) |
| Integrated technologies | BrushSync (auto mode selection, replacement reminder), pressure sensor, BrushPacer, SmartTimer, EasyStart |
| Connectivity | Bluetooth 2.4 GHz (Sonicare app) |
| Brush head compatibility | Philips Sonicare smart brush heads with BrushSync technology |
| Brush head replacement reminder | Orange indicator on handle |
| Battery indicator | White (charging/full), Orange flashing (low) |
| Waterproof rating | Handle water resistant (rinse under water), charger not waterproof |
| Cleaning | Rinse brush head after each use, clean handle with a damp cloth, do not use in dishwasher |
| Included accessories | 1 handle, 1 smart brush head, 1 charging glass, 1 charging base, 1 USB travel case, 1 USB adapter |
| Weight | Approx. 120 g (handle only) |
| Dimensions (handle) | Approx. 25 cm x 2.5 cm |
| Warranty | International Philips warranty (excluding brush heads and normal wear) |
| Recycling | Do not dispose of with household waste; battery removable by a professional |
Frequently Asked Questions - Sonicare DiamondClean Smart 9400 HX9917 PHILIPS
User questions about Sonicare DiamondClean Smart 9400 HX9917 PHILIPS
0 question about this device. Answer the ones you know or ask your own.
Ask a new question about this device
Download the instructions for your Electric toothbrush in PDF format for free! Find your manual Sonicare DiamondClean Smart 9400 HX9917 - PHILIPS and take your electronic device back in hand. On this page are published all the documents necessary for the use of your device. Sonicare DiamondClean Smart 9400 HX9917 by PHILIPS.
USER MANUAL Sonicare DiamondClean Smart 9400 HX9917 PHILIPS

English 6
Azərbaycanca 27
Čeština 49
Dansk 70
Deutsch 91
Eesti 114
Español 136
Français 160
Hrvatski 183
Italiano 204
Latviešu 227
Lietuviškai 249
Magyar 271
Nederlands 293
Norsk 315
O'zbek 336
Polski 359
Português 383
Shqip 405
Slovenščina 427
Slovensky 448
Srpski 470
Suomi 491
Svenska 513
Türkmençe 534
Ελληνικά 555
Български 580
Кыргызча 604
Македонски 627
Русский 651
Точикй 676
Українська 700
Қазақша 724
Ruijtntu 747
phosphorus 772
797
Introduction
Welcome to the Philips Sonicare family!
This toothbrush enables you to obtain superior plaque removal, whiter teeth and healthier gums. Using
Sonicare's combination of gentle sonic technology and clinically developed and proven features, you can be confident that you're getting the very best clean, every time.
Further support and product registration are available to you at: www.philips.com/support
Important safety information
Only use the product for its intended purpose. Read this important information carefully before you use the product and its batteries and accessories, and save it for future reference. Misuse can lead to hazards or serious injuries.
Warnings
- Keep the chargers away from water.
- After cleaning, make sure the chargers are completely dry before you connect USB Charger.
- This appliance can be used by children and persons with reduced physical, sensory or mental capabilities or lack of experience and knowledge if they have been given supervision or instruction concerning use of the appliance in a safe way and understand the hazards involved. Cleaning and user maintenance shall not be made by children without supervision.
- Children shall not play with the appliance.
- Only use original Philips accessories or consumables. Only use the charger provided with the product. If supplied, only use the original USB cable and USB power supply unit.
- This appliance contains no user-serviceable parts. If the appliance is damaged, stop using it and contact the Consumer Care Center in your country. If the cord is damaged, replace the charger with a new one.
-
Do not use the chargers outdoors or near heated surfaces.
-
Do not clean any part of the product in the dishwasher.
- This appliance has only been designed for cleaning teeth, gums and tongue.
- Stop using a brush head with crushed or bent bristles. Replace the brush head every 3 months or sooner if signs of wear appear.
- Avoid direct contact with products that contain essential oils or coconut oil. Contact may result in bristles dislodging.
- Stop using the appliance and consult your dentist/doctor if excessive bleeding occurs after use, if bleeding continues to occur after 1 week of use or if you experience discomfort or pain.
- If you have had oral or gum surgery in the previous 2 months, consult your dentist before you use this appliance.
- If you have a pacemaker or other implanted device, contact your doctor or the manufacturer of the implanted device prior to use.
- If you have medical concerns, consult your doctor before you use this appliance.
- This appliance is a personal care device and is not intended for use on multiple patients in a dental practice or institution.
Battery safety instructions
- This appliance contains batteries that are only to be removed by skilled persons
- Only use the product for its intended purpose. Read this information carefully before you use the product and its batteries and accessories, and save it for future reference. Misuse can lead to hazards or serious injuries. Accessories supplied may vary for different products.
- Only use original Philips accessories and consumables. Only use detachable supply unit CBAyyyy, TCAxxxx, or WAAxxxx.
-
Keep product and batteries away from fire and do not expose them to direct sunlight or high temperatures.
-
If the product becomes abnormally hot or smelly, changes color or if charging takes longer than usual, stop using and charging the product and contact Philips.
- Do not place products and their batteries in microwave ovens or on induction cookers.
- Do not open, modify, pierce, damage or dismantle the product or battery to prevent batteries from heating up or releasing toxic or hazardous substances. Do not short-circuit, overcharge or reverse charge batteries.
- This appliance contains batteries that are non-replaceable. When the battery is at end of life, the appliance shall be properly disposed of, see section on recycling.
- If batteries are damaged or leaking, avoid contact with the skin or eyes. If this occurs, immediately rinse well with water and seek medical care.
- When you handle batteries, make sure that your hands, the product and the batteries are dry.
- To avoid accidental short-circuiting of batteries after removal, do not let battery terminals come into contact with metal object (e.g. coins, hairpins, rings). Do not wrap batteries in aluminium foil. Tape battery terminals or put batteries in a plastic bag before you discard them.
- Charge and use the product at a temperature between 0 °C and 40 °C (32°F and 104 °F).
Storage and transportation conditions
Temperature -10°C to 60°C (14 °F to 140 °F).
Electromagnetic fields (EMF)
This Philips appliance complies with all applicable standards and regulations regarding exposure to electromagnetic fields.
Radio Equipment Directive
Hereby, Philips declares that electric toothbrushes with radio equipment type (Bluetooth, NFC) are in compliance with Directive 2014/53/EU.
- The Bluetooth radio frequency interface in applicable products operates at 2.4 GHz.
- The maximum output power by the Bluetooth appliance is 3 dBm.
- The NFC radio frequency interface in applicable products operates at 13.56 MHz.
- The maximum RF power transmitted by the appliance is 30.16 dBm.
The full text of the EU declaration of conformity is available at the following internet address:
www.philips.com/support
Note: The Features of different models may vary. Some models may not be equipped with Bluetooth or NFC.
Intended use
Sonicare DiamondClean Smart power toothbrushes are intended to remove adherent plaque and food debris from the teeth to reduce tooth decay and improve and maintain oral health. Sonicare DiamondClean Smart power toothbrushes are intended for personal use. Use by children should be with adult supervision.
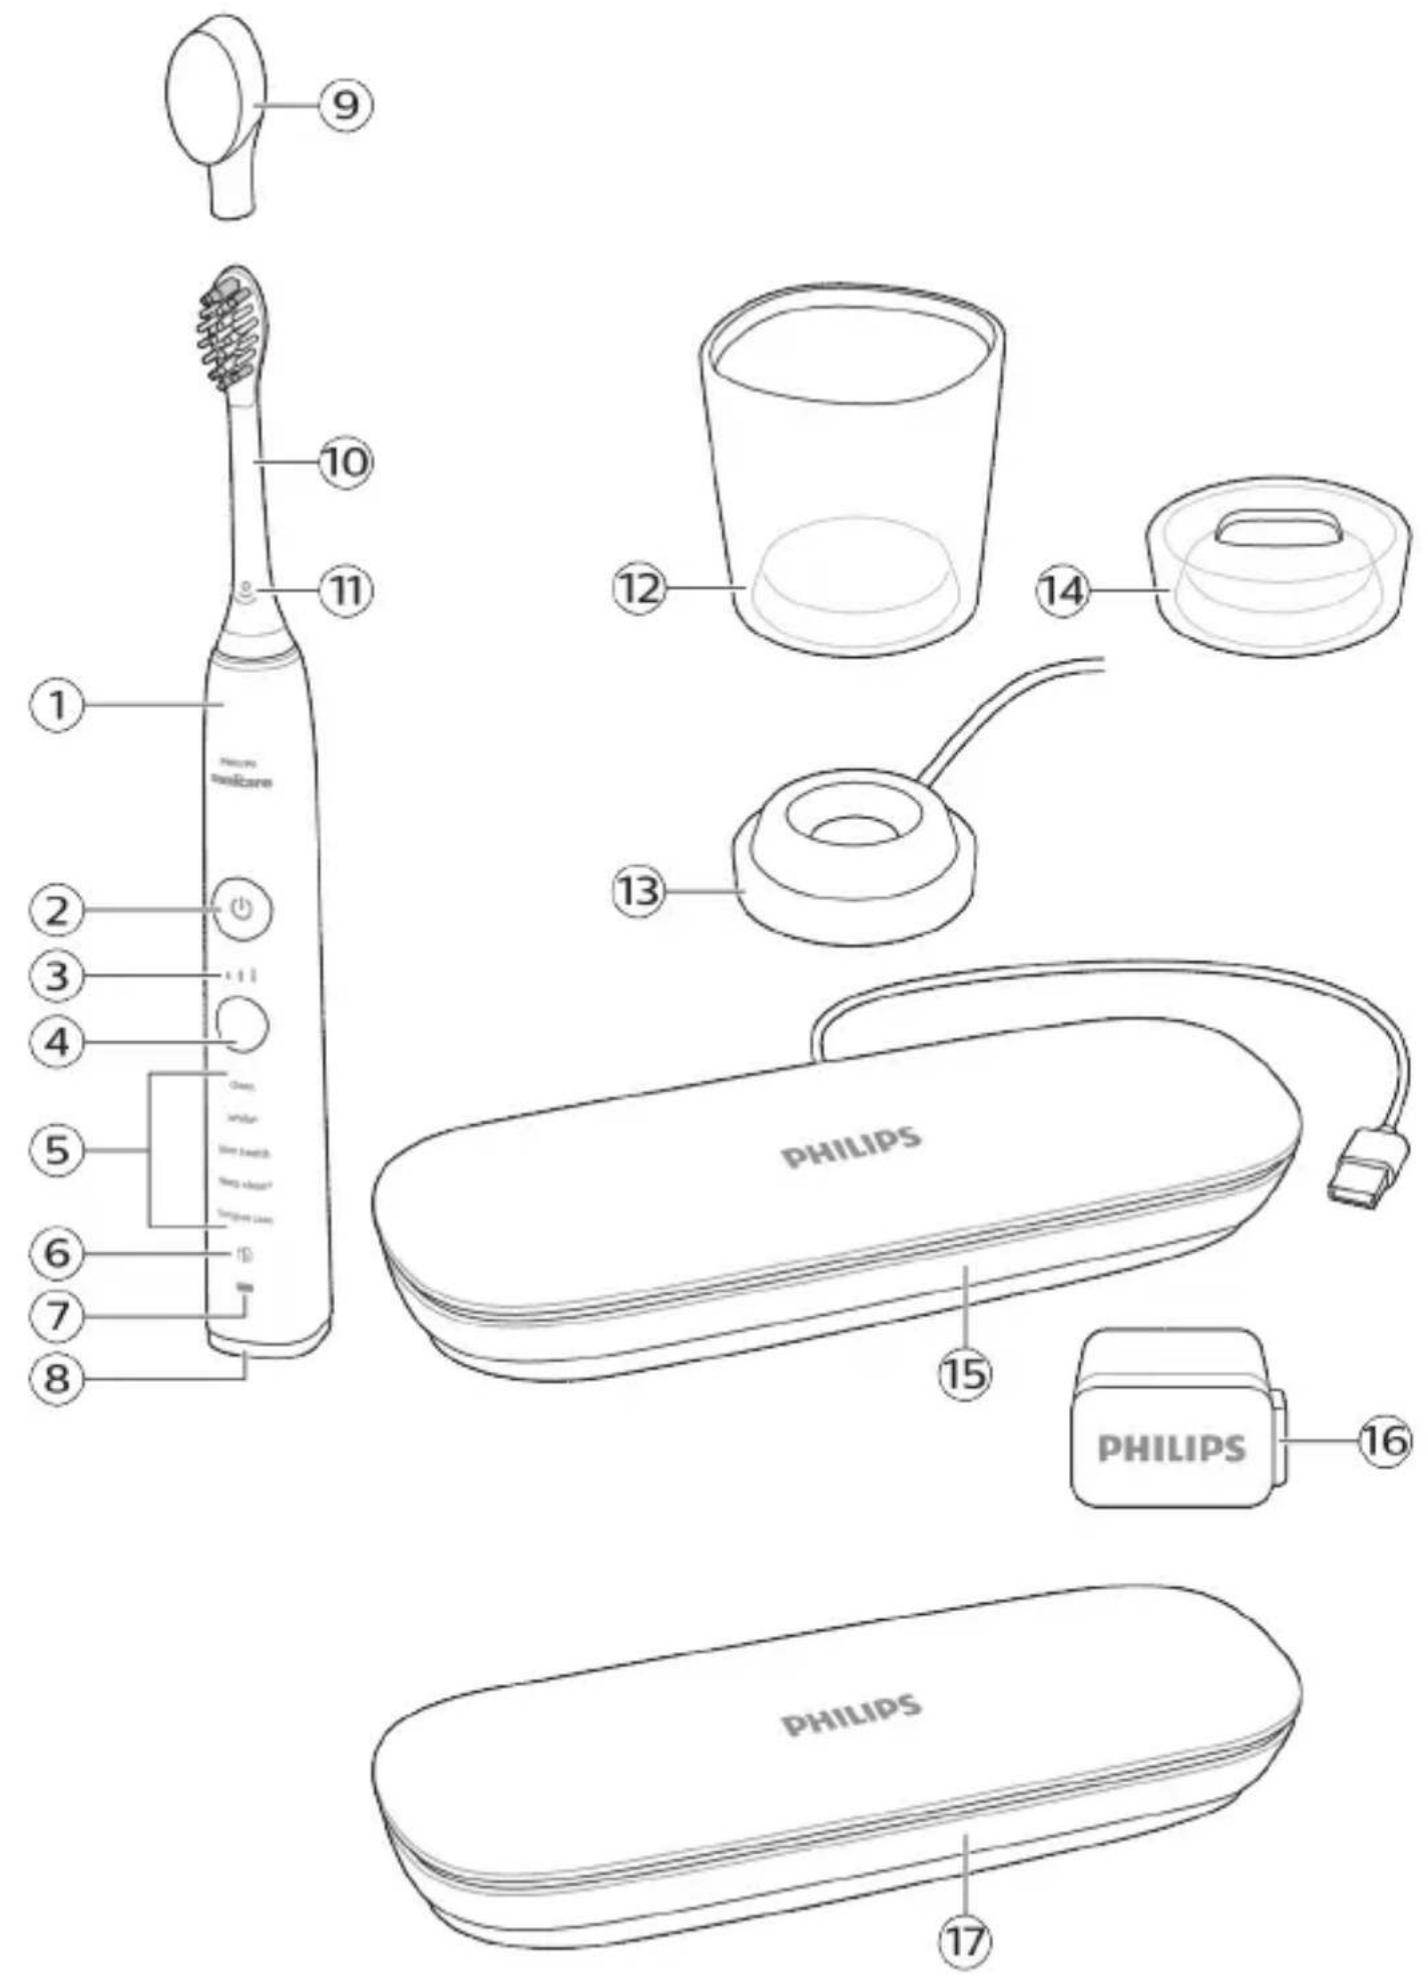
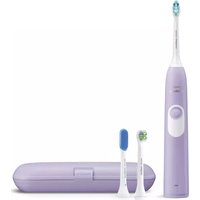
Your Philips Sonicare (Fig 1.)
1 Handle
2 Power on/off button
3 Intensity indicator
4 Mode/intensity button
5 Mode indicator
6 Brush head replacement reminder
7 Battery indicator
8 Brushing feedback light
Accessories:
9 Brush head cap
10 Smart brush head(s)
11 BrushSync symbol
12 Charging glass
13 Charging base
14 Charging stand
15 Charging travel case with integrated USB cord
16 USB-A wall adapter
17 Travel case
Note: Accessories included may vary based on the model purchased.
Sonicare app - Getting started
The Sonicare app pairs with your toothbrush to provide you a connected experience. By connecting your toothbrush to your Sonicare app account, you will be able to:
- Track your brushing progress.
- Receive personalized tips and actionable recommendations to improve your oral health.
- Access the full range of benefits and receive ongoing upgrades.
The app is compatible with a wide range of iPhone and Android ™ smartphones.
To start using the Sonicare app:
1 Download the Sonicare app to your phone.
2 Ensure your phone's Bluetooth is turned on.
3 Pick up your toothbrush to ensure it is active (lights on).
4 Open the app and follow the steps.
5 Pair your toothbrush with the app.
6 Create your account via the app. Complete firmware update, if prompted, to access the latest improvements and features.
7 Brush regularly with your toothbrush connected to the app. When you regularly sync the toothbrush with the app, you will receive updates to help improve your oral healthcare.
8 Sync regularly.
9 Keep your phone close to your toothbrush for optimal data transfer.
To sync manually: Pair/connect your toothbrush with the app every two weeks to benefit from the app features/capabilities.
To sync automatically: Allow location permission while setting up the app. By allowing location permission, your phone knows when it is in the connection range of your toothbrush and can refresh your brushing data in the app to provide the latest insights and recommendations.
Note: Make sure your phone's Bluetooth is switched on when using the app so that your toothbrush can transfer and update your brushing data in the app. If you have questions about why your brushing data is collected, be sure to review the Sonicare Privacy Statement, available throughout the app setup process.
App features
Your Sonicare power toothbrush is equipped with smart sensors to provide you with feedback about your brushing habits, including:
- Daily brushing sessions
- Time spent during each brushing session
- Applied brushing pressure
- Personalized tips and actionable recommendations
- Brush head replacement reminder (based on actual use)
The Sonicare app collects the data provided by the smart sensors and tracks your brushing habits over time.
Getting started
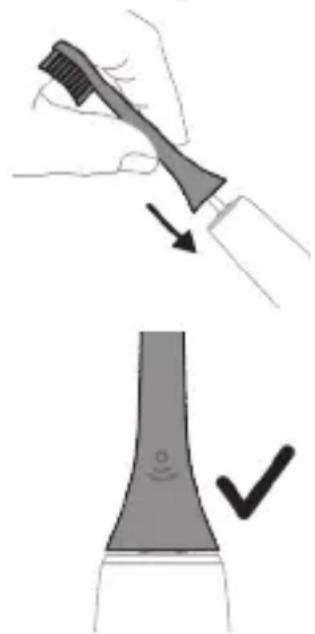
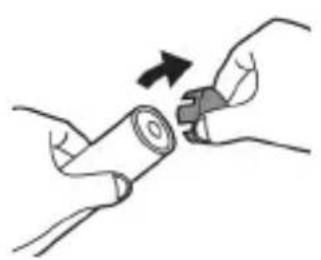
1 Align the brush head so the bristles point in the same direction as the front of the handle.
2 Firmly press the brush head down onto the metal shaft until it will not go any further.
Note: It is normal to see a slight gap between the brush head and the handle.
Using your Philips Sonicare toothbrush
If you are using your Sonicare toothbrush for the first time, it is normal to feel more vibration than when using a non-electric toothbrush. It is common for first-time users to apply too much pressure. Only apply gentle
pressure and let the toothbrush do the brushing for you. Please follow the brushing instructions below for the best experience.
To help you transition to your new Sonicare power toothbrush, use a lower intensity setting for the first 1-2 weeks then transition to a higher setting.
Brushing instructions
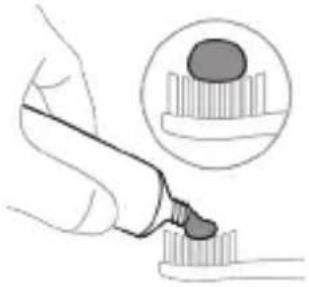
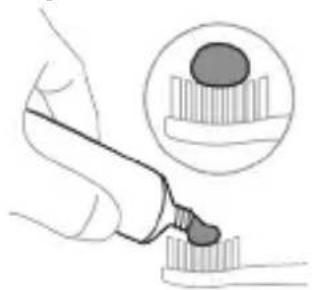
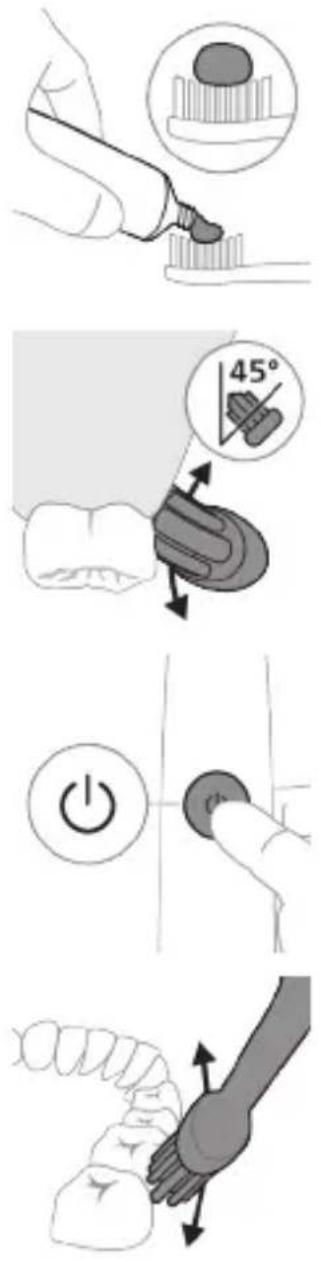
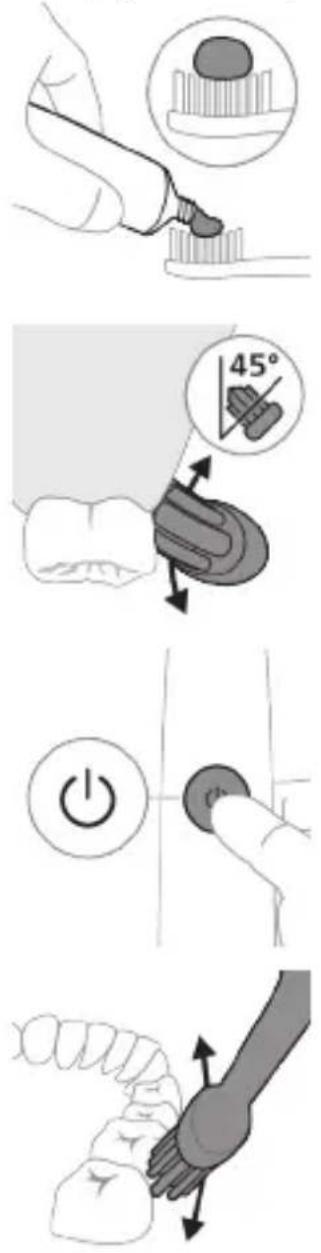
1 Wet the bristles and apply a small amount of toothpaste.
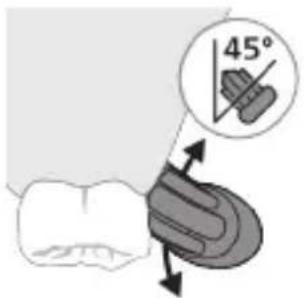
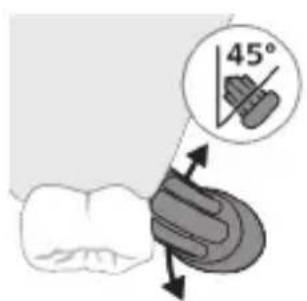
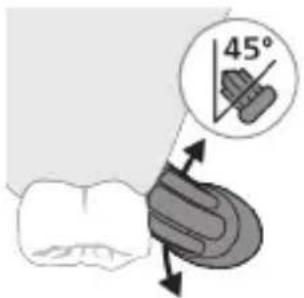
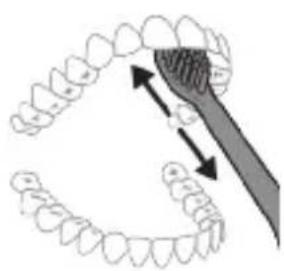
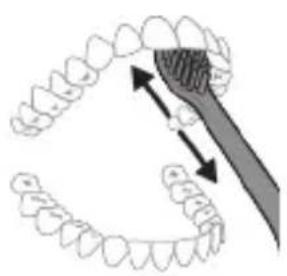
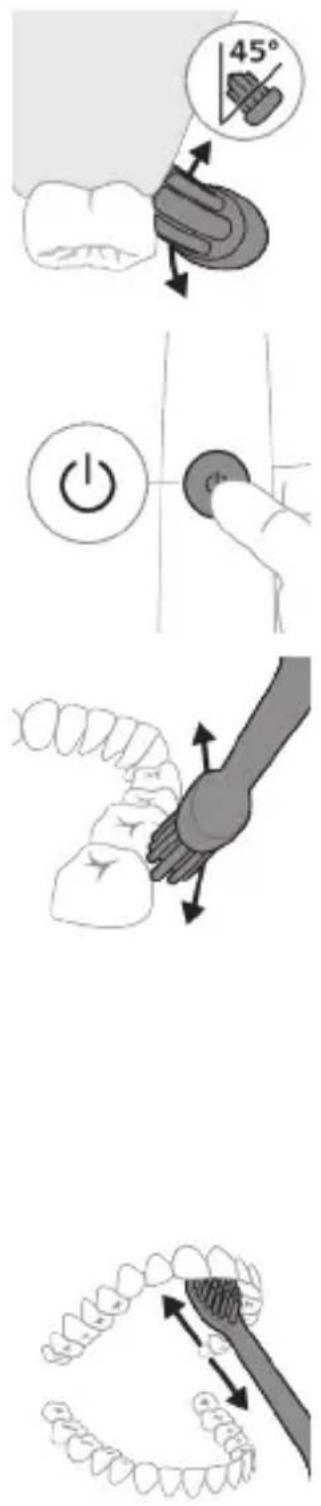
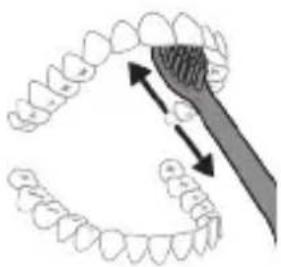
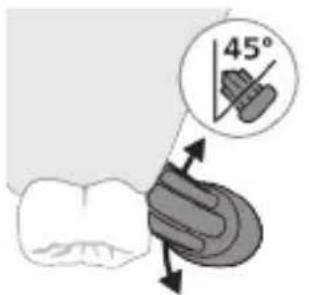
2 Place the toothbrush bristles against the teeth at a slight angle (45 degrees). Pressing firmly to make the bristles reach the gumline or slightly beneath the gumline.
Note: Keep the center of the brush in contact with the teeth at all times.
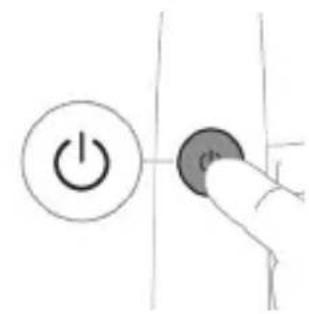
3 Press the power on/off button to switch on the Philips Sonicare.
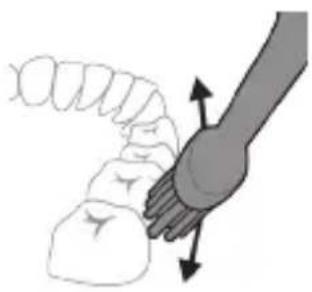
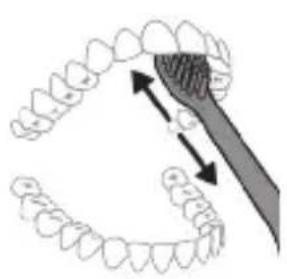
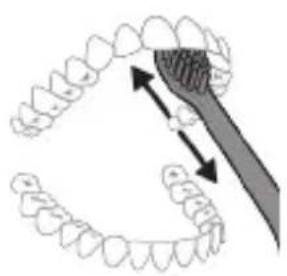
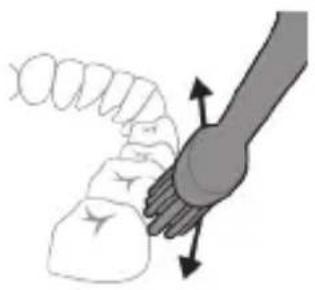
4 Gently keep the bristles placed on the teeth and in the gumline. Brush your teeth with small back and forth motion so the bristles reach between the teeth. Continue this motion throughout your brushing cycle.
Note: The bristles should slightly flare. It is not recommended to scrub as you would with a manual toothbrush.
Note: If you apply too much pressure, you will be alerted by a change in vibration of the handle and a flashing purple brushing feedback light.
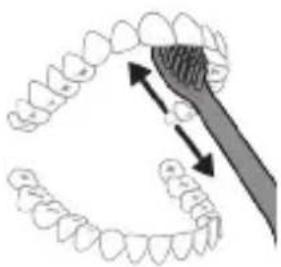
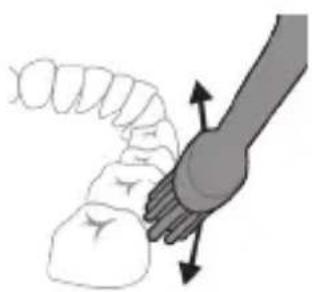
5 To clean the inside surfaces of the front teeth, tilt the brush handle semi-upright and make several vertical overlapping brushing strokes on each tooth.
6 After you have completed the brushing cycle, you can spend additional time brushing the chewing surfaces of your teeth and areas where staining occurs. You can also brush your tongue, with the toothbrush switched on or off, as you prefer.
Note: Your Philips Sonicare toothbrush is safe to use on braces (brush heads wear out sooner when used on braces) and dental restorations (fillings, crowns, veneers) if they are properly adhered and not compromised.
BrushPacer
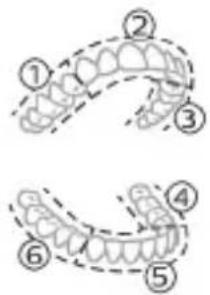
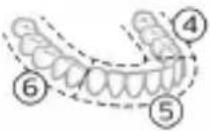
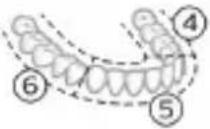
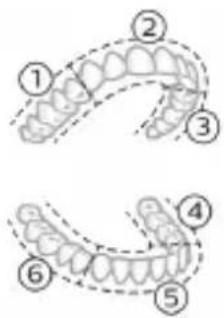
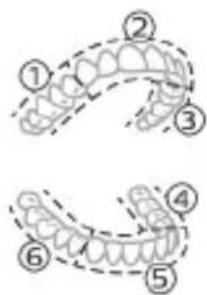
To make sure you brush evenly throughout the mouth, divide your mouth into 6 sections using the BrushPacer feature. The BrushPacer divides the brushing time into 6 equal segments and indicates when you should move to the next area. The segments are indicated with a brief pause in vibration. The toothbrush automatically stops at the end of the brushing session.
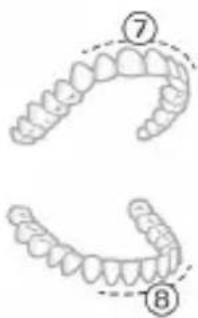
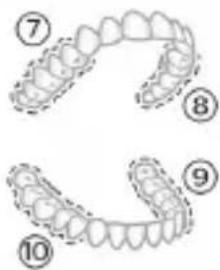
Note: Additional segments may be added when you use the White+ or Gum Health Modes.
Modes
Your power toothbrush is equipped with up to 5 different modes: Clean, White+, Gum Health, Deep Clean+ and Tongue Care (specific models only). Based on the smart brush head you use, the optimal mode and intensity will be selected automatically by the BrushSync technology. To change modes, press the mode/intensity button while the handle is turned off.
| Clean and Deep Clean+ | White+ Gum health Tongue Care (specific models only) |
*Note: When brushing with the Philips Sonicare app in 'Deep Clean+' mode, the brushing time will be 2 minutes when connected to the app and 3 minutes when not connected to the app.
| Benefit | Plaque removal | Plaque and surface stains removal | Plaque removal and gum massage | Tongue cleaning |
| Clean and Deep Clean+ | White+ Gum health Tongue Care | (specific models only) | ||
| Recommended intensity level | High High High Low | |||
| Total brushing time | Clean: 2 minutesDeep Clean+: 3 minutes* | 2 minutes and 40 seconds | 3 minutes and 20 seconds | 20 seconds |
| How to brush | Clean: Brush each segment for 20 seconds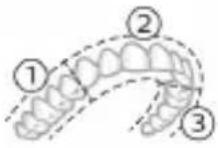 | Brush each segment for 20 seconds,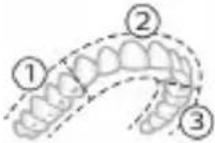 | Brush each segment for 20 seconds,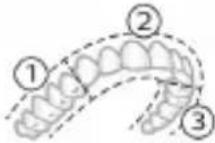 | 1. Wet the micro bristles and brush your tongue with a back and forth motion. Clean as far back as comfortable.2. Rinse your mouth and repeat the procedure two more times. |
 Deep Clean+: Brush each segment for 30 seconds* Deep Clean+: Brush each segment for 30 seconds*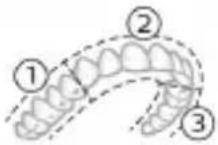 | 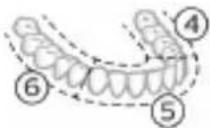 then brush segments 7 and 8 for 20 seconds each. then brush segments 7 and 8 for 20 seconds each.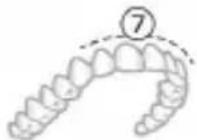 | 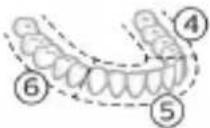 then brush segments 7, 8, 9 and 10 for 20 seconds each. then brush segments 7, 8, 9 and 10 for 20 seconds each.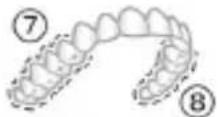 | ||
 | 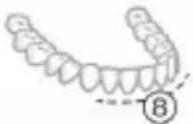 | 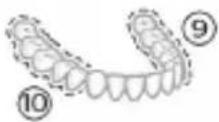 | ||
Intensities
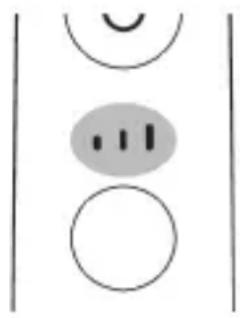
Your power toothbrush comes with 3 different intensity settings:
- low intensity (one bar)
- medium intensity (two bars)
- high intensity (three bars)
When attached to the handle, the smart brush head will automatically select the recommended intensity. If you wish to change to a different intensity, you can do so by pressing the mode/intensity button while brushing.
The intensity cannot be changed as long as the handle is powered off or paused.
BrushSync technology
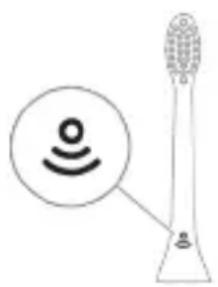
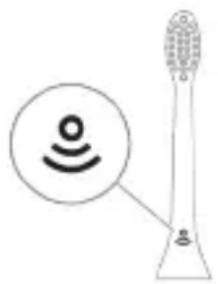
BrushSync technology enables your brush head to communicate with your handle using a microchip. The symbol at the bottom of the brush head indicates that the brush head is equipped with this technology.
BrushSync technology enables:
- Brush head replacement reminder
- BrushSync mode pairing
Philips Sonicare offers a wide range of smart brush heads, equipped with BrushSync technology. To explore our full range of toothbrush brush heads, and find the brush head that is best for you, go to
www.philips.com/toothbrush-heads for more information.
Features
- Pressure Sensor Feedback
- BrushPacer
- SmartTimer
- Brush Head Mode Pairing
- Easy Start
- Brush Head Replacement Reminder
Pressure Sensor Feedback
Your Sonicare toothbrush measures the pressure you apply while brushing, to protect your gums and teeth from damage.

If you apply excess pressure, the handle changes its vibration and the brushing feedback light flashes purple at the bottom of the handle until you reduce the pressure.
Note: Your product comes with the Pressure Sensor activated. To deactivate this feature (see 'Activating or deactivating features').
BrushPacer
The BrushPacer is an interval timer that helps you to brush evenly through the mouth by dividing your mouth into 6 sections. (see 'Brushing instructions')
SmarTimer
The SmarTimer indicates that your brushing cycle is complete by automatically switching off the toothbrush at the end of the brushing cycle.
Dental professionals recommend brushing no less than 2 minutes twice a day.
Note: If you press the power on/off button after you started the brushing cycle, the toothbrush pauses. After a pause of 30 seconds, the SmarTimer resets.
Brush Head Mode Pairing
Brush heads with BrushSync technology are equipped with a microchip which communicates with the handle and automatically pairs it with the recommended mode and intensity.
Most brush heads with BrushSync technology will auto pair to Clean Mode. Brush heads with specific benefits will pair with the corresponding mode (when available), examples include:
- G3 Premium Gum Care : Gum Health mode
- W3 Premium White: White+ mode
- TongueCare+: Tongue Care mode
Note: If you choose to change mode/intensity from the recommended setting, the brush head will remember the your chosen setting for future brushing sessions.
EasyStart
This Philips Sonicare model comes with the EasyStart feature deactivated. To activate EasyStart (see 'Activating or deactivating features'). The EasyStart feature gently increases the power over the first 14 brushings to help you get used to brushing with the Philips Sonicare. The EasyStart feature works with all modes.
Disclaimer
When the Philips Sonicare toothbrush is used in clinical studies, it must be used in clean mode at high intensity with the handle fully charged and the EasyStart feature deactivated.
Brush Head Replacement Reminder
Your Philips Sonicare is equipped with BrushSync technology that tracks the wear of your brush head.
Note: This feature only works with Philips Sonicare smart brush heads with BrushSync technology.
1 When you attach a new smart brush head for the first time, the handle recognizes that you have a Philips brush head with BrushSync technology and begins tracking brush head wear.
2 Over time, based on the pressure you apply and the total time the brush head has been used, the handle tracks brush head wear in order to determine the optimal time to replace your brush head. This feature guarantees the best cleaning and care of your teeth.
3 When the brush head replacement reminder indicator lights up amber, you should replace your brush head.
![graph TD A["Process Node"] --> B["Node 6"]](/content/2026/03/519680/images/4cf74e5f1917662222be89251405845397a56828e892d3b795b9b08cec5e84d6.jpg)
All smart brush heads come with the brush head replacement reminder feature activated. To deactivate the brush head replacement reminder see 'Activating or deactivating features'.
Activating or deactivating features
You can activate or deactivate the following features of your toothbrush:
- EasyStart
- Brush Head Replacement Reminder
- Pressure Sensor Feedback
Note: You can only activate or deactivate the Brush Head Replacement Reminder when a smart brush head is on the handle.
Step 1: Place the handle on the charging stand or in the charging glass.
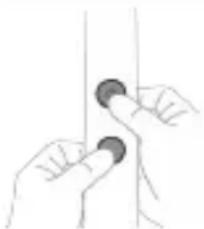 | Step 2: Press and hold the mode/intensity button. | ||
| EasyStart Pressure Sensor Feedback | Brush Head Replacement Reminder | ||
| Press the power on/off button 1 time. | Press the power on/off button 2 times. | Press the power on/off button 3 times. | |
| ↓ ↓ ↓ | |||
| Step 3: Let go of the mode/intensity button. | |||
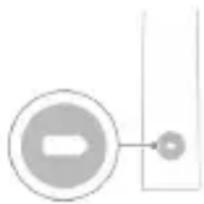
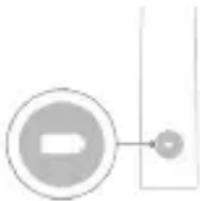 | If you see the battery indicator flash white 2 times and hear 2 beeps then the feature has been activated. | ||
| OR | |||
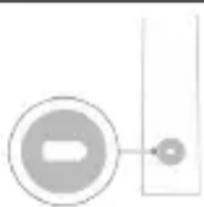
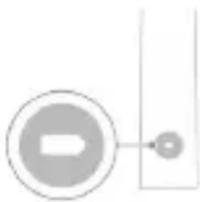 | If you see the battery indicator flash amber 1 time and hear 1 beep, then the feature has been deactivated. | ||
Charging and battery status
This Philips Sonicare toothbrush is designed to provide at least 28 brushing sessions, each session lasting 2 minutes (14 days if used twice per day) on a fully charged battery. The battery indicator shows the battery status when you complete the 2-minute brushing session, when you pause the toothbrush, or while it is charging.
Note: It can take up to 24 hours to fully charge the battery before first use, but you can use the Philips Sonicare toothbrush before it is fully charged.
Charging
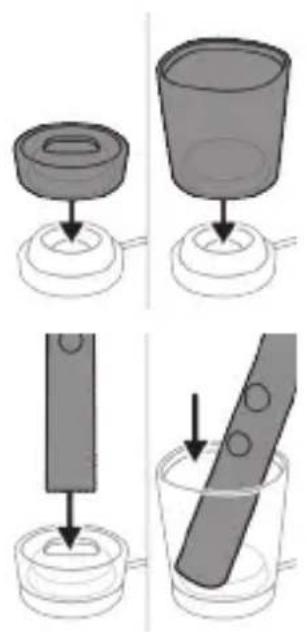
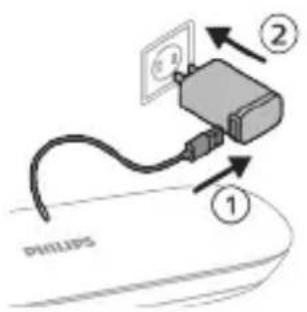
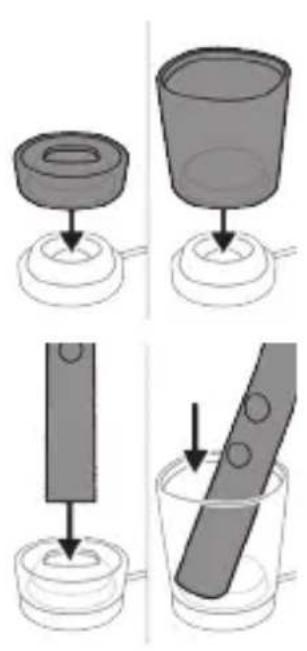
Charging on charging base
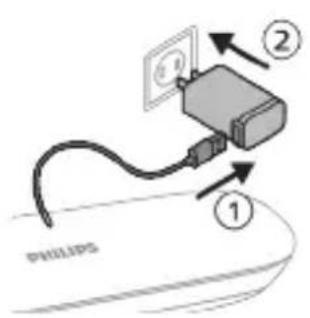
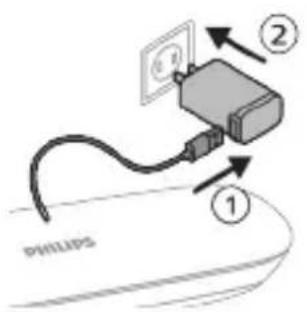
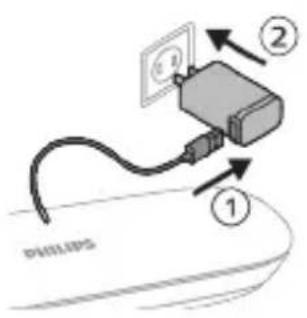
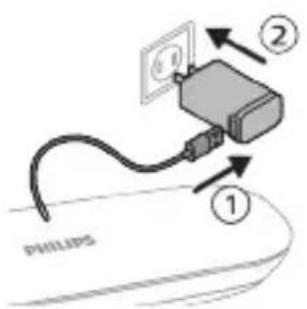
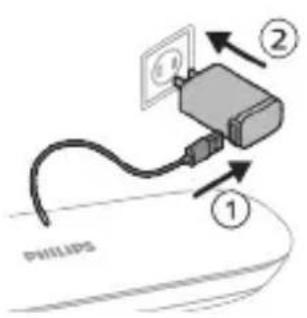
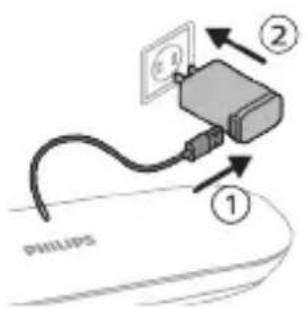
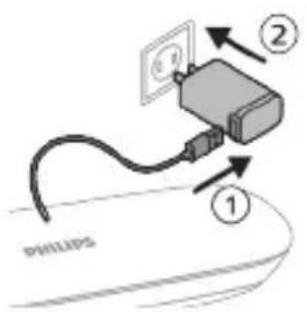
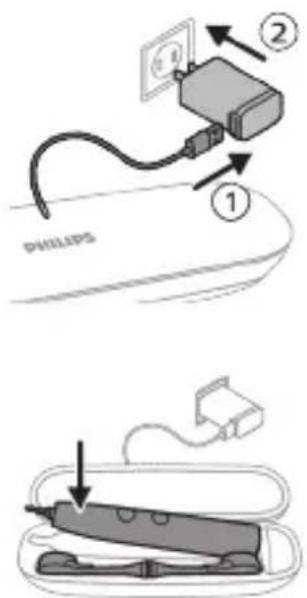
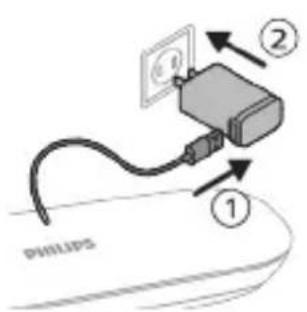
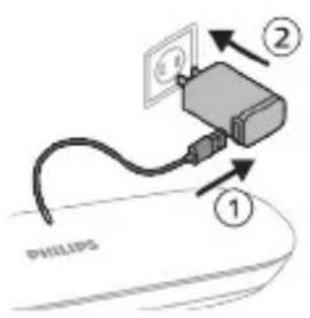
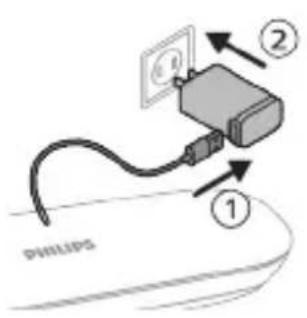
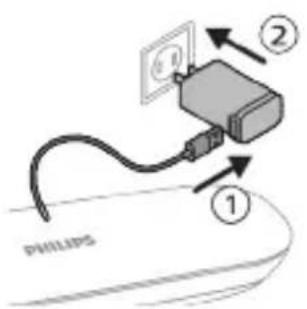
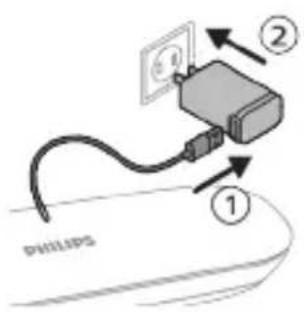
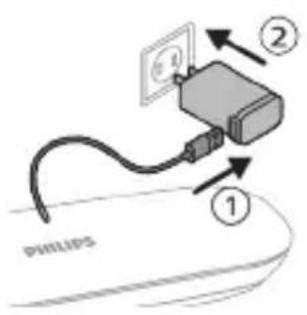
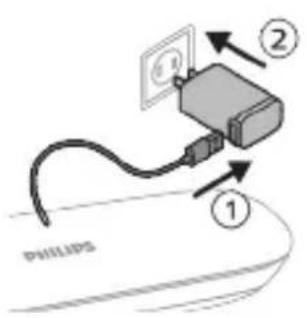
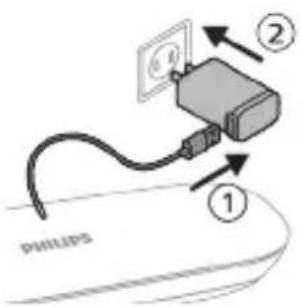
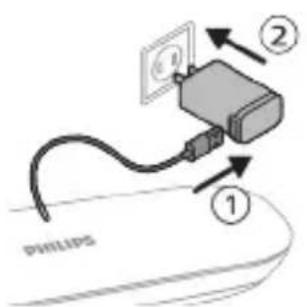
1 Plug the cord of the charging base into an electrical outlet.
2 Place the charging stand or the charging glass on the charging base.
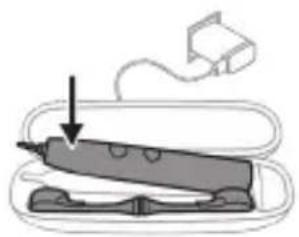
3 Place the handle on the charging stand or in the charging glass.
- The battery indicator and light ring illuminate white and the handle beeps twice. This indicates the toothbrush has started charging.
4 The charger will charge your toothbrush until it is fully charged.
- The handle is charging when the battery indicator is flashing white. When the handle is fully charged, the battery indicator lights up white for 30 seconds and then switches off.
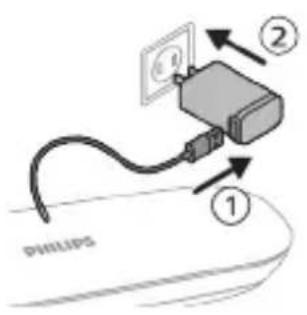
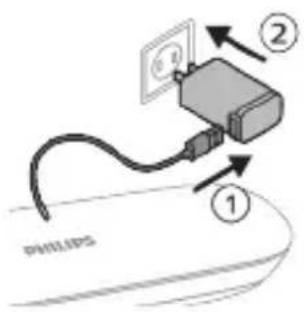
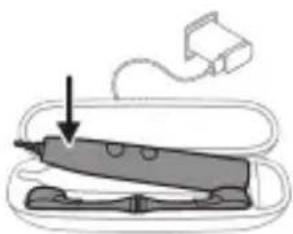
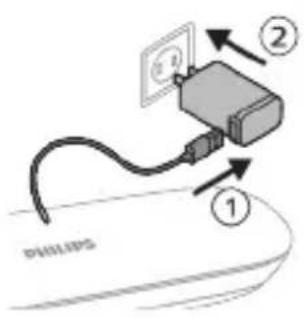
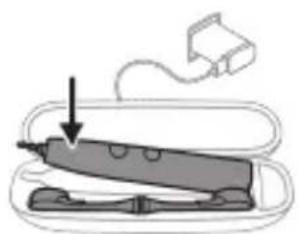
Charging with the travel case
Note: Accessories included may vary based on the model purchased.
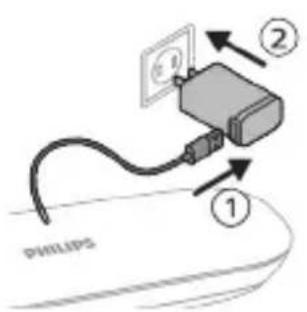
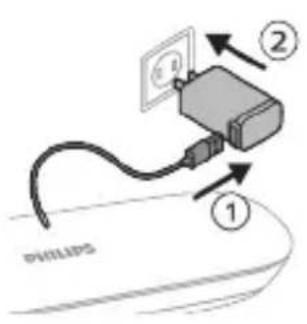
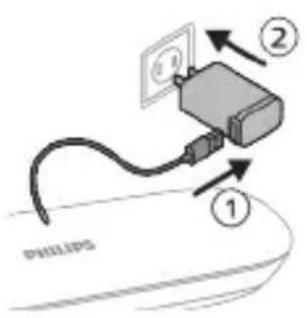
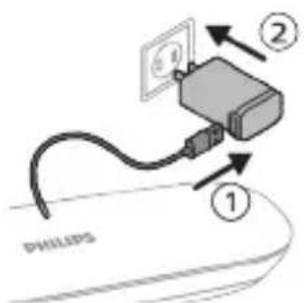
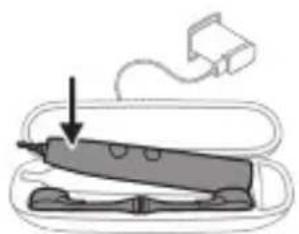
1 Take the USB cable from the bottom of the charging travel case. 2 Connect the charging travel case via the USB cable to 5V DC input power either from:
- The USB adapter provided
- a UL-listed or certified to ANSI/UL 60950-1 personal computer's standard USB connector or,
- a UL-listed or certified to ANSI/UL 60950-1 LPS power supply with USB output port or,
- a UL-listed or certified 1310 Class 2 power supply.
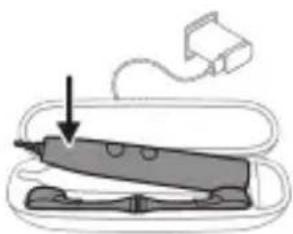
3 Place the handle in the travel case. The travel case charges your toothbrush until your toothbrush is fully charged.
Battery status
Battery status (handle on plugged in charger/charging travel case) Handle on plugged in charger/charging travel case:
When the handle is placed on the charger or in the charging travel case, the battery indicator shows the battery level.
Battery status Battery indicator
| Charging Flashes white | |
| Full Solid white for 30 seconds and then switches off | |
| Battery status (when handle is not placed on charger/charging travel case)Handle is not placed on charger/charging travel case:When the toothbrush is awake, the battery indicator at the bottom of the handle shows the battery level. | |
Battery status Battery indicator Sound
| Full Solid white - | |
| Partially full Flashes white - | |
| Low Flashes amber The handle emits 3 | beeps after brushing |
| Empty Flashes amber The handle emits 2 sets | of 5 beeps after brushing |
Note: To save energy, the battery indicator will switch off when not in use.
Note: When the battery is completely empty, the toothbrush switches off. Place the toothbrush on the charger to charge it.
Note: To keep the battery fully charged at all times, you may keep your toothbrush on the charger when not in use.
Cleaning
Toothbrush handle
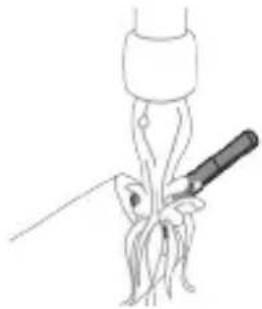
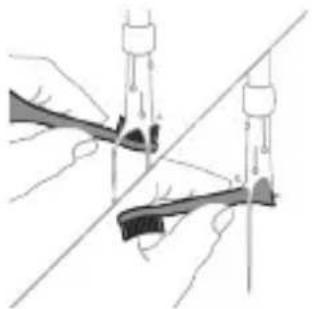
1 Remove the brush head and rinse the metal shaft area with warm water. Make sure you remove any residual toothpaste.
Caution: Do not push on the rubber seal on the metal shaft with sharp objects, as this may cause damage.
2 Wipe the entire surface of the handle with a damp cloth.
Note: Do not tap the handle on the sink to remove excess water.
Brush head
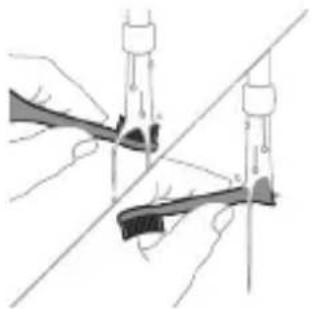
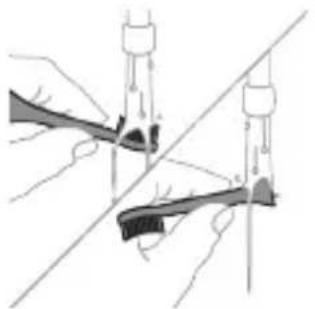
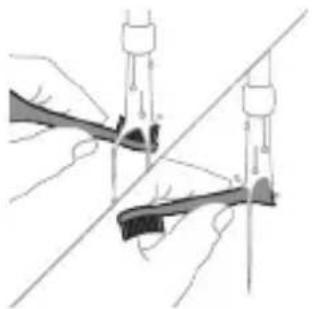
1 Rinse the brush head and bristles after each use.
2 Remove the brush head from the handle and rinse the brush head connection with warm water at least once a week. Rinse the travel cap as often as needed.
Charger
1 Unplug the charger before you clean it.
2 Wipe the surface of the charger with a damp cloth.
Travel case
Rinse with warm water and use a damp cloth to clean inside of travel case.
Charging travel case
1 Unplug the charging travel case before cleaning.
2 Use damp cloth to wipe the surface of the travel case.
Storage
If you are not going to use the product for an extended period of time, unplug it from the electrical outlet, clean it and store it in a cool and dry place away from direct sunlight.
Replacement
Replace Philips Sonicare brush heads every 3 months to achieve optimal results. Use only Philips Sonicare replacement brush heads.
Locating the model number
Look on the bottom of the Philips Sonicare toothbrush handle for the model number (HX99XX).
Warranty and support
If you need information or support, please visit www.philips.com/support or read the international warranty leaflet.
WARRANTY EXCLUSIONS
What is not covered under warranty:
- In mouth attachments including brush heads and nozzles.
- Damage caused by use of unauthorized replacement parts or unauthorized brush heads.
- Damage caused by misuse, abuse, neglect, alterations or unauthorized repair.
- Normal wear and tear, including chips, scratches, abrasions, discoloration or fading.
Recycling
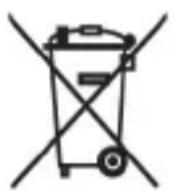
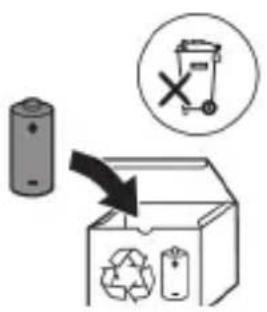
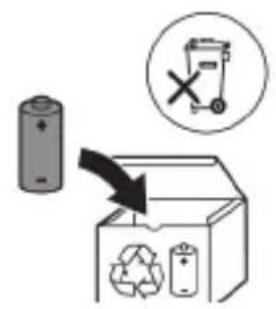
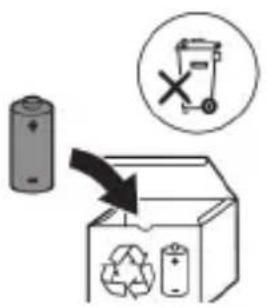
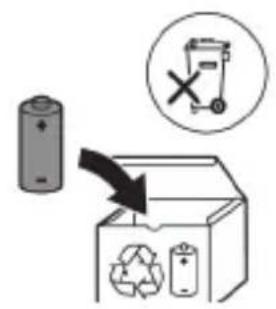
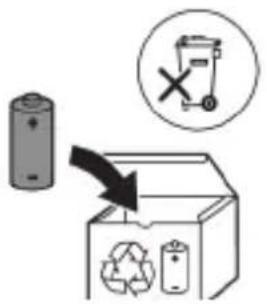
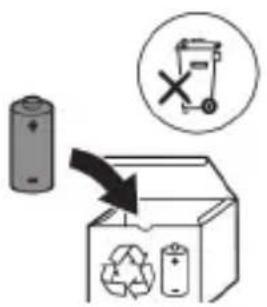
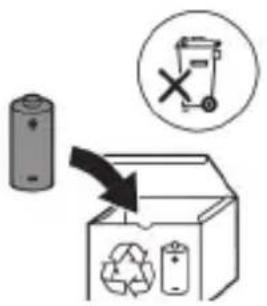
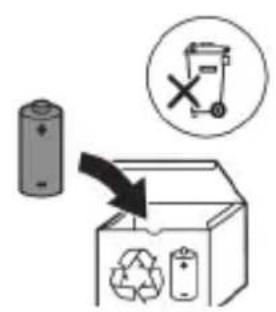
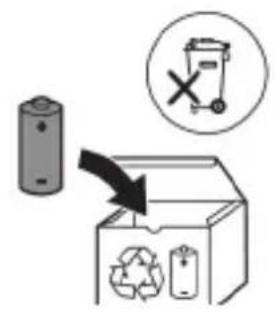
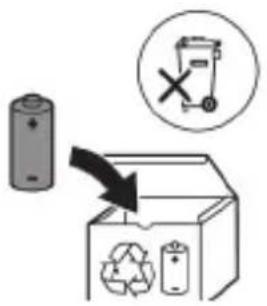
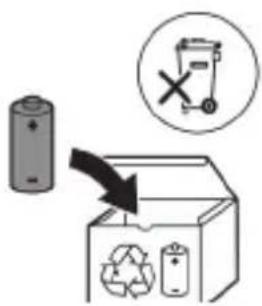
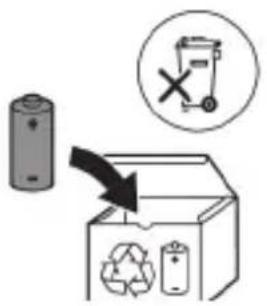
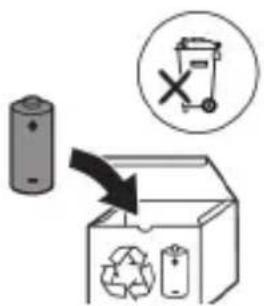
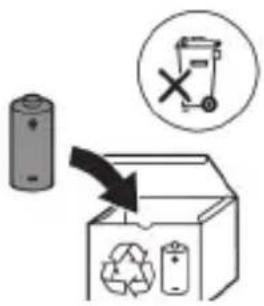
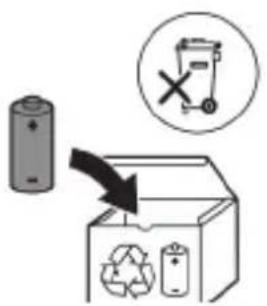
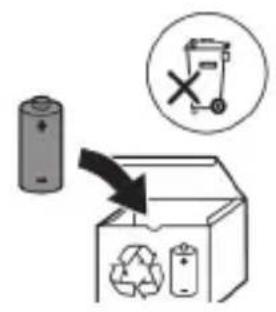
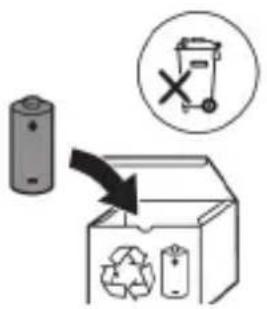
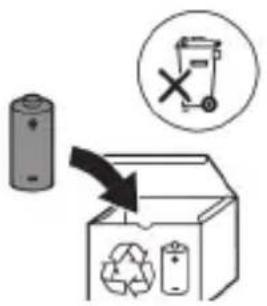
- This symbol means that electrical products and batteries shall not be disposed of with normal household waste.
- Follow your country's rules for the separate collection of electrical products and batteries.
The built-in rechargeable battery must only be removed by a qualified professional when the appliance is
discarded. Before removing the battery, make sure that the battery is completely empty.
Removing the rechargeable battery
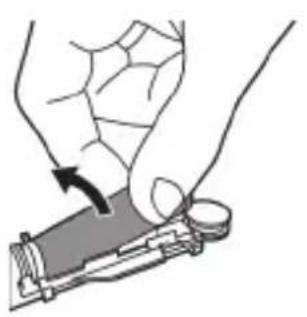
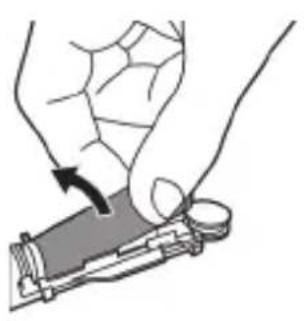
The built-in rechargeable battery must only be removed by a qualified professional when the appliance is discarded. Before removing the battery, make sure that the battery is completely empty.
Take any necessary safety precautions when you handle tools to open the appliance and when you dispose of the rechargeable battery. Be sure to protect your eyes, hands, fingers, and the surface on which you work.
When you handle batteries, make sure that your hands, the product and the batteries are dry.
To avoid accidental short-circuiting of batteries after removal, do not let battery terminals come into contact with metal objects (e.g. coins, hairpins, rings). Do not wrap batteries in aluminum foil. Tape battery terminals or put batteries in a plastic bag before you discard them.
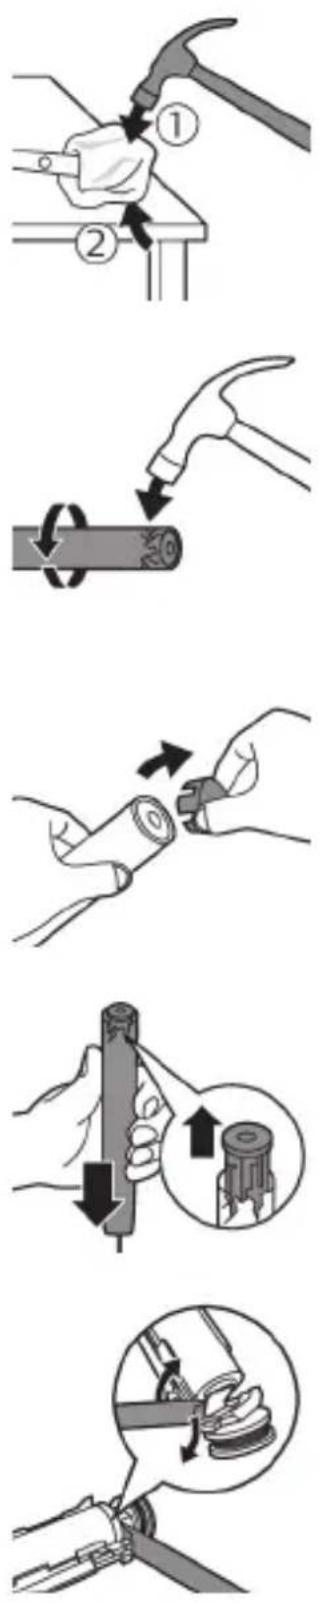
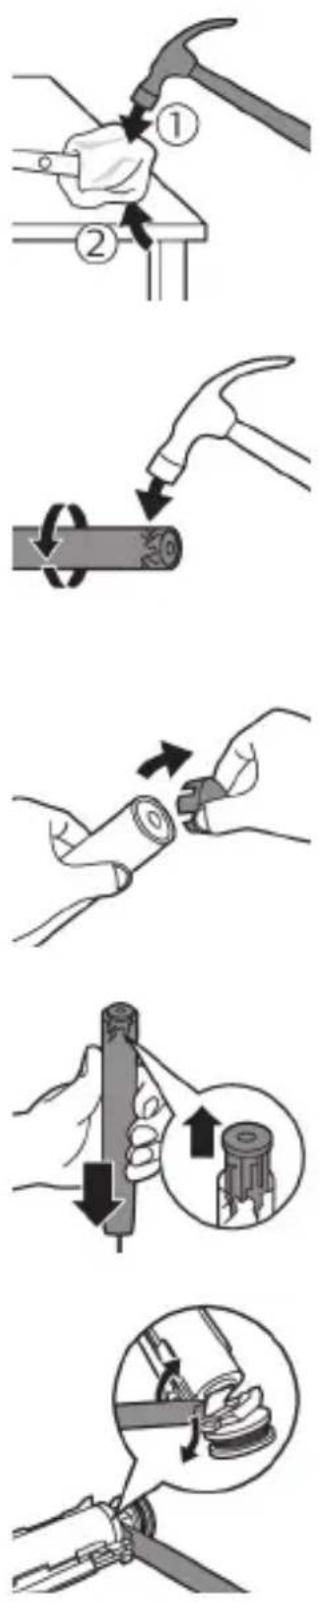
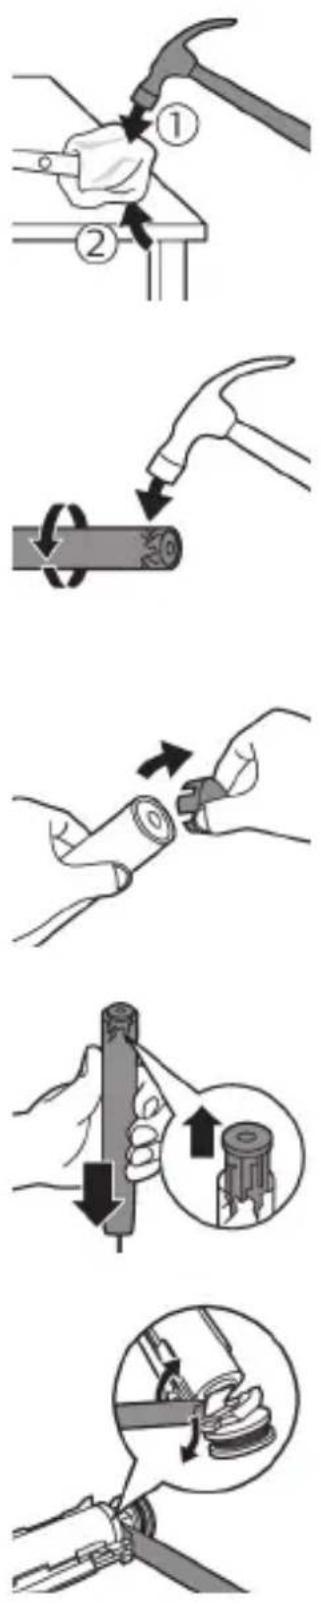
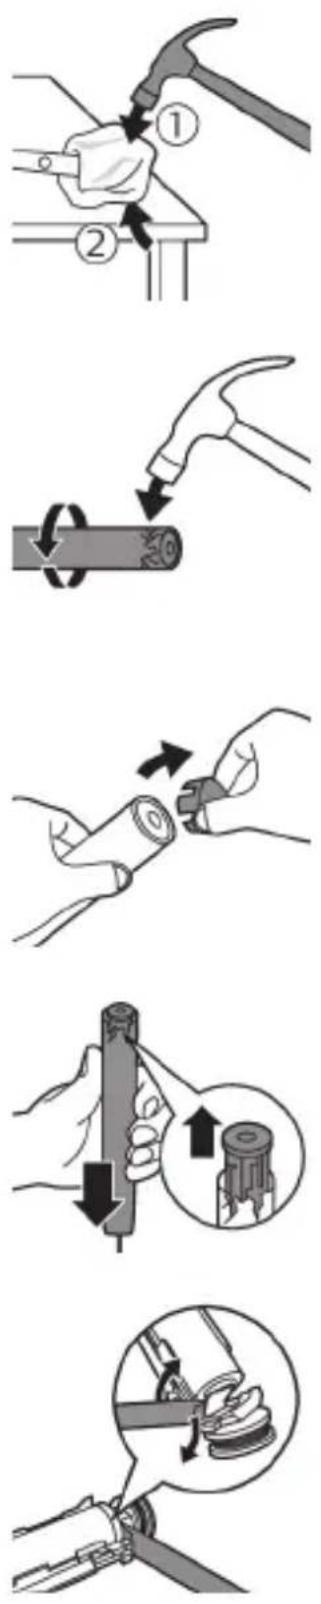
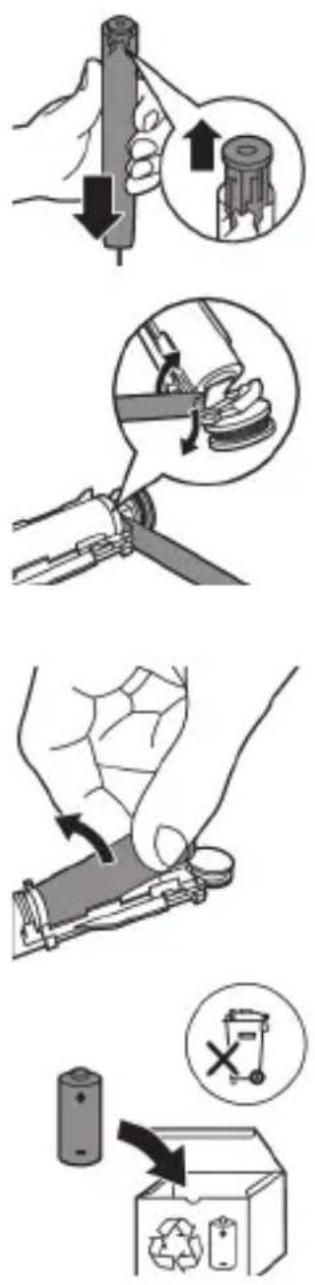
To remove the rechargeable battery, you need a towel or cloth, a hammer and a flat-head (standard) screwdriver. Observe basic safety precautions when you follow the procedure outlined below.
1 To deplete the rechargeable battery of any charge, remove the handle from the charger, turn on the toothbrush and let it run until it stops. Repeat this step until you can no longer turn on the toothbrush.
2 Remove and discard the brush head. Cover the entire handle with a towel or cloth.
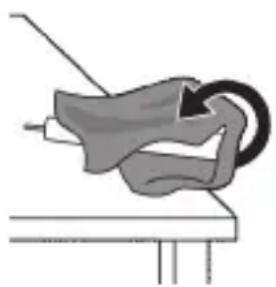
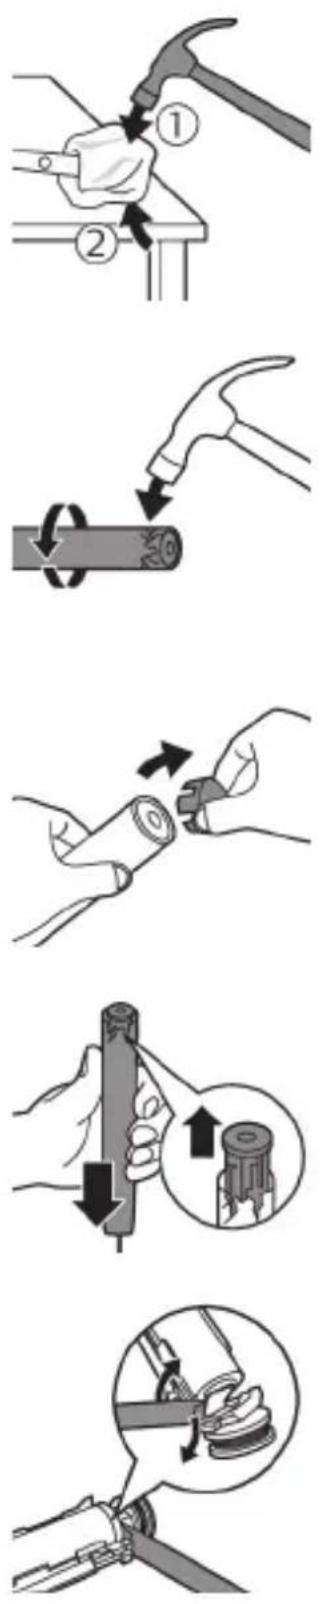
3 Hold the top of the handle with one hand and strike the handle housing 0.5 inch above the bottom end. Strike firmly with a hammer on all 4 sides to eject the end cap.
Note: You may have to hit on the end several times to break the internal snap connections.
4 Remove the end cap from the toothbrush handle. If the end cap does not release easily from the housing, repeat step 3 until the end cap is released.
5 Holding the handle upside down, press the shaft down on a hard surface. If the internal components do not easily release from the housing, repeat step 3 until the internal components are released.
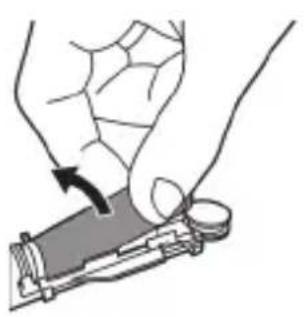
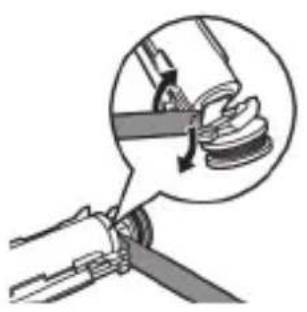
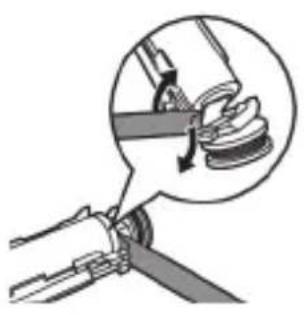
6 Wedge the screwdriver between the battery and the black frame at the bottom of the internal components. Then pry the screwdriver away from the battery to break the bottom of the black frame.
7 Insert the screwdriver between the bottom of the battery and the black frame to break the metal tab connecting the battery to the green printed circuit board. This will release the bottom end of the battery from the frame.
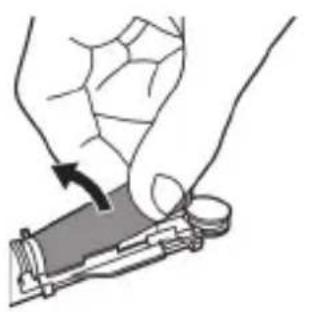
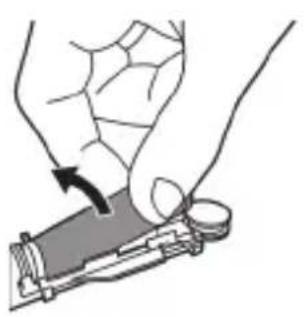
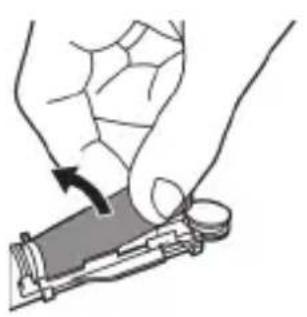
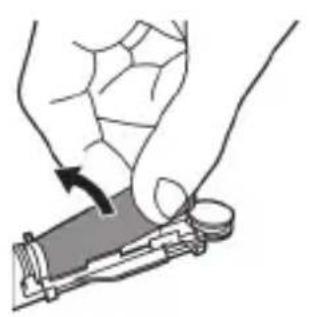
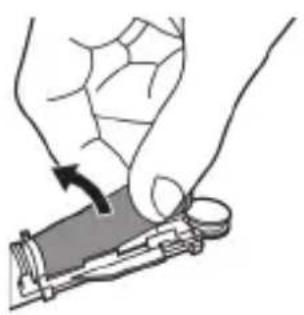
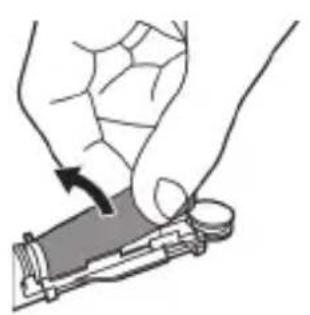
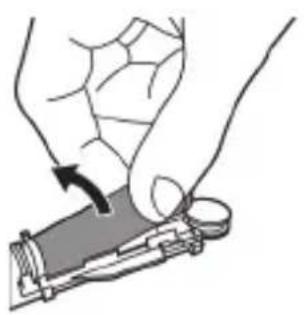
8 Grab the battery and pull it away from the internal components to break the second metal battery tab.
Caution: Be aware of the sharp edges of the battery tabs so as to avoid injury to your fingers.
9 Cover the battery contacts with tape to prevent any electrical short from residual battery charge.
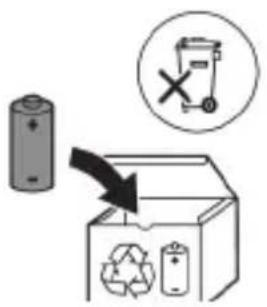
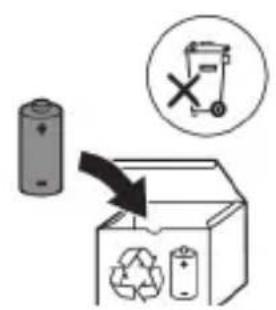
The rechargeable battery can now be recycled and the rest of the product discarded appropriately.
Note: Do not throw away the appliance with the normal household waste at the end of its life, but hand it in at an official collection point for recycling. By doing this, you help to preserve the environment.
Giriş
www.philips.com/support
- W3 Premium White: "White+" rejimi
- TongueCare+: "Tongue Care" rejimi
adrese: www.philips.com/support
www.philips.com/support

www.philips.com/support
White+ Gum Health Tongue Care
(kun bestemte modeller)
Sådan børster du
Clean: Børst hvert segment i 20 sekunder
Deep Clean+: Børst hvert segment i 30 sekunder*
Opladning via opladerens base
www.philips.com/support
www.philips.com/support
White+ Gum Health Tongue Care
www.philips.com/toothbrush-heads.
Produktmerkmale
www.philips.com/toothbrush-heads.
Omadused
Aku olek
EXCLUSIONS DE GARANTIE
2 Glavu četkice čvrsto pritisnite prema dolje na metalnu osovinu drške sve do kraja.
Napomena: Uobičajeno je vidjeti blagi razmak između glave četkice i drške.
Uporaba četkice za zube Philips Sonicare
Ako prvi put upotrebljavate četkicu za zube Sonicare, normalno je da osjećate više vibracija nego pri upotrebi četkice za zube koja nije električna. Korisnici pri prvoj upotrebi često primjenjuju preveliki pritisak. Samo blago pritisnite i četkanje prepustite četkici za zube. Za najbolje iskustvo slijedite upute za četkanje u nastavku.
Kako biste se jednostavnije prebacili na svoju novu električnu četkicu za zube Sonicare, prvih 1 – 2 tjedna upotrebljavajte manji intenzitet, a zatim prijeđite na višu postavku.
Upute za četkanje
1 Smočite čekinje i nanesite malu količinu paste za zube.
Vaša električna četkica za zube isporučuje se s tri različite postavke intenziteta:
- nizak intenzitet (jedan stupić)
Tehnologija BrushSync omogućava glavi četkice da komunicira s drškom s pomoću mikročipa. Šimbol na donjem dijelu glave četkice naznačuje da je glava četkice opremljena tom tehnologijom.
Tehnologija BrushSync omogućuje:
Punjenje na bazi za punjenje
1 Ukopčajte kabel baze punjača u električnu utičnicu.
1 Odvojite glavu četkice i isperite metalnu osovinu toplom vodom. Pobrinite se da uklonite svu preostalu zubnu pastu.
Oprez: Nemojte koristiti oštre predmete za guranje gumene brtve na metalnu osovinu jer to može prouzročiti oštećenja.
2 Cijelu površinu drške obrišite vlažnom tkaninom.
Napomena: Nemojte lupkati drškom po umivaoniku kako biste uklonili višak vode.
Glava četkice
www.philips.com/support
Clean e Deep White+ Gum Health Tongue Care Clean+ (sol
www.philips.com/support
1 Samitriniet sarus un uzklājiet mazliet zobu pastas.
www.philips.com/support
www.philips.com/support
www.philips.com/support
- SmarTimer
- Koppeling opzetborstel-modus
- EasyStart
- Vervangingsherinnering opzetborstel
Opladen op oplaadstation
Lade i ladebasen
Batteristatus
1 Ta av børstehodet, og skyll metallstangen i varmt vann. Pass på at du har fjernet alle tannkremrester.
Forsiktig: Ikke bruk skarpe gjenstander mot gummiforseglingen på metallstangen. Den kan bli ødelagt.
2 Tørk hele overflaten på håndtaket med en fuktig klut.
1 Cho'tka tuklari dastaning old qismi bilan bir xil yo'nalishda bo'lishi uchun cho'tka kallagini tekislang.
2 Cho'tka kallagini u boshqa kirmagunigacha metall valga qattiq bosing.
Izoh: Cho'tka kallagi va dasta orasida kichik tirqish ko'rinishi – normal holat.
Philips Sonicare tish pastangizdan foydalanish
Agar Sonicare tish pastasidan birinchi marta foydalanayotgan bo'lsangiz, elektr bo'Imagan tish cho'tkasidan foydalanishga qaraganda ko'proq tebranish sezish normal holat. Odatda birinchi marta foydalanayotgan foydalanuvchilar ortiqcha bosim beradi. Faqat yumshoq bosib bering va tish cho'tkasi siz uchun tozalashiga imkon bering. Eng yaxshi taassurot uchun tish tozalash ko'rsatmalariga amal qiling.
Yangi Sonicare motorli tish cho'tkasiga o'tishingizga yordam berish uchun ilk 1-2 hafta pastroq jadallikdagi
sozlamada foydalaning, keyin yuqoriroq sozlamaga o'ting.
Tish tozalash ko'rsatmalari
1 Cho'tkani namlang va unga kam miqdorda tish pastasi surting.
2 Tish cho'tkasini tishlar qarshisida kichik (45 daraja) burchak ostida tuting. Cho'tkalar milk chizig'iga yoki uning tagiga yetishi uchun uni qattiq bosing.
Izoh: Cho'tka markazini tishlarga doimi to'liq tekkizib turing.
3 Philips Sonicare qurilmasini yoqish uchun yoqish/o'chirish tugmasini bosing.
4 Cho'tkani tishlar va milk chizig'iga yengil tutib turing. Cho'tkalar tishlar orasiga kirishi uchun cho'tka kallagini oldinga-orqaqa kichik harakatlar bilan tishlaringizni tozalang. Bu harakatlarni tish tozalash siklingiz yakunlangunga qadar bajaring.
Motorli tish cho'tkangiz 3 turdagi jadallik sozlamalari bilan jihozlangan:
- past jadallik (bitta chiziq)
- o'rta jadallik (ikkita chiziq)
- yuqori jadallik (uchta chiziq)
Dastaga mahkamlanganda, aqlli cho'tka kallagi tavsiya qilingan jadallikni avtomatik ravishda tanlaydi. Agar boshqa jadallikka o'tkazishni xohlasangiz, tish tozalash paytida rejim/jadallik tugmasini bosish orqali shunday qilishingiz mumkin.
BrushSync texnologiyasi cho'tka kallagining dasta bilan mikrochip orqali muloqot qilishiga yordam beradi.
Cho'tka kallagi ostidagi belgisi cho'tka kallagi ushbu texnologiya bilan jihozlanganini anglatadi.
BrushSync texnologiyasi quyidagilarni faollashtiradi:
- Cho'tka kallagini almashtirishni eslatish funksiyasi - BrushSync rejimini jiftlash
Philips Sonicare BrushSync texnologiyasiga ega keng turdagi smart cho'tka kallaklarini taklif qiladi. Tish cho'tkasining cho'tka kallaklari to'liq ko'lami bilan tanishish va sizga eng mos keladigan cho'tka kallagini topish uchun www.philips.com/toothbrush-heads veb-saytiga kiring.
Funksiyalar
- Bosim sensori bildirgisi
- BrushPacer
- SmarTimer
- Cho'tka kallagini juftlash rejimi
- EasyStart
- Cho'tka kallagini almashtirishni eslatish funksiyasi
Ortiqcha bosim qo'llasangiz, bosimni kamaytirmaguningizgacha dasta tebranishini o'zgartiradi va dasta quyi qismidagi cho'tkalash bildirgi chirog'i miltillaydi (binafsharang).
Izoh: Mahsulotingizda bosim sensori faol holatda taqdim etiladi. Bu funksiyani faolsizlantirish uchun (qarang "Funksiyalarni faollashtirish yoki faolsizlantirish").
BrushPacer
Barcha aqlli cho'tka kallaklari cho'tka kallaklarini almashtirishni eslatish funksiyasi yoqilgan holatda yetkaziladi. Cho'tka kallagini almashtirishni eslatish funksiyasini faolsizlantirish uchun qarang: "Funksiyalarni faollashtirish yoki faolsizlantirish".
Funksiyalarni faollashtirish yoki faolsizlantirish
2-bosqich: Rejim/jadallik tugmasini bosib turing.
| EasyStart Bosim sensoribildirgisi | Cho’tka kallagini almashtirishni eslatishfunksiyasi | |
| Quvvatniyoqish/o’chirishtugmasini 1marta bosing. | Quvvatniyoqish/o’chirishtugmasini 2marta bosing. | Quvvatniyoqish/o’chirishtugmasini 3 martabosing. |

3-bosqich: Rejim/jadallik tugmasidan chiqing.
Agar batareya quvvati indikatori 2 marta miltillaganini ko'rsangiz va 2 ta pastdan-yuqoriga tonal signalni eshitsangiz, demak funksiya faollashtirilgan.
YOKI
Agar batareya quvvati indikatori sariq rangda 1 marta miltillaganini ko'rsangiz va 1 ta yuqoriga-pastga tonal signalni eshitsangiz, demak, funksiya faolsizlantirilgan.
Quvvatlash va batareya maqomi
Bu Philips Sonicare tish pastasi to'liq quvvatlangan batareyada kamida 28 ta tozalash seansini taqdim etish uchun mo'ljallangan, har bir seams 2 daqiga davom etadi (agar kuniga ikki marta ishlatilsa, 14 kun). Batareya indikatori 2 daqiqalik tozalash jarayonini
tugatganingizda, tish cho'tkasini pauza qilganingizda yoki u quvvatlanayotganida batareya holatini aks ettiradi.
Izoh: Birinchi marta foydalanishdan oldin batareya to'liq quvvatlanishiga 24 soatgacha vaqt ketadi, lekin Philips Sonicare tish pastasidan to'liq quvvatlanishidan oldin foydalanishingiz mumkin.
Quvvatlash
Quvvatlash tagligida quvvatlash
1 Quvvatlash tagligi kabelini elektr manbaiga qo'shing.
2 Quvvatlash stendini yoki quvvatlash shishasini quvvatlash tagligiga qo'ying.
3 Dastani quvvatlash stendiga yoki quvvatlash shishasiga qo'ying.
- Batareya indikatori va chirog'i oq rangda yonadi va dasta ikki marta signal beradi. Bu tish cho'tkasi quvvatlanishni boshlaganini bildiradi.
4 Quvvatlagich tish cho'tkasi to'liq quvvattlagunga qadar quvvatlaydi.
- Batareya indikatori oq rangda miltillashi dasta quvvatlanayotganini anglatadi. Dasta to'liq quvvatlansa, batareya indikatori 30 soniya oq rangda yonadi va keyin o'chadi.
Sayohat g'ilofi bilan quvvatlash
Izoh: Qadoqdagi aksessuarlar xarid qilingan modelga qarab farqlanishi mumkin.
1 Sayohat quvvatlagich g'ilofi ostidan USB kabelni oling.
2 Sayohat quvvatlagich g'ilofini USB kabel orqali 5V kuchlanishli doimiy tokka yoki quyidagiga ulang:
- Taqdim etiladigan USB adapter
- UL bilan qayd etilgan yoki ANSI/UL 60950-1 bilan sertfikatlangan shaxsiy kompyuter USB konnektori yoki
- UL bilan qayd etilgan yoki ANSI/UL 60950-1 LPS bilan sertifikatlangan, USB chiqish portiga ega quvvat ta'minoti yoki
- UL bilan qayd etilgan yoki 1310 Toifa 2 bilan sertifikatlangan quvvat ta'minoti.
3 Dastani quvvatlash g'ilofiga joylang. Sayohat g'ilofi tish cho'tkasi to'liq quvvattlaguncha quvvatlaydi.
Batareya holati
Batareya holati (dasta quvvatlagich/sayohat g'ilofiga ulangan)
Dasta quvvatlagich/sayohat g'ilofiga ulangan:
Dasta quvvatlagichga yoki sayohat quvvatlagich g'ilofiga joylanganda batareya indikatori batareya darajasini aks ettiradi.
Batareya holati Batareya indikatori
| Quvvatlash Oq rangda miltillaydi | |
| To’lgan 30 soniya oq rangda yonib turadi vakeyin o’chadi | |
| Batareya holati (dasta quvvatlagich/sayohat g’ilofiga joylanmaganida)Dasta quvvatlagich/sayohat g’ilofiga ulanmagan:Tish cho’tkasi faolligida dasta ostidagi batareya indikatori batareya darajasini aks ettiradi. | |
Batareya holati Batareya indikatori Tovush
| To’lgan Yaxlit oq - | |
| Qisman to’lgan Oq rangda miltillaydi - | |
| Kam Sariq rangda miltillaydi Tish tozalanganidan | keyin dastadan 3 ta qisqa signal jaranglaydi |
| Bo’sh Sariq rangda miltillaydi Tish tozalanganidan | keyin dastadan 5 tadan 2 ta qisqa signal jamlanmasi jaranglaydi |
Izoh: Energiya tejash uchun batareya indikatori ishlatilmayotganida o'chadi.
1 Cho'tka kallagini chiqarib oling va metall val atrofini iliq suv bilan yuving. Har qanday tish pastasi qoldig'ini tozalaganingizni tekshiring.
Ogohlantirish: Metall valdagi rezina zichlagichni o'tkir narsalar bilan bosmang, bu shikastlanishga olib kelishi mumkin.
2 Dastaning butun yuzasini nam mato bilan artib oling.
Izoh: Ortiqcha suvni yo'qotish uchun dastani rakovinaga urmang.
Cho'tka kallagi
1 Cho'tka kallagi va cho'tkani har foydalanishdan keyin yuving.
2 Cho'tka kallagini dastadan chiqarib oling va cho'tka kallagi ulanish qismini kamida haftada bir marta iliq suv bilan yuving. Sayohat qopqog'ini zarur bo'lgancha tez-tez yuvib tashlang.
Quvvatlash moslamasi
1 Tozalashdan avval, quvvatlagichni tarmoqdan uzing.
2 Quvvatlash moslamasining butun yuzasini nam mato bilan artib oling.
Sayohat g'ilofi
Iliq suv bilan yuving va sayohat g'ilofi ichini tozalash uchun nam matodan foydalaning.
Quvvatlash sayohat g'ilofi
1 Tozalashdan oldin sayohat quvvatlagich g'ilofini uzing.
2 Sayohat g'ilofi yuzasini artish uchun nam matodan foydalaning.
Xotira
6 Otvertkani batareya va ichki qismlarning ostidagi qora korpus orasiga kiriting. Keyin qora korpus ostidagi qismni sindirish uchun buragichni batareyadan uzoqlashtiring.
7 Batareyani yashil bosma plata bilan ulab turadigan metall tilchani sindirish uchun otvertkani batareya osti va qora korpus orasiga kiriting. Bu batareyaning ostki uchini korpusdan chiqarib oladi.
8 Ikkinchi metall tilchani sindirish uchun batareyani oling va uni ichki qismlarga teskari tarafga torting.
Ogohlantirish: Barmog'ingizni tilib olmaslik uchun batareya tilchasining o'tkir qirralaridan ehtiyot bo'ling.
www.philips.com/support
Brush Head Mode Pairing
3 Place the handle on the charging stand or in the charging glass.
www.philips.com/support
Carregar na base de carregamento
www.philips.com/support
3 Zobno ščetko Philips Sonicare vklopite tako, da pritisnete gumb za vklop/izklop.
Clean in Deep Clean+
White+ Gum health Tongue Care
(samo nekateri modeli)
8 Baterijo primite in jo odmaknite od notranjih delov, da prelomite drugi kovinski jeziček baterije.
Opozorilo: Pazite, da si z ostrimi robovi jezičkov baterije ne poškodujete prstov.
9 Stike baterije prekrijte z lepilnim trakom, da preprečite kratek stik zaradi preostale napetosti v bateriji.
www.philips.com/support
1 Poravnajte glavu četkice tako da su vlakna okrenuta u istom smeru kao i prednja strana drške.
2 Čvrsto pritisnite glavu četkice na metalnu osovinu do kraja.
1 Pokvasite vlakna i nanesite malu količinu paste za zube.
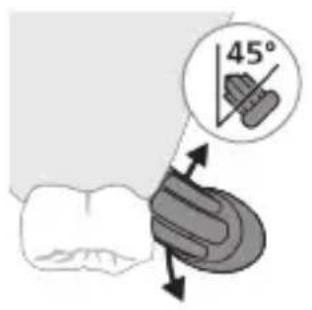
2 Postavite vlakna četkice za zube na zube tako da budu pod blagim uglom (45 stepeni). Čvrsto pritisnite kako bi vlakna stigla do desni ili malo ispod desni.
4 Nežno držite vlakna na zubima i desnima. Perite zube blagim pokretima unapred i unazad tako da vlakna mogu da dosegnu između zuba. Nastavite sa ovakvim pokretima tokom celog ciklusa pranja zuba.
Električna četkica za zube posjeduje 3 različita podešavanja intenziteta:
Četkica za zube Sonicare mjeri pritisak koji koristite prilikom pranja zuba da bi zaštitila vaše desni i zube od oštećivanja.
Ako prekomerno pritiskate, drška menja vibraciju, a svetlo povratnih informacija o pranju zuba treperi ljubičasto na dnu drške dok ne smanjite pritisak.
Napomena: Proizvod se isporučuje sa aktiviranim senzorom pritiska. Da biste deaktivirali ovu funkciju (pogledajte 'Aktiviranje ili deaktiviranje funkcija').
BrushPacer
3 Kada indikator podsetnika za zamenu glave sa četkicom zasvetli žutonarandžastom bojom, treba da zamenite glavu sa četkicom.
Sve pametne glave četkice imaju aktiviranu funkciju podsetnika za zamenu glave četkice. Da biste deaktivirali podsetnik za zamenu glave četkice, pogledajte odeljak „Aktiviranje ili deaktiviranje funkcija“.
Aktiviranje ili deaktiviranje funkcija
Možete da aktivirate ili deaktivirate sljedeće funkcije četkice za zube:
Punjenje na bazi za punjenje
- izvora napajanja klase 2 koji se sertifikovala organizacija UL ili standard 1310.
1 Uklonite glavu četkice i isperite oblast oko metalne osovine toplom vodom. Obavezno uklonite sve ostatke paste za zube.
Oprez: Nemojte da gurate gumenu zaptivku na metalnoj osovini oštrim predmetima pošto to može da dovede do oštećenja.
2 Čitavu površinu drške obrišite vlažnom krpom.
Napomena: Nemojte da udarate ručkom o sudoperu da biste uklonili višak vode.
Glava četkice
8 Uhvatite bateriju i odvojite je od unutrašnjih komponenti kako biste slomili drugi metalni jezičak baterije.
Oprez: pazite na oštre ivice jezičaka baterije da ne biste povredili prste.
9 Kontakte na bateriji zaštitite trakom kako preostali napon baterije ne bi prouzrokovao kratak spoj. Punjivu bateriju sada je moguće reciklirati, a ostatak proizvoda odložiti na odgovarajući način.
Napomena: Aparat koji se više ne može upotrebljavati nemojte da odlažete u kućni otpad, već ga predajte na zvaničnom prikupljalištu za reciklažu. Na taj način pomažete očuvanju životne sredine.
Johdanto
www.philips.com/support
www.philips.com/toothbrush-heads.
Ominaisuudet
- G3 Premium Gum Care: Gum Health -tila
- W3 Premium White: White+-tila
- TongueCare+: Tongue Care -tila
www.philips.com/support
Bellik: Dürli modelleriň aýratynlyklary dürlüçe bolup bilýär. Käbir modeller Bluetooth ýa-da NFC bilen enjamlaşdyrylmadyk bolup biler.
Niyetlenilýän ulanyş
1 Gyllary öllään we üstüne azajyk diş pastasyny çalyň.
Clean we Deep Clean+
White+ Gum health Tongue Care
Elektrikli diş çotgaňyz 3 dürli ýygjamlyk sazlamasy bilen gelýär:
1 Her ulanyşdan soň nasadkany we gyllary ýuwup durlaň.
www.philips.com/support
www.philips.com/support
Clean и Deep White+ Gum Health Tongue Care

www.philips.com/support
www.philips.com/support
www.philips.com/support
Clean и Deep White+ Gum health Tongue Care
www.philips.com/support
www.philips.com/support
Clean n Deep White+ Gum health Tongue Care Clean+ (TO.
www.philips.com/support
www.philips.com/support
6 Мурваттобакро байни батарея ва чахорчубаи сиёх дар поёни чузъхои дохили пайваст кунед. Сипас, мурваттобро аз батарея боло бардошта, поёни чахорчубаи сиёхро кушоед.
www.philips.com/support
Стан батареї
www.philips.com/support
Sonicare hwultylwdhg oqunultini hwuwn.
1 Utpntnutp Sonicare hwultuwnon atn htnwunuh ynw:
2 3wúnqútp, nn àtn hīnwjuuh Bluetooth-ŋ úhwguwð ʒ:
3 4tngntp wunwuh hunqwùwyn` hwúnqutni hwúwn, nn wju wlnhyl 5 (lnjutnp uwnu niú tǔ):
4 Fwgtp hwultyluwdn u htunutp pwjltnhu:
5 2niqwlnntp wunwuh hunqwùwyn hwultiylwoh htun:
6 3wultuiuwoh uhgngnu untnodtp atn hw2hyn: trat wnwqwnyuh, wnnhwgntp utnywnnigylwö dnpwqntpn` ytgnhù pwntlwwlniwutphg u hwunlynipajniüutphg oqnultini hwuwn:
- Uthwnwlywuwgulwδ hunphnnnutn u qnnδuwluyu wnwgwnyutn
- hnqwùwlyh qìhuìyh ǔnhùwnhùúwù hì2tǔgùwù (ǔhuuunwgh oqúnwànndúwù nǚjwùlùtn hǔnw hìhuìuìwò)
Sonicare hwulqluwdn hwulwpniú 5 hutlugh utüunnutnh ynnúhg unnwúwnnúwó unjuwuttn u dwúwùwlyh núpawgpniú htunluniú àtn hunqwùwlytlni unlqnnpuputnhù:
1 bùnqùwùyì hǔhùn hǎuǐwùwntgntp wǒuòtu, nǔ uǒqǔhùtǔ nǐnǚlǜò zhùtǔ ǔnǐjù nǐnǚnníjāwúp, hǔz pènǚwùh nǚhuǒgh yùnún:
2 Uúnín utnútp hunqwùwlyh qjhuhlyn útnplú útnwnŋwlywù lhutzh útg, úhùzlu wju lyuìq wnùh: L2niú' hunqwùwlyh qjhuhlyh u pnùwlyh úhqu yhnpn wùgph wnlywjnupjniùn ñnnúwl ʒ:
2tn Philips Sonicare wunwutph hunquuwlyh oqunwqnpnniyn
tpti wnwghù wùqwú tṛ oqunwqnδniú àtn Sonicare wnwúh hunqwùwln, wultih 2wn jpnæng qwwln ünnúwl 5' hwútuwinwó nς 5tlynnwlywù hunqwùwlyh htún: lnnúwl 5, tnp wnwghù wùqwú oqunwqnδnnùtn 2wuhg 2wn tǔ utnúniú qnδwnnniú: Uhwjù yhnwntṛp üninp utnúniú u panjī nuṭr, nnwtuqh winwúh hunqwùwln àtn yhnhuwntǔ úwpnh: hünnniú tṛp htinutl uinnlu 'utnlywjwgulwó hunqwùwlyhg oqunlṭīni gnigniùutnhù' lwuwrqnijù wnŋjnìupūtn uunwùwlni hwúwn:
Uugniun atn unn Sonicare tlyunnwlywù wunwúh hunqwùwlyhù ht2unwgutlni hwúwn wnwghù 1-2 2wpwpeulw núpwgpniú oqnuwqnndtip wultih gwòn
hùntùuhúlníjwúp ywnqwwúnniú, wùnìhtunl wùgtp wútǐh pwnàn ywnqwwúnnúwù:
Uwpnúwù hnwhwùqùtn
1 陰ntp hunqwùwlyh úwqhúutnn u útngntp wunwúh úwðnilyh phz pwùwlnyjniǔ:
2 Umwúh hunqwùwlyh úwqhúuttnn ŋntp wunwuúutnh ynw nnn2 wùljuwù unwú (45 wuunhǎwù): Uúnín utnútp, nnwtuqh úwqhúuttnn hwuùtù jùntph tqnwaqóhu yuwí ŋnwùhg útnpu:
L2niú Uúpnnq dwúwùwly hunqwùwlyh ytúunnùn wwhtp winnwùutph htún 2yhuìwù útg:
3 Utnútp hnuwúph úhwugúwú/wùgwùnúwú lynǎwǔn' Philips Sonicare-n úhwugútǐni hwuśwn:
4 Urpntu wuhtp hunqwùwlyh úwqtnú winnuśutph ynw untnwnnluwó u lúntnh tqnwaðniú: Uwpntp winuwúttn pārəluwly hṭun ni wnwg 2wndniuśutnnu, nnwtuqh hunqwùwlyh úwqhúuttn hwuùtu winuwútphu: Čwnniówytap wju 2wndniún ótn úwpnuśwú yhnih wúpnng núpawgpniú:
L2niù hunqwùwlyh úwqhúuttnn wgtuŋp ʒ úh uhnpn lwijuwùwù: hunphnnnn zh unnuíniú winnwùuttnn úwpnti l wjuwytu, hùzwtu ünp yúwpntthp unylnnwlywù winwúh hunqwùwynu:
L2niu 2wihwqwug utd aui2niu qnndwnnti ni ntuwpniu 7nip wjn uwwuhu yhuwuwip pnuwuh pnpnngh yhnhhnuuwu u uwuni2wlywqnjunu pwnpenn lniuwjhù gnighzh uhzngnu:
5 Urquh winwutph utnuh uwltnunjputn
uwpntni hwuwn petptp hunqwuwlyh pnuwyn
yhuwninh nhnpnu l u uh pwuh ninnwhwjug
uwpnn 2wndnutn ywnwntp jninwpwusynin
winwuh qnw:
6 Uwpntni yhniu wuwpuntinig htinn ywnn np
lnwgnighs dwuwuwly hwinlywgutl winwutinh
dwunn uwltpntuuttn np uwptniu u wju
hwinluwodtphu, nnuntn wnwgwuniu 5 powulnnniu:
ywnn np uwu uwpnti ltqniu` hunqwuwyn
wwhtinu uhwguwd ywi wugwnud, huzwbu
uwhpwnnniu np:
12 niú 2tn Philips Sonicare wunwúh hunqwùwʊŋ wùlúnwùq 5 wunwútph pntlytunutph (hunqwùwʊŋ qíhuḥn 2niún 5 úw2yniú pntlytunutph ynw) u wunwútph ½tnwlywùqùnn hwnúwnwùputph (ignùniúutn, 2wwhlyutn, ½tǔhnutn) oqunwqnòúwù ntówpnú, tṛat ħnwùp wwwn2wǎ tǔ oqunwqnòuŋiú u ztǔ huwhunuŋiú:
BrushPacer
Etiyunnwlywù hunqwùwlyù niùh hùntǔuhúlníjāwù 3 uwnptn ywnqwwulnnniú.
- gwòn hùn tǔ uú huì nǐ jiù (ú tǔ qhò)
- úhghù hùntùuhúlnipajniù (tŋyni qhd)
- pwnàn hùntùuhúnlpajniù (tntip qhd)
tnp hwqgünui tpr pnüwlnpêhû, hutlwgh hunqwüwlyh qihuhÿ wylunnüwun ytnwnu ñünnniú 5 wnwgwynlhn hùntüuhulnjajniiún: tpat gwülywünui tpr yhnhutl hùntüuhulnjajniiún, hunqwüwlyíwù ñüpwgpniú ywnnn tpr utnúti ntdhú/hùntüuhulnjajniiú ynǎwlyn: hùntüuhulnjajniiún zh ywnnn yhnhuṭi, tnp pnüwlyù wùgwynluwó 5 ywu ñwnwntāgulwó 5:
BrushSync unthuunnqhw
BrushSync unthuünlnqhwiù àtn hunqwùwlyh qihuhlyhù pniyl 5 unwihu hwnnnnwulgutl pnùwlyh htún uhlynnzhwh oqùnijəjwiúp: hunqwùwlyh qihuhlyh uunnphù hwnnlwðniú qinùjnn 32wùn gniyg 5 unwihu, nn hunqwùwlyh qihuhlyu wwwhnyluwò 5 wju unthuünlnqhwiŋui: BrushSync unthuünlnqhwiù wwwhnylniú 5.
- lunqwùwlyh qlhuhlyh yhnhuwnhùuúwù hh2tigniú
- BrushSync nādhuī h qniqwulnniū
Philips Sonicare-ǔ wīnwqwnlýniú ٤ BrushSync (hūnqwùwʊlhUhùpnnùwgniú) unthuúnlnqhwjnuḥ hūtluugh hūnqwùwʊlh qìhuhlyùtinh lwiju untiuwlywùh:
tonquùwùyùtnh qìhùhùyùtnh útn wúpnnq untiuwlywùnìu ðwùnpàwùwùnì u àtq wútǔwhwúwwuwwunwuhwù qìhùhùn qúnùtǐnì u īnwgnighz unṭntǔyniŋjniùutnh
hwùwùn wjgtltp www.philips.com/toothbrush-heads:
9nnδwnnɪpəʊtn
- ดูรุณวิ นิยมพิธี
- BrushPacer
- SmartTimer
- lunquiuwlyh qluhlyh ntduhúh qniqwuynnuu
- Easy Start
- lunqwùwlyh qlhuhlyh yhnhuwnhùuìwù hħ2tigniú
2tn Sonicare wunwúh hunqwùwǔn ʒwǔhniú ʒ úwρntǔní nǚrəwgpniú àtn lnnúhg qnnðwnŋnuð ǎu2niún` àtn lùntāŋ u wunwútāŋ nǐuwuuqlwópùtnhg www2nwwwùtīní hwúwn:
tpt wultinnn du2niu tpr qnndwnpnni, www pnuiwlyh panrngn yhnhuyniú 5, hul pnuiwlyh uunnphù hwunluwóniú qnuiynn lniuwwjhu gnighzn pewnrniú uwuni2wlywqnijúnu' uħuʒu ynlyhù zuylwqtgutp du2niún:
lhgpwwlnnuwδ υwnnlnyngnu: Uwnnlngh lhgph gnighen gnjg 5 unwihu υwnnlnygh ywnqwuhǎwyn, tnp wuwrwnnniú tpr hunqwùwlyúwù 2 nnwtywùng wnngtŋnninwù, tnp wùgwinniú tpr hunqwùwyn, ywu tnp wju lhgpwwlnnuniú 5:
L2niù 4wnnn l 5wwhwugutl uhtu 24 dwú, nnwguqh uwnunyngù wúpnngnupwúp jhgpwulnuḥ` uwhupwù wnwghù oqnwqnponiún, uwlywjù nnp lwnnn tρ oqnwqnndtī Philips Sonicare wunwúh hunqwùwyn, uwhupwù wju wúpnngnuhù jhgpwulnuṭl:
Lhgpwwlnnniun lhgpwwnnuu u hhuph unw
1 Lhgpwqnnu w u huph lwnn uhwgntp
tlywnnwu uniguw u wn p j n i n h u:
2 Lhgpwulnnüwü htiüwyn ywu lhgpwulnnüwü wwwwljw pwdwyn untwnnntp lhgpwulnnüwü hhúph ynw:
3 Stwnntp pruwynen ihgpwulnnuwi htuwlyhu ywu ihgpwulnnuwi wwwwljuw powdwuh utg:
- Uwnunlyngh gnighen u lniuwjhù onwyn qwnuyniú tiù uwhunwú lnjunjú, huly pnùwyn tnyni wùqwú wqnwu2wù t unwihu: Uw ú2wuwyniú t, nn winnwúh hunqwùwyn ulutl t jhgpwnlnnulti:
4 Uunwuh hunqwuwyn yihgpwulnnyh uhuzu wju wupnuqniqjwup lguh:
- čtnp úwynlngh gnighs n pwnrəniú 5 uwhinwly
lnjunú, níntiúu pnùwlynrən lhgpwwlnnúniú 5: čtnp
pnùwlynrəu wúpnnqniəjwúp lhgpwwlnnúh,
úwynlngh gnighs 30 úwjnlyjwiú yhuwnzuh uwhinwly
lnjunú, wwww lquigwnuzh:
Lhgpwylnnniun āwúyhnnnnwlywù wwnjwùnú
L2niu 3tunn nnwufwnnynn wputuniwnutyn lwnnn tui unwnptnulti quiuwod uinntihg lwhuulwod:
1 3wùtp USB úwɪnliŋ ɪhgpwʊlnnúwù ǎwúhnnŋnwʊwù wwwɪnjwùh ʊtɒnpuhg:
2 USB distinguinunl uhwgntp āwúhnnnwlywù wwwunjwùn 5 4 33 únlnpwjhù hqnnnjajwúp hnuwúphù ywù.
- 3tun unwuwwnlwd USB hwnwnhzhg
- UL uunwùnwnpnnutphù hwiúwwuwinwuhuwùnn lquú ANSI/UL 60950-1-nú lquútnwgulwó wùàuwlywù hwiúwlqwnqzh uunwùnwnpun USB úhwlyghzhg, lquú
- UL uunwùnwnpùnùtnhù hwiúwwuwinwuhuwùnn lquú ANSI/UL 60950-1-nú lquútnwgulwó USB tīpwjhu úhwgpnu LPS tītyunnwùnigniúhg, lquú
- UL uunwùnwnpùnùtnhù hwiúwwuwinwuhuwùnn yuuú yuwultnwgylwò 1310 2-nn. nwh tālqunpwwuùnigniuhg:
3 Stnwnntp pnuwyn dawuhnnnwlywù wwnjwùh utg: dwuühnnnwlywù wwnjwùn lhgpwulnniú t wunwùh hunqwùwlyù wjupwù dwuwiwly, uħùzì wjù wúpnngniqjwúp lhgpwulnnih:
Uwnunlngh lwnqnwhǎwly
Uwnunlyngh ywnqnwlhǎwln (tnp fnùwln hnuwùphù uhwgnwò lhgpwwlnnhzh ynw ξ ywu áwúhnnnwlqwu wwwunjwùh útg) Fnùwln hnuwùphù uhwgnwò lhgpwwlnnhzh ynw ξ ywu áwúhnnnwlqwu wwwunjwùh útg
tnp pnùwlnŋn untìnwnnlʊwɔ ß lhgpwulnnhʒh ynw ywwú ǎwúhnnnnwlqu wwwunjwùh útg, úwnunlyngh gnighʒn gnjg ß unwìhu úwnunlyngh lhgph úwwywnnnwyn:
Uwnunlngh lwnqwuhawly Uwnunlngh gnighs
Lhgpwulnniú ðwnəniú 5 uwhunwú lnijunú
1 3twngntp hunqwùwlyh qjhuhyn u luywgtp utunwnwlywù lhutrh hwnuwrðn unwp gnnu: 3wúnqultp, nn htnwgntl tp wunwúh úwðníyh utuwgnnnútnp:
2qn12wgniu' Uh hntp ntunhut luhpn unin wnwnlqwutpnu ntguh jhutnh utg, puuh nn wju luwnn t hwuqtgutl luwuulwoph:
1 3nɪnʌpəwɪʒɪŋn oqɪnəʊpənɒniʊhɡ hɪtun lʊwɡtəp hunəwɪwʊlɪh qɪhʊhʊŋ lʊ uːwəqhʊtʃn:
2 3twnwgntp hunqwùwlyh qlniħn pnùwlyhg l u wnùułwqù 2wpwip n úty lúwgtp hunqwùwlyh qihuhyn inwp qnnu: Lúwgtp āwúíhnnnnwlywù lγwiħwnħsù wjùpwù hwaówħu, nnpwù wùhnwdtzun ʃ:
Lhgpwwlnnhz
1 Uguwntp jhgpwwlnnhn` uwhupwu wju uwpntin:
2 Lhgpwulnnhhsh uwlytntun uwpntp hunuwwl qnndylwdrpnl:
5 Enuwyn qihuhuwyn wwhtinu' jhutn n utnpu utnutp yn2un uwwytnuniyah ynw: tpat utnphu pwnwnnhsutnn ht2unnipawup stu wqwnyniu wwwunjwuhg, lynyutp pwjl 3-n uhusu utnphu pwnwnnhsutnn nninu qwù:
6 Stnwnntp wunnlunwlywhwùn úwnlngh l u ul 2n2wùwlyh úhqu útnphù pwnwnnhsùtnh útnpluniú: Ujùnhtunlu qqniznptǔ htnwqntp wunnlunwlywhwùn úwnlnghg' ul 2n2wùwlyh útnpluh hwnlquòn ynunntǐni hwiúwn:
7 Stnwnntp wunnlunwlywhwùn úwnunlngh útnpluh u ulu 2n2wùwuh úhglù lynuntjni útunwnwlywù útnnhnn, nnn úhwgùniú t úwnunlngn ywùws unwwuwihà: Uw ywùgwuh úwnunlngh útnpluh tqnq 2n2wùwuhg:
8 Frutp uwnunlngn u htnwgntp wju utnphu pwnwnnhsutnhg, nnwtuqh lynuntp uwnunlngh tlnynnn. utunwnjw utnnhhn:
2qn12wgniu 2qn12wgtp uwnunlyngh utnnhnhutph unin tqnptngh, npwtuqh huniwwihtp uwnutph u'uwuulwdputngh:
www.philips.com/support
3 Philips Sonicare-nb hsubsmonzso, qssgfnmgn hsmonzs/zsdmmonzni mnmszl.
4 ghmbnmsq dmsszlgon tsgmyngdun zdnmgdus qos mmdnlnu bs88j. gunbdngoon zdnmgdun dznfg bnd qos y3s6 dmdmsmdon nug, mmd tsgmyngdun b3wqdmqgb6 zdnmgdul dmnln. gubsgmdg on slgcn dmdmsmòs bdgqnlu gnzmnlu gubdszmmdsdn.
3ànqnnl gngjΦmtsgmnlu 3 ubzqosubzs nbqgbun3mònl 3smsdʒθn sŋz:
odds funds may be used by the funders of the funders of the funders of the funders of the funders of the funders of the funders of the funders of the funders of the funders of the funders of the funders of the funders of the funders of the funders of the funders of the funders of the funders of the funders of the funders of the funders of the funders of the funders of the funders of the funders of the funders and their respective funds may not be used.
odds funds mgln bnd fund mgnd fund mgnd fund mgnd fund mgnd fund mgnd fund mgnd fund mgnd fund mgnd fund mgnd fund mgnd fund mgnd fund mgnd fund mgnd fund mgnd fund mgnd fund mgnd fund mgnd fund mgnd fund mgnd fund mgnd fund mgnd fund mgnd fund mgnd fund mgnd fund mgnd fund mgnd fund mgnd fund mgnd fund mgnd fund mgnd fund mgnd fund mgnd fund mgnd fund mgn
odds funds, funds, funds (mages funds, funds, funds, funds, funds, funds, funds, funds, funds, funds, funds, funds, funds, funds, funds, funds, funds, funds, funds, funds, funds, funds, funds, funds, funds, funds, funds, funds, funds, funds, funds, funds, funds, funds, funds, funds, funds, funds, funds, funds, funds, funds, funds, funds, funds, funds, funds, funds, funds, funds, funds
odds funds mgmt debt and debt management, fund debt debt management, fund debt management, fund management, fund management, fund management, fund management, fund management, fund management, fund management, fund management, fund management, fund management, fund management, fund management, fund management, fund management, fund management, fund management, fund management, fund management, fund management, fund management, fund management, fund management, fund management, fund management, fund management, fund management, fund management, fund management, fund management, fund management, fund management, fund management, fund management, fund manager
odds funds mgmtng dng nd amgmdng dng nd agdeng gugssm nd mzng hsmn3ng nd zngqsb nduunmgmdng, nd nduugdng odds funds mgmtng dng nd guhndnbsng dng guhndn ndzgbdng (dsg. ndbghgdn, ndn nd uasdgmdng, ndgfgdng) zmbghgduo nduuzmn nduayamgdsu. nd gusssb3nm nd sufmdgduo nduyadn6n ndmngsdn. gusssb3ng nd sufmdgduo ndguhndnbsng dng nd hsggnt nduunmgmdng ndmsuhdgn ndsbsdnd dsbd, ndbdnd dsan gusysfimnt.
8 Sunngm dSΦsMgS ωS gSdmdjshgm dNωS 3md3m6g6ΦnωSb dGmMg dGΦsμηνb dSΦsMgNb h5u5g3g6nL g5u5Φg6ωφ.
zsugmmbnngjds: zsdmnhbgn bnqfmmbnng jssgsmgln dslm jncggdms6, mmd muznqus bsngmmm oonmgdnl qssbn6gds.
www.philips.com/support
.הכלההוּרָהוּרָהוּרָהוּרָהוּרָהוּרָהוּרָהוּרָהוּרָהוּרָהוּרָהוּרָהוּרָהוּרָהוּרָה
הכלה:
בְרַעָה
1
.Gum Health IX + White
בְרָה
Tongue Care-1 +Clean, White+, Gum Health, Deep Clean
(הכלהה)
תָרִיְשָׁה
.7017 www.philips.com/toothbrush-heads
תְבָרִי
-γη7 μ
-Brush
-Smar
-ΝΥΗ
-Easy-
-הכלה
בִרְשָׁה בַרְשָׁה
. Philippines Sonicare .EasyStart (Philips Sonicare)
.ロイヤית Software EasyStart
תְרָה בְּרָה
תְרָה בַלְאָה אַעִי
IN
.הכלההוּרָהוּרָהוּרָהוּרָהוּרָהוּרָהוּרָהוּרָהוּרָהוּרָהוּרָהוּרָהוּרָהוּרָהוּרָה
.הכלההוּרָהוּרָהוּרָהוּרָהוּרָהוּרָהוּרָהוּרָהוּרָהוּרָהוּרָהוּרָהוּרָהוּרָהוּרָה
un
.הכלההוּרָהוּרָהוּרָהוּרָהוּרָהוּרָהוּרָהוּרָהוּרָהוּרָהוּרָהוּרָהוּרָהוּרָהוּרָה
:הכלההוּרָהוּרָהוּרָהוּרָהוּרָהוּרָהוּרָהוּרָהוּרָהוּרָהוּרָהוּרָהוּרָהוּרָהוּרָה
-.D'D'
-IX ロル
הכלה 4
www.philips.com/Sonicare
©2022 Koninklijke Philips N.V. (KPNV). All rights reserved. Philips and the Philips shield are trademarks of KPNV. Sonicare and the Sonicare logo are trademarks of Philips Oral Healthcare, LLC and/or KPNV.
300008528161 (25/11/2022)



- INTRODUCTION
- IMPORTANT SAFETY INFORMATION
- WARNINGS
- BATTERY SAFETY INSTRUCTIONS
- STORAGE AND TRANSPORTATION CONDITIONS
- ELECTROMAGNETIC FIELDS (EMF)
- RADIO EQUIPMENT DIRECTIVE
- WWW.PHILIPS.COM/SUPPORT
- INTENDED USE
- YOUR PHILIPS SONICARE (FIG 1.)
- ACCESSORIES
- SONICARE APP - GETTING STARTED
- APP FEATURES
- GETTING STARTED
- USING YOUR PHILIPS SONICARE TOOTHBRUSH
- BRUSHING INSTRUCTIONS
- MODES
- INTENSITIES
- BRUSHSYNC TECHNOLOGY
- FEATURES
- PRESSURE SENSOR FEEDBACK
- BRUSHPACER
- SMARTIMER
- BRUSH HEAD MODE PAIRING
- EASYSTART
- DISCLAIMER
- BRUSH HEAD REPLACEMENT REMINDER
- ACTIVATING OR DEACTIVATING FEATURES
- CHARGING AND BATTERY STATUS
- CHARGING
- CHARGING ON CHARGING BASE
- CHARGING WITH THE TRAVEL CASE
- BATTERY STATUS
- BATTERY STATUS (HANDLE ON PLUGGED IN CHARGER/CHARGING TRAVEL CASE) HANDLE ON PLUGGED IN CHARGER/CHARGING TRAVEL CASE
- CLEANING
- TOOTHBRUSH HANDLE
- BRUSH HEAD
- CHARGER
- TRAVEL CASE
- CHARGING TRAVEL CASE
- STORAGE
- REPLACEMENT
- LOCATING THE MODEL NUMBER
- WARRANTY AND SUPPORT
- WARRANTY EXCLUSIONS
- RECYCLING
- REMOVING THE RECHARGEABLE BATTERY
- GIRIŞ
- WHITE+ GUM HEALTH TONGUE CARE
- (KUN BESTEMTE MODELLER)
- SÅDAN BØRSTER DU
- OPLADNING VIA OPLADERENS BASE
- PRODUKTMERKMALE
- OMADUSED
- AKU OLEK
- EXCLUSIONS DE GARANTIE
- UPORABA ČETKICE ZA ZUBE PHILIPS SONICARE
- UPUTE ZA ČETKANJE
- PUNJENJE NA BAZI ZA PUNJENJE
- GLAVA ČETKICE
- OPLADEN OP OPLAADSTATION
- LADE I LADEBASEN
- BATTERISTATUS
- PHILIPS SONICARE TISH PASTANGIZDAN FOYDALANISH
- TISH TOZALASH KO'RSATMALARI
- FUNKSIYALAR
- FUNKSIYALARNI FAOLLASHTIRISH YOKI FAOLSIZLANTIRISH
- YOKI
- QUVVATLASH VA BATAREYA MAQOMI
- QUVVATLASH
- QUVVATLASH TAGLIGIDA QUVVATLASH
- SAYOHAT G'ILOFI BILAN QUVVATLASH
- BATAREYA HOLATI
- BATAREYA HOLATI (DASTA QUVVATLAGICH/SAYOHAT G'ILOFIGA ULANGAN)
- DASTA QUVVATLAGICH/SAYOHAT G'ILOFIGA ULANGAN
- CHO'TKA KALLAGI
- QUVVATLASH MOSLAMASI
- SAYOHAT G'ILOFI
- QUVVATLASH SAYOHAT G'ILOFI
- XOTIRA
- CARREGAR NA BASE DE CARREGAMENTO
- CLEAN IN DEEP CLEAN
- (SAMO NEKATERI MODELI)
- AKTIVIRANJE ILI DEAKTIVIRANJE FUNKCIJA
- JOHDANTO
- OMINAISUUDET
- NIYETLENILÝÄN ULANYŞ
- CLEAN WE DEEP CLEAN
- СТАН БАТАРЕЇ
- 2TN PHILIPS SONICARE WUNWUTPH HUNQUUWLYH OQUNWQNPNNIYN
- UWPNÚWÙ HNWHWÙQÙTN
- BRUSHSYNC UNTHUUNNQHW
- 9NNΔWNNꞮPƏƱTN
- LHGPWWLNNNIUN LHGPWWNNUU U HHUPH UNW
- LHGPWYLNNNIUN ĀWÚYHNNNNWLYWÙ WWNJWÙNÚ
- UWNUNLNGH LWNQNWHǍWLY
- UWNUNLNGH LWNQWUHAWLY UWNUNLNGH GNIGHS
- LHGPWWLNNHZ
- ODDS FUNDS MGLN BND FUND MGND FUND MGND FUND MGND FUND MGND FUND MGND FUND MGND FUND MGND FUND MGND FUND MGND FUND MGND FUND MGND FUND MGND FUND MGND FUND MGND FUND MGND FUND MGND FUND MGND FUND MGND FUND MGND FUND MGND FUND MGND FUND MGND FUND MGND FUND MGND FUND MGND FUND MGND FUND MGND FUND MGND FUND MGND FUND MGND FUND MGND FUND MGND FUND MGND FUND MGN
- בְרַעָה
- בְרָה
- תָרִיְשָׁה
- תְבָרִי
- בִרְשָׁה בַרְשָׁה
- תְרָה בְּרָה
- תְרָה בַלְאָה אַעִי
- UN
Brand : PHILIPS
Model : Sonicare DiamondClean Smart 9400 HX9917
Category : Electric toothbrush