
FlexScan S1910M - Monitor EIZO - Free user manual and instructions
Find the device manual for free FlexScan S1910M EIZO in PDF.
| Product Type | LCD Color Monitor |
| Screen Size | 19 inches |
| Native Resolution | 1280 x 1024 |
| Aspect Ratio | 5:4 |
| Input Connectors | DVI-D (SIGNAL 1), D-sub mini 15-pin (SIGNAL 2) |
| USB Port | 1 USB port (for ScreenManager Pro) |
| Power Supply | 100-240 V AC, 50/60 Hz |
| Power Consumption (max) | Approx. 40 W |
| Standby Consumption | Less than 1 W |
| Brightness | 250 cd/m² |
| Contrast Ratio | 1000:1 |
| Response Time | 8 ms |
| Viewing Angles (horizontal/vertical) | 170° / 150° |
| Screen Adjustments | Height, tilt, swivel (pivot not available) |
| Display Modes (FineContrast) | Custom, Movie, Picture, Text, sRGB |
| Functions | Auto adjustment (analog), brightness adjustment, power saving |
| Security | Kensington lock (security slot) |
| Package Contents | Monitor, power cord, DVI-D cable (FD-C39), user's manual, setup manual, warranty, M4×12 screws (4 pieces) |
| Cleaning | Use a soft, dry cloth |
| Warranty | Limited warranty (see provided document) |
Frequently Asked Questions - FlexScan S1910M EIZO
User questions about FlexScan S1910M EIZO
0 question about this device. Answer the ones you know or ask your own.
Ask a new question about this device
Download the instructions for your Monitor in PDF format for free! Find your manual FlexScan S1910M - EIZO and take your electronic device back in hand. On this page are published all the documents necessary for the use of your device. FlexScan S1910M by EIZO.
USER MANUAL FlexScan S1910M EIZO
Important: Please read this Setup Manual and the User's Manual stored on the CD-ROM carefully to familiarize yourself with safe and effective usage. Please retain this manual for future reference.
Installationshandbuch
The monitor supports the following resolutions.
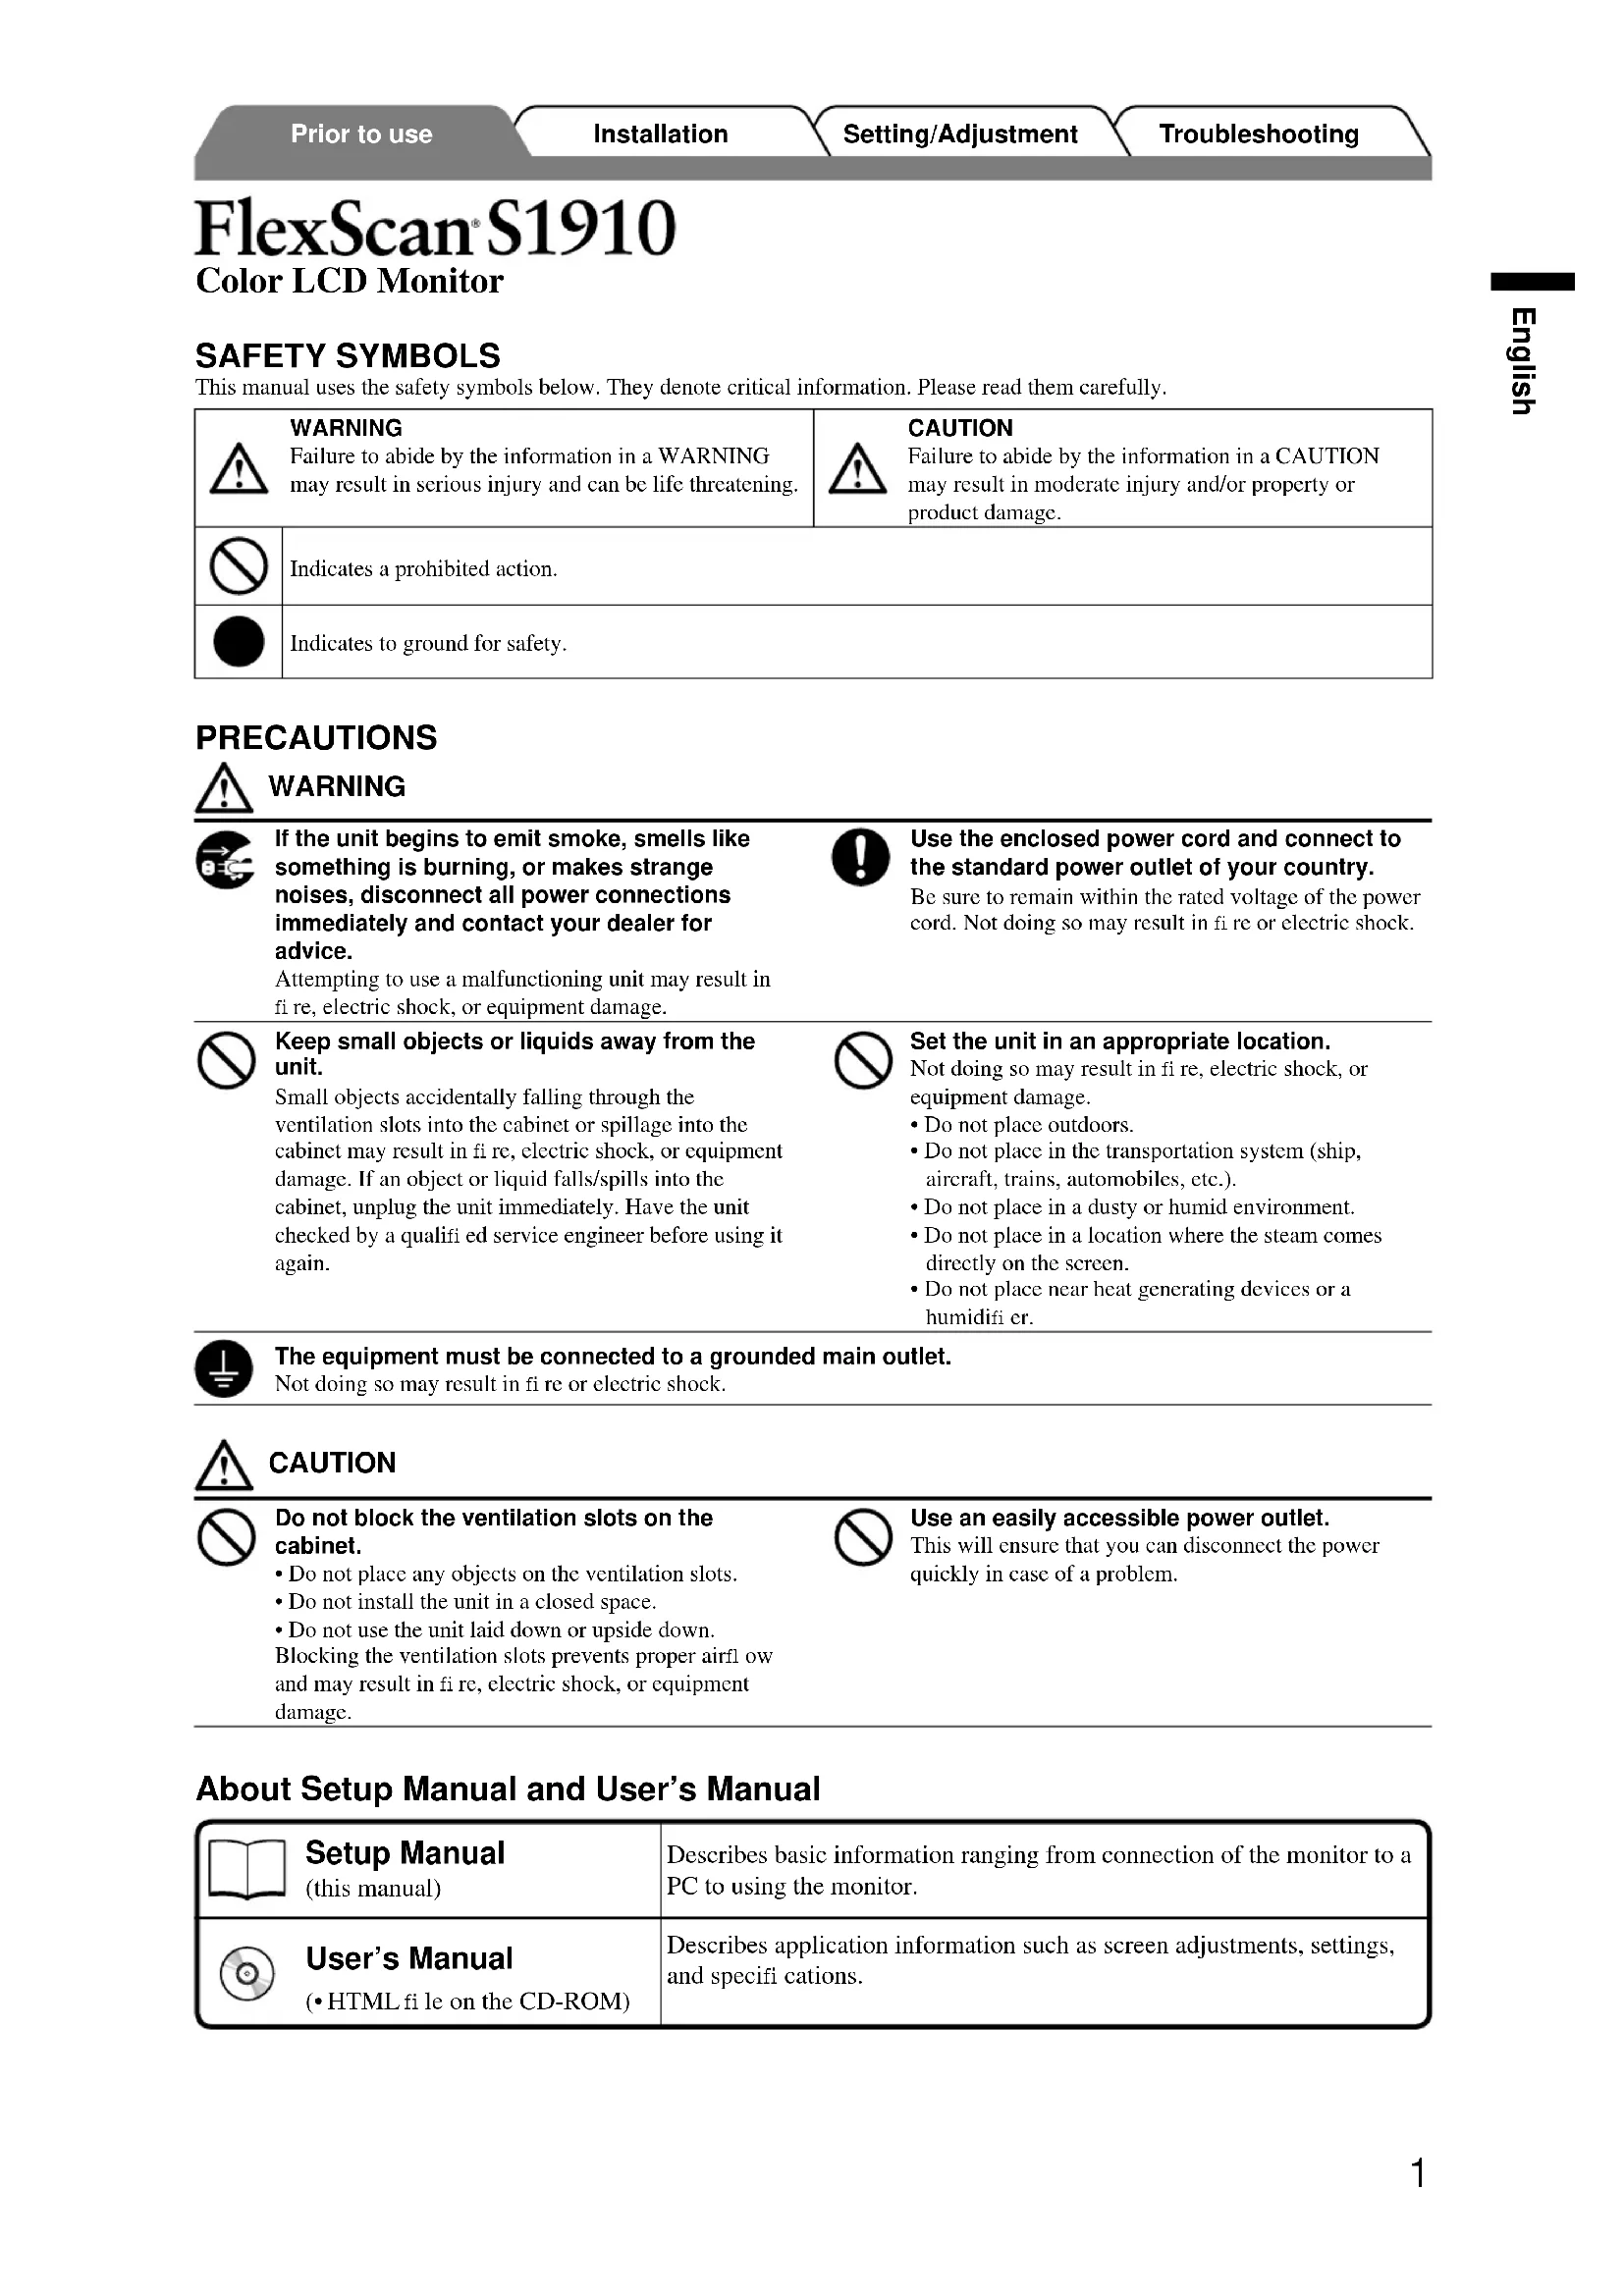
This manual uses the safety symbols below. They denote critical information. Please read them carefully.
| WARNING Failure to abide by the information in a WARNING may result in serious injury and can be life threatening. | CAUTION Failure to abide by the information in a CAUTION may result in moderate injury and/or property or product damage. | |
| Indicates a prohibited action. | ||
| Indicates to ground for safety. | ||
PRECAUTIONS

WARNING

If the unit begins to emit smoke, smells like something is burning, or makes strange noises, disconnect all power connections immediately and contact your dealer for advice.
Attempting to use a malfunctioning unit may result in fire, electric shock, or equipment damage.

Keep small objects or liquids away from the unit.
Small objects accidentally falling through the ventilation slots into the cabinet or spillage into the cabinet may result in fire, electric shock, or equipment damage. If an object or liquid falls/spills into the cabinet, unplug the unit immediately. Have the unit checked by a qualified service engineer before using it again.

Use the enclosed power cord and connect to the standard power outlet of your country.
Be sure to remain within the rated voltage of the power cord. Not doing so may result in fire or electric shock.

Set the unit in an appropriate location.
Not doing so may result in fire, electric shock, or equipment damage.
- Do not place outdoors.
- Do not place in the transportation system (ship, aircraft, trains, automobiles, etc.).
- Do not place in a dusty or humid environment.
- Do not place in a location where the steam comes directly on the screen.
- Do not place near heat generating devices or a humidifi er.

The equipment must be connected to a grounded main outlet.
Not doing so may result in fire or electric shock.

CAUTION

Do not block the ventilation slots on the cabinet.
- Do not place any objects on the ventilation slots.
- Do not install the unit in a closed space.
- Do not use the unit laid down or upside down. Blocking the ventilation slots prevents proper airflow and may result in fire, electric shock, or equipment damage.

Use an easily accessible power outlet.
This will ensure that you can disconnect the power quickly in case of a problem.
About Setup Manual and User's Manual
| Setup Manual (this manual) | Describes basic information ranging from connection of the monitor to a PC to using the monitor. |
| User's Manual (•HTML file on the CD-ROM) | Describes application information such as screen adjustments, settings, and specifi cations. |
Package Contents
Check that all the following items are included in the packaging box. If any items are missing or damaged, contact your local dealer.
NOTE
- Please keep the packaging box and materials for future movement or transport of the monitor.
Monitor
Power cord
Digital signal cable (FD-C39)

Analog signal cable (MD-C87)

EIZO USB cable (MD-C93)

EIZO LCD Utility Disk (CD-ROM)
- User's Manual
Setup Manual (this manual)
Limited warranty
Fixing screws: M4 × 12 mm 4PCS
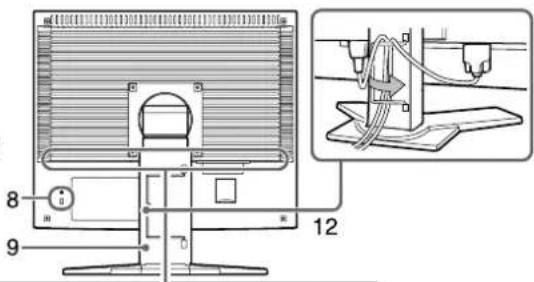
Controls and Functions
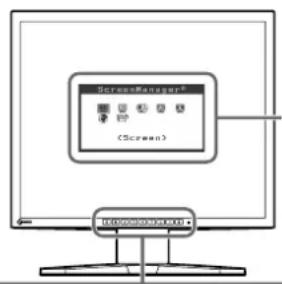
Adjustment menu (*ScreenManager)

| 1 | Input signal selection button | Switches input signals for display when two PCs are connected to the monitor. |
| 2 | Mode button | The M button allows you to switch the display. |
| 3 | Auto adjustment button | Performs the function to adjust the screen automatically. (analog input only) |
| 4 | Enter button Displays the Adjustment menu, determines an item on the menu screen, and saves values adjusted. | |
| 5 | Control buttons (Left, Down, Up, Right) | • / / button Displays the brightness adjustment window (page 5). • Chooses an adjustment item or increases/decreases adjusted values for advanced adjustments using the Adjustment menu (page 5). |
| 6 | Power button Turns the power on or off. | |
| 7 | Power indicator Indicates monitor's operation status. Blue: Operating Flashing yellow : Power Save mode (2 time for each) (Digital only) Yellow: Power saving Off : Power off | |
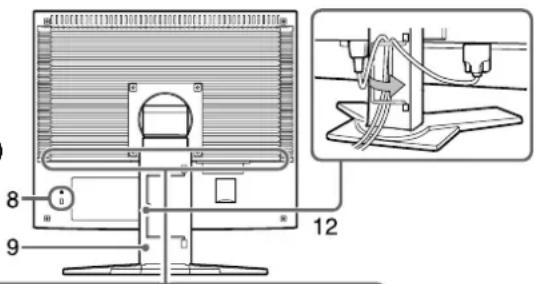
| 8 | Security lock slot | Complies with Kensington's MicroSaver security system. |
| 9 | Stand (Detachable) | Stand adjusts the height and angle of the monitor screen. |
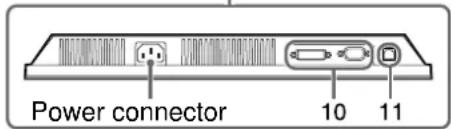
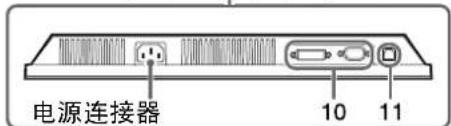
| 10 | Input signal connectors | Left: DVI-D connector (SIGNAL 1) /Right: D-sub mini 15-pin connector (SIGNAL 2) |
| 11 | USB port | Connects the USB cable to use the ScreenManager Pro for LCD software (for Windows). For how to use it, refer to the User's Manual on the CD-ROM. |
| 12 | Cable holder | Holds the monitor cables. |
- ScreenManager® is an EIZO's nickname of the Adjustment menu. (For how to use ScreenManager, refer to the User's Manual on the CD-ROM.)
Connecting Cables
Attention
- When replacing the current monitor with an S1910 monitor, be sure to change the PC settings for resolution and vertical frequency to those which are available for the S1910 monitor referring to the resolution table (back of cover page) before connecting the PC.
NOTE
- When connecting two PCs to the monitor, refer to the User's Manual on the CD-ROM.
1 Check that the monitor and the PC are powered off.
2 Connect the monitor to the PC with a signal cable that matches the connectors.
After connecting the cable connectors, tighten the screws of the connectors to secure the coupling.
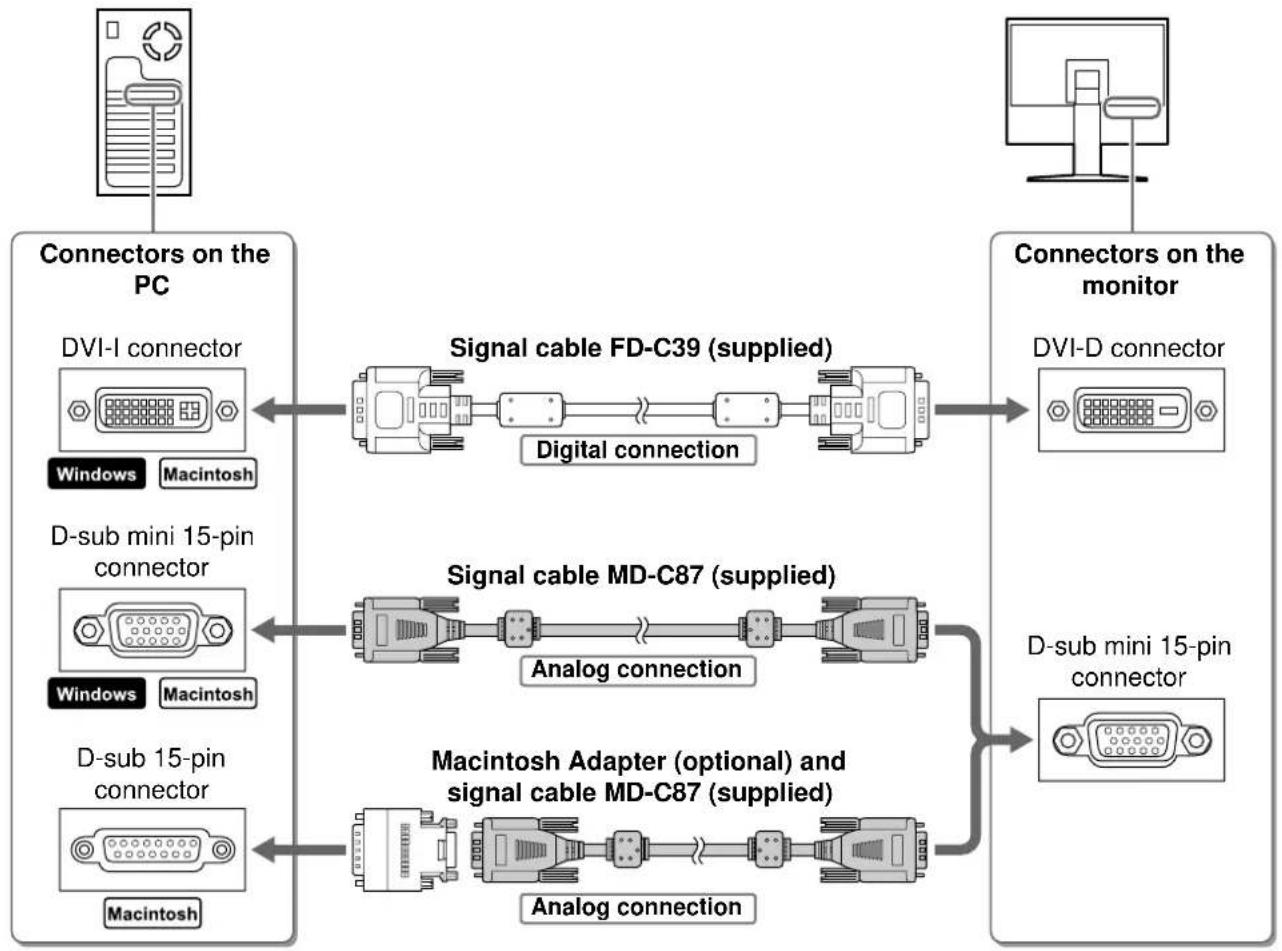
3 Plug the power cord into a power outlet and the Power connector on the monitor.
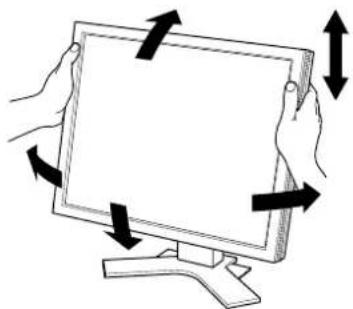
Adjusting Screen Height and Angle
Adjust the screen height, tilt and swivel the screen to the best condition for working.
Displaying Screen
1 Press to turn on the monitor.
2 Turn on the PC.
The monitor's Power indicator lights up blue and the screen image appears.
3 When using analog input signals, perform the Auto Adjustment function. (Refer to "Performing Auto Adjustment function" below.)
The Auto Adjustment function is not necessary when digital signals are input because images are displayed correctly based on the preset data of the monitor.
Attention
- Turn off the monitor and PC after using them.
- For the maximum power saving, it is recommended that the power button be turned off. Unplugging the power cord completely shuts off power supply to the monitor.
Performing Auto Adjustment Function (Analog input only)
When analog signals are input, the Auto Adjustment function enables the automatic adjustment of clock, phase, screen position, and resolution.
For details of the Auto Adjustment function, refer to the User's Manual on the CD-ROM.
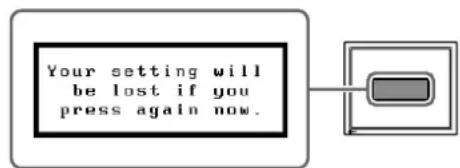
1 Press A.
A message window appears.
2 Press A again while the message is displayed.
The Auto Adjustment function is activated and clock, phase, screen position, and resolution are adjusted automatically.
Attention
- The Auto Adjustment function works correctly when an image is fully displayed over the display area of a Macintosh or Windows PC screen. It does not work properly when an image is displayed only on a part of the screen (DOS prompt window, for example) or when a black background (wallpaper, etc.) is in use.
- The Auto Adjustment function may not work properly with some graphics boards.
Selecting Display Mode
FineContrast allows you to select the best display mode easily according to monitor's application. For details of FineContrast, refer to the User's Manual on the CD-ROM.
FineContrast Mode
| Custom Available for | making desired setting. |
| Movie Suitable for playing back animated images. | |
| Picture Suitable for displaying images such as photos or picture images. | |
| Text Suitable for displaying texts for word processing or spreadsheets. | |
| sRGB Suitable for color matching with sRGB compatible peripherals. | |
1 Press M.
The FineContrast window appears.
2 Press again while the FineContrast menu is displayed.
Each time the button is pressed, the mode on the screen switches. (Refer to the FineContrast Mode table.)
3 Press at the desired mode.
The selected mode is set.
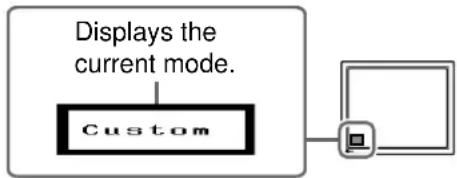
FineContrast mode Window
Adjusting Brightness
1 Press △ □ △ ▽
The brightness adjustment window appears.
2 Adjust the brightness with A D △
Press to increase screen brightness or press or decrease.
3 Press at the desired brightness.
The specified brightness is saved.
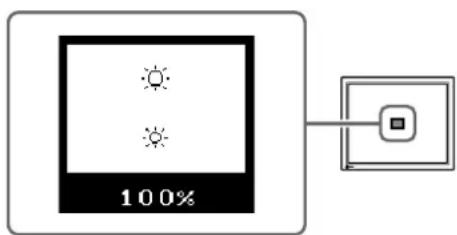
Brightness adjustment Window
Performing Advanced Settings/Adjustments
- Advanced adjustments for the screen or color and various settings are available using the Adjustment menu.
For details of each adjustment function, refer to the User's Manual on the CD-ROM.
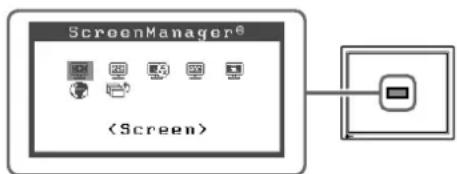
Adjustment menu
The basic settings and adjustments are completed. For advanced settings/adjustments, refer to the User's Manual on the CD-ROM.
No-Picture Problem
If no picture is displayed on the monitor even after the following remedial action is taken, contact your local dealer.
1. Check the Power indicator.
| Symptom Status | Possible cause and remedy | |
| No picture Power Indicator does | not light up. | Check whether the power cord is correctly connected. If the problem persists, turn off the monitor power for a few minutes, then turn it on and try again. |
| Power Indicator lights blue. Check | the brightness setting. | |
| Switch the input signal with S. | ||
| Power Indicator lights yellow. Press | a key on the keyboard, or clicking the mouse. | |
| Power indicator is slowly flashing yellow. | Press the power of the computer. |
2. Check the error message that remains on the screen for 40 seconds.
These messages appear when the input signal is incorrect even if the monitor is functioning.
| Symptom Status Possible cause and remedy | ||
| Signal Check Analog No Signal | The input signal is not received correctly. | When the image is displayed correctly after a short time, there is no problem with the monitor. (Some PCs do not output the signal soon after powering on.) |
| Check whether the signal cable is properly connected to the PC. | ||
| Switch the input signal with S. | ||
| Signal Error Digital fD:135.0MHz fH:80.0KHz fU:75.0Hz | The signal frequency is outside the specifi cation. Incorrect signal frequency is shown in red. | Change the mode to an appropriate mode using the graphics board's utility software. Refer to the manual of the graphics board for details. |
FlexScan S1910
LCD-Farbmonitor
SICHERHEITSSYMBOLE
Cable de signal analogue (MD-C87)

Cable USB EIZO (MD-C93)

EIZO LCD Utility Disk (CD-ROM)
EkTeAeonpuOmuoewv yia Tpoxwnpneouc
Pouiaic yia npoxopneevous ia tyn ofoyn, to xoupa kai yia diapopes pvoiiaic ivai dioeoue eouovpouioeov.
MEPbI PEPDOCTOPOXHOCTN

PNEyPExEHeN

Pn NOBJIeHbIbIMa,NCXODHcero n3 yctpoiCTBa, 3anaxa rapn HIN Heo6bIHybIX 3ByKOB HEmeJHeHO oecToyte yctpoiCTBO n obpaTntecb K npodabuy 3a NOMOuBIO.
IIOHbTKaKcJIiyatauHHHeHCnpaHBOYcTPOHCTBa MOKe TpHBecTH KIOxApy, IopakcIHIO 3JcKTpHcckHM TOKOM HIN IOBpeXdEHIO O6OpyOBAHNA.

XpaHnte MeKHe npedMeTbI N KNDKOCTBdAnOT yCTpoiCTBa.
CnyaHnOe HnHaJAHHe MeKHX IpeMeTOB Hn HpoJIHTo
KHKOCTH BHyTb KOpNya Cpe3 BeHTHJIAHOHHbc
OTBePCTH MoKET IpnBEcTH KIOXApy, IopaxeHHIO
OJIeKTpUeCKHM TOKOM HIN IOBpeKJDeHHIO
OBopyIOBaHH. B cIyAc nOIIaHaHH KaKoro-JH60
IpeIMTe Hn KHKOCTH BHyTb KOpNya IIeMeJIDHIO
OBeCTOByte YcTPOHCTBO. IpeP NOcElyuOeJ
EKHIyATaIHne O6paTHTecb K KBaJIHΦHnIPOBaHHOMY
CIEHAAJIHCTy II PO pCMHTy II TeXHHueCKOMY
OcSIyKHNBAHHIO JIIT BAIIIOJIHeHHI IpOBepKH.

NcnoIb3yIe BxOaHmB KOMnIeK THyp nITaHn, noqKnIOHaembl K cTaNapTHoN dna BaWe cTpaHbI wTenCeIbHO pOzTeK.
Y6eHTecb B CO6JIIOJEHH INIpeJIOB HOMHHaIBHO HAnpKHeHH, HA KOTOPOE paccHTAH IIHYp IITAHHH. HcBbIOIIIEHnE 9TOrO Tpc6OBaHHMOKET PnHBecTH K IOXApy HINI NopaxKeHH OJIeKTPueckHM TOKOM.

YctaHOBtyeycTPOeCTBO NIOxOJaHcEM MeTe.
HeBbIOIeHHe 3TOrO Tpe6oBaHH MoKET npHBecTH K IOXApy, IopAkeHHIO 3JIeKTPnueCKHM TOKOM HIOOBpcckHIO O6OpYOBaHH.
- He yctaHaBnBaHte Ha OTKpbITOM BO3Iyxe.
He yctanabHbAte B TpaHcHOpTHbIX cpeCTBax (Ha Kopa6JAX, B caMOJcTaX, Noe3Jax, ABTOMO6HJAX H.T.I.) - He yctaIIaBJIINBaHTe B IIbIbIIbIX H BJIaXIIbIX MecTaX.
He yctaHaBnBaIte B MeCTe, Ie 3KpaH IOIBePKeH IIpMOMyJeHCTBIOIapa.
He yctaaBnBaHrTe B6HH3yCtpoHcTB,BBIeJIHOIIHX TENIO,HN VBJIAKHNTEJ.

06opyoobAHne doJXHO 6bIb NpokJIIOyeHO K3a3emHeHHo WTeNCBHO PO3ETKE IITAOue CEH.
HeBbIOJIHHHeHc 9TOrO Tpe6oBaHHa MoKcT IIpNBecTH K IOXkapy HIN IopaxKeHHO 3JIeKtpueckHM TOkOM.

BHIMAHNE

He 3aKpbBaIe BeHTnJIauHNoHHbIe OTBepCTNBA Kopnyce.
He NOMEIIaIte KaKHe-JIHbO npEIMeTbHa BENTHJINIOHHBIEOTBepCTH.
He yctaaabJHbAte yctpoHcTBO 3aMKHyTom npoctpaHCTBE.
He KcHpyHTpye yCTPOB BO BROPHOHTaIBHOM HIN HepeBepHYOM IOJOKeHH.
3aKpbTHe BeIITHIIINHOIIbIX OTBepCTHI HApYIIaeT IpaBnIbHbI BO3DyIIIbHb IIOTOK H MOKeT IIpHBecTH HOkapy, HopaKeHHIO 3JIeKTPhueCKHM TOKOM HIN IOBpeKdIIHIO O6OpYIOBaIIHIA.

NcnoB3yIte wTenceIbHyIO po3eKy c Bo3MOXHOCTbIO NERKOHO DocTyna.
BlaoraprA TOMy PnH Heo6xOnHMocTH MoXHO 6yTeT
6bIcPo OBeCTOHTb yCTPOINCTBO CcyYae
BO3HHKIOBEIIKAKOJIJIHO IpO6JIcMbI.
O pykoBODCTBe no yctaHOBKe n pykoBOdCTBe NOJIb3OBaTeJIa
调整菜单
(*ScreenManager®)
Moosacherstrasse 6, Au CH-8820 Wadenswil, Switzerland
Phone: +41-0-44 782 24 40 Fax: +41-0-44 782 24 50
Avnet Technology Solutions GmbH

- Installationshandbuch
- PRECAUTIONS
- WARNING
- CAUTION
- About Setup Manual and User's Manual
- Package Contents
- NOTE
- Controls and Functions
- Connecting Cables
- Attention
- Adjusting Screen Height and Angle
- Displaying Screen
- Performing Auto Adjustment Function (Analog input only)
- Selecting Display Mode
- Press M.
- Press again while the FineContrast menu is displayed.
- Press ° at the desired mode.
- Adjusting Brightness
- Press △ □ △ ▽
- Adjust the brightness with A D △
- Press ° at the desired brightness.
- Performing Advanced Settings/Adjustments
- No-Picture Problem
- Check the Power indicator.
- Check the error message that remains on the screen for 40 seconds.
- FlexScan S1910
- SICHERHEITSSYMBOLE
- EkTeAeonpuOmuoewv yia Tpoxwnpneouc
- MEPbI PEPDOCTOPOXHOCTN
- PNEyPExEHeN
- BHIMAHNE
- O pykoBODCTBe no yctaHOBKe n pykoBOdCTBe NOJIb3OBaTeJIa
- Avnet Technology Solutions GmbH
Brand : EIZO
Model : FlexScan S1910M
Category : Monitor