Stages Isofix - Car seat Joie - Free user manual and instructions
Find the device manual for free Stages Isofix Joie in PDF.

User questions about Stages Isofix Joie
0 question about this device. Answer the ones you know or ask your own.
Ask a new question about this device
Download the instructions for your Car seat in PDF format for free! Find your manual Stages Isofix - Joie and take your electronic device back in hand. On this page are published all the documents necessary for the use of your device. Stages Isofix by Joie.
USER MANUAL Stages Isofix Joie
natural_image
Line drawing of a baby car seat with no text or symbolsGB Welcome to Joie™
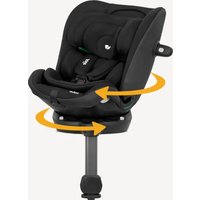
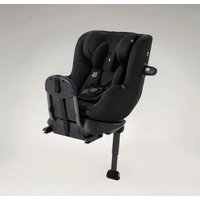
Congratulations on becoming part of the Joie family! We are so excited to be part of your journey with your little one. While traveling with the Joie stages™ isofix you are using a high quality, fully certified safety Group 0+/1/2 child restraint. Please carefully read this manual and follow each step to ensure a comfortable ride and best protection for your child.
To use this Joie stages™ isofix with a 3-point adult seat belt and the ISOFIX connections according to the ECE R44.04 Regulation, the child should weight 0-25kg (approximately 0-7 years old). This stages™ isofix can be installed using a 3 point retractable adult seat belt approved to ECE R16 or similar standard systems provided.
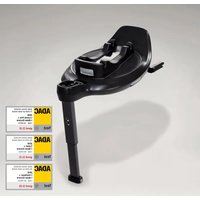
Base
These instructions show the use of the stages™ isofix seat and the base. This base can also be used with other certain Joie infant child restraints. Please read all the instructions in this manual before installing and using the product.
! IMPORTANT: KEEP FOR FUTURE REFERENCE, PLEASE READ CAREFULLY.
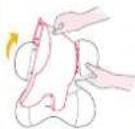
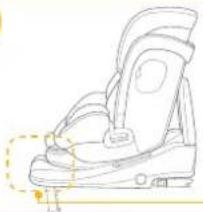
Please keep the instruction manual in the storage compartment at the bottom of the base as right figure.

natural_image
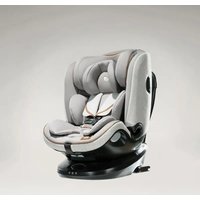
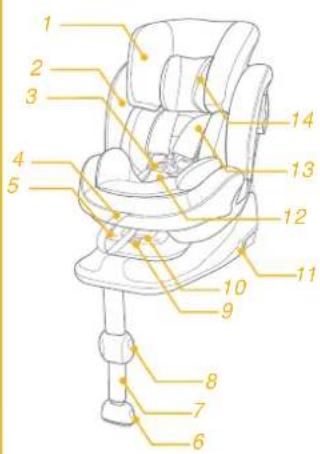
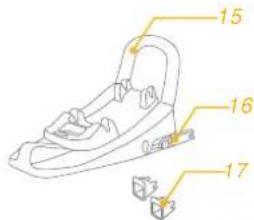
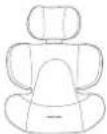
Pure diagram of a mechanical device without any text, numbers, or symbolsParts List
Please make sure there are no missing parts. Please contact the retailer if anything is missing.
1 Head Support
2 Seat Pad
3 Buckle
4 Adjustment Webbing
5 Child Restraint Latched Indicator
6 Load Leg Adjustment Button
7 Load Leg
8 Load Leg Adjustment Button
9 Child Restraint Release Button
text_image
Labeled diagram of a car comfort seat with numbered parts for identification10 Recline Adjustment Button
11 ISOFIX Releasing Button
12 Crotch Strap
13 Shoulder Strap
14 Infant Insert
15 Rebound Bar
16 ISOFIX Connector
17 ISOFIX Guides
18 Head Support
Adjustment Lever
19 Side Impact Shield
text_image
15 16 17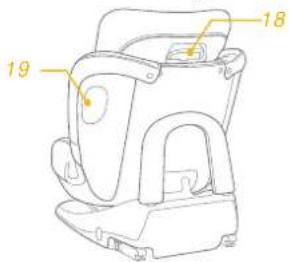
text_image
18 19WARNING
NO child restraint can guarantee full protection from injury in an accident. However, proper use of this child restraint will reduce the risk of serious injury or death to your child.
Make sure that the straps holding the restraint to the vehicle should be tight and any straps restraining the child should be adjusted to the child's body. Check to make sure that the straps are not twisted.
! DO NOT install or use this child restraint without following the instructions and warnings in this manual or you may put your child at serious risk of injury or death.
! NEVER use ropes or any other substitutes in place of seat belts in case of injuries from restraint.
! DO NOT make any modifications to this child restraint or use it along with component parts from other manufacturers.
! DO NOT use this child restraint if it is damaged or has missing parts.
! DO NOT use forward facing mode before the child's weight exceeds 9kg. Keep your child rearward facing as long as possible as rearward facing is the safest position.
WARNING
! DO NOT have your child in swaddled clothes when using this child restraint in baby or toddler mode, because this may prevent your child from being properly and securely fastened by the shoulder harnesses and the harnesses between thighs.
When using this child restraint in baby or toddler or Junior mode, the harness must be used correctly, and make sure the lap belt is not above the child's pelvis portion.
! DO NOT leave this child restraint unsecured in your vehicle because an unsecured child restraint can be thrown around and may injure occupants in a sharp turn, sudden stop, or collision. Remove it if not in regular use.
! NEVER leave your child unattended with this child restraint.
! Don't use it on front seat with active airbag when installed in rearfacing mode.
! NEVER use a second-hand child restraint or a child restraint whose history you do not know because they may have structural damage that endangers your child's safety.
WARNING
! Please keep this child restraint away from sunlight, otherwise it may be too hot for the child's skin.
! DO NOT use this child restraint as a regular chair as it tends to fall down and could injure the child.
! DO NOT use this child restraint without the soft goods.
! The soft goods should not be replaced with any besides the ones recommended by the manufacturer, because the soft goods constitute an integral part of the child restraint performance.
! DO NOT put anything other than the recommended soft goods in this child restraint.
! DO NOT put unsecured items in the vehicle because they can be thrown around and may injure occupants in a sharp turn, sudden stop, or collision.
! Do not place other items on top of the child restraint if it is in the car boot to prevent damage.
! Do not allow the car restraint harness or buckles to become trapped or caught in the vehicle seat or door.
! DO NOT continue to use this child restraint after it has suffered any crash. Replace immediately as there may be invisible structural damage from the crash.
WARNING
! Remove this child restraint from the vehicle seat when it is not in use for a long period of time.
! To avoid suffocation, remove plastic bag and packaging materials before using this product. The plastic bag and packaging materials should then be kept away from babies and children.
! Consult the retailer for issues concerning maintenance, repair and part replacement.
! Do not place any objects in the load leg area in front of your base.
! Frequently check the ISOFIX guides for dirt and clean them if necessary. Reliability can be effected by ingress of dirt, dust, food particles etc.
! DO NOT use any load bearing contact points other than those described in the instructions and marked on the child restraint.
! Correct Installation is only permitted by use of the ISOFIX connectors.
! Must use the rebound bar.
Emergency
In case of emergency or accidents, it is most important to have your child taken care of with first aid and medical treatment immediately.
Product Information
- This Joie child restraint with base is classified for "Semi-Universal" use and is suitable for fixing into the seat positions of the following cars. This child restraint can be installed using a 3 point retractable adult seat belt approved to UN ECE R16 or similar standard (Using a 3 point retractable adult seat belt and ISOFIX at the same time while using the child restraint in Group 2 mode).
- Seat positions in other cars may also be suitable to accept the child restraint. If in doubt, consult either the child restraint manufacturer or the retailer.
- Please refer to our vehicle fitting list (on-product as well as online at our website).
This is an ISOFIX CHILD RESTRAINT SYSTEM. It is approved to UN ECE regulation 44, 04 series of amendments for general use in vehicles fitted with ISOFIX anchorages systems.
It will fit vehicles with positions approved as ISOFIX positions (Please refer to our vehicle fitting list either), depending on the category of the child restraint and of the fixture. If in doubt, consult either the child restraint manufacturer or vehicle manufacturer.
The ISOFIX size class for which this device is intended is A, C, D.
Suitable for Child weighing under 25kg
Mass Group Group 0+/1 /2
Materials Plastics, metal, fabrics
Patent No. Patents pending
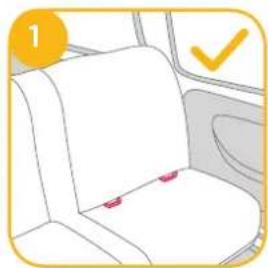
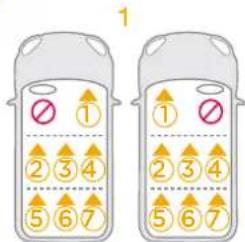
Concerns on Installation
see images 1 - 3
natural_image
Interior view of a car seat with a highlighted section and checkmark (no text or symbols)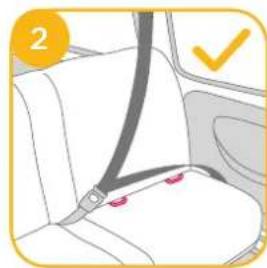
natural_image
Car seatbelt buckle diagram showing seat, seat, and seatbelt (no text or symbols)3
text_image
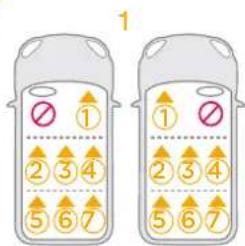
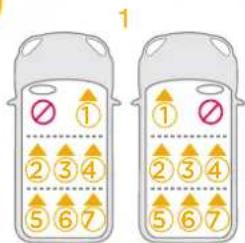
1 ① ② 3 4 5 6 7 ① ② 3 4 5 6 7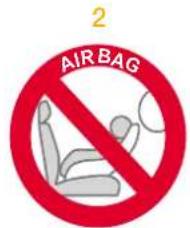
text_image
AIR BAG 2Check provided car fitting list for approved seats for child seat attachment.

natural_image
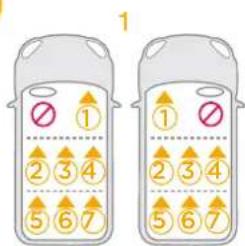
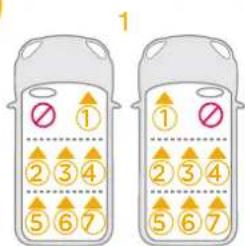
Line drawing of a car showing interior seating and seat layout (no text or symbols)Choose the Installation Mode
| ECE R44.04 | Child's Weight | Installation Mode | Installation | Reference Age | Recline Position | Reference Images |
| 0-18kg | Baby mode | 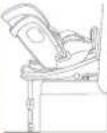 | Approx <4 years | Position 1 -7 | 1 | |
| 9-18kg | Toddler mode | 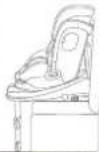 | Approx 1 year to 4 years | Position 1 -7 | 1 | |
| 15-25kg | Junior Mode | 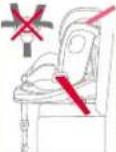 | Approx 3-7 years | Position 1 -7 | 2 |
Use Infant Insert
 We recommend using the full infant insert while the baby is 0-6 months or until they outgrow the insert. The infant insert increases side impact protection. We recommend using the full infant insert while the baby is 0-6 months or until they outgrow the insert. The infant insert increases side impact protection. | 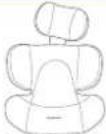 |  | Remove the head support portion of the infant insert when the child's head no longer fits comfortably. |
| Detach the snaps on the head support to remove the head portion of the insert. | 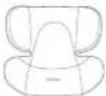 | Remove the body portion of the infant insert when the infant's shoulders no longer fit comfortably. | |
 |  | Remove the infant insert cushion by detaching the snaps to allow more space when the infant does not fit comfortably. The cushion can be used separately without being attached to the insert to bolster the infant's back for more comfort. |
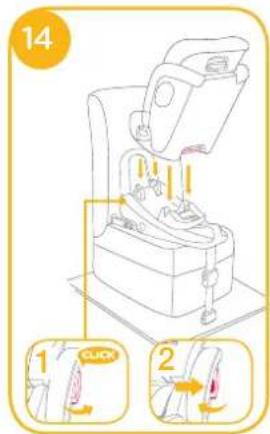
Installing the Base for use with the stages™ isofix seat
Installation of ISOFIX Base System
see images 4 - 13
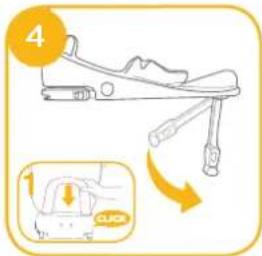
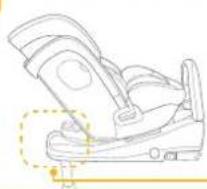
Unfold the load leg from storage compartment.
! Insert the rebound bar downwards until you hear a "click" which means that the assembly is complete. 4-1
If required attach the plastic guides onto the vehicle ISOFIX bars 5-1
Extend the ISOFIX connectors by depressing on the release button 6-1 whilst pulling on the connector 6-2
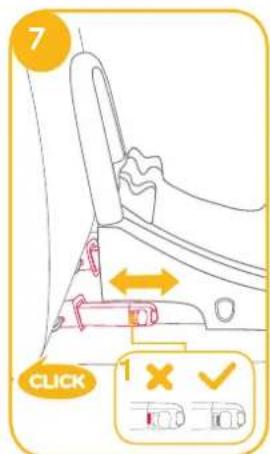
! Press the ISOFIX adjuster button ⑥-1 and push to adjust ⑦ until rebound bar tight against the vehicle seat.
text_image
4 1 CLICK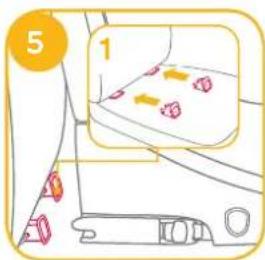
text_image
5 1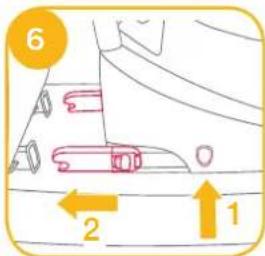
text_image
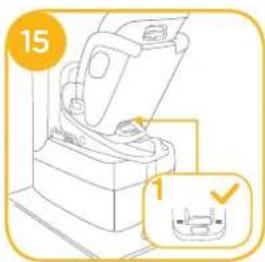
6 2 1! Make sure that both ISOFIX connectors are securely attached to their ISOFIX anchor points. The colors of the indicators on both ISOFIX connectors should be completely green. 7-1
! There are 9 adjustable positions for ISOFIX. Press the ISOFIX release button and push the base back against the vehicle seat until tight.
After placing the base on the vehicle seat, extend the load leg to floor B-1, when the load leg indicator shows green means it is installed correctly. Red means it is installed incorrectly.

When the load leg indicator shows red this means the load leg is in the wrong position.
! Make sure the load leg is in full contact with the vehicle floor pan.
! Squeeze the load leg releasing button, then shorten the load leg upwards.
text_image
7 CLICK 1 X ✓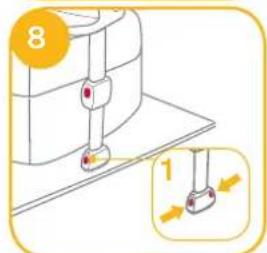
text_image
8 1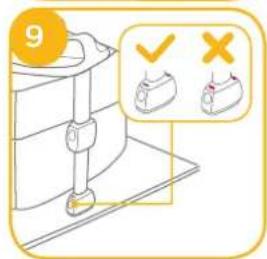
text_image
9 ✓ ×! The ISOFIX connectors must be attached and locked onto the ISOFIX anchor points. 10-1
! The load leg must be installed correctly with green indicator. 10-2
Please refer to baby mode and toddler mode and junior mode in section to use the stages ^TM isofix.
Removing the base
To remove base from the vehicle press the release button 11-1 and pull the base back from the seat. 11-2
Then press ^12 -1 and pull back on the ISOFIX connector ^12 -2
! For transporting base, press ISOFIX release button 13-1 and move back ISOFIX connector so it is folded completely 13-2.

text_image
10 !1 !2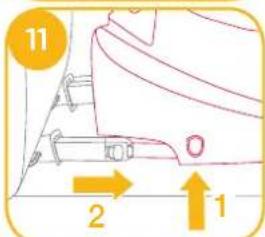
text_image
11 2 1
text_image
12 2 1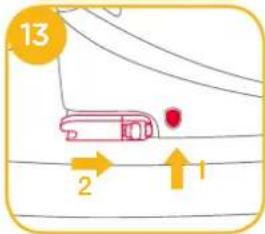
text_image
13 2 1Installing the stages ^™ isofix seat in the Base
see images 14 - 36
Baby Mode (Rearward Facing Mode)
Rearward Facing Newborn - 4 years old Recline position Position 1-7
! Please install the base on the vehicle seat (with rebound bar attached), then install the shell, and then put the child in the stages™ isofix.
! Ensure rebound bar is fitted to base.
! The most convenient way to install the shell is when the base is in the 7^th position.
! Pull up on the stages™ isofix seat to be sure it is securely latched into the base.
! Please ensure that there is no gap between the vehicle seat upper surface and the bottom of the base.
! Make sure to open the side impact protection shield for more side impact safety. 14-1 The side impact shield opposite the vehicle door can be closed to allow more seating space. 14-2
text_image
14 1 CLICK 2If the stages ^TM isofix is secure, the stages ^TM isofix latched indicator shows green. If the stages ^TM isofix is not secure, the stages ^TM isofix shows red. 15-1
- Infant insert is for children's protection. Child 0-6 months must use the full insert.
- Infant insert includes head support and body portion and wedge.
- Please install the base on the vehicle seat, then install the shell, and then put the child in the stages™ isofix.
- After the child is placed into the seat, check whether the shoulder harnesses are at correct from proper height.
- Please make sure the infant insert has the wedge assembled before using it for infant. 16
- Detach the snaps on the head support, and then remove the infant insert. Please refer to (Use Infant Insert). To assemble head support in reverse steps.
- After removing the wedge from the infant insert, please store it in a place where the child can not access it.
text_image
15 1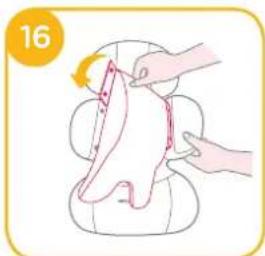
natural_image
Illustration of a hand holding a piece of meat being cut with a knife, no text or symbols present
natural_image
Line drawing of a car seat assembly with no text or symbolsSecuring your Child in the stages™ isofix Rearward Facing
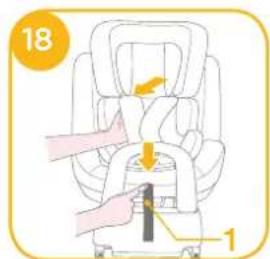
- Press the webbing adjustment button, while pulling out the shoulder harnesses to the proper length. ^18
18-1 Adjustment webbing - Press the red button to disengage the buckle. 19
- Fix the buckles on the both sides of seat to make placing the baby more convenient. 20
text_image
18 1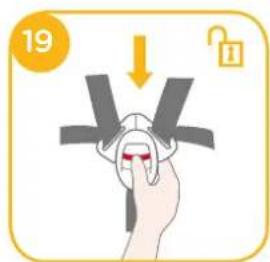
text_image
19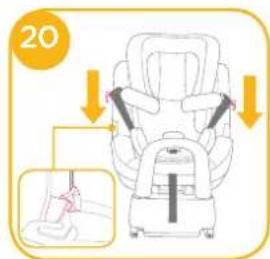
text_image
20- Place the child into the stages ^TM isofix and pass both arms through the harnesses. ^21
natural_image
Illustration of a child seated in a car seat, no text or symbols present! When used rear facing, the shoulder harness height must be even with the child's shoulders.

text_image
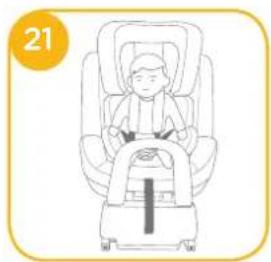
22! After the child is seated, re-check whether the shoulder harnesses are at the proper height.
-
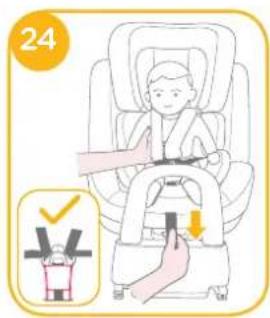
Engage the buckle. 23
-
Pull down the adjustment webbing and adjust it to the proper length to make sure your child is snugly secured. 24
! Make sure the space between the child and the shoulder harness is about the thickness of one hand lay flat on children's chest.
! To release the stages™ isofix seat, taking the child out of the stages™ isofix seat, lift the stages™ isofix seat up 2 while squeezing the child restraint release button. 25-1
text_image
24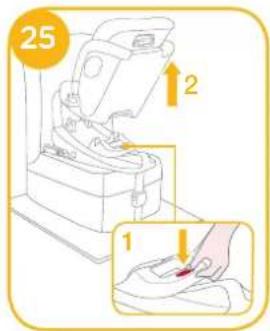
text_image
25 1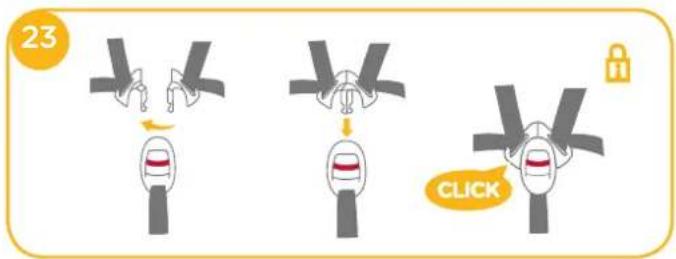
text_image
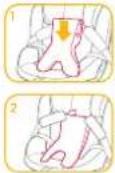
23 CLICKToddler Mode (Forward Facing Mode)
Forward Facing 1-4 years old
Recline position Position 1-7
! Please install the base on the vehicle seat (with rebound bar attached), then install the shell, and then put the child in the stages™ isofix.
! Ensure rebound bar is fitted to base.
The most convenient way to install the shell is when the base is in the 7^th position.
natural_image
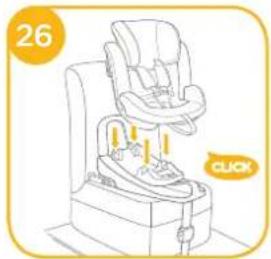
Line drawing of a baby car seat with a highlighted button and 'CLICK' label (no text or symbols on the diagram itself)If the stages ^™ isofix is secure, the child restraint latched indicator shows green. If the stages ^™ isofix is not secure, the latched indicator shows
red. 27-1
! Pull up on the stages™ isofix seat to make sure it is securely latched into the base.
! Please ensure that there is no gap between the vehicle seat and the bottom of the base.
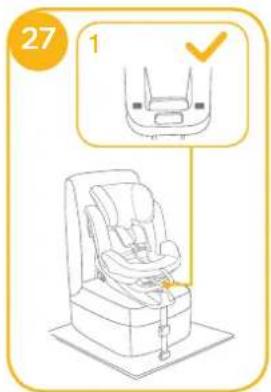
text_image
27 1Securing your Child in the stages™ isofix Forward Facing
Note
- When installing the stages ^™ isofix in the forwards facing mode, do not use the infant insert.
- Please install the Base on the vehicle seat, then install the seat, and then put the child in the stages™ isofix.
-
After the child is placed into the stages ^™ isofix seat, check whether the shoulder harnesses are at proper height.
-
Press the webbing adjustment button, while pulling out the shoulder harnesses to the proper length.
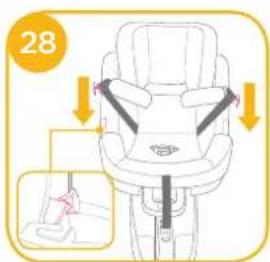
- Press the red button to disengage the buckle.
- Fix the buckles on the both sides of seat to make placing the baby more convenient. 28
- Place the child into the stages ^TM isofix and engage the buckle.
text_image
28
text_image
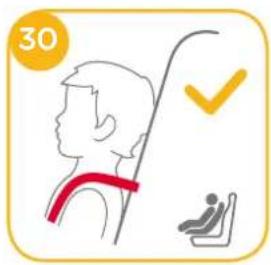
29! When used forward facing, the shoulder harness height must be even with the child's shoulders. 30
! After the child is seated, re-check whether the shoulder harnesses are at the proper height.
-
Engage the buckle.
-
Pull down the adjustment webbing and adjust it to the proper length to make sure your child is snugly secured. 29
! Make sure the space between the child and the shoulder harness is about the thickness of one hand lay flat on children's chest.
! To release the stages™ isofix seat, taking the child out of the stages™ isofix seat, lift the stages™ isofix seat up while squeezing the child restraint release button.
text_image
30Junior Mode (Forward Facing Mode)
Forward Facing 3-7 years old
Recline position Position 1-7
! Please install the base on the vehicle seat (with rebound bar attached), then install the shell, and then put the child in the stages™ isofix.
! Ensure rebound bar is fitted to base
! The most convenient way to install the shell is when the base is in the 7^th position.
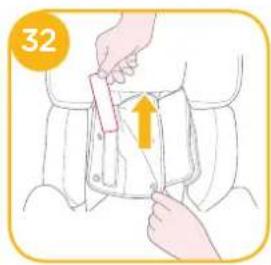
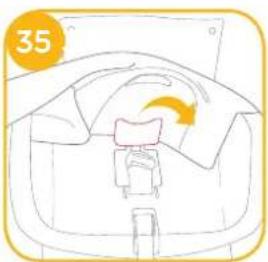
! Just use the vehicle seat belt when installing the child restraint in the junior mode, do not use the infant insert, crotch strap, shoulder straps, please store the shoulder straps, buckle in respective storage compartments. 32 33 34 35 36
text_image
32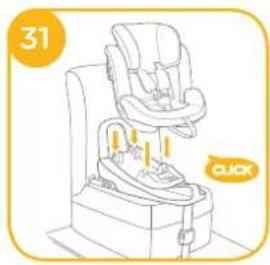
natural_image
Line drawing of a baby car seat with a highlighted button and '31' label (no text or symbols on the diagram itself)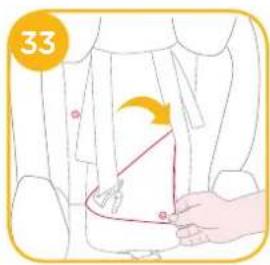
text_image
33
natural_image
Illustration of a surgical procedure with an arrow indicating a specific area (no text or symbols present)! Please adjust the shoulder harnesses to proper length before store the shoulder straps and buckle in their storage compartments.
natural_image
Simple line drawing of a car interior with a handle and seat, no text or symbols present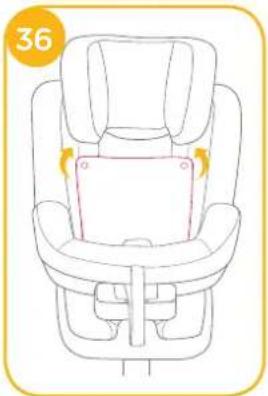
natural_image
Line drawing of a baby car seat with highlighted seat area and directional arrows (no text or symbols)Securing your Child in the stages™ isofix
Forward Facing
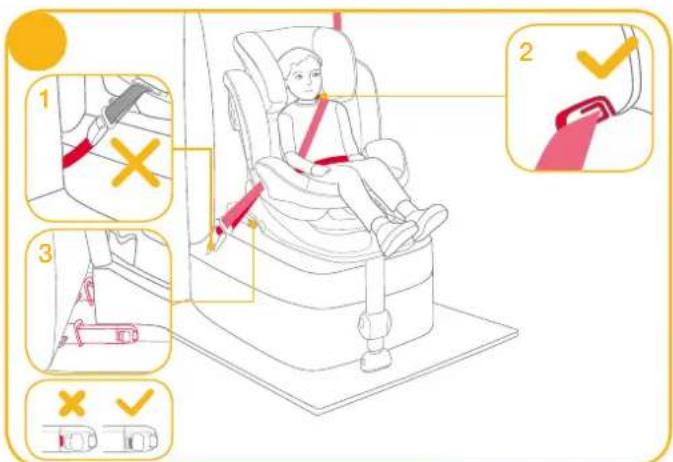
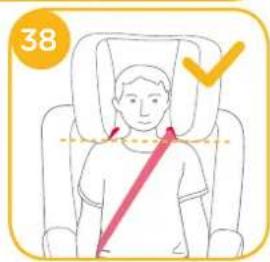
! Position shoulder belt through shoulder belt guide, pass waist belt through seat slots. Fasten buckle and pull the vehicle belt to tighten. 37
text_image
Diagram illustrating car seatbelt usage and safety rules, showing numbered steps from seatbelt to seatbelt switch.When used in junior mode, the shoulder belt guides must be even with or just above the child's shoulders.
! The child restraint can not be used if the vehicle safety belt buckle (female buckle end) is too long to anchor the child restraint securely. 57-1
! Shoulder belt must pass through shoulder belt guide. 37-2
! Make sure that both ISOFIX connectors are securely attached to their ISOFIX anchor points. The colors of the indicators on both ISOFIX connectors should be completely green. 37-3
! Do not use shoulder belt loose or positioned under arm. ! Do not use shoulder belt behind child's back.
text_image
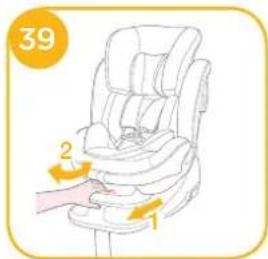
38Recline Adjustment
see images 39 - 41
! Please re-check the load leg position after reclining.
text_image
39 1 2There are 7 recline angles with baby mode and 7 positions for toddler mode and 7 positions for junior mode. 40 41
40
natural_image
Line drawing of a car seat with a highlighted seat and safety belt (no text or symbols)
natural_image
Simple line drawing of a car interior with no text or symbols41
natural_image
Line drawing of a car seatbelt device with no text or symbols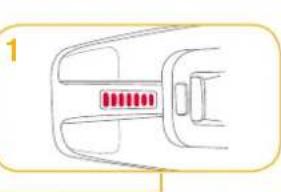
natural_image
Simple line drawing of a car handle with red buttons (no text or symbols)Height Adjustment
see images 42
- Please adjust the head support and check if the shoulder harnesses are at the correct height according to 22:30.
- Squeeze the head support adjustment lever ^42 -1, meanwhile pull up or push down the head support until it snaps into one of the 6 positions. The head support positions are shown as ^42 .
When the head support is adjusted to the 4th position or higher, side wings will extend for more shoulder space.
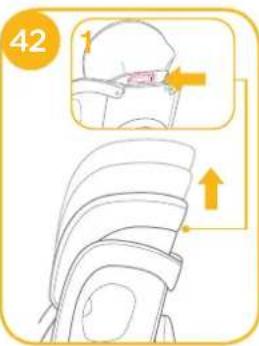
text_image
42 ↑Detach Soft Goods
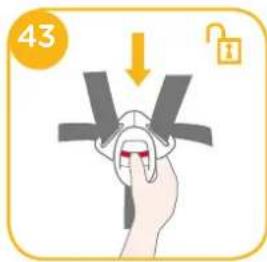
see images 43 - 50
Press the red button to disengage the buckle.
! Crotch strap cover attached to the crotch hole inside with fasteners loop and hook.
To re-attach the soft goods please repeat the above steps in the reverse order.
text_image
43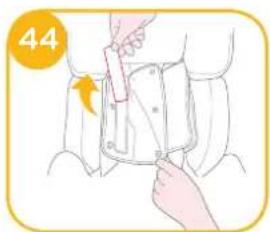
natural_image
Illustration of a person adjusting a seatbelt using a tool (no text or symbols)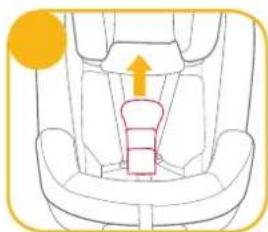
natural_image
Diagram of a car seat with an upward arrow indicating direction (no text or symbols)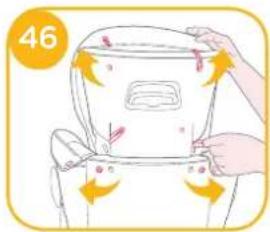
text_image
46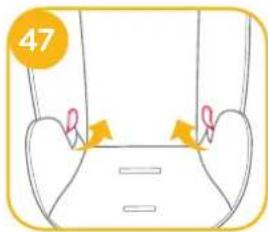
natural_image
Diagram of a mechanical or anatomical structure with arrows indicating motion or force direction (no text or symbols)
natural_image
Illustration of a car seatbelt with a hand inserting a cable to the seat (no text or symbols)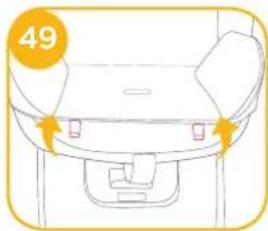
natural_image
Line drawing of a car front bumper with no text or symbols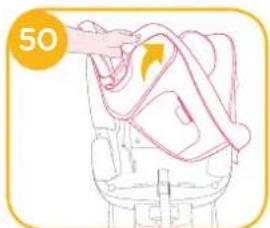
natural_image
Illustration of a hand holding a rope tied to a chair, with no visible text or symbolsCare and Maintenance
! After removing the foam of infant insert, please store it somewhere that the child can not access it.
! Please wash the soft goods with cold water under 30°C.
! Do not iron the soft goods.
Do not bleach or dry clean the soft goods.
Do not use undiluted neutral detergent, gasoline or other organic solvent to wash the child restraint. It may cause damage to the child restraint.
Do not twist the soft goods to dry with great force. It may leave the soft goods with wrinkles.
! Please hang dry the soft goods in the shade.
! Please remove the child restraint from the vehicle seat if not in use for a long period of time. Put the child restraint in the shade and somewhere your child can not access it.


natural_image
Pure diagram of a vehicle silhouette without any text, numbers, or symbolsListe des pièces
natural_image
Interior view of a car seat with a red belt and checkmark indicator (no text or symbols on the seats)
natural_image
Car seatbelt diagram showing seat, seat, and seatbelt (no text or symbols)3
text_image
1 2 3 4 5 6 7 1 2 3 4 5 6 7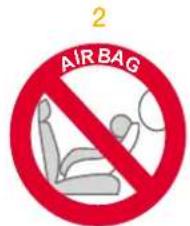
text_image
2 AIR BAGnatural_image
Line drawing of a car showing interior compartments with seatbelt and passenger seat (no text or symbols)text_image
7 CLICK 1 X ✓
text_image
8 1
text_image
9 ✓ ×natural_image
Illustration of a hand holding a folded garment with a red arrow indicating rotation (no text or symbols)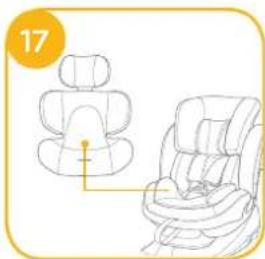
natural_image
Line drawing of a car seat assembly with no text or symbolsnatural_image
Illustration of a child seated in a car seat, no text or symbols presentnatural_image
Line drawing of a baby car seat with a click button and orange number 26 (no text or symbols on the device itself)natural_image
Line drawing of a baby car seat with a click button and numbered label (31), no text or symbols on the device itself.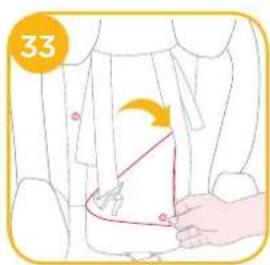
text_image
33
natural_image
Illustration of a surgical procedure with an arrow indicating a specific area (no text or symbols present)natural_image
Simple line drawing of a car interior with a handle and seat, no text or symbols present
natural_image
Line drawing of a car seat with seatbelt and seat, no text or symbols presenttext_image
37 1 2 3 ✓ ✓natural_image
Illustration of a car seat assembly with front and side views, no text or symbols present
natural_image
Line drawing of a car seatbelt with a highlighted seat and a close-up view showing red buttons (no text or symbols)natural_image
Illustration of a person using a tool to adjust or install a rectangular device, with no visible text or symbols.
natural_image
Line drawing of a car seat with an arrow indicating upward motion (no text or symbols)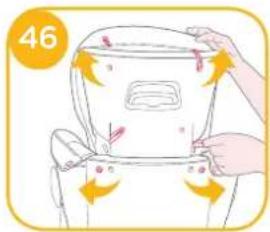
text_image
46
text_image
47
natural_image
Illustration of a hand adjusting the seatbelt with a numbered label (48) in the corner, showing no text or symbols on the device itself.
natural_image
Line drawing of a car seatbelt with no text or symbols
natural_image
Illustration of a hand holding a bag with an arrow indicating rotation (no text or symbols)natural_image
Pure diagram of a vehicle or device outline without any text, numbers, or symbolsLista de piezas
text_image
Labeled diagram of a car comfort seat with numbered parts for identification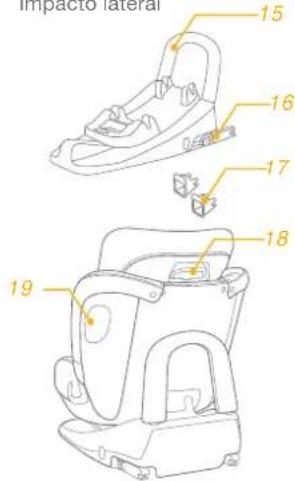
text_image
Impacto lateral 15 16 17 18 19ADVERTENCIA
natural_image
Interior view of a car seat with a checkmark indicating selection (no text or symbols on the seat itself)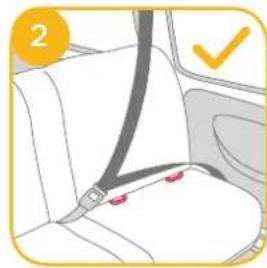
natural_image
Car seatbelt diagram showing seat, seat, and seatbelt (no text or symbols)3
text_image
1 2 3 4 5 6 7 1 2 3 4 5 6 7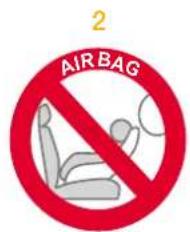
text_image
2 AIR BAGtext_image
7 CLICK 1 X ✓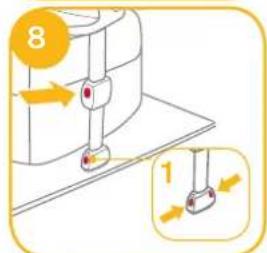
text_image
8 1
text_image
9 ✓ ×natural_image
Illustration of hands folding a piece of dough with a knife, no text or symbols present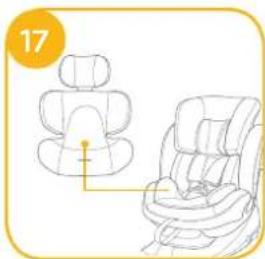
natural_image
Line drawing of a car seat assembly with no text or symbolsnatural_image
Illustration of a child seated in a car seat, no text or symbols presentnatural_image
Line drawing of a baby car seat with a highlighted button and 'CLICK' label (no text or symbols on the device itself)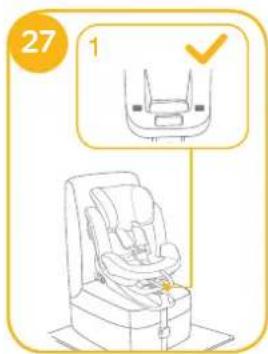
text_image
27 1natural_image
Line drawing of a baby car seat with buttons and a 'CLICK' button, no text or symbols present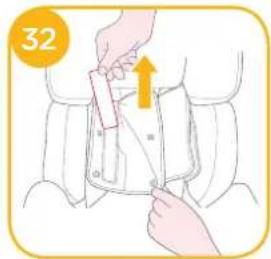
text_image
32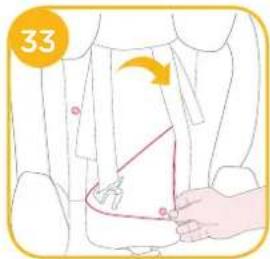
text_image
33
natural_image
Illustration of a surgical procedure with an arrow indicating a specific area (no text or symbols present)natural_image
Simple line drawing of a car interior with a handle and seat, no text or symbols present
natural_image
Line drawing of a car seat with seatbelt and seat, no text or symbols presenttext_image
37 1 2 3 ✓ ✓natural_image
Line drawing of a car seat assembly and its side view, no text or symbols present
natural_image
Line drawing of a car seatbelt device with a highlighted seat and red indicator lights (no text or symbols)Ajuste de la altura
natural_image
Illustration of a person adjusting a seatbelt device with a hand holding a tool (no text or symbols)
natural_image
Line drawing of a car seat with an arrow indicating upward motion (no text or symbols)
text_image
46
text_image
47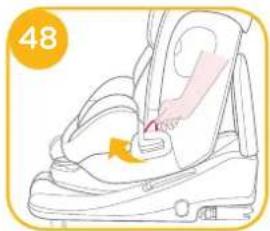
natural_image
Illustration of a car seatbelt with a hand adjusting the seat area (no text or symbols)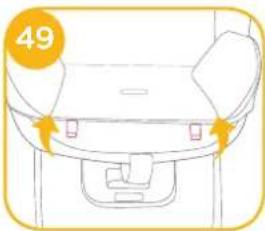
natural_image
Line drawing of a car seatbelt with no text or symbols
natural_image
Illustration of a hand holding a rope tied to a chair, with no visible text or symbolsnatural_image
Pure diagram of a device outline with no text, numbers, or symbolsLista de peças
natural_image
Illustration of a car seat with two red buttons and a yellow checkmark (no text or symbols)
natural_image
Car seatbelt diagram showing seat, seat, and seatbelt (no text or symbols)3
text_image
1 2 3 4 5 6 7 1 2 3 4 5 6 7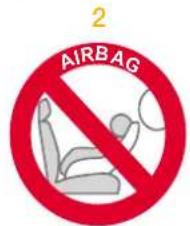
text_image
AIRBAG 2natural_image
Line drawing of a car interior showing two seated individuals inside the dashboard and seat (no text or symbols)text_image
7 CLICK 1 X ✓
text_image
8 1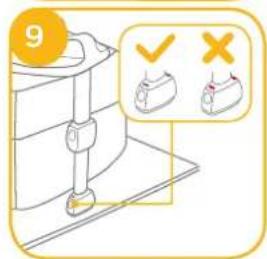
text_image
9 ✓ ×natural_image
Illustration of hands holding a pink object with a yellow arrow indicating rotation (no text or symbols)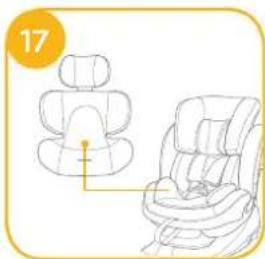
natural_image
Illustration of a car seat assembly with two views (top and side), no text or symbols presentnatural_image
Illustration of a child seated in a car seat, no text or symbols present
text_image
22natural_image
Line drawing of a baby car seat with a highlighted button and 'CLICK' label (no text or symbols on the diagram itself)natural_image
Line drawing of a baby car seat with a 'CLICK' button and number 31 (no text or symbols on the diagram itself)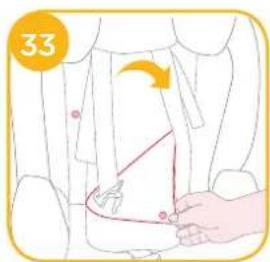
text_image
33
natural_image
Illustration of a surgical procedure with an arrow indicating a specific area (no text or symbols present)natural_image
Simple line drawing of a car interior with a handle and seat, no text or symbols present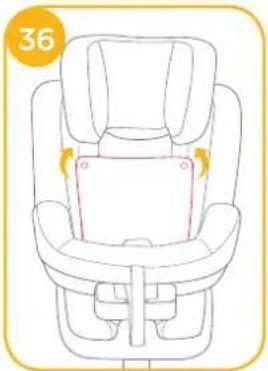
natural_image
Line drawing of a baby car seat with highlighted seat area and number 36 (no text or symbols on the diagram itself)text_image
37 1 2 3 ✓natural_image
Illustration of a car seat assembly and its side view, no text or symbols present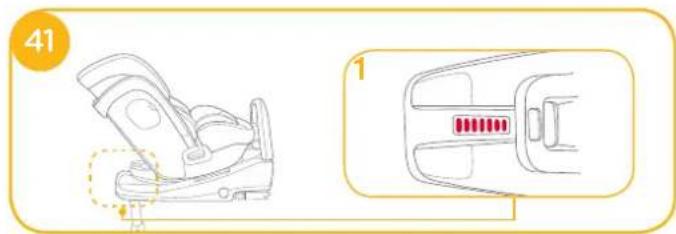
natural_image
Line drawing of a car seatbelt with a highlighted seat and red button, no text or symbols presentAjuste de altura
ver imagens 42
Separar as partes macias
ver imagens - 50
natural_image
Illustration of a person adjusting a seatbelt using a tool (no text or symbols present)
natural_image
Line drawing of a car seat with an arrow indicating upward motion (no text or symbols)
text_image
46
text_image
47
natural_image
Illustration of a car seatbelt with a hand inserting a belt, no text or symbols present
natural_image
Line drawing of a car seatbelt with no text or symbols
natural_image
Illustration of a hand holding a rope tied to a chair, with no visible text or symbolsnatural_image
Pure diagram of a vehicle or device outline without any text, numbers, or symbolsOnderdelenlijst
text_image
Labeled diagram of a car seat with numbered parts for identification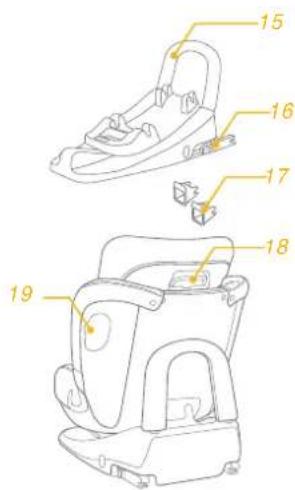
text_image
Technical diagram of a mechanical device with numbered parts labeled 15 through 19WAARSCHUWING
natural_image
Illustration of a car seat with red buttons and a checkmark (no text or symbols)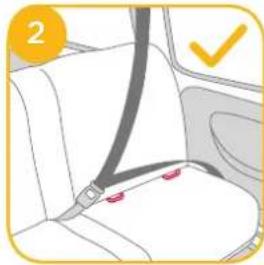
natural_image
Car seatbelt diagram showing seat, seat, and seat with red location pins (no text or symbols)3
text_image
1 ① ② 3 4 ⑤ 6 7 ① ② 3 4 ⑤ 6 7
text_image
AIRBAG 2natural_image
Line drawing of a car interior showing two people seated inside the dashboard and seat, with no text or symbols present.text_image
7 CLICK 1 X ✓
text_image
8 1
text_image
9natural_image
Illustration of a hand cutting a piece of meat with a knife, no text or symbols present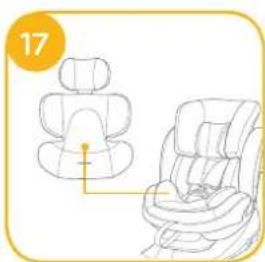
natural_image
Line drawing of two car seats with seat covers, one upright and one tilted (no text or symbols)Uw kind in de achteruit gerichte stages™ isofix vastzetten
natural_image
Illustration of a child seated in a car seatbelt, no text or symbols present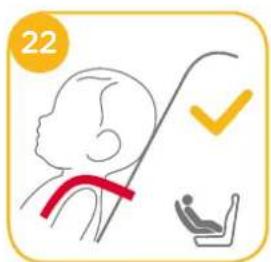
text_image
22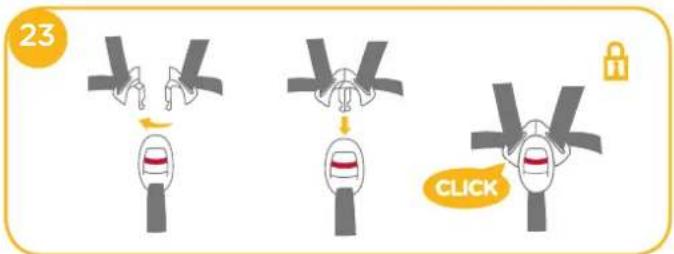
text_image
23 CLICKnatural_image
Line drawing of a baby car seat with a highlighted seat and 'CLICK' button (no text or symbols on the diagram itself)natural_image
Line drawing of a baby car seat with a 'CLICK' button and number 31 (no text or symbols on the diagram itself)natural_image
Illustration of a surgical procedure with an arrow indicating a specific area (no text or symbols present)natural_image
Line drawing of a car interior with a seatbelt and directional arrow (no text or symbols)
natural_image
Line drawing of a car seat with highlighted seat area and number 36 (no text or symbols on the diagram itself)Uw kind in de vooruit gerichte stages™ isofix vastzetten
text_image
37 1 2 3 ✓natural_image
Illustration of a car seat assembly and its side view, showing front and side views with no text or symbols.
natural_image
Illustration of a car seatbelt device with a highlighted seat and red indicator lights (no text or symbols)Hoogteafstelling
zie afbeeldingen 42
natural_image
Illustration of a person adjusting a seatbelt using a tool (no text or symbols present)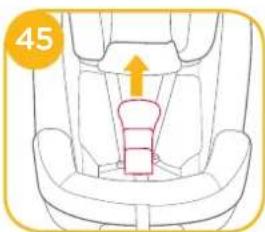
natural_image
Line drawing of a car seat with an arrow indicating upward motion (no text or symbols)
text_image
46
text_image
47
natural_image
Illustration of a car seatbelt with a hand adjusting the seat area (no text or symbols)
natural_image
Line drawing of a car seat with no text or symbols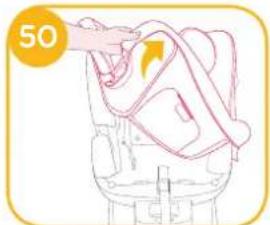
natural_image
Illustration of a hand holding a rope or cable, with a numbered circle highlighting '50' (no text or symbols on the diagram itself)Allison Baby UK Ltd, Venture Point, Towers Business Park Rugeley, Staffordshire, WS15 1UZ