USER MANUAL HWS60A SAMSUNG
Thank you for purchasing this Samsung product.
To receive more complete service, please register
your product at www.samsung.com/register
SAFETYWARNINGS
TO REDUCE THE RISK OF ELECTRIC SHOCK, DO NOT REMOVE THE COVER (OR BACK).
NO USER-SERVICEABLE PARTS ARE INSIDE.
REFER SERVICING TO QUALIFIED SERVICE PERSONNEL.
Refer to the table below for an explanation of
symbols which may be on your Samsung product.
| CAUTION
RISK OF ELECTRIC SHOCK.
DO NOT OPEN. | CAUTION
RISK OF ELECTRIC SHOCK.
DO NOT OPEN. |
| This symbol indicates that high voltage is present inside. It is dangerous to make any kind of contact with any internal part of this product. |
| This symbol indicates that this product has included important literature concerning operation and maintenance. |
| Class II product : This symbol indicates that it does not require a safety connection to electrical earth (ground). If this symbol is not present on a product with a power cord, the product MUST have a reliable connection to protective earth (ground). |
| AC voltage : This symbol indicates that the rated voltage marked with the symbol is AC voltage. |
| DC voltage : This symbol indicates that the rated voltage marked with the symbol is DC voltage. |
| Caution, Consult instructions for use : This symbol instructs the user to consult the user manual for further safety related information. |
WARNING
- To reduce the risk of fire or electric shock, do not expose this appliance to rain or moisture.
CAUTION
- TO PREVENT ELECTRIC SHOCK, MATCH WIDE BLADE OF PLUG TO WIDE SLOT, FULLY INSERT.
- This apparatus shall always be connected to a AC outlet with a protective grounding connection.
- To disconnect the apparatus from the mains, the plug must be pulled out from the mains socket, therefore the mains plug shall be readily operable.
- Do not expose this apparatus to dripping or splashing. Do not put objects filled with liquids, such as vases on the apparatus.
- To turn this apparatus off completely, you must pull the power plug out of the wall socket. Consequently, the power plug must be easily and readily accessible at all times.
PRECAUTIONS
- Ensure that the AC power supply in your house complies with the power requirements listed on the identification sticker located on the bottom of your product. Install your product horizontally, on a suitable base (furniture), with enough space around it for ventilation (7 10~cm) . Make sure the ventilation slots are not covered. Do not place the unit on amplifiers or other equipment which may become hot. This unit is designed for continuous use. To fully turn off the unit, disconnect the AC plug from the wall outlet. Unplug the unit if you intend to leave it unused for a long period of time.
- During thunderstorms, disconnect the AC plug from the wall outlet. Voltage peaks due to lightning could damage the unit.
- Do not expose the unit to direct sunlight or other heat sources. This could lead to overheating and cause the unit to malfunction.
-
Protect the product from moisture (i.e. vases), and excess heat (e.g. a fireplace) or equipment creating strong magnetic or electric fields. Unplug the power cable from the AC wall socket if the unit malfunctions. Your product is not intended for industrial use. It is for personal use only. Condensation may occur if your product has been stored in cold temperatures. If transporting the unit during the winter, wait approximately 2 hours until the unit has reached room temperature before using.
-
The battery used with this product contains chemicals that are harmful to the environment. Do not dispose of the battery in the general household trash. Do not expose the battery to excess heat, direct sunlight, or fire. Do not short circuit, disassemble, or overheat the battery.
CAUTION: Danger of explosion if the battery is replaced incorrectly. Replace only with the same or equivalent type.
Fabric cleaning
Remove any dirt or stain on the product surface immediately.
Removing and cleaning can be less effective for some substances or if left for a prolonged time.

CAUTION
- Use a vacuum cleaner or an adhesive lint roller to remove dust, handprints, and the likes.
- Some cleaning brushes may damage the product, depending on the materials they contain.
- Towels and cleaning clothes may leave lint or dirt on the product.
- Do not use a nail or other tools to scratch the dirt off. It may damage the fabric.
- To remove oil or liquid stains, use a clean white cloth moist with water. If the stain persists, wipe it with a mixture of water and neutral detergent (such as dishwashing soaps) and a cloth.
- A non-neutral detergent or cleaner may cause discolouration or fabric damage.
- After cleaning, use a dry cloth or hairdryer to dry the area.
- Do not use excessive force to avoid discolouration or fabric damage.
CONTENTS
01 Checking the Components 7
Inserting Batteries before using the Remote Control (AA batteries X 2) 7
02 Product Overview 8
Top Panel of the Soundbar 8
Bottom Panel of the Soundbar 10
03 Using the Remote Control 11
How to Use the Remote Control 11
Using the Hidden Buttons (Buttons with more than one function) 14
Output specifications for the different sound effect modes 14
Adjusting the Soundbar volume with a TV remote control 15
04 Connecting the Soundbar 16
Connecting Electrical Power 16
Connecting an SWA-9100S (Sold Separately), SWA-W500 (Sold Separately) to your Soundbar 16
05 Using a wired connection to the TV 17
Method 1. Connecting with HDMI 17
Method 2. Connecting using an Optical Cable 19
06 Using a wireless connection to the TV 20
Method 1. Connecting via Bluetooth 20
Method 2. Connecting via Wi-Fi 22
07 Connecting an External Device 23
Connecting using an Optical Cable 23
08 Connecting a Mobile Device 24
Method 1. Connecting via Bluetooth 24
Method 2. Connecting via Wi-Fi (Wireless Network) 27
Getting Started with Amazon Alexa (Built-in Alexa) 28
Getting Started with Alexa on Amazon Product (Works with Alexa) 30
Using the Tap Sound 32
09 Connecting To Apple AirPlay 2 33
10 Installing the Wall Mount 34
Installation Precautions 34
Wallmount Components 34
11 Installing the Soundbar in front of TV 36
12 Software Update 37
Auto Update 37
USB Update 37
Reset 38
13 Troubleshooting 39
14 Licence 41
15 Open Source Licence Notice 41
16 Important Notes About Service 42
17 Specifications and Guide 43
Specifications 43
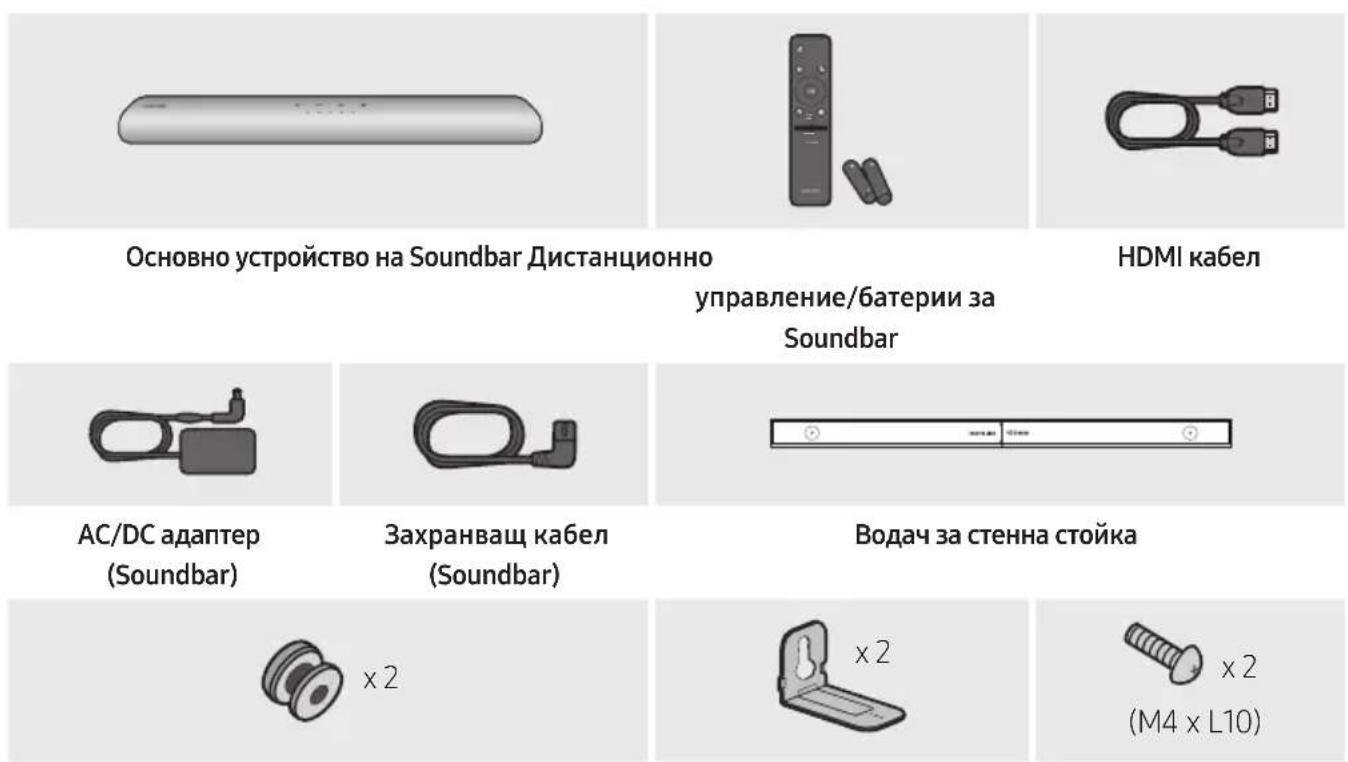
01 CHECKING THE COMPONENTS

Holder-Screw Bracket-Wall Mount Screw
- For more information about the power supply and power consumption, refer to the label attached to the product. (Label: Bottom of the Soundbar Main Unit)
- To purchase additional components or optional cables, contact a Samsung Service Centre or Samsung Customer Care.
- For more information about the wallmount see page 34.
- Design, specifications, and App screen are subject to change without prior notice.
The appearance of the accessories may differ slightly from the illustrations above.
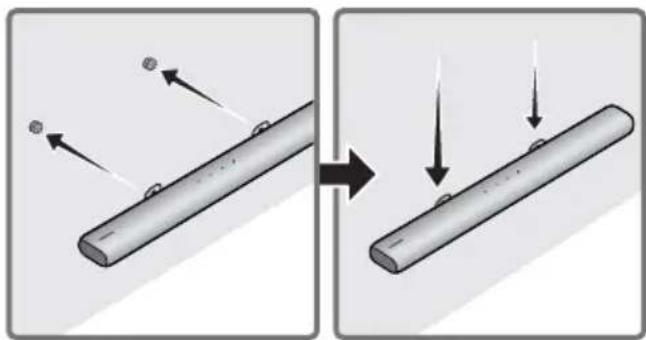
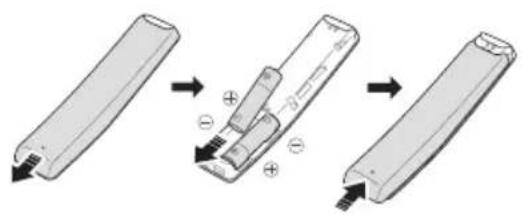
Inserting Batteries before using the Remote Control (AA batteries X 2)
Slide the back cover in the direction of the arrow until it is completely removed. Insert 2 AA batteries (1.5V) oriented so that their polarity is correct. Slide the back cover back into position.

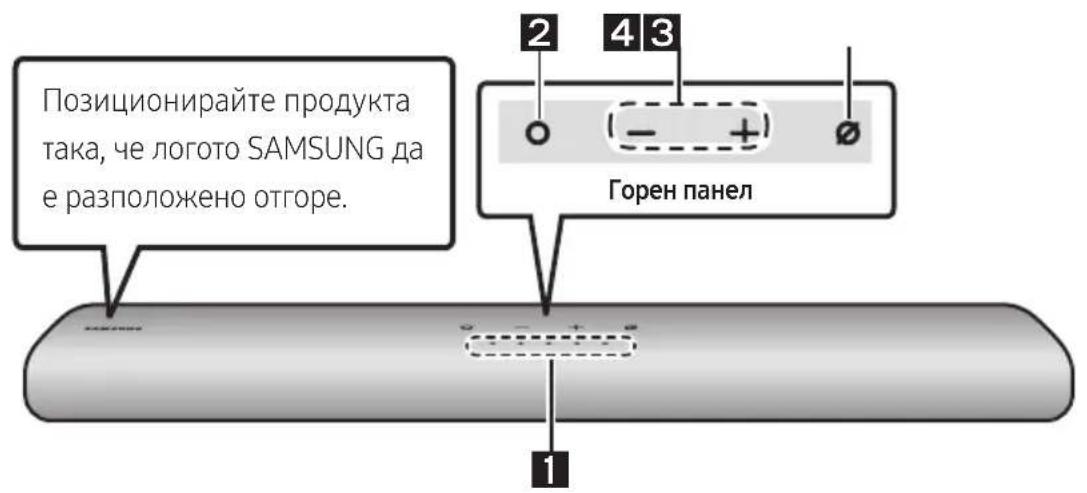
02 PRODUCT OVERVIEW
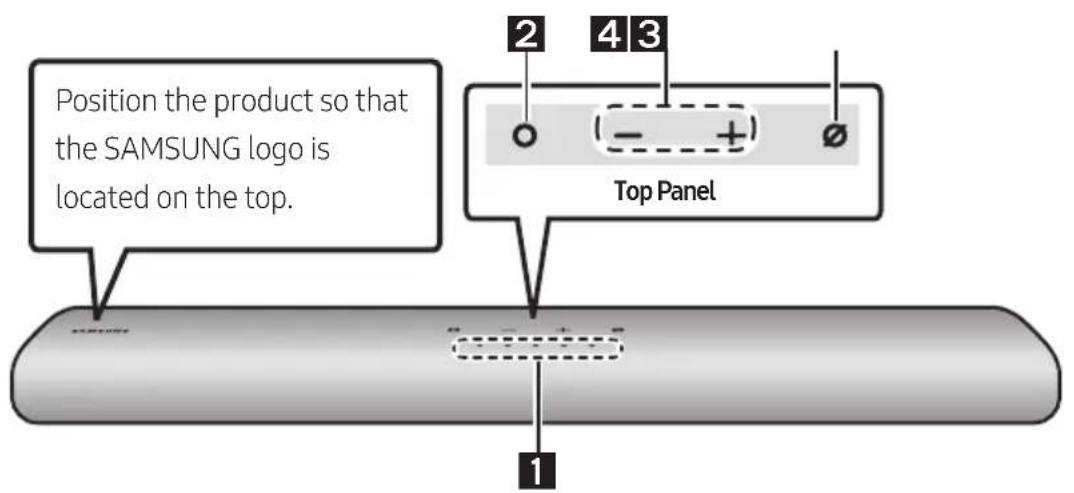
Top Panel of the Soundbar
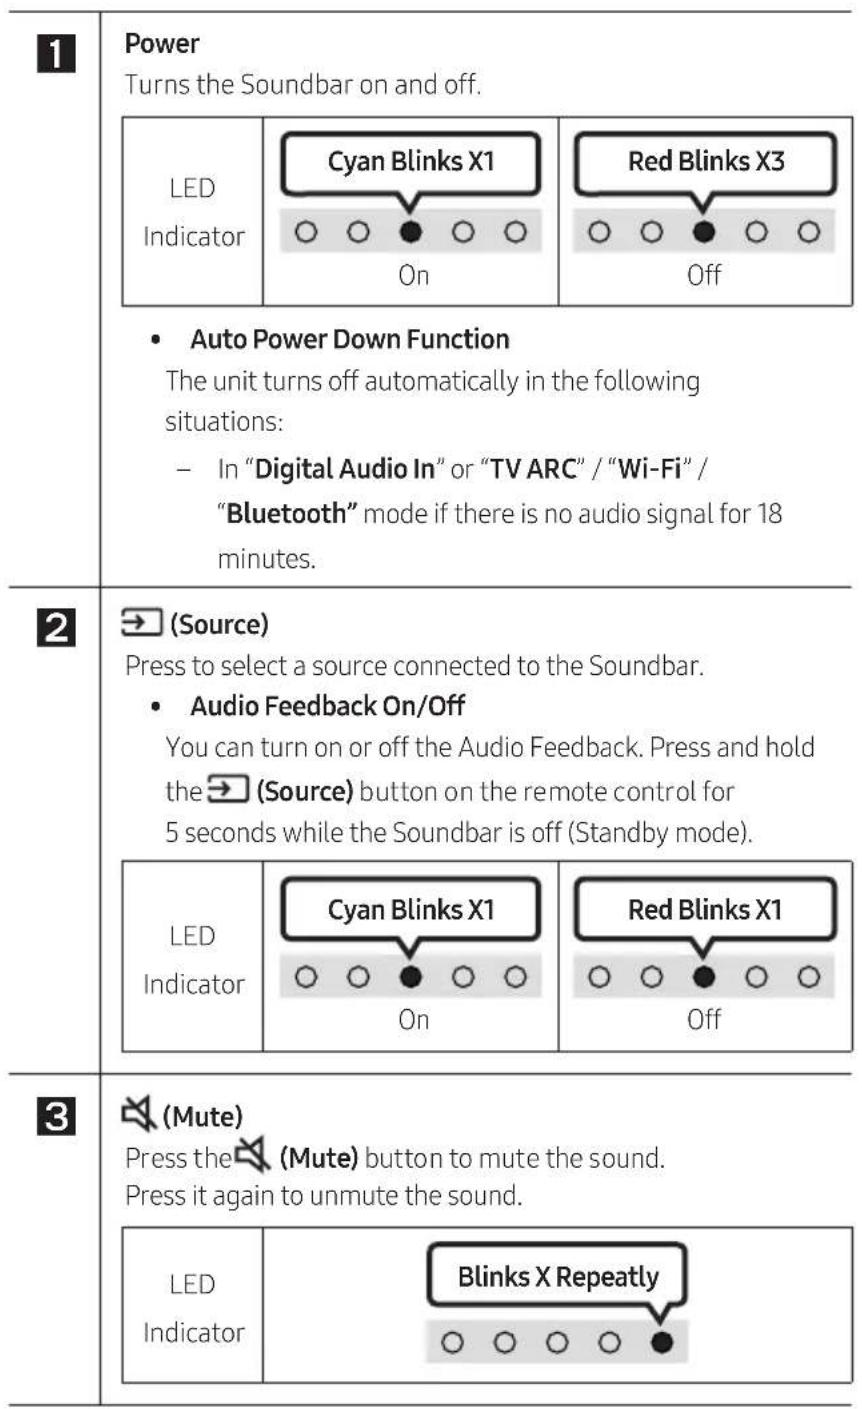
| 1 | LED indicator | The LED Indicator flashes, glows, or changes colour depending on the Soundbar's current mode or status. The colour of the LED indicator and the number of lights indicate the active mode as described below. |
| W
White LED | W
White LED | M
Multicolour LED | W
White LED | W
White LED |
| ·The Multicolour LED changes to White, Cyan, Green, Red, and Blue depending on the mode or status. |
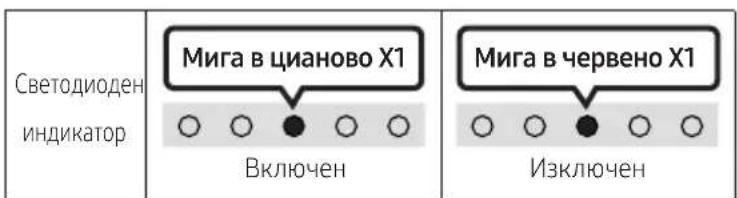
| 2 | Multi Function Button | ·In standby mode, press the Ⓞ (Multi Function) button to turn on the Soundbar.
·Press the Ⓞ (Multi Function) button to change the mode. Each time you change the mode, the LED lights in white and then turns off. |
| LED
Indicator | White On → Off White
●○○○○ | On → Off White On → Off
●○○○○ | ●○○○○ | |
| “Digital Audio In” or
“TV ARC” | “Wi-Fi” “Bluetooth” | | |
| 3 | Volume Button | Press the (volume) button to adjust the volume. |
| 4 | Mic
On/Off
Button | Press the Ⓞ (Mic On/Off) button to turn on or off the microphone. |
| LED Indicator | Red On | ○○○○○ |
| “Mic Off” | “Mic On” |
- When you plug in the AC cord, the power button will begin working in 4 to 6 seconds.
- When you turn on this unit, there will be a 4 to 5 second delay before it produces sound.
- If you hear sounds from both the TV and Soundbar, go to the Settings menu for the TV audio and change the TV speaker to External Speaker.
- You can turn on and off audio feedback by using SmartThings app. To learn about using the SmartThings app, refer to "Method 2. Connecting via Wi-Fi (Wireless Network)".
Bottom Panel of the Soundbar

| 1 | ID SET
Press to connect the Soundbar to Surround speakers and a subwoofer wirelessly.
(The surround speaker, subwoofer are sold separately.) |
| 2 | NETWORK
Press to connect to a wireless network (Wi-Fi) via the SmartThings app. |
| 3 | SERVICE
Connect a USB storage device to upgrade the product's software. |
| 4 | DC 19V (Power Supply In)
Connect the AC/DC power adapter. (See page 16) |
| 5 | DIGITAL AUDIO IN (OPTICAL)
Connect to the digital (optical) output of an external device. (See page 23) |
| 6 | HDMI (ARC)
Connect to the HDMI (ARC) port on a TV. (See page 17) |
- When disconnecting the power cable of the AC/DC power adapter from a wall outlet, pull the plug. Do not pull the cable.
- Do not connect this unit or other components to an AC outlet until all connections between components are complete.
03 USING THE REMOTE CONTROL
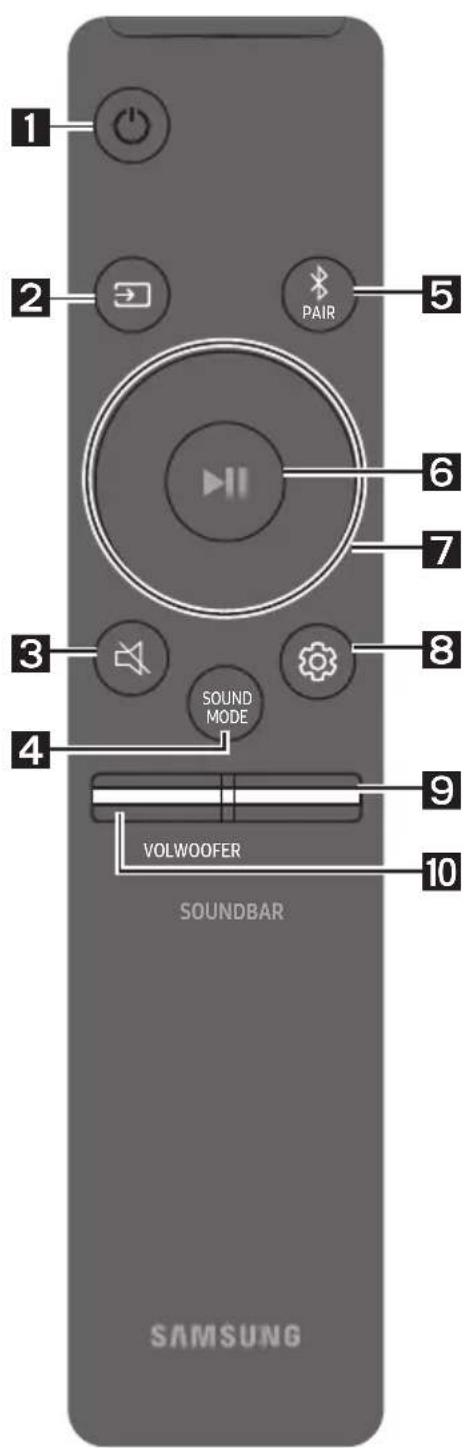
How to Use the Remote Control
| 4 | SOUND MODE
By pressing the button, you can select the desired audio mode. Each time the mode changes, the Multicolour LED blinks in white. |
| LED
Indicator | White Blinks X1
○○●○○ |
| “Standard”→“Music”→“Adaptive Sound” |
| ·Standard
Outputs the original sound.
·Music
Provides more natural and room filling sound for music content.
·Adaptive Sound
Analyzes the content in real time and automatically provides the optimal sound field based on the characteristics of the content. |
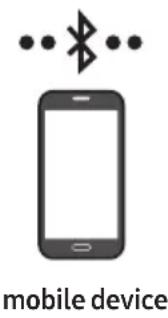
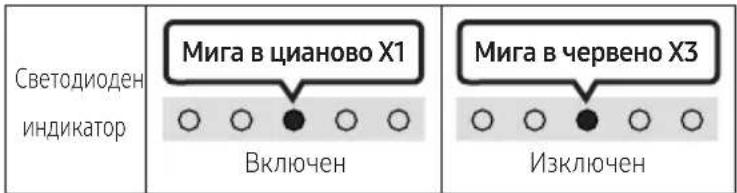
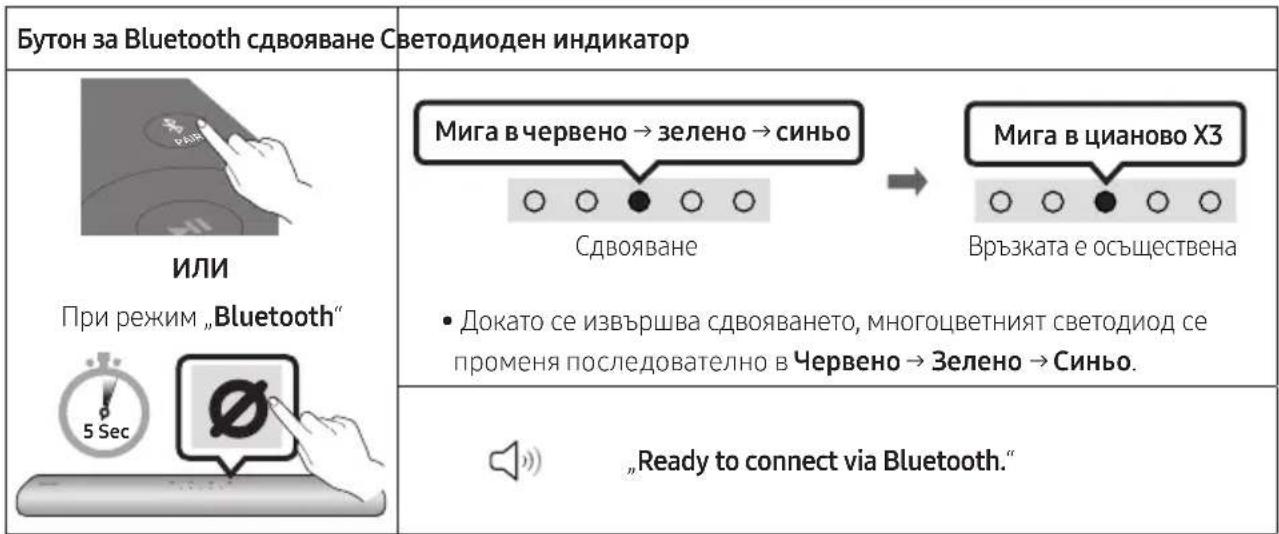
| 5 | Bluetooth PAIR
Switch the Soundbar to Bluetooth pairing mode.
When you press the button, the LED display changes as shown below.
·Until pairing is complete, the Multicolour LED changes as Red→Green→Blue in turn. |
| LED
Indicator | Red→Green→Blue Blinks
○○●○○○
Pairing
→Cyan Blinks X3
○○●○○○
Connection is complete |
| “Ready to connect via Bluetooth.” |
| 6 | II (Play / Pause)
You can also play or pause music by pressing the button. |
| 7 | Up/Down/Left/Right
Press Up/Down/Left/Right on the button to select or set functions.
·Music Skip
Press the Right button to select the next music file. Press the Left button to select the previous music file. |


(Sound Control)
By pressing the button, you can select the desired audio mode. The desired item can be adjusted using the Up/Down buttons. Each time the mode changes, the Multicolour LED blinks in white.
| LED Indicator | White Blinks X1
○○●○○ |
| “Treble”→“Bass”→“Sync”→“Centre Level”→“Side Level” |
- To control the volume of the treble or bass sound, select "Treble" or "Bass" in Sound Settings, and then adjust the volume between -6 +6 by using the Up/Down buttons.
- Press and hold the (Sound Control) button for about 5 seconds to adjust the sound for each frequency band. 150Hz , 300Hz , 600Hz , 1.2kHz , 2.5kHz , 5kHz , and 10kHz are selectable using the Left/Right buttons and each can be adjusted to a setting between -6 to +6 using the Up/Down buttons. (Make sure the Sound mode is set to "Standard".)
- To control the volume of the each speaker select "Centre Level" or "Side Level" in Sound Settings, and then adjust the volume between -6 +6 by using the Up/Down buttons.
- If the video on the TV and audio from the Soundbar are not synchronised, select "Sync" in Sound Control, and then set the audio delay between 0~300 milliseconds by using the Up/Down buttons.
"Sync" is only supported for some functions.
- If Surround Speakers are connected, select "Rear Level" and then use the Up/Down buttons to adjust the volume within a -6 to +6 range.

WOOFER (BASS) LEVEL
Push the button up or down to adjust the level of the woofer (bass) to -12 or between -6 to +6. To set the woofer (bass) volume level to 0 (Default), press the button.

VOLUME
Push the button up or down to adjust the volume.
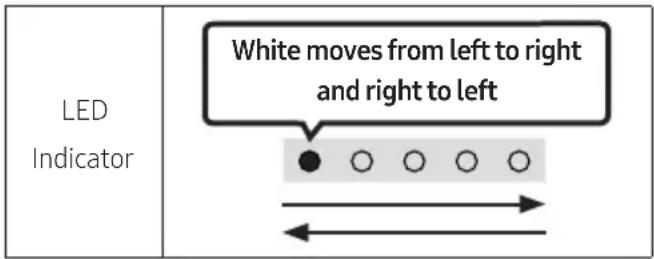
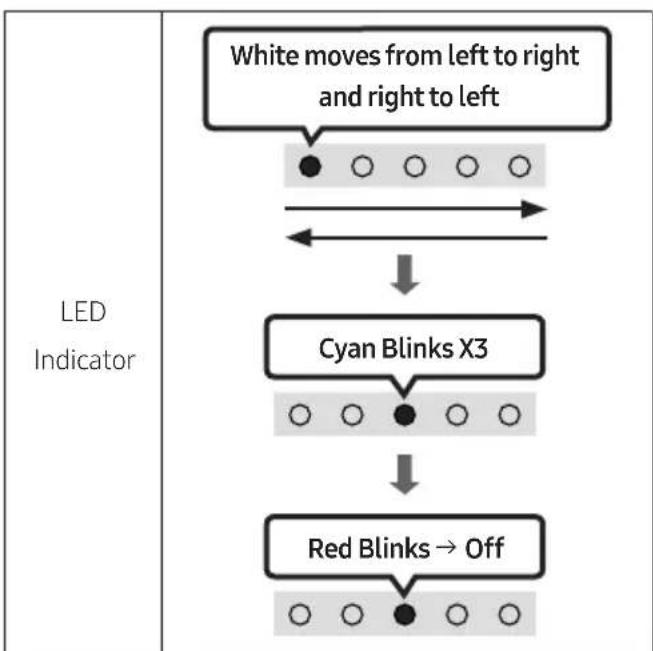
| LED Indicator | White moves to right X1
Volume Up | White moves to left X1
Volume Down |
Using the Hidden Buttons (Buttons with more than one function)
| Hidden Button | Reference page |
| Remote Control Button Function |
| WOOFER (Up) | TV remote control On/Off (Standby) | page 15 |
| Up ID SET | | |
| (Sound Control) | 7 Band EQ page 13 | |
| (Source) | Audio Feedback On/Off (Standby) page 11 | |
Output specifications for the different sound effect modes
| Effect Input | | Output |
| With Subwoofer Only | With Subwoofer & Wireless Rear Speaker Kit |
| Standard | 2.0 ch 2.1 ch 2.1 ch | | |
| 5.1 ch 2.1 ch 5.1 ch | | |
| Music | 2.0 ch 5.1 ch 7.1 ch | | |
| 5.1 ch 5.1 ch 7.1 ch | | |
| Adaptive Sound | 2.0 ch 5.1 ch 7.1 ch | | |
| 5.1 ch 5.1 ch 7.1 ch | | |
- The Samsung Wireless Rear Speaker Kit, and Subwoofer can be purchased separately. To purchase a Kit or the Subwoofer, contact the vendor you purchased the Soundbar from.
Adjusting the Soundbar volume with a TV remote control
Adjust the Soundbar volume using the TV's remote control.
- This function can be used with IR remote controls only. Bluetooth remote controls (remote controls that require pairing) are not supported.
- Set the TV speaker to External Speaker to use this function.
-
Manufacturers supporting this function: VIZIO, LG, Sony, Sharp, PHILIPS, PANASONIC, TOSHIBA, Hisense, RCA
-
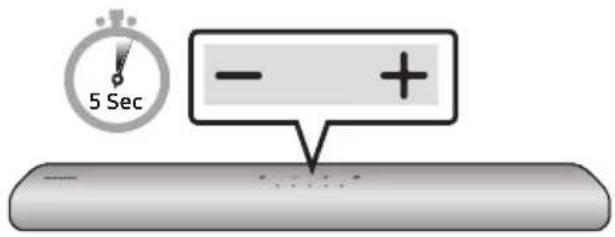
Turn Off the Soundbar.
- Push up and hold the WOOFER button for 5 seconds.
Each time you push the WOOFER button up and hold it for 5 seconds, the mode switches in the following order: "Off-TV Remote" (Default mode), "Samsung-TV Remote", "All-TV Remote".
The LED indicator status changes each time the mode is changed, as shown below.
| Remote Control Button LED | Indicator Status | |
| 5 Sec | Red Blinks X1
"Off-TV Remote"
(Default mode) | Disable the TV remote control. |
| 5 Sec | Cyan Blinks X1
"Samsung-TV Remote" | Enable a Samsung TV's IR remote control. |
| 5 Sec | Blue Blinks X1
"All-TV Remote" | Enable a third-party TV's IR remote control. |
04 CONNECTING THE SOUNDBAR
Connecting Electrical Power
Use the power components to connect the Soundbar to an electrical outlet in the following order:
- For more information about the required electrical power and power consumption, refer to the label attached to the product. (Label: Bottom of the Soundbar Main Unit)
- First connect the power cable to the AC/DC adapter. Connect the AC/DC adapter (with the power cable) to the Soundbar.
- Connect the power cord to a wall socket.
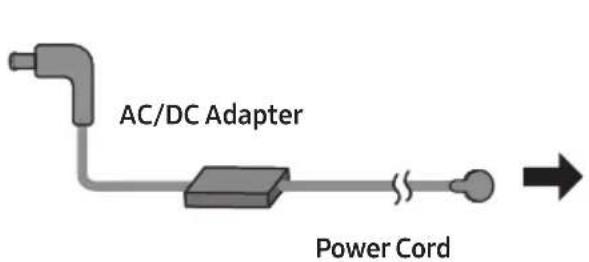

Bottom of the Soundbar Main Unit
NOTES
- If you unplug and reconnect the power cord when the product is turned on, the Soundbar turns on automatically.
- Make sure to rest the AC/DC Adapter flat on a table or the floor. If you place the AC/DC Adapter so that it is hanging with the AC cord input facing upwards, water or other foreign substances could enter the Adapter and cause the Adapter to malfunction.
Connecting an SWA-9100S (Sold Separately), SWA-W500 (Sold Separately) to your Soundbar
Expand to true wireless surround sound by connecting the Samsung Wireless Rear Speaker Kit (SWA-9100S, sold separately) and Wireless Subwoofer (SWA-W500, sold separately) to your Soundbar. For detailed information on connections, see the Samsung Wireless Rear Speaker Kit and Wireless Subwoofer manual.
05 USING A WIRED CONNECTION TO THE TV
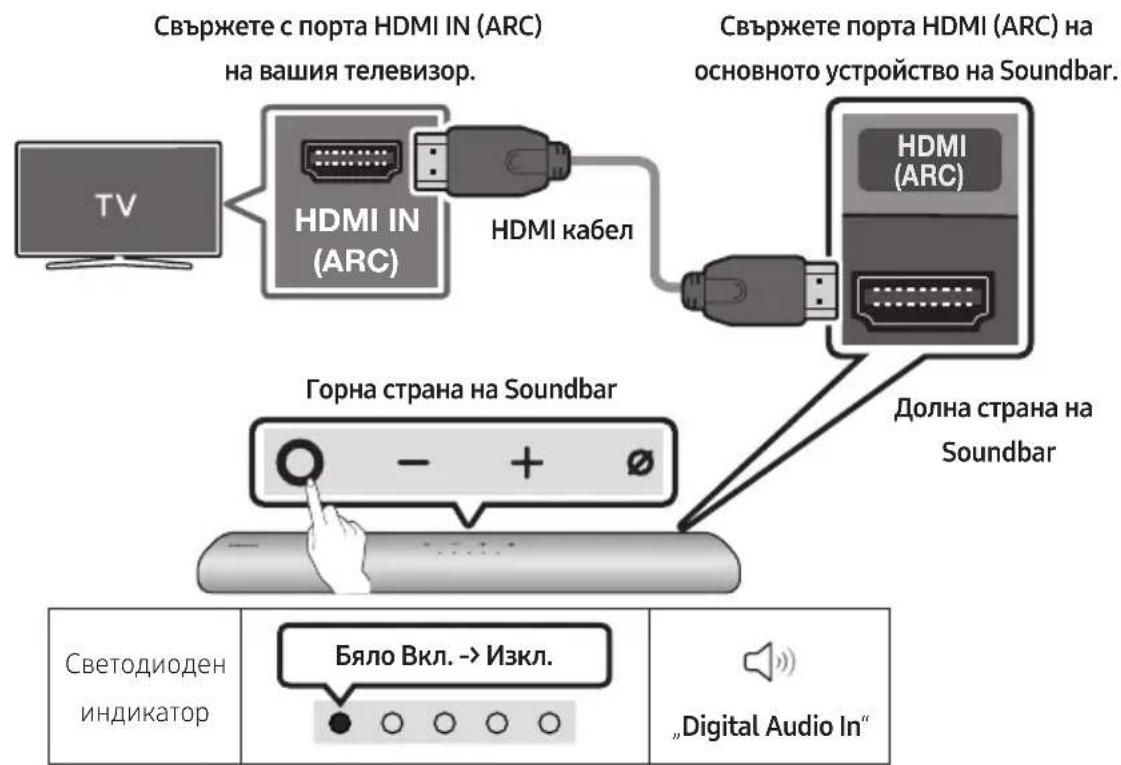
Method 1. Connecting with HDMI

CAUTION
- When both the HDMI cable and optical cable are connected, the HDMI signal is received first.
- To connect the HDMI cable between the TV and Soundbar, be sure to connect the terminals marked ARC. Otherwise, the TV sound may not be output.
- The recommended cable is High Speed HDMI Cable with Ethernet.
Connecting the TV that supports HDMI ARC (Audio Return Channel)
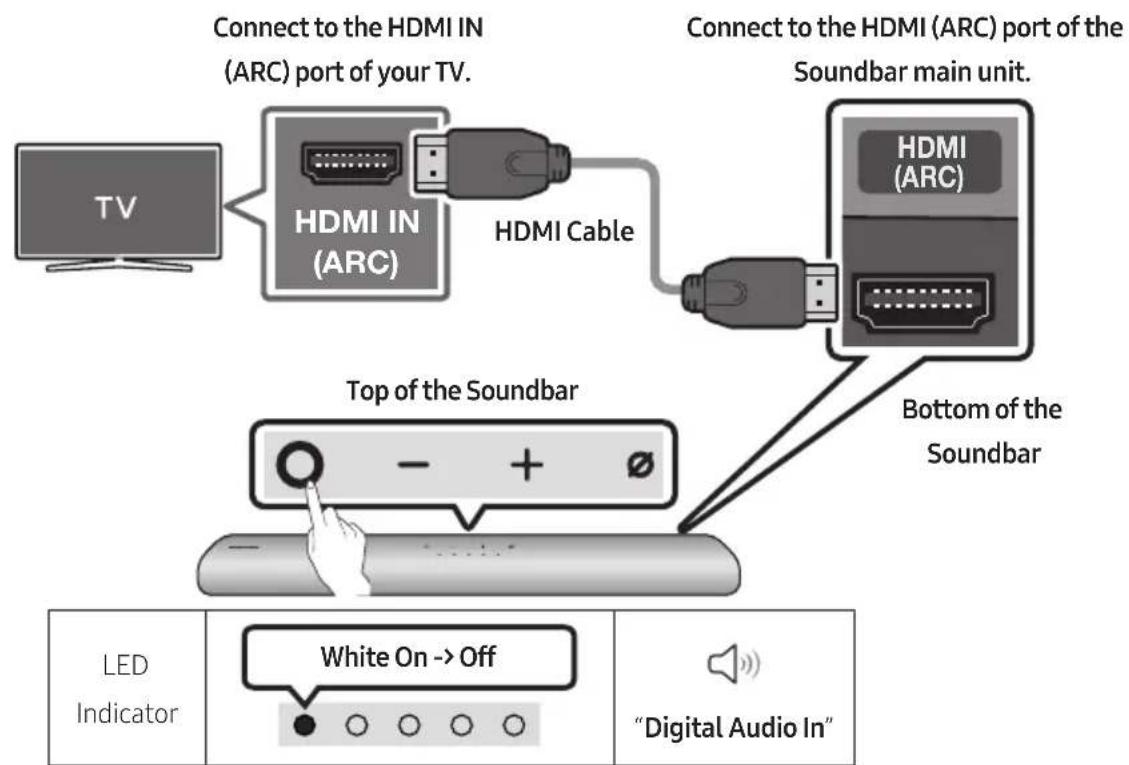
- With the Soundbar and TV turned off, connect the HDMI cable as shown in the figure.
- Turn on the Soundbar and TV.
-
TV sound is output from the Soundbar.
-
When the TV sound is not output, press the (Multi Function) button at the top of the Soundbar or the (Source) button on the remote control to select the "Digital Audio In" mode.
- When the sound is not output, check the HDMI Cable connection again.
- Use the volume buttons on the TV's remote control to change the volume on the Soundbar.
NOTES
- When you connect the TV that supports the HDMI ARC (Audio Return Channel) to the Soundbar with an HDMI cable, you can transmit the digital video and audio data without connecting a separate optical cable.
- We recommend you use a coreless HDMI cable if possible. If you use a cored HDMI cable, use one whose diameter is less than 14mm .
- This function is not available if the HDMI cable does not support ARC.
- When the audio in a broadcast is encoded in Dolby Digital and the "Digital Output Audio Format" on your TV is set to PCM, we recommend that you change the setting to Dolby Digital. When the setting on the TV is changed, you will experience better sound quality. (The TV menu may use different words for Dolby Digital and PCM depending on the TV manufacturer.)
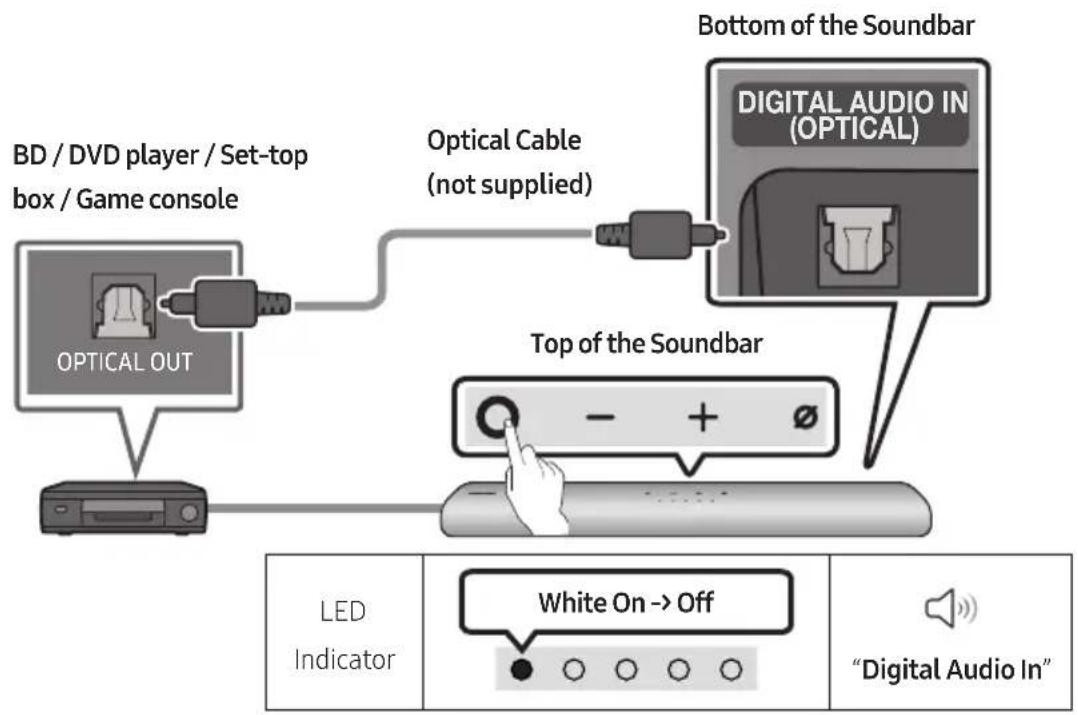
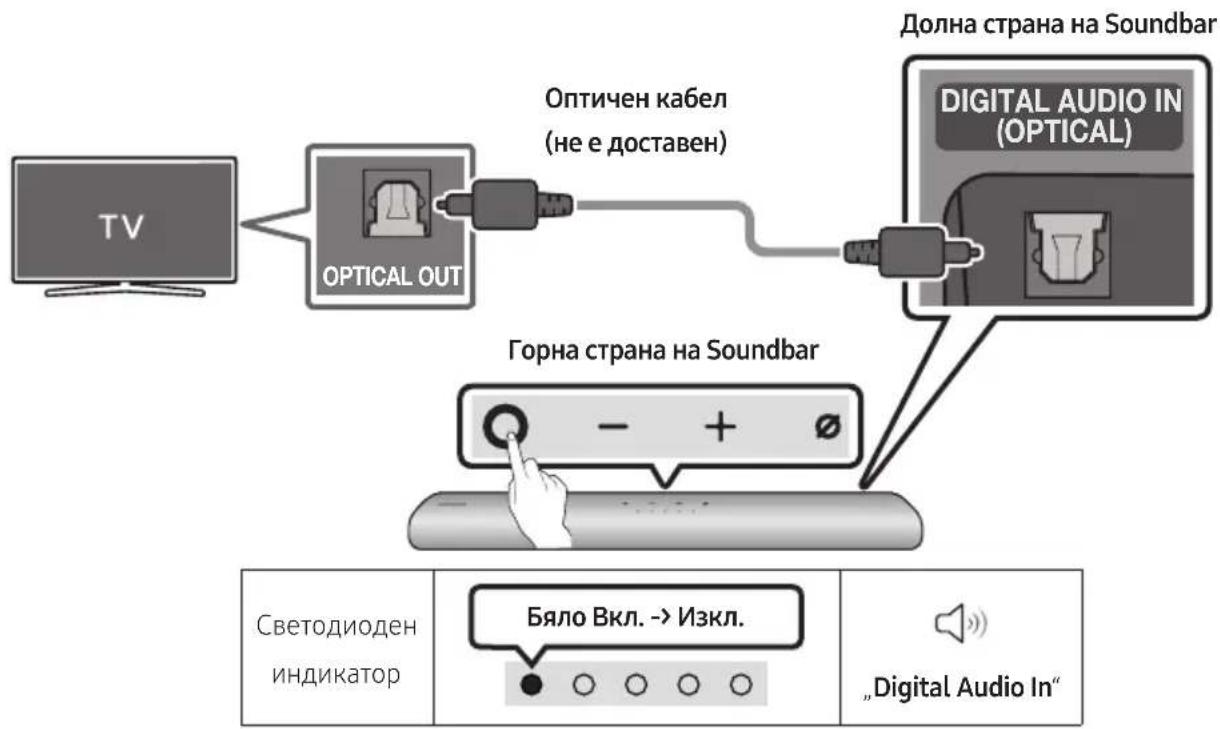
Method 2. Connecting using an Optical Cable
Pre-connection Checklist
- When both the HDMI cable and optical cable are connected, the HDMI signal is received first.
- When you use an optical cable and the terminals have covers, be sure to remove the covers.

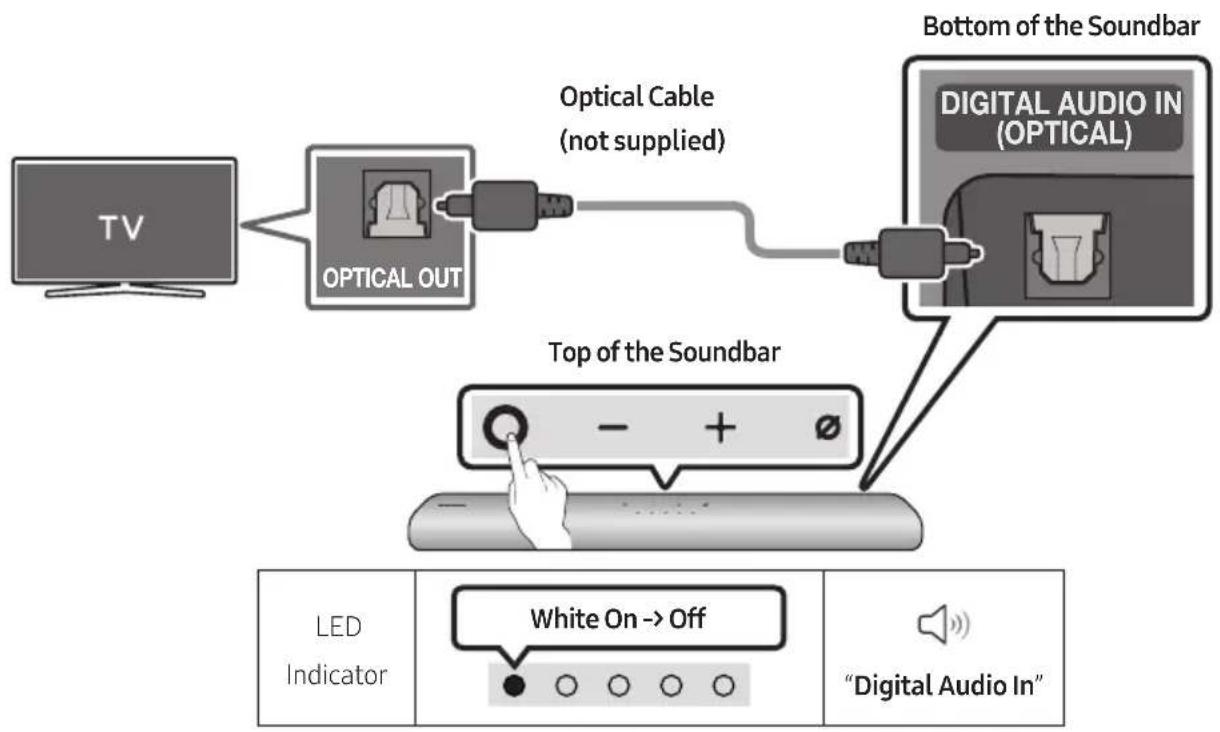
- With the TV and Soundbar turned off, connect the DIGITAL AUDIO IN (OPTICAL) port on the Soundbar and the OPTICAL output port on the TV with the optical cable (not supplied), as shown in the figure.
- Turn on the Soundbar and TV.
- Press the (Multi Function) button at the top of the Soundbar or the (Source) button on the remote control and then select the "Digital Audio In" mode. Then the announcement, "Digital Audio In" is output.
- The TV sound is output from the Soundbar.
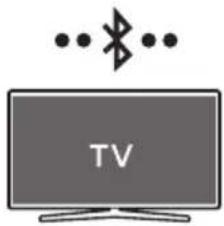
06 USING A WIRELESS CONNECTION TO THE TV
Method 1. Connecting via Bluetooth
When a Samsung TV is connected using Bluetooth, you can hear stereo sound without the hassle of cabling.
- Only one Samsung TV can be connected at a time.
- Samsung TV that supports Bluetooth can be connected. Check the specifications of your TV.
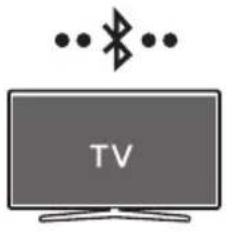
The initial connection
1.
| Bluetooth Pairing button LED | Indicator |
| OR
When in “Bluetooth” mode | Red → Green → Blue Blinks
Pairing
→
Cyan Blinks X3
Connection is complete
· Until pairing is complete, the Multicolour LED changes as Red → Green → Blue in turn. |
| 5 Sec | “Ready to connect via Bluetooth.” |
- Select Bluetooth mode on the Samsung TV.
(e.g. Home (O) Settings (O) Sound Sound Output Bluetooth Speaker List [AV] Samsung Soundbar S60A / [AV] Samsung Soundbar S61A (Bluetooth))
- Select "[AV] Samsung Soundbar S60A / [AV] Samsung Soundbar S61A" from the list on TV's screen.
An available Soundbar is indicated with "Need Pairing" or "Paired" on the TV's Bluetooth device list. To connect the Samsung TV to the Soundbar, select the message, and then establish a connection.
-
You can now hear Samsung TV sound from the Soundbar.
-
If there is a connection log between the Soundbar and Samsung TV, the Soundbar is automatically connected by changing its mode to "Bluetooth"
If the device fails to connect
- If you have an existing Soundbar (e.g., [AV] Samsung Soundbar S60A / [AV] Samsung Soundbar S61A) on the list of speakers on the Samsung TV, delete it.
- Then repeat steps 1 through 3.
Disconnecting the Soundbar from the Samsung TV
Press the (Multi Function) button at the top of the Soundbar or the (Source) button on the remote control to select the mode other than "Bluetooth".
- Disconnecting takes time because the Samsung TV must receive a response from the Soundbar. (The time required may differ, depending on the Samsung TV model.)
Notes on Bluetooth connection
- Locate a new device within 1m to connect via Bluetooth communication.
- If asked for a PIN code when connecting a Bluetooth device, enter <0000>.
- The Soundbar automatically turns off after 18 minutes in the Ready state.
-
The Soundbar may not perform Bluetooth search or connection correctly under the following circumstances:
-
If there is a strong electrical field around the Soundbar.
- If several Bluetooth devices are simultaneously paired with the Soundbar.
-
If the Bluetooth device is turned off, not in place, or malfunctions.
-
Electronic devices may cause radio interference. Devices that generate electromagnetic waves must be kept away from the Soundbar main unit - e.g., microwaves, wireless LAN devices, etc.
Method 2. Connecting via Wi-Fi
Pre-connection Checklist
- Wi-Fi connection is available only on Samsung TV.
- Check whether the wireless router (Wi-Fi) is turned on and the TV is connected to the router.
- The TV and Soundbar must be connected to the same wireless network (Wi-Fi).
- If your wireless router (Wi-Fi) uses a DFS channel, you will not be able to establish a Wi-Fi connection between the TV and Soundbar. Contact your Internet service provider for details.
- Because the menus may differ depending on the year of manufacture, refer to your TV manual.
-
To connect the TV to the Soundbar via Wi-Fi, connect the Soundbar to the wireless router first. See page 27, for details on how to establish a Wi-Fi connection.
-
For more information about Wi-Fi connection to the Soundbar, see page 27, "Method 2. Connecting via Wi-Fi (Wireless Network)".
- Change the input source of the TV by using the Audio menu to Soundbar.
Samsung TVs released in 2017 or later
Home () Settings () Sound Sound Output [AV] Samsung Soundbar S60A / [AV] Samsung Soundbar S61A (Wi-Fi)
07 CONNECTING AN EXTERNAL DEVICE
Connecting using an Optical Cable
- With the external device and Soundbar turned off, connect the DIGITAL AUDIO IN (OPTICAL) port on the Soundbar and the OPTICAL output port on the external device with the optical cable (not supplied), as shown in the figure.
- Turn on the Soundbar and external device.
- Press the (Multi Function) button at the top of the Soundbar or the (Source) button on the remote control and then select the "Digital Audio In" mode. Then the announcement, "Digital Audio In" is output.
- The external device sound is output from the Soundbar.
08 CONNECTING A MOBILE DEVICE
Method 1. Connecting via Bluetooth
When a mobile device is connected using Bluetooth, you can hear stereo sound without the hassle of cabling.
- When you connect a paired Bluetooth device with the Soundbar off, the Soundbar automatically turns on.
The initial connection
- When connecting to a new Bluetooth device, make sure the device is within 1m distance.
1.
- On your device, select "[AV] Samsung Soundbar S60A / [AV] Samsung Soundbar S61A" from the list that appears.
- Play music files from the device connected via Bluetooth through the Soundbar.
If the device fails to connect
- If you have an existing Soundbar (e.g., [AV] Samsung Soundbar S60A / [AV] Samsung Soundbar S61A) on the list of speakers on the Mobile device, delete it.
- Then repeat steps 1 and 2.
Notes on Bluetooth connection
- Locate a new device within 1m to connect via Bluetooth communication.
- If asked for a PIN code when connecting a Bluetooth device, enter <0000> .
- The Soundbar automatically turns off after 18 minutes in the Ready state.
-
The Soundbar may not perform Bluetooth search or connection correctly under the following circumstances:
-
If there is a strong electrical field around the Soundbar.
- If several Bluetooth devices are simultaneously paired with the Soundbar.
-
If the Bluetooth device is turned off, not in place, or malfunctions.
-
Electronic devices may cause radio interference. Devices that generate electromagnetic waves must be kept away from the Soundbar main unit - e.g., microwaves, wireless LAN devices, etc.
The Soundbar supports SBC data (44.1kHz, 48kHz).
- Connect only to a Bluetooth device that supports the A2DP (AV) function.
- You cannot connect the Soundbar to a Bluetooth device that supports only the HF (Hands Free) function.
- When connecting the Soundbar to a Bluetooth device, place them as close to each other as possible.
- The farther the Soundbar and Bluetooth device are from each other, the lower the sound quality will become.
The Bluetooth connection may break when the devices are out of the effective range.
- The Bluetooth connection may not function as intended in areas with poor reception.
-
A Bluetooth device may experience noise or malfunction under in the following conditions:
-
When the body is in contact with the signal transceiver on the Bluetooth device or Soundbar
-
In corners or when there is an obstacle in proximity, such as a wall or partition, where electrical changes may occur.
-
When exposed to radio interferences by other products operating on the same frequency ranges, such as medical equipment, microwave ovens, and wireless LAN devices.
-
Obstacles such as doors and walls may still impact the sound quality even when the devices are within the effective range.
-
Note that your Soundbar cannot be paired with other Bluetooth devices while using the Bluetooth option.
- This wireless device may cause electrical interference during operation.
Disconnecting the Bluetooth device from a Soundbar
You can disconnect a Bluetooth device from the Soundbar. For instructions, see the Bluetooth device's user manual.
The Soundbar will be disconnected.
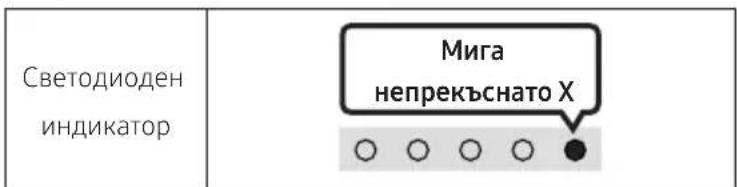
- If the Soundbar is disconnected from the Bluetooth device, the multicolour LED indicator on the Soundbar blinks "Red" three times.
Disconnecting the Soundbar from the Bluetooth device
Press the (Multi Function) button at the top of the Soundbar or the (Source) button on the remote control to select the mode other than "Bluetooth".
- Disconnecting takes time because the Bluetooth device must receive a response from the Soundbar. (Disconnection time may differ, depending on the Bluetooth device)
- If the Soundbar is disconnected from the Bluetooth device, the multicolour LED indicator on the Soundbar blinks "Red" three times.
Method 2. Connecting via Wi-Fi (Wireless Network)
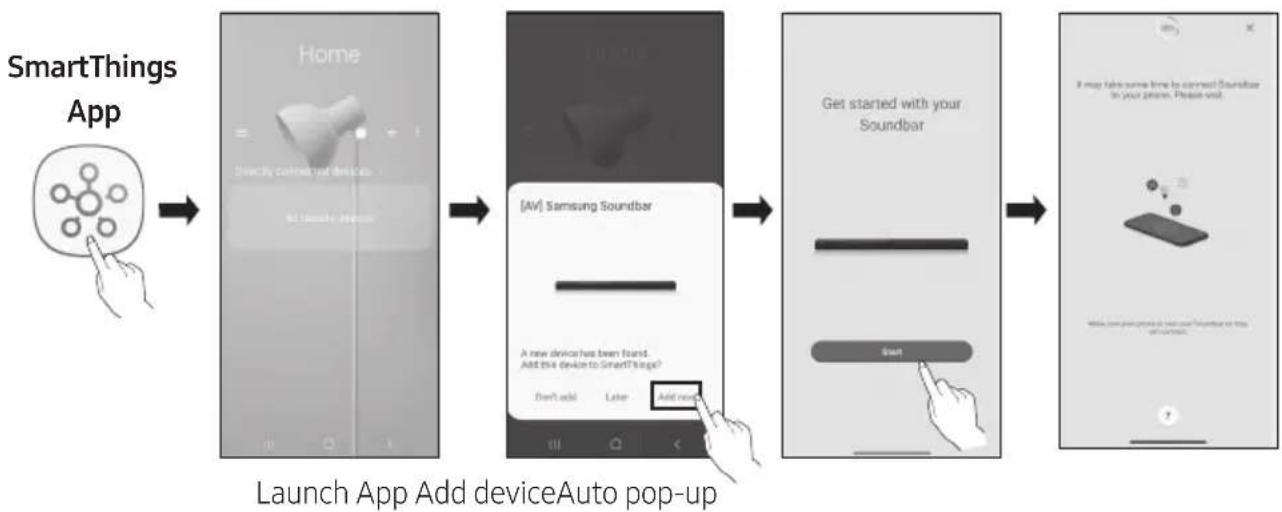
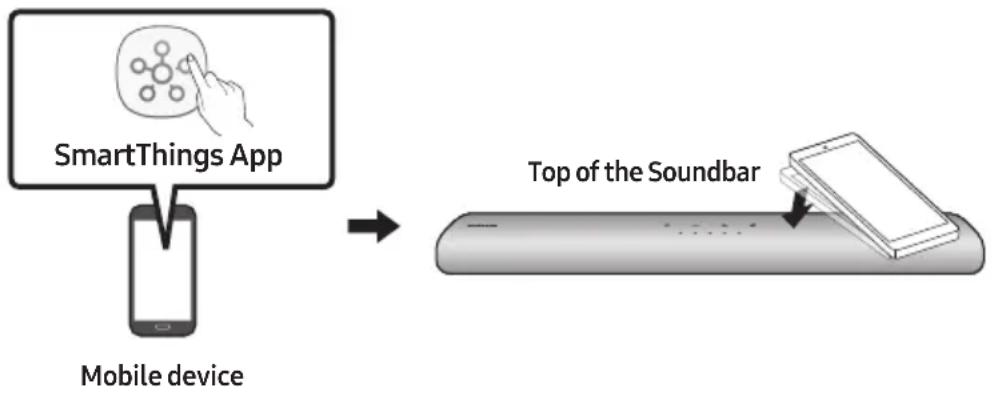
To connect a Soundbar to a mobile device via a wireless network (Wi-Fi), the SmartThings app is required.
The initial connection
- Install and launch the SmartThings app from your mobile device (smartphone or tablet).
-
On the app, follow the screen instructions to add the Soundbar.
-
The automatic pop-up (the second screenshot below) may not show on some devices. If the pop-up window does not appear, press “+” on the Home screen. The Soundbar is added to the app.
Getting Started with Amazon Alexa (Built-in Alexa)
- Amazon Alexa is a service provided by Amazon.
- This function may not be supported depending on the model or geographical area.
- This function only supports some languages, and the supported functions may differ depending on the geographical area.
- For product specification or compatibility, refer to the Samsung website (www.samsung.com).
Using Alexa, you can play music, listen to news, see weather forecasts, and control home appliances. To use Amazon Alexa, an Amazon account is required to connect the Soundbar over the network.
- Install the SmartThings app on your mobile device and then launch it.
- Enter the Alexa account by following the instructions on the app and then log in the service.
-
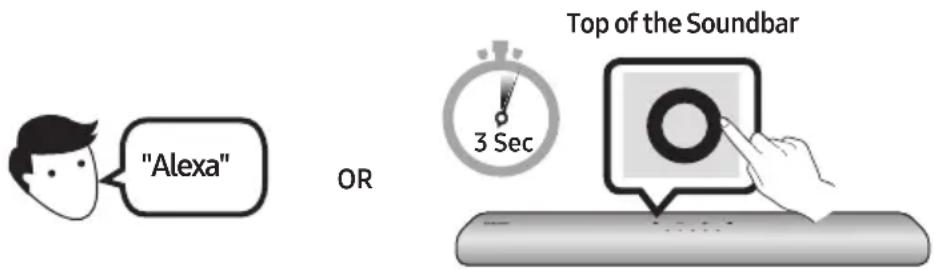
Call Alexa or press the (Multi Function) button on the Soundbar for 3 seconds to use the Alexa service.
-
Press the (Multi Function) button for 3 seconds to call Alexa. Say with the button pressed to enable voice recognition.
- The LED indicator status on the Soundbar changes depending on the Alexa status. See page 31 for details.

Trigger + Command
| Things to try Example of what to say |
| Volume control | "Alexa, turn up the volume." |
| "Alexa, turn down the volume" |
| Listening to streaming content from Amazon Music | "Alexa, play some jazz music" |
| Playback control | "Alexa, play next song." |
| "Alexa, stop the music." |
| "Alexa, what is this song?" |
| Weather information "Alexa, what's the weather?" |
| Timer scheduling "Alexa, set a timer for 10 minutes." |
Getting Started with Alexa on Amazon Product (Works with Alexa)
This function may not be supported depending on the model or geographical area.
- This function only supports some languages, and the supported functions may differ depending on the geographical area.
For product specification or compatibility, refer to the Samsung website (www.samsung.com).
This service is provided by Amazon and can be terminated at any time. Samsung does not assume responsibility for service availability.
Amazon Alexop screen is subject to change without prior notice.
Connect and use with an Amazon product (Amazon Echo)
Use an Amazon Echo product to control your Soundbar and enjoy music services provided by Amazon Echo. To use Amazon Alexa, an Amazon account is required to connect the Soundbar over the network.
- Install the SmartThings app on your mobile device and then launch it.
- Enter the Alexa account by following the instructions on the app and then log in the service.
Use voice commands to control the Soundbar
- The Amazon Echo service you can use with your Soundbar is limited to music. Other services provided by Amazon Echo, such as news and weather, can only be accessed through your Amazon Echo product.

Trigger + Command + Speaker name
- To use voice commands for the Soundbar named "Living room"
| Action Voice Command | |
| To set the volume level to 5 | "Alexa Set the volume to 5 on Living room" |
| To increase the volume level | "Alexa Volume up on Living room" |
| To mute the sound "Alexa Mute on Living room" | |
| To listen to a radio station named KISS FM | "Alexa Play Kiss FM on Living room" |
| To play the next song | "Alexa Next song on Living room" |
| To stop the audio | "Alexa Stop on Living room" |
| To turn the audio off "Alexa Turn off on Living room" | |
Alexa indicator status
The LED indicator status on the Soundbar changes depending on the Alexa status, as shown below.
| Alexa status LED indicator on Soundbar |
| Idle | Off |
| Listening | Cyan On
○○●○○→○●●●○→○●●●● |
| Thinking | Cyan Blinks X1
○○●○○←○●●●○→○●●●● |
| Speaking |
| Timer Alarms and Reminders | Cyan Blinks X2
○○●○○→○○●○○ |
| Notification | Yellow Blinks X2
○○●○○ |
| Alexa service unavailable | Red Blinks X3
○○●○○ |
| Network disconnected | Red Blinks X3
○○●○○ |
| Mic Off | Red On
○○●○○ |
Using the Tap Sound
Tap the Soundbar with your mobile device to play audio from the mobile device through the Soundbar.
- This function may not be supported, depending on the mobile device.
- This function is only compatible with Samsung mobile devices with Android 8.1 or later.
-
Turn on the Tap Sound function on your mobile device.
-
For details on how to turn on the function, refer to "Enable the Tap Sound function" below.
-
Tap the Soundbar with the mobile device. Select "Start now" in the displayed message window. A connection is established between the mobile device and Soundbar via Bluetooth.
-
Play audio from the mobile device through the Soundbar.
-
This function connects a mobile device to the Soundbar via Bluetooth by detecting vibration that occurs when the device touches the Soundbar.
- Make sure the mobile device does not tap a sharp corner of the Soundbar. The Soundbar or mobile device may become scratched or damaged.
- It is recommended that the mobile device be covered with a case. Lightly tap the wide area in the upper portion of the Soundbar, without using excessive force.
- To use this function, update the SmartThings app to the latest version. The function may not be supported, depending on the app version.
Enable the Tap Sound function
Use the SmartThings app to turn on the Tap View, Tap Sound function.
- On the mobile device, run the SmartThings app.
- Select ( 必) in the SmartThings app screen displayed on the mobile device.
- Set "Tap View, Tap Sound" to On to allow the function to work when a mobile device moves close to the Soundbar.
NOTES
- When the mobile device is in power-saving mode, the Tap Sound function does not work.
- The Tap Sound function may not work if there are devices near the Soundbar that cause radio interference such as electric devices. Make sure devices that may cause radio interference are placed at a sufficient distance away from the Soundbar.
09 CONNECTING TO APPLE AIRPLAY 2
- This feature may not be available in some countries.
Connect and use with an Apple product
- With AirPlay 2, you can control your home's audio system from your iPhone, iPad, HomePod, or Apple TV.
- This Samsung Soundbar supports AirPlay 2 and requires iOS 11.4 or later.
NOTE
- Confirm that the Soundbar is connected to Wi-Fi. (Refer to "Method 2. Connecting via Wi-Fi (Wireless Network)".)
10 INSTALLING THE WALL MOUNT
Installation Precautions
Install on a vertical wall only.
- Do not install in a place with high temperature or humidity.
- Verify whether the wall is strong enough to support the product's weight. If not, reinforce the wall or choose another installation point.
- Purchase and use the fixing screws or anchors appropriate for the kind of wall you have (plaster board, iron board, wood, etc.). If possible, fix the support screws into wall studs.
Purchase wall mounting screws according to the type and thickness of the wall you want to mount the Soundbar on.
Diameter: M5
Length: 35mm or longer recommended.
- Connect cables from the unit to external devices before you install the Soundbar on the wall.
Make sure the unit is turned off and unplugged from the power source before you install it. Otherwise, it may cause an electric shock.
Wallmount Components

Wall Mount Guide
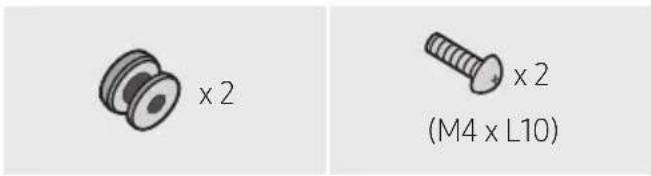
Holder-Screw Screw

Bracket-Wall Mount
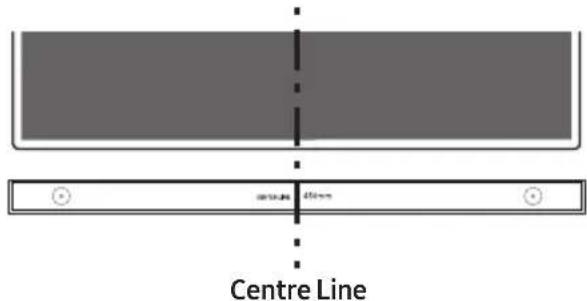
- Place the Wall Mount Guide against the wall surface.
The Wall Mount Guide must be level.
If your TV is mounted on the wall, install the Soundbar at least 5 cm below the TV.
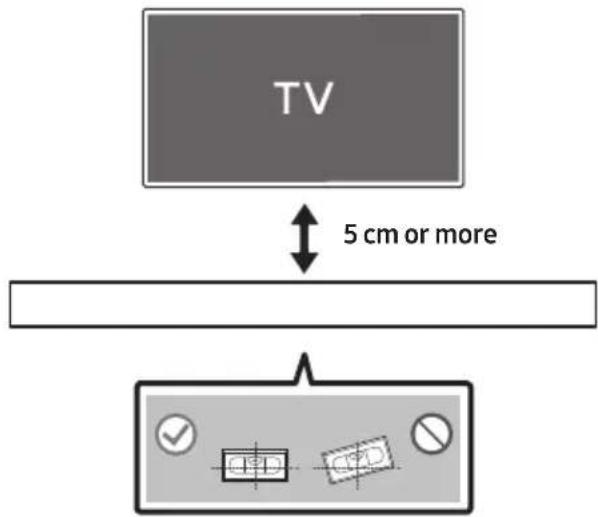
- Align the Wall Mount Guide's Centre Line with the centre of your TV (if you are mounting the Soundbar below your TV), and then fix the Wall Mount Guide to the wall using tape.
If you are not mounting below a TV, place the Centre Line in the centre of the installation area.
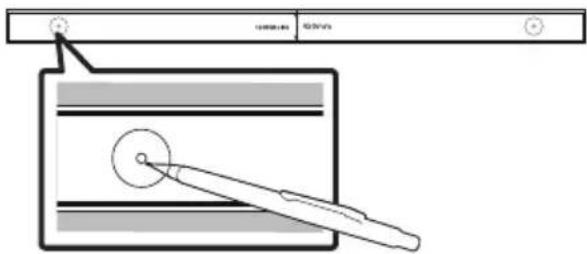
- Use a pen to mark the positions of the holes and remove the Wall Mount Guide.
-
Using an appropriately sized drill bit, drill a hole in the wall at each marking.
-
If the markings do not correspond to the positions of studs, make sure you insert appropriate anchors into the holes before you insert the support screws. If you use anchors, make sure the holes you drill are large enough for the anchors you use.
-
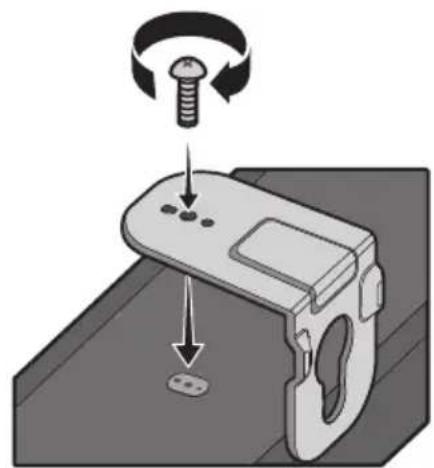
Push a screw (not supplied) through each Holder-Screw, and then screw each screw firmly into a support screw hole.

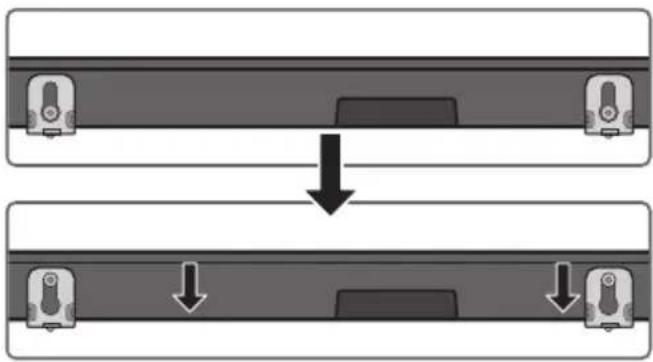
- Install the 2 Bracket-Wall Mounts in the correct orientation on the bottom of the Soundbar using 2 Screws.
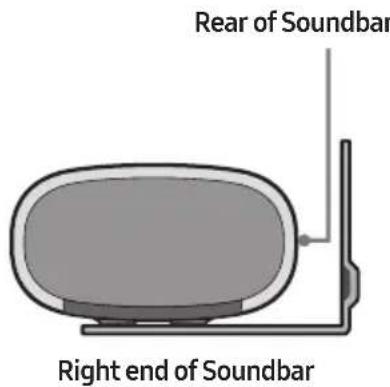
- When assembling, make sure the hanger part of the Bracket-Wall Mounts are located behind the rear of the Soundbar.
- Install the Soundbar with the attached Bracket-Wall Mounts by hanging the Bracket-Wall Mounts on the Holder-Screws on the wall.
-
Slide the Soundbar down as shown below so that the Bracket-Wall Mounts rest securely on the Holder-Screws.
-
Insert the Holder-Screws into the wide (bottom) part of the Bracket-Wall Mounts, and then slide the Bracket-Wall Mounts down so that the Bracket-Wall Mounts rest securely on the Holder-Screws.
11 INSTALLING THE SOUNDBAR IN FRONT OF TV
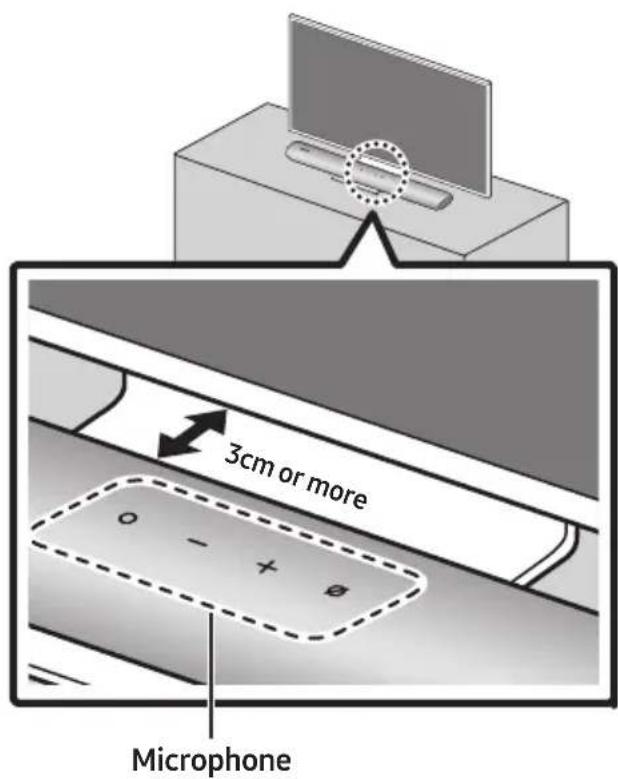
Installing the centre of the Soundbar to the centre of the TV as illustrated in the image.
At this time, place the Soundbar at least 3cm away from the TV so that there is no interference with voice recognition.
NOTES
- Make sure the Soundbar is placed on a flat and solid surface.
Insufficient gap from the TV may cause voice recognition and acoustic problems.
12 SOFTWARE UPDATE
Auto Update
When the Soundbar is connected to the Internet, software updates automatically occur even when the Soundbar is turned off.
- To use the Auto Update function, the Soundbar must be connected to the Internet. The Wi-Fi connection to the Soundbar will be terminated if the Soundbar's power cord is disconnected or the power is cut off. If the power is cut off, when the power comes back on or you reconnect the power cord, turn on the Soundbar, and then reconnect it to the Internet.
USB Update
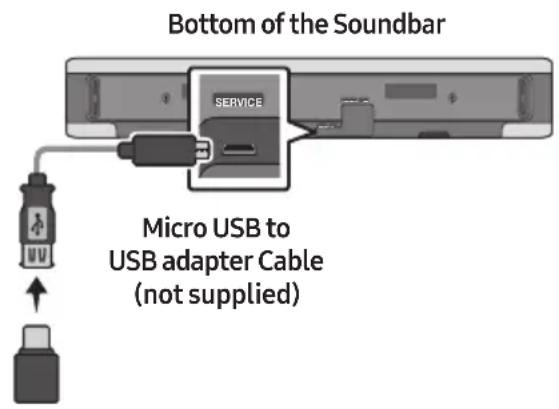
Samsung may offer updates for the Soundbar's system firmware in the future.
When an update is available, you can update the Soundbar by connecting the USB drive that contains the update firmware to the SERVICE port of the Soundbar.
- Go to (www.samsung.com) search for the model name from the customer support menu option.
- For more information about update, refer to Upgrade Guide.
- Download the upgrade file (USB type).
- Unzip the file to create a folder with the file name.
- Store the created folder in a USB and then connect it to the Soundbar.
- Turn on the Soundbar. Then the product is updated within 3 minutes.
- During update, do not turn it off or remove the USB.
- If the yellow LED is on after the software update is completed, this means that an additional update is in progress. When this happens, don't turn off the power or remove the USB.
- If update does not proceed, reconnect the Soundbar power cord.
- When the latest version is installed, no update is performed.
- Depending on the USB type, update may not be supported.
Reset
With the Soundbar on, press the - + (Volume) buttons on the body at the same time for at least 5 seconds. The LED display changes as shown below and then the Soundbar is reset.

CAUTION
- All the settings of the Soundbar are reset. Be sure to perform this only when a reset is required.
13 TROUBLESHOOTING
Refer to the instructions below if this product does not function properly.
Soundbar does not turn on.
- Check whether the power cord of the Soundbar is correctly inserted into the outlet.
Soundbar works erratically.
After removing the power cord, insert it again.
Remote the power cord from the external device and try again.
If there is no signal, the Soundbar automatically turns off after a certain period of time. Turn on the power. (See page 11.)
In case the remote control does not work.
Point the remote directly at the Soundbar.
Replace the batteries with new ones.
The Soundbar does not output any sound.
The volume of the Soundbar is too low or muted. Adjust the volume.
- When any external device (STB, Bluetooth device, mobile device, etc.) is connected, adjust the volume of the external device.
For sound output of the TV, select Soundbar. (Samsung TV: Home (m) Settings (Sound Sound Output Select Soundbar)
The cable connection to the Soundbar may not be loose. Remove the cable and connect again.
Remove the power cord completely, reconnect, and turn the power on.
Reset the product and try again. (See page 38.)
In case the TV is not connected via HDMI (ARC).
- Check whether the HDMI cable is correctly connected to the ARC terminal. (See page 17)
Connection may not be possible due to the connected external device (set-top box, game console, etc.). Directly connect the Soundbar.
HDMI-CEC may not be activated on the TV. Turn on the CEC on the TV menu. (Samsung TV: Home (m Settings ( ) General External Device Manager Anynet+ (HDMI-CEC) ON)
There is no sound in when connecting to the TV in HDMI (ARC) mode.
→Your device is unable to play the input signal. Change the TV's audio output to PCM or Dolby Digital. (For a Samsung TV: Home ( Settings (Sound Expert Settings Digital Output Audio Format)
The Soundbar will not connect via Bluetooth.
→When connecting a new device, switch to Bluetooth Pairing for connection. (Press the
PAIR button on the remote control or press the (Mic On/Off) button on the body for at least 5 seconds.)
If the Soundbar is connected to another device, disconnect that device first to switch the device.
Reconnect it after removing the Bluetooth speaker list on the device to connect. (Samsung TV: Home ( m Settings ( )
Sound Sound Output Bluetooth Speaker List)
Remove and reconnect the power plug, then try again.
Reset the product and try again. (See page 38.)
The sound drops out when connected via Bluetooth.
- Some devices can cause radio interference if they are located too close to the Soundbar. e.g. microwaves, wireless routers, etc.
If your device that is connected via Bluetooth moves too far away from the Soundbar, it may cause the sound to drop out. Move the device closer to the Soundbar.
If a part of your body is in contact with the Bluetooth transceiver or the product is installed on metal furniture, the sound may drop out. Check the installation environment and conditions for use.
Unable to connect to Wi-Fi.
Check whether your wireless router is on.
Turn off the router, turn it back on, and then try again.
→The Soundbar will not connect if the wireless signal is too weak. Try moving the router closer to the Soundbar, or eliminating any obstacles that are between the Soundbar and the router, if possible.
If your wireless router is new, you will need to reconfigure the speaker's network settings.
The Soundbar does not turn on automatically with the TV.
When you turn off the Soundbar while watching TV, power synchronization with the TV is disabled. First turn off the TV.
14 LICENCE
Dolby AUDIO
Manufactured under license from Dolby Laboratories. Dolby, Dolby Audio and the double-D symbol are trademarks of Dolby Laboratories Licensing Corporation.
dt.
For DTS patents, see http://patents.dts.com. Manufactured under license from DTS, Inc. (for companies headquartered in the U.S./Japan/ Taiwan) or under license from DTS Licensing Limited (for all other companies). DTS, Digital Surround, and the DTS logo are registered trademarks or trademarks of DTS, Inc. in the United States and other countries. © 2020 DTS, Inc. ALL RIGHTS RESERVED.
HOMI
The terms HDMI and HDMI High-Definition Multimedia Interface, and the HDMI Logo are trademarks or registered trademarks of HDMI Licensing Administrator, Inc. in the United States and other countries.
Spotify
- Use your phone, tablet or computer as a remote control for Spotify. Go to Spotify.com/connect to learn how
- The Spotify Software is subject to third party licences found here: https://www.spotify.com/connect/third-party-licenses.

Works with Apple AirPlay
- Apple, AirPlay, iPhone, iPad, HomePod, and Apple TV are trademarks of Apple Inc., registered in the U.S. and other countries.
- Use of the Works with Apple badge means that an accessory has been designed to work specifically with the technology identified in the badge and has been certified by the developer to meet Apple performance standards.
15 OPEN SOURCE LICENCE NOTICE
To send inquiries and requests for questions regarding open sources, contact Samsung Open Source (http://opensource.samsung.com)
16 IMPORTANT NOTES ABOUT SERVICE
- Figures and illustrations in this User Manual are provided for reference only and may differ from actual product appearance.
- An administration fee may be charged if either
(a) an engineer is called out at your request and there is no defect with the product (i.e. where the user manual has not been read).
(b) you bring the unit to a repair centre and there is no defect with the product (i.e. where the user manual has not been read).
- You will be informed of the administration fee amount before a technician visits.
17 SPECIFICATIONS AND GUIDE
Specifications
| Model Name HW-S60A / S61A | |
| Weight 3.0 kg | |
| Dimensions (W x H x D) 764.0 x 68.0 x 125.0 mm | |
| Operating Temperature Range +5°C to +35°C | |
| Operating Humidity Range 10 % ~ 75 % | |
| AMPLIFIER
Rated Output power (30W x 2) + (30W x 2) + (30W x 2) + 20W | |
| Supported play formats | LPCM 2ch, Dolby Audio™
(supporting Dolby® Digital), DTS |
| WIRELESS DEVICE OUTPUT POWER
Wi-Fi max transmitter power | 100mW at 2.4GHz – 2.4835GHz, 200mW at 5.15GHz – 5.25GHz, 100mW at 5.25GHz – 5.35GHz & 5.47GHz – 5.725GHz |
| WIRELESS DEVICE OUTPUT POWER
BT max transmitter power | 100mW at 2.4GHz – 2.4835GHz |
NOTES
Samsung Electronics Co., Ltd reserves the right to change the specifications without notice.
- Weight and dimensions are approximate.
Precaution: The Soundbar will restart automatically if you turn on/turn off Wi-Fi.
| Overall Standby Power Consumption (W) | 5.2W |
| Wi-Fi Port deactivation method | Press the ID SET button on the bottom panel of the Soundbar for 30 seconds to turn Wi-Fi On / Off. |
| Bluetooth Port deactivation method | Press the NETWORK button on the bottom panel of the Soundbar for 30 seconds to turn Bluetooth On / Off. |
Hereby, Samsung declares that this radio equipment is in compliance with Directive 2014/53/EU and the relevant UK statutory requirements.
The full text of the declaration of conformity is available at the following internet address:
http://www.samsung.com go to Support and enter the model name.
This equipment may be operated in all EU countries and in the UK.
The 5GHz WLAN(Wi-Fi or SRD) function of this equipment may only be operated indoors.
[Correct disposal of batteries in this product]
(Applicable in countries with separate collection systems)
This marking on the battery, manual or packaging indicates that the batteries in this product should not be disposed of with other household waste at the end of their working life. Where marked, the chemical symbols Hg, Cd or Pb indicate that the battery contains mercury, cadmium or lead above the reference levels in EC Directive 2006/66.
If batteries are not properly disposed of, these substances can cause harm to human health or the environment.
To protect natural resources and to promote material reuse, please separate batteries from other types of waste and recycle them through your local, free battery return system.
Correct Disposal of This Product
(Waste Electrical & Electronic Equipment)
(Applicable in countries with separate collection systems)
This marking on the product, accessories or literature indicates that the product and its electronic accessories (e.g. charger, headset, USB cable) should not be disposed of with other household waste at the end of their working life. To prevent possible harm to the environment or human health from uncontrolled waste disposal, please separate these items from other types of waste and recycle them responsibly to promote the sustainable reuse of material resources.
Household users should contact either the retailer where they purchased this product, or their local government office, for details of where and how they can take these items for environmentally safe recycling.
Business users should contact their supplier and check the terms and conditions of the purchase contract. This product and its electronic accessories should not be mixed with other commercial wastes for disposal.
For information on Samsung's environmental commitments and product specific regulatory obligations e.g. REACH, WEEE, Batteries, visit:
www.samsung.com/uk/aboutsamsung/sustainability/environment/our-commitment/data/
COMMISSION REGULATION (EU) 2019/1782
Ecodesign requirements for external power supplies :
www.samsung.com/global/ecodesign_component
AVERTISSEMENTS
02 VUE D'ENSEMBLE DU PRODUIT
09 CONNEXIONÀ APPLE AIRPLAY 2
Manufactured under license from Dolby Laboratories. Dolby, Dolby Audio and the double-D symbol are trademarks of Dolby Laboratories Licensing Corporation.
dts.
For DTS patents, see http://patents.dts.com. Manufactured under license from DTS, Inc. (for companies headquartered in the U.S./Japan/ Taiwan) or under license from DTS Licensing Limited (for all other companies). DTS, Digital Surround, and the DTS logo are registered trademarks or trademarks of DTS, Inc. in the United States and other countries. © 2020 DTS, Inc. ALL RIGHTS RESERVED.
HOMI
The terms HDMI and HDMI High-Definition Multimedia Interface, and the HDMI Logo are trademarks or registered trademarks of HDMI Licensing Administrator, Inc. in the United States and other countries.

Spotify

Works with Apple AirPlay
- Apple, AirPlay, iPhone, iPad, HomePod, and Apple TV are trademarks of Apple Inc., registered in the U.S. and other countries.
- Use of the Works with Apple badge means that an accessory has been designed to work specifically with the technology identified in the badge and has been certified by the developer to meet Apple performance standards.
15 AVIS DE LICENCE LIBRE
09 CONNECTION A APPLE AIRPLAY 2
Manufactured under license from Dolby Laboratories. Dolby, Dolby Audio and the double-D symbol are trademarks of Dolby Laboratories Licensing Corporation.
dts.
For DTS patents, see http://patents.dts.com. Manufactured under license from DTS, Inc. (for companies headquartered in the U.S./Japan/ Taiwan) or under license from DTS Licensing Limited (for all other companies). DTS, Digital Surround, and the DTS logo are registered trademarks or trademarks of DTS, Inc. in the United States and other countries. © 2020 DTS, Inc. ALL RIGHTS RESERVED.
HOMI
The terms HDMI and HDMI High-Definition Multimedia Interface, and the HDMI Logo are trademarks or registered trademarks of HDMI Licensing Administrator, Inc. in the United States and other countries.

Spotify

Works with Apple AirPlay
- Apple, AirPlay, iPhone, iPad, HomePod, and Apple TV are trademarks of Apple Inc., registered in the U.S. and other countries.
- Use of the Works with Apple badge means that an accessory has been designed to work specifically with the technology identified in the badge and has been certified by the developer to meet Apple performance standards.
15 AVVISO DI LICENZA OPEN SOURCE
09 CONEXION A APPLE AIRPLAY 2
-Estafunciopodiumoestardisponiblenalgunospaies.
Manufactured under license from Dolby Laboratories. Dolby, Dolby Audio and the double-D symbol are trademarks of Dolby Laboratories Licensing Corporation.
dts.
For DTS patents, see http://patents.dts.com. Manufactured under license from DTS, Inc. (for companies headquartered in the U.S./Japan/ Taiwan) or under license from DTS Licensing Limited (for all other companies). DTS, Digital Surround, and the DTS logo are registered trademarks or trademarks of DTS, Inc. in the United States and other countries. © 2020 DTS, Inc. ALL RIGHTS RESERVED.
HOMI
The terms HDMI and HDMI High-Definition Multimedia Interface, and the HDMI Logo are trademarks or registered trademarks of HDMI Licensing Administrator, Inc. in the United States and other countries.
Spotify
Works with Apple AirPlay
- Apple, AirPlay, iPhone, iPad, HomePod, and Apple TV are trademarks of Apple Inc., registered in the U.S. and other countries.
- Use of the Works with Apple badge means that an accessory has been designed to work specifically with the technology identified in the badge and has been certified by the developer to meet Apple performance standards.
15 AVISO SOBRE LICENCIA DE CÓDIGO ABIERTO
www.samsung.com/uk/aboutsamsung/sustainability/environment/our-commitment/data/
REGLAMENTO (UE) 2019/1782 DE LA COMISION
09 LIGAR AO APPLE AIRPLAY 2
Manufactured under license from Dolby Laboratories. Dolby, Dolby Audio and the double-D symbol are trademarks of Dolby Laboratories Licensing Corporation.
dts.
For DTS patents, see http://patents.dts.com. Manufactured under license from DTS, Inc. (for companies headquartered in the U.S./Japan/ Taiwan) or under license from DTS Licensing Limited (for all other companies). DTS, Digital Surround, and the DTS logo are registered trademarks or trademarks of DTS, Inc. in the United States and other countries. © 2020 DTS, Inc. ALL RIGHTS RESERVED.
HOMI
The terms HDMI and HDMI High-Definition Multimedia Interface, and the HDMI Logo are trademarks or registered trademarks of HDMI Licensing Administrator, Inc. in the United States and other countries.
Spotify
Works with Apple AirPlay
- Apple, AirPlay, iPhone, iPad, HomePod, and Apple TV are trademarks of Apple Inc., registered in the U.S. and other countries.
- Use of the Works with Apple badge means that an accessory has been designed to work specifically with the technology identified in the badge and has been certified by the developer to meet Apple performance standards.
15 AVISO DE LICENÇA DE OPEN SOURCE
www.samsung.com/uk/aboutsamsung/sustainability/environment/our-commitment/data/
REGULAMENTO (UE) 2019/1782 DA COMISSAO
VOORZORGSGMAATREGELEN
Audiofeedback Aan/UiT
Samsung-TV's van 2017 of later
Start () Instellingen () Geluid Geluidsuitvoer [AV] Samsung Soundbar S60A / [AV] Samsung Soundbar S61A (Wi-Fi)
07 EEN EXTERN APPARAAT VERBINDEN
09 VERBINDEN MET APPLE AIRPLAY 2
13 PROBLEEMOPLOSSING
Manufactured under license from Dolby Laboratories. Dolby, Dolby Audio and the double-D symbol are trademarks of Dolby Laboratories Licensing Corporation.
dt.
For DTS patents, see http://patents.dts.com. Manufactured under license from DTS, Inc. (for companies headquartered in the U.S./Japan/ Taiwan) or under license from DTS Licensing Limited (for all other companies). DTS, Digital Surround, and the DTS logo are registered trademarks or trademarks of DTS, Inc. in the United States and other countries. © 2020 DTS, Inc. ALL RIGHTS RESERVED.
HOMI
The terms HDMI and HDMI High-Definition Multimedia Interface, and the HDMI Logo are trademarks or registered trademarks of HDMI Licensing Administrator, Inc. in the United States and other countries.
Spotify
Works with Apple AirPlay
- Apple, AirPlay, iPhone, iPad, HomePod, and Apple TV are trademarks of Apple Inc., registered in the U.S. and other countries.
- Use of the Works with Apple badge means that an accessory has been designed to work specifically with the technology identified in the badge and has been certified by the developer to meet Apple performance standards.
15 KENNISGEVING OPEN SOURCE- LICENTIE
www.samsung.com/uk/aboutsamsung/sustainability/environment/our-commitment/data/
VERORDENING (EU) 2019/1782 VAN DE COMMISSIE
(Standardmodus), "Samsung-TV Remote", "All-TV Remote".
Manufactured under license from Dolby Laboratories. Dolby, Dolby Audio and the double-D symbol are trademarks of Dolby Laboratories Licensing Corporation.
dt.
For DTS patents, see http://patents.dts.com. Manufactured under license from DTS, Inc. (for companies headquartered in the U.S./Japan/ Taiwan) or under license from DTS Licensing Limited (for all other companies). DTS, Digital Surround, and the DTS logo are registered trademarks or trademarks of DTS, Inc. in the United States and other countries. © 2020 DTS, Inc. ALL RIGHTS RESERVED.
HOMI
The terms HDMI and HDMI High-Definition Multimedia Interface, and the HDMI Logo are trademarks or registered trademarks of HDMI Licensing Administrator, Inc. in the United States and other countries.
Spotify
Works with Apple AirPlay
- Apple, AirPlay, iPhone, iPad, HomePod, and Apple TV are trademarks of Apple Inc., registered in the U.S. and other countries.
- Use of the Works with Apple badge means that an accessory has been designed to work specifically with the technology identified in the badge and has been certified by the developer to meet Apple performance standards.
15 BEKANNTMACHUNG ZU OPEN SOURCE LIZENZEN
www.samsung.com/uk/aboutsamsung/sustainability/environment/our-commitment/data/
VERORDNUNG (EU) 2019/1782 DER KOMMISSION
09 ANSLUTA TILL APPLE AIRPLAY 2
Manufactured under license from Dolby Laboratories. Dolby, Dolby Audio and the double-D symbol are trademarks of Dolby Laboratories Licensing Corporation.
dt.
For DTS patents, see http://patents.dts.com. Manufactured under license from DTS, Inc. (for companies headquartered in the U.S./Japan/ Taiwan) or under license from DTS Licensing Limited (for all other companies). DTS, Digital Surround, and the DTS logo are registered trademarks or trademarks of DTS, Inc. in the United States and other countries. © 2020 DTS, Inc. ALL RIGHTS RESERVED.
HOMI
The terms HDMI and HDMI High-Definition Multimedia Interface, and the HDMI Logo are trademarks or registered trademarks of HDMI Licensing Administrator, Inc. in the United States and other countries.
Spotify
Works with Apple AirPlay
- Apple, AirPlay, iPhone, iPad, HomePod, and Apple TV are trademarks of Apple Inc., registered in the U.S. and other countries.
- Use of the Works with Apple badge means that an accessory has been designed to work specifically with the technology identified in the badge and has been certified by the developer to meet Apple performance standards.
15 LICENSMEDDELANDE FÖR OPEN SOURCE
www.samsung.com/uk/aboutsamsung/sustainability/environment/our-commitment/data/
KOMMISSIONENS FÖRORDNING (EU) 2019/1782
Alexa-indikatorstatus
LED-indikatorstatusen på Soundbar endres avhengig av Alexa-statusen, som vist nedenfor.
| Alexa-status LED-indikator på Soundbar |
| Standby | ○○○○○Av |
| Lytter | Cyan på○○●○○→○●●●○→○●●●● |
| Tenker | Blinker cyan X1○○●○○←○●●●○→○●●●● |
| Snakker |
| Tidtakeralarmer og påminnelser | Blinker cyan X2 Blinker blätt X2○○●○○→○○●○○ |
| Varsel | Blinker gult X2○○●○○ |
| Alexa-tjeneste utilgengelig | Blinker rødt X3○○●○○ |
| Nettverk frakoblet | Blinker rødt X3○○●○○ |
| Mik av | Rød på○○●○○ |
Bruke Tap Sound
09 KOBLE TIL APPLE AIRPLAY 2
Manufactured under license from Dolby Laboratories. Dolby, Dolby Audio and the double-D symbol are trademarks of Dolby Laboratories Licensing Corporation.
dts.
For DTS patents, see http://patents.dts.com. Manufactured under license from DTS, Inc. (for companies headquartered in the U.S./Japan/ Taiwan) or under license from DTS Licensing Limited (for all other companies). DTS, Digital Surround, and the DTS logo are registered trademarks or trademarks of DTS, Inc. in the United States and other countries. © 2020 DTS, Inc. ALL RIGHTS RESERVED.
HOMI
The terms HDMI and HDMI High-Definition Multimedia Interface, and the HDMI Logo are trademarks or registered trademarks of HDMI Licensing Administrator, Inc. in the United States and other countries.
Spotify
Works with Apple AirPlay
- Apple, AirPlay, iPhone, iPad, HomePod, and Apple TV are trademarks of Apple Inc., registered in the U.S. and other countries.
- Use of the Works with Apple badge means that an accessory has been designed to work specifically with the technology identified in the badge and has been certified by the developer to meet Apple performance standards.
15 LISENSMERKNADER OM ÅPEN KILDEKODE
For Å sende henvendelser og spørsmål angående Åpne kilder,kontakt Samsung Open Source (http://opensource.samsung.com)
16 VIKTIG MERKNAD OM SERVICE
www.samsung.com/uk/aboutsamsung/sustainability/environment/our-commitment/data/
KOMMISJONSFORORDNING (EU) 2019/1782
09 YHTEYDEN MUODOSTAMINEN APPLE AIRPLAY 2:EEN
Manufactured under license from Dolby Laboratories. Dolby, Dolby Audio and the double-D symbol are trademarks of Dolby Laboratories Licensing Corporation.
dts.
For DTS patents, see http://patents.dts.com. Manufactured under license from DTS, Inc. (for companies headquartered in the U.S./Japan/ Taiwan) or under license from DTS Licensing Limited (for all other companies). DTS, Digital Surround, and the DTS logo are registered trademarks or trademarks of DTS, Inc. in the United States and other countries. © 2020 DTS, Inc. ALL RIGHTS RESERVED.
HOMI
The terms HDMI and HDMI High-Definition Multimedia Interface, and the HDMI Logo are trademarks or registered trademarks of HDMI Licensing Administrator, Inc. in the United States and other countries.
Spotify
Works with Apple AirPlay
- Apple, AirPlay, iPhone, iPad, HomePod, and Apple TV are trademarks of Apple Inc., registered in the U.S. and other countries.
- Use of the Works with Apple badge means that an accessory has been designed to work specifically with the technology identified in the badge and has been certified by the developer to meet Apple performance standards.
15 AVOIMEN LÄHDEKIELEN LISENSSI-ILMOITUS
www.samsung.com/uk/aboutsamsung/sustainability/environment/our-commitment/data/
KOMISSION ASETUS (EU) 2019/1782
Alexa-indikatorstatus
Manufactured under license from Dolby Laboratories. Dolby, Dolby Audio and the double-D symbol are trademarks of Dolby Laboratories Licensing Corporation.
dt.
For DTS patents, see http://patents.dts.com. Manufactured under license from DTS, Inc. (for companies headquartered in the U.S./Japan/ Taiwan) or under license from DTS Licensing Limited (for all other companies). DTS, Digital Surround, and the DTS logo are registered trademarks or trademarks of DTS, Inc. in the United States and other countries. © 2020 DTS, Inc. ALL RIGHTS RESERVED.
HOMI
The terms HDMI and HDMI High-Definition Multimedia Interface, and the HDMI Logo are trademarks or registered trademarks of HDMI Licensing Administrator, Inc. in the United States and other countries.
Spotify
- Brug din Telefon, tablet aller computer som fjernbetjening til Spotify. Gå til Spotify.com/ connect for at &, hvordan du gør
- Spotify-softwareer underlagt tredjepartslicenser. Få mere at vide her: https://www.spotify.com/connect/third-party-licenses.

Works with Apple AirPlay
- Apple, AirPlay, iPhone, iPad, HomePod, and Apple TV are trademarks of Apple Inc., registered in the U.S. and other countries.
- Use of the Works with Apple badge means that an accessory has been designed to work specifically with the technology identified in the badge and has been certified by the developer to meet Apple performance standards.
15 BEMAERKING VEDR. OPEN SOURCE-LICENS
For at sende forsporgsler og anmodninger om sporgsmål vedrørende Åbne kilder, skal du kontakte Samsung Open Source (http://opensource.samsung.com)
16 VIGTIG NOTE OM SERVICE
www.samsung.com/uk/aboutsamsung/sustainability/environment/our-commitment/data/
KOMMISSIONENS FORORDNING (EU) 2019/1782
09 CONNECTAREA LA APPLE AIRPLAY 2
Manufactured under license from Dolby Laboratories. Dolby, Dolby Audio and the double-D symbol are trademarks of Dolby Laboratories Licensing Corporation.
dts.
For DTS patents, see http://patents.dts.com. Manufactured under license from DTS, Inc. (for companies headquartered in the U.S./Japan/ Taiwan) or under license from DTS Licensing Limited (for all other companies). DTS, Digital Surround, and the DTS logo are registered trademarks or trademarks of DTS, Inc. in the United States and other countries. © 2020 DTS, Inc. ALL RIGHTS RESERVED.
HOMI
The terms HDMI and HDMI High-Definition Multimedia Interface, and the HDMI Logo are trademarks or registered trademarks of HDMI Licensing Administrator, Inc. in the United States and other countries.

Works with Apple AirPlay
- Apple, AirPlay, iPhone, iPad, HomePod, and Apple TV are trademarks of Apple Inc., registered in the U.S. and other countries.
- Use of the Works with Apple badge means that an accessory has been designed to work specifically with the technology identified in the badge and has been certified by the developer to meet Apple performance standards.
15 NOTIFICARE DE LICENTÀ OPEN SOURCE
Pentru a adresa intrebari si solicitari privind sursele beschise,contactaitechipa Samsung Open Source (http://opensource.samsung.com)
16 NOTÄ IMPORTANT DESPRE SERVICE
www.samsung.com/uk/aboutsamsung/sustainability/environment/our-commitment/data/
REGULAMENTUL (UE) 2019/1782 AL COMISIEI
Cerinte in materie de projetare ecologica aplicabile surselor de alimentare externe : www.samsung.com/global/ecodesign_component
10 MoHTiPaHe Ha CTeHHaTa CToiKa 34
IpeDynpexKdeneHnBbB Bp3Ka C MoHTaKa 34
ABTomatnHaakTyauIn3aun 37
AkyaIinauaIype3 USB 37
Hylipane 38
13 OTeTpaHЯBaHe Ha Hen3PpABHOCtN 39
14 IinzeH3 41
15 BeIeKka 3a IuIeH3a 3a OTBOpEn KoI 41
16 BaKn 6eJekn 3a 06cnykBaHeTo 42
17 Cpeunfokaun npbKOBOCTBO 43
CpeunphiKaua 43
01 ПОНБЕРKA HA KOMПОHEHTITE
Дьржач-BИNTСКОБаЗТЕнHACTOДKA BИNT
3aДоьнгелнаифорmaцяоTHOCHO3axpaHbaHeToиNotpe6JIeHNeTOHa eIeKTPoEnernHa npaBeTe cnpaBka c etNkeTa, noCTaBeH Ha npodykta. (EtKeT:doHa ctpaHa Ha ochOBHOTO yctpoiCTBO Ha Soundbar)
- 3a da 3akynte dobnHnTeHN KOMnoHEn nnn He3aBnKHeHN Ka6eN, CBpKeTe ce c LcHTbp 3a o6cnykBaHe Ha Samsung nn C cIeHTbp 3a o6cnykBaHe Ha kIneHTn Ha Samsung.
3a noBueHnΦopMaun OTHOCHO CTeHHata CToKb BxKTe CtpaHnua 34.
-Дизайнг,спесификадит e ekpaНьТ ha пложенят поджат ha npomЯн 6e3npedn3BecTne.
BnIbT Ha akcecoapnte moKe da ce pa3nUaBa OT npedctaBeHna HnIOCTpaunTe no-rope.
Посраваяне на 6aTeРиTe пpeДиИЗПОЛЗВаHe на диСТанцINOHOTOупав lien(e (2 6aTePи Pa3Мер AA)
ПльзHETe 3aДнЯ KaNAK NO NOCOKaHa cTpeLKaTa,doKAto He ro CBaJIte n3ZaIIO. NocTaBete 26aTePn AA (1,5 V), KaTO rN opNEHTnpate TaKa, YeNoJIpaRITeTbT mI da e npabINeH. ПльзHETe 3aDnna KaNAK OTHOBO Ha MICTOTO My.
02ОпиcaнеHAПОДуКТА
Topen paheI ha Soundbar
| 1 | Сbvетоно徳
Индikatop | Сbvетоноягий Иndikatop мига, Сbvети плпомени цьета си в заразсимост OT
над_STУДРЕЖIM пл сьстаяне на Soundbar. Сbvетьт на Сbvетоноядь ржим, Както e описано по-дoly. |
| W
Бял Сbvетоноя | W
Бял Сbvетоноя | M
Многоцовен Сbvетоноя | W
Бял Сbvетоноя | W
Бял Сbvетоноя |
| • Многоцовен Сbvетоноя се помени в Баял, Зелен, Уерveho и Синьо в
Зависмост OT ржима пл сьстаянeю.
•Натишиete 6утона (Мульtnфункциноален) 6утон, за ды В kinluочite
Soundbar.
•Натишиete 6утона (Мульtnфункциноален), за ды помени ржима.При Всяка
помяна на ржима Сbvетонояы CBETBAВ 6уло и сед тoba уragва. |
| 2 | Мулифункциноален
6утон | Сbvетоноя徳
Индikatop | Бяло Вк. -> Изд.Бял
● O O O O | Вьл. -> Изд.Бял
● O O O | → Изд.
● O O O | |
| "Digital Audio In" Пл
"TV ARC" | "Wi-Fi" | "Bluetooth" |
| 3 | Бутон за сида на
Звуka | Натишиete 6утона - + (Сида на 3вуka), за ды Perugлирате сида на 3вуka. |
| Бутон за
ВКЛЮваце/
ИЗКЛЮваце
На
МИКРОФОHA | Наточeteconutа® (Мikpoфон Вкл./ИЗкл.), за за ВКЛЮчITE Или ИЗКЛЮчITE
Mikpoфona. |
| СBSTODIOДЕN
ИндIKATOP | СBSTEN YERBEHÔN
O O O O O | O O O O O |
| „Mic Off“ | „Mic On“ |
Korato BkIIOHTe AC ka6ena, 6yToHbT 3a 3axpaHbaHeto 3ape60t n cIe 4do 6cekyHn.
Korato BkIIOHTe TOBa yCTpoiCTBO, Ie MInHaT 4 do 5 cekyHn, npEiTo n ana n3daJe 3Byk.
- Ako ce chyBa 3Byk kaKTo OT TeLEBn3Opa, Taka n OT Soundbar, OTndTe Ha MeHIO HAcTpoKn, 3a dapeRyInpate 3Byka Ha TeLEBn3Opa n Da IIOMeHIne BnCOKOrOBopntela Ha TeLEBn3Opa C BbHs. BnCOK..
- Moxe Te Da BkJIIOUBAte N I3KJIIOUBAte MmKpOfoHnraTc C NOMoUta Ha npIIOXeHneTo SmartThings.3a Da HayuTe NOBce 3a nI3NoJ3BaHeTo Ha npIIOXeHneTo SmartThings, BIXTe MeToD 2. Cbbp3BaHe npE3 Wi-Fi (6e3xNvHa Mpexka)"
BkIIOUbaHe/N3KJIIOUbaHe
BknoyBa n3KlouyBa Soundbar.
-ФункцЯ Auto Power Down
YCTPOINCTBOTO CE N3KNIUOVA ABOTMAUHO B CJIeHNITcNTyaCIN:
BpeKIMn „Digital Audio In"IIN „TV ARC" / „Wi-Fi" / „Bluetooth", ako B npOdbJIkeHne Ha 18 MmHytn HЯMa ayДno CnHaJ.
2
(N3TOUHNK)
HaTnchete, 3a da n36epete n3TOUHk, CBbp3aH KbM Soundbar.
BkIIOueH/IM3KIOUeH Ha Aydno 06p.Bpb3Ka
Mokte da BkHouHTe nn Da n3KIOHTe ayINO 06p. HaTncTe n 3aDpbXTe 6yToHa TOCHNK) Ha DCtAnuOHnTo ynpabLeHne 3a 5 cekyHn,doKaTO yCTpoIcTBOTO Soundbar e N3KIOUeHo (B peKIM Ha rOTOBHOCT).
3
(3arnywaBaHe)
HaTnCHete 6yToHa (3arLyuBaHe),3a Da 3aTnyuHInTe 3Byka.HatncHete ro OTHOB,3a Da OTMeHInTe 3aRnyuBaHaHTo.
| 4 | SOUND MODE
С натуckанeto на 6утона моче за изберete яеланя удю реким.При всяк помая на рекима
MHOROцьETНЯТСBEТДОДпreamигвВ6Ял. |
| Сbvетонодан
Индikatop | Мira в 6яло X1
O O O O |
| "Standard" → "Music" → "Adaptive Sound" |
| · Standard
Изbewда оригиналеня зук.
· Music
Осигура в no-etectveн, Изьлваши,pomeшениTo 3byk 3a МузICALNo sbdьржанe.
· Adaptive Sound
Анлзира сьдьржанetoВ realno Вразeme и abTOMATUHNO п徝оставя ONTIMALHO 3ByKOBO NOJIe
В зависмоCT OT xapakterpICTNKITE Na sbdьржанeto. |
| 5 | Bluetooth PAIR
Вълочete Soundbar в реким за сдвогане позBluetooth.
Korato натуснete 6утона, Сbvетоюнят диспilece пожимя, Каду e роказано по-doly.
· Дokато се ИЗвршва сдвоганeto, MногоцьETНЯТ СbvETODIOd ce пожимя последоватлho в
Червeto→3eleno→Синьo. |
| Сbvетонодан
Индikatop | Мira в zuианоу X3
O O O O
Сьвоганe
Вpbзкатa e ocьшес玮�н |
| "Ready to connect via Bluetooth." |
| 6 | II (ВьзponЗвждан/Пayзa)
Можete сьшддь вьзponЗвждote ялддяпocstавя музika на пayзa с натуckанeto на 6утона. |
| 7 | Harope/Hadoly/Hanяво/Hadясно
Натснete Harope/Hadoly/Hanяво/Hadясно на 6утона, за язберete ялп havingpointe phyнци.
· Пreckaчанe на музika
Натснete 6утона Надясно, за язберete сеadingашия музICALen phaill.Натснete 6утона
Hanяво, за язберete с п徴хordnia музICALen phaill. |


(KoHTpOHa 3Byka)
C HatackaHTo Ha 6yToHa moKe da n36epTe keJaan yauNo peKm. KeJaanr T eJeMeHT moKe da ce peruInpa c nOoTa ha 6yToHnTe Harope/HaOny. Ppi BcKa npomHa Ha peKmMa MHOrOuBETHnrt CBtoND, ppeMnBa B 6raNo.
MeToI. Cbbp3BaHe c HDMI

BHIMAHNE
KoratoHDMI ka6eIbT nOHTuHnT Ka6eI ca CBp3aHn, nbpBO ce noJyaba HDMICnHaJIbT.
- 3a Да свьржete c HDMI ka6ela TeleBn3opa n Soundbar, yBepete ce, ye cte cBbP3aII n3BOIDTE,об03haueHcARC.ВпрOTиВeн счuaй TeleBn3OpBT можда He He n3ДaBa 3Byk.
- Пренистелов сабел e High-Speed HDMI Cable with Ethernet.
Cbbp3BaHe Ha TeIeBn3Op, KoITo IoIbprka HDMI ARC (kaHaI 3a o6paTeH 3ByK)
1.ПиизклочenvSoundbarителевизорсвьржeteHDMIka6eNa,кakToe noka3aHoHaФИгypata.
2. BkIIOUeTe Soundbar n TeJIeBn3opa.
3. TeIeBn3NoHHnT 3ByK ce n3BeJka ot Soundbar.
- AKO 3ByKbT OT TeNeBn30pa He ce Bb3npoN3Bexkda, HaTNCheTe 6yToHa
O (MynnФуннкионанe)В rohpata qact Ha Soundbar nnn 6ytoHa (N3TouHnK) HaДиctaHNoHHOTO ynpabLeHne, 3a da n36epete pexim „Digital Audio In".
Korato 3Bykbt He ce n3Bexka, npOBepe OTHOBO HDMI ka6enHaTa Bpb3ka.
- IV3ПОЛЗВайтЕ 6уТонITE 3a сила Ha 3Byka Ha дистанционноу упраВление Ha Teleевизра, 3a Дд поменITE силata Ha 3Byka Ha Soundbar.
BENEXKNI
Korato cBbpxe Te HDMI ka6eI TeIeBn3Op, noIbpxaHDMI ARC (kaHaI 3a o6paTeH 3Byk), KbM Soundbar, moxete da npedabate uipobu Bndeo n aydno daHHn, 6e3 n3no3BaHe Ha OTdelen OINTUeH Ka6eI.
- Прелорьаме по Вьзможноctда ИЗползВate 6e3жилен HDMI ka6e.Ако HDMI ka6eЛьт ec knila,ИЗползВаite Ka6e cДиametbp по 14 mm.
- Ta3n ΦyHKcIa He e Ha pa3noIooKeHne, aKo HDMI ka6eIbT He noIbPka ARC.
Korato 3Bykbt Ha npedabaheto e kOdnpaB Bolby Digital n,ΦopMaT 3a znΦpOB ayDno n3XoD"Ha BaAunr TeLeBn3Op e 3aAadHn Ha PCM, npenopbUBaMe da npomeHnte HacTroBkata Ha Dolby Digital. Korato NaCTpoiKaTa Ha TeLeBn3Opa ce npomeHn, KaueCTBOTO Ha 3Byka ige ce noBUnn. (TeLeBn3IOHHOTo MeHIO MoKe Da n3NoJ3Ba pa3nUHn dUmN 3a Dolby Digital n PCM B 3aBncmocT ot npOn3BOIDnteHa TeLeBn3Opa.)
Metod 2. Cbbp3BaHe c nOmoUta Ha onTnueH ka6eI
KoHTpOJIeH cIINcBk 3a npOBepKa npEi Cbbp3BaHe
KoratoHDMI ka6eIbT nOtnuHnT Ka6eI ca Cbpb3aHn, nbpBO ce noJyaba HDMI cnHaJIbT.
Korato n3no3BaTe onTueH Ka6eN KneMITE mAt noKpHTe, yBepTe ce, ye cTe npemaxhaHn pOKpTTa.

- Пи ИЗклочен телевизор n Soundbar CBbpxkete npota Ha Soundbar DIGITAL AUDIO IN (OPTICAL) n npota OPTICAL Ha telveBn3opa c onTnHnKa6eI (He e JocTaBeH), KaKTo e Noka3aHo HaФИгypata.
- BkHouTe Soundbar n TeJeBn3opa.
- Hatnche 6ytoHa (Myntnphiynknohaen) 6ytoh B rohpata ctpaHa Ha Soundbar nn 6ytoHa (N30uHnK) Ha nctaHIOHHOTO ynpabIeHne, Cnei Koeto N36epete pexim „Digital Audio In". Cnei TOBa ce Bb3npoINBExJa cbo6ueHneTo „Digital Audio In".
- 3BykblOT TeIeBn3Opa ce Bb3npOn3BeJka ot Soundbar.
06 ИЗПОЛЗВАЕ HA БЕЗКИЧHA BPb3KA KbM TEЛEBИЗOPA
MeToI 1. Cbbp3BaHe npe3 Bluetooth
Korato TeleBn3op Samsung e cBbP3an npe3 Bluetooth, moKeTe da yyeTe cTepeo 3Byka, 6e3 npi TOBa Da ce HxJdaete ot Ka6en.
- MoXe da ce cBbpxke camo no eINH TeIeBn3Op Samsung.
- Moxe da ce cBbpxe TeJeBn3Op Ha Samsung, koTo noDbpxa Bluetooth.
PpOBepTe CneuΦnKaunTe Ha Baunr TeJeBn3Op.
PbPBOHaayalHo CBbp3BaHe
1.
2.Изберете рекиьmBluetoothHaTeleBn3opaSamsung.
(Hanpimep Hauano () Hactpoien () 3Byk 3BykoB n3xoJ CnncbKa Ha Bluetooth Bvocokorobopnten [AV] Samsung Soundbar S60A / [AV] Samsung Soundbar S61A (Bluetooth))
- Изберетe „[AV] Samsung Soundbar S60A / [AV] Samsung Soundbar S61A" OT списька на ekрана на Телевизора.
HaJIyuH e noka3aH c,Heo6xOaMocT OT CDBOBAHe" nn ,CBOeH" Ha CNcBka C Bluetooth yctpoiCTBa. 3a Cbbp3BaHe Ha TeleBn3Op Samsung cbc Soundbar n36epete Cbo6uHHeTo n CneI TOBa yCTaHOBeTe Bpb3ka.
-
A cera mojkeTe nayeTe 3Byka Ha TeleBn3opa Samsung npe3 Soundbar.
-
Ako Иma PerinctbP Ha CBbp3BaHeTo MeKdy Soundbar n TeleBn3op Samsung, Soundbar abTomatuHc Ce CBbp3Ba Upe3 npomHa Ha peXmAm cN Ha „Bluetooth".
Ako yctpoiCTBOTO He ycnee da ce Cbbpke
- Ако Имате сьшесъваш Soundbar (нарример [AV] Samsung Soundbar S60A / [AV] Samsung Soundbar S61A) в списька с Високоговориту на телевизopa Samsung, Истриптг.
CneiToBaNoBTopeTe CbNKn O1do3.
PbboHaayalHo Cbbp3BaHe
1.Инсталар Te npyche Te npinoxeHneTo SmartThings npe3 BaWeTo Mo6nH0 yCTpoIcTBO (cmapTfoH nII Ta6JeT).
2. CneBaaTe nHCTpyKunTe Ha ekpaHa Ha npIIOxKeHnETo, 3a da do6aBnte Soundbar.
Bb3MOxHcHa HnKOn yCTpOiCTBa Da He Ce NOBn ABTomuHnT n3CKaHa, np03opeu (Btopata ekpaHHa CHmka No-dony).
Ako n3ckaauaunr np03opeu He ce noBn, HATNCheTe + Haekpan Home. Soundbar e do6aben KbM npnojKeHneTo.

09 CBbP3BAHE KbM AIRPLAY 2 HA APPLE
- Ta3n ΦyHKZnRA MoKe Da He e Ha pa3nOJoxKeHne B HЯKON IbprKaBn.
Cbbp3BaHe n n3POn3BaHe c npOdyKT Ha Apple
- C AirPlay 2 mökete на ураловate aydnocntemata в заший iPhone, iPad, HomePodиApple TV.
To3n Samsung Soundbar noDlbpka AirPlay 2 n nnckBa Bercna Ha iOS 11.4 nIi no-HoBa.
3ABEJIEXKKA
- Потвьрдete, Ye Soundbar e CBьрзан Кьм Wi-Fi Мпөгka. (3a снравka вижт e „MeToД 2. CBьрзВаHe npe3 Wi-Fi (6e3ЖИЧа Мпөгka)")
10 MOHTUNPAHE HACTEHHATACTOKA
IpeynpexKdHnBbB Bpb3Ka C MOHTaKa
- MoHTnpaIte cAmo Ha BepTnKaJHa CTeHa.
He MoHTnpaIte Ha MЯCTO C BnCOKa TempepaTpa NII IN BlaXHOCt.
- PpOBepTe DaJIi CteHaTa e DoCTaTbUHO 3dpaBa, 3a Da n3DbpxK TereITo Ha npOdykTa. Ako He e, noDCnIeTe rnnn n36peTe dpyro MACTO 3a MOHTaX.
- Kyneteи n3noJ3BaIte 3akpenBaIu BnHTObe nnДIO6eJI, NOxOJaIz 3a BaIu TIn CTeHa (MaIJIka, MeTJI, DbPBO I.T.H.). Ako e Bb3MOxH0, 3akpenTe OOnOpHnte BnHTObe KbM rpeDN B CTEHa.
3akyneTe BnHTObe 3a CteHeH MOHTax B CbOTBcTCTBnC TnPa N De6eInHaTa Ha CTeHaTa,Ha KOrTO XeJaTe Da MOHTnpaTe Soundbar.
Диаметыр: M5
-Дьлжина:прелорьва ceДьлжина OT 35mm nll no-roJMa.
Cbpxte Ka6eHnTe OT yCTPOINCTBOTO KbM BbHnHn yCTPOINCTBa, npEi Da MOHTnpaTe Soundbar Ha cTeHa.
- Ппеди да монтурае устюството, ce yверete, che to e n3клочецно и сеньт Mye n3ba徳ен OT eilektpruecknя kohtakr. B npOTINBEH clyuaн мося дa ce noJyu n eilektprueckn ydap.
KoMNoHeTn 3a CTeHeH MoHTaJx

Bodau3aCTeHnA CToKa

X2

X2
(M4 x L10)
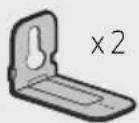
Дьржач-BИNTВИNT
Cko6a 3a CTehHa CToiKa
- NocTaBete Boaucha CTeHnA cToiKa Bbpxy NOBbpxHOCTTHa cTeHaTa.
Boday3a cteHna ctoiKa Tp8Ba da e paBeH.
- Ako TeLeBn3OpbT Bn e MOHTnpaH KbM CTehata, MoHTnpaIe Soundbar haMaIko Ha 5 cm NOd TeLeBn3opa.
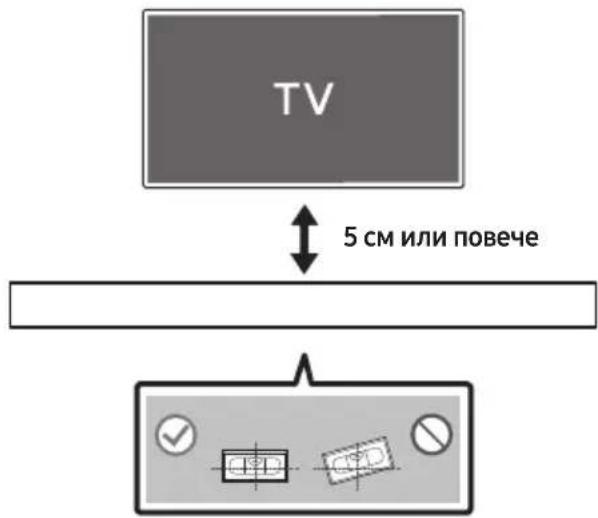
2.ПодравнeteLeHTpaHataLHHaHaBodau 3aCTeHnA CToIkaCcHTbpaHaBaIyra TeLeBn3Op(aKO MOHTnPateSoundbarnoTeLeBn3Opa)INcIeTobaФNKcPaNTe BODaY3aCTeHnA CToIkaHaCTeHATAc NOMOuTaHaTNKCo.
- Ako He MOHTnpaTe NOI TeJIeBN3Op, NOCTaBete LcHtpaHa IHHN B UcHTbpa Ha 30HaTa 3a MOHTnpaHe.
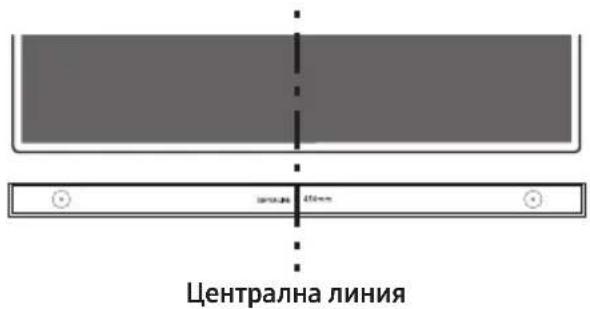
3.ИЗползваiteхимикал,зада OTбелжптЕпОЗицпITEHaOTBOPHTe,NCBaIeTeBODaU 3aCTeHnA CToIKA.
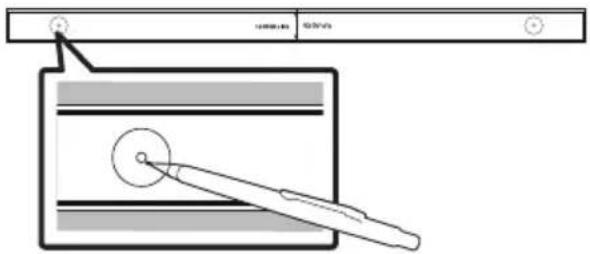
-
pa3Mep, npo6nIte OTBOP B cTeHaTa Bbpxy BCa MapKnupOBka.
-
Ako MapknpoBknte He CbOTBeTCTBaT Ha
- NO3uNTe Ha uNΦTOBete, NOCTaBete
- NOxOJaU N OOpN B OTBOPTe, PpeN da
- NOCTaBTE NOIbPkaUte BINTOBe. Ako
- IN3NOJ3BaTe ONOpN, ce yBepTe, ye
- OTBOPTe, KOnTO npo6NuBate, ca
- DOCTaTbUHO rOJIeMn 3a ONOpTe, KOnTO
-
NOJ3BaTe.
-
BkapaTe BnHT (He e doctabeH) npe3 BCEKn DbpKau-BnHT n CneI TOBa 3aBnHTe TcEKN BnHT 3dpaBO B OTbopa 3a ONopeH BnHT.

- MoNTpaIte 2 Cko6a 3a cTeHHa cToiKa B npabuHata opneHTaun OTOJHaTa cTpaHa Ha Soundbar, kato n3noJIbATE 2 BuHTa.
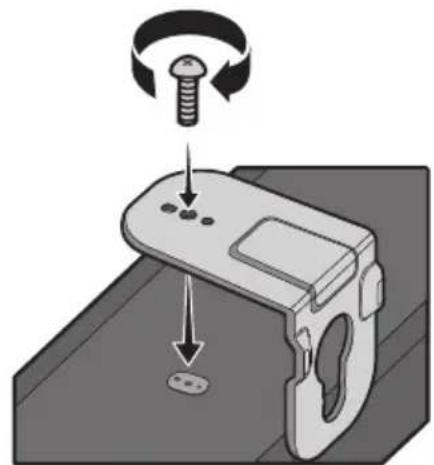
- Пи crлбяванeto ce ybepeTe, Ye 3aKaayakata Ha Cko6n 3a CTeHnA cToiKa e pa3noJoxKeHa 3aД 3aJHata Yact Ha Soundbar.
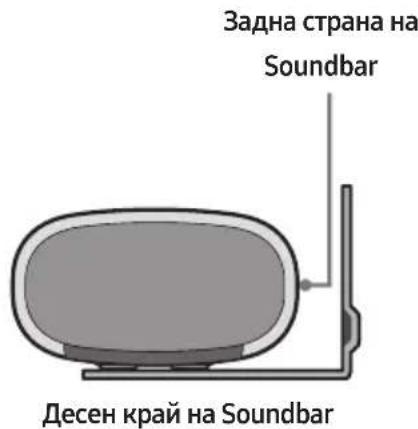
- MoHTnpaIe Soundbar c npKpeneHnTe CkO6n 3a CTeHHa CToHka, KaTO 3aKauHnTe CkO6n 3a CTeHHa CToHka Ha DbpxKaBnHTOBete Ha CTeHaT.

ABTOMaTnUHa aKtyaIIN3aIIn
Korato npe3 Soundbar ce yctaHOBn Bpb3ka c INHTepHeT,coΦTyepHnte akTuJIIn3aIINCe I3BbPbWBaT aBTOMaTHUHO,doPI KOrato Soundbar e N3KJIIOUeH.
- 3a Да силльва Функцята Auto Update (АВТOMATИЧА Akтуализаши), Soundbar Трябва да с установера Врьзka с Иntерпет. Wi-Fi Врьзкata сс Soundbar щe бде пекьсанда рпи ИЗКЛЮЧВане на зхранваши Кабел Ha Soundbar пи пекьсваны Ha 3axpaнваны. Ако зхранваны 6дe пекьсанда, KORATO CE ВьзCTанови пл.KORATO BKЛЮЧITE OTHOBO 3axpaнваши Кабел, BKЛЮЧETe Soundbar и сеД_TOВа установete OTHOBO Врьзka с Иntерпет.
Aктуализаця чрз USB
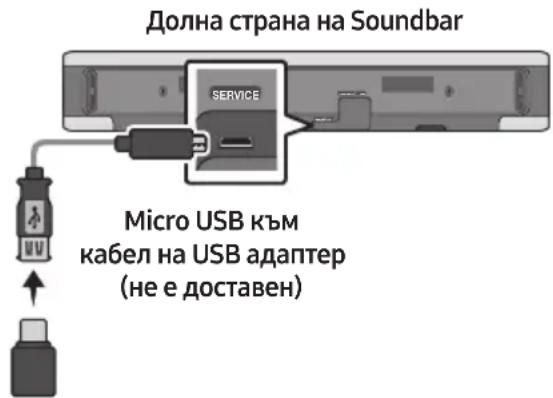
Bb3MOxHo e B 6bDee Samsung da npednar aKtuaIaCn 3a foBpMyepa Ha cnCTemata Soundbar.
Korato Ima haIinuHa aKtuaIn3aun, MoKeTe da aKtuaIn3npate Soundbar ue3 Cbbp3BaHe Ha USB fIaIi nAmETTa, CbIbprKaUa aKtuaIn3npaHnA _B pMyep, KbM nopTa SERVICE Ha Soundbar.
- OTnIeTe Ha (www.samsung.com) IOTbpcTe HMeTo Ha MoJeLa OTOpIaHa MeHIOTo 3a NODpBxKKa Ha KJIeHTN.
3a noBue He HOpMaua OTHOCHOaTyaIIN3aUInTe BIXTe PbKOBoCTBOTO 3aHaIgpaXdaHe.
2.ИЗТЕТЕфайla Зандграхданe(USB TIN).
3. Pa3apxNBpaIte faIna, 3a da cb3daTe npIka c mEto Ha faIna.
4. 3ana3eTe c63daJeHaTa napka Ha USB HocnteI N CJIeT TOBa rO CBbPKeTe KbM Soundbar.
5. BkIouhe Soundbar. Toraba npOdyKtBt ce akTyaIIn3upa B paMKITE Ha 3 MInHyTu.
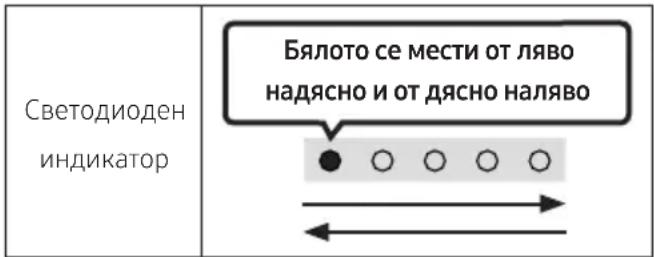
- ПО Врeme Ha akTyaIIn3aIcIra He ro n3KJIIOUvBaIte N He BaJeTe USB HOCITeJI.
- Ako JkblTnT CBETOIOE BKJIUOeH, CneI KaTo aKtuaIn3aunraHa Ha COfTyepa 3aBbpSNI, TOBa O3NaHauBa, Ye B MOMeHTa Teue DOnbInHeJHa aKtuaIn3aunr. Korato ToBa Ce cLyuH, He N3KJIuOyBaIte 3axpaHbAHeto Hne npemaxBaIte USB.
- Ako akTuJIIn3aIuIaTHe npOdbJIxN, CBbpxKeTe 3axpaHbUaIg Ka6eJHa Soundbar OTHOB.
Korato e 6nla nHctaInpaHa ha-NOBaTaBepcna, He ce n3BbPwBa HnKaKbaakTyan3aun.
B 3aBnCmOCT OT TnPa USB nMa BepoTHOCT Da He ce NODbPkaT aKtuaIImaIuN.
Hyalpae
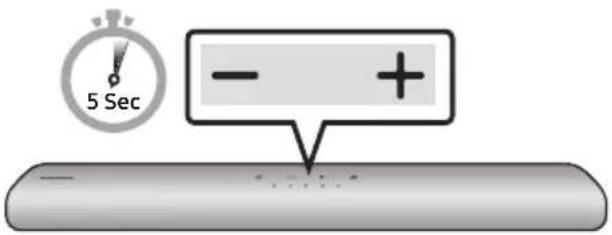
При Вкюун Soundbar haTиСHTe
eДнOBрЕмEH6byToHnTe-+(CnlaHa 3Byka)
Ha yCTpoIcTBOTO 3a noHe 5 ceKuHdN.
CBeTOДIOДИЯТ ДИСПЛeN ce npOMeH, KaKTo e
POKa3aHO OTdoNy, n CLEd TOBa Soundbar ce
Hylnpa.

BHIMAHHE
- BcunHacTpoKn Ha Soundbar ca HynpaH. YBepTe ce, ye cTe n3BbPwnI TOBa camo aKO ce HanaRa HynpaHe.
13 OTCTPAHЯBAHE HA HEN3ПРABHOCTN
Ppei Da nOtBpcnte nomou, npoBepTe cneHOTo.
Soundbar He ce BkJIIOUBA.
→Пювереталл зхранвашият ka6eн ha Soundbar e noctabeh npabnilho B KOHTaKta.
Soundbar pa6oTu HnpeDcKa3yeMo.
→ИЗваде Te 3axpaHbaция Ka6e n rO NOCTaBeTe OTHOBO.
→ИЗваде Te 3axpaHbauЯ Ka6eI OT BbHshOTO yCTpoiCTBO I ONNTaIte OTHOBO.
→Ako hama cnHnAn,Soundbar aBtOMaTnUHO ce n3KlIOuBa cIeI,OppeJeIeN nepNoIOT BpeMe.BkIOUte ro ot 6yToHa 3a BKIOUbaHe/u3KIOUbaHe.(BxTe cTpaHnua 11.)
B cnyaaye dntaHnHOHOTy npablenHe he pa60Tu.
→HacoueteДиctaHOnHTo ynpabLeHneДиpeKTHO KbM Soundbar.
→ПоДмeнeTe 6aTePnIteс HOBN.
Soundbar He Bb3npo3Bekda HnKaKbB 3Byk.
→3BykBT oT Soundbar e npekaleHo cna6 nnn 3aŋyuweH. PerynpaTe cnlaTa Ha 3Byka.
→Korato e cBbP3aHO BbHnHO yCTpOInCTBO (dekoep 3a TeIeBn3n, Bluetooth yCTpoINCTBO, MO6nHNO yCTPOINCTBO nT.H.), peYnnpaTe CnIaTa Ha 3ByKa Ha BbHnHOTo yCTpOInCTBO.
→3a n3x0JaI 3ByK OT TeIeBn3opa n36epeTe Soundbar. (TeIeBn3op Samsung: Hauano () HacTpoiKn () 3ByK 3ByKOB n3xoJ I36epeTe Soundbar)
→Cbþp3BaHeTo Ha Ka6eNa KbM Soundbar He 6nBa Da e Xna6aBO. IVBaJeTe Ka6eNa n rO CBþxKeTe OTHOBO.
→I3BaTe 3axpaHbAunKa6eI n3uJIo, CBpKHe OTHOBIO IN BkJIHOUcTe 3axpaHbAHeTo.
→CTapTnpaIte npOdyKta n OnITaIte oTHoBO. (BnJTe cTpaHnua 38.)
B cnyuaye TeleBn3OpbT He e Cbbp3aH npe3 HDMI (ARC).
→ПювереTe Дали HDMI ka6eЛьт e npавилно CBbp3ан C ARC kIemata. (ВижTe CTpaHnua 17)
→Bb3MOxHo e da He MoXe Da 6bDe yCTaHOBeHa Bp3Ka 3apaDi CBbp3aHOTo BBHsHO yCTpoiCTBO (deKOep 3a TeLEBn3n, TeLEBn3IOHHa INrPoBa KOH3OJa n T.H.). CbpxKeTe DnpeKTHo KbM Soundbar.
→HDMI-CEC MoxeиДа He ce aKTHBnpa Ha TeLEBn3opa. BkIIOye CEC ot MeHIOTo Ha TeLEBn3opa. (TeLEBn3op Samsung:
Hauano (n) → Hactpoyn ( ) O6u n → Dncpeep Ha BbHsHn yctpoNCTBa → Anynet+ (HDMI-CEC) BKJ.)
HЯma 3BykПри ВКЛIOUBAHe Na TeJIeBn3OpaВ peXIM HDMI (ARC).
→BaWeTo yCTPOIcTBO He MoXe Da
Bb3PpON3BeDe BxOJHnA CnIHaJI.
IpOMeHete ayDnO n3XoJa Ha TeJeBn3Opa
Ha PCM nIi Dolby Digital. (3a TeJeBn3Op
Samsung: Hauano (m) HacTpoiKn
(→ 3ByK → EkCpeptHn HacTpoiKn →
ΦopMaT 3a cnΦpOB ayDnO n3XoJ)
Soundbar He ocbuecTBBA Bpb3ka ue3 Bluetooth.
→Korato Ce Cbbp3Ba HOBO yctpoiCTBO, 3a yctaHOBRAHe Ha Bpb3ka BKIIOUcTe CdboBAHe npe3 Bluetooth. (HaTnCHete 6yToHa PAIR HaДиCTaHcIOHHTO ynpabVeHne nII Na HATnCHete 6yToHa
O(MnKpofoh BkN./N3Kn.)Ha yCTpOiCTBOTO nOHe 3a 5ceKuHdN.)
→Ako Soundbar e cBbp3aH KbM npyro yCTPOIcTBO, NpBBO npeKbCHete Bp3kata Ha TOBa yCTPOIcTBO, 3a Da CMeHnTe yCTPOIcTBOTO.
→CbpxkTe ro OTHOB, kaTo 3a da yCTaHOBnTE Bpb3ka Tp86Ba Da npemaxHeTe CnncbKa C BnCOKOrOBoPnteN, Cbbp3aHn npe3 Bluetooth. (TeneBn3op Samsung: Hauao (n→Hacptoyn ( ) 3Byk → 3BykoB n3xOД → CnncbK Ha Bluetooth BnCOKOrOBoPnteN)
→ИЗваде Te Μενсени и Го поставete OTHOBO, сд.TOBa ONITaITE NaK.
→CTapTnpaIte npOdykTa n onuTaIte OTHOBo. (BnKTe ctpaHnua 38.)
3ByKbT ce r6n, KOrato e ocBueCTBeHa Bpb3ka qpe3 Bluetooth.
→HЯkon yctpoiCTBa MoKe Da IpeiN3BnKat
paIIOOCMyuIeHnI, aKO Ce HAMpuT TBbPde
6JI3O Do Soundbar, NaIpIMep MInKpOBbJINOBn
neuKN, 6e3KnUHN pyTePN I T.H.
→Ako yctpoiCTBOTO, KOeTo e Cbbp3aHo Upe3 Bluetooth, 6bJe npemecTeHO TBbpDe daJIeU OT Soundbar, 3ByKbT MoJCe Da ce n3ry6n. IpemecTeTe yctpoiCTBOTO no-6IIN3O Do Soundbar.
→Ako yact OT BaWeTo TJeO e B KOHTaKT C
Bluetooth npneMo-mpedabateIy IIN
IpOdyKbT e MOHTnpaH BbpxMy TaIHa
IOBbpXHOCT, 3ByKbT MoKe Da Ce n3ry6n.
PpOBepTe MOHTaXHaTa cpea N ycNoBnra 3a
ynoTpe6a.
He moke da ce ocbsceTbn Bpb3ka c Wi-Fi.
→Проверетадамбзкунгтуэр e BKлючен.
→ИЗкlioуete pyTepa,ВКlioуete Ги След TOBa ONITaIte OTHOBO.
Soundbar Няма Да осьшitectви Врьзka, ako 6e3ЖИHЯТ сгнел e ТБВрде сla6. Oптайда пемechITE рутepа no-6лзо дo Soundbar Или Да OTСТРанITE BCИЧКИ пелЯТСВИ мжДу Soundbar n pytepa, aKO e ВьЗМоЖНО.
→Ako 6e3KnHnT pyTepe HOB,ue Tp8Ba Da npekOHfHyprnPate MpeKOBITE NaCTPOkNHa BvcoKOroBOpntela.
Soundbar He ce BkIIOUBa aBTOMaTnUHO 3aeHc C TeJIeBn3opa.
→Korato n3KJIIOUHTe Soundbar,doKaTo
TneJaTe TeteBn3n,ce DeaKTINbnpa
CnHxPOHN3nPaHETo Ha 3axpaHBaHETo C
TeteBn3Opa.ПьрBO n3KJIIOUte
TeteBn3Opa.
14 リルCEH3
Dolby AUDIO
Manufactured under license from Dolby Laboratories. Dolby, Dolby Audio and the double-D symbol are trademarks of Dolby Laboratories Licensing Corporation.
dt.
For DTS patents, see http://patents.dts.com. Manufactured under license from DTS, Inc. (for companies headquartered in the U.S./Japan/ Taiwan) or under license from DTS Licensing Limited (for all other companies). DTS, Digital Surround, and the DTS logo are registered trademarks or trademarks of DTS, Inc. in the United States and other countries. © 2020 DTS, Inc. ALL RIGHTS RESERVED.
HOMI
The terms HDMI and HDMI High-Definition Multimedia Interface, and the HDMI Logo are trademarks or registered trademarks of HDMI Licensing Administrator, Inc. in the United States and other countries.

Works with Apple AirPlay
- Apple, AirPlay, iPhone, iPad, HomePod, and Apple TV are trademarks of Apple Inc., registered in the U.S. and other countries.
- Use of the Works with Apple badge means that an accessory has been designed to work specifically with the technology identified in the badge and has been certified by the developer to meet Apple performance standards.
15 Белека 3A ЛицензА 3A OTBOPEH KOD
3aДаИЗпразTe 3aПТВанЯи 3aЯВКи NO BbnpocN, CBbp3aHn C OTBopeHNTe KoIDObe, CBbpKxeTe ce cbc Samsung Open Source (http://opensource.samsung.com)
16 BAXKHN
БЕЛEXКИ 3A
OBCJIyXBAHETO
- Βινφριτε ένηλιοςτραύπιτε B TOBa
pbkoBODCTBO 3a nOtpe6ntela ca
npedoctabeHn cAmO 3a cnpaBka N MoRaT da
ce pa3nUaBaT OT DeIcTBNTENH N3rJeD Ha
n3denneto.
- ※ke da ce NauchcnTakca 3a
aДМИнICTpnpaHe, aKO:
(a) e n3BnKaH TexHnK nO BaIe HaCToRBaHe n HЯMa IeΦeKT B npOdykTa (T.e. He cTe npOyei pbKOBOdCTBOTO 3a NOTpe6ntela)
(b) 3aHeceTe ypeDa B cepBn3eH ceHTbp n HЯMa DeΦeKt B npOdykTa (T.e. He cTe npOyei pBkoBOdCTBOTO 3a notpe6ntela).
Cymata 3a Ta3n TaKc3a aMmHnCTpnpaHe 5e BN 6bJe CbO6uHa, Ppei Da ce n3BbPn KaKBaTo I da e 6nlo pa60Ta nn PoCeUeHne BkBus.
17 CNEUΦNKAU IN PbKOBOCTBO
CpeunΦnKaçna
Ako 6aTeepnte He ce n3XbPnT npaBnIHO, Te3N BeIeCTBa MoTa Da IpeiIN3BnKaT yBpeKdaHe Ha OBeWKOTo 3dpaBe Nn Ha OKoJHaTa CpeJa.
3a da ppeiHa3nTe npnpoHnTe pecypcn n 3a da cbdeIcTbATE 3a MHOrokpaTHaTa ynoTppe6a Ha MaTeepHaJIHnTe pecypcn, MoJy OTdEJaYte 6aTePnIte OT dpyrIne BIVOBe OTnaDbUHN IpOdyKtn I rPeuKlnpaiTe nocpeIcTBOM BaWata lokaHa cIcTeMa 3a 6e3PiATNo BpbuaHe Ha 6aTePnI.
IpaBnHIO TpeTnpaHe Ha n3deJIneTo CneI KpaHa eKcNlOaTaUOnHHMy XHBOT (OtnaDbu, npedCTablaBaun eJekTpuecko neektpoHNO 60pyDahe)
(HaIInuHO B CtpaHn CbC CnCTeMn 3a pa3JeHNO CMeTOcb6Hpae)
To3n 3NaK, noctaben Bbpyx u3dieneto, HeGBN npHaJNeJXHcTn nIeauTHMaTePnaIa, O3NaUba, Ye npOykbT n npHaJLeJXHocHTte (HaNPmep 3apRdNo yCTpoiCTBO, cnyuAaKn, USB ka6e) He 6nBa da ce n3XBpbIaT 3aeDnO C dpYrnte 6bTOBn OTpaDbu, KORato n3Teue ekCpIoataunOHnT My kINBOT. OTdeJIaTe Te3n yCTpoiCTBa OT dpYrnte BnIOBn OTpaDbu, nI ppeJaBaIte 3a peuKlnipaHe. Cna3BaIkn TOBa npABIno He n3laIaTe Ha ONaCHO TdPaBeTo Ha npyTu npEtna3BaTe OKoJIhata CpeDa ot 3AmbpcaBaHe, npEtn3BnuKaHO OT 6e3KoHTPOJIHO n3XBbPJIaHe Ha OTpaDbu. OCBEN TOBa, I0do6Ho OTROBOPHO NOBeJHHe Cb3daBa Bb3MOJHOC7 a NobTOpho (ekOLOrHuHO cbO6pa3Ho) IN3no13BaHe Ha MaTePnaJIHInTe pecypcn.
ДомашнITEnotpe6nteIITp86Ba da ce CBbpxKat c TbproBecaHa Ipe6Ho,OT KOroto ca 3aKyNiln
H3deJIneTo,IIIN CbC CbOTBETHaTMeCTHaDbpxkabHa aReHcN,3a Da noluyat Noppo6Hn HnCTpyKcN KbDe
N KORA MoRAT da 3aHeCat Te3n yctpoiCTBa 3a peuKlnpahe,6e3oNaCHO 3a OKoJHata CpeJa.
KopnpaTHBnIe nOteJIcneBa Da ce CbpxKaT C DoCTaBnka Cn I Da npOBeprT yCNOBnTa Ha DOrOBopa 3a NokynKa. ToBa n3dJIeNue n HerOBnTe eJeKtpoHn PpHaJdJIeXHoCTn He 6nBa Da ce CmecTBaC dpyrIne OTNaDbuNHa TbprOBCKOTO ppeIppraTne.
3a INΦopMaζησ OTHOCHO aHraJImeHTIte Ha Samsung no OTHOSeHne Ha OKoJIHaTa cpea n CpeuΦnHtε 3a npOdykTa peryIaTOpHn 3aIbIJIkeHn, hApPmEp REACH, WEEE, 6aTePn, nocTeTe: www.samsung.com/uk/aboutsamsung/sustainability/environment/our-commitment/data/
PEIAMEHT (EC) 2019/1782 HA KOMNCYTA
09 ŁACZENIE Z SYSTEMEM APPLE AIRPLAY 2
Manufactured under license from Dolby Laboratories. Dolby, Dolby Audio and the double-D symbol are trademarks of Dolby Laboratories Licensing Corporation.
dts.
For DTS patents, see http://patents.dts.com. Manufactured under license from DTS, Inc. (for companies headquartered in the U.S./Japan/ Taiwan) or under license from DTS Licensing Limited (for all other companies). DTS, Digital Surround, and the DTS logo are registered trademarks or trademarks of DTS, Inc. in the United States and other countries. © 2020 DTS, Inc. ALL RIGHTS RESERVED.
HOMI
The terms HDMI and HDMI High-Definition Multimedia Interface, and the HDMI Logo are trademarks or registered trademarks of HDMI Licensing Administrator, Inc. in the United States and other countries.
Spotify
Works with Apple AirPlay
- Apple, AirPlay, iPhone, iPad, HomePod, and Apple TV are trademarks of Apple Inc., registered in the U.S. and other countries.
- Use of the Works with Apple badge means that an accessory has been designed to work specifically with the technology identified in the badge and has been certified by the developer to meet Apple performance standards.
www.samsung.com/uk/aboutsamsung/sustainability/environment/our-commitment/data/
ROZPORZADZENIE KOMISJI (UE) 2019/1782
09 PřIPOJENÍK APPLE AIRPLAY 2
Manufactured under license from Dolby Laboratories. Dolby, Dolby Audio and the double-D symbol are trademarks of Dolby Laboratories Licensing Corporation.
dts.
For DTS patents, see http://patents.dts.com. Manufactured under license from DTS, Inc. (for companies headquartered in the U.S./Japan/ Taiwan) or under license from DTS Licensing Limited (for all other companies). DTS, Digital Surround, and the DTS logo are registered trademarks or trademarks of DTS, Inc. in the United States and other countries. © 2020 DTS, Inc. ALL RIGHTS RESERVED.
HOMI
The terms HDMI and HDMI High-Definition Multimedia Interface, and the HDMI Logo are trademarks or registered trademarks of HDMI Licensing Administrator, Inc. in the United States and other countries.

Spotify

- Hudbu ze Spotify muzes ovladat na dalkupres Telefon, tablet nebo poçaţač. Nastrancespotify.com/connect najdeş, jakna to
- Software Spotify podléhá licencím třétich stran, jejichžseznam je uveden zde: https://www.spotify.com/connect/third-party-licenses.

Works with Apple AirPlay
- Apple, AirPlay, iPhone, iPad, HomePod, and Apple TV are trademarks of Apple Inc., registered in the U.S. and other countries.
- Use of the Works with Apple badge means that an accessory has been designed to work specifically with the technology identified in the badge and has been certified by the developer to meet Apple performance standards.
15 POZNÁMKA K LICENCI OTEVRENEHO SOFTWARE
09 PRIPOJENIE K APPLE AIRPLAY 2
Tato fungcia nemusi byt v niektorych krajinach k dispozicii.
13 RIESENIE PROBLEMOV
Manufactured under license from Dolby Laboratories. Dolby, Dolby Audio and the double-D symbol are trademarks of Dolby Laboratories Licensing Corporation.
dts.
For DTS patents, see http://patents.dts.com. Manufactured under license from DTS, Inc. (for companies headquartered in the U.S./Japan/ Taiwan) or under license from DTS Licensing Limited (for all other companies). DTS, Digital Surround, and the DTS logo are registered trademarks or trademarks of DTS, Inc. in the United States and other countries. © 2020 DTS, Inc. ALL RIGHTS RESERVED.

The terms HDMI and HDMI High-Definition Multimedia Interface, and the HDMI Logo are trademarks or registered trademarks of HDMI Licensing Administrator, Inc. in the United States and other countries.

Works with Apple AirPlay
- Apple, AirPlay, iPhone, iPad, HomePod, and Apple TV are trademarks of Apple Inc., registered in the U.S. and other countries.
- Use of the Works with Apple badge means that an accessory has been designed to work specifically with the technology identified in the badge and has been certified by the developer to meet Apple performance standards.
15 POZNÁMKA K LICENCI S OTVORENYM ZDROJOVYM KÓDOM
Ak chcetezaslat otazky ci poziadavky na otazky o otvorenych zdrojoch, obratte sa na diviziu Samsung Open Source (http://opensource.samsung.com).
16 DÖLEZITÁ POZNÁMKA OHL'ADOM SERVISU
Soundbar also panel 10
09 CSATLAKOZTATÁS AZ APPLE AIRPLAY 2-ESHEZ
Manufactured under license from Dolby Laboratories. Dolby, Dolby Audio and the double-D symbol are trademarks of Dolby Laboratories Licensing Corporation.
dts.
For DTS patents, see http://patents.dts.com. Manufactured under license from DTS, Inc. (for companies headquartered in the U.S./Japan/ Taiwan) or under license from DTS Licensing Limited (for all other companies). DTS, Digital Surround, and the DTS logo are registered trademarks or trademarks of DTS, Inc. in the United States and other countries. © 2020 DTS, Inc. ALL RIGHTS RESERVED.
HOMI
The terms HDMI and HDMI High-Definition Multimedia Interface, and the HDMI Logo are trademarks or registered trademarks of HDMI Licensing Administrator, Inc. in the United States and other countries.

Spotify

Works with Apple AirPlay
- Apple, AirPlay, iPhone, iPad, HomePod, and Apple TV are trademarks of Apple Inc., registered in the U.S. and other countries.
- Use of the Works with Apple badge means that an accessory has been designed to work specifically with the technology identified in the badge and has been certified by the developer to meet Apple performance standards.
15 NYICT FORRASKODU LICENC MEGJEGYZES
Manufactured under license from Dolby Laboratories. Dolby, Dolby Audio and the double-D symbol are trademarks of Dolby Laboratories Licensing Corporation.
dts.
For DTS patents, see http://patents.dts.com. Manufactured under license from DTS, Inc. (for companies headquartered in the U.S./Japan/ Taiwan) or under license from DTS Licensing Limited (for all other companies). DTS, Digital Surround, and the DTS logo are registered trademarks or trademarks of DTS, Inc. in the United States and other countries. © 2020 DTS, Inc. ALL RIGHTS RESERVED.
HOMI
The terms HDMI and HDMI High-Definition Multimedia Interface, and the HDMI Logo are trademarks or registered trademarks of HDMI Licensing Administrator, Inc. in the United States and other countries.

Works with Apple AirPlay
- Apple, AirPlay, iPhone, iPad, HomePod, and Apple TV are trademarks of Apple Inc., registered in the U.S. and other countries.
- Use of the Works with Apple badge means that an accessory has been designed to work specifically with the technology identified in the badge and has been certified by the developer to meet Apple performance standards.
15 OBAVIJEST O LICENCIZA UPORABU SOFTVERA OTVORENOG KODA
Želite li poslati upite i zahtjeve u vezi sa softverom otvorenog koda, obratite se grupi Samsung Open Source (http://opensource.samsung.com)
16 VAŽNA NAPOMENA VEZANA UZ SERVIS
- Slike u ovom korisnickom prisručniku služe kao samo kao referencei i mogu se razlikovati od stvarnog izgleda proizvoda.
- Moguca je naplata administrativne pristojbe u slučaju
(a) poziva inżenjera na vaš zahtjev, a nema oštećenja na proizvodu (tj. ako niste pročitali korisnički prirucnik)
(b) da donesete Jedinicu na popravak u servis, a nema oštecenja na proizvodu (tj. akoniste pročitali korisnički prirucnik)
- S visinom administrativne pristojbe bit cete upoznati prije poduzimanja bilo kakvih radnji ili kućnog posjeta.
17 TEHNICKI PODACI I VODIC
Tehnički podaci
| Naziv modela HW-S60A / S61A | |
| Težina 3,0 kg | |
| Dimenzije (Š x V x D) 764,0 x 68,0 x 125,0 mm | |
| Raspon radne temperature +5°C do +35°C | |
| Raspon vlažnosti 10 % ~ 75 % | |
| POJACALO
Nazivna izlazna snaga | (30W x 2) + (30W x 2) + (30W x 2) + 20W |
| Podržani formati za reprodukciju | LPCM 2ch, Dolby AudioTM
(podržava Dolby® Digital), DTS |
| IZLAZNA SNAGA BEŽICNOG UREDAJA
Maks. snaga Wi-Fi odašiljača | 100mW pri 2,4GHz - 2,4835GHz, 200mW pri 5,15GHz - 5,25GHz, 100mW pri 5,25GHz - 5,35GHz & 5,47GHz - 5,725GHz |
| IZLAZNA SNAGA BEŽICNOG UREDAJA
Maks. snaga BT odašiljača | 100mW pri 2,4GHz - 2,4835GHz |
NAPOMENE
Samsung Electronics Co., Ltd pridržava pravo promjene specifikacija bez prethodne obavijesti.
- Težina i dimenzije su približni.
Mjera opreza : Soundbar ce se automatski ponovnoPokrenuti aka uključite/isključite bežičnu vezu.
| Ukupna potrošnja energije u stanju mirovanja (W) | 5,2W |
| Wi-Fi
Način isključivanja ulaza | Pritisnite gumb ID SET na donjoj ploči sustava Soundbar na 30 sekundi da biste uključili/isključili Wi-Fi. |
| Bluetooth
Način isključivanja ulaza | Pritisnite gumb NETWORK na donjoj ploči sustava Soundbar na 30 sekundi da biste uključili/isključili Bluetooth. |
Tvrtka Samsung ovime izjavljuje da je ova radio-oprema sukladna Direktivi 2014/53/EU te relevantnim zakonskim odredbama Ujedinjenog Kraljevstva.
Cijeli tekst izjave o sukladnosti dostupan je na sljedećoj internetskoj adresi: http://www.samsung.com. Idite na stavku Podrška i unesite naziv modela.
www.samsung.com/uk/aboutsamsung/sustainability/environment/our-commitment/data/
UREDBA KOMISIJE (EU) 2019/1782
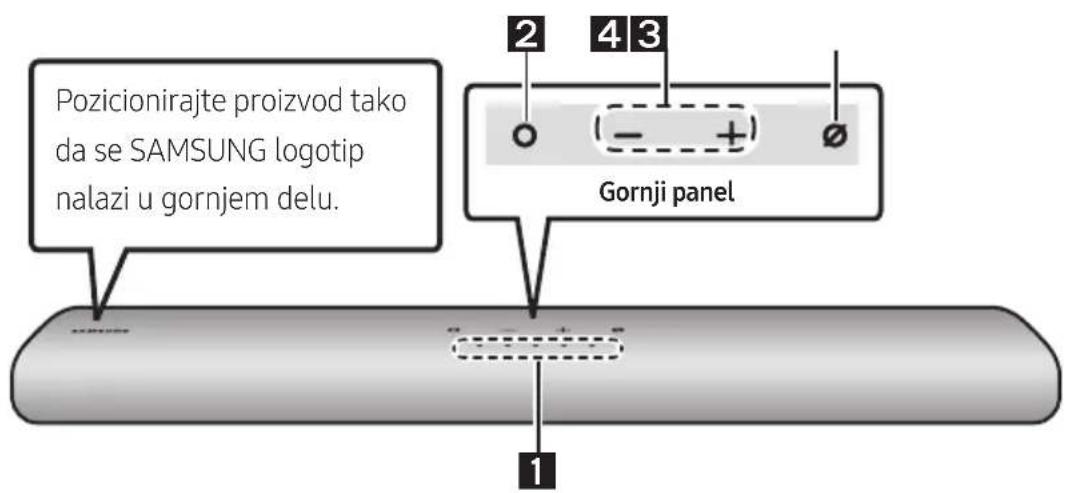
Gornji panel Soundbar ureðaja
| 1 | LED indicator | LED indicator treperi, svetli ili uomini zu zavisnosti od trenutnog režima ili statusa
Soundbar urečaja. Boja LED indicator a broj lampica ukazuju na režim koji je aktivan, kao što je opisano u nastavku. |
| W
Bela LED
lampica | W
Bela LED
lampica | M
Višebojna LED
lampica | W
Bela LED
lampica | W
Bela LED
lampica |
| ·U zavisnosti od režima ili statusa, višebojna LED lampica uomini zu sledeće boje: Bela,
Svetloplava, Zelena, Crvena i Plava. |
| 2 | Multifunkcionalno
dugme | ·U režimu pripravnosti, pritisnite dugme (Multifunkcionalno) da biste uključili
Soundbar zvučnik.
·Pritisnite dugme (Multifunkcionalno) da biste promenili režim. Svaki put kada
promene režim, LED lampica zasvetli u beloj boji, a zatim se isključi. |
| LED
indicator | Bela lampica
uključeno → isključeno | Bela lampica
uključeno → isključeno | Bela lampica
uključeno → isključeno | |
| "Digital Audio In" ili
"TV ARC" | "Wi-Fi" | "Bluetooth" | |
| 3 | Dugme jačina
zvuka | Pritisnite dugme + (Jačina zvuka) da biste podesilji jačinu zvuka. |
| 4 | Dugme za uključivanje/isključivanje mikrofona | Pritisnite dugme (Uključivanje/isključivanje mikrofona) da biste uključili ili isključili mikrofon. |
| LED indicator | Crvena lampica uključena | O O O O O |
| "Mic Off" | "Mic On" |
- Kada prikljucite kabl za napajanje naizmeničnom strujom, dugme za napajanje ce početi da radi za 4 do 6 sekundi.
- Kada uključite ovaj uredaj, prociće 4 do 5 sekundi pre nego što se začuje zvuk.
- Ako Čujete zvuk i iz TV-a i iz Soundbar uredaja, idite u meni Podesavanja za zvuk TV-a i promenite podesavanje za zvučnik TV-a na Spoljni zvučnik.
- Audio odgovor možete da uključite ili isključite pomoću aplikacje SmartThings. Da biste saznali kako se koristi aplikacija SmartThings, pogledajte odeljak „Metod br. 2. Povezivanje putem Wi-Fi mreže (bežična mreža)”.
Donji panel Soundbar-a
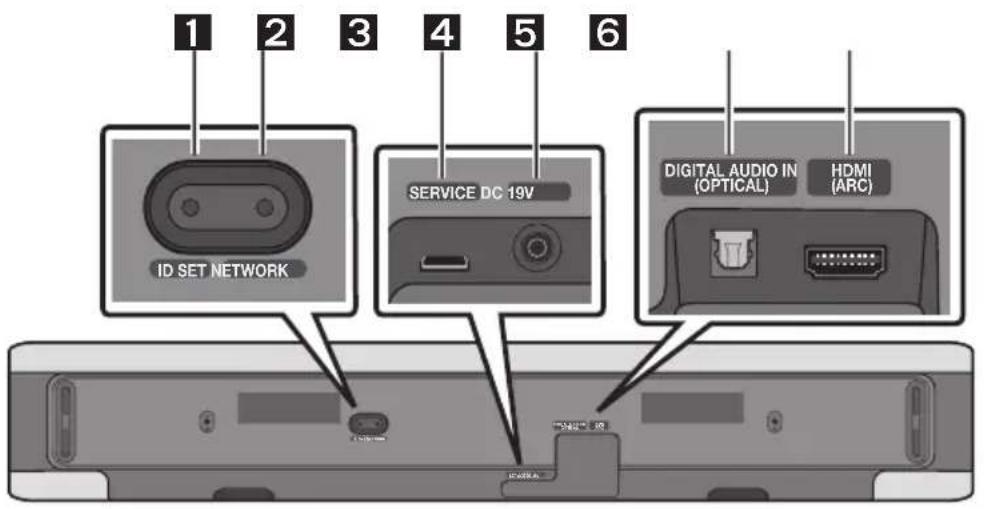
| 1 | ID SET
Pritisnite da biste bežičim putem povezali Soundbar urežaj sa Surround zvučnicima i sabvufer zvučnikom. (Surround zvučnik, sabvufer zvučnik se prodaju odvojeno.) |
| 2 | NETWORK
Pritisnite da biste ih povezali sa bežičnom mrežom (Wi-Fi) pomoću aplikacije SmartThings. |
| 3 | SERVICE
Povežite USB urežaj za skladištenje kako biste ažurirali softver proizvoda. |
| 4 | DC 19V (Priključak za napajanje)
Povežite AC/DC adapter za napajanje. (pogledajte stranu 16) |
| 5 | DIGITAL AUDIO IN (OPTICAL)
Povežite sa digitalnim (optickim) izlazom spoljinog urežaja. (pogledajte stranu 23) |
| 6 | HDMI (ARC)
Povežite sa HDMI (ARC) priključkom televizora. (pogledajte stranu 17) |
- Kada vadite kabl za napajanje AC/DC adaptera iz zidne uticnice, izvucite utikač. Ne vucite kabl.
- Ovaj uredaj ili druge componente nemojte priključivati na uticnicu za napajanje naizmeničnom strujom dok ne završite meudusobno povezivanje svih componenti.
03 UPOTREBA DALJINSKOG UPRAVLJAÇA
Kako se koristi daljinski upravljač
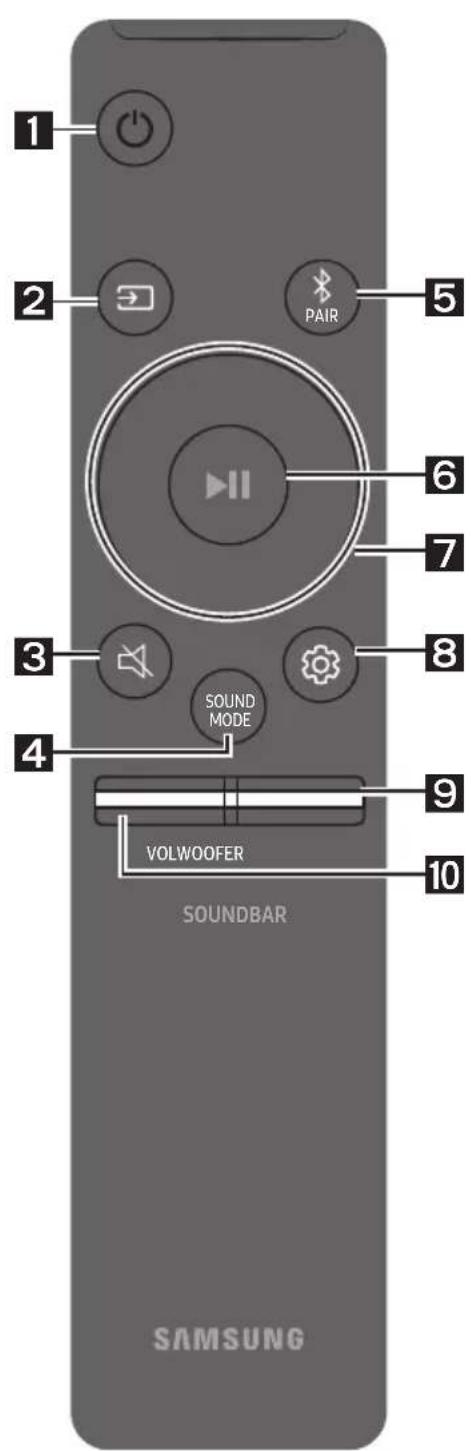
| 1 | Napajanje
Uključuje i isključuje Soundbar. |
| LED
indikator | Svetloplava lampica
treperi X1
Uključeno | Crvena lampica
treperi X3
Isključeno |
| ·Funkcija Auto Power Down
Jedinica se automatiski isključuje u sledećim situacijama:
- U režimma „Digital Audio In" ili „TV ARC" / „Wi-Fi" /
„Bluetooth" ako nema audio signala 18 minuta. |
| 2 | (1zvor)
Pritisnite za izbor izvora signala koji je povezan sa Soundbar-
om.
·Audio povr. inform. Uključeno/Isključeno
Audio povr. inform. možete da uključite ili isključite.
Pritisnite i zadržite dugme (1zvor) na daljinskom
upravljaču 5 sekundi dok je Soundbar isključen (Režim
pripravnosti). |
| LED
indikator | Svetloplava lampica
treperi X1
Uključeno | Crvena lampica
treperi X1
Isključeno |
| 3 | (Priguši zvuk)
Pritisnite dugme (Priguši zvuk) da biste prigušili zvuk.
Ponovo ga pritsnite da biste uključili zvuk. |
| LED
indikator | Trepti X uzastopno |
| LED
indikator | Bela lampica treperi X1 |
| "Standard"→"Music"→"Adaptive Sound" |
| ·Standard
Na izlazu se dobija originalni zvuk.
·Music
Obezbeduje prirodniji zvuk koji više ispunjava prostoriju prilikom reprodukcie muzičkog sadržaja.
·Adaptive Sound
Analizira sadržaj u realnom vremenu i automatski obezbeduje optimalno zvučno polje na osnovu
karakteristika sadržaja. |
| Bluetooth PAIR
Prebacuje Soundbar urežaj u režim za Bluetooth uparivanje.
Kada pritsnete dugme, LED lampice se menjaju na način prikazan u nastavku.
·Dok se uparivanje ne završi, višebojna LED lampica naizmenično menj boje: Crvena → Zelena →
Plava. |
| LED
indikator | Treperi lampica crvena → zelena → plava
Uparivanje
"Ready to connect via Bluetooth." |
| "Reprodukuj/pauziraj"
Pritiskom na ovo dugme takodeme moistetePokrenuti reproducciju muzike ili je pauzirati. |
| 7 | Nagore/Nadole/Nalevo/Nadesno
Pritisnite dugme Nagore/Nadole/Nalevo/Nadesno da biste izabrali ili podesili funkcjie.
·Preskoči muzičku datoteku
Pritisnite dugme Nadesno da biste izabrali sledeću muzičku datoteku.
Pritisnite dugme Nalevo da biste izabrali prethodnu muzičku datoteku. |
| LED
indikator | Bela lampica treperi X1 | |
| "Treble" → "Bass" → "Sync" → "Centre Level" → "Side Level" | |
| - Da bistie upravljali jačinom zvuka visokih tonova ili basa, izaberite „Treble" ili „Bass" u Podesavljanima zvuka, a zatim podesite jačinu zvuka na vrednost od -6 do +6 pomoću dugmadi za kretanje Nagore/Nadole.
- Pritisnite i zadržite dugme (Kontrola zvuka) na oko 5 sekundi da bistie podesili zvuk za svaki frekvencijski opseg. Mogu se izabrati 150Hz, 300Hz, 600Hz, 1,2kHz, 2,5kHz, 5kHz i 10kHz pomoću dugmadi Nalevo/Nadesnoi i svaka opcija se može podesiti na postavku izmerodu -6 i +6 pomoću dugmadi Nagore/Nadole. (Uverite se da je režim zvuka poděšen na „Standard“)
- Da bistie upravljali jačinom zvuka svakog zvučnika izaberite „Centre Level" ili „Side Level" u Podesavljanima zvuka, a zatim podesite jačinu zvuka na vrednost od -6 do +6 pomoću dugmadi za kretanje Nagore/Nadole.
- Ukoliko slika na televizoru i zvuk sa ureža Soundbar nisu sinhronizovani, izaberite opcjù „Sync" u Kontrli zvuka i zatim podesite zakašnjenje zvuka na vrednost izmerodu 0 i 300 milisekundi pomoću dugmadi Nagore/Nadole.
- „Sync" je podžana samo za neke funkcije.
- Ako su povezani zvučnici za prostorni zvuk, izaberite „Rear Level", a zatim koristite dugmad Nagore/Nadole i prilagodite jačinu zvuka u rasponu od -6 do +6. | |
| 9 | NIVO WOOFER (BAS) ZVUCNIKA
Pritisnite dugme nagore ili nadole da bistie prilagodili jačinu zvuka vufera (basa) na -12 ili izmerodu -6 i +6.
Da bistie podesili jačinu zvuka vufera (basa) na 0 (podrazumevana vrednost), pritsnite dugme. | |
| 10 | JACINA ZVUKA
Pritisnite dugme nagore ili nadole da bistie prilagodili jačinu zvuka. | |
| LED
indikator | Bela lampica se pomera udesno X1
●○○○○
Pojačavanje zvuka | Bela lampica se pomera ulevo X1
○○○○
Stižavanje zvuka |
Manufactured under license from Dolby Laboratories. Dolby, Dolby Audio and the double-D symbol are trademarks of Dolby Laboratories Licensing Corporation.
dt.
For DTS patents, see http://patents.dts.com. Manufactured under license from DTS, Inc. (for companies headquartered in the U.S./Japan/ Taiwan) or under license from DTS Licensing Limited (for all other companies). DTS, Digital Surround, and the DTS logo are registered trademarks or trademarks of DTS, Inc. in the United States and other countries. © 2020 DTS, Inc. ALL RIGHTS RESERVED.
HOMI
The terms HDMI and HDMI High-Definition Multimedia Interface, and the HDMI Logo are trademarks or registered trademarks of HDMI Licensing Administrator, Inc. in the United States and other countries.

Works with Apple AirPlay
- Apple, AirPlay, iPhone, iPad, HomePod, and Apple TV are trademarks of Apple Inc., registered in the U.S. and other countries.
- Use of the Works with Apple badge means that an accessory has been designed to work specifically with the technology identified in the badge and has been certified by the developer to meet Apple performance standards.
15 OBAVEŠTENJE O LICENCI OTVORENOG IZVORNOG KODA
Da biste poslali pitanja i zahteve u vezi sa softverom otvorenog koda obratite se grupi Samsung Open Source (http://opensource.samsung.com)
16 VAŽNA
NAPOMENA O SERVISIRANJU
- Slike ilustracije koje su upotrebljene u ovom korisnickom uputstvu date su samo kao reference i mogu se razlikovati od vaseg proizvoda.
- Administrativni troškovi mogu biti naplaceni u sledecim slučajevima:
(a) tehnicar je pozvan u vaš dom na vaš zahtev i ako proizvod不同程度 (tj. ako niste pročitali ovo korisničko uputstvo),
(b) vi donesete uredj u servisni centar, a proizvod nije u kvaru (tj. ako niste pročitali ovo korisničko uputstvo).
www.samsung.com/uk/aboutsamsung/sustainability/environment/our-commitment/data/
VARNOSTNI PODATKI
VARNOSTNA OPOZORILA
ZARADI NEVARNOSTI ELEKTRICNEGA UDARANE ODPIRAJTE ZADNJEGA (HRBTNEGA)POKROVA.
NAPRAVA NIMA DELOV, KI BI JIH LAHKO
POPRAVIL UPORABNIK. SERVIS NAJ OPRAVI
USTREZNO USPOSOBLJENA OSEBA.
Manufactured under license from Dolby Laboratories. Dolby, Dolby Audio and the double-D symbol are trademarks of Dolby Laboratories Licensing Corporation.
dt.
For DTS patents, see http://patents.dts.com. Manufactured under license from DTS, Inc. (for companies headquartered in the U.S./Japan/ Taiwan) or under license from DTS Licensing Limited (for all other companies). DTS, Digital Surround, and the DTS logo are registered trademarks or trademarks of DTS, Inc. in the United States and other countries. © 2020 DTS, Inc. ALL RIGHTS RESERVED.
HOMI
The terms HDMI and HDMI High-Definition Multimedia Interface, and the HDMI Logo are trademarks or registered trademarks of HDMI Licensing Administrator, Inc. in the United States and other countries.

Works with Apple AirPlay
- Apple, AirPlay, iPhone, iPad, HomePod, and Apple TV are trademarks of Apple Inc., registered in the U.S. and other countries.
- Use of the Works with Apple badge means that an accessory has been designed to work specifically with the technology identified in the badge and has been certified by the developer to meet Apple performance standards.
15 OBVESTILO O ODPRTOKODNIH LICENCAH
www.samsung.com/uk/aboutsamsung/sustainability/environment/our-commitment/data/
UREDBA KOMISIJE (EU) 2019/1782
O'otav natae to koupi, n evseEiEh LED aaaaet oNw caiveTal npakatw.
09 ΣYNΔΕΣH ΣTO APPLE AIRPLAY 2
Autn n 1eitoupyia eVdexetai va unv evai dlaOeoum no opioeves cxwpe.
Manufactured under license from Dolby Laboratories. Dolby, Dolby Audio and the double-D symbol are trademarks of Dolby Laboratories Licensing Corporation.
dt.
For DTS patents, see http://patents.dts.com. Manufactured under license from DTS, Inc. (for companies headquartered in the U.S./Japan/ Taiwan) or under license from DTS Licensing Limited (for all other companies). DTS, Digital Surround, and the DTS logo are registered trademarks or trademarks of DTS, Inc. in the United States and other countries. © 2020 DTS, Inc. ALL RIGHTS RESERVED.

The terms HDMI and HDMI High-Definition Multimedia Interface, and the HDMI Logo are trademarks or registered trademarks of HDMI Licensing Administrator, Inc. in the United States and other countries.

Xpnouoioe to tnaepwo, to taumntov unoloyotn oou wct nlexipotnpoi yia to Spotify. nyalve oTo Spotify.com/ connect yia va mathetaic nwc
To loyiou Ko Spotifuy uoketal oe adiec Tpiwv, tC onoiec mnpoeic va 8eic edw: https://www.spotify.com/connect/thirdparty-licenses.

Works with Apple AirPlay
- Apple, AirPlay, iPhone, iPad, HomePod, and Apple TV are trademarks of Apple Inc., registered in the U.S. and other countries.
- Use of the Works with Apple badge means that an accessory has been designed to work specifically with the technology identified in the badge and has been certified by the developer to meet Apple performance standards.
02 PRODUKTA PÄRSKATS
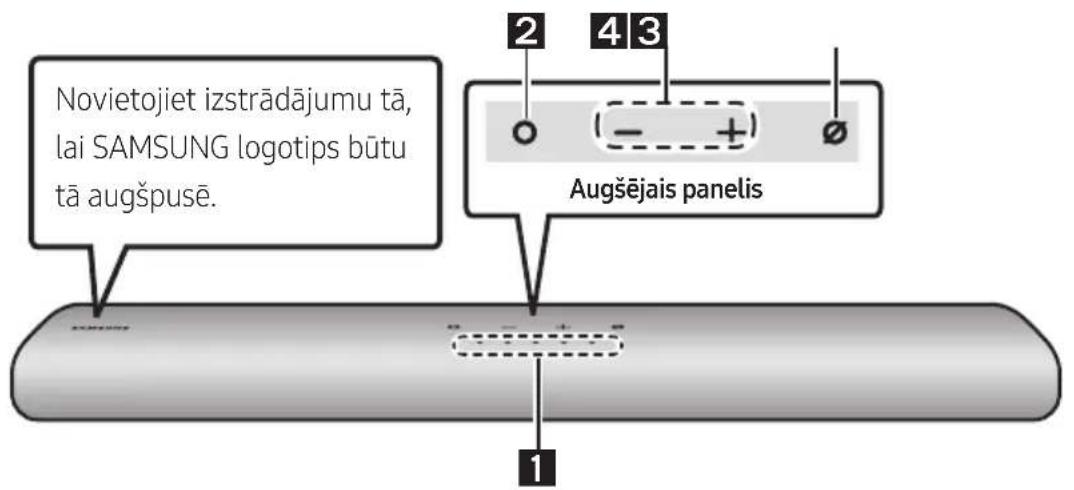
Sistemas Soundbar augšejais panelis
13 PROBLEMU NOVER'SANA
Manufactured under license from Dolby Laboratories. Dolby, Dolby Audio and the double-D symbol are trademarks of Dolby Laboratories Licensing Corporation.
dt.
For DTS patents, see http://patents.dts.com. Manufactured under license from DTS, Inc. (for companies headquartered in the U.S./Japan/ Taiwan) or under license from DTS Licensing Limited (for all other companies). DTS, Digital Surround, and the DTS logo are registered trademarks or trademarks of DTS, Inc. in the United States and other countries. © 2020 DTS, Inc. ALL RIGHTS RESERVED.
HOMI
The terms HDMI and HDMI High-Definition Multimedia Interface, and the HDMI Logo are trademarks or registered trademarks of HDMI Licensing Administrator, Inc. in the United States and other countries.

Works with Apple AirPlay
- Apple, AirPlay, iPhone, iPad, HomePod, and Apple TV are trademarks of Apple Inc., registered in the U.S. and other countries.
- Use of the Works with Apple badge means that an accessory has been designed to work specifically with the technology identified in the badge and has been certified by the developer to meet Apple performance standards.
15 PAZINOJUMS PARATVERTA PIRMKODA LICENCI
Lai nosutitu jautajumus un pieprasijumus par atverto pirmkodu, szinieties ar uzemumu Samsung Open Source (http://opensource.samsung.com)
16 SVARIGA PIEZIME PAR APKOPI
09 ÜHENDAMINE APPLE AIRPLAY 2-GA
Manufactured under license from Dolby Laboratories. Dolby, Dolby Audio and the double-D symbol are trademarks of Dolby Laboratories Licensing Corporation.
dts.
For DTS patents, see http://patents.dts.com. Manufactured under license from DTS, Inc. (for companies headquartered in the U.S./Japan/ Taiwan) or under license from DTS Licensing Limited (for all other companies). DTS, Digital Surround, and the DTS logo are registered trademarks or trademarks of DTS, Inc. in the United States and other countries. © 2020 DTS, Inc. ALL RIGHTS RESERVED.
HOMI
The terms HDMI and HDMI High-Definition Multimedia Interface, and the HDMI Logo are trademarks or registered trademarks of HDMI Licensing Administrator, Inc. in the United States and other countries.

Works with Apple AirPlay
- Apple, AirPlay, iPhone, iPad, HomePod, and Apple TV are trademarks of Apple Inc., registered in the U.S. and other countries.
- Use of the Works with Apple badge means that an accessory has been designed to work specifically with the technology identified in the badge and has been certified by the developer to meet Apple performance standards.
15 AVATUD LÄHTEKOODI LITSENTSI TEATIS
www.samsung.com/ee/aboutsamsung/sustainability/environment/our-commitment/data/
KOMISJONIMÄARUS (EL) 2019/1782