SPA 1200 - Industrial vacuum cleaner METABO - Free user manual and instructions
Find the device manual for free SPA 1200 METABO in PDF.
User questions about SPA 1200 METABO
0 question about this device. Answer the ones you know or ask your own.
Ask a new question about this device
Download the instructions for your Industrial vacuum cleaner in PDF format for free! Find your manual SPA 1200 - METABO and take your electronic device back in hand. On this page are published all the documents necessary for the use of your device. SPA 1200 by METABO.
USER MANUAL SPA 1200 METABO
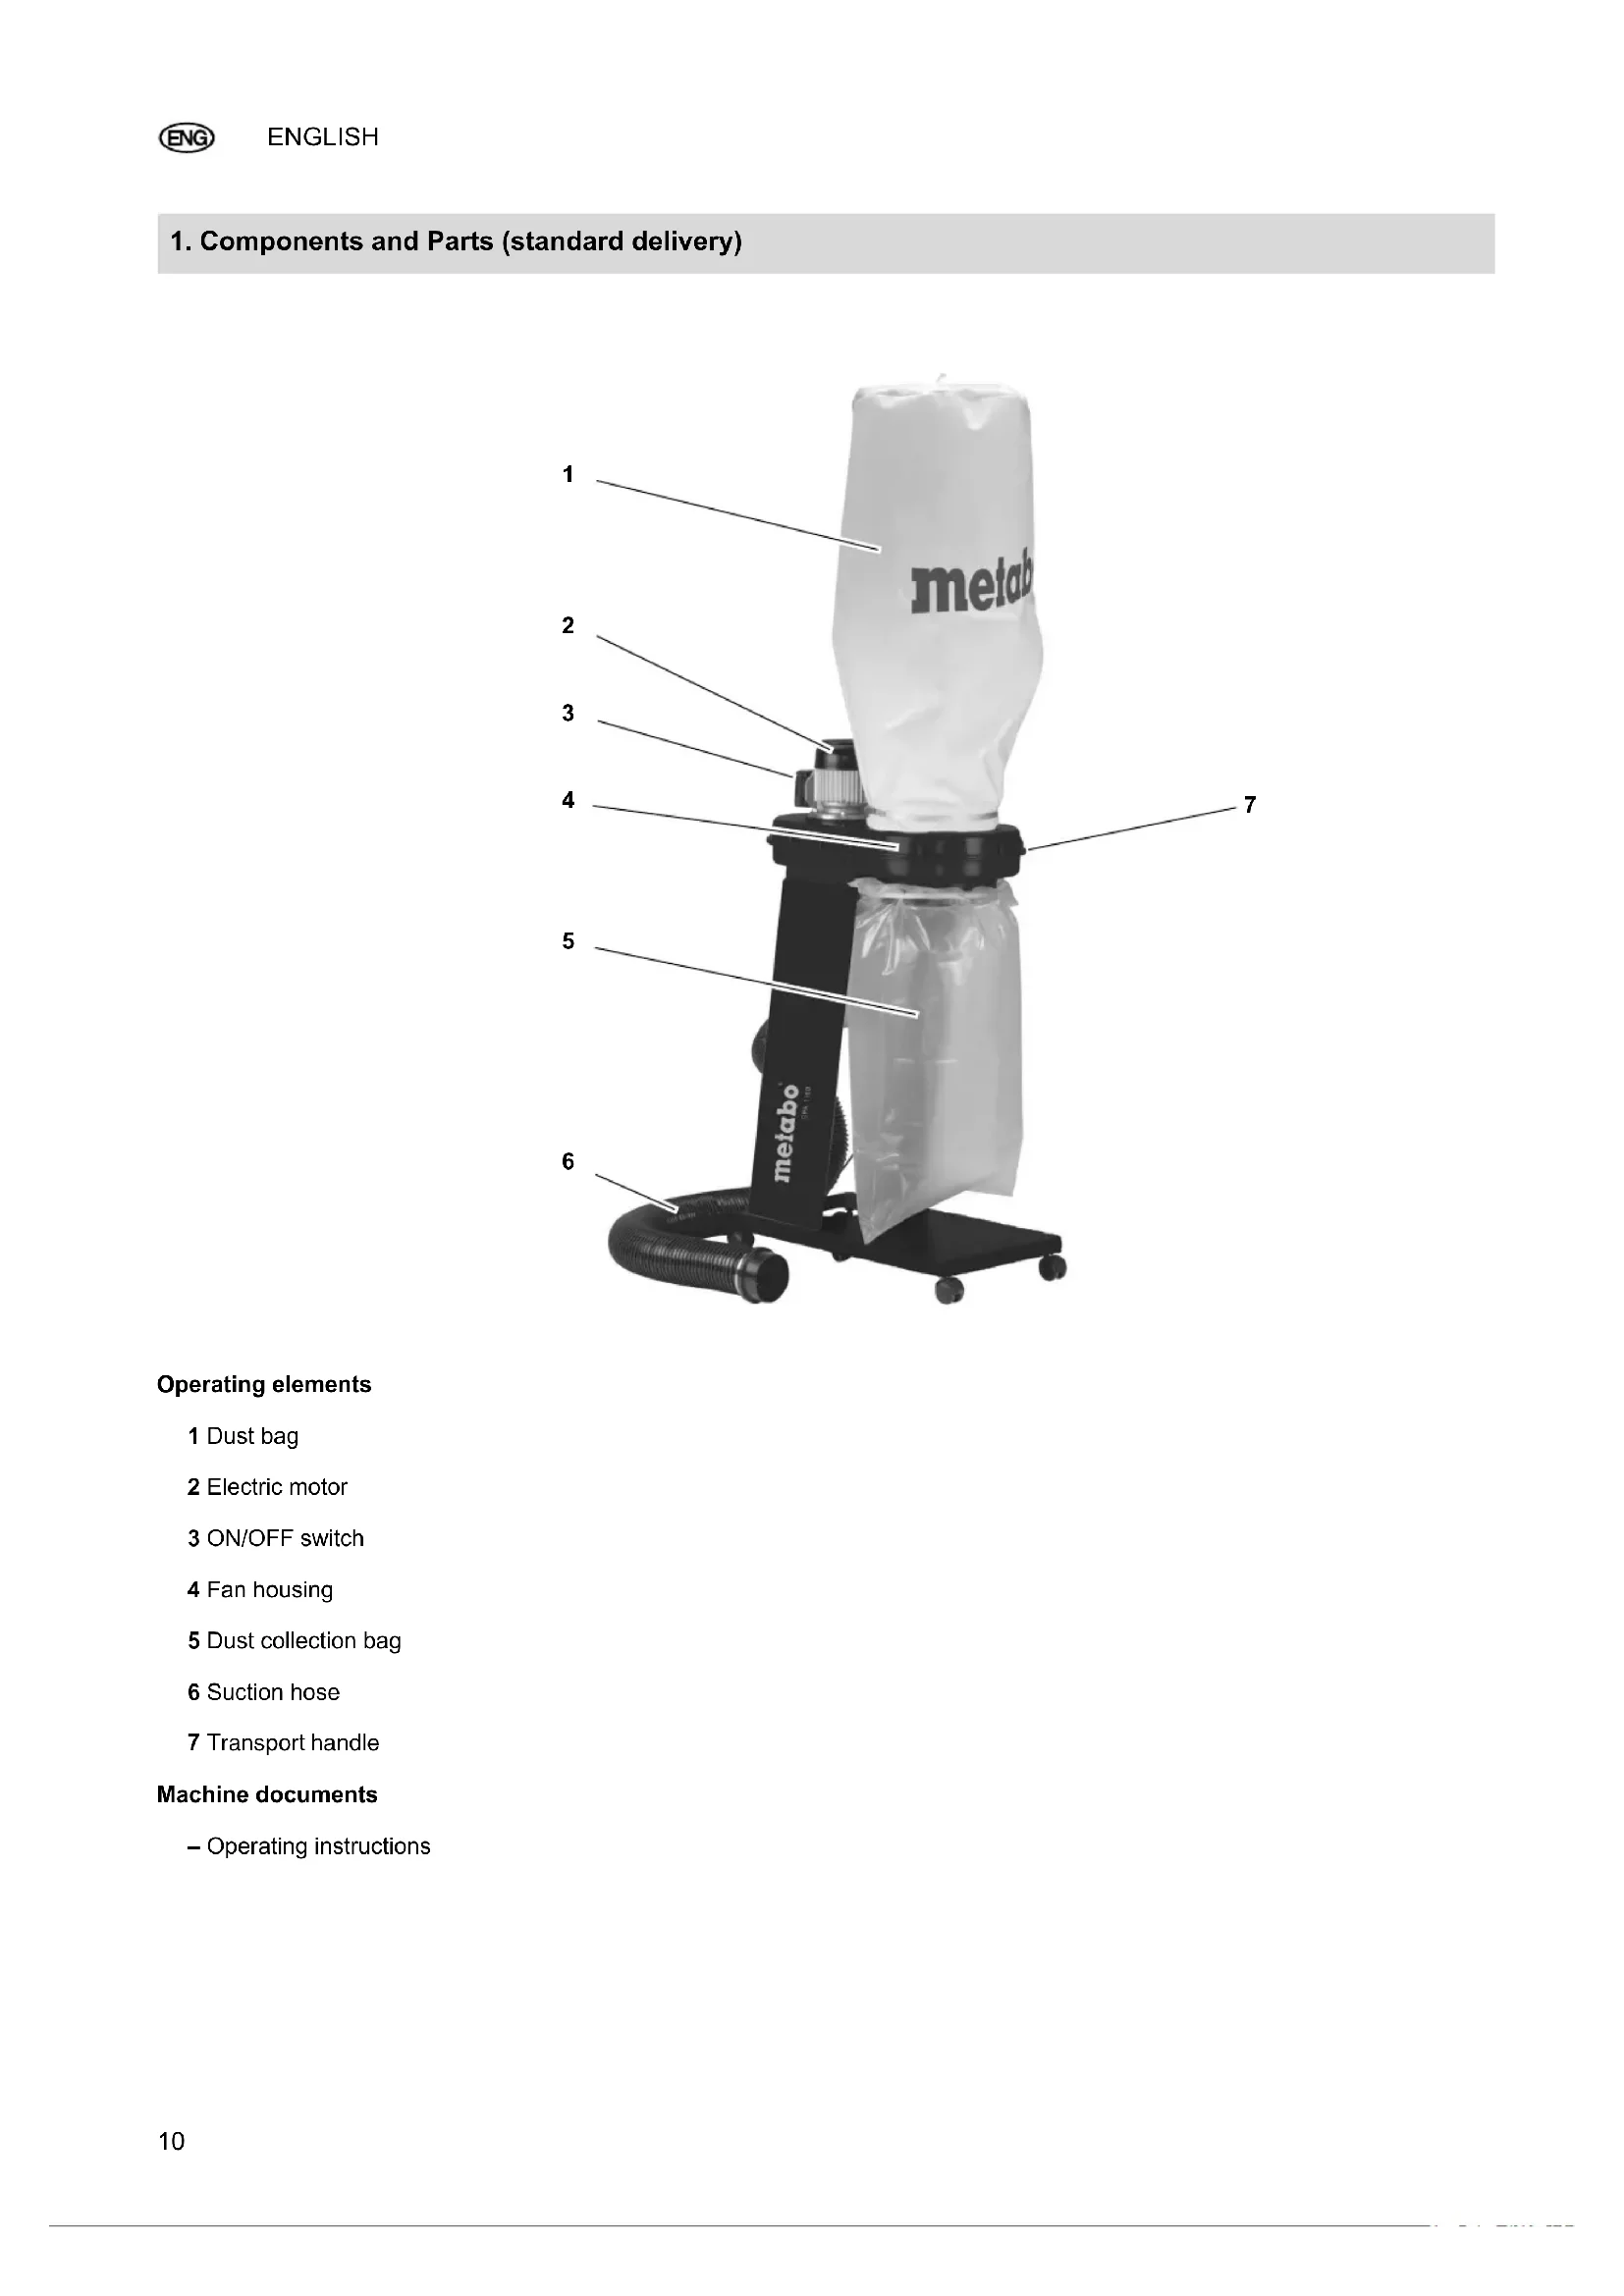
1. Components and Parts (standard delivery)

Operating elements
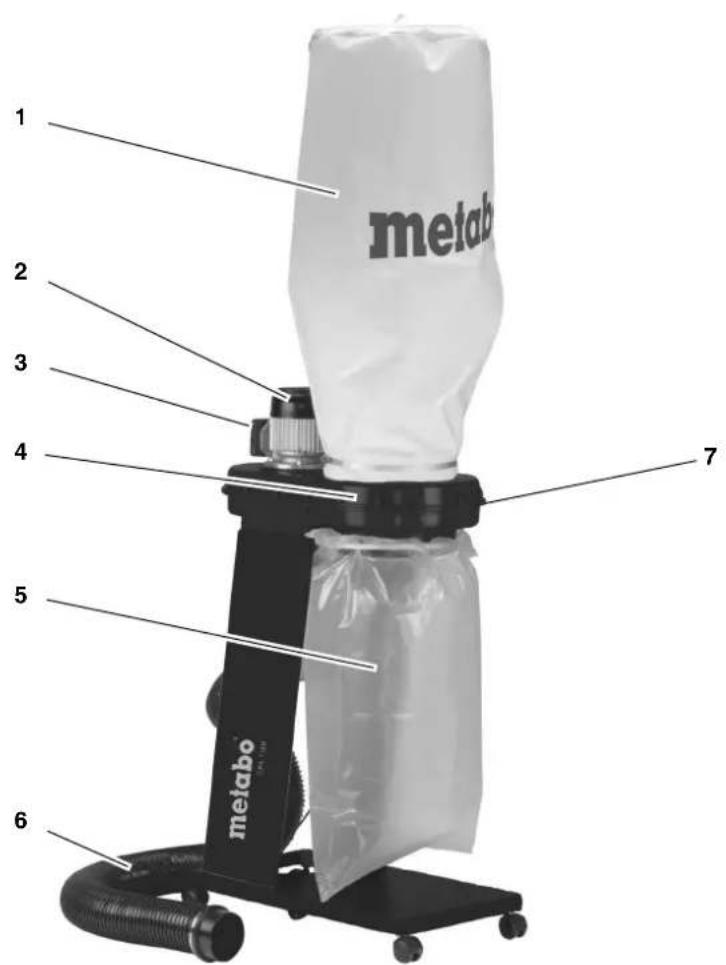
1 Dust bag
2 Electric motor
3 ON/OFF switch
4 Fan housing
5 Dust collection bag
6 Suction hose
7 Transport handle
Machine documents
- Operating instructions
Table of Contents
1. Components and Parts (standard delivery)
2. Please read first!
3. Safety
3.1 Specified Conditions of Use
3.2 General Safety Instructions
3.3 Symbols on the Machine
4. Assembly
4.1 Mains Connection
4.2 Electrostatic Charging
4.3 Overload Protection
5. Operation
6. Care and Maintenance
7. Available Accessories
6.1 Maintenance
6.2 Cleaning
6.3 Storage
6.4 Repairs
8. Disposal
9. Technical Specifications
2. Please read first!
These operating instructions have been written to make it easier for you, the user, to learn how to operate this machine and to do so safely. Here is how to use the instructions:
- Read these instructions before use. Pay special attention to the safety information.
- These instructions are intended for persons having a basic technical knowledge of the operation of machines like the one described herein. If you have no experience whatsoever, we strongly recommend to seek the advise of an experienced person.
- Keep all documents supplied with this machine for future reference. Retain your proof of purchase in case of a future warranty claim.
- This machine must not be sold or lent to someone else without being accompanied by these operating instructions and all other machine documents.
- The manufacturer is not liable for any damage resulting from neglect of these operating instructions.
Information in these instructions is denoted as under:
Danger!
Risk of personal injury or environmental damage.
Risk
Risk of electric shock!
Risk of personal injury by electric shock.

Caution!
Risk of material damage.

Note:
Additional information.
-
At times, numbers are used in illustrations (1, 2, 3, ...). These numbers
-
indicate component parts;
- are consecutively numbered;
-
correspond with the number(s) in brackets (1), (2), (3) ... in the neighbouring text.
-
Numbered steps must be carried out in sequence.
- Instructions which can be carried out in any order are indicated by a bullet point () .
- Listings are marked by a dash (-).
3. Safety
3.1 Specified Conditions of Use
This machine is designed for the extraction of wood and plastic chips as well as wood dust from woodworking machines.
Inflammable gases (eg paint or varnish mist) and explosive media must not be extracted.
CAUTION - This device is not suitable for extracting dust that is hazardous to health.
Industrial use, use in vocational training, in schools, etc ist not permitted.
Polyethylene dust collection bags of 0.10mm minimum thickness must be used. When using dust collection bags made of other materials, these must have the same strength against mechanical damage.
Any use other than the use specified above is not allowed. Any modification of the machine or use of spare parts not tested and approved by the manufacturer may cause unforeseeable damage!
3.2 General Safety Instructions
- When using this tool observe the following safety instructions, to exclude the risk of personal injury or material damage.
- Please also observe the special safety instructions in the respective chapters.
- Also follow the instructions of the woodworking machine the dust extractor is connected to.
In case of a fault unplug the machine immediately. Never start the machine without the upper dustbag in place. - Use the machine only to extract dust from woodworking machines.
- Ignition sources must not be extracted.
- Should the machine catch fire, unplug immediately or interrupt the power supply by turning the fuse/circuit breaker OFF. Extinguish the fire immediately with
water or foam. Do not operate the machine again.
WARNING - Operating staff must be provided with appropriate instruction on how to use these machines.
Always pay attention to the stability of the device. The ground must be firm, horizontal and even. Secure the device against rolling away, tilting and slipping.

General hazards!
- Keep your work area tidy - a messy work area invites accidents.
- Be alert. Know what you are doing. Set out to work with reason. Do not operate the machine.
- Do not operate the machine if you lack concentration.
- Consider environmental conditions: keep work area well lighted.
- Do not operate the machine near inflammable liquids or gases.
- This machine may only be started and operated by persons familiar with the operation of electric tools who are aware of the risks involved by using such machine.
- This device can be used by children from 8 years of age and, in addition, by persons with impaired physical, sensory or mental ability or lack of experience or knowledge if they are supervised or have received induction training on the use of the device and un
derstand the associated risks.
Children may not play with the device.
- Cleaning and user maintenance may not be performed by children unless supervised.
- Keep bystanders, particularly children, out of the danger zone. Do not permit other persons to touch the machine or power cable while it is running.
- Do not overload tool - use it only within the performance range it was designed for (see "Technical Specifications").
- Turn power off if the tool is not used.
Danger! Risk of electric shock!
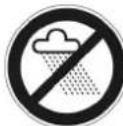
WARNING - This device is only intended for dry use.
- CAUTION - This device is designed for use indoors.
- CAUTION - This device may only be stored indoors.
- Do not expose machine to rain.
- Do not operate machine in damp or wet environment.
- Prevent body contact with earthed objects such as radiators, pipes, cooking stoves, refrigerators when operating this tool.
- Do not use the power cable for any purpose it is not intended for.
- Make sure the power cable is unplugged before servicing or troubleshooting.
- At low temperatures, the device may not be used outdoors.
Hazard generated by insufficient personal protection gear!
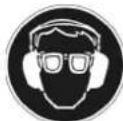
- Wear hearing protection.
- Wear safety glasses.
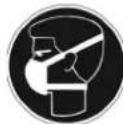
- Wear dust mask.
- Wear suitable work clothes.
- When working outdoors wearing of non-slip shoes is recommended.
Risk of injury by inhaling wood dust!
-
Dust of certain timber species (e.g. beech, oak, ash) can cause cancer when inhaled.
Make sure that as little as possible wood dust can escape into the environment: -
remove wood dust deposits in the work area (do not blow away!);
- fix any leakages on the dust collector;
- ensure good ventilation.
Hazard generated by modification of the machine or the use of non-OEM parts not tested and approved by the manufacturer!
- Assemble the machine in strict accordance with these instructions.
- Use only parts approved by the manufacturer. This applies particularly to safety
devices (see Spare Parts List for stock numbers).
- Do not change any parts.
Hazard generated by tool defects!
- Keep machine and accessories in good repair. Observe the maintenance instructions.
- Before each use check the machine for possible damage: before operating the machine carefully check all safety devices, protective guards and slightly damaged parts for proper function. Check to see that all moving parts work properly and do not jam. All parts must be correctly installed and meet all conditions necessary for the proper operation of the machine.
The machine must not be operated when the electric motor, ON/OFF switch or fan housing are damaged - Never use the machine if the power supply cable is damaged. Risk of electric shock. Have a damaged power supply cable replaced by a qualified electrician immediately.
- Damaged protection devices or parts must be repaired or replaced by a qualified specialist. Have damaged switches replaced by a service centre. Do not operate machine if the switch can not be turned ON or OFF.
3.3 Symbols on the Machine

Danger! Disregard of the following warnings can lead to severe personal injury or material damage.
Read instructions.

Wear safety glasses and hearing protection.

Wear dust mask.

Do not operate tool in damp or wet environment.

4. Assembly
- Place fan housing (7), with the motor facing down, on a workbench or similar stable support and set it level with a block of wood or similar.
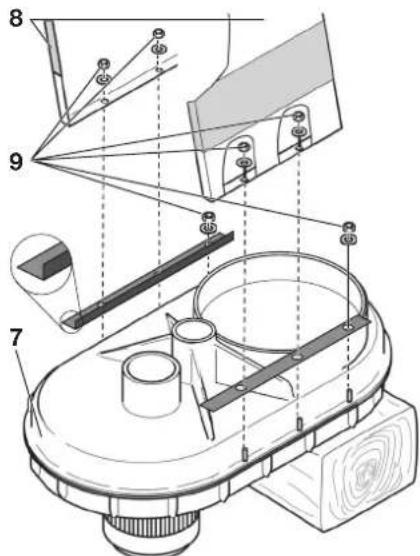
- Loosen the 3 hexagon nuts and washers (9) shown on both sides of
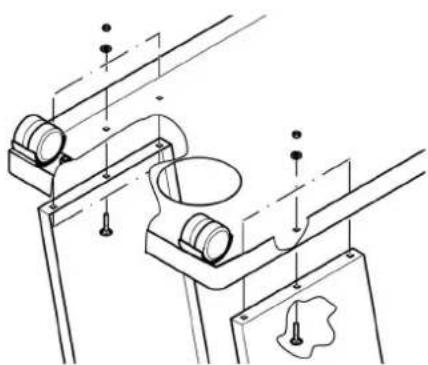
the ventilator housing. Mount the 2 plates as shown on the bolts. Guide the two side panels (8) over the bolts with the adhesive label pointing outwards. Fit all washers and re-tighten all nuts on the ventilator housing.
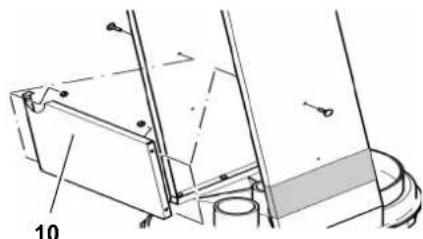
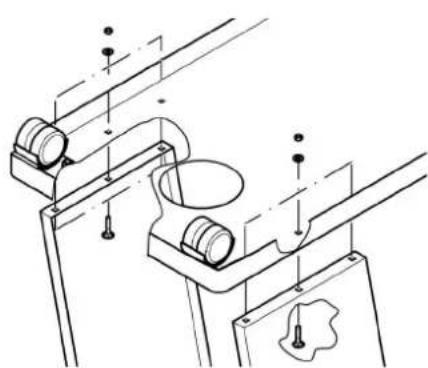
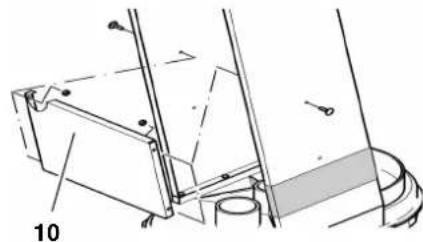
- Install the cross plate (10) between the side panels using carriage bolts and hex flange nuts.

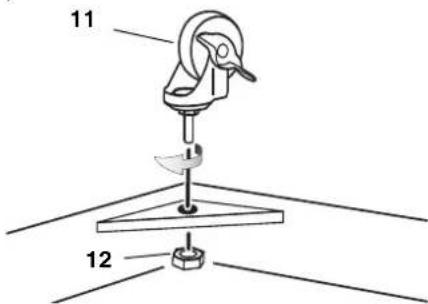
- Screw one castor (11) to each corner of the bottom panel. Secure each castor with a hex nut (12).
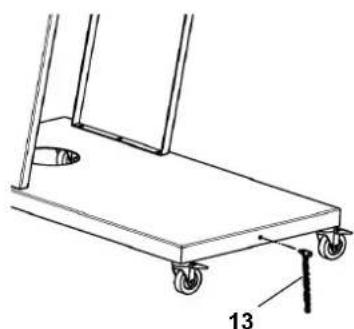
- Screw the earthing chain (13) into the bottom panel. Secure the earthing chain with a hex flange nut.
- Place the thus prepared bottom panel on the side panels and secure
with carriage bolts and hex flange nuts. Then check all screws and nuts for tightness and place machine with the castors on the floor.
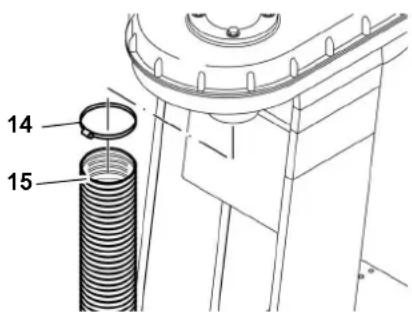
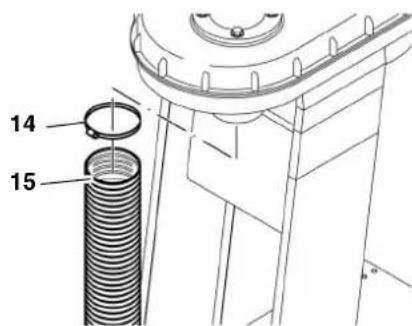
- Put the hose clamp (14) on one end of the suction hose (15), then push the hose on the suction port below the motor. Tighten the hose clamp.
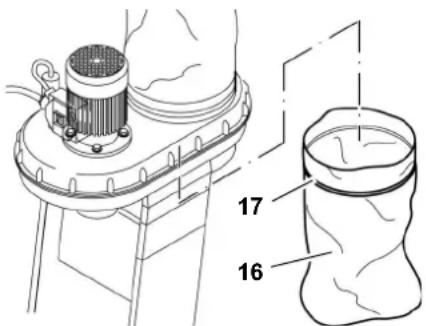
- Clamp dust collection bag under the fan opening. Fit a sufficiently long and wide dust collection bag (16) (eg600× 900mm) and tighten it with the tightening strap (17).
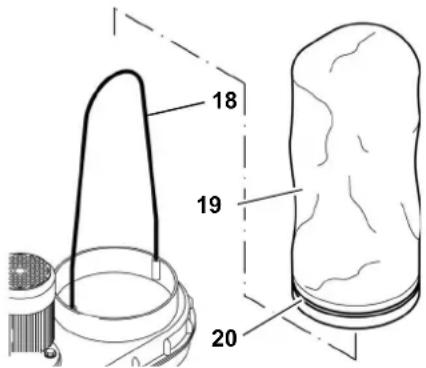
- Insert the rod (18) into the two holes on the edge of the upper dust bag opening. Thread the clamp ring (20) through the guide sewn into the dust bag (19). Fit the dust bag over the dust bag opening. Tighten the clamp ring.
4.1 Mains Connection

Danger! High voltage
- Operate this machine in dry surroundings only.
-
Operate machine only on a power source meeting the following requirements (see also "Technical Specifications"):
-
outlets properly installed, earthed and tested.
- outlet protected by a 10A fuse (time-lag);
- mains voltage and system frequency conform to the voltage and frequency shown on the machine's name plate;
-
fuse protection by a residual current device (RCD) of 30mA sensitivity.
-
Use only oil-resistant extensions cords class H07 RN-F. Lead cross-section should be at least 1.0mm^2 . Protect the power supply cable from heat, aggressive liquids and sharp edges.
- Run the power supply cables in a way that they do not interfere with your work and will not get damaged.
- Do not pull on power supply cable to unplug.
4.2 Electrostatic Charging
The entire extraction system of the machine is constructed of electrically nonconductive components. If the suction hose is connected to electrically conductive parts (eg metal dust chutes or suction pipes), they need to be earthed to dissipate possible electrostatic energy.
On the machine no plastic parts may be replaced by metal parts. The suction hose in particular must not be retrofitted with a metal spiral. In this context small metal parts like screws and hose clamps are harmless.
Use only genuine spare parts. These spare parts are designed for the machine.
4.3 Overload Protection
To protect the electric motor against overloads it has a motor protection built
in. If the motor is overheated or overloaded the machine will shut off.
In this case the motor can be restarted after a few minutes of cooling down.

Note:
If the machine is shut OFF repeatedly by a tripped motor protection
(2-3 times) within a short time, the machine needs to be checked by a qualified electrician, before attempting to turn it ON again.
5. Operation
- Place the dust extractor next to the woodworking machine in a way that it will not interfere with your work.
- Connect the suction hose to the dust extraction port of the woodworking machine.
- Place the power supply cable on the floor and plug it into an outlet.
-
Turn the motor ON and wait a few seconds, until the fan has reached full speed.
-
If the upper dust bag does not fill with air after a few seconds, pull it up.
-
Only now start the woodworking machine and commence with your work.
- Let the dust extractor postrun for at least 10 seconds after the woodworking machine has been turned OFF.

Note:
For extended daily use of your woodworking machine an automatic power relay for the dust extractor would be of advantage. This relay turns the dust extractor time-delayed ON and OFF once the woodworking machine is turned ON or OFF respectively.
This automatic power relay is available from the manufacturer in two versions (see chapter "Available Accessories").
6. Care and Maintenance

Danger!
Prior to all servicing:
-
turn the machine OFF,
-
Pull out the mains plug and store it in such a way that the person using the device can see that the plug is removed.
- wait until the machine has come to a complete stop.
Repair and maintenance work other than described in this section should only be carried out by qualified specialists.
- Replace defective parts, especially of safety devices, with genuine replacement parts only. Parts not tested and approved by the manufacturer can cause unforeseen damage.
- Check to see that all safety devices are operational again after each service.
6.1 Maintenance
Before switching ON
Visual check to see if power supply cable and power cable plug are damaged; have faulty parts replaced by a qualified electrician.
The machine requires no maintenance. However, before switching ON perform the following checks.
- Check all screw connections! Retighten loose connections.
Is the switch housing, motor or fan housing damaged? Have these parts immediately replaced by a qualified electrician.
Is the upper dust bag or suction hose damaged? Replace the damaged part(s).
6.2 Cleaning
In event of reduced suction power:
- Loosen the suction clamp and pull off the suction hose from the union beneath the electric motor.
- Clean the grille.
-
Reattach the suction hose and hose clamp and tighten the hose clamp.
-
Wipe work stand and fan housing with a moist cloth.
- Motor and ON/OFF switch may only be cleaned with a dry cloth.
- The upper dust bag should only be beaten (make sure dust collection
bag is installed on the underside of the machine).
- Change the chip collection bag when it is about 4/5 full.

6.3 Storage
- For storing the dust extractor, place the suction hose over the motor and insert the end in the opening in the base plate.
Danger!
- Store the machine in such way that it can not be started by unauthorised persons.
Make sure that nobody can get hurt by the stored machine.

Caution!
- Do not store machine unprotected outdoors or in damp environment.
6.4 Repairs
Danger!
Repairs to electric tools may only be carried out by a qualified electrician!
If the mains connection cable of this device is damaged, it must be replaced by the manufacturer or the Customer Service department of the manufacturer or a similarly qualified person to prevent endangering personnel and property.
Contact your local Metabo representative if you have Metabo power tools requiring repairs. See www.metabo.com for addresses.
You can download a list of spare parts from www.metabo.com.
7. Available Accessories
For special tasks the following accessories are available from specialist retailers:
A Automatic power relay order number: 0913014626 ALV 1, single-phase 230 VAC, for time-delayed switch-on or switch-off of the dust extractor after the woodworking machine has been switched on or off.
B Automatic power relay order number: 0913014634 ALV 10, three-phase 400 VAC, single-phase 230 VAC
C Filter cartridge order number: 0920016529 filters out ultrafine dust particles, effective filter surface 52m^2
D Chip collection bag order number: 0913017617
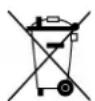
8. Disposal
Power tools should not be disposed of with household waste. According to European directive 2012/19/EU on waste electrical and electronic equipment used pow
er tools must be collected separately and taken to an appropriate recycling facility.
Contact your local council for the disposal options for your old tool.
The tool packaging is 100% recyclable.
9. Technical Specifications
| Voltage | V | 220 - 240 (1~50 Hz) |
| Motor capacity kW 0,55 | ||
| Rated volume flow m | 3/h 600 | |
| Associated vacuum Pa 740 | ||
| Max. volume flow m | 3/h 900 | |
| Max. vacuum Pa 1600 | ||
| Suction hose length mm 2500 | ||
| Suction hose diameter | mm | 100 |
| Suction hose connection | mm | 100 |
| Dust bag volume | dm3 | 65 |
| Weight (with empty dust collection bag) | kg | 22 |
| Noise emission according to EN 60335-2-69 | ||
| Sound power level LWA | dB (A) | 98,25 |
| Sound pressure level LPA | dB (A) | 85,5 |
| Measurement uncertainty K | dB (A) | 3 |
m = 311
-PykoBoIDCTBO no 3KcnIyataaun
Copephanhe
1.BHeuHn BnD yCtpoIcTbA (HOMNLeKTH NOCTABH)
2.ПочNTaHTeВперByIO oupeBb!
3. Be3onachocTb
3.1PpimHeHne no Ha3HaueHHO
3.2 O6uhe yka3aHnno 6e3oNaCHO CTN
3.3 CnMBOJIbHa yCTPOIcTBe
- MoHTaH
4.1 PoiKJIIOUeHHe K cTeN
4.2 CtaTnueckn 3ap
4.3 Überlastschutz
5.3nnyataua
6. TexHnueeckoe o6cnyHnBaHne n yXoD
6.1 TexHnueckoe o6cnyHnBaHne
6.2 YnCTka
6.3 XpaheHne yctpoNCTBa
6.4 PeMoHT
7. DocTynHbIe akceccyapbl
8.утlinиация
9. TexHHueckHe xapaHTepnCTnKu
TO6bI NCKHIOHTb ONaC-HOCTb IJIa IIODeH NIMyUe-
CTBa, npn HcnoJb3ObaHn DaHHoro yCTpOiCTBa CO6IouaIte cJeDyUoIne yKa3aHnI NO 6e3OnaCHOCTN.
- 06paTHe BnMaHne Ha Oocobie yKa3aHnI NO 6e30-NaCHOCTN, IMeUcNEcB HeKOTOpbIX rlaBax.
Takkeco6IoudaIteHCTpyKUIO NO 3KcNlyaTaUuNE DepeBOO6pa6aTBiBaIOU-0eRO CTaHka, ONUCTKy KOTOPORo IPOUN3BOJNTe.
При BOЗнКHOBEHIN HeNCI npaBHOCTe HEmdJIeHNO BbIbTe BnIKHy n3 pO3eTKN. Hn B Koem clyuae He BKIOUaHTe MaUNHy CO CHrTbIM BepXHM MeKOM dIra c6opa nbIIN.
IcnoJb3yIeMaunHy TOnbKOdIaYnCTKn DepeBOO6pa6aTbIBaHOuX CTAH-KOB.
He nbitaiTecb y6paTb eHCTOCHNI BO3rOpaHn. - Pn BocnIaMeHnn yCTpoNCTBa HEmeIeHNO BbInbTe CTeByIO BnIKy I3 po3eTKu NIN OTHIOUHTe ceTeBOI npEOxpaHNTeJIb. He3aMeDInTeJbHO nOTyI INTE OROB BOOIN NIN neHON. He BkIoUaHTe YCTPONCTBO NOBTOPNO.
IPEDyPENHEHNE-O6cnyKnBaUoNn nepcoHaIdoJIKeH6bITbHaJIeJkaaUMO6pa3OM npOH-CTpykTnpOBaH NO npabINam 3KcnLyatauNn DaHHbIX MaunH.
Bcerda cneiTe 3a yctOuHBOCTbIO np60pa.OcHOBaHHe DOJIHHo 6bITb IpOuHbIM, TOpN3OHTaJIbHbIM INPOBHbIM. He donychaIteOTHaTbIBaHnI, ONpOKnIbI
BaHnI N cKoJIbJKeHnI npN-6opa.
Onachoctb obuero xa-paKtepa!
CoepHnTe BnpAKe BaWe MeTo pa60TbI-6ecnopAnK Ha pa6OeM MeCTe MoKHe IpNBecTH K HeCCHaCTHOMy ClyuAo.
Будte octopoxHbI.CleDnTe 3a Tem-,чTo DeJaTe.Похinte K pa6Ote Oco3-HaHNo.He nCnoJb3yInTe yCTpoiCTBO,ecnBbl He cocpeDoTOyeHbI.
He nCnoJb3yInTe yCTpoi-CTBO,ecnBbl HaxoNTecb NOd DeIcTBnEM aIKOROJI, HapKOTnuecknx BeueCTB IIN MeNkAmEHTOB.
- YUHTbIbAaTe BIIHHe OKpyKaIOuSeI cpebl. I03a6ObTbTeCb O XOpOWeM OBeUeHN.
He noJIb3yIteCb daHHbIM yCTpoIcTBOM pIaOM C roIPOUHMn HNDIOCTaMn IIN ra3amN.
Данhoe yctpoicTBO pa3peuaeTcI NCIOJIb3OBaTbTOJIbKO TEM JINUcAM, KOTOpbIe 3HaKOMbl c pa60ToJ 3JIeKTPoPn6OpOB N 3HaHTO 6O BCEx ONaCHOCTx, CB3aHHbIX C O6paueHHeM C HIMN.
3THM npnbopom MoryT NOIb3OBaTbcra DeTn CTap-We 8 IeT, a TaKHe Iuca C OrpaHnueHHbIMN Hn3NueCKHMn, OprAHOJIeNTNUceKNM NIN MeHTaJIbHbIMN BO3-MOJHKHOCTaMn INN C HeIOCTaTHOM ONbITa N 3HaHn, ecIn OHn pa6OtaIOT NOD KOHTPOJeM INN pOnHCTpyKTHnpOBaHbIB OTHOWE
HIN 6e3oNaCHO hKcNlyaTaun npnbopa nCBraHHbIX C Hm ONaCHOCTeI.
- DeTAM 3aPpeSeHo nIgpaTb C npnbopom.
- DeTAM 3aIpeuSeHo 6e3 npnCMOTpa BbIIOJIHrTb ONUCTKHy I NOJIb3OBATeJIbCKoe TexO6cJyJHbAHne npn6opa.
He donyuchai Te noBJIeHnI NOCTOPOHHX,OCO6EHoTeiB ONaCHOH 30He. He nO3BOJIAIte dpyrIM KaCatbCayCTPOINCTBa NIn CeTeBOrO Ka6EJa BO Bpempa60Tbl.
He donyckaIte neperpy3- KI yCTpoNcTBA -NCNoJIb- 3yIte yCTPOINcTBO TOLbKO B TOM dHaNa3OHe MOUHOCTe, KOToPbYka3aH B TEXHHueCnX xapaKTePNCTNKax.
OTKJIIOUaIte yCTPOIcTBO, cIN He NOJb3yeTECb NM.
Onachoe 3JeHTpueCTBO!
I PEPENPEHDEHNE - DaaHbI np6op npedHa3NaueH ToJIbKO dJa cyXOTo pImeHn.
BHIMAHNE-ДaHHbI npn6op npedHa3HaueHTOJIbKOДЯИСПОЛБ3OBa-HNBAHHTPNOMeUeHIN.
BHIMAHNE-ДaHHbI npnbop pa3peucho xpaHnTb TOnbKO BHyTpN NOMEHn.
He octabIyTe daHnoe yCTpoNCTBO NOd DOxDEm. He nCNoJIb3yIte yCTpoNCTBO BO BlaJHOn aTMOC-phipe.
BoBpempa60tbc daHbIM yCTpoINCTBOM n36eTaIte TeLeChoro KOHTaTc 3a3eMJIHHbIM O6OpyOBAHNEM (HaNPmEp, 6aTapeMaN, Tpy6amn, PnITAmn, XoIoNDNbHNKaMn).
He nCnoJIb3yIte cTeBoi Ka6eJIb He IIO Ha3HaueHnIO.
Ipeep npOBeHnemTexHHueCKoO 6cLyKHBnHaYbEdNTecb,TO yCTpOHCTBOOTCOEHNHeHOOTcTn.
- Пи НИЗКИХ Temпературах
3анрешино ИСПОЛБЗОВаТь
прибор ВHE РOMEЧЕни.
Onachoctb n3-3a He-doctaTOUHOro 06bema CpeDCTB INHINBnDaJaIbHOJ 3aunTb!
HaedeBaTe HayuHnKn.
HaedeBaIte 3aunTHbIe ouKn.
- Haidebaite pecesnapatop.
HaeneBaIte cneOeJy.
- Pn pa60tax BHe nOmeHnI peKOMeHdyetc HaTeBaTb HeCKoJIb3aIyU ObYBb.
60yem yacTke (He cdyBaTb!);
- YcTpaHnTe HerepMeTNUHOCTN BbITJHKHOI CNCTEMbl;
-ObecneBteXopoUyu BOENTnlaIIO.
OnachocTb BHeceHn TexHnuecKnx n3MeHEnn HnN nCNoJIb3OBAHHaNe, He cepTnΦnUnpOBaHHbIX N He pa3peWeHHbIX n3- roTOBHTeJem!
CMOHTnpyTe yCTpOInCTBO TOUHO B COOTBETCTBm C DaHHbIM pyKOBOdCTBOM.
IcnoJb3yIte ToJIbKO pa3peWeHHbIe N3rOToBHTeJIemDeTaII.N BOCo6eHocTn3TO KacaETcN pPeOxpaHITeJIbHbIX nPncNOC6JIeHNI (Homepa IJIa 3aKa3a CM.B nepeUHe 3aNaChbIX Ya-CTe).
He BHOcHTe N3MeHEny B DeTaJIH.
OnachbIe deΦeHTbl -ycTpoiCtBO!
- Obecneybe TuaTeIbHbI yXoJ 3a ycTpoiCTBOM. CJeDyuTe INcTpKuM NO TexHHueCKOMy O6CnyHnBaHNIO.
KaHdbpa3 neped hauaIOM pa60tbI npOBepnTe yCTpOyCTBO Ha npEdMeT NOBpeJDeHn: npeed npimHeHem ycTPOYCTBa TuaTeJIbHO npOBepbTe npEOxpanTeNbIe N 3aunTHbIe pncnocO6JeHna TaKHe He-3HaHTeJbHO NOBpeXdEHbIe DeTaIi, Ha npEdMeTnxTexHnueCKoN
HcnpaBHOCTN I DOJXHOI pa6oTOcNOcObHOCTN. Y6eDNTecb, YTO NOBnKHBie DeTALIN cnpaBHO FyHKUONHpyOT N He 3aKInHnBaHT. Bce DeTALIN DOJIKNbI 6bITb PpaBnIbHO CMOHTIOPOBaHbI UyOBJeTBOPaTb BCEM yCIOBnAM, HeO6xOIMMbIM IJI PApBnIbHOI pa6oTbYCTPOINCTBa.
MaunHy 3anpeucaetc HcNoIb3OBaTb,ecnIOBpeKdEHN 3JeKTpOdBnraTeIb, BbIKIouaTeIb IIN KOpNyc BeHTnlaTopa.
HnB KOem Cnyaehne NOIb- 3yntecb yCTPOINCTBOM, ecNI NOBpeKdEHN CeTeBOH Ka6eJIb.CuueCTByeT onacHOCTb NopaKeHnA 3JeKTPnueckm TOKOM. NopyHuTe CneuaJINCTy- 3JeKTPoTEXHnKU He3aMeJIITeJIbHO NOMEHrTb NOBpeKdEHHbI CNTeBOH Ka6eJIb.
- IOBpeJdeHHbIe 3auntHbIe npncnocO6JIeHnI INIDeTaNIOJIHHbI 6blb OTpeMOHTnpOBaHbI INI 3aMeHeHbIB aBTOpN3OBaHHOM cepBnCHOM cHTpe. DObepbTe 3aMeHy NOBpeKdEHHbIX BbIKIOUaTeJe CEPBnCHoMactepcKo. He noJIb3yInTeCb yCTpOiCTBOM,ecNI BbIKIOUaTeJIb HE BBINOJIHReT CBOx FyHKuN.
3.3 CnMbOJIbI Ha yCTpOu-CTBe

Onacho!
HecoblodeHne
CleedyuOuNX npeDynpexKdEHN MOKeT npBecTu K TJeJIbIM TpaBMam INI
NOBpeHdEHHIO -mMyeCTBa.

IpoHTaTe pykoBODCTBO NO 3KcNly-atau.
HaedeBaTe 3aunT-HbIe OUKN- HauuHnKn.
HaedeBaIte pecnnpaTOp.
He pa6oTaIe C yCTPOINCTBOM B yCIOBnX BnaHHoH aTMocΦepbl..
4. MoHTaX
- PIOJIOKHTe KOpNc BEHTINrTopa (7) DBIRaTeIeM BHN3 Ha BepCTak NIN HHyIO pOCHyIO NOBepxHOCTb N BblPOBHnIe T B ROPN3OHTaIBHOI NIO-CHOCTn C NOMOJIbIO DEpeBraHHORO 6pycka NIN aHaIOruHORO npedMeTa.

2.Ocna6ntb3n06paKeHHbixWeCTn- rpaHHbIXraIKN N NOkHaIbIXwa- 6bl(9)cO6ex CTOPOH KOpnyca BEHTnIaTopa.YCTaHOBnTB Ha BnH- Tbl2 nlaCTnHb, KaK nOKa3aHO Ha pucyHke.IpoBeCTn Obe 6okOBbie INaCTnHb(8)HaBDHTAMN,YTo6bl HAKLeKa npn 3tOM 6blaO6paueHa Habepx.CHOBa 3aΦHKcnpoBaTB BCEraIKNIOkHaIbIe Wai6blHa KOpnyceBEHTnIaTopa.
3.C NOMOJIbBOBTOB C NOJyNOTaHONI ROJOBKO IN IeCTINrpaHHbIXHNKHXraek3aΦHKcpyTe nonepeHuOIIactHy (10)MeKdy6oKOBbIMNIIaCTINHAM.
4.ПиИВHNTIte NO OJHOMy HAnpabJIaIIOUeMy poNkY (11)В KaHdOM yrIyOnOpHoN INaCTINbI.3aФИKcHpyTe poJInKII WeecTnRpaHHbIM raKaMn (12).

5.BBnHTTe ueb 3a3eMHeHn(13)B OONOPHyIOIaCTHy.3aΦHKcpyNe TceNb 3a3eMHeHn WeCTIRpaHHO Hn3KoIraKoI.
6.Co6paHHyIO onOpHyIO nlaCTnHy yIooJIte Ha 6OkoBbIe INaCTnHbI u 3aKpeNITe BnHTamC noJyNotaHOI rOLOBKOu IueCTnRpaHHbIMN
HINKIMNraHkAMn.3aTe npoBepbTe NIOHTHOCTb NOCAHNBCEX BNHTOB IN NOCTaBbTe yCTpOJcTBa Ha NoI POJIHKAMN BHN3.
- HadeHbTe XOMyT (14) Ha KOHeu BCacbBaHOUero WJahra (15) n HaCAdHTe erO Ha BCacbBAIOUm WtTyuep noD 3JeKtpoBnRaTeIem.3aTAHHTe XOMyT.

8.3aKpeHnTe MeWOK dIa c6opa CTpyHHIOIo OTBepCTHeM-CTpyHKOyJIOBHTeJIe.MeWK (16)TOCTaTOHOIINHbI NHNPHI (HaNPIMep,II.600×900MM) 06TARHTe 3aHHMOHJeHTO(17) n 3aΦHKcypYte.
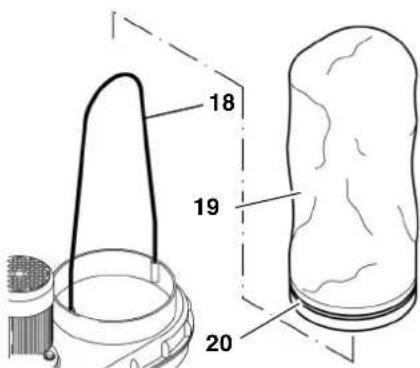
9.BCTaBbTe KpyTbI b CtepeKHeb (18) B DBA OTBepCTIN NO KpOMKe BepXHe- ro pactpy6a dN Ma MeuKa dN c6opa Nbln. PpoEnbTe CTJHHOE KOJIbO (20)Yepe3PiouNTyO HAnpaBIAKOUyOB MeuKe dNc6opa Nbln (19).HaedeHbTe MewOK Ha nbJeOTBOHbI paCTpy6. 3aTaNHTe CTJHKHOE KOJIbO.
Ipeep KaHdbIM BHHIOueHHem
Bn3yaIbHbI KOHTpoIb CeTeBOrO Ka6eIy H BuIKH Ha npEIMet NOBpeKJdeHIN; 3aMeHy HeNCnpaIBhIX DeTanei NOpuyITcneuaNInCTy-3JeKTPnuKy.
YcTpoIcTBo He Tpe6yEt TexHnueckoro 06CJIyKINBaHnR. OndaHO KaKDbI pa3 nepei Haayalom pa60TbI BbInOnHnTe cIeMyUOuI npOBepHy.
- Поберпье BCE BИНTOBье COEДИЕHЯ! 3aTЯнITE OcIa6JIeHьIE BИHTOBье COEДИЕHЯ.
He nobpeKdEhbln Kopnyc BbIKIOu- yateJI, 3JIeKTPOBnIgATEJb IIN Kopnyc BeHTnIaTopa? NopyHITe CneuaJIHCTy-3JIeKTPnKy He3aMeIJIHTeJIbHO 3aMeHHTb DeTALN.
He nobpeKdEHN BepxHm Mewok dIra c6opbl nbIIN nBcacbBaIO- uin wlaHr? 3aMeHnTe nobpeKdEHHbIe deTALN.
6.2 Ynctka
- Pn yMeHbWeHm MOuHocTHBcAcbIBaHHa:
-OTcoeHNHTb WlnaHROBbI XOMyT N BCaCbIBaHOUsN WJNaHr OT BcCbIBaHOSe rno naTppy6Ka nOd 3JeK-TPoDBnRaTeJEM.
-OuHCTnTbpeWTeKy.
-CHOBA NOCDOEHNHTB BCACbIBaIOUHJUHn UHaHn UHaHRObI XOMyT, IOCNE YERO 3aTHHyTb XOMyT.
OuHuaTe Waccn H Kopnyc BeHTNJIrTopa BlaJHHoT TpIKNoH.
3NeKtpoDBuratBb BbIKHuaTeB pa3peaetcYHCTHTb TOJbKO cyxOy TpIKNo.
BepxHmMeoKdIc6opapbInn DOCTaTOHO npOTo Bb6ntb (CneINTe 3a TeM,HTo6blnpn 3TOM nOy cTPOcTBOM 6bl 3aKpePJIeH Me-ooK dIa C6opa CTpykKn).
MeJOKIJIc60paCTpyKHN3aMeHnTe,KAKTObKOOH3aIOJHHTbcN npImepHOHa4/5
6.3 XpaHeHne yCtpoNCTBa
HaBpemXpaHEnnCnCTEmbIydaHEnnCTpyHKN O6epHNTe BbyTHe HoiShaHOrOIN Pa3 BOKpyr DnRaTeJIa, a KOHeu ShaHra BCTaBbTe BOTBepCTHe B ONOPHOIIaCTHe.

Onacho!
XpaHInTe yCTpoNcTBo TaK, YTO6bIM He MOrJIH BOCnOJIb3OBA TbCra NOCTOpOHHe.
- Y6eIITecb, YTO HIKTO He CMOKET nope3aTbc o cToaee ycTpoiCTBO.

BHHMaHHe!
He xpaHnte He3aUHueHHoe yCTPOINCTBO NOID OTKpbITbIM He6OM HIN BO BIAJHKOM aTMocfepe.
6.4 PeMoHT

Onacho!
PemOH TAnEeKtpOnpnpoB OcyuEcT BJIeTcTOIbKO CneuaHnCTaMn-3JeK TpoTeXnKaMn!
B clyae noBpeKdHnA cTeBOro Ka6eJI dAnHoro npnbopa B ceJx 6eOanchoCTn He0bXoDMo oBeceuHTb erO3aMeHy n3rTOBtJeM, CneuaJI-CTOM cepBnCHOH cLyK6bl N6o DpyTmLIuOM aHaIorHHo KBAInΦnKaun.
IIO BOIpocam pemOnHa 3JIeKTPoHHCTpymENTOB Metabo o6paauaTeCbBpeHNoHaJIbHOe npedCTaBHTeJIbCTBOKOMNaHm Metabo.ADPEC m.Ha caTewww.metabo.com.
IpeuHn 3aNaChbIX YacTeM MoKHO 3a- rpy3ntb c caTaNw.metabo.com.
7. DocTynHbIe aHceccyapbl
B CneuHaJIIm3npuOBaHHbIX MaRa3InHax Bbl MoKeTe npNo6peCTn CJeIyoUne Akceccyapbl, KOToPbIE NOMOry peJHTb BAM Ooc6bIe 3aDaYi:
A O60pyoBOaHne IJIa ABToMaTHUeCKORO BKIOUOHeHnN2IIN3aKa3a:0913014626ALV 1,1~230B,IINBIIIOUeHnN BbIHIOUeHnNC3aDEpKKo CnCTEmbYdaJeHnCTpyHKn B MOMENT BHIIOUeHnN BbIKIOUeHn DEpeBOO6paBaTaBAIOUeO CTaHa.
B O6opyOboaHne nIaABTomHe-CKOro BnIOUeHnNo 13aKa3a:0913014634ALV 10,3\~400B,1\~230B
C NpTPOH HnIbTpTa No 3aHa3a:0920016529 YnaBnBaETcMyIO MeIkyIO nbIb. HtpyOuaNOBepxHOCTb5,2M²
D MewoK dIa c6pa cTpyKKn No 13aKa3a:0913017617
8. Ytvn3aun
3NeKtpnpnbOpbI He OTHOCATcR K 6bITOBMy Mycopy. Corlacho ebponeynckoI npKeTnBe 2012/19/EU no otpa6oTaHHbIM 3NeKtpnueCKMn 3NeKtpOHbIM
npn6opam nCnoIb3oBaHHbIe 3JIeKtpo npn6opbl noIeHaT c60py OTdIbHo OT npOeRo Mycopa I NOcIeMyoUeI eKOIoRnueckn 6eONaHOB TOpNHO nepepa60tke.
OB3MOXHHOCx yTNIN3aun OTCnyHNBwero npnbopa Bbl MOKeTe y3HaTbB aDMNHnCTpaun BaWero ropoDa nHnHaceJIeHHoro nyHtA.
YnakoOHybMaTePnaI yCTpoNCTBaHa 100% nOxOHT dIa BTOpHNo nepepa6oTHI
9. TexHnuechne xapaKTepuCTnHn
CtpaHa n3rOToBJIeHn: KHTaI
PpOu3BODHTeIb: Metabowerke GmbH",
Metaboallee 1, D-72622 Nuertingen,
Германя
3aBOd-n3rTOBNTeJIb:
"Metabo Powertools (China) Co. Ltd."
Bldg. 7, 3585 San Lu Road,
Pujiang Industrial Park, Min Hang District,
Kntai
HmnpTeB Pocn:
OOO"Meta6oEbpaa
Pocca,127273,Mo
yI. Bepe3oBa aIJIe, 45 a, cTp 7, oΦnc 106
ten: +7 495 980 78 41
Data npo3BOCTBa 3aunfoB0bAHa B 10-
3HaHOM CEPINHOM HOMeHHTpyMeHTa,
yha3aHHOM Ha ero shnIbndke.1 r uΦpa
0603Haayet rOd, HanpIMep «4» 0603HaayeT,
TO n3dJIe NpOu3BeDeHcB 2014 roy. 2 aN
3raufoob03HaayoHOMepMecaB
rOy npOn3BOcTba, HAnpImep «05» - Ma
TapaHTnHbI cpoK:1 roD c DaTb npOdaHH
CpOK CnyK6bI HNCTpyMeHTa:5JIeT C DaTbI
H3ROTOBJIeHH
1. Kopotkni orla npulaay (komnlehtaia)
OprAHn KepyBaHHa
1MiwoKdIa3bOpnynny
2 EneKtpoDvBryH
3 BmMkaqi BBIMKHeHHBIMKHeHH
4 Kopnyc BENTNIJrTopa
5 Miiok dny Tnpn
6 BiDCMOKTOBaIbHn IJIaHr
7PykaIraTpaHcnOpTyBaHHa
Dokymentaia, 0o noctaactbca 3 npnaadom
- Ihctpykui3 ekcnnyatauii
3mict
- HopotKn orIa npHa dy (HOMPTaia)
- CnoaTHy npOHTaTn!
- Texhika 6e3neKn
3.1 BnKOpNCTaHHa 3a BnKOpNCTaHH
3.2 3aJIbHi npaBnla texHikn6e3neKn
3.3 Cnmboln Ha npniladi - MoHTaX
4.13'eHaHHa 3 MepeKeio KINBHeHH
4.2 EneKtpocTaTuHn3apJd
4.3 3axnCT BiD npeBaHTaKeHHA - Eknnyataqia
- Texhichne obcnyrobyBaHHaDOrnA
6.1 TexhiNe 0cbnyroByBaHHa
6.2 OuHnEHHa
6.3 36epirannn npnila
6.4 PEmoHT
7.Пиладд - Ytvnizuaia
- Texhi xiapaKTePnCTHNI
2. CnoouatHy npoHTaTn!
KepiBnTBO 3 ekcnnyatau cIaJeHO TaK, uo6 Bn uBnIdo Ta 6e3neH0 noaII npauOBaTH BaUM IHCTpyMeHTOM. Ocb KopoTa Bka3IBKa, Jk Tpe6a YntaTH YHHe KepiBnTBO 3 eKnnyatau:
- Ipeep noaTkom ekCnIyatauii do KINr npOHTaTe YHHe KepiBnTBO 3 ekCnIyatauii. OcObBy yBary npdiitb npabnam TexhiK6e3neKn.
LjaHCTpyKzir 3ekcnnyatauoiopieHToBaHa Ha IIOJe 3 6a3OBHMNTexHHMM 3HaHHyMa,Heo6XiHMMn DnIpoBToN 3PnCtPOAMn, 0o ONcaHi BciinHCTpyKzii. KaUO y Bac BiDcyTHiIDocBId pObToN 3 TaHmPiNCtPOAMn, CNoaATkyCKOpncTaTecra DonomorOIODOCBiDyeHNx faxiBvB.
-36epiraIte pa30 3 iHCTpyMeHTOM yci DOkymeHTN, uO6 y pa3i Notpe6n 3BepHyTNCr Do HNX 3HOBy. Ha BnnaDOK BnHHKHeHHra rapaHTiHoro BnnaAdKy 36epiraIte taKoX Yek npo NOKy.
-ⅡKIO Bn 3daeTe iHCTpymEnT B opEny a6o npOaTe, nepeBaaiTe pa30M 3 Hm ycIO DOkymentauio Do Hboro.
-Binpo6HnK He Hece BiNobiDaIbHicTb 3a noWkoJKeHHa, 0o BnHKnBpe3yIbTaTi HeOpTpMaHaHHzieiT HcTpkykii 3 eknnyataui.
InΦopMaiaNo3HaueHa Bcii InCTpyKcii 3 ekCnlyataaTakIM YHOM:

He6e3nega!
PonepeJkeHn npo He6e3neKy TpaBMyBaHHa 60 WKOu nIg DOBkInJI.

He6e3neHa ypaKeHHa npHmCtpyMOM!
PonepeJKeHHnpo He6e3neHy TpaBMyBaHHBhAcIIOK ypaKeHHeJIeKTPNCHM CTpyMOM.

ybara!
PonepeJxHnI npo MoHJIbBi MaTepiJIbHi 36HTKn.

Bhaizibha:
OdaTHoBa iHΦopMauiJ.
- LInΦpHn Ha MaIIOHkax (1,2,3 ToIoo):
-No3HaueHHKOpemix DeTaJIeN;
-HymepyIOTbCnIOcJIIOBHO;
CTOCYIOBcBAIDNOBIDHINXUHpB DyKkax(1),(2),(3)TOO y TEKCTI NOPy.
-InctpyKuii, nopraDOK BnKoHaHHRAHX Heo6XiIDHO DOTpMByBaTncra, HymepyIOtbcR.
-Inctpykii, kI MaOTb DOBilbHn nopraDOK BHKOHaHHN, No3HaueHi Kpanko. - Cnncn no3NayeHo 3a DonomorOIO Tnpe.
3. Texhika 6e3nekn
3.1 BnKOpncTaHHa npn3HaueHHa
PnnaI npn3NaeHn dny BndaJIeHHB iDCMOKtYBaHHaM DepeBHO Ta nlaCTNKOBOCTpyHN, a TaKOH DepeBHOro Nnly BiD DepeBOO6pO6Hx BepCTaTIB.
3a6bOpHReTbcB BndaJIaTI
JIeKo3aMnCTI Ra3N
(HanpNKlaI, Tymah fap6n
a60 LaKy) Ta
Bn6bYxOHe6e3neuHi peyOBHH.
YBAI! Cey npnilad He npn3HaueHn DnA 36npaHnny, He6e3neuHOro dny 3doPov'
BnKOpncTaHnB KOMepuiHnx 3aKnlaJax, y npoPeciHo-TexHiuHnx HABuaIbHnx 3aKnlaJax, IkoJax ToO 3a6OpOHeHe.
Heo6xIDHO BnKOpNCTOBvBaTH
NoJIeTINHeHOBi MiXKn DnA
360py CTpyKKn MIImaIbHOIO
TOBUnHOIO 0,10 MM. PnN
BnKOpNCtAHHi NaKeTIB DnA
360py CTpyKKn 3 iHNIX
MaTePiaJIb BOHNI NOBHHI
MaTN pInHaIMHi TaHy J
CTiIKICTb DO MexaHInHx
NOJKOJKeHb.
IHWE BHKOPNCaHHBBAJaTbCRA BHKOPNCaHHMa He 3a npn3HaueHHM.BNKOpNCaHHr He 3a npn3HaueHHM,BHeceHHA3mIHdo KOHCTpyKuII npnCTPOo a6o BHKOpNCaHHaDeTaJIe,He nepeBipEnx a6o He CXBaJIeHNX BInpO6HINKOM,MOKe CnpuHHTNHepePe6aCyBaHi MaTepiAlbHi 36nTHn!
3.2 3araJIbHi npaBnla TexHInn 6e3neHn
- Μιοδ BИКЛЮЧNTN
ВИнИКHeHЯ He6e3NeKEN
ДЯ ЛЮDEн a60
MATEPIaIbHnx ZIHHOCTeɪ
ДOTpIMyTEcB npH
ВИКOPINCTaHHI ZbOro
IHCtpyMeHTy HAcTyHnX
правл ТexhIKи 6e3neKN.
-ДоТрИмУнTeсь cpeiaJIbHnx npaBnI TexHIX6e3NeKn, приБeDEHnx y BiДnobiДнHx po3dɪλax.
Takok3BaKaHTeHa iHOpMaIIO B iNCTpyKuII 3 ekCnLyataii DepeBOO6p06Horo BepCTaTa,3 RaKOro BNDAJIaETbCra Tnpca.
Y pa3i HecnpaBnocTi HeaHNO BnHrTm MepeKeBn 7TeKep 3 po3eTKn. 3a6OpOHReTBcR BMkATn npnilad 6e3 BepxHbOro MiHa dIa 360py nIy.
BnKOpNCToBvBaTn npHJaD IINHe DnBnDaJIeHNH TnpCn YN NnIy 3 DepeBoO6pO6Hnx BepCTaTIB.
3a60pOHaETbCBAKOpNCTOByBaTn npIlaIДЯ BuaJIeHЯДжepel3aIMaHHa.
JaKuo npnilad 3aHnBcra, Heo6xidHO HeraHOBuHHTM MepeKeBnI uTeKepe 3 po3TKn a6o BiD'EDHaTN BiEleKTpomepeKi, BMMKHyBUn 3aNo6iHHN npncpti. HeraHo nOracNTu BOrOb BOdoIO a6o NiHO. 3a6OpOHeHO BMNKaTN npnilad 3HOBy.
IONEPEJHEHHa: ekCnlyatyUOHy nepcoHaJI NOBHN 6ByTn HaJeKHM YINOM pOiHCTpyKToBaHNI UoDo npAbl ekCnLyatauii CbOro npHaady.
3aBKn 3BepTaIe yBaIy Ha cTaNbHicTh npncTpOIO. NOBepxNn NOBnHa 6yTN TBepoIO, rOpN3OHTaJIbHOIO i pIBHOIO. 3aKpInNTn npnaD BiD BiKOuyBaHH, nepeKnDaHH Ta KOB3aHH.
A
3araIbHI He6e3neK!
PiTpmyTe npaOK Ha CBOemy po6oOmy mici- 6e3naH a po6oOmy mici MOHe pns3BecTHdo HeuacnX BnpaNkIB.
БудTe yBaJHnM.
KoHTpoJIIOIte Te, lo Bn
po6Ite. IpnCTyJaIte do
po6Otn po3BaJInBO. He
KOpNCtYInTEcb
IHCTpyMeHToM, RaIcNo He
MOKeTe
CKOHUeHTpyBaTnCb.
3a60pOHaTbCn KopnCTyBaTncn npIlaDom, 3HaxoJYnCb nI dIeHO aIKoRoiu, HapKOTnKIB a60 liKiB.
BpaxOByTe BnIIB HABKOIIHbOro cepeoBua.3a6e3neUTe DOCTaTHc OCBiTJIeHHJ.
He BnKOpncToBnyTe npnilaI nO6n3y IerKo3aMnCTnx piDnT Ta ra3iB.
- Cen npnaM OMyb BBOHTN B eKcIpyaTuO Ta BnKOpNCTOBvBaTn IuWe OC6N, RKi MaOTb 3HaHHr Ta HABNUr DJIPO6OTN 3 eEeKTPuHmN pncTPOAMn Ta 3aBxDn
ycbiOMIOIOb He6e3neHy, IOB'ra3aHy 3 cHm.
LcHnIpaM MoKytb BnHOpNCTOBvBaTH DITN BiKOM BiD 8 pOKiB IJIOn3 O6MeKeHmN fI3NHyHMn, TaKTNbHmN a6o PO3yMOBIMN MOJIINBOCTaMn, a60 3 HeIOCTaTHiM DOCBiIDom i/ a60 3HaHHaMn EKcNlyataqii npilaNy, RaKIO BOHN nepe6yBaIoTB NiI HaTJADOM BiIOVBdaJIbHOI OcO6u Hn NICrA OTPImaHHraB TaHOI OcO6n IHCTpykTaJx y oDo 6e3neuHOI p6OTn 3 npilaDM Ta YcBiIDOMIOUToB He6e3NeKn, UO MoKHTb BnHnKHyTN B pe3yIbTaTI eKcNlyaTaQII npilaNy.
HeD03B0JnTe DITaM rpaTncs3 iHcTpymeHTom.
ДiTЯмЗаборонocamOCTIиHO BnKohyBaTHOnuHcHn iTexHicHe06CnyroBvBaHH npHaay.
HeOnyckaIte CTOpOHHX ocio,ocO6JIbBO dITei, B He6e3neHy 30Hy.He DO3BOJRAIte CTOpOHIM OC6aM TopKaTnCra IHCTpyMeHTa abo Noro Ka6eJIIO JKNBLeHnPiD Yac EKcNlyataui.
He nepebaHTaKnyTe iHCTpymeHT-BNKOPNCOTbYTe uei HCTpymeHT IINue y diaana30Hi NotyHKHOCTI Bka3aHOMy TExnHnx xapaKTepnCTnHex.
BumkaTe npila, KoJI BIn He BnKOpNCTOBycTbCra.
He6e3neHa ypaHHeHHa eIeKtpnHm CtpymOM!
ПОЕРДЖEHHA!UeINpnilad npn3NaHEnIbNBAKOPNCaHH TaibnB Cyxnx yMOBax.
YBAI!Cey npnilaD npn3HaueHn DnBnKOpNCtAHN BnKlOuHO BCEpeHi npMiuEhb.
YBAI!Cey npnilad Do3B0JAEb8c8 36epiratn TlbKn B npimieHHi.
He 3aIiShaIte ue npncTpii nD dozem. He ekCnlyaTyIe ue npncTpiy BOLOROMy cepedobuizi.
-Пид час роботи на цьому
пистою ун��аite
Topkaнн Тулбу i3
Заземленич actинам
(Hanр. радiaTopamn
Оаленни, Trpyбам,
ПлHTам,
холдьнкам).
He BnKOpncToBynte Ka6eIb eIeKtpOHNBLeHnB U cIJx, dIy IKNX BiH He neped6aueHn.
- PpeDpo6oTaMn3TexHIOHO6cIyROByBaHHaPeKoHaTecr,0OpnpiaD BiID'EdHaHbBIMpeXKi KINBLeHNH.
3abopohTbcBnKOpNCbByBaTN npnilad 3a MeKaMn npMiueHb npn Hn3bKnX TempepaTypax.
He6e3neHa BhaCNIIOH HeOCTaTHbOro OchaueHHA
3acobamn iHdNbidaJbHoro 3axncty!
4.3 3axnCT BiI nepeBaHTaKeHHA
Ia 3axncty eJeKtpoDbnHyBa I nepebaHTaKeHH BCTaHOHeHO
npntpi 3axncty DnHyHa. Kkuo eJeKtpoDnHyn nepepiBaetcba 60 nepeBaHTaHcyTbcR, npntpi BmNkae npnilad.
YcbomyBnnaHy eJeKTPoDBnryH MOxHa 3HOBy BBIMKHyTN uepe3 KjIbKa XBINHH NICJXOLODKeHH.

Bka3ibKa:
KIOIINHIAI IPOITROM KOPOTKOYacy HeoHopa3OBO (2-3 pa3n)BHMHKaETbCayepe3 CIIpaIbOByBaHHIPnCTPOIO 3axNCTU BnHTyHa, PepeT TMMAK3HOBY BBIMKHHTI INHIAID, HOROMeIpeBipHTN KBaJIqIKOBAHn cJIeKTpHK.
5. Eknnyatauia
- Po3TaUyBaTn npuIa nopyu i3 DepeBOo6pO6Hm BepCTaTOM, 0o6 BiH He 3aBaxkab onepaTopy niD yac po60tN.
2.ПiД'ЕнДИТВСМОКТУВАЛБНИ WIIaHRdo naTpy6ka DЯ BIVdAJIeHnTHItpCnHa DepeBEOO6po6HOMy BepCTaTI.
3.Пуркл actn 3'eHyBaIbHn Ka6eJIb i 3a DonomorOHO HbOro NiKlIOuHTn npucTpiDdo DKepeNa JINBHeHHA. - YbIMKHyTu eJeKtpoDbuRyH i 3aueKaTu KJIbKa CeKyHd, NOKI BEHTNJrTop DOcRHe MaKcImMaJbHoI WbNdkOCTi.
-ⅡKIOBepxHmMiOOKIIN360py Nnly He HaNyBaETbcra ABTomATuHOYepe3 KJBka CEkyH,NOTaRHTNHorO Bropy.
- TijbKn Teenep MoXHa BMnHaTn DepeBoo6pO6Hm BepCTaTI NOHNATN 6pO6JIOBaTH DepeB'Hi 3arOTOBKn.
6.ПиЯВIMKHeHHA DepeBOO6pO6HOro BepCTaTa CnCTemaДЯВИdaleHЯ TnPCnMaE npaIOBaTuIe npoTAROM 云HaMEnHe 10ceHyHd.

Bka3ibHa:
KIOIepeBOO6p06HnBepCTaI
UoDEHHOBHKOPHCTOBYcTBcN IpOTAROM
TPHBALIO Nepioy yacy, NepeBaHO
6yde npHCTPIABTOMATHHORO
BBIMKHEHH CHCTeMH dJIbBIAJIeHH
THPCN.3ABJAKN cBOMy CHTeMa dJI
BHDAJIeHH THPCN 6yDe BMHKATHC Ta
BHMMKAITHC13aTPMHKOIO YACy
UOHO 6yDe BBIMKHeHO HBMKHeHO
JepeBOO6p06Hn BepCTaT.
Ue npctpi aBtOMaTHHORo BBIMKHeHHI NOCTaAeTbCBA Bnpo6HNKOM yDBOx pi3Hnx BapiaHTax (pO3di «PnlaDra»).
6. Texhichhe 06cnyrobyBaHHa dORnA

He6e3neka!
Ipeep ycima po6oTaMn 3 Texo6cLyroBvBaHHaOuHHeHHa:
- BIMMHHTN PnIaIaI;
- BHTaHTn MepeKebu I TeKe3 p0eTkn i po3HOuBaTu NOro TaHm YHOM, 106 onepaTop Mir y 6yDb- RKN MOpENT nepeKoHaTncA, 10 WTeKeB HrTo;
3.3aehaTn do NOBHOI 3yINHNI npnaIy.
-Onncahi B cboMy po3diIpo60tn 3 texhiHoro 06cnyroByBaHHra peMOHTy D03BOJIReTbcRA BHKOHyBaTH TiIbKnΦaxIBqM.
-NowokJKeHi DeTaJI, Hacampeed 3anobixhi npictpoi, 3amiHOBaTH TINbKnOpriHaJIbHIMNI DeTaJIAMN, OCHINbKN DeTani, KIi He nepeBipepHI Ta He CXBaJIeHi BnPo6HnKOM, MOHyTb PnI3BeCTn Do Hepepe6aHyBaHNX NowokJKeHb.
-Пся loKHO rO OuHrEHHa TExHiHOrO 06CnyrOByBaHHr 3HOBy Heo6xIDHO aHTnByBaTu i nepeBipTu Bci 3axnChi npctpoi.
6.1 Texhivhe obcnyrobyBaHHa
Ipeep KOHHyBIMKHeHHAM
Bi3yaIbHo nepeBipNTm MepKebn Ka6eIb Ta MepeKebn wTeKeP Ha HaaBHCtB deFeKTiB. 3a nTope6n 3BepHyTncb Do faxIBuE-EnkTpNa dla 3amHn NooKOJKeHNX KOMNHeHTiB.
PnnaI He notpe6ye TexhHoro 06cIyroBvBaHH. Ondak nepeD KOHHM BBIMKHeHHM Heo6XiHo nepeBipTN HaBeDeHi HxKi KOMNOHeHTN.
- Ipebeipntu Bci rBnHToBi 3'eHaHH! 3HOBy 3aTyrHyTu Bci ocla6neHi rBnHToBi 3'eHaHH.
IpekoHaTcA,IO KOpNyc nepemnKaa,eJeKtpoDbnHyn a6o BeHTnIaTOp He NoWKoDHeHi. HeraHNo 3amHInn NoWKoDHei deTani,3BepHyBmncb no Donomory do faxibra-EneKtpnka.
- PpekoHaTnC, 0o BepxHm Miok DnI Nnly a6o BCMOKtByBaIbHm IlaHr He NouKOJKeHi. 3aMiHTN NOuKOJKeHi KOMNoHEHTN.
6.2 OuHnHHa
Rkno notyHHictb BCMOTyBaHH 3MeHwyeTbca:
-3HATN XOMYT UHaHra Ta BiI'EDHaTH BCMOK TYBaJIbHNI UHaHr BiD BCMOK TYBaJIbHO rnoTa py6ka nID eJeKTpOdBnHyHom.
-OuHCTHTNpeWITHy.
-3HOBy BCTaHOBHTN BCMOKTyBaJIbHnI UJIaHr Ta XOMyT I 3aTfHyTH XOMyT.
OuHCTHTn niCTaBky Ta Kopnyc BEHTNlAToPA BOIOrIO rHaHipKOIO.
EneKtpoBnIHyN I BMMKaH MOXHa HCTHTN LIIe CyXIO raHiipKOIO.
BepxhiMiwoKdIa360pynny DOCTaTHbO TIlbKn Bn6HTN (nepekoHaTeC, 0o Miok dIa Tnpcni pknpIneH npi npnaDom).
3amHHTMIWOKdIaTnpcNpiD pnilaOm,IOHOBiH 3aONBHbCn np6JIN3HOHa4/5o6Emy.
6.3 36epiraHn npnaJy
Дя 36epiraHHCnCTeMnДЯ BndaJIeHHN TnPCn, NOMICTHTN BiDCMOKtYBaJIbHn IJIaHr Ha DBIgHyI BCTaBHTN KHeu b IJIaHra B OTBip BOnpHi nIITi.
He6e3neHa!
-
Pn36epirahHpiuJyTre6a BKNIT3axoDIBIy 3ano6iraHHYbIMKHeHH npuJy cToPOHHIMOco6amn.
-
IpekoHaTecra, 0o HixTo He Otpmae TpaBMy BiHepyXOMOrO npnaIaIy.

yBara!
3a6bOpOHeHO 36epiratn npnlaD y BOIorHX a6o cnpHX npmiiueHHx 6e3 BiNobiHoro 3axncty.
6.4 PemoHT

He6e3neka!
PemOHt eJekTpnpnlaNy noBHHi 3diHCHOBaTH TiIbHN KBaJIΦIOBaHI faxibci-eJekTpkn!
Ypa3i yuKoJHHeHH MepeKeBOrO Ka6eIIO daHOro npHaNy BuiJx 6e3neH Heo6XiDHO 3a6e3neuHTn Horo 3amHy BnPo6HkOM, faxibem cepBicHO CIyXb6n a6o IHoo OC6oH BiNobIDHO KBaJIiPhiKaii.
Дя ремоHTу eNEKtpoHCTpym enta Metabo 3BepTaeTecbdo perioHaIbHoro npedTabHnTuBa Metabo.ADpeCn nB. ha caTi www.metabo.com.
Cnncn 3anaacnix yactnh moKna 3abaHTaKNTn Ha caTti www.metabo.com.
7.Пиладя
Iy cneuiabHx 3aBdaHy cneiai3OBaHNx Mara3nHa MoXHa npu6aTuKe npuaAra:
A Pnctpi aBtOMaTHHOro yBIMKHeHH N# Jn 3aMOBHeHH:0913014626 ALV 1,1~230 B, Dn BBIMKHeHH Ta BIMKHeHH CNTEMN Dn BnDAJIeHH TIPCN i3 3aTPMko Yacy, SoiHO bye BBIMKHeHO N BuMKeHo DepeBOO6pObHn BepCTaT.
BПиСТPII aBTOMaTHHOrO yBIMKHeHHN NoДЯЗAMOBJIeHHA:0913014634 ALV10,3-400B,1-230B
CΦIbtpyBaHnKapTpNdx NoJn3aMOBHeHH:0920016529 3aTpmyeHaJdpi6HiiHnnPi. NOBepxHaJIbtpaui5,2M²
D MiwoK dIy TnpCn No dIa 3amOBLeHHr: 0913017617
8. Ytvnlaiaia
EneKtpoHn npnlaHn He
HaJIeKaTb Do nO6yTOBnx
BixOxOIB.3riHNO 3
DInpeKTHBOIO EC 2012/19/
EU ODo BIXxOIB
eNeKTPnHOro Ta
eNEKtpOHoro 06laHaHH,
BHKOpNCtane eNEKtpnHHe 06laHaHH
PiJaRa e pO3JIbHi yTNIJIaCi3 MeTOIO
Ioro noaJbwoi eKoIorHNo 6e3neuHoi nepepo6Kn.
IpoBapiaHTn yTnla3aui npnaLy, knn 6iNbwe He eKcnlyaTuEcbra, BN MOKeTe iHaTncBa admiHicTpauCi CBORO paohy nMiTa.
NakyBaIbHn MaTepiA I npHaNy Ha 100% npHaTHn IaB TOpHHoI nepepo6Kn

TOB "Meta6o YkpaiaHa
Byn.3opHa,22
c.CBtOneTpibcBe
KnIBcbKa 06J.
08141,KnIB
www.metabo.com
9. TexhiHxapaHTepnCTHH
| Hanpyra | В | 220-240 (1~50 Г) |
| ПOTУДНИСТБДВИRGУНАКВТ 0,55 | ||
| HOMINAЛьнМоБ'ЕмнIMNotIM | 3/rogen 600 | |
| ВIDNOVIДNEpoЗРIDJOENHAЯ 740 | ||
| Манс.об'ЕмнIMnotIM | 3/rogen 900 | |
| Манс.poэрДженя | Па 1600 | |
| Довинна BCMOТУВальношална | ММ | 2500 |
| Дiametр BCMOТУВальношална | ММ | 100 |
| Штуер дд BCMOТУВальношална | ММ | 100 |
| ОБ'ЕМMiSHAдд 3бору пелу | Дм³ | 65 |
| Маça(з рунимMiSHOMдд Тирси) | КГ | 22 |
| Знayеня emiciiшуmy зriДно 3 DIN EN 60335-2-69 | ||
| РIBeNBЗвЮВОЛnotУностITWA | ДБ(A) | 98,25 |
| pIBeNBЗвЮВОТпSCHуLPA | ДБ(A) | 85,5 |
| КоeФICIЕNT loxNiбNi ВIMIPIOBAнЯ K | ДБ(A) | 3 |


Metabowerke GmbH
Metabo-Allee 1
72622 Nuertingen
Germany
www.metabo.com