322HD60 - Hedge trimmers HUSQVARNA - Free user manual and instructions
Find the device manual for free 322HD60 HUSQVARNA in PDF.
| Product type | Hedge trimmer |
| Brand | Husqvarna |
| Model | 322HD60 |
| Displacement (cm³) | 21.7 |
| Idle speed (rpm) | 2 900 |
| Maximum speed (rpm) | 9 000 |
| Maximum power (kW/hp at rpm) | 0.6 / 0.8 at 7 800 |
| Fuel tank capacity (L) | 0.3 |
| Weight without fuel (kg) | 5.2 |
| Blade type | Double-edged |
| Cutting length (mm) | 600 |
| Cutting speed (cuts/min) | 4 400 |
| Spark plug | HQT-4 672201, gap 0.5 mm |
| Guaranteed sound power level LWA (dB(A)) | 101 |
| Sound pressure level at ear (dB(A)) | 92 |
| Vibration front/rear (m/s²) | 4.4 / 4.3 |
| Muffler with catalytic converter | Yes |
| Fuel | Mixture of unleaded gasoline 90 RON min and two-stroke oil 50:1 |
| Safety devices | Trigger lock, anti-kickback protection, stop switch, transport guard |
| Regular maintenance | Air filter cleaning, crankcase and blade lubrication, spark plug check, cooling system cleaning |
| Transport and storage | Drain fuel, attach transport guard, secure device |
Frequently Asked Questions - 322HD60 HUSQVARNA
User questions about 322HD60 HUSQVARNA
0 question about this device. Answer the ones you know or ask your own.
Ask a new question about this device
Download the instructions for your Hedge trimmers in PDF format for free! Find your manual 322HD60 - HUSQVARNA and take your electronic device back in hand. On this page are published all the documents necessary for the use of your device. 322HD60 by HUSQVARNA.
USER MANUAL 322HD60 HUSQVARNA
EN Operator's manual 2-17
SV Bruksanvisning 18-32
DA Brugsanvisning 33-47
FI Käyttöohje 48-63
NO Bruksanvisning 64-78
Transportation, storage and disposal.... 14
Technical data.... 14
EC Declaration of Conformity.... 16
Introduction
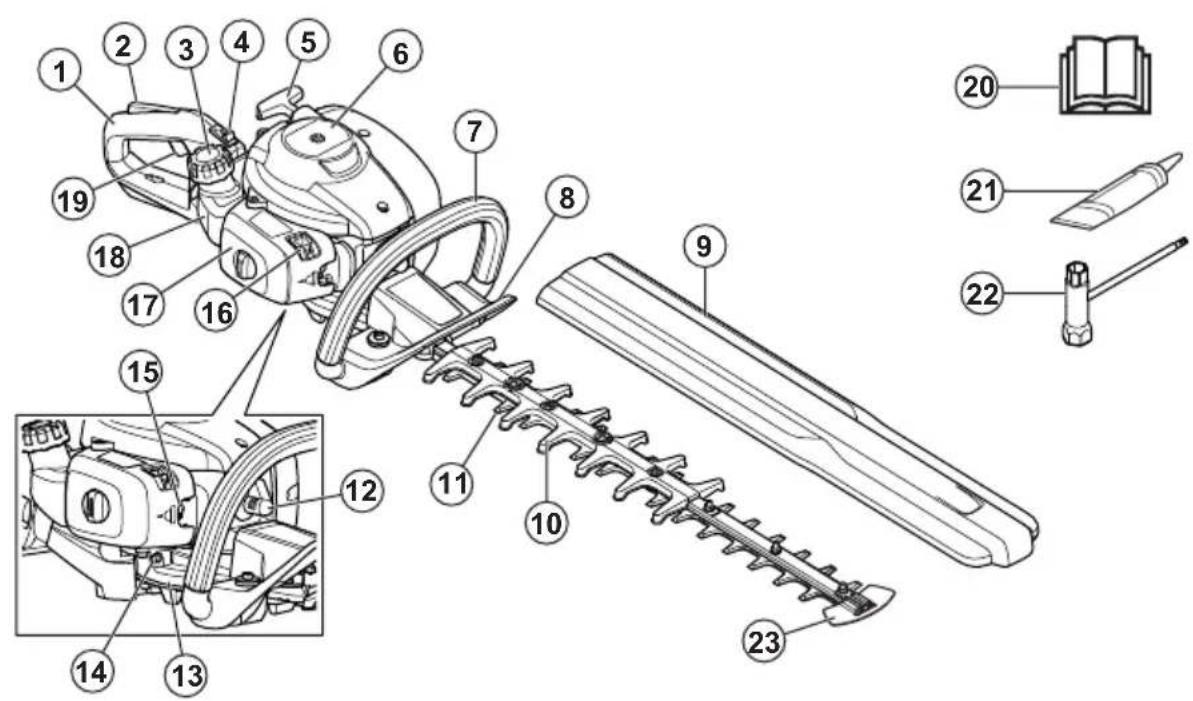
Product overview
-
Rear handle
-
Throttle trigger lockout
-
Fuel tank cap
-
Stop switch
-
Starter rope handle
-
Cylinder cover
-
Front handle
-
Hand guard
-
Transport guard
-
Blade guard
-
Blade
-
Spark plug cap and spark plug
-
Gear housing
-
Grease nipple
-
Air purge bulb
-
Choke control
-
Air filter cover
-
Fuel tank
- Throttle trigger
- Operator's manual
- Tube of grease
- Combination wrench
- Blade tip protection
Product description
The product is a hedge trimmer with a combustion engine.
Intended use
Use the product to cut branches and twigs. Do not use the product for other tasks.
Symbols on the product

WARNING! This product is dangerous. Injury or death can occur to the operator or bystanders if the product is not used carefully and correctly. To prevent injury to the operator or bystanders, read and obey all safety instructions in the operator's manual.

Read the operator's manual carefully and make sure that you understand the instructions before use.

Use approved hearing protection and approved eye protection.

Use approved protective gloves.

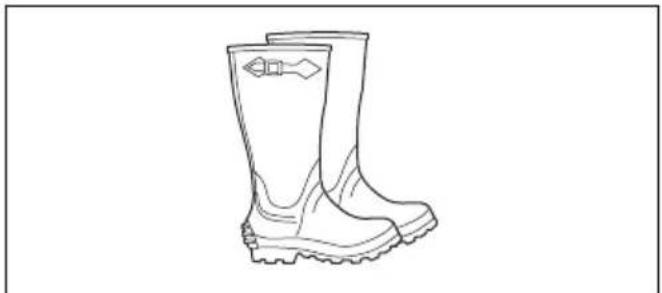
Use heavy-duty slip-resistant boots.

Idle adjustment screw.

High speed needle.

Low speed needle.
Noise emission to the environment label as per European Directive 2000/14/EC, UK directives and regulations and New South Wales legislation "Protection of the Environment Operations (Noise Control) Regulation 2017". The guaranteed sound power level of the product is specified in Technical data on page 14 and on the label.

The product agrees with the applicable EC directives.

This product conforms to applicable UK regulations.
yyyyMMddxxxx The
e rating plate shows serial number. yyyy is the production year and ww is the production week.
Note: Other symbols/decals on the product refer to certification requirements for some markets.
Euro V Emissions

WARNING: Tampering with the engine voids the EU type-approval of this product.
Safety
Safety definitions
Warnings, cautions and notes are used to point out specially important parts of the manual.

WARNING: Used if there is a risk of injury or death for the operator or bystanders if the instructions in the manual are not obeyed.

CAUTION: Used if there is a risk of damage to the product, other materials or the adjacent area if the instructions in the manual are not obeyed.
Note: Used to give more information that is necessary in a given situation.
General safety instructions

WARNING: Read the warning instructions that follow before you use the product.
- Incorrect or careless use of the product can turn it into a dangerous tool that can cause serious or even fatal injury. It is extremely important that you read and understand the contents of this operator's manual.
- This product produces an electromagnetic field during operation. This field may under some circumstances interfere with active or passive medical implants. To reduce the risk of serious or fatal injury, we recommend persons with medical implants to consult their physician and the medical implant manufacturer before operating this product.
• Overexposure to vibration can lead to circulatory damage or nerve damage in people who have impaired circulation. Contact your doctor if you experience symptoms of overexposure to vibration. Such symptoms include numbness, loss of feeling, tingling, pricking, pain, loss of strength, changes in skin color or condition. These symptoms normally appear in the fingers, hands or wrists. The risk increases at low temperatures.
- If you encounter a situation where you are uncertain how to proceed you should ask an expert. Contact your dealer or your service workshop. Avoid all usage which you consider to be beyond your capability.
- Keep in mind that the operator is responsible for accidents or hazards occurring to other people or their property.
- Never allow anyone else to use the product without first ensuring that they have understood the contents of the operator's manual.
- Never allow children to use or be in the vicinity of the product. As the product is equipped with a spring-loaded stop switch and can be started by low speed and force on the starter handle, even small children under some circumstances can produce the force necessary to start the product. This can mean a risk of serious personal injury. Therefore remove the spark plug cap when the product is not under close supervision.
- Store the product out of reach of children.
- Never use the product if you are tired, if you have drunk alcohol, or if you are taking medication that could affect your vision, your judgement or your coordination.
- Never use a product that is faulty. Carry out the checks, maintenance and service instructions described in this manual. Some maintenance and service measures must be carried out by trained and qualified specialists. Refer to instructions under the heading Maintenance.
- Never use a product that has been modified in any way from its original specification.
Safety instructions for operation

WARNING: Read the warning instructions that follow before you use the product.
- Never use the product in extreme weather conditions such as severe cold, very hot and/or humid climates.
- Faulty blades can increase the risk of accidents.
- Ensure that no people or animals comes closer than 15 m / 50 ft while you work.
- Observe your surroundings and make sure that there is no risk of people or animals coming into contact with the cutting equipment.
- Inspect the working area. Remove any objects that could be thrown out.
• Always ensure you have a safe and stable working position.
- Never leave the product unsupervised with the engine running.
- Make sure that your hands and feet do not come near the cutting unit when the engine is running.
- If anything jams in the blades while you are working, switch off the engine and wait until it has stopped completely before cleaning the blades. Disconnect the spark plug cap from the spark plug.
- When the engine is switched off, keep your hands and feet away from the cutting unit until it has stopped completely.
- Watch out for stumps of branches that can be thrown out during cutting.
- Listen out for warning signals or shouts when you are wearing hearing protection. Always remove your hearing protection as soon as the engine stops.
- Never work from a ladder, stool or any other raised position that is not fully secured.
- Always use both hands to hold the product. Hold the product in front of your body.
- If any foreign object is hit or if vibrations occur stop the product immediately. Disconnect the spark plug cap from the spark plug. Check that the product is not damaged. Repair any damage.
- Ensure that the spark plug cap and ignition lead are undamaged to avoid the risk of electric shock.
- Check that all nuts and screws are tight.
- Make sure the gearbox is lubricated correctly. Refer to To lubricate the gear housing on page 12.
- The gearbox gets hot when the product has been in use. To avoid burning yourself do not touch the gearbox.
- All covers and guards must be fitted before starting.
- If the blades get stuck, they can be loosened by sticking the combination wrench into the gearbox. Stick the combination wrench into the gearing and turn it back and forth. Refer to To examine the blades on page 12.
- The transport guard should always be fitted to the cutting unit when the product is not in use.
Personal protective equipment

WARNING: Read the warning instructions that follow before you use the product.
• Always use approved personal protective equipment when you use the product. Personal protective equipment cannot fully prevent injury but it decreases the degree of injury if an accident does occur. Let your dealer help you select the right equipment.
- Use approved hearing protection that provides adequate noise reduction. Long-term exposure to noise can result in permanent hearing impairment.
- Use approved eye protection. If you use a visor, you must also use approved protective goggles. Approved protective goggles must comply with the ANSI Z87.1 standard in the USAs or EN 166 in EU countries.

natural_image
Line drawing of binoculars and a pair of eyeglasses (no text or symbols)- Use gloves when necessary, for example when you attach, examine or clean the cutting equipment.

natural_image
Line drawing of two gloves with bandages and segmented bands (no text or symbols)- Use sturdy non-slip boots or shoes.
natural_image
Line drawing of a pair of boots with visible tread pattern and sole plate (no text or symbols)- Use clothing made of a strong fabric. Always use heavy, long pants and long sleeves. Do not use loose clothing that can catch on twigs and branches. Do not wear jewelry, short pants, sandals or go with bare feet. Put your hair up safely above shoulder level.
- Keep first aid equipment close at hand.

Safety devices on the product

WARNING: Read the warning instructions that follow before you use the product.
- Do not use a product with defective safety devices.
- Do a check of the safety devices regularly. If the safety devices are defective, speak to your Husqvarna service agent.
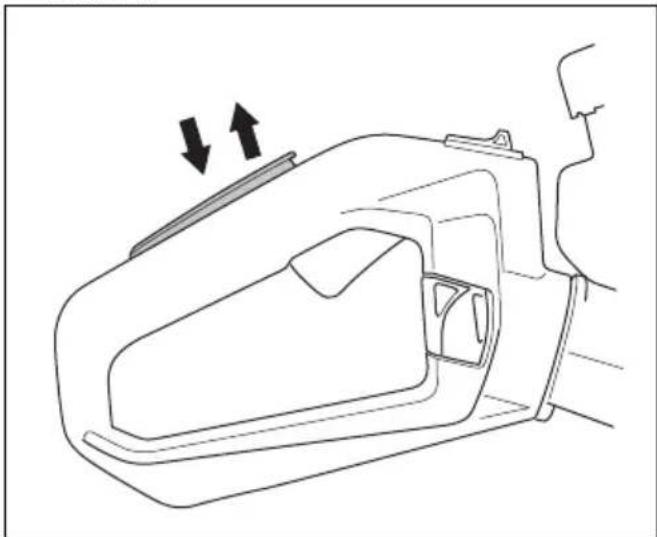
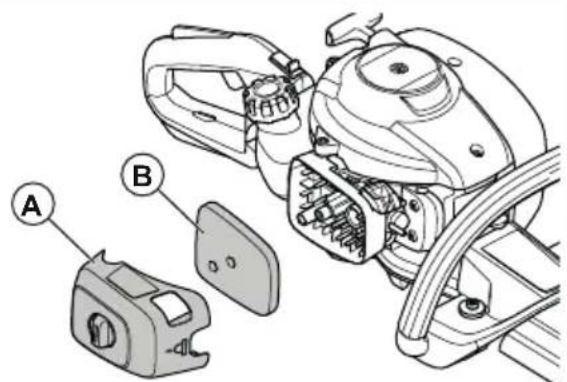
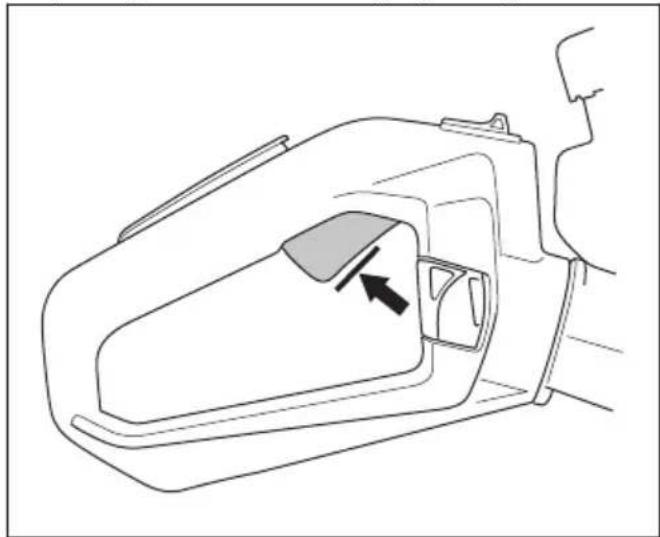
To do a check of the throttle trigger lockout
- Make sure that the throttle trigger lockout (A) and throttle trigger (B) move freely and that the return spring operates correctly.
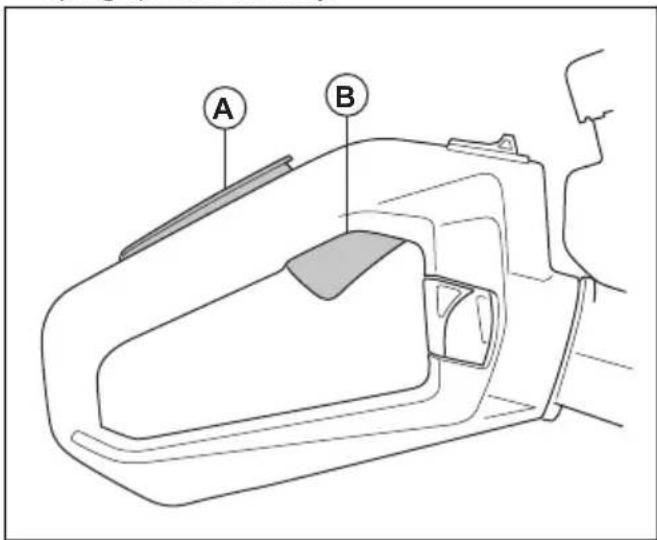
- Push down the throttle trigger lockout and make sure that it goes back to its initial position when you release it.
natural_image
Line drawing of a car interior showing a side panel with arrows indicating motion or movement (no text or symbols)- Release the throttle trigger lockout and make sure that the throttle trigger is locked at idle speed position.
natural_image
Line drawing of a car interior door with a black arrow pointing to the side panel (no text or symbols)-
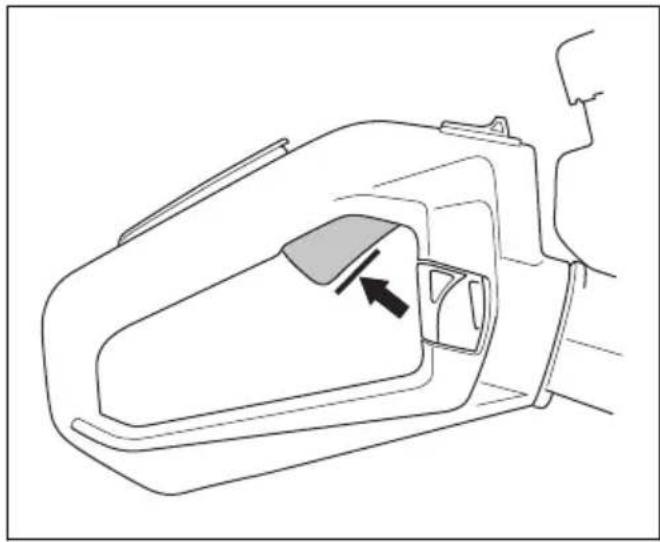
Start the engine and apply full throttle.
-
Release the throttle trigger and make sure that the blades stop fully.

WARNING: If the blades move when the throttle trigger is in the idle speed position, adjust the idle speed. Refer to To adjust the idle speed on page 11.
To do a check of the stop switch
-
Start the engine.
-
Push the stop switch to the stop position and make sure that the engine stops.

WARNING: The stop switch automatically goes back to start position. To prevent accidental start, remove the spark plug cap from the spark plug when you assemble or do maintenance on the product.
To do a check of the hand guard
The hand guard prevents injuries from the blades.
-
Stop the engine.
-
Make sure that the hand guard is attached correctly.
-
Examine the hand guard for damages.
To do a check of the vibration damping system
The vibration damping system decreases vibration in the handles. The vibration damping units operate as a separation between the product body and the handle unit.
-
Do a visual check for deformation and damage.
-
Make sure that the vibration damping units are correctly attached.
natural_image
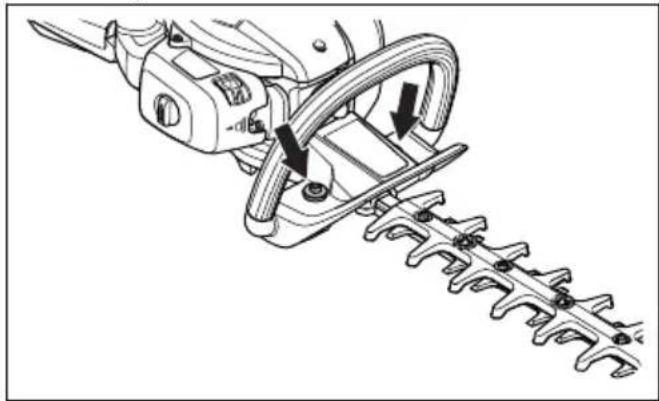
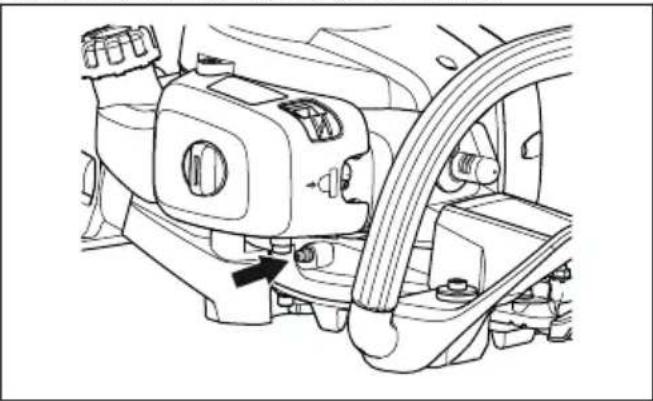
Technical line drawing of a mechanical tool with hatching and adjustment arrows (no text or symbols)To do a check of the muffler

WARNING: Do not operate the product without a muffler or a defective muffler. A defective muffler can increase the noise level and the risk of fire. Do not use the product without, or with a broken, spark arrester screen. The spark arrester screen must be replaced if it is damaged.

WARNING: The mufflers become very hot during and after operation, also at idle speed.

CAUTION: If the spark arrester screen is frequently blocked it can be a sign that performance of the catalytic converter is decreased. Turn to your servicing dealer to examine the muffler. A blocked spark arrester screen will cause overheating and result in damage to the cylinder and piston.

WARNING: The inner surfaces of the muffler contain chemicals that can cause cancer. Be careful not to touch these elements if the muffler is damaged.
The muffler keeps the noise levels to a minimum and points the exhaust fumes away from the operator. A muffler with a catalytic converter decrease harmful exhaust gases.
- Stop the engine.
- Do a visual check for damage and deformation.
-
Make sure that the muffler is correctly attached to the product.
-
Clean the spark arrester screen with a wire brush.
natural_image
Line drawing of a mechanical assembly with hands operating a tool (no text or symbols present)To do a check of the blades and blade guard
The outer part of the blades has the function of a blade guard. The blade guard prevents cut injuries.
- Stop the engine and make sure that the blades stop.
- Remove the spark plug cap from the spark plug.
- Put on protective gloves.
- Make sure that the blade and blade guard is not damaged or bent. Always replace a damaged or bent blade, or a damaged blade guard.
- Make sure that the screws to the blades and blade guard are tight.
Fuel safety

WARNING: Read the warning instructions that follow before you use the product.
- Do not start the product if there is fuel or engine oil on the product. Remove the unwanted fuel/oil and let the product dry.
- If you spill fuel on your clothing, change clothing immediately.
- Do not get fuel on your body, it can cause injury. If you get fuel on your body, use soap and water to remove the fuel.
- Do not start the product if the engine has a leak. Examine the engine for leaks regularly.
- Be careful with fuel. Fuel is flammable and the fumes are explosive and can cause injuries or death.
-
Do not breathe in the fuel fumes, it can cause injury. Make sure that there is a sufficient airflow.
-
Do not smoke near the fuel or the engine.
- Do not put warm objects near the fuel or the engine.
- Do not add the fuel when the engine is on.
• Make sure that the engine is cool before you refuel. - Before you refuel, open the fuel tank cap slowly and release the pressure carefully.
- Do not add fuel to the engine in an indoor area. Not sufficient airflow can cause injury or death because of asphyxiation or carbon monoxide.
- Tighten the fuel tank cap fully. If the fuel tank cap is not tightened, there is a risk of fire.
- Move the product a minimum of 3 m / 10 ft from the position where you filled the tank before a start.
- Do not fill the fuel tank fully. Heat causes the fuel to expand. Keep a space at the top of the fuel tank.
Safety instructions for maintenance

WARNING: Read the warning instructions that follow before you use the product.
- Stop the engine and make sure that the cutting equipment stops. Let the product become cool before you do the maintenance.
- Disconnect the spark plug cap before you do the maintenance.
• The exhaust fumes from the engine contain carbon monoxide, an odourless, poisonous and very dangerous gas that can cause death. Do not run the product indoors or in closed spaces. - The exhaust fumes from the engine are hot and can contain sparks. Do not run the product indoors or near flammable material.
- Accessories and changes to the product that are not approved by the manufacturer, can cause serious injury or death. Do not change the product. Always use original accessories.
- If the maintenance is not done correctly and regularly, there is an increased risk of injury and damage to the product.
- Only do the maintenance as this operator's manual recommends. Let an approved Husqvarna service agent do all other servicing.
- Let an approved Husqvarna service agent do servicing on the product regularly.
- Replace damaged, worn or broken parts.
Operation
Introduction

WARNING: Read and understand the safety chapter before you use the product.
Fuel
This product has a two-stroke engine.

CAUTION: Incorrect type of fuel can result in engine damage. Use a mixture of gasoline and two-stroke oil.
Premixed fuel
- Use Husqvarna premixed alkylate fuel for best performance and extension of the engine life. This fuel contains less harmful chemicals compared to regular fuel, which decreases harmful exhaust fumes. The quantity of remains after combustion is lower with this fuel, which keeps the components of the engine more clean.
To mix fuel
Gasoline
- Use good quality unleaded gasoline with a maximum of 10% ethanol contents.

CAUTION: Do not use gasoline with an octane grade less than 90 RON/87 AKI. Use of a lower octane grade can cause engine knocking, which causes engine damages.
Two-stroke oil
- For best results and performance use Husqvarna two-stroke oil.
- If Husqvarna two-stroke oil is not available, use a two-stroke oil of good quality for air-cooled engines. Speak to your servicing dealer to select the correct oil.

CAUTION: Do not use two-stroke oil for water-cooled outboard engines, also referred to as outboard oil. Do not use oil for four-stroke engines.
To mix gasoline and two-stroke oil
| Gasoline, liter | Two-stroke oil, liter |
| 2% (50:1) | |
| 5 0.10 | |
| 10 0.20 | |
| 15 0.30 | |
| 20 0.40 |

CAUTION: Small errors can influence the ratio of the mixture drastically when you mix small quantities of fuel. Measure the
quantity of oil carefully and make sure that you get the correct mixture.

natural_image
Illustration of a person in uniform holding an object, no text or symbols present- Fill half the quantity of gasoline in a clean container for fuel.
- Add the full quantity of oil.
- Shake the fuel mixture.
- Add the remaining quantity of gasoline to the container.
- Carefully shake the fuel mixture.

CAUTION: Do not mix fuel for more than 1 month at a time.
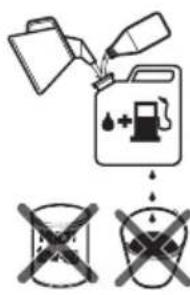
To fill the fuel tank

WARNING: Obey the procedure that follows for your safety.
- Stop the engine and let the engine become cool.
- Clean the area around the fuel tank cap.

natural_image
Simple black-and-white icon showing a droplet and a fuel pump with a plus sign (no text or symbols)- Shake the container and make sure that the fuel is fully mixed.
- Remove the fuel tank cap slowly to release the pressure.
- Fill the fuel tank.

CAUTION: Make sure that there is not too much fuel in the fuel tank. The fuel expands when it becomes hot.
- Tighten the fuel tank cap carefully.
-
Clean fuel spillage on and around the product.
-
Move the product 3 m/10 ft or more away from the refueling area and fuel source before you start the engine.
Note: To see where the fuel tank is on your product, refer to Introduction on page 2.
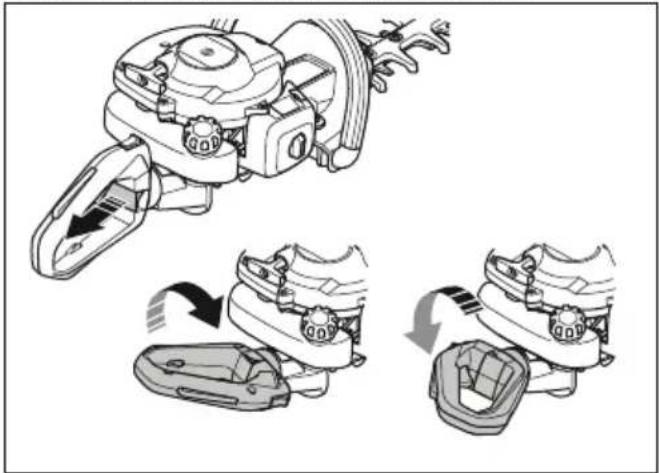
To adjust the handle
The rear handle can be adjusted into 3 positions.
- Release the handle lock and turn the handle.
natural_image
Technical illustration of a mechanical assembly showing three steps: disassembly, fastening, and rolling (no text or symbols present)To start the product with a cold engine
- Pull the choke control to choke position.
- Push the air purge bulb approximately 6 times or until the bulb starts to fill with fuel. It is not necessary to fill the air purge bulb fully.
- Hold the body of the product on the ground with your left hand. Do not step on the product.
- Pull the starter rope handle slowly with your right hand until you feel some resistance, then pull the starter rope handle quickly and with force.

WARNING: Do not wind the starter rope around your hand.

CAUTION: Do not pull the starter rope to full extension and do not let go of the starter rope handle.
- Continue to pull the starter rope handle until the engine fires, then push the choke control to its initial position.

WARNING: The blades move when the engine starts.
- Continue to pull the starter rope handle until the engine starts.
- Push and release the throttle trigger to set the engine to idle speed.
- Push the throttle trigger gradually to increase the engine speed.
- Make sure that the engine runs smoothly.
To start the product with a warm engine
- Hold the body of the product on the ground with your left hand. Do not step on the product.
- Pull the starter rope handle slowly with your right hand until you feel some resistance, then pull the starter rope handle quickly and with force. Continue until the engine starts.
Note: For more information about how to start the product, refer to To start the product with a cold engine on page 9.
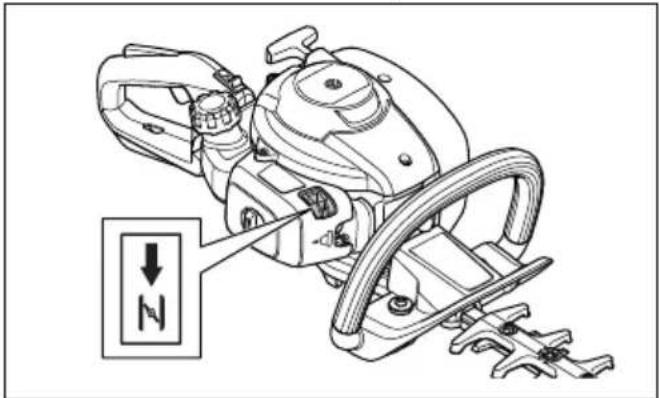
To stop the product
- Move the stop switch to the stop position to stop the engine.

CAUTION: The stop switch automatically goes back to run position.
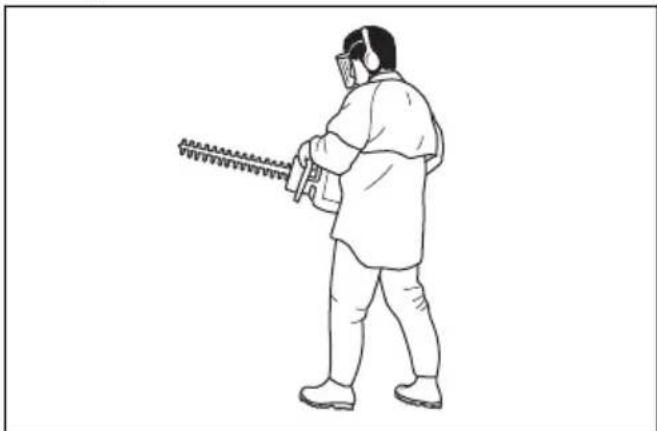
To operate the product
- Start near the ground and move the product up along the hedge when you cut the sides. Make sure that the body of the product does not touch the hedge.
natural_image
Line drawing of a person in protective gear using a long-handled tool (no text or symbols)- Adjust the speed to align with the work load.
Maintenance
Introduction

WARNING: Read and understand the safety chapter before you do maintenance on the product.
Maintenance schedule
| Maintenance Before | operation | After 40 h | After 100 h |
| Clean the external surface. After each operation. | |||
| Clean the muffler, exhaust pipe and engine from leaves, dirt and unwanted lubricant. | After each operation. | ||
| Make sure that the cutting unit does not move at idle speed. X | |||
| Do a check of the stop switch. Refer to To do a check of the stop switch on page 6. | X | ||
| Examine the cutting unit for damages and cracks. Replace if it is damaged. X | |||
| Examine the hand guard for damages and cracks. Replace if it is damaged. X | |||
| Do a check of the throttle trigger lockout and the throttle trigger. Refer to To do a check of the throttle trigger lockout on page 5. | X | ||
| Examine the engine, the fuel tank and the fuel hose for leaks. X | |||
| Tighten nuts and screws. X | |||
| Examine the starter and the starter rope for damages. X | |||
| Do a check that the screws that hold the blades together are correctly tightened. X | |||
| Clean the air filter. Clean more frequently if used in areas which has dust. Replace if it is damaged. | X | ||
| Examine the vibration damping units for damages and cracks. Replace if it is damaged. | X | ||
| Clean the external surface of the spark plug and the area around it. Remove the spark plug and measure the electrode gap. Adjust the electrode gap or replace the spark plug. Refer to To examine the spark plug on page 11. | X | ||
| Clean the cooling system. X | |||
| Clean the external surface of the carburetor and the area around it. X | |||
| Examine the fuel filter for contamination and the fuel hose for cracks and other defects. Replace if it is damaged. | X | ||
| Clean the spark arrester screen on the muffler, replace if it is damaged. X | |||
| Clean the inner surface of the fuel tank. X | |||
| Replace the spark plug. X | |||
| Examine the clutch, clutch spring and the clutch drum for wear. Replace if it is damaged by an approved servicing dealer. | X | ||
| Make sure that the gear housing is filled with grease. X | |||
| Do a check of all cables and connections. X | |||
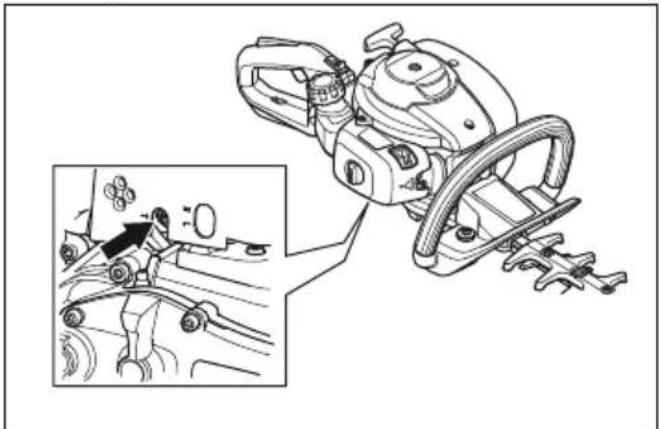
To adjust the idle speed
- Clean the air filter and attach the air filter cover.
- Start the product. Refer to To start the product with a cold engine on page 9
- Turn the idle adjustment screw T clockwise until the cutting unit starts to move.
natural_image
Technical line drawing of a mechanical tool with an inset showing a close-up of a person's wheel (no text or symbols present)- Turn the idle adjustment screw counterclockwise until the cutting unit stops.

WARNING: If the cutting unit does not stop when you adjust the idle speed, speak to your nearest servicing dealer. Do not use the product until it is correctly adjusted or repaired.
Note: The idle speed is correct when the engine operates smoothly in all positions. Refer to Technical data on page 14 for the recommended idle speed.
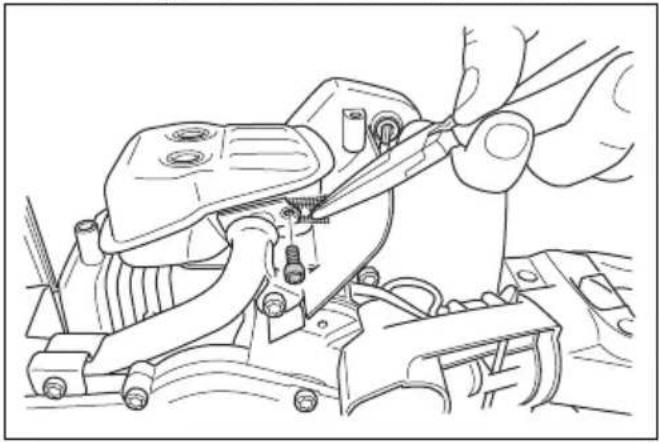
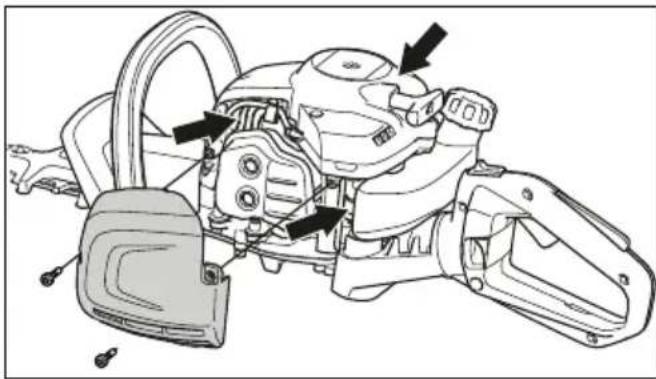
To clean the cooling system
The cooling system keeps the engine temperature down. The cooling system includes the cooling fins
on the cylinder, the cylinder cover and the air intake through the crankcase.
natural_image
Technical line drawing of a mechanical assembly with arrows indicating components (no text or symbols)
CAUTION: The air intake between the fuel tank and crankcase, is easily blocked by leaves. Clean the air intake fully.
- Clean the cooling system with a brush weekly or more frequently if it is necessary.
- Make sure that the cooling system is not dirty or blocked.
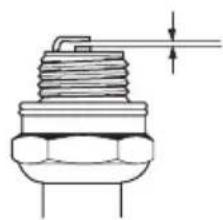
To examine the spark plug

CAUTION: Always use the recommended spark plug type. Incorrect spark plug type can cause damage to the product.
- Examine the spark plug if the engine is low on power, is not easy to start or does not operate correctly at idle speed.
• To decrease the risk of unwanted material on the spark plug electrodes, obey these instructions:
a) Make sure that the idle speed is correctly adjusted.
b) Make sure that the fuel mixture is correct.
c) Make sure that the air filter is clean.
- If the spark plug is dirty, clean it and make sure that the electrode gap is correct, refer to Technical data on page 14.
natural_image
Technical line drawing of a mechanical component with threaded body and shaft (no text or symbols)- Replace the spark plug if it is necessary.
To clean the air filter
Clean the air filter regularly from dirt and dust. This prevents carburetor malfunctions, starting problems, loss of engine power, wear to engine parts and more fuel consumption than usual.
- Remove the air filter cover (A).
- Remove the filter (B) from the filter frame.
- Clean the filter with warm soap water.
Note: An air filter that is used for a long time can not be fully cleaned. Replace the air filter regularly and always replace a defective air filter.
- Make sure that the filter is dry.
- Apply oil to the air filter. Refer to To apply oil to the foam air filter on page 12
- Clean the inner surface of the air filter cover. Use compressed air or a brush.
To apply oil to the foam air filter

CAUTION: Always use Husqvarna special air filter oil. Do not use other types of oil.

WARNING: Put on protective gloves. The air filter oil can cause skin irritation.
-
Put the foam air filter in a plastic bag.
-
Put the oil in the plastic bag.
- Rub the plastic bag to supply the oil equally across the foam air filter.
- Push the unwanted oil out of the foam air filter while in the plastic bag.

natural_image
Three-step line drawing showing a spray bottle pouring liquid into a container, a plastic bag with a side panel, and a hand cleaning a surface (no text or symbols)To lubricate the gear housing
- Use Husqvarna special grease. Speak to your servicing dealer for more information about recommended grease.
- Add the grease through the grease nipple.
natural_image
Technical line drawing of a car's internal components, showing no text or symbols
CAUTION: Do not fill the gear housing fully.
To clean and lubricate the blades
- Clean the blades from unwanted materials before and after you use the product.
- Lubricate the blades before long periods of storage.
Note: Speak to your servicing dealer for more information about recommended cleaning agents and lubricants.
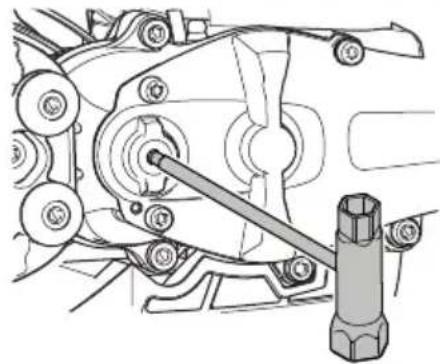
To examine the blades
-
Remove the cap on the gear housing.
-
Make sure that the blades move freely. Put the combination wrench in the gear housing and turn clockwise and counterclockwise.
natural_image
Mechanical assembly diagram showing a gear and shaft assembly (no text or labels)-
Examine the edges of the blades for damages and deformation.
-
Use a file to remove burrs on the blades.
Troubleshooting
Troubleshooting
| The engine does not start | ||
| Problem Possible cause Recommended step | ||
| Starter pawls The starter pawls cannot move freely. | Adjust or replace the starter pawls. | |
| Clean around the starter pawls. | ||
| Speak to an approved servicing dealer. | ||
| Fuel tank Incorrect fuel type. | Drain it and use correct fuel. | |
| Carburetor Incorrect idle speed. Adjust the idle speed. | ||
| No spark The spark plug is dirty or wet. | Make sure that the spark plug is dry and clean. | |
| Incorrect electrode gap. | ||
| Refer to Technical data on page 14 for correct electrode gap. | ||
| Spark plug The spark plug is loose. Tighten the spark plug. | ||
| The engine starts but stops again | ||
| Problem Possible cause Recommended step | ||
| Fuel tank Incorrect fuel type. | Drain it and use correct fuel. | |
| Carburetor Incorrect idle speed. | Adjust the idle speed. Refer toTo adjust the idle speed on page 11. Speak to your servicing dealer if it is necessary. | |
| Air filter Clogged air filter. Clean the air filter. | ||
| Blade | ||
| Problem Possible causes Recommended step | ||
| The blade moves slowly or does not move. | The blade is blocked or it is damaged. | Clean the blades from unwanted materials. Refer to To clean and lubricate the blades on page 12. Remove burrs from the blade, refer to To examine the blades on page 12. Replace the blade if it is damaged. |
| The blade does not cut easily. | The blade is not sharp or it is damaged. | Sharpen the blade, refer to To examine the blades on page 12. Replace the blade if it is damaged. |
| The blade becomes hot. There is friction between the blades. | Remove burrs from the blade and lubricate the blade. Refer to To clean and lubricate the blades on page 12. | |
Transportation, storage and disposal
Transportation and storage
- Always allow the product to cool down before storage.
- For storage and transportation of the product and fuel, make sure that there are no leaks or fumes. Sparks or open flames, for example from electrical devices or boilers, can start a fire.
• Always use approved containers for storage and transportation of fuel. -
Empty the fuel before transportation or before long-term storage. Discard the fuel at an applicable disposal location.
-
Attach the transport guard during transportation and storage.
- Remove the spark plug cap from the spark plug.
- Attach the product during transportation. Make sure that it cannot move.
- Clean and do servicing on the product before long-term storage.
Technical data
Technical data
| 322HD60 | |
| Engine | |
| Cylinder displacement, cm ^3 | 21.7 |
| Idle speed, rpm 2900 | |
| Recommended max speed, rpm 9000 | |
| Maximum engine power acc. to ISO 8893, kW/hp @ rpm 0.6/0.8 @ 7800 | |
| Catalytic converter muffler Yes | |
| Ignition system | |
| Spark plug HQT-4 672201 | |
| Electrode gap, mm 0.5 | |
| Fuel | |
| Fuel tank capacity, I/cm^3 | 0.3/300 |
| Weight | |
| Without fuel, kg 5.2 | |
| Noise emissions1 | |
| Sound power level, measured dB (A) 100 | |
| Sound power level, guaranteed LWA dB (A) 101 | |
| Sound levels2 | |
| Equivalent sound pressure level at the operator's ear, measured according to EN ISO 22868, dB(A) | 92 |
| Vibration levels3 | |
| Equivalent vibration levels ( a_hv,eq ) at handles, measured according to EN ISO 22867, m/s2: | |
| Front/Rear, mm/s2 | 4.4/4.3 |
| Blades | |
| Type Double sided | |
| Cutting length, mm 600 | |
| Cutting speed, cuts/min 4400 | |
EC Declaration of Conformity
EU Declaration of Conformity
We, Husqvarna AB, SE-561 82 Huskvarna, Sweden, tel: +46-36-146500, declares on our sole responsibility that the product:
| Description Hedge trimmer | |
| Brand Husqvarna | |
| Type/Model 322HD60 | |
| Identification Serial numbers dating from 2022 and onwards | |
complies fully with the following EU directives and regulations:
| Regulation Description | |
| 2006/42/EC "relating to machinery" | |
| 2014/30/EU "relating to electromagnetic compatibility" | |
| 2000/14/EC "relating to the noise emissions in the environment" | |
| 2011/65/EU "on the restriction of the use of certain hazardous substances in electrical and electronic equipment" |
and that the following standards and/or technical specifications are applied;
The following standards have been applied:
EN ISO 12100:2010, EN ISO 10517:2019, EN IEC 63000:2018, EN ISO 14982:2009
RISE SMP Svensk Maskinprovning AB, Box 7035, SE-750 07 Uppsala, Sweden has performed voluntary type examination on behalf of Husqvarna AB. Certificate number: SEC/10/2280
For information relating to noise emissions, refer to Technical data on page 14.
Huskvarna, 2022-05-09

Stefan Holmberg, R&D Director, Technology Management, Husqvarna AB
Responsible for technical documentation

UK Declaration of conformity
We, Husqvarna AB, SE-561 82 Huskvarna, Sweden, tel: +46-36-146500, declares on our sole responsibility that the product:
| Description Hedge trimmer | |
| Brand Husqvarna | |
| Type / Model 322HD60 | |
| Identification Serial numbers dating from 2022 and onwards | |
complies fully with the following UK regulations:
| Description |
| The Restriction of the Use of Certain Hazardous Substances in Electrical and Electronic Equipment Regulations 2012 |
| The Supply of Machinery (Safety) Regulations 2008 |
| The Noise Emission in the Environment by Equipment for use Outdoors Regulations 2001, schedule 9 |
| Electromagnetic Compatibility Regulations 2016 |
and that the following standards and/or technical specifications are applied: EN ISO 12100:2010, EN ISO 10517:2019, EN IEC 63000:2018, EN ISO 14982:2009.
For information relating to noise emissions, refer to Technical data on page 14.
Huskvarna, 2022-05-09

Stefan Holmberg, R&D Director, Technology Management, Husqvarna AB
Responsible for technical documentation

UK Importer: Husqvarna UK Ltd Preston Road, Co. Durham DL5 6UP
Innehåll
Introduktion.... 18
Säkerhet....19
Drift....23
Underhåll.... 26
Felsökning....29
natural_image
Line drawing of a mechanical component or device (no text or symbols)natural_image
Line drawing of two human gloves with bandages and straps (no text or symbols)natural_image
Line drawing of a pair of boots with visible tread pattern and buckles (no text or symbols)natural_image
Line drawing of a car interior showing a side panel and head, with arrows indicating motion or movement (no text or symbols)natural_image
Line drawing of a car interior door with a handle and arrow indicating direction (no text or symbols)natural_image
Technical line drawing of a mechanical tool with a hatched groove and gear mechanism (no text or symbols)Kontrollera ljuddämparen

natural_image
Line drawing of a mechanical assembly with hands operating a tool (no text or symbols present)
natural_image
Illustration of a person in uniform holding an object, no text or symbols presentnatural_image
Simple black-and-white icon showing a droplet and a fuel pump with a plus sign (no text or symbols)natural_image
Technical illustration of a mechanical assembly showing three steps: tool, gear shift, and final component (no text or symbols)Starta produkten med kall motor
natural_image
Line drawing of a person in protective gear using a long-handled tool (no text or symbols)
natural_image
Technical illustration of a mechanical tool with an inset showing a close-up of a vehicle's wheel and gear assembly (no text or symbols present)natural_image
Technical line drawing of a mechanical assembly with no visible text or symbols
natural_image
Technical line drawing of a spark plug with threaded body and shaft (no text or symbols)natural_image
Illustration of three steps of cleaning a surface: pouring liquid into a bag, handling a container, and cleaning a tray (no text or symbols)natural_image
Technical line drawing of a car interior showing engine compartment and valve (no text or symbols)
natural_image
Mechanical assembly diagram showing a linkage mechanism with no visible text or symbolsStefan Holmberg, R&D Director, Technology
Management, Husqvarna AB
natural_image
Line drawing of glasses and binoculars (no text or symbols)natural_image
Line drawing of two gloves with bandages and shaded areas (no text or symbols)natural_image
Line drawing of a pair of boots with visible tread pattern and buckles (no text or symbols)natural_image
Line drawing of a car interior showing a door and seat with directional arrows indicating movement (no text or symbols)natural_image
Line drawing of a car interior showing the door and seat area with an arrow indicating direction (no text or symbols)natural_image
Technical line drawing of a mechanical tool with hatching and adjustment arrows (no text or symbols)Sådan kontrolleres lyddæmperen

natural_image
Line drawing of a mechanical assembly with hands adjusting components (no text or symbols)natural_image
Simple black-and-white icon of a fuel pump with a droplet and plus sign (no text or symbols)natural_image
Technical illustration of a mechanical tool with three sequential steps showing the process (no text or symbols)natural_image
Line drawing of a person in protective gear using a long-handled tool (no text or symbols)
natural_image
Technical illustration of a mechanical tool with an inset showing a close-up of a vehicle's wheel and gear assembly (no text or symbols present)natural_image
Technical line drawing of a mechanical assembly with arrows indicating components (no text or symbols present)
natural_image
Technical line drawing of a spark plug with threaded end and shaft (no text or symbols)natural_image
Three-step illustration showing a spray bottle pouring liquid into a bag, a plastic bag being filled with liquid, and a hand cleaning a surface (no text or symbols)natural_image
Technical line drawing of a car interior showing engine compartment and structural components (no text or symbols)
natural_image
Technical line drawing of a mechanical assembly with pulleys and a shaft (no text or symbols)Stefan Holmberg, R&D Director, Technology Management, Husqvarna AB
natural_image
Line drawings of eyeglasses and binoculars (no text or symbols)natural_image
Line drawing of a pair of gloves with bandages and segmented bands (no text or symbols)natural_image
Line drawing of a rainforest boots with visible tread pattern and buckles (no text or symbols)natural_image
Line drawing of a car interior showing a handle and seat, with arrows indicating motion direction (no text or symbols)natural_image
Line drawing of a car door handle with a black arrow pointing to the interior panel (no text or symbols)natural_image
Technical line drawing of a mechanical tool with hatching and adjustment arrows (no text or symbols)natural_image
Line drawing of a mechanical assembly with hands operating a tool (no text or symbols present)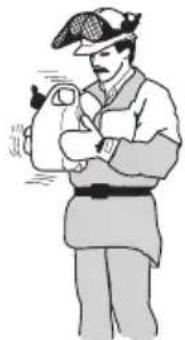
natural_image
Illustration of a person in uniform holding an object, no text or symbols presentnatural_image
Simple black-and-white icon showing a droplet and a fuel pump with a plus sign (no text or symbols)natural_image
Technical illustration of a robotic arm with three sequential steps showing mechanical components and motion (no text or symbols)natural_image
Line drawing of a person in protective gear spraying a long, serrated object (no text or symbols)
natural_image
Technical illustration of a mechanical tool with an inset showing a close-up view of the component (no text or symbols present)natural_image
Technical line drawing of a mechanical assembly with no visible text or symbols
natural_image
Technical line drawing of a mechanical component with threaded end and shaft (no text or symbols)natural_image
Illustration of three different cleaning or cleaning techniques: spray bottle, plastic bag, and wooden box (no text or symbols)natural_image
Technical line drawing of a car interior showing dashboard and steering wheel (no text or symbols)
natural_image
Mechanical assembly diagram showing a linkage mechanism with no visible text or symbols- Bakre håndtak
- Gassregulatorsperre
- Drivstofflokk
- Stoppbryter
- Startsnorhändtak
- Sylinderdeksel
- Fremre håndtak
- Håndbeskyttelse
- Transportbeskyttelse
- Skivebeskyttelse
- Blad
- Tennplugghette og tennplugg
- Girhus
- Smørenippel
- Pumpe (blære)
- Struper
-
Luftfilterdeksel
-
Drivstofftank
- Gassregulator
- Bruksanvisning
- Tube med fett
- Kombinasjonsnøkkel
- Bladtuppbeskyttelse
Produktbeskrivelse
natural_image
Line drawing of glasses and binoculars (no text or symbols)natural_image
Line drawing of two gloves with bandages, no text or symbols presentnatural_image
Line drawing of a pair of boots with visible tread pattern and side clasp (no text or symbols)Sikkerhetsutstyr på produktet

natural_image
Line drawing of a car interior showing a handle and seat with directional arrows indicating movement (no text or symbols)- Slipp gassregulatorsperren, og kontroller at gassregulatoren er låst i tomgangsstilling.
natural_image
Line drawing of a car interior door with a handle and arrow indicating direction (no text or symbols)natural_image
Technical line drawing of a mechanical tool with a hatched groove and adjustment arrows (no text or symbols)Slik kontrollerer du lyddemperen

natural_image
Line drawing of a mechanical assembly with hands operating a tool (no text or symbols present)- Fyll halve drivstoffmengden i en ren beholder for drivstoff.
- Tilsett all oljen.
- Rist drivstoffblandingen.
- Fyll resten av bensinen på beholderen.
- Rist drivstoffblandingen forsiktig.

OBS: Ikke bland drivstoff for mer enn én måned om gangen.
Slik fyller du drivstofftanken

natural_image
Simple black-and-white icon showing a droplet and a fuel pump with a plus sign (no text or symbols)natural_image
Illustration of a robotic arm with three sequential steps showing mechanical components and motion (no text or symbols)natural_image
Line drawing of a person in protective gear spraying a long, serrated object (no text or symbols)
natural_image
Technical illustration of a hatched tool with an inset showing a person operating a vehicle (no text or symbols present)- Vri justeringsskruen for tomgang mot urviseren til klippeenheten stanser.

ADVARSEL: Hvis klippeenheten ikke stopper når du juster tomgangsturtallet, må du kontakte nærmeste serviceverksted. Ikke bruk produktet før det er riktig justert eller reparert.
Merk: Tomgangsturtallet er korrekt när motoren går jevnt i alle stillinger. Se Tekniske data på side 76for å finne anbefalt tomgangsturtall.
natural_image
Technical line drawing of a mechanical assembly with no visible text or symbols
natural_image
Technical line drawing of a mechanical component with threaded body and shaft (no text or symbols)natural_image
Three-step illustration showing a spray bottle, a plastic bag, and a hand holding a cloth (no text or symbols)natural_image
Technical line drawing of a car interior showing dashboard, steering wheel, and valve (no text or symbols)
OBS: Ikke fyll girhuset helt.
natural_image
Technical line drawing of a mechanical assembly with pulleys and gears (no text or symbols)Feilsøking
Feilsøking
natural_image
Line drawing of a mechanical component or bracket (no text or symbols)natural_image
Line drawing of two human gloves with bandages and shaded areas (no text or symbols)natural_image
Line drawing of a pair of boots with visible tread pattern and buckles (no text or symbols)natural_image
Line drawing of eyeglasses and binoculars (no text or symbols)natural_image
Line drawing of a car interior showing a handle and seat, with arrows indicating movement or force (no text or symbols)natural_image
Line drawing of a car front panel showing the side door and internal compartment, with no text or symbols present.natural_image
Technical line drawing of a mechanical tool with hatching and adjustment arrows (no text or symbols)natural_image
Line drawing of a mechanical assembly with hands adjusting components (no text or symbols)natural_image
Simple black-and-white icon showing a droplet and a fuel pump with a plus sign (no text or symbols)natural_image
Technical illustration of a robotic arm and two separate footshells with mechanical joints, showing step-by-step assembly (no text or symbols)natural_image
Line drawing of a person in protective gear using a long-handled tool (no text or symbols)
AVERTISSEMENT: Assurez-
natural_image
Technical illustration of a mechanical tool with an inset showing a person operating a vehicle (no text or symbols present)natural_image
Technical line drawing of a mechanical assembly with no visible text or symbols
natural_image
Technical line drawing of a mechanical component with threaded body and mounting holes (no text or symbols)natural_image
Three-step illustration showing a droplet being poured into a bag, a packet being placed in a container, and a hand cleaning a surface (no text or symbols)natural_image
Technical line drawing of a car's internal components, showing valve and hose assembly (no text or symbols)
natural_image
Technical line drawing of a mechanical assembly with gears and a shaft (no text or symbols)- Achterhandgreep
- Gashendelvergrendeling
- Brandstoftankdop
- Stopschakelaar
- Startkoordgreep
- Cilinderkap
- Voorhandgreep
- Handbeveiliging
- Transportbescherming
- Bladbeschermkap
- Mes
- Bougiekap en bougie
- Tandwielhuis
- Smeernippel
- Primerbalg van brandstofpomp
- Chokehendel
-
Luchtfilterdeksel
-
Brandstoftank
- Gashendel
- Bedieningshandleiding
- Tube vet
- Ring-steeksleutel
- Bescherming bladuiteinde
Productbeschrijving
natural_image
Line drawings of eyeglasses and a pair of accessories (no text or symbols)natural_image
Line drawing of two human gloves with bandages and segmented palm (no text or symbols)natural_image
Line drawing of a pair of boots with visible tread pattern and buckles (no text or symbols)natural_image
Line drawing of a car interior showing a handle and side panel with arrows indicating motion (no text or symbols)natural_image
Line drawing of a car interior showing the door and seat area with an arrow indicating direction (no text or symbols)-
Start de motor en geef vol gas.
-
Laat de gashendel los en controleer of de bladen volledig stoppen.

natural_image
Technical line drawing of a mechanical tool with hatching and mounting bracket (no text or symbols)Geluidemper controleren

natural_image
Line drawing of a mechanical assembly with hands adjusting components (no text or symbols)De bladen en bladbeschermkap controleren
natural_image
Simple black-and-white icon showing a fuel pump with a droplet and plus sign (no text or symbols)natural_image
Technical illustration of a robotic arm and two footshells with mechanical joints, showing step-by-step assembly (no text or symbols)natural_image
Line drawing of a person in protective gear using a long-handled tool (no text or symbols)
natural_image
Technical illustration of a mechanical tool with a close-up inset showing a person operating a vehicle (no text or symbols present)natural_image
Technical line drawing of a mechanical device with labeled components and arrows indicating assembly or connection (no text or symbols present)
natural_image
Technical line drawing of a mechanical component with threaded body and shaft (no text or symbols)• Vervang de bougie indien nodig.
natural_image
Illustration of three steps of a cleaning or packaging procedure: pouring liquid into a bag, applying a cloth to a tray, and handling a sponge (no text or symbols present)natural_image
Technical line drawing of a car interior showing dashboard and steering wheel (no text or symbols)
natural_image
Mechanical assembly diagram showing a belt drive mechanism with pulleys and gears (no text or labels)natural_image
Line drawing of glasses and binoculars (no text or symbols)natural_image
Line drawing of a pair of gloves with bandages and straps (no text or symbols)natural_image
Line drawing of a pair of boots with visible tread pattern and sole details (no text or symbols)natural_image
Line drawing of a car interior showing a handle and side panel with arrows indicating motion (no text or symbols)natural_image
Line drawing of a car interior showing the door and seat area with an arrow indicating direction (no text or symbols)natural_image
Technical line drawing of a mechanical tool with hatching and adjustment arrows (no text or symbols)natural_image
Line drawing of a mechanical assembly with hands operating a tool (no text or symbols present)natural_image
Simple black icon showing a droplet and a fuel pump with a plus sign (no text or symbols)natural_image
Technical illustration of a mechanical tool with three steps showing the process: cutting, fastening, and fastening (no text or symbols present)natural_image
Line drawing of a person in protective gear holding a long-handled tool (no text or symbols)
natural_image
Technical illustration of a mechanical tool with an inset showing a person on a vehicle (no text or symbols present)natural_image
Technical line drawing of a mechanical assembly with no visible text or symbols
natural_image
Technical line drawing of a mechanical component with threaded end and shaft (no text or symbols)natural_image
Illustration of three steps of cleaning a material: pouring liquid into a bag, applying a sample to a container, and handling a cloth (no text or symbols)natural_image
Technical line drawing of a car interior showing mechanical components and a directional arrow (no text or symbols)
natural_image
Technical line drawing of a mechanical assembly with gears and a shaft (no text or symbols)Fehlerbehebung
Fehlerbehebung
Stefan Holmberg, R&D Director, Technology Management, Husqvarna AB
natural_image
Line drawing of a mechanical component or device with no visible text or symbolsnatural_image
Line drawing of a pair of gloves with bandages and fingers (no text or symbols)natural_image
Line drawing of a pair of boots with visible tread pattern and sole (no text or symbols)natural_image
Line drawing of a car interior showing a handle and side panel with arrows indicating motion (no text or symbols)natural_image
Line drawing of a car interior showing the side panel and window (no text or symbols)natural_image
Technical line drawing of a mechanical tool with a hatched edge and gear mechanism (no text or symbols)natural_image
Line drawing of a mechanical assembly with hands operating a tool (no text or symbols present)
natural_image
Illustration of a person in uniform holding an object, no text or symbols presentnatural_image
Simple black icon showing a fuel pump with a droplet and plus sign, symbolizing fuel efficiency or energy addition (no text or symbols)natural_image
Illustration of a robotic arm with three steps showing mechanical assembly (no text or symbols)natural_image
Line drawing of a person in protective gear spraying a long tool (no text or symbols)
ПРЕДУПРЕЖДЕНИЕ:
natural_image
Technical illustration of a mechanical tool with an inset showing a close-up of a person operating a vehicle (no text or symbols present)natural_image
Technical line drawing of a mechanical assembly with no visible text or symbols
natural_image
Technical line drawing of a mechanical component with threaded end and shaft (no text or symbols)natural_image
Three-step illustration showing a spray bottle pouring liquid into a container, a hand holding a cloth, and a hand cleaning a surface (no text or symbols)natural_image
Technical line drawing of a car's front and side engine compartment showing valve, hub, and wheel (no text or symbols)
natural_image
Technical line drawing of a mechanical assembly with gears and a shaft (no text or symbols)natural_image
Line drawing of glasses and binoculars (no text or symbols)natural_image
Line drawing of two gloves with bandages and shaded areas, no text or symbols present• Kandke vastupidavaid, mittelibisevaid jalatseid.

natural_image
Line drawing of a rainforest boots with visible tread pattern and sole (no text or symbols)Toote ohutusseadised

natural_image
Line drawing of a car interior showing a handle and side panel with arrows indicating motion (no text or symbols)natural_image
Line drawing of a car interior door with a black arrow indicating the handle area (no text or symbols)natural_image
Technical line drawing of a mechanical tool with a hatched groove and adjustment arrows (no text or symbols)natural_image
Line drawing of a mechanical assembly with hands operating a tool (no text or symbols present)natural_image
Simple black-and-white icon showing a fuel pump with a droplet and plus sign (no text or symbols)natural_image
Technical illustration of a robotic arm with three sequential steps showing mechanical components and motion (no text or symbols)natural_image
Line drawing of a person in protective gear using a long-handled tool (no text or symbols)
natural_image
Technical illustration of a hair shower mechanism with an inset showing a close-up of the component (no text or symbols present)natural_image
Technical line drawing of a mechanical assembly with arrows indicating components (no text or symbols present)
natural_image
Technical line drawing of a mechanical component with threaded body and shaft (no text or symbols)natural_image
Illustration of three different cleaning or packaging methods: pouring liquid into a bag, handling a cloth, and cleaning a tray (no text or symbols)natural_image
Technical line drawing of a vehicle's internal components, showing no text or symbols
natural_image
Mechanical assembly diagram showing a belt drive mechanism with pulleys and gears (no text or labels)natural_image
Line drawing of glasses and a pair of binoculars (no text or symbols)natural_image
Line drawing of two gloves with bandages and shaded areas (no text or symbols)natural_image
Line drawing of a pair of boots with visible tread pattern and side clasp (no text or symbols)natural_image
Line drawing of a car interior showing a handle and seat, with arrows indicating motion direction (no text or symbols)natural_image
Line drawing of a car door handle with an arrow indicating the interior component (no text or symbols)natural_image
Technical line drawing of a mechanical tool with hatching and adjustment arrows (no text or symbols)Slāpētāja pārbaude

natural_image
Line drawing of a mechanical assembly with hands operating a tool (no text or symbols present)natural_image
Simple black-and-white icon showing a droplet and a fuel pump with a plus sign (no text or symbols)natural_image
Technical illustration of a robotic arm with three sequential steps showing mechanical components and motion (no text or symbols)natural_image
Line drawing of a person in protective gear using a long-handled tool (no text or symbols)
natural_image
Technical illustration of a mechanical tool with an inset showing a person operating a vehicle (no text or symbols present)natural_image
Technical line drawing of a mechanical assembly with no visible text or symbols
natural_image
Technical line drawing of a spark plug with threaded end and shaft (no text or symbols)- Ja nepieciešams, nomainiet aizdedzes sveci.
- Tīriet filtru ar siltu ziepjūdeni.
natural_image
Illustration of three different cleaning or cleaning techniques: a spray bottle, a plastic bag, and a hand holding a cloth (no text or symbols present)natural_image
Technical line drawing of a car interior showing dashboard, steering wheel, and seat (no text or symbols)
natural_image
Mechanical assembly diagram showing a belt drive mechanism with pulleys and gears (no text or labels)Stefan Holmberg, R&D Director, Technology Management, Husqvarna AB
Atbildīgais par tehnisko dokumentāciju

Περιεχόμενα
Εισαγωγή....178
Ασφάλεια....179
Λειτουργία....184
Συντήρηση.... 187
natural_image
Line drawing of a mechanical component or device with no visible text or symbolsnatural_image
Line drawing of two gloves with bandages and shaded areas (no text or symbols)natural_image
Line drawing of a rubber boots with visible tread pattern and buckles (no text or symbols)natural_image
Line drawing of a car interior showing a handle and side panel with arrows indicating motion (no text or symbols)natural_image
Line drawing of a car door handle with a highlighted interior component and arrow indicator (no text or symbols)natural_image
Technical line drawing of a mechanical tool with a hatched groove and adjustment arrows (no text or symbols)natural_image
Line drawing of a mechanical assembly with hands operating a tool (no text or symbols present)natural_image
Simple black-and-white icon showing a fuel pump with a droplet and plus sign (no text or symbols)natural_image
Technical illustration of a robotic arm with three steps showing mechanical assembly (no text or symbols)natural_image
Line drawing of a person in protective gear using a long-handled tool (no text or symbols)
natural_image
Technical line drawing of a mechanical tool with an inset showing a close-up of the component (no text or symbols present)natural_image
Technical line drawing of a mechanical assembly with no visible text or symbols
natural_image
Technical line drawing of a mechanical component with threaded end and shaft (no text or symbols)natural_image
Illustration of three steps of cleaning a surface: pouring liquid into a bag, applying a plastic sample, and handling a cloth (no text or symbols)natural_image
Technical line drawing of a car interior showing engine compartment and structural components (no text or symbols)
natural_image
Technical line drawing of a mechanical assembly with gears and a tool (no text or symbols)natural_image
Line drawings of eyeglasses and binoculars (no text or symbols)natural_image
Line drawing of two human gloves with bandages and shaded areas (no text or symbols)natural_image
Line drawing of a pair of boots with textured soles (no text or symbols)natural_image
Line drawing of a car interior showing a side panel with arrows indicating motion or movement (no text or symbols)- Sprostite zaklep ročice plina in preverite, ali je ročica plina zaklenjena v položaju prostega teka.

natural_image
Line drawing of a car interior showing the door and seat area with an arrow indicating direction (no text or symbols)-
Zaženite motor in pritisnite polni plin.
-
Sprostite ročico plina in se prepričajte, da se rezilo popolnoma ustavi.

OPOZORILO: Če se rezilo premika, ko je ročica plina v položaju prostega teka, je treba nastaviti prosti tek. Glejte razdelek Prilagajanje hitrosti prostega teka na strani 204.
natural_image
Technical line drawing of a mechanical tool with hatching and adjustment arrows (no text or symbols)Preverjanje dušilnika

natural_image
Line drawing of a mechanical assembly with hands operating a tool (no text or symbols present)- Dolijte polovico bencina v čisto posodo za gorivo.
- Dodajte celotno količino olja.
- Pretresite mešanico goriva.
- V posodo dodajte še preostalo količino bencina.
- Temeljito pretresite mešanico goriva.

natural_image
Simple black-and-white icon of a fuel pump with a droplet and plus sign (no text or symbols)-
Pretresite posodo in tako poskrbite za ustrezno mešanje goriva.
-
Odstranite pokrovček posode za gorivo, da sprostite pritisk.
-
Napolnite posodo za gorivo.

natural_image
Technical illustration of a robotic arm with three sequential steps showing mechanical components and motion (no text or symbols)natural_image
Line drawing of a person in protective gear using a long-handled tool (no text or symbols)
OPOZORILO: Pazite, da se s sprednjim delom rezalne opreme ne dotaknete tal.
natural_image
Technical illustration of a mechanical tool with a close-up inset showing a person operating the wheel (no text or symbols present)- Nastavitveni vijak obračajte v nasprotni smeri vrtenja urinih kazalcev, dokler se rezalna enota ne ustavi.

natural_image
Technical line drawing of a mechanical assembly with no visible text or symbols
natural_image
Technical line drawing of a mechanical component with threaded end and shaft (no text or symbols)- Filter očistite s toplo milnico.
natural_image
Illustration showing three steps of cleaning a surface: pouring liquid into a container, applying a plastic sample, and handling a cloth (no text or symbols)natural_image
Technical line drawing of a vehicle's internal components, showing no text or symbols
POZOR: Ohišja menjalnika ne napolnite do konca.
natural_image
Technical line drawing of a mechanical assembly with gears and a tool (no text or symbols)- Preglejte, ali so robovi rezila poškodovani in deformirani.
- S pilo odstranite ostanke z rezila.
Odpravljanje težav
Odpravljanje težav