Camileo Pro HD - Camcorder TOSHIBA - Free user manual and instructions
Find the device manual for free Camileo Pro HD TOSHIBA in PDF.
| Product type | HD digital camcorder |
| Brand | Toshiba |
| Model | Camileo Pro HD |
| Image sensor | 5-megapixel CMOS (2592x1944) |
| Video resolutions | HD (1280x720) at 30 fps, DVD (720x576), VGA (640x480), CIF (352x240) |
| Photo resolutions | 3M, 5M, 8M (interpolated) |
| Optical zoom | 3x |
| LCD screen | 2.4 inches |
| Internal memory | 128 MB (90 MB available) |
| External storage support | SD/MMC card up to 32 GB SDHC |
| File formats | MP4 (video), JPEG (photo), WAV (audio) |
| Battery | Rechargeable Li-ion compatible with NP60 |
| Approximate battery life | 110 photos or 60 minutes of video recording |
| Connectivity | USB 2.0, AV output, component HDTV output |
| TV output | NTSC / PAL |
| Main functions | Video recording, photo, voice recorder, night mode, flash, LED light, white balance, effects (B&W, sepia), self-timer, histogram |
| Maintenance and cleaning | Wipe with a soft, dry cloth. Avoid contact with water and high temperatures. |
| Safety | Do not disassemble, do not expose to water, use only supplied accessories, keep out of reach of children. |
| Included accessories | Battery, power adapter, USB, AV and component cables, remote control, wrist strap, carrying case, CD-ROM with manual |
| Repairability | Not user-serviceable; contact Toshiba customer service. |
Frequently Asked Questions - Camileo Pro HD TOSHIBA
User questions about Camileo Pro HD TOSHIBA
0 question about this device. Answer the ones you know or ask your own.
Ask a new question about this device
Download the instructions for your Camcorder in PDF format for free! Find your manual Camileo Pro HD - TOSHIBA and take your electronic device back in hand. On this page are published all the documents necessary for the use of your device. Camileo Pro HD by TOSHIBA.
USER MANUAL Camileo Pro HD TOSHIBA
Welcome and thank you for choosing a TOSHIBA product.
For your convenience, your TOSHIBA product is furnished with two guides:
a) a Quick Start Guide, and
b) a comprehensive PDF* User's Manual on the included CD.
- Requires Adobe Acrobat / Reader v. 5 or later. Free Reader Downloads at:
www.adobe.com/products/acrobat/readstep2.html
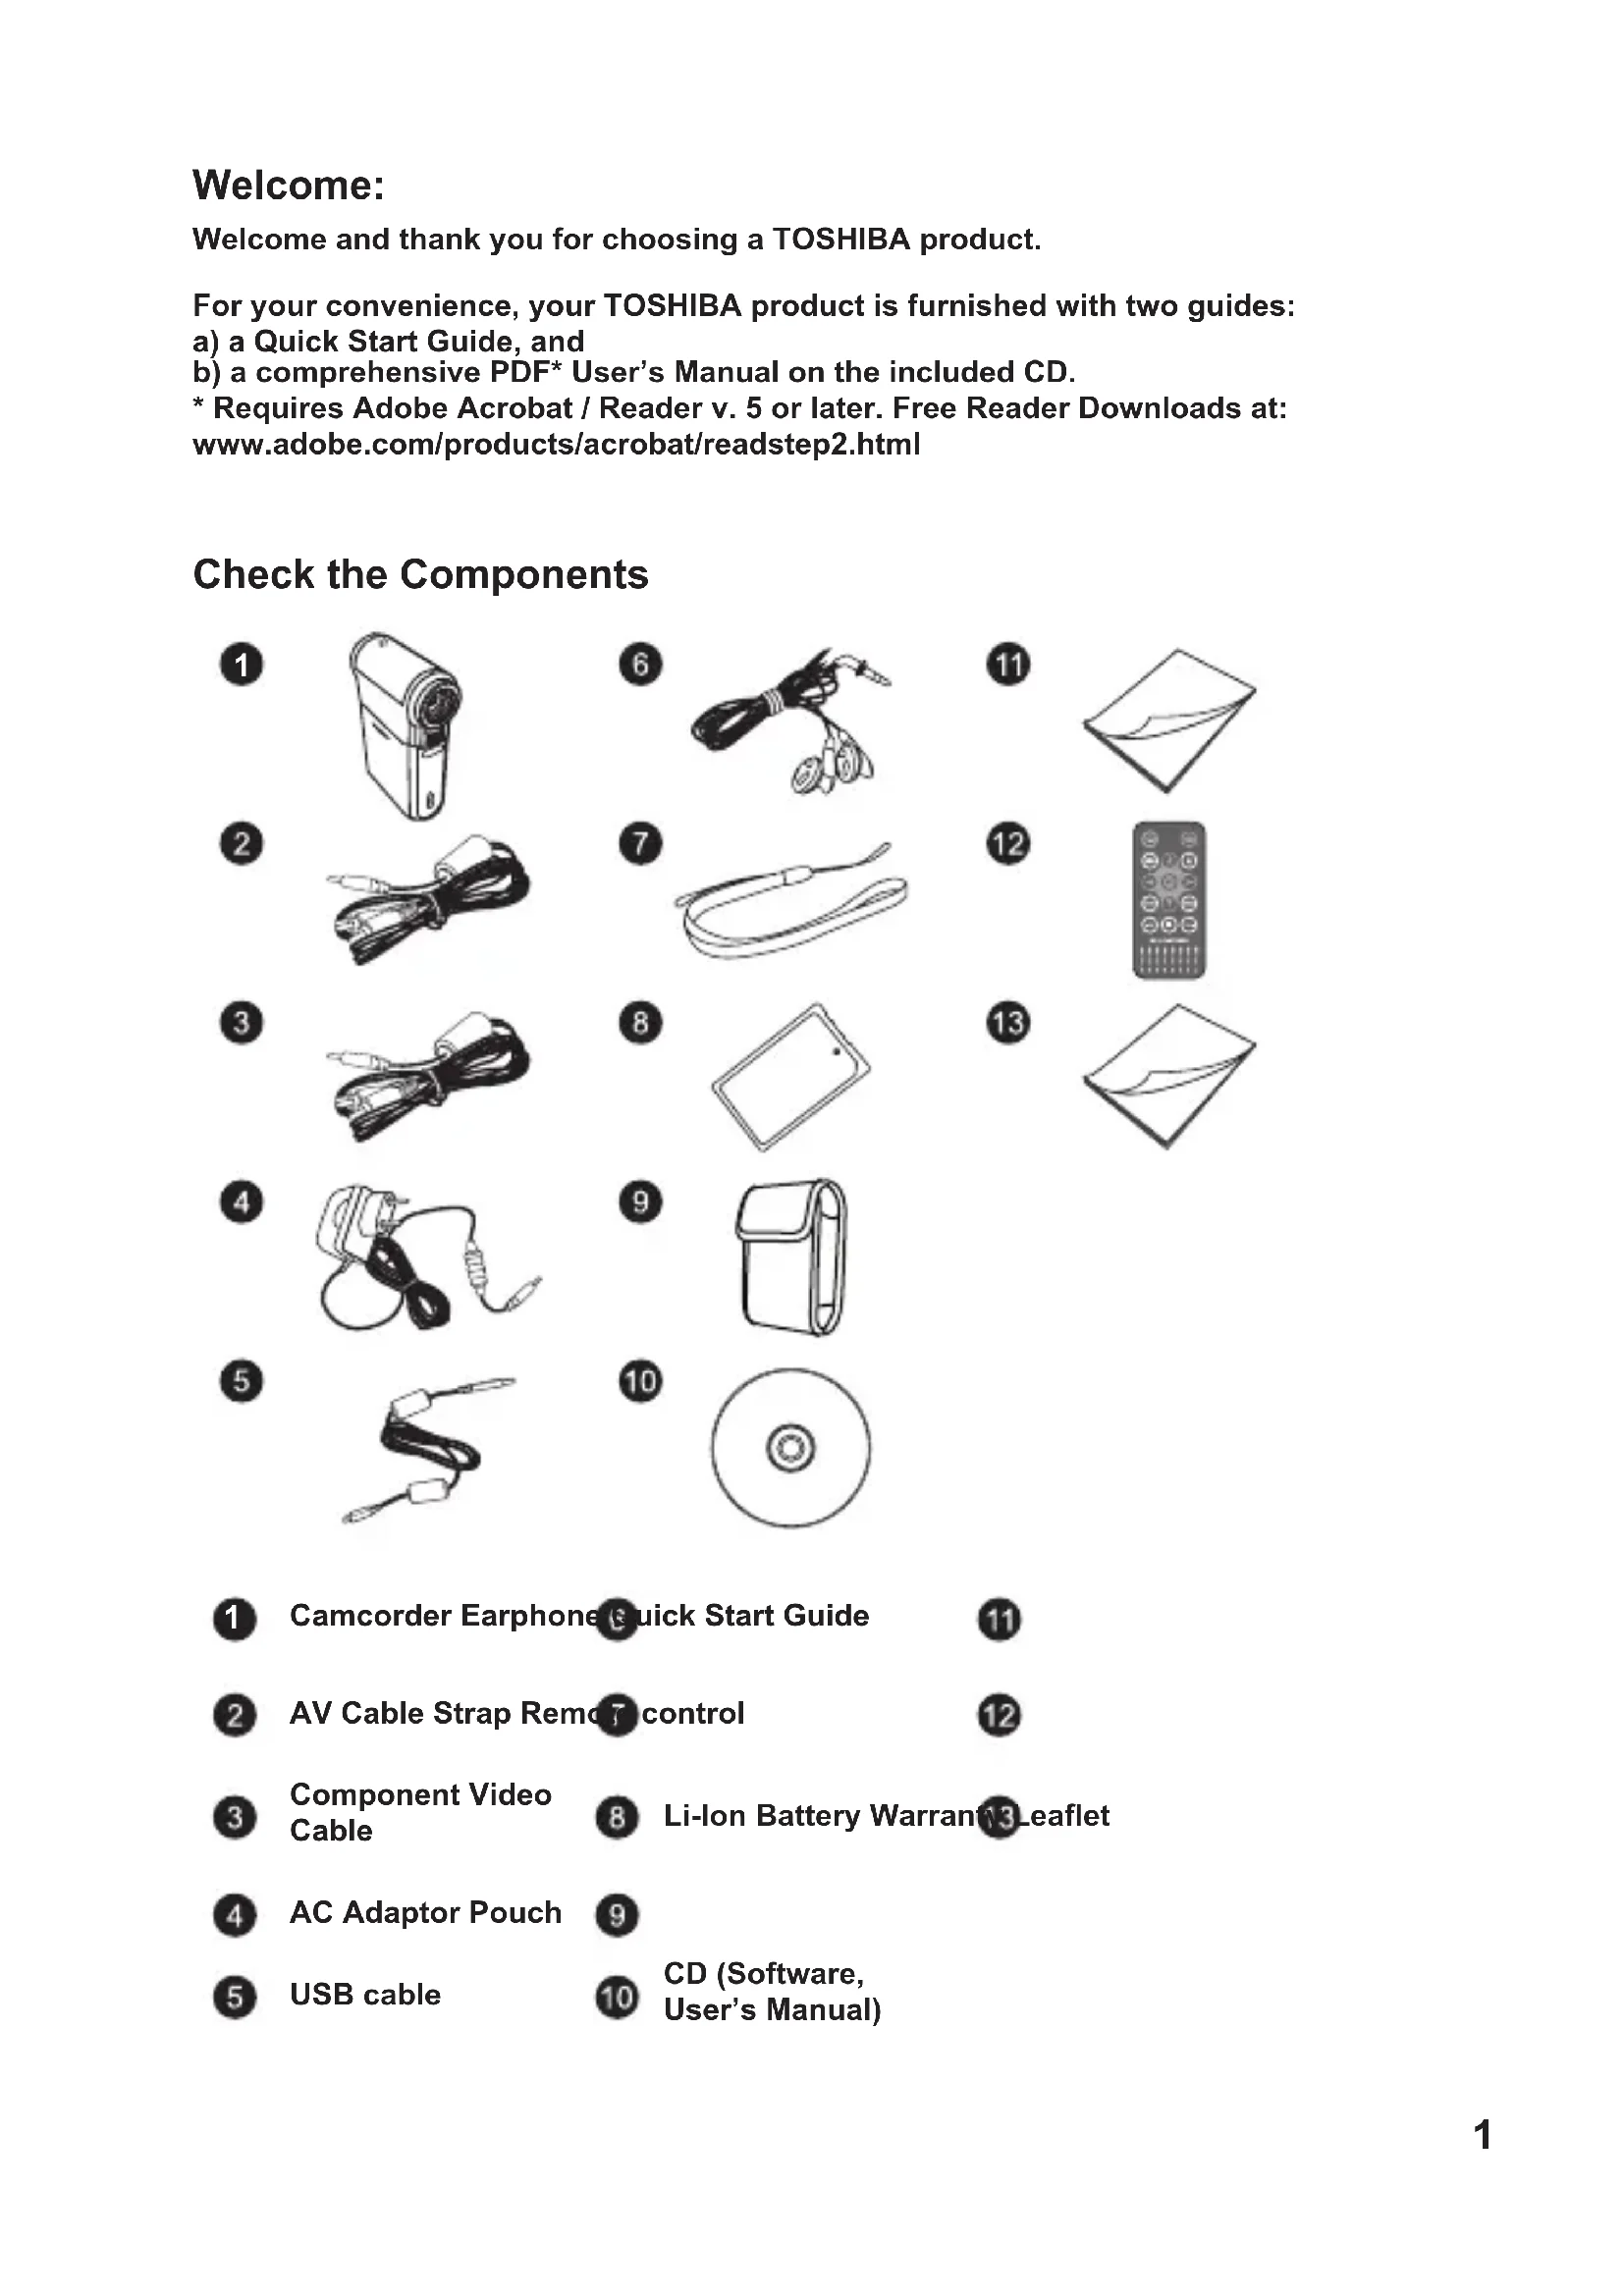
Check the Components
1

2

6

11

7

12
3

8

13

4

9

5

10

1
Camcorder Earphone Quick Start Guide
11
2
AV Cable Strap Remot control
12
3
Component Video Cable
13-Eaflet
4
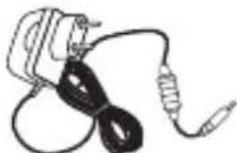
AC Adaptor Pouch
9
CD (Software, User's Manual)
5
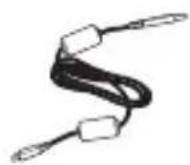
USB cable
Safety Instructions:
- Do not drop, puncture or disassemble the camcorder; otherwise the warranty will be voided.
- Avoid all contact with water, and dry hands before using.
- Do not expose the camcorder to high temperature or leave it in direct sunlight. Doing so may damage the camcorder.
- Use the camcorder with care. Avoid pressing hard on the camcorder body.
- For your own safety, avoid using the camcorder when there is a storm or lightning.
- Do not use batteries of different specifications. Doing so may lead to the potential for serious damage.
- Remove the battery during long periods between usage, as a deteriorated battery may affect the functionality of the camcorder.
- Remove the battery if it shows signs of leaking or distortion.
- Use only the accessories supplied by the manufacturer.
- Keep the camcorder out of the reach of infants.
- Risk of explosion if battery is replaced by an incorrect type.
- Dispose of used batteries according to the instructions.
Important Safety Information:
1. Avoiding water and wet locations
Do not use the product in rain, or near washbasins or other wet locations. Take care not to spill any food or liquid into the product. In case the product gets wet, unplug all cables, turn it off and allow it to dry thoroughly before turning it on again.
2. Avoid hearing damage
Permanent hearing loss may occur if earphones are used at high volume. Set the volume to a safe level. You can adapt over time to a higher volume of sound that may sound normal but can be damaging to your hearing. If you experience ringing in your ears of muffled speech, stop listening and have your hearing checked. The louder the volume, the less time is required before your hearing could be affected. Hearing experts suggest that to protect your hearing:
- limit the amount of time you use earphones at high volume
- avoid turning up the volume to block out noisy surroundings
- turn the volume down if you can't hear people speaking near you

System Requirements:
System requirements are different in different video resolution settings:
| Video Resolution PC system requirements | |
| HD (1280x720) @30fps | OS = Windows XP SP2, Vista or above (QuickTime 7.0 or above) CPU = Pentium 4 3.0GHz or above System RAM = 512MB (1GB recommended) Display card = 256MB of RAM |
| DVD (720x576) @30fps | OS = Windows 2000/XP, Vista or above (QuickTime 7.0 or above) CPU = Pentium 4 1.5GHz or above System RAM = 256MB (512MB or above recommended) Display card = 64MB (128MB or above recommended) |
| VGA (640x480) @30fps | |
| CIF (352x240) @30fps | |
Getting Started
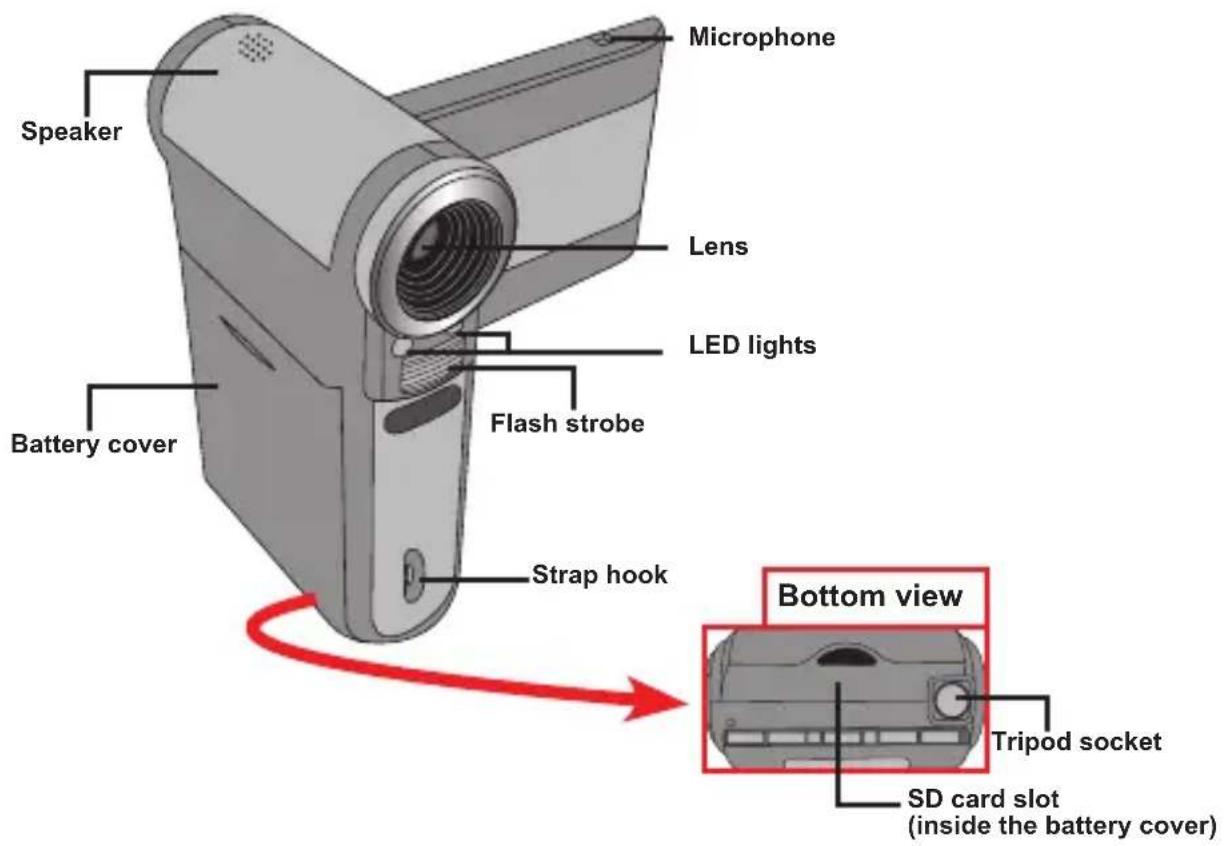
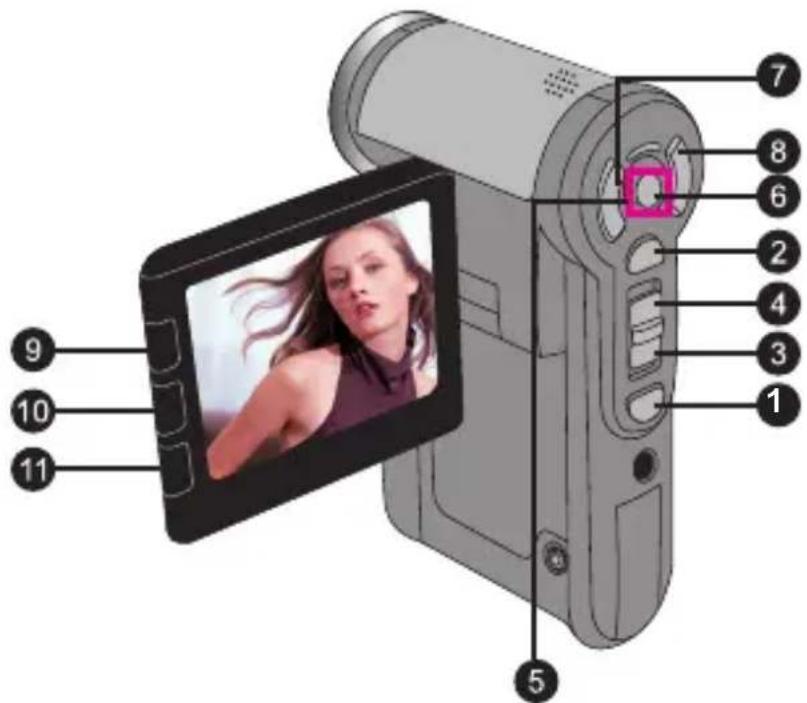
- Knowing your camcorder parts

Installing the battery
- Slide the battery cover open.
- Place the accessory Li-Ion battery into the compartment. Note that the metallic contacts must be aligned with the contacts in the compartment.
- After the battery is properly installed, replace the battery cover.

- Charging the battery
Please charge the battery at least 8 hours for first time use.
- Connect the cable.
Connect one end of the supplied AC adapter to the USB port of the camcorder and the other end to a wall outlet.
OR
Connect one end of the supplied USB cable to the USB port of the camcorder and the other end to a powered PC. Make sure the camcorder is powered off.
- The charging LED turns red and the charge starts.
- When the charging is interrupted or the battery pack is fully charged, the charging LED will turn green.
When using a PC to charge the battery, do not power on the camcorder, or the charge will stop.
Inserting a memory card (optional)
To insert a memory card, do the followings:
(1) Open the battery cover.
(2) Gently push the card as indicated until the card reaches the bottom of the slot.
To remove the memory card, gently push the card and it will pop up. Then pull the card out of the slot.
- Turning on/off your camcorder
Open the LCD monitor or press and hold down the Power button for 1 second to turn on the camcorder.
To turn off the camcorder, press and hold down the Power button for 1 3 seconds or close the LCD monitor.
If the camcorder stays inactive for a long period of time, it may automatically shut down due to the Auto-Off setting.
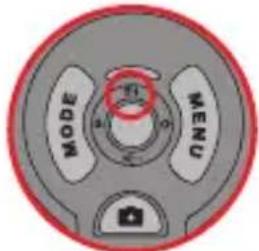
Setting language
- Power on the camcorder.
- Press the MODE key to enter the MODE menu.
- Use the Joystick switch to select the Setting mode and press OK to enter the menu screen.
- Use the Joystick to select the Language item, and then Press OK to confirm.
- Move the Joystick up/down to select a language.
- When done, press OK to confirm the setting.
Setting time
- Power on the camcorder.
- Press the MODE key to enter the MODE menu.
- Use the Joystick switch to the Setting mode and press OK to enter the menu screen.
- Use the Joystick to select the Date & Time item, and then Press OK to confirm.
- Move the Joystick up/down to adjust value. Move the Joystick left/right to shift between fields.
- When done, press OK to confirm the setting.
- Reading LCD indicators
1 Mode icon Remaining recordable time 9
Video resolution While Balance mode 10
Picture resolution Exposure mode 11
4 LED lights mode Flash mode 12
5 Macro mode Histogram mode 13
6 Battery life Selftimer mode 14
7 Zoom ratio indicator NightShot mode 15
SD card inserted Recording time 16
The LCD will display 4:3 ratio while setting as DVD (720x576), VGA or CIF video resolution. (Please refer to the page 9 for more detailed instructions.)
Basic Operations
Recording a video clip
- Adjust the focus:
Normally the camcorder can auto focus without adjusting focus. If you want to take close-up pictures, you can push the Up button to switch to Macro mode (
Note: Please make sure your memory card is inserted before recording.
| - | 30cm ~ ∞ (12" ~ )∞ |
| 5cm ~ 30cm (2" ~ 12") * At 1.5X fixed zoom |

- Zooming:
Move the Zoom button up or down to zoom in or zoom out the screen. The optical magnification is 3X.
- Press the Record button to start recording.
- Press the Record button again to stop recording.
The zoom function is also available during recording (except in macro mode).
If the surroundings are dark, you can switch the LED lights mode to On or Auto to help focus and lighting.
It's normal that the camcorder will feel slightly warm with continuous use / recording due to its high performance.
Recording a voice clip
- Power on the camcorder.
- Press the MODE key to enter the MODE menu.
- Use the Joystick switch to select the Voice Recorder mode and press OK to enter the menu screen.
- Press the Record button to start recording
- Press the Record button again to stop recording.


Taking a still picture
1. Adjust the focus:
Normally the camcorder can auto focus without adjusting focus. If you want to take close-up pictures, you can push the Up button to switch to Macro mode (
Note: Please make sure your memory card is inserted before recording.
| - | 30cm ~ ∞(12" ~ )∞ |
| 5cm ~ 30cm (2" ~ 12") * At 1.5X fixed zoom |
2. Zooming:
Move the Zoom button up or down to zoom in or zoom out the screen. The optical magnification is 3X.
Adjust other advanced settings if necessary.
the surroundings are dark, you can switch the LED lights mode to On or Auto to help focus and lighting.
- Press the Shutter button half way down and hold for the camcorder to auto focus. When the focus frame turns green, press the button fully down to take a still picture.

Due to the sensor capture feature, the LCD preview and ratio of still picture capture will vary depending upon different video resolution settings. The image capture of the camcorder is set where as video resolutions are different.
| Video resolution Preview | Taking pictures and focusing | |
| HD(1280x720p) | 16:9 ratio | 4:3 ratio |
| DVD(720x576) | 4:3 ratio 4:3 ratio | |
| VGA(640x480) | ||
| CIF(352x240) | ||

Playing back your recordings
- Press the MODE button and use the Joystick to switch to "My Works" mode.
Or press the Play/Pause button ( on the left side of the LCD monitor.
- There are three folders below My works: Video, Picture, and Voice. Select Video, Picture or Voice, and then press the OK key to enter the index mode.

- Operations in playback mode:
| File type How | ... Action | |
| Index mode Full-screen mode | Shift between Index mode and Full-screen mode | In Index mode, press the OK key to switch to Full-screen mode. In Full-screen mode, press the MENU button to switch to Index mode. |
| Shift between files | 1. In Index mode: Use the Joystick to move the highlight box. 2. In Full-screen mode: Use the Joystick to move left or right. | |
| Video & Audio | Start playing | When selected (in full-screen mode), the file automatically starts playing. |
| Pause/Resume playing | During playing/While paused, press the OK key. | |
| Adjust the volume level | During playing, use the Joystick to move up or down. | |
| Stop playing During playing, press the MENU button. | ||
| Return to the preview screen | Press the Shutter button. | |
| Fast forward | During playing, press the Next ( ) button. To stop, press the Play/Pause ( ) button. | |
| Fast backward | During playing, press the Previous ( ) button. To stop, press the Play/Pause ( ) button. | |
| Select the next file While paused/stopped, press the Next ( ) button. | ||
| Select the previous file | While paused/stopped, press the Previous ( ) button. | |
| Picture | Zoom in/out Use the Joystick to move up or down. | |
| Lock/Release zoom ratio | When the zoom ratio is greater than 1.0x, press the OK key. | |
| Browse the enlarged picture | When the zoom ratio is locked, use the Joystick to browse the picture. | |
- Playing back your recordings on PC
Installling software
Please notice that the recorded videos are .mp4 format. So you need some special programs to view the recordings on PC.
Please install the HD-DV DECODER program on the bundled CD. (* HD-DV DECODER is designed for playing back the .mp4 files recorded by our camcorder with Windows Media Player 10 & 11.)
Connecting PC and Save files
After the software is properly installed on your PC, please follow below procedures.
- Turn on the camcorder.
- Connect the camcorder (with SD card inserted) to your computer with the USB cable.
- A dialogue window will appear automatically. Please select the item "Open folder to view files" and click "OK".
- If the dialogue window does not appear automatically, you may double click on "My computer" and open the "Removable Drive".
- Double-click on the DCIM file folder.
- Double-click on the 100MEDIA file folder.
- Copy the files you wish to keep and save them to the desired location on your computer.

Connecting the camcorder to TV
Please follow the below instructions to connect your camcorder and TV via accessory AV cables for real-time display. You can display your video clips and still pictures on your TV, sharing them with your friends and family.

Connecting the camcorder to HDTV
HD TV hereby means the HDTV built-in component input ports, thus can perform HD high resolution quality while connected.
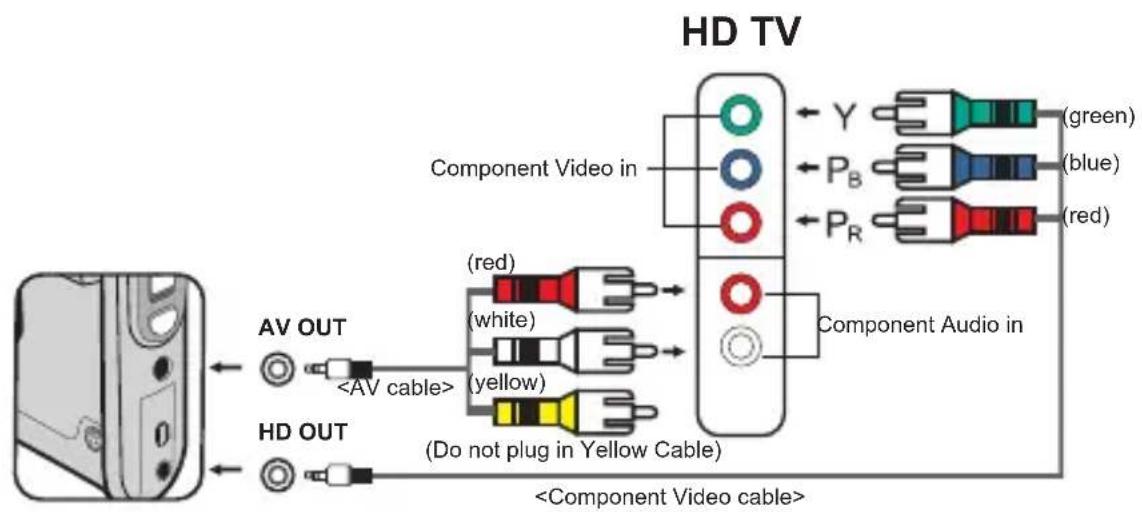
- Turn on your HD TV.
- Turn on the Camcorder.
- Plug one end of the component video cable into the (Component Video IN) port on the HDTV and the other end into the (HD OUT) port on Camcorder.
- Plug one end of the other AV cable into the (Component Audio IN) port on the HDTV and the other end into the (AV OUT) port on Camcorder. (Please do not plug in the yellow connector to HDTV's AV-IN.)
- Press the input switch mode on HD TV and select "Component Input".

If you record an HD resolution clip while connected to your HD TV, the TV display video resolution will down size to DVD (720x576) resolution due to data bit rate, but the recorded file will remain HD with no change.
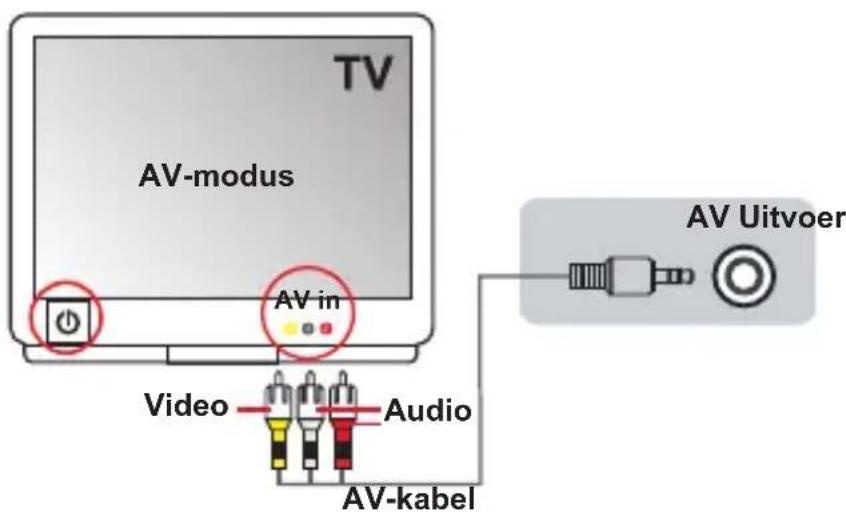
Connecting the camcorder to Standard TV
TV = Traditional CRT TV
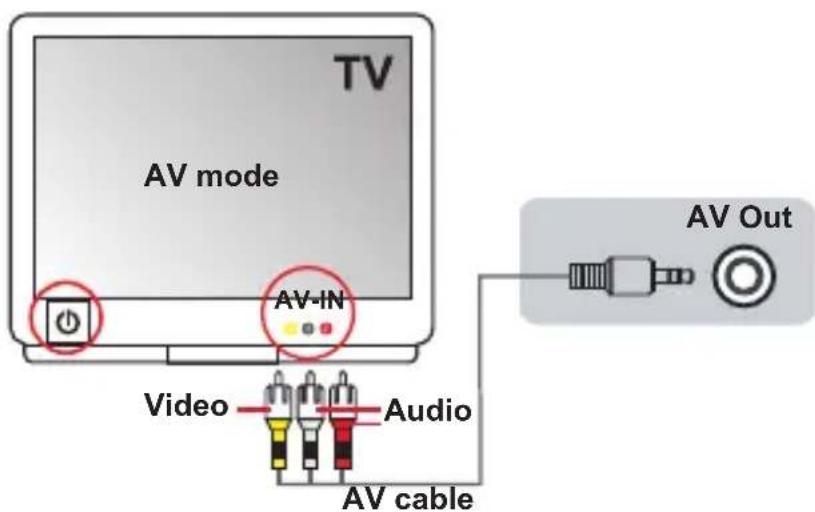
- Power on your TV and switch the TV to AV mode.
- Connect the audio and video ends of the AV cable (yellow/white/red color) to the TV "AV-IN" jacks.
- Power on the camcorder.
- Connect the other end of the AV cable to the "AV out" port on your camcorder. When the pop-up message appears on the screen, please select "AV-Out".
Advanced Operations
Menu operation
The menu items provide several options for you to fine-tune your camcorder functions. The following table gives details on menu operations.
| How to... Action | |
| Bring up the menu Press the MENU button. | |
| Move the highlight bar Use the Joystick to move up or down. | |
| Enter sub-menu/Confirm an item Press the OK key. | |
| Exit menu/Go back to upper menu Press the MENU button (when in sub-menue). |
- Menu items in Camcorder mode
Power-on Press the Menu button.
| Item Option Description | ||
| Video resolution | HD Set the video resolution to HD (1280x720 pixels). | |
| DVD Set the video resolution to DVD (720x576 pixels). | ||
| VGA Set the video resolution to VGA (640x480 pixels). | ||
| CIF Set the video resolution to CIF (352x240 pixels). | ||
| Picture Resolution | 3M Set picture resolution to 3 mega pixels. | |
| 5M Set picture resolution to 5 mega pixels. | ||
| 8M Set picture resolution to 8 mega pixels. | ||
| NightShot | On/Off | Enabling this setting allows you to take a photograph with a dark background. Since the shutter speed will slow down when taking photographs at a dark place, we recommend using a tripod to eliminate blurring from hand shake. Warning: Noise increases when NightShot is enabled. |
| WB | Auto The camcorder automatically adjusts white balance. | |
| Sunny | This setting is suitable for outdoor recording in sunny weather. | |
| Cloudy | This setting is suitable for recording in cloudy weather or shady environments. | |
| Fluorescent | This setting is suitable for indoor recording with fluorescent lamp lighting, or environments with high color temperature. | |
| Tungsten | This setting is suitable for indoor recording with incandescent lamp lighting, or environments with low color temperature. | |
- Menu items in Camcorder mode
| Item Option Description | ||
| Flashlight | On The flash | is forced to fire in every shot. |
| Auto The flash | automatically fires when the lighting is insufficient. | |
| Off The flash | is disabled. | |
| Video Light On/Auto/Off | This setting allows you to add extra light when the lighting is insufficient during recording video clips. | |
| Effect | Normal Make recordings in natural color. | |
| B&W Make recordings in black and white. | ||
| Classic Make recordings in sepia-toned color. | ||
| Exposure -2~+2 | Manually adjust the exposure to gain better effect when the preview image appears too bright or too dark. A positive value indicates the image will be brighter than usual; while a negative value makes the image dimmer. | |
| Selftimer Or/Off | Enable/Disable the selftimer. After the selftimer is turned on, the camcorder will have ten seconds delay before recording when the Shutter button is pressed. | |
| Histogram On/Off Enable/Disable image | histogram display on the screen. | |
| Icon On/Off | Enable/Disable OSD (on screen display) icons to display on the screen. | |
- Menu items in Playback mode
Power-on Press the MODE button Use the Joystick to switch to My Works mode Select Video, Picture or Voice folder Press the OK button Press the MENU button.
| Item Option | Description | |
| Delete One | Yes/No Delete current file. | |
| Delete All | Yes/No | Delete all pictures and video.audio files stored in the memory. |
| Slide Show/Video play | - | The camcorder displays images/video clips in sequence. You can press the OK key to stop the slide show/video play. |
| Lock | Yes/No | Single, multiple, or all files can be locked. A locked file cannot be erased by a delete function. While the formatting function will erase all locked/unlocked files. |
- If there are no files in the camcorder, no items will be seen.

Menu items in Setting mode
Power-on Press the MODE button Select the Setting ( ) mode Press the OK button.
| Item Option Description | ||
| Date & Time - | Set date and time. | |
| Beep | On/Off | Enable/Disable beep sound. |
| Flicker | 50Hz | Set flicker frequency to 50Hz*. |
| 60Hz | Set flicker frequency to 60Hz*. | |
| TV-Out | NTSC | Set TV system compatibility to NTSC. This option is suitable for America, Taiwan, Japan, and Korea areas. |
| PAL | Set TV system compatibility to PAL. This option is suitable for Germany, England, Italy, Netherlands, China, Japan, and Hong Kong. | |
| Icon | On/Off | Enable/Disable OSD icons to display on the screen. |
| LCD Bright | -2~+2 | Set LCD brightness. A positive value makes the LCD brighter; while a negative value makes the LCD dimmer. |
| Format | Yes | Format the storage medium. Note that all files stored in the medium will be gone. |
| No | Cancel action. | |
| Auto Off | Off | Disable Auto-off function. |
| 1 min | The camcorder automatically shuts down when staying inactive for over 1 minute. | |
| 3 min | The camcorder automatically shuts down when staying inactive for over 3 minutes. | |
| 5 min | The camcorder automatically shuts down when staying inactive for over 5 minutes. | |
| Language | - | Lets you select the language used for OSD. |
| Default | On | Restore factory defaults. Note that your current settings will be overridden. |
| Off | Cancel action. | |

Battery Life Indicator
| Icon Description |
| Full battery life |
| Moderate battery life |
| Low battery life * The flash strobe and the LED lights will be disabled." |
| Empty battery life |
Note: To avoid sudden outage of power supply, you are recommended to replace the battery when the icon indicates low battery life.
Battery Life
| Still picture Video clip | |
| Number of shots Recording time (minute) | |
| 110 60 | |
| * shoot every 30 seconds ** flash is off *** resolution is set to 5M (2592x1944) | * resolution is set to HD (1280x720 pixels) |
Note: This table is for your reference only. The actual battery life depends on your battery type and recharge level.
Storage Capacity
| Memory | Video (min.) Still picture | ||||||
| HD DVD VGA CIF 8M 5M 3M | |||||||
| SD card (256MB) | 7 18 | 40 95 | 145 230 | ||||
| SD card (512MB) | 15 36 | 80 | 190 290 460 | ||||
| SD card (1GB) | 30 72 | 160 | 380 580 920 | ||||
| SD card (2GB) | 60 | 144 | 320 | 770 | 1160 | 1840 | |
| SD card (4GB) | 120 | 288 | 640 | 1540 | 2320 | 3680 | |
Note: The actual value of capacity may vary (up to ± 30% ) depending on the color saturation and complexity of your subject and surroundings.

Specifications
| Item Description | |
| Model 5 Mega-pixel | camcorder |
| Image sensor 5 Mega (2592x1944 pixels) | |
| Resolution | Still image: 3M/5M/8M 1280x720 (HD) 720x576 (DVD) 640x480 (VGA) 352x240 (CIF) |
| Lens 3X optical zoom lens | |
| File format MP4, JPEG, WAV | |
| Video frame rate | 1280x720, up to 30fps 720x576, up to 30fps 640x480, up to 30fps 352x240, up to 30fps |
| Internal memory 128MB built-in; 90MB for storage | |
| External memory SD/MMC card (minimum 256MB up to 32GB SDHC) | |
| LCD display 2.4" LCD | |
| TV out HDTV Component out, NTSC/PAL system supported | |
| Interface USB 2.0 | |
| Microphone Yes | |
| Speaker Yes | |
| Voice Recorder Yes | |
| Nightshot Yes (both in still image and video modes) | |
| Battery | NP60 compatible Li-ion rechargeable battery |
Note: Specifications are subject to change without notification.

Remote Control

Before using the remote control, be sure to remove the insulator.
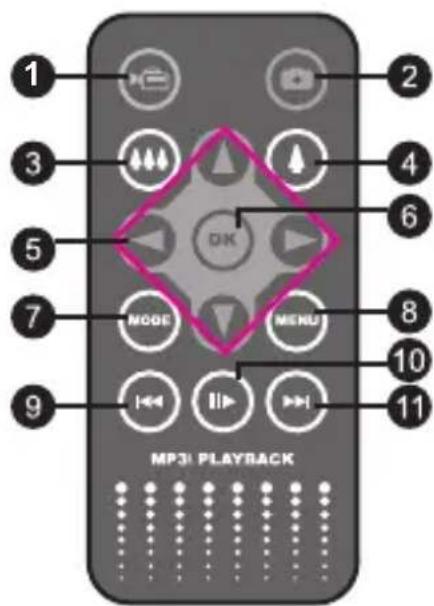
| 1 | Record button | |
| 2 | Shutter button | |
| 3 | Zoom out button | |
| 4 | Zoom in button | |
| 5 | Direction buttons | |
| 6 | OK | OK key |
| 7 | MODE | Mode button |
| 8 | MENU | Menu button |
| 9 | Previous/Backward button | |
| 10 | II | Play/Pause button |
| 11 | Next/Forward button |

Troubleshooting
| When using the camcorder: | ||
| Problem Cause Solution | ||
| The camcorder can not be powered on normally. | The battery is out of power. Replace the battery. | |
| The battery is incorrectly installed. | Re-install the battery. | |
| The camcorder is still powered on, but the LCD screen does not display. | If the camcorder stays idle over one minute, the LCD screen will automatically shut down to save power. | Press any button except the power button to reactivate the display. |
| Can not take pictures or video clips when pressing the Shutter or Record button. | Out of memory. | Free some space from the SD/MMC card or the internal memory. |
| The camcorder is recharging the flash strobe. | Wait until the flash strobe is fully charged. | |
| Using a “protected” SD card. | Set the SD card to be writeable. | |
| The LCD screen displays “MEMORY ERROR” or “CARD ERROR” message. Or the camcorder cannot read the memory card. | The format of the memory card is not compatible with the camcorder. | Use the camcorder “Format” function to format the card. |
| The memory card is corrupted. | Replace the memory card with a new one. | |
| When connecting the camcorder to PC or TV: | ||
| Problem Cause Solution | ||
| I cannot view the video clips on my computer. | Driver or software is not installed on the computer. | Install Direct X 9.0 or above to solve this problem. Please go to http://www.microsoft.com to download the required files. |
| The TV screen does not display after connecting the camcorder to the TV. | The camcorder is not correctly connected to the TV. | Reconnect the camcorder to TV correctly. |
| The camcorder does not respond when connecting to PC. | The [USB Mode] setting is set to [Printer]. | Set the [USB Mode] option to [Menu]. |
TOSHIBA support
Need help?
For the latest driver updates & user manuals please have a look at:
TOSHIBA options & services support page:
computers.toshiba.eu/options-support
Please see computers.toshiba.eu/options-warranty
for the TOSHIBA hotline numbers.
Regulatory Information
CE compliance
This product is CE marked in accordance with the requirements of the applicable EU Directives. Responsible for CE marking is Toshiba Europe GmbH, Hammfelddamm 8, 41460 Neuss, Germany. A copy of the official Declaration of Conformity can be obtained from following website: http://epps.toshiba-teq.com.
Working Environment
The Electromagnetic Compliance (EMC) of this product has been verified typically for this product category for a so called Residential, Commercial & Light Industry Environment. Any other working environment has not been verified by Toshiba and the use of this product in these working environments is maybe restricted or cannot be recommended.
Possible consequences of the use of this product in non verified working environments can be: Disturbances of other products or of this product in the nearby surrounding area with temporarily malfunction or data loss/corruption as result. Example of non verified working environments and related advices:
Industrial environment (e.g. environments where a mains voltage of 380V three-phase is being used mainly): Danger of disturbances of this product due to possible strong electromagnetic fields especially near to big machinery or power units.
Medical environment: The compliance to the Medical Product Directive has not been verified by Toshiba, therefore this product cannot be used as a medical product without further verification. The use in usual office environments e.g. in hospitals should be no problem if there is no restriction by the responsible administration.
This product is not certified as a medical product according to the Medical Product Directive 93/42 EEC.
Automotive environment: Please search the owner instructions of the related vehicle for advices regarding the use of this product (category).
Aviation environment: Please follow the instructions of the flight personnel regarding restrictions of use.
Additional environments not related to EMC
Outdoor use: As a typical home/office equipment this product has no special resistance against ingress of moisture and is not strong shock proofed.
Explosive atmosphere: The use of this product in such special working environment (Ex) is not allowed.
Following information is only for EU-member states:
The use of the symbol indicates that this product may not be treated as household waste. By ensuring this product is disposed of correctly, you will help prevent potential negative consequences for the environment and human health, which could otherwise be caused by inappropriate waste handling of this product. For more detailed information about recycling of this product, please contact your local city office, your household waste disposal service or the shop where you purchased the product.

Disposal of spent batteries and accumulators
The symbol on the batteries and accumulators indicates that the batteries and accumulators shall not be treated as household waste. By ensuring that the batteries and accumulators are disposed of correctly, you will help prevent potential negative consequences for the environment and human health, which could otherwise be caused by inappropriate waste handling of spent batteries and accumulators. For more detailed information about take-back and recycling of batteries, please contact our website: http://eu.computers.toshiba-europe.com or your local city office or the shop where you purchased the product.

www.adobe.com/products/acrobat/readstep2.html
Lieferumfang
1

2

6

7

11
12


3
8

13

4

9

5
10

5
1
www.adobe.com/products/acrobat/readstep2.html
Vérifiez le contenu
1
2

6

7

11

12

13

3

4
8
9

5
10

1
Caméscope Écouteu
11
www.adobe.com/products/acrobat/readstep2.html
www.adobe.com/products/acrobat/readstep2.html
Wisselstroomadapter D s agtas
5
USB-kabel
10
TV = Traditionele CRT-TV