
Camileo Z100 - Camcorder TOSHIBA - Free user manual and instructions
Find the device manual for free Camileo Z100 TOSHIBA in PDF.

| Product Type | Camcorder |
| Brand | Toshiba |
| Model | Camileo Z100 |
| Dimensions (L x W x H) | 120 x 54 x 62 mm (4.7 x 2.1 x 2.4 in) |
| Weight | 255 g (8.99 oz) without battery |
| Image Sensor | Two 5MP CMOS sensors |
| Lens | F2.8, fixed focus |
| Zoom | 2D: 10x digital; 3D: 4x digital |
| LCD Screen | 2.8-inch touch screen (16:9) |
| Storage Media | Built-in 128MB (partial for firmware); SD/SDHC/SDXC up to 128GB |
| Video Resolution | Up to Full HD 1920x1080p 30fps |
| Photo Resolution | Up to 16MP (interpolated) |
| File Format | Video: MP4 (H.264); Photo: JPEG |
| Battery | Lithium-ion rechargeable; charge time ~4h; life ~1h40min |
| Power Supply | AC adapter (included) or USB charging |
| Interface | Mini USB 2.0, Mini HDMI out |
| 3D Recording | Yes, switchable between 2D and 3D |
| Special Features | Face tracking, smile detection, slow motion, time lapse, pre-record, motion detection |
| Operating Temperature | 32°F to 104°F (0°C to 40°C) |
| Operating Humidity | 20% to 80% (no condensation) |
| Safety Warnings | Do not disassemble; avoid water; use only Toshiba batteries; keep from children |
| Maintenance | Clean with soft dry cloth; do not use harsh chemicals |
| Spare Parts | Battery and AC adapter available from Toshiba |
| Warranty | One-year limited warranty |
Frequently Asked Questions - Camileo Z100 TOSHIBA
User questions about Camileo Z100 TOSHIBA
0 question about this device. Answer the ones you know or ask your own.
Ask a new question about this device
Download the instructions for your Camcorder in PDF format for free! Find your manual Camileo Z100 - TOSHIBA and take your electronic device back in hand. On this page are published all the documents necessary for the use of your device. Camileo Z100 by TOSHIBA.
USER MANUAL Camileo Z100 TOSHIBA
Leading Innovation >>>
CAMILEO® Z100 User's Guide
English/Espanol
Regulatory Information
FCC Information

Product Name: Camcorder
Model number: CAMILEO ^® Z100
FCC notice “Declaration of Conformity Information”
This equipment has been tested and found to comply with the limits for a Class B digital device, pursuant to part 15 of the FCC rules. These limits are designed to provide reasonable protection against harmful interference in a residential installation. This equipment generates, uses and can radiate radio frequency energy and, if not installed and used in accordance with the instructions, may cause harmful interference to radio communications. However, there is no guarantee that interference will not occur in a particular installation. If this equipment does cause harmful interference to radio or television reception, which can be determined by turning the equipment off and on, the user is encouraged to try to correct the interference by one or more of the following measures:
◆Reorient or relocate the receiving antenna.
Increase the separation between the equipment and receiver.
Connect the equipment into an outlet on a circuit different from that to which the receiver is connected.
Consult the dealer or an experienced radio/TV technician for help.
▲WARNING
Changes or modifications made to this equipment, not expressly approved by TOSHIBA or parties authorized by TOSHIBA could void the user's authority to operate the equipment.
FCC Conditions
This equipment has been tested and found to comply with Part 15 of the FCC Rules. Operation is subject to the following two conditions:
(1) This device may not cause harmful interference.
(2) This device must accept any interference received. Including interference that may cause undesired operation.
Contact
Address: TOSHIBA America Information Systems, Inc.
9740 Irvine Boulevard
Irvine, California 92618-1697
Telephone: (949) 583-3305
Safety Instructions
1 Do not drop, puncture or disassemble the camcorder; otherwise the warranty will be voided.
2 Avoid all contact with water, and dry hands before using.
3 Do not expose the camcorder to high temperature or leave it in direct sunlight. Doing so may damage the camcorder.
4 Use the camcorder with care. Avoid pressing hard on the camcorder body.
5 For your own safety, avoid using the camcorder when there is a storm or lightning.
6 Do not use batteries of different specifications. Doing so may lead to the potential for serious damage.
7 Remove the battery during long periods between usage, as a deteriorated battery may affect the functionality of the camcorder.
8 Remove the battery if it shows signs of leaking or distortion.
9 Use only the accessories supplied by the manufacturer.
10 Keep the camcorder out of the reach of children.
11 Risk of explosion if battery is replaced by an incorrect type.
12 Dispose of used batteries according to the instructions.
▲WARNING
Safety instructions for using 3D devices
If you or any viewer experiences the following symptoms or any other discomfort from viewing 3D video images, stop viewing and contact your health care provider: Convulsions, Eye or muscle twitching, Loss of awareness, Altered vision, Involuntary movements, Disorientation, Eye Strain, Nausea/Vomiting, Dizziness, Headaches, Fatigue.
Some viewers may experience a seizure or blackout when exposed to certain flashing images or lights contained in certain 3D television pictures or video games. Anyone who has had a seizure, loss of awareness, or other symptom linked to an epileptic condition, or has a family history of epilepsy, should contact a health care provider before using the 3D function.
If you feel eye fatigue or other discomfort from viewing 3D video images, stop viewing and take a rest until the condition is eliminated.
Due to the possible impact on vision development, viewers of 3D video images should be age 6 or above. Children and teenagers may be more susceptible to health issues associated with viewing in 3D and should be closely supervised to avoid prolonged viewing without rest.
❖Avoid use of the 3D function when under the influence of alcohol.
- Watching the screen while sitting too close for an extended period of time may cause eye strain. Consult your display manual to determine the ideal viewing distance.
Viewing in 3D may cause dizziness and/or disorientation for some viewers. Therefore, to avoid injury do not place your player or display near open stairwells, balconies, or wires, and do not sit near objects that could be broken if accidentally hit.
About the battery
Use only batteries recommended by TOSHIBA as replacements. The battery is a lithium ion battery, which can explode if not replaced, used, handled or disposed of properly. Dispose of the battery as required by local ordinances or regulations.
Charge the battery only in an ambient temperature between between 32 and 104 degrees Fahrenheit (0 to 40 Celsius). Otherwise, the electrolyte solution might leak, battery performance might deteriorate and the battery life might be shortened.
◆Never install or remove the battery without first turning off the power and disconnecting the AC adaptor.
Only use the supplied AC adaptor or USB cable, or an optional Toshiba battery charger to charge the battery. Never attempt to charge the battery with any other charger.
3D device compatibility and 3D viewing
3D Compatible Devices Required.
If you want to view 3D content on an external display or device, you may need a compatible 3D display, compatible 3D playback device or 3D source, and/or a 3D capable HDMI ^® cable (all sold separately).
3D effect and image quality may vary depending upon content quality and display device capability / functionality / settings.
Safety icons
This manual contains safety instructions that must be observed to avoid potential hazards that could result in personal injuries, damage to your equipment, or loss of data. These safety cautions have been classified according to the seriousness of the risk, and icons highlight these instructions as follows:
| △DANGER | Indicates an imminently hazardous situation which, if not avoided, will result in death or serious injury. |
| △WARNING | Indicates a potentially hazardous situation which, if not avoided, could result in death or serious injury. |
| △CAUTION | Indicates a potentially hazardous situation which, if not avoided, may result in minor or moderate injury. |
| CAUTION | Indicates a potentially hazardous situation which, if not avoided, may result in property damage. |
| NOTE | Provides important information. |
Additional Information
© Copyright 2012 TOSHIBA CORPORATION. All rights reserved. TOSHIBA reserves the right to make technical changes. TOSHIBA assumes no liability for damages incurred directly or indirectly from errors, omissions or discrepancies between this product and the documentation.
Trademarks
CAMILEO is a registered trademark of Toshiba America Information Systems, Inc. and/or Toshiba Corporation.
Adobe and Adobe Reader are either registered trademarks or trademarks of Adobe Systems Incorporated in the United States and/or other countries.
ArcSoft and MediaImpression are registered trademarks of ArcSoft, Inc.
Facebook is a registered trademark of Facebook Inc.
HDMI, the HDMI Logo and High-Definition Multimedia Interface are trademarks or registered trademarks of HDMI Licensing, LLC.
Intel, Intel Core, Celeron, Centrino and Pentium are trademarks or registered trademarks of Intel Corporation or its subsidiaries in the United States and other countries.
Mac is a trademark of Apple Inc., registered in the U.S. and other countries.
Microsoft, Windows, and Windows Vista are either registered trademarks or trademarks of Microsoft Corporation in the United States and/or other countries.
Secure Digital and SD are trademarks of SD Card Association.
YouTube and the YouTube logo are registered trademarks of Google, Inc.
All other brand and product names are trademarks or registered trademarks of their respective companies.
Contents
Chapter 1: Getting to Know Your Camcorder.... 11
Overview 11
Check the components 12
System requirements....13
Front view 14
Rear view....14
Side view 15
Underside view 15
Chapter 2: Getting Started....16
Loading the battery....16
Charge your battery 18
Inserting and removing an SD ^TM Card.....22
Protecting data on an SD ^TM Card.....23
Turning the camcorder on and getting started .....24
Record 3D video 24
Turning off the camcorder 24
Chapter 3: Record Mode.... 25
Button functions 25
LCD touch screen information 26
Notification icons....26
Video recording 29
Taking Photos....30
Using the Zoom function ....30
Menu options/operations....31
Video Setting options....32
Photo Setting options ....36
Deleting files 41
Chapter 4: Playback Mode.... 43
Button functions 43
LCD touch screen information 44
Notification icons....44
Touch function icons 45
Playback mode operations....46
Video Playback....47
Photo Playback 47
Delete a file in Playback mode ....47
Video Trim 48
Chapter 5: Camcorder Settings.... 49
Setup Menu 49
Menu Sound 49
TV 49
Language 50
Time Settings....50
Format 50
Default Setting 51
Chapter 6: Viewing Photos and Videos on TV....52
Connecting to a 3D-compatible TV ....52
Connecting to a high-definition 16:9 (wide) TV.....53
Chapter 7: Viewing Photos and Videos on a Computer...... 54
Installing bundled software....54
Transferring photos or videos to a computer......55
Chapter 8: Uploading Video and Photo Files to the Internet.....56
CAMILEO® Uploader....57
Setting up your account information for a web site ....59
Chapter 9: Webcam Mode....61
Chapter 10: Specifications.... 62
Operating Environment Conditions ....63
Chapter 11: Troubleshooting.... 64
Chapter 12: Other Information....68
Toshiba Support 68
Before you call ....68
Contacting Toshiba 69
Toshiba's technical support web site ....69
Toshiba voice contact 69
Warranty....69
Online Warranty Information......69
Warranty Service 69
Chapter 1
Getting to Know Your Camcorder
Overview
Your Toshiba camcorder comes equipped with two separate lenses and two 5MP sensors that can record 3D or 2D videos at full HD resolution of 1920 x 1080.
Other features of your CAMILEO ^® Z100 camcorder are:
High quality images up to 16 megapixels, in 3D or 2D.
◆2.8" LCD touch screen for easy viewing of video, photos and onscreen menus.
You can preview and playback 3D images on the LCD screen without wearing 3D glasses.
You can connect the camcorder to an HDTV via an HDMI cable, and easily playback the recorded high-definition videos on a wide screen HDTV / 3D TV.
◆10x digital zoom (4x in 3D mode).
On-screen video trimming (in 2D mode) without the need for a computer.
ISO sensitivity and color balance can either be adjusted automatically or changed manually.
Built-in CAMILEO ^® Uploader, allowing you to easily upload videos captured by the camcorder to the Internet (for Windows ^® based systems only).
Built-in memory allows you to take photos and to record videos without a memory card. The memory card slot allows you to increase the storage capacity.
◆ Various effects options, such as Time Lapse and Slow Motion.
NOTE
A portion of the built-in memory is used for firmware to operate the camcorder.
Check the components
Unpack the box and make sure all items listed below are included:
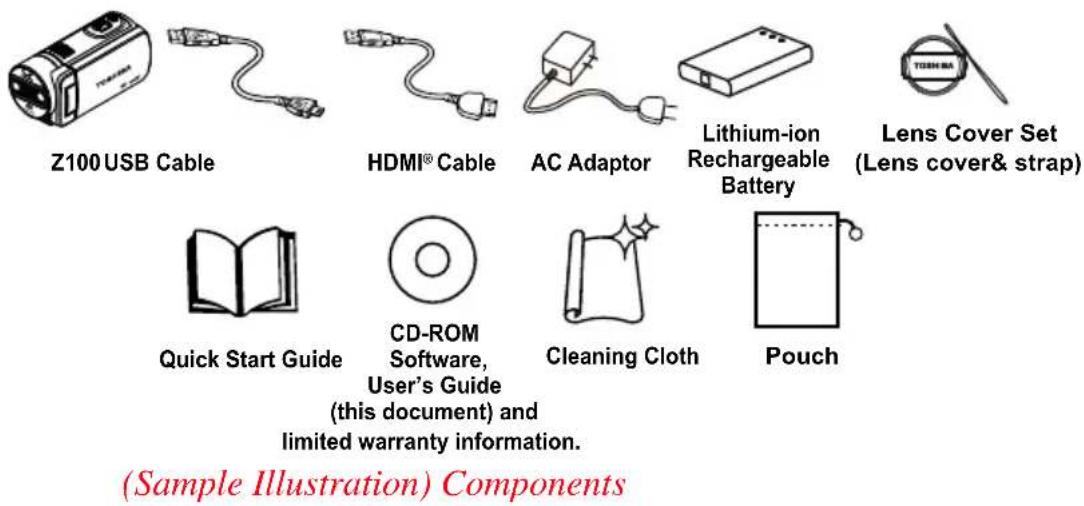
NOTE
Be sure to remove the protective film on the lens before using.
System requirements
◆Microsoft ^® Windows ^® XP/Windows Vista ^® /Windows ^® 7
Intel ^® Core ^TM 2 Duo or above
AMD Athlon 64 X2 or above
◆1 GB (2 GB or more recommended)
◆1 GB free HDD space
4x CD-ROM Drive
◆ Available USB 2.0 port
◆3D-compatible display screen for 3D video
Mac compatibility
Mac OS 10.6 or above
CPU Intel ^ Core ^TM 2 Duo or above
◆1 GB (2 GB or more recommended)
◆1 GB free HDD space
DVD-ROM
◆ Available USB 2.0 port
◆3D-compatible display screen for 3D video
NOTE
The LCD touch screen is manufactured using extremely high-precision technology. However, some tiny black and/or bright dots (white, red, blue or green) may appear on the LCD touch screen. These dots are a normal result of the manufacturing process, and do not affect the recording.
Front view
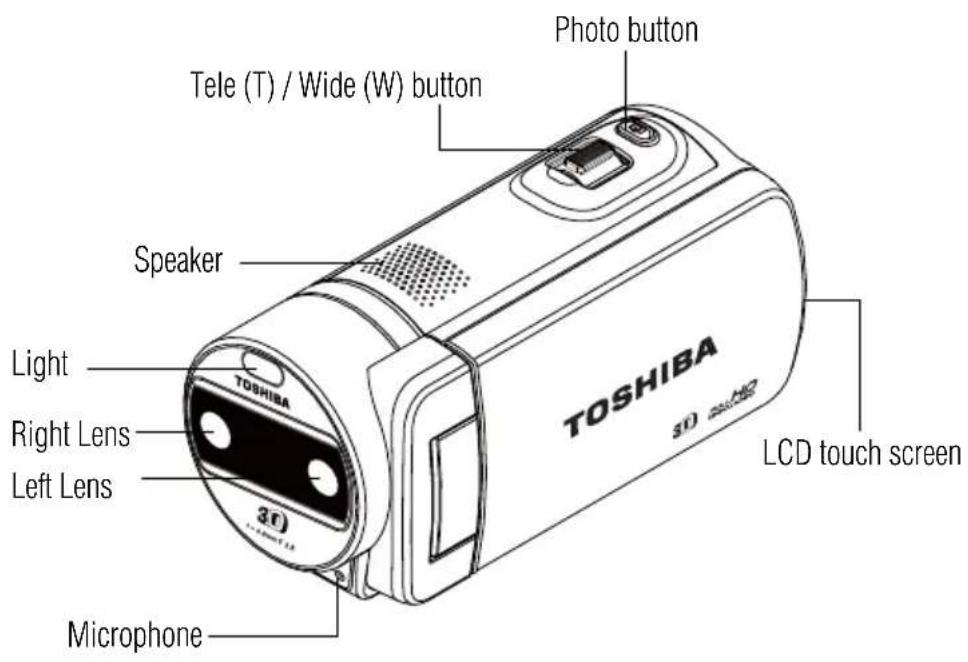
(Sample Illustration) Front view
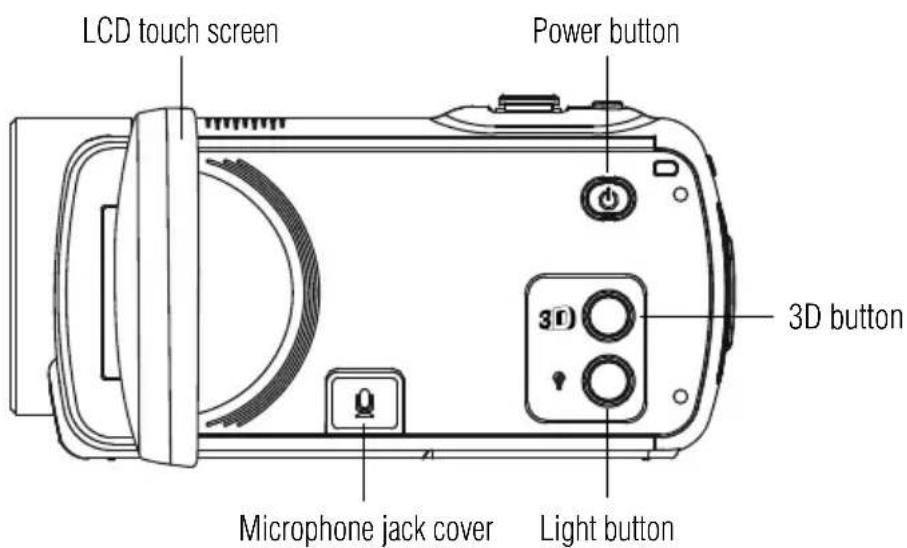
Rear view
(Sample Illustration) Rear view
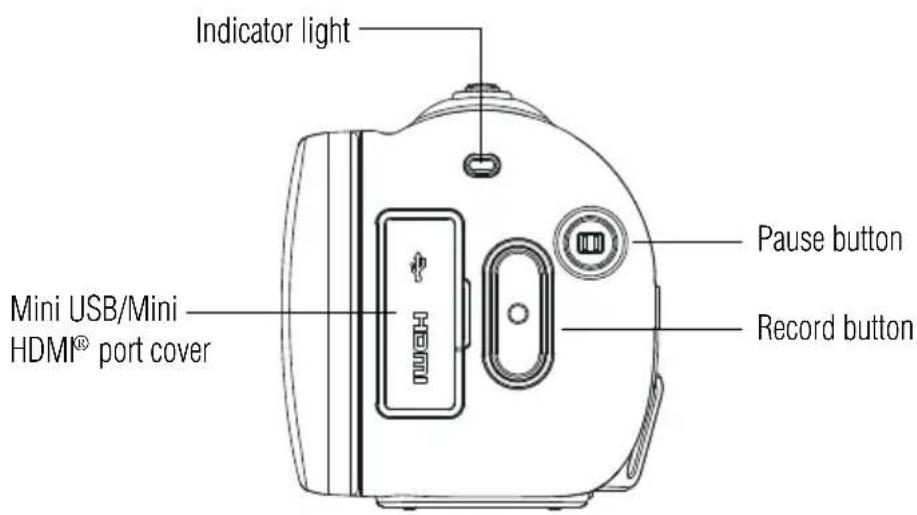
Side view
(Sample Illustration) Side view
Underside view
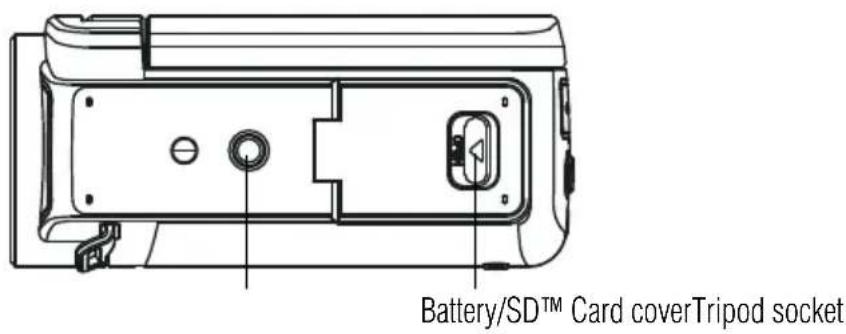
(Sample Illustration) Underside view
Chapter 2
Getting Started
Loading the battery
Before using the camcorder, you will need to remove the protective film from the battery. To do so, remove the battery, then remove the film, and replace the battery as shown below.
The battery comes pre-installed in the camcorder, however, you must remove the protective film on the battery before use.
To properly connect the battery:
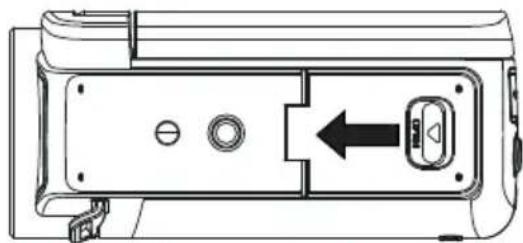
1 Slide the safety latch and open the battery / SD ^TM Card cover.
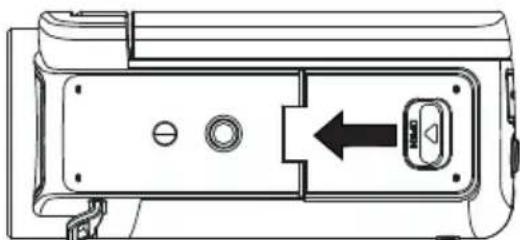
natural_image
Technical line drawing of a device rear panel with a directional arrow indicating movement or force (no text or symbols)(Sample Illustration) Opening the battery / SD™ Card cover
2 Remove the battery.
3 Pull the protective film off.
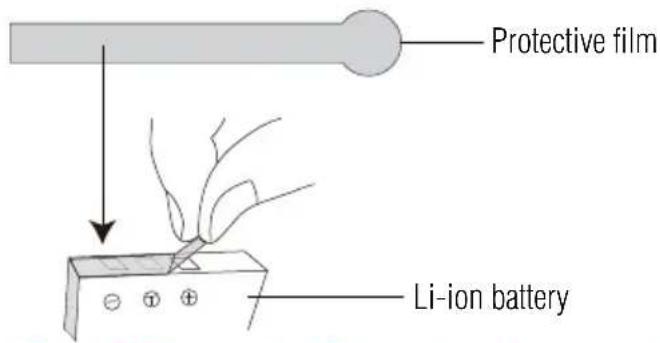
(Sample Illustration) Removing the protective film
4 Reinsert the battery, making sure it is lined-up with the correct polarity marks.
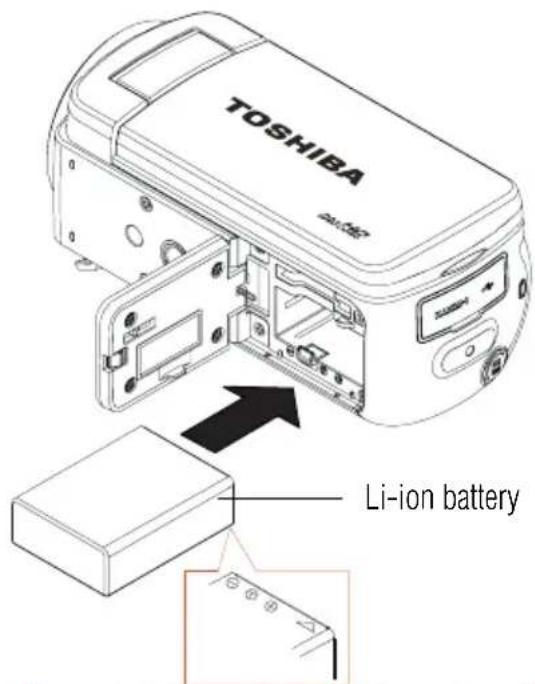
(Sample Illustration) Reinserting the battery
NOTE
Be sure the orange latch is engaged after inserting the battery.
5 Close the battery / SD ™ Card cover.
Charge your battery
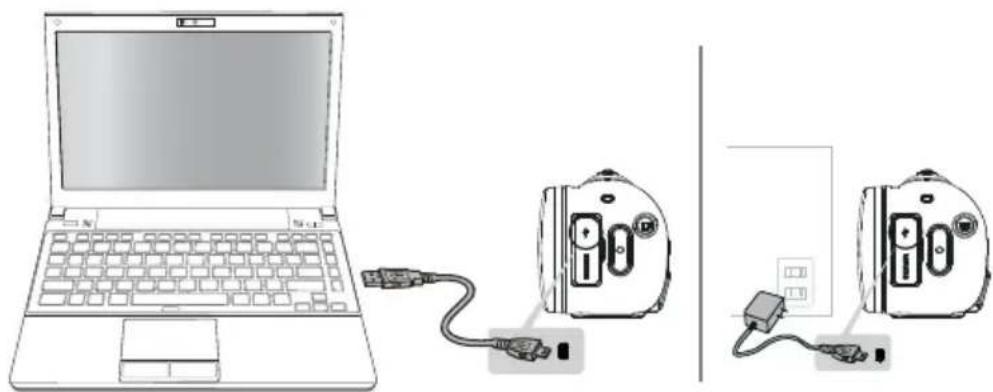
You must use the supplied AC adaptor or the USB cable to charge your camcorder before use. Turn off the camcorder. A blinking light indicates active charging, and a solid light indicates that charging is complete. In AC charging mode, the light will turn off automatically after the battery is fully charged. The full charge time is approximately 4 hours.
natural_image
Diagram showing a laptop connected to two devices via cables, one with ports and the other with power lines (no text or symbols)(Sample Illustration) Charging the battery
▲WARNING
Handling of the battery
Never attempt to dispose of a battery by burning or by throwing it into a fire, and never allow exposure to a heating apparatus (e.g., microwave oven). Heat can cause a battery to explode and/or release caustic liquid, both which may possibly cause serious injury.
Never attempt to disassemble, tamper with or repair a battery. The battery could overheat and ignite. Leakage of the caustic alkaline solution or other electrolytic substances could cause fire, possibly resulting in death or serious injury.
Never short-circuit the battery by either accidentally or intentionally bringing the battery terminals in contact with another conductive object. This could cause serious injury or a fire, and could also damage the battery and product. Always wrap the battery in plastic (or place it in a plastic bag) whenever transporting it, to avoid exposing the terminals to another conductive object which could result in serious injury. Always cover the metal terminals with insulating tape when disposing of the battery, to prevent accidental short-circuiting which could result in serious injury.
▲WARNING
Never drive a nail or any other sharp object into the battery, hit battery with a hammer or other object or step on it. Doing so could cause a fire or explosion possibly resulting in serious injury.
✿Never charge the battery by a method other than as instructed. Doing so could cause a fire or explosion possibly resulting in serious injury.
✿Never connect the battery to a plug socket or a car cigarette plug socket. The battery could rupture or ignite causing a fire or explosion possibly resulting in serious injury.
✿Never allow a battery to become wet. A wet battery will overheat or ignite causing rupture or fire, possibly resulting in death or serious injury.
Never store a battery in an area of high humidity. This could cause a fire or explosion possibly resulting in serious injury.
Never expose a battery to abnormal shock, vibration or pressure. Never use a battery which has been exposed to abnormal shock even if the appearance is normal. The battery's internal protective device could fail, causing it to overheat or ignite resulting in caustic liquid leakage, or explosion or fire, possibly resulting in death or serious injury.
Never subject a battery to heat, and never store it or use it near a heat source. The battery could ignite or explode when heated or burned, possibly resulting in death or serious injury. Subjecting a battery to heat could also cause caustic liquid to leak. It can also cause failure, malfunction, or loss of stored data.
Use of correct battery
◆Always use the battery supplied. Other batteries have different voltage and terminal polarities. Use of non-conforming batteries could generate smoke or cause fire or rupture, possibly resulting in serious injury.
WARNING
Battery safety
✿Never allow caustic electrolyte fluid leaked from the battery to contact your eyes, body or clothing.
Use appropriate protective gloves when handling a damaged battery.
If caustic electrolyte fluid from the battery should contact your eyes, immediately wash your eyes with large amounts of running water and obtain prompt medical attention, to help prevent permanent eye damage.
If electrolyte fluid should contact any part of your body, immediately wash it off under running water to help prevent skin rashes.
If electrolyte fluid should contact your clothes, promptly remove them to help prevent the electrolyte fluid from contacting your body, possibly resulting in serious injury.
Battery warning indicators
◆Always immediately turn the power off and disconnect the power cable/cord plug from the plug socket and stop using the battery if you observe any of the following conditions:
◆Offensive or unusual odor
Excessive heat
Discoloration
◆Deformation, cracks or leaks
Smoke
- Other unusual event during use, such as abnormal sound In such an event, carefully and immediately remove the battery from the product. In some instances, you might have to wait for the product to cool down before removing the battery, in order to avoid any possible minor injury due to heat exposure. Do not turn on the product's power again until an authorized Toshiba service provider has checked it for safety. Continued use could cause a fire or rupture possibly resulting in serious injury or product failure including but not limited to the loss of data.
▲WARNING
Disposal of used batteries
◆Always dispose of used batteries in compliance with all applicable laws and regulations. Put insulating tape, such as cellophane tape, on the electrode during transportation to avoid a possible short circuit, fire or electric shock. Failure to do so could possibly result in serious injury.
▲ CAUTION
Inserting the battery
When installing a battery or before moving the product, always make sure the battery is inserted correctly and securely. If the battery falls out, while you are carrying the product, you could be injured or the battery could be damaged.
CAUTION
Do not use an impaired or exhausted battery
Never continue to use a battery after its recharging capability has become impaired, or after the warning message indicating that the battery power is exhausted has been displayed. Continued use of an exhausted or impaired battery could result in the loss of data or damage to the product.
NOTE
Handling of the battery
◆Never attempt to install batteries in reverse polarity.
▲WARNING
- Make sure the battery is securely installed in the product before attempting to charge the battery. - Improper installation could generate smoke or fire, or cause the battery to rupture.
▲ CAUTION
The battery is a lithium ion battery, which can explode if not replaced, used, handled or disposed of properly. Dispose of the battery as required by local ordinances or regulations. Use only batteries recommended by TOSHIBA as replacements.
Charge the battery only in an ambient temperature between 32 and 104 degrees Fahrenheit (0 and 40 degrees Celsius). Otherwise, the electrolyte solution might leak, battery performance might deteriorate and the battery life might be shortened.
✿Never install or remove the battery without first turning off the power and disconnecting the AC adaptor.
Inserting and removing an SD™ Card
NOTE
An SD ^™ Card may need to be purchased separately.
Your camcorder comes with an SD ^™ Card slot that allows you to expand the memory capacity by using an optional SD/SDHC/SDXC memory card.
1 Slide the safety latch and open the battery / SD ^TM Card cover.
natural_image
Technical line drawing of a device casing with internal components and a directional arrow (no text or symbols)(Sample Illustration) Opening the battery / SD ^TM Card cover
2 Insert the memory card into the slot until it locks in place as shown below.
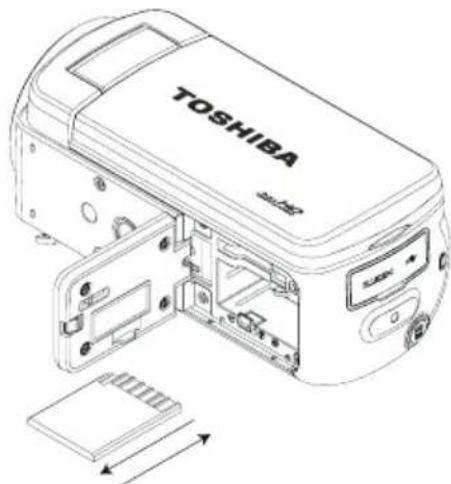
To remove the
SD ^TM Card, press
inward to release
it. When the card
pops out, grasp
it and pull it
straight out.
(Sample Illustration) Inserting and removing an SD^TM Card
3 Close the Battery / SD ™ Card cover.
CAUTION
To prevent data corruption, it is recommended that you format the SD™ Card in the camcorder before using.
CAUTION
All data will be erased if the SD™ Card is formatted. Make sure all data is copied to your computer or other media before formatting the SD™ Card.
NOTE
When a memory card is inserted, photos and videos are saved onto the card rather than the built-in memory.
Protecting data on an SD™ Card
Photos or videos cannot be recorded on an SD ^™ Card when the card is locked (read only); however, photos and videos can be viewed.
Make sure the lock is in the writable position before recording photos and videos as shown below.

position position
(Sample Illustration) Protecting data on an SD™ Card
Turning the camcorder on and getting started
To turn on the camcorder, either:
- Flip the LCD touch screen outward to turn on the camcorder automatically.
Or press the Power (💡) button for approximately one second to turn it on.
To record video: Press the Video (☐) button to begin recording. Press it again to stop recording.
To take a photo: Press the Photo (☐) button halfway down to take a photo.
To view stored videos and photos: Touch the screen and press the onscreen icon to switch to Playback mode.
Record 3D video
Press the 3D (so) button to switch between 2D and 3D modes.
You can play back 3D video with this camcorder (same operation as above).
NOTE
When the camcorder is switched from 2D to 3D, the screen flashes and becomes darker. This is not a malfunction.
Turning off the camcorder
To turn off the camcorder, either press the Power (💡) button for one second, or place the LCD touch screen back to its original position.
NOTE
If you close the LCD panel while recording, the camcorder stops recording.
Chapter 3
Record Mode
Button functions

Record Starts or stops video recording.
Pause / Resume Pauses or resumes video recording.

Photo Captures a photo.
Tele (T) / Wide (W) Zooms in or out.
Power Powers ON or OFF.

3D Toggles between 3D and 2D modes.

Light Turns On / Off the LED light or Digital light.
NOTE
Touch the LCD touch screen to show the status of the setting.
LCD touch screen information
The indicators shown on the images below may appear on the LCD touch screen when photos and videos are recorded:
| Onscreen notification icons Onscreen touch function icons | |
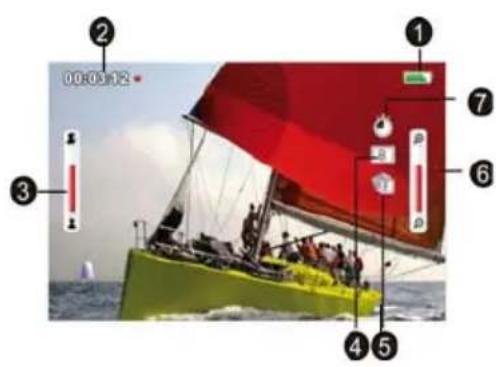 |  |
(Sample Image) LCD touch screen indicators
| NOTE | To avoid persistence of the image on the screen, please turn off the Digital Light function after you used it in the dark situation. |
| NOTE | The light is disabled automatically when battery power is low ( ). |
Notification icons
| 1 |  | Battery: Shows the battery charge level. |
 | DC power mode (the camcorder is turned on and plugged in the AC charger). | |
| 2 Recording | 00  | |
00  | Pause recording | |
 | The remaining amount of photos that can be taken at the current resolution settings | |
 | Current number of photos taken | |
| 3 Motion Detection (2D Video Record mode only) | ||
| 4 Scene | |||
 | Skin | ||
 | Night | ||
| 5 Manual White Balance | |||
| 6 Zoom meter: | 2D mode:1×~10×(10×digital zoom)3D mode:1×~4×(4×digital zoom) | ||
| 7 Motion Detection (2D Video Record mode only) | |||
| 8 Digital light |  | ||
 | Light ON | ||
 | Light OFF | ||
| 9 Video Resolution | |||
Some features may not be used in combination with others.
NOTE
Tap on the screen to close the touchable function bars. Tap again to show the bars.
The camcorder does not power off automatically in DC power mode.
In adapter charging mode, you can turn on the camcorder and it will become DC power mode. In DC power mode, the device is charged by less electric current.
Video recording
Press the Video (H) button to start recording. A time indicator displays on the LCD touch screen while recording a video. Press the Video button again to stop recording.
To pause recording, press the Pause (☐) button. To continue recording, press it again.
To take a still photo while recording a video, press the Photo (☐) button.
Touch the onscreen Playback (▶) icon to view a recorded video.
The resolution settings available are:
| Video Quality | |
 | Full HD 1080/30: 1920 x 1080p 30fps |
 | HD60 720/60: 1280 x 720p 60fps |
 | HD30 720/30: 1280 x 720p 30fps |
 | VGA 480/30: 640 x 480p 30fps |
NOTE
The image resolution captured during video recording is the same as the video resolution.
NOTE
When the function of Slow Motion is activated, the video resolution is WQVGA and the view angle becomes smaller.
Taking Photos
Press the Photo (☐) button halfway down until the focusing frame turns from white to green. Then press it fully down to take a photo.
Touch the onscreen ( ) icon to view the photo.
The Resolution settings available are
| Image Quality | |
 | High-16MP (interpolated): 4608 x 3456 |
 | Standard-5MP: 2592 x 1944 |
 | Low-3MP: 2048 x 1536 |
Using the Zoom function
The Zoom function magnifies images when recording Videos or taking Photos.
◆ Press the Tele/Wide (T/W) buttons to zoom IN/OUT.
The Zoom function can be set from 1x\~10x (10x Digital Zoom) for 2D recording.
The Zoom function can be set from 1x\~4x (4x Digital Zoom) for 3D recording.
Menu options/operations
In order to adjust the menu options, please:
1 Touch the LCD screen to view available options/setting mode.
2 Touch the Menu options (图标) icon.
3 For each setting, you must touch the icon once to select it and a second time to activate it.
4 Touch the Return/Exit (→) icon twice, or hold it down to exit.
Video Settings | Photo Settings | Effects Setup*  | Delete |  |
| LightResolutionMotion Detection*Face Tracking*Slow Motion*Pre-RecordTime Lapse*Date PrintingContinuous Play | LightResolutionSelf-TimerSmile Detection*Date PrintingISOSlideshow | Exposure MeasureSceneFilterWhite Balance | Menu SoundTVLanguageTime SettingFormatDefault Setting | Delete VideoDelete PhotoSelect & DeleteDelete All |
*These features only work in the 2D mode.
Please see “Camcorder Settings” on page 49 for more information about Setup.
| Icon Description | |
 | Displays the video settings options. |
 | Displays the photo settings options. |
 | Displays the effects options. |
 | Displays the Setup options. |
 | Displays the delete options. |
Video Setting options

Light
In this option, select a mode to brighten the shooting area or to extend the brightness of objects. The Light settings available are:
 | ON Turns the light ON, providing illumination when recording. |
 | OFF Turns the light OFF. |
 | Digital Light Extends the dynamic range of high contrast and backlight, so objects appear brighter and clearer. |

natural_image
Child kneeling beside a white stuffed dog on sandy ground (no text or symbols visible)Without Digital Light

natural_image
Child kneeling beside a white dog on sandy ground (no text or symbols visible)Digital Light On

Resolution
The Resolution settings available are:
 | Full HD 1080/30 Records videos at 1920 x 1080p 30fps resolution. |
 | HD 720/60 Records videos at 1280 x 720p 60fps resolution. |
 | HD 720/30 Records videos at 1280 x 720p 30fps resolution. |
 | VGA 480/30 Records videos at 640 x 480p 30fps resolution. |
NOTE
The remaining time will be varied based on the option you have.

Motion Detection (Only available for 2D mode)
This option allows the camcorder to automatically record videos when the camcorder detects movement.
| Icon Description | |
| Turns Motion Detection ON. | |
| Turns Motion Detection OFF. | |

Face Tracking (Only available for 2D mode)
The camcorder detects and focuses on face(s) automatically. This function helps to capture subjects in backlit conditions.
| Icon Description | |
 | Turns Face Tracking ON. |
 | Turns Face Tracking OFF. |
| Operation Screen | |
| In Record mode, when the camcorder is aimed at face(s), the face frame(s) appear. |  |

Slow Motion (Only available for 2D mode)
This option allows recording of videos with a slow motion effect. When the video is played, the playback time will be longer than the actual recording time.
| Icon Description | |
 | Turns Slow Motion ON. |
 | Turns Slow Motion OFF. |
NOTE
While using the Slow Motion setting, audio is not recorded and zoom is disabled.
The view angle may become smaller when the Slow Motion function is activated.
When the Slow Motion function is activated, the video resolution is WQVGA.

Pre-Record
The Pre-Record function allows the camcorder to begin recording a few seconds before the Record button is pressed.
| Icon Description | |
 | Turns Pre-Recording ON. |
 | Turns Pre-Recording OFF. |
NOTE
◆Be sure to aim the camcorder at the subject and position it securely before the Video button is pressed
The Pre-Record function is disabled when another video setting is activated.

Time Lapse (Only available for 2D mode)
This option allows the camcorder to record still images at specific time intervals that can then be played back as one video file. The Time Lapse settings available are:
| [SYHW] | OFF Disables Time Lapse. |
| [AXHG] | 1 second Records one frame per second. |
| [ZW6W] | 3 seconds Records one frame every three seconds. |
| [KXYX4] | 5 seconds Records one frame every five seconds. |

Date Printing
This option imprints the date and time on each video.
| Icon Description | |
 | Turns Date Printing ON. |
 | Turns Date Printing OFF. |
| Operation Screen | |
| When this function is activated, the date appears on the corner of the video. |  |

Continuous Play
This option allows you to playback files continuously.
| Icon Description | |
 | Turns Continuous Play ON. |
 | Turns Continuous Play OFF. |
Photo Setting options

Light
In this option, select a mode to brighten the shooting area or to extend the brightness of objects. The Light settings available are:
| [DOZ8] | ON Turns the light ON, providing illumination when recording. |
 | OFF Turns the light OFF. |
 | Digital Light Extends the dynamic range of high contrast and backlight, so objects appear brighter and clearer. |

natural_image
Child kneeling on sandy ground next to a white seal, no visible text or symbolsWithout Digital Light

natural_image
Child kneeling beside a white dog on sandy ground (no text or symbols visible)Digital Light ON

Resolution
The Resolution settings available are:
 | High-16MP (interpolated) | Takes photos at 4608 x 3456, 16MP quality. |
 | Standard-5MP | Takes photos at 2592 x 1944, 5MP quality. |
 | Low-3MP Takes | photos at 2048 x 1536, 3MP quality. |

Self-Timer
The Self-Timer allows you to take photos with a ten-second time delay.
| Icon Description | |
 | Turns Self-Timer ON. |
 | Turns Self-Timer OFF. |

Smile Detection (Only available for 2D mode)
The camcorder automatically takes the photo when it detects a smile.
| Icon Description | |
 | Turns Smile Detection ON. |
 | Turns Smile Detection OFF. |
| Operation Screen | |
| In Photo mode, when the camcorder is aimed at face(s), the face frame(s) appear around a smiling face and automatically take the photo. |  |

Date Printing
This option imprints the date and time on each photo.
| Icon Description | |
 | Turns Date Printing ON. |
 | Turns Date Printing OFF. |
| Operation Screen | |
| When this function is activated, the date appears on the corner of each photo. |  |

ISO
The camcorder automatically adjusts the ISO setting of images. Four manual ISO sensitivity settings are also available (800, 1600, 3200, 6400). Use the higher setting to take a photo in darkened locations, or for a subject moving at a high rate of speed.
 | Auto Sets the ISO setting automatically according to conditions. |
 | 800 ISO 800 |
 | 1600 ISO 1600 |
 | 3200 ISO 3200 |
 | 6400 ISO 6400 |
NOTE
The image may become grainy with a higher ISO setting.

Slideshow
Photos can be viewed one after another in a slideshow in a chosen interval of time. The Slideshow settings available are:
 | 2 seconds Displays one photo every two seconds |
 | 5 seconds Displays one photo every five seconds |
 | 10 seconds Displays one photo every ten seconds |
 | OFF Disables Slideshow |
Effects setting options
| Icon Description | |
 | Displays the Exposure Measure options. |
 | Displays the Scene options. |
 | Displays the Filter options. |
 | Displays the White Balance options. |

Exposure Measure
The camcorder adjusts the exposure (amount of light the camcorder receives from the scene) automatically. The Exposure settings available are:
 | Auto The camcorder meters the light in an average value for the overall scene and adjusts the exposure automatically. This setting is suitable for normal conditions. |
 | Center The camcorder still meters the light in an average value for the entire scene, but gives greater weight to the center. This way, the center of the image appears more clear, while the surrounding may appear darker. |
 | Spot The camcorder only meters the light in the middle spot of the scene. This setting is typically used, for example, in capturing the light of a candle. |

Scene
You can select a mode according to the scene and conditions. The Scene settings available are:
 | Auto Automatically adjusts to current conditions. |
 | Skin Adjusts skin tones to appear more natural. |
 | Night Adjusts for low light conditions or at night. |
 | Backlight Brightens closer subjects when brightly lit from behind. |
NOTE
To avoid blurry photos when taking photos in Night mode, place the camcorder on a flat, steady surface, or use a tripod.

Filter
You can select a special filter effect for photos and videos. The Filter settings available are:
 | Auto The image uses the full color spectrum. |
 | Black & White The image is converted to black and white. |
 | Classic The image is converted to sepia. |
 | Negative The image is converted to a negative of the original. |

White Balance
The camcorder adjusts the white balance of images automatically. The White Balance settings available are:
 | Auto Automatically adjusts white balance. |
 | Daylight Adjusts the white balance for outdoor conditions. |
 | Fluorescent Adjusts the white balance for fluorescent lighting. |
| [S443] | Tungsten Adjusts the white balance for tungsten lighting. |
Deleting files
| Icon Description | |
 | Delete videos. |
 | Delete photos. |
 | Delete both videos and photos. |
 | Delete all. |

Deleting Video(s)
| Operation Screen | |
| 1 In the Delete menu, touch theDelete Videoicon twice.2 Touch to select the desired thumbnail video(s).Check mark(s) will indicate the selected file(s).3 Touch theDelete( ) icon to delete the selected video(s).4 Touch theReturn/Exit( ) icon twice, or hold it down to exit. | 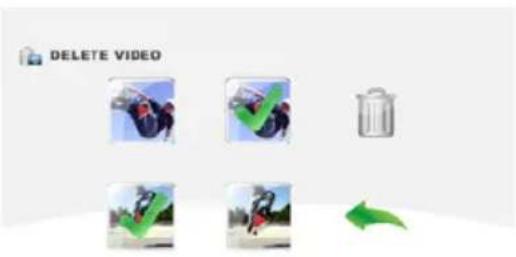 |

Deleting Photo(s)
| Operation Screen | |
| 1 In the Delete menu, touch theDelete Photoicon twice.2 Touch to select the desired thumbnail photo(s).Check mark(s) will indicate the selected file(s).3 Touch theDelete( ) icon to delete the selected photo(s).4 Touch theReturn/Exit( ) icon twice, or hold it down to exit. | 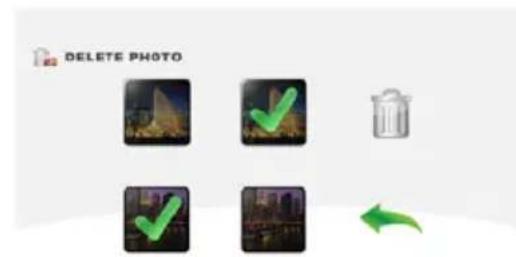 |

Select & Delete
| Operation Screen | |
| 1 In the Delete menu, touch the Select & Delete icon twice.2 Touch to select the desired thumbnail photo(s) and video(s).Check mark(s) will indicate the selected file(s).3 Touch the Delete ( [IMAGE] ) icon to delete the selected photo(s) and video(s).4 Touch the Return/Exit ( [IMAGE] ) icon twice, or hold it down to exit. |  |

Delete All
Use this option to delete all photos and videos.
 | Yes Deletes all photos and videos in the built-in memory (when no SDTM Card is installed), or delete all photos and videos on the installed SDTM Card. | |
 | No | |
NOTE
When an SD™ Card has been installed, only the photos and videos stored on the card are deleted.
Videos or photos cannot be deleted if the card is write-protected.
Chapter 4
Playback Mode
Button functions
The buttons have the following functions in Playback mode.
Record Starts or stops video recording.

Pause / Resume Pauses or resumes video recording.

Photo Captures a photo.

Tele (T) / Wide (W) Zooms in or out.

Power Powers ON or OFF.

3D Toggles between 3D and 2D modes.
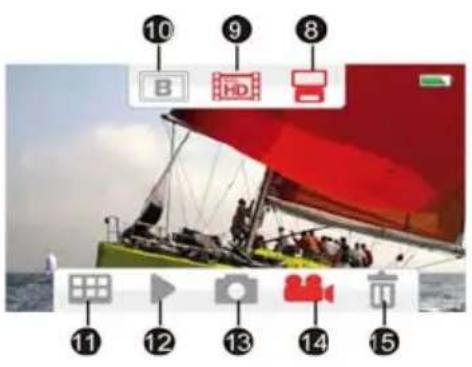
LCD touch screen information
The indicators shown below may appear on the LCD touch screen while in Playback mode:
| Onscreen notification icons Onscreen touch function icons | |
 |  |
(Sample Image) LCD touch screen indicators
Notification icons
| 1 |  | Battery: Shows the battery charge level. |
 | DC power mode (the camcorder is turned on and plugged in the AC charger). | |
| 2 | 00:03:12 | Playback time counter. |
 | Current number of photos taken. | |
 | The remaining amount of photos that can be taken at the current resolution settings. | |
| 3 |  | Volume control. |
| 4 |  | Video Playback mode. |
 | Photo Playback mode. |
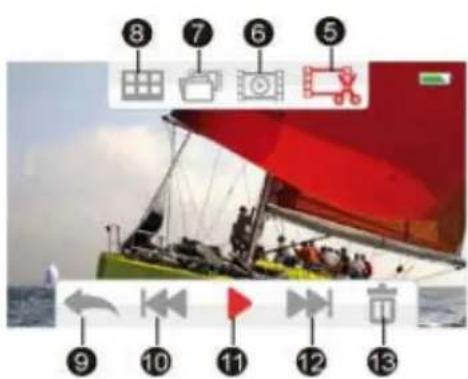
Touch function icons
| 5 |  | Video Trim mode. |
| 6 | Video Playback mode | |
 | Continuous play ON/OFF. | |
| Photo Playback mode | ||
 | Slideshow ON/OFF. | |
| 7 |  | Select & Play thumbnail screen ON. |
| 8 |  | Menu ON. |
| 9 |  | Return to Record mode. |
| 10 |  | Go to the previous file. Fast rewind Videos. |
| 11 |  | Play the file. |
 | Pause. | |
| 12 |  | Advance to the next file. Video fast forward. |
| 13 |  | Delete the current file. |
 | Stop video play. | |
NOTE
Tap the screen to display the Menu icons. Tap again to hide the icons.
Playback mode operations
To view and manage photos and videos in the built-in memory or on an SD ^™ Card, use the Playback mode.
| Operation Screen | |
| 1 In Record mode, touch the onscreen (icon to switch to Playback mode.2 Touch the onscreen (icon to view the previous video/photo, or touch the onscreen (icon to view the next video/photo.The Menu screen appears.3 Touch the onscreen (icon to open the thumbnail screen for photos and videos.The Select & Play screen appears. |  |
 | |
| 4 In the Select & Play screen, select the file(s) you want to play, and then touch (to confirm. Check marks appear on the selected file(s).5 Or touch the Return/Exit (icon twice (or touch and hold it for one second) to exit. |  |
| 6 Touch the onscreen (icon to play the selected files. (Video: full length. Photo: displays for two seconds.) |  |
Video Playback
| Operation Screen | |
| 1 In Video Playback mode, touch the ( ) or ( ) icon to play or pause the video.2 Touch the ( ) icon to view the previous video, or touch the ( ) icon to view the next video.3 While playing a video, touch the ( ) or ( ) icon to fast rewind/forward the video.4 In Continuous Play On mode the ( ) icon is highlighted.Touch the ( ) icon to play all video files continuously. Touch the ( ) icon to stop the video.5 Use the Tele/Wide buttons to adjust the volume. |  |
Photo Playback
| Operation Screen | |
| 1 In Photo Playback mode, touch the ( ) icon to view the previous photo, or touch the ( ) icon to view the next photo.2 In Slideshow On mode the ( ) icon is highlighted. Touch the ( ) or ( ) icon to play or pause the slideshow. Touch the ( ) icon to stop the slideshow. |  |
Delete a file in Playback mode
| Operation Screen | |
| 1 In Playback mode, touch the ( ) icon.2 Touch the ( ) icon to delete the current photo.3 Touch the Return/Exit ( ) icon twice, or hold it down to exit. |  |
NOTE
When an SD™ Card has been installed, only the photos and videos stored on the card are deleted.
Videos or photos cannot be deleted if the card is write-protected.
Video Trim
Use this option to trim the beginning and/or end of the recorded video and save it as a new video clip.
| Operation Screen | |
| 1 In Video Playback mode, touch theonscreen ( ) icon. |  |
| 2 Touch the Dividing ( ▼ ) icon (theicon turns yellow) to indicate thebeginning/end.3 Touch the Rewind/Forward (◀◀ ) /( ) icon to fine-tune the dividingpoint.4 To preview the video, touch theonscreen ( ) or ( ) icon to play orpause the video. Touch the ( )iconto stop the video.5 Touch the Save As New ( □ ) icon totrim away white portion of the video,leaving the red portion as a new videofile.6 Touch the Return/Exit ( ◀ )icontwice, or hold it down to exit. |  |
Video Flow: Specify with the Dividing ( ▼ ) icon where the video clip is to be cut.Portions A and C will be cut, and portion B will be saved as the new video clip.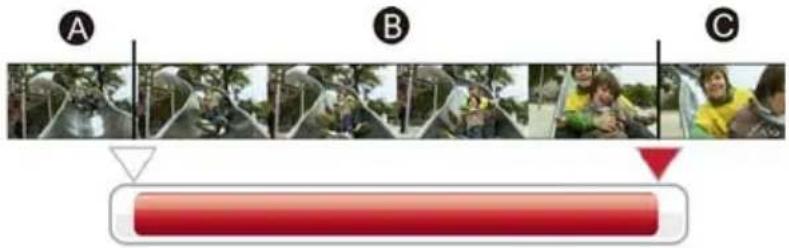 | |
Chapter 5
Camcorder Settings
Setup Menu
In order to adjust the menu options, please:
1 Touch the LCD screen to view available options/setting mode.
2 Touch the Menu options (图标) icon.
3 For each setting, you must touch the icon once to select it and a second time to activate it.
4 Touch the Return/Exit (◀) icon twice, or hold it down to exit.

Menu Sound
You can enable or disable tone and operation sounds.
| Icon Description | |
 | Enables tone and operation sounds. |
| Disables tone and operation sounds. | |

TV
Use this function to select the appropriate TV standard for your area, either NTSC or PAL.
An incorrect TV system setting may cause the image to flicker.
 | NTSC (60Hz) USA, Canada, Japan, South Korea, Taiwan, etc. |
 | PAL (50Hz) UK, Europe, China, Australia, Singapore, Hong Kong, etc. |

Language
Use this option to select the language of the user interface.

Time Settings
| Operation Screen | |
| 1 In the Setup menu, touch the Time Setting icon twice.2 Touch the Month, Day, Year, Hour, or Minute to set.3 Touch the up/down arrows to adjust the numeric value.4 Touch the ( ) icon to validate the setting.5 Touch the Return/Exit ( ) icon twice, or hold it down to exit. | 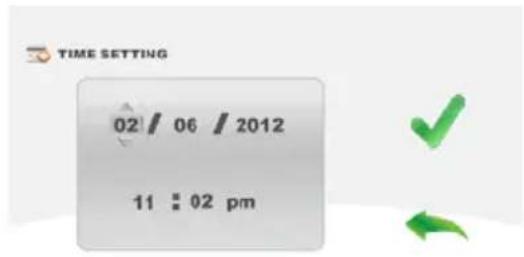 |

Format
Use this option to delete all data in the built-in memory or on the SD ^TM Card.
 | YES | Deletes all photos and videos in the built-in memory (when no SDTM Card is installed), or deletes all photos and videos on the installed SDTM Card. |
 | NO |
CAUTION
All data will be erased if the SD™ Card is formatted. Make sure all data is copied to your computer or other media before formatting the SD™ Card.

Default Setting
To restore the default factory setting, select this option.
| YES Restores to default factory setting. | ||
| NO | ||
The following table lists the camcorder's default settings:
| Setting Default Factory Setting | |
| Resolution | Video: Full HD 1080p/30Photo: Standard-5M |
| Light OFF | |
| Motion Detection OFF | |
| Face Tracking OFF | |
| Slow Motion OFF | |
| Pre-Record OFF | |
| Time Lapse OFF | |
| Continuous Play OFF | |
| Self-Timer OFF | |
| Smile Detection OFF | |
| Date Printing OFF | |
| ISO Auto | |
| Slideshow OFF | |
| Exposure Measure Auto | |
| Scene | Auto |
| Filter | Auto |
| White Balance | Auto |
| Menu Sound | ON |
| TV | Depends on shipping area |
| Language | Depends on shipping area |
| Volume | Level 4 |
Chapter 6
Viewing Photos and Videos on TV
Connecting to a 3D-compatible TV
To view images or videos on a 3D-compatible TV:
1 Connect the mini HDMI ^ cable to your camcorder's mini HDMI ^ Out port.
2 Connect the other end of the cable to a 3D-compatible TV.
3 Make the necessary settings on the 3D TV. (For further details, please refer to the instructions of your TV.)
4 The steps for viewing stored photos and videos on a TV are the same steps used for viewing them on the LCD screen.
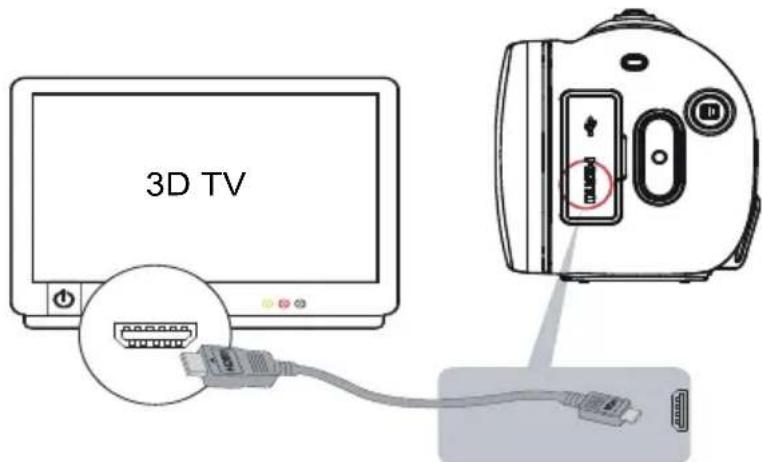
(Sample Image) Connecting a 3D TV
Connecting to a high-definition 16:9 (wide) TV
To view images or videos from your camcorder on an HDTV:
1 Connect the mini HDMI ^ cable to your camcorder's mini HDMI ^ Out port.
2 Connect the other end of the cable to an HDTV.
3 Set the video input source of your HDTV to HDMI ^® .
4 The steps for viewing stored photos and videos on a TV are the same steps used for viewing them on the LCD screen.
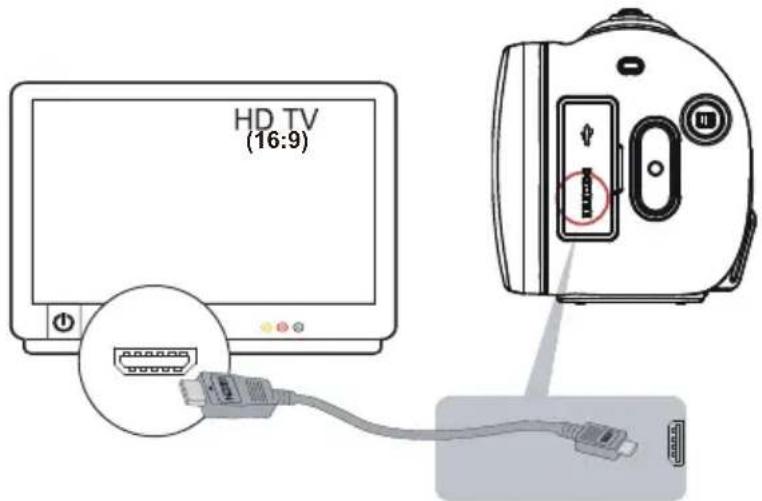
(Sample Illustration) Connecting a high-definition TV
| NOTE | You can view 3D content on a non-3D display by pressing the 3D button. The video resolution from 3D recorded content played on a non-3D display is a lower resolution than content recorded in 2D mode.However, the 3D content is still in full HD. |
| NOTE | The LCD touch screen does not display when the camcorder is connected to an HDTV. |
| NOTE | Some functions may not be accessible while the camcorder is connected to a TV or an HDTV. |
Viewing Photos and Videos on a Computer
NOTE
It may be necessary to install the bundled software application, ArcSoft MedialImpression ^® to view videos properly on your computer.
Installing bundled software
The CD-ROM supplied with your camcorder contains two software applications.
- ArcSoft MediaImpression ^® is a user-friendly application that helps manage your media, and upload videos to the Internet easily.
Adobe ^® Reader ^® is a popular program that is needed to view the User's Manual. Many users will find they already have this software installed on their computer.
To install the bundled software:
1 Insert the CD-ROM into your computer's optical disc drive. The autorun screen appears.
2 Click "Install Application Software". Follow the onscreen instructions to complete the installation.
NOTE
Detailed information can be found in the online help of all the bundled software.
Transferring photos or videos to a computer
You can transfer photos or videos stored on your camcorder to a computer and send them via email to friends or post them on the Internet.
To do this:
1 Connect the computer and camcorder with the supplied mini USB 2.0 cable.
The multi-indicator light blinks.
2 To access photos and videos on your SD ^TM Card: Videos and photos can be found on your computer at “My Computer\Removable Disk\DCIM\100MEDIA.”
3 To access photos and videos in the camcorder's internal memory: Videos and photos can be found on your computer at "My Computer\DV\DCIM\100MEDIA"
4 In this folder, you can view, delete, move, or copy any video/photo you want.
Uploading Video and Photo Files to the Internet
The built-in CAMILEO ^® Uploader application offers an easy way to upload video clips and photos to social media web sites instantly, allowing you to share them with your family and friends on these web sites. The bundled software, ArcSoft MediaImpression ^® , can also be used to upload video clips to these web sites.
NOTE
You must have Internet access to upload videos to a web site.
NOTE
CAMILEO Uploader for Windows ^® based systems only.
CAMILEO® Uploader
To upload files to the Internet:
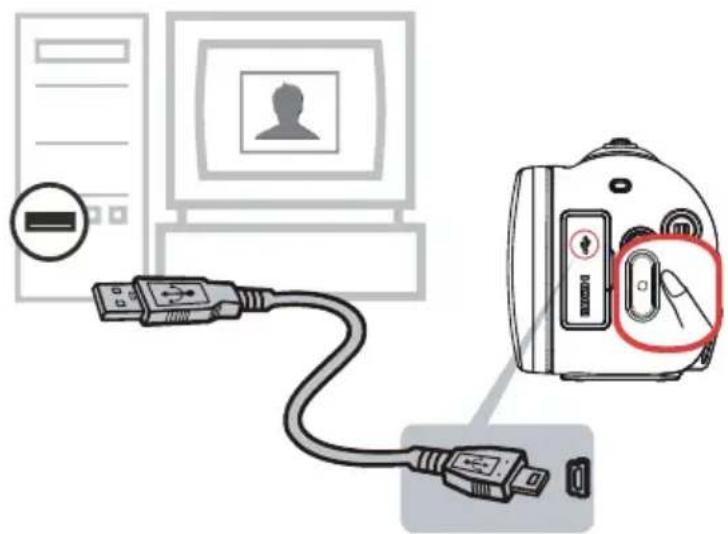
1 Connect the camcorder to the computer by using the supplied USB cable.
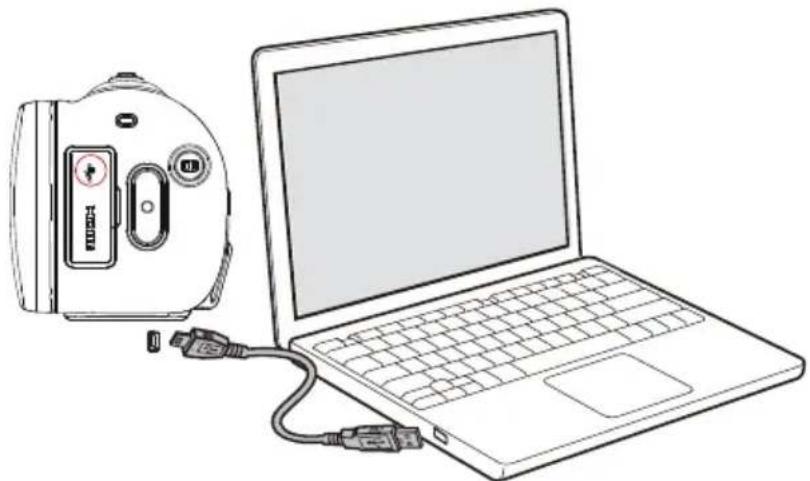
natural_image
Line drawing of a laptop connected to a CD-ROM device (no text or symbols present)(Sample Illustration) Connecting the camcorder to a computer
2 When the USB connection has been made, the CAMILEO ^® Uploader application AutoPlay window appears on your computer screen. (If the AutoPlay window does not appear, click My Computer > DVAP > DVAP.exe to execute the application.)
NOTE
It may be necessary to first install ArcSoft MedialImpression® onto your computer to view videos/photos in the CAMILEO® Uploader. If ArcSoft MedialImpression is not installed, you may be asked to install the H.264 Codec (ffdshow—a free software under GPL license) to view videos on CAMILEO Uploader correctly.
3 Choose the web site you wish to upload to.
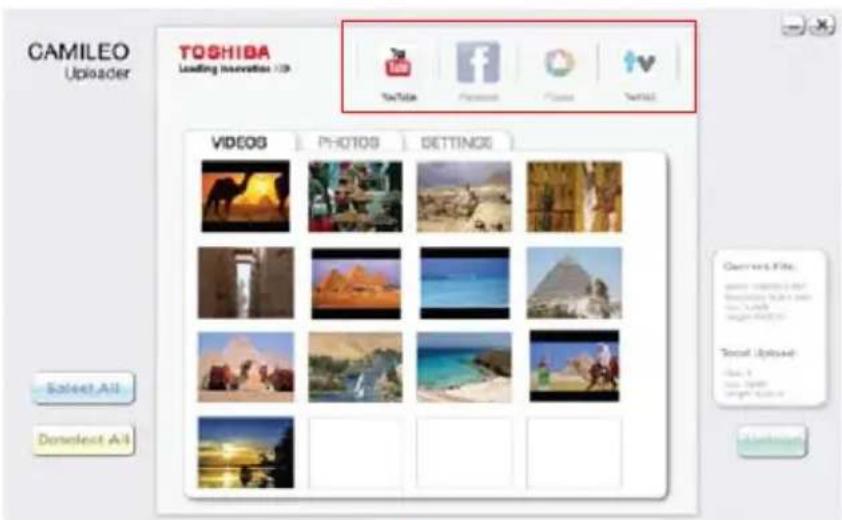
(Sample Image) CAMILEO ^® Uploader main screen
NOTE
Some social media web sites may not be accessible in certain regions.
4 Click the Videos or Photos tab to go to the videos/photos thumbnail page.
Use the scroll bar to view the next/previous page.
5 Click the files you wish to upload. Click Select All or Deselect All to select/deselect all video or photo files shown on the current page.
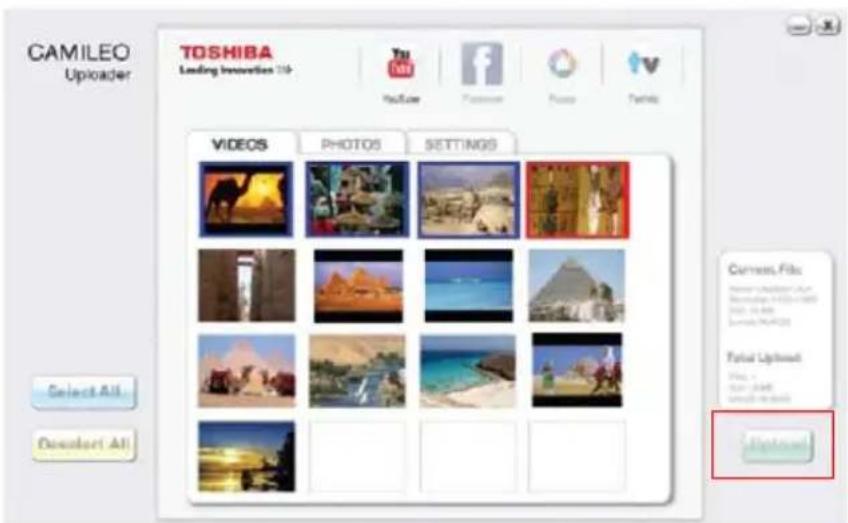
(Sample Image) CAMILEO® Uploader screen - Upload videos/photos
6 Click Upload to begin uploading your files.
Click Cancel to stop the uploading process.
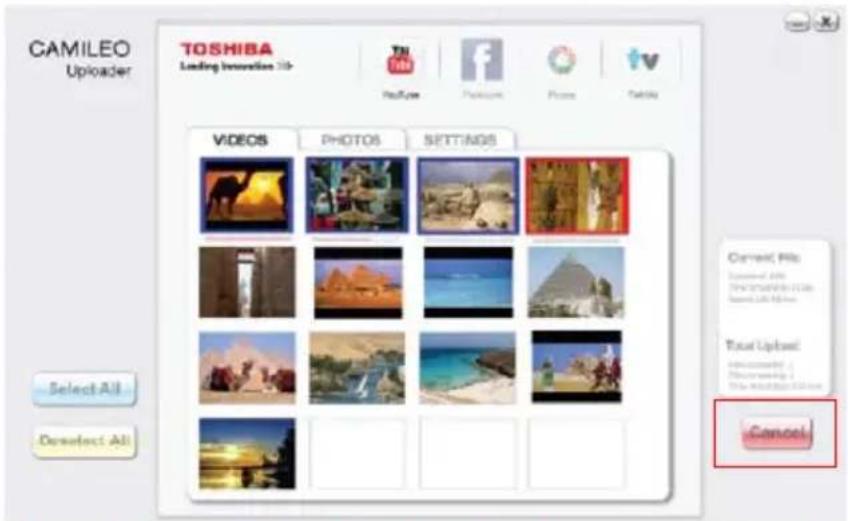
(Sample Image) CAMILEO ^® Uploader screen - Cancel
Setting up your account information for a web site
NOTE
You need to activate your Facebook account by email after registering it.
If the privacy setting of your Facebook account is set to the highest security level, you may have limited access to the CAMILEO® Uploader.
1 Choose the web site.
2 Click the Settings tab to view the setup screen.
3 Fill in your account information, and then click Save.
4 To save your account information and avoid re-entering your login information, check Remember password.
5 If you have not previously set up an account with the web site, one will first need to be created.
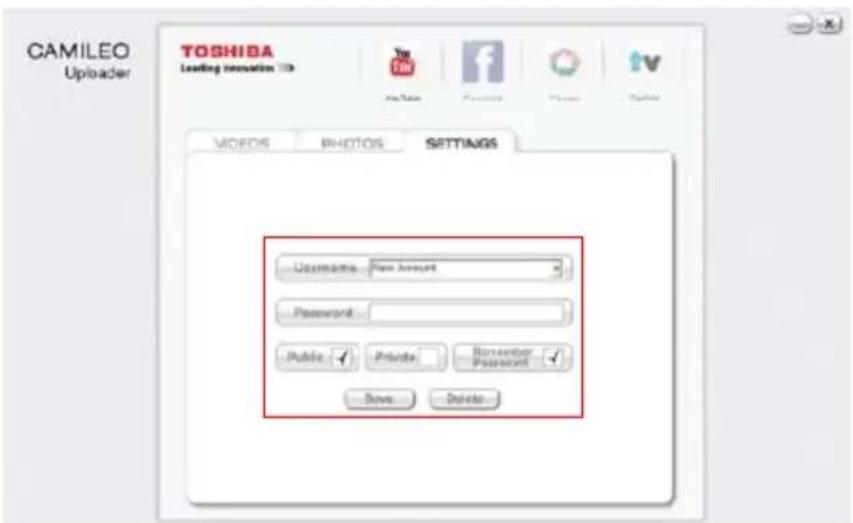
(Sample Image) CAMILEO ^® Uploader screen - Sign up for new account
NOTE
Some social media web sites may not be accessible in certain regions. You must have Internet access to upload files to a web site.
Chapter 9
Webcam Mode
Connect the camcorder to your computer, using the supplied USB 2.0 cable. Press the Video button to switch to the Webcam mode. The Multi-indicator light glows blue. In this mode, you can implement live video conference meetings and multimedia communications.
(Sample Illustration) Connecting the camcorder to a computer
NOTE
The camcorder supports webcam in 2D VGA resolution.
Chapter 10
Specifications
| Image sensor Two 5 Megapixel CMOS sensors | |
| Operations modes Video record, Photo record, Webcam | |
| Lens types Fixed focus | |
| Lens F2.8 | |
| Focus range 1m (39") ~ infinity | |
| Zoom | 2D mode: 1x ~ 10x (10x Digital zoom)3D mode: 1x ~ 4x (4x Digital zoom) |
| Shutter Electronic | |
| LCD touch screen 2.8" (7.11 cm) LCD touch screen (16:9) | |
| Storage media | Built-in 128MB memory (partial memory is used for firmware code).SD/SDHC/SDXC Card slot support (up to 128GB) |
| Image resolution | 16MP: 4608 x 3456 (Interpolated)5MP: 2592 x 19443MP: 2048 x 1536 |
| Video resolution | Full HD (1080/30): 1920 x 1080 (30fps)HD (720/60): 1280 x 720 (60fps)HD (720/30): 1280 x 720 (30fps)VGA (480/30): 640 x 480p (30fps) |
Approximate recording length (1GB)
| Resolution: | 1920 x 1080(FHD1080p/30fps) | 1280 x 720(HD720p/60fps) | 1280 x 720(HD720p/30fps) | 640 x 480(VGA/30fps) |
| Recording length: ~00 | 11:30 ~00:11:30 ~00:16:30 ~00:33:20 | |||
Approximate photo capacity (1GB)
| Resolution: | 16MP (interpolated) | 5MP 3MP |
| Photo capacity: ~250 | photos ~575 photos ~885 photos | |
| White balance Auto, Daylight, Fluorescent, Tungsten | |
| ISO Auto/800/1600/3200/6400 | |
| Exposure Measure Auto/Center/Spot | |
| Self-timer 10 second delay | |
| Light Light ON/Light OFF/Digital Light | |
| File format | Photo: JPGVideo: MP4 (H.264) |
| Image play Single image/slideshow | |
| PC interface Mini USB 2.0 port | |
| TV out Mini HDMI | ^ port |
| Battery | Lithium-ion rechargeable batteryBattery weight: 1.1 oz. (31g)Battery charging time: approximately 4 hours with AC adaptorBattery life: approximately 1 hour 40 minutes with LCD on |
| Dimensions | 4.7" (L) x 2.1" (W) x 2.4" (H)120 (L) x 54 (W) x 62 (H) mm |
| Weight | 8.99 oz. (255g) (without battery) |
Operating Environment Conditions
Operating temperature: 32 to 104 F (0 to 40 C).
Operating humidity: 20 to 80% (no condensation allowed).
Chapter 11
Troubleshooting
If the camcorder fails to function as expected, check the list of the common problems below.
| Problem / Situation Recommendation / Solution | |
| Cannot turn on the camcorder. The power turns off suddenly. | Power is off. Press the Power Button to turn on. |
| Battery pack is weak or depleted. Recharge the battery pack. | |
| Camcorder cannot be turned on after plugging power adapter. | Please make sure that you use the supplied power adapter and connect it to the power outlet correctly. |
| The indicator of remaining battery life is not displayed properly. | The remaining battery capacity indication is an approximation. |
| The files on the memory card do not display smoothly when the LCD shows the “!” marking. | “!” means the SD card is low speed or contains corrupted files. To solve this, format the SD card using the camcorder instead of a computer. (Please refer to the detailed Format instruction in Section 5). |
| The card has a problem and cannot be recognized. Replace the card with another one. | |
| Or please replace the SD card with a high speed one. | |
| Cannot take video/photo. | Memory is full. Delete some unnecessary videos / photos or insert a new SD card. |
| Power is off. Press the Power Button to turn on. | |
| The camcorder is frozen. | Please remove the battery and unplug the adapter. Then, insert the battery and plug in the adapter, and turn on the camcorder again. |
| The date imprinted on the photo is incorrect | Set the date and time in the Setting menu. |
| Why do some of my indoor photos look blurry and dark? | Poor lighting. Take the photo in better lighting. |
| The camcorder extends photo exposure time under low light / indoor condition. Keep the camcorder (and the target subject) steady for several seconds when taking photos. | |
| Place the camcorder on a flat and steady surface, or use a tripod when take photo. | |
| The color of the video / photo is not natural. | Select the proper white balance option to match the light source. |
| When recording in 3D mode, certain functions will be restricted. | Motion Detection, Face Tracking, Slow Motion, Time Lapse, and Smile Detection cannot be used during 3D recording. |
| When the camcorder is connected to the PC via USB cable, many Autoplay windows may pop out. They indicate the disks of the camcorder. | [DV] indicates the internal memory of the camcorder.[Removable Disk] indicates the external memory (memory card installed in the camcorder).The disk [DVAP] shows the built-in CAMILEO UPLOADER application is saved at this disk. Please DO NOT format this disk or delete the application inside; otherwise, the CAMILEO UPLOADER application can not function. |
1 The files on the memory card do not display properly when the LCD touch screen shows the “!” marking.
The “!” symbol indicates that the SD ^™ Card is too low of a speed or contains corrupted files. To solve this problem, format the SD ^™ Card using the camcorder instead of a computer (Refer to “Format” on page 50).
Change the SD/SDHC/SDXC card to a high speed card.
2 Why do some of my indoor photos look blurry and dark?
The camcorder extends picture exposure time under low-light/indoor conditions. Keep the camcorder (and the target subject) steady for several seconds when taking photos. The shutter sounds when a picture is taken.
3 How do I charge the battery?
You must use the supplied AC adaptor or the USB cable.
The camcorder must be turned OFF. A blinking light confirms the camcorder is currently charging. A steady light indicates that charging has been completed. The light turns off automatically after battery is fully charged (In AC charging Mode).
4 After connecting the USB cable to the computer:
◆“DV” indicates the internal memory of the camcorder.
“Removable Disk” indicates the external memory (SD/SDHC/SDXC card installed in the camcorder) (path will vary depending on name of SD™ Card).
◆“DVAP” indicates the built-in CAMILEO ^® Uploader (for Windows ^® based systems only).
CAUTION
Do not format the disk or delete the application. The CAMILEO ^® Uploader application may not function.
Chapter 12
Other Information
Toshiba Support
If you require help or are having problems operating your product, you may need to contact Toshiba for additional technical assistance.
Before you call
Since some problems may be related to software, it is important that you investigate other sources of assistance first. Try the following before contacting Toshiba:
◆Review the documentation supplied with your product.
If a problem occurs when you are running software applications, consult the software documentation for troubleshooting suggestions. Contact the software company's technical support department for assistance.
Consult the reseller or dealer from whom you purchased your product. They are your best resource for current information and support.
Contacting Toshiba
Toshiba's technical support web site
For technical support, or to stay current on the most recent software and hardware options for your CAMILEO ^® product and for other product information, be sure to regularly check the Toshiba web site at www.support.toshiba.com.
Toshiba voice contact
For technical support, call the Toshiba Customer Support Center:
Within the United States at (888) 592-0944
Outside the United States at (949) 583-3305
Warranty
Online Warranty Information
This product comes with a One (1) Year Standard Limited Warranty. The One (1) Year Standard Limited Warranty for Toshiba Computer Accessories and Electronics can be found online at http://pcsupport.toshiba.com/accessories1yr.
Warranty Service
Customers located in the fifty (50) United States and District of Columbia may obtain warranty service by visiting the Toshiba Acclaim web site at www.acclaim.toshiba.com or by contacting the telephone support center at 1-888-592-0944.
Customers located outside the fifty (50) United States and District of Columbia may obtain warranty service by contacting the telephone support center at 1-949-583-3305.
TOSHIBA
Leading Innovation >>>
natural_image
Technical line drawing of a camera body panel with no visible text or symbolsnatural_image
Technical line drawing of a device rear panel with a directional arrow indicating movement or force (no text or symbols)natural_image
Diagram showing a laptop connected to two devices via cables, no text or symbols presentnatural_image
Technical line drawing of a device rear panel with a directional arrow indicating left side (no text or symbols)Tele (T)/Gran angular (W)
natural_image
Child kneeling beside a white dog on sandy ground (no text or symbols visible)Sin luz Digital

natural_image
Child kneeling beside a white dog on sandy ground (no text or symbols visible)Luz Digital encendida

Resolución
Tele (T)/Gran angular (W)