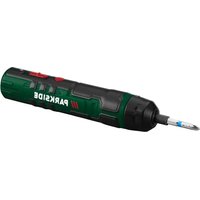
PDSS 310 A3 - Screwdriver PARKSIDE - Free user manual and instructions
Find the device manual for free PDSS 310 A3 PARKSIDE in PDF.
User questions about PDSS 310 A3 PARKSIDE
0 question about this device. Answer the ones you know or ask your own.
Ask a new question about this device
Download the instructions for your Screwdriver in PDF format for free! Find your manual PDSS 310 A3 - PARKSIDE and take your electronic device back in hand. On this page are published all the documents necessary for the use of your device. PDSS 310 A3 by PARKSIDE.
USER MANUAL PDSS 310 A3 PARKSIDE
PNEUMATIC IMPACT WRENCH PDSS 310 A3
GBIE NI
PNEUMATIC IMPACT WRENCH
Operation and Safety Notes
Translation of the original instructions
FR BE
CLÉ À CHOC PNEUMATIQUE
DRUCKLUFT-SCHLAGSCHRAUBER
Before reading, unfold the page containing the illustrations and familiarise yourself with all functions of the device.
DK
GB/IE/NI Operation and Safety Notes Page 5
Intended use
Features 6
Technical Data . 6
Safety information for air tools
Risks due to projecting parts.. 9
Risks from gripping/winding. 9
Operating hazards
Hazards due to repetitive motions.. 9
Risks associated with accessories . Page 10
Hazards in the work environment.. Page 10
Hazards due to dust and vapours.. Page 10
Noise hazards.. Page 10
Hazard due to vibration.. Page 11
Additional safety instructions for pneumatic machinery . Page 11
Commissioning
Inserting the socket wrench or bit . Page 11
Connecting. Page 12
Adjusting the compressed air.. 12
Adjusting the torque.. 12
Initial use.. Page 12
Changing rotation.
Correctly holding the equipment. Page 13
After initial use
Maintenance.. Page 13
Cleaning and Care
Troubleshooting
Information about warranty and service processing.. Page 14
Warranty terms.. Page 14
Scope of warranty . Page 15
Processing of warranty claims..
Environmental instructions and disposal information
Declaration of Conformity
Introduction
| The following pictograms are used in these operating instructions / on the device: | |||
| Refer to operating manual! Compressed air hose | |||
| Follow warnings and safety notices! Note | |||
| Never use hydrogen, oxygen, carbon dioxide or other bottled gasses as an power source | |||
| Wear ear protection, dust mask, safety glasses and protective gloves. | |||
Pneumatic impact wrench PDSS 310 A3
Introduction

Congratulations! You have chosen a high-quality device from our company. Familiarise yourself with the product before
using it for the first time. In addition, please carefully refer to the operating instructions and the safety advice below. Initial operation of this tool must be performed by trained personnel.
KEEP OUT OF THE REACH OF CHILDREN!
Intended use
This air powered impact driver is suitable for loosening and tightening screw connection during assembly and repairs, and for loosening bolts when changing tyres. Only use the product as described and for the specified applications. Keep these instructions in a safe place. When passing this product on to others please also include all documents. Any use not specified is prohibited and potentially dangerous. Damages resulting from noncompliance or misuse are not covered by the warranty and are not included in the manufacturer's liability. This device has been designed for household use and may not be used for commercial or industrial purposes.
- Features

Verify contents are complete and the device is in perfect condition immediately after unpacking. Do not use if the tool is
defective.
Adjustable screw
2 Compressed air connection (for 1 / 4 plug nipple)
3 Torque control
4 Trigger
5 Oil filling port
6 Pivot bolt (forward/reverse)
7 Square drive
The following parts are considered accessories:
8 Extension
Plug nipple (1 / 4^ = 6.35mm)
[10] Machine oil
[1] Lubricator
12 Allen key
13 Socket attachments
Technical Data
Air consumption: approx. 350l/min
Operating pressure: max. 6.3 bar
Square drive: 12'' (12.7 mm)
Compressed air connection: 14 (6.35 mm)
Tool intake: 12'' (12.7 mm)
Max. torque: 310 Nm
Introduction / Safety instructions for air tools
Speed max.: 7000 min
-1
Output: 0.354 kW
Weight: approx. 2105 g
Air supply: via maintenance unit
with filter pressure reducer and oil atomiser
Required air quality: purified, condensation
free and oil misted
Compressors: with min. 50 l tank
volume
Noise parameters (per
EN ISO 15744): approx. L pA: 84,4 dB(A)
approx. LWA: 95,4 dB(A)
Instability K: 3 dB
Vibration
(per EN 28927-2): 3.3 m/s²
Instability K: 0,82m / s^2

Safety information for air tools
AWARNING! Basic safety measures must be followed when using air tools to eliminate the risk of fire, electric shock and personal injury. Please be sure to read and follow the notices in this operating manual prior to the first use and store them in a safe place. The manufacturer assumes no liability for damages or personal injury resulting from failure to follow these operating instructions.
The hazards listed are foreseeable for general use of handheld air impact drivers. However, the user must also assess specific risks which may arise from its use.

DANGER! Keep your hands or other limbs out of reach of rotating parts. Injuries may otherwise occur.
AWARNING! CRUSHING HAZARD!
Keep hands away from the counter bearing (e.g. box spanner) during use. This particularly applies when removing screws in tight work environments.
WARNING! RISK OF INJURY! Disconnect the compressed air before changing tools, adjustments and maintenance.
A WARNING! EXPLOSION HAZARD!
Never use petrol or other flammable liquids to clean the air tool! Sparks could ignite residual vapours inside the compressed air tool resulting in explosion. Do not use the tool in explosive environments with flammable liquids, gasses or dust. Never work on materials which are or potentially could be highly flammable or explosive.
In the cases of multiple hazards the safety instructions must be read and understood before attaching, operating, repairing and exchanging accessories and before working near the machine for screw connections. Otherwise severe bodily injuries may result.
The machine for screw connections should only be set up, adjusted or used by qualified and trained operators.
- Never modify the machine for screw connections. Modifications may reduce the effectiveness of safety measures and increase operator risks.
- Do not lose the safety instructions - hand them to the operator.
Never use a damaged machine on screw connections.
Regularly maintain machines to verify all required rated values and markings such as rated speed or rated air pressure are legible on the machine. If necessary, the user must contact the manufacturer for replacement labels for markings.
Only use the equipment for applications for which it was designed!
Do not overburden the device.
Never use hydrogen, oxygen, carbon dioxide or other bottled gasses to power this tool as doing so may result in explosion, thus severe injuries.
Regularly maintain and clean the device as required (see chapters "Maintenance" and Cleaning and care").
Check the device for damage prior to initial operation. Always verify the tool's proper condition before every use.
Remain alert at all times! Unforeseen machine movement due to reaction forces or the tool or counter bearing breaking may result in injuries.
Risk of injury due to chips being projected at high speeds in the event the tool (socket) breaks.
PARKSIDE
7 GB/IE/NI
Safety instructions for air tools
Unforeseen tool movements may result in hazardous situations.
- Crushing risk based on the torque between the counter bearing and the work piece.
- Keep hands away from the tool (socket) being used to prevent the risk of injuries.
Only use holders and adapters in good condition and intended for use with the machines described here.
Avoid an unnatural posture. Always maintain a proper footing and balance. This will allow you to better control the electrical power tool in unforeseen circumstances.
Switch the device off when not in use.
Always wear personal protective equipment and safety glasses. Wearing personal protective equipment such as dust mask, non-slip safety shoes, hard hat or ear protectors, depending on the type of air tool and its application, reduces the risk of injuries.
Protect hoses from kinks, constrictions, solvents and sharp edges. Keep hoses away from heat, oil and rotating parts.
Replace damaged hoses immediately. A damaged supply line may result in the air hose flapping about, possibly resulting in injuries.
Do not use the equipment when fatigued or under the influence of drugs, alcohol or medications. Just a moment of carelessness when using this equipment may result in serious injuries.
Do not directly inhale exhaust air. Keep eyes away from exhaust air. Exhaust air from the air tool may contain water, oil, metal particles or contaminants from inside the compressor. This may result in health damage.
A WOHTH!WHEN PUT-
TING THE TOOL DOWN! Always put down the device so the trigger is not activated. This could potentially result in accidental activation of the tool, which again could result in hazards.
Only use suitable accessories. These can be purchased from the manufacturer. Using non-OEM accessories may result in hazards.
Only use filtered and regulated compressed air. Dust, caustic vapours and / or moisture may damage the motor of an air tool.
The hose must be constructed for a minimum pressure of 8.6 bar or 125 PSI, but no less than 150% of the maximum pressure produced by the system.
The tool and supply line must be equipped with a hose coupling to completely release pressure when disconnecting the coupling hose.
DANGER! Avoid contact with live lines. This device is not insulated against electric shock.
Do not modify this equipment in any way without the manufacturer's approval.
Only use the tool at the specified pressure (max. 6.3 bar).
Disconnect the tool from the air supply after each use and when not in use.
- Discontinue use if the tool is leaking or in need of repair.
Never connect the tool to an air hose with pressure exceeding 6.3 bar.
Keep your working area clean and well lit. Untidy or poorly lit working areas can result in accidents. Doing so will allow you better control of the equipment, particularly in unforeseen circumstances.
A WnKinHe equipment repaired by qualified specialist personnel using OEM spare parts. This will ensure your device remains safe to use.
- Keep children and other individuals away from the equipment during use. Distractions can cause you to lose control of the equipment.
Wear suitable clothing. Do not wear loose clothing or jewellery. Keep your hair, clothing and gloves away from moving parts. Loose clothing, jewellery or long hair can become caught in moving parts.
Put down trigger and equipment in the event of unexpected compressor failure.
- Never use or store the tool in humid, dusty locations or near water, other fluids or hazardous gases.
If possible, use a condensate trap or regularly drain condensate (water) from hoses and pipes before and during air tool use.
Secure work pieces. Use clamps or a vice to secure the work piece. Holding the work piece
Safety instructions for air tools
in your hand or pressing it against your body will not allow for safe use of the equipment.

TENTION! An undersized compressed air system may reduce the efficiency of your equipment.
Risks due to projecting parts
If the work piece, one of the accessories or the tool itself breaks, parts may be projected at great speeds.
Always wear impact-resistant eye protection when using the machine for screw connections. The level of protection required should be assessed for each individual application.
Be sure the work piece is properly secured.
Risks from gripping/winding
Risks from gripping / winding may result in suffocation, scalping and / or cuts if loose clothing, jewellery, necklaces, hair or gloves are not kept away from the machine and its accessories.
Gloves may become tangled in the rotating drive, which may result in injuries or fractures in fingers.
Rotating drives and extensions may easily catch / wind rubberised or metal reinforced gloves.
Never wear loose gloves or gloves with cut or worn fingers.
Never hold on to the drive, collect or the drive extension.
Keep hands away from the rotating drive.
- Operating hazards
When using the machine the operator's hands may be exposed to crushing, impact, cut, abrasion and heat hazards. Wear suitable gloves to protect hands.
The operator and maintenance personnel must be physically capable to manage the weight and power of the machine.
Hold the machine correct: be prepared to counteract typical or sudden movements - keep both hands ready.
Be sure your body is well balanced and maintain a solid stance.
If tools are required to absorb the reaction torque, use a suspension attachment whenever possible. If this is not possible, we recommend side handles for machines with straight handle and pistol grip. At any rate we recommend using tools to absorb if it is greater than 4Nm for machines with straight handles, greater than 10Nm for machines with pistol grip and greater than 60Nm for offset screwdrivers.
In the event of power failure release the start- or stop control.
Only use the lubricants recommended by the manufacturer.
- Hex nut drivers with open flathead can crush fingers.
Do not use the tool in tight spaces and be sure your hands are not crushed between the machine and work piece, especially when unscrewing.
Hazards due to repetitive motions
When using a machine for screw connections the operator may experience discomfort in hands, arms, shoulders, neck or other body parts whilst performing work-related tasks.
Maintain a comfortable position whilst using this tool, be mindful of a secure grip and avoid awkward positions or positions making it difficult to maintain your balance. The operator should change his posture during extended periods of use, which may help to prevent discomfort and fatigue.
If the operator experiences symptoms such as persistent malaise, discomfort, palpitations, pain, tingling, numbness, a burning sensation or stiffness, these warning signs should not be ignored. The user should consult a qualified healthcare professional.
PARKSIDE
9 GB/IE/NI
Safety instructions for air tools
Risks associated with accessories
Disconnect machine from the power supply before changing a tool or accessory.
Do not touch collets or accessories whilst impact driving, as doing so may increase the risk of cuts, burns or injuries from vibration.
Only use accessory and material sizes and types recommended by the manufacturer for screw joints, do not use other accessory and material types and sizes.
Only use impact sockets in good working condition as manual sockets and accessories in poor working condition may break and be ejected when used with impact drivers.
Hazards in the work environment
Slipping, tripping and falls are main causes of injuries at the workplace. Be mindful of surfaces which may have become slippery during machine use, and of tripping hazards caused by the air- or hydraulic hose.
Proceed with caution in unfamiliar surroundings. These may hold hidden dangers due to electrical cables or supply lines.
The machine for screw connections is not suitable for use in explosive environments and is not insulated against contact with electrical power sources.
Verify there are no electrical lines, gas lines, etc. which may result in a hazard in the event they are damaged during machine use.
Hazards due to dust and vapours
Dusts and vapours generated by use of machines for screw connections may result in damage to the health (e.g. cancer, birth defects, asthma and/or dermatitis); it is imperative to perform a risk assessment for these hazards and implement the respective regulatory mechanisms.
The risk assessment should include dust generated from machine use and dust in the area possibly being blown around.
Exhaust air must be discharged so the amount of dust being blown about in a dusty environment is minimised.
If dust or vapours are generated the principal task must be to monitor them in the area where they are released.
All machine mounting parts or accessories intended to collect, extract or eliminate airborne dust or vapours should be used and maintained according to manufacturer instructions.
Use respiratory protection.
Noise hazards
With inadequate ear protectors the impact of high noise levels may result in permanent hearing damage, hearing loss and other problems, e.g. tinnitus (ringing, whistling or buzzing in the ear).
It's imperative to perform a risk assessment for these hazards and implement the suitable regulatory mechanisms.
Suitable regulatory mechanisms to minimise the risk include measures such as using insulation to prevent pinging sounds on work pieces.
Use hearing protection.
The machine for screw connections must be operated and maintained as recommended in these instructions to prevent an unnecessary increase in the noise level.
If the machine for screw connections features a silencer, always ensure it is available when using the machine for screw connections and in good working order.
Select, maintain and replace consumables and machine tools as recommended in these instructions to prevent an unnecessary increase in the sound level.
Safety instructions for air tools / Commissioning
Hazard due to vibration
Exposure to vibration may cause damage to the nerves and disturb blood circulation in hands and arms.
- Keeps hands away from the sockets of hex nut drivers.
Wear warm clothes when working in cold environments and keep hands warm and dry.
If you notice your skin on fingers or hands becoming numb, tingling, hurting or becoming white, stop working with the machine and consult a physician.
Operate and maintain the machine for screw connections as recommended in this manual to prevent an unnecessary increase in vibration.
Do not use work or poorly fitting sockets or extensions, as these are very likely to significantly increase vibration.
- Select, maintain and replace consumables and machine tools as recommended in these instructions to prevent an unnecessary increase in vibration.
When possible use socket fittings.
Whenever possible, use a stand, clamp or an equaliser to support the weight of the machine.
- Do not grip the machine too tightly but firmly, maintaining the necessary hand reaction forces, as the vibration hazard typically increases when tightening the grip.
Additional safety instructions for pneumatic machinery
Compressed air can result in serious injuries.
Always close the air supply, release pressure from the hose, and disconnect the machine from the compressed air supply when the machine is not in use, before switching accessories or when performing repairs.
- Never aim the air flow at yourself or others.
Hoses flapping about can result in serious injuries. Therefore always inspect hoses and their fasteners for damage and a secure fit.
Direct cold air away from hands.
Do not use quick-release couplings on the tool intake of impact- and impulse drivers. Only use
connectors made from hardened steel (or material with comparable impact resistance) on threaded hose connections.
If using universal swivel couplings (coupling discs) always use locking pins and use whip-check hose safety cables for protection in the event the connection between the hose and the machine or in between hoses fail.
- Be sure not to exceed the maximum pressure specified on the machine.
In torque controlled machines with continuous rotation the air pressure has a safety-related impact on the output. Therefore, hose length and diameter requirements must be determined.
Never carry pneumatic tools by the hose.
Commissioning
Note: the device is operational after installing the plug nipple.
- Inserting the socket wrench or bit
ATTENTION! Always install the desired socket key before connecting the tool to your compressed air system. Always disconnect the compressed air supply from the compressed air connection 2 before attaching or changing socket keys 13
Insert the correct sock, if necessary with extension 8, in the drive.
Slide the socket attachmeh8 onto the square 7 of the drive.
Be sure the snap ring is locked into the notch of the socket attachment 13.
Only use socket attachments 13 sizes 1 / 2^ specified in figure A.
- Be sure the socket attachments 13 used are not damaged. Never use damaged or the wrong size (not suitable) socket attachments 13.
Commissioning
- Connecting
Note: only use connection hoses with a minimum inside diameter of 9mm
First wrap a piece of Teflon tape (not included) around the outer threads of the plug nipple 9 and the lubricator 11 (see fig. B).
Now screw the plug nipple into the thread of the lubricator [11] (see Figure C).
You must use an open-end spanner to tighten this connection with moderate force.
Now turn the combination of lubricator 11 and plug nipple 9 into the connection thread 2 of the impact driver (see Fig. C).
Also retighten this connection with an open-end spanner.
Now press the air hose onto the plug nipple using a little force, until the hose locks in.
ATTENTION! Be sure the air hose is firmly connected. A loose hose whipping about out of control presents a major hazard. Also ensure the two screw connections between lubricator [1], coupling and machine are securely seated.
Adjusting the compressed air
Note: this device is designed for an operating pressure of up to 6.3 bar and a compressor with the minimum air flow specified in the technical specifications. When setting the air pressure, remember the pressure drops by approx. 0.6 bar with a hose length of 10m and an inside diameter of 9mm .
Only use filtered, lubricated and regulated compressed air.
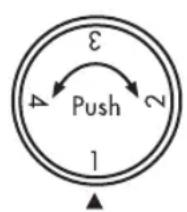
Adjusting the torque
Set the torque control to the correct torque by pressing it toward the housing and turning it until it locks at the desired setting.
- Be sure the operating pressure of the compressor is between 5 and 6.3 bar.
Note: the ideal pressure is 6.3 bar. The maximum torque cannot be reached at a pressure of only 5 bar or with insufficient air flow.
| Setting | |
| 1 (low, min.) | |
| 2 (normal) | |
| 3 (high) | |
| 4 (extra high, max.) | |
Initial use
Activate the trigger 4 to start the equipment.
Release the trigger to deactivate the equipment.
- Changing rotation
ATTENTION! The device must come to a complete standstill before changing the direction of rotation.
ATTENTION! A machine rotating in an unexpected direction can be dangerous. Always pay attention and use care.
Note: The impact driver clockwise / counterclockwise rotation. Use the reverse switch 6 to change the direction of the impact driver.
Push the bolt forward in the direction of the F^ marking (Forward/Fasten") for clockwise operation. You can now e.g. tighten screws.
Push the bolt back towards the R'' marking (Reverse / Release) so it protrudes from the back of the equipment to set to counter-clockwise mode. You can now e.g. loosen screws.
Commissioning / After initial use / Maintenance / Cleaning and Care
- Correctly holding the equipment
This equipment weighs 2.1kg
Hold the equipment with both hands to ensure safe operation (see Fig. D).
After initial use
Once the task has been finished the device must be disconnect from the compressed air supply 2.
Switch off the compressor.
Briefly activate the trigger of the equipment to release any residual compressed air.
Now pull back the safety on the connection coupling of your compressed air hose.
Now remove the hose from the plug nipple.
WARNING! Careful when putting the device down. Always put down the device so it does not rest on the trigger. This could potentially result in inadvertent activation of the tool, which in turn could result in hazards.
- Maintenance
ATTENTION! All maintenance must be performed by trained individuals. Follow the specified maintenance instructions to ensure a long life and proper operation of this quality product.
Disconnect equipment from the compressed source when performing maintenance and care.
Check the condition of wear and tear items and accessories with each maintenance.
Note: Daily cleaning and regular lubrication are an absolute necessity for smooth operation.
Only use special tool oil with a high viscosity (thin fluid). Oil for compressed air tools or SAE10-20 motor oil are suitable.
ATTENTION! Do not use other (especially high viscosity) lubricants. Malfunctions or permanent damage may otherwise occur.
The following lubricating options are available:
a) via the lubricator 11
Fill the lubricator included with a bit of oil by first unscrewing the inlet screw from the lubricator.
Now install the lubricant in the compressed air supply as described in chapter "Establishing connections".
b) via oil-mist generator
If a complete maintenance unit with oil-mist generator is installed on your compressor the lubricator [1] does not necessarily need to be mounted.
To use the oil-mist generator plug the plug nipple directly into the equipment and connect with your air hose.
c) byhand
Alternatively you can also manually lubricate your equipment (not recommended).
To do so, remove the screw plug on the oil filler port 5.
Apply 3-5 drops of oil to the compressed air connection and the oil filling port 5 before using the compressed air tool.
If the air tool has not been used for several days 5-10 drops of oil must be added to the air connection 2 and the oil filler port 5.
Note: Regular lubrication is imperative to ensure the longest possible life for your compressed air device. We recommend continuous lubrication via the included lubricator [1].
Always store your air tools / equipment in dry locations.
No maintenance is required beyond the above lubrication and cleaning.
- Cleaning and Care
Only clean the tool with a dry cloth.
Never clean with fluids such as petrol, solvents or water.
Do not allow liquids to enter the equipment.
Troubleshooting / Information about warranty and service processing
Troubleshooting
Note: Regular lubrication is imperative to ensure the longest possible life for your compressed air device. We recommend continuous lubrication via the included lubricator [11].
After every maintenance verify the equipment is still operating as originally.
| Faults Possible causes Action | ||
| Impact driver not working | Trigger 4 not pulled Pull trigger 4 | |
| No compressed air supply If applicable, drain condensation from tube (water bag) | ||
| Straighten kinks in the hose | ||
| Connect compressed 2 air | ||
| Leak in compressed air system | Remedy leak | |
| Compressor defective Verify the compressor is supplying compressed air. If necessary, have compressor repaired by a qualified professional | ||
| Defect inside the air tool Have air tool repaired by a qualified professional | ||
| Not properly tightening screw | Air pressure too low Increase air pressure. ATTENTION! Never exceed the maximum approved operating pressure of the air tool! | |
| Not loosening screw | Torque is too low | Turn torque control 3 to a higher setting |
| Rusted screw Apply rust remove to screw | ||
Information about warranty and service processing
Creative Marketing Consulting GmbH warranty
Dear customer, the warranty for this device is 3 years from the date of purchase. In the event of product defects you have legal rights against the retailer of this product. Your legal rights are not limited in any way by our warranty detailed below.
Warranty terms
The warranty period begins on the date of purchase. Please keep the original sales receipt in a safe location. This document is required as your proof of purchase.
Should this device show any fault in materials or manufacture within three years from the date of purchase, we will repair or replace it - at our choice - free of charge to you. Warranty services require the defective device and the proof of purchase (sales receipt) to be presented within the three-year period
Information about warranty and service processing
along with a brief written description of the defect and when it occurred.
If the defect is covered by our warranty, we will return the repaired device or replacement thereof. A repair or exchange of the device does not extend a new warranty period.
Scope of warranty
The device has been manufactured to strict quality guidelines and meticulously examined before delivery. The warranty applies to faults in material or manufacture. This warranty does not apply to product parts subject to normal wear and tear and which can therefore be considered as wear items, or to damage to fragile parts, e.g. switches, storage batteries or glass parts.
This warranty becomes void if the device has been damaged or improperly used or maintained. All instructions provided in the operating instructions must be followed strictly to constitute proper use of the product. Applications and actions which the operating instructions warn of or advise against must be avoided without fail.
This product is intended for private, non-commercial use only. The warranty is void in the case of inappropriate and improper handling, use of force and of any intervention which was not carried out by our authorized service branch.
- Processing of warranty claims
Please follow the instructions below to ensure quick processing of your matter:
When inquiring about your product please have your receipt and product number (e.g. IAN) ready as your proof of purchase.
The item number can be found on the type plate, engraving, the cover page of your instructions (bottom left) or the decal at the back or bottom.
In the event of malfunctions or other defects please first contact the service department below by phone or e-mail.
A product recorded as defective, along with the proof of purchase (sales receipt) and a description of the defect and when it occurred, can then be returned free of charge to you to the service address provided.

Note:
Visit www.lidl-service.com to download this and many other manuals, product videos and software.
How to contact us:
GB
Name: C. M. C. GmbH
Website:www.cmc-creative.de
E-mail:service.gb@cmc-creative.de
Phone:0-808-189-0652
(standard German landline
rates apply)
Fax:
0-808-189-0652
Registeredoffice:Germany
IAN 285198
Please note the following address is not a service address.
Please first contact the above service address.
Address:
C. M. C. GmbH
Katharina-Loth-Str. 15
66386 St. Ingbert
Germany
PARKSIDE
15 GB/IE/NI
Environmental instructions and disposal information / Declaration of Conformity
Environmentalinstructions and disposal information
EN ISO 11148-6:2013

Equipment, accessories and packaging should be recycled in an environmentally friendly manner.
Do not dispose of the compressed air tool through your household waste, or throw into fire or water. If possible, non-operational devices should be recycled. Contact your local retailer for information.
Documentation Representative
Declaration of Conformity (C)
We,
C. M. C. GmbH
Documentation officer: Marc Uhle
declare on our sole responsibility the product
Pneumatic impact wrench
Item number: 2046
Year of manufacture: 2017 / 34
IAN:285198
Model: PARKSIDE PNEUMATIC IMPACT
WRENCH PDSS 310 A3
to meet the basic safety requirements of European Directives
Machinery Directive
EC Directive 2006/42/EC
and its amendments.
The conformity assessment is based on the following harmonised standards:
Indledning
Hensigtsmaessig anvendelse. Side 18
Udstyr.
Directive relative aux machines
Directive CE 2006/42/CE
WAARSCHUWING! EXPLOSIEGE-
A WARNING! QUETSCHGEFAHR!
A WARNING! EXPLOSIONSGEFAHR!
service.at@cmc-creative.de
Telefon: +49 (0) 6894 9989751
SCHLAGSCHRAUBER PDSS 310 A3