Danville 4010N - Barbecue tepro - Free user manual and instructions
Find the device manual for free Danville 4010N tepro in PDF.

User questions about Danville 4010N tepro
0 question about this device. Answer the ones you know or ask your own.
Ask a new question about this device
Download the instructions for your Barbecue in PDF format for free! Find your manual Danville 4010N - tepro and take your electronic device back in hand. On this page are published all the documents necessary for the use of your device. Danville 4010N by tepro.
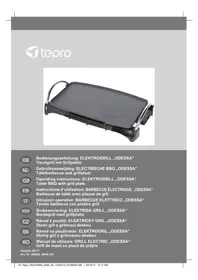
USER MANUAL Danville 4010N tepro
natural_image
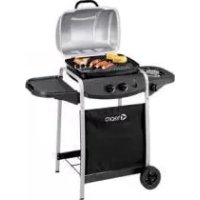
Black metal outdoor table with four legs and a top panel, no visible text or symbolsGB Operating Instructions: ELECTRIC GRILL "Danville" Table grill with grill grate
text_image
Exploded view diagram of a portable grill with numbered parts for identificationInhaltsverzeichnis
natural_image
Simple line drawing of a rope or pipe with a mechanical component inserted, no text or symbols present.natural_image
Technical line drawing of a mechanical component with curved surfaces and a vertical rod (no text or symbols)natural_image
Technical line drawing of a mechanical component with no visible text or symbolsnatural_image
Line drawing of a four-legged table with a curved top and legs, showing a small arrow indicating motion or movement (no text or symbols)natural_image
Simple line drawing of a pipe with a valve and clamped parts (no text or symbols)natural_image
Technical line drawing of a mechanical component with ribbed structure and mounting bracket (no text or symbols)natural_image
Technical line drawing of a mechanical component with no visible text or symbolsnatural_image
Line drawing of a four-legged table with a circular top and four legs, showing a small directional arrow (no text or symbols)Warning Symbols....26
Safety Instructions 26
Installation....28
Preparations....28
Grill Assembly 28
Before Initial Use 29
Operation....29
Grill Tips 30
Maintenance and Cleaning 31
Disposal....32
Declaration of Conformity 32
Specifications 32
Service 33
Distributing Company 33
Before using the appliance
After unpacking and before each use, check the appliance for defects.
If a defect should be found, do not use the appliance, but notify your dealer.
The operating instructions are based on the standards and regulations applicable in the European Union. In countries outside the European Union, also observe country-specific directives and legislation!

Before initial use, read the safety instructions and the operating instructions carefully.
Only then will you be able to use all functions safely and reliably. Keep the operating instructions at a safe place and pass them on to any subsequent owners.
Components
1 Hot plate (1)
1 Wind/splash protection (2)
1 Grill grate (3)
1 Heating element (4)
1 Temperature control (5)
1 On/Off switch and temperature controller 0-MAX (6)
1 Power cable with mains plug (7)
1 Drip pan (8)
2 Heat-insulated handle (9)
4 Legs (10)
4 Feet (11)
1 Tray (12)
1 Recess for temperature control (13)
1 Grill trough (14)
1 Pilot lamp (15)
Please check that the contents of the box are complete and undamaged. Please contact your dealer if a part should be missing or defective.
Claims lodged after the appliance has been completely or partly assembled in regard to damage or missing parts will not be processed.
Intended Use
This electric grill is designed for cooking food.
It is designed solely for private use.
Use the appliance only as described in these operating instructions. Any other use is considered not as intended and may lead to damage to property or possibly personal injury.
The manufacturer shall not be liable for damage caused by use other than the intended purpose.
For your Safety
Warning Symbols
DANGER high risk!

Failure to observe the warning can lead to damage to life and limb.
ATTENTION moderate risk!

Failure to observe the warning may cause damage to property.
CAUTION minor risk!

Facts which should be considered when using the appliance.
Safety Instructions
– Before initial use, check that the current type and the mains voltage match the details on the rating plate.
- This appliance is an electric grill for household use, and it is not designed for industrial or professional use.
- Do not use the appliance if the appliance or the power cable is damaged or has been dropped.
- Always connect the electric grill to an AC socket with a voltage of 230 V\~. 50 Hz. The fuse for the plug socket should be at least 10 A.
- The installation of an earth leakage circuit-breaker with a rated trip current of not more than 30 mA into the domestic wiring offers additional protection. Seek advice from your electrician.
- If you should notice damage to the appliance or malfunctions,
immediately disconnect the mains plug from the socket.
- Incorrect use of electricity can be lethal.
- Do not use the cable to disconnect the mains plug from the socket.
– Periodically check the mains plug and the power cable for damage.
- Do not move the appliance during operation.
- If the appliance is operated on a table, make sure that it does not protrude beyond the table edge.
- Set the appliance onto a heat-resistant surface.
- Keep inflammable materials like textiles away from the appliance.
- Do not place food wrapped in plastic or metal foil onto the grill while it is in use. This could cause damage to the grill or a fire.
- Operate the appliance in a safe area, at a sufficient distance from playing children or pets.
- Always use the supplied connector plug with controller for this appliance. Do not connect a different plug with controller to this appliance.
The supplied connector plug with controller may not be used with other appliances.
- Never try to repair the appliance yourself. In the event of a problem, have the appliance repaired by qualified specialists. Never open the housing yourself. There is a risk of electric shock!
- If the power cable of the appliance is damaged, it must be replaced by the manufacturer or their service department to avoid hazards.
- Prevent damage to the power cable from crushing, kinking, or rubbing on
sharp edges, and keep it away from hot surfaces
- If an extension cable is used, it must match the respective rating.
- Route the cable and if required, the necessary extension cable to prevent accidental pulling on the cable or to prevent a trip hazard.
- Do not immerse the appliance in water or other liquids.
– Never touch the mains plug with wet or moist hands.
- Operate the electric grill on a level, dry, and non-slip surface.
- Do not place the appliance onto mobile items on which the appliance may topple.
- Do not insert items into the appliance.
– Always disconnect the mains plug after use and before cleaning
- Use only accessories supplied with the appliance.
- Move the appliance only after it has cooled down.
- Do not place the appliance onto a hot surface. Do not store the appliance near hot devices like hotplates, fireplaces, etc.
- Do not use the appliance near bathtubs, showers, or swimming pools.
- Do not operate the appliance in rooms with inflammable liquids or gases.
- Do not set up the grill near entrances or areas used frequently for pedestrian access.
– Always exercise extreme caution, Distractions may cause loss of control over the appliance. Never leave the appliance unattended.
- Do not place items filled with liquids, for example vases, onto the appliance.
- Use the appliance only in temperate latitudes. The tropics and especially humid climates should be avoided.
- The appliance must not be set up directly under a wall socket.
- Do not use the appliance with a timer switch or a separate remote control system.
- WARNING: Do not use charcoal or similar fuels in this device.
DANGER risk of accidents!

This appliance is not intended for use by persons (including children) with limited physical, sensory or mental abilities or lacking experience and/or knowledge.
- Inform this group of persons about the dangers of the appliance and have them supervised by a person responsible for their safety.
– Any modification to the product represents a major safety hazard and is thus prohibited. Do not carry out repairs yourself. In case of damage, repair, or other problems with the appliance, contact our service centre or a local specialist.
- Keep children and pets away from the appliance.
– Never use the grill without a drip pan.
Danger Risks to children!

Playing children may get caught in the plastic packaging and may suffocate
- Do not let children play with the plastic packaging.
- Make sure that children do not place small assembly parts into their mouth. They could swallow the parts and suffocate.
DANGER Risk of fire!

To prevent overheating of the appliance and fire, the appliance must not be covered.
- The appliance remains hot for a considerable time after switching it off. Take care not to burn yourself and do not place any objects onto it. There is a risk of fire.
DANGER Risk of burns!

This electric grill becomes very hot during operation. For prevention of burns, do not touch the hot surfaces directly with your skin. Always hold the appliance with the heat-insulated handles (9).
- Keep a minimum distance of 1 m from inflammable material like wallpaper, curtains, and blinds.
- Always be attentive and exercise caution. Do not use the appliance when you cannot concentrate or are tired or under the influence of drugs, alcohol, or medication. Even the slightest distraction during use of the product can lead to serious injuries.
Installation
Preparations
DANGER risk of injuries!

Failure to observe the instructions can cause problems when using the grill.
- Observe all assembly instructions listed here.
- First, read the assembly instructions completely.
- Take sufficient time for the assembly and prepare a level work area of two to three square meters.
- Small parts like the handles may be pre-installed.
- When the appliance is used as a table-top grill, installation of the feet is not required.
Grill Assembly
- Unpack the grill and remove all packing foils. Keep the packing materials outside the reach of children and dispose of it according to the regulations after assembly of the grill.
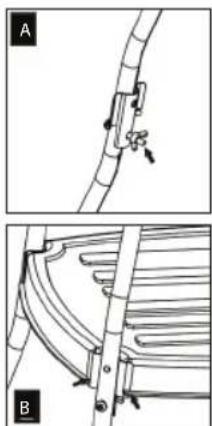
Mounting the feet
natural_image
Technical line drawing showing two views (A and B) of a mechanical component with no visible text or symbolsA. Put the metal stator on the steel pipe, let the screw through the steel pipe and tighten it with butterfly screw.
B. Put the metal stator into the slot according to the arrow indicate.

natural_image
Simple line drawing of a mechanical component with no text or symbolsC. According to the arrow indicate, put the screw into steel pipe and tighten it with butterfly screw nut.
natural_image
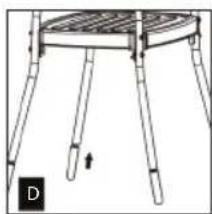
Line drawing of a four-legged table with a curved top and two legs, showing a small directional arrow (no text or symbols)D. According to the arrow indicate, plug in slip feet cover.
- Using some pressure, fit the grill trough (14) onto the upper end of the legs (10). Confirm that the legs and the grill trough are connected securely to each other.
- Hook the wind/splash protection (2) first into the two center recesses and then into the left and right recesses.
- Insert the hot plate (1) into the two holes in the wind/splash protection (2), and let the two rods on the side of the hot plate (1) slide into the provided notches on the left and the right.
- ATTENTION: The grill plate is placed loosely above the heating coil to prevent a buildup of heat.
Note:
When the legs are not installed, the grill can be used as a table-top grill.
Take care to use a level, fire-resistant base.
Before Initial Use
-
Clean the grill grate and the drip pan as described in the section Maintenance and Cleaning.
-
Set the appliance onto a level, dry, and non-slip surface.
- Use a heat-resistant base when the appliance is used as a table-top grill.
- Let the appliance heat for approx. 10 min without food in order to burn off production residues.
- Some smoke and corresponding smell may occur with initial use. This is normal and is caused by the combustion of production residues. The smoke and the smell disappear after a short time. Please insure sufficient ventilation of the room.
- The appliance is ready for operation
Operation
- Remove the grill grate (3). Then remove the temperature control (6) up from the grill support (14), and then pull it back with the heating element (4) and remove it.
- Approx. 1 liter of cold water can be poured into the drip pan (8) to prevent excessive smoke while grilling.
- Refill water if the water level drops while grilling. At this time, take care that no water gets onto the heating element.
-
Fit the heating element and the temperature control back onto the grill support by following the steps in reverse. When doing so, it is important that the temperature control is fitted correctly into the recess (13) of the grill holder (14). The safety switch (brown) must be pushed in completely. Otherwise the appliance cannot be switched on.
-
Set the grill grate onto the grill trough. Also pay attention to the cooking times.
-
Connect the mains plug (7) to a suitable socket.
-
The appliance should be heated for approx. 10-15 min before the start of grilling.
-
Turn the On/Off switch and temperature controller 0-MAX (6) to MAX. The pilot lamp (15) lights up and at the same time the heating element is heated.
-
Now the food can be placed onto the grill grate. Frozen food should be defrosted completely before grilling.
-
The drip pan (8) catches dripping fat and gravy. Never use the grill without a drip pan.
-
The handles (9) of the grill are heat-insulated. However, as the grill becomes very hot, it is recommended that you use heat-resistant kitchen gloves or pot holders.
-
Use long-handled cutlery for placing the food.
-
The food should be turned over several times during the grilling for uniform grilling. The grilling time depends on the type of food.
-
You can adjust the temperature with the temperature control settings 0-MAX (just above 0 = low temperature, MAX = very high temperature). The pilot lamp goes out as soon as the set temperature has been reached.
-
CAUTION! To avoid heat build-up, do not place aluminum foil or other grilling utensils onto the grill grate.
-
Risk of burns! If the grill must be moved when hot for any reason, only hold the grill with the heat-insulated handles (9) and move it slowly.
-
To switch the grill off, turn the temperature control 0-MAX to 0 and disconnect the mains plug (7) from the socket.
-
Let the appliance cool down for approx. 20 min before moving it.
-
The grill griddle (3) and the temperature control (5) may be removed only after the appliance has cooled down completely.
Grill Tips
Cooking Times
The following table lists some guide values for the cooking times of different foods. The grill time may differ depending on the thickness of the meat and your personal taste.
Cooking Times Table
| Meat type Grilling time |
| Beef fillet 8-18 min |
| Beef hamburger 8-12 min |
| Veal cutlet 5-8 min |
| Pork cutlet 12 min |
| Lamb chop 4 - 8 min |
Always use tongs or a pancake turner to turn the food, never a fork or other sharp or pointed implements. These will damage the anti-stick coating of the grill plate.
Always preheat the grill plate. Place the food to be grilled onto the hot plate only after sufficient preheating. Use a lower temperature setting to slowly prepare delicate foods like fish fillet. Use a high temperature setting to brown meat, to seal the meat, and to grill vegetables or an entire fish.
Meat becomes softer when marinaded overnight. Marinade is prepared with oil to introduce moisture, vinegar to soften the meat, and a mixture of spices.
Turn the fish or the meat only once. Multiple turning is not required and dries out the grilled food.
Use the temperature control to switch off the appliance after use. and disconnect the mains plug from the socket. Let the appliance cool well before transporting or cleaning it.
Wipe the grill grate occasionally with a paper kitchen towel soaked with oil, so that the grilled food will not stick to it.
Maintenance and Cleaning
Your grill has been manufactured from quality materials. Please observe the following instructions when cleaning and maintaining the surfaces.
DANGER Risk of burns!

Let the grill cool down completely before you clean it.
DANGER Health hazard!

Do not use paint solvents or thinners to remove spots.
These are hazardous to your health and must not come into contact with food
ATTENTION Risk of damage!

Do not use strong or polishing solvents or scouring pads, as these attack the surfaces and leave scouring marks.
- Before each cleaning, set the temperature controller (5) to 0 and disconnect the mains plug from the socket.
- Never immerse the grill into water or other liquids. When cleaning, take care that no liquid gets onto the heating element or comes into contact with live parts.
- Wipe the surfaces of the appliance with a lightly moistened cloth and then wipe it dry.
• Take off the grill grate (3). Then lift the temperature control (5) up from the grill holder (14) and pull it back and remove it together with the heating element (4).
- Remove the drip pan from the appliance and empty it. Clean the drip pan with warm water and a little detergent.
- Wipe the grill grate with a cloth lightly moistened with warm water. Add a little detergent to dissolve the fat more easily.
- Stubborn food residue can be removed more easily if first soaked for several minutes in cooking oil.
Dab the respective locations with kitchen paper soaked with cooking oil. After approx. 5-10 minutes, wipe off the food residue with a clean cloth.
- Clean all parts carefully after cleaning, before you reassemble the appliance following the steps in reverse and use it again.
- When the appliance is not in use, store it in a dry place, protected from dust and direct sunlight.
- IMPORTANT: The grill always should be protected against moisture during storage.
Disposal
The packaging is composed of environmentally friendly materials which can be disposed of via local recycling stations.
Never dispose of the appliance with normal household waste. Dispose of the appliance through your authorized disposal company or local waste disposal facility. Comply with the current regulations. In case of doubt, contact your local waste disposal facility.
Declaration of Conformity
This product complies with the applicable European and global Directives. This is verified by the CE marking (corresponding declarations have been deposited with the manufacturer).
Specifications
Product: Art No. 4010N and 4010-CH Electric grill "Danville"
Rated voltage: 230 V, \~ 50 Hz
Rated power consumption: 1600 W
Weight: approx. 3.8 kg
Overall dimensions: approx. 60 x 48 x 89 cm (W x D x H)
Grill area: approx. 40.4 x 22.7 cm
Protection class: IPX4
Service
If you have any technical queries, please contact our service department. This product has been carefully manufactured and packaged. If you should have a claim, our employees will be glad to help you.
Technical changes and errors excluded.
Distributing Company
tepro Garten GmbH
natural_image
Simple line drawing of a curved pipe with a mechanical component inserted, no text or symbols presentnatural_image
Technical line drawing of a mechanical component with curved and straight sections (no text or symbols)natural_image
Simple line drawing of a mechanical component with no text or symbolsnatural_image
Line drawing of a four-legged table with a curved top and legs, showing a small arrow pointing to the bottom right (no text or symbols)natural_image
Simple line drawing of a pipe with a valve and clamped parts (no text or symbols)natural_image
Technical line drawing of a mechanical component with ribbed structure and mounting bracket (no text or symbols)natural_image
Technical line drawing of a mechanical component with no visible text or symbolsnatural_image
Line drawing of a four-legged table with a circular top and four legs, showing a small directional arrow (no text or symbols)(Largh. x Prof. x Alt.)
natural_image
Simple line drawing of a pipe with a valve and clamped parts (no text or symbols)natural_image
Technical line drawing of a mechanical component with curved and straight surfaces (no text or symbols)natural_image
Pure technical diagram of a mechanical component with no text, numbers, or symbolsnatural_image
Line drawing of a four-legged table with a curved top and two legs, no text or symbols presentD. Plugga in glidfotens lock såsom pilen visar.