
IAN 85413 - Barbecue tepro - Free user manual and instructions
Find the device manual for free IAN 85413 tepro in PDF.

| Product type | Gas barbecue |
| Brand | tepro |
| Model | IAN 85413 |
| Dimensions (L x D x H) | Approx. 112 x 52 x 96.5 cm |
| Weight | Approx. 10.4 kg |
| Gas consumption | 500 g/h |
| Total power | Approx. 7 kW |
| Main burner | Dual burner (2 x 2.35 kW) |
| Side burner | 1 burner of 2.3 kW |
| Cooking surface | 45 x 34 cm |
| Gas type | Liquid gas (butane/propane) at 50 mbar |
| Connection pressure | 50 mbar |
| Ignition | Piezoelectric |
| Compatible gas container | 5 kg or 11 kg bottle |
| Main material | Heat-resistant painted steel |
| Number of burners | 3 (2 main + 1 side) |
| Usage | Outdoor only |
| Safety | Gas leak check, automatic gas shut-off |
| Cleaning | Regular cleaning, grate washable with soapy water |
| Warranty | 3 years |
| Delivery contents | Barbecue, grate, drip tray, regulator, gas hose, mounting accessories |
Frequently Asked Questions - IAN 85413 tepro
User questions about IAN 85413 tepro
0 question about this device. Answer the ones you know or ask your own.
Ask a new question about this device
Download the instructions for your Barbecue in PDF format for free! Find your manual IAN 85413 - tepro and take your electronic device back in hand. On this page are published all the documents necessary for the use of your device. IAN 85413 by tepro.
USER MANUAL IAN 85413 tepro
World of Garden & Hunting
natural_image
Exterior view of a modern outdoor grill with a metal grater and open trunk (no visible text or symbols)Gasgrill Fremont


GSSITMLI2012H2L708 P


natural_image
Line drawing of a portable electric grill with control panel and side-mounted tray, showing directional arrows (no text or symbols)
DE ATCH
Inhalt
Product contents/control elements....48
Before using the device 48
Proper use 48
For your safety 48
Caution icons 48
Safety notes 48
Assembly....50
Preparation 50
Required tools 50
Assembling the grill....50
Setting up the grill....51
Connecting the gas container 51
Checking for gas leaks 51
Notes for first-time users: 51
Turning on/lighting 51
Ignition system – Igniting with a Piezo lighter 52
Conventional lighting with matches....52
Preheating/regulating the flame....52
Cooking with the lid closed....52
Turning the grill off....52
Maintenance and cleaning 52
Storage....53
Note on the declaration of conformity 53
Disposal....53
Troubleshooting....54
Distributor 54
Warranty....55
Service 55
GB
Congratulations!
You have purchased a high-quality unit. Please familiarise yourself with the unit before assembling and using it for the first time.

Read the operating instructions before using the appliance. Only use the device as described and for the specified application areas. Please store these operating instructions in
a safe place. Also be sure to include all documents when passing the unit on to third parties.
Before using the device
After unpacking and before each use of the unit, check whether it exhibits damages.
If this is the case, do not use the unit, instead please notify your vendor.
The operating instructions are based on standards and regulations valid in the European Union. If you are abroad, please be sure to observe the country-specific guidelines and laws!
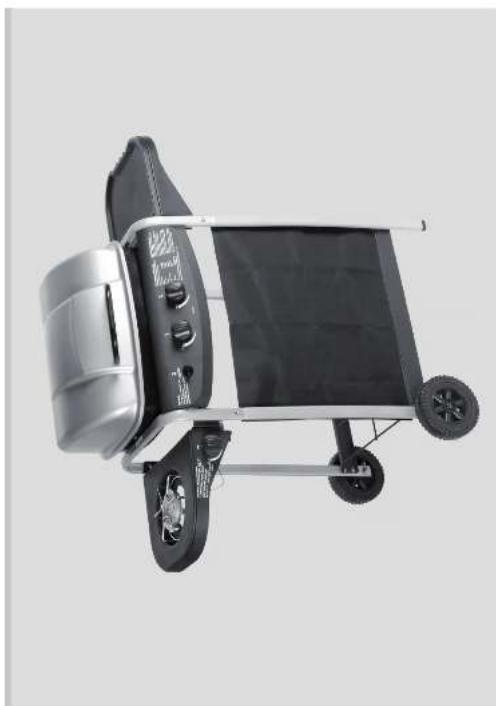
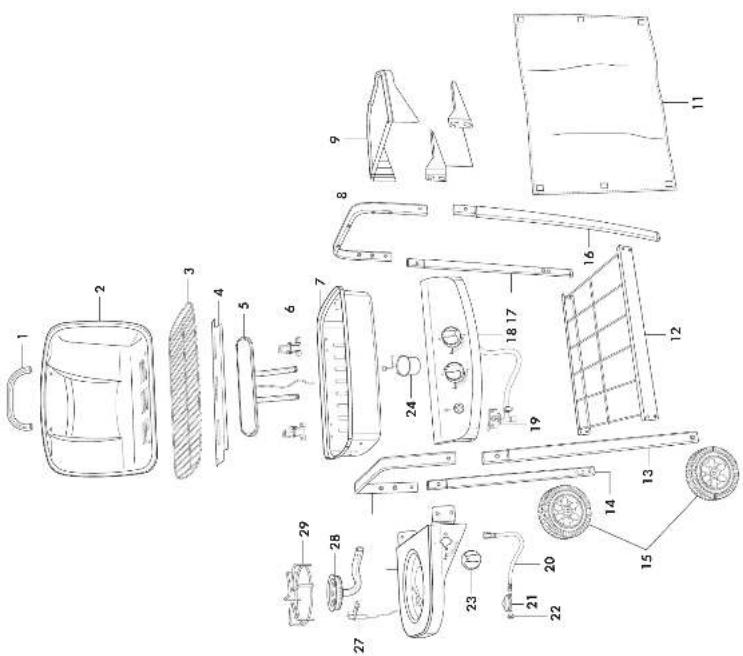
Product contents/control elements
| No. | Quantity Name | |||||||
| 1 | 1 | L | i | d | h | a | n | d |
| 2 | 1 | L | i | d | ||||
| 3 | 1 | G | r | i | l | l | r | a |
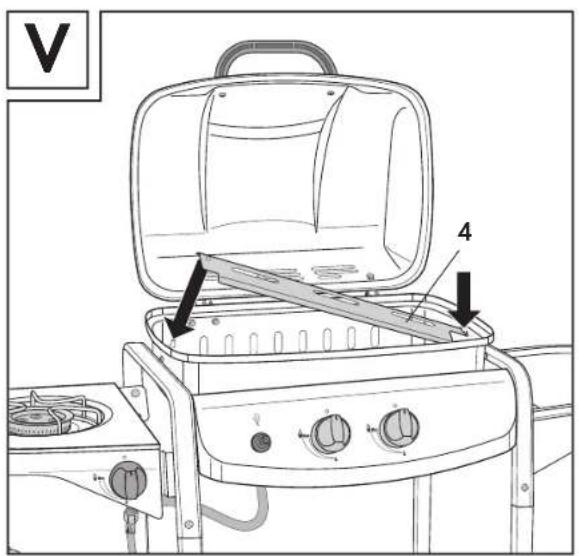
| 4 | 1 | H | e | a | t | t | e | n |
| 5 | 1 | B | u | r | n | e | r | |
| 6 | 2 | H | i | n | g | e | ||
| 7 1 | Burner housing | |||||||
| 8 1 | Right upper support | |||||||
| 9 | 1 | S | i | d | e | t | a | b |
| 10 2 | Front and rear side table support | |||||||
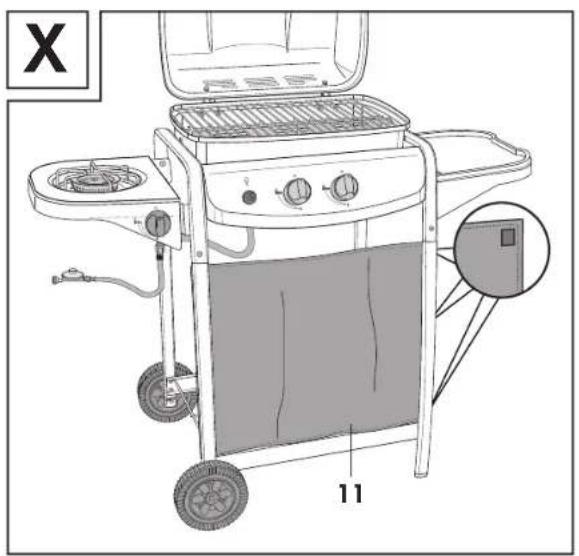
| 11 1 | Textile front cover | |||||||
| 12 1 | Bottom rack | |||||||
| 13 1 | Left front leg | |||||||
| 14 1 | Left rear leg | |||||||
| 15 2 | Wheel | |||||||
| 16 1 | Right front leg | |||||||
| 17 1 | Right rear leg | |||||||
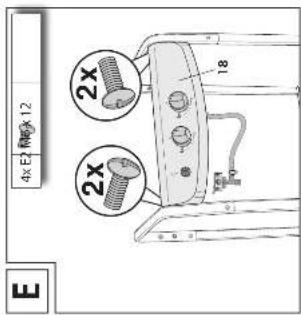
| 18 | 1 | Control panel | ||||||
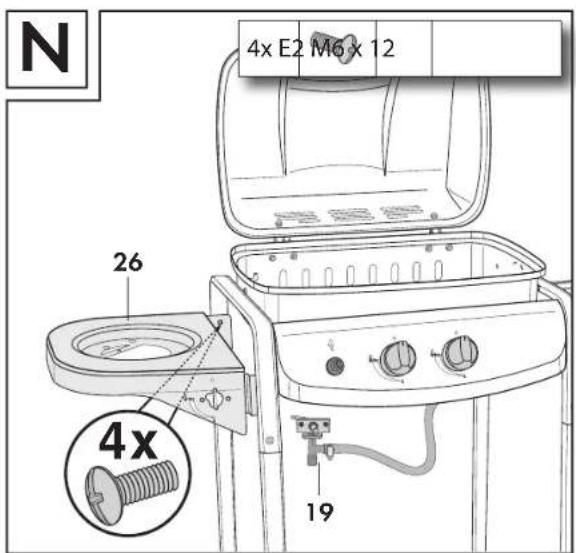
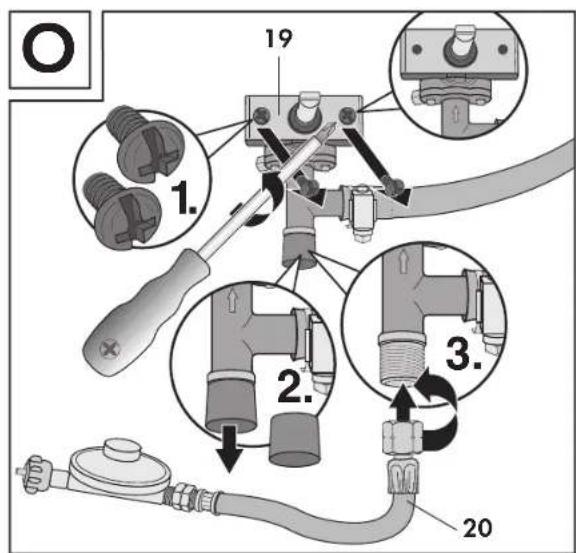
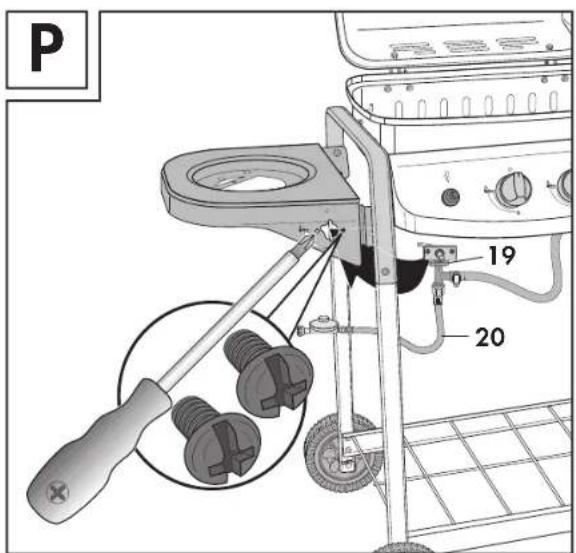
| 19 | 1 | Gas connection with side burner temperature control | ||||||
| 20 1 | Gas hose | |||||||
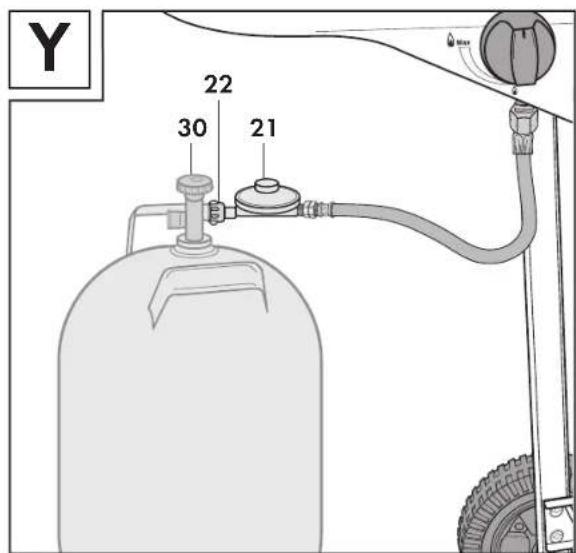
| 21 1 | Pressure regulator | |||||||
| 22 | 1 Union nut (part from No. 21) | |||||||
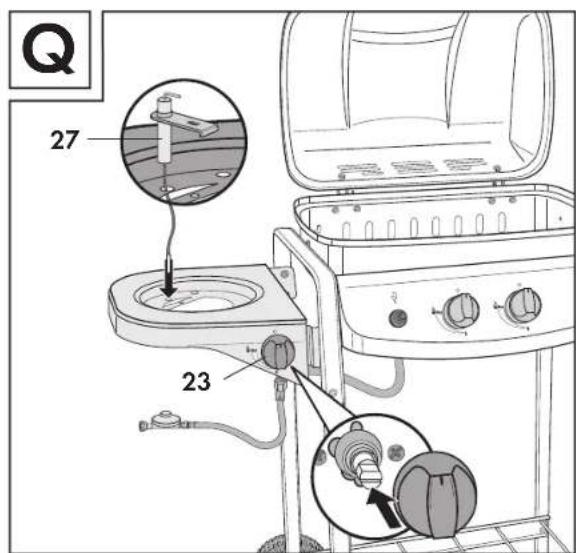
| 23 | 1 Knob for side burner temperature control | |||||||
| 24 1 | Fat tray with holder | |||||||
| 25 | 1 Left upper support | |||||||
| 26 | 1 Side burner housing | |||||||
| 27 | 1 Side burner electrode | |||||||
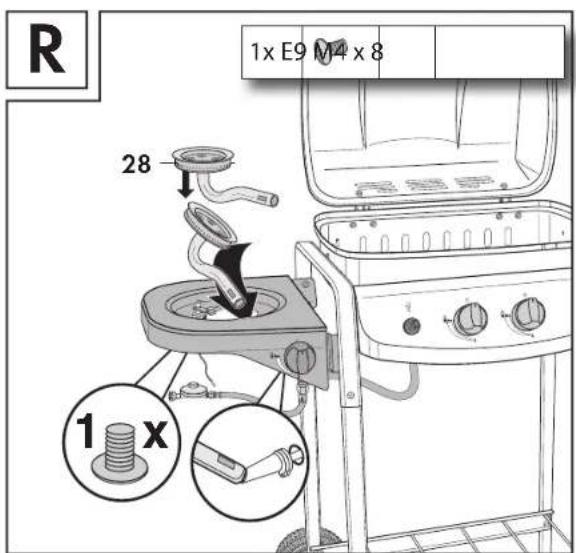
| 28 | 1 Burner for side burner | |||||||
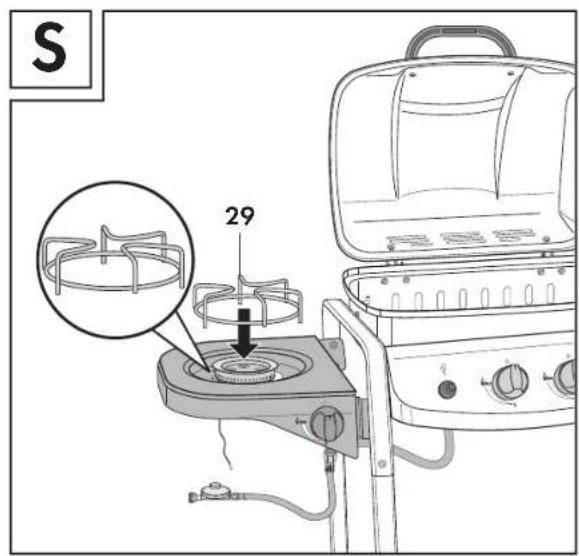
| 29 | 1 Side burner top piece | |||||||
| 30 | Gas container valve | |||||||
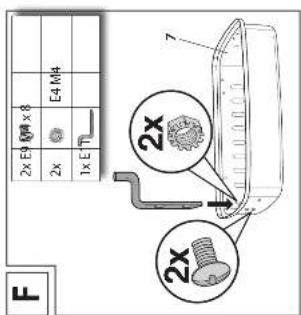
Assembly material in the blister packaging:
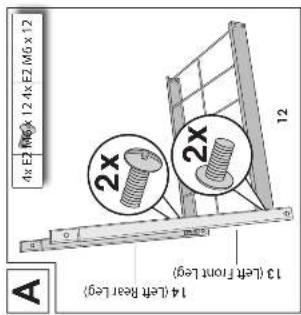
| No. | Pieces | Name |
| E1 8 | Bolt M6 x 20 mm | |
| E2 | 16 | Bolt M6 x 12 mm |
| E3 | 6 Bolt | ST 4 x 10 |
| E4 2 | Nut M4 | |
| E5 | 2 Washer | |
| E6 | 4 Nut M6 | |
| E7 | 8 Bolt M5 x 8 mm | |
| E8 | 4 Shoulder bolt M6 x 15 | |
| E9 | 3 Bolt M4 x 8 | |
| E10 | 2 | Wheel axle |
| E11 | 1 | Heat tent support (No. 25) |
| E12 | 2 Splint for wheel axle (R pin) (No. E10) | |
| E13 | 6 | Nut M5 |
Please make sure the delivery is complete and is not damaged. If a part is missing or defective, please contact your dealer.
Complaintsrelatingtodamagedormissingpartsreportedonceassembly has begun or is complete will not be acknowledged.
Proper use
This gas grill is designed for heating, cooking and barbecuing meals.
It is only suitable for outdoor use and is only intended for private application.
c Only use the unit as described in these operating instructions. Any other use is deemed improper and may result in damage to property or even injury to persons.
The manufacturer assumes no liability for damages, which are incurred by improper use.
I e
For your safety
Caution icons
Danger
High risk !

Failure to heed the warning may result in injury to life and limb.
Attention Moderate risk!

Failure to heed the warning may cause damage to property
Caution

Minor risk!
Points, which should be observed when handling the unit.
Safety notes
Danger Risk of explosion!

Leaking gas may form a highly explosive air/gas mixture that could cause a fire or explosion and could result in life-
threatening injuries or death.
- In general, you should have a fire extinguisher and first aid kit on hand and be prepared for an accident or fire.
- Do not use the grill if there is a gas leak.
- Do not in any case use an open flame to inspect a gas leak. Make sure that no sparks or open flames can occur when checking for a gas leak.
- Do not loosen the gas connections, gas hose or pressure regulator while the grill is in operation.
- Only use one hose connection between the device and the gas container, which does not exceed the recommended length of 1.5 m.
- In the event of a leak, turn off the grill, extinguish all open flames and open the lid. If the leak is still present, check the grill for damages, loose connections etc. Ask your local gas dealer if you are unable to resolve the problem.
- Always check that there are no leaks in the gas line after you have connected it. Use soap water for this (see chapter "Checking for gas leaks").
- Make sure that the gas hose has been firmly mounted and that the hose connection is always accessible along its entire length.
GB
- Do not use any denatured alcohol, petrol or similar liquids to light or relight the grill.
- Donotstoreoruseanypetrol, denaturedalcoholorotherflammable gases or liquids in the grill's vicinity if it is in use.
- Neverleavethegascontainerconnectedwiththepressureregulator if it not connected to the gas hose.
– Never light the grill when the lid is closed.
- Do not modify the appliance.
Modifying the unit in any way may be dangerous and is prohibited. Do not tamper with the grill controls, the gas connections, nozzles, valvesetc. In the event of damage, repairs or other problems with the grill, please consult the service centre or a technician from your local gas dealer.
Danger Risk of fire/explosion/poisoning!

Defective gas containers or improper handling of the gas con-
tainers may result in fires or explosions leading to life-threat-
ening injuries or death. Gas leaks can cause poisoning.
- A dented or rusty gas container may be hazardous and must be replaced for this reason. Do not use a gas container with a defective container valve.
- Read and follow the operating instructions and safety instructions for the gas container.
- Never connect the gas supply to the grill without using a pressure regulator that complies with the respective country's pressures specifications.
- Replace the gas hose if prescribed by national requirements and/or the validity period of the hose.
- Always place the gas container next to or behind the grill on a level, solid base.
Never place the gas container under the grill.
- Donotplacethegascontainernexttoheatsourcesandavoidexposing it to direct sunlight.
- Make sure that no ignition sources such as fire, smouldering cigarettes, openflamesetc.arenearbywhenchangingthegascontainer.
– Turn off the gas supply at the gas cylinder after use.
- Turn off the grill after you are done using it.
- Always store the gas container in an upright position and never in a horizontal position in a well ventilated area and do not store it below ground level (e.g. in the cellar).
- Make sure that the gas hose is not kinked, which would affect the supply of gas. The gas hose may not be subjected to tension and may not come into contact with the hot parts of the grill or other objects.
- Make sure that the vents in the burner housing are unobstructed.
– Never change the setting of the pressure regulator.
—Neveropencomponentsthathavebeensealedbythemanufacturer.
Danger Risk of fire!

Part of the grill become very hot during operation and may cause fires.
- This appliance must be kept away from flammable materials when in operation.
Set up the grill so that it is at least 1 m away from flammable materials such as awnings, wood terraces and balconies.
- Only set up the grill on a solid, level area with no wind exposure and only use it in wind-protected areas.
- Keep the power cord and gas supply hoses away from hot surfaces.
- Do not move the device when in operation.
- Do not transport the gas container when in operation.
- Donotfilltheburnerhousingwitheitherflammable(e.g.charcoal)or non-flammable substances.
- Do not in any case cover the gas burner with any objects. Never fill the burner housing with liquids (e.g. water).
– Some foods produce flammable fats and juices. Clean the grill regularly, ideally each time after using it.
Danger Risk of injury!

This device is not intended to be used by persons (including
children)withimpairedphysical,sensoryormentalabilities
or who lack experience and/or knowledge.
- Advisethisgroupofpersonsofthedangersassociatedwiththedevice and have them supervised by a person responsible for their safety.
- Keep children and pets away from the device.
Danger Burn hazard!

Warning: accessible parts may be very hot. Keep young children away.
- Always wear barbecuing or kitchen gloves when opening the cover or grilling.
- Maintainadequatedistancetohotpartsanddonottouchthem.Only open and close the grill lid by the handle.
- Do not wear any clothing with baggy arms.
- Only use long-stemmed grilling tools with heat-resistant handles.
- Allow the grill to cool off completely before cleaning and/or stowing it.
Danger Risk of poisoning!

Carbon monoxide is produced when using the grill. This gas
is odourless and can be fatal in enclosed rooms!
- Use outdoors only.
Risk
Health hazard!
Paint solvents and thinners could cause injury to health.

seanysuch agents for cleaning and avoid contact with food.
Risk
Hazards for children!
Children can become trapped in the packing film when playing and suffocate.
- Do not allow children to play with the packing film.
- Makesurethatchildrendonotplaceanysmallassemblycomponents into their mouths. They could swallow the parts and choke.
Danger Risk of injury!

Some areas of the grill and individual parts have sharp edges.
- Handle the individual parts of the grill with care to prevent accidents and/or injuries when assembling and operating it. Wear protective gloves if necessary.
- Do not set up the grill close to entrances or highly frequented areas.
– Exercise extreme caution when grilling. If you are distracted, you could lose control of the device.
- Be attentive at all times and be aware of what you are doing. Do not use the device if you lack the necessary concentration or are fatigued or under the influence of drugs, alcohol or medication. A single moment of inattentiveness when using the device may result in serious injury.
Attention Risk of damage!

The screwed connections may gradually loosen during use and affect the stability of the grill.
- Before you use the unit, always check to make sure the screws are secure.
- If applicable, tighten all screws again to ensure that the grill is stable.
Attention Risk of damage!

Improper handling of the grill may result in damages.
- Do not use any strong or abrasive solvents or scouring pads as they may attack and scratch the surfaces.
- Protect the gas regulators from being contaminated by oilormudetc.
- Once you have connected the gas hose to the container valve, do not turn the pressure regulator any further (risk of a gas leak around the gasket).
- If the pressure regulator is used normally, it must be replaced with a new one no later than 10 years after the date of manufacture. Only in this way, can proper functioning be ensured.
Assembly
Preparation
Danger
Risk of injury!

Failuretoobservetheinstructionsmayresultinproblemsand risks when using the grill.
- If applicable, wear safety gloves to protect against sharp edges.
-
Always follow all assembly instructions provided.
-
First completely read through the assembly instructions.
- If necessary, have another person assist you.
- Take enough time for the assembly and clear a work area of two to three square meters.
- Arrange the required tools so that they are within reach. Small parts such as handles may be premounted.
Required tools
- Cross-slotted screw driver
- Pliers or
• 10 mm wrench / socket key for M6 nuts
- 8 mm wrench / socket key for M5 nuts
- 7 mm wrench / socket key for M4 nuts
- 1 x 17-size open-end wrench
(national specifications may require the use of another corresponding open-end wrench)

Assembling the grill
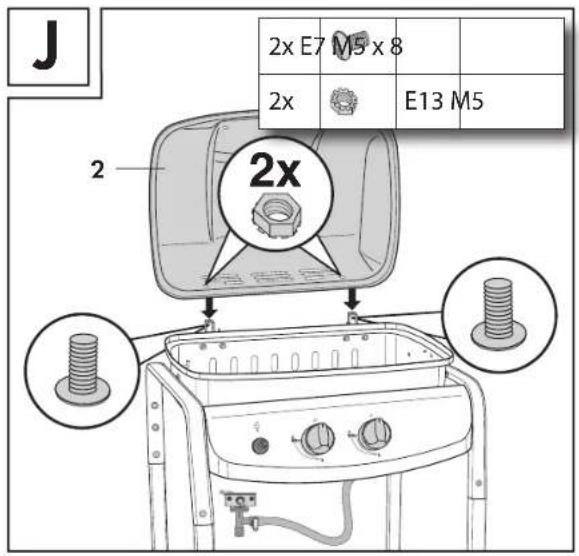
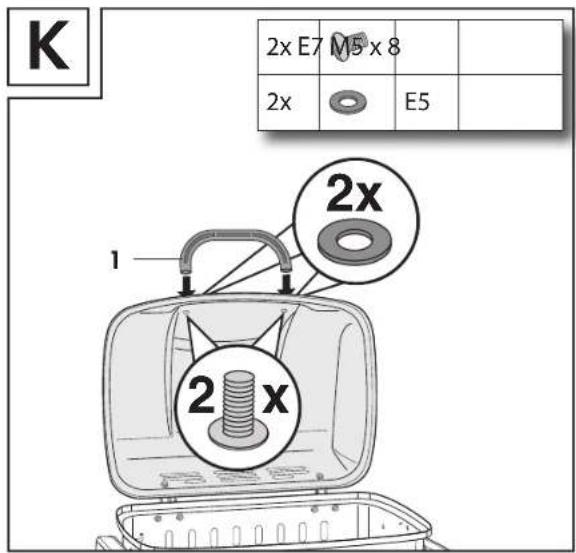
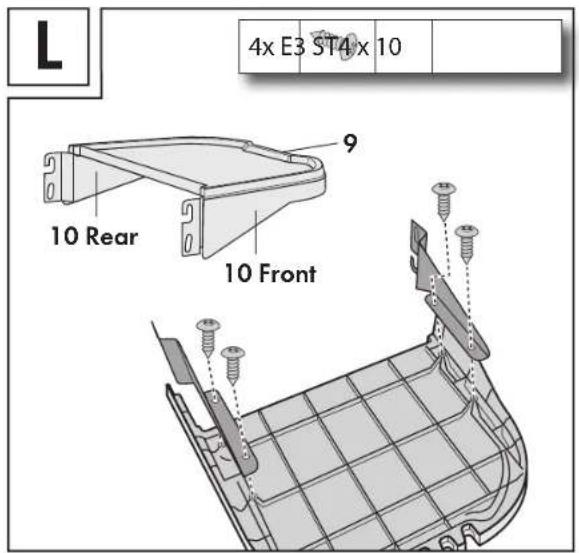
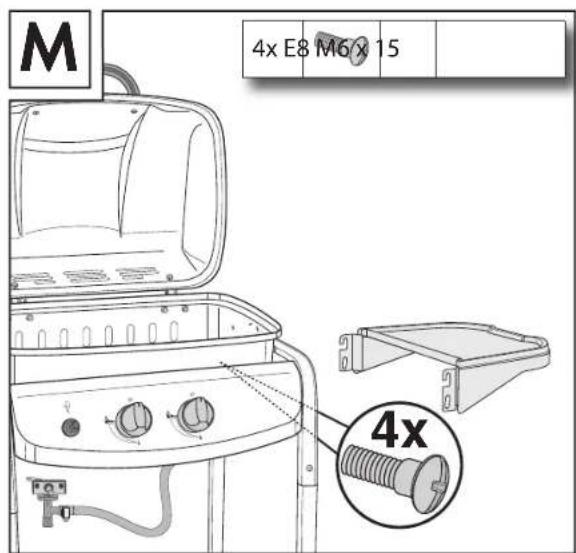
Assemble the grill as shown in figures A - Z.
Please observe the following assembly notes:
- Regarding fig. A and B: Please observe the stickers and Velcro strips on the legs. The Velcro strips must be facing inward.
- Regarding fig. D: Please observe the stickers and make sure that the threaded holes are facing inward.
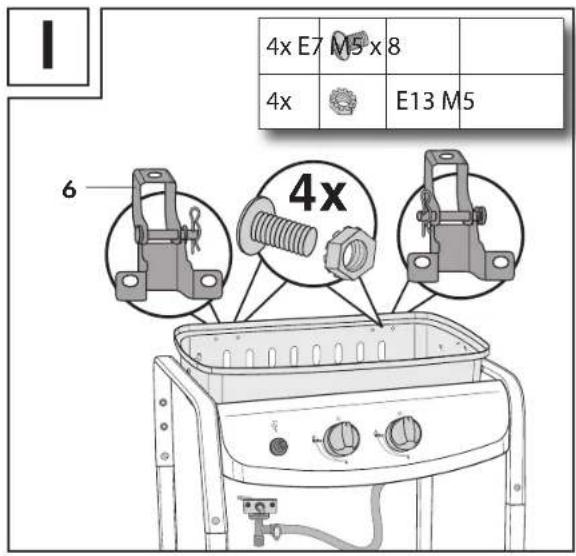
Insert the rear screws so that the screw head is on the inside. Otherwise the side table (9) could bump up against the protruding screw when folded down.
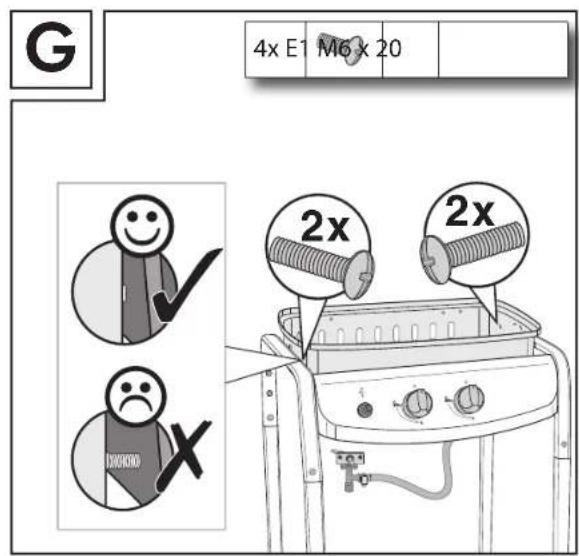
- Regarding fig. G: Tighten the screws so that the burner housing (7) is flush with the support (25/8).
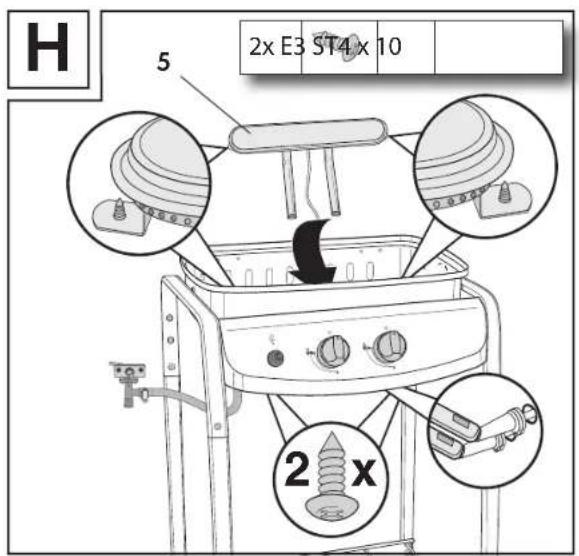
- Regardingfig.H:Insert the burner(5) so that thenozzles of the temperature controlsextend into the burnerconnectingtubes. The tube ends rest loosely above the nozzles. This gap is desired!
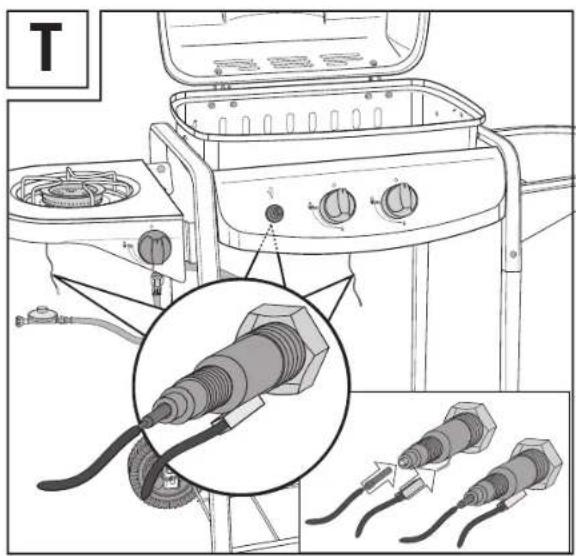
- Regarding fig. O: Depending on national specifications, there are various possibilities for connecting the gas hose (20) to the grill (fig. O only shows one example for connecting the pressure regulator). Firsttaketheprotectivecapoffofthegasconnection(19), if present, and dispose of it.
Method 1: Screw one end of the gas hose (20) onto the gas connection until tight(left-handthread).Donotuseanextragasket!Holdthe gasconnection firmly with pliersoranopen-endwrenchandthenuse an open-end wrench to tighten the union nut of the gas hose.
Method 2: Slide a hose clamp of the right size a few centimetres over the loose end of the gas hose (20).
Then slide this end onto the gas connection (19) (wet the gas connection somewhat to facilitate sliding onto the hose). Fix the connection with the hose clamp.
Connecttheotherendofthegashose(20)withtheincludedpressure regulator (21).
GB
Separate instruction manuals are included with the gas hose (20) and the pressure regulator (21). Follow these operating instructions closely when connecting the pressureregulator with the gashose and the gas container (the figures may differ depending on nationals specifications for the hose, pressure regulator and gas container).
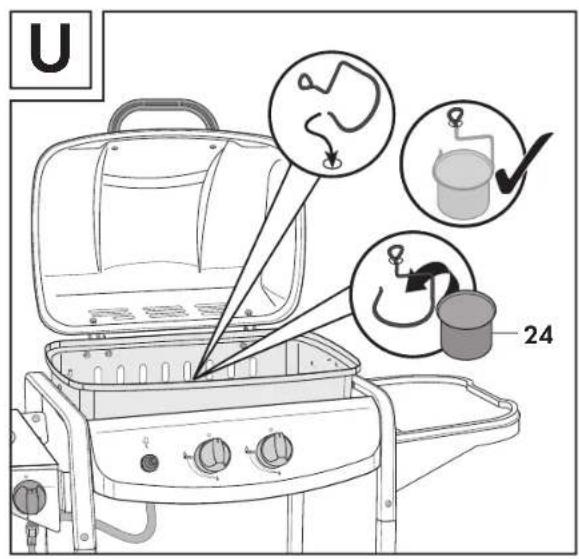
Lay the hose so that it is not kinked or twisted.
- Regardingfig. R: Insert the burner for the side burner (28) so that the nozzle of the side burn at temperature control extends into the burner connecting tube. The tube ends rest loosely above the nozzles. This air gap is necessary!
- Check to make sure that the gasket for the container valve thread is present and in orderly condition. Do not use any extra gaskets!
- Screw the pressure regulator (21) onto the canister valve threading as described in the instruction manual, which is enclosed with the pressure regulator.
- Lay the gas hose so that it does not kink or twist.
- Check all connections for gas leaks (see chapter "Checking for gas leaks").
Setting up the grill
Attention Risk of damage!

The bolt connections may gradually loosen during use and consequently reduce the stability of the grill.
- Before you use the unit, always check to make sure the screws are secure. If applicable, tighten all screws again to ensure that the grill is stable.
- Before use, place the grill on a level, solid base located outdoors.
- Before use, wash the grill rack with warm scouring water.
- Place the gas container next to or behind the grill and do not in any case place it on the bottom rack under the grill.
- Check the gas container and connections for leaks (see chapter "Checking for gas leaks").
- Check to make sure the grill burner is unobstructed if you are using the grill after a longer break.
- Only use a pot with a diameter of at least 15 cm and no more than 22 cm on the side burner.
Connecting the gas container
You will need a conventional commercial, full container of propane or butane gas in order to operate the grill.
Note: The figures may differ depending on national specifications for the hose, pressure regulator and gas container.
In case of national requirements change the hose, if necessary.
Danger Risk of fire/explosion/poisoning!

Leaking gas may form a highly explosive air/gas mixture that could cause a fire or explosion and could result in life-
threatening injuries or death.
- Never connect the gas supply to the grill without a pressure regulator that complies with therespective country's pressurespecifications.
- Only use a hose connection between the unit and gas container, which does not exceed the recommended length of 1.5 m.
-
Make sure that the gas hose has been firmly mounted and that the hose connection is always accessible along its entire length.
-
Turn all 3 temperature controls to the ●Off position.
- Make sure that the gas container valve (30) has been turned off (see fig. Y).
- Screw any existing safety cap off of the container valve thread.
Checking for gas leaks
- Turn all 3 temperature controls to the (Off) position.
- Open the gas container valve.
- Rub all bolt connections and the gas hose with soap water. If bubbles form, a connection is loose or the gas hose is cracked and may no longer be used. Donotoperatethegrill, insteadimmediatelyshutoffthevalveonthe gas container.
- Checktheboltconnectionsandifnecessary,tightenthenutsaccordingly.Then repeat the check.
- If there is still a gas leak, do not in any case use the grill, but consult our customers serviceteam. Contact data are provided in the chapter "Service".
- Close the container valve if you are not using the grill.
Notes for first-time users:
For the best possible, long lasting experience with your new grill, the lid and grill pan have been coated with a heat-resistant paint. This paint only becomes heat resistant the first time the grill is heated up.
- For this reason, allow the unit to burn-in on a high flame for approximately 60 minutes with the lid closed and the grill rack removed, then let it cool down before grilling for the first time. A strong odour may be emitted for uncertain amount of time under certain circumstances. However, this is no cause for concern.
- Donottouchanyofthehotsurfacesduringtheburn-inprocessasthey could be damaged as a result.
Turning on/lighting
Risk

Danger of explosion!
Firstread the following instructions on turning on/lighting the grill and all warning and safety notes before you light
the grill.
- Check the grill for cracks, puncturing or other damage before you use it.
- Stop using the grill if the gas hose is damaged or porous.
- Open the grill lid before you ignite the burner. Otherwise, the burner may ignite explosively, which could cause severe physical injury or death.
Ignition system – Igniting with a Piezo lighter
- Open the lid.
- Open the gas container valve. Do not lean over the grill area.
- Pushatemperaturecontrolonthegrillorthesideburnertemperature control,holditdownandatthe sametime,turnitto the positionwith the large flame Max.
- Press the Piezo lighter ↘ several times.
- Once the burner has been ignited, turn the other grill temperature control to the large flame _Max as well (if needed). The second burner will automatically ignite.
Important! If the burner does not ignite, push the temperature control and then turn it completely to ● (Off). Also close the valve on the gas container. Wait 3 minutes and either repeat the process or ignite the burner the conventional way (see chapter "Conventionallightingwithmatches", below). Consult your vendor if you have difficulty lighting the unit.
Conventional lighting with matches
Danger
Burn hazard!

Never light the grill with a match from above, instead always do so from below.
- Open the lid.
- Open the gas container valve. Do not lean over the grill area.
- Pushatemperaturecontrolonthegrillorthesideburnertemperature control,holditdownandatthe sametime,turnitto the positionwith the large flame Max
- Insert an ignited, conventional fireplace match (extra long) from below through the large hole in the grill pan or in the side burner housing near the burner.
Preheating/regulating the flame
- Heat the grill for 10 to 15 minutes at the maximum setting before you start grilling. Keep the lid closed in the process.
- You can reduce the output/heat by turning the temperature control towards "Minimum" (small flame ⚠).
Tips for saving energy:
- Do not keep the lid open for too long.
- Turn off the grill as soon as you are done grilling.
- Only heat up the grill for 10 to 15 minutes.
- Do not heat the grill longer than recommended.
- Do not set the burner higher than necessary.
Cooking with the lid closed
Gas grills with a lid permit gentle cooking of larger pieces of meat and whole poultry similar to an oven. Only one flame is needed when cooking with the lid closed.
- Set the heat to low or medium and close the lid. Avoid heating up the grill too much.
Turning the grill off
- First close the container valve on the gas container to burn off any leftovergas.Pushandthenturnthetemperaturecontrolstothe●(Off) position.
• After every use, only disconnect the gas container from the grill outdoors!
Maintenance and cleaning
Your grill is made of high-quality materials. In order to clean and maintain the surfaces, please observe the following notes:
Danger
Burn hazard!

Allow the grill to cool off completely before cleaning it.
Risk
Health hazard!

Do not use any dye solvents or thinners to remove spots. They are harmful to health and may not come into contact with food.
Attention Risk of damage!

Do not use any strong or abrasive solvents or scouring pads as they may attack and scratch the surfaces.
– Never use conventional oven cleaners.
- Clean the grill regularly, ideally after every use.
- Once you have finished grilling, turn on the empty grill for approximately 5 minutes. This will burn remaining fat off of the grate. Then let the grill cool off completely.
- Removethegrillrack(3)andcleanitthoroughlywithscouringwater. Rinse it off with clean water and then dry the rack off thoroughly.
- Remove any loose deposits on the grill using a wet sponge.
- If a layer of fat has formed on the inside surface of the lid, you can clean it with a strong, hot soapy solution. Then rinse it off with clean water and dry it thoroughly before using the grill again.
- You can remove leftover food on the grill basewith a brush, spatula or cleaning sponge. Then wash it off with warm soapy water, rinse with clean water and dry.
- In general, you should clean the inside and outside surfaces with warm soapy water. Please be sure not to damage the burner openings and nozzles when cleaning the unit.
- Checkregularlytomakesuretherearenoinsectsintheburner,which could plug the gas system and consequently the gas supply. Also checkallotherareasinthisrespect.Itispossiblethate.g.spidersmay nest in the tubes.
Clean the burner with a soft brush or compressed air. Then wipe it off with a cloth.
You can clean plugged openings with a stable pipe cleaner, a wire or with an opened end of a paper clip. - Regularly tighten all screws before using the grill to ensure that the grill has a stable position.
GB
Cleaning the electrode
If it becomes difficult to light the burner, the electrode may be dirty.
• In this case, clean the electrode tip with fine sand/abrasive paper.
- The side burner electrode (27) is freely accessible. The grill burner electrode is located under the burner and can be accessed from below.
• The electrode tip should be located approximately 4-6mm from the burner edge. This is the ideal distance for reliable lighting.
Storage
• Always store the gas container in an upright position and never in a horizontal position in a well ventilated area and do not store it below ground level (e.g. in the cellar).
- Store the grill in a dry area that is free of dust.
- Before using the grill for the next time, check all parts and if applicable, tighten the screws.
- Cover the grill with a protective cover.
However, make sure that you only place the protective cover on the grill once it has cooled off, is clean and dry.
Attention Risk of corrosion!

A protective cover, which has been placed on a warm, wet grill, which has not been cleaned, may result in severe corrosion.
- All surface dirt on the grill should always be cleaned off after the grill has cooled down and then dried off thoroughly before placing the protective cover on the grill. This is particularly important if the grill will not be used for a prolonged period of time and before storing it over winter for instance.
Note on the declaration of conformity
This unit complies with applicable European and national guidelines. This is confirmed by the CE mark (corresponding explanations can be obtained from the manufacturer).
Disposal

The packaging is made of environmentally-friendly materials, which can be disposed of at local recycling centres. Do not in any case dispose of the grill in your normal household garbage!

Dispose of the grill using an authorised disposal service or a wasted disposalfacility in your community. Observe the regulations currently ineffect. If doubt, contact the disposalfacility area.
Disposing of empty gas containers:
- Readandfollowtheoperatingandsafetyinstructionsforthegascontainer.
Troubleshooting
The following advice should help you to solve problems. If this does not work, please contact the service centre of the company Tepro (see chapter "Distributor").
| Problem Cause Solution | ||
| Smell of gas. A gas connection has a leak. | Immediately turn off the gas container. Check the gas supply (see chapter "Checking for gas leaks"). If necessary, contact the gas dealer or the service centre of the company Tepro. | |
| Burner doesn't light. | The gas container is empty. | Replace the gas container with a full one. |
| The container valve has been closed. | Open the valve on the gas container. | |
| Burner, gas nozzle or gas hose plugged. | Remove dirt (see chapter "Maintenance and cleaning"). | |
| Electrode cable is loose or has separated from the contact. | Mount the cable back onto the contact. | |
| Small flame or flashback (fire in the combustion tube or roaring noise can be heard). | Gas container is too small. | Connect a larger gas container. |
| Burner, gas nozzle or gas hose plugged. | Remove dirt (see chapter "Maintenance and cleaning"). | |
| Too much wind in the grill area. | Set the grill up in the calmest possible area. | |
| The burner doesn't develop any power. | Burner is dirty. Clean the burner (see the section "Maintenance and cleaning"). | |
| Severe flare up and burning on the heat tent. | Heattent is very dirty. | Lettheheattentcooloff completely and then clean it. |
| Food for grilling very fatty or marinated. | Use aluminium grilling trays. | |
| Temperaturetoo low. | Grill not preheated. Preheat the grill for 5 - 10 min. | |
| Strong draft. Set the grill up in the calmest possible area. | ||
Distributor
Tepro Garten GmbH
Carl-Zeiss-Strasse 8/4
D-63322 Rödermark
Germany
Web: www.tepro-gmbh.de
GB
Warranty
Dear Customer,
We grant you a 3-year warranty on this unit from the date of purchase. If this unit exhibits defects, you have statutory rights vis-à-vis the vendor. These statutory rights are not limited by our warranty described below.
Warranty terms
The warranty period begins on the date of purchase. Please store the original receipt in a safe place. You will need this document as it provides the proof of purchase.
If material or manufacturing defect arises within three years of purchasing this device, you will receive a spare part or the unit will be replaced -at our discretion -free of charge. This warranty servicerequires that the defective unit and the proof of purchase (receipt) are submitted within the three-year period and a written description or brief description on the phone is provided as to the nature of the defect and the time of occurrence.
If the defect is covered by our warranty, you will receive a spare part or a new unit. The delivery of a spare part or the replacement of the device does not mark the beginning of a new warranty period.
Warranty period and statutory defect claims
The warranty does not extend with a case of warranty coverage. This also applies for replaced parts. Damages and defects, which may already exist at the time of purchase, must be reported immediately after unpacking the product. Spare parts delivered after the warranty period has expired are subject to charge.
Warranty scope
The unit was manufactured with care in accordance with strict quality guidelines and thoroughly inspected before being shipped out.
Warranty coverage is provided for material or manufacturing defects. This warranty does not cover unit parts, which are exposed to normal wear and are as such deemed wearable parts, e.g. grill racks and burners.
This warranty expires when the unit is damaged, improperly used or maintained. All instructions provided in the operating instructions must be complied with in their entirety in order to ensure proper use of the unit. Its imperative that uses of the unit and actions, which the customer is expressly advised against or warned of in the operating instructions, are heeded.
The unit is only intended for private and not commercial use. The warranty is voided in the event of misuse and improper use, the use of force and intervention not performed by one of our authorised service outlets.
Handling of warranty claims
Please observe the following notestoensure that your claim is processed quickly:
- Please hold onto the receipt and product number (tepro 3205) as a proof of purchase for all subsequent enquiries.
- You can obtain the product number from the front panel or the operating instructions.
- In the event of a malfunction or other defects, please first contact the service department specified below by phone or e-mail. You will then be advised of the further course of action.
Service
Tepro Garten GmbH
Carl-Zeiss-Strasse 8/4
D-63322 Rödermark
Germany
Phone: +49 (0) 6074 8931 0
Fax: +49 (0) 6074 8931 11