VPLFE110U - Projector SONY - Free user manual and instructions
Find the device manual for free VPLFE110U SONY in PDF.
User questions about VPLFE110U SONY
0 question about this device. Answer the ones you know or ask your own.
Ask a new question about this device
Download the instructions for your Projector in PDF format for free! Find your manual VPLFE110U - SONY and take your electronic device back in hand. On this page are published all the documents necessary for the use of your device. VPLFE110U by SONY.
USER MANUAL VPLFE110U SONY
Operating Instructions for Networking GB
This man has just been
注意
CONBUN-UN-UN-UN-UN-UN-UN-UN-UN-UN-UN-UN-UN-UN-UN-UN-UN-UN-UN-UN-UN-UN-UN-UN-UN-UN-UN-UN-UN-UN-UN-UN-UN-UN-UN-UN-UN-UN-UN-UN-UN-UN-UN-UN-UN-UN-UN-UN-UN-UN-UN
CONBUN-UN-UN-UN-UN-UN-UN-UN-UN-UN-UN-UN-UN-UN-UN-UN-UN-UN-UN-UN-UN-UN-UN-UN-UN-UN-UN-UN-UN-UN-UN-UN-UN-UN-UN-UN-UN-UN-UN-UN-UN-UN-UN-UN-UN-UN-UN-UN-UN-UN-UN
File Manager (FFFFFF)
SETTINGSE
(VPL-PX15)
VPL-PX15
Regular Report (定期レト)
Preparations for Using the Networking Function.. 6 (GB)
System Configuration 6 (GB)
Using the PC Card. 7 (GB)
Setting for Networking Function 7 (GB)
Using the Remote Commander or a Mouse and Keyboard. 7 (GB)
Using the Net Mouse Function 8 (GB)
Setting Up the Projector 9 (GB)
9 Setting Up from the Projector 9 (GB)
Setting Up from a Computer 13 (GB)
Basic Operation Flowcharts 15 (GB)
Operations from a Computer. 15 (GB)
Operations from the Projector. 17 (GB)
Operation
Operations from a Computer. 20 (GB)
Preparations. 20 (GB)
Running a Presentation Using the Slide Viewer 21 (GB)
Projecting an Excel or Word File 24 (GB
Projecting an Image Using the Image Viewer. 26 (GB)
Using File Manager. 29 (GB)
Controlling the Projector from a Computer 30 (GB)
Checking the Indicators on the Projector 31 (GB)
Using the e-Mail Report Function 31 (GB)
Operations from the Projector. 34 (GB)
Preparations. 34 (GB)
Running a Presentation Using the Slide Viewer 35 (GB)
Projecting an Excel or Word File 37 (GB
Running a Slide Show Using the Image Viewer 39 (GB
Connecting to the Internet. 41 (GB)
Using the Remote Desktop Function 41 (GB)
Using the e-Mail Report Function 42 (GB)
Others
Troubleshooting 43 (GB)
- Microsoft, Windows and PowerPoint are the registered trademarks of Microsoft Corporation in the United States and/or other countries.
- Netscape Navigator is a trademark of Netscape Communications Corporation in the United States and/or other countries.
All other product and company names mentioned herein are trademarks or registered trademarks of their respective owners. - ORiNOCO is a registered trademark of Agere Systems.
The projector is compatible with networking.
Connecting to a Local Area Network (LAN) allows you to run a presentation using a file stored in a computer connected by the same LAN. You can open the file from a computer located far away from the projector as well as one in the same conference room. Connecting to the Internet only with the projector is also available.
When you have access to the projector by using the Web browser of a computer, you can control the projector from that computer.
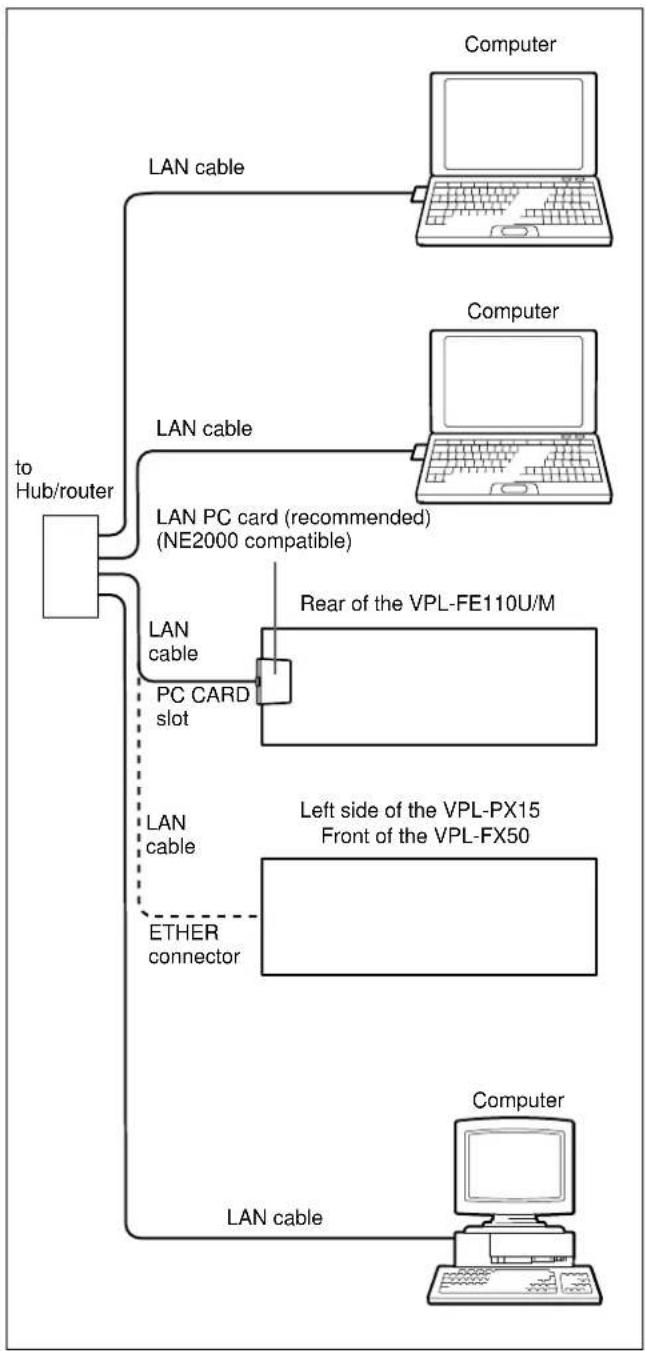
Connection to a LAN
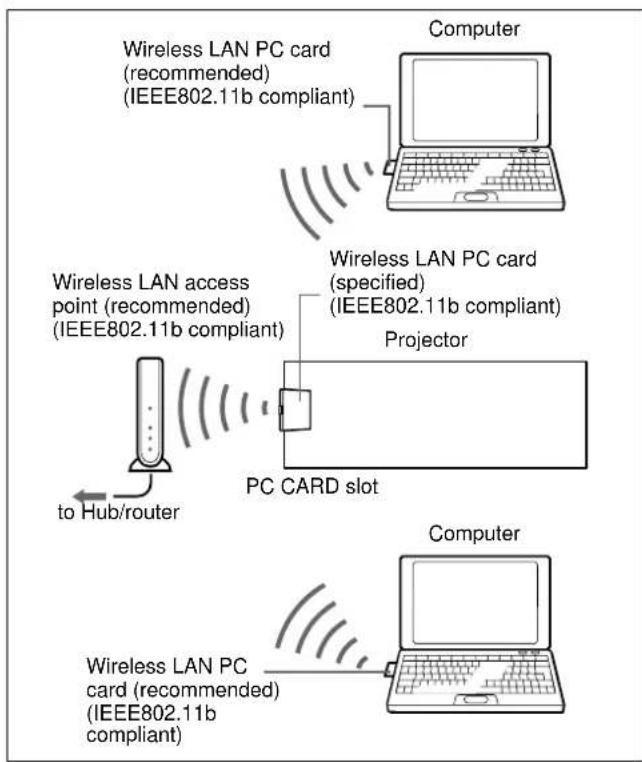
The projector is equipped with the ETHER connector (VPL-PX15 and VPL-FX50) and a PC card slot, which allows you to connect the projector to LAN by using the LAN cables or the specified/recommended LAN PC card. Installing a wireless LAN PC card to the PC card slot enables wireless LAN connection.
Presentation Viewer
The projector has built-in simple Microsoft PowerPoint, Microsoft Excel and Microsoft Word viewer funtions, named Slide Viewer, Worksheet Viewer and Document Viewer, respectively. The functions allow you to run a slide show using a PowerPoint file or to project an Excel or Word file without any conversion.
Image Viewer
The projector has built-in Image Viewer function, allowing you to view images created in the JPEG, BMP, GIF or PNG format, to set up a slide show, and to run a slide show using the images.
File Manager
Use of a computer's Web browser enables you to add files stored in the computer to the projector or delete files stored in the projector by operating the computer.
Remote Desktop
This projector is compatible with the Remote Desktop feature incorporated in Windows XP Professional. The projector can access a computer on the same LAN, allowing projection of any file stored on that computer, as if it were in front of you.
Web browser built-in
The Internet Explorer 4.0 or its equivalent is built into the projector, allowing you to connect to the Internet.
Auto Projector Search function
If Windows Me or Windows XP is installed in your computer, you can easily get access to the projector's Web browser by double-clicking the corresponding projector's icon in the My Network window of the computer. You can promptly start a presentation.
Net Mouse function
This function allows you to operate the projector for setup, run a presentation, etc. with the mouse and keyboard of a computer by displaying the projector window on the computer.
Projector information via web browser
You can check the present status of the projector and version information of the projector on the computer display.
e-Mail Report function
The projector enables the sending of mail that contains the time of replacement of the projector lamp, error occurrence, etc., to the mail addresses that have been specified.
SNMP available
When an SNMP (Simple Network Management Protocol) is used for the network management, you can also manage the projector by the SNMP.
Memory function
The projector can store a file imported from a computer or a memory card.
When you store the file, you can create a password to prevent unauthorized people from opening it.
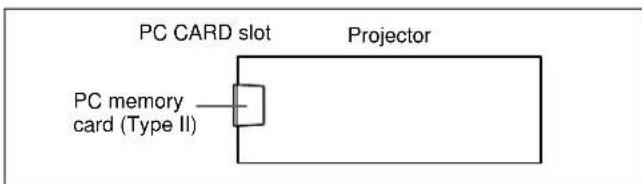
PC card slot incorporated
The projector is equipped with a PC card slot. Inserting the PC memory card, in which data are stored, into this slot allows you to run a presentation easily without using a computer.
Precautions
Caution
Before you turn off the projector or reset it by using the supplied Remote Commander, make sure to exit any application software which is running. Otherwise, system damage may occur and you may not be able to restart the network function.
Recommended system requirements for the projector are as follows:
- Microsoft Windows 98, Microsoft Windows 98 SE, Microsoft Windows 2000, Microsoft Windows Me, Microsoft Windows XP Professional
- The viewers of the projector are compatible with PowerPoint, Excel and Word of Windows Office 97 and 2000. However, some features of the applications may not be correctly displayed.
- Make sure to use the specified/recommended LAN PC card, wireless LAN PC card, PC memory card and wireless LAN access point. Also use the specified/recommended wireless LAN PC card to install into the connected computers.
Using a device not specified/recommended may cause incorrect operations.
For the specified/recommended devices, see the supplied "Specified/recommended PC Card/Wireless LAN Access Point."
- To prevent data loss, make backup of data frequently. In no event will Sony be liable for any loss of data.
- Please note that the software specifications are subject to change without notice.
- Some of the illustrations in this manual may differ from the actual application software.
About the supplied software
Copyright laws prohibit reproducing the software or the software manual in whole or in part, or renting the software without the permission of the copyright holder.
About This Manual
This manual explains networking operations of the VPL-PX15, VPL-FX50 and VPL-FE110U/M LCD Data Projector.
On-line Help files are also available. When you access the Web server of the projector, a Help sentence will appear on a computer when you rest the pointer over each item.
You can open the help file of the network projector by clicking Help from the Start menu on the desktop.
However, some network features are not supported by the projector. The Help file for Slide Viewer,
Worksheet Viewer, Image Viewer or Document Viewer opens when you click the button on the tool bar of the respective application window.
Refer to the Operating Instructions of this model for operations other than networking.
Preparations for Using the Networking Function
This section describes the tasks that are required for using the networking function of the projector.
System Configuration
For details on connections, refer to the Operating Instructions of the projector.
Connecting to LAN using the LAN cables or LAN PC card
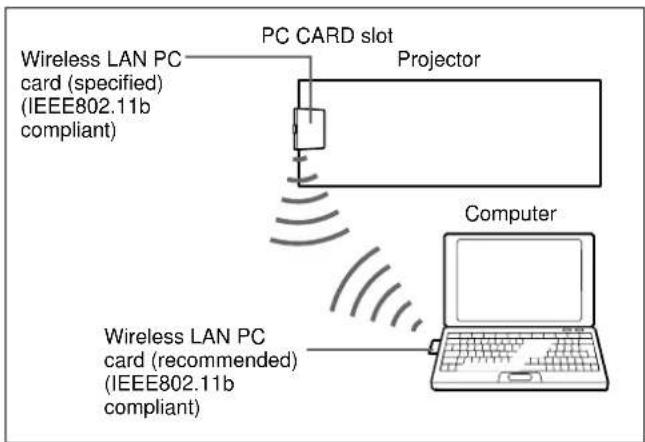
Connecting to wireless LAN using the wireless LAN access point
Connecting to wireless LAN without using the wireless LAN access point (Peer to Peer mode)
Using the memory card
Using the PC Card
The PC CARD slot of INPUT B (VPL-PX15) or INPUT C (VPL-FX50 and VPL-FE110U/M) on the projector accepts one PCMCIA Type II PC card. To connect to a LAN, it is required to insert the specified/ recommended LAN PC card (VPL-FE110U/M only) or wireless LAN PC card into this slot.
You can also insert the recommended PC memory card into this slot. Storing the file created with Microsoft PowerPoint, Excel or Word, or the image file in a memory card enables you to project a file or run a presentation without connecting to a computer.
Notes
- Do not turn off the projector or restart the network projector while the PC card is writing or reading.
- Make sure to use the specified/recommended LAN PC card, wireless LAN PC card or PC memory card. For the specified/recommended cards, see the supplied "Specified/recommended PC Card/Wireless LAN Access Point."
- The driver software for the specified/recommended PC cards is installed into the projector at the factory. Installing any other driver software is not required and cannot be done.
For inserting and removing the PC card, refer to the Operating Instructions of the projector.
Setting for Networking Function
To activate the networking function of the projector, do the following setup.
For VPL-PX15
Set INPUT-B FUNC. in the INSTALL SETTING menu to ON.
For detailed information, see the Operating Instructions of the projector.
For VPL-FX50
Set INPUT-C FUNC. in the INSTALL SETTING menu to ON.
For detailed information, see the Operating Instructions of the projector.
For VPL-FE110U/M
Set the INPUT C/RS-232C/RS-422A select switch on the rear panel to INPUT C.
Using the Remote Commander or a Mouse and Keyboard
For VPL-PX15 and VPL-FX50
When you operate the projector for setting up the projector, running a slide show, etc., use the supplied Remote Commander. Before operation, set the PJ/ NETWORK select switch on the Remote Commander to NETWORK.
You cannot connect a mouse and keyboard to the projector.
For VPL-FE110U/M
When you operate the projector for setup, run a presentation, etc., use of the remote commander or commercially available PS/2 mouse and keyboard is required.
Note
Connect the mouse and keyboard to the projector before connecting the power cord of the projector to the AC outlet.
For connections of the mouse and keyboard, refer to the Operating Instructions of the projector.
Using the Net Mouse Function
When you operate the projector for setup, type an Internet address, run a presentation, etc., you can do so by operating the mouse and keyboard of a computer.
Note
Only Internet Explorer Version 5.0 or later is available for using the Net Mouse function.
1 Start the Internet Explorer Version 5.0 or later on the computer.
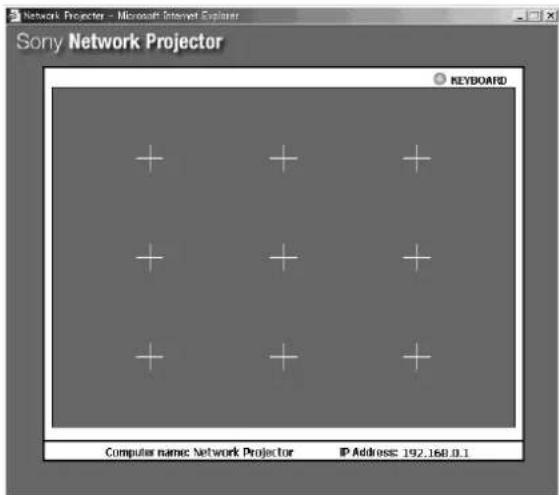
2 Enter the IP address of the projector. Type "http://xxx.xxx.xxx.xxx (IP address of the projector)/netmouse". The window of the projector appears on the computer.
3 Operate with the mouse of the computer within the projector window displayed on the computer. The operations of the mouse and keyboard reflect those on the projector screen and you can operate the projector.
Note
When the network environment is heavily loaded, movement of the mouse on the projector may not be smooth.

Setting Up the Projector
Basic setups such as IP address and wireless LAN settings are necessary for networking operations of the projector. You can set them up either from the projector or a computer connected to the same LAN.
Before setting up
For VPL-PX15 and VPL-FX50
- Turn on the projector with the / key on the supplied Remote Commander or control panel of the projector.
- Confirm that INPUT-B FUNC. (VPL-PX15) or INPUT-C FUNC. (VPL-FX50) in the INSTALL SETTING menu is set to ON.
- Press the INPUT key on the supplied Remote Commander or control panel of the projector to select INPUT B (VPL-PX15) or INPUT C (VPL-FX50). The Network Projector window opens.
- Set the PJ/NETWORK select switch on the Remote Commander to NETWORK.
- When you are setting up the items from the projector, using the Net Mouse function is convenient. For details on the Net Mouse function, see page 8 (GB).
- You can also set up from the projector using the screen keyboard displayed on the projector's screen, and operate with the supplied remote commander. For information on the screen keyboard, see page 35 (GB).
For VPL-FE110U/M
- Confirm that the INPUT C/RS-232C/RS-422A select switch is set to INPUT C.
- Turn on the projector with the ON key on the supplied Remote Commander or control panel of the projector.
- Press the INPUT SELECT key on the supplied Remote Commander or control panel of the projector to select INPUT C. The Network Projector window opens.
- When you are setting up the items from the projector, using the Net Mouse function is convenient. For details on the Net Mouse function, see page 8 (GB).
- You can also set up from the projector using the screen keyboard displayed on the projector screen, and operate with the remote commander or the connected mouse and keyboard. For information on the screen keyboard, see page 35 (GB).
Setting Up from the Projector
Setting the password
You can set a password for protection against access from remote network users.
1 From the Start menu, click Control Panel in the Network Projector window.
2 Double-click the Password icon. The Password Properties dialog box appears.
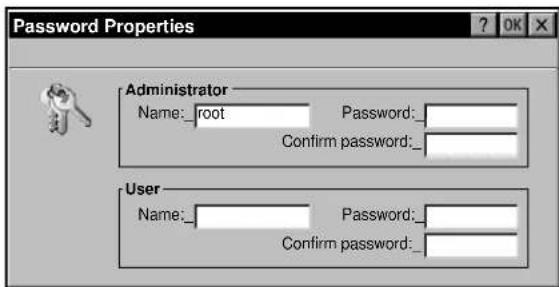
3 Specify the Password for Administrator, then enter the same password again in the Confirm password text box for Administrator.
The Name of Administrator is preset as "root" at the factory. It cannot be changed.
4 Specify the Name and Password for User, then enter the same password in the Confirm password text box for User.
When you are required to enter the password for Administrator or User while you are operating the projector from a computer, enter the Name and Password which you set in steps 3 and 4.
Setting up the network configuration
Setting up the network configuration, such as IP address setting, is necessary for building a LAN connection. The IP address of the projector will be displayed on the task bar of the Network Projector window of the projector.
If the connection environment is changed, you need to set up the network configuration again.
For details, contact your network administrator.
1 From the Start menu, click Control Panel in the Network Projector window.
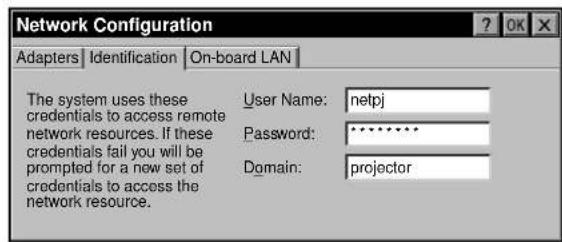
2 Double-click the Network icon. The Network Configuration dialog box appears.
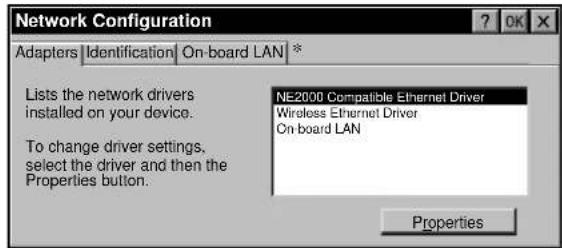
- The On-board LAN tab is displayed for the VPL-PX15 and VPL-FX50.
3 Select the driver name according to the network connection type. You can select one of the following driver names.
NE2000 Compatible Ethernet Driver: When using the recommended NE2000 compatible PC LAN card.
Wireless Ethernet Driver: When using the specified VAIO or ORiNOCO wireless LAN PC card.
xxx: When using a specified wireless LAN PC card other than VAIO or ORiNOCO
On-board LAN: When using the ETHER connector to connect to LAN (displayed for the VPL-PX15 and VPL-FX50)
The selected driver's setting dialog box appears.
4 Confirm that the "Specify an IP address" radio button is selected, and set the necessary items. The IP Address is initially set to "192.168.0.1," and the Subnet Mask is set to "255.255.0.0" at the factory.
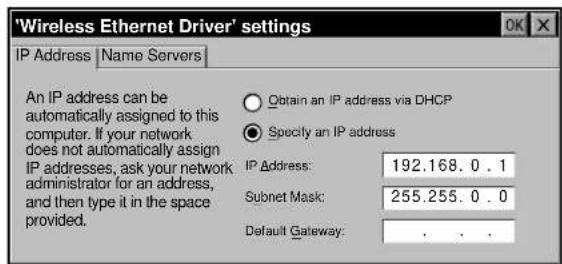
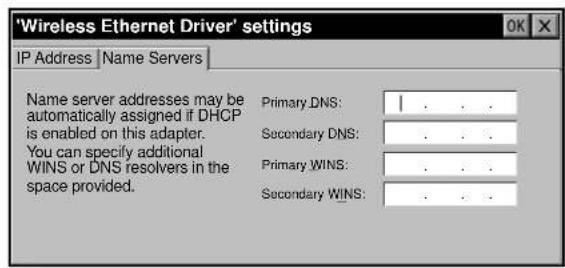
5 Click the Name Servers tab to display the Name Servers dialog box, then set the necessary items.
6 Click the OK button. The Network Configuration dialog box reappears.
7 According to your requirements, click the Identification tab and set the necessary items.
8 Click the OK button.
When you use a wireless LAN PC card with the VPL-PX15 or the VPL-FX50
If you select Wireless Ethernet Driver in step 3, follow the steps below after performing step 6.
1 Click the On-board LAN tab.
2 Remove the check from the "Enable On-board LAN" checkbox.
3 Click the OK button. The window in step 2 reappears.
Note
Once the On-board LAN was deactivated, it is not shown in the driver names of the Network Configuration dialog box. If you want to select Onboard LAN, check the Enable On-board LAN checkbox, then repeat from step 2 in "Setting up the network configuration."
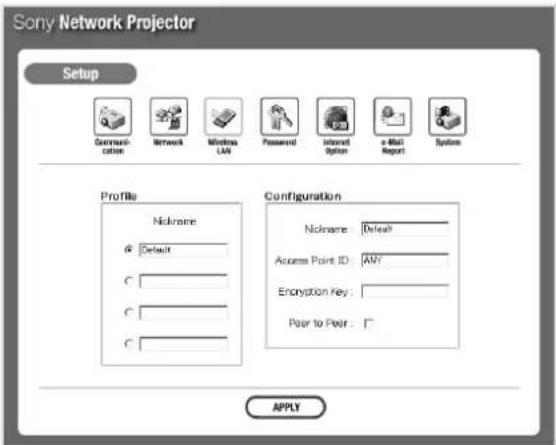
Setting up a wireless LAN environment
When you are using a VAIO or ORiNOCO wireless LAN PC card, it is also necessary to set up the projector following the steps below.
When you are using a specified wireless LAN PC card other than VAIO or ORiNOCO, refer to the Operating Instructions supplied with the PC card before setting.
Using a wireless LAN access point
Set up the access point you are connecting to as follows.
1 From the Start menu, click Control Panel in the Network Projector window.
2 Double-click the Wireless LAN icon. The Wireless LAN settings dialog box appears.
3 Click the radio button for Nickname, and type a nickname in the selected text box.
4 Click the Edit button. The Access Point settings dialog box appears.
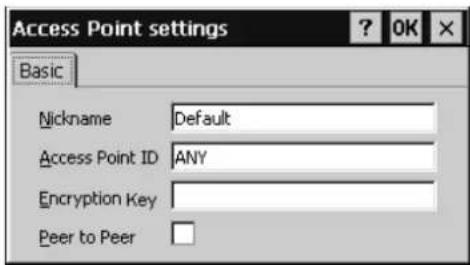
5 Enter a Nickname. The Nickname identifies the access point. Enter up to 32 characters for the Nickname using alphanumeric characters and symbols (ASCII characters). If multiple access points exist, make sure to assign a different name to each one.
6 Enter the Access Point ID. Type the ID specified for the access point you are connecting to.
7 Enter the Encryption Key. Type the encryption key, if it is set and is active on the access point.
8 Click the OK button. The Wireless LAN settings dialog box reappears.
9 Click the radio button of the Nickname you want to use, and click the OK button. Connection is made to the selected access point.
To connect to an access point which is already configured
If multiple access points exist, you can assign up to four Nicknames for them. If you want to connect to an access point which is already configured, select a radio button next to the relevant Nickname then click the OK button in the Wireless LAN settings window. Connection is made to the selected access point.
Note
When the manufacturer of the wireless LAN card inserted into the projector and that of the wireless LAN access point are not the same, how to enter the encryption key may differ. If the encryption key appears in hexadecimal values, enter the hexadecimal values for Encryption Key.
When no communication is taking place between the access point and the projector
If the channel for the access point is set to 12-14, set it to any channel between 1 and 11.
Notes
- Contact qualified Sony personnel if any trouble occurs when you are using the specified/ recommended Sony wireless LAN PC card.
- If the manufacturer of the wireless LAN card and that of the wireless LAN access point are not the same, communication by enabled encryption does not take place correctly.
Peer to Peer (Ad-hoc) mode
To connect to a wireless LAN between the projector and computers without using the wireless LAN access point, follow the steps below on the projector only.
1 Follow steps 1 to 5 in "Using a wireless LAN access point." In the Access Point settings dialog box, set the Nickname of this mode.
2 Click the checkbox next to Peer to Peer.
3 Enter an optional Access Point ID. You can type up to 32 alphanumeric characters for the ID.
4 Enter the Encryption Key if you want to make it active.
5 Click the OK button. The Wireless LAN settings dialog box reappears.
6 Click the radio button of the Nickname you entered in step 1. The Peer to Peer mode takes effect.
For the computers connected it is required to enter the same Access Point ID and Encryption Key as those entered in the procedure above and an optional Nickname. For details, refer to the Operating Instructions of the wireless LAN PC card inserted into the computers.
Notes
- Use wireless LAN PC cards of the same manufacturer both for the projector and the computer.
- If Peer to Peer (Ad-hoc) is configured on one of the connected computers, perform step 1, then steps 3 to 6 above to enter the same Access Point ID and Encryption Key as those of the computer and an optional Nickname on the projector.
-Select Peer to Peer (Ad-hoc) only for one of the projector and computers on the same LAN. - When you use Peer to Peer (Ad-hoc) mode, you need to set a dedicated IP address and Subnet Mask for this mode on the projector and the computer.
Checking connection with the access point
You can check if the projector is correctly connected to the access point.
1 Double-click the exception level indicator) icon on the task bar of the Network Projector window. The window that indicates the connection status between the projector and the access point appears.
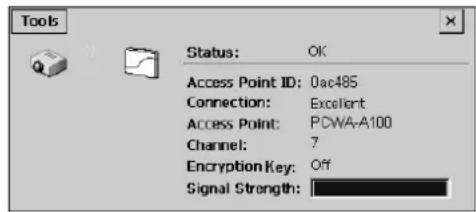
2 Check the following.
- Status: Shows OK if the projector has a correct recognition of the wireless LAN PC card.
- Access Point ID
- Connection: Connection status with the access point
- Access Point: Information about the connected access point
- Channel: Assigned channel
- Encryption Key: Encryption enabled or disabled on the connected access point
- Signal Strength: Signal level for communication between the projector and the access point
When Access Point ID shows "searching"
Verify if the Nickname, Access Point ID and Encryption Key are correct. Selecting Edit wireless Profiles... from the Tools menu opens the Wireless LAN settings window. If any of the items is not correct, correct it following steps 3 through 9 on page 11 (GB).
Setting the date and clock
The clock is displayed on the task bar of the Network Projector window. To set the date and time, follow the steps below.
1 From the Start menu of the Network Projector window, click Control Panel.
2 Double-click the Date/Time icon.
3 Set the date and time.
Assigning an application software to the FUNCTION key on the Remote Commander (for VPL-PX15 and VPL-FX50)
If you assigned an application to the FUNCTION 1 or 2 key on the supplied Remote Commander, a touch of the key enables you to start that application. The screen keyboard is assigned to the FUNCTION 3 key at the factory, and you cannot reassign or cancel that assignment.
For detailed information about the screen keyboard, see page 35 (GB).
1 From the Start menu of the Network Projector window, click Control Panel.
2 Double-click the Launch Keys icon. The Launch Keys Settings dialog box appears.
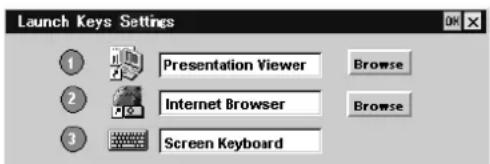
3 Click Browse for the key (1 or 2) to which you want to assign an application software, then click the application you want from the application list.
4 Repeat step 3 if you want to assign an application to the other key.
5 Click the OK button.
Setting Up from a Computer
Notes
- Connect a single computer you are using for setups to the projector if the IP address of the projector is not changed from the factory-preset one.
- If the browser of your computer is set to "Access the Internet using a proxy server," enter the IP address of the projector in the box "Access the Internet without using a proxy server" when you have access to the projector from your computer.
- The computer may not accept the password for the projector, depending on the version of the browser. In this case, restart the browser.
Opening the setup window
1 Start the computer's browser software (Internet Explorer 4.0 or later versions, or Netscape Navigator 4.5x or 4.7x version).
2 Type "http://xxx.xxx.xxx.xxx (for the IP address of the projector)/setup".
If the IP address is not changed from the factory-preset one, type "http://192.168.0.1/setup" (when using a LAN PC card) or "http://192.168.0.2/ setup" (when using the ETHER connector). If the number of the IP address starts from 0 (zero), enter the number without 0. Example: 192.168.000.001 192.168.0.1 The Password dialog box appears.
3 Enter the Name and Password for Administrator. If the Password setting is not changed from the factory-preset one, enter "root" in the Name text box.
The Setup window appears.
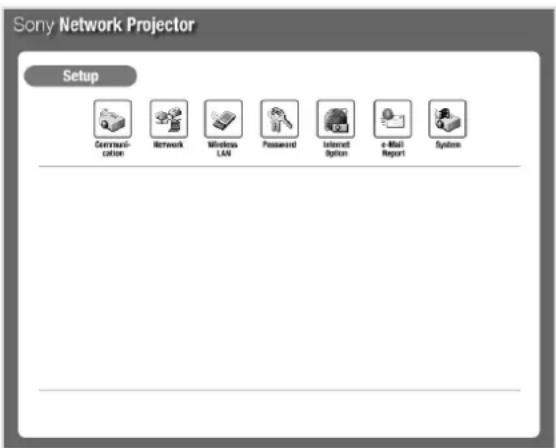
Setting the password
1 Click the Password icon in the Setup window. The password setting dialog box appears. Setup procedure is the same as that operated by the projector.
For details, see "Setting the password" on page 9 (GB).
2 Click the APPLY button.
Setting up the network configuration
1 Click the Network icon in the Setup window. The Network configuration window appears.
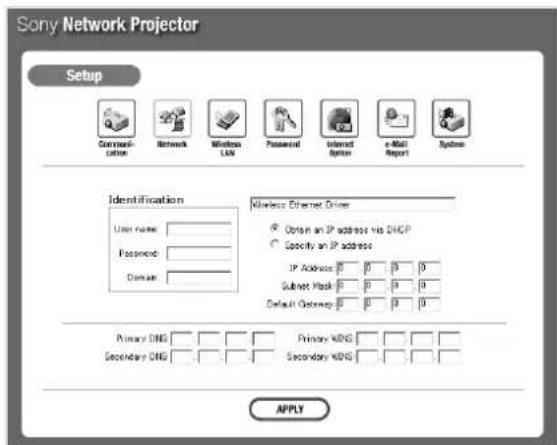
In this window you can set the items described in steps 4 to 7 in "Setting up the network configuration" on page 10 (GB).
For details, see "Setting up the network configuration" on page 9 (GB).
2 Click the APPLY button.
The window for restart appears.
3 Click the START button.
If the projector is turned on and the Network Projector window is open, the projector's screen is turned off for about 10 seconds, then the projector restarts.
The network setting does not take effect until you restart the projector.
Setting up the wireless LAN environment
1 Click the Wireless LAN icon in the Setup window. The dialog box for setting the Nickname, Access Point ID, Encryption Key and Peer to Peer appears. Setup procedure is the same as that operated by the projector.
For details, see "Setting up a wireless LAN environment-Using a wireless LAN access point/Peer to Peer (Ad-hoc) mode" on pages 11 (GB) and 12 (GB).
2 Click the APPLY button.
Note
When using a specified wireless LAN PC card other than VAIO or ORiNOCO, set up the wireless LAN environment from the projector.
Basic Operation Flowcharts
This section describes the operation flowchart for using the projector via a network or for using the built-in network function of the projector. There are two types of flowcharts; for operations from a computer and for those from the projector. For details, see the pages in parenthesis.
Required conditions
The projector and computer are connected to the same LAN.
The projector and computer are turned on.
- The INPUT-B FUNC. (VPL-PX15) or INPUT-C FUNC. (VPL-FX50) is set to ON in the INSTALL SETTING menu.
The INPUT C/RS-232C/RS-422A select switch is set to INPUT C. (VPL-FE110U/M)
The input of the projector is set to INPUT B (VPL-PX15) or INPUT C (VPL-FX50 and VPL-FE110U/M).
Operations from a Computer
Running a presentation using a file created with PowerPoint
You can control a presentation using a file created with PowerPoint from a computer.
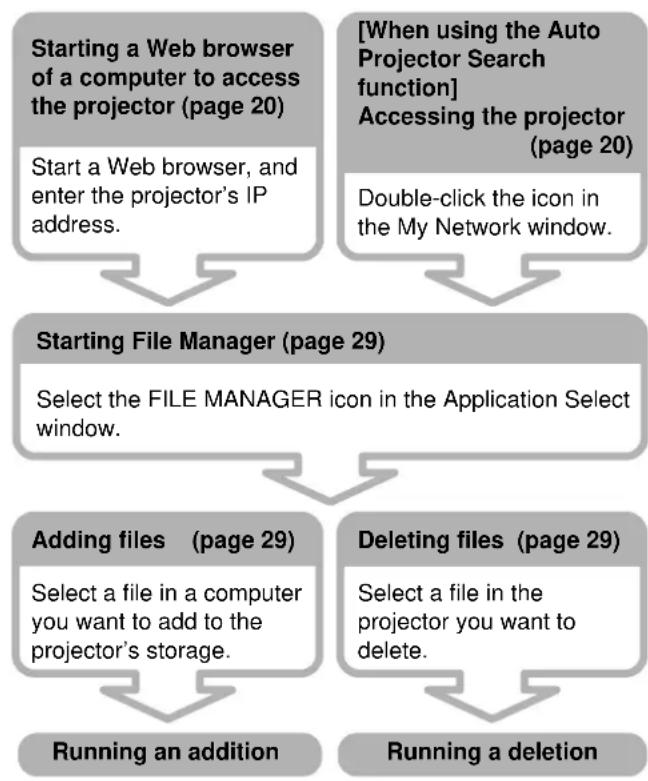
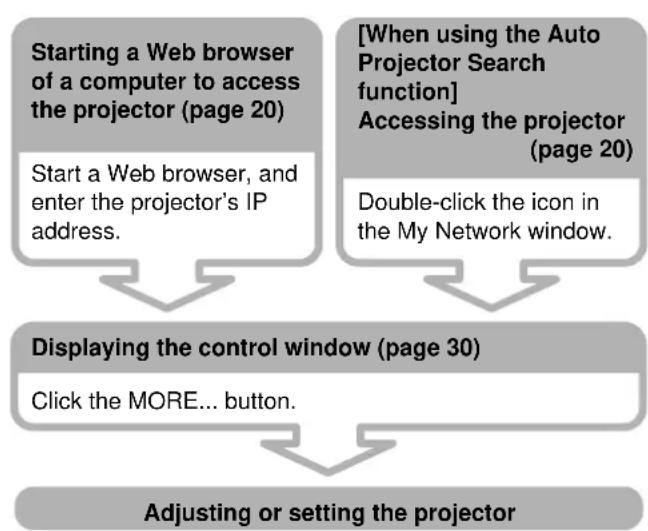
Starting a Web browser of a computer to access the projector (page 20)
Start a Web browser, and enter the projector's IP address.
[When using the Auto
Projector Search
function]
Accessing the projector
(page 20)
Double-click the icon in the My Network window.
Selecting PRESENTATION VIEWER (page 22)
Select the PRESENTATION VIEWER icon in the Application Select window.
Finding a file you want to use for your presentation (page 22)
Select where the file is stored, the computer or projector, then select the PowerPoint file you want. The Slide Viewer starts.
Setting up a slide show (page 22)
Set which slides to use and how to advance a slide in a slide show.
Running a slide show
Projecting an Excel or Word file onto the projector
You can display an Excel or Word file on the projector by operating from a computer.
Starting a Web browser of a computer to access the projector (page 20)
Start a Web browser, and enter the projector's IP address.
[When using the Auto
Projector Search
function]
Accessing the projector
(page 20)
Double-click the icon in the My Network window.
Selecting PRESENTATION VIEWER (page 24)
Select the PRESENTATION VIEWER icon in the Application Select window.
Finding a file you want to project on the projector (page 24)
Select where the file is stored, the computer or projector, then select an Excel or Word file you want. If you select an Excel file, Worksheet Viewer starts. If you select a Word file, Document Viewer starts.
Projecting the Excel or Word file

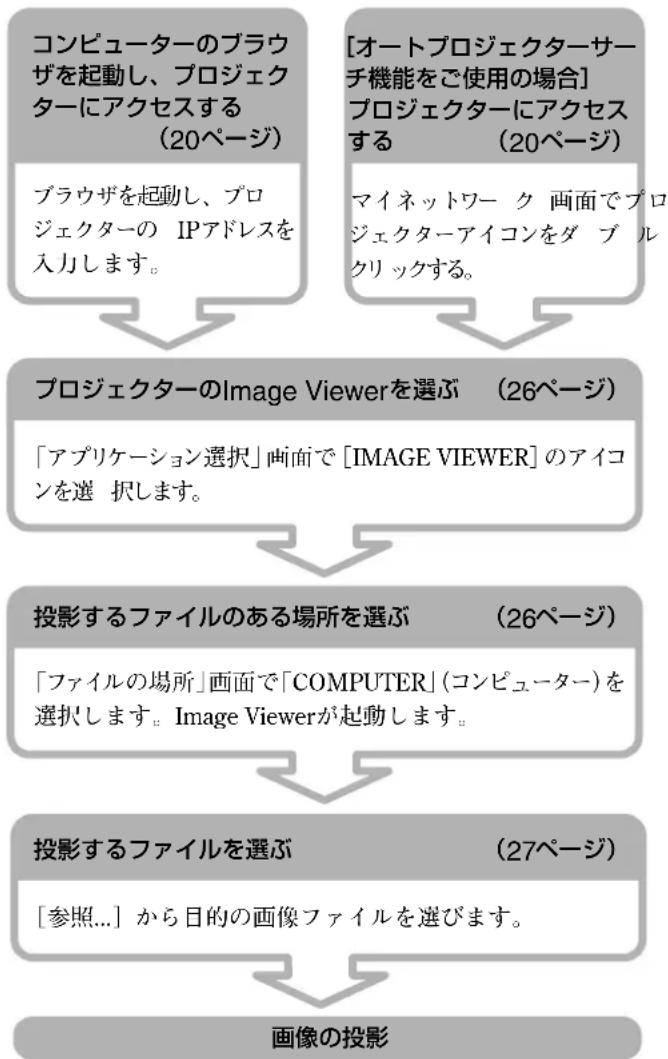
Projecting an image onto the projector using a file stored in a computer
You can project an image onto the projector by operating from a computer.

Starting a Web browser of a computer to access the projector (page 20)
Start a Web browser, and enter the projector's IP address.
[When using the Auto
Projector Search
function]
Accessing the projector
(page 20)
Double-click the icon in the My Network window.
Selecting the Image Viewer of the projector (page 26)
Select the IMAGE VIEWER icon in the Application Select window.
Selecting where the file is stored (page 26)
Select COMPUTER in the Look In window. The Image Viewer starts.
Finding a file you want to project on the projector (page 27)
Select the image file you want by clicking the Browse button.
Projecting an image
Projecting an image or running a slide show onto the projector using a file stored in the projector
By using an image file stored in the projector or in the PC memory card you can project it on the projector by operating a computer. You can also run a slide show using the slide show setting file preset on the projector.
Starting a Web browser of a computer to access the projector (page 20)
Start a Web browser, and enter the projector's IP address.
[When using the Auto
Projector Search
function]
Accessing the projector
(page 20)
Double-click the icon in the My Network window.
Selecting the image Viewer of the projector (page 28)
Select the IMAGE VIEWER icon in the Application Select window.
Selecting where the file is stored (page 28)
Select PROJECTOR in the Look In window. The Image Viewer starts.
Selecting a folder to project (page 28)
Select a folder you want in the Folder/.SHO File Select window.
Selecting the setting file to run a slide show (page 28)
Select the .SHO file you want in the Folder/.SHO File Select window.
Projecting an image
Setting up a slide show (page 28)
Set how to advance a slide in a slide show.
Running a slide show
Managing files with File Manager
You can add files stored in a computer to the projector's storage or delete files stored in the projector.
Controlling the projector
You can perform various adjustments and settings of the projector from a computer.
Operations from the Projector
Running a presentation using a file stored in the computer
Immediately after you open a file created with PowerPoint stored in a computer, you can start a presentation by operating the projector.
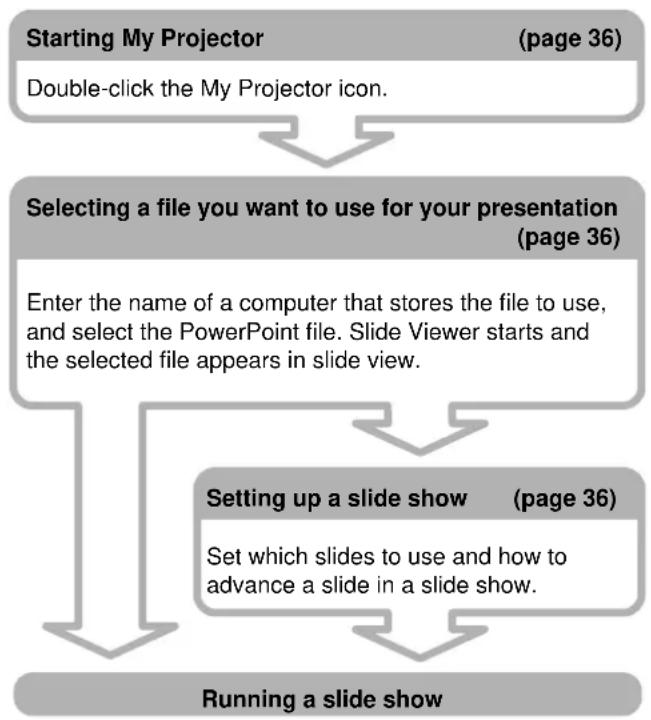
Running a presentation using a file stored in the projector or memory card
By using a PowerPoint file stored in the projector or in the PC memory card, you can run a presentation by operating the projector only.
Starting the Presentation Viewer (page 36)
Double-click the Presentation Viewer icon.
Selecting a file you want to use for your presentation (page 36)
Select the PowerPoint file you want in the Open File dialog box. The Slide Viewer starts, and the selected file appears in slide view.
Setting up a slide show (page 36)
Set which slides to use and how to advance a slide in a slide show.
Running a slide show
Projecting an Excel or Word file stored in a computer
You can project an Excel or Word file stored in a computer on the same LAN by operating the projector.
Starting My Projector (page 38)
Double-click the My Projector icon.
Selecting a file you want to project (page 38)
Enter the name of a computer that stores the required file, and select an Excel or Word file. If you select an Excel file, Worksheet Viewer starts. If you select a Word file, Document Viewer starts.
Projecting an Excel or Word file stored in the projector or memory card
You can project an Excel or Word file stored in the projector or memory card onto the projector.
Starting the Presentation Viewer (page 38)
Double-click the Presentation Viewer icon.
Selecting a file you want to project (page 38)
Select an Excel or Word file in the Open File dialog box. If you select an Excel file, Worksheet Viewer starts. If you select a Word file, Document Viewer starts. The selected file is projected on the projector.
Running a slide show using an image file stored in the projector or memory card
You can run a slide show using an image file stored in the projector or memory card by operating the projector only.
Starting the Image Viewer (page 40)
Double-click the Image Viewer icon.
Selecting the files you want to use for your slide show (page 40)
Click the folder which contains the files you want. All the slides contained in the folder are displayed in thumbnail windows.
Selecting the slides you want to use for a slide show (page 40)
Select the slides you want to use. If you want to select all the slides displayed in thumbnail windows, click Select all from the Slide Show menu.
Setting up an image (page 40)
Zooming or rotating a slide.
Running a slide show (page 40)
Select how to advance a slide. A slide show starts.
Connecting to the Internet
Starting the Internet Browser (page 41)
Double-click the Internet Browser icon.
Running a presentation using the Remote Desktop function
If Windows XP Professional is installed in your computer, the projector can access your computer on the same LAN and project all the data and applications stored in that computer.
Accessing the computer where the file you want is stored (page 41)
Double-click the Remote Desktop icon, and enter the IP address of the computer.
Logging on to the computer (page 41)
When the log on window of the computer is projected on the projector, enter the user name and password of the computer. The desktop window of the computer is projected on the projector.
Selecting the file you want to use for your presentation (page 41)
Select the file you want, and project it on the projector.
Preparations
Before starting
For VPL-PX15
Confirm that the INPUT-B FUNC. is set to ON in the INSTALL SETTING menu.
For VPL-FX50
Confirm that the INPUT-C FUNC. is set to ON in the INSTALL SETTING menu.
For VPL-FE110U/M
Confirm that the INPUT C/RS-232C/RS-422A select switch is set to INPUT C.
Starting the browser for accessing the projector
In order to control the projector from a computer, you have to access the projector by starting the browser on the computer. Suitable browsers are Internet Explorer 4.0 or later versions, and Netscape Navigator 4.5x or 4.7x version.
If your computer is equipped with Windows Me or Windows XP and you use the Auto Projector Search function, the following procedure is not necessary. Access the projector by using the procedure described in "Accessing the projector using the Auto Projector Search function."
1 Turn on the projector.
2 Set the input to the projector to INPUT B (VPL-PX15) or INPUT C (VPL-FX50 and VPL-FE110U/M)
3 Switch on the computer.
4 Start the browser on the computer.
5 Enter the IP address of the projector. Type "http://xxx.xxx.xxx.xxx (for the IP address of the projector)."
You can verify the IP address as it is displayed on the task bar in the Network Projector window. The Application Select window appears.
When the password is set for the projector, the password setting dialog box appears. Enter the Name and Password for User.
For information on the Application Select window, see "Names and functions of the Application Select window."
Operations that follow the above steps are shown on pages 21 (GB) to 31 (GB).
Notes
- Do not have access to the projector from two or more computers simultaneously.
- If the browser of your computer is set to "Access the Internet using a proxy server," enter the IP address of the projector in the box "Access the Internet without using a proxy server" when you have access to the projector from your computer.
- The computer may not accept the password for the projector, depending on the version of the browser. In this case, restart the browser.
- If the browser on a computer exits without closing the application, the projector automatically returns to the initial Network Projector window after about 30 seconds. In this case, restart the browser.
Accessing the projector using the Auto Projector Search function
When you are using a computer equipped with Windows Me or Windows XP, you can access the projector without starting the browser on the computer.
Note
It is necessary to add the Universal Plug and Play component on the computer to use the Auto Projector Search function. Click Control Panel, then select Add/Remove Programs.
Click the service manager icon [ ] on the task bar of the projector to display the control window. In the control window, press to use once or set the start-up mode of the property to Auto to use thereafter.
1 Double-click the My Network icon.
2 Double-click the projector icon. The Application Select window appears.
When the password is set for the projector, the password setting dialog box appears. Enter the Name and Password for User.
For information on the Application Select window, see "Names and functions of the Application Select window."
Operations that follow the above steps are shown on pages 21 (GB) to 31 (GB).
Names and functions of the Application Select window
Having access to the projector opens the Application Select window. The following shows the names and functions of the icons and buttons in the window.

Language select button
Clicking opens the language select drop-down list. Each window has help sentences shown on the lower part of the window. You can display them in English, French, German, Spanish, Italian or Japanese.
FILE MANAGER icon
Starts the File Manager to manage the files stored in the projector.
③IMAGE VIEWER icon
Opens the setup window for projecting image files.
4PRESENTATION VIEWER icon
Opens the select window for starting the PowerPoint viewer (Slide Viewer), Excel viewer (Worksheet Viewer) or Word viewer (Document Viewer).
(5) I/O (on/standby) button
Turns the projector on or sets it to standby mode.
Help
Resting the pointer over each item displays the instructions for the item. This makes your operations easier in each window.
Input select buttons
Select the input to the projector. The INPUT C button does not exist in the window for the VPL-PX15.
MORE... button
Opens the control window for the projector.
Notes
It may take time to display the file depending on your network configuration.
- As the Slide Viewer, Worksheet Viewer and Document Viewer are the basic PowerPoint, Excel and Word functions, respectively, they do not support some features of other software. We recommend you should project the file you are using for your presentation on the projector before starting the presentation.
The display on the computer may be different from the original display from the projector.
The following fonts are available for the Presentation Viewer; Arial, Courier New, Symbol, Tahoma, Times New Roman and Wingdings.
Running a Presentation Using the Slide Viewer
When you intend to run a presentation with PowerPoint in a conference room, you can control the presentation by operating your computer in the same room or in the location far away from the projector.
What you can do with the Slide Viewer
You can
-run a slide show using the file created with PowerPoint.
show a custom slide show if created.
show a speaker's note or hide it.
show a slide or hide it.
- set timings to advance a slide during a slide show.
You can select an automatic or manual slide show.
Running a presentation
1 Click the PRESENTATION VIEWER icon in the Application Select window. The Look In window appears.
2 Click to select where to search for the file you want to use for your presentation.
COMPUTER: To select a file stored in a computer
PROJECTOR: To select a file stored in the projector
The File Select window appears.
3 Select the file you want to use for your presentation.
When you select COMPUTER in step 2
Clicking Browse opens the file select window on a computer. Click the PowerPoint file (.ppt or .pps file) you want. You can also select the file by entering the file name in the Browse text box. The selected file name is displayed in the Browse text box.
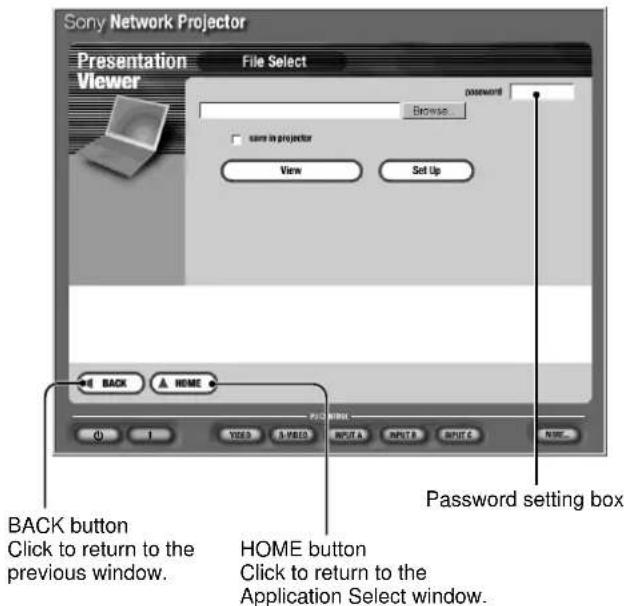
To store the selected file into the projector
Click to check the "save in projector" checkbox. You can set the password for the file, if necessary. Specify the password in the "password" text box. This disables the file to open from now on unless you enter the password.
The file will be stored when you click the Set Up or View button.
Note
When you delete a file using File Manager, entering the password is not required even if the password is set for the file.
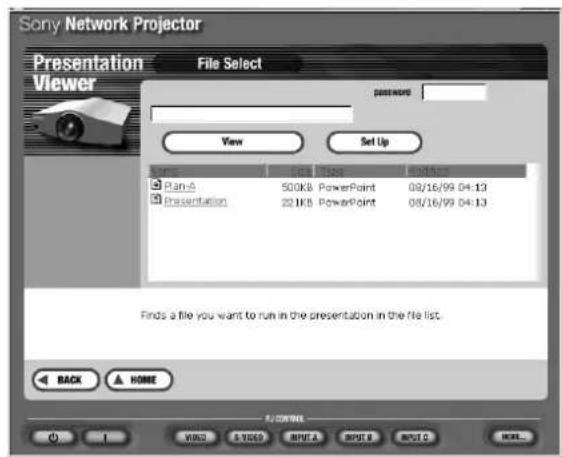
When you select PROJECTOR in step 2
The file list showing the files stored in the projector or a memory card (VPL-PX15 and VPL-FX50) appears. Click the PowerPoint file you want. The selected file name is displayed in the text box.
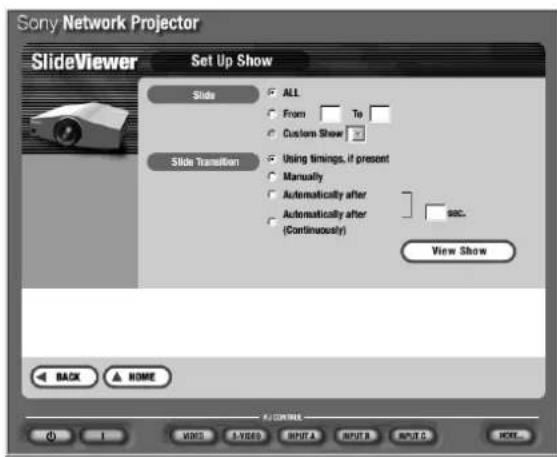
4 Set up your slide show, if necessary. Click the Set Up button in the File Select window. The Set Up Show window appears. You can specify slides you want to use for your slide show and set how to advance a slide in the slide show. Resting the mouse pointer over each item shows instruction on the lower part of the window.
Note
If you are running a presentation using the file stored in a computer, the file is transferred to the projector at the time you click the Set Up button. It will take a little time to display the Set Up Show window on the computer. How long it takes depends on the file size. During this time a message will appear.
5 Click the View button in the File Select window or click the View Show button in the Set Up Show window.
The slide show starts.
Note
If you are running a presentation using the file stored in a computer, the file is transferred to the projector at the time you click the View button. It will take a little time to display a slide show on the projector screen. How long it takes depends on the file size. During this time a message will appear.
To end the slide show
Click the End Show button. (See page 24 (GB).)
The File Select window returns.
Note
If the message "Projector's memory is full" appears when clicking the View or Set Up button, delete unnecessary files stored in the projector using the File Manager (page 29 (GB)), then try to run the slide show again. If the message "File size is too large." appears, reduce the file size, then try to run the slide show again.
Tip :
You may make it smaller by clicking Option, then Save from the Tools menu, and unchecking Save Fast in the PowerPoint application.
About the window displayed while the presentation is running
The following window is displayed during a presentation.
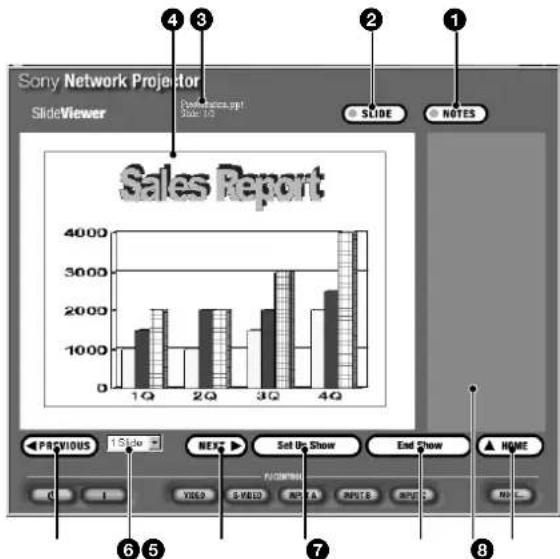
NOTES button
Selects to display/remove a speaker's note.
SLIDE button
Selects to display/remove a slide show on/from a computer's display.
File name/slide number
Shows the name of a file and which slide is displayed.
(continued)
4Slide
Shows the currently displayed slide in the slide show. The projector's screen displays only this slide.
PREVIOUS button
Returns to the previous slide or Animation setting during the slide show.
⑥ Slide text box
Clicking opens the slide name drop-down
When you select a specific slide from the list, it will be shown.
NEXT button
Advances to the next slide or Animation setting immediately.
Set Up Show button
Returns to the Set Up Show window.
End Show button
Ends or suspends the slide show to return to the File Select window.
Note
Displays a speaker's note. It is not displayed on the projector screen.
HOME button
Returns to the Application Select window.
Projecting an Excel or Word File
You can project an Excel or Word file on the projector by operating a computer.
When you select an Excel file, the Worksheet Viewer starts and a worksheet of the selected file is projected on the projector screen. When you select an Excel file, the Document Viewer starts and the first page of the selected file is projected on the projector screen.
What you can do with the Worksheet Viewer or Document Viewer
You can
- display Excel worksheets or Word documents to fill the projector screen.
- zoom in or out the projected worksheet or document page.
Note
As the Worksheet Viewer or Document Viewer are a simple Excel or Word viewer function, it does not support some features.
Projecting an Excel or Word file
1 Follow steps 1 to 3 in "Running a Presentation Using the Slide Viewer - Running a presentation" on page 22 (GB). Make sure to select an Excel file (.xls file) or Word file (.doc file) in step 3.
2 Click the View button.
The Worksheet Viewer starts when you select an Excel file, and the worksheet of the selected file is displayed on the projector.
The Document Viewer starts when you select a Word file, and the first page of the selected file is displayed on the projector.

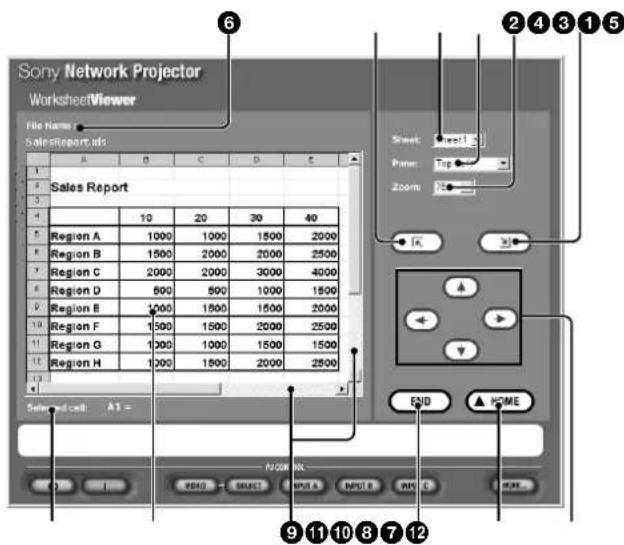
Example: Worksheet Viewer window
When you rest the mouse pointer over each button or item, its instructions will appear on the bottom of the window.
Notes
The range of the displayed area of a worksheet on a computer and that of the projected area on the projector is not the same.
- When you click a cell on a computer for worksheet Viewer, the cell becomes active if the selected cell is within the area displayed on the projector. If the selected cell is outside the displayed area, the area with the selected cell is centered on the projector's display.
About the window displayed while the Worksheet Viewer is running
按钮
Selects the bottom rightmost cell of the displayed worksheet.
Zoom text box
Clicking opens the drop-down list to select the ratio of enlargement or reduction. The worksheet is enlarged or reduced with the currently selected cell centered.
3Pane text box
When the displayed worksheet is split into multiple panes, click to open the drop-down list and select the desired pane from Top Left, Top Right, Bottom Left and Bottom Right.
Sheet text box
Clicking opens the drop-down list of the sheet names included in the displayed workbook. Selecting a sheet name displays the selected sheet.
5 button
Selects the top leftmost cell of the worksheet.
File Name
Shows the file name currently displayed.
7Selected Cell
Shows the column and row numbers of the selected cell.
8Worksheet
Displays the worksheet which is currently projected on the projector.
Scroll bars
Use to scroll the display left or right, or up or down. To scroll, drag the box or click the arrows.
10END button
Ends or suspends the worksheet display to return to the File Select window.
Home button
Returns to the Application Select window.
12Scroll buttons
Clicking or button moves one screen to the left or right.
Clicking or button moves one screen up or down.
(continued)
About the window displayed while the Document Viewer is running
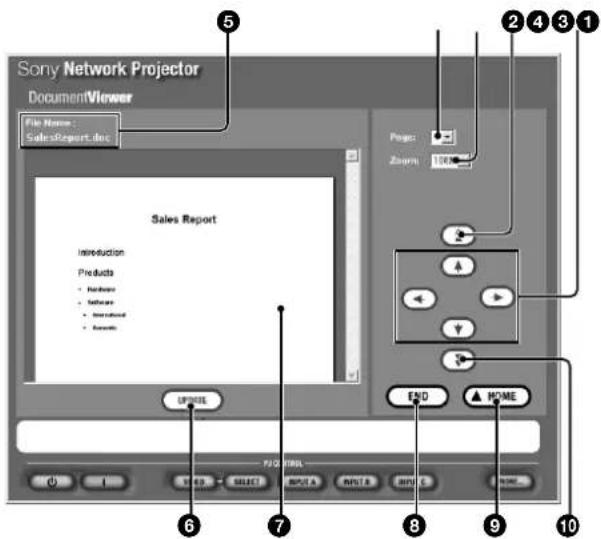
1Scroll buttons
Clicking or button scrolls the displayed page left or right.
Clicking or button scrolls the displayed page up or down.
2 ±b button
Displays the next page.
③Zoom text box
Clicking opens the drop-down list to select the ratio of enlargement or reduction. The displayed page is enlarged or reduced.
4Page text box
Clicking opens the drop-down list of the page numbers. Selecting the page number displays the selected page.
File name
Shows the name of the currently displayed Word file.
UPDATE button
Clicking this buttom displays the same window as that being projected on the projector.
7Document page
Displays the page which is currently projected on the projector by clicking the UPDATE button.
END button
Ends or suspends the Word file display to return to the File Select window.
HOME button
Returns to the Application Select window.
10 button
Displays the previous page.
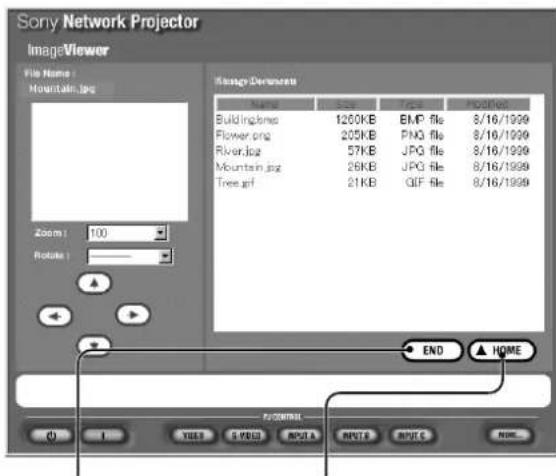
Projecting an Image Using the Image Viewer
You can project an image file stored in any computer on the same LAN or stored in the projector's storage or in the memory card installed in the projector. You can also run a slide show using the slide show setting file (.SHO file) preset in the projector.
Projecting an image stored in a computer on the projector
1 Click the IMAGE VIEWER icon in the Application Select window. The Look In window appears.
2 Click COMPUTER.
The Image Viewer of the projector starts, and the Image Viewer window opens.
Resting the mouse pointer over each item shows its instruction on the lower part of the window.
3 Select an image file to display.
Click Browse to open the file select window on a computer. Double-click the file you want.
The selected file name is displayed in the Browse text box.
4 Click the SHOW button.
A full-screen image of the selected file is displayed on the projector.
Note
When projecting a large size image file such as those in UXGA format, it cannot be opened due to lack of memory. In this case, reduce the image to obtain a smaller file size.
To save time taken for transferring data
When clicking the SHOW button, the file is transferred to the projector. It will take a little time to display an image on the projector's screen. To display the image immediately, transfer all the files you want to use to the projector before starting your presentation.
1 After step 3 in "Projecting an image stored in a computer on the projector," click the SEND button.
The selected file name appears in the Temporary File list and the file is transferred to the projector. Repeat this step until all the files you want are shown in the Temporary File dialog box.
2 Double-click the file name listed in the Temporary File dialog box.
A full-screen image of the selected file is displayed on the projector.
Note
If the memory of the Temporary File list is full, the data transferred earlier will be erased.
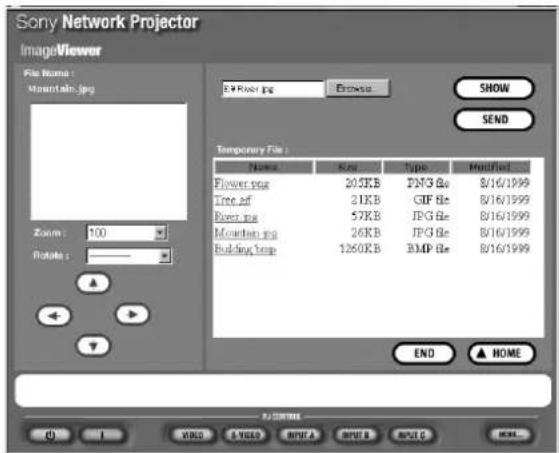
About the window displayed while the Image Viewer is running

File name
Shows the file name of the currently displayed image.
②Slide
Shows the currently displayed image on the projector's screen.
③Zoom text box
Clicking opens the drop-down list to select the ratio of enlargement or reduction for the image.
4Rotate text box
Clicking opens the drop-down list to select the angle of rotation for the image.
Note
When projecting a large size image file such as those in UXGA format, it cannot be rotated due to lack of memory. In this case, reduce the image to obtain a smaller file size.
⑤Scroll buttons
Clicking the arrows changes the display area of the image on the screen, if the enlarged image does not fit the screen.
END button
Ends or suspends the full-screen display to return to the File Select window.
7▲HOME button
Returns to the Application Select window.
(continued)
Note
When you exit the Image Viewer window by clicking the END or HOME button, the files listed in the Temporary File will be automatically erased. To store the files, add them to the projector using the File Manager function.
For details, see "Using File Manager" on page 29 (GB).
Running a presentation using an image file stored in the projector
1 Click the IMAGE VIEWER icon in the Application Select window. The Look In window appears.
2 Click PROJECTOR.
The Image Viewer of the projector starts, and the Folder/.SHO File Select window opens.
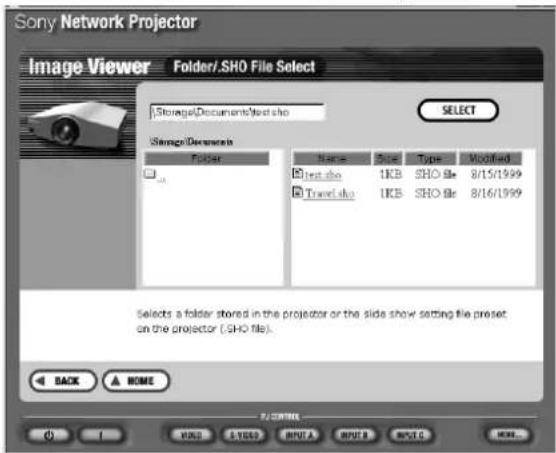
3 Click the folder you want or the folder that contains the slide show setting file (.SHO file) in the Folder list on the left of the window. The contents of the selected folder are listed on the right.
For details on .SHO files, see "Saving the slide show setting" on page 40 (GB).
4 Select a folder or .SHO file you want to use, then click the SELECT button. The Image Viewer window appears.
5 Select an image file you want to project on the projector.
When you select a folder in step 4 Image files contained in the selected folder are listed on the right.
END button Ends or suspends the display to return to the File Select window.
v HOME button Returns to the Application Select window.
Click the file you want.
A full-screen image of the selected file is projected on the projector.
Resting the mouse pointer over each item on the left of the window shows its instructions on the lower part.
When you select an .SHO file in step 4 The selected .SHO file appears on the right.
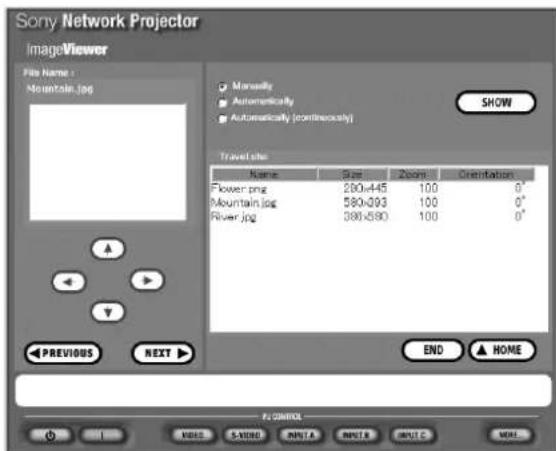
Select how to advance slides, and click the SHOW button. The slide show starts.
Resting the mouse pointer over each item on the window shows its instructions on the lower part.
About the window displayed while the Image Viewer is running
The same window as that in "About the window displayed while the Image Viewer is running" on page 27 (GB) appears.
The NEXT button on the .SHO file select window is to advance to the next slide immediately during the slide show. The PREVIOUS button is to go back to the previous slide.
Using File Manager
You can manage the files stored in the projector from a computer by a simple operation. The File Manager function enables you to delete unnecessary files stored in the projector or to add files stored in a computer to the projector's storage.
Use File Manager while checking the currently used memory and largest unused memory of the projector displayed in the File Manager window.
Adding files to the projector using File Manager
1 Click the FILE MANAGER icon in the Application Select window. The File Manager window appears.
2 Search for the file stored in a computer you want to add to the projector.
Click the Browse... button in the Add File section to open the file select window on the computer. Select the file you want. You can also select the file by entering the file name in the Browse... text box.
You can set the password for the selected file in this step. Specify the password in the "password" text box. Setting the password disables you to open the file from now on unless you enter the password.
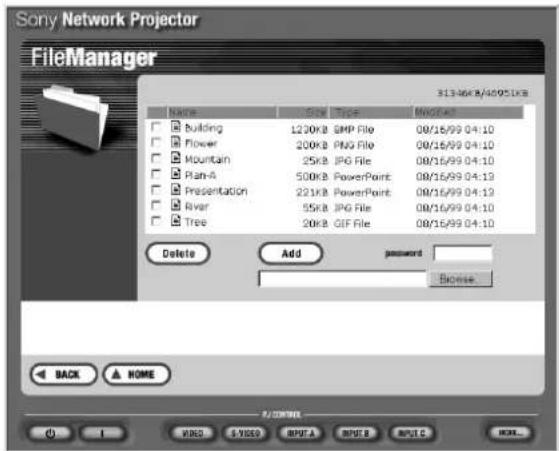
3 Click the Add button. The selected file is stored in the projector.
Deleting files from the projector using File Manager
1 Click the FILE MANAGER icon in the Application Select window.
The File Manager window appears and the list of files stored in the projector pops up.
2 Select the file you want to delete. You can check all the files you want to delete.
3 Click the Delete button. All the files you have checked are removed from the file list.
Note
You can delete a file even if the password is set for the file.
Controlling the Projector from a Computer
You can perform various adjustments and settings of the projector on a computer's display. Three control windows are available; GENERAL, PICTURE CTRL and SETTINGS windows, each with different functions.
The functions of the buttons in the windows are the same as those on the Remote Commander supplied with the projector.
For details on the buttons, see the Operating Instructions of the projector.
The illustrations shown in the steps below are for the VPL-PX15.
1 Click the MORE... button in the PJ CONTROL section.
The GENERAL window appears.
2 Click the function tab to select the window you want.
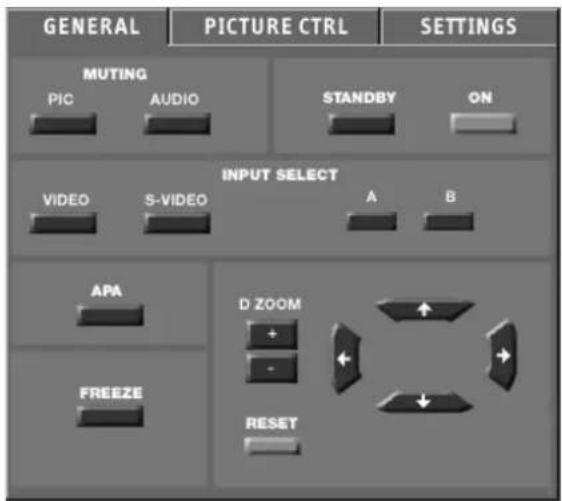
GENERAL window
(VPL-PX15)
For VPL-FE110U/M
Specify the switcher number with the SWITCHER button. Use the GROUP button to specify the group index numbers and the INDEX button to specify the device index numbers. Click to open the drop-down list, then select the number.
PICTURE CTRL window
(VPL-PX15)
For VPL-PX15
The COLOR TEMP (HIGH, LOW) buttons function the same as the settings in the menu.
For VPL-FX50
The DDE (OFF, PROGRESSIVE, FILM) and RGB ENHANCER + / - buttons function the same as the settings in the menus.
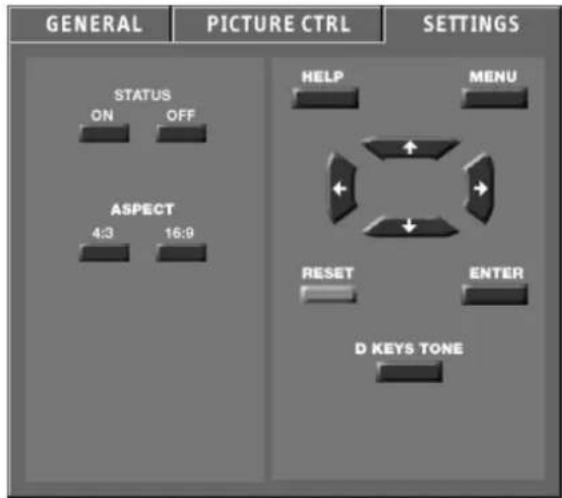
SETTINGS window
(VPL-PX15)
For VPL-PX15
The ASPECT (4:3, 16:9) and STATUS (ON, OFF) buttons function the same as the settings in the menu.
For VPL-FX50
The ASPECT (4:3, 16:9) and LAMP MODE (STANDARD, LOW) buttons function the same as the settings in the menus.
3 Click the button to adjust or set.
Checking the Indicators on the Projector
You can check the present status of the indicators on the control panel of the projector on a computer display.
1 Start Internet Explorer 4.0 or later versions, or Netscape Navigator 4.5x or 4.7x version on the computer.
2 Type "http://xxx.xxx.xxx.xxx (for the IP address of the projector)/info" as a URL.
If you do not change the factory-set IP address, type "http://192.168.0.1/info" (when using a LAN PC card) or "http://192.168.0.2/info" (when using the ETHER connector).
If the password is set, the password setting dialog box appears.
3 Enter the name and password of the Administrator. The Information window appears.
The illustration below is for the VPL-PX15.
Projector Status
Shows the present status of the projector.
Projector
Shows the information on the projector.
System
Shows the versions of the OS (Operating System) and application currently used.
4 UPDATE button
Click to update the latest information.
Error Status
Shows the present status of the indicators on the control panel of the projector.
For information on the indicators, see the Operating Instructions.
Using the e-Mail Report Function
The projector sends mail to the preset addresses to inform of the projector's status, the replacement time of the projector lamp, maintenance time of the projector and error occurrence.
What you can do with the e-Mail Report function
- Reports installation status of the projector, user information, etc. periodically. You can specify the transmitting date of mails.
If any error occurs with the projector, reports it immediately. - Sends a warning mail when a preset used time of the projector lamp has been reached.
(continued)

Setting for e-Mail Report function
To use the e-Mail Report function, set the mail addresses and date to where and when mail is to be sent, and which mail functions you are using.
1 Display the Setup window on the computer. For how to display the Setup window, see "Opening the setup window" on page 13 (GB).
2 Click the e-Mail Report icon in the Setup window. The setting window of the e-Mail Report function opens. See the explanations described below for how to set each item.

1Address text boxes
Enter mail addresses in the TO: and CC: text boxes where you want to receive mail. The projector enables to send mail to three different addresses. You can enter up to 128 characters for each address.
Regular Report
A report on the present status of the projector, user information, etc. of the projector is periodically sent by mail.
Set the timing to send mail as follows:
At: Specifies the time when mail is to be sent. Select the hour from the drop-down list.
Every Week on Days: Selecting this check box allows mail to be sent on the selected days every week.
Mon/Tue/Wed/Thu/Fri/Sat/Sun: Specifies the days of the week. You can check two or more days.
Every Month on Day: Selecting this check box and selecting the day from the drop down list enables to send a mail on the defined day every month.
The Regular Report contains the following items:
Product Information: Model name, Serial number, Version information
User Information: User name, Organization name, Place where the projector is installed
Information: Used time of the projector lamp, Lamp mode, etc.
Memo
3APPLY button
Click when setting of all the items is complete.
4 Maintenance Reminder
Selecting this check box and entering the hours of use when maintenance is required for the projector in the text box enables you to receive mail that informs you when the preset time has been reached. You can specify the time between 1 and 99999 hours.
The elapsed time is displayed in the Elapsed Hours text box. Selecting the RESET check box and clicking APPLY reset the elapsed time to zero.
NEXT button
Closes this window and opens the setting window for the mail server.
Lamp Reminder
Selecting this check box and entering the used hours of the projector lamp in the text box enables you to receive mail that informs you of the replacement time of the projector lamp when the preset time has been reached. You can specify the time between 1 and 9999 hours.
7 Error Report
Selecting this check box allows sending of an error report if any error occurs with the projector.
Notes
- If the days of the week are specified without selecting the Every Week on Days check box, you cannot receive the Regular Report. If the preset day on the Every Month on Day does not exist in the month, you will receive mail on the last day of the month.
- You cannot specify the day of the week or day of the month if the Every Week on Days or Every Month on Day check box is not selected.
- Specifying the hours for Lamp Reminder or Maintenance Reminder is not available if the corresponding check box is not selected.
Setting the mail server
After the mail setting is complete, click the NEXT button.
The mail server setting window opens.
Mail Address
Type the allocated mail address. You can enter up to 128 characters.
2SMTP
Type the address of the mail server. You can enter up to 128 characters.
Test Mail
Sends mail as a test to confirm whether it is sent to the specified addresses. Select the Send check box, then click the APPLY button.
BACK button
Closes this window and opens the mail setting window.
⑤APPLY button
Click this button when the mail server setting is complete or when you send a test mail.
Note
If the following items have not been set or are incorrectly set, the error message appears and the test mail is disabled:
- TO: text box in the mail setting window
- Mail Address in the mail server window
- SMTP
Preparations
Before starting
For VPL-PX15 and VPL-FX50
- Confirm that INPUT-B FUNC. (VPL-PX15) or INPUT-C FUNC. (VPL-FX50) in the INSTALL SETTING menu is set to ON.
- Using the Net Mouse function allows you to operate the projector screen with the mouse and keyboard of the computer. For details, see "Using the Net Mouse Function" on page 8 (GB).
- When you use the supplied remote commander, switch the PJ/NETWORK select switch to NETWORK.
For VPL-FE110U/M
- Confirm that the INPUT C/RS-232C/RS-422A select switch on the rear of the projector is set to INPUT C.
- Using the Net Mouse function allows you to operate the projector screen with the mouse and keyboard of the computer. For details, see "Using the Net Mouse Function" on page 8 (GB).
- When you do not use the Net Mouse function, use the remote commander or a mouse and keyboard (not supplied). Connect the mouse and keyboard to the projector before connecting the power cord of the projector to the AC outlet.
Opening the Network Projector window
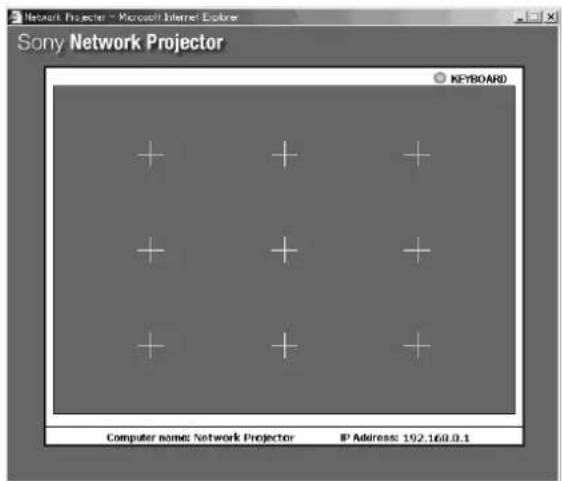
To perform networking operations without connecting to a computer, display the Network Projector window on the projector.
1 Turn on the projector.
2 Set the input to the projector to INPUT B (VPL-PX15) or INPUT C (VPL-FX50 and VPL-FE110U/M).
The Network Projector window appears.
Names and functions of the Network Projector window
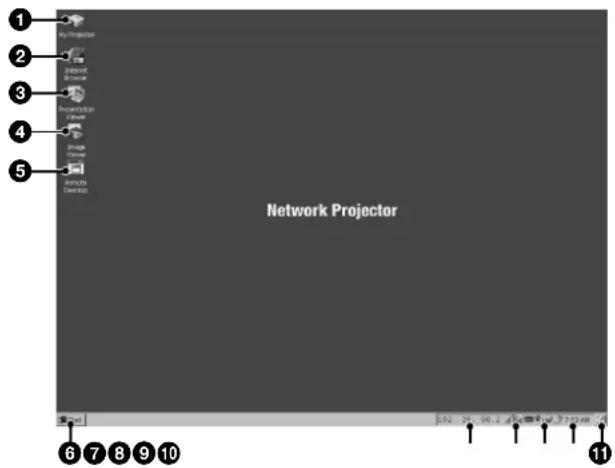
My Projector icon
Browsing the folders in the projector. Double-clicking the icon shows the Memory card icon, etc.
Internet Browser icon
Double-clicking the icon connects to the Internet.
Presentation Viewer icon
Select when you want to run a presentation using the file created with PowerPoint or you want to project an Excel or Word file on the projector.
4Image Viewer icon
Double-clicking the icon starts Image Viewer for running a slide show using image files stored in the projector or memory card.
Remote Desktop icon
Double-click the icon to use the Remote Desktop function.
Start menu
IP address
Shows the IP address of the projector. You can verify it when you are accessing the projector from a computer.
Reception level indicator icon
When the projector correctly recognizes the wireless LAN PC card you insert into the PC CARD slot, the icon appears on the task bar. Double-clicking the icon opens the window indicating the connection status between the projector and the access point.
Screen keyboard icon
Clicking the icon displays the screen keyboard on the projector screen. You can operate the projector for setups or enter a URL by using the supplied Remote Commander (for the VPL-PX15 and VPL-FX50) or the remote commander (for the VPL-FE110U/M). The screen keyboard has two pages. Clicking the Shift key changes the page.
For VPL-PX15 and VPL-FX50
- When the PJ/NETWORK select switch on the supplied Remote Commander is set to NETWORK, the TAB, ESCAPE, ENTER and arrow keys on the Commander function the same as those on the keyboard.
- Pressing the R CLICK key on the supplied Remote Commander on the screen keyboard icon opens the sub menu. Clicking Remote, then On enables you to use the arrow keys on the Remote Commander as those on the screen keyboard and to select the keys.
10Clock
Desktop icon
Running a Presentation Using the Slide Viewer
You can run a presentation by using a file with PowerPoint stored in a computer located in the same conference room or far from the projector.
Even when a computer is not connected to the projector, you can also start the presentation using a file stored in the projector's storage or in the memory card installed into the PC CARD slot.
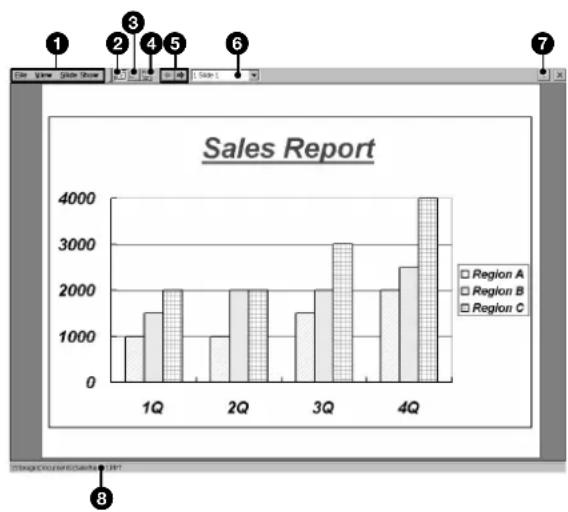
About the Slide Viewer window
1Menu bar
| Menu Command Function | ||
| File | Open | Opens files stored in the projector. |
| Recent Files | Opens the recently used files which are shown in the submenu. | |
| About | Indicates version information on the program. | |
| Close | Closes the currently displayed file. | |
| View | Slide View | Shows a slide in Slide View mode. |
| Note View | Shows a slide in Note View mode. | |
| Slide Show | Runs a slide show. | |
| View Show | Run | Runs a slide show. |
| Set Up Show | Sets up the slide show. | |
(continued)
② (Slide View) button
Shows a slide.
(Note View) button
Shows a slide and speaker's note.
4 (Slide Show) button
Runs a slide show.
⑤Slide transition buttons
Click the button to display the previous slide.
Click the button to display the next slide.
⑥ Slide list box
Click to open the drop-down list and select the number of the slide you want to display.
7 (Help) button
Click to display the Help topic for the Slide Viewer.
File name
The name of a file is displayed.
Running a presentation
Using a file stored in a computer connected to the LAN
1 Double-click the My Projector icon in the Network Projector window.
2 Enter "\xxxxx (name of a computer you want to access)" in the address column, then click the Enter button.
The shared folders for the computer are displayed.
Note
You have to set the items for Identification in the Network Configuration dialog box (page 10 (GB)), and have to set share files with a computer you want to access.
3 Select the folder which contains the PowerPoint file (.ppt or .pps file) you want to run a presentation, then double-click that file.
If the password is set for the selected computer, enter the password.
The Slide Viewer starts.
4 When you want to set up the slide show, click Set Up Show from the View Show menu. The Set Up Show dialog box opens. For details, see Help for Slide Viewer.
5 Click Run from the View Show menu to run the slide show.
Using a file stored in the projector or in the memory card
1 Double-click the Presentation Viewer icon in the Network Projector window.
The Presentation Viewer starts, and the Open File dialog box appears.
2 Select the PowerPoint file you want, and click the OK button.
The Slide Viewer starts, and the selected file appears in slide view.
3 Perform steps 4 and 5 in "Using a file stored in a computer connected to the LAN."
Switching the slide view mode
Slide Viewer has three view modes; Slide Show, Slide View and Note View, each of which gives you a different way of showing a slide. Display a view by clicking its corresponding command from the View menu. Clicking its button on the tool bar also switches the view.
About Help for the Slide Viewer
For details on operations with the Slide Viewer, see Help. Clicking the button on the tool bar opens the Help topic.
Projecting an Excel or Word File
You can project Excel or Word files stored in a computer on the same LAN. You can also project those stored in the projector or in the memory card without connecting a computer.
About the Worksheet Viewer window
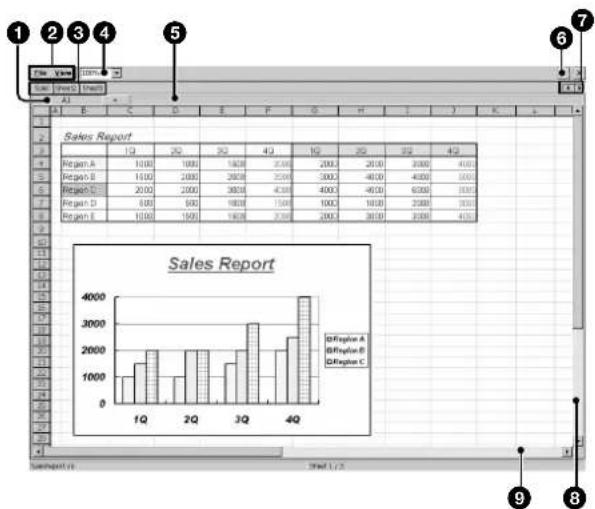
1Name box
Identifies the currently selected cell.
2Menu bar
| Menu Command Function | ||
| File | Open | Opens files stored in the projector. |
| Recent Files | Opens the recently used files which are shown in the submenu. | |
| About | Indicates version information on the program. | |
| Close | Closes the currently displayed file. | |
| View | Split (Remove Split*) | Splits the displayed window into multiple panes. |
| Zoom | Opens the Zoom dialog box to enlarge or reduce the display. | |
- When Split is selected, the command in parentheses is displayed. Selecting it restores the normal window.
Sheet tabs
Displays the names of sheets. Click the sheet tab to make a sheet active.
4Zoom box
Click to select the magnification to reduce or enlarge the display of an active worksheet.
Cell contents bar
Displays the result or constant value of the active cell.
(Help) button
Displays the Help topic for the Worksheet Viewer.
7按钮
Use to scroll through the sheet tabs. Click an arrow of the direction to which you want to scroll.
up/down) scroll bar
Use to scroll the display up or down. To scroll, drag the box or click the arrow.
/left/right) scroll bar
Use to scroll the display left or right. To scroll, drag the box or click the arrow.
About the Document Viewer window
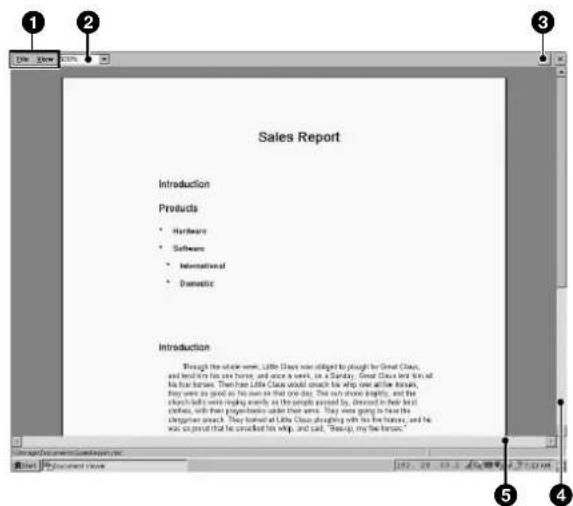
(continued)
1Menu bar
| Menu Command Function | ||
| File | Open | Opens files stored in the projector. |
| Recent files | Recently stored files are displayed. Clicking one of them opens that file. | |
| About | Indicates version information on the program. | |
| Close | Closes the currently displayed file. | |
| View | Page Width | Enlarges or reduces the displayed page so that the width of the page fits the window. |
| Whole Page | Reduces the displayed page so that the whole page fits the window. | |
| 2 Pages | Displays two pages at the same time in the window. | |
| Zoom | Opens the Zoom dialog box for enlarging or reducing the displayed window. | |
| Full Screen | Displays the pop-up menu for changing the currently displayed method. | |
Zoom box
Click to select the magnification to reduce or enlarge the displayed page.
(3) (Help) button
Displays the Help topic for the Document Viewer.
4 / (up/down) scroll bar
Use to scroll the display up or down. To scroll, drag the box or click the arrow.
值 /left/right) scroll bar
Use to scroll the display left or right. To scroll, drag the box or click the arrow.
Projecting an Excel or Word file
Using a file stored in a computer connected to the LAN
1 Follow steps 1 and 2 in "Running a presentation - Using a file stored in a computer connected to the LAN" on page 36 (GB).
2 Select the folder which contains an Excel or Word file you want to project on the projector, then double-click that file. If the password is set for the selected computer, enter the password. When you select the Excel file, Worksheet Viewer starts and a worksheet of the selected file is projected on the projector. When selecting the Word file, Document Viewer starts and the first page of the document is projected.
Using a file stored in the projector or in the memory card
1 Double-click the Presentation Viewer icon in the Network Projector window. The Presentation Viewer starts, and the Open File dialog box appears.
2 Select an Excel or Word file you want to project, and click the OK button. When you select the Excel file, Worksheet Viewer starts and a worksheet of the selected file is projected on the projector. When selecting the Word file, Document Viewer starts and the first page of the document is projected.
Changing the size or display area of the projected worksheet
When you want to zoom in or out the projected worksheet or page, or change the area of the worksheet in view, see Help for Worksheet Viewer or Document Viewer.
About Help for Worksheet Viewer or Document Viewer
For details on operation with Worksheet Viewer or Document Viewer, see Help. Clicking the button on the tool bar opens the Help topic.
Running a Slide Show Using the Image Viewer
You can display thumbnail images of the files stored in the projector or a memory card installed in the projector, then run a slide show by selecting the images you want.
When you start the Image Viewer of the projector and select the folder which contains the files you want, the main window opens.
About the main window of the Image Viewer
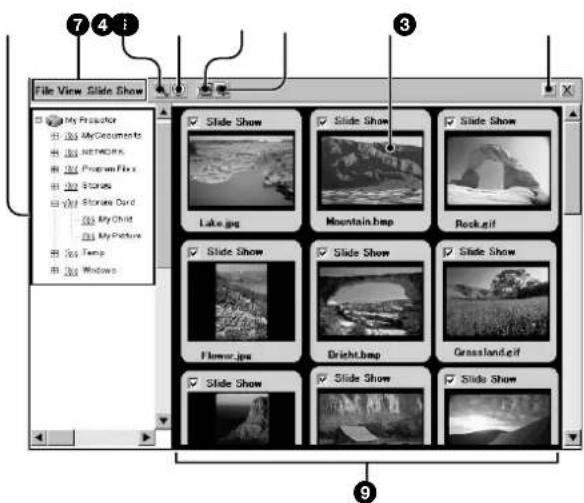
1 (Help) button
Click to display the Help topic for the Image Viewer.
②Slide
Clicking a slide displays a green frame around the slide. This indicates that the slide is selected.
③ (Slide Show Setting) button
Opens the Slide Show Setting dialog box for zooming, rotating, etc.
4 (View Show) button
Clicking the button opens the sub menu for advancing a slide.
5 (Information) button
Opens the information dialog box of the selected slide.
(6 Full screen) button
Displays the full-screen window of a slide you choose.
7Menu bar
| Menu Command Function | ||
| File | About | Indicates version information on the program. |
| Close | Closes the currently displayed file. | |
| View | Full Screen | Displays the full-screen window of an image you choose. |
| Information | Opens the information dialog box of the selected image. | |
| Sort slides | Sorts the slides in a folder by specified order. | |
| Slide Show 512 | View Show | Runs a slide show by advancing a slide selected in the sub menu. |
| Slide Show Setting | Sets up the slide show in detail. | |
| Select all | Selects all the slides included in the thumbnail window. | |
| Clear all | Cancel any selection of slides in thumbnail images. | |
| Load... | Loads the slide show setting file stored. | |
| Save... | Stores the current slide show setting as a setting file (Extension is“.SHO.”) | |
3Folder dialog box
Browsing the folders stored in the projector or a memory card installed in the projector.
⑨Slide display area
Displays thumbnail images of the slides included in the folder you select.
(continued)
Displaying a full-screen image
You can display a full-screen image of an thumbnail image selected from the main window.
1 Double-click the Image Viewer icon in the Network Projector window. The Image Viewer starts.
2 Select the folder which contains the image files you want to display from the folder dialog box. You can choose the folder stored in the projector or a memory card installed in the projector. The main window opens, showing thumbnail images of the slides contained in the selected folder.
3 Select a slide you want to display by clicking a. thumbnail slide. The green frame appears on the selected slide.
4 Right-click the slide to select Full Screen, click Full Screen from the View menu, or click the button on the tool bar. The slide is displayed to fit the projector screen.
Running a slide show
1 Follow steps 1 and 2 in "Displaying a full-screen image."
2 Select slides you want to use for your slide show.
- Check the Slide Show check box on each slide you want to use. Check all the slides you are using.
- To use all of the slides in the selected folder, click Select all from the Slide Show menu.
- If you have already stored the slide show setting files, click Load... from the Slide Show menu to display the Load Slide show setting file dialog box. Select the file you want.
For details on the Slide show setting files, see "Saving the slide show setting."
3 When you want to set up the slide, such as zooming or rotating of an image, click Slide Show Setting from the Slide Show menu or click the button on the tool bar.
The Slide Show Setting dialog box appears.
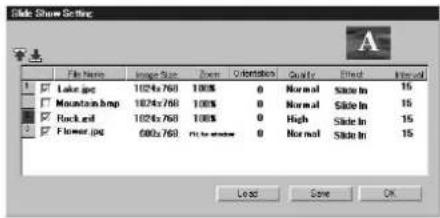
Change the settings and click the OK or Save button.
Note
When projecting a large size image file such as those in UXGA format, it may not be opened or rotated due to lack of memory. In this case, reduce the image to obtain a smaller file size.
4 Click View Show from the Slide Show menu, or click the button on the tool bar. The sub menu for choosing how to advance a slide opens. Clicking one of the options starts a slide show.
Saving the slide show setting
You can run a slide show repeatedly by using the files stored as the slide show setting files (.SHO files). You can also change the settings of the stored setting files.
To save the file
1 Click Save... from the Slide Show menu. The Save Slide show setting file dialog box opens.

2 Enter the file name, then click the OK button. The saved files are shown in the Load Slide show setting file dialog box.
To save after changing the settings
Click Slide Show Setting from the Slide Show menu to open the Slide Show Setting dialog box, and change the settings. Click the Save button to open the Save Slide show setting file dialog box. Follow step 2.
To change the settings after saving
1 Click Slide Show Setting from the Slide Show menu. The Slide Show Setting dialog box opens.
2 Click Load. The Load Slide show setting file dialog box opens.
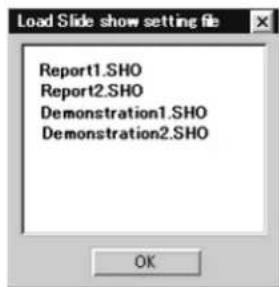
3 Select the file for which you want to change the settings, and click the OK button. The Slide Show Setting dialog box opens.
4 Change the settings, then click the Save button.
To change the setting in the main window
1 Click Load... from the Slide Show menu. The Load Slide show setting file dialog box opens.
2 Select the file you want to change, and click the OK button. The main window opens.
3 Change the checks in the Slide Show check boxes of the slides.
About Help for Image Viewer
For details on operations with Image Viewer, see Help. Clicking the button on the tool bar opens the Help topic.
Connecting to the Internet
1 Double-click the Internet Browser icon in the Network Projector window. The Internet Browser window appears.
2 Click the software keyboard icon on the task bar to display the screen keyboard, then enter the address for the homepage you want.
Using the Remote Desktop Function
The projector is compatible with Remote Desktop feature for Windows XP Professional. The feature allows the projector to access all the data stored in a computer equipped with Windows XP Professional on the same LAN. Only a single projector in a conference room allows running a presentation.
Note
To use the Remote Desktop function, it it required for the computer to register the remote desktop users who are permitted to get access to the computer. Set the Remote Desktop setting by clicking Control Panel, selecting System and then System Properties.
1 Double-click the Remote Desktop icon on the desktop window of the projector. The Remote Desktop setting window opens.
2 Enter the IP address of the computer in which the file you want is stored. The log on window for the computer is displayed.
3 Enter the user name and password of the computer. When the projector logs on to the computer, the desktop window of the computer appears on the projector screen.
4 Operate the projector to select the file you want and to run a presentation.
Note
You can use up to 256 colors on the projector.
Using the e-Mail Report Function
The projector sends mail to the addresses you specified to inform of the replacement time of the projector lamp (Lamp Reminder), the maintenance time of the projector (Maintenance Reminder) or the occurrence of an error (Error Report). You can also receive mail periodically that contains the projector's status and user information, etc. (Regular Report)
Setting for e-Mail Report function
To use the e-Mail Report function, set the mail addresses and date to where and when mail is to be sent, and which mail functions you are using.
1 From the Start menu, select Control Panel, then select e-Mail Report. The e-Mail setting window opens.
2 Click the Mail tab. The following window opens.

3 Set the addresses where mail is to be sent. Enter mail addresses in the TO: and CC: text boxes. The same mail can be sent to three different addresses at the same time.
4 Set the time and day when mail is to be sent, and the mail function you are using (Error Report, Lamp Reminder and/or Maintenance Reminder).
5 Click the Server tab. The mail server setting window opens.
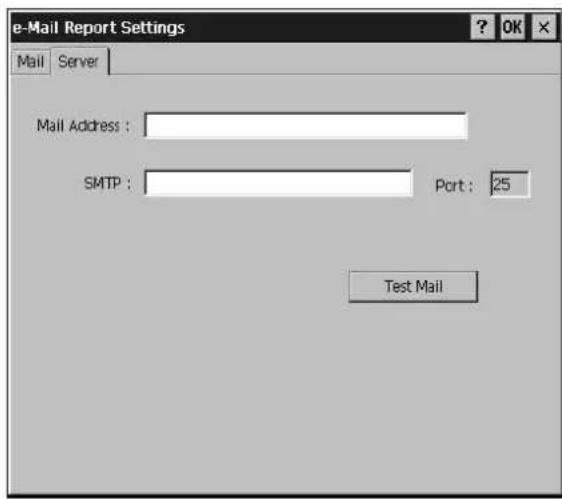
6 Set the allocated mail address, and SMTP of the mail server. For details, refer to the e-Mail Report Help.
7 When all the settings are complete, click the OK button.
To send test mail
You can send mail as a test to confirm whether it is sent to the specified addresses. Click the Test Mail button.
About Help for e-Mail Report
For details on operation with e-Mail Report function, see Help. Clicking the button on the tool bar opens the Help topic.
Troubleshooting
If the projector appears to be operating erratically, try to diagnose and correct the problem, using the following guide. If the problem still persists, consult with qualified Sony personnel.
| Symptom | Causes and remedies |
| A connection to the network is not established. | ·The PC card is not properly inserted into the PC CARD slot. →Check that the card is facing correctly, then push the card into the slot until it is firmly seated. ·The cable is not properly connected to the ETHER connector. (VPL-PX15, VPL-FX50) →Insert the plug of the cable to the connector firmly. ·The LAN PC card, wireless LAN PC card and wireless LAN access point you are using are not the specified/recommended ones. →Use the specified/recommended devices. Use of those not specified/ recommended may cause incorrect operation. For information on the specified/recommended cards, etc., see the attached “Specified/recommended PC Card/Wireless LAN Access Point.” |
| ·The network environment is not properly set up. →Check the network configuration settings of the projector. (pages 9 (GB) and 14 (GB)) →When you control the projector by using the computer's Web browser, check the network settings on the computer as well. ·When you use a wireless LAN PC card, Enable On-board LAN is selected. (VPL-PX15, VPL-FX50) →Remove the check mark from the Enable On-board LAN checkbox. ·When you are using the wireless LAN PC card, the wireless LAN is not properly set up. →Check that the Access Point ID and Encryption Key in the Connecting Status dialog box are set to the same numbers as those of the connected access point (page 12 (GB)). ·When you are using the wireless LAN PC card, Peer to Peer mode is not properly set up. →Select Peer to Peer only on a piece of equipment connected to the same wireless LAN (page 12 (GB)). ·The channel of the access point is set to 12-14. →Set the channel of the access point to 1-11. ·The LAN PC card, wireless LAN PC card, memory card or access point still does not operate properly after checking the above. →Consult with the manufacturer of the card or access point you use. When you are using the specified Sony wireless LAN PC card, consult with the qualified Sony personnel. | |
| The computer cannot access to the projector. | ·The setting of INPUT-B FUNC. (VPL-PX15) or INPUT-C FUNC. (VPL-FX50) in the INSTALL SETTING menu is not correct. →Set it to ON. ·The INPUT C/RS-232C/RS-422A select switch is not correctly set. (VPL-FE110U/M) →Set it to INPUT C. ·The browser of your computer is set to “Access the Internet using a proxy server.” →Enter the IP address of the projector in the box “Access the Internet without using a proxy server.” ·You entered the projector's IP address started with 0 (zero). →Do not enter 0 at the beginning of the number. Example: 192.168.000.001 →192.168.0.1 |
| The Auto Projector Search or Remote Desktop function does not work. | ·The necessary setting is not done on the connected computer. →Perform the necessary setting for the corresponding function on the computer (page 20 (GB) or page 41 (GB)). |
| The projector screen freezes. | The software of the projector is frozen. →Once you set INPUT-B FUNC. (VPL-PX15) or INPUT-C FUNC. (VPL-FX50) in the INSTALL SETTING menu to OFF, then reset it to ON. →Restart the projector by pressing the RESET key within 5 seconds after pressing the FUNCTION key on the supplied RM-PJ1001 Remote Commander. (VPL-FE110U/M) |
| Fonts or styles change in a PowerPoint, Excel or Word file. | In the text of the file, fonts or styles not supported by the Slide Viewer, Worksheet Viewer or Document Viewer are used. →Only the following fonts are available for the Slide Viewer. Other fonts will be replaced with these fonts; Arial, Courier New, Symbol, Tahoma, Times New Roman, Wingdings. If replaced, an end of paragraph may change according to tab or pharagraph settings. Styles not supported by the Slide Viewer will be replaced with supported styles. |
| Some characters are not displayed in a PowerPoint, Excel or Word file. | You cannot display characters that the Slide Viewer, Worksheet Viewer or Document Viewer does not support, such as Chinese. →Use the file created in English, French, Spanish, German or Italian which are supported. |
| Some features of a PowerPoint, Excel or Word file are not properly displayed or such effects are not displayed at all. | The file is using the features that are not supported by the Slide Viewer, Worksheet Viewer or Document Viewer of the projector, or the file is created with PowerPoint 2002, Excel 2002 or Word 2002. →The features will be replaced with those that are supported. Apply effects that are supported if nothing is displayed. |
| A slide show cannot be run. The message “There is not enough free disk space. Delete one or more files to free disk space, and then try again.” appears. | The memory of the projector is full. →Delete unnecessary files stored in the projector using File Manager to increase memory capacity. |
| A slide show cannot be run. The message “File size is too large. Decrease file size in any way; for example, by dividing it into smaller files, then try to restart the slide show.” appears. | File size exceeds the capacity for transition to the projector. →Check empty memory capacity in the File Manager window, then decrease the file’s capacity by dividing it into smaller files. →Click Option then Save from the Tool menu on the PowerPoint, then remove the check from Save Fast. |
| Internet Browser for the projector cannot be started. | The projector is not connected to the LAN. →Check the setups for the network configuration and wireless LAN environment. (pages 9 (GB)-14 (GB)) |
| You cannot get access to the home pages with the Internet browser of the projector, or some of them are not displayed. | Plug-in software such as Media Player and Real Player is required, or a home page you are accessing is created in Java format. →As the Internet browser of the projector is not compatible with plug-in software, it cannot display home pages that use Media Player or Real Player. The browser of the projector is not compatible with Java format. |
| The message “Password is set for the file. Enter password.” appears. | The password is set for the projector or the file. →Enter the password. When the IP address is not changed from the factory-preset one, enter “root” in the Name text box for Administrator. |
| The message “You might have entered the wrong password. Enter it again.” appears. | The password you entered is not correct. →Enter the correct password. |
© 1999 - 2001 WESTTEK LLC. All Rights Reserved. WESTTEK and the WT Logo are registered trademarks of WESTTEK, LLC.
The SONY VPL-Series projector contains materials owned by Sony and Sony suppliers, including WESTTEK, LLC. Your purchase of the SONY VPL-Series projector gives you a limited right to use these materials, solely as a part of the SONY VPL-Series projector and only as necessary to use the SONY VPL-Series projector in the manner described in the accompanying documentation. Your purchase of the SONY VPL-Series projector does not transfer any ownership in these materials to you and you are forbidden to use them for any purpose other than as part of the SONY VPL-Series projector. These materials are protected by copyright law and international treaties. Any unauthorized use, reproduction or distribution of such materials, or any portion of them, may result in severe civil and criminal penalties, and will be prosecuted to the maximum extent permissible under law.
Table des matieres
Avant l'utilisation
Fenetre GENERAL
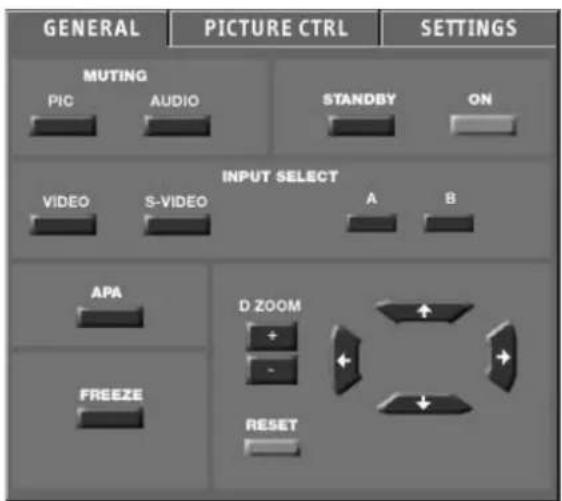
(VPL-PX15)
Fenetre PICTURE CTRL
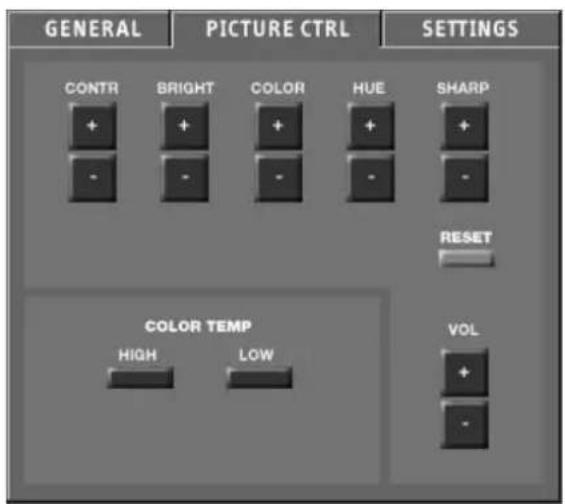
(VPL-PX15)
Pour le modeleVPL-PX15
Fenetre SETTINGS
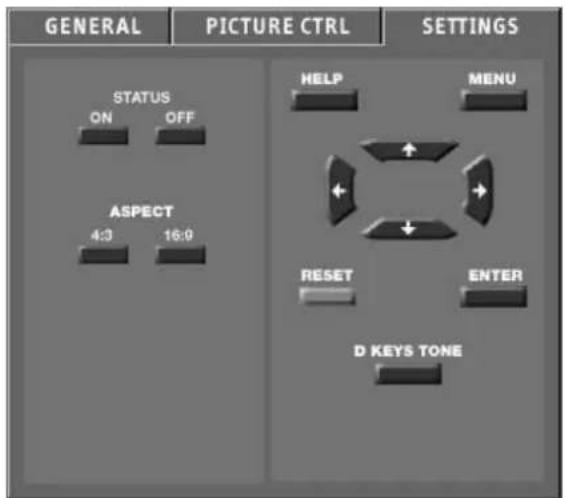
(VPL-PX15)
Pour le modeleVPL-PX15
Bouton APPLY (appliquer)
Bouton APPLY (appliquer)
Bouton (mode dipositive)
Bouton (informations)
Boton APPLY (APPLICAR)
Icono My Projector (Mi projector)
1Textfelder "Address" (Adresse)
Symbol "Presentation Viewer" (Präsentations-Viewer)
Symbol "Remote Desktop" (Remotedesktop)
Finestra GENERAL

(VPL-PX15)
Finestra PICTURE CTRL
(VPL-PX15)
Finestra SETTINGS
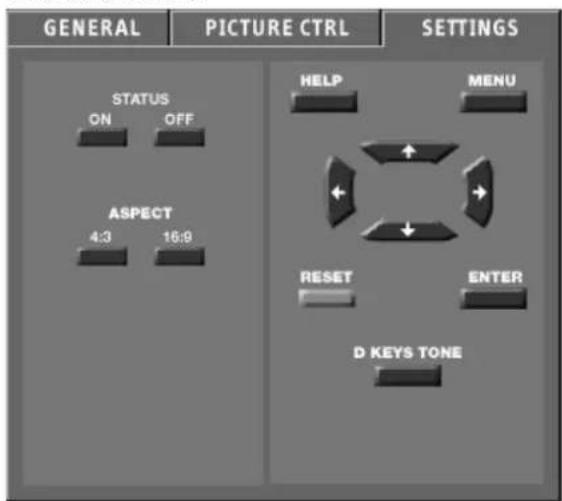
(VPL-PX15)
Pulsante (Slide Show Setting)
1 Language select(语言选择)键
③ (Slide Show Setting(幻灯片演示设定))键
6 (Full screen(全屏幕))键
显示所选择幻灯片的全屏幕视窗。