USER MANUAL Cuddle & Bubble Comfort CHICCO
WARNING: BEFORE USE, REMOVE AND DISPOSE OF ALL PLASTIC BAGS AND PACKAGING MATERIALS AND KEEP THEM OUT OF REACH OF CHILDREN.
INTRODUCTION
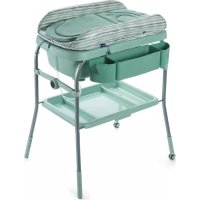
CUDDLE & BUBBLE Comfort is a practical and functional changing table with baby bath, designed to nestle the baby during diaper changing and bath time.
Components
A-Frame
A1 - shelf with handle
A2 - changing table
A3 - feet (2x)
A4 - feet with wheels (2x)
A5 - intersections with buttons (2x)
A6 - securing blocks (2x)
A7 - securing straps (2x)
A8 - safety strap
B-Tub
B1 - rubber plug
B2 - drain cap and hose
C - Accessories
C1 - storage basket
C2 - head wash
C3 - sponge basket with lid
C4 - fabric reducer
WARNING FOR THE CHANGING TABLE
- The changing table can be used for infants from moment of birth up to 12 months and 11 kg. For home use only.
- WARNING: Do not leave the child unattended.
- WARNING: Take into account risk of free flames and other sources of strong heat such as electric stoves, gas stoves, etc. in the immediate vicinity of the product.
- WARNING: Make sure that the wheel brakes are engaged before use.
-
Never use the product without tub mounted on the frame.
-
The changing table mat must always be fixed onto the frame when used. The changing table must always be used with padding on the lid so as to provide sufficient barrier to protect the baby against falls.
- Do not use the product if any part is broken, torn or missing.
- Do not use accessories, spare parts, or any component not supplied or approved by the manufacturer.
- This product must only be used by an adult.
- To avoid the risk of injury, make sure that the space above the product is suitable (there should be no shelves, furniture, etc.).
- Do not place more than one child at a time in the changing table.
- Do not place the product on surfaces that are not perfectly flat.
- All securing devices for assembly must be tightened correctly and checked regularly.
- Do not allow other children to play unsupervised near the product.
- Wait for the product to cool before placing the baby onto it whenever it has been exposed to heat.
- Do not overload the bottom shelf with weights exceeding 7kg .
- When unused, the product should be kept out of reach of children.
USING THE CHANGING TABLE
Assembly
- The boxed product is already partially assembled and the following instructions must be performed to complete it:
- Place frame A still packaged onto the floor horizontally (fig. 1).
- Install the 4 feet A3 and A4 (fig. 2).
All feet can be adjusted at 3 heights.
WARNING: To ensure the stability of the product, make sure all the feet are mounted at the same height, checking for proper engagement of the pins into the holes on the legs (fig. 3).
WARNING: the two feet with the wheels A4 must be installed on the same side of the product.
- At this point, position the frame A upright, grasp the two upper tubes and push them in the opposite direction to open the product (Fig. 4).
- Pry down on both the intersections A5 until you hear the engagement click (fig. 5).
- Push the shelf A1 downwards by placing your hand over the centre handle until fully engaging it on the frame cross tube (fig. 6).
- Install the storage basket C1 at the centre of
the front upper tubular frame, lining up the two pins of basket C1 with the holes in the tubular (fig. 7).
- At this point hang the head wash C2 to the right of the storage basket C1, by sliding it vertically downwards into the guide (fig. 8).
- Hook the sponge basket C3 to the left of the storage basket C1 by sliding it vertically downwards into the guide (fig. 9).
- Install the tub B onto the frame A, aligning the side slots on the tub with the fixing blocks (fig. 11-12). Complete the assembly of the tub by inserting the rubber plug B1 in the relevant slot and pressing the base of the plug (fig.11A) while rotating it in the relevant hole (fig. 11B).
- Complete assembly by lifting the changing table A2 and turning it to position it onto the tub B (fig. 13).
WARNING: to prevent inadvertent rotation of the changing table A2, make sure that the securing straps A7 correctly engage clamps A6 through the release buttons until you hear a click (fig. 13A - 13B).
Using the reducers
To ensure maximum comfort and ergonomics of the changing table for use in the first months of a child's life, use the reducer in padded fabric C5 supplied (Fig. 16).
The reducer C5 can be removed or secured to changing table A2 through the holes and velcro found on product (fig. 14-15).
WARNING FOR THE TUB
- Age of use allowed: from birth up to 12 months and 11kg. For home use only.
- WARNING: To avoid risk of drowning, always keep the child under hand. The child can drown in the tub in only a brief time and little water (2 cm).
Only an adult may wash the baby.
- Never leave your child unattended.
- Keep all bathing materials near the tub so as to never leave the child unattended.
WARNING: To avoid RISK OF DROWNING never leave the child unattended during the bath. Do not answer the phone or open the door. Always take the baby with you if it is necessary to leave the bathroom.
-
Do not use the tub on elevated surfaces (e.g. tables or the edge of the bath tub for adults).
Make sure that the supporting surface under the tub can support it.
Always make sure that the tub is resting on a flat, dry and stable surface. The stability of the tub should be checked before and during use.
-
Never turn the child on its stomach inside the tub.
- WARNING: To avoid burns, before placing the child in the tub pay attention to water temperature (max 38^ - 100^ ), make sure that the child cannot access the tap.
- Mix water to avoid hot and cold pockets.
- Before placing the child in the water for the bath, check that the water temperature with a thermometer is correct.
- Before filling the tub with water, make sure that the plug is seated properly.
- Fill the tub up to the MAX level indicated by the line. It is dangerous to exceed the maximum filling level of the tub.
Only one child may use the tub at a time.
- Do not leave objects in the tub when bathing.
- When using the tub make sure that the plug has been fitted correctly.
- Before placing the child in the water for the bath, make sure that the changing table is always secured in place from the side of the frame.
- Pay attention to appliances and power cables near the product.
USING THE WASH TUB
The tub B supplied can be used as follows:
- Installed on the frame A (fig. 17).
To access the tub B turn the changing table A2 over on its back side (fig. 18).
Before use, fasten the safety strap A8 to the fastening block A6 (fig. 28A).
Before filling the tub B, make sure that the plug B1 is correctly closed (fig. 20).
- On a flat surface or inside an adult bath tub (fig. 19).
- Before filling the tub B, make sure that the plug B1 is correctly closed (fig. 20), making sure to remove drain plug and hose B2 by unscrewing it to ensure product stability (fig. 21).
- Then proceed with filling of the tub B to the maximum level indicated by the appropriate symbol on the inner surface of the tub B (fig. 22).
- The hand shower for adults can be temporarily positioned in the dedicated grip on the short side of the tub B (fig. 23).
WARNING: Perform this operation before putting the baby inside the tub.
- To empty the tank B, if installed on the frame, it is advisable to use the special tube B2 (fig 25), after opening the rubber plug B1 (fig. 24).
- Alternatively, if the tank B is used in a bath tub or other flat surface, empty it by opening the cap (Fig. 24) or turning it over to drain the water.
WARNING: Drain water into a drain (e.g. bath,toi
let, washbasin, bidet).
WARNING: Drain the tub only after the baby has been removed.
- When it is not being used, the tube B2 must be hooked to the relevant fastening point (fig. 29).
- The structure is provided with a towel holder (fig. 36A-36B).

not bleach

not tumble dry

not iron

not dry clean
CLOSING THE PRODUCT
To close the product:
- Release both buttons from the fixing blocks A6 (fig. 26 - 27).
- Collapse the changing table A2 by making it turn on its back (fig. 28 - 28A).
- Remove the tub B installed (fig. 30).
- Remove all objects on the shelf A1.
- Press both intersections A5 and slightly lift them upwards (fig. 31).
- Push outwards on the shelf handle A1 to release the shelf A1 (fig. 32).
- At this point, the structure can be folded by moving the tubular profiles of the frame A together until the arms of the intersections A5 have fully closed (Fig. 33-34).
ADJUSTING HEIGHT AND LOCKING THE WHEELS
The product can be adjusted to three different heights to better suit the height of the user.
- To proceed with the height adjustment refer to drawing (fig. 35).
- For extra security and stability of the product during use, it is necessary to lock both wheels by acting on the brake levers, simply by pushing them down (fig. 36).
- In contrast, to move the product with greater ease, unlock the brakes by lifting the brake levers upward.
WARNING: Never move the product while the child is on board.
PRODUCT CLEANING AND MAINTENANCE
Periodically clean the product observing the following:
- The product can be cleaned with a moist cleaning cloth.
- Do not use solvents or abrasive products on any of the surfaces.
Always dry the metal parts to prevent the formation of rust.
- Follow the indications below to wash the re-ducer:

h by hand in cold water.

CUDDLE & BUBBLE
IMPORTANT : À CONSERVER POUR CONSULTATION ULTÉRIEURE - À LIRE SOIGNSEUÇMENT.
AVERTISSEMENT: AVANT L'EMPLOI, ENLEVER ET ÉLIMINER TOUS LES SACS EN PLASTIQUE ET LES ÉLÉMENTS QUI FONT PARTIE DE L'EMBALLAGE DU PRODUIT ET LES TENIR HORS DE PORTÉE DES ENFANTS.
INTRODUCTION
FERMETURE DU PRODUIT
WAARSCHUWINGEN VOOR HET BADJE
IcnoJb3OBaHHe NOdCTnIKN
B ueJax rapaHTn MaKcImMaIbHOrO KOMΦOpTa n əpROHOMuHOCHTn neJIeHaJIbHOrO CTOnIka dIra erO nCNoJIb3OBaHnB B IepBbIe MeCAUbl XN3HN pe6eHka, CJeNyET nCNoJIb3OBaTb MfKkyIOndCTnIKy C5, npedocTabIeMyIO B KOMNeKTAuIN (pnc.16).
IodctnIka C5 moKet cHMaTbCra nn npNkpeIJIaTbcRA K neHeHaJIbHOMy CTOLNY A2 npN nC-ONb3OBaHHn NeTnei N IINPyeK Ha n3JeNN (pnc.14 - 15).
MEPbI PPEIOCTOPOXHOCTN PN Nc- IIOJIb3OBAHm BAHHOCHK
- N3dennne npedymoTpeHo dnerTeH: 12 MecaeB, BecOM do 11 kr. PpeymoTpeHO TOnbKO DnA DomaHero nCNoJIb3OBAHnI.
BHIMAHHE!ДлпретВрашеня onacHOCTn yToNaHn, He OTXoJnte ot pe6eHka. Pe6eHOK MOxET yTOHyTb B BaHHOChE 3a KOpOTKoeBpeMn Hn3KOM yPoBHe BoDbl (2 cm).
ToIbKO B3pOcJIbI yenOBek DoJxKeH KyIaTb pe-6eHka.
- Hnkorga He octabnTe pe6eHka 6e3 npncMoTpa.
- Poirotobte BCE Heo6xOIMoe ImaMbIbpe6eHka pAOM C BaHHouKo, YTO6bl He OCTaBJIaTbe OOnHO.
BHIMAHHE! Yo6b He donyctnb, Yo6b pe6beHOK yToHyn, Hn B Koem cnyuae He OTXoHInTe ot Hero.He OTBeuaite Ha TenefoHHbte 3BOHNa a TaKxe Ha 3BOHOK B DBepb. Ecnn No Kaum-Ni60 npuHnAm Bam Heo6xOJMo BbInTu N3 BaHON KOMHaTb, BO3bMNTe C CO6o Pe6ehKa.
He nCnoB3yIne BaHHouky Ha BbICOKnX NOBepxHOCTaX (HaNPIMep, CToJIbI INN 6OpTbI BaHHoN).
- Y6eIITecb, yTO ONOpHnA NOBepxHOCTb IOD BaHHOuKo IOCTaTOUHa, yTO6bl BbIDepXkAtb ee BEc.
Bcerda npOBepaTe, yTo6bI BaHHOuKa onnpaJaacbHa POBHyIO,CyXyIO uYCTOnuHByIO NOBepxHOCTb. UCTOnuHBOCtB BaHHoCKn DOJXHa nPo-BePraTbca Nepei N B XOJe NCNoJIb3OBaHIn.
- HNKoIa He KlaInte pe6eHka Ha XNBOTnK B BaHHe.
BHIMAHHE!ДЯTORO,UTO6bIu36exKaTb OXorOBpe6eHka,nepeeroPacnoJoxeHnEm B BaHHouKe npOBepbTe TempepaTyBODbl (MaKc. 38^ -100F),pe6eHOK He DonJxeh NMeTb DOCTyN KpaHy.
- NepemeunBaTe Body n36exaHna 60nee Tropaynx nn XOIOndhix 3OH.
- Перд размшеним peбенkaВ Bodу Дя Кун,在поверьтемпетатувді ТерmonМетром.
- Pered 3anonHeHem BaHHouKn BOOn y6eInTeCb, YTO npO6ka yCTaHOBNeHa COOTBeTCTByU0IzMM o6pa3oM.
3aONHInTe BaHHouky Do IOCTnXeHnY yPOBnY, yka3aHHOrO liHnei MAKC. OnacHo npeBbluTa b MaKcImaJIbHbI yPOBeHb 3aONHeHnBaHHoUKn.
-Испόньзуг Te BaHHочКу He 6OJIe Yem ДЯ OД-HORo pe6eHka.
He octablanTe npedMeTb B BaHHOcKe npKyNaHIN.
-ПиИСПОЛБ3OBaHIN BaHHOчКп ПОВЕРЯТе COOTBETCTByIOUyIO yCTaHOBky ПобкN.
- Прждуем похитbppeбнkaВьody Кунан,在pOBepbTe,HTOпеленьсntONIK
3a6nokupoBaH C 6okOBO CTOpOHpaMbI.
CobnoaTe octopoxHOCTb B OTHOWeHN 6bTOBbIX np6OpOB uIN 3JeKToPpOBoDNK PdOM C N3DeHnEM.
NCIOJIb3OBAHNEBAHHOCHKIN
BaHHouka B, BXOJaAaB KOMnIeKtauHIO, MoXeT IcNoJIb3OBaTbcra CneDyUoHm O6pa3OM:
- YctaHOBJIeHHaHa paMe A (pnc. 17).
Длдюctура К ванноче В Heo6xOДМо nepeBepHyt bпеленьнс столк A2, nobopaunВая eroc3aundneссторныизделя (pnc.18).
-Перед Исторьогимem сеюглтыху A8 к кренихому 6лokу A6 (pnc.28A).
-ПередзалленемВанночь,убintecb,чTo npo6ka B1Зakpyta coOTBeTCTByIOUM 6pa30m (pnc.20).
Ha poBHOIOBepxHocTNnIN B BaHHe (pnc. 19).
- Pered 3aOpHHeHem BaHHOuKn B, y6eIntecb, yTO npo6Ka B1 3akpyTa COOTBeTCTByIOUm oBpa3OM (pnc.20), BbIHbTe npo6ky CInBa n Tpy6ky B2, OTkpuyNBaey B ue Y cenJx rapaHTn yCTOnyINBOcTN u3dennr (pnc.21).
3aTeM 3aONHInTe BaHHouky B Do MaKcImaJIb-Horo yPOBn, yKa3aHHOrO CneUaJIbHbIM CmBOLOM Ha BHTpeHHeN NOBepXHOCTN BaHHoUKN B (pnc.22).
- MoxHb BpeMeHHo paCNoJoxNt b dUw dIyI BaHb I B CneuJIbHbI depXaTeIb, paCNoJoxKeHbI c KOpOTko CTOpOHb I BaHHouKn B (pnc.23).
BHIMAHHE: BbInonHnTe DaHHyO nepaunIO pa3MeueHnpe6eHkaB BaHHouKe.
-Дяслва BaHNoKn B,ecIn OHa yCTaHOBNeHa Ha pame,peKOMeHdyetcN cNoJb3OBA Tb CneuaJIbHyIO Tpy6Ky B2, npedocTaNHeHHyO B KOMJIeKtauu (pnc.25),nocne n3BneueHn pe3nHOBOI npo6Kn B1 (pnc.24).
B KaueCTBe aJIbTepeHaTINBbl,ecnBaHNoHouKa B nC- NOJb3yeTcB BaHHe IIN Ha DpyrNx POBbIX NOBepxHOCTX, CJeIeYET CInBaTb ee,OTKpbIBaI np6k Ky (pnc.24),nnI nepeBepHytI dIra CInBa BOIbl.
BHIMMAHNE:BoJaIOnJXHa BbIXOaNTb uepe3 cneuaJIbHbI CNB (HaNPmEp, BaHHa, yHHTa3, paKOBnHa, 6nJe).
BHIMAHHE: CInBaIte BaHNoKy ToJIbKO BbIHyB npedBaPnteJbHO pe6eHka.
Korda He nCnoNb3yETc, Tpy6ka B2 DoJxHa 6bItb npNKpePnEHa K CneuNaBHOI TOUKe KpePnEHHa (pnc.29).
- CtrpykTypa ochaueHa depkaTeIeM dIy noToTeHeu (pnc.36A-36B).
3AKPbITNE N3DEJIIN
ДяЗakpbITNnI3dennnCneDyET BbINOJIHHTb
cneyuoune DeiCTBnIa:
- OtCTeHnTe 06e KhoIKN OT KpeIeXhBix 6NoKOB A6 (pnc.26-27).
- Chmnte neeHaJIbHbI cToJNK A2, noBopa- uHBa erO c3aDHe cToPOHbI (pnc. 28 - 28A).
- CHIMITE paHee yctaHOBJIeHHy BoHHouky B (pnc. 30).
- Y6epnte Bce npedMeTb c noJkn A1.
- HaxMMTe 06e KhoNkI shapHnpoB A5 n cnerKa noHNMMTe INx BBepx (pnc. 31).
- Haxmte ha pyuky noikn A1 dny pacenneHHa noikn A1 (pnc. 32).
- Tenepb ctpyktypa moKeT 6bItb CIOXeHa NyTeM c6nKHeHr Tpy6ok pAmb A do nOHHoro c6nKHeHr KPOHHTeHOB shapHnpOB A5 (pnc. 33-34).
PEGYIIMPOBKA BbICOTbI N BLOKINPOBKA KOJEC
I3dJIne MoKet 6bITb OTpeYnIpObaHo Ha Tpex yPOBHX BbICOTb IJIO obeCneHnHaNlyUeero COOTBeTCTBnPoCTy NObb3OBaTeJI.
- pyerynipOBKn BbICOTb CJIeNyEt ObaaTaBcK yka3aHnM pncyHka (pnc. 35).
Buejx 60bwee 6e3oNaChOCTn uYcToHBOCTn H3dEINr npu nCNoIb3OBaHN, cJeDyET 3a6NOKIpOBaTb 6oa KOJeca NytEm BO3JeNCTBnHa pblaTn TOPMO3a, IpocTo HaKIMaBHN3 (pnc.36).
- Haobopot, Bцянх Han60e8 yD6HOro nepemeueHn 3dJIy, cIeJyET pa36NOKupOBaTbTOPM03a, NOHIMaB BBepx pbuArn TOPM03a.
CHCTKA I YXOD 3A IN3DEJIENEM
Pon3BOJNTe nepnoDnueckyO ouNCTky n3dE Jnn, BbIOJHJ CNeNyUoJe yKa3aHn:
-Издени можеюцаьсь влжног Тяпков.
He nCnoJb3yIte JIry OUcTKn pAcTBOpuTeNn a6pa3NBHbIe cpeIcTba.
- BbItnpaIte HacxO MeTALnueckne yactN, TTO6bI npedOTBpaNTb 06pa3OBAHne pxkABuHbI.
-Дя MOй NOДСТИКN CLEДУITE npVBeDEHbIM dAJIe yKa3aHnM:

paTb BpyHyIO BXOJIOHOI BOe

He ot6eJIbBaTb

He cyuHTb B ceHTpnpdyre

aДNTb

He npdBepraTb xHmUeCKo YnCTke

CUDDLE & BUBBLE
BAJKINBO: 36EPEKITb ДЯ ПОДАЛБШОГВИКОРNUCTAH- НЯ Y MAйБУTHьOMY - YBAЖ- HO ПСОЧNTAITE.
YBAGA: INPEED BUKOPUCTAHHAM 3HIMITb I BUKINHBTEBCI HABHI PIACTIKOBI NAKETN TA PEWITY KOMNOHEHTIB YNAKOBKN BINO6y. B6yd-b-akomy PA3I, 3BEPiAInTE IX B HEIOCTUHNOMY DIAJ DIITEIMICU.
BCTYI
Bupi6 CUDDLE & BUBBLE Comfort - ue npaKTHHn Ta yHKUHaBn CNOBnBaHn CTOnIK 3 BaHHoKoH, pN3HaueHn DnB NKOpCTaHH nIac 3amHnPiDy3HnKa Ta KypaHHnDHTHH.
KOMTOHEHTM
A-Kapkac
A1 - noiunka 3 pyukoIO
A2-CNOBINBaIbHNI CTONIK
A3 - Hixk (2 wt.)
A4-HixKn3 KOJecamn(2 wt.)
A5- wapHipn 3 KhoNkamn (2 wt.)
A6 - φικατόρη (2 υτ.)
A7 - φikcyuqi peMHU (2 mT.)
A8-PemHeIb 6e3neKn
B-BaHHOuKa
B1-rymoBa npo6ka
B2-Дренихна КршkaТа Тубka
C-Akcecyapn
C1-KoHTeHepIpeuei
C2-BaHHOuKaIJI MMTTROJIOBNI
C3 - BiDcik JIy6Ku 3 KpnWkoio
C4-TkahnHHHeproHOMiHHMaTpaUHK
3AYBAXEHHACTOCOBHO CNOBUNBAJIb-HOToCTOJNKA
CNoBnBaIbHn CTOnIK npn3HaueHo IJIaItei BIKOM BiH HapOJKeHHo Do 12 MicuB Ta BaroIO do 11 Kr. Bupi6 npn3HaueHo JnWe DJa DomaHbORO BnKOpNCTaHHa.
- YBAGA: Hikon He 3aIIuMaTe dntnHy 6e3 HaJIy.
- YBARA: He 3a6yBaIe npo He6e3neKy BiIckpn
TORO NOIyM' Ta iHux Dxkepe Tenn, TaKx Ja eIeKtpnHi Ta ra3oBi neu Too y 6e3noceped Hi 6n3bKocTi BiD Bnp6y.
- YBARA: Пеки ВИКОПИСТАННМпЕКОHAITecb, lo Ha KOLecax 3aДЯнг RAJIbMa.
HikonHe BnKOpncToBnyTe Bnpi6 6e3 MoHToBaHoHa Kapkaci BaHHOuKN.
MaTpaCnOBuBaJbHorO CTOnIka 3aBxJn Mae 6byTu 3aΦIKCOBaHn Ha KapKaci NiD uac BnKOpnCTaHH. CnOBuBaJbHn CTOnIK 3aBXJn Heo6xIDHO BnKOpNCTOByBATN 3M'AKOIO O6NBKOIO, Aka NOKpNbAe KpnUkY, 0o6 3a6e3neHTn DoCTaTHi 6ap'epn Dnra 3axNCTy DnttHN BiD naINb.
He BnKOpncToByIe Bnpi6, kkuO kKa-He6yDb DeTaJIb N0wKoJKeHa, BiipBaHaHa a6o BiCyTHra.
- He 3actocobyTe akcecyapn, 3anachi yactuHn a6o kOMnoHeTn, He nOCTaBJIeHi a6o He yXBaJIeHi BnPo6HnKOM.
- Lii Bnpi6 Mae BnKOpNCToByBaTn BnKlIOuHO dopocna oc6a.
ДяункHeHH np3nky noKoJxHnpeBipIte,io6 naBnpo6om 6yNo 3a6e3neHo HaleXn npocTip (He NOBnHO 6yTu nOnuYok,Me6nib,ToIo).
- He BnKOpNCToBMyTe CNoBnBaIbHn CTOnJIkДЯ KJIbKOx MaJIIOKIB OJHOuacHO.
He BCTaHOBNIouTE BuPi6 Ha HepiBHi NOBepxHi.
Bci Kpiinbhi Detani, npn3hauehi dna MoHTaKy, 3abxdi Heo6xidno npabunbHO 3atryBaTu, perynpho nepebiprtu Ta nTaryBaTu y pa3i Heo6xidHocti.
He do3B0JnTe iHm dIyram rpatnc6iJa CnoBvBaIbHOrO CTOnka 6e3 HaJMy.
-Писяпepe6уванняВиpo6у nДВПИВOM BИСОkoI Temператур nOДбайт npo Te, IO6 Вирio OXOJOHOy,пepш HIX KlaCTN Ha HbOToДNTINHy.
He 3aBaHTaKyIte HIXKIO NOINuKy peaMn BaTROIOHaD7Kr.
Tpmae Bnpi6 noani BiD dite, konn Hm He KopncTyETecb.
BVKOPNUCTAHN CNOBUBAJbHOROCTOJIKA 36npaHH
Bupi6 y kopo6ci Bxe qactkoBO 3ibpaHn.ДЯ 3aBepweHHaMOHTaxy Heo6xIDHO BIKOHATN Hactyni onepaui:
1. NocTaBTe 3e 3i6paHn KapKac A rOpNtOH TaIbHO Ha nIyory (MaI. 1).
2. Tenep BCTaHOBITb 4 HixkN A3 Ta A4 (MaI. 2). Bci HixkN MoXHa peryIIOBAtn NO BNCOTi y 3 pi3Hnx NONOKeHHx.
YBAFA: Lio6 rapaHTyBaTn CTiIKcTb Bnpo6y, nepekoHaIteCb, 10 BCi HIXKN 3MOHTOBaHI Ha OJHAKOBII BNCOTI, NepeBipraUOn IpaBnJIbHe 3'EDHaHHaHTNΦTIB 3 OTBOpAMn Ha HIXKax (MaI. 3).
YBAGA: DBI HIXKNI 3 KONEcAMN A4 BCTaHOBIOIOBTbCn Ha ODNOMY KOPOTKOMY 6Oci Bnpo6y.
- Tenep noctabte Kapkac A BeptnkaJIbHo, Bi3bMiTbcra 3a BepxHi Tpy6Kn Ta NotarHITb iX y pI3Hi CTOpOHn, IIO6 po3Knactu Bnpi6 (MaI.4).
- HatnchItb Bn3 Ha 6nDbA 7apHnpA5, nOKn He noyTe KnaCaHHa,Ke NiTBePdxKyE fikca-tio (MaI.5).
- 5TOBxHITb NOIuKy A1 BHN3, B3ABWn6 pyKO3a pyKy nOcepeHHi, 0o6 BOHa NOBHiCtO cina Ha nOpeuHy Tpy6ky Kapkaca (MaJ.6).
- BctaHOBIb KOHTeHep IJIpeuei C1 nocepeIHHI nepeHNboI BepxHboIT py6Kn, 0o6 cniBnAII nBa BVCTyNI KOHTeHepa C1 3 OTbOpAMN Ha Tpy6ui (MaJ.7).
- Tene npinkpinitb 3 npaboro 60ky KOHTeHepa Dnpeey C1 BaHHouky Dnry MNTra RoIOBnC2, NotarhyBun II BepTKKaJbHO BHN3 NO Ha-npamHn (MaJ,8).
- Tenep npnkpiitb 3 liBoro 60ky KOHTeHepa dIy peey C1 biDcik IyRy6Kn C3, notarHyBUn Ioro BEPTNkAlbHO BHN3 NO HAnpMHi (MaI,9).
- BCTaHOBIb BaHHOuy KBy H a KapKac A TaKIM cHOM, 6iHi BnPi3N BaHHOuKn CnIBnAdAIn 3 6IokyUOUMn oikcatopamn A6 (MaJ.11-12). 36epiBt BaHHOuyKBy, BCTaBnBUnrYmOBy npo6Ky B1 y BiINOBiHN OTBip, dJa YORo Heo6xIDHO CTnCHyt NHXHIO uactHy npo6Kn (MaJ.11A) Ta BCTaBHTN II oBeptOBm pyXOM y BiINOBiHN OTBip (MaJ.11B).
- 3aBepHTM OHTaK, iHIMiTb CNOBnBaJIbHn CTOLNk A2, NOBepTaUOu NOro TaKIM YINOM, 3o6 BIn PO3MiCTNBcR Ha BaHHOchB (MaJ.13).
YBAG: 3a06iraHH BnnaKOBoro nepeBepTaHH CnoBnBaIbHOrO CTOnIka A2,nepeKoHaTecb,io6 fikcyoi peMHci A7 6yIn npabnIbHO npnkpiinHe I do 6lokyuOx fikcatopib A6 3a DonOMorOIO KHOON, NiITBePdxKeHHm OTOE KlaaunH (Ma1.13A-13B).
BmKopnctaHn eproHomiyHoro MaTpaunka
Iio6 rapaHTyBaTH KOMΦOpT Ta eproHOMiKy CIOBnBaJIbHOro CTOnIKA PrN BnKOpNCtAHHi B nepSiMICaI JKNTTA DNTUNH, BnKOpNCTOByTe TKaHNHn HaNBHn ePROHOMiHm MaTaunC5,AKn IDoJaETbcra (MaJ.16).
EproHOMiHm MaTpaUHK C5 MoXHa 3HImaTu Ta npKpIInrTa Do CNOBnBaIbHOrO CTOnIkA2 3a DOnOMoTO PeTeNb Ta 3acti60-KInnyuOK, 10 3HaxOJrTbcra Ha Bnpo6i (MaI. 14 - 15).
3AYBAXEHHCTOCOBHO BAHHOKNДЯ KYNAHN
Дляякoro Biky: BiHapodxeHHno 12 mci-
uiB Ta DoCgHHeHH Barn y 11 Kr. Bupi6 npn3Ha-ueHO JIuwe DnAOMaUHbOTo BNKOpNCtAHH.
- YBARA: 3a06 3anobirn pu3nky noToNaHH, 3aBXDN TpIMaIte DHTnHy pykAmN. NTnHa MOXe yTOHyTu BaHHouci dyjke WBNKO Ta npH HeBeNIKOMy pIBHi BOi (2 cm).
KynaHHAM DTUNH MaE 3aMaTncb Nnue dopocna oc6a.
Hikon He 3aIIwaIte dITnHy 6e3 Hargy.
-ПлготуиTe BCE Heo6xIDHe Дя КупннЯ nopyu 3 BaHHOkoH, uOb He 3aJIWIaTNДNTNHy OdHV.
- YBARA: 3a063an06irtn PN3NkY NOTOJAHH Hb RKOmy pa3i He BiXoDbTe BiD nHTnH Ni dac Kyn HHe BiNobiaute Ha TelefoHHi D3BiHN Ka Ta D3BInKn y Dbepi. RaQo Bam 3 Bydb-koipnunHn NotpioHO BnTn 3 BaHH, 3a6epitb 3 Co6oIO nHTnHy.
He BUKOPICOTOBYIte BaHHOcKy Ha NiHrTnx NOBepxHx (Ha npKnAd, Ha cToJax a6o Ha KpaIO BaHHN dIa DOpocnX).
- IpekeKaHTeCb, 06 onopHa nobepxHn iD BaHHoUKOIO nla KynaHHa 6yna DOCTaTHbOIO nla II YTPMaHHa.
3abxnn nepeBipraTe, uo6 BaHHouka cnnpaIacb Ha pIBHy, cyxy Ta cTInky nobepxHIO. CtiKicTb BaHHouKn Heo6XiIdNo nepeBiprTn nepei Da nJ yac BnKOpNCtAHN.
HikonHe KnaIbIb dHTHy XNBOTIKOM Ha IHO BaHHOCHN.
- YBAGA: 3anobirn pn3ny onikib, nepu HIX caJkaTn dHTHy y BaHooKy, 3BepHt b yBaI r Hy Ta TEmpeatpy BOn (MaKc. 38^ - 100^ ); YHIMOJIINBTE dHTNHi DOCTyI Do KpaHy.
- Iepemiatae Body, 06 3aio6irn HaeBHOCTi 6ilbI rapyux aOxOIOHNX 3OH.
- Nepsh Hix 3aHypoiBaTu dntuHy y BODy dny Ky- nahanHry, nepeBipTe Temnepatpy BODn TepMoMeTPOM.
- Ipeen TUM R K HAnOBHnTn BaHHOuy BDOIO, nepekoHaITeCb, 06 npaBnIbHO 6yJa BCTaBHeHa npo6ka.
- HanOBHIne BaHHouky BDOIO Do pIBH3 no3HaUKO MAX. He6e3neuHO nepeBnUyBaTN MaKcImaJIbHNI pIbeHb HaNOBHeHHa BAHHOUYK.
Banhouka npn3haeHa Jny KynHnJnWe OndHiEi DHTHHN ODHoyaCHO.
He 3aIIuIe 6yIb-IAKnx npEIMetIB y BaHHouCi nIi Yac KynaHH.
Пд уасвикористань BaHHOунпpebipЯTe, u6 npabuBHO 6vna BCTaBNeHa npo6ka.
- Nepsh HIX 3aHypIOBaTN DNTINHy y BODY dJa KyNaHH, nepeBipTe, uo6 CnoBnBaIbHi n CTOnIK 6vB 3aΦIKCOBAHn Ha KapKaci.
3BepHiYyBarhyHa eNeKtpnHi no6yTobi npnaa a6o eNeKtpnHi Ka6eni nopyu 3 Bnp06om.
BVKOPUCTAHHBAHHOCHINJYKYNAHN
BaHHouky B, 10 HaadaeTbcra, MoXHa BnKOpncTOBByBaTN HAcTyHnHm YnHOM:
BCTaHOBnEHa Ha Kapkac A (MaJ. 17).
- Ⅲo6 DiCTaTnC BaaHNoKuB, Heo6xIaH No nepeBepHyTu CnoBuaBbHm CTOnIK A2, BiDknHyBshn NOrO Ha 3aHIO CTOpOHy BInpo6y (MaI.18).
- Ipeep BnKOpNCTaHHm Heo6xHNo npNKpInTu peMHeCb 6e3neKn A8 do fikcatopa A6 (MaI. 28A).
-Перед Тимяк Наобновати Ванночу B,переконайтесь, по павильно закрета побka B1 (man.20).
- Ha pibhi nOBepxhi a6o y BaHHi dIy dopocnix (MaI. 19).
-Перед ТИМ РАновьати Ванhoeу B,пepeконайтесь,цоб павильно 6уна зakрпагпpoбka B1 (man.20);Зврпгь увагу на Te,цоб6уна 3нята дрени Кршka та Трубka B2,ВИКPyTNBши ii,цоб rapaHTyВаТи CTiINKICTb Bnpo6y (man.21).
- HanobHitb BaHHouky B do MaKcImaJIbHOro piB-H, No3HaueHOrO cNeiJIaIbHIM CmMBOJOM Ha BHyTpIiHiN NOBepxHi BaHHouKn B (MaI. 22).
- MoXHa TmUaCOBO BCTaHOBUTn DyUOBn PO3nIIOBau 3 BaHHn dny DOPOCSnX y BiINOBiDne rHizdo Ha KOpOTkI CTOPoHI DiTAYOoi BaHHOuyKn B (MaN.23). YBArA:BnuKoHaIe tio OepaIIO nepeD TmJK caJxATn DITNUHy B BaHHOuyKy.
Длг.TOrO 3nTn BOny 3 BaHNoKn B,Якso BOHa BCTaHOBJIeHa Ha KapKac,peKOMeHnyETbCЯКориCTyBaTncb CneuiJIbHoIO Tpy6koIO B2, Ⅲo HadaeTbcR B KOMIIeKti (MaI.25),nicra.Toro Yk BiIDkpNTa rymoBa np06ka B1 (MaI.24).
- JKIOJIITAYBaHHOuKaB BIKOPINCTOBYETBCy BaHNI DnI DOpOCInx a6o Ha pIBHX NOBepXHx, 3nnTe 3 HeI BOy, BiKpNBUn np6kU (MaI.24) a6o npeBepHyBun II, Uo6 3 HeI BNTeKla BOa. YBAI: 3nnIte BOy y BiNobiHN CTOK (HaPnKnaIa, BaHHy, yHITa3, yMnBaJIbHNK, 6iJe).
YBAG: 3nBaIe BOy 3 BaHNoUkN IuIe nicna TORo,ЯK 3a6epTe 3 Hei dHTHy.
- RaKIO Bnpi6 He BnKOpncTObyETbC8, Tpy6ka B2 Ma€ 6yttn pRKnPirIeHa Do BiINOBiHOrO Miczra npEHaHHa (MaI. 29).
- KOHCTpykciMaE KOHTeINHeP dIa CepBeTOK (MaJ.36A-36B).
CKIADAHNBAHPOBv
TTOO nepeuTN Do CKnaDaHnB Bnp6y, Heo6xIDHO 3po6TuN HAcTyHHe:
- Po3cti6Hitb 06nDbi KhoIKN Ha φikcaTopax A6 (maj.26-27).
- CklaqItb cnoBnBaIbHn cToIaK A2, BiKInHyB- 1nn Ioro Ha3aI (MaI. 28 - 29).
- 3HimiTb paHiIe BCTaHOBNeHy DITy BaHHOu-
Ky B (man. 30).
- Y6epiB Bci peu 3 noNuKn A1.
- Hatncitb obnBi KhoNk uapHnpiB A5 i TpoKn nHimtB ix Bropy (MaI. 31).
- NotarHItb Ha3OBHi pyuKy noJnukA1, 106 Bi'EnHaTu noJnuky A1 (MaI. 32).
- Tenep Kapkac MoKHa cKnactn, 3BiBUn Tpy6Kn Kapkaca A Do NOBHorO cKnadaHn pUarIB 3 IapHnpAmA5 (MaI. 33-34).
PEYUIOBAHHK OJIEC NOBUCOTNA BLOKYBAHH
BncoTy Bnpo6a MoKHa peRyIIOBaTu, BnKOpncOByuOi Tpu pi3Hnx pIBH, 0o6 Kpaue npunctocyBatn Ioro do 3pOCTyBaua.
- Lio6 nepeTn do peryIIOBaHHa BucOTn, NOINBt b Ha MaJIIOHOK (MaI. 35).
-Дя 6иьwoi He6e3nekn Ta CTiKoCTI Bnpo6y nID yac BnKOpNCtAHHr He06xIDHO 3a6NoKyBaTn O6nDa Koneca 3a DOnomOroTo ralbMIBHnx pnuarib, npocTo HATncHyBwn IX BHN3 (MaI.36).
Habnaku 106IeKo nepectabuNTu Bupi6,po36ko Kynte ralbma, nHraBun Bropy ranbMIBHi pUar.i. YBAFA:Bupi6 MoKHa nepecyBaTu, KOIN B HbOMy HeMaE dHTHH.
CHUHHA TAOJIA 3A BINOBOM
NepioDnHOn YnCTiB Bnpi6, DOpTmMyOuNCb Ha-ctynHnx IHCTpyKciI:
Bupi6 MoXHa YIcTITN BOIIOIO cepBeTkoIO.
- He BnKOpNCTOByIte po3UnHHNKn a6o a6pa3NB Hi peYOBHN Hi Ha JkNX NObepxHax.
- BntpItb Docyxa MetaneBi YactnHn, 06 3ano-6irtn yTbOpEHIO ipx.
- UIO6 BUNpaTn ePROHOMiHm MaTaPcNk, DOTpNMyNTecb HAcTyNHx IHCTpyKciI:

TINBpyHy BXOJIOHNI BOJI

He BiδiδiIOBaTNI

He cyuHTmexaHHiHnM cnocobom


He nida batni ximuihui uinctci

CUDDLE & BUBBLE
IMPORTANTE: GUARDE ESTE MANUAL PARA CONSULTAS FUTURAS - LEIA ATENTAMENTE.
ATENÇA: ANTES DE USAR O PRODUTO, REMOVA E DESCARTE SACOS PLÁSTICOS E TODOS OS ELEMENTOS QUE FACAM PARTE DA EMBALAGEM DO PRODUTO OU MANTENHA FORA DO ALCANCE DAS CRIANÇAS.
INTRODUÇÃO
JSSS JSSS JSSS JSSS JSSS JSSS JSSS JSSS JSSS
(1)
(2 JSLJI) A4 g A3 a 81 Jg81 S
cLaij ai jie Jao 1
Jc
Jolwol Jowll jai jao jai jao.
(3 J<JJ) 1J2J1
A4 15
( x,y) = ( ab,52ab) . 若 b 1 .
Lwolg LwJ, A J<.Aa: aJis Joc 3
Poi j GwS oll 1821 g Log a n w l o
(4) 1,2,3
Cgws gwi A5 jlll jclbll lc hoi 4
(5J≤JJ)(<1.1S>
Jw81 jai 1c Jg jwA1 5
JgU gglglaolaiy
(6) 若正方形 且1/2.
121 LbX 6C1 jssil alw
C1 aLwJ sLaWoo oJ LcR aBg gLoJI yLo21
(7) 可分类 & 可分类 唯一性 & 唯一性 唯一性.
1cC2wJll JwE g o glo 8a dJl0o .7
Jawgoc Jw alw. C1 w
(8)
glc 1b2oogdl C3 aiewai alwll galei.8
Jewgoc Jc JGLsC1 jscil alw
(9) 1,2,3,4,5,6,7,8
aB
J<.JI) Jla 20 yg 1c aai
JLJ 11-12
0123456789012345678901234567890123456789012345678901234567890123456789012345678901234567890123456789012345678
J<11) aannn 11a
.11B
Lagg A2 jieji AJgIb gooJI JaiS.10
(13 JJJ) B jzglg Lge
A2 1g A2 g aJgIg Jg Ig
A6 LlIg JcA7 JcAaJc
LcLcG G aJc
.13B-13A J<JI)
Lai
Jlalll 121 Jlaa n c snae gann aJn Jg j
Jac no Jg81 gagill plssw81 sic yjil alglb
Jlaall C5 jaiplaswl Ic Jab
.16 J5 JJI) G 20 g
JLa no A2 jaiill alglbl aaii g C5 iaii gl
.14-15 J5 JJI) jll Lgogg
jgduol
Jag jg jg jg jg jg jg jg jg jg jg jg jg jg jg jg jg jg jg jg jg jg jg jg jg jg jg jg jg jg jg jg jg jg jg jg jg jg jg jg jg jg jg jg jg jg jg jg jg jg jg jt J 11 12
jaii iiai iiai iiai iiai iiai iiai iiai iiai iiai iiai iiai iiai iiai iiai iiai iiai iiai iiai iiai iiai iiai iiai iiai iiai iiai iiai iiai iiai iiai iiai iiai iiai iiai iiaii
jaii iaii iaii iaii iaii iaii iaii iaii iaii iaii iaii iaii iaii iaii iaii iaii iaii iaii iaii iaii iaii iaii iaii iaii iaii iaii iaii iaii iaii iaii iaii iaii iaii iaii iAI
jaiil aai g aai g aai g aai g aai g aai g aai g aai g aai g aai g aai g aai g aai g aai g aai g aai g aai g aai g aai g aai g aai g aai g aai g aai g aai g aai g aai g aai g aai g aai g aai g aai g aai g aai g
ai = j = 1^maij S ai = _j = 0^ma_ij S
JL 10000000000000000000000000000000000000000000000000000000000000000000000000000000000000000000000000000
yolig Eai jgimn b
S OBC = S COD + S BOC - S BOC
(35)
jLJg
11 11
(36 Joo) Joo y Lgog
15 15
Lc8 11
a1s1 JaaJg2gglslil
aillwog ciill iabii
Lolololololololololololololololololololololololololololololololololololololololololololololol
a b a a h e p 111 a b ii 5 -
2b
yjgSi aieiie 15jx 10
- 实验原理
jia 1 Jwic ailll lLg
2l LCLg
W
Jao Jaowei 8
A
gLg5 a 10
图
SIL
员
Lol Li li:Li xi xi xi xi xi

ARTSANA S.P.A.
ARTSANA GERMANY GMBH
Borsigstrasse 1-3
28923 Alcorcon (Madrid)-Spain
902 117 093
www.CHICCO.es

ARTSANA PORTUGAL S.A.
ARTSANA POLAND Sp.zo.o.
Aquarius, UI. Połczyńska 31 A
01-377 Warszawa
+48222905990
www.CHICCO.com

ApTcaHa C.n.A.
Bua CandapanHn KaTeenn,1
ARTSANA BRASIL LTDA.
Dec V. Ruben Dario 1015
Colonia Lomas De Providencia 44647
Guadalajara, Jalisco-Mexico
018007028983
www.CHICCO.com.mx

ARTSANA ARGENTINA S.A.
Uruguay 4501
Victoria Cp(1644)
San Fernando-Buenos Aires-Argentina
0810-888-2442
www.CHICCO.com.ar

ARTSANA INDIA PRIVATE LIMITED
ZTh Floor, Tower B, Paras Twin Towers.
Golf Course Road, Sector 54
Gurgaon - 122002 - Haryana, India
(+91)(124)(4964500)
www.CHICCO.in

ARTSANA S.p.A.
22070 Grandate (CO)-Italy
Tel. (+39) 031 382 111
Fax (+39) 031 382400
www.CHICCO.com

NOTE


46079348000000_1315
ARTSANA S.p.A.-Via Saldarini Catelli, 1 - 22070 Grandate (CO) - Italy
Tel. (+39) 031 382 111 - Fax (+39) 031 382 400 - www.chicco.com