UB 200 CosyNight - Heated blanket BEURER - Free user manual and instructions
Find the device manual for free UB 200 CosyNight BEURER in PDF.
| Product type | Heating blanket (heated mattress pad) |
| Brand | Beurer |
| Model | UB 200 CosyNight |
| Compatible dimensions | Mattresses 90 × 200 cm and 100 × 200 cm |
| Power supply | Mains (plug adapter) |
| Heating zones | Body and feet, individually adjustable |
| Temperature levels | 9 levels per zone (0 = off, 1 = min, 9 = max) |
| Automatic shut-off timer | 1 to 12 hours, adjustable in 1-hour increments |
| Quick heating | Yes, "Turbo" mode during the first 10 to 50 minutes |
| Remote control | Via free "beurer CosyNight" app (WLAN) |
| ECO level | Yes, for levels 1 to 4 (low consumption) |
| Anti-allergy level | Yes, level 9 for 12 hours |
| kWh consumption display | Yes, via "kWh" button |
| Safety | Safety system with automatic shut-off in case of fault |
| Washing care | Machine washable at 30 °C, delicate cycle, max 5 washes |
| Material | Textile certified Öko-Tex Standard 100 |
| Radio frequency | 2.4 GHz (Bluetooth Low Energy and WLAN) |
| Smartphone compatibility | iOS ≥ 8.0, Android ≥ 4.4, Bluetooth ≥ 4.0 |
| Package contents | 1 heated mattress pad, 1 switch, 1 user manual, 1 quick guide |
| Certifications | Öko-Tex Standard 100, RED 2014/53 EU compliance |
Frequently Asked Questions - UB 200 CosyNight BEURER
User questions about UB 200 CosyNight BEURER
0 question about this device. Answer the ones you know or ask your own.
Ask a new question about this device
Download the instructions for your Heated blanket in PDF format for free! Find your manual UB 200 CosyNight - BEURER and take your electronic device back in hand. On this page are published all the documents necessary for the use of your device. UB 200 CosyNight by BEURER.
USER MANUAL UB 200 CosyNight BEURER
GB App-controlled heated underblanket UB 190
App-controlled fully fitted heated underblanket UB 200
Instruction for Use 13
- Getting to know your device 14
- Included in delivery.. 14
2.1 Device description.. 14 - Important instructions Retain for future reference 15
- Intended use 16
- Operation 16
5.1 Safety 16
5.2 Initial use. 17
5.3.Manual operation.. 17
5.4. Automatic operation (remote operation)..19
- Cleaning and maintenance 20
7.Storage 21
8.Disposal 21
9.What if there are problems? 21 - Technical data 21
Explanation of symbols
| Read the instructions! | 30° | 30°C extra gentle washing program | |
| Do not bleach | |||
| Do not insert pins! Do not insert pins! Do not insert pins! Do not insert pins! Do not insert pins! Do not insert pins! Do not insert pins! Do not insert pins! Do not insert pins! Do not insert pins! Do not insert pins! Do not insert pins! Do not insert pins! Do not insert pins! Do not insert pins! Do not insert pins! Do not insert pins! Do not insert pins! Do not insert pins! Do not insert pins! Do not insert pins! | |||
| Do not iron | |||
| Do not use folded or rucked! | Do not dry-clean | ||
| The textiles used for this device meet the stringent human ecological requirements of Oeko Tex Standard 100, as verified by Hohenstein Research Institute. | |||
| 0-3 | Not suitable for children under 3 years. | ||
| WARNING: Warning of risks of injury or health hazards | |||
| CAUTION: Safety information about possible damage to appliance/accessories. | |||
| NOTE: Important information. | |||
1. Getting to know your device
Manual heating using the controller supplied
- Separate temperatures can be set for the body and foot areas
- Switch-off time 1 to 12 hours in 1 hour intervals
Remote-controlled heating via WLAN
- Can be controlled even on the move via smartphone and the free “beurer CosyNight” app
- Heat programs can be created
- Individual heat programs for each day of the week
- Multiple heated underblankets can be controlled with one smartphone
- Corrections can be made at any time with the controller
System requirements
iOS ≥ 8.0, Android™ ≥ 4.4, Bluetooth® ≥ 4.0
List of supported smartphones:

- For your own protection, use WLAN protected against unauthorised access.
2. Included in delivery
1 Heated underblanket
1 Controller
1 Instructions for use
1 Brief instructions
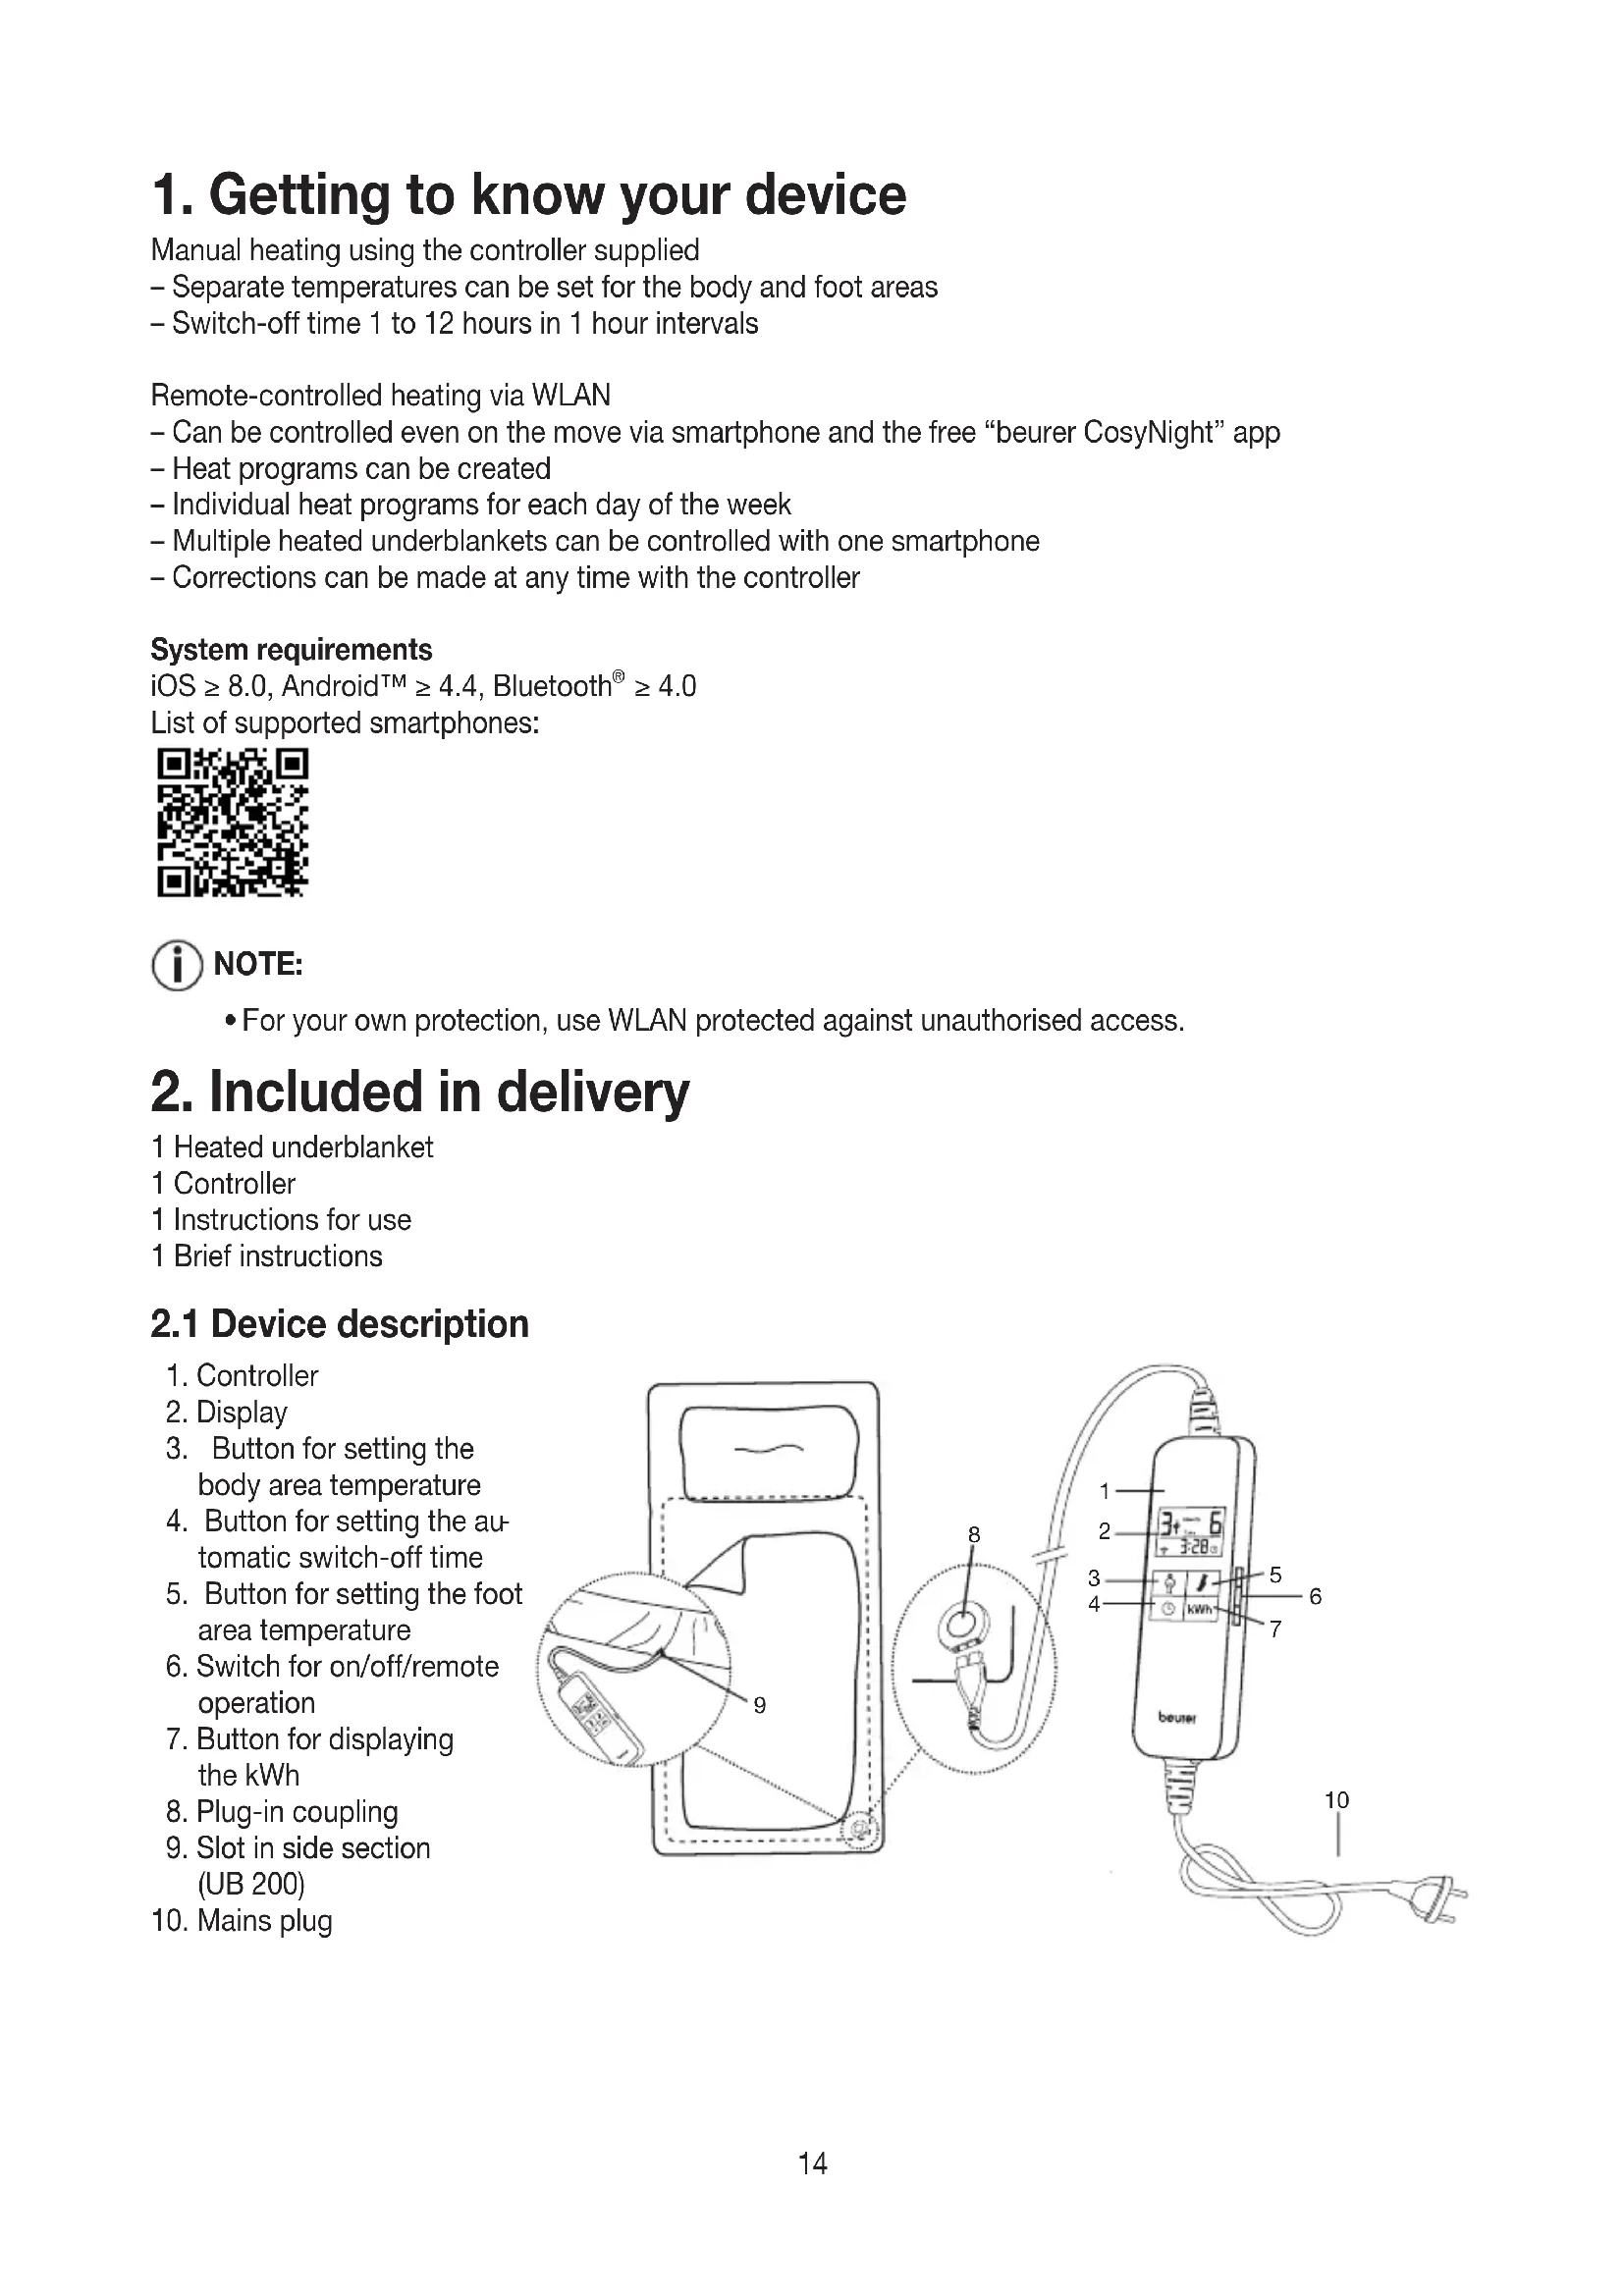
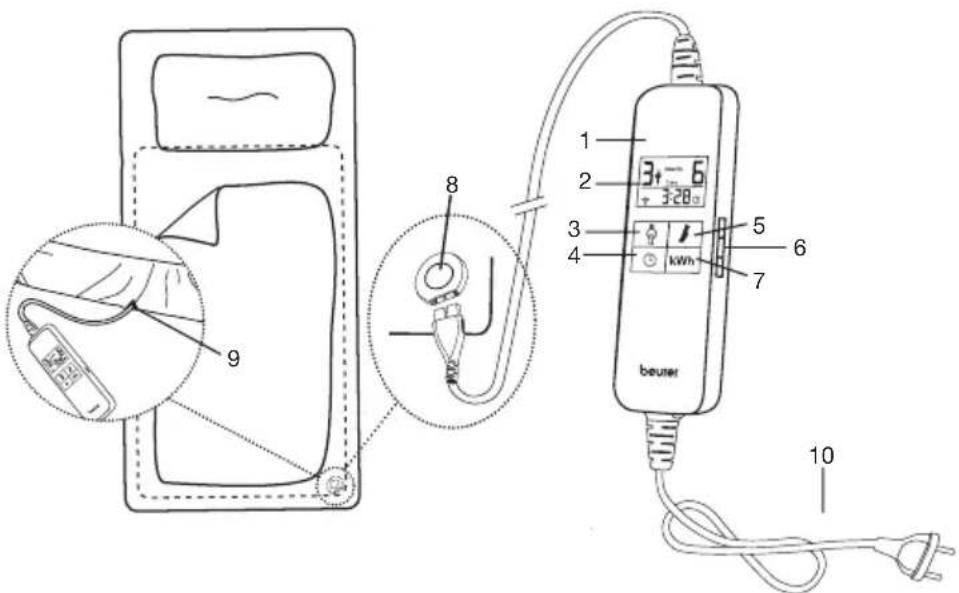
2.1 Device description
- Controller
- Display
- Button for setting the body area temperature
- Button for setting the automatic switch-off time
- Button for setting the foot area temperature
- Switch for on/off/remote operation
- Button for displaying the kWh
- Plug-in coupling
- Slot in side section (UB 200)
- Mains plug
3. Important instructions Retain for future reference

WARNING
- Non-observation of the following notes may result in personal injury or material damage (electric shock, skin burns, fire). The following safety and hazard information is not only intended to protect your health and the health of others, it should also protect the product. For this reason, pay attention to these safety notes and include these instructions when handing over the product to others.
- This heated underblanket must not be used by persons who are not sensitive to heat or by vulnerable people who may not be able to react to overheating (e.g. diabetics, people with skin alterations due to illness or scarred tissue in the application area, after taking pain relief medication or alcohol).
- This heated underblanket must not be used by very young children (0-3 years old), as they are unable to respond to overheating.
- This heated underblanket must not be used by young children (3-8 years old) unless the controller has been set by a parent or responsible adult and the child has been given adequate instructions on how to use the heated underblanket safely.
- This heated underblanket may be used by children over the age of 8 and by people with reduced physical, sensory or mental skills or a lack of experience or knowledge, provided that they are supervised and have been instructed on how to use the heated underblanket safely, and are fully aware of the consequent risks of use.
Children must not play with the heated underblanket. - Cleaning and user maintenance must not be performed by children unless supervised.
- This heated underblanket is not designed for use in hospitals.
- Do not insert needles.
- Do not use when folded or bunched up.
- Do not use if wet.
- Before using on an adjustable bed, check that the heated underblanket and the cables are not, for example, trapped in a hinge or bunched up.
- This heated underblanket must only be used in conjunction with the controller specified on the label.
- The electrical and magnetic fields emitted by this electric heated underblanket may interfere with the function of a pacemaker. However, they
are still well below the limits: electrical field strength: max. 5000 V/m, magnetic field strength: max. 80 A/m, magnetic flux density: max. 0.1 millitesla. Please consult your doctor and the manufacturer of your pacemaker before using this heated underblanket.
- Do not pull, twist or make sharp bends in the cords.
- Please check this heated underblanket frequently for signs of wear and tear or damage. If any such signs are evident, if the heated underblanket has been used incorrectly or if it no longer heats up, it must be checked by the manufacturer before being switched on again.
- If the mains supply cord is damaged, it must be disposed of. If it cannot be removed, the device must be disposed of.
-
When this heated underblanket is switched on:
-
Do not place any objects on it (e.g. suitcase or washing basket)
-
Heat sources, such as hot water bottles, heat pads or similar must not be placed on it.
-
The electronic components in the controller warm up when the heated underblanket is in use. For this reason, the controller must not be covered or placed on the heated underblanket when it is in use.
- If you should have any questions about using our devices, please contact our Customer Services department.
- Always observe the notes on operation (section 5), cleaning and maintenance (section 6) and storage (section 7).
4. Intended use

CAUTION
- This heated underblanket is intended only for warming beds.
5. Operation
5.1 Safety

CAUTION
- The heated underblanket is fitted with a SAFETY SYSTEM. This sensor technology provides protection against overheating across the entire surface of the heated underblanket with an automatic switch-off in the event of a fault. If the SAFETY SYSTEM has switched off the heated underblanket, the temperature settings are no longer illuminated when switched on.
- Please note that for safety reasons, the heated underblanket can no longer be operated after a fault has occurred and must be sent to the specified service address.
5.2 Initial use
- Starting from the foot of the bed, place the heated underblanket flat on your mattress.
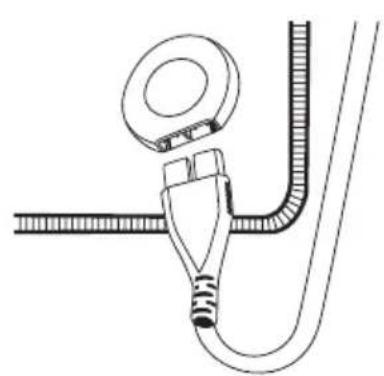
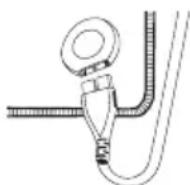
- Use the plug-in coupling to connect the controller and heated underblanket
- Then fit your sheet as usual so that the heated underblanket is between the mattress and the sheet.

CAUTION
- Make sure that the heated underblanket is smoothed out completely flat and that it cannot bunch up or form folds during use.
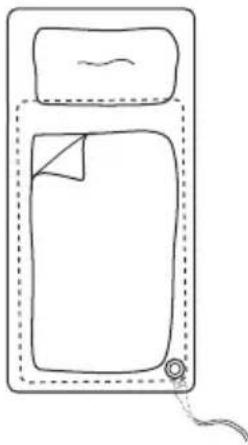
- Insert the mains plug into a suitable socket.
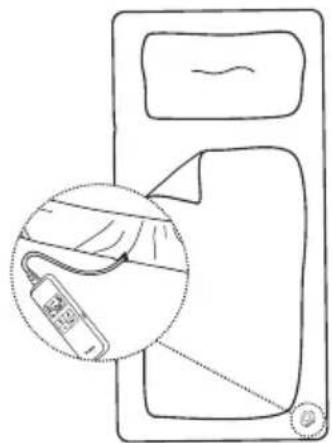
Additional information UB 200
The area intended for the head is not heated.
Guide the plug-in coupling plug through the slot on the side section [9] and then connect the controller to the heated underblanket by plugging together the plug-in coupling [8] (see fig.).
Then pull the side section over the sides of your mattress like a fitted sheet. The heated underblanket is designed to fit 90 × 200 cm as well as 100 × 200 cm mattresses. Then fit your fitted sheet over it as usual with the heated underblanket positioned between your mattress and the fitted sheet.
5.3. Manual operation
To switch on the heated underblanket, slide the ON/OFF/remote switch [6] on the side of the controller [1] to the ON (l) position.
In this mode, it is possible to set individual settings for heating and switch-off times via the controller.
When switched on, the display [2] illuminates and at first displays all the segments for approx. 2 seconds. After that, the display shows the following basic settings:
Temperature setting for body area: 0
Temperature setting for foot area: 0
Automatic switch-off time: 0
NOTE:
- The illuminance level drops after approx. 5 seconds so that illumination of the display does not disturb your sleep during the night.
1 NOTE:
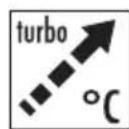
- This heated underblanket has a fast heating function, which allows the heated underblanket to heat up faster in the first 10-50 minutes (depends on the setting). For the first 15 minutes, the word "Turbo" appears on the display.
Setting the temperature
Press the button to set the temperature setting for the body area [3].
Press the button to set the temperature setting for the foot area [5].
Setting 0: Off
Setting 1: Minimum heat
Setting 2 - 8: Individual heat
Setting 9: Maximum heat
NOTE:
- Switching sequence of the temperature settings:
0-9-8-7-6-5-4-3-2-1-0-9,etc
WARNING
If the heated underblanket is being used over several hours, we recommend that you set or program the lowest temperature setting on the controller to avoid overheating the person using the blanket.
1 NOTE:
- The fastest way to warm up the heated underblanket is to initially set the highest temperature setting.
- We strongly recommend switching on the heated underblanket approx. 30 minutes before going to bed and covering it with the duvet in order to prevent heat loss.
Selecting automatic switch-off time
Press the button to set the automatic switch-off time [4]. You can set the automatic switch-off time to 1, 2, 3, 4, etc. up to 12 hours.
NOTE:
- Switching sequence of the automatic switch-off time:
1 h - 12 h - 11 h - 10 h - 9 h, etc. 1 h - 12 h - 11 h, etc. (time in hours).
The heated underblanket is automatically switched off once the set switch-off time has elapsed.
The following is then shown in the display:
Temperature setting for body area: 0
Temperature setting for foot area: 0
Automatic switch-off time: 0
To switch on the heated underblanket again, press either the button to set the temperature setting for the body area [3] and/or for the foot area [5].
If you do not want to use the heated underblanket beyond the selected switch-off time, slide the ON/OFF/REMOTE switch to the OFF (0) position to switch off the heated underblanket.
Switching off
To switch off the heated underblanket, slide the ON/OFF/REMOTE switch on the controller to the OFF (0) position.
When switched off, the illumination and the display are turned off.
NOTE:
- If the heated underblanket is not being used for several days, set the ON/OFF/REMOTE switch to the OFF (0) position and remove the mains plug from the socket.
ECO Control
Temperature settings 1, 2, 3 and 4 are particularly energy-saving. If these temperature settings are selected, the "ECO" symbol appears on the display.
kWh display
Press the "kWh" [7] button to display the current power consumption in kWh.
The power consumed since the last switch-on is displayed.
Due to the low power consumption in the "ECO" temperature settings, the displayed value (power consumption in kWh) takes a while to change.
1 NOTE:
- A healthy sleeping environment can be achieved by keeping the bedroom cool and pre-heating your bed shortly before going to bed. Lower heating costs for the bedroom also create further cost savings.
Anti-allergy temperature setting - useful information
In recent years, the number of people allergic to domestic dust and domestic dust mites has risen sharply. Typical symptoms of this allergy are irritated eyes, sneezing fits, coughing fits and shortness of breath in the early morning. These reactions are triggered by proteins in the excrement of the domestic dust mite. Mites are almost always present in warm and humid microclimates, as are often found in beds. They feed mainly on human skin flakes and mildew and can be found in every house. Even with regular and thorough cleaning, dust and skin cells continuously build up.
With the anti-allergy temperature setting, you can fight back against the mite population and create a dry, mildew-free bed environment.
For this, set the body and foot area temperatures to setting 9 and the automatic switch-off time to 12 hours. "Anti-Allergy" is shown in the display.
In order to prevent heat loss, the heated underblanket must be completely covered by the duvet during this process.
This process dries your mattress and therefore creates a "hostile microclimate for the mites" on the mattress surface. We recommend regular use of the anti-allergy temperature setting. Ideally, the heated underblanket should be operated for the full 12 hours.
5.4. Automatic operation (remote operation)
NOTE:
- You can also use the basic functions of the heated underblanket without the "beurer CosyNight" app. The additional features such as remote control, heat programs set to be run automatically and consumption statistics are only available in conjunction with the "beurer CosyNight" app.
- Place the heated underblanket on your mattress, connect the plug-in coupling and insert the mains plug into the socket, as described in 5.2.
Switching on
Slide the ON/OFF/remote switch to the position REMOTE(). The heated underblanket is ready to connect to WLAN and to be controlled via the "beurer CosyNight" app.
1 NOTE:
The "WLAN" and the REMOTE symbols flash or illuminate continuously, depending on the connection status. For more details see "9. What if there are problems"
Connecting the heated underblanket with the "beurer CosyNight" app
- Ensure that your smartphone is connected to the Internet.
- Activate Bluetooth® and WLAN on your smartphone.
- Download the free "beurer CosyNight" app from the Apple App Store (iOS) or from Google Play (Android).
1 NOTE:
-
Depending on the settings for your smartphone, additional charges may be incurred for connecting to the Internet or transferring data.
-
Start the "beurer CosyNight" app and follow the instructions.
Switching off
If you want to manually set your heated underblanket again, slide the ON/OFF/remote switch to position 1 for manual operation. The heat programs are then no longer active, but remain saved.
Slide the ON/OFF/remote switch to position 0 to switch off the heated underblanket. The display turns off.
i NOTE:
- For safety reasons, you can use the control at any time to manually control the heated underblanket, for example in order to select a lower temperature setting. The manual setting "overwrites" the current heat program and only remains active until it elapses.
6. Cleaning and maintenance
WARNING
- Before cleaning the heated underblanket, always disconnect the mains plug from the socket and unplug the plug-in coupling [8] and thereby the controller [1] from the heated underblanket. Otherwise there is a risk of electric shock.
CAUTION
- The controller must never come into contact with water or other liquids, as this may cause damage.
To clean the controller, use a dry, lint-free cloth. Do not use any chemical or abrasive cleaning agents. - Small marks on the heated underblanket can be removed with a damp cloth and, if necessary, with a little liquid detergent for delicate laundry.
CAUTION
- Please note that the heated underblanket must not be chemically cleaned, wrung out, tumble dried, put through a mangle or ironed.
- This heated underblanket is machine-washable.
- Set the washing machine to a particularly gentle wash cycle at 30^ (wool cycle).
- Use a delicate laundry detergent and measure it out according to the manufacturer's instructions.
CAUTION
- Please note that frequent washing of the heated underblanket has a negative effect on the product.
- The heated underblanket should therefore be washed in a washing machine a maximum of 5 times during its life.
- Immediately after washing, reshape the heated underblanket to its original dimensions while it is still damp and spread it out flat on a clothes horse to dry.
WARNING
- Do not use pegs or similar items to attach the heated underblanket to the clothes horse. Otherwise the heated underblanket may be damaged.
- Do not reconnect the controller to the heated underblanket until the plug-in coupling and heated underblanket are completely dry.
- Otherwise the heated underblanket may be damaged.
- Never switch on the heated underblanket to dry it! Otherwise there is a risk of electric shock.
7. Storage
If you do not plan to use the heated underblanket for a long period of time, we recommend that you store it in the original packaging. For this purpose, disconnect the controller from the heated underblanket by unplugging the plug-in coupling.

CAUTION
- Please allow the heated underblanket to cool down first. Otherwise the heated underblanket may be damaged.
- To avoid sharp folds in the heated underblanket, do not place any objects on top of it whilst storing.
8. Disposal
For environmental reasons, do not dispose of the device in the household waste at the end of its service life.
Dispose of the device at a suitable local collection or recycling point in your country. Dispose of the device in accordance with EC Directive - WEEE (Waste Electrical and Electronic Equipment). If you have any questions, please contact the local authorities responsible for waste disposal.
9. What if there are problems?
| Problem Cause Solution | ||
| Display does not light up/no display | The mains plug is not connected to the socket and/or is not switched on. | Connect the mains plug and switch on the heated underblanket. |
| The safety system switches off the heated underblanket. | Send the heated underblanket to Customer Services. | |
| “E1” appears on the display. | Controller is not properly connected to the heated underblanket. | 1. Switch off 2. Connect the plug-in coupling correctly 3. Switch on |
| “E2” appears on the display | Heated underblanket no longer heats up, no display on the controller. | Send the heated underblanket to Customer Services. |
| “E3” appears on the display | Error when updating the controller firmware. | Restart the update or contact Customer Services if necessary. |
| WLAN symbol flashes | Heated underblanket attempts to establish a connection to the WLAN router. | If this process takes more than 1 minute, check the status of your WLAN router and/or reconfigure the WLAN access of your heated underblanket via the app. |
| “REMOTE” flashes | Heated underblanket attempts to establish a connection to the server. | If this process takes more than 1 minute, try again later or reconfigure the WLAN access of your heated underblanket via the app. |
10. Technical data
For technical data, see the type plate label on the heated underblanket.
System requirements:
iOS ≥ 8.0, Android™ ≥ 4.4, Bluetooth® ≥ 4.0,
List of supported smartphones:

1 NOTE:
- For your own protection, use WLAN protected against unauthorised access.
Data transfer:
The product uses Bluetooth® low energy technology and WLAN, frequency band 2400.0 MHz - 2483.5 MHz, Bluetooth® transmission power max. 0 dBm, WLAN transmission power max. 18 dBm, compatible with Bluetooth® 4.0 smartphones/tablets
We hereby guarantee that this product complies with the European RED Directive 2014/53/EU. Please contact the specified service address to obtain detailed information, such as the CE Declaration of Conformity.
FRANÇAIS
Sommaire
Iotppe6JIeHHe Toka OTo6paXaETcC MOMeHTa NocJeHrO BKJIIOUeHn.
OTo6paXaemoe 3NaueHne, obycIOBJIeHHoe He3HaHTeIbHbIM nOTpe6JIeHnEM TOKa B TeMnepaTyPcHOM pexKMe ECO, n3MeHnEeTc (noTpe6JIeHnE TOKa B KBT-4) TOnbKO cnYCTra HeKoTOpoe BpEmr.
iYka3aHne
BbI co3daIte 3IOPOByIO aTMocOepey dIra cHa, ecII 6yTe DeepKaTb cIaIbHIO npoxlaIHOi, a KpOBaTB HeMHoro corpeete nepeI OTXoOM KO chY. BlaIroApA MeHbIIM pacxOam Ha OTONJIeHne CnJIbHI HAIIO 3KOHOMUeCKaB bIroJa.
TemnepaTyphbpeKIMAHTnaJIeprna
BaxkHO 3HaTb
B nocneHnre rOdbI 3aMeTHo yBeJIuHIOc bIIOJe, IcNbITbIbAIOx H aJIpeRIO Ha domaHIO IO bIbI b KJleuei, oBtaioux B Hei. DnT OToI φOpMbI aIIeprnX xaApKTePHo pa3dpaxKeHne rna3, npntybl YnxAHnra, KaIbI N OdbIuKa B paHHne yTpEHnE yacBi. 3TN peakun Bo3HnkaIoT pni KOHTaKe C 6eIKamn, HaxoDJIUMNCB EKKPeMeHTax KJleuei, oBtaioux B DomauHe Nbln. KJeeu, NOBIAIOUncsBO B BlaXHOM N TeILOM MInpOKlImate, cacto npeo6laiaOeM B KPOBaTEx, ppaTNUeCKN Be3DecuOn. OH nNTaOTcN PpenMyuectBeHHO KOxHbIMu YeUkAMn IN PLEcHEBbIMr Pr6kAmn HaxoJrTCB JIObOM Dome. DaKe npnrpeYraPHOIN OCHOBaTeNbHO y6opKe uactuKN PbIIN KOKN NOCTOBHO HAKaJIINBAOTcR.
C nomoubio temnepaupno ro peximaaAHTnaJIpeprraBbIMoKxTe cIeHApabHeHNO 60pOtbc a noynJiauei KJIeuei n 3a6OTntbcra O noIepXaHm cyXOrO KInMaTa KPOBaTn 6e3 PJIeceH.
Дя зтого установп Te mнера typy B obnaCTn Te la n Hor ha CTyneHb 9 n BpeM aBToMaTnueckOro BbIKnIO- ueHry chee3 12 yacob. Ha dinCnlee oTo6pa3ntc hAnncs b «AHTnuaJIneprnra».
Bo n36eKAnHe nOteRn TeNla dIra 3ToI npOeDpybI 3JIeKTpUeCKyIO npocTbIHIO peKOMeHdyETcI NOHOCTBIO NaKpbITb OeJlOM.
- Ha Cnyuyn yuepe6a, Bb3BaHHoro He npabnIbHbIM IcnoIb3ObaHneM
- Ha 6bICTpOn3HaUNBaIOUInCeY qACTN
- Ha DepeKtbl, O KOTOpbIX NOKyNaTeJIb 3HaJI B MOMeHT NOKyPIKU
- Ha Cnyuay Co6CTBeHHo BnHb NOKyNaTeJra
- npn OTCyTCTBn KaccBOrO YeKa.

ToBap cepTnDnucnpoBaH:
Cpok 3Kcnpnyatauun n3dennr: MmH.5 JeT
ΦπρMa-ι3rθοτOBιTeJB: Boηpep Γmδx, CoΦπuHrep ηTpaccce 218,
89077-YM,EmaHn
Фирma-нмпортep: OOOБоиер, 109451 r. MockBa, yI.
IpepeBa 62, Kopn. 2, oΦnc 3
CepBnchbI ueHtp: 109451 r. MockBa, yJ.
IpepeBa 62, Kopn. 2
Ten(φakc) 495-658 54 90, bts-service@ctdz.ru
Data npoJaxn
Iopnnncb npoabua
UItamn mara3nHa
Iopnncb nokynatenr