
D7010X0 - Basket NEFF - Free user manual and instructions
Find the device manual for free D7010X0 NEFF in PDF.
| Brand | Neff |
| Model | D7010X0 |
| Category | Range hood |
| Weight | 7.0 kg |
| Material | Stainless steel |
| Exhaust type | External with telescopic duct |
| Minimum duct diameter | 150 mm |
| Power supply | Electrical (5 m extension cable supplied) |
| Mounting | Wall-mounted, fixing with dowels |
| Duct slope | 1° towards outside |
| Minimum distance to floor | 1 m |
| Depression protection | Do not exceed 4 Pa |
| Maintenance | Clean with special stainless steel cleaner, no scouring |
| Accessories | Optional silencer for 150 mm duct |
| Repairs | Must be carried out by an approved specialist |
| Repairability | Parts available via manufacturer after-sales service |
| Compliance | Applicable safety standards |
| Use | Domestic |
Frequently Asked Questions - D7010X0 NEFF
User questions about D7010X0 NEFF
0 question about this device. Answer the ones you know or ask your own.
Ask a new question about this device
Download the instructions for your Basket in PDF format for free! Find your manual D7010X0 - NEFF and take your electronic device back in hand. On this page are published all the documents necessary for the use of your device. D7010X0 by NEFF.
USER MANUAL D7010X0 NEFF
This appliance conforms to the relevant safety regulations.
Repairs should only be carried out by qualified specialists.
Improperly executed repairs can give rise to significant hazards for the user.
Note down the type designation of the external fan in the extractor hood operating instructions.
Check whether this fan may be combined with the extractor hood. The licensed type HBD-MX10-8 must be indicated in the operating and installation manuals for the extractor hood.
The appliance should only be connected up to the mains and taken into use by a qualified specialist.
Before carrying out repairs or maintenance, isolate the fan.
Todo this, disconnect the plug-and-socket connection of the electric cable which is connected to the extractor hood or disconnect the extractor hood power cord from the power supply.
If the connecting cable for this appliance is damaged, the cable must be replaced by the manufacturer or his customer service or a similarly qualified person in order to prevent serious injury to the user.
Old appliances are not worthless rubbish. If they are disposed of in an environment-friendly manner, valuable raw materials can be recovered for use again. Before you dispose of an old appliance, make sure that it has been rendered inoperative.
Your new appliance was protected on its way to you by the packaging. None of the materials cause pollution to the environment and all can be recycled for use again. Please help to protect the environment and dispose of the packaging in an environment-friendly manner.
You can obtain information about the best method disposing of old appliances and packaging from your dealer or local municipal council.
If the extractor hood is operating in exhaust-air mode at the same time as a flue-type heater (e.g. gas, oil or solid-fuel heater, instantaneous water heater, boiler), there must be an adequate air supply which the fireplace requires for combustion.
Safe operation is possible if the partial vacuum in the installation room of the fireplace does not exceed 4 Pa (0.04 mbar).
This can be achieved if the combustion air is able to flow through non-lockable openings, e.g. in doors, windows and in conjunction with an air supply/air-intake wall box or by other technical procedures such as reciprocal interlocking.
If the air supply is inadequate, there is a risk of poisoning caused by combustion gases being drawn back into the room.
Note: When assessing the air supply, always take into account the entire ventilation system in the house. This rule does not apply when using cooking appliances, e.g. hob or gas cooker.
The fan must be attached at least 2m from the extractor hood.
Do not attach the outer wall fan near windows, doors or patios.
When attaching the outer wall fan, ensure that
- residents and neighbours are not disturbed by noise and odours,
- i t is accessible for maintenance and repairs.
The plug-and-socket connections of the electric cables must be located inside the building.
Do not reduce the 150~mm diameter of the pipes connected to the extractor hood. An additional silencer for 150~mm pipes is available as an optional accessory from specialist outlets.
Preparing the wall
The wall must be flat and perpendicular.
- Ensure that the wall is capable of providing a firm hold for mounting screws and plugs.
Weight: 7,0kg
We reserve the right to construction changes within the context of technical development.
Installation
1. Wall opening
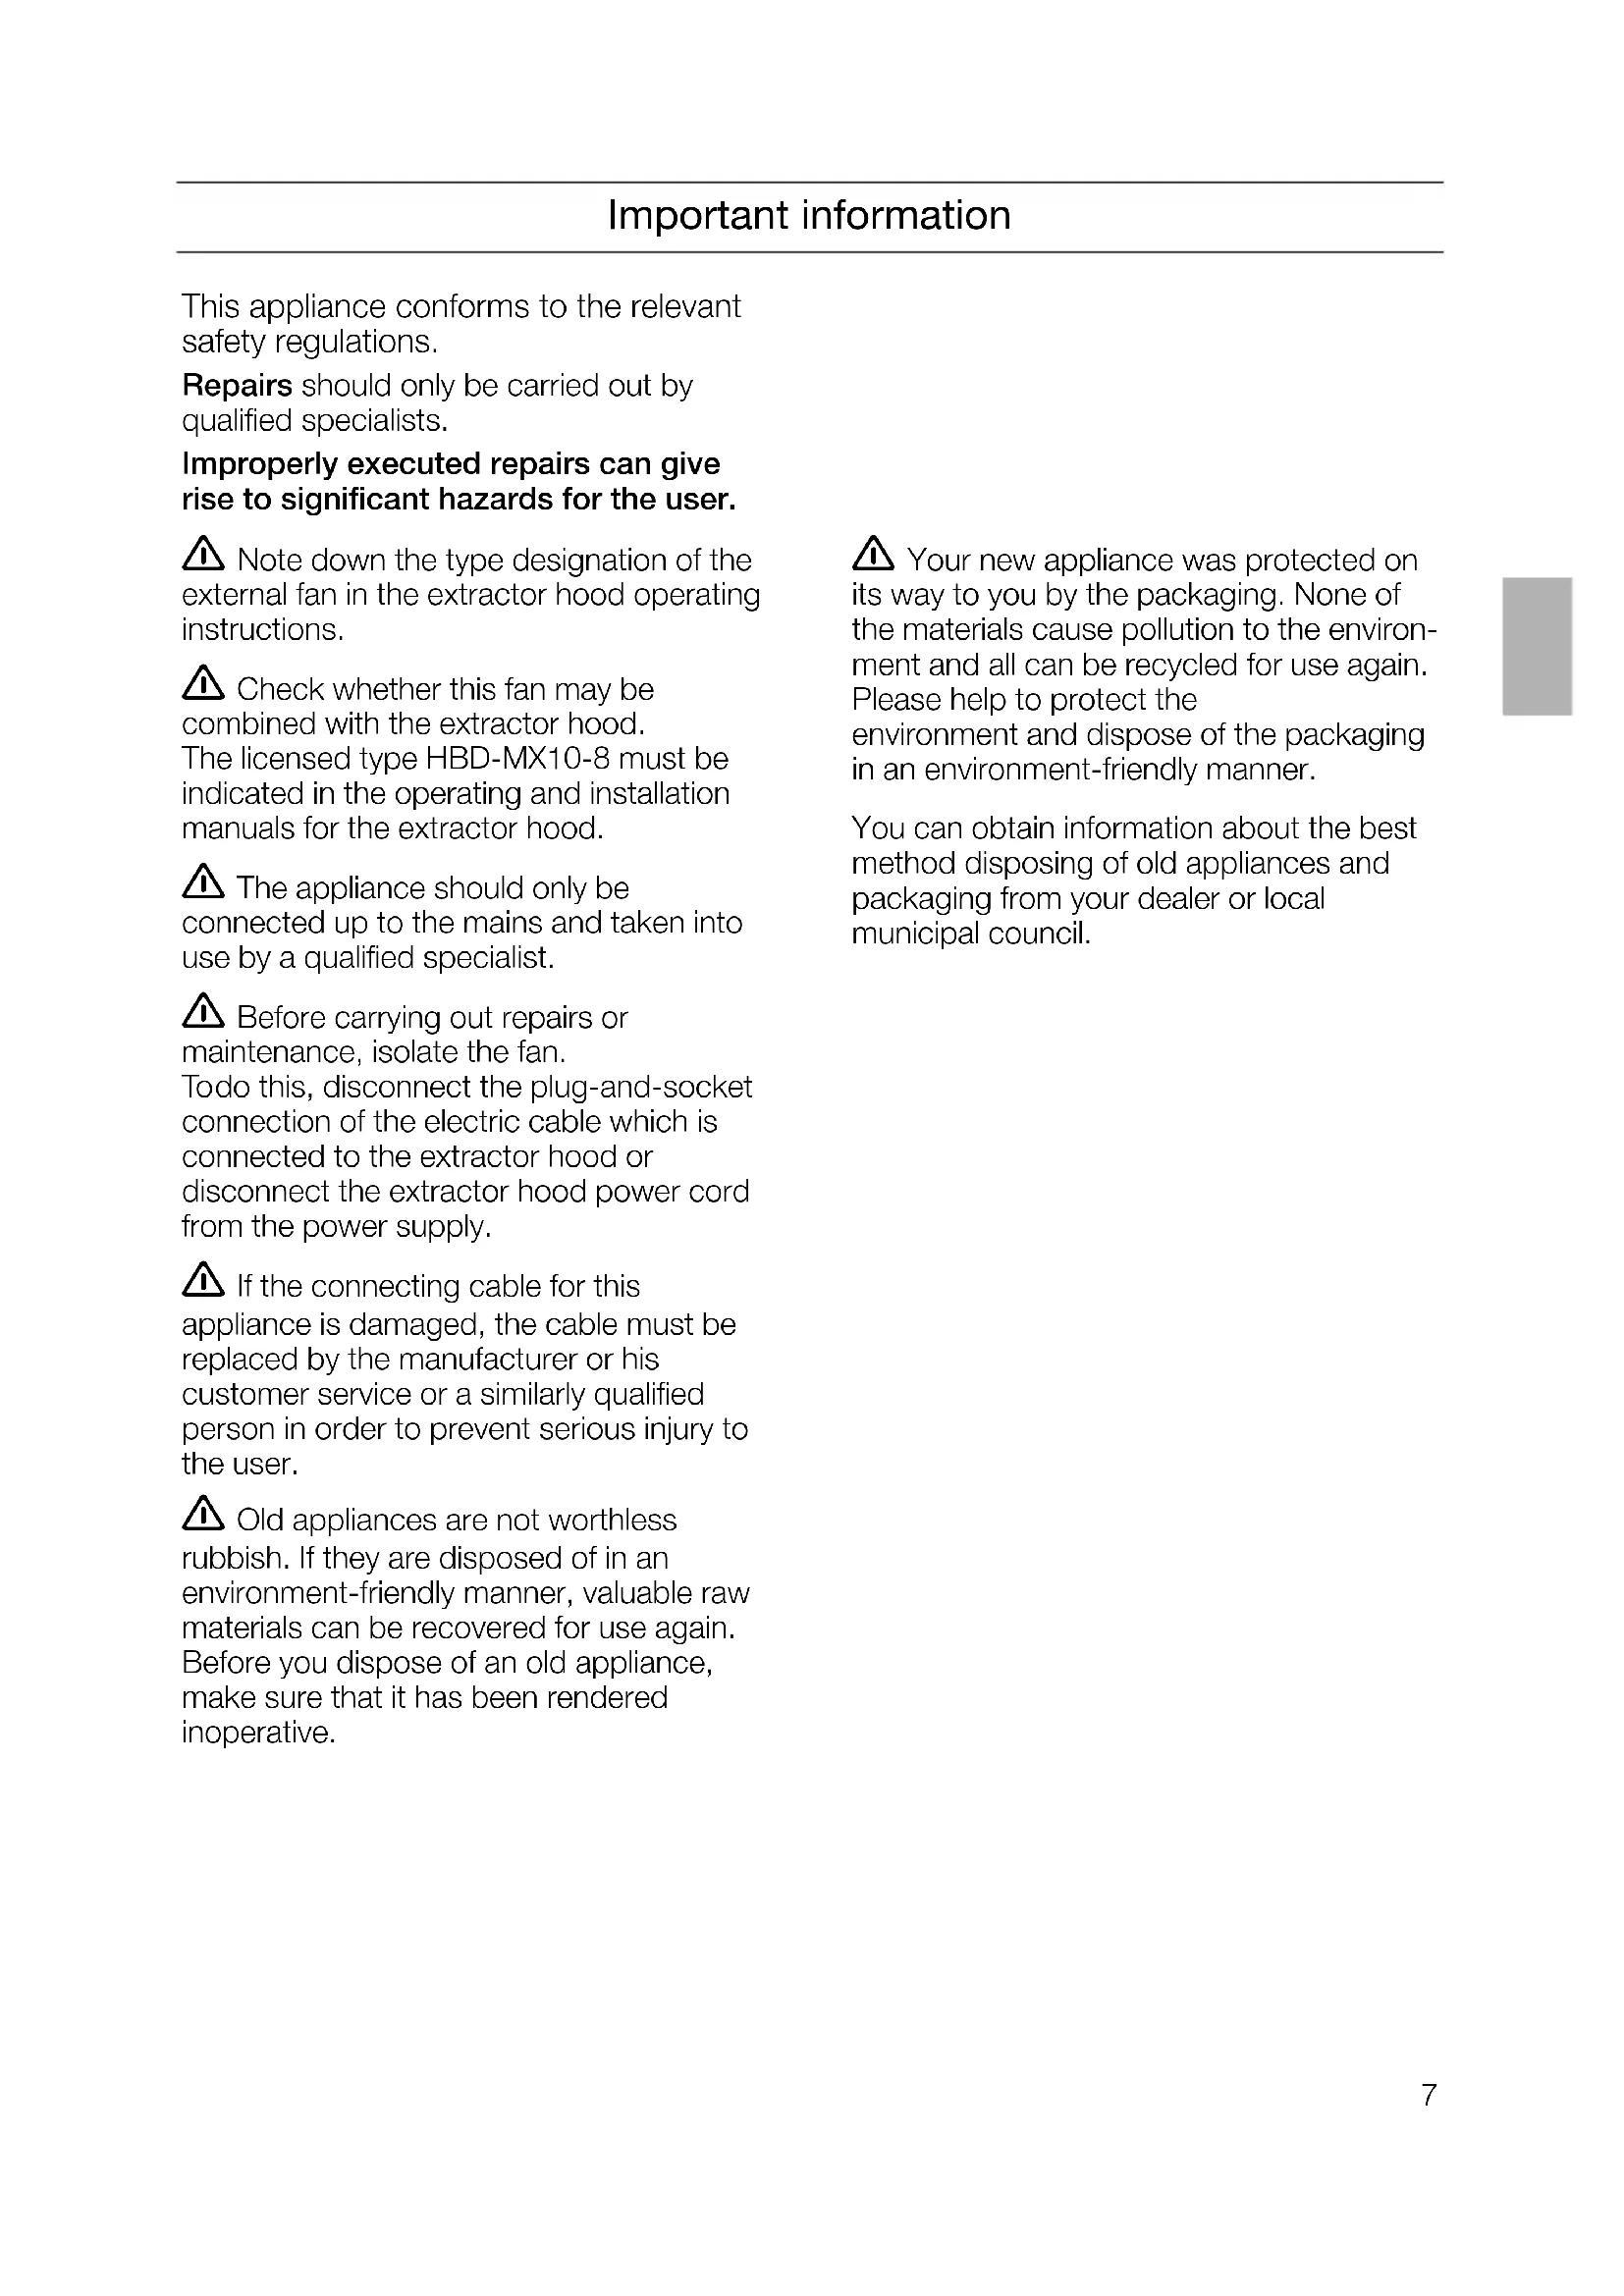
Drill at least a 160~mm hole for the telescopic tube and at least an 18~mm hole for the cable conduit. Distance to the floor at least 1 m to ensure unrestricted air outlet.
- Shorten the cable conduit to the wall thickness and insert. Insert the telescopic tube: flush with the outside wall, overhanging by 30mm on the inside.
Cable conduit:
3^ gradient to the outside.
Telescopic tube:
1^ gradient to the outside.
Secure and seal the cable conduit and telescopic tube.

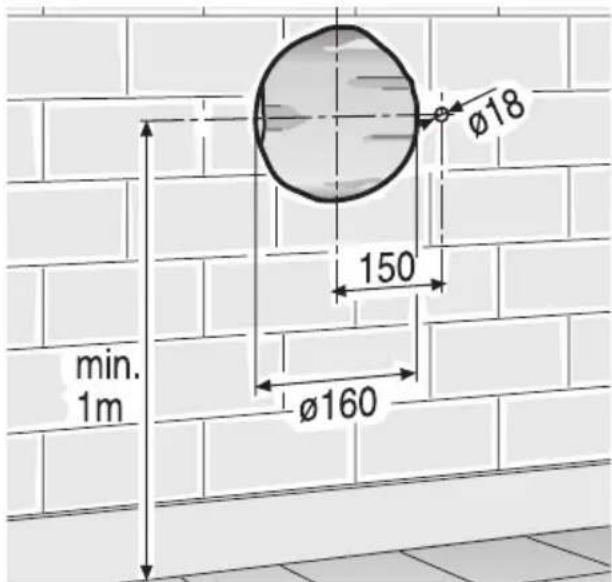
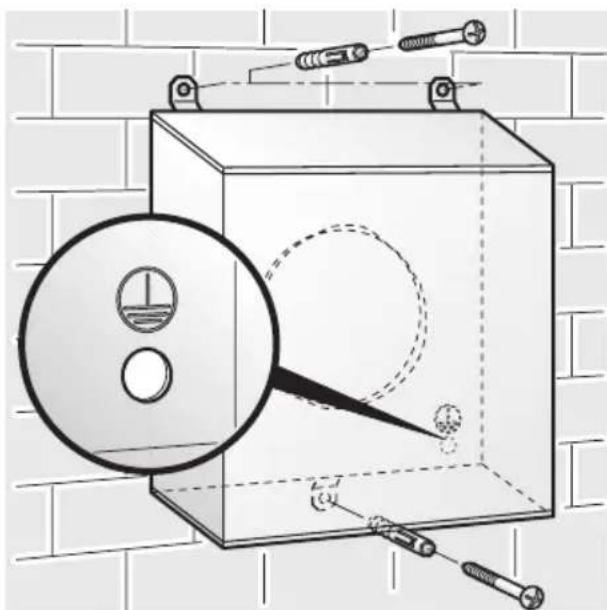
- Hold the fan on the wall.
Ensure that the pipe connection of the fan has been inserted into the telescopic tube.
Air outlet downwards.
Mark a mounting borehole at top left.
- Remove the fan.
- Drill the 8 mm 8 mm mounting bore-hole at top left, insert a wall plug, hold the fan in position and screw to the wall.
- Ensure that the fan is level and centred on the telescopic tube.
Mark mounting boreholes at top right and bottom middle.
Remove the fan again.
Installation
- Drill the 8 mm mounting boreholes at top right and bottom middle. Insert wall plugs.
The wall plugs must be suitable for the brickwork.

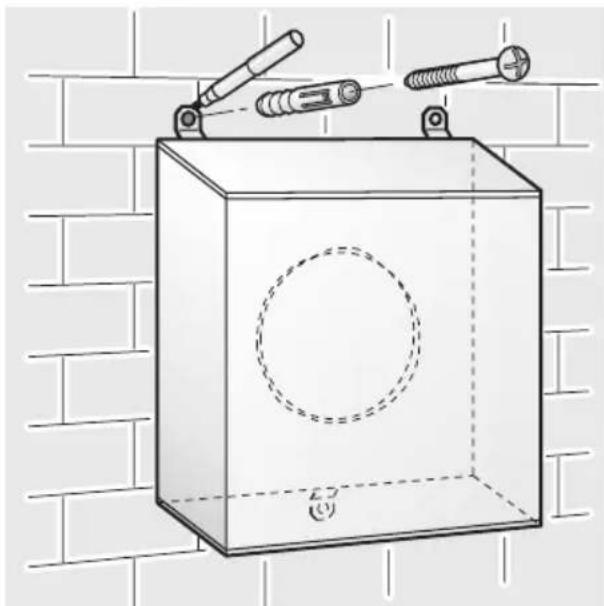
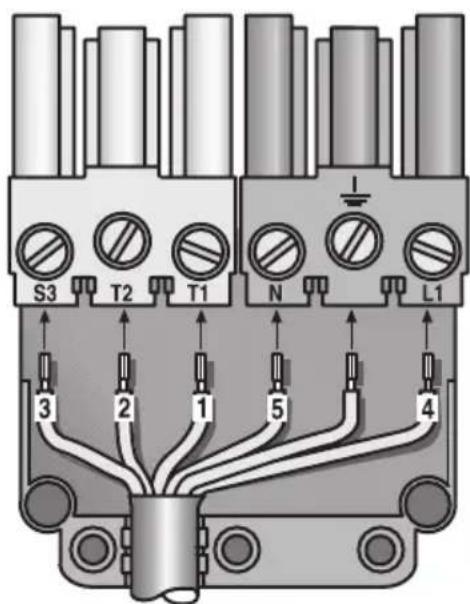
- Detach the plug from the cable.
- Feed the cable through the cable conduit.
- Hold the fan in position and screw to the wall.
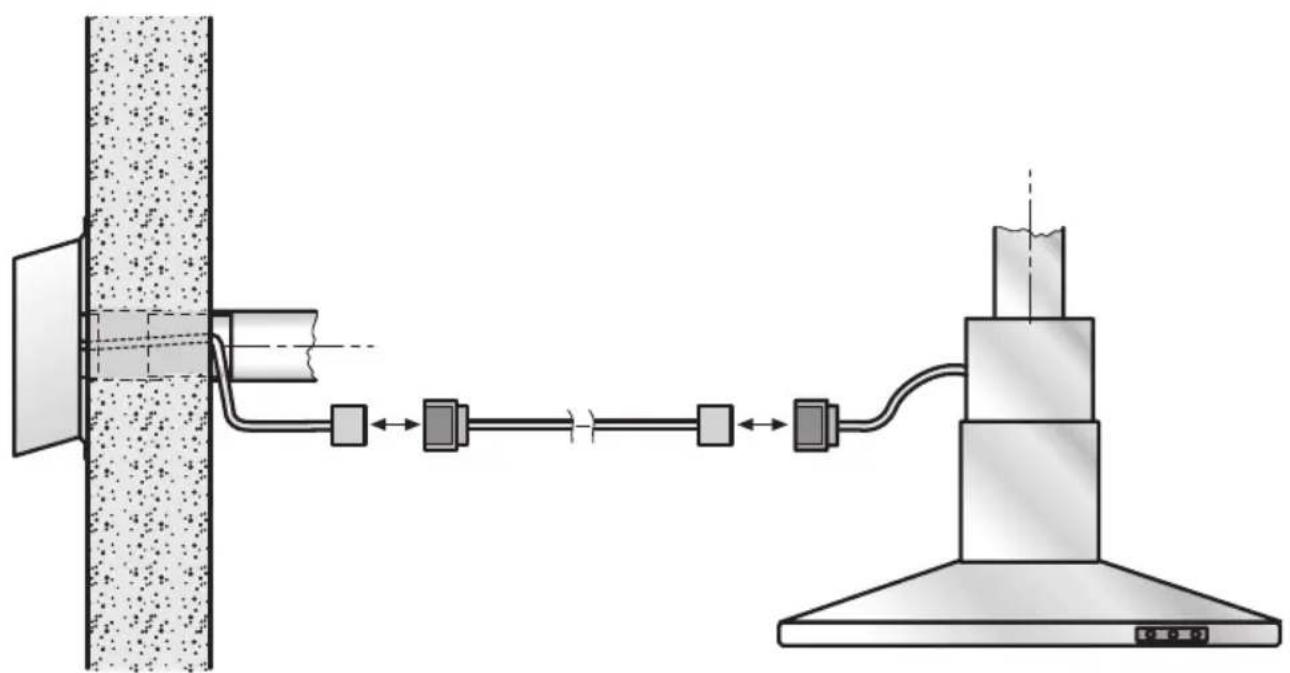
The fan is connected to the extractor hood with the 5 m extension cable enclosed with the extractor hood. If an additional extension cable is required, the exterior of the fan housing must be earthed by an electrician before the housing is screwed into position. The parts used for earthing must not come into contact with the fan impeller.
- Re-attach the plug to the cable. Ensure that the wires are connected to the correct terminals.
Installation
- Connect the pipe and cable from the fan to the extractor hood.
The additional cover on the plug must always be attached and closed for safety reasons.
User information
Safety instructions
Regularly check that air can flow freely out of the fan.
Do not obstruct the air outlet grille or cover with plants.
If the connecting cable for this appliance is damaged, the cable must be replaced by the manufacturer or his customer service or a similarly qualified person in order to prevent serious injury to the user.
Cleaning and care
Use a mild non-abrasive stainless steel cleaner.
Do not use any of the following to clean stainless steel surfaces: abrasive sponges, cleaning agents containing sand, soda, acid or chloride!
Apply a little stainless steel cleaner from time to time in order to maintain the appearance of the appliance.

Brand : NEFF
Model : D7010X0
Category : Basket