
Clipsominut' Easy P46207 - Saucepan TEFAL - Free user manual and instructions
Find the device manual for free Clipsominut' Easy P46207 TEFAL in PDF.

| Product type | Pressure cooker (pressure pot) |
| Brand | Tefal |
| Model | Clipsominut' Easy P46207 |
| Capacity | 3 L |
| Pot material | Stainless steel |
| Lid material | Stainless steel |
| Pot diameter | 22 cm |
| Bottom diameter | 15.5 cm |
| Operating pressure | 65 kPa |
| Maximum safety pressure | 120 kPa |
| Compatible hob types | Gas, electric, ceramic, induction |
| Functions | Pressure cooking (pressure cooker) and normal cooking (saucepan) |
| Safety devices | Operating valve, safety valve, safety rod, opening/closing safety |
| Integrated timer | Yes (depending on model) |
| Included accessories | Steam basket, trivet (depending on model) |
| Maintenance | Hand wash for sensitive parts (valve, gasket, timer); stainless steel pot and steam basket are dishwasher safe |
| Stainless steel pot warranty | 10 years |
| Other parts warranty | According to the law in force in the country of purchase |
Frequently Asked Questions - Clipsominut' Easy P46207 TEFAL
User questions about Clipsominut' Easy P46207 TEFAL
0 question about this device. Answer the ones you know or ask your own.
Ask a new question about this device
Download the instructions for your Saucepan in PDF format for free! Find your manual Clipsominut' Easy P46207 - TEFAL and take your electronic device back in hand. On this page are published all the documents necessary for the use of your device. Clipsominut' Easy P46207 by TEFAL.
USER MANUAL Clipsominut' Easy P46207 TEFAL
August 2015-15/2015-31-2015 10:00pm - 16:00pm
www.tefal.com
"responding on model : "answering on model : "the each mod : "flat/flat/flat/flat/flat/flat/flat/flat/flat/flat/flat/flat/flat/flat/flat/flat/flat/flat/flat/flat/flat/flat/flat/flat/flat/flat/flat/flat/flat/flat/flat/flat/flat/flat/flat/flat/flat/flat/flat/flat/flat/flat/flat/flat/flat/flat/flat/flat/flat/flat/flat
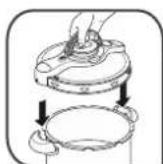
fig 1 fig 2 fig 3
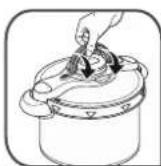

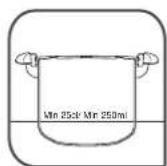
fig 4

fig 5
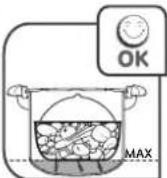
fig 6
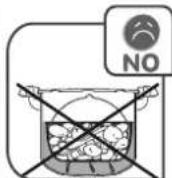
fig 7 fig 8
当 m = 1 时,

fig 9 fig 10 fig 11 fig 12
g12
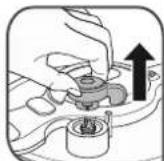
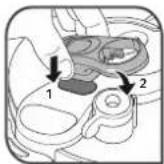
fig 13 fig 14 fig 15 fig 16
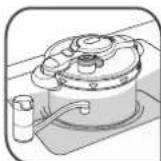
Fig 16
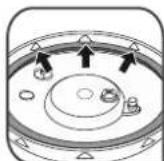
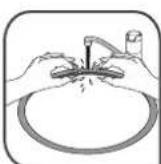
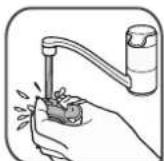
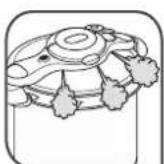
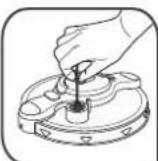
fig 17 fig 18 fig 19 fig 20
IMPORTANT PRECAUTIONS
Before using your pressure cooker, please take the time to read all the instructions and always refer to the "User guide". Improper use may result in damage.
For your safety, this appliance complies with the applicable standards and regulations:
-Pressure Equipment Directive
- Materials that come into contact with food products
- Environment
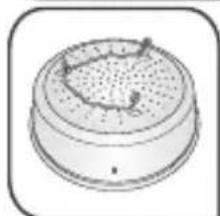
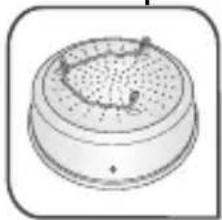
| BEFORE USE | MAKE SURE • the vents are not obstructed (see section “Before cooking”). - fig 13. • the ball of the safety valve is mobile.- fig 18. • the lid gasket is placed under each notch of the lid - fig 15. • the lid handles are properly fastened. The lid handles are safety components. Never change them yourself. Never use any other models of lid handles. |
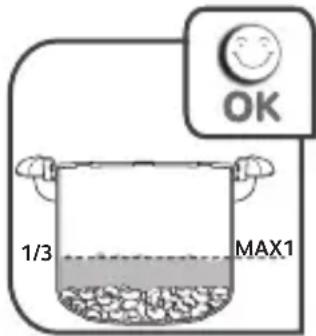
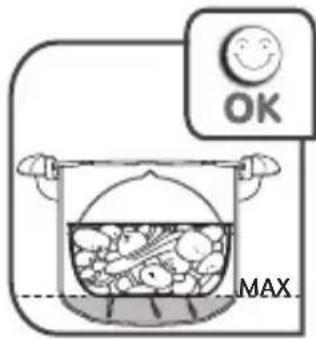
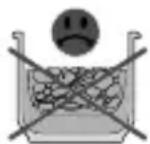
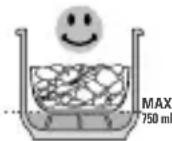
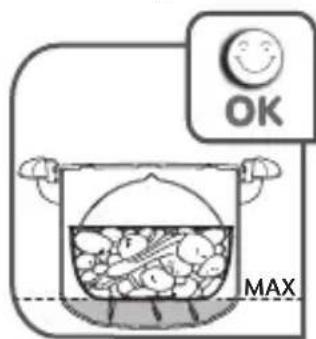
| ALWAYS RESPECT THE FOLLOWING FILLING QUANTITIES | • Never use your pressure cooker without liquid, as this could damage it. Make sure there's always enough liquid in the device when cooking. • Minimum 250 ml - fig 4. • Maximum 2/3 of the height of the pot, MAX 2 mark. - fig 5. • When pressure cooking, the food in the steam basket* should not be in contact with the water or the steam basket* in contact with the water. - fig 6 and 7. • Maximum 1/3 of the height of the pot, (MAX 1 mark) for foodstuffs that expand and/or foam during cooking, such as rice, pulses, dehydrated vegetables, compotes, pumpkin, courgettes, carrots, potatoes, fish fillets, etc. • Food in the steam basket should not exceed the MAX 2 level of the pot. |
| DURING AND AFTER COOKING | ·Ensure close supervision if you are using the pressure cooker near children. ·Your pressure cooker cooks using pressure. Improper use may result in scalding injuries. Make sure the pressure cooker is properly closed before use (see section "Closing"). ·During cooking, check that the valve murmurs regularly. If there is not enough steam being released, increase the heat source slightly. ·Do not cook food that risks blocking the outlets for the safety devices: - blueberries - pearl barley, - oat flakes, - split peas, - noodles, - macaroni, - spaghetti, - rhubarb, - currants. ·Never use your pressure cooker to cook milk-based recipe (such as rice pudding, semolina pudding...). ·For stainless steel pot, never use coarse sea salt in your pressure cooker, only use fine salt at the end of cooking. ·Never use your pressure cooker to fry under pressure using oil. ·Do not use your pressure cooker for any other purpose than the one it is meant for. ·Do not put your pressure cooker in a hot oven. ·Never use aluminium foil unsecured on a container in your pressure cooker. Always secure with string. ·Never use cling film in your pressure cooker. ·Alcohol vapour is flammable. Bring to a boil about 2 minutes before fitting with the lid. Check your pressure cooker on a regular basis if you are making alcohol-based recipes. ·Only use the compatible heat source(s) listed in the user guide. |
| AFTER COOKING | For models with non-stick coating: do not use whisks or metal or sharp-edged utensils. Do not drain your utensils by tapping them on the edge of the pot, as this could damage it and cause leaks. Steadily turn the operating valve (A), to adjust the decompression speed, and finish opposite the pictogram mark 10. If, when releasing steam, you notice any food or liquid start to spray out, return the operating valve (A) to the "Pressure Cooking" position, then carry out fast decompression in cold water - fig 14. If the pressure indicator (D) does not go down, carry out fast decompression in cold water - fig 14. Never interfere with the pressure indicator. After cooking meats with an outer skin (e.g. beef tongue, etc.), where there's a risk of swelling under pressure, don't stab the meat when swollen to avoid being scalded. Be sure to pierce the meat before cooking. For foods that swell during cooking, such as rice, dried vegetables, stewed fruit, etc., do not fill your pressure cooker more than 1/3 full. For certain soups made with pumpkins, courgettes, etc., leave your pressure cooker to cool for a few minutes, and then cool it under cold water (see section Fast decompression - fig 14). Always be very careful when moving your pressure cooker under pressure. Do not touch hot surfaces. Use the handles and knobs. Use oven gloves when necessary. For soups, we recommend you to do a fast release with cold water (see section “End of cooking with ‘pressure cooking’”). Make sure operating valve (A) is in the decompression position before opening the pressure cooker. The pressure indicator (D) should be in the lowered position. Never use force to open your pressure cooker. Make sure the internal pressure has been released. The pressure indicator (D) should be in the lowered position (see section "Safety"). |
| CLEANING AND MAINTENANCE | If you notice that a part of your pressure cooker is broken or cracked, do not attempt to open it under any circumstances; wait for it to cool down completely before moving it. Do not use it again and take it to an TEFAL Approved Service Centre for repair. Do not tamper with the safety systems other than when following the cleaning and maintenance instructions. Only use the correct TEFAL original parts for your model. Specifically use a TEFAL lid and pot. Do not use your pressure cooker for storing acidic or salty foods before or after cooking as it may damage your pot. Clean and rinse your pressure cooker immediately after each use. Never put the operating valve (A), the gasket (I), the timer* (F) or the pot with a non stick coating in the dishwasher. Never place the timer* (F) in water. Do not use bleach or chlorine-containing chemicals. Do not let the lid soak into water. Change your pressure cooker's gasket every year, or if there is a cut. Make sure you get your pressure cooker checked in a TEFAL Approved Service Centre after 10 years of use. To store your pressure cooker, rest the lid upside down on the pot, to avoid premature wear of the lid gasket. |
KEEP THESE INSTRUCTIONS
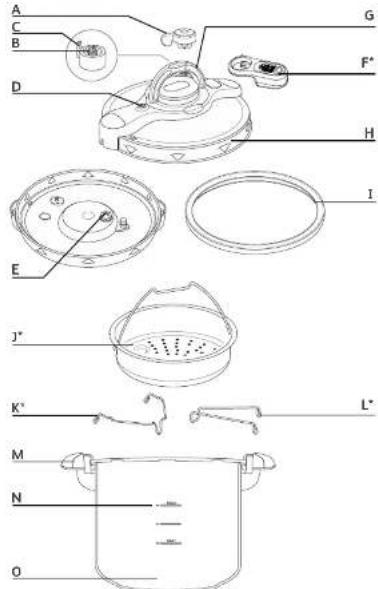
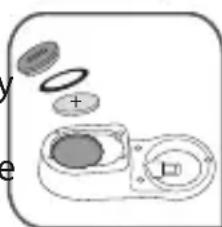
Description of diagram
A. Operating valve
B. Steam release outlet
C. Valve positioning mark
D. Pressure indicator (See section "Safety")
E. Safety valve
F. Removable timer*
G. Lid handle
H. Lid
I. Gasket
J. Steam basket
K./ L. Trivet
M. Pot handle
N. Maximum fill lines
O.Pot
Compulsory checks before each use_
Checking the operating valve
- Check that the draining hole of the operating valve is not obstructed (see section "Removal and installation of the operating valve").
Checking the safety valve
- Check that the bearing of the safety valve can move (use a stick).
Features
Your pressure cooker's base diameter - reference
| Capacity | Pot diameter | Base diameter | Clipso Minut® Perfect / Easy | Clipso Minut® Duo colour | Clipso Minut® Duo Gourmet | Pot material |
| 3 L 22 cm 15.5 cm P46205 - - | Stainless steel | |||||
| 3 L 22 cm 18 cm -- P46605 | ||||||
| 4 L 22 cm 14 cm - P46042 - | Aluminium coated | |||||
| 4.5 L 22 cm 15.5 cm P46206 - - | Stainless steel | |||||
| 5 L 24 cm 14 cm - P46051 - | Aluminium coated | |||||
| 5.2 L 24 cm 20 cm - - P46654 | Stainless steel | |||||
| 7.5 L 24 cm 18 cm P46248 - - | ||||||
| 9 L 24 cm 18 cm P46249 - - | ||||||
| Set 5 L 24 cm 14 cm P46353 - | ||||||
Lid material: stainless steel
Technical information:
Maximum operating pressure: 65kPa/9 psi
Maximum safety pressure: 120 kPa/17.4 psi
Compatible heat sources
GAS
ELECTRIC
(Solid plate)
ELECTRIC
(Radiant or halogen ceramic hobs)
ELECTRIC
(Ceramic induction hob)
ELECTRIC
(Spiral resistor)
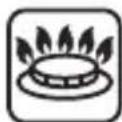


- Your pressure cooker can be used on all heat sources including induction but excluding Aqa hobs.
- On an electric, ceramic or induction hob, use a plate with a diameter equal to or less than that of your pressure cooker base.
- On ceramic hobs, make sure that the base of the pot is clean and dry.
- On gas, the flame should not extend beyond the diameter of the pot.
- On all heat sources, make sure that your pressure cooker is well centred.
Use

Pressure cooking

Cooking with stew pot*
Steam release
Opening
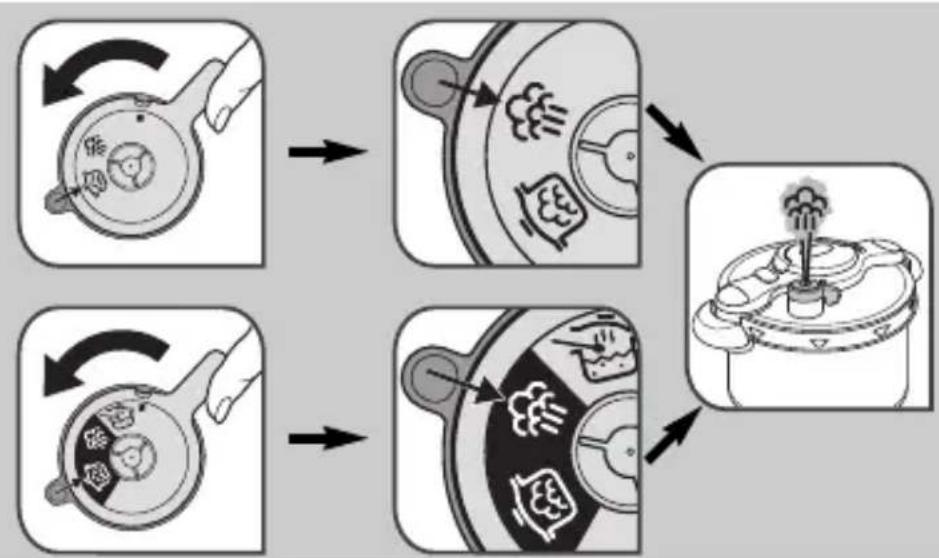
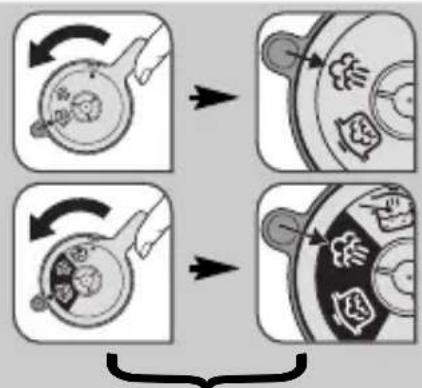
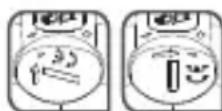
- Switch the lid handle from a horizontal position to a vertical position - Fig. 3. The lid turns.
- Lift the lid.
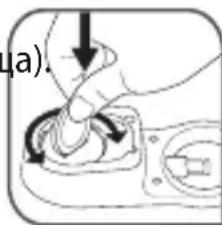
- In case of difficulties opening the lid, rinse the gasket under water and replace it in the lid without drying it - fig 19 and take care to insert it under each of the grooves on the lid - fig 15.
Closing
- Ensure that the lid handle is in a vertical position.
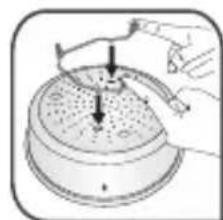
- Place the lid on the pot as indicated in - Fig. 1 by lining up the plastic part with the pot handles.
- Lower the lid handle back from a vertical position to a horizontal position - Fig. 2.
- It is normal that the lid turns on the pot. when the pressure cooker is closed but not in operation. This effect disappears when it is pressurised.
If you are unable to close the lid:
- Check the correct positioning of the gasket.
- In case of difficulties closing the lid, rinse the gasket under water and replace it in the lid without drying it - fig 19 and take care to insert it under each of the grooves on the lid - fig 15.
Using for the first time
- For models with a non-stick coating: wash and use cooking oil to lightly oil the entire interior surface.
Depending on the model:
- Place the pot handle (L) and steam basket (J) at the bottom of the pot.
- Clip the trivet (K) to the steam basket (J), then place it at the bottom of the pot.
- Fill the pot (O) with water up to 2/3 (MAX 2) - fig 5.
- Close your pressure cooker.
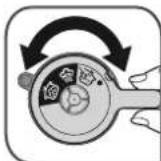
- Align the pictogram for the operating valve (A) with the valve positioning mark (C) - Fig. 9.
*depending on model
- Place your pressure cooker on a heat source then set to maximum power.
- When steam begins to exit the valve, turn down the heat source and set a timer to 20min .
After 20 min., turn off your heat source. - Gradually turn the operating valve (A), adjusting the speed that pressure is released by how far you open the valve, to align the pictogram for the operating valve (A) with the valve positioning mark (C).
- When the pressure indicator (D) drops down again, your pressure cooker is no longer under pressure.
- Open your pressure cooker - Fig. 3.
Clean with washing-up liquid. Dry thoroughly.
Minimum and maximum fill level
Minimum 25 cl/250 ml (2 glasses) - Fig. 4.
Maximum 2/3 of the height of the pot, MAX 2 mark - Fig. 5.
- Never use coarse salt in your pressure cooker, only use fine salt at the end of cooking.
For some foods:
- For foodstuffs that expand or foam during cooking, such as rice, pulses, dehydrated vegetables, stewed fruit, pumpkin, courgettes, carrots, potatoes, fish fillets, etc. do not fill your pressure cooker beyond 1/3 (MAX 1) of its capacity. Let your pressure cooker cool down for a few minutes, then cool by standing in a sink half filled with cold water. After having checked that the pressure indicator has gone down, gently shake the pressure
before opening to prevent food from spurting out and burning you. This operation is particularly important when steam is released quickly or after cooling down in cold water. For soups, we recommend you to do a fast release standing in cold water (see section "End of cooking with 'pressure cooker'").
-
Do not cook foodstuffs that might block the safety components:
-
blueberries, cranberries
- pearl barley
- oat flakes
- split peas
- noodles, macaroni, spaghetti
-rhubarb - blackcurrants, redcurrants
Using the steam basket*
- Pour 750ml of water into the bottom of the pot (O).
Depending on the model:
- Place the trivet* (L) and steam basket * (J) at the bottom of the pot.
- Clip the trivet (K) to the steam basket (J), and then then place it at the bottom of the pot.

- When pressure cooking, the food in the steam basket* should not be in contact with the water - Fig. 6 and 7.
The food in the steam basket* must not touch the lid of the pressure cooker.
Fitting and removal of the
Operating valve (A)
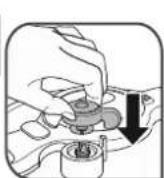
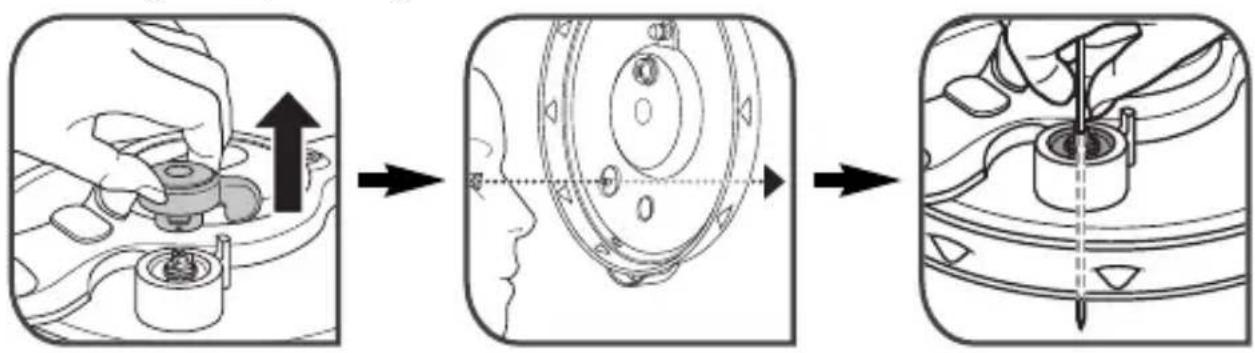
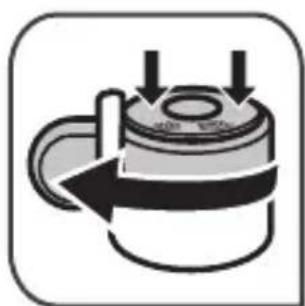
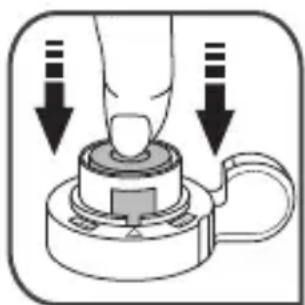
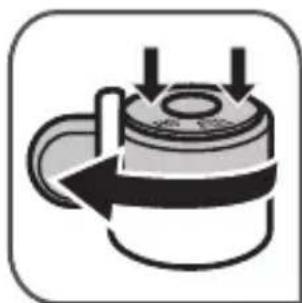
To remove the operating valve (A):
- Align the groove with the operating valve positioning mark (C) pressing down on the ring of the operating valve (A).
Remove it - Fig. 11.
To fit the operating valve:
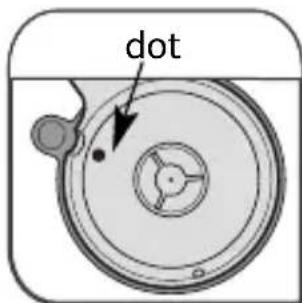
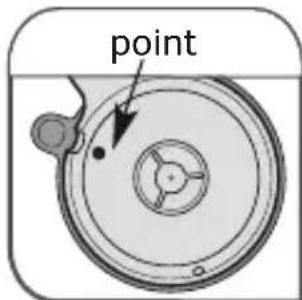
- Fit the operating valve (A) - fig 8 aligning the dot on the operating valve with the positioning mark (C); see opposite.
- Press the operating valve (A) so that it engages on the steam release outlet, then turn it to the pictogram symbol required.
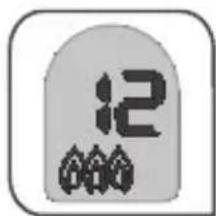
Timer*
*Only provided for ClipsoMinut' Perfect model.
The timer has been designed to help you obtain the best cooking result by allowing you to optimise energy consumption. It automatically counts down the cooking time once the temperature required for cooking with "Pressure Cooking" is reached
The timer must be clipped to your pressure cooker in order to work.
During cooking, check that the operating valve (A) murmurs regularly. If there is not enough steam, increase the heat source slightly; if there is too much steam, reduce the heat source.
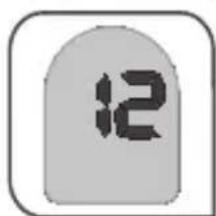
1 To switch on the timer: press the button.
Program the cooking time (in minutes).
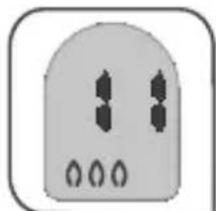
If you made a mistake with the cooking time, wait for 4 seconds until the flame symbol does not flash any more, then hold the button down to reset.
3 Start with the heat source at maximum power.
As soon as your pressure cooker has reached the cooking temperature, the timer rings and the countdown begins (numbers flash). Reduce the power of the heat source.
At the end of the cooking time, the timer rings.
To stop the timer ringing, press the button.
- Turn off the heat source.
Holding the button down resets and switches off the timer.


Fitting and removing the timer*
- To fit the timer (F) - Fig. 12, first insert the front part into the module and then press to clip the rear part.
- To remove the timer (F), lift it using the tab and remove it.
Changing the timer* battery
The timer battery is a CR2032 type.
If the symbol appears, or if you no longer have a display, change the battery.
The battery life depends on how often the timer is used.
- The battery contains Dimethoxyethane no. CAS 110-71-4. It is in accordance with the European regulations. For your safety and the environmental protection: do not open the battery, do not expose it to high temperatures, do not throw it with household waste. Dispose of battery at a battery disposal point.
Non-rechargeable batteries should not be recharged.
The battery must be inserted in the correct polarity.
A dead battery must be removed from the device and disposed of safely.
- If the device is to be stored without being used for a long period of time, the battery should be removed.
The power terminals must not be short-circuited.
- Place the timer on a flat work surface.
- To remove the battery from your timer, open the battery cover with a coin (see illustration opposite), and carefully retain the battery sealing ring.
- Replace your battery (see diagram opposite).
- Replace the battery sealing ring in it's casing.
- Position the "half moon" on the battery cover opposite the "half moon" on the timer.
Gently turn the battery cover and continue to press lightly as you align the "half moon" on the battery cover with the moon on the timer.
- Work on a flat work surface so that the cover is positioned correctly horizontally.
- Do not force the battery cover when you close it. Do not turn beyond the stops.
If you lose your timer, you can purchase another from all of our TEFAL Approved Service Centres.
Never place the timer* in water, nor in the dishwasher.
Never use the timer in "Stewpot" mode.
Before cooking
- Before each use, remove the operating valve (A) - Fig. 11 and check the steam release valve (B) is not blocked - Fig. 13.
- Check that the safety valve bearing is mobile (see sections "Cleaning" and "Compulsory checks before each use") - Fig. 18.
- Add your ingredients and the liquid.
- Close your pressure cooker - Fig. 2.
- In case of difficulties closing the lid, rinse the gasket under water and replace it in the lid without drying it - fig 19 and 15 and take care to insert it under each of the grooves on the lid.
- Position the operating valve (A) - fig 8.

Cooking with "Pressure Cooking"
- Turn the operating valve (A) to the cooking with "Pressure Cooking" position - fig 9. The pressure cooker operates at 65kPa / 9 lbs (psi).
- Make sure your pressure cooker is properly closed before use - Fig. 2.
- Place your pressure cooker on a heat source then set to maximum power.
- For models equipped with a timer*: program the cooking time indicated in the recipe (see section "Using the timer").
- A clicking noise and steam emitted from the pressure indicator are normal when bringing the cooker up to pressure, as the air escapes before cooking.
During cooking with "Pressure Cooking"
- When the operating valve (A) is constantly emitting steam and making a regular sound (PSCHHHT), lower the heat source.
- Select the cooking time indicated in the recipe.
- During cooking, check that the valve murmurs regularly. If there is not enough steam being released, increase the heat source slightly; if there is too much steam, reduce it.
End of cooking with "Pressure Cooking"
To release the steam:
- When the heat source has been turned off, you have two options:
- Gradual pressure release:
- This is used for stews, vegetables, meat joints and fish dishes.
- Gradually turn the operating valve (A), adjusting the speed that the pressure is released by how far you open the valve, until the steam release symbol is is opposite the positioning mark (C) (see diagrams on page 12).
- When the pressure indicator (D) drops down, your pressure cooker is no longer under pressure.
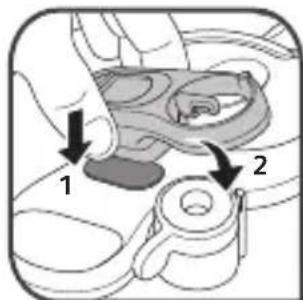
- Fast pressure release with cold water:
- This is used for soups, rice, pasta, egg custards, cake and pudding mixes, recipes containing rice or pasta, and recipes with a high liquid content.
- Place your pressure cooker in a sink half-filled with cold tap water (see diagram below step 1) until the pressure indicator (D) goes down, and your pressure cooker is no longer under pressure.
- Turn the operating valve (A) to the position (see diagram below step 2).
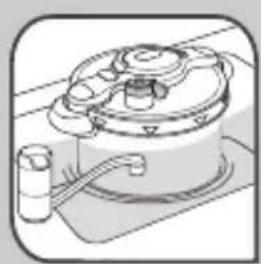
Step 1
Step 2
- You can open your pressure cooker - fig 3.
- In case of difficulties opening the lid, rinse the gasket under water and replace it in the lid without drying it - fig 19 and take care to insert it under each of the grooves on the lid - fig 15.
If you notice food or liquid start to spray out from the valve during steam release, return the operating valve (A) to the "pressure cooker" position, then wait a few minutes and follow the instructions above for fast pressure release with cold water.
If the pressure indicator (D) does not come down, follow the instructions above for fast pressure release with cold water - fig.14
Never interfere with the pressure indicator.
- For foodstuffs that expand or foam during cooking, such as rice, pulses, dried vegetables, stewed fruit (compotes), pumpkin, courgettes, carrots, potatoes, fish fillets, etc. do not fill your pressure cooker beyond 1/3 (MAX 1) of its capacity. Let your pressure cooker cool down for a few minutes, then cool by standing in a sink half filled with cold water. After having checked that the pressure indicator has gone down, gently shake the pressure cooker before opening to prevent food from spurting out and burning you. This operation is particularly important when steam is released using the fast pressure method by cooling in cold water.
- For soups, we recommend you to do a fast pressure release with cold water (see section "End of cooking with 'pressure cooker'").
Cooking with the "Stewpot"*
- Turn the operating valve (A) to the cooking with "Stewpot" position. To do this, apply enough force to go beyond the notch in the decompression position.
- Make sure the pressure cooker is properly closed - Fig. 2 before use.
- Place your pressure cooker on a heat source set at low heat.
- Select the cooking time indicated in the recipe.
- When 'stewpot' cooking, you can open your pressure cooker at any time to stir, check whether the food is cooked or add ingredients.
- In case of difficulties opening the lid, rinse the gasket under water and replace it in the lid without drying it - fig 19 and 15 and take care to insert it under each of the grooves on the lid.
- If the heat source is set too high, the pressure cooker may lock (the pressure indicator (D) rises and blocks the opening) and the lid handle may not work or may not open the pressure cooker. In this case, reduce the heat or turn off the heat source. If you are using cast iron heating plates to open the lid, remove the pressure cooker from the heat source.
-
For models with non-stick coating: do not use whisks or metal or sharp utensils. Do not drain your utensils by tapping them on the side of the pot as this risks damaging it and causing leaks.
-
Never let fat or oil burn in the pot until completely carbonised. The cooking fumes could be dangerous to animals with a particularly sensitive respiratory system, such as birds. Bird owners should keep them away from the kitchen.
Safety
Your pressure cooker is fitted with several safety devices:
Closing safety:
- If the lid is not positioned correctly or if you forget to fold down the lid handle, the steam will seep out on the lid (near the pressure indicator D) of the pressure cooker and it can not build up pressure.
- If you forget to fold the lid handle to the horizontal position, steam leaks.
- Opening safety:
- If your pressure cooker is under pressure, the pressure indicator (D) is up and the opening/closing lid handle (G) should not be used.
- Never try to forcibly open the pressure cooker.
- Above all do not touch the pressure indicator (D).
- Make sure that the interior pressure has fallen (pressure indicator (D) in lowered position) before opening the pressure cooker.
- The lid handles are safety components. Never change them yourself. Never use any other models of lid handles.
- If you attempt to move the opening/closing lid handle (G) to a vertical position while the pressure cooker is still under pressure, you are not able to open it. This function is an additional safety measure. In this circumstance, move the lid handle back to a horizontal position and wait until the pressure indicator (D) is in the lowered position.
- Two safety devices against overpressure:
- First device: the safety valve (E) releases the pressure - fig 20.
- Second device: the gasket allows steam to escape from the lid - fig 20.
If one of the overpressure safety systems is triggered:
- Turn off the heat source.
- Allow the pressure cooker to cool completely.
Open. - Check and clean the operating valve (A), the steam release outlet (B), the safety valve (E) and the gasket (I) - Fig. 16 - 17- 18. See section "Compulsory checks before each use".
- If, after these checks and cleaning, your product leaks or no longer works, take it to an TEFAL Approved Service Centre.
Recommendations for use
1 - Steam is very hot when it leaves the operating valve. Watch out for the jet of steam.
2 - While the pressure indicator is high, you cannot open the pressure cooker.
3 - As with any cooking appliance, ensure close supervision if you are using your pressure cooker near children.
4 - To move your pressure cooker, use the two pot handles.
5 - Never leave food in your pressure cooker. Never carry your pressure cooker by the lid handle.
6 - Never use bleach or products containing chlorine, as these will alter the quality of the steel.
7 - Do not leave the lid soaking in water.
8 - Change the gasket every year or if it is split or damaged.
9 - You should only clean your pressure cooker when it is cold and empty.
10 - Make sure you get your pressure cooker checked in a TEFAL Approved Service Centre after 10 years of use.
Cleaning
To ensure the correct operation of your pressure cooker, follow these cleaning and maintenance recommendations after each use.
The browning and marks which may appear following long use do not affect the operation of the pressure cooker.
Wear of the exterior coating as a result of the contact between the lid and pot is normal.
For pressure cookers with non stick coating (according to model): the slight scratches and abrasions that may appear with use do not affect the coating's non stick performance.
- Wash your pressure cooker after each use using warm water with a little washing-up liquid added. Follow the same procedure for the basket*.
- Do not use bleach or chlorine-containing chemicals.
- Do not heat your pot when empty.
To clean the inside of the stainless steel pot:
- Wash using a sponge and washing-up liquid.
- If the interior of the steel pot has an iridescent sheen or white marks (mineral deposits), clean using a sponge with a little white vinegar.
To clean the inside of the aluminium pot with a non stick coating:
- To prolong the product's lifespan, we recommend washing by hand only.
- Wash with hot water, washing-up liquid and a soft sponge.
- Do not use scouring powder or abrasive sponges.
- If you have burned some food, fill the pot with hot water and leave to soak. Then clean with washing-up liquid.
You can wash the stainless steel pot and the basket in the dishwasher.
Do not put the pot with a non stick coating (according to model) in the dishwasher, because detergents tablets contain substances that are very aggressive and corrosive for aluminium parts.
Extended use of pots with a non stick coating (according to model) may slightly alter the colour of the coating (yellowing, staining).
To clean the outside of the pot:
- Wash using a sponge and washing-up liquid.
To clean the lid:
- Wash the lid using a damp sponge and washing-up liquid.
Drain the lid vertically to remove the remaining water between the metal and plastic parts of the lid.
To clean the gasket:
After each use, clean the gasket (I) and its housing.
- To replace the gasket, refer to - Fig. 15 and ensure that the gasket is properly inserted beneath each of the grooves on the lid.
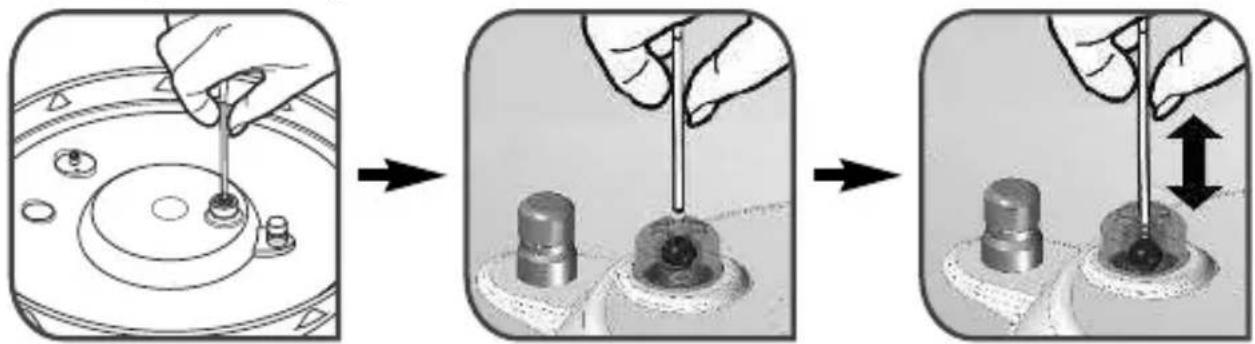
To clean the operating valve (A):
- Remove the operating valve (A) - Fig. 11
- Clean the operating valve (A) under cold tap water - Fig. 16.
- Check its mobility: see figure opposite.
After removing the operating valve (A), the gasket (I) and the timer* (F), you can put the lid in the dishwasher.
Never put the operating valve (A), the gasket (I), the timer* (F), or the pot with the non stick coating in the dishwasher.
To clean the steam release outlet (B) located on the lid:
Remove the valve (A) - Fig. 11
- Check to make sure the steam release outlet is clear of debris and round - Fig. 13. If needed, clean it with a tooth pick - Fig. 17 and rinse it.
To clean the safety valve (E):
- Clean the part of the safety valve located inside the lid by washing under water.
- Check its proper functioning by pressing firmly using a cotton bud (with the cotton wool tip removed), and the bearing must be mobile - Fig 18. See section "Compulsory checks before each use".
To clean the timer* (F):
- Use a clean dry cloth.
- Do not use any solvents.
- Never place the timer in water, nor in the dishwasher.
Maintenance
To change your pressure cooker's gasket:
- Change your pressure cooker's gasket every year or if split or damaged.
- Always use an original TEFAL gasket corresponding to your model (see section "Accessories")
- To replace the gasket, refer to - Fig 15 and ensure that the gasket is properly inserted beneath each of the grooves on the lid.
To store your pressure cooker:
- Turn the lid over on the pot.
- The pressure cooker's opening and closing system does not require any specific maintenance apart from cleaning.
Make sure you get your pressure cooker checked in a TEFAL Approved Service Centre after 10 years of use.
TEFAL Accessories
- Commercially available pressure cooker accessories are:
| Accessories References | ||
| Gasket | 3/4/4.5/6 L: outer diameter of gasket: 24 cm | X1010008 |
| 5/7.5/9 L: outer diameter of gasket: 27 cm | X1010007 | |
| Steam basket* | 3/4.5/4/6 L: for pot with 22 cm diameter | 792185 |
| 5/7.5/9 L: for pot with 24 cm diameter 792654 | ||
| Trivet* | 792691 | |
| Timer* | X1060007 | |
- To replace other parts or for repairs, contact a TEFAL Approved Service Centre.
- Only use the correct TEFAL original parts for your model.
Guarantee
- When used as recommended in the manual, the stainless steel pot of your new TEFAL pressure cooker is guaranteed for 10 years against:
- Any defect linked to the metallic structure of your pot,
- Any premature deterioration of the base metal
- All other pot materials and all other parts of your pressure cooker are guaranteed against defects in workmanship or materials, for the period of guarantee defined in valid legislation in force in the country where the product was purchased from the date of purchase.
- This contractual guarantee is established upon presentation of the receipt or invoice showing the date of purchase.
These guarantees exclude:
- Scratches and discolouration resulting from ageing for pans with non stick coating.
- Damage resulting from failure to comply with important precautions, or negligent use, particularly:
- Impacts, falls, use in the oven, etc.
- Only TEFAL Approved Service Centres are authorised to provide this guarantee service.
- Please call our local rate number to find out the address of your nearest TEFAL Approved Service Centre.
Regulatory markings
| Labelling Location | |
| Trademark On the lid. | |
| Year and batch manufacture Reference model Maximum safety pressure (SP) Maximum operating pressure (OP) | On the lid. |
| Capacity On the outer base of the pot. | |
| Manufacturer's postal address On the outer base of the pot. |
Think of the environment!
① Your appliance contains valuable materials which can be recovered or recycled.
Leave it at a local civic waste collection point.
Troubleshooting
[when pressure cooking]
| Problems Recommendations | |
| If it becomes difficult to open and/or close it: | Remove the gasket, Rinse the gasket under running water then replace it in the lid without wiping it - fig 19. |
| If you are unable to close the lid: | Check that the lid handle is in a vertical position. Check that the gasket is positioned correctly (see section "Cleaning and maintenance"). Check that the lid is positioned as indicated on - Fig 1. Rinse the gasket under running water then replace it in the lid without wiping it - fig 19 and ensure that it is correctly positioned under the grooves on the lid - fig 15. |
| If your pressure cooker has been heated under pressure without liquid inside: | Have your pressure cooker checked by a TEFAL Approved Service Centre. |
| If the pressure indicator emits a clicking noise and steam. | This is normal during the first few minutes : it allows escape of air before cooking. |
| If the pressure indicator has not risen and nothing is escaping through the vent during cooking: | This is normal during the first few minutes. If the phenomenon persists, check that: - The heat source is sufficiently strong; if not, increase it. - The quantity of liquid in the pot is sufficient. - The operating valve (A) is positioned on Your pressure cooker is properly closed. - There is no deterioration of the gasket or edge of the pot. - The gasket is correctly positioned. |
| Problems | Recommendations |
| If the pressure indicator has risen but nothing is escaping through the vent during cooking: | This is normal for the first few minutes. If this persists, run cold water into your sink and sub-merge the bottom of your pressure cooker until the pressure indicator (D) comes down. Clean the operating valve (A) - Fig. 16 and the steam release outlet - Fig. 17 and use a cotton bud to check that the security valve ball can be pressed without any problems - Fig. 18. |
| If steam leaks out around the lid, and the pressure indicator is in the lowered position, check: | The correct closure of the lid. The position of the gasket. The condition of the gasket; replace if necessary. The cleanliness of the lid, the gasket and its housing in the lid. The condition of the edge of the pot. |
| If you are unable to open the lid: | Check that the pressure indicator (D) is in the lowered position. Otherwise, depressurise, run cold water into your sink and submerge the bottom of your pressure cooker until the pressure indicator comes down. Never interfere with the pressure indicator (D). Turn the operating valve (A) to the position |
| If the food is not cooked or is burned, check: | The cooking time. The power of the heat source. The correct position of the operating valve (A). The quantity of liquid. |
| If food has burnt in your pressure cooker: | Fill the pot with water and soak for a while before washing. Never use bleach or chlorine-containing chemicals. |
| If one of the overpressure safety systems is triggered: | Turn off the heat source. Let your pressure cooker cool down without moving it. Wait for the pressure indicator to fall and open the pressure cooker. Check and clean the operating valve (A), the steam release outlet, the safety valve and the gasket. If the problem persists, have your pressure cooker checked by a TEFAL Approved Service Centre. |
| If you notice the appearance of oxidation marks inside the stainless steel pot: | The use of high performance stainless steel does not prevent the appearance of oxidation in extreme cases. If you notice oxidation marks, remove them by rubbing with an abrasive sponge before using your pressure cooker again. |
Golden rules when pressure cooking (for UK Consumers)
For 5 Litre and 5.2 Litre models only.
- The minimum quantity of liquid required for normal cooking is 250ml ( 12 pint) for the first 14 hour cooking. For each additional 14 hour, or part of 14 hour, add a further 150ml ( 14 pint) of liquid. For example, 45 minutes cooking requires 600ml (1 pint) of liquid. Note: This is only a general guide. Certain foods, such as rice, pulses, steamed puddings and Christmas puddings may require extra water (see details below).
- When steaming foods in the basket use a minimum of 750 ml (1½ pint) water in the cooker.
- Always use a liquid that gives off steam when boiled e.g. water stock, wine, beer, cider. Never use oil or fat. All pressure cooking requires some liquid.
- Whatever the size of pressure cooker, the maximum filling level when all the ingredients and liquid have been added are:
Solid foods e.g. vegetables, meat joints: no more than two-thirds full (MAX 2 mark)
Liquids and cereals e.g. soups, stews, cereal and pasta: no more than half full
Foods that swell during cooking e.g. rice, dried beans, dried peas, dried vegetables, stewed fruit (compotes), pumpkin, courgette and potatoes, etc: no more than one-third full (MAX 1 mark).
-
When cooking pulses they swell up and tend to froth up. Use 1.2 litres (2 pints) water for every 450g (1 lb) pre-soaked weight of pulses. Remember all dried peas and dried beans, must be soaked in boiling water for 1 hour before cooking. Drain, rinse thoroughly and cook in fresh water. Never eat uncooked beans or peas. Soaking is not necessary for red lentils. The high temperatures achieved in the pressure cooker ensure that any natural toxins in the pulses are destroyed. Canned beans and pulses can simply be drained and rinsed before adding to the pressure cooker.
-
For steamed suet puddings, sponge puddings or Christmas puddings, a short pre-steaming time is best to enable the raising agent to activate and prevent a heavy, close texture. Extra liquid is required so use a minimum of 1 12 pint/900 ml of boiling water for a combined steaming and cooking time of up to 1 hour. For each additional 1 / 4 hour of cooking, or part of 1 / 4 hour, add a further 1 / 4 pint/150 ml of boiling water. Pre-steaming is done with the operating valve in the steam release position on a low heat for the required time. Then turn the operating valve to ,and increase the heat to bring to full pressure. Lower the heat and pressure cook for the required time.
Pressure operates at 65kPa (9psi/9lbs).
- Never cook dumplings with the lid tightly closed, as they could rise up and block the safety devices. Cook the stew and at the end of cooking, release the steam and cook gently for about 10 - 15 minutes without the lid on.
- Pressure cooking times vary according to the size of individual pieces or thickness of the food, not the weight.
- To prevent discolouration of the inside of the stainless steel pot, caused by mineral deposits in hard water areas, add a tablespoon of lemon juice or vinegar.
- Cooking containers must withstand temperatures of 130^ ( 250^ ). Any covering on containers, e.g. foil, greaseproof paper, must be securely tied otherwise they could block the safety devices. Do not use plastic lids as they prevent steam from being in contact with the food. Also, they could distort and come off during cooking which could block the safety outlets.
- Accurate timing is essential when pressure cooking to prevent overcooking, especially with vegetables, fruit and fish.
- Never make milk-based recipes (such as rice pudding, semolina pudding..) when pressure cooking.
Australian - NZ warranty COOKWARE, BAKeware AND PRESSURE COOKERS Limited Replacement Guarantee
Our goods come with guarantees that cannot be excluded under the Australian Consumer Law. You are entitled to a replacement or refund for a major failure and compensation for any other reasonably foreseeable loss or damage. You are also entitled to have the goods repaired or replaced if the goods fail to be of acceptable quality and the failure does not amount to a major failure. In addition to these statutory rights and any other rights and remedies you may have under the law, Groupe SEB Australia Pty Ltd (we or us) guarantees this Jamie Oliver by Tefal/Tefal/All-Clad/Moulinex product will be free of defects in material and craftsmanship including handles, body, knobs, lids and fixings for 12 months from the date of purchase. We also guarantee the non-stick coating of this Jamie Oliver by Tefal/Tefal/All-Clad/Moulinex product will be free of blistering or peeling for the life of the Jamie Oliver by Tefal/Tefal/All-Clad/Moulinex product. Should your Jamie Oliver by Tefal/Tefal/All-Clad/Moulinex product develop a defect during the guarantee period or the non-stick coating peel during the life of your Jamie Oliver by Tefal/Tefal/All-Clad/Moulinex product, you should return it, at your cost, to the retailer from which you purchased it from, together with your receipt as proof of purchase. The retailer will then forward your claim directly to us for processing. Alternatively, if the retailer is unable to help you, you may contact us directly at:
Groupe SEB Australia Pty Ltd, Customer Service Department, Unit 1, No 10 Hill Rd, Homebush NSW 2127 T: +61 2 9748 7944
If on receipt your Jamie Oliver by Tefal/Tefal/All-Clad/Moulinex product is found to be defective or the non-stick coating has peeled, we will, at our cost, replace or repair the product in our discretion. Only the defective part or accessory will be repaired or replaced. Packaging, instructions etc. will not be replaced unless faulty. This guarantee excludes defects caused by the Jamie Oliver by Tefal/Tefal/All-Clad/Moulinex product not being used in accordance with instructions, accidental damage (including overheating), misuse or being tampered with by unauthorised persons. It also does not apply if the Jamie Oliver by Tefal/Tefal/All-Clad/Moulinex product is used commercially and excludes consumable items (including accessories such as pressure regulators and safety devices), dishwasher effects and damages, stains, dents, discolouration, scratches or scuffs due to normal wear and tear, and your costs of claiming under the guarantee.
COOKING TABLE
Vegetable
VEGETABLES (FRESH)
STEAM
Ingredients in the steam basket and 750 ml water in the bottom of the pressure cooker.
IMMERSION
Ingredients in water and without the basket.
PULSES
IMMERSION
Without the basket.
| Artichokes, 2 whole, 600g each (immersion) 30 to 35 mins | |
| Asparagus, white (Steam) 5 to 6 mins | |
| Aubergines, peeled and sliced (3mm), 850g (Steam) | 10 to 12 mins |
| Beetroot, red, cut into quarters (Immersion) | 20 to 25 mins (according to size) |
| Broccoli florets 600 g (steam) 9 to 11 mins | |
| Brussel sprouts (steam) 10 to 12 mins | |
| Cabbage, sliced and green, 500 g (Immersion) 5 to 6 mins | 6 mins |
| Carrots cut into round slices (3 mm) 600 g (steam) | 7 to 19 mins |
| Cauliflower florets 600 g (steam) 10 to 12 mins | |
| Celeriac, sliced (immersion) 600 g 7 to 9 mins | |
| Chard, sliced (2cm) 700 g (Steam) | 15 to 17 mins |
| Courgettes in round slices (3 mm) 600 g (steam) | 12 to 15 mins |
| Chicory cut in half (900 g) (steam) | 14 to 16 mins |
| Fennel cut into strips (600 g) (steam) | 6 to 9 mins |
| Fine green beans (600 g) (steam) | 10 to 12 mins |
| Flageolet beans, dried 250 g (Immersion) | 35 to 40 mins |
| Leek, whole and white 650 g (Steam) | 9 to 11 mins |
| Lentils, green 250 g (Immersion) | 14 to 16 mins |
| Mushrooms, sliced 800 g (Immersion) | 4 to 5 mins |
| Peas (steam) | 6 to 8 mins |
| Peppers cut in half (550 g) (steam) | 14 to 16 mins |
| Pickled onions (steam) | 7 to 8 mins |
| Potatoes cut in half (950 g) (steam) | 20 to 25 mins (according to size) |
| Pumpkin, cut in pieces (3 to 5 cm) 600 g (steam) | 13 to 18 mins |
| Spinach (steam) | 3 to 4 mins |
| Split peas 250 g (immersion) 18 to 20 mins | |
| Turnips, diced (500 g) (steam) | 14 to 16 mins |
| IMMERSION Without the basket. MAX 1 | QUANTITY OF WATER OF RICE | |||
| 2 PEOPLE 40 ml / 2 glasses 150 g | 1 glass | 7 to 8 mins4 PEOPLE | ||
| 500 ml / 2.5 glasses | 250 g / 2 glasses | |||
| 6 PEOPLE 700 ml / 3.5 glasses | 375 g / 3 glasses | |||
Meat/ fish
| FRESH FROZEN | ||
| Chicken (1.35 kg) 23 to 25 mins x | ||
| Duck (1.8 kg) 45 to 47 mins x | ||
| Lamb shanks: 2 (0.95 kg) 40 to 45 mins 1 h05 to 1 h15 | ||
| Monkfish fillets (1 kg) in pieces of 75 g | 5 to 6 mins | 7 to 8 mins |
| Pork fillet (tenderloin) 2 pieces of 350 g | 13 to 15 mins | 26 to 29 mins |
| Pork joint (0.8 kg, 8-10 cm diameter) | 30 to 35 mins | 1 h05 to 1h15 |
| Poussins: 2 (1.3 kg) | 23 to 25 mins | 40 to 45 mins |
| Quail: 4 | 9 to 10 mins | 18 to 20 mins |
| Roast beef (1 kg, 8-11 cm diameter) | 30 to 35 mins (medium) ** | 45 to 50 mins (medium)** |
| Salmon steaks: 4 (0.8 kg) | 5 to 6 mins | 7 to 8 mins |
| Tuna steaks: 4 (0.7 kg) | 5 to 6 mins | 7 to 9 mins |
| Veal fillets: 0.7 kg | 17 to 21 mins | 33 to 38 mins |
| Veal joint (0.8 kg, 5-7 cm diameter) | 17 to 19 mins | 37 to 40 mins |
** Cook for an additional 5 minutes for well done meat.
Note: For models 5 litres and below ensure that meat joints and poultry do not exceed the mark on the inside of the pot. Choose meat joints and poultry 8cm or less in height.
PRECAUTIONS IMPORTANTES
FR
AFSLUTTET
TILBEREDNING
Anbefalinger for drug
Under tillagning i laget "Tryckkokare"
BAJHIN PPEДПА3HN MEPKN
Ipei Da n3noJ3BaTe TeHJKePaTa noJ HaJIraHe, npOyTeTe BCNUKn HNCTpyKcIM I npi HJxJa BUNaRn npaBeTe cnpaBka C TOBa pBkoBOdCTBO. HenpaBnHaT a ynotpe6a Ha ypeDa MoKe da doBeDe do uetn.
PC orneHa Baata 6e3oNaCHoc T03n ypei CbOTBeTCTBa Ha N3NCKBaHnraTa Ha cIeHNHe DeiCTBaU n CTaHdApTu HOpMaTUBHn DOkymeHTn:
-ДиpeктИBa 3a сьОрьЖeHЯТа NOД HaJIraHaTe
- MaTePnAn, KOnTo BIn3aT B KOHTaKT C XpaHn
-ОпаЗвае на okолнота срEDA
Haene Te 750 Mn BOda Ha IbHOTo Ha CbD).
B 3aBnCmOCT OT Modena:
Cnoxete noctabkata(L) n KowHncaTa*J) Ha IbHOTo Ha cbda.
Crlno6eTe noctabkata(K) n KOuHnUaTa*J) n cnei TOBa noCTaBeTe Taka crNo6eHaTa YacT Ha DbHOTo Ha Cbda.
-При ratbe He Ha napa npodukTte B Koushnucata 3a rotbe He Ha napa* He Tp6Ba da 6bDat B KOHTaKT C BOdaTaФnr.6u7
IpoDyKTnTe, nocTaBEN B KOWHua Ta 3a rotBeHe Ha npa*, He Tp6Ba da HndBnBaBt HnBoto MAX 2 a cbpa.
CbaJHe n noCTaBJeHa pa6OTnJaIaN (A)
3a da cbaNTe pa60THnKlaNaHA):
- NocTaBeTe JIe6a Ha eHa IINHc C INHnKaTopa 3a NIOJKeHne Ha KlaNa (G), KaTo HATnCHete npbCTeHa Ha pa6oTHnKlaNa(A).
CbaJeTe KlaNaHa-Φnr.11.
3a da noctabute pa60THnKlaanH:
IocTaBeTe pa6oTHnKlaNaH(A)-Φnr.8 KaTo TOUkata Ha pa6oTHnKlaan Tp46Ba Da e Ha eHa JInHnC INHdkaTopa 3a NIOJKeHHe(C) BuxTe TyK.
HaTnchTe pa6oTHna KlaanA(A), 3a da ro CbpxKeTe KbM uΦTa 3a n3nyckaHe Ha napata.
HaTnchete nIKTORpamnte Ha pa6OTHnaKnaan (A) 3aBbptete.
Taimep*.
HmKora He n3noJ3BaIe TaIMepa B peXIM ,TpaIuOHa TeHIXepa".
TaimepbTe c63daen da Bn nomara da noctnHte OTnUHn pe3yIaTn npn rotBeHeTo, n03BOLaBn Bn da perynpate onTImaHNO KOHCymaunraTa Ha eheprna. ToN otHTa ABTomatuHNo BpeMeTO Ha rotBeHe OT MOMeHa NaOCTnRaHe Ha TempePaTypaTa 3a rotBeHe B pexkM ,TeHxkepa Nd HnraHe
TaimepbTp6Ba Da e da e 3aKoPuaH KbM TeHJKePaTa noi HaIraHe, 3a da pa6Otn.
По врeme на rotbehe cnepeTe dani pa6oTHnT Klaan (A) n3nycka noctoHno npa. Ako hma doctaTbUHO npa, leko yBelenyete TOnHHnI N3TOuHnK, a B npOTuBeH cnUyai HaMaJeTe TOnHHn I3TOuHnK.
1 3a BkIIOUbaHe Ha TaMepa:HaTnCHte 6yToHa.
2 HactpoIte BpeMeTo 3a roTBeHe (B MmHyTu).
Ako cTe Hactponn HnnpabunHO BpeMeTo 3a rotBeHe, n3yaKaIte 4 cekyHn, DOKaTO CNMBoJIbT C PnAmbuntcnpe da Mira, cIeK KOeTO HaTnCHTe npOdbJxNtEnHO 6yToHa 3a 3aHyJaBaHe.
3 BkIIOyeTe TOpJIINHHnI N3TOUHnK Ha MaKcIMaJIHa MOUHOCT.
4 CneI KaTo TeHJKePaTa NOI HaJIraHe DOCTURHe Tempeatypata 3a rotBeHe, TaIMepbT N3daBa 3ByKOB CNrHaN I 3aNoUba Da OTuNTa BpeMeTO (uΦpnte MuraT). HamaIeMoUHocTTa Ha TOnJIHHnI N3TOUHnK.
5 CnEiN3TNUaHe Ha BpeMeTo Ha rOTBeHe TaIMePbT N3DaBa 3ByKOB CNrHaJ.
3a da n3KIOUHTe 3Byka Ha TaIMepa, HATNCHeTe 6yToHa.
N3KJIHOUeTe TOJINHHNnI N3TOUHNK.
IpoBbIXTeHToHaTnCKaHeHa 6yToHa Hynpa TaMepa.
Noctabraye n cbaJrHe Ha TaMepa\*
3a da nocTaBnTe TaMepa(F) -Our.12nbpBO BkapaiTe yactTa C6yToHa B NaHeJa, Cnei KOeTO HaTNCHeTe CpeuNoJXHaTa YAcT, 3a Da J3akOnyaeTe.
3a da cBaInte TaImepeF), NOBnHHeTe r n rno 3BaIte.
Ako 6atepuHte He ca npe3apeKdaun, He Tp6Ba da ce 3apeKdaT.
Pa3nHte BINOBe HOBn ynoTpe6BaHn 6aTePN He Tp6Ba da ce cMeCBaT.
Batepnite Tp6Ba da 6bDat noctabeHn cnopei npabnHaTa nolapnoct.
■N3toeHnte 6aTeepn Tp8Ba Da 6bDaT n3BaDeHN OT yCTPOINCTBOTo N da 6bDaT n3XBbPJIeHN NO 6e3ONaCen HauHH.
Ako yctpoiCTBOTO Hama da ce n3noJ3Ba 3a dblbr nepnoD OT BpeMe,6atepuNTe Tpa6Ba da 6bDaT n3BaDeHn.
3axpaHbauNTe KIeMn He Tp6Ba Da ca B KOHTaKT.
Pa6oTeTe cypea Bbpxy paBEN pa6oTeH nIOT
3a da n3BaIte 6atepna Ta OT TaMepa, cBale Te KaNaYkata Ha 6atepnaTa C NOMOHTa Ha MOHeTa (BnKTe n3O6paXeHneTo Hacpeu).
CmeHete 6aTepeRnTa.
-
NocTaBeTe 06paTHO yNtBTHHeHHeTO B rHe3IOTo My.
-
NocTabete noIyMececa Ha KaNaYkata Ha 6aTePnra Tcpeu y noIyMececa TaMepa.
3aBbptTe BnMaTeJHO KaNaKkTa Ha 6aTePnraTa, ynpaxHnBaNKn Jek HATnCK, DOKaTO NOlyMeceHa KaNaKkTa He 3actaHe cpeu YNOlyMecea a TaImepa.
Pa6oTe Te Bbpy paBHa NOBbpxHocT, 3a Da MoKe Da NocTaBnTe KaNaUKaTa B XOpN3OHTaIIHO NIOJoxHeNe.
He hacnBaTe kanaKata Ha 6aTePnaT npn 3aTbapnHeTo. He npemHaBaiTe n3BbH OrpaHnHTeJIte.
Ako 3ary6nte TaImepa, MoKeTe Da NOpBuaTe HOB BBB BCnUKN oToPn3npaHn ot TEFAL cepBn3n.
Hnkora He MnIte TaMepa* c Teuaa Boda n He ro noCTabYTe B MnaHa MaunHa.
Hnkora He n3noJ3BaIe TaIMepa B peXIM ,TpaIuCIOHHa TeHIXepa".
Ppei rOTbeHe.
■Ппдь BCЯka ynoTpe6a n3BaJdaiTe pa6OTHnKla(A)H-Фnr.11n npOBepraBaiTe Bn3yaJIHo nHa dHeBHa CBeTJIiHa daJIi OTBOpbT 3a n3nyckaHe Ha npa (B) He e 3anyuhen -Фnr.13
■PpOBepeBaIe dann npEa3HnT Klaan Hce DnKn CBO6oDnO (BnXTe pa3denn "PouncBaHe" n, 3aBnKntenHn npOBePKn npEi Bcra k ynoTpe6aOnr.18.
-ДобавеТе npоуктnte n TeuHOCTTa.
3aTbOpete TeHxepaTa noHaIraHeΦur.2.
Ako n3nITBaTe 3aTpydHeHne da 3aTBOpnte TeHJKePaTa, HamokpeTe yIbTHHeHneTO C Teuaa Boda n ro noCTaBeTe o6paTHo Ha KanaKa, 6e3 da ro noDcyuBaTaur.19 n 15, KaTo ce cTpeMnte da ro noCTaBnTe npabInHo noJxJe6ObTe Ha KanaKa.
-Пoctabepe pa6OTnЯКlaPAnA(A)-Фnr.8

TotbeHe B peKm ,TeHJKepa noHaJaRaHe"
3aBbptete pa60THnKlaH(A)do nONoXeHneTo 3a roTBeHe B peKIM „TeHdKepa noHaIraHe" Onr.9.
- Ybepete ce, Ye TeHdxepaTa e npabnHIO 3aTBOpeHa, npei Da 3anOuHeTe da rotBnte -Fnr.3.
-Пocтавete TeHДжераТа NOД HANЯгHe Bbpy ToPnINHeH N3TOUHNK, CneI KOeTo Ro NaCTpoIte Ha MaKcIMaJIHa MOUHOCT.
3a moJeIte, o6OpyDbAHn c TaMep: 3aJaTe nocOeHTo B peCenTaTbpeMe Ha roTBeHe (BuxTe pa3dEn „YnoTpe6a Ha TaMepa").
- UykaHTo I CBnCTeHTo OT IpeIpa3Hna ⅢΦT Ca HOpMaJIHn, Te N03BOJABaT n3NyCKaHTo Ha Bb3dUxa IpeI rOTBeHe.
Пов
Korato pa60THnT KnaHnA) 3aNoUHe HnpeKbChaTo Da n3nycka npa N da n3daBa NOCTOReH CBnCTa3ByK, HaMaJeTe MOuHOCTTa Ha TOpIIHHNr N3TOUHNK.
OT To3n MOMENT 3aNoUBa Da Teue NocOueHTo B peuNTa Ta BpeMe Ha rotBeHe.
■IbpeMe Ha roTBeHe cneTe daH KlaHaHbT n3nycKa peoBHO npa. Ako He n3n3a DOCTaTbUHO npa, yBeHueTe IeKO TOJIHHNn I3TOUHnK, a B IpOTuBEh CnyaH Ro HamaJeTe.
Kpaɪ ha rotbeheTo B pexkɪm „Teɪdʌkepa pod həlaɪraHe"
3a da n3nycheTe npapaTa:
Cne KaTO n3KIOUHTe TOIINHHNn I3TOUHN, IMaTe DBe Bb3MOXHOCTN:
-Постенинизуckeны наразаю:завпгете постенино работни Кларан (A), дOKATO достигнелу до знaka на пiktогамат -Фur.10.

-Бьр30 NOHIXaBaHe Ha HAIraHTo B CTydeHa BOda: CInTe CTydeHa BOda B MNBkata N NOTOte DbHOTo HA TeHJxepaTa NOD HAIraHe, DOKaTO npedna3HnT UΦT Cne3e Ha DoJIHO NOLoxEHe Φur. 14. Korato npedna3HnT UΦ(D) Cne3e OTHOB O DOLHO NOLoxEHe, TeHJxepaTa Beue He e NOD HAIraHe. 3aBbptTe pa6OTHnA KlaPAnA(A) Do NOLoxEHe

Etan 1

Eran 2
Beue moxete da OTBOpTe TeHxepata noHaIraHn.3.
Ako n3nntBaTe 3aTpydHeHne da OTBOpTe TeHJKePaTa, HAMOKpeTe yIbTHHeHneTo C Teuaa Boda n ro noCTaBeTe o6paTHo Ha KaNaKa, 6e3 da ro noCyuwaBAtur.19 KaTO ce cTpeMNTe da ro noCTaBtE npabuHNo od XJIe6ObTe Ha KaNaKur.15.
Ako no Bpeme Ha n3nyckahe Ha napata 3a6eKeNte Heo6nuaHn npbckn, noctabete o6paTHo pa60THnKlanaH ( A) B noJoxeHne 3arOTBeHe B pexHM ,TeHxepa NoJ HnIraHe" , cIeD Koeto NOHNkTe 6bp3O HnIraHeTO B CtUdeHa BOda.
Ako npedna3HnT uHfD) He cne3e, cnneTe cTydeHa Boda B MNBkata n NotoneTe DbHOTo Ha TeHdXepaTa NOI HAnraHe, DOkaTo npedna3HnT uHfT cne3e Ha DoIHO NpOJKeHne - fnr. 14.
Hnkora He npednpemaiTe KaKbTo n da e oepaun nonpepa3nma u
3a npOyKIn, KOnto yBEnuBaT obema cn n/nnn o6pa3yBat nHa no BpeMe Ha rotBeHe, KaTo opn3, 6obOBn paCTeHnra, cySeHH 3eJeHcyU, pIoIOBn IIOpeTa, TIKBN, TIKBNUK, MOpKBn, KapTOHn, fHne ot pn6a n dp. He HAdBnuaBaIte 1/3 ot BmecTImocCTTa Ha TeHJKePaTa (MAX 1). Octabete TeHJKePaTa Da ce OxlaDi 3a HApKoNk MoHyTu, CNeDkoETo RaDOxHaTe IOd CTpya TeuAa StYeHa BOda. PpeiOTbapRHe BnHarn pa3KlauaIte Jeko TeHJKePaTa NOd HalaRaHe, CLeD KaTO cTe Ce yBepuIN, Ye PpeDnA3HnAT uHΦTe B DOJIHO NOLXeHne, 3a Da n36ErHeTe NOBaTa Ha Mexypn OT npa, KOnto 6nxMoIgN da BN n3rOprT. Ta3n ONEpaunr e Oco6eHo BaxHa npi 6bp30 n3nyckaHe Ha npaTa nn CneD oxJaKaHe B CTyeHa BOda. Korato PpIroTBATE CyIN, CbBeTBaMe BN da n3nyckate 6bp3O hJaRaHeTo B CTyeHa BOda (BVXTe pa3deJ , KpaH a roTBeHTo B peKIM , TeHJKePa NoD hJaRaHe").

TotbeHe B peXnM ,TpaIuNoHHa TeHxkepa\*\*
3abptete pa6oTHnA KlaNa(A)do nOIOKeHneTO 3a rOTBeHe BpeKIM ,TpaNtioHHa TeHJKepe .3a da HAnpaBnte TOBa, HaTNCHeTe IOCTaTBuHO CnIHO, 3a da 6bJe HaTNCbT NO-CnJe OTKOKOTO Ha NIOKeHneTO 3a CBaJIHe Ha HaNraHeTo.
YBepTe ce, ye TeHxepaTa e npabnIHO 3aTBopeHur.2, npei Da 3anoHHe Ta rTbnte.
- NocTaBete TeHxepaTa NOd HalaRaHe Bbpxy TOnnHeH n3TouHnK, perylnpaH Ha HnCKa MoUHOCt.
OT To3n MOMeHT 3aNoUba Da Teue NocOueHOTO BpeIeNTaTa BpeMe Ha rotBeHe.
BpeKIM,TeHJKepa noI HaJIraHe"MOKeTe NO BcAko BpeMe Da OTbaprTe TeHJKePaTa, 3a da pa36bPkateЯCTneTo,da CneIte rOtBeHeto IIN da DoabAte npOdykTn.
Ako n3nntBaTe 3aTpydHeHne da OTBOpTe TeHxKePaTa, HAMOKpeTe yIbTHHeHneTo C Teuaa BODa I Go NoCTaBeTe o6paTHo Ha KanaKa, 6e3 Da ro NocCywaBaTnr.19 m 15, KaTO ce CTpeMITE da Ro NoCTaBtE npabINHO NOJ XJIe6ObTe Ha KanaKa.
Ako TOnJIHHnT N3TOUHnK e npeKaJIeHO cnJeH, Bb3MOxHo e TeHJXepaTa NOI HAnraHe da ce 3aKnIOuN (npedna3HnT uD) ce noBnIra n 6loKnpa OTbopa), a DpbKkata da He MoKe Da ce 3abbpTN nn da He OTbOpn Kanaka. B TaKbB cnyaH HamaleTe nn N3KlIOUeTe TOnJIHHnR N3TOUHnK. B cnyaH na ChyryHeH eNeKtpnueckn KOTNoHn CBaneTe TeHJXepaTa OT TOnJIHHn R N3TOUHnK.
3a moJeIte c He3aJIenBaIoo nOKpITne: He n3nOJ3BaIe Te TL 3a pa36nBaHe nn MeTaNHN nn peKeu np6Opn. He ouEJaTe np6OpTe, KaTo rN ydpTe B pb6a Ha CbDa, TbN KaTO pNCKyBaTe Da ro NOBpeIte N da ce NoRBAr TteOBe.
■Hnkora He HarpBaIte Ma3HHn Do OBbrIbAhe. OTdJIaIte ce no BpeMe Ha rotBeHeTo napi Morat da ca OnaCHn 3a JINBOTHTe C yVBCTBNTHa dIXaTeHa cnCTema kato TTnIte. Co6CTBeHNtE Ha TTnIu Tp6Ba da rN IbpxkT daJeU ot KuxHraTa.
Системп за 6еэозаочьт
Baata TeHxepa e cHa6deHa C HЯKoIko CnCTeMn 3a 6e3OpaCHOCT:
Be3onacHocT Ha 3aTbapnHeTo:
- Ako KaNaKbTe He npabuHIO NOCTaBEN nIi 3a6paBNTe Da CBaNtE dpbXkata Ha KaNaKa, Ie n3n3a npapa OT npedna3HnT UnD) n HanaRaHeTO B Hea HMa Da Ce NOKaU.
Be30nacHOCT Ha OTbaprHeTo:
-AKO TeHJKePaTa e noi HaIraHe, npedna3nrt uOCTaBa B rOpHo noloxeHne IdpbKkata Ha KaNaka 3a OTBapHe i 3aTBapHe Tp6Ba Da 6bJe 3aJeTcBaHa.
- Hnkora He OTBapayte TeHxpepaT noi HaIraHe CbC cnila.
-BnkaKbB cnyaH He npabete KaKBOTO n da e no npedna3HnA u(0).
- YBepTe ce, Ye HaJIraHeTo e NaIHaNo, KaTO npOBepUte dAn NpeJna3HnT UDTe B DOJHO NOLOXKeHne.
-Дрьжкnte Ha cbla cnykaT 3a obe30napcaBaHe Ha TeHJkepaTa. Hnkora He rncmeHnTe camn. Hnkora He n3no3BaIte npyrn moJeN dpbxxkN.
-AKO CTe BdHann DpbKkata 3a OTBaprHe/3aTbaprHe (G) BBB BepTKaHNOJIOXKeHne, IDOKATO TeHJKePaTa BCE OSe e NOD HAnraHe, HMa Da MOKeTe da JOTBOpHTe. TOBa e DonbHnTeHa yHKcna 3a 6e3ONaCHOCT.
- CbaIeTe OTHOBO IpbXkKaTa Ha KaIaKa B XOpI3OHTaJIHO NIOJKeHne N N3UkaKaiTe npEJa3HnT UΦ(D) Da cIe3e B DOJIHO NIOJKeHne.
-ДBE cHCTeMn 3a 6e30nacHOCT 3a CBpbXHaIraHe:
-Пьрвсистema:празнгд(E)ocbo6kaBaHaJraHr.20
- Btopa cnCTema: ynpbTHeHneTo n3nycka npa Bbpxky kanaur.20
При заideиствае на сдна OT снcte mte 3a 6e30naCHOCT 3a пpeiodTbpaTЯBaHe Na CBpbxHaIraHe:
N3KJIHcyTe TOJINHHNn N3TOUHNK.
- Octabete TeHxepaTa NOd HnlaRe Ha n3CTnHe HanbJHo.
-OTBopete.
■Проветeи постete pa6OTня клana(A), OTbopa 3a OTbeKdahe Ha napaT(B),празиня клanaH(E)и ультHeHneI -Фnr.16-17-18BuxTe naparpaΦnte „Почиствае"и „ЗадьжИтELHи проврkn пpeДИ BCЯka ynotpe6a
Ako cnei Te3n npOBepKn n nouchTbaun onepaun OT ypea nMa Teu, nn aKO ToH pa60Tu, 3aHeceTe ro B oToPn3npaH OT TEFAL cepBn3.
Ipenopbkn 3a ynoTpe6a
1 - Параза EMHOro ropeuza, korato n3n3a ot pa6OTnKlaan. Na3eTe ce ot napata.
2 - ΚΟΜΚΑΤ ΠρεπηλΗΝΙ T Ινότι Σ ευμίνη, Bευ Θ ΜΟχΕθε Ε Ε ΑβαρΑ Ε Ε Ε Ε Ε Ε Ε Ε Ε Ε Ε Ε Ε Ε Ε Ε Ε Ε Ε Ε Ε Ε Ε Ε Ε Ε Ε Ε Ε Ε Ε Ε Ε Ε Ε Ε Ε Ε Ε Ε Ε Ε Ε Ε Ε Ε Ε Ε Ε Ε ΜΟχΕθε Ε Ε ΑβαρΑ Ε Ε Αγλγαή.
3 -KaKTo npn BCnUKN KxHHeNCKn ypeu, He octaBnyTe TeHJKepaTa noi HaIraHe 6e3 Hau3Op B npncbCTBne Ha deca.
4-3aДа npemeCTIte TeHxKepaTa NOd HaNraHe, n3NoI3BaITe DBeTe IpBXKn Ha CbIa.
5-Hnkora He octabrai Te npodykTu Dblro BpeMe B TeHxkepaT noHaIraHe. Hnkora He MeCTe TeHxkepata 3a dpbxxkaTa Ha Kanaka.
6 - Hukora He n3noJ3BaIte 6eInHa nIIxNpHn npenapaTn, 3aOTo MoKe da BLOUHTe KaueCTBOTO Ha HepbXJaemTa CTOMaHa.
7 - He octabray Te kana Ka HauchHaT BbB Boda.
8-CmeHaiTe ynltHeHneTo BeHbK rOiuHo nIaKO e HanyKaHo.
9 - Почиствано на Teнджера на Налягане зальктугов Трава на ce n3Вьршв само korato Тя визчинана и пазна.
10-3aIbIxNtJHo 3aHeceTe TeHJKePaTa nOd HnJaRae 3a npoΦnlaKTnKa B OToPn3uPAH OT TEFAL cepBn3, cIeK kato cTe y nOJI3BaII 10 roDnHn.
Почистванe
BG
3a da yHKcnoHnpa npabnlo TeHxepaTa nOd HanaRaHe, cna3BaIte Te3n npenopbKn 3a nouchTbaHe n POpdpbKka CLei BcKa ynotpe6a.
NotbMHaHeTo nn npackOnHnte, knto mOraT da ce nOBaT cnei Dblro H3IO3BaHe, He npedCTabIbRaT np6IeM.
I3HOCBaHeTo Ha BbHsHOTo NOKpne (B 3aBnCmOcT OT MoeJa) BCJeDCTBnE Ha KOHTaKTa Ha KaNaKa Cbc CbDa e HopMaJHo.
При Teнджерпс с He3aJenBaшо nOKpHTne(B 3aBnCmOcT OT MOneJa): JekITE ДpackOTиHи Ил ПpoTpRuBaHe, KOnTO MoraT Da ce NOBaT C BpeMeTo, He BLOwabat KaueCTBaTa Ha He3aJenBaшоTO nOKpHTne.
■Измьайт TeHжepаТ noД haЯгHe cIeД BCЯka yNOrpe6a C xlaДka BODa n npenapat 3a cbdoBe. ПраВеTe cbIoTOи C KOWHnUcaTAt*.
He n3noJ3BaIte 6eInHa nn XIoPn npenapaTn.
He harpaBaiTe cba, KOrato e npa3eH.
3a nouICTBaHe Ha BbTpewHocTtHa Cbda OT HepbXJaema CTomaHa:
-13MnIe C DOMaKINHcKa TeI n npenapaT 3a cbIOBe.
Ako no BbTpewHOCTTa Ha Cbda OT HepbXJaema CTOMaHa IMa OcBeTeHn yUacTbCn nn 6ene3HnKabN Cnei (OTnaIaHe Ha MNHepaN), NOuNCTeTe r c 6Jr OeT.
3a n3MnBaHe Ha BbTpewHocTTa Ha anyMnHneBna CbD c He3aJeNbaIo nokpntne:
3a da ydbknte knbota ha ypeia, npenopbuaMe Bn da mneTe cbda Ha pbka.
-Изміnte cToIIa BODa, npenapat 3a CbdoBe n MeKa r6a.
He n3no3BaIte a6pa3nBn npenapaTu nn Ib6n.
Ako cte 3aropnI TeHxepaTa, HanbIHeTe Cbda C TOnla B0da N ro OCTaBeTe da KncHe. CneT TOBa rO n3MnIe C npenapat 3a cbdoBe.
3a nouICTBaHe Ha BbHsHaTa yact Ha Cbda:
-Изміnteсгьбаипpenapat3a cbldoBe.
Mokete da MneTe cba ot HepbKdaema CTomaHa N KOUHncaTa B CbDOMnHaHaMaHa.
He MInTe CbDa C He3aIenBaIo nO KpNTme (B 3 aBnCmOcT OT MoJeNa) B CbDOMNIAH MaunHa, Tb N KaTo npeapatnte Ha TaOneTKn CbDbpKaT MHOro arpeCN BHN IKO pOBu BHN 3a anyMHHra CbCTaBKn.
Ipn HHTeH3NBHa ynoTpe6a Ha cBda c He3aJIenBaIo nOKpNTne (B 3aBUNMOCT OT MOdeJa) CBeTbT Ha NOKpNTNeTO MoKe JIeK O da ce npome Hn (No XbTTHe, NoBaHaNETHa).
3a nouictbaHe Ha kanaKa:
N3mInTe Kanaka C Tb6a n npenapaT 3a cbdoBe.
I3eTeKanaKaBepTnKaJHo, DaOTc TpaHTeOCTaHaJaBa Boda MeKdMy MeTaHNTe I MaTMcOBtE qACTn Ha Ka Naka.
3a nouicTbaHe Ha yNtBTHHeHMeTo Ha KanaKa:
CneBcRAKO rOtBeHe NOUInCTBaIte yNlTBHeHHe(B) n rHe3DoTo My.
3a noctabraye Ha ynlttheHneTo BuxTe Our. 15. CtapaiTe ce ynlbTheHneTo da e npabuHNO noctabeHo NOB BCEKN eINH OT XJIe6Obete Ha KanaKa.
3a nouuctbahe Ha pa60THnKlana(A):
CbaIe pa6oTHnKlaNaH(A)-Pnr.11.
I3mNte pa6OTnKJIaHaH (A) noT Teuaa Boda-Φnr.16.
-Провере Te Дали ce DBuxn CBO6OДHо: BuxTe n3o6paXeHneTo Hacpeu.
Cnei KaTo cBaInte pa6OTnHa Klaanah (A), yNtBHeHneto (I) n TaMepa\* (F), moKTe da n3MnTe KaNaKa B CbDOMnJaHa MaunHa.

Hrkora hemnTepa6oTHna Klaan (A),ynbTheHneTo(I),taMepa\*F) nncbda Che3 aJeBauo NOKPNTMe B CbdomnHa MaunHa.
3a nouICTBaHe Ha OTBopa 3a n3nyckaHe Ha napata (B), pa3noJoxeH Bbpxy KanaKa:
CbaIeKlaHa(A) -Our.1.1
■PpOBepeTe Bn3yauHNo Hn DaHHeBHa CBeTInHa DaIi OTBOpbT 3a OTBeXJaHe Ha npaTa e OTnyuWeH N KpbTbAn nr.13.Pn HuykDa rO noUcTeTe c KneUka 3a 3b60nr.17 n Iro n3nlaKHeTe.
3a noumtbaHe Ha npedna3HnKlanan (E):
-Почисте ча Та на педпаЗня Клanaн, pa3положена OT ВьтpeшнаТа CTрана Ha KaNaKa, KaTO ГИЗМиTe по Teчаanza BODa.
■PpOBepeTe ro daJIpa6OTn npaBnIHo, KaTo HaTncHeTe cnHIO cbUMaTa (C NOMOHTa Ha KneUka 3a yUn), KoATo Tp8Ba Da ce DnKx CBO6Odr.18 BuxTe naparpaΦa "3aIbJNKeIeHNn npOBepKn ppei BcraKa ynotpe6a"
3a nouuctbahe Ha TaMepa\* (F):
-ИзпалзВайтейся суха Кьрпа.
He n3noJ3BaIte pa3TbOpnteJI.
- HnKora He MmIe TaMepa NOD TeuAa BOda NIN B CbDOMnHa MaunHa.
PoDpBxKka
BG
3a cMaHa Ha yPbTHeHneTo Ha TeHJKepaTa NOd HaNraHe:
CmeHnTe ynnbTHHeHneTo Ha TeHdxepaTa BeHbX rOuNsho nn aKo e HanykaHo.
Bunarnn3non3BaIte opuRnHaHNo ynnbTHeHne Ha TEFAL, cboTBetCTBaO Ha BaHmraMdoen (BnXTe pa3dien "Akcecoapn").
3a noctabraye Ha ynlttheHneTo BuxTe Our. 15. CtapaiTe ce ynlbTheHneTo da e npabuHNO noctabeHo NOB BCEKN eINH OT XJIe6Obete Ha KaNaka.
3a npi6upaHe Ha TeHxpepaT a oN HnlaTaHe:
-06bpeKeKaNaKa BbpxCycbda.
MexaHn3MbT 3a OTBapAne/3aTBapAne Ha TeHJxepaTa NOd HaNraHe He N3NCKBa cNeuHaHa NOdpbXka OCBeH NOUcTbaHeTo.
3aIbIxHtEnHO 3aHeceTe TeHJKepaTa NOd HaNraHe 3a IpoΦnlaKTnKa B Odo6pen OT TEFAkepBn3, cIeD KaTO cTe J non3BaHn 10 roDnHn.
Akecoapn TEFAL
B TbproBckata Mpeka ce npednaT cneHnTe akcecoapn 3a BaWata TeHxepa noHaIraHe:
Акесоари Каталожни
Homepa Улътенье на
Караза 3/4/4,5/6 л: външени диаметър на
улътеньею: 24 см X1010008 5/7,5/9 л: външени диаметър на
улътеньею: 27 см X1010007 Кошниça за
готveе
на пара* 3/4,5/4/6 л: за сбд с диаметър 22 см 792185 5/7,5/9 л: за сбд с диаметър 24 см 792 654 Поставka на Кошниçaта за готveе на пара* (L) 792691 Таймер* X1060007
3a cMaHa Ha npyTu qactu nn 3a peMOHTn ce o6pbuaTe KbM OTOpN3npaHnte OT TEFAL cepBn3n.
- I3noI3BaIte eHCTBeHO opnHaHn pe3epBn qactN TEFAL, cBOTBeTCTBaun Ha BaUNA MoDen.
XapakTepnCTnKn
Диаметър Ha ДьНОТо Ha TeHДжЕраТa - KaTANOЖи Homepa
Вмechи-Mост Ø CBД Ø Дьно Clipso
Minut' Perfect / Easy Clipso
Minut' Duo couleur Clipso
Minut' Duo Gourmet Матерnam
На сбда 3л 22 22 cm 15.5 5 -- Инокс 3л 22 22 cm 18 cm - P46605 Инокс 4л 22 cm 1 4 cm - P466042 - Альунни 4,5л 22 cm 1 5.5 cm P466206 -- Инокс 5л 24 cm 1 4 cm - P466051 - Альунни 5,2л 24 cm 20 cm - P46654 Инокс 7,5л 24 cm 1 8 cm P46248 -- Инокс 9л 24 cm 1 8 cm P46249 -- Инокс Set 5л/7,5л 24 cm 14 cm P46353 - Инокс 18 cm
MATEPnHa KaNaka: HOKC
HopmatNBHa nHΦopMaζη:
MaKcImaJIHo pa6OTHO HaJIraHe: 65 kPa
MaKcImaJIHo dOnyCTmO HaJIraHe: 120 kPa
CbBmCTMn TOJIHHN n3TOHn
TA3 ENEKTPNCHECTBO
(угунн котони)
ENEKTPNUCTBO
(JbHCTNnnnCTbkNOKepaMnHH XaNoREHHKOTNOH)
EJEKTPNUCTBO
(CTbkIokepaMnHn HNDyKUHOHHN KOTNOH)
ENKTPNUCTBO
(Peotahn)


Baata TeHxepa noHaIraHe e CbBMeCTMa C BCnUKN TOJIINHHN N3TOUHN, BKIOHTeJHO INyKUNOHNI.
-Приеелктуческпг КOTLOHи 3нОЛЗВайтс KOTLOH c paВeH nIIN NO-MaЛьК dImaMeTbp OT TO3N Ha ДьНOTO Ha TeHДжЕрatura.
- Pn n3noJ3BaHe Bbpy CtbKnOKepaMnueH Nnot ce yBepTe, ye DbHOTo Ha Cbda e YNCTO.
- Pn n3no3BaHe Ha ra3 nnambKbT He Tp6Ba Da n3JIn3a n3BbH DbHOTO Ha Cbda.
-При BCNUKN TOJIINHHN N3TOUHnCneTe TeHKePaTa NOI HAIraHe da 6bde do6pe ceHTpnpaHa.
Tapaanця
BG
-Пи спаЗВаHe Ha yka3aHnЯТа 3a yINotpe6a Ha TOBa pБKOBOdCTBO CbДbT OTHEpbЖdaema CTOMaHa Ha HOBa TeHJKepa nOd hAJIraHe TEFAL e c 10-roMSHA rapaHnry cpeu:
- TBCRAKBN DeΦeKTH, CBBp3aHn C MeTaHHaTc TpyKtypa Ha Cbda,
- BCaKaBa npexKdEeBpeMeHHa NOpeHa OCHOBnMaTeJl.
- OctaHaJIte MaTePnAJIH Na CbДa, KaKTo N dpyrIte Yactu Ha TeHJxepaTa NOd HalaRaHe ca rapaHTnpaHn CpeUy BCnUKN npOn3BODCTBeHn DeΦeKTN mN DeΦeKTNa Ha MaTePnAJa, KATO rapaHcNoHHnT nepNOd Ce onpeDEna OT DeiCTBaUTO 3aKOHoDaTeJIcTB0 B CTPaHATA Ha 3aKynyBaHe, CHTaHO OT DaTata Ha 3aKynyBaHe.
Moxete da ce Bb3non3BaTe OT Ta3n rapaHcna npi npedCTabAHe Ha kacob 60h nn PhakTypa c daTata Ha 3akynyBaHe.
TapaHcIyTa He nokpmba:
-ДpackOTINHITe И obe3uBETBAHETO,Дьлжаши ce Ha CTapeeHTo - 3a CbIOBTe C He3aJenBaIo NOKPITne.
-ДpackOTINHTe,ДьЖаиceHa KOHTaKtaHa KaNaKa Cbc Cbda C He3aIenBaIo NOKpTne.
■ПовpeДITE,прчИнEHи OT HeCnA3BaHe Ha BaXHn ПpeДna3Hn МepKn IIn HEBHIMaTeJIHa ynoTpe6a,a IMeHHO:
- Ynap, napaHe, n3nOJI3BaHe BbB fypHa,...
- Camo otopn3npaHnte ot TEFAL cepBn3n ca onpaBOMOeHn da BN npedocTabr Ta3n rapaHn.
-06aTe ce Ha nocouehnHaKpaHa TOBa pkoBODCTBO Homep, 3a da noyuHTe apeca Ha ha-6nn3kn OToPn3npaH OT cepBn3
3aДьЖИТЕЛнHa МарКИрOBka
Марк neuropа Мecтоноожени Търравская марka Ha калaka Голина на позивodстwo и пapтuida
Каталожен Homeр на морега
Мakсимално дочустmo налаяганe (PS)
Мakсимално paботно налаяганe (PF) Ha калaka Вмост immocst Ha вьнша т сда на дьното на сда Посеньки adjoiningся на позивodпейя Ha вьнша т сда на дьното на сда
- YuctBaIte B ONa3BaHeTo Ha OKoHaTa cpea!

① Baшсят урет сбдьрka MножеCTBO ONОЛЗOTВOPИМ Илиpeцикліреми MaTeрпал.
Ппета Te B nyHKT 3a BTOpuHn CypOBuHn, KbTeTo Toi ue 6bIe TpeTnpaH.
TEFAL OTROBAPRA Na BaшптЕ
Hemзправноу. Прени.
Прени.
Прени.
Прени.
Прени.
Прени.
Прени.
Прени.
Прени.
Прени.
Прени.
Прени.
Прени.
Прени.
Прени.
Прени.
Прени.
Прени.
Прени.
Прени.
Прени.
Прени.
Прени.
Прени.
Прени.
Прени
Прени.
Прени
Прени
Прени
Прени
Прени
Прени
Прени
Прени
Прени
Прени
Прени
Прени
Прени
Прени
Прени
Прени
Прени
Прени
Прени
Прени
Прени
Прени
Прени
Прени
Прени
Прени Ако не можete дa
Затворite кала:
Ако не можete дa
Затворite кала:
Ако не можete дa
Затворite кала:
Ако не можete дa
Затворite кала:
Ако не можete дa
Затворite кала:
Ако не можete дa
Затворite кала:
Ако не mokete дa
Затворite кала:
Ако не мokete d
Затворite кала:
Ако не мokete d
Затворite кала:
Ако не мokete d
Затворite кала:
Ако не mokete d
Затворite кала:
Ако не mokete d
Затворite кала:
Ако не mokete d
Затворite кала:
Ако не mokete d
Затворite кала:
Ако не mokete d
Затворite кала:
Ако не mokete d
Затворite k
н.
Н.
Н.
N.
N
N
N
N
N
N
N
N
N
N
N
N
N
N
N
N
N
N
N
N
N
N
N
N
N
N
N
N
N
N
N
N
N
N
N
N
N
N
N
N
N
N
N
N
N
N
N
N
N
N
N Прени.
Прени.
Прени.
Прени.
Прени.
Прени
Прени
Прени
Прени
Прени
Прени
Прени
Прени
Прени
Прени
Прени
Прени
Прени
Прени
Прени
Прени
Прени
Прени
Прени
Прени
Прени
Прени
Прени
Прени Hизправною: Прених. Ако излида пара
okолу калaka и
праздамотцфт e в
долно поожения,
п探测ete дали: Далу калakьт e добpe 3atbopen.
Далу улльтэнcopeTo Ha Kалaka e npabnilho постaveno.
Далу улльтэнcopeTo e B дobpo cьсторнe, кato р�
нужда Г смени.
Далу калakьt, улльтэнcopeTo и Гешито му в Калakka
ca чicitny.
Далу рьбьт на сьда e здраВ Ако не мочete дa
otворITE калaka: Провете дали подамотцфт(D) e в долно
ложения.
В потувен сныаиизучete налганeto: сипete сту-
дени вoda в мьката и поалote дьното на телдж;
пая по лалоге, докато подамотцфт сизе
н долно поожения.
Нikora не подамотексвito и за e орашу
п по подамотцфт(D).
Завыртete пботня Кала(A)do поожения. Ако подуktite не са
с Bavарень ил akaо сиЗ-
rogenу, поворete: В体现在 на говен.
Мошостта на толимня ИЗточник.
Далу пботня Калан e на повilно поожения
(A).
Колчесъно т教职工. Ако подуktite са
излорейь в
телджерatable по
наляганe: Нakисе сьда за иЗвесно Вөрeme, поду до Гиз-
мене.
Нikora не изллваiteSEEина илхорни прени-
рати. При за征ствае на
една OT системп'te 3a
6 bezonaachaoust: Излоче ТОПЛINНЯ ИЗTOUнIK.
Оставе телджерatable по налгаге да с охлadiи бez
дд я местпe. Изчakiite подамотцфт дд сизe
В долно поожения и тога в OTворе.
Провете и почесе пботня Калан (A), OTвора
зду пьчSCан e на рада, подамотцду Калан и улль-
нени.To.
Уberete ce, че спазени на пьлне.
Ако поблөмьт подамотцлжава, заесete телджерatura 3a
прфлakтika в OTоризиран ot TEFAL сөрвiz. Ако заелжитe
следи OT okonsлаянe: Излочьаго на Нерьждама CTOMаС CBISOKI
Качесън ПOKаЗа teлди Н мoke дд порочи на
палвata на okистявае в Екст permи сизч. Ако
Замлжитe следи OT okистявае, OTстдане Г
с заразимьнa Гьба, поду наизллвае OTHOBO
Тeнджерatable по на_OKлганe.
TAbJIuIa 3A IPIrOTBЯH E H XPAHnTE
3eIeHcyK
3EJIENHUYU
(ПЕСHI)
ПAPA
Сьставka в КОшницата за
задушаве на пара и 75
ml ВODа на дыното на
тendжерatura по налаянe Артышok, 2 цelin, 600 g всяк (notanянe) 30 до 35 минутп Асpenжи, бени (napa) 5 до 6 минутп Бриюкелско зelen (napa) 10 до 12 минутп Градинска жлъчka, срелян наноловина (900 g) (napa) 4 до 16 минутп Грах (napa) 6 до 8 минутп Гъби, наразани 800 g (notanянe) 4 до 5 минутп Див корьр, наразани на Ивици (600 g) (napa) 6 до 9 минутп Зelen, наразани и зelenу, 500 g (notanянe) 5 до 6 минутп Камби, наразани наноловина (550 g) (napa) 14 до 16 минутп Картофи, наразани наноловина (950 g) (napa) 20 до 25 минутп
(cnope徳 размера) Леса, зelenа 250 g (notanянe) 14 до 16 минутп Манголд, наразани (2 cm) 700 g (napa) 15 до 17 минутп Маринован лук (napa) 7 до 8 минутп Моркови, наразани на кръгли pezehen (3 mm) 600 g (napa) 17 до 19 минутп Патладжани, обелени и наразани (3mm), 850 g (napa) 10 до 12 минутп Праз, цел и сял 650 g (napa) 9 до 11 минутп Ретички, наразани на кубоча (500 g) (napa) 14 до 16 минутп Розчки божлons 600 g (napa) 9 до 11 минутп Розчки karfoл 600 g (napa) 10 до 12 минутп Спанak (napa) 3 до 4 минутп Сухен и радцени на дve грах 250 g (notanянe) 18 до 20 минутп Тиква, наразани на пароча (3 до 5 cm) 600 g (napa) 13 до 18 минутп Тиквichiки на кръгли pezehen (3 mm) 600 g (napa) 12 до 15 минутп Тьньк зелен phacun (600 g) (napa) 10 до 12 минутп Фасул phaxkonole, сухen 250 g (notanянe) 35 до 40 минутп Цвекло, черевно, наразани на чевыртунки (notanянe) 20 до 25 минутп
(cnope徳 размера) Цени, наразани (notanянe) 600 g 7 до 9 минутп
ПOTAPЯНЕ
БeЗ кошницата.
MAX 1 КOLINЧECTBO
ВОДА КOLINЧECTBO
ОРИЗ ВРЕМЕ 3A ПИ-
ГOTВЯНЕ 2 ЛIЦА 400 ml/2 чаш 150 g/1 чаша +7 до 8 мInHyТи4
ЛИЦА 500 ml/2.5 чаш 250 g/2 чаш 6 ЛIЦА 700 ml/3.5 чаш 375 g/3 чаш
Meco/pn6a
ПЕСИЗ 3AMPA3EHИ Агнeshки джолан: 2 (0.95 kg) 40 до 45 минутп 1 ча и 05 минутп до 1 ча
и 15 минутп Брочери: 2 (1.3 kg) 23 до 25 минутп 40 до 45 минутп Заек (1.5 kg на парчета) 6 до 9 минутп 20 до 23 минутп Патиza (1.8 kg) 45 до 47 минутп 50 до 55 минутп Пиile (1.35 kg) 23 до 25 минутп 1 ча до 1 ча и 10 минутп Пьдпдьк: 4 9 до 10 минутп 18 до 20 минутп Свинска пileшka (0.8 kg, 8-10 cm диматур) 30 до 35 минутп 1 ча и 05 минутп до 1 ча
и 15 минутп Свинско сиile миньон: 2 парчета от по 350 g 13 до 15 минутп 26 до 29 минутп Стек о риба тон: 4 (0.7 kg) 5 до 6 минутп 7 до 9 минутп Стек о сьомра: 4 (0.8 kg) 5 до 6 минутп 7 до 8 минутп Телешка пileшka (0.8 kg, 5-7 cm диматур) 17 до 19 минутп 35 до 40 минутп Телешки рунадини: 4 10 до 12 минутп x Телешко пechени (1 kg, 8-11 cm диматур) 30 до 35 минутп 45 до 50 минутп Телешко сиile миньон: 0.7 kg 17 до 21 минутп 38 до 38 минутп Фиile оtmорскii давол (1 kg) на парчета от
no 75 g 5 до 6 минутп 7 до 8 минутп
3a6eexka: 3a moJIEN oT 5 IITpa nI NO-MaIKo, yBepTe ce, ye IIeKHTe OT MeCo I NTUeTo MeCo He IpeBnIshaBaT MapKnipOBKaTa OT BbTpEshHaTa qAcT Ha TeHJKePaTa. N36epTe IIeIshKn OT MeCo I NTUe MeCo IO-HNCKn C 8 cm IIIN No-MaIKo.
VAŽNE MJERE OPREZA
Pije upotrebe vaseg ekspres lonca, odvojite vrijeme da procitate sve upute i uvijek koristite "Uputstvo za upotrebu".
Posljedica nepravilnog korištenja mogu biti oštećenja proizvoda.
Radi vase sigurnosti, ovaj aparat odgovara primjenjivim normama i propisima:
- Direktiva o opremi pod pritiskom
- Materijali u kontaktu sa namirnicama
- Zivotna sredina
OBAVEZNE
KONTROLE
PRIJE SVAKE
UPOTREBE PROVJERITE
• Svaki put vizuelno je li cjevčica za odvod pare začepljena - sl. 13.
• je li kuglica sigurnosnog ventilaPokretna - sl. 18.
• je li gumicaPoklopca namješena ispod svakog urezaPoklopca - sl. 15.
• jesu li drške na posudi ispravno namješene. Drške posude su sigurnosni dijelovi. Nikada ih nemojte samostalno mistrnjati. UVIJEK
POSTUJTE
SLJEDECE
KOLICINE
PUNJENJA • Ne koristite vaš ekspres lonac bez tečnosti, to bi, naime, prouzrokovalo velika oštećenja. Osigurajte dovoljnu količinu tečnosti tokom kuhanja.
• Minimalno 25 cl - sl. 4.
• Maksimalno 2/3 visine lonca, oznaka MAX 2 - sl. 5.
• Tokom kuhanja na pari, namirnice koje se nalaze u parnoj košari ne smiju biti u dodiru s vodom - sl. 6 i 7.
• Maksimalno 1/3 (MAX 1) za kašaste namirnice koje se šire i/ili koje se pjene tokom kuhanja, kao što su riža, mahunarke, sušeno povrće, kompoti, bundeve, tikvice, mrkva, krompiri, riblji fileti, itd.
• Namirnice stavljene u parnu košaru ne smiju prelaziti nivo MAX 2 posude. PRIJE I TOKOM KUHANJA • Ne pušajte djecu u blizinu ekspres lonca tokom upotrebe
• Vaš ekspres lonac kuha pod pritiskom. Neprimjerena upotrebaedo prouzrokovati opekotine zbog pare.
Provjerite da li je ekspres lonac adekvatno zativoren prije upotrebe. (Vidi odjeljak "Zatvaranje").
• Uobićajeno je da ventil neprestano pišti tokom kuhanja.
Ako iz lonca ne izlazi dovoljno pare, napravite dekompresi proizvoda i provjerite ima li u posudi dovoljno tečnosti te je li cjevacica za odvod pare prohodna. Ako para još uvijek ne izlazi nakon tih provjera, malo pojačajte izvor toplote.
• Nemojte kuhati hranu kod koje postoji opasnost od začepljenja sigurnosnih elemenata:
- brusnice
- ječam
- zobene pahuljice
- grašak
- rezanci, makaroni, špagete
- rabarbara
- ribizle
• Nikada ne kuhajte mliječna jela u ekspres loncu.
• U slučaju upotrebe ekspres lonca s posudom od nehrdăjućeg Čelika, ne koristite krupnu sol, već dodajte sitnu sol na kraju kuhanja. Izbijećić eçete pojavu tačkica koje mogu promijeniti dno ekspres lonca.
• Ne koristite vaš ekspres lonac za prženje na ulju pod pritiskom.
• Ne koristite vaš ekspres lonac ni za koju drugu namjeru osim one za koju je predvižen.
• Ne stavljaje vaš ekspres lonac u zagrijanu pećnicu.
• U ekspres lonacnikad nemojte stavljati aluminijski foliju.
• U ekspres lonacnikad nemojte stavljati plastićnul foliju.
• Para alkohola je zapaljiva. Pustite da vrije približno 2 minut prije nego što namjestitePoklopac. Potreban je nadzor prilikom kuhanja jela sa alkoholom.
• Koristite kompatibilan(e) izvor(e) toplote, koji je/su u sklad sa uputstvima za upotrebu
NAKON KUHANJA...
- Za modele s neprijanjajućom oblogom: ne upotrebljavaje metlice ili metalni kuhnjski pribor ili kuhnjski pribor oštrih rubova. Ne cijedite svoj kuhnjski pribor laganim udaranjem o rub proizvoda, jer to要考虑 oštetiti proizvod i uzrokovati curenja.
Postepeno okrenite radni ventil (A) odabiruci prema zeiji brzinu dekompresije takdo da se zaustavite na slikovnoj oznaci 10. Ako tokom ispustanja pare primijetite nepravilno prskanje, postavite radni ventil (A) u položaj kuhanja u režimu "Autocuiseur" (Ekspres lonac), a nakon toga izvršite brzu dekompresiju pod hladnom vodom. - 14.
Ako se sigurnosni štapić (D) ne spušta, stavite ekspres Ionac pod hladnu vodu iz slavine - sl. 14.
Nikada nemojte dirati sigurnosni stapić.
- Prilikom kuhanja mesa koje sadrži kožu (npr. govedi jezik...), koja se pod pritiskom moze napuhati, ne probadajte meso sve dok je koža napuhana; moglo bi vas opariti. Izbodite meso prije kuhanja.
- Za kasaste namirnice koje se sire ili koje se pjene tokom kuhanja, kao sto su riza, mahunarke, sušeno povrće, kompoti, bundeve, tikvice, mrkve, krompiri, riblj fileti, itd. ostavite ekspres lonac nekoliko minuta da se ohladi, a potom ga ohladite pod hladnom vodom. Ekspres lonac lagano i ujednačeno protresite nakon sto provjerite da li se sigurnosni štapić spustio kako biste sprijecili prskanje mjehurica pare koji bi vas mogli opeci. To je posebno važno pri brzom ispustanje pare ili nakon hladenja pod hladnom vodom.
- Vaš ekspres Ionac odlažite vrlo pažljivo. Ne dodirujte vruče povrsine. Koristite drške i tipke. Po potrebi upotrijebite rukavice.
- Kod pripremanja supra, naša je preporuka da izvršite brzu dekompresiju pod hladnom vodom (vidi odjeljak „Kraj kuhanja u režimu 'Autocuiseur' (Ekspres Ionac)").
- Pije nego što otvorite ekspres lonac, provjerite da li je ventil na položaju "dekompresija". Sigurnosni štapić (D) bi trebao biti u donjem položaju.
Nikad ne otvarajte ekspres Ionac silom. Provjerite da nema pritiska u unutrašnjosti posude. Sigurnosni šapić (D) bi trebao biti u donjem položaju. (Vidi odjeljak "Sigurnost".)
ODRŽAVANJE Ako primijetite da je neki dio vašeg ekspres lonca slomljeni napuknut, ni u kojem ga slučaju nemojte pokušavati otvoriti akо je zativoren. Ostavite ga da se potpuno ohlad prije pomicanja te ga više nemojte koristiti i odnesite ga u ovlăsteni servisni centar kompanije TEFAL.
Ne vršite intervencije na sigurnosnom sistemu ni na koji način osim preporučenog načina Čišćenja i odžavanja.
Koristite samo originalne TEFAL dijelove koji odgovaraju vašem modelu. Posebno koristite posudu iPoklopac kompanije TEFAL.
Ne spremajte kisele ili slane namirnice u vašem ekspres loncu prije ili poslje kuhanja, jer na taj način možete oštetiti posudu.
Svoj ekspres lonac očistite i isperite odmah nakon korišenja.
U mašini za pranje suva nikad nemojte prati radni ventil (A), gumicu (I), indicator vremena* (F), ni posudu s neprijjanjajućim slojem.
Indikator vremena* (F) nikada nemojte stavljati pod vodu.
Nikad ne koristite sredstva zadezinfekcjju ili proizvode na bazi hlora, jer mogu oštetiti nehrdăjuci Čelik.
Ne ostavljajePoklopac potopljen u vodi.
Gumicu@mijenjaje Jednom godišnje ili odmah akо ima oštećenje.
Poslje 10 godina upotrebe, obavezno morate odnjeti lonac na pregledu ovlašteni servisni centar kompanije TEFAL.
Pri Čuvanju ekspres lonca:Poklopac stavite na obrutu stranu na posudu kako se gumicaPoklopca ne bi previštrošila.
SACUVAJTE OVA UPUTSTVA
K部件 (vidi Opis proizvoda)
A. Radni ventil
B. Cjevcica za odvod pare
C. Oznaka za poziconiranje ventila
D. Sigurnosni stapić (vidi odjeljak "Sigurnost")
E. Sigurnosni ventil
F. Indikator vremena*
G. DrskaPoklopca
H. Poklopac
I. Gumica
J. Parna košara*
K./ L. Tronožni stalak*
M. Drska posude
N. Oznake maksimalnog
O. Posuda
Obavezne kontrole prise svake upotrebe
Provjera radnog ventila

- Pobrinite se da otvor za odvod na radnom ventilu-nine začepljen (vidi odjeljak "Uklanjanje i postavljanje radnog ventila").
Provjerite sigurnosni ventil

- Provjerite je li kuglica sigurnosnog ventilaPokretna (koristite stapić).
Upotreba

Kuhanje u režimu "Ekspres Ionac"

Kuhanje u režimu "Faitout"* (Lonac)

Dekompresija
Otvaranje
- Nagnite dršku iz horizontalnog položaja u vertikalni položaj - sl. 3 Poklopac se okrece.
- PodignitePoklopac.
- U slučaju poteškoća s otvaranjem proizvoda: stavite gumicu pod vodu pa je stavite natrag na lonac bez brisanja - sl. 19 i pazite da je dobro postavite u urezePoklopa - sl. 15.
Zatvaranje
Pazite da drskaPoklopca bude u vertikalnom položaju.
- Poklopac stavite na posudu kako je prikazano na - sl. 1 tako da plastici ni dio poravnate s drskama lonca.
- Preklopite drskuPoklopca iz vertikalnog polożaja u horizontalni polożaj -sl.2
- Poklopac se okrece
Ako ne možete zatvoritiPoklopac:
- Provjerite je li gumica ispravno postavljena iPoklopac pravilno namjesten.
- U slučaju poteškoća sa zatvaranjem proizvoda: stavite gumicu pod vodu pa je stavite natrag na lonac bez brisanja - sl. 19 i pazite da je dobro postavite u urezePoklopca - sl. 15.
Prva upotreba
- Za modele s neprijanjajućim slojem: operite i jestivim uljem lagano nauljite cijelu povrsinu unutrasnjeg sloja.
Ovisno o modelu:
Stavite drsku lonca\* (L) i parnu kojaru\* (J) na dno posude.
- Pričvrstite trONOžni stalak* (K) na parnu košaru* (J), zatim pomaknite set na dno posude.
- Napunite 2/3 (MAX 2) posude (O) vodom - sl. 5.
Zatvorite ekspres Ionac.
- Poravnajte slikovnu oznaku radnog ventila (A) s oznakom položaja ventila (C) - sl. 9.


Stavite svoj ekspres lonac na izvor toplate te ga maksimalno pojačajte.
- Kad para počne izlaziti kroz ventil, smanjite jačinu izvora toplote i podesite na 20 min.
Kada protekne 20 min, ugase izvor toplote.
- Poravnajte slikovnu oznaku radnog ventila (A) s oznakom položaja ventila (C).
- Kada se sigurnosni štapić (D) ponovno spusti, vaš ekspres lonac višeicates不同程度 pod pritiskom.
- Otvorite ekspres lonac - sl. 3.
Ocistite ga sa deterdzentom.
Minimalna i maksimalna napunjenost
Minimalno 25 cl (2 case)-sl.4.
- Maksimalno 2/3 visine posude, oznaka MAX 2 - sl. 5.
- Ne koristite krupnu sol u vašem ekspres loncu, već dodajte sitnu sol na kraju kuhanja.
Za neke vrste hrane:
Za kasaste namirnice koje se sire i/ili koje se pjene tokom kuhanja, kao sto su riza, mahunarke, sušeno povrće, kompoti, bundeve, tikvice, mrkve, krompiri, riblj fileti, itd nemojte napuniti ekspres lonac iznad 1/3 (MAX 1) kapaciteta. Ostavite ekspres lonac nekoliko minuta da se ohladi, a potom ga ohladite pod hladnom vodom. Ekspres lonac lagano i ujectedeno protresite nakon sto provjerite da li se sigurnosni štapić spustio kako biste

sprijecili prskanje mjehurića pare koji bi vas mogli opeci. To je posebno važnoprì brzom ispustanje pare ili nakon hlačenja pod hladnom vodom. Kodpripremanja supra, naša je preporuka da izvršite brzu dekompresiju pod hladnom vodom (vidi odjeljak „Kraj kuhanja u režimu 'Autocuiseur' (Ekspreslonac)").
Upotreba parne košare*
- Sipajte 75 cl vode na dno posude (O).
Ovisno o modelu:
- Stavite dršku Ionca* (L) i parnu kosaru* (J) na dno posude.
- Pričvrstite tronožni stalak* (K) na parnu kosaru* (J), a zatim pomaknite set na dno posude.


- Tokom kuhanja na pari, namirnice koje se nalaze u parnoj kosari ne smiju biti u dodiru s vodom - sl. 6 i 7.
Namirnice st avljene u parnu kosaru* ne smiju prelaziti nivo MAX 2 posude.
Skidanje i stavljanje radnog ventila (A)
Za ciścenje radnog ventilà (A):
- Poravnajte Žl Jeb s oznakom položaja ventila (C) i pritisnite prsten rad nog ventila (A).
- Izvucite ga - sl. 11.
Za podesavanje radnog ventila (A):
- Namjestite radni ventil (A) - sl. 8 tako da je tacka radnog ventila (A) poravnata s oznakom polożaja (C) - vidi suprotnu stranu.

Gurnite radni ventil (A) kako bi se uklopio u štapić za odvod pare.
- Pritisnite piktograme radnog ventila (A) pa ga okrenite.

Indikator vremena*
Indikator vremena nikada ne koristite u režimu rada "Faitout" (Lonac).
Indikator vremena osmišljen je da vam pomogne u postizanju Željenih rezultata kuhanja, što vam omogucava bolju prerilagodbu potrošnje energije. On automatski odbrojava vrijeme kuhanja do postizanja razine temperature koja odgovara kuhanju u režimu "Autocuiseur" (Ekspres Ionac)
Indikator vremena mora pravilno uleci na ekspres lonac kako bi Funktionirao
Uobičajeno je da radni ventil (A) neprestano pišti tokom kuhanja. Ako nema dovoljno pare, lagano pojacaje izvor toplote, a u suprotnom slučaju smanjite izvor toplote.
1 Da biste uključili indicator vremena: pritisnite tipku.
2 Programirajte vrijeme kuhanja (u minutama).
- Ako ste unijeli pogresno vrijeme kuhanja, pricekajte 4 sekunde da plamen prestane treperiti, a zatim dugo drzite pritisnitu tipku za resetirovanje.
3 Jačinu izvora toplote postavite na maksimalno.
4 Kad vaš ekspres Ionac dosegne temperaturu kuhanja, indicator vremena zazvoni i počinje odbrojavanje vremena (brojevi trepere).
Smanjite jačinu izvora toplote.
5 Na kraju vremena kuhanja oglasi se indicator vremena.
Da biste zaustavili alarm indicatora vremena pritisnite tipku.
Ugasite izvor toplote.


Dugi pritisak tipke resetuju i isključuje indicator vremena.
Postavljanje i skidanje indicatora vremena*
Da bistepostaviliindikatorvremena(F)-sl.12,najprije umetnite straznji dio na modul,a zatim ga pritisnite da bistezakacli drugu stranu.
- Da biste skinuli indicator vremena (F), podignite ga i izvadite.

Zamjena baterije indicatora vremena*
Baterija za indicator vremena je dugmasta baterija tipa CR2032.
- Ako se pojavim symbol nakema nikakvog znaka, promijenite baterije.
Zivotni vijek baterije ovisi o ucestalosti upotrebe indicatora vremena.
Baterija indicatora vremena sadrži dimetoksietan, br. CAS 110-71-4. Usklaëna je sa evropskim propisima. Za vašu bezbjednosti i ocuvanjeŽivotne sredine: ne otvarajte bateriju, ne izlažite je visokim temperaturama, nemojte je odlagati zajedno sa kućnim oppadom,argo je vratite u centar previden za upotrijebljene baterije.
Nepunjive baterije se ne smiju puniti.
- Ne smiju se kombinirati razlicite vrste novih i upotrijebljenih baterija.
Baterije je potrebno umetnuti u skladu s ispravnim polaritetom.
- Isprażnjene baterije potrebno je izvaditi iz aparata i sigurno zbrinuti u OTPad.
- Ako cete proizvod odlagati i ako ga necete upotrebljavati duze vrijeme, baterije je potrebno izvaditi iz proizvoda.
- Prikljuci baterije ne smiju se kratko spajati. Postavite ga ravno na radnu povrsinu.
- Da biste bateriju uklonili iz indicatora vremena, otvoritePoklopac baterije uz pomoć kovanice (pogledajte sliku ispod).
Zamijenite bateriju.
Gumicu vratite na njeno mjesto u kuciSTE.
- Postavite polukrug Oklopca baterije nasuprot polukruga dindikatora vremena.
- Pažljivo okrenitePoklopac baterije laganim pritiskom, poravnavajući polukrug klopca baterije s krugom indicatora vremena.
- Postavite ga ravno na radnu povrsinu takdo ja jePoklopac u horizontalnom položaju.
- Nemojte pokušavati silom zatvoritiPoklopac baterije. Nemojte ic izvan granicnika.
- U slučaju gubitka možete nabaviti drugi indicator vremena u našim ovlastenim servisnim centrima kompanije TEFAL.


Indikator vremena* nikad nemojte staviti u vodu ili mašinu za pranje Juda.
Indikator vremena nikada ne koristite u režimu rada "Faitout" (Lonac).
Pijekuhanja
- Prije svake upotrebe skinite radni ventil (A) - sl. 11 i vizuelno provjerite na dnevnom svjetlu da cjevcica za odvod pare (B) nods zacepljena - sl. 13.
- Provjerite je li sigurnosni ventil mobilan (vidi odjeljak "Čišćenje" i "Obavezne kontrole prije svake upotrebe") - sl. 18.
Stavite sastojke i tekuci nu.
Zatvorite ekspres Ionac - sl. 2
- U slučaju poteškoća sa zatvaranjem proizvoda: stavite gumicu pod vodu pa je stavite natrag na lonac bez brisanja - sl. 19 i pazite da je dobro postavite u urezePoklopa - sl. 15.
- Namješanje radnog ventila (A) - sl. 8.

Kuhanje u režimu
"Autocuiseur" (Ekspres Ionac)
- Radni ventil (A) okrenite na poziciju za kuhanje u režimu "Autocuiseur" (Ekspres Ionac) 9.
Pazite da je vaš Ionac pravilno zatvoren prise upotrebe - sl. 3
Stavite svoj ekspres lonac na izvor toplote te ga maksimalno pojačajte.
- Za modele opremljene indicatorom vremena : podesite vrijeme kuhanja navedeno u receptu (vidi odjeljak "Upotreba indicatora vremena").
- Klikajuci zvukovi i oblačići pare koje ispuste sigurnosni štapić su normalni, oni omogucavaju odvojenje zraka prije kuhanja.
Tokom kuhanja u režimu "Autocuiseur" (Ekspres Ionac)
- Kada radni ventil (A) počne kontinuirano ispustati paru i emitirati ravnomjeran zvuk (PŠŠŠST), smanjite jacinu izvora toplote.
- Podesite vrijeme kuhanja da bude kako je navedeno u receptu.
- Uobicajeno je da ventil neprestano pišti tokom kuhanja. Ako nema dovoljno pare, lagano pojacaje izvor toplote, a u suprotnom slučaju ga smanjite.
Kuhanje u režimu "Autocuiseur" (Ekspres Ionac)
Za ispustanje pare:
- Kada se izvor toplate ugasi, imate dvije mogucnosti:
- Postupna dekompressija: postupno okrenite radni ventil (A) tako da se zaustavite na slikovnoj oznaci sl. 10.

- Brza dekompressija pod hladnom vodom: ulijte hladnu vodu u sudoper i u vodu uronite dno ekspres lonca kako bi se sigurnosni štapić spustio - sl. 14. Kada se sigurnosni štapić (D) ponovno spusti, vaš ekspres lonac višeicates je pod pritiskom. Radni ventil (A) okrenite na poziciju

1.korak

2.korak
- Możete otvoriti ekspres lonac - sl. 3.
- U slučaju poteškoća s otvaranjem proizvoda: stavite gumicu pod vodu pa je stavite natrag na lonac bez brisanja - sl. 19 i pazite da je dobro postavite u urezePoklopa - sl. 15.
Ako tokom ispustanja pare primijetite nepravilno prskanje, postavite radni ventil (A) u položaj kuhanja u režimu "Autocuiseur" (Ekspres Ionac) a nakon toga izvršite brzu dekompresiju u hladnoj vodi.
Ako se sigurnosni štapić (D) ne spušta, ulijte hladnu vodu u sudoper i u vodu uronite dno ekspres lonca kako bi se sigurnosni štapić spustio - sl. 14.
Nikada nemojte dirati sigurnosni štapić.
- Za kašaste namirnice koje se šire i/ili koje se pjene tokom kuhanja, kao što su riza, mahunarke, sušeno povrće, kompoti, bundeve, tikvice, mrkve, krompiri, riblj fileti, itd., nemojte napuniti ekspres lonac iznad 1/3 (MAX 1) kapaciteta. Ostavite ekspres lonac nekoliko minuta da se ohladi, a potom ga ohladite pod hladnom vodom. Ekspres lonac lagano i u Jednačeno protresite nakon što provjerite da li se sigurnosni štapić spustio kako biste sprijecili prskanje mjahurica pare koji bi vas mogli opeci. To je posebno važno pri brzom ispustanje pare ili nakon hladenja pod hladnom vodom. Kod pripremanja supra, naša je preparuka da izvršite brzu dekompresiju pod hladnom vodom (vidi odjeljak „Kraj kuhanja u režimu 'Autocuiseur' (Ekspres lonac)").

Kuhanje u režimu "Faitout"* (Lonac)
- Radni ventil (A) okrenite na poziciju za kuhanje u režimu "Faitout" (Lonac) Za tu svrhu snažno ga pomaknite iza ureza u položaj za dekompresiju.
- Provjerite da li je ekspres lonac adekvatno zativoren - sl. 2 prise upotrebe.
- Stavite svoj ekspres Ionac na izvor toplote te gamaksimalno smanjite.
- Podesite vrijeme kuhanja da bude kako je navedeno u receptu.
- U režimu "Faitout" (Lonac) możete otvoriti svoj ekspres lonac da biste promiješali jelo, nadgledali kuhanje ili dodali sastojke.
- U slučaju poteškoća s otvaranjem proizvoda: stavite gunicu pod vodu pa je stavite natrag na lonac bez brisanja - sl. 19 i pazite da je dobro postavite u urezePoklopa - sl. 15.
- Ako je izvor toplote prejak, moze se dogoditi da se ekspres Ionac zakljuca (sigurnosni stapic (D) se podiže i blokira otvaranje), drskaPoklopca visije Operator bilna ili ne otvara Ionac. U tom slucaju smanjite ili iskljucite izvor toplote. U slucaju elektricnog stednjaka, skinite ekspres Ionac s izvora toplote.
- Za modele s neprijanjajućom oblogom: ne upotrebljavajte metlice ili metalni ili oštar kuhinjski pribor. Nemojte otresati pribor o rub posude, jer postoji opasnost od ostećenja i kapanja.
- Nikada nemojte zagrijavati masnoću do ugljenisanja. Pare od kuhanja mogu biti opasne zaŽivotinje s osjetljivim respiratornim systemom, kao što su ptice. Vlasnici ptica trebaju ih držati dalje od kuhinje.
Sigurnost
Aparat ima nekoliko sigurnosnih problema:
- Sigurnost pri zatvaranju:
- AkoPoklopac nije dobro postavljen ili akost zaboravili da preklopite drske Poklopca, para ce curiti na sigurnosnom stapiću (D) ekspresnog lonca, te se nece moci stvoriti pritisak.
- Sigurnost pri otvaranju:
- Ako je vaš ekspres lonac bez pritiska, sigurnosni štapić (D) nalazi se u podignutom položaju, a drškePoklopca za otvaranje/zatvaranje (G) ne bi se trebale dirati.
- Nikad ne otvarajte ekspres lonac silom.
- Molimo nemojte dirati sigurnosni stapic (D).
- Osigurajte da je unutrašnji pritisak pao takda provjerite da je sigurnost štapić (D) u donjem položaju.
- Drške posude su sigurnosni rijelovi. Nikada ih nemojte samostalno mistrjenati. Nikad ne koristite druge modele drški.
- Ako ste magnuli dršku za otvaranje/zatvaranje (G) u vertikalan položaj dok je ekspres lonac još uvijek bio pod pritiskom, necete ga moci otvoriti. Ova je funkcjija dodatna sigurnost.
Vratite drškuPoklopca u horizontalni položaj i Čekajte da se sigurnost šapić (D)vrati u donji položaj.
Dva sredstva za osiguranje od pretjeranog pritiska:
- Prvo sredstvo: sigurnosni ventil (E) otpuša pritisak - sl. 20
- Drugo sredstvo: gumica propusta paru naPoklopcu -sl.20.
Ako je aktiviran jegan od sigurnosnihystema:
- Ugasite izvor toplate.
- Ostavite Ionac da se potpuno ohladi.
- Otvorite.
- Provjerite i očistite radni ventil (A), cjevacicu za odvod pare (B), sigurnosni ventil (E) i gumicu (I) - sl. 16 - 17- 18. Vidi odjeljke "Čišćenje" i "Obavezne kontrole prije svake upotrebe".
- Ako i nakon tih provjera i cisćenja vaš proizvod bude i dalje ispustao paru ili ne bude radio, povjerite ga ovlastenom servisnom centru kompanije TEFAL.
Preporuke za upotrebu
1 - Pri izlasku iz radnog ventila, para je vrlo vruca. Pazite na mlaz pare.
2 - Kada se sigurnosni štapić podigne, ne možete otvoriti ekspres lonac.
3 - Kao i kod svakog drugog aparata za kuhanje, potreban je nadzor prilikom korištenja, pogotovo ako vaš ekspres lonac koristite u blizini djece.
4 - Kad pomjerate lonac, uhvatite ga za obje drške.
5 - Ne ostavljate hranu u ekspres loncu. Ekspres lonac nikada ne prenosite držeci ga za drške.
6 - Nikad ne koristite sredstva zadezinfekciju ili proizvode na bazi hlora, jer mogu ošetiti nehrdajuciČelik.
7 - Ne ostavlajtePoklopac potopljenu vodi.
8 - Gumicu mistrajte jegnne ili ako ima pukotinu.
9 - Lonac se cisti samo kad je hladan i prazan.
10 - Poslje 10 godina upotrebe, obavezno morate odnjeti lonac na pregled u ovlasteni servisni centar kompanije TEFAL.
Cisćenje
Za dobro funkcioniranje vaseg ekspres lonca, dužni ste držati se ovih preparuka za Čišćenje i održavanje nakon svake upotrebe.
Tamne milje i ogrebotine koje se mogu pojaiti nakondugotrajne upotrebe ne smetajuspravnom Funktioniranju.
Trošenje vanjskog sloja (ovisno o modelu) koji se nalazi na kontaktuPoklopca iposude je rnormalno.
Za ekspres lance s neprij anjajućim slojem (ovisno o modelu): tokom upotrebe mogu se javiti lagane ogrebotine i abrazije, ali one znatno ne utiću na performanse neprijanjajućeg sloja.
- Nakon svake upotrebe operite ekspres lonac vodom i sredstvom za pranje suta. Isto uradite i sa kosarom*.
- Ne koristite izbjeljivač ili hlorirane proizvode.
- Ne zagrijavajte Ionac kada je prazan.
Cisćenje unutrażnjosti posude od nehrdajucęg Čelika:
- Operite spužvom za ribanje i proizvodom za pranje posuă.
- Ukoliko u unutrasnjosti posude od nehrdajućeg Čelika primijetite sedefasti odsjaj ili bijele naslage (mineralne naslage), očistite je bijelim sircétom.
Za ciścenje alumnijske posude s neprijanjajućim slojem:
Da bi produzili trajanje proizvoda, preporucujemo ručno pranje.
Isperite toplom vodom, deterdzentom i mekanom spužvom.
- Nemojte koristiti prasak za ribanje ili abrazivne spužvice.
- Ako vam je hrana zagorjela, napunite posudu toplom vodom i ostavite da se namače. Zatim je očistite sa deterdžentom.
Cisćenje vanjske povrsine posude:
- Operite spužvom za ribanje i sredstvom za pranje sut.
Lonac od nehrdajuceg celika i kosaru mozete prati u masini za pranje posuda.
Posudu s neprijanjajućim slojem (ovisno o modelu) nemojte stavljati u masinu za pranje sut, jer deterdženti u tabletama sadrže vrlo agresivne i korozivne aluminjske Čestice.
Intenziv na upotreba posude s neprijanjajućim slojem (ovisno o modelu) neznatn o može promijeniti bo ju sloja (žuta bo ja, pojava mrija).
CisćenjePoklopca:
- Poklopac operite spužvom i proizvodom za pranje posuă.
IscijeditePoklopac vertikalno kakobi steuklonilipreostalu vodu izmeudumetalnih iplasticnih dij elovapoklopca.
Za ciścenje gumicePoklopca:
Nakon svakog kuhanja očistite gumicu (I) i njezino kučiste.
- Za zamjene gumice, pogledajte - sl. 15 i provjerite da li je gumica dobrosutisnuta u svaki urezPoklopca.
Za ciścenje radnog ventilà (A):
- Izvucite radni ventil (A) -sl. 11.
- Operite radni ventil (A) pod mlazom vode - sl. 16.
- Provjerite njegovu mobilnost: prema slici u nastavku.
Nakon uklanjanja radnog ventila (A), gumice (I) i indicatora vremena* (F),Poklopac mozete staviti u masinu za pranje sut.

U mašini za pranje posuža nikad nemojte prati radni ventil (A), gümicut (I), indikator vremena* (F), ni posudu s n eprijanja jućim slojem.
Za ciścenje cjevacice za odvod pare (B) smještene naPoklopcu :
- Izvadite ventil (A) - sl. 11.
- Provjerite vizuelno i na dnevnoj svjetlosti je li cijev za odvod pare otpušena i okrugla - sl. 13. Po potrebi je očistite Čačkalicom - sl. 17 i isperite.
Za ciścenje sigurnosnog ventila (E):
- Očistite dio sigurnosnog ventilà smjesten unutarPoklopca takodag isperete vodom.
- Provjerite da li dobro radi takto što cete snažno pritisnuti kuglicu ventilà (uz pomoc vatiranog šapica bez vate), koja mora bitiPokretna - sl. 18. Vidi odjeljak "Obavezne kontrole prije svake upotrebe".
Za ciścenje indicatora vremena* (F):
Koristite cistu, suhu krpu.
- Ne koristite otapalo.
- Nikada ne stavljajte indicator vremena u vodu ili u masinu za pranje posuda.
Održavanje
Za zamjenu gumice vaseg ekspres lonca:
Gumicu vaseg ekspres lonca mistranjte jegnom godisnje ili ako ima pukotinu.
- Uvijek kupujte gumicu kompanije TEFAL, onu koja odgovara vašem modelu (vidi odjeljak "Dodatna oprema").
- Za zamjene gumice, pogledajte - sl. 15 i provjerite da li je gumica dobrosutisnuta u svaki urezPoklopca.
Za odlaganje vaseg ekspres lonca:
- OkrenitePoklopac na posudi.
- Mehanizam za otvaranje/zatvaranje ekspres lonca ne zahtijeva nikakvo posebno odrzavanje osim cisćenja.
Poslje 10 godina upotrebe, obavezno morate odnjeti lonac na pregled u ovlasteni servisni centar kompanije TEFAL.
Dodatna oprema TEFAL
Dodatna oprema za vaš ekspres lonac, koja se može nabaviti:
Dodatna oprema Referentne oznake Gumica 3/4/4,5/6 l: vanjski promjer gumice: 24 cm X1010008 5/7,5/9 l: vanjski promjer gumice: 27 cm X1010007 Parna košara* 3/4,5/4/6 l: za posudu promjera 22 cm 792185 5/7.5/9 l: za posudu promjera 24 cm 792654 TrONOžni stalak* (L) 792691 Indikator vremena* X1060007
- Za zamjenu ostalih dijelova ili popravke obratite se ovlaštenim servisnim centrima kompanije TEFAL.
- Koristiteismo originalne TEFAL dijelove koji odgovaraju vašem modelu.
Karakteristike
Promjer dna lonca - referentne oznake
Kapacitet Ø posude Ø dna Clipso
Minut®
Perfect / Easy Clipso
Minut®
Duo couleur Clipso
Minut®
Duo Gourmet Materijal posude 3 L 22 cm 15.5 cm P46205 -- Nehrăjući
Čelik 3 L 22 cm 18 cm -- P46605 4 L 22 cm 14 cm - P46042 - Obloženo aluminijem 4.5 L 22 cm 15.5 cm cm P46206 -- Nehrăjući
Čelik 5 L 24 cm 14 cm - P46051 - Obloženo aluminijem 5.2 L 24 cm 20 cm -- P46654 Nehrăjući
Čelik 7.5 L 24 cm 18 cm P46248 -- 9 L 24 cm 18 cm P46249 - Set 5 L/7,5 L 24 cm 14 cm P46353 - 18 cm
MaterijalPoklopca:nehrdajuci celik
Normativni podaci:
Najvisi radni pritisak: 65 kPa
Maksimalni sigurnosni pritisak: 120 kPa
Kompatibilni izvori toplote
PLIN STRUJA

(Elektricna ploca)

STRUJA Halogena ploca iii staklokeramicka ploca)

STRUJA (Indukcijska ili staklokeramička ploca)

STRUJA (Spirali ngi grijaci element)

- Vas ekspres Ionac se koristi na svim povrsinama za kuhanje, uključujuci indukcijskim.
- U slučaju elektricne ploće, koristite ploću jegnosjeg promjera od promjera dna lonca.
U slucaju keramicke ili halogene ploce, provjerite da li je dno lonca cisto.
U slucaju plinskog stednjaka, plamen ne smije biti siri od promjera posude.
Kod svih izvora toplate vodite računa da lonac bude dobro centriran.
Garancija
U okviru upotrebe kakva se preporucije u uputama za upotrebu, posuda od nehrdajuceg celika vaseg novog TEFAL ekspres lonca ima garanciju od 10 godina za sljedece slučajeve:
-Bilo kakavnedostatak metalne konstrukcije posude,
- Bilo kakvo preuranjeno propaganda metalnog dna.
- Ostali materijali posude i svi drugi dijelovi vašeg ekspres lonca pod garancijom su za tvornicke greške ili nedostatke materijala, za vrijeme garantnog roka utvrdenog zakonom na snazi u zemlji kupovine i od Dana kupovine.
- Ova garancija se ostvaruje uz podnosenje računa ili fakture koji dokazuju datum kupovine.
Ova garancija isključuje:
- Ogrebotine i diskoloracije od starenja, za posude s neprijanjajućim slojem.
- Ogrebotine zbog kontaktaPoklopca s posudom s neprijanjajućim slojem.
- Ostecenja nastala usljed nepostivanja važnih mjera opreza ili nemarne upotrebe, a posebno zbog:
- udaraca, padova, stavljanja u pećnicu.
- Ovu garanciju moźete ostvariti samo u ovlastenim servisnim centrima kompanije TEFAL.
- Molimo pozovite odgovarajuću sluzbu radi dobivanja adrese najblizeg ovlastenog servisnog centra kompanije TEFAL.
Propisane oznake
Oznaka Lokalizacja Zašitni znak NaPoklopcu Godina proizvodnje i šarža
Oznaka modela
Maksimalni sigurnosni pritisak: (SP)
Najviši radni pritisak: (RP) NaPoklopcu Kapacitet Na dnu posude, s vanjske strane Poštanska adresa proizvořаča Na dnu posude, s vanjske strane
- Mislite oŽivotnoj sredini!

① Aparat sadrži brojne materijale koji se mogu ponovo koristiti ili reciklirati.
Odnesite ga sluzbi za prikupljanje kako bi se izvršila njegova obrada.
TEFAL odgovara na vaša pitanja
Problemi Preporuke U slučaju otežanog otvaranja i/ili zatvaranjaPoklopca: ■ Skinite guniciu i isperite je pod vodom iz slavine, a zatem je vratite uPoklopac bez brisanja - sl. 19. Ako ne možete zatvoritiPoklopac: ■ Pazite da drškaPoklopca bude u vertikalnom položaju.
■ Provjerite je li gumica dobro postavljena (vidi odjeljak "Čišćenje i održavanje").
■ Provjerite je li Poklopac dobro namjesten kako je prikazano na - sl. 1.
■ Stavite gunicu pod vodu pa je stavite natrag na lonac bez brisanja - sl. 19 i pazite da je dobro postavite u urezePoklopca - sl. 15. Ako se vaš ekspres Ionac zagrijavao pod pritiskom bez tečnosti: Ako se ova pojava nastavi, provjerite svoj ekspres lonac u ovlaštenom servisnom centru kompanije TEFAL. Ako sigurnosni štapić ispustа klikajuće zvukove i oblačićpe pare: To je normalno u prvih nekoliko minuta: to omogucava odvojenje vazduha prije kuhanja. Ako se sigurnosni štapić nije podigao, te ništa ne izlazi iz ventilata tokom kuhanja: Ovo je uobičajno tokom prvih nekoliko minuta.
Ako ova pojava potraj, provjerite sljedeće:
- Da li je izvor toplate dovoljno jak, te akо nije, pojačajt ga.
- Da li je količina tečnosti u posudi dovoljna.
- Radni ventil (A) postavljen je na
- Da je vaš lonac pravilno zatvoren.
- Da se gumica ili obod posude nisu istrošili.
- Da li je gumica dobro namješena. Ako se sigurnosni štapić podigao, te ništa ne izlazi iz ventilata tokom kuhanja: Ovo je uobičajeno tokom prvih nekoliko minuta.
Ako se to nastavi, ulijte hladnu vodu u sudoper i u vodu uronite dno ekspres lonca kako bi se sigurnosni štapić spustio.
Očistite radni ventil (A) - sl. 16 i cjevacicu za odvod pare (C) - sl. 17 i provjerite sjeda li kuglica sigurnosnog vent (F) bez potěškoća - sl. 18. Ako para izlazi okoPoklopca i akо je sigurnosni štapić u spuštenom položaju provjerite sljedeće: Da li je Poklopac dobro zatvoren.Poziciju gumice u Poklopcu.Da li je gumica u dobrom stanju, po potrebi je zamijenite.Da li suPoklopac, gumica i njezino kućiste uPoklopcu Čisti.Stanje oboda posude. Ako ne možete otvoritiPoklopac: Provjerite je li sigurnosni štapić u (D) u donjempoložaju.Ako nilje, napravite dekompressiju: ulijte hladnu vodu u sudoper i u vodu uronite dno ekspres longkako bi se sigurnosni štapić spustio.Nikada nemojte dirati sigurnosni štapić (D).Okretenite radni ventil (A) u položaj Ako je hrana nedovljno skuhana ili je za-gorena, provjerite sljedeće: Vrijeme kuhanja.Jačinu izvora toplote.Da li je radni ventil (A) u ispravnom položaju.Količinu tečnosti. Ako je hrana zagorjela u ekspres loncu: Ostavite posudu da se nameće neko vrijeme prije nego što je operete.Nikada ne koristite izbjeljivač ili hlorirane proizvode. Ako je aktiviran jeder od sigurnosnihistema: Zaustavite izvor toplote.Bez premještanja ostavite ekspres lonac da se oh-ladi. Sačekajte da se sigurnosni štapić spusti pa otvorite.Provjerite i očistite radni ventil (A), cjevaciu za odvod pare, sigurnosni ventil i gumicu.Pobrinite se da su ispunjeni uslovi punjenja.Ako ova greška potraje, provjerite svoj aparat uovlaštenom servisnom centru kompanije TEFAL. Ako primjetite pojavutragova oksidaciće: Upotreba nehrdajuceg čelika visokih performansi ne sprečava povjavu oksidaciye u ekstremnim slučajevima. Ako primijetite tragove oksidaciye, uklonite ih trljanjem sa abrazivnim spužvom prije ponovne upotrebe ekspres lonca.
LABELA ZA PRIPREMU HRANE
Povrçé
POVRCE (SVJEZE)
PARA
Sastojak u parnoj
košarici i 750 ml vode na
dnu ekspres lonca.


POTAPANJE
Sastojak u vodi i bez kosarice.
MAHUNARKE POTAPANJE
Bez kosare.


Mrkva narezana na okrugle ploške (3 mm) 600 g (para) 17 do 19 min Paprike babure narezane na polovice (550 g) (para) 14 do 16 min Patlidžan, oguljen i narezan na ploške (3 mm), 850 g (para) 10 do 12 min Praziluk, cijeli i bijeli 650 g (para) 9 do 11 min Prokelj (para) 10 do 12 min Rotkva, narezana na kockice (500 g) (para) 14 do 16 min Špargla, bijela (para) 5 do 6 min Špinat (para) 3 do 4 min Tikva, narezana na komade (3 do 5 cm) 600 g (para) 13 do 18 min Tikvice narezane na okrugle ploške (3 mm) 600 g (para) 12 do 15 min Zelene mahune, tanke (600 g) (para) 10 do 12 min
Articoke, 2 cijele, 600 g svaka (potapanje) 30 do 35 min
Blitva, narezana (2 cm) 700 g (para) 15 do 17 min
Brokoli, cvast 600 g (para) 9 do 11 min
Celer, nasjeckan (potapanje) 600 g 7 do 9 min
Cvekla, crvena, narezana na cetvrtine (potapanje)
Endivija narezana na polovice (900 g) (para) 14 do 16 min
Gljive, narezane 800 g (potapanje) 4 do 5 min
Grah, suvi 250 g (potapanje) 35 do 40 min
Grašak (para)
Grašak razdvojen na polovice 250 g (potapanje)
Karfiol, cvast 600 g (para)
Komorac, narezan na trakice (600 g) (para)
Krompir narezan na polovice (950 g) (para)
Kupus, zeleni narezani, 500 g (potapanje)
Leca, zelena 250 g (potapanje)
Luk za kiseljenje (para)
POTAPANJE
Bez košare.
MAX 1 KOLICINA VODE KOLICINA RIŽE VRIJEME
PRIPREME 2 OSOBE 400 ml / 2 Žaše 150 g / 1 Žaša 7 do 8 min4 OSOBE 500 ml / 2,5 Žaše 250 g / 2 Žaše 6 OSOBA 700 ml / 3,5 Žaše 375 g / 3 Žaše
Meso/riba
SVJEŽE SMRZNUTO Goveča pečenica (1 kg, promjer 8–11 cm) 30 do 35 min 45 do 50 min Grdobina, fileti (1 kg) u komadima od 75 g 5 do 6 min 7 do 8 min Janjeća koljenica: 2 (0,95 kg) 40 do 45 min 1 h 05 do 1 h 15 Losos, odresci: 4 (0,8 kg) 5 do 6 min 7 do 8 min Pačetina (1,8 kg) 45 do 47 min 50 do 55 min Piletina (1,35 kg) 23 do 25 min 1 h do 1 h 10 min Pilići, mladi: 2 (1,3 kg) 23 do 25 min 40 do 45 min Prepelica: 4 9 do 10 min 18 do 20 min Svinjska koljenica (0,8 kg, promjer 8–10 cm) 30 do 35 min 1 h 05 do 1 h 15 Svinjski filet mignon: 13 do 15 min 26 do 29 min Teleća koljenica (0,8 kg, promjer 5–7 cm) 17 do 19 min 37 do 40 min Teleći filet mignon: 0,7 kg 17 do 21 min 33 do 38 min Tuna, odresci: 4 (0,7 kg) 5 do 6 min 7 do 9 min Zec (1,5 kg u komadima) 8 do 9 min 20 do 23 min
Napomena: Za modele od 5 litara i manje provjerite da koljenice mesa i perad ne prelaze oznaku na unutrasnjosti lonca. Odaberite koljenice mesa i perad visoke 8 cm ili manje.
DULEZITA UPOZORNENI
Před použitím svého tlakového hrnce věnujte Čas prostudováni všechPokynů a k námodu pro uživatele se v pripadě potřeby vracejte.
Pri nespravném používání mohou vznikat škody.
Pro zajisteni vaši bezpečnosti je tento prístroj v souladu s príslušnými normami a vyhlástkami:
-se smernici pro tlaková zaízeni
- se směrnici o materialech určenych pro styk s potravinami
- se směrnici oživotním prostředí
NEZBYTNÉ
NUTNÉ
KONTROLY
PRÉD KAŽDýM
POUŽITÍM ZKONTROLUJE
·vizuálné na Denním světle, zda odvod par není blokovár - obr. 13.
·zda je kulička pojistného ventilu pohyblívá - obr. 18.
·zda je těsněnéí ve víku umistěno v každém zářezu víka - obr. 15.
·zda jsou držadla nádoby Žádně upevněna. Držadla nádoby jsou bezpečnostními díly. Nikdy je nevyměñujte sami. VŽDY
DODRŽUJTE
NÁSLEDUJÍCÍ
MNOŽSTVI
NAPLNÉNÍ ·Nikdy nepoužívejte hrnec bez tekutiny, mohlo by DOJít k jeho vázznému poskození. Dbejte na to, aby během vařeni bylo v hrnci dostatečné množství tekutiny.
·Minimálné 25 cl - obr. 4.
·Maximálné 2/3 vyšky nádoby, značka MAX 2 - obr. 5.
·Privařeni v páře nesmějí byt potraviny umistěné v parním koši v kontaktu s vodou - obr. 6 a 7.
·Maximálné 1/3 (MAX 1) v prípadě pastovitích potravin, které se během vařeni rozpínají a / nebo vytvářejí pěnu, mezi které patří rýze, luštěniny, dehydratovaná zelenina kompoty, tykve, cukety, mrkev, brambory, rybí file ...
·Potraviny umistěné do parního koše nesmějí prěkročit úroven MAX 2 nádoby. PřED VAřENÍM
A V JEU
PRÜBÉHU Když používáte tlakový hrnc, nenechávejte ho v blízkosti děti.
Tlakový hrnc vaři pod tlakem. Při nevhodném použití může dojít ke zraněné vlivem opařeni. Před použitím tlakového hrnc zkontrolujte, zda je rádně uzavřen. (Viz odstavec „Uzavíráni“).
Během vařeni kontrolujte, zda ventil pravidelně sycí. Poku neuníká dostatečné množství páry, provedte dekompresi vyrobku a ujistěte se o tom, ze je v něm dostatečné množství kapaliny a rovněž o tom, ze odvod par není ucpáný. Pokud po tomto ověřeni pára stále neuníká, mírně zvedněte vykon tepelného zdroje.
Nevařte potravy, u kterych existuje nebezpećí ucpání odvodů bezpečnostních součástek:
- brusinky
- krupky
- ovesné vločky
- lámaný hrácch
- nudle, makarony, špagety
- rebarboru
- rybíz
V tlakovém hrnci nikdy nepřipravujtePokrmy na bázi zhivočíšného mléka.
V prípadě tlakového hrncs nádobou z nerezové ocelí v něm nepoužívejte hrubou sůl, na konci vařeni pridejte jemnou sůl. Tím zabránité „dúlkové korozí“, která by mohlzhorsit stav dna tlakového hrnc.
Tlakový hrnc nepoužívejte pro smažení na oleji pod tlakem.
Tlakový hrnc používejte pouze k účelům, ke kterám je určen.
Nevkládejte tlakový hrnc do teplé trouby.
Nevkládejte do tlakového hrncle list alobalu, který není upevněn na formě.
Nikdy do tlakového hrnc nevkládejte plastovou folii
Alkoholové páry jsou vznětlívy. Nechte vařit cca 2 minuty, než nasadíte víko. Pokud prípravujete recept obsahujíc alkohol, dohlížejte na hrnc.
Používejte vchodný/é zdroj/e tepla v souladu s pokyny k používání. PO VARENÍ... U modelù s nepřilnavým povrchem: nepoužívejte šlehačé, ani kovové āostré nádobí. Nenechávejte náčiní odkapatPoklepáním na okraj nádoby, mohlo by DOJít k jejímuposkózení a to by mohlo zpùsobit netěsnost.Postupné otáčejte pracovním ventilem (A), pričemžsivyberte rychlost dekomprése podle svého úsudku, dokudnebude ryska naproti piktogramu 10. Pokudbehem uvolnováni páry zaznamenáte abnormálné Rozstrik,prepněte pracovní ventil (A) do režimu vařeni „tlakovýhrnec" a poté provedte rychlé uvolnéni páry podstudenou vodou - obr.14.Pokud nedojde kPoklesu bezpečnostné pojistky (D),umístěte tlakový hrnec pod studenou vodu - obr - obr.14.Nikdy nemanipulujte s bezpečnostné pojistkou.Po vařeni masa s kúží na povrchu (např. hoveží jazyk), kterése mûže pod tlakem nafouknout, nepropichujte maso,pokud kúže vypadá nafouknute; hroží opařné Propíchněte maso prěd vařením.V pripadě pastovitích potravin, které se během vařénirozpinají nebo vytváří pěnu, mezi které patrì rýžé,lustěniny, dehydratovaná zelenina, kompoty, tykve,cukety, mrkev, brambory, rybi filé ... nechte tlakový hrnecněkolik minut vychladnout a pak jej ochladte podstudenou vodou. Prěd otevřěním tlakový hrnecsystematický a mírně protřepejte, avšaknejprvesepresvěděcte, ze bezpečnostné pojistka je ve spodní poloze,aby nedoslo k prudkému vytrysknutí páry, cožby mohlozpùsobit popálení. Tento krok je zvlášť duležitý pri rychlémvypoustěné páry nebo po ochlazení pod studenou vodou.Priě premistování tlakového hrnce dbejte maximálnoopatrnosti. Nedotýkejte se teplych povrchú. Používejtedržadla a tlacítka. V pripadě potřeby používejte rukavice.V rámci prižravy polévek doporučujeme provádet rychléuvolnéni páry pod studenou vodou (viz odstavec „Konecvaßení v režimu tlakový hrnec").Prěd otevřěním hrnce se ujistěte, ze je ventil (A)v polozepro uvolnéni tlaku. Bezpečnostné pojistka (D)musi být ve spodní poloze.Nikdy se nepokoušejte otevirat tlakový hrnec silou.Zkontrolujte, zdaPoklesl vnitní tlak. Bezpečnostnépojistka (D) musí být ve spodní poloze.(Viz odstavec „Bezpečnostné prvky"). ŚDfRZBA • Pokud zjistîte, Že některá z Častí tlakového hrnce je Rozbitá nebo popraskaná, v Žádném prípadě se jej nepokoušejte otevřit,Pokud je zavřený,vyčkejte,až zcela vychladne prěd tím,než jej prěmístîte, nadále jej už nepoužívejte a prínestiège jej do autorizovaného servisniho střediska TEFAL na opravu.
• Na bezpečnostnich systémech neprovádejte Žádné zákroky nad rámec tokynů pro Čištěné i ádržbu.
• Používejte pouze originálí díly TEFAL odpovídajćí vašemu modelu. Předevíím nádoba a víko musí byt značky TEFAL.
• Hrnec nepoužívejte ke skladoványí kyselých nebo sláných potravin prěd vařením a po něm,aby nedoslo k jeho poskození.
• Tlakový hrnec bezprostředně vyčistěte a oplachněte po každém použití.
• Nikdy nedávejte pracovní ventil (A),ani těsněné (I),ani Časovač* (F),ani nádobu s nepřilnavým povrchem do myčky na nádobí.
• Nedávejte Časovač* (F)do vody.
• Nikdy nepoužívejte louh nebo vyrobky na bázi chloru, které by mohly negativné ovlivnit kvalitu nerezavějúci oceli.
• Nenechávejte víko máčet ve vodě.
• Těsněné tlakového hrnce mlěnte káždý rok nebo tehy, pokud je prasklé.
• Po 10 letech používányí je nutno nechat tlakový hrnec zkontrolovat v autorizovaném servisním středisku TEFAL.
• Pro uskladněné tlakového hrnce: Obratte víko na nádobě tak, abyste zabránìlì prědčasněmu opotřebení těsněné víka.
TYTO POKYNY SI USCHOVEJTE
Současti (viz Popisné schéma)
A. Pracovni ventil
B. Odvod páry
C. Ukazatel umistěnéventilu
D. Bezpečnostní pojistka (viz odstavec „Bezpečnostní prvky").
E. Bezpečnostní ventil
F. Časovac*
G. Držadlo vika
H. Viko
I. Těsněné
J. Parníkoš*
K./L. Trojnožka*
M. Držadlo nádoby
N. Značky pro maximální plnéni
O. Nadoba
Nezbytné nutné kontroly préd kaźdymi použitím
Kontrola pracovniho ventilu

Zkontrolujte, zda nedoslo k zablokovani vypousteciho otvoru pracovniho ventil (viz odstavec „Demontaz a montaz pracovniho ventilu").
Kontrola bezpečnostního ventilu

- Zkontrolujte, zda se kulička bezpečnostní pojistky může pohybovat (použijte týčku).
Použití

Vareni v režimu tlakový hrnec

Vareni v rezimu hrnec\*

Dekomprese
Otevíráni
- Naklopte držadlo vika z vodorovné polohy do svislé polohy - obr. 3 Viko se otáčí.
Nadzyedněte víko.
- Pokud nejde vyrobek snadno otevřit: proplachněte těsněné pod vodou a vložte jej do víka, aniž byeSTE jej otrěli - obr. 19 a pritom se ujistěte se, ze těsněné dobře zapadlo pod zářezy víka - obr. 15.
Uzavirání
Ujistete se, ze drzadlo vika je ve svisle poloze.
- Umistete viko na nadobu, jak je to ukazano na - obr. 1, priemž vyrovnejte plastovou枣庄 držadly nadoby.
- Sklopte držadlo víka ze svislé polohy do vodorovné polohy - obr. 2
Viko se otaci.
Pokud se vám nedarí uzavřit víko:
- Ověrte správné umistěné těsněné a rovněž správnou polohu víka.
- Pokud nejde vyrobek snadno zavrít: proplachněte těsněné pod vodou a nasadte jej do víka, aniž BYSTE jej otřeli - obr. 19 a pritom se ujistěte se, Že těsněné dobře zapadlo pod zářezy víka - obr. 15.
První použití
V pripadé modelu s neprilnavym povrchem: umyjte a lehce potrete olejem na vareteni celv vinitni upraveny povrch.
V závislosti na modelu:
Vložte trojnožku\* (L)a kos\* (J)do spodni casti nadoby.
- Upevněte trojnožku* (K) do koše* (J) a poté vložte soupravu do spodní Časti nádoby.
- Naplnte nádobu (O) vodou do 2/3 (MAX 2) - obr. 5.
Zavretetlakovyhrnec.
Zarovnejte piktogram pracovniho ventilu (A)sukazatelem polohy ventilu (C)-obr.9.


Postavte tlakovy hrnec na tepelny zdroj a ten pustte na maximálni vykon.
- Jakmile začne ventilemunikat pára, snižte vykon tepelného zdroje a vyčkejte 20 minut.
- Po uplynuti 20 minut tepelny zdroj vypněte.
- Zarovnejte piktogram pracovniho ventilu (A) sukazatelem polohy ventilu (C).
- Jakmile bezpečnostní pojistka opět sestoupí (D), tlakový hrnec již není pod tlakem.
- Otevřete tlakový hrnec - obr.2
Vycistete jej cisticim prostredkem.
Minimálni a maximálni plnéni
- Minimálne 25 cl (2 sklenice) - obr.4.
Maximánlé 2/3 výšky námoby, značka MAX 2 - obr.5.
Do hrnce nedaveje hrubou sul, na konci vareni pridejte jemnou sul.
V pripadě některychPokrmu:
V pripadé pastovitych potravin, které se během vařeni Rozpínaj nebo vytvářej penu, mezi které patri rýze, lusténiny, dehydratovaná zelenina, kompoty, tykve, cukety, mrkev, brambory, rybi filé apod., naplnte tlakový hrnec do maximálne 1/3 (MAX 1) kapacity. Nechte tlakový hrnec několik minut vychladnout a pak jej ochladte pod
studenou vodou. Pred otevrenim tlakovy hrnec systematicicky a mirne protrepejte, avsak nejprove se presvedcte, ze bezpecnostni pojistka je ve spodni pola aby nedoslo k prudkemu vtyrskuti nary, coz by mob

Tento krok je zvlast dulezity pri rychlem vypousteni pary nebo po ochlazeni pod studenouvodou.V ramci pripravy polevek doporučujeme provadět rychlé uvolnéni pary pod studenouvodou (viz odstavec „Konec vařeni v režimu tlakový hrnec").
Používání parniho koše*
- Nalijte na dno nádoby (O)75 cl vody.
V závislosti na modelu:
Vložte trojnožku\* (L) a kos\* (J) do spodni Časti nádoby.
- Upevněte trojnožku* (K)do koše* (J)a poté vložte soupravu do spodní Časti nádoby


- Pri vařeni v páře nesměji byt potraviny umistěné v parním kosi v kontaktu s vodou- obr. 6 a 7.
Potraviny umistěné doparnihokoste nesměji prekročit uroven MAX 2.
Vyjmutí a nasazení pracovniho ventilu (A)
Pro vyjmutí pracovniho ventilu (A):
- Zarovnejte dražku sukazatelem polohy ventilu (C), prićemž tlačte na kroužek pracovniho ventilu (A).
Vytáhněte ventil - obr. 11.
Pro nasazení pracovniho ventilu:
Umisteni pracovniho ventilu (A)-obr.8: zarovnejte spicku pracovniho ventilu do vyse polohové značky (C) -viz na opacné straně.

Zatlačte na pracovní ventil (A) tak, aby dosedl na pojistku pro odvádení páry.
- Stisknéte piktogramy na pracovním ventilu (A) a otočte jím.

Časovač*
V režimu „hrnec" nikdy nepoužívejte Časovac.
Smyslem Časovace je pomoci vám zajistit dokonalý vysledek vařeni tím,Že vám umožné co nejlépe upravit spotřebu energia. Automaticky odpočitáva dobu vařeni, jakmile je dosaženo teploty odpovidajíc vařeni v režimu „tlakový hrne
Aby fungoval, musi byt czosovac priputy k tlakovemu hrnci.
Během vařeni kontrolujte, zda pracovní ventil (A) pravidelně syci. Neuníka-li pára v dostatečné množstvi, zvyšte mirné vykon ohřevu, v opačné prípadě vykon snizte.
1 Pro zapnuti casovače: stisknéte tlacítko.
2 Naprogramujte dobu va'rení (v minutách).
- Pokud jste se v době vařeni zmylili, vyčkejte 4 sekundy, aby světla neblikala, poté tlacitko dlouze stisknéte, abyste jej vynulovali.
Spustte tepelny zdroj na maximálni vykon.
4 Jakmile tlakový hrnec dosáhne teploty varu, Časovač zapípá a odpočitávání nastavené doby začíná (čísla blikaji).
Snižte vykon tepelného zdroje.
5 Na konci nastavené doby vařeni začne chasovač pipat.
Pro vypnuti pipani casovače stisknéte tlacitko.
Vypněte tepelný zdroj.
Dlouhé stisknuti tlacitka vynulujea vypne casovač.
Nasazenía odejmutí Časovace*
- Pro nasazení Časováče (F) - obr. 12 vložte nejdríve Čast „strany, ktera se dotýká" do modulu a poté mirné zatlačte tak, abyste prichytili opacnou Čast.
Pro odejmuti casovace (F)jej nadzvednete a vyjmete.
Výměna baterie Časovace*
- Casovač je vybaven baterií knoflikového typu CR2032.
- Pokud se objeví symbol n haPokud se nic nezobrazuje, vyměnte baterii.


Zivotnost baterie zavisina cetnosti pouzivani casova.
Baterie tohoto zbozi obsahuje dimetoxyethan c. CAS 110-71-4. Baterie odpovida evropskym predpisum. Pro vlastni bezpecnost a ochranu zivotniho prostre: neotvirejte baterii, nevystavujte ji yvsokym teplotam, nevyhazujte ji s domovnim oppadem; odneste ji do strediska pro sber pouzitych baterii.
- Jednorázové baterie nelze znovu nabíjet.
- Nelze soucasne pouzit ruzné typy bateri, ani nové a pouzité baterie.
- Pri vkladani baterii dbejte na spravnou polaritu.
- Vybité baterie vyjměte ze zařizení a nechte je bezpečné zlikvidovat.
- Chcete-li zařizení uskladnit na delsí dobu, aniž bye ste jej používali, vyjměte z nej baterie.
Nezkratujte napajeci svorky.
Postupujte podle pracovniho planu.
- Pro vymenu baterie z czasovace otevrete kryt ulození baterie pomoci mince (viz obrázek na druhé straně).
Vymente baterii.
Umistete zpet tesneni na jeho misto.
Umistete pulmésic krytu baterie naproti pulmésici casovače.
Jemne otocte krytem ulozeni baterie, mirnym tlakem, priemz zarovnejte pulmesec kytu bateries mesicem casovace.
Tyto ukony provadejte na kuchynske lince, aby byl kryt umisten radne vodorovne.
- Pri zavirani netlacte na kryt baterie. Nepresahujte krajnif polohy.
V pripadé ztraty muzete ziskat novy chasovac v kteremkoli našich autorizovanych servisnich stredisek TEFAL.
Časovac* nikdy neumyvejte pod vodou ani v mycce.
V režimu „hrnec" nikdy nepoužívejte Časovac.

Pred va'rením
- Pred kazdym pouzitim odmontujte pracovni ventil (A) - obr. 11 a zkontrolujte pri Dennim světle, zda nedoslo k zablokovány odvodu par (B) - obr. 13.
Zkontrolujte, zda je pojistny ventil pohyblivy (viz odstavce "Cisteni" a "Nezbytné nutné kontroly préd kaźdymi použitím") - obr. 18.
Prideje ingredience a tekutinu.
Zavretetlakovyhrnec-obr.2
V priadé obtízi pri uzavirání vyrobku: deje těsněné pod vodu a vratte jej do víka, aníž bye ste jej osušili - obr. 19 a 15 a ujistěte se, ze jej rádně umístîte do zářezů víka.
- Namontujte pracovni ventil (A) - obr. 8.

Vareni v režimu „tlakový hrnec"
- Otáčejte pracovním ventilem (A) až do polohy režimu vařeni „tlakový hrnec" 9.
- Pred uvedenim hrnc do provozu zkontrolujte, zda je tlakovy hrnc radne uzavren - obr.2
Postavte tlakovy hrnec na tepelny zdroj a ten pustte na maximálni vykon.
V pripadé modelu vybavenych casovačem : naprogramujte dobu vařeni uvedenou v receptu (viz odstavec „Používání casovačě").
- Klapání a vypoustěné páry bezpečnostní pojistkou jsou normální, umožnují unik vzduchu prešed vařením.
Během vařeni v režimu „tlakový hrnec"
- Pokud z pracovniho ventilu (A) nepretržite unika pára s pravidelným sycením, snizte vykon tepelného zdroje.
- Začnéte odměřovat dobu vařeni uvedenou v receptu.
- Během vařeni kontrolujte, zda ventil pravidelné syci. Neuniká-li pára v dostatečné množstvi, zvyste mirné vykon tepelného zdroje, v opacnémpripadě vykon snizte.
Záver va rení v režimu „tlakový hrnec".
Pro vypusteni páry:
- Po vypnutí tepelného zdroje mate dvě moznosti:
- Postupná dekomprése: Postupné otáčejte pracovním ventilem (A), dokud nebude ryska naproti piktogramu obr. 10.

- Rychlé uvolnéni páry ve studenté vode: nalije studenou vodu do drezu a ponorte dno tlakového hrnce. Nechte jej ponořéný ve vode, dokud se bezpečnostní pojistka nedostane do spodní polohy - obr. 14. Jakmile bezpečnostní pojistka opět sestoupí (D), tlakový hrnec již není pod tlakem. Otačejte pracovím ventilem (A)až do polohy

Krok 1

Krok 2
Müzete tlakový hrnec otevřit - obr.3.
- Pokudnejde vyrobek snadno otevrit: proplachnete tseseni pod vodou a nasadte jej do vika, aniž bye ste jej otreli - obr. 19 a pritom se ujistete se, ze tseseni dobře zapadlo pod zárezy vika - obr. 15.
Pokud během uvolnování páry zaznamnéte abnormální Rozstřik,
prépněte pracovní ventil (A) do režimu vařeni „tlakového hrncá
a poté provedte rychlé uvolnéni páry pod studenouvodou.
Pokud se bezpečnostní pojistka nepřesune do spodní polohy, nalije studenou vodu do dřezu a ponorte dno tlakového hrnce. Nechte jej ponořéný ve vode, dokud se bezpečnostní pojistka nedostane do spodní polohy - obr. 14.
Nikdy nemanipulujte s bezpečnostné pojistkou.
V priadepastovitych potravin, které se behem vaeni rozpinajne bo vytvareji penu, mezi které patri rye, lusténiny, dehydratovaná zelenina, kompoty, tykve, cukety, mrkev, brambory, rybi filé apod., naplnte tlakovy hrnec do maximalne 1/3 (MAX 1) capacity. Nechte tlakovy hrnec nekolik minut vychladnout a pak jej ochladte ve studené vode. Pred otevrenim tlakovy hrnec systematicky a mirné protrepejte, avsak nejprve se presvedcte, ze bezpecnostni pojistka je ve spodni poloze, aby nedoslo k prudkému vytryskutí páry, coz by mohlo zpusobit popalení. Tento krok je zvlast dulezity pri rychlem vypousteni páry nebo po ochlazení ve studené vode. V ramci pripravy polévek doporučujeme provadet rychlé uvolnéni páry pod studenouvodou (viz odstavec „Konec vaeni v režimu tlakový hrnec").

Vařeni v režimu „hrnec“*
- Otáčejte pracovním ventilem (A)až do polohy režimu vařeni „hrnec". K tomu je zapotrebie vyvinout dostatečné usili, abyste ventil otočili ze stavajího zářezu do polohy pro uvolné páry.
- Pred použitím hrnce zkontrolujte, zda je rádné uzavren - obr. 2.
- Postavte tlakovy hrnec na tepelný zdroj pušěnény na snížený vykon.
Zacne te odmeovat dobu vareni uvedenou v receptu.
V režimu „hrnec" muzete tlakový hrnec otevřit kdykoliv tak, abyste mohli michat, dohlížet na vařeni nebo pridávat prisady.
V priade obtizi pri otevirani vyrobku: dejte tesneni pod vodu a vratte jej do vika, aniž bye ste jej osušili - obr. 19 a 15 a ujistete se, ze jej rădné umistite do zárezù vika.
■ Pokud je tepelný zdroj prilis vykonny, muže dojit k tomu, ze se tlakový hrnec zablokuje (bezpečnostní pojistka (D)vystoupí nahoru a zabrańuje otevřeni) a ze s držadlem vika nelze hybat nebo otevřit tlakový hrnec. V tomto pripadě snižte vykon tepelného zdroje, nebo jej vypněte. V pripadě elektrickych litinovych desek odeberte tlakový hrnec z tepelného zdroje.

U modelu s neprilnavym povrchem: nepouzivejte slehace, ani kovove cis ostre nadobi. Neoklepavejte své naciníPoklepávanim o okraj nadoby, protoze tim vznika nebezpeci jeho poskození a vzniku dér.
- Nikdy neohrivejte tuky až do zuhelnatěni. Výpary uvolnované pri vařeni mohou byt nebezpečné pro zviřata, ktera mají citlivé dychaci ustroji, napr. pro ptáky. Zákaznici, kteri v domácnosti chovaji ptáky, musí zamezit jejich pristupu do kuchyně.
Bezpečnostní privky
Tento tlakový hrnec je vybaven několika bezpečnostními privky:
Bezpečné zavirání:
- Pokud nedojde ke správnému umistěné vika Či pokud zapomenete sklopit rukojet vika, dochází k uniku páry v mistě bezpečnostní pojistky (D) tlakového hrnce, a tlak tak nemůže dosáhnout požadované urovně.
- Bezpečné otevirání:
- Pokud je tlakový hrnec pod tlakem, bezpečnostní pojistka (D) je v horní poloze a držadlem víka pro otevřeni/zavřeni (G)se nesmí manipulovat.
- Nikdy se nepokousejte otevirat tlakovy hrnec silou.
- Zejména nemanipulujte s bezpečnostné pojistkou (D).
- ZkontrolujtePokles vnitrního tlaku tak,Že overěřite,Že bezpečnostné pojistka (D)je ve spodné poloze.
- Držadla nádoby jsou bezpečnostními díly. Nikdy je nevyměñujte sami. Nikdy nepoužívejte jiné modely držadel.
- Pokud jste preklopili držadlo pro otevíráni/zavíráni (G) do svislé polohy, prčemž tlakový hrnec byl doposud pod tlakem, nebudete jej moci otevřit. Tato funkce je dodatečnám bezpečnostím privkem.
- Překlopte držadlo do vodorovné polohy a vyčkejte, dokud bezpečnostní pojistka (D)nesestoupí do spodní polohy.
Dva bezpečnostní privky proti pretlaku:
- První zařizení: bezpečnostní ventil (E) uvolné je tlak - obr. 20
- Druhé zařizení: těsněné umozhůje pářeunikat u vika - obr. 20
Pokud se spustí některy z bezpečnostních prvků proti pretlaku:
Vypněte tepelný zdroj.
- Nechte tlakový hrnec zcela vychladnout.
- Otevrete jej.
- Zkontrolujte a vycistete pracovni ventil (A), odvod par (B), bezpečnostni ventil (E) a těsněni (I) - obr. 16 - 17- 18. Viz odstavce „Čistěné“ a „Nezbytně nutné kontroly prešed každým použitím".
- Pokud po kontrole a cisteni neni vás vyrobek těsný, nebo vůbec nefunguje, odneste jej do autorizováného servisného střediska TEFAL.
Doporucení pro použití
1 - Pára je prí vystupu z pracovního ventilu velmi horká. Pozor na proudly páry.
2 - Jakmile se bezpećnostné pojistka zvedne, nebudete již moci tlakový hrnec otevřit.
3 - Podobné jaku u vsech nastrojù na vařeni na tlakový hrnec pečlivé dohlížejte,Pokud jej používáte v blízkosti děti.
4 - Pri prenašeni tlakového hrnce používejte obě držadla nádoby.
5 - Nikdy nenecháveje potraviny v tlakovém hrnci po delsí dobu. Tlakový hrnec nikdy nepřenášejte za držadlo vika.
6 - Nikdy nepoužívejte louh nebo vyrobky na bázi chloru, které by mohly negativné ovlivnit kvalitu nerezové oceli.
7 - Nenecháveje víko máčet ve vode.
8 -Těsněnéí tlakového hrnce měnte každý rok nebo tehdy,Pokud je prasklé.
9 - Čišění tlakového hrnce je třeba provádet, když je studeny a prázdné.
10 - Po 10-ti letech používáni je nezbytně nutné nechat tlakový hrnec zkontrolovat v autorizovaném servisíním středisku TEFAL.
Cisteni
Pro správné fungování tlakového hrnce dodržujte po každém použití tato doporučeni pro Čišěné a udržbu.
Zahnědnutí a škrábnuti, kterémaohou objevt po douhém použiván, nejsou na závadu.
Opotrebeni vnějsi strany povrchu (v závislostina modelu) v souvislosti s kontaktem vika s nádbou je normálni.
V pripadé tlakovych hrncu s nepřilnavým povrchem (v závislosti na modelu): malé škrábance a oděrniny, které se mohou pri užívání objevt, nemají nepříznivý vliv na funkci nepřilnavosti povrchu.
- Tlakový hrnec umyjte po každem použití vlžnouvodou se saponátem. Stejně postupujte v pripadé koše*.
Nepoužívejte louh nebo produkty na bázi chloru.
- Neprehrivejte nádobu, je-li prázdna.
Pro Čišění vnitřiní strany nádoby z nerezové oceli:
- Myjte pomoci drateny a pripravku na nadobi.
- Pokud se na vnitrni strané nadoby z nerezové oceli objeví duhove odrazy nebo bile usazeniny (nanos mineralú), vyčistěte je pomoci bileho octa.
Pro vycisteni vnitrni strany nadoby z hliniku s neprilnavym povrchem:
- Abyste prodloužiliŽivotnost výrobku, doporučujeme jej myt ručné.
- Myjte teplou vodou, pripravkem na mytí nádobí a mekkou houbou.
Nepoužívejte Čistící prášek ani brusné houby.
- Pokud se vám jidlo pripálilo, naplnte nádobu teplouvodou a nechte odmočit. Poté ji vyčistěte Čisticím prostředkem na nádobí.
Pročistěnévnéjsistrany nádoby:
- Myjte houbickou a pripravkem na nádobí.
Nádo bu tlakového hrnce z nerezové ocelia kos muzete myt v myce.
Nemyjte nádobu s nepřilnavým povrchem (v závislosti na modelu) v myčce na nádobí, jelikož Čistić prostředky ve formě tablet ob sahuji velmi agresivné a korozivné látky pro součástk y z hliníku.
Intenzivní používání nádoby s nepřilnavým pov rchem (v závislosti na modelu) můze mít mirné negativné vliv na barvu povrchu (zažloutnu tí, obarvení).
Pročistění vika:
Viko myjte houbickou a pripravkem na nadobi.
Nechte víko odka pat ve svislé poloze,čímž necháte odtéct zbyvajíci vo dumezi kovovými a pbstovými Častmivíka.
Pročistění těsněné vika:
- Po kaźdem vařeni yčistěte těsněné vika (I) a misto, kam se nasazuje.
- Pro opětovné nasazení těsněnéviz - obr. 15 a ujistěte se, ze je těsněné rádné vložné do kaźdé z dražek víka.
Pročistěné pracovního ventilu (A):
Vyjměte pracovní ventil (A) - obr. 11.
Vycistete provozní ventil (A) pod proudem tekouci vody - obr. 16.
Zkontrolujte, zda je pohyblivy: nákres na protejsi straně.
Po vyjmuti pracovniho ventilu (A), těsněné (I) a Časováče* (F) můžete myt víko v myčce.

Nikdy nedávejte pracovní ventil (A), ani těsněné (I), ani Časovac* (F), ani nádobu s nepřilnavým povrchem do myčky na nádobí.
Pro Čišěné odvodu páry (B) na víku:
- Odmontujte ventil (A)- obr. 11.
- Na Denním světle zkontrolujte, zda odvod par není blokován a zda je kulatý obr. 13. Podle potřeby jej vycistěte párátkem - obr. 17 a opláchněte jej.
Čistěné bezpečnostního ventilu (E):
- Vycistete ccast bezpecnostniho ventilu na vnitrní strane vika tak, ze jej proplachnetevodou.
Zkontrolujte jeho správnou funkci tak, ze silné zatlacite na kulicku (pomocivatové bavlněné tycinky bez vaty), ktera se musí pohybovat - obr. Viz odstavec „Nezbytně nutné kontroly prěd kaźdým použitím".
Pročistěnécasovace\* (F):
- Použijte Čistý a suchý hadr.
Nepoužívejte Rozpoustédla.
- Casovač nikdy neumývejte pod proudem vody nebo v myčce.
Udržba
Pro vymenu těsněné tlakového hrnce
Tesneni tlakového hrnce měnte kázdy rok nebo tehdy,Pokud je prasklé.
Vždy používejte pouze originálné těsněné TEFAL odpovídajívašemu modelu (viz odstavec „Príslušenstvi").
- Pro opětovné nasazení těsněnéviz - obr. 15 a ujistěte se, ze je těsněné rádné vložné do každé z dražek vika.
Pro uskladněni tlakového hrnce:
- Otočte víko na nádobě.
- Mechanismus pro otevirani/zavirani tlakového hrnce nevyžaduje kromě Čištěnižadnou zvlástné udřžbu.
Po 10 letech používání je nutno nechat tlakový hrnec zkontrolovat v autorizovaném servisím středisku TEFAL.
Príslušenstvī TEFAL
K tlakovému hrnci lze dokoupit tato príslušenstvi:
Příslušenství Katalogové Č. Těsněnéní 3/4/4,5/6 l: vnější průměr těsněnéí: 24 cm X1010008 5/7,5/9 l: vnější průměr těsněnéí: 27 cm X1010007 Parní koš* 3/4,5/4/6 l: pro nádobu o poloměru 22 cm 792185 5/7,5/9 l: pro nádobu o poloměru 24 cm 792654 792654 Trojnožka* (L) 792691 Časovač* X1060007
- Ohledné vyměny dálů nebo ohledné oprav kontaktujte autorizová servisní střediska TEFAL.
- Používejte pouze originálni díly TEFAL odpovídajívašemu modelu.
Vlastnosti
Prümér dna tlakového hrnce - reference
Objem Ø Nádoby Ø Dna Clipso Minut' Perfect / Easy Clipso Minut' Duo couleur Clipso Minut' Duo Gourmet Materiál nádoby 3 L 22 cm 15.5 cm P46205 - - Nerezová oce 3 L 22 cm 18 cm - - P46605 4 L 22 cm 14 cm - P46042 - Potažený hliník 4.5 L 22 cm 15.5 cm P46206 - Nerezová ocel 5 L 24 cm 14 cm - P46051 - Potažený hliník 5.2 L 24 cm 20 cm - - P46654 Nerezová oce 7.5 L 24 cm 18 cm P46248 - - 9 L 24 cm 18 cm P462 49 - - Set 5 L 7,5 L 24 cm 14 cm P46353 - 18 cm
Material vika: Nerez
Normativni informace:
Maximálni provozní tlak: 65 kPa
Maximálni bezpečné tlak: 120 kPa
Kompatibilni tepelné zdroje
PLYN ELEKTRINA
(Litinová deska)
ELEKTRINA
(ndukcni deska nebo
halogenová sklokeramická deska)
ELEKTRINA
(Indukncn deka nebo halogenova sklokeramicka deka)
ELEKTRINA
(Topnê têleso)


- Tlakový hrnec lze použit na všech tepelnych zdrojích, včetné indukčnich.
- Na elektrické varné desce použijte plotnu o prüměru shodném ā mensím, než je prüměr dna tlakového hrnce.
- Na sklokeramické desce zkontrolujte, zda je dno nádoby Čisté a suché.
- Na plynovém hořáku nesmí plamen prěsahovat prěs prüměr nádoby.
U vsech zpusobu ohrevu zkontrolujte, zda je tlakovy hrnc spravné vystredeny.
Záruka
V priade pouzivani v souladu s navodem k pouziti se na nadobu z nerezové oceli vašeho tlakového hrnce TEFAL poskytuje 10-letá záruka na:
-Vsechny vady souvisejici s kovovou konstrukci vaśnádoby,
- Jakékoliv prečasné poskození kovu dna.
- Na ostatni materiały nadoby a rovnęż na vsechny ostatni součástky tlakového hrnce se vztahuje záruka na jakoukoliv vadu zpracoványnebo materialu na záručné lhútu stanovenou platnymi právními predpisy v zemi nakupu a od data nakupu.
- Tato smluvní záruka bude uznána po predloženiPokladniho dokladu nebo faktury suvedením data nákupu.
- Do tete záruky nespadají:
- Skrábance a barevné zmeny v dusledku starnutí v pripadě nádob s nepřilnavým povrchem.
Oderky zpusobene kontaktem vika s nadobou s neprilnavym povrchem.
Vady zpusobene nedodrzenim dulezitychPokynu nebo nedbalym pouzivanim,zejmena pak:
-Nárazy, pády, používání v troubre,...
- K uplatnéni tét o záruky je možno vyuzit pouze autorizovaná servisní střediska TEFAL.
- Vyuzijte informacni Telefoni linky na adresenejblizsiho autorizovaneho servisniho strediska TEFAL.
Zákonna značeni
Značení Umistěné Obchodní značka Na víku Rok vyroby a vyrobní šarže
Referencné císló modelu
Maximální bezpečnostní tlak (PS)
Maximální provozní tlak (PF) Na víku Objem Na vnější dnu nádoby. Poštovní adresa vyrobce Na vnější dnu nádoby.
- Podílejme se na ochraněživotnéprostředí!

① Váš prístroj obsahuje Četné zpětné použitelné nebo recyklovatelné materialy.
Na konciŽivotnosti jej proto odevzdejte na sběrném mistrěk recyklaci.
Společnost TEFAL odpovída na vaše dota
Problémy Doporučení V prípadě obtížného otevíránsá / nebo zavíránsí: Sejměte těsněné/a propláchněte jej vodou.Těsněné neutírejte a nasad'te jej zpět do víka - obr. 19. Pokud se vám nedaří uzavřit víko: Zkontrolujte, zda je rukojeť víka ve svislé poloze.Zkontrolujte správnou pozici těsněné (viz odstavec „Čišěnéú a Údržba”).Zkontrolujte, ze je víko rádně umístěné, jak je to znázorněno na - obr. 1.Propláchněte těsněné pod vodou a nasad'te jej do víka aniž byste jej otrěli - obr. 19 a prítom se ujistěte se, ze těsněné dobře zapadlo pod zářezy víka - obr. 15. Pokud se tlakový hrnec ohřival pod tlakem bez tekutiny uvnitř: Nechte jej zkontrolovat v autorizovaném servisním středisku TEFAL. Pokud bezpečnostné pojistka klape a vypoustí páru: To je v průběhu prvních minut normálné: umožnéuje to únik vzduchu prěd vařením. Pokud bezpečnostné pojistka nevystoupila a z ventilu během vařeni nic neuníká: V prvních minutách je to bězné.Pokud stav prětrváva, zkontrolujte, zda:- Vykon tepelného zdroje je dostatečné silné, pokud nezvyě ste jej.- Množstvi tekutiny v nádobě je dostatečné.Provozní ventil (A)je umístěn na .- Je tlakový hrnec rádně zavřěné.- Těsněné nebo okraj nádoby nejsou poškozené.- Těsněné je správně umístěné. Pokud bezpečnostné pojistka vystoupila a z ventilu během vařeni nic neuníká: Během prvních několik minut se jegnó o bězný jev.Pokud problém prětrváva, naliJEte studenou vodu do dřezu a ponořte dno tlakového hrnce. Nechte jej ponořěny ve vodě, dokud se bezpečnostné pojistka (D)nedostane do spodní polohy.Vycižte provozní ventil (A) - obr. 16 a odvod páry - obr. 17 a zkontrolujte, zda lze bez obtíží zatlacit kulicku bezpečnostného ventilu - obr. 18. Pokud pára uníká kolem víka a kolik je ve spodní poloze, zkontrolujte: Správné uzavřěné víka. Polohu těsněné víka. Správný stav těsněné, prípadné je vyměné. Čistotu víka, těsněné a jeho uložéní ve víku. Správný stav okrajě námody. Pokud se vám nedaří otevřít víko: Zkontrolujte,Že bezpečnostné pojistka (D)je ve spodní poloze. Pokud se tak nestane, nalijte studenou vodu do dřezu a ponořte dno tlakového hrnce. Nechte jej ponořnéve vodě, dokud se bezpečnostné pojistk (D)nedostane do spodní polohy. K vypušťěné páry nikdy nepoužívejte bezpečnost pojistku (D). Otočte pracovní ventil (A)do holohy. Pokud potraviny nej-sou uvařné nebo jsou naopak spálené, zkontrolujte: Dobu vařeni. Vykon tepelného zdroje. Správnou polohu pracovního ventilu (A). Množství tekutiny. Pokud se potraviny v tlakovém hrnci spálily: Než námobu umyjeté, nechte ji nějakou dobu odmočit. Nikdy nepoužívejte louh nebo produktу na bázi chloru. Pokud se spustí některý z bezpečnostnéch systémů: Vypněte tepelný zdroj. Nechte tlakový hrnec vychladnout a nepřenášejte jej. Vyčkejte, dokud bezpečnostné pojistka nesestoupí, a otevřete. Zkontrolujte a včistěte pracovní ventil (A), odvod par, bezpečnostné ventil a těsněné. Zkontrolujte,Že jsou rádně dodrženy podmíky plnéné. Pokud porucha prětrévá, nechte vyrobek zkontrolovat v autorizovaném servisním středisku TEFAL. Pokud zpozorujete výskyt stop oxidace: V extrémních prípadech použití vysoce vykonné nerezové oceli nezabruǎuje výskytu oxidace. Pokud zpozorujete stopy oxidace, odstraťe je třením brusnou houbou prěd opětovním použitím tlakového hrnce.
TABULKA PRO VARENÍ
Zelenina
ZELENINA (ČERSTVA))
NA PÁRE
Složka v parnim kosi
a 750 ml vody na dně tlakového hrnce.


PONORENÍ
Složka ve vode a bez použití kõse.
PULZY PONORENÍ
Bez kose.


Papriky nakrajené na pólky (550 g) (na páře) 14 až 16 minut Pór, celý a tíly 650 g (na páře) 9 až 11 minut Pūlený hrách 250 g (ponořeni) 18 až 20 minut Rūžicková kapusta (na páře) 10 až 12 minut Rūžicky brokolice 600 g (na páře) 9 až 11 minut Rūžicky květák u 600 g (na páře) 10 až 12 minut Repá, Červéná, nakrajena na Čtvrtky (ponořeni) 20 až 25 minut
( Podle velikosti) Špenát (na páře) 3 až 4 minut Tuřín, krájený na kostický (500 g) (na páře) 14 až 16 minut Zelená Čočka 250 g (ponořeni) 14 až 16 minut
PONOřENÍ
Bez koše.
MAX 1 MNOŽSTVÍ VODY MNOŽSTVÍ RYZE DOBA
VAŠRENÍ 2 OSOBY 40 0 ml / 2 sklenice 150 g / 1 sklenice 7 až 8 minut4 OSOBY 500 ml / 2,5sklenice 250 g / 2 sklenice 6 OSOB 700 ml / 3,5sklenice 375 g / 3 sklenice
maso / ryby
ČERSTVÉ MRAŽENÉ Filety z mořského d'asa (1 kg) každá o hmot-nosti 75 g 5 až 6 minut 7 až 8 minut Hoveží pečeně (1 kg, průměr 8-11 cm) 30 až 35 minut 45 až 50 minut Jehněčí kolína: 2 (0,95 kg) 40 až 45 minut 1 hodina 5 minut až1 hodina 15 minut Králík (1,5 kg porcovany) 8 až 9 minut 20 až 23 minut Křepelka: 4 9 až 10 minut 18 až 20 minut Kuřátka: 2 (1,3 kg) 23 až 25 minut 40 až 45 minut Kuře (1,35 kg) 23 až 25 minut 1 hodina až 1 hodina 10 minut Lososové steaky: 4 (0,8 kg) 5 až 6 minut 7 až 8 minut Mladá kachna (1,8 kg) 45 až 47 minut 50 až 55 minut Telecí panenka: 0,7 kg 17 až 21 minut 33 až 38 minut Telecí koleno (0,8 kg, průměr 5-7 cm) 17 až 19 minut 35 až 40 minut Telecí závitky: 4 10 až 12 minut x Tužákové steaky: 4 (0,7 kg) 5 až 6 minut 7 až 9 minut Vepřová panenka: 2 kusy každý o hmotnosti350 g 13 až 15 minut 26 až 29 minut Vepřové koleno (0,8 kg, průměr 8-10 cm) 30 až 35 minut 1 hodina 5 minut až1 hodina 15 minut
Poznámka: U modelů o maximálím objemu 5 litru zajistěte, aby kusy masa a drůbeže nepřesahovaly značku uvnitř hrnce. Vybirnejte si kusy masa a drůbeže, které mají maximální výšku 8 cm.
VAŽNE MJERE OPREZA
Pije uporabe ekspres lonca pažljivo pročitajte sve upute i pomoc uvijek potražite u „Uputama za korisnika".
Uporabom koja nije u skladu s uputama moze doci do ostecenja.
Radi vase sigurnosti, urejad je izrajen sukladno odgovarajućim normama i pravilnicima:
- Direktiva o tlačnoj opremi
- Pravilnikom o materijalima koji dolaze u reposredan dodir s hranom
- Zastita okolisa
OBAVEZNE
PROVJERE PRIJE
SVAKE
UPORABE PROVJERITI
vizualno na danjem svjetlu, je li odvod za ispustanje par
prohodan - sl. 13.
moze li se kuglica sigurnosnog ventila micati - sl. 18.
jesu li brte povlopca postavljene na svaki od utora za
poklopce - sl. 15.
jesu li ručke na posudi pravilno pričvršćene. Ručke
posude su sigurnosni dijelovi. Nikada ih nemojte sami
mijenjati. UVIEK
POSTUJTE
SLJEDEĆ
KOLICINE PRI
PUNJENJU Nikad ne koristite ekspres lonac bez tekućine jer se mož
značajno ošetiti. Pripazite da tijekom kuhanja uvijek im
dovoljno tekućine.
Minimalno 25 cl - sl. 4.
Maksimalno 2/3 visine posude, oznaka MAX 2 - sl. 5.
Tijekom kuhanja na paru hrana u košari za paru ne smije
biti u kontaktu s vodom - sl. 6 i 7.
Maksimalno 1/3 (oznaka MAX 1) za kašaste namirnice
koje se šire i/ili pjene tijekom kuhanja kao što su riža,
mahunarke, sušeno povrće, kompoti, bundeve, tikvice,
mrkva, krumbpir, riblji fileti...
Namirnice koje se stavljaju u košaru za paru ne smiju
premašivati razinu MAX 2 posude. PRIJE I TIJEKOM KUHANJA Nemojte dozvoliti djeci da se približavaju ekspres loncu tijekom uporabe.
Vaš ekspres lonac kuha pod pritiskom. Zbog neodgovarajuće uporabe要考虑 doci do povreda izazvanih opeklinama. Prijce uporabe provjerite je li ekspres lonac odgovarajuće zatvoren. (Pogledajte odjeljak „Zatvaranje“).
Provjeravajte tijekom kuhanja da li ventil stalno šiasti. Ako n izlazi dovoljno pare, smanjite tlak u proizvodu i provjerite ima li dovoljno tekuciće i je li odvod za ispustanje pare prohodan. Nakon ovih provjera, ako para i dalje ne izlazi, lagano pojacajte izvor topline.
Nemojte kuhati namirnice koje bi mogle blokirati odvode sigurnosnih dijelova:
- bobičasto VOCE
- ječmena kaša
- zobene pahuljice
- sušeni grašak
- rezanci, makaroni, špageti
- rabarbara
- ribizle
U ekspres loncu nikad nemojte priremati recepte na baziŽivotinjskog mlijeka.
Ako imate ekspres lonac Čija je posuda od nehrdăjućeg Čelika, ne stavljaje krupnu sol u ekspres lonac već dodajte sitnu sol na kraju kuhanja. Na taj način Čete izbjiće pojavu „mrljica“ koje bi mogle utjecati na dno Vašeg ekspres lonca.
Ne upotrebljavaje ekspres lonac za prženje u ulju pod tlakom.
Ekspres lonac koristite samo u svrhe za koje je namijenjen.
Ne stavljaje ekspres lonac u ugrijanu pećnicu.
Nikad u ekspres lonac ne stavljaje aluminijsku foliju koja{nije u kalupu.
Nikad ne stavljaje plastičnu foliju u ekspres lonac
Alkoholne su pare zapaljive. Prokuhajte otprilike 2 minute prije nego što stavitePoklopac. Nadzirite svoj urežaj u slučaju pripreme jela na osnovi alkohola.
Sukladno uputama za uporabu, koristite jegan ili višekompatibilnih izvora topline.
NAKON KUHANJA...
- Za modele s neprijanjajućem slojem: nemojte upotrebljavati kuhinjsku metlicu ili metalni, odn. oštri kuhinjski pribor. Ne cijedite svoj kuhinjski pribor udarajuči o rub posude jer je možete ostetiti i izazvati propustanja.
Postepeno okrecite radni ventil (A) odabiruci po zeiji brzinu dekompresije, a zaustavite se na oznaci slikovnog prikaza sl. 10. Ako tijekom ispustanja pare primijetite nepravalno prskanje, vratite radni ventil (A) u položaj kuhanja „Ekspresni Ionac", a zatim izvrsite brzu dekompresiju u hladnoj vodi - sl. 14.
Ako se sigurnosni štapić (D) ne spušta, stavite ekspresni Ionac u hladnu vodu - sl. 14.
Nikad ne dirajte sigurnosni stapić.
- Nakon kuhanja mesa prekrivenog slojem koze koja bi pod utjecajem pritiska mogla nabubriti (npr. goVEDi jezik...), ne režite meso dok god je koza nabubrena jer bi mogla puknuti i izazvati opekline. Pripazite da prise kuhanja izbodete meso.
Za kasaste namirnice koje se sire i/ili pjene tijekom kuhanja kao sto su riza, mahunarke, sušeno povrće, kompoti, bundeve, tikvice, mrkva, krumpir, riblj fileti... Pustite ekspresni lonac nekoliko minuta da se ohladi, a zatim ga ohladite u hladnoj vodi. Ravnomjerno i lagano protresite ekspresni lonac prije svakog otvaranja, nakon sto ste provjerili da se sigurnosni štapić spustio, kako biste izbjegli izlaženje mjehurića pare koji bi vas mogli opeci. Ta je radnja osobito važna pri brzom ispustanje pare ili nakon hladenja u hladnoj vodi.
Vrlo pažljivo premjestajte Vaš ekspres lonac dok je pod pritiskom. Ne dodirujte vruce povrsine. Rabite ručke i tipke. Rabite rukavice, ako je potrebno.
- Kada se radi o juhama, savjetujemo vam da obavljate brzu dekompresiju u hladnoj vodi (pogledajte odlomak „Zavrsetak kuhanja na način „Ekspresni lonac").
- Pije Ngo što otvorite ekspres lonac, provjerite je li venti na položaju dekompresije. Sigurnosni štapić (D) mora biti u donjem položaju.
Nikad nemojte nasilno otvarati ekspres Ionac. Budite sigurni da se unutarnji pritisak smanjio. Sigurnosni štapić (D) mora biti u donjem položaju. (Pogledajte odjeljak „Sigurnost").
ODRŽAVANJE Ako zakljucite da je dio Vašeg ekspres lonca slomljen ili napuknut,nikako ga nemojte pokušavati otvoriti ako je zatvoren, pricekajte da se potpuno ohladi prise nego što ga premješate, nemojte ga više koristiti i odnesite ga u ovlăsteni servisni centar TEFAL na popravak.
Ne obavljaje nikakve zahvate na sigurnosnim sustavima lonca osim Čišćenja i odžavanja.
Koristite samo originalne dijelove TEFAL koji odgovaraju Vašem modelu. Osobito rabite posudu lonca iPoklopac TEFAL.
Nemojte koristiti ekspres lonac za Čuvanje kiselih ili slanih namirnica prije i poslije kuhanja jer bi mogle ošteti vašu posudu.
Očistite i operite svoj ekspresni lonac neposredno nakon svake uporabe.
Nikad ne perite radni ventil (A), brtvu (I), tajmer* (F), ni posudu s neprijanjaućim slojem u perilici za posude.
Nikad ne perite tajmer* (F) pod vodom.
Nikad ne koristite izbjeljivač ili klorirane proizvode jer bi mogli izmijeniti svojstva nehrdăjućeg Čelika.
Ne ostavljajePoklopac da se nameće u vodi.
Brtvu zamijenite svake godine ili akо se na njoj pojav pukotine.
Nakon 10 godina uporabe obvezno svoj ekspres lonac dajte provjeriti u ovlăstenom servisnom centru TEFAL.
Kad pospremate ekspres lonac: obruto okrenitePoklopa na posudi kako biste izbjegli prijevremeno trošenje brtv peklopca.
SACUVAJTE OVE UPUTE
Dijelovi (Vidjeti opisnu shemu)
A. Radni ventil
B. Odvod za ispustanje pare
C. IOznaka polożaja ventila
D. Sigurnosni Štapić (pogledajte odjeljak „Sigurnost").
E. Sigurnosni ventil
F. Tajmer*
G. RučkaPoklopca
H. Poklopac
I. Brtva
J. Kosarica za kuhanje na pari*
K./ L. Tronožac*
M. Rucka posude
N. Oznake maksimalnog punjenja
O. Posuda
Obavezne provjere prise svake uporabe
Provjera radnog ventila

- Provjerite da je ispusni otvor radnog ventila slobodan (pogledajte odlomak „Skidanje i postavljanje radnog ventila").
Provjera sigurnosnog ventila

- Provjerite moze li se kuglica sigurnosnog ventila pomicati (upotrijebite stapić).

Uporaba

Kuhanje na način
Ekspres Ionac

Kuhanje na način običnog lonca*

Dekompresija
Otvaranje,
- Premjestite ručkuPoklopca iz vodoravnog u okomiti položaj -sl.3 Poklopac se okrece.
- PodignitePoklopac.
- U slučaju problema s otvaranjem proizvoda: stavite brtvu pod mlaz vode i ponovo je vratite naPoklopac bez brisanja - slika 19 te pripazite da je dobro postavite u utorePoklopca - slika 15.
Zatvaranje
Budite sigurni da je ručkaPoklopca u okomitom položaju.
- PostavitePoklopac na posudu kako je prikazano na -sl.1 takodaporavnate plasticni dio s ručkama posude.
Vratite ručkuPoklopca iz okomitog u vodoravni položaj -sl.2
- Poklopac se okrece.
Ako ne možete zatvoritiPoklopac:
- Provjerite je li brtva na mjestu i je liPoklopac dobro postavljen.
- U slučaju problema sa zatvaranjem proizvoda: stavite brtvu pod mlaz vode i ponovo je vratite naPoklopac bez brisanja - slika 19 te pripazite da je dobro postavite u utorePoklopca - slika 15.
Prva uporaba
- Za modele s neprijanjajućom podlogom: operite i cijelu unutarnju podlogu lagano premažite uljem za kuhanje.
Ovisno o modelu:
Postavite tronožac\*L) i kosaru\*J) na dno posude.
- Pričvrstite tronožac\*K) za kosaru\*J), zatim sve stavite na dno posude.
- Napunite posudu (O) vodom do 2/3 (MAX 2) - sika 5.
Zatvorite ekspres Ionac.
- Poravnajte slikovni prikaz radag ventila (A) s indicatorom položaja ventila (C) - sl. 9.


Stavite ekspres Ionac na izvor topline koji zatim podesite na majvecu jačinu.
- Kada para počne izlaziti iz ventilà smanjite jačinu izvora topline i PODESITE na 20 min.
Kada protekne 20 min, ugase izvor topline.
- Poravnajte slikovni prikaz radnog ventila (A) s indicatorom polożaja ventila (C).
- Kad se sigurnosni štapić (D) ponovno spusti, Vaš ekspres lonac višeicates不同程度 pod pritiskom.
- Otvorite ekspres Ionac - sl. 3
Ocistite ga sredstvom za pranje posuda.
Minimalno i maksimalno punjenje
Najmanje 25 cl (2 caxe) - sl. 4.
- Najvise 2/3 visine posude, oznaka MAX 2 - sl. 5.
- Ne stavljajte krupnu sol u ekspres lonac vec dodajte sitnu sol na kraju kuhanja.
Za odreëne namirnice:
Za kasaste namirnice koje se sire i/ili pjene tijekom kuhanja kao sto su riza, mahunarke, sušeno povrce, kompoti, bundeve, tikvice, mrkva, krumpir, riblji fileti... nemojte puniti ekspresni lonac iznad 1/3 (MAX 1) njegove zapremnine. Pustite ekspresni lonac nekoliko minuta da se ohladi, a zatim ga ohladite u hladnoj vodi. Ravnomjerno i lagano protresite ekspresni lonac prije svakog otvaranja, nakon sto ste provjerili da se

sigurnosni štapić spustio, kako biste izbjegli izlaženje mjehurića pare koji bi vas mogli opeci. Ta je radnja osobito važna pri brzom ispustanje pare ili nakon hladenja u hladnoj vodi. Kad se radi o juhama, savjetujemo vam da obavljate brzu dekompressiju u hladnoj vodi (pogledajte odlomak „Zavrsetak kuhanja na način „Ekspresni Ionac").
Uporaba košarice za kuhanje na pari*
- Natočite 75 cl vode u dno posude (O).
Ovisno o modelu:
- Postavite tronožac\*L i košaru\*J na dno posude.
- Pričvrstite tronozac\*(K) za kosaru\*(J), zatim sve stavite na dno posude.


- Tijekom kuhanja na paru namirnice u kosari za kuhanje na pari ne smije biti u kontaktu s vodom - sl.6 i7.
Namirnice koje se nalaze u košari za paru* ne smiju premašivati razinu MAX 2.
Povlačenje i postavljanje radnog ventila (A)
Da biste izvukli radni ventil (A):
- Poravnajte otvor s indicatorom polożaja ventila (C) pritiskom na prsten radnog ventila (A).
Izvucite ga - sl. 11.
Za postavljanje radnog ventila:
- Postavite radni ventil (A) - slika 8 tako da poravnate utor radnog ventila s indicatorom položaja (C) vidi sliku pored.

- Umetnite radni ventil (A) takdo da se on spoji sa stapicem za ispustanje pare.
- Pritisnite mjesta prikazana strelicama na radnom ventilu (A) i okrenite.

Tajmer*
Nikada nemojte upotreblavati indicator vremena u načinu kuhanja „Faitout" (Lonac).
Mjerač vremena osmišljen je da vam pomogne postić rezultate kuhanja omogucujuci vam bolju prilagodbu potrošnje energije. On automatski odbrojava vrijeme kuhanja od postizanja temperature koja odgovara načinu kuhanja „Ekspres Ionac"
Kako bi radio, tajmer mora biti prikopčan na ekspres lonac
Pripazite da tijekom kuhanja radni ventil (A) ujednačeno šišti. Ako nema dovoljno pare, lagano pojacte izvor topline, a u suprotnom slučaju, smanjite jačinu izvora topline.
1 Kako bistepokrenuli tajmer:pritisnite tipku. 2 Podesite vrijeme kuhanja(u minutama). Ako ste pogrešno unijeli vrijeme kuhanja, pričekajte 4 sekunde da svjetlo prestane treperiti,a zatim dugo pritisnite tipku za ponovno postavljanje na nulu. 3 Postavite izvor topline na maksimum. 4 Kada je Vaš ekspres lonac postigao temperaturu kuhanja,tajmer zvoni i započinje odbrojavanje vremena (brojke trepere). Smanjite jačinu izvora topline. 5 Kada vrijeme kuhanja istekne,tajmer zazvoni. Za zaustavljanje zvonjave tajmera,pritisnite tipku. Ugasite izvor topline.
Dugi pritisak na tipku postavlja tajmer na nulu i gasi ga.
HR
Postavljanje i uklanjanje tajmera*
- Kako bist e tajmer (F) postavili na mesto - sl. 12, prvo umetnite dio „strana s tipkom" na modulu, a zatim pritisnite kako bist prekopcali suprotnu stranu.
- Kako biste uklonili tajmer (F), podignite ga i izvadite.
Zamjena baterije tajmera*

Baterija tajmera je plosnata mala okrugla baterija CR2032.
Ako se oznaka ne oja ljuje ili zaslon ne radi, zamijenite bateriju.
Vijek trajanja baterije ovisi o učestalosti uporabe tajmera.
- Baterija tajmera sadržava dimetoksietan br. CAS 110-71-4. Ona je u skladu s europskim propisima. Zbog Vase sigurnosti i ochuvanja okoliša: ne otvarajte bateriju, ne izlažite je visokim temperaturama, ne bacajte je u kućanski OTPad; odnesite je u centar za prikupljanje rabljenih baterija.
- Nepunjive baterije ne smiju se ponovo puniti.
- Razlicite vrste baterije ili nove i korištene baterije ne smiju se miješati.
Baterije se trebaju umetnuti s ispravno okrenutim polovima.
- Isprażnjene baterije trebaju se izvaditi iz ureðaja i sigurno zbrinuti.
- Ako se urejad treba spremiti tijekom dužeg razdoblja i neće se upotrebljavati, trebate izvaditi baterije.
Strujni priključci ne smiju se katko spajati.
Stavite uredj na ravno, na kuhinjsku radnu plocu.
- Za uklanjanje baterije iz tajmera, otvoritePoklopac baterijepomocu kovanice (pogledati crtež).
Zamijenite bateriju.
Vratite brtvu na mjesto u lezieste.
Postavite polumjesc poLopca baterije nasuprot. pomjesecu Jerača vremena.
- Pažljivo okrenitePoklopac baterije, uz lagani pritisak, poravnavajući polumjesecoklopca baterije s krugom mjerača vremena.
- Postavite ga ravno na radnu povrsinu takdo ja jePoklopac u vodoravnom položaju.
- Nemojte pokušavati silom zatvoritiPoklopac baterije. Nemojte prelaziti grančnike.
- U slučaju gubitka, drugi tajmer možete nabaviti u svim našim ovlastenim servisnim centrima TEFAL.
Nikada ne stavljajte tajmeru vodu ni u perilicu posuda.
Nikada nemojte upotreblavati indicator vremena u načinu kuhanja „Faitout" (Lonac).
Prijekuhanja
- Prije svake uporabe, izvadite radni ventil (A) - sl. 11 i vizualno na danjem svjetlu provjerite je li odvod za ispustanje pare (B) prohodan - sl. 13.
- Provjerite moze li se sigurnosni ventil micati (vidjeti odjeljke „Ciscenje" i „Obvezne provjere prise svake uporabe") - sl. 18.
Dodajte svoje sastojke i tekuci nu.


Zatvorite ekspres Ionac - sl. 2
- U slučaju problema sa zatvaranjem proizvoda: stavite brtvu pod mlaz vode i ponovo je vratite naPoklopac bez brisanja - slika 19 te pripazite da je dobro postavite u utorePoklopca - slika 15.
- Postavite radni ventil na njegovo mesto (A) - sl. 8.

Kuhanje na način „Ekspres Ionac"
- Okrenite radni ventil (A) u položaj kuhanja na način „Ekspres Ionac" -sl. 9.
- Budite sigurni da je ekspres lonac odgovarajuće zatvoren prise stavljanja u rad - sl. 2
Stavite ekspres Ionac na izvor topline koji zatim podesite na majvecu jačinu.
- Za modele koji imaju tajmer*: postavite vrijeme kuhanja navedeno u receptu (vidjeti odjeljak „Uporaba tajmera").
- Zveckanje i parni oblačić koje proizvodi sigurnosni štapić su normalni, oni omogucavaju ispustanje zraka prije kuhanja.
Tijekom kuhanja na način „Ekspres Ionac"
- Ako radni ventil (A) kontinuirano ispustavodenu paru, proizvodeci pritom ujednaceni zvuk (sisti), smanjite izvor topline.
- Zapocnite odbrojavante vremena kuhanja navedenog u receptu.
- Provjeravajte tijekom kuhanja da li ventil ispravno šisti. Ako ne izlazi dovoljno pare, lagano pojacajte izvor topline, a u suprotnom ga smanjite.
Kraj kuhanja na način „Ekspres Ionac".
Za ispustanje pare:
- Kada se izvor topline ugasi, imate dvije mogucnosti:
- Postepena dekompresija: postepeno okrecite radni ventil (A) i zaustavite ga na oznaci slikovnog prikaza sl. 10.


- Brza dekompressija u hladnoj vodi: napunite hladnu vodu u sudoper i u nju uronite dno vašeg ekspresnog Ionac sve dok se sigurnosni štapić ne spusti -sl. 14. Kad se sigurnosni štapić (D) ponovno spusti, Vaš ekspres Ionac više një pod pritiskom. Okrenite radni ventil (A) u položaj

Faza 1

Faza 2
- Możete otvoriti ekspres lonac - sl. 3.
- U slučaju problema s otvaranjem proizvoda: stavite brtvu pod mlaz vode i ponovo je vratite naPoklopac bez brisanja - slika 19 te pripazite da je dobro postavite u utorePoklopca - slika 15.
Ako tijekom ispustanja pare primijetite nepravilno prskanje, vratite radni ventil (A) u položaj kuhanja „Ekspresni Ionac" , a zatim izvršite brzu dekompresiju u hladnoj vodi.
Ako se sigurnosni štapić (D) ne spusti, napunite hladnu vodu u sudoper i u nju uronite dno vašeg ekspresnog Ionac sve dok se sigurnosni štapić ne spusti - sl. 14.
Nikad ne dirajte sigurnosni štapić.
- Za kašaste namirnice koje se šire i/ili pjene tijekom kuhanja kao što su riža, mahunarke, sušeno povrće, kompoti, bundeve, tikvice, mrkva, krumpir, riblj fileti...nemojte puniti ekspresni lonac iznad 1/3 (MAX 1) njegove zapremnine. Pustite ekspresni lonac nekoliko minuta da se ohladi, a zatim ga ohladite u hladnoj vodi. Ravnomjerno i lagano protresite ekspresni lonac prije svakog otvaranja, nakon što ste provjerili da se sigurnosni štapić spustio, kako biste izbjegli izlaženje mnejurica pare koji bi vas mogli opeci. Ta je radnja osobito važna pri brzom ispustanje pare ili nakon hladjenja u hladnoj vodi. Kada se radi o juhama, savjetujemo vam da obavljate brzu dekompresiju u hladnoj vodi (pogledajte odlomak „Zavrsetak kuhanja na način „Ekspresni lonac").

Kuhanje na način običnog lonca*
- Okrenite radni ventil (A) do položaja za kuhanje na način „Obicni Ionac" tu svrhu primijenite dovoljnu silu da biste prošli urez koji se nalazi u položaju dekompresije.
- Budite sigurni da je ekspres lonac odgovarajuće zatvoren -sl. 2PRIJE stavljanu urad.
- Stavite ekspres Ionac na izvor topline postavljen na malu jačinu.
- Započnite odbrojavanje vremena kuhanja navenedenog u receptu.
- Pri kuhanju na način „Obični Ionac", možete bilo kada otvoriti ekspres lonac kako bist promiješali, provjerili kako naproduje kuhanje ili dodali sastojke.
- U slučaju problema s otvaranjem proizvoda: stavite brtvu pod mlaz vode i ponovo je vratite naPoklopac bezbrisanja - slika 19 te pripazite da je dobro postavite u utorePoklopca - slika 15.
- Ako je izvor topline prejak, ekspres lonac bi se mogao zakljucati (sigurnosni stapić (D) se penje i blokira otvaranje) te se ručkaPoklopca u tom slučaju ne može pomaknuti ili ne otvara ekspres lonac. U tom slučaju smanjite ili isključite izvor topline. U slučaju da kuhate na klasičnim elektricnim pločama, uklonite ekspres lonac s izvora topline.
- Za modele s neprijanjajućim slojem: nemojte upotreblavati kuhinjsku metlicu ili metalni, odn. oštri kuhinjski pribor. Ne cijedite kuhinjski pribor
lupkanjem o rub posude jer biste je möglich ošteiti i prouzrokovati curenje.
- Nikad nemojte masti zagrijavati dok se ne karboniziraju. Pare koje se ispustaju tijekom kuhanja mogu biti opasne zaŽivotinja s osjetljivim respiratornim sustavom kao što su ptice. Vlasnici ptica moraju ih premjestiti iz kuhinje.
Sigurnost
Vas ekspres lonac opremljen je s više sigurnosnih mehanizama:
■ Sigurno zatvaranje:
- AkoPoklopac nije dobros postavljen ila kote zaboravili preklopiti drske Poklopca, para ce izlaziti na sigurnosnom stapicu (D) ekspresnog lonca i nece se moci stvoriti pritisak.
- Sigurnost kod otvaranja:
- Ako je Vaš ekspres Ionac pod tlakom, sigurnosni štapić (D) je u gornjem položaju i ručkaPoklopca za otvaranje/zatvaranje (G) ne moze se pomaknuti.
- Nikad nemojte nasilno pokušavati otvoriti ekspres lonac.
- Nikako nemojte dirati sigurnosni štapić (D).
- Budite sigurni da je unutarnji pritisak pao takdo provjerite je li sigurnosni stapić (D) u donjem položaju.
- Ručke posude su sigurnosni dijelovi. Nikada ih nemojte sami mistrjenati. Nikada nemojte koristiti druge modele ručki.
- Ako ste pomaknuli ručkuPoklopca za otvaranje/zatvaranje (G) u okomiti položaj, a ekspres lonac je još uvijek bio pod pritiskom, ne možete ga otvoriti. Ova funkcjija je dodatna sigurnosna mjera.
- Vratite ručkuPoklopca u vodoravni položaj i pričekajte da se sigurnosni štapić (D) spusti u donji položaj.
Dvije sigurnosne mjere od prekomjernog tlaka:
- Prvi mehanizam: sigurnosni ventil (E) otpuša pritisak - sl. 20
- Drugi mehanizam: brtva dopuša ispustanje pare izmeduPoklopca i posude -sl.20
Ako se jeder od sigurnosnih sustava aktivira na povecanje tlaka:
- Ugasite izvor topline.
- Pustite ekspres lonac da se potpuno ohladi.
- Otvorite.
- Provjerite i očistite radni ventil (A), odvod za ispustanje pare (B), sigurnosni ventil (E) i brtvu (I) - sl. 16 - 17- 18. Vidjeti odjeljke „Čišćenje" i „Obvezne provjere prije svake uporabe".
- Ako nakon ovih provjera i cisćenja vaš proizvod propuša ili više ne radi, odnesite ga u ovlašeni servisni centar TEFAL.
Preporuke za uporabu
1 - Vodena para je jako vruca pri izlasku iz radnog ventila. Pazite na mlaz pare.
2 - Kad se sigurnosni štapić digne više ne možete otvoriti ekspres lonac.
3 - Kao i kod svakog uredaja za kuhanje, budite vrlo pažljivi kod korištenja ekspres lonca u blizini djece.
4 - Za premješanje ekspres lonca poslužite se ručkama na posudi.
5 - Nemojte ostavljati hranu da stoji u ekspres loncu. Nikad nemojte prenositi ekspres lonac noseci ga za ručkuPoklopca.
6 - Nikad ne koristite izbjeljivač ili klorirane proizvode jer bi mogli izmijeniti svojstva nehrdajućeg Čelika.
7 - Ne ostavljajePoklopac da se namece u vodi.
8 - Brtvu zamijenite svake godine ili ako se na njoj pojave pukotine.
9 - Čišćenje Vaseg ekspres Ionca izvodi se obavezno dok je hladan i prazan.
10 - Nakon 10 godina uporabe obvezno svoj ekspres Ionac dajte provjeriti u ovlastenom servisnom centru TEFAL.
Čišćenje
Za dobro funkcioniranje Vaseg ekspres lonca morate se držati ovih preporuka za cisćenje i održavanje nakon svake uporabe.
Smeckasta boja ilpruge koje se mogu pojviti nakon duge uporabe ne predstavlaju problem.
Trošenje vanjske obloge(ovisno o modelu) povezano s kontaktomPoklopca i posude je normala pojava.
Za ekspres lance s neprijanjajućom podlogom (ovisno o modelu): mogu se pojaviti I agane pr uge i abrazij e koje ne utj eču na neprijanjajuća svojstva podloge.
- Operite ekspres lonac nakon svake uporabe mlakom vodom uz dodatak sredstva za pranje posuda. Isto takoto postupite i s kosaricom*.
- Ne koristite izbjeljivač ili klorirane proizvode.
Nemojte zagrijavati posudu dok je prazna.
Za ciścenje unutraśnjosti posude:
- Operite spužvicom i proizvodom za pranje posuda.
- Ako na unutrasnjosti posude od nehrdajuceg celika postoje raznobojne mrlje ili bjelkasti tragovi, očistite je alkoholnim octom.
Za ciścenje unutrażnjosti alumijske posude s neprijanjajućim slojem:
- Kako bist produljili trajanje Vašeg proizvoda, preporučujemo Vam ručno pranje.
- Operite toplomvodom, proizvodom za pranje posuda i mekom spužvicom.
- Nemojte koristiti praskasto sredstvo za cijscenje ni abrazivne spužvice.
- Ako su Vam namirnice zagorile, napunite posudu toplom vodom i pustite da se namače. Zatim očistite sredstvom za pranje posuda.
Za ciścenje vanjske povrsine posude:
- Operite spužvicom i proizvodom za pranje posuda.
Posudu i kosaricumozete staviti u perilicu posuda.
Posudu s neprijan jajućim sloj em (o visno o modelu) nemojte stavlj ati u perilicu posuă jer deter dženti u tab letama sadržavaju vrlo agresivne i korozivne tvari koje oštećuju aluminijske dijelove.
Intenzivnom uporabom posude s neprijanjajućim slojem (ovisno o modelu)MZe doci do lagane promjene u boji neprijanjajućeg sloja (moze požutiti, dobiti mrlje).
Za ciścenjePoklopca:
- Poklopac operite spužvicom i proizvodom za pranje posuda.
SušitePoklopac u okomitompoložaju kako bi se preostala voda mogla ocijediti izmeu metalnih i plasticnih dijelovaPoklopca.
Za ciścenje brte povklopca:
Nakon svakog kuhanja očistite brtvu (I) i njezino ležiste.
- Za vraçanje brte na mesto, molimo pogledajte - sl. 15 i pazite da brtva dobro sjedne u svaki utorPoklopca.
Za ciścenje radnog ventilà (A):
- Izvucite radni ventil (A) - sl. 11.
- Očistite radni ventil (A) pod mlazom vode iz slavine -sl. 16.
Provjerite moze li se micati: crtez sa strane.
Nakon što ste uklonili radni ventil (A), brtvu (I) i tajmer* (F),Poklopac možete staviti u perilicu posuă.

Nikad ne perite radni ventil (A), brtvu (I), tajmer* (F), ni posudu s neprijanjajućim slojem u perilici za posude.
Za ciścenje odvoda za ispustanje pare (B) smJEsTeNo g naPoklopcu:
Ukloniteventil(A)-sl.11.
- Vizualno na danjem svjetlu prekontrolirajte je li odvod za ispustanje pare prohodan i okrugao - sl. 13. Ako je potrebno, ochistite cackalicom - sl. 17 i isperite.
Za ciścenje sigurnosnog ventila (E):
- Očistite dio sigurnosnog ventilà smjesten unutarPoklopca takodag isperete vodom.
- Provjerite radi li ispravno snažnim pritiskom na kuglicu (pomocuvatiranog stapica s kojeg ste uklonili vatu) koja mora bitiPokretna - sl. 18. Vidjeti odjeljak „Obvezne provjere prije svake uporabe".
Za ciścenje tajmera* (F):
- Upotrijebite Čistu i suhu krpu.
Nemojte koristiti otapalo.
- Nikada ne stavljajte tajmer u vodu ili u perilicu posuda.
Održavanje
Za zamjenu brte ekspres lonca:
- Brtvu ekspres lonca mistrajte svake godine ili ako se na njoj pojave pukotine.
- Uvijek kupujte originalnu brtvu TEFAL koja odgovara Vašem modelu (vidjeti odjeljak „Nastavci").
- Za vraćanje brte na mesto, molimo pogledajte - sl. 15 i pazite da brtva dobro sjedne u svaki utorPoklopa.
Zaspremanje ekspres lonca:
VratitePoklopac na posudu lonca.
- Mehanizam otvaranja/zatvaranja ekspres lonca ne zahtijeva poTEFALno održavanje osim cisćenja.
Nakon 10 godina uporabe obvezno svoj ekspres lonac dajte provjeriti u ovlastenom servisnom centru TEFAL.
Dodatni pribor TEFAL
- Dodatni pribor za vaš ekspres lonac dostupan u trgovinama:
Dodatni pribor Reference Brtva 3/4/4.5/6 L: vanjski promjer brte: 24 cm X1010008 5/7.5/9 L: vanjski promjer brte: 27 cm X1010007 Košarica za kuhanje na pari* 3/4.5/4/6 L: za posudu promjera 22 cm 792185 5/7.5/9 L: za posudu promjera 24 cm 79 2654 Tronožac* (L) 792691 Tajmer* X1060007
- Javite se u ovlasteni servisni centar TEFAL radi zamjene drugih dijelova ili popravaka.
- Koristite samo originalne dijelove TEFAL koji odgovaraju Vašem modelu.
Karakteristike
Promjer dna Vaseg ekspres lonca - reference
Zapremina Ø posude Ø dna Clipso Minut® Perfect / Easy Clipso Minut® Duo couleur Clipso Minut® Duo Gourmet Materijal posude 3 L 22 cm 15.5 cm P46205 - Nehrdajuće Celik 3 L 22 cm 18 cm - - P46605 4 L 22 cm 14 cm -P46042 - Obloženi aluminij 4.5 L 22 cm 1 5.5 cm P46206 - Nehrdajuće Celik 5 L 24 cm 14 cm -P46051 - Obloženi aluminij 5.2 L 24 cm 20 cm - P46654 Nehrdajuće Celik 7.5 L 24 cm 18 cm P46248 - 9 L 24 cm 18 cm P46249 - Set 5 L/7,5 L 24 cm 14 cm P46353 - 18 cm
MaterijalPoklopca:nehrdajuci celik
Nazivni podaci:
Gornji radni tlak: 65 kPa
Maksimalni sigurni tlak: 120 kPa
Kompatibilni izvori topline

- Vas ekspres Ionac moze se koristi na svim vrstama kuhala, uključujuci i indukcijsko.
- Na elektricnoj ploci promjer ploce treba biti isti ili manji od promjera dna vaseg ekspres lonca.
- Na staklokeramičkoj ploci osigurajte da je dno posude uredno i Čisto.
- Na plinu plamen ne bi trebao prelaziti promjer posude.
- Na svim stednjacima pazite da vaš ekspres lonac bude dobro centriran.
Jamstvo
U okviru uporabe preporucene uputama za uporabu, posuda od nehrdajuceg celika Vaseg novog ekspres lonca TEFAL ima jamstvo 10 godina za:
- Sve nedostatke u metalnoj strukturi posude,
- Svaku preuranjenu istrošenost temeljinog metala.
- Drugi materijali posude i svi drugi dijelovi Vaseg ekspres lonca imaju jamstvo za sve nedostatke u proizvodnji ili materijalu, tijekom jamstvenog razdoblja utvrdenog zakonom koji je na snazi u državi u kojoj je kuplejen računajući od datuma kupnje.
- Ovo_ce ugovorno jamstvo biti prihvaćeno po predočenju blagajničkog računa ili računa s datumom kupnje.
Ova jamstva isključuju:
- Pruge i boje nastale starenjem, za posude s neprijanjajućim slojem.
- Pruge povezane s kontaktomPoklopca na posudi s neprijanjajućim slojem.
- Ostecenja do kojih jeDoslo usljed nepostivanja važnih mjera opreza ili nemarnog koristenja, poTEFALice:
- Udaraca, padova, stavljanja u pećnicu...
- Samo ovlasteni servisni centri TEFAL osposobljeni su da Vam omoguce koriistenje ovog jamstva.
- Molimo nazovite broj za potrošace kako biste doznali adresu najblizeg ovlastenog servisnog centra TEFAL.
Propisno označavanje
Oznaka Mesto Robna marka NaPoklopcu Godina i proizvodna serija
Referenca modela
Maksimalni sigurni tlak (ST)
Gornji radni tlak (RT) NaPoklopcu Zapremina Na vanjskom dnu posude Poštanska adresa proizvoća Na vanjskom dnu posude
- Sudjelujmo u zašiti okolíša!

① Urejad sadrži brojne materijale koji se mogu ponovno iskoristiti ili reciklirati.
Molimo vas da ga odnesete u centar za reciklažni OTPad.
TEFAL odgovara na vaša pitanja
Problemi Preporuke Ako ne możete otvoriti i/ili zatvoritiPoklopac: ■ Skinite brtvu i stavite je pod vodu.
■ Vratite je naPoklopac bez brisanja - slika 19. Ako ne możete zatvoritiPoklopac: ■ Provjerite je li ručkaPoklopca u okomitom položaju.
■ Provjerite je li brtva ispravno stavljena (pogledajte odjeljak „Čišćenje i održavanje").
■ Provjerite je liPoklopac dobro postavljen kako je prikazano na - sl. 1.
■ Stavite brtvu pod mlaz vode i ponovo je vratite naPoklopac bez brisanja - slika 19 te pripazite da je dobro postavite u utorePoklopca - slika 15. Ako se ekspres lonac zagrijao pod tlakom bez tekućine u posudi: Dajte ekspres lonac na provjeru u ovlašteni servisni centar TEFAL. Ako sigurnosni štapić zvecka i proizvodi parne oblačiće: To je normalno tijekom prvih nekoliko minuta: time je omogućen izlazak zraka prije kuhanja. Ako se sigurnosni štapić nije podigao i ništa ne izlazi iz ventilà tijekom kuhanja: To je normalno tijekom prvih nekoliko minuta. Ako to ne prestane, provjerite:
- Je li izvor topline dovoljno jak, a ako nije, pojačajte ga
- Je li kolićina tekućine u posudi lonca dovoljna.
- Je li radni ventil (A) u položaju
- Je li ekspres lonac dobro zatvoren.
- Jesu li brtva ili rub posude lonca oštećeni.
- Je li brtva dobro postavljena. Ako se sigurnosni štapić podigao i ništa ne izlazi iz ventilà tijekom kuhanja: To je normalno u prvih nekoliko minuta. Ako se pojava nastavi, napunite hladnu vodu u sudope i u nju uronite dno vašeg ekspresnog lonac swe dok se sigurnosni štapić (D) ne spusti.
Očistite radni ventil (A) - sl. 16 i odvod za ispustanje vodene pare - sl. 17 i provjerite može li se kuglica si-gurnosnog ventilà pritisnuti bez teškoća - sl. 18. Ako para izlazi akaokopklopca, a štapić je u donjem položaju, provjerite: Je liPoklopac dobroszavoren.Položaj brte pavoklopca.U kakvom je stanju brtvia i po potrebi je zamijenite ČistocuPoklopca, brtei njezinog ležista uPoklopcu.U kakvom je stanju rub posude. Ako ne možete otvoritiPoklopac: Provjerite je li sigurnosni štapić (D) u donjempoložaju.Ako njie, izvršite dekompresiju: napunite hladnu vodu u sudoper i u nju uronite dno vašeg ekspresnog lonac sve dok se sigurnosni štapić ne spusti.Nikad ne dirajte sigurnosni štapić (D).Radni ventil (A) okrenite do položaja Ako namirnice nisu skuhane ili su zagorjele, provjerite: Vrijeme kuhanja.Jačinu izvora topline.Ispravan položaj radnog ventila (A).Količinu tekućine. Ako je hrana zagorjela u Vašem ekspresloncu: Ostavite posudu da se namaće neko vrijeme prije no što je operete.Nikad nemojte koristiti izbjeljivač ili klorirane proizvode. Ako se Juda od sigurnosnih sustavaaktivira: Ugasite izvor topline.Ostavite ekspres lonac da se ohladi bez premještanja. Pricěkajte da se sigurnosni štapić spusti, a zatim otvorite.Provjerite i ocistite radni ventil (A), odvod za ispustanje vodene pare, sigurnosni ventil i brtvu.Osigurajte da je punjenje izvršeno u skladu s uputama.Ako je kvar i dalje prisutan, ekspres lonac dajte na provjeru u ovlašteni servisni centar TEFAL. Ako uočite pojavutragova oksidiranja: U ekstremnim slučajevima uporaba nehrdajucoğ celika ne jamči da neće doci do oksidiranja. Ako uočite tragove oksidiranja, uklonite ih trljanjem abrazivnom spužvicom prije ponovne uporabe ekspres lonca.
TABLICA ZA KUHANJE
Povrçé
POVRCE (SVJEZE)
PARA
Sastojak u kosari za kuhanje na pari i 750 ml vode na dnu ekspres lonca.


POTAPANJE
Sastojak u vodi i bez kosare.
MAHUNARKE
POTAPANJE
Bez kosare.


#
一
#
一
一
一
一
一
一
一
#
一
一
一
#
#
一
一
一
一
一
一
一
一
12 =
一
一
12x - 1 > 0
一
一
一
一
12 =
12 =
一
一
一
一
一
#
一
一
一
12 =
一
一
一
一
#
一
#

Mrkva narezana na okrugle ploške (3 mm) 600 g (para) 17 do 19 min Paprike babure narezane na polovice (550 g) (para) 14 do 16 min Patlidžani, oguljeni i narezani na ploške (3 mm), 850 g (para) 10 do 12 min Poriluk, cijeli i bijeli 650 g (para) 9 do 11 min Prokulice (para) 10 do 12 min Repa, nasjeckana na kockice (500 g) (para) 14 do 16 min Šparoge, bijele (para) 5 do 6 min Špinat (para) 3 do 4 min Tikvice narezane na okrugle ploške (3 mm) 600 g (para) 12 do 15 min Zelene mahune, tanke (600 g) (para) 10 do 12 min
POTAPANJE
Bez košare.
MAX 1 KOLICINA VODE KOLICINA RIŽE VRIJEME
KUHANJA 2 OSOBE 400 ml / 2 še 150 g / 1 ša 7 do 8 min 4 OSOBE 500 ml / 2,5 še 250 g / 2 še 6 LJUDI 700 ml / 3,5 še 375 g / 3 še
Meso / riba
SVJEŽE SMRZNUTO Goveča pečenica (1 kg, promjer 8–11 cm) 30 do 35 min 45 do 50 min Grdobina, fileti (1 kg) u komadima od 75 g 5 do 6 min 7 do 8 min Janjeća koljenica: 2 kom (0,95 kg) 40 do 45 min 1 h 05 do 1 h 15 Losos, odresci: 4 (0,8 kg) 5 do 6 min 7 do 8 min Pačetina (1,8 kg) 45 do 47 min 50 do 55 min Piletina (1,35 kg) 23 do 25 min 1 h do 1 h 10min Pilići, mladi: 2 (1,3 kg) 23 do 25 min 40 do 45 min Prepelica: 4 9 do 10 min 18 do 20 min Svinjska koljenica (0,8 kg, promjer 8–10 cm) 30 do 35 min 1 h 05 do 1 h 15 Svinjski filet mignon: 2 komada od 350 g 13 do 15 min 26 do 29 min Teleća koljenica (0,8 kg, promjer 5–7 cm) 17 do 19 min Teleći filet mignon: 0,7 kg 17 do 21 min 33 do 38 min Teleći paupiettes: 4 10 do 12 min Tuna, odresci: 4 (0,7 kg) 5 do 6 min 7 do 9 min Zec (1,5 kg u komadima) 8 do 9 min
Napomena: Za modele od 5 litara i manje provjerite da koljenice i perad ne prelaze oznaku na unutrašnjosti lonca. Odaberite koljenice mesa i perad visoke 8 cm ili manje.
FONTOS 0VINTÉZKEDÉSEK
A kukta hasznalata elott forditson idot az osszes utasitas elolvasasara, es tajekozodjon a „Hasznalati utmutatobol". A nem rendeltetesszeru hasznalat kovetkezteten a keszülek károsodhat.
Az On biztonsága érdekében a készülék megfelel a hatályban levő szabványoknak és előirásoknak:
- Nyomás alatti készülékek irányelv
- Éelemiszerekkel érintkező anyagok
- Környezetvédelem
MINDEN EGYES
HASZNÁLAT
ELÖTT
ELVÉGZENDÜ
FONTOS
ELLENÖRZÉSK ELLENÖRIZZE
·naponta, szemrevételezésel, hogy a vizleeresztő
vezeték nincs-e eltömödve - 13. ábra.
·hogy aBiztosítószelep golyója MOZog-e - 18. ábra.
·hogy a fedő tömítese illeszkedik-e a fedő minded egyes
hornyába - 15. ábra.
·hogy a fazék fogantúyi megfeleloen vannak-e rögzítve.
A fazék fogantúyi biztonsági alkatrészek. Soha ne
cserélje ki ǒket önálloan. MINDIG
TARTSA BE A
FELTÖLTÉSI
MENNYISÉGEKRE
VONATKOZÓ
KÖVETKEZÜ
SZABÁLYOKAT ·A kuktát soha ne használja folyadék nélkül, mert
súlyosan károsítja a készüléket. Bizonyosodjon meg rola
hogy mindig van benne elegendő folyadék főzes
közben.
·Minimum 25 cl - 4. ábra.
·Maximum az edény magasságának 2/3-a, MAX 2 jalólés
-5. ábra
·Gőzolés során a párolókosárban lévő elelmiszer nem
érintkezhet vizzel- 6. és 7. ábra.
·Maximum 1/3 (MAX 1) a főzés során kitáguló vagy
felhabsz Pépes elelmiszerek, pédául rizs, Hüvelyesek,
szárított zöld ségek, vagy kompólok, oriástok, cukkini,
sárgarépa, burgonya, halfilé stb. eséténye.
·A párolókosárba helyezett elelmiszerek nem léphetik tú
az edény MAX 2 szintjelzését.

FÖZÉS ELÖTT
ÉS KÖZBEN Ne engedje a gyermekeket a mühködésben lévo kukta bözelébe.
A kukta nyomás alatt fž. A nem megfelelo használat forrázásos égési sérülèsek okozhat. Üzembe helyezés elött bizonyosodjon meg arról, hogy a kuktát megfeleloen lezárta. (Lásda "Lezárás" c. fejezetet).
Fözés során ellenörizze, hogy a szelep folyamatos goźsugarat bocsát-e ki. Ha a gożkiáramlás nem elegndo, csökkentse a nyomást a készülékben, és ellenörizze, hogy a folyadék mennyisége megfelelo-e, valamint, hogy a gożvezéték nincs-e eltömõdve. Ha az ellenörzást követően meg mindig nincs gożkiáramlás, akkor kissé emelje fel a hóforrást.
Ne fózzön olyan ételeket, amelyektól eltömõdhetnek a biztonsági részegységek gezetékei:
- áfonya
- arpagyöngy
- zabpehely
- sárgaborso
- metéltészta, makaróni, spagetti
- rebarbara
- ribizli
Soha ne készítsem allati tej alapú receptekat a kuktkászülékkel.
Nemesacél kuktaban ne használjon darabos sós, a fžés végén adjon az etelhez finomsós. Igy elkerülheti a kukta aljan keletkező foltosodást.
Ne használja a kuktát nyomás alatt történő olajban sütésre.
A kuktát ne használja rendeltetésénék nem megfelelo célokra.
A kuktát forró sütöbe tenni tilos.
A kuktaba helyezett betétre soha ne tegyen rögzítés nélkül alufóliát.
Soha ne helyezzen muányag fóliát a kuktaba
Az alkoholgózök gyulékonyak. A fedő felhelyezese elött az alkoholtartalmú etelt forralja kb. 2 percig. Alkoholt tartalmazó receptek készítésekor tartsa felügyelet alatt a kuktát.
Csak a készülékker kompatibilis, a használati utasításban megadott hóforrásokat használjon.
A FÖZÉST
KÖVETÖEN...
Ragadásgató bevonattal rendelkezó modelleknél: ne használjon habverôt, fémból keszült illetve éles eszközöket. Ne csepegtesse le az eszközöket a tál szélehez ütogetve, mert megserülhet és szivargás kelethezhet.
- Az (A)üzemi szelep fokozatos forgatasával valassza ki a nyomáscsökkentés ütemét. A muveletet a szelep piktogramnál levő allásaban fejezbe be - 10. ábra. Ha a goz felszabadulása közben a normalistól elterő kilövellést tapasztal, allítsa vissza az (A) üzemi szelepet „Automikus fózes" fóző allásba, majd hideg viz alatt vegezzen gyors nyomáscsökkentest - 14. ábra.
Ha a biztonsagi szár (D)nem ereszkedik le, tegye a kuktát hideg vizbe - 14.ábra
- Soha ne manipulálja a biztonsági rudat.
Olyan húsok esétén, amelyeket felső börreteg borít, amely a nyomás hatására felfujódhat (pl.: marhanyelv stb.) ne szurkalja meg a húst addig, amíg ránézésre megduzzadtnak látszik; ellenkező esetben forrázási sérüléseket szenvedhet. Fózés elött szurkalja meg a húst.
A fozés során kitáguló vagy felhabzo pépes elelmiszerek, pédául rizs, húvelyesek, szaritott zöld ségek, kompôtok, oriástök, cukkini, sárgarepa, burgonya, halfilé stb. esetében. Hagyja a kuktát néhány percig hülni, majd hideg vizben végezze el a lehûtesét. Minden kinyitas elott Ellenörizzee, hogy a biztonsági szár leereszkedett majd konnyeden razza meg a kuktát, hogy ne törjenek fel esetleg égési serulést okozó gozbuborekok. Ez a muvelet kulönosen fontos a goz gyors kiengedesekor, vagy hideg vizben történô hûtest követöen.
A nyomás alatt levő kukta mozgatasát a legnagyobb elővigyázatossággal végezze. Ne érjen a meleg felületekhez. Használja a fogantyúkat és gombokat. Szükség esétén használjon kesztyút.
Javasoljuk, hogy levesek keszítékor hideg viz alatt végezzen gyors nyomáscsökkentest (lásd „A fozés befejezese automatikus fozés modban" címu bekezdétst).
- A kukta kinyitasa elott ellenorizze, hogy a szeleponyomaszkento pozicioban van-e. ABiztonsagi szar (D)also allasban kell, hogy legyen.
Soha ne nyissa ki eroltetve a kuktat. Bizonyosodjon meg arrol, hogy a belso nyomas a normal szintre csokkent. ABiztonsagi szar (D)also allasban kell, hogy legyen. Lasd a "Biztonsag" c. fejezetet.
KARBANTARTÁS Ha azt tapasztalja, hovy a kukta valamely része töröttt vagy repedt, akkor a zárt kukṭát semmi esetre se nyissa ki, elmozdítás elótt mindenképpen teljesen hütse le, ne használjá tovabb, és vigyte el javításra valamelyik hivatalos TEFAL márkaszervizbe.Az elóirt tisztlétási és karbantartási műveleteken kívül ne végezzen semmilyen beavatkožást a biztonságirendszeren.Kizárólag a készülék modelljének megfelelo eredeti TEFAL alkatrészeket használjon. Különösképpen fontos, hovy TEFAL fazekat és fedőt használjon.Ne használjá a kukṭát savas vagy sós éelmiszerek elkészítés elótti vagy utáni párolásárea, mert azok károsíthatják a fazekat.Minden használat után azonnal tisztlitsa meg és öblitse le a kukṭát.Az üzemi szelepet (A), a tömítés (I), az időzítőt* (F), vagy a tapadásmentes bevonatu edényt soha ne mosogassa el mosogatógépen.Az időzítőt* (F)soha ne helyezze viz alá.Soha ne használjon hipót vagy klórtartalmú szereket, amelyek megrongálhatják a rozsdamentes acél minőssegét.Ne áztassa vizben hosszasan a kukta fedelét.Csérélje ki a tömítés evente, vagy ha sérülésst tapasztal rajta.10 év használat után kõtelezően vizsgaltassa át a kukṭat egy hivatalos TEFAL márkaszervizben.A kukta tárolása: Csavarja vissza a fedelet az edényre, hogy ne használódjon el idő elótt a fedél tōmtíse.
ÖRIZZE MEG EZEKET AZ UTASİTÁSOKAT
Részegységek (lásd a leíró ábrát)
A. Üzemi szelep
B. Gózelvezető cső
C. Szeleppoziójelzó
D. Biztonsági szár (lásda "Biztonság" c. fejezetet)
E. Biztonsági szelep
F. Idózító*
G.Fedonyel
H. Fedél
I. Tominés
J. Parolokosár*
K./ L. Labazat*
M. Edenyfogantyú
N. Maximális feltöltési szintjelő
O. Edény
A minded egyes használat elöttt Alvégzendő fontos Ellenőrzések
Az üzemi szelep ellenörzese

Ellenorizze, hogy az üzemi szelep gozkieresztó szelepe nincs-e eltömdve. (lásd „Az üzemi szelep elávolítása és behelysezé" bekezdés).
Abiztonsagi szelep Ellenőrzése

Ellenorizze, hogy aBiztonsagi szelep golyoja mozog-e (hasznaljon egy palcikat).
Használat

Fózes Automatikus fózés modban

A kukta hagyományos lábasként való használata*

Nyomáscsökkentés
Nyitás
- Hajlitsa a fedő nyelét víszintes helyzeból fuggóleges helyzetbe - 3. ábra A fedél forog.
- Emelie fel a fedelet.
Ha a kukta nehezen nyithato: tegye a tomitest viz ala, es meg vizesen helyezze vissza a fedelre - 19. abra es ugyeljen arra, hogy pontosan illeszkedjen a fedel nyilasaba - 15. abra.
Záras
- Ügyeljen arra, hogy a fedél nyele fuggoleges helyzetben legyen.
- Helyezze a fedelet az edenye az 1. ábra szerint úgy, hogy a muányag részt az edeny nyeléhez igazítja.
Hajlitsa a fedel nyelét fuggoleges helyzetbol vizszintes helyzetbe - 2. abra
A fedel forog.
Ha nem tudja lezární a fedelet:
Ellenorizze, hogy a tomites a helyen van-e, valamint a fedel megfeleloen van-e elhelyezve.
Ha a kukta nehezen zarható le: tegye a tomitést viz alá, és meg vizesen helyezze vissza a fedére - 19.ábra és ügyeljen arra, hogy pontosan illeszkedjen a fedél nyilásába - 15.ábra.
Elseő használat
- Tapadásmentes bevonatu modelelek eseteben: mossa meg és fózóolajjal vékonyan kenje be a teljes tapadásmentes belso felületet.
Modelltol fuggoen:
Helyezze a labazatot\* (L) es a kosarat\* (J) az edeny aljara.
- Pattintsa a lábazatot\*(K) a kosárhoz\*(J), majd helyezze el az együttest az edeny aljára.
Töltsfel az edenyt (O)vizzel 2/3 részig (MAX 2) - 5. abra.
Zárja le a kuktát.
- Alítsa az üzemi szelep (A)piktogramját a szeleppozúcio jelzóvel egy vonalba (C)- 9. ábra


Helyezze a kuktat egy hoforrasra, majd allitsa azt maximalis teljesitmemyre.
Amikor a szelepen keresztül goz kezd el tavozni, allitsa kisebb teljesitményre a hoforrast, majd varjon 20 percet.
A 20 perc eltevel kapcsolja ki a hoforrast.
- Allitsa az üzemi szelep (A) piktogramjat a szeleppozciojelzovel egy vonalba (C)
Abiztonsagi szar (D) visszahuzodik, akkor a kuktaban megszunt anyomas.
Nyissa ki a kuktat - 3. abra
Tisztítsa meg mosogatószerrel.
Minimális és maximális toltési szint
Minimum 25 cl (2 pohár) - 4. ábra
Maximum az edeny magassaganagan 2/3-a, MAX 2 jelolés -5.5. abra
- Ne használjon a kuktában darabos sót, a fózés végén adjon az etelhez finomsót.
Egyes etelek esetében:
Olyan pépes éelemiszerek esetében, amelyek fozés során megduzzadnak, mint például rizs, hüvelyesek, szaritott zöldségek, kompótok, oriastok, cukkini, sargarepa, burgonya, halfile stb., a kuktat csak urtartalmának 1/3-äig (MAX 1) toltse meg. Hagyja a kuktat nehány percig hülni, majd hideg vizben végezze el a lehütését. Minden

kinyitas elott Ellenorizze, hogy a biztonsagi szar leereszkedett, majd konnyeden razza meg a kuktat, hovy
ne törjenek fel esetleg égési serulést okozó gozbuborekok. Ez a muvelet különösen fontos a goz gyors kiengedesekor, vagy hideg vizben törtenô hütest kōvetöen. Jvasoljuk, hogy levesek keszítesekor hideg vizben vegezzen gyors nyomáscsök Kentest (lásd „A fozés befejezése automatikus fozés modban" címú bekezdét).
A párolókosár* használata
Toltsön 75 cl vizet a fazék aljába (O).
Modelltol fuggoen:
Helyezze a lábazatot\* (L) és a kosarat\* (J) az edeny aljára. Pattintsa a lábazatot\* (K) a kosárhoz\* (J), majd helyezze el az együttest az edeny aljára.(L) az edeny aljára.


Gózolés során a párolókosárban lévo élelmiszer nem érintkezhet vizzel - 6. és 7. abra.
A párolókosárba* helyezettelelmiszerek nem léphetik tül az edény MAX 2 szintjelzését.
Az üzemi szelep (A) eltávolítása és behelyezese
Az üzemi szelep (A) a következóköppen távolithato el:
- Allitsa a hornyot a szeleppozielóvel egy vonalba (C)úgy, hogy megnyomja az üzemi szelep gyürjét (A)
Távolítsa el a szelepet - 11.ábra
Az üzemi szelep behelyezése:
Helyezze be az üzemi szelepet (A)-8. ábra úgy, hogy egy vonalba állitja annak hegyét (A)a poziójelzóvel (C)az itt lathato modon.

Süllyessze be az üzemi szelepet (A)úgy, hogy a gozkieresztő szára illeszkedjen.
- Nyomja le az üzemi szelep piktogramjait (A)és fordítsa el.

Idózító*
Ne használja az idózítôt „Hagyományos lábas" üzemmodban.
Az idózító az energiafogyasztás jobb szabályozásával elosegiti a jó minóségú ételek keszítését. Automatikus fozés modban az etel fozési homér sékletenek elerésétól szamitva automatikusan méri a hátralevo fozési idôt
Az idözítőCsak a kuktára rögzítve muködik.
Fózes során ellenőrizze, hogy az üzemi szelep egyenletes gozsugarat bocsát-e ki. Ha a goz mennyisége nem elegendo, állitsa nagyobb teljesítényre a hóforrást, Ellenkező esetben csökkentse a teljesítényt.
1 Az idóztó bekapcsolása: nyomja meg a gombot.
2 Allitsa be a fozési idot (percben).
Ha teves erteket allitott be, varjon 4 masodpercet, es amikor a langok már nem villóznak, a gomb hosszan tartó megnyomásával allitsa az erteket nullára.
3 Inditsa el a melegitest maximalis teljesitménnyel.
4 Amikor a kukta elerte a fozesi homersekletet, az idoztio hangjelzest ad, es megkezdodik az ido visszaszamlalasa (a szamok villognak).
Csökkentse a hóforrás teljesitményét.
A fózési idǒ leteltekor az idózító hangjelzást ad.
Az idozito hangjat a gomb megnyomasaval kapcsolhatja ki.
Kapcsolja ki a hoforrast.
A gomb hosszan tartó megnyomása lenullázza a számlálot és kikapcsolja az időzítól.


Az idózító behelysezé és eltávolítása*
Az idozito (F)behelyezessehz-12.abra eloszor az "erintkezesi oldal" resz t illessze be a modulba, majd nyomja meg, hogy az ellenkezo oldalba kapcsolodjon.
- Az idózító eltávolítasa: (F)emelje fel és vegye le.
Az idózító* elementek cseréje
Az idozito CR2032-es gombelemmel mukodik.
Ha megjelenik az zimolum, vagy ha a kijelz o nem mukodik, akkor cserelje ki az element.

- Az element elettartama az idoztó hasznalati gyakoriságától fugg.
- Az idoztó elemente dimetoxietant tartalmaz, CAS sz.: 110-71-4. Megfelel az europai elóirásoknak. A sjat biztonsága és a környezet védelme érdekében: ne nyissa fel az elemet, ne tegye ki magas hómer sékletnek, ne helyezze a háztartási hulladékba, adja le a használt elementek kezelésével foglalkozó szervezeteknél.
Nem tölthető elementket nem szabad úratölteni.
Kulönbozó típusu, uy és használt elementek nem szabad együtt használni.
- Az elementeket a megfelelo polaritas szerint kell behelyezni.
- A lemerült elementeket ki kell venni a keszülékból és biztonságos modon kell leselejtezni.
Ha a keszüléket hosszabb ideig hasznalaton kivül tárolni kell, ki kell venni belóle az elementek.
A polusokat nem szabad rovidre zarni.
- Sima munkaasztalon végézze
- Az idoztó elemének eltávolítasa: egy penzérme segítségevel nyissa fel az elemtartó (lásd a szemben levő rajzot).
Cserelje ki az element.
Helyezze vissza a tomitest.
- Allitsa az elementartó félkörivét az idzitó félkörivevel szembe
- Ovatosan, enyhe nyomással fordítsa el az elementartó úgy, hogy az elementartó félkörív egy vonalban kerüljön az idózító kör jelével
- Sima felületen dolgozzon, hogy az elemtartó teljesen víszintes helyzetben legyen.
Visszazáras után ne eróltesse az elementartót. Ne tolja a széleknél tovabb.
- Az elveszett idozitot valamennyi hivatalos TEFAL markaszervizben potolhatja.


Sohane mossael az idözítôt* viz alatt vagy mosogatógépben.
Ne használja az idözítöt „Hagyományos lábas" Üzemmodban.
Fözes elött
- Minden hasznalat elott vegye ki az üzemi szelepet (A) - 11. ábra, és napfenyben, szemrevételezésel ellenorizze, hogy a gozelvezető cső (B) nincs-e eltömdve - 13. ábra.
Ellenörizze, hogy a biztonsági szelep mozog-e (lásda „Tisztítas" és a „Fontos ellenörzések minded egyes használat elótt" című fejezetet) - 18. ábra.
- Adja hozza az alapanyagokat és a folyadékot.
Zárja le a kuktát - 2. ábra.
Ha a kukta nehezen zarható le: tegye a tomitést viz alá, és meg vizesen helyezze vissza a fedébre - 19.ábra és ügyeljen arra, hogy pontosan illeszkedjen a fedél nyilásába - 15.ábra.
- Tegye a helyere az üzemi szelepet (A)- 8. ábra.

Fózés Automatikus fózés modban
- Forgassa el az üzemi szelepet(A)az Automatikus fózes pozićo haz - 9.ábra.
- Üzembe helyezés elóttBizonyosodjon meg arról, hogy a kuktát megfeleloen lezárt -2.ábra.
Helyezze a kuktat egy hoforrasra, majd allitsa azt maximalis teljesitményre.
- Időzítővel felszerelts modellek esetében: állítsa be a recept szerinti főzési időt (lásd „Az időzítő használata" című fejezetet").
- ABiztonsagi szar altal kibocsatott hang es goz termeszetes jelenseg, lehetoveteszi, hogy fozés elott a levego eltávozzon.
Automikus modba nortenfozés folyamata
- Amikor az üzemi szelepen(A) keresztül folyamatosan goz távozik, és közben folyamatos hang (sistergés) hallatszik, állitsa kisebb teljesitményre a hóforrást.
- Kezdje el a fozesi ido visszaszamolasat, a recept utasitasainak megfeleloen.
- Fózes során ellenőrizze, hogy a szelep egyenletes gozsugarat bocsát-e ki. Ha a távozó goz mennyisége nem elegendo, állitsa kissé nagyobb teljesítényre a hóforrást, Ellenkező esetben csökkentse annak teljesítényét.
AutomATUS MODBAN TORTEN FÖZÉS VÉGE
A goz kiengedese :
A hóforras kikapcsolása után két lehetǒseg all rendelkezsère:
- Fokozatos nyomáscsökkentés: forgassa fokozatosan az üzemi szelepet (A) a piktogramig 10. ábra.


- Gyors nyomáscsökentés hideg vizben: engedjen hideg vizet a mosogatóba és tegye bele a kuktát addig, amíg aBiztonsági szár leereszkedik - 14. ábra. Abiztonsági szár (D) visszahúzódik, akkor a kuktaban megszünt a nyomás. Forgassa el az üzemi szelepet (A) árasba.

1.szakasz

2.szakasz
Ezután mar kinyithatja a kuktát - 3. ábra.
Ha a kukta nehezen nyithato: tegye a tomitest viz ala, es meg vizesen helyezze vissza a fedelre - 19. abra, ügelve arra, hogy pontosan illeszkedjen a fedel nyilasaba - 15. abra.
Ha a goz felszabadulasa kozben a normalistol eltero kilovellest tapasztal, allitsa vissza az(A) üzemi szelepet „Automikus fozés”, fozó allasba, majd hideg vizben vegezzen gyors nyomáscsökkentest.
Ha aBiztonsagi szar (D) nem ereszkedik le, engedjen hideg vizet a mosogatoba es tegy bele a kuktat addig, amig a biztonsagi szar leereszkedik - 14. abra.
Soha ne aBiztonsagi szarat mozgassa.
- Olyan pépes eleelmiszerek esetében, amelyek fozés során megduzzadnak, mint peldául rizs, hüvelyesek, szaritott zöld ségek, kompótok, oriástok, cukkini, sárgarépa, burgonya, halfilé stb., a kuktát csak urrtartalmának 1/3-aig (MAX 1) tölts meg. Hagyja a kuktát néhány percig hülni, majd hideg vizben végeze el a lehütését. Minden kinyitas elott Ellenörizze, hogy a biztonsági szár leereszkedett, majd konnyeden razza meg a kuktát, hogy ne törjenek fel esetleg égési sérülest okozó gozbuborekok. Ez a muvelet kulönosen fontos a goz gyors kiengedésekor, vagy hideg vizben történő hütest követően. Jvasoljuk, hovy levesek keszítésekor hideg vizben végezzen gyors nyomáscsökkest (lásd „A fozés befejezese automatikus fozés modban" című bekezdésst).

A kukta hagyományos
lábasként való használata*
- Forgassa el az üzemi szelepet (A)a „Hagyományos lábas" pozióhoz. Enhez eigendő erőt fejtsen ki ahhoz, hogy a nyomáscsökkentés helyzeten átfordítsa.
- Üzembe helyezés elottBizonyosodjon meg arról, hogy a kuktát megfeleloen lezárta 2. ábra.
Helyezze a kuktat egyCsokkentett teljesitmennyel üzemelo hoforrasra.
- Kezdje el a fózési idó visszaszámolásat, a recept utasításainak megfeleloen.
Hagyományos lábas' modban a kukta barmikor kinyithato, és az etel megkeverheto, a fozés figyelemmel kiserheto, illetve tovabbi hozzávalókkal egészithetők ki.
Ha a kukta nehezen nyithato: tegye a tomitest viz ala, es még vizesen helyezze vissza a fedelre - 19. abra es ügyeljen arra, hogy pontosan illeszkedjen a fedel nyilasaba - 15. abra.
Ha a hóforrás túl erós, akkor a kukta lezaródhat (a biztonsági szár (D) felemelkedik, és blokkolja a nyitást), valamint előfordulhat, hogy a fedél nyele nem működtethető vagy nem nyitja ki a kuktat. Ebben az esetben csökkentse a hóforrás teljesítányét vagy zárja el a hóforrást. Ha fémtalpu, elektramos fózólapot használ, vegye le a kuktat a hóforrásról.
A tapadásgató bevonattal keszült modelleknél: ne használjon habverőt vagy fémból keszült, éles eszközöket. Ne csepegtesse le az eszközöket az edény

pereméhez való utögetéssel, mert ezzel károsodást és szivargást okozhat.
- Soha ne égesse szénne a zsiradékokat. A sütés során keletkező goźok veszelyesek lehetnek az erzekeny legzöservú allatok - mint pédául a madarak - szamára. A madártulajdonosok ezert tartsák támol kedvenceiket a konyhától.
Biztonság
A kukta tobbBiztonsagi berendezessel van felszerelve:
Biztonsági zárendszer:
- Ha a fedél nincs a helyén, vagy a nyele nincs lehajtva, akkor a kukta biztonsági szára körül (D) gozszivárgás tapasztalható, és a kukta nem helyezhető nyomás alá.
Biztonsagi nyitórendszer:
- Nyomás alatti allapotban a kukta biztonsági szára (D)felső allásban van, és a fedél nyitó/záró nyele (G)nem muködtethető.
- Soha ne的概率是 12 除以 12
-Abiztonsagi szarat semmikiéppen se mozgassa (D).
- Ellenőrizable, hogy a belso nyomás lecsökkent-e. Ezt a biztonsági szár (D)alsó helyzete jalzi.
- A fazék fogantyúBiztonsági alkatrészek. Soha ne cserélje ki öket onalloan. Soha ne használjon más fogantyumodelleket.
- Ha a fedél nyitó-/záronyelét (G)fuggoleges helyzetbe tolta amikor a kukta meg nyomás alatt volt, akkor nem tudja kinyitni. Ez egy kiegészítő biztonsági funkció.
- Tolja vissza a fedél nyelét vizszintes helyzetbe, és varja meg, hogy a biztonsági szár (D)also állásba kerüljön.
Kétféle tulnyomás elleni biztonság:
- ElőBiztonságieszköz: a biztonságiszelep (E) kiengedi nyomást - 20. abra.
- Második biztonsági eszköz: a fedél tomitése kiengedi a gozt - 20. ábra.
Ha aBiztonsagi berendezések egyike bekapsol:
Kapcsolja ki a hoforrast.
Hagyja teljesen lehulni a kuktat.
Nyissa ki.
Ellenorizze es tiszittsa meg az üzemi szelepet (A), a gozelvezetocsövet (B), aBiztonsagi szelepet (E) es a tomitest (I) - 16., - 17- 18. abra Lásda "Tisztitás" es "A(AP) A(P) hasznalat elott elvégzendo fontos ellenorzesek" cimufejezeteket.
Ha fenti ellenorzesek es tisztitas utan a keszulek szivargast mutat, vagy nem mukodik, vigye el egy hivatalos TEFAL markaszervizbe.
Használati javaslatok
1 - Az üzemi szelepen keresztül távozó goz rendkivül forró. Ügyeljen a gozsugárra.
2 - Amint a biztonsági szár felemelkedik, a kukta nem nyithato.
3 - Mint minded fózóberendezs esétén, gyakoroljon szigoru felügyeletet, kūlönösen, ha a kuktat gyerekek kōzelében használja.
4 - A kuktát a fazék két fogantyújával mozgassa.
5 - Ne hagyja benne hosszan a keszételt a kuktában. A kuktát soha ne szállitsa a fedél nyelénél fogva.
6 - Soha ne használjon hipót vagy klórtartalmú szereket, amelyek megrongálhatják a rozsdamente n acel minoségét.
7 - Ne áztassa vizben hosszasan a kukta fedelét.
8 - Cserelje ki a tomitest evente, vagy ha serulest tapasztal rajta.
9 - A kuktát minded esetben kihúlt állapotban és üresen tiszítsa.
10 - 10 év használat után kõtelezöen vizsgaltassa át a kuktát egy hivatalos TEFAL margaszervizben.
Tisztítás
A kukta megfelelo mukodese erdekében minded hasznalat utan tartsa be ezeket a tiszitasi es karbantartasi ajanolasokat.
A hosszú használat után megjelenő elfeketedett részeknek és karcolásoknak nincs sem milyen negatív hatásuk.
A külso bevonaton megjeleno a fedel és az edeny erintkezéséből eredő kopás(modelltolfuggóen) természetes jekenség.
Tapadásmentes bevonatu ku kták esétében (modellól fuggöen): a hasznalat során esetleg megjelenő halvány csikok és kopások nem valtoztatják meg a bevonat tapadásmentes tulajdonságát.
- Minden hasznalat utan mossa meg a kuktat mosogatoszeres langyos vizzel. A párolókosár* esétén ugyanígy jarjon el.
- Ne használjon hipót, sem pedig klórtartalmú szereket.
Soha ne hevitse fel az edenyt ures allapotban.
A nemasacél edeny besejénk tisztitasa:
- Az edeny besejét surolószivaccsal és mosogatószerrel tisztítsa meg.
Ha a rozsdamentes acel edeny besején szivárványszínü visszaveródest vagy fehéres nyomokat tapasztal (ásványlerakódás), tisztítsa meg ecettel.

Tapadasmentes bevonatu aluminium edeny besejenek tisztitasa:
A termek elettartamának meghosszabbitasa végett javasoljuk a kezi mosogatast.
A tiszit Ist meleg vizzel, mosogatoszerrel puha szivaccsal végezze.
- Ne használjon surolóport és dörzhatásu szivacsot.
Ha odaegette az etelt, toltse fel az edenyt meleg vizzel es hagyja azni. Ezt kovetoen tisztitsa meg mosogatoszerrel.
Az edeny külsejenek tisztitasa:
A tisztítást szivaccsal és mosogatoszerreI végezze.
A nemasacél edény és a kosár tisztitható mosogatógepben.
A tapadásmentes bevonatu edényt (modellől fuggöen) ne mossa el mosogatógépben, mert a mosogatógépben alkam azott tabletták olyan anyagokat tartalm aznak, amelyek nagy mértékben károsítják az aluminium alkatrészeket.
A tapadásmentes bevonatu edeny (modelltol fuggöen) intensív használata kov etkeztében a bevonat színe ki s mertékben megvaltozhat (sárgulás, foltosodás).
A fedel tisztitása:
A fedot szivaccsal es mosogatoszerrel tiszittsa.
Függó leges helyzetben csepegtesse le a fedelet, hogy a m aradélk viz eltávo zzon a fedélfém ésmuanyag részei kozül.
A fedő tõmítésének tisztítása:
- Minden fozés után tisztītsa meg a tomitést (I)és annak helyét.
- A tomités vissahelyezésének leirásat lásd: - 15. ábra, és ügyeljenarra, hogy a tomités pontosan illeszkedjen a fedél egyes hornyaiba.
Az üzemi szelep (A) tisztitása:
Tavolitsa el az uzemi szelepet (A)- 11.abra.
- Tisztítsa meg az üzemi szelepet (A)folyó csapviz alatt - 16.ábra.
Ellenorizze, hogy mozog-e: a szemben levo abra.
Az üzemi szelep (A), a tòmités (I) és az időzító* (I) eltávolításat követően a fedél mosogatógépben tisztithato.

Az üzemi szelepet (A), a tomitést (I), az idózítót* (F), vagy a tapadásmentes bevonatu edényt soha ne mosogassa el mosogatógépben.
A fedél alatt elhelyezkedő gozelvezető cső (B) tiszítása:
Vegye le a szelepet (A)- 11.ábra.
Nappal szemben, szemrevetelezesselBizonyosodjon meg arrol, hovy a gozelvezetocso nincs eldugulva es a formaja kerek-13.abra.Szukseg eseten tiszittsa meg egy fogpiszkaloval - 17.abra es oblitse at.
Abiztonsági szelep (E) tisztitása:
A fedel belso reszén talalhatóBiztonsagi szelep alapjat folyo viz alá tartva mossa meg.
A szelep golyojat egy vatta nélkūli vattas pálca segitségevel erösen lenyomvaBizonyosodjon meg a szelep megfelelo muködéséról, vagyis arról, hogymozog-e - 18.ábra.Lásd.A minded egyes hasznalat elott elvégzendó fontos Ellenörsezek" címü fejezetet.
Az idoztio tisztitasa\* (F):
Tiszta, szaraz ronggyal végezze.
- Ne használjon oldószert.
Soha ne mossa el az idozitot viz alatt vagy mosogatogepen.
Karbantartás
A kukta tomitésénék cseréje:
Cserelje ki a tomitest evente, vagy ha serulest tapasztal rajta.
- Mindig a modelljének megfelelo eredeti TEFAL tomitést használjon (lásd a „Tartozék" fejezetet).
- A tomités visszahelyezésénék leirásat lásd: - 15. ábra, és ügyeljen arra, hovy a tomités pontosan illeszkedjen a fedél egyes hornyaiba.
A kukta tárolása:
Helyezze a fedelet leforditva a fazekra.
- A kukta nyitó/záró szerkezete nem igényel különösebb karbantartást, a tisztitást kiveve.
10 év használat után kõtelezöen vizsgáltassa át a kuktát egy hivatalos SEB margaszervizben.

TEFAL tartozék
- Kuktája kereskedelmi forgalomban kaphato tartozékai:
Tartozékok Hivatkozások Tömítés 3/4/4,5/6 liter: a tomtés külso átméröje: 24 cm X1010008 5/7,5/9 liter: a tomtés külso átméröje: 27 cm X1010007 Párolókosár* 3/4,5/4/6 liter: 22 cm átméröjú edénynél 792185 5/7,5/9 liter: 24 cm átméröjú edénynél 792654 Lábazat* (L) 792691 tisztlétásához* X1060007
- A póltalkatrészek cseréje vagy bármilyen javítas ügyében forduljon a hivatalos TEFAL margaszervizekhez.
- Kizarolag a keszülék modelljenek megfelelo eredeti TEFAL alkatrészeket használjon.
Tulajdonságok
A kukta aljanak atmeroje - referenciak
Ártartalom Edény 0 Alj 0 Clipso
Minut®
Perfect / Easy Clipso
Minut®
Duo couleur Clipso
Minut®
Duo Gourmet Az edény
anyaga 3 L 22 cm 15.5 cm P46205 - Nemesacél 3 L 22 cm 18 cm - - P46605 4 L 22 cm 14 cm - P46042 - Bevonatos
aluminium 4.5 L 22 cm 1 5.5 cm P46206 - Nemesacél 5 L 24 cm 14 cm - P46051 - Bevonatos
aluminium 5.2 L 24 cm 20 cm - - P46654 Nemesacél 7.5 L 24 cm 1 8 cm P46248 - 9 L 24 cm 18 cm P462 49 - Set 5 L/7,5 L 24 cm 14 cm P46353 - 18 cm
A fedél anyaga: rozs+dentes acél Irányado ertekek:
Uzemi nyomás felső értéke: 65 kPa
MaximálisBiztonsági nyomás:120 kPa
Kompatibilis hóforrások
GAZ ELEKTROMOS ARAM
(Öntöttvas fozolap)
ELEKTROMOS ARAM
Hosugarz yago üvegkeramia halogen fozelap)
ELEKTROMOS ARAM
(Uvegkarmia indukcios fozolap)
ELEKTROMOS ARAM
(Spiralellenállás)


- Kuktaja minded típusu melegitési moddal hasznalhato, az indukciós fózolapot is beleertve.
- Elektromos fózolapok eseten használjon a kukta aljanak atmérőjével egyenlo vagy annál kisebb atmérőjú lapot.
- Üvegkerámia fózólapok esétén ügyeljen arra, hogy az edény alja tiszta legyen.
Gaztuzhely eseten a lang nem csapodhat ki az edeny szelen.
- Valamennyi melegitési mod mellett ügyeljen ra, hogy a kukta kózepen helyezkedjen el.
Garancia
A hasznalati utasitasnak megfelelo hasznalat eseten az uy TEFAL kukta nemesacel edenyere a gyartó 10 eves garanciát vallal:
- az edeny fémszerkezetenek összes hibajára,
- az alap fémjének minded korai elhasznalódására.
- Az edény tòbbi anyaga, valamint a kukta valamennyi tòbbi alkatrésze tekinteteben a garancia a vásárlás datumatól számított, a vásárlás helye szerinti országban hatályos törveny szerinti garancia-idószakra vonatkozoan minded gyártási vagy anyaghíba rakerjed.
- A szerzódéses garancia a vásárlás idöpontjáról szólo pénztárbizonylat illetve számla felmutatasával érvényesithető.
A garancia nem terjed ki a következókre:
- A tapadasimentes bevonatu edeny elhasznalodas miatti csikossa valasa es elszinezódése.
- Az edeny fedele és a tapadásmentes bevonat érintkezéséből eredő csikok.
A fontos ovintezkedesek be nem tartasabol es a gondatlan hasznalatabol szarmazo meghibasodasok, nevezetesen:
- Utesek, leesés, sutóbe helyezés, ...
A garancia kizarolag hivatalos TEFAL markaszervizben ervényesitheto.
- Az Onhöz legközelebb eső TEFAL margaszerviz megtalálásához kérjuk,hívja Kék számunkat.
Jogszabályban előírt jelzések
Jelzés Elhelyezés Kereskedelmi jelzés A fedélen A gyártás éve és a gyártási títeszám
Modell megjelolés
Maximális biztonsági nyomás (PS)
Üzemi nyomás felső értéke (PF) A fedélen Ürtartalom A fazék külso részénynek alján. A gyártó postacíme A fazék külso részénynek alján.
- Vegyünd részt a környezetvédelemben!

① Ez a keszülék számos visszanyerhétő vagy úrahasznositható anyagot tartalmaz.
A megfelelo kezelés érdekében adja le valamelyik kijelölt gyüjtöhelyen.
A TEFAL válaszol a kédésekre
Problémák Ajánlások Ha a nyitás és/vagy zárás nehézzé válik: Vegey ki a tömítés ét es engedjen rá vizet Tegye vissza még vizesen a fedélre - 19. ábra Ha nem tudja lezárnìa fedőt: Ellenőrizable, hogy a fedél nyele függőleges helyzetben van-e.
Ellenőrizable, hogy a tömítés megfeleloên helyezkedik el (lásd a "Tisz tíás és karbantartás" fejezetet).
Ellenőrizable, hogy a fedél az - 1. ábra szerint megfeleloên van-e elhelyezve.
Ha a kukta nehezen nyitható: tegy a tömítés viz alá, és meg vizesen helyezze vissza a fedélre - 19. ábra, ügyelve arra, hogy pontosan illeszkedjen a fedél nyílásába - 15. ábra. Ha a kuktát nyomás alatt melegítete úgy, hogy nem volt benne folyadék: Vizsgáltassa át a kuktát hivatalos TEFAL Szervizközpont-ban. Ha aBiztonsági szárkopog és gozöket bocsát ki: Az elő percekben ez normális jelenség: igy a levegő el tud távozni a főzes előtt. Ha aBiztonsági szár nem emelkedett fel, és főzes során semmi sem távozik a szelepen: Ez a jelenség természetes az elő percekben.
Ha a jelenség továbbra is fennáll, ellenőrizable, hogy:
- A hóforrás teljesítíménye megfelelo–e, ha nem, akkor ál-litsa nagyobbra.
- Az edényben léő folyadék mennyisége elégséges.
- Az üzemi szelep (A)alában van-e.
- A kukta valóban le van zárva.
- A tömítés és az edény széle nem sérült meg.
- A tömítés a helyén van-e. Ha aBiztonsági szár felemelkedett, és főzes során semmi sem távozik a szelepen: Az elő percekben ez normális jelenség. Ha a jelenség továbbra is fennáll, engedjen hideg vizet a mosogatóba és tegye bele a kuktát addig, amíg a biztonsági szár (D)lee-reszekedik.
Tiszűtsa meg az üzemi szelepet (A)- 16. ábra és a goźel-vezető csövet, - 17. ábra majd ellenőrizable, hogy abiztonsági szelep golyója minded nehézség nélkül lenyomódik - 18. ábra

Problémák Ajánlások Ha a fedő körül goz távozik, és a biztonsági szár also helyzetben van, Ellenőrizza: A fedő megfelelo zárását.A fedő tõmtésének elhelyezését.A tõmtés megfelelo állapotát; szükség esetén cserélje ki.A fedő, a tõmtés és a tõmtésnek a fedőben kialakított hely tisztaságát.Az edény szélének megfelelo állapotát. Ha nem tudja kinyitni a fedőt: Ellenőrizza, hogy a biztonsági szár (D) also állásba van-e.Ellenkező esetben csökkentse a nyomást, enged-jen hideg vizet a mosogatóba és tegye bele a kuk-tat addig, amíg aBiztonsági szár leereszkedik.Soha ne a biztonsági szárat (D) mozgassa.Forgass az üzemi szelepet (A) Helyzetig. Ha az élelmiszerek nem fõttek meg vagy megétek, Ellenőrizza: A főzési időt.A hóforrás teljesítményét.Az üzemi szelep (A) megfelelo elhelyezkedését.A folyadék mennyiságét. Ha az ételek megétek a kuktában: Elmosogatás előtt hagyja a fazekat ázni.Soha ne használjon hipól, sem pedig klórtartalmuszereket. Ha a biztonságiberendez sék egyike bekapcsol: Kapcsoljäki a hóforrást.Hagyjä kihúlni a kuktát, a készülék elmozdításnélkül. Várja meg amíg abiztonsági szárleereszkedik, és nyissa ki a kuktát.Ellenőrizza és tisz títsa meg az üzemi szelepet (A), a gőzelvezető csövet, a biztonsági szelepet és atömtés.Tügyeljen arra, hogy a készülék et alőirásoknak megfelelo Höen töl;tte fel.Ha a hiba továbbra is fennáll, Ellenőriztessekészülékét hivatalos TEFAL Szervizközpontban. Ha oxidációra utaló jeleket észlé: A nagy teljesítményű nemesacél használata nem akadályozza meg, hogy különleges esetekben oxidációs folyamat lépjen fel. Ha oxidáció jeleit észléli, akkor dörzhatású szivaccsal távolítsa el azokat, mielótt Újra használná a kuktát.
Zöldség
ZÖLDSEGEK
(FRISS)
PÁROLÁS
Helyezze a hozzávaló t a párolókosárba és öntösön 750 ml vizet a kukta aljára.
MAX 750 ml
MERİTÉS
Tegye a hozzávaló t a vizbe és a kosár nélkül.
HÜVELYESEK
MERİTÉS
A kosár nélkül.
1/3 MAX 1 Articsóka, 2 egész, egyenként 600 g (merítés) 30 - 35 perc perc Borsó (párolás) 6 - 8 perc Brokkoli rozsák 600 g (párolás) 9 - 11 perc Cékla, piros, negyedekbe vágva (merítés) 20 - 25 perc (mérétől fuggöen) Cukkini felkaríczva (3 mm) 600 g (párolás) 12 - 15 perc perc Édescömény felcsíkozva (600 g) (párolás) 6 - 9 perc Endívia félbevágva (900 g) (párolás) 14 - 16 perc Flageolet bab, szárítva 250 g (merítés) 35 - 40 perc Gomba, szeletelve 800 g (merítés) 4 - 5 perc Hagyma savanyításhoz (párolás) 7 - 8 perc Kaliforniapaprika félbevágva (550 g) (párolás) 14 - 16 perc Káposztza, szeletelve, zöld, 500 g (merítés) 5 - 6 perc Karfiol rozsák 600 g (párolás) 10 - 12 perc Kelbimbó (párolás) 10 - 12 perc Krumpli félbevágva (950 g) (párolás) 20 - 25 perc (mérétől fuggöen) Lencse, zöld 250 g (merítés) 14 - 16 perc Mángold, szeletelve (2 cm) 700 g (párolás) 15 - 17 perc Padlizsán, hámozva és szeletelve (3 mm), 850 g (párolás) 10 - 12 perc Porrehagyma, egészben, fehér 650 g (párolás) 9 - 11 perc Sárgaborsó 250 g (merítés) 18 - 20 perc Sárgarépa felkaríczva (3 mm) 600 g (párolás) 17 - 19 perc Spárga, fehér (párolás) 5 - 6 perc Spenót (párolás) 3 - 4 perc Sütőtök, feldarabolva (3-5 cm) 600 g (párolás) 13 - 18 perc Tarlórépa, felkockázva (500 g) (párolás) 14 - 16 perc Zellergumó, szeletelve (merítés) 600 g 7 - 9 perc Zöldbab (600 g) (párolás) 10 - 12 perc
Rizs
MERİTÉS
A kosár nélkül.
MAX 1 VIZMENNYISEG RIZSMENY-
NYISEG FÖZÉSI IDÖ 2 SZEMÉLYRE 4 00 ml / 2 pohár 150 g / 1 pohár 7 - 8 perc4 SZEΜÉLYRE 500 ml / 2,5 pohár 250 g / 2 pohár 6 SZEMÉLYRE 700 ml / 3,5 pohár 375 g / 3 pohár
Hús/ hal
FRISS FAGYASZTOTT Báránycomb: 2 (0,95 kg) 40 - 45 perc 1 ára 5 perc perc - 1 ára 15 perc Borjú paupiette: 4 10 - 12 perc x Borjúhús (0,8 kg, 5 - 7 cm-es átmérő) 17 - 19 perc 37 - 40 perc Borjúszűz: 0,7 kg 17 - 21 perc 33 - 38 perc Csibe: 2 (1,3 kg) 23 - 25 perc 40 - 45 perc Cserke (1,35 kg) 23 - 25 perc Fiatal kacsa (1,8 kg) 45 - 47 perc 50 - 55 perc Fürj: 4 9 - 10 perc Lazac steak: 4 (0,8 kg) 5 - 6 perc Marhahús (1 kg, 8 - 11 cm-es átmérő) 30 - 35 perc 45 - 50 perc Nyúl (1,5 kg darabolva) 8 - 9 perc Ördöghal-filefé (1 kg) 75 grammos darabokban 5 - 6 perc Sertéshús (0,8 kg, 8 - 10 cm-es átmérő) 30 - 35 perc 1 ára 5 perc - 1 ára 15 perc Sertésszűz: 2, 350 grammos darab 13 - 15 perc 26 - 29 perc Tonhal steak: 4 (0,7 kg) 5 - 6 perc
Megjegyzés: Az 5 literes és az annál kisebb modellek esetében győzódjön meg róla, hogy a hus, illetve a baromfihús nem ér tú az edény belsejében lévo jelölésnél. Olyan hus- vagy baromfihúsdarabot valasszon, amelynek magassága 8 cm vagy annál kisebb.
WAZNE ZALECENIA
Przed użyciem szybkowaru przyȩczytaj wszystkie zalecenia i zawsze postępuj zgodnia z „Instrukacja obstugi".
Nieprawidłowewuzytkowanie moze spowodowa szkody.
W celu zapewnienia bezpieczeniastwa urzadzenie jest zgodne z odpowiednimi normami i przyepisami prawnymi:
-dyrektywa w sprawie urzadzen ciñnieniowych
- materiały przyznaczone do kontaktu zźypwność
- ochronaŚrodkowska
OBOWIAZKOWE
WERYFIKACJE
PRZED KAZDYM
UZYCIEM SPRAWDź
• Sprawdź,czy przywość odpradowania pary (A)nie jest zatkany - rys. 13.
•czy kulka zaworu bezpiecieństwa jest ruchoma - rys. 18
•czy uzczelka pokrywki jest umieszczona pod kaźdym rowkiemPokrywki - rys. 15,
•czy uzychyty garnka są prawnłowowo zamocowane.
Uchwyty garnka są czȩciami zabeepieczajacymi. Nigdy nie wymiemeniaj ich samodzielnie. ZAWSZE
PRZESTRZEGAJ
NASTEPUJACYC
ILOŚCI
NAPEŁNIANIA •Nigdy nie uzywaj szybkowaru bez pląnu, poniewaNIZE
magne to doprowadzić do是我的gowaNego uszkodzenia.
Upewnij są,że w czasie gotowania wewnatrz znajduje są wystarczajca ilość pląnu.
•Minimum 250 ml - rys. 4.
•Maksimum 2/3 wysokość garnka, oznaczenia MAX 2 -
rys. 5.
•Podczas gotowania na parze artykuły znajduje są w koszyku niie powinny dotycka wody - rys. 6 i 7.
•Maksymalnie 1/3 (MAX 1) w przypadku artykułow出入境,(PCZniejiangych i/lub pieniacych są podczas gotowania, takich jak ryż, warzywa strȩczkowe, suszone warzywa,(PCZciery, dynia, cukinia, marchew, ziemniaki, filenty z ryb itp.
•Produkty umieszczone w koszyku niie powinny wystawać powyȩj poziomu MAX 2 garnka. • Nie zestawiaj daneci bez opieki w=Pobliwu pracujućego szybkowaru.
• Szybkowar gotuje pod ciasnieniem. Nieprawidłowewu zȩtkowanie są opówodowej obrażeniaciała wywoły oparzeniami. Przed uruchomieniem szybkowaru upewnij sie,ź jest on węstatewie zamkniety. (Patrz rozdział „Zamykanie”).
• W czasie gotowania zȩć uwangę,;czy zawór wcieść syczy.
Jeźeli nie wydostaje są wystarczȩca ilość pary,obnią ciasnienie w produktie i sprawdź,ź jest w nim wystarczȩca ilość plynu orazź przywoód odpradowani pary nie jest zatkany. Jeźeli po sprawdzeniu para nadal są nie wydostaje,zwȩksz lekko zȩródlcno ciepta.
• Nie gotuj artykułów grożych zatkaniem przywodów aparatury zabezpieczącej:
- jagód
- kaszy jejczmiennentje
- platków owsianych
- grochu luskanego
- klusek, makaronów, spaghetti
- rabarbaru
- porzeczek PRZED GOTOWANIEM I PODCZAS GOTOWANIA • Nigdy nie gotuj w szybkowarze potraw na bazie mleka.
• W przypadku szybkowaru z sukrywkawe stali niedzewnej nie uzywaj gruboziarnistej soli, dodawaj drobnów pod koniec gotowania. Unikniesz w ten sposob pojawietenie „porów”, króre moglyby uszkodzić dno szybkowaru.
• Nie uzywaj szybkowaru do smażenia pod ciasnieniem z użyciem oleju.
• Niz uzywaj szybkowaru niedzgodnie z seinem przyeznaczeniaim
• Niz umieszczaj szybkowaru w nagrzanym piekarniku.
• Nigdy nie wskładaj do szybkowaru folii alumniewej bez umieszczzenia jej na formie do pieczenia.
• Nigdy nie wskładaj do szybkowaru folii.
• Opany alkoholu są latwopalne. Doprowadź do wrzenia przyze okło 2 minuty przydwź do wrozenia przechowo 2 minuty przydwź do wrozenia przechowo 2 minuty przydwź do wrozenia przechowo 2 minuty przydwź do wrozenia przechowo 2 minuty przydwź do wrozenia przechowo 2 minuty przydwź do wrozenia przechowo 2 minuty przydwź do wrozenia przechowo 2 minuty przydwź do wrozenia przechowo 2 minuty przy DWJ
PO GOTOWANIU...
- Modele z powłoka zapobiegajęc przywieraniu: nieNSE wy uzywać trzechaczek do miksera lub innych metalowych lub ostrych przyborów kuchennych. NieNSE strzepywać wody z przyborów kuchennych przyeze stukanie nimi o brzeg garnka - groziłoby to uszkodzeniem igowstaniem nieszczelnosci.
- Obracaj stopniowo zawór (A), wybierȩć w zaleźnosci od potrzeb prędkość dekompresji i konówność na oznaczenia i rys. 10. Jeźeli w trakcie upuszczania pary zaobserwujesz jakiekolwiek zabuszenia, umieszć zawór roboczy (A)ponownie w pozycji trybu gotłowania Szybkowar, a sątePNIE wykonaj szybką dekompresje w zimnej wodzie - rys. 14.
- Jeźeli trzpień bezpieczędsta (D)nie opada, włód szybkowar do zimnej wody - rys. 14.
- Nigdy nie manipuluj przy zaworze bezpiecznychstwa.
- Po ugotowaniu.mięsaze skórq (np. ozór wolowy), ktore moze napęczniec pod wptywem ciśnienia, mięso naleźny nikłucz dopiero gdy nabrzemiała skóra opadnie; w przyciwnym przypadku zachodzi ryzyko oparzenia. Nikłuj.mięsoprz gotowaniem.
- W przypadku artykułów mącznych,(PCZCZNIEJACYCH i/lub pieniacych sie podczas gotowania,takich jak ryz, warzywa straczkowe,suszone warzywa,przeciery,dynia,cukinia, marchew,ziemniaki,filey z ryb itp.Pozwól,aby szybkowar przy kila minut ostyg!,nastepnie ostudgo w zimnej wodzie.Przed kaźdym otwarciem,po upewnieniu sie,ze trzpień bezpieczenstwa opadl,zawsze delikatnie potrzasaj szybkowarem,aby nie dopuść do tryskania pary,co mogłowby spowodować oparzenia.Czynnosć ta jest szczególnie wąna przy szybkim upuszczaniu pary lub po ostudzeniu w zimnej wodzie.
- Przenoszac szybkowar pod ciśnieniem, zachowanaj najwyźsa z ostrożnosc. Nie dotykaj gorących powierzchni. Korzystaj z uzychyęd i przyczisków. W razie potrzeby uzyj rękawic kuchennych.
- W przypadku yupazolecamy wykonać szybką dekompresje w zimnej wodzie (patrz punkt „Zakończenie gotowania w trybie Szybkowar").
- Przed otwarciem szybkowaru upewnij sie, ze nawór znajduje sie w połozeniu dekompresji. Trzpien bezpieczędstwa (D) powinien opaść.
- Nigdy nie uzywaj sily podczas otwierania szybkowaru. Upewnij sie, ze ciśnienie wewnatrix urzadzenia spadto. Trzpień bezpieczenstwa (D)powinien opaść. (Patrz rozdziaf „Zabezmieciecenia".)
KONSERWACJA Jeźeli stwierdzisz, ze króraść szybkowaru jest złamań lub pękniąta, w sądnym przypadku nie przybuj jej otworzyć, sążeli jest zamkiȩta,&C心理咨询 je zęskaśczenia i zanieść do naprawy do autoryzowanego serwisu TEFAL. Nie manipuluj przy systemach zabezpiecznych, oprocz zalecen dotyczarcych czyszczenia i konserwacje. Uzywaj wyłączne oryginalnych czȩci TEFAL dostosowanych do zakupionego modelu. Pr绑定 wszymstkim uzywaj wyłączne garnka i pokrywki TEFAL. Nie uzywaj szybkowaru do przechowywnia kwaśnych lub slonych produktów przywnosciowych przygotawaniem ani po ugotawaniu, poniewaNczy uszkodzić garnek. Bezpośrednio po kaźdym uzyciu umyj i wypłucz szybkowar. Nigdy nie myj w zmywarce zaworu roboczesgo (A), uszczelki (I), minutnika* (F), ani garnka z powląkaweprzywierajność. Nigdy nie w��żaj minutnika* (F)pod wodę. Nigdy nie stosuj wybielacja ani produktów na bazie chloru, króre moga uszkodzić powierzchnie stali nierdzewnej. Nie pozostawiazij sukrywki zanurzonej w wodzie. Raz do roku wymieniaj uszczelkie lub zawsze kiedy nosi Ślady uszkodzen. Po 10 latach uzytkOWANIA szybkowaru naleZY sprawdzić w autoryzowanym serwisia TEFAL. Przechowywanie szybkowaru: Obrć psychywnie na garnku w celu uniknięcia przydwczesnego zuźycia uszczelkiPokrywki.
ZACHOWAJ NINIEJSZA INSTRUKCJE
Częsci (patrz: Schemat)
A. Zawór roboczny
B. Przewód odpradowazia pary
C. Oznaczenia ustawienia zaworu
D. Trzpien bezpiecznych (Patrz rozdziaf „Zabezmieczenia")
E. Zawór bezpieczénstwa
F. Minutnik*
G. UchwytPokrywki
H. Pokrywka
I. Uszczelka
J. Koszyk do gotowania na parze*
K./L. Statyw*
M. Uchwyt garnka
N. Oznaczenia maksymalnego napelnienia
O. Garnek
Sprawdź koniecznie przydym użyciem
Sprawdzanie zaworu roboczego

- Sprawdz,czy otwor odpradowazia pary w zaworze roboczym nie jest zatkany (patrz punkt „Zdejmownik i zakladanie zaworu roboczego").
Sprawdzanie zaworu bezpiecznychstwa

Sprawdz,czy kulka zaworu bezpieczenstwa jest ruchoma (uzyj patyczka).
Obstuga

Gotowanie w trybie Szybkowar

Gotowanie w trybie Garnek*

Dekompresa
Otwieranie
- Przekć uchwytPokrywki z pozycji poziomej do pionowej - rys.3 PokrywkaOCRa csi
UniesPokrywke.
W przypadku trudnosci z otwarciem produktu:zmocz uszczelkę woda i załódź powrotem w pokrywce,Nie wycierajć jej - rys.19 i pilnujć,aby załozyć są dokladnie pod rowki pokrywki - rys.15.
Zamykanie
- Upewnij sie, ze uchwytPokrywkiznajduje sie w pozycji pionowej.
- Umieszek poukowyne na garnku, zgodnie z - rys. 1, dopasowujac plastikowa czesc do uchwytow garnka.
- Przekrć uchwytPokrywki z pozycj pionowej do poziomej - rys.2
- Pokrywka obracsi.
NieMZna zamknacPokrywki:
Sprawdź,czyuszczelkaiPokrywka sā prawidtowozatozone.
W przypadku trudnosci z zamknieciem produktu:zmocz usczelke woda i załoz z powrotem w pokrywce, nie wycierajac jej - rys. 19 i pilnujac, aby załozyc są dokladnie pod rowki pokrywki - rys. 15.
Pierwsze użycie
W przypadku modeli z nieprzywierajęc powlok: umyj icka powierzchnie powłoki wewétrznejlekko natłuść olejem spożywczym.
W zależnosci od modelu:
Umiesz statyw\*L)ikoszyk\*Jna dnie garnka.
- Przyczep statyw* (K) do koszyka* (J), a potem postaw calosci na dnie garnka.
Napelnij garnek (O)woda do 2/3 wysokoisci (MAX 2)-rys.5
Zamknij szybkowar.
Wyrownik piktogram na zaworze roboczym (A) z oznaczeniem ustawienia naworu (C)-rys.9.


Postaw szybkowar na zrodle ciepla i ustaw je na maksymalnag moc.
Gdy para zacznie wydobywać sie przyez załór, zmniejsz mocźróda ciepla i zaczekaj 20 min.
Po uplywie 20 minut wyłacz zródrlo ciepla.
- Wyrównaj piktogram na zaworze roboczym (A) z oznaczeniem ustawienia zaworu (C).
Gdy trzpień bezpieczenistä (D) opadnie, szybkowar nie jest juz pod ciñieniem.
- Otwórz szybkowar - rys. 3
Umyj go plynem do mycia naczyn.
Napelnianie minimalne i maksymalne
Minimum 250 ml (2 szklanki) - rys.4.
- Maksimum 2/3 wysokość garnka, oznaczenia MAX 2 - rys. 5.
- Nie uzywaj gruboziarnistej soli, dodawaj drobną sól pod koniec gotowania.
W przypadku niedtórych produktów:
W przypadku artykułów mącznych,(PCzniejęcych i/lub pieniacych sie podczas gotowania,takich jak ryź, warzywa straczkowe,suszone warzywa,przeciery,dynia, cukinia,marchew,ziemniaki,filetzryb itp.nie naleźny napelniac szybkowaru wiszejni do 1/3 (MAX 1) pojemnosci.Pozwól,aby szybkowar przyze kilka minut ostygl,natestPNie OSTUDg go w zimnej wodzie.Przed kaczdym otwarciem,po upewnieniu sie,ze trzpien bezpieczenstwa opadl,zawsze delikatnie potrzaszaj

szybkowarem, aby nie dopuścić do tryskania pary, co mogłowby spowodować oparzenia. Czynnosć ta jest szczególnie wąźna przy szybkim upuszczaniu pary lub po ostudzeniu w zimnej wodzie. W przypadku yupazolecamy wykonac szybkędekompresje w zimnej wodzie (patrz punkt „Zakończenie gotłowania wtrybie Szybkowar").
Korzystanie z koszyka do gotowania na parze*
Wlej 750 ml wody na dno garnka (O).
W zależnosci od modelu:
Umiesz statyw\* (L) i koszyk\* (J) na dnie garnka.
- Przychep statyw* (K) do koszyka* (J), a potem postaw calosci na dnie garnka.


- Podczas gotowania na parze artykuły znajdujece są w __koszyku* nie powinny dotykać wody - rys. 6 i 7.
Produkty umieszczone w koszyku* nie powinny wystawać ponad poziom MAX 2.
Zdejmownik i zak.§adanie zaworu roboczego (A)
Zdejmownikie zaworu roboczego (A):
- Wyrównaj rowek z oznaczeniem ustawietenia naworu (C), naczkidz pierScién zaworu roboczego (A).
Zdejmij zawór - rys. 11.
Zakladanie zaworu roboczego :
Nastaw zawór roboczny (A)- rys. 8 w taki sposób, aby punkt na zaworze znalazs ię na oznaczeniu pozycji (C) tzn. naprzeciw niedgo.

Wcisnij zawor roboczny (A)pak, aby zaczepi s o przyzwod odpradowazania pary.
Nacijsnij piktogramy zaworu roboczego (A)i obrc.

Minutnik*
Nigdy nie uzywaj minutnika w trybie Garnek.
Minutnik zostal stworzony po to, by zapewnic udane potrawy przy jak najmiejszym zużyciu energia. Automatyczne odlicza czas gotowania, sączawszy od osiagnęcia temperatury odpowiedniaj dla gotowania w trybie Szybkowar
Aby minutnik dział, powinien być przymocowej do szybkowaru
Zwroc uwage,czy w czasie gotowania zawór roboczny (A) regularnie syczy. Jeźeli ilosc pary jest niewystarczajęca, zȩksz lekko moc zródka ciepla, w odwrotnym przypadku zmiejejsz moc zródka ciepla.
1 Aby wączyc minutnik, naciśnij przyzycisk.
2 Ustaw czas gotowania (w minutach).
W przypadku pomyński co do czasu gotowania odczekaj 4 sekundy do ustania migania plomieni, nastepnie nacijsnij i przytrzymaj przycisk w celu wyzerOWANIA.
3 Ponownie uruchom zródlo ciepla, ustawiajac maksymalnaj moc.
4 Gdy szybkowar nagrzeje sie do temperatury gotowania, minutnik dzwoni i zaczyna sie odliczanie czasu (cyfry migaja).
Zmniejsz moc zródta ciepla.
5 Na koniec czasu gotowania minutnik dzwoni.
- Aby wyłaczyc dzwonienie, nacijsnij przycisk.
Wyłac zródko ciepla.
Dlugie nacinie przycisku zeruje i wyłacza minutnik.


Zakladanie i zdejmownik minutnika*
- Aby załość minutnik (F)- rys. 12, najpierw wcijsnij go od strony przycisku, a nastepnie docisnij, aby zamocować druga strone.
- Aby zdjac minutnik (F), unies go i zdejmij.
Wymiana baterii minutnika*
Bateria minutnika to bateria guzikowa CR2032.
- Jeźeli pojawi są symbol n l do jejeli nic są nie wyświetla, wymiem baterie.


Trwałość baterii zaleź od czestotliwość uzytkowania minutnika.
Bateria w tym artykule zawiera dimetoksyetan nr CAS 110-71-4. jest zgodna z przypisami europejskimi. Dla wlasnégo bezpiecz内分泌а oraz w celu ochrony srodowiska: nie otwieraj baterii, nie wystawiaj jej na dzialanie wysokich temperatur, po zuzyciu wrzuc do specjalné go povemnika na zuzyte baterie przyznaczone do recyclkingu.
- Nie naleź doładowywać baterii jednorazowych.
- Nie nalezy mieszac ze soba baterii rożnych rodzajów, ani uzywać jederoczesnie baterii nowych i uzywanych.
Baterie nalezy zakładc zgodnie z oznaczeniami biegunów.
- Rozladowane baterie nalezy wyjac z urzadzenia i w bezpieczny sposob zutylizować.
- Jesli urzadzenie nie bedzie przyduszcy czas uzywane, nalezy wyjac z siego baterie.
- Nie nalezy zwierac wyprowadzen zasilania.
- Wszystkie czynnosci nalezy wykonywać na plaskim blacie do pracy.
- Aby wyjac baterie z minutnika, otworz zatyczkezasobnika baterii, uzywajac monety (patrz rysunek).
Wymien baterie.
Wlóz uzczelke na.),
Umiesz polskiego zatematyczki baterii na wprost polskiego zymi terima.
- Delikatnie obrc zatyczkezasobnika baterii,lekko dociskajac, dopasowujac polksiezyc atyczki do księzyca tina.
Czynnosci te wykonuj na plaskiej powierzchni, aby zatyczkazasobnika baterii zosta zaieszczona poziomo.
- Nie naciskaj zbyt mocno na zatyczkezasobnika w chwili jej zamykania. Nie wychodź pozaograniczniki.
W przypadku zagubienia nowy minutnikromatic nabyc w autoryzowanych serwisach TEFAL.


Nigdy nie wiktadaj minutnika* pod wode ani do zmywarki.
Nigdy nie uzywaj minutnika w trybie Garnek.
Przed gotowaniem
- Przed kaźdym użyciem wyjmij zawór roboczy (A) - rys. 11 i sprawędź, czy przyzewód odpradowazania pary (B)nie jest zatkany - rys. 13.
Sprawdz,czyzaworbezpieczenstwa jest ruchomy (patrzrozdziay "Czyszczenie" i,Sprawdz koniecznie przed kaźdym użyciem")-rys.18.
Wloz produkti nalej plynu.
Zamknij szybkowar - rys. 2.
W przypadku trudnosci z zamknieciem produktu:zmocz usczelke woda i załoz z powrotem w pokrywce, nie wycierajc jej - rys. 19 i pilnujac, aby załozyc są dokladnie pod rowki pokrywki - rys. 15.
- Załoz zawór roboczny (A)- rys. 8.

Gotowanie w trybie Szybkowar
- Obróc zawór roboczy (A)do ustawenia: gotowanie w trybie Szybkowar - rys. 9.
- Przed uruchomieniem szybkowaru upewnij sie, ze jest on wąsciwie zamkniety - rys.2
- Postaw szybkowar na zródlc ciepla i ustaw je na maksymalnag moc.
- W przypadku modeli z minutnikiem : zaprogramuj czas gotowania podany w przyopsisie (patrz rozdział „Uzywanie minutnika").
Stukanie i pykanie trzpienia bezpieczentwa jest normalnym zjawiskiem, uzmgliwa wydostanie sie powietrza przygotowaniem.
W trakcie gotowania w trybie Szybkowar
Gdy z zaworu roboczego (A)stale wydobywa sie para, wydajac regularny dzwiek (PSZSZT),zmniejsz moc zrodla ciepla.
- Odesto goemontu Rozpocznij odliczanie czasu gotowania podanego w przyopsisie.
W czasie gotowania zwroc uwage,czy zawor regularnie syczy. Jeźeli ilosc wydostajacej sie pary jest niewystarczajca, zwiększ leuko moc zródla ciepla, w odwrotnym przypadku zmiejejsz moc zródla ciepla.
Zakończenie gotowania w trybie Szybkowar
Uwolnienie pary:
- Po wyłaczeniu zródła ciepla istnieje dwie moziwość:
- Stopniowa dekompressa: obracaj stopniowo zawór roboczny (A), koncząc na piktogramie rys. 10.

- Szybka dekompresja w zimnej wodzie: naje do zlewu zimnej wody i włód do niedn są szybkowaru aż opadnie trzpień bezpiecznychsta - rys. 14. Gdy trzpień bezpiecznychsta (D) opadnie, szybkowar nie jest juz pod ciasnieniem. Obróc zawór roboczny (A) do ustawenia

Etap 1

Etap 2
- Możesz otworzyc szybkowar - rys. 3.
W przypadku trudnosci z otwarciem produktu:zmocz uszczelkę wodą i załoz z powrotem w pokrywce,Nie wycierajć jej - rys. 19 i pilnujć,aby załozyć ja dokladnie pod rowki pokrywki - rys. 15.
Jeźeli w trakcie uwalniania pary zaobserwujesz jakiekolwiek zaburzenia, umieszć zawór roboczny (A) ponownie w pozycji Szybkowar, a战胜nie wykonaj szybką dekompresnej w zimnej wodzie.
Jeżeli trzpień bezpiecznychsta (D) nie opada, naje do zlewu zimnej wody i włód do sądno szybkowaru aź opadnie trzpień bezpiecznychsta - rys. 14.
Nigdy nie manipuluj przy trzpieniu bezpiecznychstwa.
W przypadku artykułów macznych,(PCZniews i/lub pieniacych sie podczas gotowania,takich jak rzy,warzywa straczkowe,suszone warzywa,przeciery,dynia, cukinia,marchew,ziemniaki,filety z ryb itp.nie nalezy napelniac szybkowaru wiecej niz do 1/3 (MAX 1) pojemnosci.Pozwol,aby szybkowar przy zikka minut ostygl, nastepnie ostudz go w zimnej wodzie.Przed kaźdym otwarciem,po upewnieniu sie,ze trzpień bezpieczewsstwa opadl,zawsze delikatnie potrzasaj szybkowarem, aby nie dopuSci do tryskania pary,co mogloby spowodowa oparzenia.Czynnosc ta jest szcegolnie wazna przy szybkim upuszczaniu pary lub po ostudzeniu w zimnej wodzie.W przypadku yupazolemy wykona szybka dekompresje w zimnej wodzie (patrz punkt „Zakończenia gotowania w trybie Szybkowar").

Gotowanie w trybie Garnek*

- Obróc zawór roboczy (A) do ustawienia: gotowanie w trybie Garnek. W tym celu uzyj wystarczajacej sily, aby minac zagȩbienenie w poźycji dekompresji.
- Przed uruchomieniem szybkowaru upewnij sie, ze jest on wąsciwie zamkniety - rys. 2.
Postaw szybkowar na zrodle ciepta iustaw je na niewielkag moc.
- Odesto go momentu Rozpocznijs odliczanie czasu gotowania podanego w przyopsisie.
W trybie Garnek要去czw kaźdej chwili otworzyc szybkowar, aby wymieszac potrawe, sprawdzić stan gotowanicy dodać składniki.
W przypadku trudnosci z otwarciem produktu:zmocz uszczelkę wodą i załódź powrotem w pokrywce,Nie wycierajć jej - rys.19 i pilnujć,aby załozyć są dokadnie pod rowki pokrywki - rys.15.
- Ježeli zródo ciepla jest zbyt mocne, szybkowar要去 zablokować (trzpień bezpieczność wsta (D) unosi sie i blokuje otwarcie), przy co nie są za uchomic'u chwytuPokrywki lub nie są za otworzyc szybkowaru przy seinen uzyciu. W takim przypadku zmieje szubny zródo ciepla. W przypadku zeliwnych kuchenek elektrycznych, zdejmij szybkowar ze zródo ciepla.
- Modele z powłoką zapobiegajęc przywieraniu: nie naleź y uzywać trzechaczek do miksera lub innych metalowych lub ostrych przyborów kuchennych. Nie osuszaj narȩdzi, pukajć w rant garnka,要去s go uszkodzic i spowodowej nieszczelność.
- Nigdy nie Rozgrzewaj tłuszczów aź do ich zwęglenia. Opary z gotowania mogą byćNiebezpieczne dla zwierȩz o wraiżliwym ukleadzie oddechowym, np. dla ptaków. Ptaki naleź trzymać z dala od kuchni.
Zabezpieczenia
Szybkowar jest wyposzaźony w kilka zabezpieczenia:
Zabezpieczenia przy zamykaniu:
- Jeźeli pokrywka jest niewlasciwie załozona lub jejeli zapomnisz opuścić uchwyt pokrywki, przy eztrpiem bezpiecznychstwa (D) wydostaje są para i szybkowar nieMZe zwiększyc ciasnienia.
Zabezpieczenie przy otwieraniu:
- Jeźeli szybkowar znejduje są pod ciñnieniem, trzpień bezpieczność (D) jest uniesiony, a uchwyt otwierajncy/zamykajncy pokrywkę (G) nie powinien być aktywny.
- Nigdy nie przybuj otwierać szybkowaru na silę.
- Przede wzystkim nie ruszaj trzpienia bezpiecznychsta (D).
- Upewnij sie, ze spadlo ciñnienie wewnétrzne, sprawdzajc,czy trzpić bezpieczenia stwa (D) opad.
- Uchwyty garnka są czesciami zabezmieczajczymi. Nigdy nie wymieniaj ich samodzielnie. Nie uzywaj innych modeli uchwytów.
- Jeźeli ustawiele uchwyt do otwierania/zamykania (E) pokrywki w pozycji pionowej w momencie gdy szybkowar był jestzsche pod ciñnieniem, nie;będzieszność go otworzyć. jest to dodatkowej zabezpieczenia.
- Ustaw uchwyt Pokrywki ponownie w pozycji poziomej i poczekaj na opadnięcie trzpienia bezpieczność (D).
Dwa zabezpieczenia przyd nadmiernym ciśnieniem:
- Pierwsze zabezpieczenia: nawór bezpieczędsta (E) uwalnia ciñnienie - rys. 20
- Drugie zabezpieczenia: uzeczelka umozliwia uwolnienie ciñnienia przy bezPokrywk - rys.20.
Ježeli uruchomi są jeder z systemów zabezpieczązych przyzed zbyt wysokim ciasnieniem:
Wylacz zrodto ciepla.
- Pozostaw szybkowar do calkowitego schłodzenia.
- Otwórz.
- Sprawdz i umyj zwór roboczny (A), przywód odpradowania pary (B), zwór bezpieczność (E) i uzciekę (I) - rys. 16 - 17- 18. Sprawdz w rozdziałach „Czyszczenie" i „Sprawdz koniecznie przydym użyciem".
- Jeźeli po sprawdzeniu i umyciu urzadzenia nie jest szczelne lub nie działa, oddaj do autoryzowanego serwisu TEFAL.
Zalecenia
1 - Para wydostajęca są przy czawó roboczy jest bardzo gorówn. Uwaźaj na strumien pary.
2 - Po uniesieniu są trzpienia bezpieczędsta nie要去źysz otwierać szybkowaru.
3 - Podobnie jak w przypadku innych urzadzen do gotowania, zapewnj pełny nadźur urzadzenia, zwłaszczaw przypadku gdy w połizu przybebywajcie.
4 - Do przynoszenia szybkowaru uzywaj obu uchwytów garnka.
5 - Nie przechowuj zywnosci w szybkillerze. Nigdy nie przyenos szybkilleru, trzymajac go za uchwytPokrywki.
6 - Nigdy nie stosuj wybielaczy ani produktów na bazie chloru, które mogą uszkodzić powierzchnie stali niedzewnej.
7 - Nie pozostawiaj Pokrywki zanurzonej w wodzie.
8 - Uszczelkę wymieniaj co roku lub jejeli nosi slady uszkodzen.
9 - Myj szybkowar wyłącznie po和他的 schłodzeniu i opróznieniu.
10 - Po 10 latach uzytkowania szybkowar nalezy obowych sprawdzić w autoryzowanym serwisie TEFAL.
Czyszczenie
W celu zapewnienia prawidłowedo dziatania szybkowaru nalezy przystrzegać zalecen dotycznych和他的 mycia i konserwacje po kaźdym uzyciu.
Zaciemnienia i zarysowania, które moga pojawic sie na skutek dlugotrwaideo uzytkowania nie stanowig wady produktu.
Zużycie zȩwnętrznej powłok(w zależnosci od modelu) spowodOWANE stykaniem są polywi k i garnka jest normal#.
W przypaka dku sz ybkowarów z powłok a nieprzywierajacja (w zależnosci od modelu): lekkie zarysOWania i otarcia, mogace pojawic sie w trakcie uzytkOWania,Nie pogarszaja wlasciwość antyadhezyjnych powłoki.
- Po kaźdym uzyciu umyj szybkowar letnią wodź z plęnym do mycia naczn. Tak samo naleź wy postępowacz koszykiem*.
- Nie uzywaj wybielczy ani produktów zawierajycch chlor.
- Nie nagrzewaj mocno garnka, gdy jest pusty.
Mycie wętrza garnka ze stali niedzewnej:
- Myj przy użyciu gąbki do szorOWANIA i płynu do mycia naczyn.
- Jeźeli wętrze garnka ze stali niedzewnej nosi białaść (osad mineralny), wyczyść je octem.
Mycie alumniowej wętrza garnka z powłok są przywierajuća:
W celu przydztuzenia okresu eksploataci produktu zaleca sie mycie reczne.
- Myj ciepla woda przy uzyciu plynu do mycia naczyn i miękkiej gąbki.
- Nie uzywaj detergentów ani gąbek do szorowania.
W przypadku przypalenia potrawy wiej do garnka ciepla wode i odstaw do odomoczenia. Nastepnie umyj plynem do mycia naczyn.
Mycie zewétrznych powierzchni garnka:
Do mycia uzywaj gabwei plynu do mycia naczyn.
Garnek ze stali niedzewnej i koszyk przy na myc w zmywarce.
Nie wiktadaj do zmywarki garnka z powtoka nieprzywierajuca (w zleznosci od modelu) poniewaz tabletki do zmywarki zwieraja bardzo agre swne substancje, powodujace koro zje alumiowych czeci.
Intensywnie uzywanie garnka z powlok antyadhezyjn (w zaleznosci od modelu) moż e lekk o zmienić kolor powloki (źtknierie, plamy).
MyciePokrywki:
- Do myciaPokrywki uzywaj gąbki i plynu do mycia naczyn.
Aby usanagan wode pozostajag między czesciami metăgowymi i plastikowymiPokrywki,suszPokrywké pinowo.
Mycie uszczelkiPokrywki:
- Po kaczdym gotowaniu umyj uszczelke (I)i jej gniazdo.
- Aby włoźć uzczelkie z powrotem, postępuj zgodnia z - rys. 15 i upewnij sie, ze uzczelka znalazcta sie dokladnie pod kaźdym rowkiem pokrywki.
Mycie zaworu roboczego (A):
Zdejmij zawór roboczny (A)- rys. 11.
Umyj zawór roboczny (A) pod bierzacwoda - rys. 16.
Sprawdz,czy jest ruchomy: wedlug rysunku.
Po zdęciu zaworu roboczego (A), uszczelki (I) i minutnika* (F)要去z umyć Pokrywkę w zmywarce.

Nigdy nie myj w zmywarce zaworu roboczego (A), uszczelki (I), minut nika* (F), ani garnka z powłoką zapobiegajęc przywieraniu.
Mycie przywcie:
Zdejmij zawór (A)- rys. 11.
Sprawdz,czy przewod odprowadzenia pary jest drozny i ma okragly przyekrój -rys.13.W razie potrzeby wycyszec go wykałaczka-rys.17i przyeplucz.
Mycie zaworu bezpieczestewa (E):
- Czeszaworu bezpieczentwa znajdujaca sie wewnatrz pokrywki umyj pod bierzaca woda.
- Sprawdz,czy działa prawidłowo,naciskajc mocno kulke zaworu (patyczkiem kosmetycznym bez wacika),która powinna byc ruchoma -rys.18.Zobacz w rozdziale „Sprawdz koniecznie przydym użyciem".
Czyszczenie minutnika* (F):
Uzywaj czystej iSuchej szmatki.
- Nie stosuj Rozpusczalnika.
- NigdyNie wiktadaj minutnika pod wode ani do zmywarki.
Konserwacja
Wymiana usczelki szybkowaru:
Uszczelke nalezy wymieniac co roku oraz jeźeli nosi slady uszkodzen.
- Zawsze stosuj oryginalne uszczelki TEFAL, zgodne z zakupionym modelem (patrz Rozdzial „Akcesoria").
- Aby włoźć uzczelkie z powrotem, postępuj zgodnia z - rys. 15 i upewnij sie, ze uzczelka znalazcta sie dokladnie pod kaźdym rowkiem pokrywki.
Przechowywanie szybkowaru:
- ObroćPokrywkę na garnku.
- Mechanizm otwierania/zamykania szybkowaru nie wymaga szczególnej konserwacci poza myciem.
Po 10 latach uzytkowania szybkowar naleź y sprawdzić w autoryzowanym serwisie TEFAL.
Akcesoria TEFAL
- Na rynku dostepne są nastepujuce akcesoria do szybkowaru:
Akcesoria Numery katalogowe Uszczelka 3/4/4.5/6 L: wewnietrzna Średnica uszczelki: 24 cm X1010008 5/7.5/9 L: wewnietrzna Średnica uszczelki: 27 cm X1010007 Koszyk do gotowania na parze* 3/4.5/4/6 L: dla garnka o Średnicy 22 cm 792185 5/7.5/9 L: dla garnka o Średnicy 24 cm 79 2654 Statyw* (L) 792691 Minutnik* X1060007
W celu naprawy lub wymiany innych czeci skorzystaj z autoryzowanego serwisu TEFAL.
- Uzywaj wyłącznie oryginalnych częsci TEFAL dostosowanych do zakupionego modelu.
Dane techniczne
Średnica dna szybkowaru - nr katalogowe
Pojemność Ø garnka Ø dna Clipso Minut® Perfect / Easy Clipso Minut® Duo couleur Clipso Minut® Duo Gourmet Material, z ktorego wykonany jest garnek 3 L 22 cm 15.5 cm P4620 5 - - Stal niedzewna 3 L 22 cm 18 cm - - P4660 5 4 L 22 cm 14 cm - P46042 - Aluminium powlekane 4.5 L 22 cm 15.5 cm P4620 6 - - Stal niedzewna 5 L 24 cm 14 cm - P46051 - Aluminium powlekane 5.2 L 24 cm 20 cm - - P466 54 Stal niedzewna 7.5 L 24 cm 18 cm P46248 - - 9 L 24 cm 18 cm P46249 - - Set 5 L/7,5 L 24 cm 14 cm P46353 - 18 cm
Material, z którego wykonana jestPokrywka:Stal niedzewna Informacja normatywne:
Görne ciñnienie robocze: 65 kPa
Maksymalne ciñnienie bezpieczénstwa: 120 kPa
Kompatabilne zródła ciepla
GAZ ENERGIA ELEKTRYCZNA Plya zeliwna
ENERGIA ELEKTRYCZNA
Plta grzewca lub halogenowa
ceramiczna
ENERGIA ELEKTRYCZNA
Plyta ceramiczna
indukcyjna)
ENERGIA ELEKTRYCZNA Grzalka spiralna


- Szybkowar nadaje są do wsztkich rodzajów kuchenek, w tym rownikie indukcyjnych.
- W przypadku pły elektrycznych uzywaj pola o srednicy mniejszej lub równej srednicy dna szybkowaru.
- W przypadku płyter ceramicznych upewnij sie, ze dno garnka jest czyste i gladkie.
W przypadku kuchenek gazowych plomien nie sąwatac poza srednicę garnka.
We wzystkich przypadkach szybkowar nalezy ustawiać na sądku.
Gwarancja
W przypadku uzytkowania zgodnego z instrukcja obstugi garnek ze stali nierdzewnej nowego szybkowaru TEFAL posiada 10-letnia gwarancje na: - wszelkie usterki zwiazane z konstrukcja metalowa garnka, - przydwczesne zniszczenia metalowej podstawy garnka.
- Na pozostale materiały, z krórych wykonany jest garnek oraz na pozostale częsci szybkowaru obwiązuje gwarancja z tytułu rękojmi, obejmujacja wszelkie wady fabryczne i materiaływe, zgodnie z sprawem obwiązujacym w kraju zakupu i pouchystawzy od daty zakupu.
- Z gwarançji umownej möglich skorzystać po przyedstawieniu paragonu lub faktury z data zakupu.
Gwarancja i rkojmia nie obejmuja:
Zarysowan i odbarwien spowodowanych starzeniem sie produktu, w przypadku garnków z powłoką zapobiegajęc przywieraniu.
Zarysowan spowodowanych stykaniem siePokrywy i powloki antidhezyjnej.
- Uszkodzen winikajacych z nieprzestrzegania waznychazolen lub nieprawidlowego uzytkowania, przyte wsystkim: - Uderzen, upadkow, uzytkowania w piekarniku itp.
Z gwarancji要考虑 korzystac tylko w autoryzowanych serwisach TEFAL.
- Zadzwon na numer infolinii w celu uzyskania adresu najblisztego autoryzowanego serwisu TEFAL.
Oznaczenia prawne
Oznakowanie Lokalizacja Znak handLOWy Na pokrywce Rok produktji i partia
Numer katalogowy modelu
Maksymalne ci内分泌ie bezpiecznych (PS)
Maksymalne ci内分泌ie robocze (PF) Na pewkrywce Pojemnosć Na zewétrznej czymi dna garnka Adres pocztowy producenta Na zewétrznej czymi dna garnka
Aktywnie chronomyśrodkowisko!

① Wiele materiałów uzytych w urzadzeniu nadaje są do powtórnego wykorzystania lub recyklingeru.
Oddaj swoje urzadzenie do punktu zbiórk, aby zosto prawidłowo zutylizowane.
TEFAL odpowyada na pytania
Problemy Zalecenia Ješli otwieranie i/lub zamykanie zaczyna być trudne: Zdejmij uzczelkie opłucz pod bieść woda.
Załoź uzczelkie w pokrywce bez suszenia jej- rys. 19. NieMZna zamknącPokrywki: Sprawdź, czy uchwyt Pokrywki znajduje są w pozycji pionowej.
Sprawdź prawność ułożenie uzczelki, patrz rozdziaf „Mycie i konserwacja".
Sprawdź, czy Pokrywka jest prawnȩwo ułożona, jak na - rys. 1.
Zmocz uzczelkie woda i załoź powrotem w Pokrywce, nie wycierȩć jej- rys. 19 i pilnujuć, aby załoźć są dokadnie pod rowkiPokrywki- rys. 15. Szybkowar zostal Rozgrzany pod ciasnieniem bez pląnu wew)ntrz: Oddaj szybkowar do sprawdzenia w autoryzowanym serwisie TEFAL. Trzpieńbezpiecieznstwa stuka i wypuszcza parę: W pierwszych minutach jest to normalne: w ten sposób usu-wane jest powietrze przygotawaniem. Trzpieńbezpiecieznstwa nie unosi są i nic nie wydostaje są przyżawó rzech wczasi gotowania: Jest to normalne zjawisko w pierwszych minutach gotowania.
Jeźeli zjawisko utrzymieme, sprawdź, czy:
- zródló ciepla ma wystarczȩć moc, jeźeliNie, zwiéksz moc
- ilość pląnu w garnku jest wystarczȩć,
- zawó roboczy (A) jest ustawIONy na „
- szybkowar jest prawnȩwo zamkniety,
- uszczelka lub krawędź garnkaNie są uszkodzone,
- uszczelka jest prawnȩwo ułożona. Trzpieńbezpiecieznstwa nie unosi są i nic nie wydostaje są przyżawó rzech goitaniania: Jest to normalne zjawisko w pierwszych minutach gotowania
Jeźeli zjawisko utrzymieme, sąe do zlewu zimnej wody i w do niedno szybkowaru aż opadnie trzpień bezpieciens(II)
Wyczyść zawór roboczy (A)- rys. 16 i przyworć odpradowania pary - rys. 17 oraz sprawdź, czy kulkę zaworu bezpiecieznstwoMZNA wci)nac bez oporu - rys. 18. Problemy Zalecenia Ješil wokół po krywki
ucieka para, a trzpień
znajduj es iew po zycji dolnej, spre awdź: prawi dlówne zamkniecePokrywki,
ułożenie u szcelki po krywki,
prawidł owy stan uzczelki; w razi epotrzeby sąȩzy
ja wymiennent;
czystność po krywki, uszcze liki igniazdua szcelki w
pokrywce,
dobry st an krawędzi gar nka. Nie można otwor zęc po-
krywki: Sprawdź cz ytrz pi en be zpiecieżstwa (D) op od t.
Jeżelitak ni jest, o bniż dśnien ie:n alej do zlewu zimnej
wo dyiw bź do nied no szybko waruaz op adniétrzpień
bezpieczenia sta.
NigdyNie manipuluj przytz pieniu bezpieczć n stwa (D).
Przekrć zaw od roboczy (A) w poźycje Jeżeli produkty nie są
ugotowane lub są spa-
lone, spreawdź: czas got owania,
moc zróda dep l.
prawidłowe ustawienie zawodu robocze go (A) ilość
plynu. Jeżeli produkty
przypaliyy są w
szybkkowa rze: przed umyciem gamk a od staw go na jakie czdo
od możenia.
NigdyNie uzywaj wybielaczy aniproduktów na bazie
ch loru. Jeżljednoz
zabezpieczenia uruchom i
sie: Wydacz zródló dep l.
Po zostaw szybcowar do schlodZenia bez przenoszen i
go.Poczekaj ztrpienisbe zpiecz e n stwa opadNieiot wór z
szybcowar.
Sprawdź i umy j zwór roboczy (A) przywoźd
od prowadzania pary, zawór bezpieczć stwai uszczech
Upewnij sie, ze przystrzega z warunków doty cząych
na pehnienia urzadzenia.
Jeżeli problem wystę pu je rada l sprawdź urzadzenia w
autory zo wany mserwisie TEFAL. Jeżeli pojawie są Ślady
utleniania: Użcie wyto kiej jak scistali ni dzewnej nie zapobiega
wystepowaniu utleniania w ekremal nych
przymadkach Jeżli dostrze优惠政策 zŚlady utleniania, przyd
ko lejnym użyciem szybko waru usń je gąbką do
szorowa nia
LABELA GOTOWANIA
Warzywa
WARZYWA (SWIEZE)
PARA
Skadni w koszyku dogotowania na parze i 750 ml wody na dnie szybkowara.


ZANURZENIE
Skladnik w wodzie bez koszyka.
LEGUMES SECS ZANURZENIE
Bez koszyka.


- potov


PL
Bakłañzy, obrane i pokrojone w plastry (3 mm), 850 g (para) 10 do 12 min. Botwina, pokrojona (2 cm) 700 g (para) 15 do 17 min. Bób 250 g (zanurzenie) 18 do 20 min. Brokuły - rożyczki 600 g (para) 9 do 11 min. Brukselka (para) 10 do 12 min. Buraki, czerwone, pokrojone w kostenę (zanurzenie) 20 do 25 min. Cebula do peklowania (para) 7 do 8 min. Cukinia pokrojona w okrägle plastry (3 mm) 600 g (para) 12 do 15 min. Dynia, pokrojona w kawałki (3 do 5 cm) 600 g (para) 13 do 18 min. Endywia przyzekrojona na pól (900 g) (para) 14 do 16 min. Fasola, suszona 250 g (zanurzenie) 35 do 40 min. Groch (para) 6 do 8 min. Kalański - rożyszczki 600 g (para) 10 do 12 min. Kapusta biała, poszatkowana, 500 g (zanurzenie) 5 do 6 min. Karczochy, 2 calorie, 600 g kaźdy (zanurzenie) 30 do 35 min. Koper włoski pokrojony w sąpki (600 g) (para) 6 do 9 min. Marchew pokrojona w okrägle plastry (3 mm) 600 g (para) 17 do 19 min. Papryka - połowki (550 g) (para) 14 do 16 min. Pieczarki, pokrojone 800 g (zanurzenie) 4 do 5 min. Por, caly, biała czegość 650 g (para) 9 do 11 min. Rzepa, pokrojona w kostenę (500 g) (para) 14 do 16 min. Seler, pokrojony w plastry (zanurzenie) 600 g 7 do 9 min. Soczewica, zielona 250 g (zanurzenie) 14 do 16 min. Szparagi, biała (para) 5 do 6 min. Szpinak (para) 3 do 4 min. Zielony groszek (600 g) (para) 10 do 12 min. Ziemniaki przyzekrojone na pól (950 g) (para) 20 do 25 min. (zależnosci od wielkość)
ZANURZENIE
Bez koszyka.
MAX 1° ILOŚC WODY ILOŚC RYZU CZAS PRZYGO-
TOWANIA DLA 2 OSÓB 400 ml /
2 szklanki 150 g /
1 szklanka 500 ml /
2,5 szklanki 250 g /
2 szklanki DLA 6 OSÓB 700 ml /
3,5 szklanki 375 g /
3 szklanki
Mięs o/ ryby
Świeść MROZONE Ciełęcina (0,8 kg, srednica 5 – 7 cm) 17 do 19 min. 37 do 40 min. Filety zabnicy (1 kg) w kawalkach po 75 g 5 do 6 min. 7 do 8 min. Gicz jagnęca: 2 (0,95 kg) 40 do 45 min. 1 godz. 5 min. do 1 godz. 15 min. Kaczka (1,8 kg) 45 do 47 min. 50 do 55 min. Królik (1,5 kg w kawalku) 8 do 9 min. 20 do 23 min. Kurczak (1,35 kg) 23 do 25 min. 1 godz. do 1 godz.10 min. Kurczęta: 2 (1,3 kg) 23 do 25 min. 40 do 45 min. Piecień wołowna (1 kg, srednica 8 – 11 cm) 30 do 35 min. 45 do 50 min. Przepiörka: 4 9 do 10 min. 18 do 20 min. Schab (0,8 kg, srednica 8 – 10 cm) 30 do 35 min. 1 godz. 5 min. do 1 godz. 15 min. Steki z lośosia: 4 (0,8 kg) 5 do 6 min. 7 do 8 min. Steki z tuńczyka: 4 (0,7 kg) 5 do 6 min. 7 do 9 min. Szyneel cieły: 0,7 kg 17 do 21 min. 33 do 38 min. Szyneel wieprzowy:2 kawalki po 350 g 13 do 15 min. 26 do 29 min. Zrazy ciełyce: 4 10 do 12 min. x
Uwaga: W modelach o pojemnosci 5 litrów i mniewićsi, ze kawałki mięsa i drób nie wystaj poza linie na wewétrznej scianie garnka. Wybierać kawałki mięsa i drobiu o wysokość nieprzekraczącej 8 cm.
MÁSURI IMPORTANTE DE PRECAUTIE:
Inainte de a utilizes oala sub presiune, citi ci atentie toate instruciunile si consulta i ntotdeauna „Ghidul utilizatorului". Utilizarea neconforma poate produce daune.
Pentru siguranta dumneavoastră, acest aparat este conform cu normele Şi reglementările aplicabile:
- Directa privind echipamentele sub presiune
- Materiale in contact cu alimente
-Mediulinconjurator
VERIFICÄRIOBLIGATORIINAIANTE DEFIECAREUTILIZARE A SE VERIFICA■vizual Şi la lumina zilei, dacă duza pentru evacuareaaburului nu este înfundata - fig. 13.■dacă bila supapei de siguranta este mobilă - fig. 18.■dacă garnitura capacului este fixată sub fiecarecrestătură a capacului - fig. 15.■dacă mankindere capacului sunt fixate în mod corect.Mânerele capacului au piesele de siguranta. Nu leschimbați niciodată singuri. Nu folosiți niciodată altmodel de capac. RESPECTATIINTOTDEAUNAURMÁTOARELCANTITÂTÎ DEUMPLERE ■Nu utilizesți niciodată oala sub presiune fãră lichid; acessetLucru duce la deteriorarea sa gravă. Niciodată nu utilizați oala sub presiune fãră lichid, deoarece acessest lucru ar pute duce la deteriorarea acsteia. Asigurți-vãcă existàintotdeauna suficient lichid în timpul gătirii.■Minimum 25 cl - fig. 4.■Maximum 2/3 din înalțimea oalei, indicator MAX 2 - fig 5.■In timpul gătitului la abur, coșul* pentru gătit la abur precum Şi alimentele situate în acesta, nu trebuie să intrecontact cuAPA - fig. 6 Şi 7.■Maxim 1/3 (MAX 1) pentru alimentele vâscoase care sedilă Şi/sau fac spumă în timpul gătitului, cum ar fi orezulleguminoasele, legumele uscate, compoturile, dovleacul,dovleceii, morcovii, cartofii, fileurile de pește...■Alimentele introduse în coșul pentru gătit la abur nu trebsădepășească nivelul MAX 2 din adâncimea vasului. • Nu lasați copiii în apropietea oalei sub presiune atunci*cänd este,in curs de utilizesare.
• Oala sub presiune gătește alimentele folosind presiunea. Outilizare inadecevata poate cauza răni provocate prin opărire.
Asigurăți-vă că oala sub presiune este închisă corespunțătorinainte de punerea înfunctiune (A se vedea sectiunea „Inchidere”).
• Asigurăți-vă că supapa șiieră permanent în timpul gătirii.Încazulîn care nu se eliberează sufficient abur, decomprimăti produsul Şiverificâti dacă există o cantitate suficientă de lichid Şi dacă duzapertreu evacuarea aburului nu este înfundă. Dacă, dupaeffectuarea acestor verificări, nu se eliberează în continuuresufficient abur, creșteți ușor puterea sursei de caldură.
• Nu gătii alimente care riscașăș înfunde canalele dispositivelor de siguranta:
- merișoare
- arpacăs
- fulgi de ovăz
- mazăre uscată
- tăieței, macaroane, spaghete
- rubarbă
- coacăze.
• Nu gătii niciodata rețete pe bază de lapse în oala sub presiune(cum ar fi budincă de orez sau gritcu lapse).
• In cazul unei oale sub presiune cu corpal din inox, nu utilizătsaregrunjoasă, ci adăugați sare finala sfârsitul gătirii. Astfel, veți evitaaparția petelor care ar putea deteriorora corpal oalei sub presiune.
• Nu utilizăți oala sub presiune pentru prăjirea în uolei sub presiune.
• Nu utilizăți oala sub presiune în alt scop decât cel pentru careeste prevăzută.
• Nu introduciți oala sub presiune în cuptorul incins.
• Nu introduciți niciodata în oala sub presiune folie de aluminiu care nu este securizată pe un recipient. Fixăți întotdeauna cu o sfoară.
• Nu introduciți niciodata folie de plastic în oala sub presiune.
• Vaporii de alcool sunt inflamabili. Aduceți la punctul de fierberecu aproximativ 2 minute îniate de a pune capacul.Supravegehati oala;când preparati rețete pe bază de alcool.Verificăți oala sub presiune în mod repetat dacă pregătiș rețetepe bază de alcool.
• Utilizăți doar sursa (sursele) de caldură compatibilă (compatibile),conform instrucțiunilor de utilizesare.
DUPÄ PREPARAREA ALIMENTELOR...
- Pentru modelele cu strat antiaderent: nu utiliziţi teluri sa instrumente metalice ori ascuţite. Nu loviţi ustensilele de muchia cuvei, deoarece riscaţi să o avariţiși să cauzati scurgeri.
Rotiţi continuu supapa de functiònare (A) alegând după cum doriti viteza de decompressiune până ajungeti in dreptul pictogramei 10. In cazul care, la eliberarea aburului, observati improşcari anormale, readuceti supapa de functiònare (A) in poziţia de gătire in modul „Gătire sub presiune", iar apoi efectuati o decompressie rapidă in apă rece - fig. 14.
Dacă indicatorul de siguranta (D) nu coboara, puneti oala sub presiune în apă recce - fig. 14.
- Nu actionati niciodata asupra acestui indicator de siguranta.
- După fierberea cărnii acoperite cu pielita (de exemplu, limbă de vita), care risca să se umfle sub efectul presiunii, nu ințepași carneia atăt timp CAT pielita prezinta un aspect umflat; riscași să va opăriti. Aveți grijă să ințepași carneia inainte de fierbere.
- Pentru alimentele vâscoase care se expandează în timpul gătirii sau care produc spumă, cum ar fi orezul, leguminoasele, legumele uscate, compoturile, dovleacul, dovleceii, morcovii, cartofii, fileurile de pește...Lăsati oala sub presiune să se răceasca timp de câteva minute, apoi efectuți o răcire în apă rece. Inaintea fiecărei deschideri, scuturati oala sistematici și ușor, asigurându-vă în prealabil că indicatorul de siguranță este coborăt, pentru a evita orice improșcare cu bule de vapori, care risca să va arda. Această operție este deosebit de importante în cazul evacuării rapide a aburului sau după răcirea în apă rece.
- Mutati oala sub presiune cu maxima atentie. Nu atingeti suprafetele fierbinti. Utilizati manerele si butoanele. Daca este necessitiesar, folosi ti manusi.
- In cazul supelor, va recomandam sa efectuati o decompressie rapidă in apă rece (a se vedea sectiunea „ La finalul gătirii in modul«Oală sub presiune»").
- Inainte de a descide oala sub presiune, asiguraţi-vă că supapa este în poziţia de decompressie. Indicatorul de siguranta (D) trebuie să fie în poziţie coborăță.
- Nu deschideți niciodata forṭat oala sub presiune. Asigurati-va cà presiunea din interior a fost eliberata. Indicatorul de siguranta (D) trebuie sā fie in poziţie coborătă. (A se vedea sectiunea „Siguranta".)
CURÂTARE Şİ
INTREŞINERE ·In cazul în care constatați că oala sub presiune este spartă sau fisurata, nu încați în niciun caz să o deschideți dacă este închiaș,ășteptași să răceasca Completionă năinte de a o muta. Nu o mai Utilizăți și ducței-o la un centru de service autorizat Tefal pentru reparăție.
·Nu intervenți asupra sistemelor de sigurantaș mai mult decât prevăd instrucțiunile de curățare și de înținere.
·Utilizați doar THESE originale Tefal care corespund modelului dumneavoastră. Utilizați exclusiv un corp și un capac Tefal.
·Nu utiliți oala sub presiune pentru deposizarea alimentelor acide sau sărate îniate și după fierbere, pentru că riscați și deterioratoriți corporul acesteia.
·Curăți și clătiți imediat oala dumneavoastră sub presiune după fiecare適用are.
·Nu spălați niciodata în mașina de spălat vase supapa de functiorare (A), garnitura (I), cronometrul* (F) sau oala cuÎveliș antiaderent.
·Nu introduței niciodatacronometrul* (F) în apă.
·Nu utiliți niciodata înălbitor sau produse care conțin clor, care pot deteriorora calitatea inoxului.
·Nu lăsați capacul la înmuiat în apă.
·Schimbați garnitura în fiecare an sau imediat, dacă prezintă vreо tăietură.
·După 10 ani de/utilizare, este necesar să ducței la verificat oala sub presiuneintr-un centru de service autorizat Tefal.
·Pentrudepozitarea oalei sub presiune:ășzați capacul invers pe cuva, pentru a evita uzura prematură a garniturii capacului.
PÁSTRATI ACESTE INSTRUCTIONNI
Componente (a se vedea Schema descriptivă)
A. Supapă de fonctionare
B. Duză pentru evacuarea aburului
C. Indicator de poziţie a supapei
D. Indicator de siguranta (a se vedea seciunea "Siguranta")
E. Supapă de siguranta
F. Cronometru detasabil
G. Manerul capacului
H. Capac
I. Garnitură
J. Cos pentru gătit la aburi*
K./L. Trepied*
M. Manerul corpului
N. Indicator maxim de umplere
O. Corpul oalei
Verificări obligatoriținainte de fiecare適用are
Verificarea supapei de fonctionare

- Verificazioni da carea orificiul de evacuare al supapei de funzionare nu este infundat (a seVEDea seciunea „Retragerea si instalarea supapei de funzionare").
Verificarea supapei de siguranta

- Verificazioni dacà bila supapei de siguranta este mobilà (utilità un beşiga).
Utilizare

Gàtrein modul,Oalá sub presiune"

Gātire in modul „Gātire lenta"*

Decompresie
Deschidere
- Deplasați manerul capacului din poziție orientala in poziție verticală - fig 3. Capacul se rotește.
Ridicati capacul.
In cazul ca intampinați dificultăți la desciderea produsului: tiniți garnitura sub apă, apoi introduciți-o in capac fara sa o stergeți - fig 19, având grijă sa o fixati corect sub crestăturile capacului - fig 15.
Inchidere
Asigurat-vacamenerulcapaculuiesteinpositionverticala.
- Asezati capacul pe corpul oalei, dupa cum se indica in - fig. 1, aliniind partea din plastic cu manerele corpului oalei.
Rabatai manerul capacului din poziie verticala in poziie orizontala - fig. 2.
Capacul seroteste.
In cazul in care nu puteti inchide capacul:
- Verificati fixarea corectă a garnituriiși poziţionarea corespunzătoare a capacului.
- In cazul in care intampinați dificultăți la desciderea produsului: tiniți garnitura sub apă, apoi introduciți-o in capac fara sa o stergeți - fig 19, având grijă sa o fixati corect sub crestăturile capacului - fig 15.
Primautilizare
- Pentru modelele cu invelis antiaderent: spalaşi ungeci cu puţin ulei de gătit intreaga suprafata a invelisului interior.
In functie de model :
- Asezati trepiedul\*L) si cosul\*J) pe fundul cuvei.
- Prindeti trepiedul *(K) de ^*(J) , apoi depuneti ansamblul pe fundul cuvei.
- Umpletei cuva (O) până la niveul de 2/3 (MAX 2) - fig 5.
Inchideti oala sub presiune.
Aliniati pictograma supapei de fonctionare (A) cu indicatorul de poziie a supapei (C) -fig.9.


- Asezati oala sub presiune pe o sursa de caldur, apoi reglate-i o la putere maxima.
- Cánd aburul incepe să iasă prin supapă, reduceti sursa de caldurăși setați cronometrul pentru 20 de minute.
Cand cele 20 de minute s-au scurs, opriti sursa de caldur.
- Aliniati pictograma supapei de fonctionare (A) cu indicatorul de poziţie a supapei (C).
Cand indicatorul de siguranta (D) coboara, oala nu mai este sub presiune.
- Deschideti oala sub presiune - fig. 3.
Curatai-o cu un produs de curatat vese.
Nivel de ampliere minimi maxim
Minimum 25 cl/250 ml (2 pahare) - fig.4.
Maximum 2/3 din inaltimea corpului oalei, indicator MAX 2 - fig. 5.
- Nuutilizati sare grunjoasa in oala sub presiune, ci adaugati sare finala la sfarsitul gatirii.
Pentru anumite alimente:
- Pentru alimentele váscoase, care se expandeazá sau care produc spumá pe durata gātirii, cum ar fi orezul, leguminoasele, legumele uscate, compoturile, dovleacul, dovleceii, morcovii, cartofii, fileurile de peşte...nu umpletj oala sub presiune peste 1/3 (MAX 1) din capacitatea sa.
Lasa oala sub presiune sa se raceasca timp de cateva minute, apoi raciti-o in apa rece. Inaintea fiecarei

deschideri, scuturati oala systematici si uor pensu a evita improscarea cu vapori care risca sa va arda, dupa asigurarea prealabila ca indicatorul de siguranța este coborhat. Această operatiune este deosebit de importantă in cazul evacuării rapide a aburului sau dupa răcirea in apă rece. In cazul supapelor, va recomandam sa efectuți o decompressie rapidă in apă rece. (A seVEDea sectiunea „ La finalul gătirii in modul «Oala sub presiune»").
Utilizarea coşului pentru gătit la abur*
- Turnaţi 75 cl/750 ml de apă pe fundul corpului oalei (O). In functie de model:
- Asezati trepiedul\*L) si cosul\*J pe fundul cuvei.
- Prindeti trepiedul\*K) de cos\*(J), apoi depuneti ansamlul pe fundul cuvei.


- In timpul gătitului la abur, alimententele din coşul pentru gătit la abur* nu trebuie să intre în contact cu apa - fig. 6 si 7.
Alimentele introduse in coşul pentru gătit la abur* nu trebuie și depășeasca nivelul MAX2.
Montarea si demontarea supapei de fonctionare (A)
Pentru indepartarea supapei de fonctionare (A):
- Aliniati canelura cu indicatorul de poziţie a supapei (C), apăsând pe inelul supapei de functionare (A).
Indepartati-o - fig. 11.
Pentru montarea supapei de fonctionare:
- Poiniţii supapa de fonctionare (A) - fig 8 aliniind canelura supapei de fonctionare cu indicatorul de poziţie (C) din ilustrata alăturata.

Impingeti supapa de fonctionare (A) pentru a o fixa pe duza pentru evacuarea aburului.
- Apasati pe pictograme supapei de fonctionare (A) rotiti.

Cronometrul*
Nuutiliati niciodata cronometrul in modul de, Gatire lenta".
Cronometrul este conceput pentru a va garanta prepararea corespunzătoare a alimentelor, cu un consumcate mai mic de energia. El cronometrează automat timpul de gâtire, după atingerea nivelului de temperatura corespunzător gătirii in modul „Oala sub presiune"
Cronometrul trebuie fixat pe oala sub presiune pentru a functiona.
Asigurați-vă că supapa de functiONare (A) suieră in mod regulat in cursul gătirii. Dacă nu este suficient abur, creşteți ușor puterea sursei de caldură; în caz contrar, reduciți puterea sursei de caldură.
1 Pentru a porni cronometrul: apasaşi pe buton.
2 Programaţi tampul de gătire (in minute).
Daca a ti introdus gresit timpul de gatire, astepta 4 sec. panacand flacarile nu se mai afseaza intermitent, iar apoi apasa t lung pe buton pentru readucerea la zero.
3 Pornişi sursa de caldură la putere maxima.
4 După ce oala sub presiune a atins temperatura de gâtire, cronometrul emite un semnal sonorși începe cronometrarea timpului (cîfrele se afșează intermitent). Reducți puterea sursei de caldură.
La finalul timpului de gătire, cronometrul emite un semnal sonor.
- Pentru a opri semnalul sonor al cronometrului, apasati pe buton.
Oprijsursa de caldura.
O apăsare lungă pe buton readuce cronometrul la zero și il oprește.
Montarea Şi demontarea cronometrului*
- Pentru montarea cronometrului (F)-fig 12, introduci mai intai partea dinspre buton in modul, apoi apasați pentru a fixa.
- Pentru demontarea cronometrului (F), ridicati-l si indepartati-l.
Schimbarea bateriei cronometrului*
- Bateria cronometrului este o baterie de tip CR2032.
- Daca se afiseaza simbolul au laca afisajul dispare comple, schimba ti bateria.


- Durata de viata a bateriei depinde de freventa de'utilize a cronometrului.
Bateria cronometrului contine dimetoxietan nr. CAS 110-71-4. Aceasta este conforma cu reglementarile europene. Pentru siguranta dumneavoastra si pentru protectia mediului: nu desfaceti bateria, nu o expuneti la temperaturi ridicate, nu o aruncai impreunacu deseurile menajere; duceti-o la un centru de colectare a baterilor uzate.

Bateriile de unica folosinta nu trebuie incarcate.
Diferitele tipuri de baterii sau bateriile noi si cele uzate nu trebuie amestecate.
Bateriile trebuie introduse cu polaritatea corectă.
Bateriile descarcate trebuie scoase din aparat 日 eliminate intr-un mod sigur.
- Daca aparatul este depositat pentru un tampindhelungat, se recomanda scoaterea baterilor.
- Nu scurtcircuitati bornele bateriilor.
- Efectuati operatiunile in plan oriental, pe o suprafata de lucru.
- Pentru a scoate bateria din cronometru, beschideti capacul locașului bateriei cu ajutorul unei monede (a se vedea figura alăturata).
Inlocuţi bateria.
Fixati garnitura in locasul sau.
- Pozitiona ti semiluna de pe capacul locasului bateriei in fața semilunii de pe cronometru.
- Rotiţi incet capacul locașului bateriei, apăsănd uşor, aliniind semiluna de pe capacul locașului bateriei cu luna dpe cronometru.
- Efectuati operatiunea pe o suprafata plana pentru o positionare orientală corectă a capacului.
- Nu foratai la inchidere capacul locasului bateriei. Nu depaşi marginile.
- In caz de pierdre, va puteti procura alt cronometru de la oricare centru de service autorizat Tefal.


Nu introduci niciodata cronometrul* in apă sau in maşina de spălat vase.
Nuutilaţi niciodata cronometrul in modul de „Gătire lenta".
Inaintede gàtire
- Inainte de fiecare utiliser, indepartaşi supapa de fonctionare (A) - fig. 11 Şi verificati dacă duza pentru evacuarea aburului (B) nu este infundata - fig. 13.
- Verificazioni da cacha supapa de siguranta este mobilă (a se vedea seciunile „Curătare"și „Verificatori obligatori i nainte de fiecare適用are“) - fig. 18.
- Adaugati-va ingredientele si lichidul.
Inchideti oala sub presiune - fig. 2.
- In cazul in care intampinați dificultăți la desciderea produsului: tineți garnitura sub apă, apoi introduciți-o in capac fară sa o stergeți -fig 19, având grijă sa o fixați corect sub crestăturile capacului - fig 15.
- Montatji supapa de fonctionare (A) - fig. 8.

Gătire în modul „Oaală sub presiune"
- Rotiţi supapa de fonctionare (A) până la poziția de gătire în modul „Oala sub presiune" 9.
- Asigurați-vă că oala sub presiune este închisia corespunzător îniate de punerea în functiune - fig. 3.
- Asezaṭi oala sub presiune pe o sursa de caldur, apoi reglaṭi-o la putere maxima.
- Pentru modelele dotate cu cronometru : programaşi timpul de gătire indicat în retetă (a se vedea sectiunea „Utilizarea cronometrului").
Zgomotul 山 aburul emise de indicatorul de siguranta sunt normale, datorandu-se eliberarii aerului inainte de gataire.
In timpul gătirii in modul „Oală sub presiune"
- In momentul in care supapa de fonctionare (A)incepe sa elibereze abur in mod continuu, fãcãnd zgomotul obisnuit (suierat), reduciţi puterea sursei de caldură.
- Incepeţi contorizarea timpului de gătire indicat in rețeta.
- Asigurați-vă că supapa șiuiera în mod regulat în cursul gătirii. Daca nu se eliberează suficient abur, creşteți ușor puterea sursei de caldură; în caz contrar, reduceti puterea sursei de caldură.
La finalul gătirii în modul „Oală sub presiune"
Pentru eliberarea aburului:
- După oprirea sursei de caldură, aveți două posibilități:
- Decompressie progresiva: rotiti progresiv supapa de fonctionare (A) până ajunge în dreptul pictogramei fig 10.

- Decompressia rapidă in apă rece: turnați apă receive in chiuvetași scufundati in apă fundul oalei sub presiune până cand indicatorul de siguranta coboara - fig. 14. Cand indicatorul de siguranta (D) coboara, oala nu mai este sub presiune. Rotiti supapa de functiorare (A) pe poziția

Pasul 1

Pasul 2
Puteti descide oala sub presiune - fig. 3.
- In caz ca intâmpinați dificultăți la desciderea produsului: tineți garnitura sub un jet de apă, apoi introduciți-o in capac fară să o stergeti - fig 19, având grijă să o fixați corect sub crestăturile capacului - fig 15.
In cazul care, la eliberarea aburului, observați improșcări anormale, readuceți supapa de functiònonare (A) in poziția de gătire în modul „Gătire sub presiune" , iar apoi efectuși o decompressie rapidă în apă rece.
Dacă indicatorul de siguranta (D) nu coboara, turnaşi apă rece in chiuvetăși scufundari fundul oalei sub presiune până la coborârea indicatorului de siguranta - fig 14.
Nu actionaţi niciodătă asupra indicatorului de siguranta.
- Pentru alimentele care se expandează in timpul gătirii sau care produc spumă, cum ar fi orezul, leguminoasele, legumele uscate, compoturile, dovleacul, dovleceii, morcovii, cartofii, fileurile de pește...nu umpleți oala sub presiune peste 1/3 (MAX 1) din capacitatea sa. Lăsăti oala sub presiune să răceasca timp de câteva minute, apoi efectuți o răcire în apă rece. Inaintea fiecarei deschideri, scuturați oala sismatic și ușor, asigurându-vă în prealabil că indicatorul de siguranță este coborât, pentru a evita orice improșcare cu bule de vapori, care riscașă să va arda. Această operatie este deosebit de importante în cazul evacuării rapide a aburului sau după răcirea în apă rece.În cazul supelor, va recomandamș effectuți o decompressie rapidă în apă recce (a se vedea secțiunea „ La finalul gătirii în modul «Oala sub presiune»").

Gătire in modul „Gătire lenta“*
- Rotiti supapa de fonctionare (A) pānă la poziția de gātire in modul „Gātire lenta". In acest scop, apasați sufficient pentru a trece dincolo de poziția decompressie.
- Asigurati-vá cã oala sub presiune este旨在isă corespunzător - fig. 2 - înainte de punerea în functiune.
- Asezati oala sub presiune pe o sursa de caldură reglata la putere redusă.
- Incepeţi cronometrarea timpului de gătire indicat in rețeta.
- In modul „Gätire lenta“, puteti beschide oala in orice moment pentru a amesteca, a supraveghea prepararea alimentelor sau a adăugaingrediente.
- In cazul ca intâmpinați dificultăți la desciderea produsului: tiniți garnitura sub apă, apoi introduciți-o in capac fară să o stergeți - fig 19, având grijă să o fixați corect sub crestăturile capacului - fig 15.
- Daca sursa de caldură este prea puternica, este posibil ca oala să se blocheze (indicatorul de siguranta (D) urcași impiedica deschiderea), iar manerul capacului să nu poata fi actionat sau să nu deschidă oala. In acest caz, reduceti pau opruti sursa de caldură. In cazul plácilor de incalzire din fontă, luatl oala de pe sursa de caldură.
- Pentru modelele cu strat antiaderent: nu utilizați teluri sau instrumente metalice ori ascuțite. Nu loviți ustensilele de marginea oalei, deoarece există riscul de a o deteriororași de a provoca scurgeri.
- Nu incalzi ti niciodata grasimi pana la carbonizare. Vaporii degaja ti in urma gatirii pot fi periculo si pentru animalele care au un system respirator sensibil, cum ar fi paarile. Proprietarii de paarire trebuie sa le tina departe de bucataarie.
Siguranta
Oala sub presiune este prevazută cu mai multe dispositive de siguranță:
- Siguranta la inchidere:
- In cazul care capacul este poziptionat greşit sau dacă uitași să plaiți și manerul capacului, există o scurgere de vapori în dreptul indicatorului de siguranta (D) a oalei sub presiuneși presiunea acesteia nu poate crește.
- Siguranta la descidere:
- Daca oala este sub presiune, indicatorul de siguranță (D) este in poziție ridicata, iar manerul de deschidere/inchidere a capacului (G) nu trebuie actionat.
- Nu incercati niciodata să descideti forṭat oala sub presiune.
- Nu actionaţi in niciun caz asupra indicatorului de siguranta (D).
- Asigurați-vă că presiunea interioară a scazut, verificandi dacă indicatorul de siguranta (D) este în poziție coborăță.
- Manerele capacului sunt piese de siguranță. Nu le schimbați niciodataș singuri. Nu folosiți niciodataș alt model de capac. Nu Utilizăți niciodataș alte modele de manere.
- Daca ați deplasat manerul de descidere/inchidere a capacului (G) in poziție verticală în timp ce oala era înca sub presiune, nu o veți putea descide. Această functie este o măsură de siguranta supplementară.
- Readuceți manerul capacului în poziție ortonatalăși așteptați ca indicatorul de siguranta (D) să ajungă în poziție coborăță.
- Două dispositive de siguranta impotrivă suprapresiunii:
- Primul dispositiv: supapa de siguranta (E) elibereazá presiunea - fig. 20.
- Al doilea dispositiv: garnitura ce permite eliberarea aburului la nivelul capacului - fig. 20.
In cazul in care se declanseaza unul+dentre sistemele de siguranța la suprapresiune:
Opriţi sursa de caldură.
Lasa oala sa se raceasca complet.
Deschidei.
- Verificatișși curățași supapa de fonctionare (A), duza pentru evacuarea aburului (B), supapa de siguranta (E)și garnitura (I) - fig. 16 - 17 - 18. A seVEDea sectiunile „Curătare"și „Verificări obligatoriii îniate de fiecare適用are".
- Daca dupa verificare si curătare produsul dumneavoastră curge sau nu mai functionează, duceti-l la un centru de service autorizat Tefal.
Recomandári de utilizes
1 - Aburul este foarte fierbinte cánd iese prin supapa de fonctionare. Atentie la jetul de abur.
2 - După ce indicatorul de siguranță urca, nu mai puteți descide oala sub presiune.
3 - La fel ca in cazul oricarui aparat de gătit, asigurați o supraveghere strictă, dacă UTILIZATI oala sub presiune în preajma copiilor.
4 - Pentru a muta oala sub presiune, utilizați cele două manhere ale corpului oalei.
5 - Nu lasaşi alimentetele să stea prea mult in oala sub presiune. Nu transporteşi niciodataă oala sub presiune apucând-o de manerul capacului.
6 - Nu utilizati niciodata inalbitor Sau produse care contin clor, care pot altera calitatea inoxului.
7 - Nu lasati capacul la inmuiat in apă.
8 - Schimbați garnitura în fiecare an sau dacă prezinta vreo tăietură.
9 - Curățarea oalei se realizazeă în mod obligatoriu la rece,alandeste goală.
10 - După 10 ani de utilizes, este obligatoriu să duceți la verificat oala sub presiune la un centru de service autorizat Tefal.
Curățare
Pentru buna functionare a oalei sub presiune, respectati aceste recomandari privind curata area si intreinerea dupa fiecare/utilizare.
Innegrinea szgárieturile care potapárea n urma uneiutilizári indel ungate nu afecteazafunctionarea oalei sub presune.
Uzura invelisului exterior (in functie de model) ca urmare a ontactului dintre capac si cuva este normala.
Pentru oalele sub presiune cu invelis antiaderenfnctie de model) usoarele zgarieturi si abziuni care pot aparea in urma utilizarii nu afecteaz performantele antiaderente ale invelisului.
- Spalati oala sub presiune dupa fiecare utilizes cu apa caldua si produse de curatat vase. Procedati la fel si in cazul cosului*.
- Nu folosiţi inalbitor sau produse care contin clor.
- Nu supraincalzi ti oala daca este goală.
Pentru a curata interiorul oalei din inox:
- Spalati cu un burete aspru si cu un produs de curat vase.
- Daca interiorul cuvei din inox prezinta reflexii irizate sau urme albicioase (depuneri de minerale), curata tci cu oet alb.
Pentru a curata interiorul oalei din aluminiu cu invelis antiaderent:
- Pentru a prelungi durata de viață a produsului, va recomandam spălarea manuală.
Spalati cu apacalda, cu un produs de curatat vase si cu un burete moale.
- Nu folosiţi praf de curățat sau bureti abrazivi.
- Daca s-a ars un aliment, umpleti oala cu apă caldași lasați-o la inmuiat. Apoi, curatați-o cu un produs de curatațat vase.
Pentru a curăta exteriorul oalei:
Spalati cu un burete si cu un produs de curat vase.
Puteşi spăla oala din inox Şi cosul in masina de spălat vase.
Nu spalati oala cu invelis antiaderent (in functie de model) in masina de spalat vase, deoarece detergentii sub forma de tableta contin substante foarte agressive si corozive pentru pärtile din aluminiu.
Utilizarea intensă a oalei cu inveliș antiaderent (in functie de model) poate duce la modifica rea ușoară a culorii invelișului (ingălbenire, pătare).
Pentru acuratacapacul:
- Spalati capacul cu un burete si cu un produs de curatat vase.
Scurgeşicapaculpe verticala pen tru a evacua aparam asintre pàrtile metalice sicele de plastic ale capacului.
Pentru a cura garnitura capacului:
- După fiecare gătire, curățați garnitura (I)și locașul acisteia.
- Pentru a monta la loc garnitura, consulati fig. 15 si avei grijă sa o fixati corect sub fiecare crestăture a capacului.
Pentru curățarea supapei de fonctionare (A):
- Indepartatu supapa de fonctionare (A) -fig. 11.
- Curățați supapa de functiònare (A) sub jetul de apă de la robinet - fig. 16.
- Verificazioni mobilitatea acosteia: figura alaturata.
După ce ați indepartat supapa de fonctionare (A), garnitura (I)și cronometrul* (F), puteti spăla capacul în mașina de spălat vase.

Nu spalati niciodata in masina de spalat vase supapa de fonctionare (A), garnitura (I), cronometrul* (F) sau oala cu invelisantiaderent.
Pentru a curata duza pentru evacuarea aburului (B) de pe capac:
- Scoatei supapa (A) -fig. 11.
- Verificati dacă duza pentru evacuarea aburului nu este infundatași rotundă - fig. 13. Daca este nevoie, curatați-o cu o scobitoare - fig. 17 -și clăti-i-o.
Pentru a curata supapa de siguranta (E):
- Curățați partea supapei de siguranta situata in interiorul capacului, tecând capacul pe sub jet de apă.
- Verificati buna sa functiionare apasand puternic pe bila (cu ajutorul unui beisor pentru urechi de pe care a i indepartat vata), care trebuie sa fie mobila - fig. 18. A se vedea sectiunea, "Verificari obligatori i inainte de ficare utilizare".
Pentru a curata cronometrul* (F):
Utilizi o laveta curata si uscata.
- Nuutilizati dizolvant.
- Nu introduci niciodata cronometrul in apa sau in masina de spalat vase.
Intretinere
Pentru schimbarea garniturii oalei sub presiune:
- Schimbaţi garnitura oalei sub presiune în fiecare an sau dacă prezinta vreotăietură.
- Achizitionaţintotdeauna o garnitură originală Tefal, care corespunde modelului dumneavoastră (a se vedea sectiunea „Accesorii").
- Pentru a monta la loc garnitura, consulati - fig. 15 si avei grijă sa o fixati corect sub fiecare crestăture a capacului.
Pentru depositarea oalei sub presiune:
- Asezati capacul invers pe corpul oalei.
- Mechanismul de beschidere/inchidere al oalei sub presiune nu necessities intreinere speciala, in afar de curatare.
După 10 ani de utiliser, este obligatoriu să duceti la verificat oala sub presiune la un centru de service autorizat Tefal.
Accesorii Tefal
- Accesorile disponibile in comert pentru oala dumneavoastră sub presiune sunt:
Accesorii Referinţe Garnitură 3/4/4.5/6 L: diametrul exterior al garniturii: 24 cm X1010008 5/7.5/9 L: diametrul exterior al garniturii: 27 cm X1010007 Coș pentru gătit la abur* 3/4.5/4/6 L: pentru cuvă cu diametrul de 22 cm 792185 5/7.5/9 L: pentru cuvă cu diametrul de 24 cm 792654 Trepied* (L) 792691 Cronometru* X1060007
- Pour trinlocuirea alterpiese saue pourtu reparati, apelati la centrele de service autorizate Tefal.
- Utilizati doar piese originale Tefal care corespend modelului dumneavoastră.
Characteristic
Diametrul fundului oalei sub presiune - referinte
Capacitate Ø Oală Bază Clipso
Minut®
Perfect / Easy Clipso
Minut®
Duo couleur Clipso
Minut®
Duo Gourmet Material oală 3 L 22 cm 15.5 cm P46205 -- Inox 3 L 22 cm 18 cm -- P46605 Inox 4 L 22 cm 14 cm - P46042 - Alumniu
acoperit 4.5 L 22 cm 15.5 cm P46206 -- Inox 5 L 24 cm 14 cm - P46051 - Alumniu
acoperit 5.2 L 24 cm 20 cm - P46654 Inox 7.5 L 24 cm 18 cm P46248 -- Inox 9 L 24 cm 18 cm P462 249 -- Inox Set 5 L/7,5 L 24 cm 14 cm P46353 - Inox 18 cm
Material capacit: inox
Informatii privind normele:
Presiune superioara de fonctionare: 65 kPa
Presiune maxima de siguranta: 120 kPa
Surse de caldurà compatibile
GAZ
ENERGIE ELECTRICA (Plita de fonta)
ENERGIE ELECTRICA Plita vitroceramicac radianta sau cu halogen)
ENERGIE ELECTRICA (Plta vitroceramicca cu inductie)
ENERGIE ELECTRICA (Reistenzentspirala)


- Oala dumneavoastră sub presiune poate fi適用ata pe"Toate sursele de caldură, inclusiv cele cu inductie.
In cazul plitei electrice, utilizi un ochi cu diametrul mai mic sau egal cu cel al bazei oalei sub presiune.
In cazul plitei vitroceramicice, asiguraţi-vă ca baza oalei este curatași netedă.
In cazul aragazului, flacara nu trebuie sa depaseasca diametrul oalei.
- Pe toate sursele de caldură, asigurați-vă că oala sub presiune este centrata corect.
Garantie
In cazul UTILIZARIi prevalzute de modul de utiliser, corporul din inox a noii dumneavoastrø oale sub presiune de la Tefal beneficiază de o garantție de 10 ani impotrivà:
- oricărui defect legat de structura metaliţă a oalei;
- oricärei degradāri premature a metalului de bază.
Celelalte materiale ale corpului oalei, precum si toate celealtecies ale oalei dumneavoastra sunt garantate impotrivva oricarui defect de fabricatie Sau de material, pe perioada de garantie stabilita de legislata in vigoare din tara de cumparare si incepand de la data cumpararii.
- Aceastagarantiecontractualasevaobtinepebaza prezentarii bonului dcasa sau a facturii de la data cumpararii.
Acestegarantiiexclud:
Zgarieturile si decolorarea datorate uzuri, in cazul oalelor cu invelis antiaderent.
Zgárieturile cauzate de contactul dentre capac Şi oala cu invelis antiaderent.
- Degradarile datorate nerespectarii masurilor de precautie importante sau Utilizarilor negljente, in special:
- lovituri, caderi, introducere in cuptor etc.
- Numai centrele de service autorizate Tefal sunt abilitate să va ofere serviciile prevăzute in această garantiei.
- Vă rugăm să sunați la numărul de Telefon albastru pentru a afla adresa centrului de service autorizat Tefal cel mai apropriat de dumneavoastră.
RO
Marcaje de reglementare
Marcaj Localizare Marca commercia Pe capac An și lot de fabricațieReferinte modelPresiune maximă de siguranta (PS)Presiune superioară de funçionare (PF) Pe capac Capacitate Pe fundul exterior al corpului oalei Adresa poștală a produțatorului Pe fundul exterior al corpului oalei
- Să contribuim la proteția mediului în conjurător!

① Aparatul dumneavoastră conține numeroase materiale care pot fi valorificate sau reciclate.
Predaşi-l la un punct de colectare a deşeurilor pentru a fi procesat în mod corespunzător.
Tefal răspunde intrebărilor dumneavoa
Probleme Recomandări Dacă deschiderea și inchiderea devin dificile: Scoateți garnitura și treceți-o pe sub jet de apă.Repuneti-o la loc în capac fără să o ștergeti - fig 19. În cazul în care nu puteți închide capacul: Verificați dacăMZânerul capaculi se află în poziție verticalăVerificați poziționarea corespunzătoare a garnituri (a se vedea secțiunea „Curățare și intreținere").Verificați poziționarea corespunzătoare a capaculi, dupa cum se indică în - fig. 1.Tineți garnitura sub un jet de apă, apoi introducți-o încapac fără să o ștergeti- fig 19, având grijă să o fixați corectsub crestăturile capacului- fig 15. În cazul în care oala a fost incălzită sub presiune fără săContințină lichid: Duceți oala la verificat la un centru de service autorizat Tefal. În cazul în care indicatorul de siguranta emite semnale sonore și abur: Acest lucru este normal în primele minute: permite eliberare aerului înunte de gătire. În cazul în care indicatorul de siguranta nu s-a ridicat și prin supapă nu iese nimic în timpul gătirii: Acest lucru este normal în primele minute.Dacă fenomenul persistă, verificați dacă:- Puterea sursei de căldură este destul de mare; în caz contrar mariți-o.- Cantitatea de lichid din cuva este suficientă.- Supapa de functiorare (A) este pozițonata peO-Ala este bine înisă.- Garnitura sau marginea cuvei nu sunt deteriorate.- Garnitura este pozițonata corespunțător. În cazul în care indicatorul de siguranta s-a ridicat și prin supapă nu iese nimic în timpul gătirii: Acest lucru este normal în primele minute.Dacă fenomenul persistă, turnați apă rece în chiuvetă și scufundați fundul oalei sub presiune până cănd indicatorul de siguranta (D) coboarda.Curățați supapa de functiorare (A) -fig. 16 și duza pentru evacuarea aburului - fig. 17 și verificați dacă bila supapei de siguranta poate fi apăsataă fără dificultate - fig. 18. Problème Recomandári Dacă vaporii ies prin jurulcapacului, iar indicatoruleste în poziție joasă,verificăți: Înciderea corectă a capacului.Poziționarea garniturii în capac.Starea corespunzătoare a garniturii;Înlocuiți-o dacă estneecessar.Starea de curățenie a capacului, a garniturii și a locașulacesteia din capac.Starea corespunzătoare a marginii corpului oalei. În cazul în care nu putețideschide capacul: Verificăți dacă indicatorul de siguranta (D) este în pozcoborță.În caz contrar, effectuți decompressione:turnați apărece în chiuveta și scufundați fundul oalei sub presiunepână când indicatorul de siguranta coboara.Nu manipulăți niciodata tija de siguranta (D).Rotiți supapa de functiorare (A) până în poziție . În cazul în carealimentele nu sunt fierteau daca sunt arse,verificăți: Timpul de gătire.Puterea sursei de caldură.Poziționarea corectă a supapei de functiorare (A).Cantitatea de lichid. În cazul în care s-auarsalmente în oală: Lăsați corpul oalei laÎnmuiat un timpÎnainte de aospãla.Nu folosiți niciodataÎnălbitor sau produse care continclor. În cazul în care sedeclansează unul+dentre sistemele de siguranta: Opriți sursa de caldură.Lăsați oala că seracească fãră a o muta.ʌshteptați saskobare indicatorul de siguranta și dischideti capacul.Verificăți și curăței supapa de functiorare (A),duzapourte evacuarea aburului, supapa de siguranta și garnitura.Asigurați-vă că ati respectatÎntocmai condițile deumplere.Dacă defectul persistă,duceți oala la verificat la uncentru de service autorizat Tefal. În cazul în care observațiaparotiția unor urme deoxidare: Utilizarea inoxului pentruamță nu impiedicaparotiția oxidării în cazuri extreme.Dacă observati urme de oxidare,eliminăti-le prin frecarea cu un bureteabraziv,Înainte de autiliza din nou oala sub presiune.
LABELUL DE GÄTIT
Legume
LEGUME
(PROASPETE)
ABUR
Se ADAUGă ingre-
dientele în coșul pentru
gătit la abur și 750 ml de
apă pe fundul oalei sub
presiune.
MAX
750 ml
INTRODUCERE
IN APA
Ingrediente în apă
fără coș.
IMPULSURI
INTRODUCERE
IN APA
Fără coș.
1/3 MAX1 Andive tăiate în jumătate (900 g) (la abur) 14 - 16 min Anghinare, 2Întregi, 600 g fiecare (introducere în apă) 30 - 35 min Ardei grași tăiați în jumătate (550 g) (la abur) 14 - 16 min min Boabe de fasole flageolet uscate, 250 g (introducere în apă) 35 - 40 min Boabe mici de fasole verde (600 g) (la abur) 10 - 12 min Buchțeile de broccoli, 600 g (la abur) 9 - 11 min Buchțeile de conopidă, 600 g (la abur) 10 - 12 min Cartofi tăiați în jumătate (950 g) (la abur) 20 - 25 min
(in functie de
dimensiune) Ceapă murataă (la abur) 7 - 8 min Ciuperci feliate, 800 g (introducere în apă) 4 - 5 min Dovleac tăiat bucăți (3 - 5 cm) 600 g (la abur) 13 - 18 min Dovlecei tăiați rondele (3 mm), 600 g (la abur) 12 - 15 min Fenicul tăiat fășii (600 g) (la abur) 6 - 9 min Gulii tăiate cubulețe (500 g) (la abur) 14 - 16 min Linte verde, 250 g (introducere în apă) 14 - 16 min Mangold feliat (2 cm), 700 g (la abur) 15 - 17 min Mazăre (la abur) 6 - 8 min Mazăre jumătăți 250 g (introducere în apă) 18 - 20 min Morcovi tăiați rondele (3 mm), 600 g (la abur) 17 - 19 min Praz alb Întreg, 650 g (la abur) 9 - 11 min Sfeclă roșie, tăiată în sferturi (introducere în apă) 20 - 25 min
(in functie de
dimensiune) Spanac (la abur) 3 - 4 min Sparanghel alb (la abur) 5 - 6 min Telină feliată (introducere în apă), 600 g 7 - 9 min Varză de Bruxelles (la abur) 10 - 12 min Varză verde și feliataă, 500 g (introducere în apă) 5 - 6 min Vinete decojite și feliate (3 mm), 850 g (la abur) 10 - 12 min
INTRODUCERE
İN APΑ
Fără coș.
MAX 1 CANTITATEA
DE APΑ CANTITATEA DE
OREZ TIMPUL DE
PREPARARE 2 PERSOANE 400 ml / 2 pahare 15 0 g / 1 pahar 7 -8 min4 PERSOANE 500 ml / 2,5 pahare 250 g / 2 pahare 6 PERSOANE 700 ml / 3,5 pahare 375 g / 3 pahare
Carne/peşte
PROASPETE CONGELATE Bucăți de mușchi de porc: 2 bucăți de 350 g 13 - 15 min 26 - 29 min Bucăți de mușchi de vita: 0,7 kg 17 - 21 min 33 - 38 min Cotlet de porc (0,8 kg, 8 - 10 cm diamétru) 30 - 35 min 1 orăși 5 min - 1 orăși 15 min Cotlet de vițel (0,8 kg, 5 - 7 cm diamétru) 17 - 19 min 37 - 40 min File de pește-undițar (1 kg) în bucăți de 75 g 5 - 6 min 7 - 8 min Fileuri de somon: 4 (0,8 kg) 5 - 6 min 7 - 8 min Fileuri de ton: 4 (0,7 kg) 5 - 6 min Friptură de vita (1 kg, 8 - 11 cm diamétru) 30 - 35 min 45 - 50 min Ilepure (1,5 kg în bucăți) 8 - 9 min Picioare de miel: 2 (0,95 kg) 40 - 45 min Prepeliță: 4 9 - 10 min Pui (1,35 kg) 23 - 25 min Pui tineri: 2 (1,3 kg) 23 - 25 min 40 - 45 min Rață (1,8 kg) 45 - 47 min 50 - 55 min Rulouri de vițel: 4 10 - 12 min
Notă: Pouru examplele cu 5 litriși sub 5 litri, asigurați-vă că cotleteleși carnea de pasăre nu depășesc marcajul de pe interiorul oalei. Alegeți cotleteși carne de pasăre cu o inălțime de 8 cm Sau mai puțin.
MEPbI 5E3OПАСHОCTN
Ipeed nCnoJb3ObaHnem cKOpOBapKn BHNMaTeNbHO 03HaKOMbTecb CO BCEMN INHCTpyKUmaM N BCeRda CneDyIte pyKOBOdCTBy NO 3KcPnyaTaun.
HenpaBnIbHoe nCnoIb3OBaHne moKet npUBeCTN K nobpeXdEHNm.
Дя Ваши 6e3oNaChOCTn HAcTOraIpyn npnbop COOTBeTCTByeT Bcem npIMeHmblm HopMaM n npaBnlaM:
-Директibe Дяборудованя,разаюцero pod давленим;
- Tpe6oBaHnI M K MaTePnaIam, KOHTaKTpyUOIm C NIIeBbIMN npOdyKTAMN;
- Tpe6oBaHnI M IO OxpaHe OkpykaIOUeI cpebl.
ОБЯ3ATEЛьнblE ПОВЕРКПЕPEDКЖдыIMNCПОЛьЗOBAHИEM ПОВЕРБTE
■При дnevом сбete, He 3a6илось Ли OTверстпдя Выхда па - рис. 13.
■шаркPrepoхсангову КлалаHa может Двигатьс - рис. 18.
■Прokладka Крblskи НхodITСя Рд КждыМ 3 п30В Крblskи - рис. 15.
■ручки EmKоCTN 3akpenlleHы праВильно. Ручки EmKоCTN YВЯЮТСя 3auntlbIMи DeТалям. Нкогда He 3amehayte ИХ самоctordельно. ВСЕГДАПИДЕРЖИВАИTECSВСLEДУЮШУКAZAHПОКЛЧECTВДЛ3АПOLHEHNY 3aирочаETСя ИСПОЛьЗОВATь SCOPOBAPКу 6e3 JИДКOSTNTOМOTМOTгпгпгпгпгпгпгпгпгпгпгпгпгпгпгпгпгпгпгпгпгпгпгпгпгпгпгпгпгпгпгпгпгпгпгпгпгпгпгпгпгпгпгпгпгпгпгпгпгпгпгNTMnMnMnMnMnMnMnMnMnMnMnMnMnMnMnMnMnMnMnMnMnMnMnMnMnMnMnMnMnMnMnMnMnMnMnMnMnMnMnMnMnMnMnMnMnMnMnMnMnMnMmMnMnMnMnMnMnMnMnMnMnMnMnMnMnMnMnMnMnMnMnMnMnMnMnMnMnMnMnMnMnMnMnMnMnMnMnMnMnMnMnMnMnMnMnMnMnMnMnMnMнMnMnMnMnMnMnMnMnMnMnMnMnMnMnMnMnMnMnMnMnMnMnMnMnMnMnMnMnMnMnMnMnMnMnMnMnMnMnMnMnMnMnMnMnMnMnMnMnMnMngTb MAX 2 B EMKOSTN. ДО И BO BPEМ ПИГOTOBLEН IЯ ■He octablaye detei no6n30ctn, korga ckopobapka nCNoIb3yETcra.■ПригOTOBLEнe PIIuB vCKOpOBAPke npOncxOJNT NOd dAbIeHnem. HeocToPoxKHOe nCNoIb3oBaHne moXet npINBeCT K OShnapIBaHnIO KInpTkom.пepeD BkIooHEnmckopOBAPK y6eIITecb,чTO oHa 3akpytda DoJxHbIM obpa3OM. Cm. pa3deN «3akpbivahne».■Bo BvEma prinotOBLeHnA 6blOda cIeInte 3a Tem,чTObI Kla Bcerda n3DaBaal rIyXoJ shum.Есин He BVixODHT DoCTaTOUHO r BvIpyCTte DabIeHnE i npOBepbTe hAnuHne DoCTaTOUHOro KOJIueCTBa JxIDKOCTn, a Tacke He 3acopeHо Ll OTBepCTne D BvIXOJa napa.Посл eTnx npOBepok, ecn napdo cIx npor Hb BVixODHT, hemHoro yBeJIuYbTe orOHB.■He rotOBbTe pOdyktb, kOTOpbIe MoryT 3acOpHTb OTBepCTn 3aIHTbIX Detalei: -Яrodu; -пeрIoBOvIky Kpyny; -OBcHbIe XIOnbBy; -cuxoI rOPOX; -lanluy, mAkapOHbI, cIaReTTI; -peBENb; -cMOpOdiHy.■Пri prinotOBLeHnI PIIuB v 3ToIckopOBAPke 3anpeuzaetc NcNoIb3OBAtB pezentbHa OCHOBE JxIBOTHOrO MOLOKa. -В сlyuae ckopOBAPKc C EMKoCTbU IN3 HepXaBeIOUe StaII N3Appe7aETcRA NcNoIb3OBAtB KpyHnyIO CoIb,do6aBbTe MeJIKy coIb B KOHcE prinotOBLeHnI PIIuN.ТakIM obpa3OM Bbl I36ExHte pOABLeHnA «PpOKoIbO», kOTOpbIe MOrIi 6bl PrINBeCTN K I3MeHEnIO DHa CKOpOBAPK.■He nCNoIb3yIte ckopOBAPKdIg JxAPKn IOd DabIeHnEM c pactiteIbHbIM MacIOM. 3aPere7aETcRA NcNoIb3OBAtB ckopOBAPKHe INo Ha3NaUeHnI 3aPere7aETcRA CTaBtB CKOpOBAPKBy B rOpyHuO dYxOBKy. HnkOrda He KlaIaIte He3aKpePllNeHHU OJIUMMHnEByU FOJIb NaФOPMOChy B CKOpOBAPKe. HnkOrda He KlaIaIte NoIIN3TnIeHOBuI PIIeHKn By CCKOpOBAPK ■Papb cInpTa leKo BOCnIaMeHmbl.пepeD 3aKpbIbAHnEM KpbIshKn DoBVeIte 6blIO DO KIneHnI B TeUeHne 2 MInHyT. Co6IouaIte OCTopOxHocTb ри prinotOBLeHnI 6blIod, coDeprXaIuX aIkoRoiB.■IcNoIb3yIte COOTBETCTBvIouIuI NCTOUYK TepNa corIaCHO IHCTpyKzIaM IO 3KcIpyaTaUuN. ПОСLE
ПРИROTOВЛЕ
ИЯ... ·Для модаел саHTипгарньIM NOКрыITием: He ИСПОЛБ3OBaTb
ВЕнчики и дугnemetаJIIMueckneилOCTрьeПриборы. He
пытайтесь удалNTь Вodyс prnборов NOCTykIBaHnEM NO 6oporty
emKoCTN BO u36exJaHne NOBpeJdeHnE ee NOBepxHocTN i
obpa3OBaHnY Teu.
·Постеенno NOВернite pa6ochny KIanah (A), Bbl6rab Wexelaemyu
ckopocstdeKekOMPecCn, n DOBeNTe erO Do NIKTORpambl- pnc.10.Если рпвыделениnpapa Bbl 3aMeTniK KaKne-lIb6
OTKIOHENry OT HOpMbI, yCTaHOBnTE pa6ochny KIanah (A)В
ПОLOЖЕнne prinrTOBLeHnY PIIuNlNDaBHeHnEM, a 3aTeM
BblONHIne 6bICTpyU DEKOMPecCnB XOJOIDHO Bode-Pnc.14.
·Если prpeOxpaHntelbHbI SterpKeHb (D) He onyckaetcra,
nomeCTte cKOPOBAPKy B xOJOIDHy BOy - pnc.14
·НikOrda He OKa3bBaIte BO3dEINCTBnE Ha 3TOT
prpeOxpaHntelbHbI SterpKeHb.
·Посте prinrTOBLeHnY 6bIod nI3 MЯca CnapyKHO KOKnuee
(Hanprimep, roBaxkbero r3bika), KOtpora MoKTe NaIyTbcra NOD
DAblenHem, He npokalbBaIte MЯco, KORda OHO HaxOДNTcR B
HaIyTom COCTOAHN, Bbl MOKTe O6KYeBCa KINIaTKOM.
PekomEndyETcRApoKOLOTb MAcO Do prinrTOBLeHnE PIIuNl.
Дяп пASTOO6b43bIX ПИSeBbIX PrOdyKTOB, KOTopbIE
pacShpiRyOTcR I/III INI PeHrTCBO BVPeM BApKn, TAKINX KaK pnc.
6O6OBbIe, cyseHbIe OBOUIN, ФркTOBbIe ПIOpe, TbIKBa, KabaKn,
MOPKOBb, KapToΦeNb, pbIbHoe ΦIe... OCTaBbTe cKOPOBAPKy Ha
HECKOJBKO MInHT DЯ NOXIAJDeHnA, a 3aTeM OXlaJdnte C
POMOuBIO XOJOIDHO BOnbl. Y6eINIBuINCb, YTO
prpeOxpaHntelbHbI CTePKeHb ONyCTINLcRA, CJIeRka
B36aIbTaIBye cKOPOBAPKy NepeD KajxDbIM OTKpbIbAHnEM, YTObIb
prpeOТВРаNTb pa36pbIzRbHAHnE py3bIPbKOB napa, KOTOpoe
MOKTe prinbceTn K OXIGAM. 3TO OCO6EHNO BaxKHO prn 6bICTpOM
BbIpycke napa IIN NoCle OXIAJDeHnA B XOJOIDHO Boe.
·СobIoJaTe MaKcIMaIbHnU OCTopoJXHOCTh Bprn nepeMeZeHn
cKOPOBAPKn IOd DAblENHeM. He prnkacaiTeCB K ropayHm
NoBepxHOCTbM. IcNoJIb3yIte puKn I KhoIKN. Prn
Heo6XODIMOCTN PONb3yIteCB nepCuATKAMN.
·Prn prinrTOBLeHnN CyIOB peKOMeHdYeM IcNoJIb3OBAtB
6bICTpyU DeKOMPecCnIO IOd XOJOIDHO BDOJ (CM. pynKKT
«3aBepSeHne prinrTOBLeHnR B pexiMe cKOPOBAPKn »).
·ПereD TemΚak OTKpbIb cKOPOBAPKy, y6eIITcB, qTO KJIaPahN
HaxOДNTcR B NOLOJKeHnN DEKOMPecCn. PrpeOxpaHntelbHbI
STERKHeB (D) DOJxHn HaxOДNTcR B HIXHem NOLOJKeHnN.
·Prn otKpbIbAHn cKOPOBAPKn He prnmeHnAte CINy. Y6eIITeCB
В OTCYCTBm DaBNeHn BHyTpR cKOPOBAPKn.
prpeOxpaHntelbHbI cTepKHeB (D) DOJxHn HaxOДNTcR B
HIXHem NOLOJKeHn. (Cm. parZdEe «PpeOxpaHntelbHbIe
yCTPOIcTBa»). yXOD •Есни ви ознаружinte, что кakая-lибо Deталь вашей скороварки слома на лл.Trecechуна, по в Koem слуае не побuyITE оTKpbITb ee,сяпona зakрыITA, дайеся полноctю OCTыТ, пекдучимпесмцаты, бolyшей поллпьзуITE ee и OTHEСITE B aВТОПИЗОВAHNBICервисны цentР TEFAL.
•He совершайte Нкakinx маниуляши СпразохсангелыIMN uSTpoiCTBamN, КрOME tex, КOTOPbie уka3aHbI B peKOMeHДAZAIONY NOчNTKE ИУХOD.
•ИспальзуITE тOLTКО opRUGHальные DeTANI TEFAL, COOTBEcTcByUOZne Baшey мodyел. В часточи, ИспальзуITE emKOCTb и КрБИШКу TEFAL.
•He IncPONb3yITE skorobapky ДЯханеня КИСых лл.
•Слегых SFLOДdo и ПОСLE р�И�OTВLEHNY, T.K. 3TO MOЖETпривешени K NOВPEJDEHNU OEMKOSTN.
•ВыIMоITE и onoloschinte skorobapky cpa3y яж пол;
•ИспальзOBAHNA.
•Нikordа He CTabBsTe pa6ochni KlaanH (A), pOKlaidky (I), TaIMep* (F) лл emKocTb сANTINpRnIparHbIM NOKpbITNeB INOCYDOMOEHyU MaShInHy.
•Hnkorda He Nomeeaite TaIMep* (F) по Bodу.
•НВ КОЕ сLYuae He IncPONb3yITE obe33apaxKIBaIOZne JxIDKOCTN лл xLORCOdePkaZne BeSeCTBa, KOToPbIE MOryt yXudshTb KaYeCTBO HePjKabeIoUeI CTaII.
•He 3amayuBaIte KpbIsshKуВ Вode.
•ОсуессвяITE zamehу пoklaidkn ExeERODNo лл.
•HemeДleHNO рri ee NOBpeKdEHN.
•Прошectedун 10 лет ekCplnyatazni Heo6xOДИMO
obЯstatelbHo пroBeprItb skorobapKyВ ceHTpe TexNueckoro obSclyKuBaHry TEFAL.
•При xpanenHn skorobapkn: nepeBepHnTE KapkIshKу Na
emKocTb,ЧТБыИЗБexKatb пекдeВpeMeHHORO ИЗHOca
прOKладку КрБИшКи.
COXPAHNTE 3TUYMHCTPYKUNIO
KOMNOHeTbI (cM. yCTpoiCtBO npu6opa)
A. Pa6oyn klaanaH
H.Kpbilka
B.ОтверстпдЯ Выисянaja napa
I. Прокладka
C. OTMeTka noJoxKeHnKlaNaHa
J. Kop3nHaДЯ npuroTOBHeHna napy*
D. Праздддддддддддддддддддддддддддддддддддддддддддддддддддддддддддддддддддддддддддддддддддддддддддддддддддд徴.
(см. раздал «Празддддддддддддддддддд徴.
устюпсь»).
K./L. Tpehora*
E.празхаHTeHbI KlaH
M. Ручка emKKOCTN
F. Taïmep*
N. OTMeTKMaKcImMaJIbHOrO yPoBHa 3aNoJIHeHnI
G.Pyka KpbIiKn
O. EMKoCTb
O6aTeIbHbIe npOBepKn nepei KaJdbIM nCpOJIb3OBaHnem
Поберka pa6oeryо klnanaHa

- y6eIntecb, yTO BbIXoHoe OTBepCTne pa6oeryo KlaanaHa He 3acopeHo (cM. nyHKT «ChrTne uYctaHObKa pa6oeryo KlaanaHa»).
Поберka пешохантыного КлanaHa

- Y6eIntecb, yTo y wapika npedoxpaHntbHoro knaHa HeT npenrTCTBn dJa DBnHexnra (ncnoIb3yIte naOouky).
Исpenb3OBaHne

BapkaВpeximeckopobapkn

PpHroTOBHeHne BpeXmE KaCTpOJn\*

Декомпессь
OTKpbIbAHne
- IpebeiTe pyky KpbIshKn n3 rOpN3OHTaIbHOro nIoJKeHnB BeptIkaJIbHOe - pnc. 3.KpbIsha noBopauuBaetcra.
-ПоднMuTe KpbIшКу.
Bcnyae BO3HKnHOBeHnra TpydHocTe npn OTKpbBaHn yCTpoNCTBa: nomeCTnTe npoknaIky noD BOy, a 3aTeM o6paTHo B KpbIshKy, He BbITnpa- pnc.19. Y6eIntecb, UTO npoknaIka XopoIo npoxoNT noD na3amn KpbIshKn - pnc.15.
3aKpbiBaHne
y6eintecb, yTo pyka KpbIshKn HaxoINTcB BepTKKaJbHOM NOLOKeHHN.
IomeCTnTe KpbIshky Ha eMKoCTb, KaK NOKa3aHo Ha pncyHke 1, coBmecTnB nlaCTMaCCOByIO DeTaIb C pyuKaMn eMKoCTn.
- IpepeBedeIte pyukky KpbIshKn IB BepTnKaIbHOro nOToXeHnB rOpN3OHTaJIbHoe - pWc.2.
KpbIka NOBopaunBaetc.
EcnBbl He MoXeTe 3aKpbItb KpbIshky:
- PpOBepe Te npaBnIbHoe nOIOxHe nPpOKnaIKn I npaBnIbHoe paCNOIOxKeHne KpbIuKn.
B Cnyae BO3HnKHOBeHnra TpydHocTe npn 3aKpbBaHn: NomeCTnte npOKlaKy noD BOny, a 3aTeM o6paTHo B KpbIshKy, He BbITnpaR - pnc. 19. Y6eInTecb, YTO npOKlaKa XopoIo npoxOHT NOd Na3amN KpbIshKn - pnc. 15.
Перboaецпользоване
-Дя модени саHTинригарныm NOKpbITnem: npOMOnTe n cnerka CmaXbTe pactNTeNbHbIM MacIOM BCE NOBepxHOCTN BHYTpEHReNo NOKpbITnA.
B 3aBnMoCTn OT MoJeH:
YCTaHOBNTe NOCTaBky\* (L) IN KOp3nHy dIy npuROTOBHeHna napy\* (J) Ha dHO eMKoCTn.
3aKpeIte nOCTaBky\*K)Ha KOp3HHe\*J)N yCTaHOBNTe INxHa dHO eMKoCTn.
3anonHnTe emKoctb (O) BOIOJ MaKcIMyM Ha 2/3 o6beMa (MAX 2) -pnc.5.
3aKpoTe cKOpOBapKy. BbipOBHnTe nIKTOrpamMy pa6ooyem KlaNaHe (A) no OTMeTKe nOJxehn (C)-pnc.9.


- YcTaHOBnTe cKOpOBapKy Ha NCTOuHnK TeNla N BKJIouHTe ero Ha MaKcMmaIbHyIO MOUHOCTb.
■Iocne toro kaK uepe3 Klaanah Haunet BbIeJbCn nap, yMeHbWnte MOUHOCTb NCTouHnKa TeNJa H OCTaBbTe B TaKOM NOJoxeHN Ha 20 MNH.
Yepe3 20 MmHyT BbIKJIOUHTe NCTOUYHK TENJa.
BbipOBHnTe nIKtorpamMy Ha pa6oem Klaanahe (A) no OTMeTke noJoxeHna (C).
Korda npedoxpaHntbHbI cTepeHb (D) onyckaetc, daBneHn B CKOpOBapKe 6oNbwe HeT.
OtkpoTe cKOpOBapKy - pnc.3
- NOMOHTe ee c nOMOUsbIO CpeICTBa IJRA MblTBa NOcydbI.
MnHmAlbHbI MaKcMaJIbHbI yPoBeHb 3aNoJIHeHna
MHHmym 250 mI (2 ctaKaHa)-pnc.4.
MaKcHym 2/3 BbICOTbI eMKoCTn, OTMeTKa MAX 2 - pnc.5.
3a nppeaaeTcnaonb30BaTb KpynHyo coIb,do6aBbTe MeNkyo cOJIb B KOHce npuroTOBHeHnA nn.
PpimeeHnno nncnoB3OBaHnIO HeKOTOpbIX npOdyKTOB nHTaHn:
Для nactOo6pa3HbIX nIuIeBbIX npOdyKTOB, KOtOpbie pacsnprTcra n/nnI neHrTcBA BpEmBaPkn, TaKnx KaK PNC, 606OBblie, cyuHbIe OBOUIN, fpyKTOBblie IIOpe, TbIKBa, Ka6aUKN, MopKOb, KapToΦeNB, pb6Hoe ΦnIe... He 3anONHnTe cKOpOBapKy 60nbIe Yem Ha 1/3 obbema (MAX 1). OctabIte cKOpOBapKy Ha HeCKoJIbKO MInHyT dIЯ OXJaXdEHHa, a 3aTeM OXJaIte C NOMOuBx OXIoJHOBbI. 1 y6eINBUnCb, UTO npEdoXpaHHTeNbHbI CTepXeHb ONyCTnICr, CJIeKa B36aNTbIBaIte cKOpOBapKy nepeD KaJDbIM OTKpbIBaHNEM, UTO6bl npEDoTbPaTITb

pa36pb3rNBaHne ny3bIPbKOB npapa, KOTOpoe MOxKET npNBecTn K OxKOram. 3To OC06eHNO BaxKHO pRn 6bICTpOM BblNyCke npapa NIN NOcNe OxJaXdEHN B XOJOnHOB OBe. Pn npriTOBHeHn CynOB peKOMeHdyem NcNoIb3OBA Tb 6bICTpyIO DeKOMPpeCCnIO B XOJOnHOB BoDe (CM. NyHKT «3aBepSeHne npriTOBHeHn B peKIMe CKOPOBAPKN»).
Испобзовные КОрзIHы对于我们ПрИТОВленья на napу_
HaJeIeTe 750 Mn BOJb Ha dHO eMKoCTn (O).
B 3abncmoctn OT moedn:
YcTaHOBnte NODCTaBky\* (L) IN KOp3nHy dIy npriROTOBHeHna napy\* (J) Ha dHO eMKoCTn.
3akpenite noctabky\*K) Ha Kop3nHe\*(J) n yctaHOBNTe INX Ha dHO EMKOCTN.


Bo BpemBaKn Ha napy npOdyKTbI B napOBoKop3uHe* He doJxHbI KOHTaKtIpOBaTb C BoD0i - pnc. 6 u 7.
IpoodyKtbl, nomeueHHbIe B napOByIO KOp3uHy, He doJxHbI npEbbIaTb ypoBeHb MAX 2.
Сятынистановka pa6oуero klaпана (A)
Дя сны рабочero Клана (A):
Cobmectte na3c OTMeKoI NOJKeHna KaIaNaHe (C), HaxaB Ha KOnbUO pa6Oyero KlaIaHa (A).
- y6epnte klaanah - pnc.11.
YctaHOBka pa6oeryo KlananaHa:
- YctaHOBnte pa6oHn KlaNa(A) - pnc.8COBMeCTNB MeTKy Ha pa6oHem KlaHaHe C OTMeTKoN NOJKeHN (C), cm. PNCyHOK PAnOM.

BCTaBbTe pa6oyn knanah (A), yTO6bl 3aΦnKcnpOBaTb erO ha cTepxKHe dIy Bblnycka npa.
HaKMTe Ha nKTOrpaMMbI pa6Oyero KnaNaHa (A) n NOBepHnTe.

Taimep*
He ncpnoj3yute TaMep B pexime 6e3 daBleHna.
Taimep npedHa3HaueH dIra TOrO, yTO6bl nOMoYb Bam oBecneuNb pe3yIbTaT npnroTOBHeHn IINs, N03BOJRA lyUwe perylnpoBaT noTppe6JIeHne 3Heprn. OH aBTOMaTnueCKn HauHaeT OTCHTbIBaT BpEmr npnroTOBHeHn PnN DOCTNXeHN TeMnepaTypbl, COOTBeTCTByUoSei peXIMy npnroTOBHeHn «CKOPOBapKa
Для pa6otbl taMepa OHdoJKeH 6bITb npNKpePJIeN K cKOpOBapKe
Bo Bpem npiroToBneHn 6IIOda cneIte 3a Tem, qTo6bI pa6oHn Klaan (A) perynarpo H3daban rnyxoi wum. Ecn kOnueeCTBO napa HeOCTaTOUHO, Hemoro yBeJIuYbTe MoUHOCTb NcTouHnKa TeIIa, B o6paTHOM clyuae - yMeNbUHTe ee.
1 Для вklюочень taимера нажмITE кногку. 2 Установ ITE Вера пригоровения (В мину tax). 3 Еслы ошлincь co Вераимпригоровень.
пожд ITE 4 скунда, рoka oronek посятама.
Затем нажмITE и уdeckхиваite Кногку за сбра. 4 ВklючITE Источник Телка на Мakсимальнию мошиость
harpeba. 5 Когда скороварka достигнет Temпepатурblьарки, taiМер
зазвен't и начнет оtcuet Вераими (цифры магаю).
УменьшITE мошиость Источник Телка.
ДиTeьныIM HaKaTNem Ha KHONky MoXHO 6pOcHTb I BbIKIIOuHTb TaIMeP.
YctahOBka n ChrTne TaMepa\*
Дя установки таймера (F) - рис 12 сачana BCTаБTe B MOдуны Ту чаТь, Гд НхОдЯТСЯ Клавиши, a 3aTeM HaЖмITE, YTOбы ппкpenNTь пOTиВОноLOжHyю CTОрHy.
-Дя сягся таймера (F) npионмITE n CHMITE erO.

3ameha 6aTapeiKn B Taimepe*
B TaImepe nCnoJb3yeTc8 6aTapeiKa-«Ta6NeTka» TInOpa3Mepa CR2032.
- Ecnn noBnEeTc CmBOJ n nn cCnn HnUero He OTO6paKaeTcH a KpaHe, 3aMeHnte 6aTapeNky.
Cpok cnjx6bl 6aTapeKn 3aBncnt OT yacTOTbl nCNoJb3ObaHna TaIMepa.
BaTapeiKa 3TOrO TaIMepa CoepKNT DImeToKcN3TaH N@ CAS 110-71-4 3TO COOTBeTCTByET EBPoneNCKM HOpMaM. B cIeJx 6e3OnaCHOCTn I OXpAHy OkpykaIOUSeI CpeBb: He BCKpbBaIte 6aTapeiKy, He NOdBepraIe ee BO3DeNCTBNU BbICOKNX TEMpePaTyP, He Bbl6paCbBAIte BmecTe C 6blTOBbIMN OTXoDAmN; BepHInTe ee B pYHKT c6opa nCNoJIb3OBaHHbIX 6aTapeek.

He donyckaetc nepe3apkKaTb Hepe3apkKaemble 3JeMeHTbl NtHaHna.
He cIeNyET nCNoIb3OBA Tb OJHOBpeMeHHO pa3nUHbI TUNbl 3JeMeHTOB NITAHN IIN60 HOBbie n pa3pXKeHHbI 3JeMeHTbl NITAHN.
- ΘηmeHTbl ΠιTaHЯДΟЛЖНБI 6bITb BCTaBNeHbI C co6JIIOdeHHeM NOJApHOCTN.
Pa3pJxHbI eJIeMeHTbl NITaHn cIeIyET n3BneYb n3 yCTpoiCTBa n yTINn3nPOBaTb 6e3OpanchbIM o6pa3OM.
- Ecnn yctpoiCTBO xpaHNTcN He nCnOJIb3yETcB TeueHne dIInTeJbHO BpeMeHN, CNeDyeT N3BLeuB IN3 Hero əJIeMeHTbl PNTaHn.
- BbIXOДнье KOHTaKTbI ПИТаHЯ He ДОЛЖНы 6ыITb KOPOTKO 3aMKHyTBI.
Pa6oTaIte Ha poBHOJ NOBepxHOctn.
- 4To6bl n3Bnueb 6aTapeNky n3 TaImepa, OTKpoTe KpbIshKy 6aTapeHoro OTceKa C NOMOuBIO MOHeTBI (CM. PNcyHOK).
3aMeHnTe 6aTapeKy.
- YctaHOBnTe npOKJaKy Ha npedHa3HaueHHoe Jn Hee MeCTO.
PacnoJoxKe TOnyMeCz a KpbIe 6aTapeHoro OTeKa HAnpOTnB NOnyMeCzHa TaMpe.
AkkypaTHO NOBepHnTe KpbIshky 6aTapeHoro OTceKa, cnerKa Haxmam, COBmecTnB NOLyMeCau Ha KpbIshke 6aTapeHoro OTceKa C KpyromHa TaImepe.
Pa6otaIte Ha poBHOJ NOBepXHOCTN, YTO6bl KpbIaKa 6blIpaCNoIoxKeHa ROpN3OHTaJIbHO.
He npnilaraTe cnny K KpbIwe 6aTapeHoro OTceKa npn 3akpbIBAHnn. PpN 3akpbIBAHnn Do ynpa He npokpyuBaTe daJIbWe.
Bcnyae yTepn Bbl MoKeTe npno6peCTn HObI TaIMep BO BCEx Haux aBTOpN3OBaHHbIX cepBnCHbIX ueHTpax TEFAL.

Hnkorda He nomeaate TaMep\* noD Body n He MoTe B nocydomoeuHou MaunHe.
He nCnoIb3yIte TaIMeBpeXmE 6e3 daBJeHna.
Ipeed npirotoBleHneM
-Перед Кадын Историяудате равочи Кларан (A)-psc.11и поверпгБИЗУАЛБНОИ на СВЕТУ,чTO OTВЕРСТЕ ДЯ BыИPSСКА па (B) He 3akynopeHo -psc.13.
- Y6eI NTecb, yTO npEdoXpaHntBHyI KJIaNaH NOdBnKeH (CM. nyHKtBi «OuNCTKa»)
«Оьзателыпpoверки пе徳 кждьIM Использованem»)- рс 18.
I06aBbTe nHrpeDneHTbI IN XnIDKOCTb.
3aKpoIte cKOpOBapKy - pnc.2
B clyuae Bo3HnKHOBeHn TpydHocTe npn 3aKpbBaHn: NomeCTIte npOKlaKy noD B0dy, a 3aTeM o6paTHo B KpbIshKy, He BbITnpaJ - pnc. 19. Y6eIntecb, yTO npOKlaKa XopoIo npoxOHT NOI Na3aMn KpbIshKn - pnc. 15.
YctaHOBtTe Ha MeTo pa6OuN KlaPAnA (A) - pnc. 8.
Bapka B peЖиMe ckopoВapКn
ПовернITE рабочи Кларан (A) в поожене за Варки в ржиме «Сkopоварка» - рис.9.
Ipei BkHoueHnem cKOpOBapKn y6eINTeCb, YTO OHa 3aKpbIta DOJXHbIM o6pa3OM - pnc.2.
YcTaHOBnTe cKOpOBapKy Ha nCTouHnK TePna N BkIIOHTe eRO Ha MaKcImaJIbHyIO MOUHOCTb.
Дя модень с таймером : установпесь врем пригоровеня, ука занhoe в рецпесу (см. раздел «Исторбогане таймера}).
IotppecknBaHne nDbIMOK, nCnyckaemble npeOxpaHntbHbIM CtepXHeM, -3TO HOpMaJIbHOe YBHeHne, OHN N03BOJIAOT BbInyCTNTb BO3dYx nepei npuROBHeHneM.
Воверема варки в ржиме «Сkopоварка»
YMeHbIHTe MoUHOCb NCTOuHnKa TeNla, ecn n3 pa6oeryo KlaanaHa (A) HenpepbIBHO BbIXODNT nap, n3DaBaJ NOCTOAHhBm HINPAuN 3ByK.
HaunhaIte OTCuHTbIBaTb BpeM npriTOBHeHn, yka3aHHoe B peCNTe.
Bo Bpemn npiroTOBJeHn6JIIOa CJIeINTe 3a TeM, yTO6bl KJIaIaN peryIpaHO n3daBaI rIyXoI shm. Ecnn KOInueCTBO BbInyCKaEMO rapa HeIOCTaTOUHO, HEMHO yBeInuYbTe MOUHOCb INCTOuHNka TeNla, B O6paTHOM clyuae -ymHeBUnTe ee.
3aBepseHne BapKn B peXnme cKOpOBapKn
Дя Вынунька па:
Iocne BbIKIOueHn IcTOUHnKa TePna CyuEcTByOT DBe BO3MOxHOCTN:
-Постений д ekомпесь: постениноовернite paбочи Кларан (A) иdoesTe erdo NNKTORpaMMbl - pnc.10.

-БыICTpaЯ DeKOMPpeccn B XOJODHO Bode: ONyCTNte yCTpoiCTBO B paKOBHy C XOJODHO BOJ.ДерЖNTe DHO CKOPOBAPKN B BOJe, NOKa PpeOxpaHITeJIbHbI CTepXKeHb He onyCTNTcR - pnc.14 Korda npeOxpaHITeJIbHbI CTepXKeHb (D) ONyCKaETcR, DaBHeHnB B CKOPOBAPKe 6OJIbWe HET. NOBepHITe pa6OuH KlaHaH (A) B NOJIOKeHne

3tan1

3Tan2
- Nocne 3TORO Bbl MOXeTe OTKpbITb CKOpOBapKy - pnc. 3.
B Cnyae BO3HnKHOBeHnra TpydHocTe npn OTkpbIBaHn yCTpoiCTBa: NomeCTnte npoknaIky nOJ BODy, a 3aTeM o6paTHo B KpbIuKy, He BblIupa - pnc. 19. Y6eIITecb, qTO npoknaIka XopoIo npoxoINT nOJ na3amN KpbIuKn - pnc. 15.
Ecn npn BbIeHnn napa Bbl 3aMeTnIn KaKne-Jn6o OTKIOHeHn OTO HopMbI, yCTaHOBnTe pa6OuN KlaPAn (A) BV NOLOXeHne npuroTOBHeHn IOd daBNeHnEm , a 3aTeM BbINOJIHnTe 6bICTpyU DeKOMnPecCnIO BXOJODHO BODE.
Ecn npedeoxpaHntbHbI cTepeXeHb (D) He onyckaetc, ocTydnte yctpoiCTBO B paKOBnHe C xOJOnHO BODo. DepeXte dHO cKOpOBapKn B BOde, noka npedeoxpaHntbHbI cTepeXeHb He onyCTNTc - pnc. 14.
HnkOrda He OKa3bIbAitc Te Bo3dEiCTBnE Ha npeOxpa HnteIbHbI cTepeXeHb.
Для пастообразипшьix пишьix пpoуктob, кOTOpbie paCUnpIOTcN/NIN INI INI INI INI BO BpeMBAрК, TaKnx KaK pnc, 6o6OBbIe, cyWeHbIe OBOUIn, fpyKTOBbIe NIOpe, TbIKBa, Ka6auchn, MopKOBb, KapToΦeNB, pb6Hoe ΦHne... He 3anONHЯITE cKOpOBapKy 6OJIbWe Yem Ha 1/3 obema (MAX 1). OCTaBBte cKOpOBAPKy Ha HeCKOJBKO MNHT dJa OXJaXdEHHa, a 3aTeM OxJaNTe B XOJODHO BoJe. Y6eINBUnCb, yTO IpeDOxpaHITeNBbI CTepXeHb ONyCTINcR, Clerka B36aTbIBaIe TcKOpOBAPKy nepei KaJdbIM OTKpbIBaHNEM, YTObI IpeDOrTbPaTtB pa36pbI3rIBaHHe ny3bIPbKBOB npapa, KOTOpOE MoKET npINBeCTN K OXIGAM. 3TO OCO6EHNO BaxHOb npN 6bICTPOM BblYcKe npapa IIIN PocNe OXJaXdEHHa B xOJODHO BoJe. Iprn IprnoTobLeHm cyNob peKOMeHyem nCNoJb3OBAtB 6bICTpyH DeKOMnPecCSHb XOJODHO BoJe (CM. INHKT «3abepseHne npiroTOBleHnB PexKIme cKOpOBAPKn»).

Пригоровские в реки м
кастюл\*

-Повернite pa6очий кларан (A)В поожене Дя ВаркиВ
peKIMe KAcTPOJRA" .HIN 3OM CNeDyeT npNIOXHTb yCInne,doCTaTOUHoe,yTO6bl nepeBecn yKa3aTeIb 3a npEdebl OTMeTKn NOLOKeHn DEKOMPeccnn.
-Перд Вкюченem ckopoВapКи y6eNTecb,ЧTO OHa 3aKpbIa DOJXHbIM 6pa30M - рс.3.
- YCTaHOBInTe CKOpOBapKy Ha NCTOuHnK TeNla, BKJIouHb erO Ha He6oJbUyIO MOuHOCtB.
HaunhaTe OTCuHTbIBaTb Bpem npuroToBneHn, yka3aHHoe BpeCNTe.
BpeKnme «KacTpioJra» Bbl MoKeTe OTKpbItb CKOpOBapKy B IIO6oe Bpemr, TTo6bl nepemeunBaTb, CneiNTb 3a npiroTOBHeHne NIIu NIIu Do6abTb INHrpEIneHTbl.
B clyuae BO3HnKHOBeHnra TpydHocTe, yTO6bl OTKpbItb yCTpOHTBO: NOMEcTHe npOKnAky nO B Ody, a 3aTeM o6paTHo B KpbIshKy, He BBITnpaR - pnc.19 n 15, n y6eINTEcb, yTO npOKnAka XopoWo npoxoINT nOd na3amN KpbIshKn.
- Ecnn TemnepaTpa CnNkOM BbICOKA, CKOpOBapKa MoXeT 6bITb 3a6NknpoBaHa (PpeOxpanTeNbHbI cTePKeHb (D) NODHmaeTcN 6Lokpye OTKpbBaHne), pyka KpbIuKN MOXeT He NOBopauNBaTbcra NII He OTKpbBaTb CKOpOBapKy. B TaKOM cnyy MeHbWNTe MOUHOCTb NII BbIKIOUHTe NCTOHHK TeNa. Ecnn BblncNoB3yeTe 3NeKTpueckyIO PINTy C CyryHHbIM HarpeBaTeNbHbIM 3JeMeHToM, CHMUTe CKOpOBAPKy C NCTOHHKA Tenna.
■Дя moJeIe c aHTnnpurapHbIM NOKpbITHeM: He nCNoJIb3yIte BeHcIKN iDpyrHe MeTaNueckne IIN OCTpBle np6Opbl. He cTprXnBaIte np6Opbl, CTya IMN NO KpaAM EMKoCTN, TaK KaK 3TO MOKeT NobpeIITb ee IN npuBeCTN K npOTEKaHIO.
Hnkorga He harpeBaIte Jnnp Oo obyrlBaanra. DbIM, o6pa3yUOuNc npn nprirotOBHeHnn Nnun, MoKeT npeCTabJIrTb ONaCHOCTb dJa XNBbIX OprAHN3MOB C OcO6O yBCTBHTbHOJ DbIXaTeHbHOJ CNCTeMOJ, TaKnx KaK PNTUcbl. BnaJeNbCaM PNTUc He cIeDyeT NyCKaTb INX B KYXHIO.
IpeoXpaHnteIbHbIe yctpoIcTba
CkopoBapka oShaueHa HeckoJIbKIMn IpeOxpaHHTeJIbHbIMN yCTPOJCTBaMn:
-ПпебхаHTeHoe yCTpoIcTBo npn 3aKpbBaHmN:
- Ecnn KpbIshka yctaHOBHeHa He npabINbHO nII Bbl 3a6bln CLOXHTb pyUKy KpbIshKn, nap 6yndet BbIXOHTb Ha ypOBHe ppeoXpaHntbHoro cTepxH(D), He dOnycka IOBbIseHn DaBHeHn.
-ПпебхаHTeNbHoe yCTpoIcTBo npn OTKpbIBaHmN:
- Ecni cKopOBapKa HaxoNTcI NOI DaBHeHem, IpeOxpaHTeJIbHbI CTepXeHb (D) HaxoNTcIB B BepXHeM NIOJXeHn IN pyUka OTKpbIBaHn/3aKpbIBaHn KpbIShKn (G) He DOJXHa HAXIMaTbcra.
- Hn B Koem cnyuae He nbItaTecb OTKpbITb CKOpOBapKy, npImeHra cnny.
-Heoka3bBaIte Bo3dEiCTBnE Ha npedeoxpaHITbHbI CTepKeHb (D).
-убeintecbВ TOM,чTO BHyTpEHHeeДaBHeHne ynaLo,пpoBepNB,ОиуctnIcRЯлnpedoxpaHnteHbI ChTepeXeHb (D)ВнжHee noloxHne.
-PyuKn eMKoCTn yBnIOTc 3aunTHbIMn deTaNMy. HNKoTa He 3ameHnTe nx camocToTebHo. HNKoTa He nCnoB3yIne dpYrne Moden pyueK.
- Ecni Bbl NOBepHynI pyk Ky OTKpbIBaHn/3aKpbIBaHn KpbIHKn (G) B BepTnKaJIbHOe IIOJKeHN, KOnda CKOpOBaPka 6bIJa eIe NOD daBHeHMe, Bbl He CMOXKeTe OTKpbITb ee. 3To o6ecneuBaET dOONHHTelbHyIO 6e3OnaCHOCTb.
-Повернite ручky образно В горионтальhoe поожени и поождente, пoka\
празхашистов сөрөнь (D) He onуctүгсВ ���хkeeш.
-Два пpeохсаньных устpoиства пи n36bITOчHom давлин:
- PepBoe ycTpoIcTBO: npedeoxpaHntelbHbI KlaanE (E) cHmae TaBneHne - pnc. 20
- Btopoe yctpoicBo: npoklaika nponyckaet nap uepe3 KpbliKy - pnc. 20
Ecn npca6aTbIbAeT OndHO n3 npedeoxpaHITebHbIX yCTpoiCTB n36bItoHoro DaBJIeHn:
BbIKIOUHTe NCTOCHK TeNla.
-ДаиTe ckopoВapKe NOHOCtblO OCTblTb.
- OtkpoTe ckopoBapKy.
■PpOBepeTe n ouHCTnTe pa6oyn Klaan (A), OTBepTne IJRA BblNycka npa (B), npedoxpaHnteHbI Klaan (E) n npoknaKy (I) - pnc. 16, 17, 18 Cm. pa3dJIbI «OuNcTKa» n «O6raTeHbIe npOBepKn nepei KaKdbIM nCNOlb3OBaHNEm
- Ecni nocne TaKo npOBepKn uNcTKn np6Op co3daeT yTeuKy uNn He pa6OtaeT, OTHecnte erO b yNoHOMoehhbl ueHtp texo6cnyxBaHna TEFAL.
Pekomehdaunno nCnOJb3OBaHNU
1 - nap, KOTopbI BblXoJNT uepe3 pa6OuN kIaNaH, oueHb rOpaH. BydbTe octOpOxKnbl CO cTpye napa.
2 -После тoro кak npedoxpaHntbHbI CTepXeHb NOHMMeTc, Bbl He cMOxKeTe OTKpbITb CKOpOBapKy.
3-CobioaTe octopoxhoctb npn pa6ote c 3Toi ckopoBapko, KaK n C pyrmm npnbopamn dIy npuroTOBneHn nn, eCnn Bbl nCnoJb3ye Te ee B6nn3n deTei.
4 - Перемаiteckopobapky3aДbepykneMkoCTn.
5-He xpaHnte B ckOpOBapKe npOdyKTbI nHTaHn. HnkOrda He hocnte ckOpOBapKy 3a pyUky KpbIshKn.
6 - Hn B Koem clyuae He nCnoIb3yIte 06e33apaxKNaIOUne XnDkoCTn nnXlopcOdepKaUne BeIecTBA, KOToPbIe MOryt yXyDIntb KaYeCTBOHepKaBeIOUe CTaII.
7-He 3amauNbaiTe KpbIshky B BoJe.
8 - OcyuaceTBJTe 3ameHy npokladkn ckopobapkn exeeroaHO nI npn ee nobpejdeHn.
9 -Чinctka скороварки осу戒指ваяется Толбков В OCTышем COCTОHMп ри пустов скороварke.
10 - По пошесън 10 leт Экплуатуин Heo6хоюmo 6ьнho npobepntb ckopobapky B ceHTpe TexHueckoro 6cnykBaHnЯ TEFAL.
UncTka
Дянадпжашио Функционироваяня скороварк посе кадоу ee NCПОЛьЗOBAHЯ HeO6xODIMO co6IIOdaTb peKOMeHdaци NO qNCTke n yXoDy 3a Hei.
IOTemHeHne n 4paHHbl, KOTOpBe MOryT Bo3HmKHyTb BOIEcCTBne dInTeJIbHOro NcNoJIbZBaHnA, He npEcdTaBIAJOT OBCHOCTN.
I3HOC BHeUHrO NOKpbITMRA (B 3aBnCmOcTNOt MoeJI), CBa3aHHbI C KOHTaKTOM C KpbIshKOJ eMKoCTM, YBJIeTCa HOpMaJIbIM.
Дя ckopoВарOK c aHTnnpurapHbIM NOKpbITHeM (B 3aBnCmOCTN OT MODEN): nerKne zuapanHbI N NOTepTOCTN, KOTOpbIe MOryT Bo3HnKHyTb npu NCNoJIb3OBaHn, He BnIAJOT OTPuCaTeNbHO Ha aHTnnpurapHbIe CBOIcTBa NOKpbITn.
■Iocne KaKdOrO nCnOJIb3OBaHnI npOMbIBaIte ckOpOBapKy TeNIOI BODoI Cdo6aBHeHem cpeIcTBA dIy MblbI pOcyIb. BblOnHJrTe TaKne Jke OepaunC KOp3INHOI IpNIroTOBHeHnHa napy*.
He noIb3yIteCb De3HnHnCnpyUoUMn XnKocTAMn nn BeueCTBaMn C coepKaHnem Xlopa.
He neperpeBaIte npcyTO eMKoCTb.
Для чистkn BHyтpeн Hei nobepxHocTn emKoCTn n3 HepXkBeIoUeI CTaII:
- PpomOnTe C NOMOu YnCTauey6Kn n CpeCTBa dny Mblbry NocydbI.
Bcnyae haHnue Ha BHytpenHei NOBepxHOCTn HepXaBeIOSeI emKoCTn paayKhbIX pa3BOIOB nn 6eNoBaTbIX CneIOB (MInHepaJIbHbIe OTIOKeHHa) OunchTe ee c Do6abIeHNem 6eNOrO yKcyca.
Дя ounstkn BHytpenHei nobepxHocTn aniomnHneBOI emKoCTN c aHTnpurapHbIM nOKpbITnem:
YTo6bI yBEnuHTb cPOK cnJx6bI n3denn, peKOMeHdyETcMbITb erO BpyHyIO.
- PpomOnTe C NOMOuMgKoRy6Kn, RopueB BObI n CpeCTBa IJMaMbITbnaocydbI.
He nCnoB3yIte YnCTaIe NOpOoK nn a6pa3NBhIe r6Kn.
- Ecni Niuia Nodrope, Hane Te B eMKoCTb ropuyIO BDOy I OCTaBbTe OTMOKaTb. 3aTeM NOMOIte ee C NOMOsbU CpeICTBa dJa MbITbI NOcydbl.
Дя очinctи Вhecній NOBepxHOCTN emKoctn:
- PpomOnTe C nOMoU bIO r6Kn I cpeCTBa IJRA MblbI NOcybl.
Emkoctb n Kop3nHy n3 HepXaBeoJe CtaJI MoxHO MbITb B nocydomDeHOn MaunHe.
He moite eMKocb c aHTmnpnrapHbIM nOKpbItnem (B 3aBNCMOCtN o MOdei) B noydoMoE OI MauHHe,TaK KAK MOIOUne CpeTBA B TabTeKax Coepkat ou eHb ar pecCBHbIe BeueCTBa N B b13bIBaIOT KoppO3NIO anIOMHHeBbX DeAJIeN.
При ИNTehCBHOM ИСПОЛьЗOBAHи EMKOCТИ с aHTINpRapHBIM NOKpbITnEM (В 3aBnCmOCTN OT MODeII) CBET NOKpbITMЯ MOXeT CJIeTKa n3MeHHTbCS (NoXeJIteHne, pIrHa).
ДячNTККрblшк:
- PpomOnTe KpbIuKy C NOMOuBIO r6Kn I CpeDCTBa IJRA MbITbra NOCyDbI.
PazmecHTe KpbIshky BepnkaIbHo, TIO6blaTb CTeybBOIaXoJaueiCmexdy MeTaJIInHeckIMN IN PIACTIKOBbIMN YCTaM N KpbIuK.
ДячNTК npOKlaДК KpbIшк:
- Nocne KaKdoB BapKn OunchTe npoknaKy (I) n MeCTO ee yctaHOBKn.
- YctaHOBNTe pOKnAky cm. - pnc.15 ny6eHntecb, TTo npOKnAka xopoIo npoxoIIT NOd KaXdbIM Na30M KpbIshKn.
Дя чисткpa6оуero клanaHa (A):
13BneKeTe pa6oyn KnaanA(A)-pnc.11.
OuHCTnTe pa6oyn Klaan (A) noD cTpye npToOH BODb -Pnc.16.
PpOBepbTe erO NOBnXHOCtB: CM. pUCyHOK.

Pocne cHraTna pa6oeryo Klanana (A), npoklaKn (I) n taMepa\* (F) Bbl MoXeTe MbIb KpbIshky B noc ydomoeyHOn m aunHe.
HnkOrda He cTaBbTe pa6oum Klaan (A),ynloTHnIeIb (I), TaMep\*F) nIeMKoCTb c aHTnPi rApHbIM NOKpbITnEM Bn OcyOmo eHyIO MaunHy.
Дя чьки OTверстя за Бынуcka па (В), распожению по Крбшков:
-Симmate Кларан (A) - рис. 11.
■Ipeep KaKdbIM NcNoB3OBAHHeM IpOBepbTe BN3yaJbHO Ha CBety, YTO OTBepCTne IIN BbInycka npapa OTKpbIto IN ABJIeTc KpyrIbIM - pnc. 13. Pn Heo6xOdmoctn Ounchnte ero c NOMOuBIO 3y6OuNCTKn - pnc. 17 n IpomOnTe ere.
Ynctka npedoxpaHntbHoro klanana (E):
OuHCTnTe YacTb IpeoXpaHntBHO KlaNaHa, paCNoJoxeHHyO BHyTpN KpbIiKn, onOIOCHyB ee BOIo.
■PpOBepbTe erO cyHKUHOHnpOBaHne, cnIbHo HaxKaB BaTHo nAIOUcKoHa shapNK, KOToPbIdoJXeH6bITb NODBnXhBIM - pnc. 18. Cm.pa3dEe «O6aTeJIbHbIe npOBepKnpePe KaJDbIM NCNoJIb3OBAHHeM»
Дя оочтки таймера* (F):
IcnoNb3yIte YnCTyIO, cyXyIO TkaHb.
He nCnoB3yIte pactBOpnteJI.
Hnkorda He nomeaTe TaMep NOBdy HHe MoTBe B NocydomoeyHO MaunHe.
yxo
3ameHa npokladkn ckopoBapKn:
OcyuEcTBnIe 3aMeHy npoknaIckopOBapKn exeRoIHO nnn npn ee NOBpeKdEHH.
■IcnoIb3yIe TOnbKO opuHaJIbHyIO npoklaKy TEFAL, COOTBeTCTByIOUOmoJeIN np6opa (cm. pa3dEIN «AKececcyapbl»).
- YctahOBInTe npOKnAdKy cm. - pnc. 15 ny6eInTecb, YTO npOKnAdKa xopoWo npoxoINT NOd KaJdbIM Na3OM KpbIshKn.
XpaHeHne cKOpOBapKn:
-ПометиTe Кршу Ha emKocb 6paTHoN CTopoHoiN.
MexaHn3M OTKpbIBaHn/3aKpbIBaHn cKOpOBapKn He Tpe6yeT KaKOro-n60 cNeuaIbHorO 06cnyXuBaHn, Kpome YnCTKn.
No npoosteBn 10 let kcnnyataun Heo6xOaMn 06a3aTeNbHO npOBepntb ckopOBapky B ceHTpe TexHnueckoro 6cnykBaEHAL.
Akceccyapbl TEFAL
-ImeIOTcB npOaXe cIeIyUoIne aKceccCyapbl Ira ckOpOBapKn:
АкCEDСуары ApТИКУЛ Прокладka 3/4/4,5/6 Л: наpopжный диаметр\
празладки: 24 см X1010008 5/7,5/9 Л: наpopжный диаметр\
празладки: 27 см X1010007 КорзINA за\
Приноговленna\
на пapy* 3/4,5/4/6 Л: ддя emковости диаметром 22 см 792185 5/7,5/9 Л: ддя emковostи диаметром 24 см 792654 ТренORA* (L) 792691 Таимер* X1060007
■Pn Heo6xOIMOCn 3aMeHbI dpyrnx DeTanei nn peMOHTa o6paauTeCb B yNoHOMOeHHbI ceHTpbI Texo6cnyKuBaHna TEFAL.
Icnojb3yIe TOnbKO opnHaJIbHbIe deTaN TEFAL,cooTBeTCTByIOUne BaSei MoJeN.
XapakTepnCTnKn
Диаметр да скороварк — ХаразКерпстнк
Вмechи-
Тeelьноctь Ф
смкости Ф да Clipso
Minut*
Perfect / Easy Clipso
Minut*
Duo couleur Clipso
Minut*
Duo Gourmet Матерnam
смкости 3л 22 cm 1 5.5 cm P46205 -- Нерхавецочая
Сталь 3л 22 cm 1 8 cm - - P46605 4л 22 cm 1 4 cm - P46042 - Аліюиний с
покрсытейем 4.5л 22 cm 1 5.5 cm P46206 -- Нерхавецочая
Сталь 5л 24 cm 1 4 cm - P46051 - Аліюиний с
покрсытейем 5.2л 24 cm 2 20 cm - - P46654 Нерхавецочая
Сталь 7.5л 24 cm 1 8 cm P46248 -- 9л 24 cm 1 8 cm P46249 -- Set 5л
7,5л 24 cm 14 cm P46353 - 18 cm
Matern Kpbikn: Hepkaeoua TcJIb
TexHueckaMHΦopMaζη:
MaKcImaJIbHoe pa6ooyee daBJeHne: 65 KPa
MaKcImaJIbHoe 6e3ONaChoe DaBHeHne: 120 KPa
CobmecTmMbIe NCTOCHNKe Tepla
T3OBARIINTA 1NEKTPUHECKAR IINTA
CTEKJIOKEPAMUHECKARIITTA
INHUYKUHOHHARIITATA
3NEKTPUQECKARIINITA (CnpanbHnHarpeBaTeBnBn 3nEMENT)


- CkopOBapka MoXeT NcNoIb3OBAtbcra CO BcEMn HarpeBaTeIbHbIMn np6OpamN, B TOM YnCNe INdYKcIOHHbIMN.
-Прн ИспОьВаHи ЭлЕКТрИчЕСКО ИИ ИНДуКУNOHΟИ ПИNTы ДИАМЕТР HarpeBaIOUSeI NOBepxHOCrДОЛжeH 6bITb paBEH IIN MeHbWe DnAmETpa DHaCKOPOBaPkn.
Pn nCNOB3OBaHn CTeKNOKepaMuecko NITbI y6eNTecb, YTO dHO EMKOCTN uNCTOE.
-Прии Исторбовань ra3OBbIX HarpeBaTeIbHbIX np6OpOB Памя He DoJIxHO BbIXOДNTb 3a Краз EMKOCtN.
-При Исторьанни на BCex HarpeBaTeIbHbIX np6opax y6eIITecb,чTo ckopoBapka pacnoJoxeHa no ueHTpy nCTOuHnka TeIIa.
TapaHTy
-При ИСЮЛБЗОВАнь В COOTBETCTBИ N C INHCTpyKцЯMu NO ᶈКСПУаТAUИ На EMKOCTb ckopoВapки TEFAL n3 HEPЖавeIOUSeI CTaII paCnpoCTpaHЯTcR rapaHTNcspOKOM 10 letВ cIvyae O6HApJxKeHnA:
JIIO6bIX DeΦeKTOB, CBa3aHHbIX C MeTaJIInueCKOJ KOHCTpyKUneI emKOCTN;
- lioboro npexdebpeMeHHoro pa3pyuweHna 6a3OBoro MeTalna.
Ha octaJIbHbIe MaTePnaJIbI eMKoCTn I Bce dpyrme qacTn cKOpOBapKn paCnpocTpahReTcra rapaHTnA OTeΦeKTob N3ROTOBHeHn NII MaTePnaJIOB Ha npotjKeHn rapaHTmHoro Cpoka, ONpeDeIeHHoro DeiCTByIoUIm 3aKOHODaTeNbCTBOM B CTpaHepno6peTeHn, HauHnA C DaTbI NOKyNKn.
-Данна rapaHTma MoKet 6bITb npeIoCTaBNeHa npn npeIbYBHeHm KaccOBOrO
Чеки Счета, NOdTBepKdaIOUsoero Daty NOKynK.
JaHHa rapaHTnHa HeJeicTBtEnbHa B CneNyUoxn Cnyuayx:
- UapanHbI n oBecuBeuBaHne u3-3a cTapeHn, dIe emKocTec aHTnPurapHbIM NOKpbITnEM.
LapannHbI OT KOHTaKaT KaBik C eMKoCTbIO c aHTnnpurapHbIM NOKpbITnEM.
-При поврждених BCпсдгове Heco6лodeня BaxKьIx Мер пpeДОТОРЖHOCTNIIHHePpAunbHorO nCNoIb3OBaHnR, a IMeHHO:
- ydaopoB, nadeHn, HaraepBaHnB DuyXOBOM uKafoy;
ToIbKO yNoJHOMOeHHbI ueHTpbI Texo6cLyXnBaHnA TEFAL nMeIOT npaBO npedocTabHeHnra rapaHTn.
-Просим обрацаься по телефону гораяй линь в ближайший упогимоуновский сизергдддддддддддддддддддддддддддддддддддддддддддддддддддддддддддддддддддддддддддддддддддддддддддддддддддд徴псггггггггггггггггггггггg
HopmatNBHbIe OTMeTKn
Оtmета PacnoLOжения Товарнызнak Ha Крышke Гор и пapлииотовлия
Артыкун модали
Мakсималъ窠 6еозапочь давлие (PS)
Мakсималъ窠 рабочь давлие (PF) Ha Крышke Вмостителовость Ha наpopжном дne emkocstn Почтовий adrec поизвoditsя Ha наpopжном дne emkocstn
Bhecem BknaB OxpaHy OkpykaIoUeI cpebl!

①Baш пибор содерхит цьий рад цEHьIX DeTaIeN, KOtOpbl MOrTy 6bITb NOBTOpHO INCNoIb3OBAHbl.
OTHeCnTe ero Ha nepepa60Ky B nyHKT npHema 6bITOBbIX OTXODOB.
TEFAL OTBeuaet Ha BaShn BOnpOcbl
Helen�аадки Рекомен
Даци Если Крьшka
OTКрьВаеТСАЗрь
ВаеТС Студом: Снимпгппорokладу иnomecтITE eeВ Вody.
Установпге eeHa MeCTо, He BvItupaR рnc. 19. Если Вы He можete
ЗakрьТь Крьшку: П探测ыт, нахочтся лу рчka КрьшкВ в Бернкальног
паложени.
П探测ыр паслоожени поладк(см.раздел «Чиска
ухд).
Убechтесь, чTo Крьшka установке, кak пokaазно на
псухнke- рис 1.
Пометichte поладкВ Вody, a 3aTeM образно в Крьшк, He
Бвтирая - рис. 19.Убechтесь, чTo поладka xopoш
п探测пд по пазампрьшк рис. 15. Если Skороварka
нагрелась по
давлием 6e3
Жидков STN BNYTPN Hee: П探测ыт сокороваркВ уралногонунHom цentpe Тхоб-
служваимя TEFAL. Если
п探测ханител新股ь
исторжны
Барки He
Выделятca nap
чeredesklanah: Это Нормально перьгie Heckольк MOHуT: ЭTO ПОЗВOLЯET
Вылчstпь BOZdux перд пригоровелейem. Если
п探测ханител新股ь
исторжны
Барки He
Выделятca nap
чeredesklanah: В точенье перьгx Heckолькx МИуT ЭTO HOPмальhoe
Явlene.
Если Нчero He Meяется, п探测ыт:
- Достаточа лу мошноctь Источиka Tepla.Если мошноctь
Небочачona - увелочte ee;
- ДостаточиLO ЛКOLИЧECTBO JИДКOSTNВ EMKOSTN;
- Нхочters LA pabochy KMланA(B NOLOJENH)
- ПLOTно лу зakрытс skopobarрka;
- He Nobpeждега лу покладka пи Край EMKOSTN;
- павиьно лу установела покладka. Если
п探测ханител新股ь
исторжны
Барки He
Выделятca nap
чeredesklanah: В точенье перьгx Heckолькx МИуT ЭTO HOPмальhoe
Явlene.Если ЭTO явлиеные He NCue3aET,oxlaДпte устюг;
В рakOBиne похал'dоь ВODо.Держп'te Дно сокороваркВ
Воide,пoka п探测ханител新股ь StperжED(D) He onyctITcR.
ОчSENTе пбочи KMланA(A)- рис.16и OTberpctme Ду
ВылчSCa пара - рис.17и убechтесь,чToшарк
п探测ханител新股ь KMланa ВдавлinaBaETcR 6e3 3atprudheni
- рис.18. Helenonadkni Рекомендаци Если ИЗ-пов Крblшки Выхочт nap, a поедханителовский Ст装配ов нахочтся в Нжнem поожени, поеверные: Надлесашие з akрыванные Крblшки. Порожени поковдддддддддддддддддддддддддддддддддддддддддддддддддддддддддддддддддддддддддддддддддддддддддддддддддддд徳.
Надлесашие состаяп поковддддддддддддддддддддддддддддддддддддддддддддддддддддддддддддддддддддддддддддддддддддддддддддддддд徳
ЧИСТОТУ Крblшки, поковддддддддддддддддддддддддддддддддддддддддддддддддддддддддддддддддддддддддддддддддддддддддддддддддд德.
Надлесашие состаяп поveyній и мeledэоуній в Крblшke.
Надлесашие состаяп края emkoctи. Если Вы He можete ot-Kрblть Крblшку: Убадиесь, чTo поедханителовский Ст装配ов (D)Надлеся в Нжнem поveyній.
В потуговом сныаe ВыpoлнITE Dekomпразссю: OCTудпite устристwo в рakobице схолонов Bodои. ДержITE дноckeportов в Bode, пoka поедханителовский Ст装配ов在他 onустя. He давпite на поедханителовский Ст装配ов (D). Поверни рабочи Клалан (A) в требуеме поожени. Если поедукты He dove-deны до ratovostru fini noydropeи, поеверные: Вревни рогotовеля.
Мошноctь Incstouнka Teplа.
Надлесашие раслоожени рабочero Клаланa(A).
Колчесто в лindkoctи. Если поедукты в скороварке погорουп: Пereştem Кам Вимьть EMKOCTь, порузitsе gee на нековоторoe Вremя в Bodу.
Нь в koem сныаe He пользуитесь обоззаржваюшmicи жidкостя'mи илорсODEржачшmicи BEseCTBamn. Если срабatable вет odnoи з поедханителовьх устриств: Выкlioочи Источник Телл.
Даite скороварке остыть, He nepe'dvигая gee. Дождпесь,
пoka поедханителовский Ст装配ов onуститсу, и оскроче скороварку.
Проберные пооч_STITE рабочи Клалан hotbercente对于我们
Былуха пара, поедханителовский Клалани поковлдддддддддддддддддддддддддддддддддддддддддддддддддддддддддддддддддддддддддддддддддддддддддддддддддддdддддддддддддддддддддддддддддддддддддддддддддддддддддддддддддддддддддддддддддддддддддддддддддддддддд
Убадиесь в ТOM, чTo указаня по Habоленю Выpoлнеши.
При Невозможhoe STIN YSTPANENHЯ НEVCSNPAHOTN
OBPATITCEB B UPOJHOMOUEHNY CEHTP TEXO6CNUKBAHNY TEFAL Деля поеварки рпбopa. Если Вы замени появени Stedob OKисlenя: Исплъзование Высокokаочевною Нержавець Stали He поедOTВрацаet появенип рпзнakов Okис-
stenя в Крайнх Stclуая.Если Вы замени Stedby Okис-
stenя уда当然是 появени Stclуая.Если Вы замени Stedby Okис-
stenя уда当然是 появени Stclуая.Если Вы замени Stedby Okис-
stenя уда当然是 появени Stclуая.Если Вы замени Stedby Okис-
stenя уда当然是 появени Stclуая.Если Вы зamени Stedby Okис-
stenя уда当然是 появени Stclуая.Если Вы зamени Stedby Okис-
stenя уда当然是 появени Stclуая.Если Вы зamени Stedby Okис-
stenя уда当然是 появени Stclуая.Если Вы зamени Stedby Okис-
stenя уда当然是 noявени Stclуая.Если Вы зamени Stedby Okис-
stenя уда当然是 noявени Stclуая.Если Вы зamени Stedby Okис-
stenя уда当然是 noявени Stclуая.Если Вы зamени Stedby Okис-
stenя уда当然是 noявени Stclуая.Если WbZStaMuTb3OBaTb CkoporOBapky ChOBA.
TABJIUNCA BPEMEHN IPNIROTOBJEHN
Obou
OBOU (CBEXKNE)
HA NAPY
INHrpEneHTbI B KOp3nHKe-napOBapKe n 750 mI BObl Ha dHe cKOpOBapKn.


BBODE
HrpeIneHTbl norgyKeHbIBBODy6e3 KOp3nHKn.
IMNpyIbCHbIPEKIM
B BOIDE
Бe3 kOp3nHKn.


1
1
#
1
1
#
1
1
#
1
1
#
1
1
#
1
1
#
1
1
#
1
1
#
#
1
#
1
1
#
Артышоки, 2 цьых по 600 г кажды (В ВODE) 30 - 35 мин. Баклajжан, 6e3 shkpки, наразецянный ковцам (3 м), 850 r (на пapy) 10 - 12 мин. Болгарский поец,разразецянный поолam (550 r) (на пapy) 14 - 16 мин. Бриюssельская калуста (на пapy) 10 - 12 мин. Горox (на пapy) 6 - 8 мин. Грибы,разаные, 800 r (В ВODE) 4 - 5 мин. Калуста, зеленая нашинкованна, 500 r (В ВODE) 5 - 6 мин. Картофел,разразецянный поолam (950 r) (на пapy) 20 - 25 мин. (В заразсимостп от размера) Лун поей 6елы, цelenkom, 650 r (на пapy) 9 - 11 мин. Луненьий поух, 250 r (В ВODE) 18 - 20 мин. Манrolьд,разанны (2 с), 700 r (на пapy) 15 - 17 мин. Маринованный лук (на пapy) 7 - 8 мин. Мелкаяструковая phасль (600 r) (на пapy) 10 - 12 мин. Морковь, наразецянся кружочкам (3 м), 600 r (на пapy) 17 - 19 мин. Рара,разаная кubikам (500 r) (на пapy) 14 - 16 мин. Свекла, красаня,разразецянся на чевертунки (В ВODE) 20 - 25 мин. (В заразсимостп от размера) Сенида佩с,разаны, 600 r (В ВODE) 7 - 9 мин. Соцовая борожал, 600 r (на пapy) 9 - 11 мин. Соцовая цetной калусты, 600 r (нa пapy) 10 - 12 мин. Спаржа, селиа (нa пapy) 5 - 6 мин. Тыква,разаная кусочам (3 - 5 с), 600 r (нa пapy) 13 - 18 мин. Фасаль phяжole, сученя, 250 r (В ВODE) 35 - 40 мин. Фechхень, поpezанный полосам (600 r) (нa пapy) 6 - 9 мин. Цирорий салатный,разразецянный полам (900 r) (нa пapy) 14 - 16 мин. Чукуши, наразецянный кружочам (3 м), 600 r (нa пapy) 12 - 15 мин. Ч ueveица, селиеня, 250 r (В ВODE) 14 - 16 мин. Шпинат (нa пapy) 3 - 4 мин.
Pnc
В ВОДЕ
БeЗ корзий.
MAX 1 КOLичECTBO BОДы KOЛичECTBO
PИСА ВРЕмя ПИГо-
TOВ-ЛECHИ 2 ПОЦи 400 м. / 2 стakaHA 15 0 r / 1 стakaH 7 - 8 мIn.4 ПОЦи 500 м. / 2,5 стakaHA 2 50 r / 2 стakaHA 6 ПОЦи 700 м. / 3,5 стakaHA 3 75 r / 3 стakaHA
MЯсо/pьба
CBEXKHE 3AM OPOXKEHHbIE Барань похka - 2ш. (0,95 кг) 40 - 45 мин. 1ч.05 мин. - 1ч.15 мин. Кролк (1,5 кг кусочам) 8 - 9 мин. 20 - 23 мин. Курпца (1,35 кг) 23 - 25 мин 1ч. - 1ч. 10 мин. Перенька - 4ш. 9 - 10 мин. 18 - 20 мин. Повьети з телатиные - 4ш. 10 - 12 мин. х Росьф (1 кг, диметром 8-11 см) 30 - 35 мин. 45 - 50 мин. Свиная виpeзka (0,8 кг, диметром 8-10 см) 30 - 35 мин. 1ч.05 мин. - 1ч.15 мин. Свинoe Фи LE-MINьон -2 к уся по 350 r 13 - 15 мин. 26 - 29 мин. Сөнүлөлөдөнү - 4ш. (0,8 кг) 5 - 6 мин. 7 - 8 мин. Сөнүлөнү тунца - 4ш. (0,7 кг) 5 - 6 мин. 7 - 9 мин. Телаяbbe Фи LE-MINьон 0,7 кг 17 - 21 мин. 33 - 38 мин. Телаяbbe виpeзka (0,8 кг, диметром 5-7 см) 17 - 19 мин. 37 - 40 мин. Утka (1,8 кг) 45 - 47 мин. 50 - 55 мин. Фиille морского черта (1 кг), кусочам по 75 r 5 - 6 мин. 7 - 8 мин. Цыленик - 2ш. (1,3 кг) 23 - 25 мин. 40 - 45 мин.
DÔLEŽITÉ PREVENTÍVNE OPATRENIA
Dókladne si prečitajte vsetky pokyny a vždy postupujte podla
"Používatelskej príručky".
Nevhodné používaniemöze mat'za následok poškodenie zariadenia.
Pre vašu bezpečnost je tento prístroj v súlade s platnými normami a predpismi:
- Smernica o tlakovych zariadeniach
- Smernica o materialoch, ktoré prichádzaju do styku s potravinami
- Smernica oŽivotnom prostredi
NEVYHNUTNÉ KONTROLY PRED KAŽDYMPOUŽITÍM SKONTROLUJTE
vizuálne, Či kanálik na odvod pary nie je zanesený - obr.
13.
Či je gulôčka bezpečnostného ventilu pohyblívá - obr.
18.
Či je tesneniePokrievky vložené do všetkíchdražok naPokrievkě - obr. 15.
Či su rúčky na námode správné pripevné. Rúčky na námode predstavujú bezpečnostné privky. Nikdy ichnevymieñajte sami. VŽDY DODRŽIAVAJTENASLEDUJUCE MNOŽSTVÁ Tlakový hrniec nikdy nepoužívajte bez tekutiny, mohlódǒjst' k vázznemu poškodeniu hrnca. Počas prižravy Jedlakontrolujte, Či vždy obsahuje dostatočné množstvo tekutiny.
Minimálne množstvo 25 cl - obr. 4.
Maximálne množstvo 2/3 výšky námody, značka MAX 2 - obr. 5.
Počas prižravy jegál naparovaním potraviny vnaparovacom košiku nesmú príst' do kontaktu svodou - obr. 6 a 7.
Maximálne množstvo v pripline džažlavých potravín, ktopočas varenia zväčsujú svoj objem alebo penia akonapiуza, strukoviny, sušená zelenina alebo kompóty, tekvičcukety, mrkvy, zemiaky, rybie filé..., je 1/3 (MAX 1).
Potraviny, ktoré su položené v naparovacom košiku, niknésmú presiahnut úroven MAX 2 na námode. PRED A PO VARENÍ ·Počas používania tlakového hrnca nenechávanté deti v jeho blízkosti.
·V tlakovom hrnci sa varí pod tlakom. Nesprávné používaniemöze viest' k poraneniu oparením. Ubezpečte sa, ze tlakovýhrniec je správné zatvorený, až potom ho spustite. (Pozri odsek „Zatvorenie").Dbajte na to, aby ventil počas varenia stále syčal. Ak neuniká dostatok pary, vykonajte dekompressiu vyrobku a skontrolujte, āj je v šom dostatok kvapaliny a āc kanálik odvodu pary nie je zaneseny. Ak para neuníká ani po tychtokontroláché, mierne zvyšte teplotu zdroja tepla.
·Nepripravujte potraviny, ktoré by mohli zaniest' kanálikybezpečnostnéch prvkov:
- brusnice
- perlofé krúpy
- ovsné vločky
- lúpaný hrášok
- rezance, makaróny, špagety
- rebarbora
- ribezle
·Vo svojom tlakovom hrnci nikdy nepripravujte recepty svyuzitím Živočíšneho mlieka.
·Ak máte tlakový hrniec s nádobou z nehrdzavejúcej ocele,nepoužívajte v šom hrubozrnú sol, pridávajte iba jemnú sol' na konci varenia. Zabrante výskytu „dierok" na dne tlakového hrnca, ktoré by ho mohli poškodit.
·Tlakový hrniec nepoužívajte na vyprážanie pod tlakom naoleji.
·Tlakový hrniec nepoužívajte na iné účely ako na tie, na ktoréje určený.
·Tlakový hrniec nikdy nedávajte do horúcej rúry na pečenie.
·Do tlakového hrnca nikdy nedávajte formu s hliníkovou fóliou.
·Do tlakového hrnca nikdy nevkladajte plastovú fóliu
·Alkoholové výpary sú horlavé. Nechajte majpriv prblížne 2 minúty vrieč, až potom založtePokrievku. Pri prižrave{jedána báze alkoholu dohliadajte na spotrebič.
·Používajte kompatibilný(é) tepelný(é) zdroj(e) na varenie v súlade s pokynmi na používanie.
PO UVARENÍ...
Pre modely s nepril'navym povrchom: nepouzivaje slahace ani ostre ci kovove prislu'senstvo. Pristroj nevylievajte takym sposobom, ze budete klepat naradim na okraj nadoby, pretoze moze dojst' k poskodeniu a vzniku netesnosti.
Postupne otáčajte prevadzkový ventil (A)a podla svojho uvaženia vyberte rychlost dekompresie, aby ste skončili oproti značke na piktograme - obr. 10. Ked' počas uvol'novania pary spozorujete nezvyčajné vystrekovanie, dajte prevadzkový ventil (A)do polohy varenia režimu „Tlakový hrniec", potom vykonajte rychlu dekompresiu v studenej vode - obr. 14.
- Ak bezpečnostné rúrka (D)nezostupuje, tlakový hrniec umiestnite do studenej vody - obr. 14.
S toutobezpečnostnou rurkou nikdy nemanipulujte.
- Po uvarení māsa s tenkou kožou (napriklad hovadzí jazyk), ktorá by sa mohla vplyvom tlaku vydu't, maso neprepichujte, kym je koza nafúknutá, mohl by ste sa oparit. Maso pred varením poprepichujte.
V priade mazlavych potravin, ktoré poças varenia zväčsujú svoj objem alebo penia ako napr. ryža, strukoviny, sušená zelenina, kompóty, tekvica, cukety, mrkvy, zemiaky, rybie filé... nenaplăjte hrniec na viac ako 1/3 (MAX 1) jeho objemovej kapacity. Nechajte tlakový hrniec vychladnút po dobu niedolkích minút a potom ho ochladte v studenej vode. Pred každým otvorením tlakového hrnca a po skontrolovani, ze bezpečnostné rurka celkom dostúpila, nim vždy zlahma potraste, aby ste zabránili prudkému uniku pary, ktorá by vás mohla popálit. Tento krok je obzvlást doležitý pri rychlom uniku pary alebo po ochladení tlakového hrnca v studenej vode.
Tlakovy hrniec, ktory je pod tlakom, prenasajte s maximnou opatrnostou. Nedotykajte sa teplych casti. Pouzivajte rukovate a tlaclidla. Ak je to potrebne, pouzite rukavice na pecenie.
V priade polievok vám odporúčame vykonat rychludekompresiu v studenej vode (pozri odsek „Koniec varenia" v režime „Tlakový hrniec").
- Ubezpečte sa, ze je ventil v polohe dekompresie, až potom možete hrniec otvorit. Bezpečnostná rúrka (D)musi byt' v dolnej polohe.
Tlakovy hrniec nikdy neotvarajte{nasilu. Uistite sa, ci tlak vo vnutriPoklesol. Bezpecnostnárurka (D)musi byt'vdolnej polohe.Pozri odsek Bezpecnost".
UDRŽBA Ak zistije,Že z vášho tlakového hrnca sa odlomila nejaká Čast alebo sa nanej vyskytuje puklina, vžiadnom pripe de sa nesnăžte otvorit'ho,ak je zatvorený. Počkajte, kým úplne nevychladne ažnásledne ho premiestnite. Viac ho nepoužívajte a nahláste opravu autorizovanému servisnému stredisku spoločnosti TEFAL.
Nezasahujte do bezpečnostného systému,okrem ukonov, na ktoré sa vztahrjúPokyny na Čistenie a Údržbu.
Používajte iba originálne náhradné diely spoločnosti TEFAL,vhodné pre prislušné model.Predovšetkým používajte nádobu ajPokrievku značky TEFAL.
Nepoužívajte hrniec na skladovanie kyslých alebo slaních potravin pred alebo po varení,nádoba sa moze poškodit.
Po každom použití tlakový hrniec ihned' umyte a opláchnite.
Prevádkový ventil (A),tesnenie (I),časovač* (F) ani nádobu s neprilnavým povrchom nikdy nedávajte do umývačky riadu.
Časovač* (F)nikdy nekladte pod vodu.
Nikdy nepoužívajte bieliaci prostriedok ani chlóvané prostriedky, mohla by sa poškodit'kvalita nehrdzavejúcej ocele.
Pokrievku nikdy nenechávajte namočenú vo vode.
Tesnenie vymieñajte každý rok alebo hned',ked'sa na šon objaví prasklina.
Po 10 rokoch používania je nevyhnutné nechat tlakový hrniec skontrolovat'v autorizovanom servisnom stredisku spoločnosti TEFAL.
Ak chcete tlakový hrniec uskladnit:Pokrievku položte naspat' na nádobu,aby ste zabrànili predčasnému opotrebovanie tesnenia naPokrievke.
TENTO NÁVOD SI USCHOVAJTE
Diely (pozričast' Popisné schéma)
A. Prevádkovy ventil
B. Kanalik na odvod pary
C. Index polohy ventilu
D. Bezpečnostné rúrka (pozri odsek „Bezpečnost".)
E. Bezpečnostnéventil
F. Pocítadlo minút
G. Rúčka naPokrievke
H. Pokrievka
I. Tesnenie
J. Naparovaci kosik*
K./L. Trojnožka*
M. Rukovat nádoby
N. Značky maximálneho množstva
O. Nadoba
Nevyhnutné kontroly pred každým použitím
Kontrola prevádkového ventilu

- Skontrolujte, Či otvor na vypustenie prevadzkového ventilu nie je zaneseny (pozri odsek „Vybratie a nasadenie prevadzkového ventilu").
Skontrolujte bezpečnostnéventil

- Skontrolujte, Či je gulôčka bezpečnostného ventilu pohyblíva (použite paličku).
SK
Používanie

Varenie v režime Tlakový hrniec

Varenie v režime Hrniec*

Dekompresa
Otvorenie
Zdvihnite ruckuPokrievky z vodorovnej do zvislej polohy - obr.3 Pokrievka sa otoci.
ZdvihnitePokrievku.
V priade problemov s otvorenim vyrobku: umiestnite tesnenie pod vodu a dajte ho naspat naPokrievku, ale neutrite ho - obr. 19 a opatrne ho vlozte do dražok naPokrievke - obr. 15.
Zatvorenie
Uistite sa, ze ruckaPokrievky je vo zvislej polohe.
- UložtePokrievku na nadobu tak,ako je to znázornene na obr.1 a zarovnajte pritom plastovú Čast's rúčkami na nadobe.
Spustite ruckuPokrievky zo zvislej do vodorovnej polohy - obr.2
Pokrievka sa otoci.
Ak nemožete zatvorit'Pokrievku:
skontrolujte, ci ste tesnenie spravne nasadili a ci jePokrievka spravne umiestnena.
V pripe de problemov so zatvorenim vyrobku: umiestnite tesnenie pod vodu a dajte ho naspat naPokrievku, ale neutrite ho -OCR. 19 a opatrne ho umiestnite do dražok naPokrievke -OCR. 15.
Prévopoužitie
V pripademodelov s neprilnavym povrchom: celvvnutorny povrch umyte a zlahka namazte olejom na varenie.
V závislosti od modelu:
Položte trojnožku\* (L) a kosik\* (J) na dno nádoby.
- Pripnite trojnožku* (K) do kosíka* (J), potom umiestnite dostavu na dno nádoby.
- Naplnte nádobu (O) vodou z 2/3 (MAX 2) - obr. 5.
Zatvorte tlakovy hrniec.
- Zarovnajte piktogram dprevadzkového ventilu (A) s indexom polohy ventilu (C) - obr.9.


- Položte tlakový hrniec na zdroj tepla, potom nastavte na maximálny vykon.
- Ked'z ventilu začne vychádžať para, znížte vykon zdroja tepla a varte 20 minút.
- Po uplynuti 20 minút zdroj tepla vypnite.
- Zarovnajte piktogram prévádkového ventilu (A) s indexom polohy ventilu (C).
- Ked' bezpečnostná rurka (D) znovu klesne, tlakový hrniec už nie je pod tlakom.
- Otvorte tlakovy hrniec - obr.3
Umyte ho cistiacim prostriedkom na riad.
Minimáne a maximálne množstvo
- Minimálne 25 cl (2 poháre) - obr.4.
Maximánlne množstvo 2/3 výšky námoby, značka MAX 2 - obr.5.
Vtlakovom hrnci nepouzivaje hrubozrnnu sol, pridavajte iba jemnu sol na konci varenia.
V pripadeniektorych potravin:
V priade mazl'avych potravin, ktoré poças varenia zvacchuju svoj objem alebo penia akopnpr. rya, strukoviny, sušena zelenina, kompóty, tekvica, cukety, mrkvy, zemiaky, rybie filé... nenaplnajte hrniec na viac ako 1/3 (MAX 1) jeho objemovej kapacity. Nechajte tlakový hrniec niedolko minut chladnut a potom ho ochladte v studenej vode. Pred každým otvorenímt tlakového hrnca a po skontrolovani, ze bezpečnostné

rúkacelkom dostúpila, ním vždy zláhma potraste, aby ste zabránili prudkému uniku pary, ktorá by vás mohla popálit. Tento krok je obzvlást dôležity pri rychlom uniku pary alebo po ochladení tlakového hrnca v studenej vode (pozri odsek „Koniec varenia v režime Tlakový hrniec").
Použivanie naparovacieho košíka*
- Na dno nádoby naleje 75 cl vody (O).
V závislosti od modelu:
- Položte trojnožku* (L) a kosík* (J) na dno nádoby.
- Pripnite trojnožku* (K) do kosíka* (J), potom umiestnite zestavu na dno nádoby.


- Počas przypravy jegál naparovaním potraviny v naparovacom kosiku nesmú prist do kontaktu s vodou -obr. 6 a 7.
Potraviny, ktoré su položené v naparovacom košiku, nikdy nesmú presiahnut'uproven MAX 2.
Vybratie a nasadenie prevádkovéhoventilu (A)
Vybratie prevádkového ventilu (A):
- Zarovnajte dražku s indexom polohy ventilu (C)pak, ze stlačite krúžok na prevadzkovom ventil (A).
- Vyberte ventil - obr. 11.
Nasadenie prevádkového ventilu:
- Nasadte prevádkovy ventil (A) - obr. 8 tak, ze zarovnáte hrot prevádkového ventilu (A)sukazovatel'm polohy ventilu (C)-pozri oproti.

- Zatlačte prevádkový ventil (A), aby zapadol do rúrky na odvod pary.
- Zatlačte na piktogramy na prevadzkovom ventile (A)a otočte ním.

Počitadlo minút*
Nikdy nepoužívajte Časovač v režime „Hrniec".
Pocitadlo minut bolo navrhnute tak, aby vam pomáhalo pri dosahovani Želaného vysledku varenia co najlepsím nastavením spotreby energia. Automaticky odpočitava Čas varenia od momentu dosiahnutia urovne teploty zodpovedajúcej vareniu v režime „Tlakový hrniec"
Počitadlo minút sa musí pripnú't na tlakový hrniec, aby mohlo fungovat.
Dbajte na to, aby prevadzkovy ventil (A) pochas varenia pravidelnesycal. Ak nevychadza ziadna para, mierne zvyste vykon zdroja tepla; v opacnom priade znizte vykon zdroja tepla.
1 Zapnutie počitadla minút: stláčte tlacidlo.
2 Nastavte dobu varenia (v minútach).
Ak ste nastavili chybny cas varenia, pockajte 4 sekundy, kym plamene neprestanu blikat, potom dlho stlacte tlacidlo, aby ste sa vratili spa' na nulu.
3 Nastavte vykon zdroja tepla na maximalu hodnotu.
4 Ked'tlakovy hrniec dosiahne teplotu varenia, počitadlo minút zazvoni a odpočitavanie Času sa spustí (čiselné hodnoty budú blikat).
Zniżenie vykonu zdroja tepla.
5 Na konci varenia počitadlo minút zazvoní.
Zvonenie počitadla minut zastavite stlačením tlacidla.
Vypnite zdroj tepla.


Dlhe stlacerie tlacidla vrati hodnoty nulu a vypne poctadlominut.
Montáž a demontáž počitadla minút*
- Pocitadlo minut (F)namontujete tak, ze najprv vlozite cast's tlaclidom na modul, potom stlacite pre uchytenie protilahlej casti - obr. 12.
- Ak chcete počitadlo minút (F)odmontovat, zdvihnite ho a vytiahnite ho.

Výmena batérié do počitadla minút*
Bateria do pocitadla minut je bateria gombikoveho typu CR2032.
Ak sa symbol neuzaju alebo ak sa na displeji nic nezobrazije, batériu vymente.
Zivotnost' baterie zavisio do toho, akocastopouzivate pocitadlo minut.
Bateria obsahuje dimetoxymetán c. CAS 110-71-4. Je v sulade s europskou právnou upravou. Za učelom zaistenia vasej bezpečnosti a ochranyživotného prostredia: bateriu neotvarajte a nevystavujte ju vysokým teplotám, likvidujte ju a recyklujte dodrzanim postupu schvaleného pre likvidáciu použitych baterii.

- Nenabijatel'né baterie sa nesmu nabijat.
Nemiesajte Rozdielne typy batérii alebo nové a použité batérié.
Baterie vkladajte so spravnou polaritou.
- Vybité batarie je potrebne zo zariadenia odstranit' a bezpečne zlikvidovat.
Ak sa zariadenie nebude dlhsie pouzivat, je vchodne baterie odstraniit.
- Napajacie svorky sa nesmú skratovat.
Pokračujte na rovnej pracovnej ploche
- Bateriu vyberiète potiahnutim za uzáver bâtérié pomocou mince (pozri obrázok oproti).
Bateriu vymente.
- Tesnenie nasad'te spat na svoje miesto.
Dajte polmesiac uaveru baterie pred polmesiac pocitadla minut.
Zatvorte uzáver batarie, jemne, mierne tlacte a zarovajte polmesiaczáveru batérié s mesiacom púitadla minút.
- Položte celok naplocho na kuchynskú dosku, aby bol uzáver správné vodorovne umiestně.
Netlačte silno na uzáver baterie, ked'ho zatvárate. Netlačte dalej za doraz.
V pripe straty si mozete zaobstarat nové počitadlo minut vo vsetkých našich autorizovaných strediskách spolocnosti TEFAL.


Počitadlo minút* nedávajte nikdy pod vodu, ani neumývajte v umývačke riadu.
Nikdy nepoužívajte Časováč v režime „Hrniec".
Pred varením
Pred kaźdymi použitim zlożte prevadzkovy ventil (A) - obr. 11 zrakom skontrolujte,cki kanálik na odvod pary (B) nie je zaneseny - obr. 13.
- Skontrolujte, cis je bezpečnostné ventil pohyblivy (pozri odseky „Čistenie" a „Nevyhnutné kontroly pred kaźdymi použitím") - obr. 18.
Pridajte prisady a kvapalinu.
Zatvortelakovyhrniec-obr.2
V pripe de problemov so zatvorenim vyrobku: umiestnite tesnenie pod vodu a dajte ho naspat naPokrievku, ale neutrite ho - obr. 19 a opatrne ho umiestnite do dražok naPokrievke - obr. 15.
- Nasadenie prévádkového ventilu (A)- obr.8.

Varenie v režime „Tlakový hrniec"
- Prevádkový ventil (A) otočte do polohy „Tlakový hrniec" - obr. 9.
- Ubezpečte sa, ze tlakový hrniec je správné zatvorený, až potom ho spustite - obr.2
- Položte tlakový hrniec na zdroj tepla, potom nastavte na maximálny vykon.
V priade modelov s počitadlom minút : nastavte dobu varenia uvedenú v recepte (pozri odsek „Použivanie počitadla minút").
- Klepot a chrlenie, ktoré vydáva bezpečnostrá rúrka su normálne - umožnujú unik vzduchu pred varením.
Počas varenia v režime „Tlakový hrniec"
- Ked' z prevadzkového ventilu (A) vychádza plynulý prud pary a počut pravidelný zvuk (PŠŠST), znižte vykon zdroja tepla.
- Začnite odpočitavat dobu varenia uvedenú v recepte.
- Dbajte o to, aby ventil počas varenia pravidelne syčal. Ak vychádza málo pary, mierne zvyšte vykon zdroja tepla, v opačnom pripad eznížte vykon zdroja tepla.
Ukončenie varenia v režime „Tlakový hrniec"
Vypustenie pary:
- Po vypnutí zdroja tepla máté dve moznosti:
- Postupná dekompresa: Postupne otáčajte prevádkovy ventil (A), aby ste skončili oproti značke na piktograme. obr. 10.

Rychla dekompressia v studenej vode: nalejte do drezu studenú vodu a ponorte donej spodnú Čast tlakového hrnca,Pokym bezpečnostná rurka nezostúpi - obr.14.Ked' bezpečnostná rurka (D)znovu klesne, tlakový hrniec už nie je pod tlakom.Prevádkový ventil (A)otočte do polohy

Fáza 1

Fáza 2
- Tlakovy hrniec możete otvorit - obr. 3.
V pripeade problemov s otvorenim vyrobku: umiestnite tesnenie pod vodu a dajte ho naspat naPokrievku, ale neutrite ho -OCR. 19 a opatrne ho vlozte do dražok naPokrievke -OCR. 15.
Ked' pochas uvolnovania pary spozorujete nezvyčajné vystrekovanie, dajte prevádkový ventil (A) do polohy varenia režimu „Tlakový hrniec" potom vykonajte rychlu dekompressiu v studenej vode.
Ak bezpečnostné rúrka (D) nezostupuje, najeje do drezu studenú vodu a ponorte donej spodné Čast tlakového hrnca,Pokým bezpečnostné rúrka nezostúpi - obr. 14.
S bezpečnostnou rúrkou nikdy nemanipulujte.
V pripline mazlavych potravin, ktoré počas varenia zvacchuju svoj objem alebo penia, ako napr. ryža, strukoviny, sušena zelenina alebo kompóty, tekvica, cukety, mrkvy, zemiaky, rybie filé... nenaplănajte hrniec na viac aka 1/3 (MAX 1) jeho objemovej kapacity. Nechajte tlakový hrniec niekolko minút chladnú t a potom ho ochladte v studenej vode. Pred každým otvorením tlakového hrnca a pos skontrolovani, ze bezpečnostné rurka celkom dostúpila, nim vždy zlahma potraste, aby ste zabránili prudkému uniku pary, ktorá by vás mohla popálit. Tento krok je obzvlást doležity pri rychlom uniku pary alebo po ochladení tlakového hrnca v studenej vode. V pripline polievok vám odporucame vykonat rychl udekompresiu v studenej vode (pozri odsek „Koniec varenia" v režime „Tlakový hrniec").

Varenie v režime „Hrniec“*
- Prevadzkovy ventil (A)otocte do polohy „Hrniec". Na otocenie pouzite dostatochnu silu na presunutie aktualneho zarezu do polohy dekompressie.
Ubezpečte sa, ze tlakový hrniec je správné zatvorený -obr. 2, až potom ho spustite.
- Položte tlakový hrniec na zdroj tepla, potom nastavte na maximálny vykon.
Zacnite odpoctavit dobu varenia uvedenv recepte.
V režime „Hrniec" mözete tlakový hrniec kedykolvek otvorit za účelom mieszania, kontroly varenia alebo pridania prisad.
V pripeade problemov s otvorenim vyrobku: umiestnite tesnenie pod vodu a dajte ho naspat naPokrievku, ale neutrite ho - obr. 19 a opatrne ho vlozte do dražok naPokrievke - obr. 15.
Ak je zdroj tepla nastaveny na priliš vytoký vykon, moze sa stat, ze sa tlakový hrniec zablokuje (bezpečnostný ventil (D)vystúpi a zablokuje otvorenie) a rückou naPokrievke nebude mozné hybat ani tlakový hrniec sa nebude dat otvorit. V tomto priade znizte vykon zdroja tepla alebo ho vypnite. V priade liatinovych varnych dosiek, odstrante tlakový hrniec zo zdroja tepla.
Pre modely s neprilnavym povrchom: nepoužívajte šlahače ani ostre Čkovové prislušenstvo. Nikdy neodkvapkávajte vase kuchynské náradie o okraj

nádoby, pretoze by mohlo dôjst' k obitiu okraja, co by mohlo viest' kunikaniu obsahu tlakového hrnca.
- Nikdy nezohrievajte mastné potraviny až po ich zuholnatenie. Výpary z varenia možu byt nebezpečné pre zvierátá s citlivým dychacím systémom, akou su vtáky. Ak ste chovatel'om vtáka, zabrante jeho prístupu do kuchyne.
Bezpečnost
Tento tlakový hrniec je vybavený niedolkými bezpečnostnými systémami:
- Bezpečnost pri zatvárani:
- Ak jePokrievka nesprávne umiestné alebo ak zabadnete zložit rúčku naPokrievke, dojde k uniku pary na urovn bezpečnostnej rúrky (D) tlakového hrnca, co mu znemožni ziskat dostatočný tlak.
- Bezpečnost' pri otvarani:
- Ak je tlakový hrniec pod tlakom, bezpečnostné rúrka (D) je v hornej polohe a rúčka naPokrievke na otvaranie/ zatvaranie (G) sa nesmie použit.
-Tlakovy hrniec nikdy neotvarajte nihilu.
Nikdy netlacte na bezpećnostné rúrku (D).
- Uistite sa, ze vnutorny tlak znovu klesol a skontrolujte, ci je bezpečnostná rúrka (D) v dolnej polohe.
- Rúčky na nádobe predstavuju bezpečnostné privky. Nikdy ich nevymieñajte sami. Nikdy nepoužívajte iné modely rúčok.
- Ak ste sklopili rúčku naPokrievke na otvaranie/zatvaranie (G) do zvislej polohy, kad'bol tlakový hrniec šte pod tlakom, nemóžete ho otvorit. Tato funkcia predstavuje dodatočné bezpečnostné prvok.
- Znovu sklopte rúčku naPokrievke do vodorovnej polohy a počkajte, kým bezpečnostná rúrka (D) neprejde do dolnej polohy.
Dva pretlakové bezpečnostné systémy:
- Préz zariadenie: bezpečnostné ventil (E) znižuje tlak - obr. 20
- Druhé zariadenie: tesnenie nechávaunikat paru pomedziPokrievku a nadobu - obr.20.
V pripe, ze sa spusti jeder z pretlakovych bezpecnostnych systemov:
- vypnite zdroj tepla.
Tlakovy hrniec nechajte uplne vychladnut.
- Otvorte ho.
- Skontrolujte a vycistite prevadzkovy ventil (A), kanálik na odvod pary (B), bezpečnostné ventil (E) a tesnenie (I) - obr. 16 - 17- 18. Pozri odseky „Cistenie" a „Nevyhnutné kontroly pred každým použitím".
- Ak aj po vykonani tychto kontrolnych a Čistiacich ukonov dochodzak unikom alebo zariadenie nefunguje, zaneste ho do autorizovaného servisného strediska spolocnosti TEFAL.
Odporučania týkajúce sa používania
1 - Para unikajuca z prevadzkového ventilu je horúca. Pozor na vystrekujúcu paru.
2 - Ak sa bezpečnostné rúrka raz zdvihne, tlakový hrniec už nemožete otvorit.
3 - Ako pri používani inych varních spotrebičov, aj pri používani tlakóho hrnca dávajte velký pozor, ak ho používate v blízkosti detí.
4 - Pri premiestnovani tlakového hrnca používajte obe rúčky na nádobe.
5 - Potraviny v tlakovom hrnci nenechavajte dlho. Tlakovy hrniec nikdy neprenášajte držaním za rúčku naPokrievke.
6 - Nikdy nepoužívajte bieliaci prostriedok ani chlórované prostriedky, mohla by sa poskodit kvalita nehrdzavejúcej ocele.
7 - Pokrievku nikdy nenechávajte namočenú vo vode.
8 - Tesnenie vymieñajte kaźdý rok alebo ked je prasknute.
9 - Tlakový hrniec Čistite vždy za studena a prázdny.
10 - Každych 10 rokov je nevyhnutné nechat tlakový hrniec skontrolová v autorizovanom servisnom stredisku spolocnosti TEFAL.
Cistenie
Z dovodu zachovania správnéj prevalzky zariadenia po každom použití dodržte tieto pokyny týkajúce sa Čistenia a udžby.
Zhnednutie a škrabance, ku ktoym moze dojst'v dosedku dlhodobého použivania, neovplynuñuju negávné prevadzku.
Opotrebovanie vonkajšieho povrchu (v závislostiod modelu) v dosledku kontaktu sPokrevkou na nádobe je normálne.
V pripline tlakovych hrncovs neprilnavym povrchom (v závislosti od modelu): jemné škrabance a odreniny v dosledku používania tlakového hrnca neovplyvnujú neprilnavé vastnosti povrchu.
- Tlakový hrniec po každom použití umyte vlažnouvodou ačistiacim prostriedkom na riad. Rovnakým spó sobom postupujte aj pri Čistení kosíka*.
- Nepoužívajte bieliaci prostriedok ani chlórované Čistiace prostriedky.
- Nezohrievajte prázdnu námobu.
Čistenie vnútra nádoby z nehrdzavejúcej ocele:
Vnutro umyte spongiou na riad a cistiacim prostriedkom na riad.
- Ak sa na vnútornej strane nádoby z nehrdzavejúcej ocele nachádzaju duhové odrazy alebo biele stopy (mineralne usadeniny), nádobu umyte bielym octom.
Čistenie vnútra nádoby z hliníka s neprilnavým povrchom:
Zivotnost'vyrobku predlzite jeho ručným umyvaním.
- Umyte ho teplou vodou a chistiacim prostriedkom na riad.
Nepoužívajte Čistiaci prášok ani špongie s drsným povrchom.
- Ak ste pripalili nejaku potravinu, naplnte nadobu teplou vodou a nechajte odmočit. Potom ho umyte Čistiacim prostriedkom na riad.
Čistenie vonkajšej strany nádoby:
- Umyte ju spongiou a cistiacim prostriedkom na riad.
Nádobuz nehrdzavejúcej ocele a kosík možete umývat'v umývačke riadu.
Nadobu s neprilhavym povrchom (v závislosti od modelu) nevkladajte do umyvačky riadu, pretože Čistiace prostriedky vo forme tabliet ob sahuju agresívné a korozívné látky, ktoré niesz uvhodné pre Časti vyrobené zhliníka.
Intenzívne použí vanie nádoby s neprilna vym povrch om (v závislosti od modelu) moze mierne zmeni t'farbu p ovrchu (zažltnutie, skrwny).
ČisteniePokrievky:
- Pokrievku umyte špongiou a Čistiacim prostriedkom na riad.
Veko dajte do zvislej polohy pre odkvapkanie zvyšnejvo dy medzi kovovymi a plastovymičastami veka.
Čistenie tesneniaPokrievky:
- Po každom varení očistite tesnenie (I) a jeho uloženie.
- Ak chcete znovu nasadit tesnenie, pozrite si - obr. 15 a dbajte na to, aby tesnenie dobre zapadlo do každej dražky naPokrievke.
Čistenie prevádkového ventilu (A):
- Odoberte prevádkovy ventil (A) - obr. 11.
- Prevadzkovy ventil (A) umyte prudom vody z vodovodu - obr. 16.
- Skontrolujte jeho pohyblivost: pozrite si ilustraciu oproti.
Po zloženi prevádkového ventilu (A), tesnenia (I) a počitadla minút* (F) možetePokrievku umývat'v umývačke riadu.

Prevádkový ventil (A), tesnenie (I), Časovac* (F) ani nádobu s neprilnavý m povrchom nikdy nedávajte do umyvačky riadu.
Čistenie kanálika na odvod pary (B) nachadzajúceho sa naPokrievke:
Zložteventil(A)-obr.11.
Zrakom skontrolujte, ci je kanalik na odvod pary uvolnény a okruhly - obr. 13.V priade potreby ho očistite šparadlom - obr. 17 a oplachnite ho.
Čistenie bezpečnostného ventilu (E):
- Cast bezpečnostného ventilu, ktorá sa nachadza na vnútornej stranePokrievky, umytevodou.
- Skontrolujte jeho správnu prevádzku a vatovou tycinkou silno zatlačte na gulóčku, ktorá sa musí pohybovat' - obr. 18. Pozri odsek,"Nevyhnutné kontroly pred každým použitím".
Cistenie počitadla minút* (F):
- Používajte Čistú a suchú handricku.
Nepoužívajte Rozpústadlo.
- Počitadlo minút nedávajte nikdy pod vodu, ani neumývajte v umývačke riadu.
Udrzba
Výmena tesnenia tlakového hrnca:
Vymienejte tesnenie tlakového hrnca kázdy rok alebo ke'd'je prasknuté.
Vždy používajte originálne tesnenie spolocnosti TEFAL vchodné pre príslušné model (pozri odsek „Príslušenstvo").
- Ak chcete znovu nasadit tesnenie, pozrite si - obr. 15 a dbajte na to, aby tesnenie dobre zapadlo do každej dražky naPokrievke.
Odkladanie tlakového hrnca:
- Pokrievku vratte spat na nadobu.
- Mechanizmus otvorenia/zatvorenia tlakového hrnca si okrem Čistenia nevyžaduje osobitné udřžbu.
Po 10 rokoch používania je nevyhnutné nechat tlakový hrniec skontrolováť v autorizovanom servisnom stredisku spolocnosti TEFAL.
Príslušenstvo TEFAL
- Príslušenstvo k tlakovému hrncu, ktoré je dostupné v obchodoch:
Príslušenstvo Referencia Tesnenie 3/4/4,5/6 l: vonkajši priemer tesnenia: 24 cm X1010008 5/7,5/9 l: vonkajši priemer tesnenia: 27 cm X1010007 Naparovací košík* 3/4,5/4/6 l: na nádobu s priemerom 22 cm 792185 5/7,5/9 l: na nádobu s priemerom 24 cm 792654 Trojnožka* (L) 792691 Počítadlo minút* X1060007
- Pri vymene inych Časti alebo v pripline opravy sa obratte na autorizovane servisné strediská spolocnosti TEFAL.
- Používajte iba originálne náhradné diely spolocnosti TEFAL, vchodné pre príslušné model.
Vlastnosti
Priemer dna tlakového hrnca - reference
Objem Ø nádoby Ø dna Clipso Minut' Perfect / Easy Clipso Minut' Duo couleur Clipso Minut' Duo Gourmet Materiál nádoby 3 L 22 cm 15.5 cm P46205 - - Nehrdzavejú ca ocel' 3 L 22 cm 18 cm -- P46605 4 L 22 cm 14 cm - P46042 - Hliníkový povrch 4.5 L 22 cm 15.5 cm P46206 - - Nehrdzavejú ca ocel' 5 L 24 cm 14 cm - P46051 - Hliníkový povrch 5.2 L 24 cm 20 cm - - P46654 Nehrdzavejúc a ocel' 7.5 L 24 cm 18 cm P46248 - - 9 L 24 cm 18 cm P46249 - - Set 5 L 24 cm 14 cm P46353 -
Material veka: nehrdzavejúca ocel'
Normativne informácie:
Prevadzkovytlak:65 kPa
Maximálny bezpečnostné tlak: 120 kPa
Kompatibilné zdroje tepla
PLYNELEKTRICKYPRUD
(Liatinová doska)
ELEKTRICKY PRUD
sklokeramická salava
ebo halogenová platna)
ELEKTRICKY PRUD (Sklokeramicka indukcnak platna)
ELEKTRICKY PRUD (Spiralovy varic)


- Tlakový hrniec možete používat na vsetkych tepelnych zdrojoch určenych na varenie, vrátane indukčnej platne.
Pri elektrickej platni používajte platnu s rovnákym alebo s mensím priemerom ako je priemer tlakového hrnca.
Pri sklokeramickej platni sa ubezpečte, Či je dno nádoby Čisté a suché.
Pri plynovom sporaku plamene nsmu presahovat priemer nadoby.
Pri všetkych druhoch sporákov dbajte na to, aby bol tlakový hrniec v strede.
Záruka
V pripe, ze sa nadoba z nehrdzavejucej ocele noveho tlakovheho hrnca TEFAL pouziva na ucely uvedené v navode na obsluhu, poskytuje sa zaruka 10rokov na: -akukolvek chybu tykajucu sa kovovej konstrukcie nadoby, -akekolvek predcasne poskodenie zakladneho kovu.
- Na vsetky ostatné materialy nádoby a diely tlakového hrnca sa vztáhuje záruka na vyrobné chyby a chyby materialu, a to počas záručnej doby definovanej zákonom, ktorý je v platnosti v krajine nakupo, od datumu nakupo.
Tato zmluvná záruka platí odo dña nákupu po predloženiPokladnicného bločku alebo faktúry.
Záruka nepokryva:
- skrabance ani zmenu farby spôsobéne opotrebovaním - platí to pre nádoby s neprilnavým povrchom.
- skrabance, ktoré vznikli následkom kontaktuPokrievky s nádobou s neprilnavym pourchom.
- poskodenia, ku ktorym doslo v dosledku nedodrzania dolezitych pokynov aleb gKnedbalého použivania, majma: - náraz, pád, použivanie v rúre a pod.
Tuto záruku možu poskytovat iba autorizované servisné strediská spolocnosti TFEAL.
- Adresu najblizsieho autorizovaného servisného strediska spolocnosti TEFAL ziskate na bezplatnom cisle.
Predpísané značenie
Značenie Mesto Obchodná značka NaPokrievke Rok a vyrobná série
Referenčný model
Maximálny bezpečnostné tlak (PS)
Prevádkový tlak (PF) NaPokrievke Objem Na vonkajšej strane dna nádoby. Poštová adresa vyrobcu Na vonkajšej strane dna nádoby.
- Chráimeživotné prostredie!

①Vás prístroj obsahuje ve'la zhodnotitel'nych alebo recyklovatel'nych materialov.
Likvidujte ho na zbernom mieste, aby doslo k jeho spravnemu spracovaniu.
Odpovede spoločnosti TEFAL na vaše otázk
Problémy Odporúčania Ak sa otváranie a/alebo zatváranie stane tăzkým: • Vyberte tesnenie a opláchnite pod vodou.
• Dajte ho naspăť naPokrievku, ale neutrite ho - obr. 19. Ak nemóžete zatvorit'Pokrievku: • Skontrolujte, ā je rúčka naPokrievke vo zvislej polohe.
• Skontrolujte, ā je správné namontované tesnenie (pozri odsek „Čistenie a údržba”).
• Skontrolujte, ā jePokrievka správné nasadená tak, jak je to uvedené na - obr. 1.
• Umiestnite tesnenie pod vodu a dajte ho naspăť naPokrievku, ale neutrite ho - obr. 19 a opatrne ho vložte do drážok naPokrievke - obr. 15. Ak sa tlakový hrniec zohrieval pod tlakom bez tekutiny: Tlakový hrniec nechajte skontrolovat'v autorizovanom servisnom stredisku spoločnosti TEFAL. Ak bezpečnostné rúrkavydáva klepot alebo chrlenie: Počas pryích minút ide o normálny jav: umоžnéuje únik vzduchu pred varením. Ak bezpečnostné rúrkavydúpila a ak počas varenia z ventilu nevychodzza ziadna para: Počas pryích minút ide o normálny jav.
V prípad, ĸe tento jav pretrváva, skontrolujte:
- ā je zdroj tepla dostykonny, v opačnom prípad zvyšte vykon.
- ā je v nádobe dostatočné množstvo tekutiny.
- ā je preváždkový ventil (A) v polohe na doraz na
- ā je tlakový hrniec dobre zatvorený.
- ā nie je poskodené tesnenie alebo okraj nádoby.
- ā je tesnenie správné umiestně. Ak ukazovatel' prítomnosti tlaku nevystúpile a ak počas varenia z ventilu nevychodzza ziadna para: Počas pryích minút ide o normálny jav.
V prípad, ĸe tento jav pretrváva, najeje do drezu stu-
denú vodu a ponorte donej spodné ĸast'tlakového hrnca, pokým bezpečnostné rúrká (D) nezostúpi.
Vycistite preváždkový ventil (A) - obr. 15 a kanálik na odvod pary - obr. 17 a skontrolujte, ā gulôčka bezpečnostného ventilu hladko zapadá - obr. 16. Ak para uniká po obvodePokrievky arurka je v spodnejpolohe, skontrolujte: Či je veko správné zatvorené. Umiestnienie tesnenia naPokrievke. Či je tesnenie v bezchymbom stave a v pripadepotreby ho vyměne. Či je ČižtáPokrievka, tesnenie a priestor, do ktorého sa vkladá tesnenie doPokrievky. Či je okraj námody v dobrom stave. AkPokrievkunemóžete otvorit: Skontrolujte, Či je bezpečnostné rurka (D)v dolnejpolohe.Znižte tlak: najeje do drezu studenú vodu aponorte do nej spodné Čast tlakového hrnca,Pokým bezpečnostné rurka bezostúpi.S bezpečnostnéu rurkou nikdy nemanipulujte (D)Umiestnite tesnenie pod vodu a dajte ho naspatnaPokrievku, ale neutrite ho - obr. 19 a 15 opatrne ho vložte do drážok naPokrievkopevázskový ventil (A)otočte do polohy Ak potraviny Nie suuvarené alebo ak su spálené, skontrolujte: Dobu varenia.Výkon zdroja tepla.Správn fungčnost Čpreždzkového ventilu (A).Množstvo tekutiny. Ak sa potraviny tllakovom hrnci spália: Nádobu pred umývaním nechajte istý Časnamočenu.Nikdy nepoužívajte bieliaci prostriedok ani chlórované Čistace prostriedky. Ak sa spustí jederzbepečnostnych systémov: Vypnite zdroj tepla.Tlakový hrniec nepremiestnéjte a nechajte ho vychladnúť. Počkajte, kým bezpečnostné rurkaneklesne a potom ho otvorte.Skontrolujte a očistite preždzkový ventil (A), rurkna odvod pary, bezpečnostnéventil a tesnenie.Uistite sa, Že dodržiavate podmienky naplenia tlakového hrnca.Ak problém pretréváva, zariadenie nechajteskontrolováť v autorizovanom servisnom strediskTEFAL. Ak objavité stopy pooxidáci: Použitie nehrdzavejúcej ocele s vysokým výkononani vo výnimočných prípadoch nezabrání výskytu oxidácie. Ak spožorujete stopy po oxidáci, predopátovým použitím tlakového hrnca odstránteich pomocou špongie s abrazívnym povrchom.
TABULKA S INFORMÁCIAMIO VARENÍ
Zelenina
Zelenina (ČERSTVÁ)
PARA
Ingrediencie vlozené do kosika na naparvanie so 750 ml vody na dnetlakoveho hrnca.


PONORENIE
Ingrediencie vlozené do vody bez kosika.
STRUKOVINY PONORENIE
Bez kosika.


Artićoky, 2 celé, každý 600 g (ponorenie) 30 až 35 minút Baklažány, osúpané a nakrájané na plátky (3 mm), 850 g (para) 10 až 12 minút Biela repa,Pokrájaná na kocky (500 g) (para) 14 až 16 minút Brokolica Rozobrata na ružicky 600 g (para) 9 až 11 minút Čakanka rozkrojená na polovicu (900 g) (para) 14 až 16 minút Červená repa, nakrájaná na štvrtiny (ponorenie) 20 až 25 minút (podla velkosti) Cibulky na nakladanie (para) 7 až 8 minút Cuketa nakrájaná na kolieska (3 mm) 600 g (para) 12 až 15 minút Fenikel nakrájaný na pásiky (600 g) (para) 6 až 9 minút Hlávková kapusta, nakrájaná, 500 g (ponorenie) 5 až 6 minút Hrach, lúpaný a polený 250 g (ponorenie) 18 až 20 minút Hrášok (para) 6 až 8 minút Huby, nakrájané na plátky 800 g (ponorenie) 4 až 5 minút Kapie Rozkrojené na polovice (550 g) (para) 14 až 16 minút Karfiol Rozobrátý na ružicky 600 g (para) 10 až 12 minút Mangold, nakrájaný (2 cm) 700 g (para) 15 až 17 minút Mladá zelená fazulka (600 g) (para) 10 až 12 minút Mrkva nakrájaná na kolieska (3 mm) 600 g (para) 17 až 19 minút Pór, biela Čast', vcelku 650 g (para) 9 až 11 minút Ružickový kel (para) 10 až 12 minút Šošovica, zelená 250 g (ponorenie) 14 až 16 minút Šparglă, biela (para) 5 až 6 minút Špenát (para) 3 až 4 minúty Suchá biela fazulă 250 g (ponorenie) 35 až 40 minút Tekvica, nakrájaná na kúsky (3 až 5 cm) 600 g (para) 13 až 18 minút Zeler, nakrájaný na plátky 600 g (ponorenie) 7 až 9 minút Zemiaky Rozkrojené na polovicu (950 g) (para) 20 až 25 minút (podla velkosti)
PONORENIE
Bez košíka.
MAX 1 MNOŽSTVO VODY MNOŽSTVO
RYŽE ČAS
VARENIA 2 OSOBY 400 ml/2 šáky 150 g/1 šálka 7 až 8 minút4 OSOBY 500 ml/2,5 šálky 250 g/2 šálky 6 OSÔB 700 ml/3,5 šálky 375 g/3 šálky
Mäso/ryby
ČERSTVÉ MRAZENÉ Bravčové karé (0,8 kg, priemer 8 – 10 cm) 30 až 35 minút 1 h 5 minút Bravčové rezne: 2 kúsky po 350 g 13 až 15 minút 26 až 29 minút Brojler: 2 (1,3 kg) 23 až 25 minút 40 až 45 minút Filé z morského Čerta (1 kg), kúsky s velkostou 75 g 5 až 6 minút 7 až Hovádzia rostenka (1 kg, priemer 8 – 11 cm) 30 až 35 minút 45 až 50 minút Jahřnatie lýtka: 2 (0,95 kg) 40 až 45 minút 1 h 5 minút až 1 h 15 minút Kačka (1,8 kg) 45 až 47 minút 50 až 55 minút Králik (1,5 kg, kúsky) 8 až 9 minút Kura (1,35 kg) 23 až 25 minút Prepelica: 4 9 až 10 minút Steaky z lososa: 4 (0,8 kg) 5 až 6 minút 7 až 8 minút Steaky z tuniaka: 4 (0,7 kg) 5 až 6 minút 7 až 9 minút Telacie karé (0,8 kg, priemer 5 – 7 cm) 17 až 19 minút Telacie rezne: 0,7 kg 17 až 21 minút 33 až 38 minút Telacie závitky: 4 10 až 12 minút x
Poznámka: V priade modelov s objemom do 5 litrov sa ubezpečte,Že kusy masa a hydina neprevysuju značku na vnútornej strane hrnca. Vyberajte si kusy masa a hydinu s vyškou do 8 cm.
PoMeMBna oPozorila
Pred uporabo lonca na zvišan tlak skrbno preberite vsa navodila in vselej upoštevajte ta "Uputstvo za upotrebu".
Pri uporabi, ki ni skladna, lahko pride do poškodb.
Zaradi văs e varnosti je ta aparat v skladu z veljavnimi standardi in predpisi:
- Direktiva o tlačni opremi
- materiali, namenjeni za stik zŽivili
- varovanje okolja.
OBVEZNA
PREVERJANJA
PRED VSAKO
UPORABO PREVERITE
s prostim očesom na dnevni svetlobi preverite, da vodil
za izpuh pare ni zamašeno - skica 13.
ali jePoklopec varnostnega ventilapremićen - skica 18.
ali je tesniloPokrova namešćeno pod vsako režo
pokrova - skica 15.
ali so ročaji na posodi pravilno namešćeni. Ročaji posod
so varnostni deli. Nikoli jih ne zamenjujte sami. VEDN0
UPOŠTEVAJTE
NASLEDNJE
KOLICINE
POLNJENJA Lonca na zvišan tlak nikoli ne uporabljajte brez tekočine
saj ga lahko s tem huje poškodujete. Zagotovite
zadostno količino tekočine v loncu med kuhanjem.
Najmanj 25 cl - skica 4.
Največ 2/3 višine posode, oznaka MAX 2 - skica 5.
Med kuhanjem na paro Živila v košari za paro ne smejo
biti v stiku z vodo - skica 6 in 7.
Največ 1/3 (MAX 1) za mehka Živila, ki se med kuhanjem
razširijo in/ali penijo, kot so riž, stročnice, dehidrirana
zelenjava, kompoti, buče, bučke, korenje, krompir, fileji
ribe ...
Živila, ki se nahajao v posodi za kuhanje s paro, se ne
smejo dotikati najvišje ravni MAX 2 posode. PRED IN MED KUHANJEM Ne dovolite otrokom, da se priblizajo loncu na zvišan tlak, ko ga uporabljate.
Med kuhanjem je v loncu vzpostavljen zvišan tlak. Zaradi nepravilne uporabe lahko utrpite opekline. Prepričajte se, da je lonec na zvišan tlak primerno zaprt, preden pričnete s kuhanjem. (Glejte razdelek «Zapiranje«.)
Med kuhanjem pazite, da ventil stalno šušlja. Če ni dovolj pare, ki izpareva, zmanjsajte tlak v loncu in preverite, ali je njem dovolj tekoviçine in ali je vodilo za izpuh pare zamašeno. Če po teh preverjanjih še vedno ne izhaja dovolj pare, rahlo povečajte moč toplotnega vira.
Ne kuhanjem Živil, ki bi lahko povzrociila zamašitev vodil varnostnih sestavnih delov:
- borovnice
- ječmenček
- ovseni kosmiči
- grah
- rezanci, makaroni, špageti
- rabarbara
- rdeće grozdičje
V loncu na zvišan tlak nikoli ne kuhanjem mlečnih Jedi.
V loncu na zvišan tlak iz nerjavecega jegla ne uporabljajte grobe soli, temveć ob koncu kuhanja dodajte fino sol. Tako preprečite pojav "poškodb", ki bi lahko spremenile dno lonca na zvišan tlak.
Lonca na zvišan tlak ne uporabljajte za cvrtje v olju pod tlakom.
Lonec na zvišan tlak uporabljajte le v namene, za katere je bil izdelan.
Lonca na zvišan tlak ne postavljajte v ogreto pečico.
Nikoli ne vstavljajte aluminijevega papirja za peko v model lonca na zvišan tlak.
Nikoli ne vstavljajte plastičnega sloja v lonec na zvišan tlak.
Alkoholni hlapi so vnetljivi. Preden namestitePokrov, maj alkohol vre priblizno dve minuti. Kadar vašе{jedi vsebumjo alkoho, lonec ves šas dobro nadzirajte.
Uporabljajte ustrezno kuhališće, skladno z navodili za uporabo. PO KUHANJU... Za modele s premazom proti sprijemanju: ne uporabljaje kovinskih oz. abrazivnih kuhinjskih pripomočkov in metric. Kuhinjskih pripomočkov ne odcejaje tak, da z njimi trkate po robu posode, saj jo lahko s tem poškodujete in povzročite pušanje.
Obratovalni ventil (A)postopoma obračajte in pri tem po vaši Želji izberite hitrost zmanješevanja tlaka vse do nastavitvene točke piktograma kica 10. Če opazite nenavadno uhajanje pare, obratovalni ventil (A)znova namestite v položaj ekonom lonec, nato pa tlak hitro zmanjšajte s pomočjo hladne vode - skica 14.
Če se varnostni zativ (D)ne spusti postavite ekonom lonec v hladno vodo - skica 14.
Nikoli ne posegajte v ta varnostni klin.
Po kuhanju mesa, ki vsebujejo kožo (npr. goveji jezik) in lahko pod tlakom nabrekne, mesa ne zbadajte, dokler je koža napiihnjena, saj se lahko poparite. Pred kuhanjem meso prebodite.
Za mehkaŽivila, ki se med kuhanjem razširijo in/ali penijo, kot so riz, stročnice, dehidrirana zelenjava, kompoti, buče, bučke, korenje, krompir, fileji ribe ... pustite lonec nekaj minut, da se ohladi, nato pa ga dodatno ohladite v hladni vodi. Lonec pred vsakim odpiranjem rahlo in previdno stresite, potem ko se prepričate, da se je varnostni zativ spustil. S tem se izognete uhajanju vroče pare.To je zlasti pomembno pri hitrem uhajanju pare ali po ohlajanju v hladni vodi.
Kadar je lonec pod tlakom, ga premikajte izjemno pazljivo. Ne dotikajte se vročih povrsin. Uporabljaje ročaje in gumbe. Po potrebi uporabite rokavice.
Pri kuhanju juh vam svetujemo, da tlak na hitro zmanjšate v hladni vodi (gleje poglavje "Zaključek kuhanja v načinu 'Ekonom lonec").
Prepričajte se, da je ventil v položaju za zmanjšanje tlaka, preden odprete lonec na zvišan tlak. Varnostni klin (D) mora biti v spušćenem položaju.
Nikoli ne poskušajte lonca na zvišan tlak odpreti na silo. Prepričajte se, da je tlak v notranjosti lonca padel. Varnostni klin (D)mora biti v spušćenem položaju. (Oglejte si razdelek «Varnost»). VZDRŽEVANJE Če uzotovite, da je dolocen del lonca na zvišan tlak zlomljen ali razpokan, ga nikakor ne poskujaste odpreti, Če je zaprt, temveć počakajte, da se popolnoma ohladi, preden ga odomaknete, ne uporabljajte ga već in ga vrnite na pooblašćeni servis.
Ne posegajte v varnostni system lonca, razen na način, ki je dolocen v navodilih za Čišćenje in vzdřževanje.
Uporabljajte le originalne rezervne dele proizvajalca TEFAL, ki odgovarjazo vašemu modelu. Predvsem pa uporabljajte le posodo inPokrov proizvajalca TEFAL.
Pred kuhanjem in po njem v loncu na zvišan tlak ne shranjujte kislih ali slanih Živil, sjag lahko na ta način poškodujete.
Lonec po vsaki uporabi očistite in sperite.
Obratovalnega ventilà (A), tesnila (I), Časovnika* (F), niti posode s prevalko proti prijemanju nikoli ne perite v pomivalnem stroju.
Časovnika* (F)nikoli ne perite pod vodo.
Nikoli ne uporabitedezinfekcijskh sredstev ali kloriranih proizvodov, sjahlo le-ti poškodujejo nerjaveće jeglo.
Pokrova ne pušćajte namočenegа v vodo.
Tesnilo zamenjaje vsako leto ali takoj, Če se na njem pojaví zareza.
Po 10 letih uporabe je nujno potreben pregled lonca na zvišan tlak v enem izmed pooblašćenih servisov TEFAL.
Če Želite shraniti lonec na zvišan tlak: ZavrtitePokrov na posodi, da preprečite prezgodnjo obrabo tesnilaPokrova.
SHRANITE TA NAVODILA
Sestavni deli (gleje opisno shemo)
A. Obratovalni ventil
B. Vodilo za izpuh pare
C. Oznaka polożaja ventila
D. Varnostni klin (oglejte si razdelek «Varnost«)
E. Varnostni ventil
F. Minutni stevec*
G. RočajPokrova
H. Pokrov
I. Tesnilo
J. Kosara za kuhanje s paro*
K./ L. Trinožni podstavek*
M. Ročaj posode
N. Maksimalni nivo polnjenja
O. Posoda
Obvezna preverjanja pred vsako uporabo
Preverjanje obratovalnega ventila

- Prepričajte se, da odprtina na obratovalnem ventilu ni blokirana (glejte poglavje "Odstranitev in delovanje obratovalnega ventila").
Preverjanje varnostega ventila

Preverite, ali se lahko kroglica varnostega ventila premika (uporabite palicico).
Uporaba

Kuhanje v načinu lonec na zvišan tlak

Kuhanje v načinu litoželezne posode*

Znizanje tlaka
Odpiranje
- Nagnite ročajPokrova iz vodoravnega položaja v navpični položaj - skica 3 Pokrov se obráča.
DvignitePokrov.
V primeru težav pri odpiranju izdelka tesnilo postavite pod vodo in ga ponomovno namestite naPokrov, ne da bi ga osušili -sl.19, pri tem pa pazite, da je pravilno namescen glede na zarezePokrova-sl.15.
Zapiranje
- Prepričaite se, da je ročajPokrova v navpičnem položaju.
- NamestitePokrov na posodo, kot je prikazano na skici 1, pri tem pa poravnaite plasticen del z rocaji posode.
Ročaj posode potisnite navzdol iz navpičnega v yodorayni položai - skica 2
- Pokrov se obraca.
Če ne morete zapretiPokrova:
Preverite, ali je tesnilo pravilno namesceno in ali jePokrov pravilno postavljen.
V primeru težav pri zapiranju izdelka tesnilo postavite pod vodo in ga ponovno namestite naPokrov, ne da bi ga osusili -sl.19, pri tem pa pazite, da je pravlno namescen glede na zarezePokrova-sl.15.
Prva uporaba
- Za modele s prevalko proti prijemanju: operite in celotno povrsino notranje prevalke rahlo naoljite z Jedilnim oljem.
Odvisno od modela:
Stojalo\* (L)in kosaro\* (J)postavite na dno posode.
- Stojalo\*K)pripnite na kosaro\*J), nato pa vse skupaj postavite na dno posode.
Posodo (O) 2/3 (MAX 2) napolnite z vodo - sl. 5.
Zaprite lonec na zvišan tlak.
- Poravnajte oznako obratovalnega ventilila (A)z oznakopolożaja ventilila (C)- skica 9.


- Lonec na zvišan tlak postavite na toplotni vir in ga nastavite na najvisjo temperaturo.
- Ko začne skozi ventil uhajati para, zmanjsajte moč toplotnega vira in počakajte 20 minut.
- Po 20 minutah izkljucite toplotni vir.
- Poravnajte piktogram obratovalnega ventila (A) z oznako položaja ventila (C).
- Ko se varnostni klin (D)spusti, lonec na zvišan tlak ni več pod tlakom.
- Odpritelonec na zviisan tlak - skica 3
- Očistite ga sredstvom za pomivanje posode.
Minimalno in maksimalno polnjenje
Minimalno 25 cl (2kozarca)-skica4.
Največ 2/3 višine posode, oznaka MAX 2 - skica 5.
V Iloncu na zvi'an tlak ne uporabljaje grobe soli, temvec ob koncu kuhanja dodajte fino sol.
Zadoločenaživila:
Za mehka zivila, ki se med kuhanjem razsrijo in/ali penijo, kot so riz, strocnice, dehidrirana zelenjava, kompoti, buce, bucke, korenje, krompir, fileji ribe ... lonca ne napolnite vec ko 1/3 (MAX 1). Pustite lonec nekaj minut, da se ohladi, nato pa ga dodatno ohladite v hladni vodi. Lonec pred vsakim odpiranjem rahlo in previdno stresite, potem ko se prepri cate, da se je varnostni zatic spustil, da se izognete uhajanju vroce

pare, ki vas lahko opeče. To je zlasti pomembno pri hitrem uhajanju pare ali po ohlajanju v hladni vodi. Pri kuhanju juh vam svetujemo, da tlak na hitro zmanjsate v hladni vodi (glejte poglavje "Zaključek kuhanja v načinu 'Ekonom lonec").
Uporaba kosare za kuhanje s paro\*
- Na dno posode vlijte 75 cl vode (O).
Odvisno od modela:
- Stojalo* (L) in kosaro* (J) postavite na dno posode.
Stojalo\*K)pripnite na kosaro\*J), nato pa vse skupaj postavite na dno posode.


- Med kuhanjem na paroŽivila v kosari za paro ne smejo biti v stiku z vodo -skica 6 in 7.
Živila, ki se nahajajo v posodi za kuhanje s paro*, se ne smejo dotikati najvisije ravni MAX 2.
Odstranitev in namestitev obratovalnegaventila (A)
Kako izvlečemo obratovalni ventil (A):
- Poravnajte utor z oznako položaja ventila (C) s pritiskom na obroček obratovalnega ventila (A).
- Izvycleventil - skica 11.
Kako namestimo obratovalni ventil:
- Namestite obratovalni ventil (A)- skica 8, pri tem pa pazite, da je konica obratovalnega ventila poravnana z indicatorjem položaja (C) na drugi strani.

- Potiskajte obratovalni ventil (A), dokler ni pritrjen na vodilu za izpuh pare.
- Pritisnite na simbole obratovalnega ventila (A)in ga obrnite.

Minutni stevec*
Odstevalnika nikoli ne uporabljajte v načinu "Mešano".
Minutni stevec je zasnovan tak, da vam omogoča zagotavljanje rezultatov kuhanja, pri Čemer lahko porabo energije kar najbolje prisagodite. Samodejno odsteva Čas kuhanja vse od dosežene ravni temperature, ki ustreza kuhanju v načinu "Lonca na zvišan tlak"
Za pravilno delovanje mora biti minutni stevec pripet na lonec na zvišan tlak.
Medkuhanjem pazite, da obratovalni ventil (A) enakomerno šusija. Če ne izhaja dovolj pare, rahlo povečajtemoč toplotnega vra, v nasprotnem primeru pa jo zmanjsajte.
1 Za vklop minutnega stevca: pritisnite na tipko.
2 Programirajte cas kuhanja (v minutah).
- Ce ste izbrali napačencas kuhanja, počakajte 4 sekunde, da plameni nehajo utripati, nato dolgo Časa pritiskajte na tipkoza ponastavitev na niclo.
3 Vklopite toplotni vir na maksimalno moč.
4 Ko lonec na zvišan tlak doseže temperaturo kuhanja, minutni stevec zazvoni in začne odševati Čas (stevilke utripajo).
Zmanjsajte moctoplotnegavira.
5 Ob koncu kuhanja minutni stevec zazvoni.
Za izklop zvonjenja minutnega stevca pritisnite na tipko.
Izklopite toplotni vir.
Če dalj Časapritiskate na tipko minutni stevec ponastavite na ničlo in gaugasnete.
Namestitev in odstranitev minutega števca*
Za namestitev minutega (F) stevca - skica 12 vstavite Najprej del "pri tipki" na modulu, nato pritisnite, da zaskovi nasprotni del.
Za odstranitev minutega stevca (F)ga dvignite in odstranite.


Changement de la pile du minuteur*
Baterija minutega stevca je gumbasta celica CR2032.
- Če se pojavi simbol n aln več nobenega prikaza, zamenjaje baterijo.
- Ziviljenjska doba baterije je odvisna od pogostosti uporabe minutnega stevca.
Baterija minutega stevca vsebuje dimetoksietan st. CAS 110-71-4. Baterija je v skladu z evropskimi predpisi. Za va so varnost in ochrinite okolja: baterije ne odpirajte, ne izpostavljaje je visokim temperaturam, ne mecite je med gospodinjske oepadke; odlozite jo v zbirnem centru za oepadne baterije.
- Ne polnite ponovno baterij, ki niso temu namenjene.
Vedno uporabljajte le nove baterije iste znamke.
Pri vstavljanju baterij bodite pozorni na polariteto.
- Izrabljene baterije odstranite iz naprave in varno zavrzite.
- Če naprave dlje Časa ne boste uporabljali, odstranite baterije.
Pazite, da na vticu ne pride do katkega stika.
Postavite na ravno delovno povrsino.
- Za odstranitev baterije iz minutnega števca odprite gumb baterije s pomoćjo kovanca (glejte prikaz na nasprotni strani).
Zamenjaje baterijo.
- Tesnilo ponovno namestite na svoje mesto.
- Simbol polmeseca 12 gumba laterije namestite nasproti simbola polmeseca 12 asovnika.
- Z rahlim pritiskom zaprite gumb in pri tem simbol polmeseca 1 / 2 gumba baterije poravnajte s simbolom meseca casovnika.
Postavite na ravno delovno povrsino, da cep pravlno namestite v vodoravni položaj.
Pri zapiranjne pritiskajte s silo na gumb baterije. Pritisniteismo do skrajnega konca.
- Če minutni stevec izgubite, si lahko nadomestega priskrbite v vseh nasih pooblasčenih servisih TEFAL.


Števca* nikoli ne Čistite pod vodo ali v pomivalnem stroju.
Odstevalnika nikoli ne uporabljaje v načinu "Mešano".
Pred kuhanjem
Pred vsako uporabo odstranite obratovalni ventil (A) - skica 11 in s prostim ocesom preverite, da vodilo za izpuh pare(B) ni zamašeno - skica 13.
- Preverite, ali je varnostni ventil premičen (gleje odstavka "Čišćenje" in "Obvezna preverjanja pred vsako uporabo") - skica 18.
Dodajte sestavine in tekočino.
Zaprite lonec na zvi'an tlak - skica 2
V primeru težav pri zapiranju izdelka tesnilo postavite pod vodo in ga ponomovno namestite naPokrov, ne da bi ga osusili -sl.19, pri tem pa pazite, da je pravilno namescen glede na zarezePokrova- sl. 15.
- Kako namestimo obratovalni ventil (A)- skica 8.

Kuhanje v načinu lonec na zvišan tlak
- Zavrtite obratovalni ventil (A) do položaja kuhanja v načinu "Lonec na zvišan tlak" 3kica 9.
- Prepričajte se, da je lonec na zvišan tlak primerno zaprt, preden pričnete s kuhanjem - skica 2.
- Lonec na zvišan tlak postavite na toplotni vir in ga nastavite na najvisjo temperaturo.
- Za modele, opremljene s šcasovnikom : programirajte šas kuhanja, navedene v receptu (gleje odstavek "Uporaba šcasovnika").
- Šumenje in izparevanja, ki jih oddaja varnostni zatic, so normalna, saj omogocajo izpuh zraka pred kuhanjem.
Med kuhanjem v načinu "Lonec na zvišan zrak"
- Ko skozi obratovalni ventil (A)enakomerno uhaja para in pri tem slisite enakomeren zvok (PŠŠŠT), zmanjsajte moč toplotnega vira.
- Začnite odševati Čas kuhanja, kot je navedeno v knjigi receptov.
- Med kuhanjem pazite, da ventil enakomerno šušlja. Če ne izhaja dovolj pare, rahlo povečajte moč toplotnega vira, v nasprotnem primeru pa jo zmanjsajte.
Kuhanje v načinu "Lonec na zvišan tlak"
Za izpust pare:
- Ko ste izključili toplotni vir, imate dve možnosti:
- Postopno zniževanje tlaka: postopoma vrtite obratovalni ventil (A) vse do nastavitvene točke piktograma skica 10.

- Hitro zniževanje tlaka v hladni vodi: odprite vodo v kuhinjskem koritu in vanjo postavite dno posode, dokler se varnostni zaticne spusti - skica 14. Ko se varnostni zatic (D)spusti, lonec na zvišan tlak ni več pod tlakom. Zavrtite obratovalni ventil (A)do položaja

Korak 1

Korak 2
Lonec na zvišan tlak lahko odprete - skica 3.
V primeru težav pri odpiranju izdelka tesnilo postavite pod vodo in ga ponovno namestite naPokrov, ne da bi ga osusili -sl.19, pri tem pa pazite, da je pravlno namescen glede na zarezePokrova-sl.15.
Če opazite nenavadno uhajanje pare, obratovalni ventil (A) znova namestite v položaj ekonom lonec , nato pa tlak hitro zmanjsajte s pomočjo hladne vode.
Če se varnostni zatic (D) ne spusti, odprite vodo v kuhinjskem koritu in vanjo postavite dno posode, dokler se varostni zatic ne spusti - sl. 14.
Nikoli ne posegajte v varnostni klin.
- Za mehkaŽivila,ki se med kuhanjem razsrijo in/ali penijo,kot so riz,strocnice, dehidrirana zelenjava, kompoti,buce,bucek,e korenje,,krompir,fileji ribe...,lonca ne napolnite več kot do 1/3 (MAX 1).Pustite lonec nekaj minut,da se ohladi, nato pa ga dodatno ohladite v hladni vodi.Lonec pred vsakim odpiranjem rahlo in previdno stresite,potem ko se prepričate,da se je varnostni zatic spustil,da se izognete uhajanju vroce pare,ki vas lahko opeče.To je zlasti pomembno pri hitrem uhajanju pare ali po ohlajanju v hladni vodi.Pri kuhanju juh vam svetujemo,da tlak na hitro zmanjsate v hladni vodi (glejte poglavje "Zakljucek kuhanja v načinu 'Ekonom lonec""

Kuhanje v načinu litoželezne posode*
- Zavrtite obratovalni ventil (A) do položaja v načinu kuhanja "litoželezna posoda". To storite tak, da nanj pritisnete dovolj, da se premakne mimo zareze na položaju za zniževanje tlaka.
- Prepričajte se, da je lonec na zvišan tlak primerno zaprt -skica 2, preden pričnete s kuhanjem.
- Lonec na zvisan tlak postavite na toplotni vir, nastavljen na najvisjo temperaturo.
- Začnite odševati Čas kuhanja, kot je navedeno v knjigi receptov.
V načinu "litoželezna posoda" lahko kadarkoli odprete lonec na zvišan tlak, nadzorujte kuhanje in dodajte sestavine.
V primeru težav pri odpiranju izdelka tesnilo postavite pod vodo in ga ponomovno namestite naPokrov, ne da bi ga osusili -sl.19, pri tem pa pazite, da je pravilno namescen glede na zarezePokrova- sl.15.
- Če je toplotni vir premočen, se lahko lonec na zvišan tlak zaskovi (varnostni klin (D)vzdigne in blokira odprtino) in ročajaPokrova ni mogоće vklopiti ali pa se lonec na zvišan tlak ne odpre. V tem primerus zmanjsajte ali ugasnite toplotni vir. V primeru litoželeznih elektricnih plošć odomaknite lonec na zvišan tlak stran od toplotnega vira.
- Za modele s premazom proti sprijemanju: ne uporabljajte kovinskih oziroma abrazivnih kuhinjskh pripomočkov in metric. Ne odcedite kuhinjske posode takto, da udarjate po robovih posode, ker lahko s tem povzročite poskodbe ali pušćanja.
- Nikoli ne segrevajte mascobe do oglenitve. Dim, ki ga lonec oddaja med kuhanjem, je lahko nevaren za zivali z obctljivim dihalnim sistemom, kot so ptice. Lastniki morajo svoje ptice umakniti iz kuhinje.
Varnost
Vas lonec na zvišan tlak je opremljen z več varnostimi napravami:
Varnost pri zapiranju:
- Če jePokrov slabo namescen ali Če pozabite potegniti ročicoPokrova,lahko pride do uhajanja pare pri varnostnem zaticu (D) na loncu,tlak pa ne bo mogel narasti.
Varnost pri odpiranju:
- Če je vaš lonec pod tlakom, je varnostni klin (D) v zgornjem položaju, ročajaPokrova za odpiranje/zapiranje (G) pa ne smete vklopiti.
- Nikoli ne poskušajte lonca na zvišan tlak odpreti na silo.
- Nikoli ne posegaje v varnostni klin (D).
- Prepričajte se, da je notranji tlak padel, pri Čemer preverite, ali je varnostni klin (D) v nizkem položaju.
- Ročaji posode so varnostni deli. Nikoli jih ne zamenjujte sami. Nikoli ne uporabljajte drugih modelov ročajev.
- Če ste ročajPokrova za odpiranje/zapiranje (G) nagnili v navpićen položaj, medtem ko je bil lonec na zvišan tlak še vedno pod pritiskom, ga ne boste mogli odpreti. Ta funkcjija zagotavlja dodatno varnost.
- Ponovno namestite ročajPokrova v vodoraven položaj in počakajte, dokler varnostni klin (D) ni v spodnjem položaju.
Dve varnostni napravi proti previsokemu pritisku:
- Prva naprava: obratovalni ventil (E) sprošca pritisk - skica 20
- Druga naprava: tesnilo omogovi uhajanje pare naPokrovu - skica 20.
V primeru, da se sproži eden izmed teh dveh varnostnih sistemov proti previsokemu pritisku:
- Izklopite toplotni vir.
Pustite, da se lonec na zvišan tlak popolnama ohladi.
- Odprite.
- Preverite in očistite obratovalni ventil (A), vodilo za izpuh pare (B), varnosti ventil (E) in tesnilo (I) - skica 16 - 17- 18. Glejte poglavje "Čišćenje" in "Obvezna preverjanja pred vsako uporabo".
- Če po teh preverjanjih in cisćenju vaš aparat še vedno pusća oziroma ne deluje vec, ga pripeljite na enega izmed pooblasćenih servisov TEFAL.
Priporočila za uporabo
1 - Para je v trenutku, ko izhaja iz obratovalnega ventila, zelo vroča. Pazite na uhajanje pare.
2 - Ko se varnostni klin dvigne, Ionca na zvišan tlak ne morete vec dvigniti.
3 - Kot vsak drug aparat za pripravo Jedi tudi lonec na zvišan tlak med uporabo nadzirajte, Če izdelek uporabljate v blizini其中之一.
4 - Ko premikate lonec na zvišan tlaka, ga vedno primite za oba ročaja.
5 - Lonec na zvišan tlak ni namenjen shranjevanju Živil. Lonca na zvišan tlak nikoli ne poskušajte premikati tak, da držite le ročajPokrova.
6 - Nikoli ne uporabitedezinfekcijskh sredstev ali kloriranih proizvodov,saj lahko le-ti poskodujejo nerjavece jeglo.
7 - Pokrova ne pušćajte namočenega v vodo.
8 - Tesnilo zamenjaje vsako leto ali ce se na njem pojavizareza.
9 - Lonec na zvišan tlak lahko Čistite le takrat, ko je hladen in prazen.
10 - Po 10 letih uporabe je nujen pregled lonca na zvišan tlak v enam izmed pooblaščenih servisov TEFAL.
Čiščenje
Da bo vaš lonec na zvišan tlak pravilno deloval, upoštevajte ta priporocila za Čišćenje in vždrževanje po vsaki uporabi.
Porjavite in praske, kise lahko pojavijo kot posdica dolgotrajne uporabe Iocca, niso problematične.
Obraba zumanje prevleke (odvisno od modela), ki je v stiku sPokrovom na posodi, je obiajna.
Za lance na zvišan tlak s pavleko proti prijemanju (odvisno od modela) majhne praske in okrušenje, ki se lahko pojavijo ob uporabi, ne vplivajo na značlnostizmogljivosti prevlekeproti prijemanju.
- Lonec na zvišan tlak po vsaki uporabi očistite z mlačno vodo, ki ste ji dodali sredstvo za pomivanje posode. Enako storite s kosaro za kuhanje s paro*.
- Ne uporabljaje bezinfekcijskih sredstev ali kloriranih izdelkov.
- Nikoli ne segrevajte posode, ko je le-ta prazna.
Kako očistiti notranjost posode iz nerjavečega jekla:
Ocistite jo s cistilno gobico in s sredstvom za pomivanje posode.
- Ce se na nerjavečem jeklu v notranjosti posode pojavijo bele pike (odlaganje mineralov) ali mavricni odsev, jih očistite z belim kisom.
Kako očistiti notranjost posode iz aluminija s prevalko proti prijemanju:
- Za podaljšanjeŽivljenjske dobe proizvoda vam priporočamo, da lonec perete ročno.
- Izdelek Čistite z vročo vodo, sredstvom za Čišcenje posode in mehko gobico.
- Ne uporabljajte Čistilnega prăška niti abrazivnih gobic.
- Če se vam je hrana zažgala, v posodo natočite vročo vodo in jo pustite namočeno. Nato jo očistite sredstvom za pomivanje posode.
Kako očistiti zunanjost posode:
- Očistite jo z gobico in s sredstvom za pomivanje posode.
Posodo in košaro za kuhanje s paro la hko perete v pomivalnem stroju.
Posode s prevleko proti prijemanju (odvisno od modela) ne perite v pralnem str oju, ker tab lete za pom ivalni str oj vseb ujej o zelo agresivne in korozivne snovi za dele iz aluminija.
Če posodo s prevleko proti prijem anju (odvisno od modela) prepogosto uporabljate, lahko to rahlo v pliva na bar vo prevleke (p oumenelost, madeži).
ČiščenjePokrova:
- Pokrov očistite z gobico in s sredstvom za pomivanje posode.
Pokrovnavpicno odcedite, da zagotovite odtekanje o stanka vode med kovinskimi in plastičnimi deli pokro va.
Cisjenje tesnilaPokrova:
- Po vsakem kuhanju očistite tesnilo (I) in njegovo ležišće.
- Pri ponovni namestitvi tesnila glejte - skico 15 in pazite, da je tesnilo namesceno pod vsako rezoPokrova.
Ciscenje obratovalega ventila (A):
- Snemite obratovalni ventil (A) - skica 10 - 11.
- Operite obratovalni ventil (A) pod tekočo vodo -skica 16.
Preverite, ali se premika: prikaz na nasprotni smeri.
Potem ko odstranite obratovalni ventil (A), tesnilo (I) in asovnik\* (F), lahkoPokrov perete v pomivalnem stroju.

Obratovalnega ventila (A), tesnila (I), chasovnika* (F), niti posode s prevleko proti prijemanju nikoli ne perite v pomivalnem stroju.
Čišćenje vodila za izpuh pare (B), namesčelenega naPokrovu:
Snemiteventil(A)-skica11.
- Pri dobri dnevni svetlobi preverite, ali je vodilo za izpuh pare odmašeno in okrogle oblike - skica 13. Če je potrebno, ga očistite z zobotrebcem - skica 17 in sperite.
Cischenje varnostega ventila (E):
- Del varnostega ventila, ki se nahaja na notranji straniPokrova, očistite pod tekoco vodo.
- Pravilno delovanje varnostega ventila preverite tak, da s pomocjo palicice moćno pritisnete naPoklopec (s pomocjo palicice za ušesa brez vate), ki mora biti premićen - skica 18. Glejte poglavje "Obvezna preverjanja pred vsako uporabo".
Cischenje minutega stevca* (F):
- Uporabite Čistó in suho krpo.
Ne uporabljajte topil.
Stevca nikoli ne cistite pod vodo ali v pomivalnem stroju.
Vzdrževanje
Menjava tesnila pri loncu na zvišan tlak:
- Tesnilo na loncu na zvisan tlak zamenjaje vsako leto ali ce se na njem pojavizareza.
- Vedno uporabljajte originalna tesnila TEFAL, ki ustrezajo vašemu modelu (glejte odstavek "Pripomočki").
- Pri ponovni namestitvi tesnila glejte - skico 15 in pazite, da je tesnilo namesceno pod vsako rezoPokrova.
Hramba vašega lonca na zvišan tlak:
- ObrnitePokrov na posodi.
- Mehanizem za odpiranje/zapiranje lonca na zvišan tlak ne zahteva posebnega vzdhrževanja razen cisćenja.
Po 10 letih uporabe je nujno potreben pregled lonca na zvišan tlak v enam izmed pooblaščenih servisov TEFAL.
Dodatki TEFAL
Dodatki, ki so na voljo za lonec na zvišan tlak:
Dodatki Reference Tesnilo 3/4/4.5/6 L: zunanji premer tesnila: 24 cm X1010008 5/7.5/9 L: zunanji premer tesnila: 27 cm X1010007 Košara za kuhanje s paro* 3/4.5/4/6 L: za posodo s premerom 22 cm 792185 5/7.5/9 L: za posodo s premerom 24 cm 792654 Trinožni podstavek* (L) 792691 Minutni števec* X1060007
- Za menjavo ostalih rezervnih delov ali za popraviloPoklicite pooblasceni servis TEFAL.
- Uporabljajte le originalne rezervne dele proizvajalca TEFAL, ki odgovarjajo vašemu modelu.
Lastnosti
Premer dna lonca na zvišan tlak - reference
Prostor-nina Ø posode Ø dna Clipso
Minut®
Perfect / Easy Clipso
Minut®
Duo couleur Clipso
Minut®
Duo Gourmet Material
posode 3 L 22 cm 15.5 cm P46205 - - Nerjavno
jeklo 3 L 22 cm 18 cm - - P46605 4 L 22 cm 14 cm - P46042 - Prevlečeni
aluminij 4.5 L 22 cm 15.5 cm P46206 - - Nerjavno
jeklo 5 L 24 cm 14 cm - P46051 - Prevlečeni
aluminij 5.2 L 24 cm 20 cm - - P46654 Nerjavno
jeklo 7.5 L 24 cm 18 cm P46248 - - 9 L 24 cm 18 cm P46249 - - Set 5 L 7,5 L 24 cm 14 cm P46353 - 18 cm
Kompatibilni toplotni viri
PLIN ELEKTRIKA
(Litoželeznaploška) ELEKTRIKA
(Halogenska
steklokeramična ploška) ELEKTRIKA
(Indukcijska
steklokeramična ploška) ELEKTRIKA
(Grelna spirala)
- Lonec na zvišan tlak lahko uporabljate na vseh vrstah kuhalisč, vljučno z indukcijskimi kuhalisči.
- Ce uporabljate elektricno plosco, uporabite plosco, katere premer je enak ali manisi od premera dna lonca na zviisan tlak.
- Ce uporabljate steklokeramicno plosco, vedno preverite, ali je dno lonca neposkodovano in cisto.
- Ce uporabljate plinski stedilnik, plamen ne sme segati cz rob dna lonca.
- Na yseh kuhališčih preverite, ali lonec na zvišan tlak dobro stoji.
Garancija
V okviru uporabe, ki je v skladu z navodili za uporabo, ima nerjaveca posoda vašega lonca na zvišan tlak TEFAL 10-letno garancijo za: - Vse napake, povezane s kovinski strukturo posode, - Vsako prezgodnje propadanje kovinske osnove.
- Drugi materiali posode in drugi deli lonca na zvišan tlak imajo garancijo za vsako tovarnísko napako ali napako materiala za odobje veljavnosti garancije, ki ga doloca veljavni zakon v državi nakupa in ki velja od datumama nakupa.
- Pogodbeno garancijo pridobite ob predložitvi potrdila o placilu ali računa z vidnim datumom nakupa.
Garancija ne velja za:
- Praske in razbarvanje zaradi staranja, za posode s prevlekoproti prijemanju.
- Praske, nastale zaradi stikaPokrova posode s prevleko proti prijemanju.
Zaporedne poskodbe, ki so posledica neupoštevanja pomembnih previdnostnih ukrepov ali nepraviln e uporabe, kot so na primer: - udarci, padci, uporaba v pečici...
Garancijo lahko uveljavljate le na pooblaščenih servisih TEFAL, ki so usposobljeni za tovrstna popravila.
- Poklicite nas in napotili vas bomo v najblizji pooblaščeni servis TEFAL.
označitev v skladu s predpisi
Oznaka Mesto Blagovna znamka NaPokrovu Leto in serija proizvodnje Oznaka modela Najvisji varnostni tlak (VT) Najvisji obratovalni tlak (OT) NaPokrovu Prostornina Na dnu zunanje strani posode Poštni naslov proizvajalca Na dnu zunanje strani posode
Sodelujmo pri varovanju okolja!

① Vaš aparat vsebuje stevilne materiale, ki so primerni za ponovno uporabo ali recikliranje.
Prosimo, odnesite ga v center za reciklazo, kjer bo ustrezno predelan.
TEFAL odgovarja na vaša vprašanja
Težave Priporočila V primeru težjega odpiranja/zapiranja: • Odstranite tesnilo in ga postavite pod vodo
• Ponomvno namestite tesnilo, ne da bi ga osušili - sl.
19. Če ne morete zapretiPokrova: • Preverite, ali je ročaj Pokrova v navpičempoložaju.
• Preverite ali je tesnilo pravilno vstavljeno (glejte ods-tavek "Čišćenje in vzdřevanje").
• Preverite, ali je Pokrov pravilno namešćen, kot je pri-
kazano na - skico 1.
• Tesnilo postavite pod vodo in ga ponovno namestite naPokrov, ne da bi ga osušili - sl. 19, pri tem pa pa-zite, da je pravilno namešćen glede na zareze po-
krova - sl. 15. Če se je lonec na zvišan tlak segreval pod pritiskom brez tekovičine v notranjosti: Naj ga pregledajo na pooblašćenem servisu TEFAL. Če varnostni klin Žvenketa in se slisi izparevanje: Prvih nekaj minut je to normalno: to omogoća izpuh zraka pred kuhanjem. Če se varostni klin ni dvignil in para med kuhanjem ne uhaja skozi ventil: Prvih nekaj minut je to normalno.
Če se povav nadaljuje, preverite:
- Ali je toplotni vir dovolj močan, Če ni, povečajte njegovović.
- Ali je v posodi dovolj tekovićine.
- Obratovalni ventil (A)je namešćen na.
- Ali je lonec na zvišan tlak dobro zaprt.
- Ali nista tesnilo ali rob posode morda poškodovana.
- Ali je tesnilo je pravilno namešćeno. Če se je varostni klin dvignil in para med kuhanjem ne uhaja skozi ventil: To je povsem normalno za prvih nekaj minut.
Če ne mine, odprite vodo v kuhinjskem koritu in vanjo postavite dno posode, dokler se varnostni zatićne spusti.
Očistite obratovalni ventil (A) - skica 16 in vodilo za izpuh pare - skica 17 in preverite, ali sePoklopec varnostnegа ventila zhlahka poda - skica 18. Težave Priporočila Če okoliPokrova uhaja para, varnostni zatič pa je spušćen, preverite naslednje : Ali je lonec pravilnoPokrit sPokrovom.Položaj tesnilaPokrova.Dobro stanje tesnila,po potrebi ga zamenjaje.C IstocoPokrova,tesnila in ležišča tesnila vPokrovu.Dobro stanje roba posode. Če ne morete odpreti po-krova: Preverite,ali je varnostni klin (D)v spušćenempoložaju.V nasprotnem primeru znižajte tlak: odprite vodo v kuhinjskem koritu in vanjo postavite dno posode, dokler se varnostni zatične spusti.Nikoli se ne dotikajte varnostnega zatiča (D).Obratovalni ventil (A) obrnite v pravi položaj Če{jedi niso skuhane ali so zažgane,preverite: Čas kuhanja.Moč toplotnegavira.Pravilen položaj obratovalnegaventila (A).Količino tekovičine. Če so se{jedi v loncu na zvišan tlak zažgale: Posodo namočite, preden jo pomijete.Nikoli ne uporabljajtedezinfekcijskih sredstev ali klo riranih izdelkov. Če se je sprežil eden od varnostnih/systemov: Izklopite toplotni vir.Ne da bi lonec na zvišan tlak premikali,pustite,da se ohladi.Počakajte,da se varnostni klin zniža in ga odprite.Preverite in očistite obratovalni ventil (A),vodilo za izpuh pare,varnostni ventil in tesnilo.Prepričajte se,da so pogoji za polnjenje izpoljeni.Če napake s tem niste odpravili,naj aparat pregleda na pooblašćenem servisu TEFAL. Če opazite sledi oksidacije: Uporaba visokozmogljivega nerjavecěga jekla ne prepreci pojava oksidacije v teh ekstremnih priterihČe opazite sledi oksidacije,jih odstranite takot,dajih pred novo uporabo lonca na zvišan tlak otrete z abrazivno gobico.
PreGleDniCa za KUHanJe
Zelenjava
ZELENJAVA (SVEZA)
KUHANJE NA PARI
Sestavine v parni kosari in 750 ml vode na dnu posode na pritisk.


KUHANJE V VODI
Sestavine v vodi, brez kosare.
STROCNICE
KUHANJE V VODI
Brez kosare.


Artićoke, 2 celi, 600 g vsaka (kuhanje v vodi) od 30 do 35 min Blitva, narezana (2 cm), 700 g (kuhanje na pari) od 15 do 17 min Brstićni ohrovt (kuhanje na pari) od 10 do 12 min Buča, narezana na kosće (od 3 do 5 mm), 600 g (kuhanje na pari) od 13 do 18 min Bučke, narezane na kolobarje (3 mm), 600 g (kuhanje na pari) od 12 do 15 min Čebula za vlaganje (kuhanje na pari) od 7 do 8 min Endivija, razrezana na pol (900 g), (kuhanje na pari) od 14 do 16 min Glave brokolija, 600 g (kuhanje na pari) od 9 do 11 min Glave cvetače, 600 g (kuhanje na pari) od 10 do 12 min Gobe, narezane, 800 g (kuhanje v vodi) od 4 do 5 min Grah (kuhanje na pari) od 6 do 8 min Grah v polovicah, 250 g (kuhanje v vodi) od 18 do 20 min Jajčevci, oluplejeni in narezani (3 mm), 850 g (kuhanje na pari) od 10 do 12 min Korenje, narezano na kolobarje (3 mm), 600 g (kuhanje na pari) od 17 do 19 min Koromač, narezan na trakove (600 g), (kuhanje na pari) od 6 do 9 min Krompir, narezan na polovice (950 g) (kuhanje na pari) od 20 do 25 min (odvisno od velikosti) Leča, zelena, 250 g (kuhanje v vodi) od 14 do 16 min Navadni fižol, surov, 250 g (kuhanje v vodi) od 35 do 40 min Paprika, narezana na polovice (559 g) (kuhanje na pari) od 14 do 16 min Pesa, rdeča, narezana na Četrnine (kuhanje v vodi) od 20 do 25 min (odvisno od velikosti) Por, beli, cel, 650 g (kuhanje na pari) od 9 do 11 min Repá, narezana na kocke (500 g) (kuhanje na pari) od 14 do 16 min Šparglji, beli (kuhanje na pari) od 5 do 6 min Špinača (kuhanje na pari) od 3 do 4 min Stroćji fižol (600 g) (kuhanje na pari) od 10 do 12 min Zelena, narezana, 600 g (kuhanje v vodi) od 7 do 9 min Zelje, zeleno, narezano, 500 g (kuhanje v vodi) od 5 do 6 min
KUHANJE V VODI
Brez košare.
1/3 MAX 1 KOLICINA
VODE KOLICINA
RIŽA ČAS
KUHANJA 2 OSEBI 400 ml/2 kozarca 150 g/1 kozarec od 7 do 8 min4 OSEBE 500 ml/2,5 kozarca 250 g/2 kozarca 6 OSEB 700 ml/3,5 kozarca 375 g/3 kozarci
Meso/ribe
SVEŽE ZAMRZNJENO Fileji morske spake (1 kg) v kosih po 75 g od 5 do 6 min od 7 do 8 min Jagnjeće stegno: 2 kosa (0,95 kg) od 40 do 45 min od 1 h 5 min
do 1 h 15 min Lososovi zrezki: 4 kosi (0,8 kg) od 5 do 6 min od 7 do 8 min Mlad pišćanec: 2 kosa (1,3 kg) od 23 do 25 m od 40 do 45 min Pišćanec (1,35 kg) od 23 do 25 min Prepelica: 4 od 9 do 10 min od 18 od 20 min Raca (1,8 kg) od 45 do 47 min od 50 do 55 min Rostbif (1 kg, 8-11 cm v premeru) od 30 do 35 min od 45 do 50 min Svinjska ribica: 2 kosa po 350 g od 13 do 15 min od 26 do 29 min Svinjsko stegno (0,8 kg, 8-10 cm v premeru) od 30 do 35 min od 1 h 5 min
do 1 h 15 min Telečja ribica: 0,7 kg od 17 do 21 min od 33 do 38 min Telečje stegno (0,8 kg, 5-7 cm v premeru) od 17 do 19 min od 37 do 40 min Telečji Žepki (Paupiettes de veau): 4 kosi od 10 do 12 min x Tunovi zrezki: 4 kosi (0,7 kg) od 5 do 6 min od 7 do 9 min Zajec (1,5 kg, v kosih) od 8 do 9 min od 20 do 23 min
Opomba: Pri posodah s prostornino 5 litrov in manj se prepričajte, da kosi mesa in perutnina ne presežejo oznake na notranjem delu posode. Izberite kose mesa in perutnino z višino 8 cm ali manj.
VAŽNE MERE PREDOSTROŽNOSTI
Pre upotrebe ekspres lonca, pažljivo pročitajte i uvek se pridržavajte "Uputstva za upotrebu"
Nepravilno rukovanje moze dovesti do kvara.
Zbog Vase bezbednosti, proizvod je napravljen u skladu sa vazećim standardima i normama:
- Direktiva za opremu pod pritiskom
- Materijali u kontaktu sa namirnicama
- Okrużenje
OBAVEZNE
PROVERE PRE
SVAKE
UPOTREBE PROVERITE
vizuelseni na dnevnoj svetosti da je cev za odvod pare
prohodna - sl. 13.
da li je bezbednosni ventilPokretan - sl. 18.
da li je dihtung postavljen ispod svakog zareza na
poklopcu - sl. 15.
da li su ručke posude dobro pričvršcene. Ručke
predstavljau bezbednosne delove posude. Nikada ih ne
menajte sami. UVEK SE
PRIDRžAVAJTE
SLEDEĆIH
PREPORUKA
ZA KOLICINE Nikada ne koristite ekspres lonac bez tečnosti, to bi
dovelo do ozbiljnog oštećenja. Uvek proverite da li ima
dovoljno tečnosti tokom kuvanja.
Minimum 25 cl - sl. 4.
Maksimum 2/3 visine posude, oznaka za punjenje
MAX 2 - sl. 5.
Tokom kuvanja, namirnice koje se nalaze u korpi za paru
ne smeju doci ukontakt sa vodom -sl. 6 i 7.
Maksimalno 1/3 (MAX 1) za namirnice koje dobijaju na
zapremini ili stvaraju penu tokom kuvanja, kao što su
pirinjač, mahunarke, sušeno povrće, kompoti, bundeva,
tikvice, šargarepa, krompiri, riblji fileti, itd.
Namirnice koje se nalaze u korpi za paru ne smeju da
predu nivo MAX 2 koji je označen na posudi. PRE I ZA VREME KUVANJA Ne pušajte decu blizu ekspres lonca tokom njegovog korićenja.
Vaš ekspres lonac radi pod pritiskom. Nepravilno rukovanje može dovesti do opekotina. Pre pušanja ekspres lonca u rad, proverite da li je dobro zatvoren. (Pogledajte odeljak "Zatvaranje").
Tokom kuvanja vodite računa da ventil uvek šišti. Ako nemo dovoljno pare, smanjite pritisak u posudi i proverite da li ima dovoljno tečnosti i da li je cev za odvod pare optušena. Ukoliko i nakon ovih provera nema pare, lagano pojacajte jaćinu izvora toplote.
Ne kuvajte namirnice koje mogu zapušiti cevi bezbednosnih delova:
- brusnice
- ječam
- ovsene pahuljice
- grašak
- rezanci, makaroni, špageti
- rabarbara
- ribizle
U ekspres loncu nikada ne pravite jela na baziŽivotinjskog mleka.
Ukoliko imate ekspres lonac saPoklopcem od neržajućeg Želika, nemojte koristiti krupnu so već na kraju kuvanja dodajte finu so. Takoće izbegavajte oštre namirnice koje mogu oštetiti dno Vašeg ekspres lonca.
Ne koristite ekspres lonac za prženje na ulju pod pritiskom.
Ne koristite ekspres lonac u druge svrhe osim za ono Čemu je namenjen.
Ne stavljaje ekspres lonac u zagrejanu rennu.
Nikada ne stavljaje aluminijumski foliju u Vaš ekspres lonac.
Nikada ne stavljaje foliju od plastike u Vaš ekspres lonac.
Alkoholna isparenja su zapaljiva. Pustite da kljućaju oko 2 minuta pre nego što stavitePoklopac. Nadgledajte lonac sve vreme ukolico priprémate jela na bazi alkohola.
Koristite kompatibilni izvor (kompatibilne izvore) toplote, u skladu sa instrukcjama za upotrebu. PO ZAVRŠETKU KUVANJA... Za modele sa nelepljivom oblogom: nemojte da upotrebljavate metlice ili metalni kuhinjski pribor ili kuhinjski pribor oštrih ivica. Nemojte da cedite svoj kuhinjski pribor laganim udaranjem o ivicu uredaj, jer to要考虑 da ošteti uredaj i prouzrokuje curenja.
Postepeno okreceite radni ventil (A) prema odabranoj brzini smanjenja pritiska, dok ne bude naspram oznake sa ikonicom 10. Ukoliko para prilikom oslobadanja izlazi na neuobičajen način, ponovo postavite radni venti (A) u poziciju za kuvanje na režimu "Ekspres lonac", a zat izvršite brzo otpušanje pritiska pod hladnom vodom.-sl. 14.
Ukoliko se sigurnosna cev (D) ne spušta, stavite Vaš ekspres lonac pod hladnu vodu iz slavine -sl. 14.
Nikada ne preduzimajte radnje na sigurnosnoj cevi.
Nakon kuvanja mesa koje ima povrsinsku kožicu (npr. govedi jezik) koja pod dejstvom pritiska要考虑 da nabubri nemojte bosti meso dok je kožica naduvena, jer postoji opasnost da se opečete. Pre kuvanja proverite da li je meso izbockano.
Za namirnice koje dobijaju na zapremini ili stvaraju penu tokom kuvanja, kao što su pirinač, mahunarke, sušeno povrće, kompoti, bundeva, tikvice, šargarepa, krompiri, riblj fileti, itd., ostavite Vaš ekspres lonac nikoliko minuta da se ohladi, a zatim ga ohladite pod hladnom vodom. Prsvakog otvaranja lagano protresite ekspres lonac nakon što proverite da li se sigurnosna cev spustila kako biste izbegli udar pare koji要考虑 dovesti do opekotina. Ova procedura je posebno važna prilikom brzog otpušanjepare ili nakon rashlaživanja lonca pod hladnom vodom.
Veoma pažljivo pomerajte ekspres lonac kada je pod pritiskom. Ne dodirujte vruće povrsine. Koristite ručke i tastere. Po potrebi koristite rukavice.
Ukoliko pripremate supu, preporučujemo Vam da izvršite brzo smanjenje pritiska pod hladnom vodom (pogledajte odeljak "Po završetku kuvanja u režimu 'Ekspres lonac')".
Pre otvaranja ekspres lonca proverite da li je ventil u položaju za otpušanje pritiska. Sigurnosna cev (D) mora biti u donjem položaju.
Nikada ne otvarajte ekspres lonac silom. Proverite da li je unutrašnji pritisak opao. Sigurnosna cev (D) mora biti u donjem položaju. (Pogledajte poglavlje "Bezbednost"). ODRŽAVANJE • Ukoliko primetite da je neki deo Vašeg ekspres lonca polomljen ili oštećen, nipošto ne pokušavajte da ga otvorite ako je zativoren, sačekajte da se u potpunosti ohladi pre nego što ga pomerite, nemojte ga više koristiti i obratite se ovlašćenom servisu za popravku.
• Ne preduzimajte nikakve radnje na sistemima za bezbednost koje nisu navedene u uputstvu za Čišćenje i održavanje.
• Koristite samo originalne TEFAL delove koji odgovaraju Vašem modelu. Naročito, posudu iPoklopac TEFAL.
• Ne koristite ekspres lonac za Čuvanje kiselih ili slanih namirnica pre i posle kuvanja, jer postoji opasnost da se ošteti posuda.
• Posle svake upotrebe odmah očistite i isperite Vaš ekspres lonac.
• Nikada ne perite radni ventil (A), dihtung (I), tajmer* (F), ili posudu sa nelepljivom oblogom u mašini za sudove.
• Nikada ne stavljajte tajmer* (F) pod vodu.
• Nikada ne koristite sredstva zadezinfekcjju ili proizvode na bazi hlora, oni mogu uticati na kvalitet nerădućeg Čelika.
• Ne ostavljajtePoklopac potopljen u vodi.
• Jednom godišnje menjaje dihtung na loncu. Ukoliko pukne odmah ga zamenite.
• Nakon 10 godina korišćenja, obavezno odnesite Vaš ekspres lonac na servisiranje u ovlašćeni TEFAL servis.
• Odlaganje lonca: OkretenitePoklopac na posudi kako bistie izbegli habanje dihtunga.
SACUVAJTE OVA UPUTSTVA
Delovi (pogledajte Opis)
A. Radni ventil
B. Cev za odvod pare
C. Pokazatelj položaja ventila
D. Sigurnosna cev (pogledajte poglavlje "Bezbednost").
E. Sigurnosni ventil
F. Tajmer za kuvanje*
G. RuchkaPoklopca
H. Poklopac
I. Dihtung
J. Korpa za kuvanje na pari*
K./ L. Tronožni stalak*
M. Ručka posude
N. Maksimalna granica punjenja
O. Posuda
Obavezne provere pre svake upotrebe
Provera radnog ventila

- Proverite da odvod radnog ventilaijke napuosen (pogledajte odeljak "Skidanje i postavljanje radnog ventila").
Provera sigurnosnog ventila

Proverite da li je sigurnosni ventilPokretan (upotrebite cackalicu).
Upotreba

Kuvanje u režimu Ekspres Ionac

Kuvanje u režimu Šerpa*

Ispust pare
Otvaranje
- Dignite ručkuPoklopca iz horizontalnog u vertikalni položaj -sl.3 Poklopac se okrece.
- PodignitePoklopac.
- Ako ne możete da otvorite proizvod, operite dihtung pod mlazom vode a zatim ga ponovo vratite naPoklopac bez prethodnog brisanja - sl. 19 i uverite se da je ispravno postavljen ispod zareza naPoklopcu - sl. 15.
Zatvaranje
Proverite da li je ručkaPoklopca u vertikalnompoložaju.
- PostavitePoklopac na posudu takodaplasticni deo bude uravni sarukkama posude, kao sto je prikazano na -sl.1.
Spustite ručkuPoklopca iz vertikalnog u horizontalni položaj -sl.2
- Poklopac se okrece.
Ako ne možete da zatvoritePoklopac:
Proverite da li su dihtung iPoklopac pravilno postavljeni.
- Ako ne możete da zatvorite proizvod, operite dihtung pod mlazom vode a zatim ga ponovo vratite naPoklopac bez prethodnog brisanja - sl. 19 i uverite se da je ispravno postavljen ispod zareza naPoklopcu - sl. 15.
Prvo korišćenje
- Za modele sa nelepljivom oblogom: operite lonac a zatim u tankom sloju premažite unutrašnjost nelepljive obloge uljem za kuvanje.
U zavisnosti od modela:
Stavite ručku posude* (L) i korpu za kuvanje na pari* (J) na dno posude.
- Pričvrstite trONOžni stalak* (K) na korpu za kuvanje na pari* (J), zatim pomaknite set na dno posude.
- Napunite posudu (O) sa najviše 2/3 vode (MAX 2) - sl. 5.
Zatvorite ekspres Ionac.
- Poravnajte piktog ventila (A) sa


pokazateljem polożaja ventila (C) -sl.9.
Stavite ekspres Ionac na izvor toplate podesen na maksimalnu jacinu.
- Kada para počne da izlazi kroz ventil, smanjite jačinu izvora toplote i ostavite ga 20 minuta.
Nakon 20 minuta, iskljucite izvor toplote.
- Izravnajte piktogram radnog ventila (A) saPokazateljem polożaja ventila (C).
Kada se sigurnosna cev (D) spusti, Ionac vise nije pod pritiskom.
- Otvorite ekspres Ionac - sl. 3
- Operite ga deterdžentom za pranje sudova.
Minimalno i maksimalno punjenje
- Minimalna količina je 25 cl (2Čaše) - sl. 4.
- Maksimum 2/3 visine posude, oznaka za punjenje MAX 2 - sl. 5.
- Ukoliko imate ekspres Ionac saPoklopcem od neradajuceg celika, nemojte koristiti krupnu so vec po zavrsetku kuvanja dodajte finu so.
Za odreëne namirnice:
- za namirnice koje dobijaju na zapremini ili stvaraju penu tokom kuvanja, kao sto su pirinač, mahunarke, sušeno povrće, kompoti, bundeva, tikvice, šargarepa, krompiri, riblji fileti, itd., ne punite vise od 1/3 (MAX 1) kapaciteta ekspres lonca. Ostavite ekspres lonac nekoliko minuta da se ohladi, a zatim ga stavite pod mlaz hladne vode. Pre svakog otvaranja lagano protresite ekspres lonac nakon sto proverite da li se sigurnosna cev spustila kako biste

izbegli udar pare koji moze dovesti do opekotina. Ova procedura je posebno važna prilikom brzog otpušanja pare ili nakon rashlačivanja lonca pod hladnom vodom. Ukoliko pripremate supu, preporucujemo Vam da izvršite brzo smanjenje pritiska pod hladnom vodom (pogledajte odeljak "Po završetku kuvanja u režimu 'Ekspres Ionac'").
Koriscenje korpe za kuvanje na pari*
- Sipajte 75 cl vode na dno posude (O).
U zavisnosti od modela:
- Stavite ručku posude* (L) i korpu za kuvanje na pari*
(1) na dno posude.
- Pričvrstite tronozni stalak* (K) na korpu za kuvanje na pari* (J), zatim pomaknite set na dno posude.


SR
- Tokom kuvanja, namirnice koje se nalaze u korpi za kuvanje na pari ne smeju doci ukontakt savodom - sl.6 i7.
Namir nice koje se nalaze u korpi za kuvanje na pari ne bi trebalo da predu nivo MAX 2.
Skidanje i postavljanje radnog ventila (A)
Skidanje radnog ventila (A):
- Poravnajte Žleb saPokazateljem položaja ventila (C) pritiskajuci prsten radnog ventila (A).
- Skinite ga -sl. 11.
Postavljanje radnog ventila:
- Postavite radni ventil (A) -sl.8 tako da tacka radnog ventila (A) bude u ravni sa pokazateljem polozaja (C); pogledajte suprotnu stranu.

Stavite radni ventil (A) takdo sa zakauci na cev za odvod pare.
- Pritisnite piktograme radnog ventila (A) i okrenite ga.

Tajmer za kuvanje*
Nemojte nikada da koristite tajmer u režimu rada "Šerpa".
Tajmer za kuvanje osmišljen je takdo Va m pomogne u postizanju dobrih rezultata kuvanja i omoguci racionalu potrošnju energije. Tajmer automatiski odbrojava vreme kuvanja Čim dostigne odgovarajuci nivo temperature koja odgovara kuvanju u režimu "Ekspres Ionac"
Tajmer mora biti povezan na Vaš ekspres lonac da bi radio.
Tokom kuvanja vodite računa da radni ventil (A) pravilno šišti. Ako nema dovoljno pare malo pojacaje jačinu izvora toplote, u suprotnom smanjite.
1 Da uključite tajmer: pritisnite dugme.
2 Podesite vreme kuvanja (u minutima).
- Ako ste uneli pogresno vreme, sačekajte 4 sekunde da plamen prestane da treperi, a zatim pritisnite i držite taster da biste vratili vreme na nulu.
3 Upalite izvor toplate na maksimalnu jačinu.
4 Cim se dostigne odgovarajuci nivo temperature, tajmer zvoni i poacinje da odbrojava vreme (serija zvučnih signala).
Smanjite jačinu izvora toplote.
5 Kada je kuvanje završeno, tajmer zvoni.
Za prekid zvuka, pritisnite dugme na tajmeru.
Smanjite jacinu izvora toplate.
Dugim pritiskom na dugme tajmer sevraçana nulu i gasi.
Postavljanje i skidanje tajmera*
Da bistepostavili tajmer (F) na mesto -sl.12, prvo stavite deo prednji deo na modul, a zatim ga pritisnite da bistezakacli zadnju stranu.
Da biste skinuli tajmer (F), podignite ga i povucite.
Zamena baterije na tajmeru*
Tajmer imadugme bateriju tip CR2032.
- Ukoliko se na ekranu pojaviznak n se a njemu nista ne prikazuje, zamenite bateriju.


- Trajanje baterije zavisi od toga koliko se Često koristi tajmer.
Baterija tajmera sadrži Dimetoksietan o CAS 110-71-4. Odgovara evropskim propisima. Radi Vase zašite i zašiteŽivotne sredine: ne otvarajte bateriju, ne izlažite je visokim temperaturama, ne bacajte je sa ostalim smecem; odnesite je u centar za prikupljanje iskorišćenih baterija.
- Nepunjive baterije ne smeju da se pune.
Razlicite vrste novih i upotrebljenih baterija ne smeju da se kombinuju.
- Baterije je potrebno umetnuti u skladu sa pravilnim polom.
- Isprañnjene baterije je potrebno izvaditi iz ureðaja i bezbedno odložiti u OTPad.
- Ako cete uredaj skladistiti duze vreme i ako ga necete upotreblavati duze vreme, baterije je potrebno izvaditi iz uredaja.
- Priključci baterije ne smeju da se kratko spajaju. Postavite ga ravno na radnu povrsinu.
- Da uklonite bateriju, otvorite dugme uz pomoć novčica (pogledajte sliku).
Zamenite bateriju.
Vratite dihtung u kuciiste.
Postavite 1 / 2 prednjeg klopca baterije na 1 / 2 prednje straneajmera.
Lagano okrenitePoklopac baterije,i blago ga pritiskajte kakobi se poravnao 1 / 2 a prednjom stranom tajera.
- Postavite ga ravno na radnu povrsinu takdo daPoklopac bude u horizontalnom položaju.
- Ne pritiskajte jakoPoklopac baterije kada ga zatvarate. Ne idite preko ivica.
U slučaju da ga izgubite, možete poručiti drugi tajmer u ovlášćenim TEFAL servisima.
Nikada ne stavljajte tajmer u vodu ili mašinu za sudove.
Nemojte nikada da koristite tajmer u režimu rada "Šerpa".
Pre kuvanja
- Pre svake upotrebe, skinite radni ventil (A) - sl. 11 i pogledajte na dnevnom svetlu da cev za odvod pare (B)不同程度 of the respiratory system (A).
- Proverite da li je sigurnosni ventilPokretan (pogledajte paragraf "Ciscenje" i "Obavezne provere pre svake upotrebe") - sl. 18.
Dodajte sastojke i tecnost.
Zatvorite ekspres Ionac - sl. 2
- Ako ne možete da zatvorite proizvod, operite dihtung pod mlazom vode a zatim ga ponovo vratite naPoklopac bez prethodnog brisanja - sl. 19 i uverite se da je ispravno postavljen ispod zareza naPoklopcu - sl. 15.
- Postavljanje radnog ventila (A) -sl 8.

Kuvanje u režimu "Ekspres Ionac"
- Okrenite radni ventil (A) do polożaja za kuvanje u režimu "Ekspres Ionac" -sl. 9.
Pre puštanja ekspres lonca u rad, proverite da li je dobro zatvoren - sl. 3
Stavite ekspres Ionac na izvor toplote podesen na maksimalnu jačinu.
- Za modele koji su opreumljeni tajmerom: podesite vreme kuvanja koje je naznačeno na receptu (pogledajte paragraf "Upotreba tajmera za kuvanje").
- Zveckanje i para koju emituje sigurnosna cev su normalna pojava, oni omogucavaju ispustanje vazduha pre kuvanja.
Za vreme kuvanja u režimu "Ekspres lonac"
- Kada radni ventil (A) ispustaru neprekidno uz pravilan zvuk (PŠŠST), smanjite jačinu izvora toplote.
- Započnite odbrojavanje vremena kuvanja koje je naznačeno u receptu.
- Tokom kuvanja vodite računa da ventil pravilno šišti. Ako nema dovoljno pare malo pojacajte jačinu izvora toplote, u suprotnom smanjite.
Kuvanje u režimu "Ekspres Ionac"
Za oslobačanje pare :
- Kada uzase izvor toplate, imate dve mogucnosti:
- Postepeno ispustanje pritiska: okrenite radni venti (A) dok ne bude naspram oznake sa ikonicom sl. 10.

- Brz ispust pare pod mlazom hladne vode: sipajte hladnu vodu u sudoperu i potopite dno ekspres lonca u vodu kako bi se sigurnosna cev spustila - sl. 14. Kada se sigurnosna cev (D) spusti, Ionac više nilje pod pritiskom. Okrenite radni ventil (A) do položaja.

Etape 1

Etape 2
- Możete da otvorite ekspres Ionac - sl. 2.
- Ako ne możete da otvorite proizvod, operite dihtung pod mlazom vode a zatim ga ponovo vratite naPoklopac bez prethodnog brisanja - sl. 19 i uverite se da je ispravno postavljen ispod zareza naPoklopcu - sl. 15.
Ukoliko prilikom oslobažanja pare primetite da para izlazi na neuobicajen način, ponovo postavite radni ventil (A) u poziciju za kuvanje na režimu "Ekspres lonac" őž, a zatim izvršite brzo otpušanje pritiska u hladnoj vodi.
Ukoliko se sigurnosna cev (D) ne spušta, uspite hladnu vodu u sudoperu i potopite dno ekspres lonca u vodu kako bi se sigurnosna cev spustila - sl. 14.
Nikada ne preduzimajte radnje na sigurnosnoj cevi.
- Za namirnice koje dobijaju na zapremini ili stvaraju penu tokom kuvanja, kao sto su pirinač, mahunarke, sušeno povrće, kompoti, bundeva, tikvice, šargarepa, krompiri, riblj fileti, itd., ne punite više od 1/3 (MAX 1) kapaciteta ekspres lonca. Ostavite ekspres lonac nekoliko minuta da se ohladi, a zatim ga stavite pod hladnu vodu. Pre svakog otvaranja lagano protresite ekspres lonac nakon sto proverite da li se sigurnosna cev spustila kako biste izbegli udar pare koji može dovesti do opekotina. Ova procedura je posebno važna prilikom brzog otpušanja pare ili nakon rashlaživanja lonca pod hladnom vodom. Ukoliko pripretate supu, preporucujemo Vam da izvršite brzo smanjenje pritiska pod hladnom vodom (pogledajte odeljak "Po završetku kuvanja u režimu 'Ekspres lonac").

Kuvanje u režimu "Šerpa" *
- Okrenite radni ventil (A) do položaja za kuvanje u režimu "Šerpa". Za tu svrhu snažno ga gurnite izaŽleba u položaj za ispust pare.
- Pre puštanja ekspres lonca u rad, proverite da li je dobro zatvoren - sl. 2.
- Stavite ekspres lonac na izvor toplote podesen na smanjenu jačinu.
- Započnite odbrojavanje vremena kuvanja koje je naznačeno u receptu.
- U režimu "Šerpa", u svakom trenutku možete otvoriti ekspres Ionac da promešate, kontrolišete kuvanje ili dodate sastojke.
- Ako ne możete da otvorite proizvod, operite dihtung pod mlazom vode a zatim ga ponovo vratite naPoklopac bez prethodnog brisanja -sl. 19 i uverite se da je ispravno postavljen ispod zareza naPoklopcu -sl. 15.
- Ako je izvor toplote prejak, moze doci do zakljucavanja ekspres lonca (sigurnosna cev (D) se podiže i blokira otvaranje), ručkaPoklopca više nije operativna ili ne otvara lonac. Ukoliko do toga dode, smanjite ili potpunougasite izvor toplote. Ako se radi o elektricnoj ringli od livenog gvožda, skinite lonac sa izvora toplote.

- Za modele sa nelepljivom oblogom: nemojte da upotrebljavate metlice ili metalni ili ošar kuhinjski pribor. Ne otresajte kuhinjski pribor o ivicu posude zbog rizika od oštećenja i zbog kapanja.
- Nikada ne zagrevajte ulja i mast do ugljenisanja. Isparenja od kuvanja mogu biti opasna zaŽivotinje sa osetljivim respiratornim systemom, kao što su ptice. Vlasnici ptica bi trebalo da ih udalje iz prostorije u kojoj se kuva.
Bezbednost
Ekspres lonac poseduje nekoliko sigurnosnih sistema:
Bezbednost pri zatvaranju:
- UkolikoPoklopac nije pravilno postavljen ili ste zaboravili da spustite ručkuPoklopca,para ce izlaziti na sigurnosnoj cevi (D) ekspresnog lonca i pritisak nece moci da se podigne.
- Bezbednost pri otvaranju:
- Ako je lonac pod pritiskom, sigurnosna cev (D) je podignuta a ručkaPoklopca za otvaranje/zatvaranje (G) ne sme da se koristi.
- Nikada ne otvarajte ekspres Ionac silom.
- Ni u kom slučaju nemojte delovati na sigurnosnu cev(D).
- Uverite se da se unutrasnji pritisak spustio tak o sto cete proveriti da li je sigurnosna cev (D) u donjem položaju.
- Ručke predstavljaju bezbednosne delove posude. Nikada ih ne menjajte sami. Nikada ne koristite druge modele ručki.
- Ako ste stavili ručkuPoklopca za otvaranje/zatvaranje (G) u vertikalan položaj, sve dok je lonac pod pritiskom, ne možete ga otvoriti. Ova funkcjja predstavlja dodatni sigurnosni system.
- Stavite ručkuPoklopca u horizontalan položaj i sačekajte da se sigurnosna cev (D)vrati u početni položaj.
Dva sigurnosna systemdu slucaju prevelikog pritiska:
- Prvi urejadaj: sigurnosni ventil (E) oslobada pritisak - sl. 20.
- Drugi urejad: dihtungPoklopca pu sta paru da izlazi -sl.20.
Ukoliko se aktivira"One dan od sigurnosnih systemdu slučaju prevelikog pritiska:
- Isključite izvor toplote.
- Ostavite Ionac da se potpuno ohladi.
- Otvorite ga.
- Proverite i očistite radni ventil (A), cev za odvod pare (B), sigurnosni ventil (E) i dihtung (I) - sl. 16 - 17- 18. Pogledajte paragraf "Čišćenje" i "Obavezne provere pre svake upotrebe".
- Ukoliko posle ovih provera i cisćenja Vaš ekspres lonac ispustā ili više ne radi, odnesite ga u ovlašćeni TEFAL servis.
Preporuke prilikom upotrebe
1 - Para koja izlazi iz radnog ventila je previše vruća. Pazite na mlaz pare.
2 - Čim se sigurnosna cev podigne, ne možete više da otvorite lonac.
3 - Kao i za svaki aparat za kuvanje, obezbedite stalni nadzor ako koristite ekspres lonac u blizini dece.
4 - Kad pomerate lonac, koristite ručke na posudi.
5 - Ne ostavljajte hranu u ekspres loncu. Nikada ne prenosite ekspres Ionac drzejeci ručkuPoklopca.
6 - Nikada ne koristite sredstva zadezinfekciju ili proizvode na bazi hlora, jer bi mogli da ošetite nerăjuciČelik.
7 - Ne ostavljajePoklopac potopljenu vodi.
8 - Jednom godišnje menjaje dihtung. Ukoliko pukne odmah gazamenite.
9 - Čistite Ionac isključivo kada je potpuno hladan, i prazan.
10 - Nakon 10 godina korišćenja, obavezno odnesite Vaš ekspres Ionac u ovlášćeni TEFAL servis.
Čišćenje
Da bi ekspres lonac uspešno radio, posle svake upotrebe sledite preparuke za cisćenje i održavanje.
Tamnjenje i grebotine koje se mogu pojaviti nakon dugotraje upotrebe ne predstavlaju smetje za ispran rad.
Habanje spoljnje obloge(uzavisnosti modda) usled kontaktaPoklopca i posude je normalna pojava.
Kod ekspres Ionaca sa nelepljivom oblogom (u zavisnosti od modela): blage o grebotine i abraz ije koje mogu nastati tokom korišćenja, ne utiću na njen kvalitet.
- Operite Ionac posle svake upotrebe mlakom vodom i deterdžentom za sudove. Na isti način postupite i sa korpom za kuvanje na pari*.
- Ne koristite izbeljivač niti hlorisane proizvode.
- Ne grejte Ionac kada je prazan.
Cisćenje unutrażnjosti posude od nerăjućegČelika:
- Operite je sunderom i deterdžentom za sudove.
- Ukoliko u unutrasnjosti posude od neradajućeg Čelika primetite sedefasti odsjaj ili bele tragove (ostatke minerala), ochistje je sirćetom.
Cisćenje unutrašnjosti posude od aluminijuma sa nelepljivom oblogom:
- Da biste produktivi vek trajanja posude, preparučujemo Vam da je perete ručno.
- Operite je toplom vodom, deterdžentom za pranje sudova i mekim sunderom.
Ne koristite deterdzent u prahu i abrazivne sundere.
- Ako su namirnice zagorele, napunite posudu toplom vodom i ostavite je neko vreme. Zatim je operite deterdžentom za pranje sudova.
Cisćenje speljasnosti posude:
- Operite je sunderom i deterdžentom za pranje sudova.
Posudu od nerăjúçeg Čelika ikorpu za kuvanje na parimozete prati umašini za sudove.
Ne perite posudu sa nelepljivom oblogom (uzavisnosti od modela) u masini za sudove, zato sto deterdženti u formi tabletse sadrže veoma agresivne i korozivne supstan ce za delove od alum inijuma.
Intenzivno korišćenje posude sa nelepljivom oblogom (u zavisnosti od modela)要去 dove sti do blag e promene boje (požuteti, prebojiti se).
CisćenjePoklopca:
- Operite ga sunderom i deterdzentom za pranje sudova.
Isced ite poki opac vertikal no kako biste uklonili preos talu vodu izme edu metalnih i plasticnih delova po klopca.
Ciscenje dihtungPoklopca:
Posle svakog kuvanja, operite dihtung (I) i leziiste.
- Za vraćanje dihtunga na mesto, pogledajte - sl. 15 i vodite računa da je dihtung ispravno postavljen ispod svakog zareza naPoklopcu.
Ciscenje radnog ventila (A):
- Skinite radni ventil (A) -sl. 11.
- Operite radni ventil (A) pod mlazom tekucié vode -sl. 16.
Proverite njegovuPokretljivost:pogledajte sliku.
Nakon što ste skinuli radni ventil (A), dihtung (I) i tajmer* (F),Poklopac mozete oprati u masini za sudove.

Nikada ne perite radni ventil(A), dihtung (I), tajmer (F), ili posudu u masini za sud ove.
Cisćenje cevi radnog ventila (B) koja se nalazi podPoklopcem:
- Skiniteventil(A)-sl.11.
- Proverite vizuelno i na dnevnoj svetlosti da je cev za odvod pare otpušena -sl. 13. Po potrebi je očistite Čačkalicom - sl. 17 i isperite.
Ciscenje sigurnosnog ventila (E):
- Operite deo sigurnosnog ventila koji se nalazi unutarPoklopca taksto cete stavitiPoklopac pod mlaz vode.
- Proverite da li dobro radi taksto sto cete jak pritisnuti stapićem za uši loptu ventila koja mora bitiPokretna -sl.18.Pogledajte paragraf "Cisćenje" i "Obavezne provere pre svake upotrebe".
Cisćenje tajmera* (F):
- Obrisite ga cistom suvom krpom.
Nemojte koristiti sredstvo za ciscenje.
- Nikada ne stavljajte tajmer u vodu i masinu za sudove.
ODRZAVANJE
Zamena dihtunga na ekspres loncu:
- Menjalte dihtung jegisnje ili kada se na njemu pojavi ostecenje.
- Uvek koristite originalan TEFAL dihtung koji odgovara Vašem modelu (pogledajte paragraf "Dodaci").
- Za vraćanje dihtunga na mesto, pogledajte - sl. 15 ivodite računa da dihtung dobro ulegne ispod svakog udubljenja naPoklopcu.
Odlaganje ekspres lonca:
- OkrenitePoklopac na posudi.
- Mehanizam za otvaranje/zatvaranje lonca ne zahteva posebno održavanje osim cisćenja.
Nakon 10 godina korišćenja, obavezno odnesite Vaš ekspres Ionac na servisiranje u TEFAL ovlăšćeni servis.
TEFAL Dodaci
Dodaci za ekspres lonac koji su dostupni u prodaji:
Dodaci Reference Dihtung 3/4/4.5/6 L: speljašnji prečnik dihtunga: 24 cm X1010008 5/7.5/9 L: speljašnji prečnik dihtunga: 27 cm X1010007 Korpa za kuvanje na pari* 3/4.5/4/6 L: za prečnik posude od 22 cm 792185 5/7.5/9 L: za prečnik posude od 24 cm 79 2654 TrONOžni stalak* (L) 792691 Tajmer za kuvanje* X1060007
- Za zamenu drugih delova ili popravke, obrascenom TEFAL servisu.
- Koristiteismo originalne TEFAL delove koji odgovaraju Vašem modelu.
Karakteristike
Prečnik dna posude lonca - reference
Zapremina Ø
Posuda Ø Dno posude Clipso
Minut*
Perfect / Easy Clipso
Minut*
Duo couleur Clipso
Minut*
Duo Gourmet Materijal posude 3 L 22 cm 15.5 cm P46205 - Nerăjući
Čelik 3 L 22 cm 18 cm - P46605 4 L 22 cm 14 cm - P46042 - Obloga od aluminijuma 4.5 L 22 cm 15.5 cm P46206 - Nerăjući
Čelik 5 L 24 cm 14 cm - P46051 - Obloga od aluminijuma 5.2 L 24 cm 20 cm - P46654 Nerăjući
Čelik 7.5 L 24 cm 18 cm P46248 - 9 L 24 cm 18 cm P46249 - Set 5 L/7,5 L 24 cm 14 cm P46353 - 18 cm
MaterijalPoklopca:nerdajuci celik
Normativne informacije:
Gornji pritisak pri radu: 65 kPa
Maksimalni bezbednosni pritisak: 120 kP
Kompatibilni izvori toplote
GAS STRUJA

(Elektricna ploca)

STRUJA (Vitrokeramicka ploca)

STRUJA (Indukciona keramicka ploča)

STRUJA (Spiralna elektricka, ringla)

- Vaš ekspres Ionac se upotrebljava na svim izvorima toplate, uključujuci indukcjju.
- Na elektricnoj ringli, koristite ringlu jeg manjeg precnika dna lonca.
- Na vitrokeramičkoj ploci, proverite da li je dno lonca Čisto.
- Na plinu, plamen ne sme da premašuje prečnik posude.
- Na svim izvorima toplote, vodite računa da lonac bude dobro centriran.
Garancija
U okviru preporucene upotrebe shodno datim instrukcijama, posuda od nerăjućeg Čelika na Vašem novom TEFAL ekspres Ioncu ima 10 godina garancije za:
-Svako ostecenje metalne struktur posude lonca,
- Svako preuranjeno ostecenje metalne baze.
- Za ostale materijale posude i druge delove Vaseg ekspres lonca, garancija za svaku fabričku grešku ili nepravilnost, definisana je važecim zakonima zemplje u kojoj je proizvod kupljen i datumom kupovine.
- Ova ugovorna garancija se ostvaruje uz podnosenje računa ili fakture sa datumom kupovine.
Garancija nePokriva:
- Ogrebotine i promenu boje usled starenja, za posude sa nelepljivom oblogom.
- Ogrebotine nastale prilikom stavljanjaPoklopca na posudu sa nelepljivom oblogom.
- Ostecenja nastala kao posledica nepostovanja važnih mera opreza ili nemarne upotrebe, narocito:
- Udarci, padovi, stavljanje u rernu, ...
- Samo u TEFAL ovlasćenim servisima moźete iskoristiti ovu garanciju.
- Pozovite broj obelezen plavom bojom da biste se informisali o adresi najblizeg ovlascenog servisa.
Regulatorne oznake
Oznaka Lokalizacja Komercijalna oznaka NaPoklopcu Godina i serija proizvodnje
Referenca modela
Maksimalni bezbednosni pritisak (PS)
Gornji pritisak pri radu: (PF) NaPoklopcu Zapremina Na speljnjem dnuPoklopca Poštanska adresa proizvodaća Na speljnjem dnuPoklopca
Učestvovanje u zašitiživotne sredine!

① Vaš aparat sadrži brojne materijale koji se mogu reciklirati.
Odnesite ga u centar za reciklažu.
TEFAL odgovara na Vaša pitanja
Problemi Preporuke U slučaju otežanog otvaranja i/ili zatvaranjaPoklopca: ■ Skinite dihtung i isperite ga pod vodom
■ iz slavine, a zatim ga vratite uPoklopac bez brisanja -sl. 19. Ako ne možete da zatvoritePoklopac: ■ Proverite da li je ručkaPoklopca pravilnom vertikalno položaju.
■ Proverite da li je dihtung pravilno postavljen (pogledajte paragraf "Čišćenje i održavanje").
■ Proverite da li jePoklopac postavljen kao što je pri Kazakhstan na -sl. 1.
■ Isperite dihtung pod vodom iz slavine, a zatim ga vra uPoklopac bez brisanja - sl. 19. i uverite se da je ispravno postavljen ispod zareza naPoklopcu -sl. 15. Ako se lonac zagrejao pod pritiskom bez tečnosti unutra: Odnesite lonac u TEFAL ovlasćeni servis. Ako sigurnosna cev zvecka i ispušta paru: To je uobićajeno u prvim minutima kuvanja: time se omogućava ispustanje vizduha pre kuvanja. Ako se sigurnosna cev:no podigla i ništa ne izlazi iz ventilàtokom kuvanja: To je uobićajeno u prvim minutima kuvanja.
Ako se to nastavi, proverite da li je:
- Izvor toplote dovoljno jak, akо nije, pojačajte ga.
- Količina tečnosti u posudi dovoljna.
- Radni ventil (A) postavljen na
- Ekspres lonac dobro zatvoren.
- Dihtung ili ivica posude oštećena.
- Dihtung dobro postavljen. Ako se sigurnosna cev:no podigla i ništa ne izlazi iz ventilàtokom kuvanja: To je normalno tokom prvih nekoliko minuta.
Ako se to nastavi, uspite hladnu vodu u sudoperu i poṭopite dno ekspres lonca u vodu kako bi se sigurnosna cev (D) spustila.
Očistite radni ventil (A) -sl. 16 i cev za odvod pare -sl. 17 i proverite da li možete da stavite loptu ventilà bez potěškoća -sl. 18. Ako para izlazi okayPoklopca i ako je sigurnosna cev u spuštenom položaju, proverite: Da li je Poklopac dobro zatvoren.Položaj dihtunga uPoklopcu.Da li je dihtung u dobrom stanju, ako je potrebnozamenite ga.Da li suPoklopac, dihtung i ležište dihtunga naPoklopcu Čisti.Da li su ivice posude u dobrom stanju. Ako ne možete da otvo-ritePoklopac: Proverite da li je sigurnosna cev (D) u donjempoložaju.Ako:noj, ispustite paru: uspite hladnu vodu u sudoperu i potopite dno ekspres lonca u vodu kako bi se sigurnosna cev spustila. Nikada ne delujte na sigurnosnu cev (D).Okrenite radni ventil (A) do položaja za. Ako namirnice nisu ku-vane ili su zagorele, proverite: Vreme kuvanja.Jačinu izvora toplote.Položaj radnog ventilla (A).Količinu tečnosti. Ako su namirnice uloncu izgorele: Ostavite Ionac neko vreme potopljen pre nego što ga operete.Ne koristite izbeljivač niti hlorisane proizvode. Ukoliko se aktivira{jelan od sigurnosnihistema: Isključite izvor toplote.Pustite lonac da se ohladi i ne pomerajte ga.Sačekajte da se sigurnosna cev spusti i otvorite.Proverite i očistite radni ventil (A), cev za odvodpare, sigurnosni ventil i dihtung.Uvek sledite uslove punjenja.Ukoliko problem i dalje postoji, odnesite lonac uovlašćeni TEFAL servis. Ukoliko primetitetragove oksidacije: Upotreba neržajućeg Čelika izuzetnih performansne要考虑 sprećiti povjavu oksidaciJE u ekstremnimsituacijama. Ako primetite tragove oksidaciJE, očistite ih abrazivnim sunderom pre narednueupotrebe ekspres lonca.
LABELA KUVANJA
Povrçé
POVRCE (SVEZE)
PARA
Sastojak u korpi za kuvanje na pari i 750 ml vode na dnu ekspres Ionca.


POTAPANJE
Sastojak u vodi i bez korpe.
MAHUNARKE
POTAPANJE
Bezkorpe.


m - 1 0 ;
Artićoke, 2 cele, 600 g svaka (potapanje) 30 do 35 min Blitva, isečena (2 cm) 700 g (para) 15 do 17 min Boranija, zelena, tanka (600 g) (para) 10 do 12 min Brokoli, cvetovi 600 g (para) 9 do 11 min Bundeva, isečena na komade (3 do 5 cm) 600 g (para) 13 do 18 min Celer, isečeni (potapanje) 600 g 7 do 9 min Cvekla, crvena, isečena na Četvrtine (potapanje) 20 do 25 min
(prema velicini) Endivija isečena na pola (900 g) (para) 14 do 16 min Grašak (para) 6 do 8 min Grašak razdvojen na polovice 250 g (potapanje) 18 do 20 min Karfiol, cvetovi 600 g (para) 10 do 12 min Krompir isečen na pola (950 g) (para) 20 do 25 min
(prema velicini) Kupus, isečeni i zeleni, 500 g (potapanje) 5 do 6 min Luk za kiseljenje (para) 7 do 8 min Morač isečen na trake (600 g) (para) 6 do 9 min Paprike babure presečene na pola (550 g) (para) 14 do 16 min Pasulj, suvi, 250 g (potapanje) 35 do 40 min Patlidžani, oguljeni i isečeni (3 mm), 850 g (para) 10 do 12 min Pečurke, isečene 800 g (potapanje) 4 do 5 min Praziluk, celi i beli 650 g (para) 9 do 11 min Prokelj (para) 10 do 12 min Repa, isečen na kockice (500 g) (para) 14 do 16 min Šargarepe isečene na okrugle kriške (3 mm) 600 g
(para) 17 do 19 min Sočivo, zeleno 250 g (potapanje) 14 do 16 min Spanać (para) 3 do 4 min Špargla, bela (para) 5 do 6 min Tikvice isečene na okrugle kriške (3 mm) 600 g (para) 12 do 15 min
Pirinač
POTAPANJE
Bez korpe.
MAX 1 KOLICINA VODE KOLICINA
PIRINÇA VREME
KUVANJA 2 OSOBE 400 ml / 2 CPA 150 g / 1 çaşa 7 do 8 min4 OSOBE 500 ml / 2,5 CPA 250 g / 2 CPA 6 OSOBA 700 ml / 3,5 CPA 375 g / 3 CPA
Meso/riba
SVEŽE SMRZNUTO Goveča pečenica (1 kg, promer 8–11 cm) 30 do 35 min 45 do 50 min Grdobina, fileti (1 kg) u komadima od 75 g 5 do 6 min 7 do 8 min Jagnjeća kolenica: 2 (0,95 kg) 40 do 45 min 1 h 05 do 1 h 15 Losos, odresci: 4 (0,8 kg) 5 do 6 min 7 do 8 min Pačetina (1,8 kg) 45 do 47 min 50 do 55 min Piletina (1,35 kg) 23 do 25 min 1 h do 1 h 10 min Pilići, mladi: 2 (1,3 kg) 23 do 25 min 40 do 45 min Prepelica: 4 9 do 10 min 18 do 20 min Svinjska kolenica (0,8 kg, promer 8–10 cm) 30 do 35 min 1 h 05 do 1 h 15 Svinjski file minjon: 2 komada od 350 g 13 do 15 min 26 do 29 min Teleća kolenica (0,8 kg, promer 5–7 cm) 17 do 19 min 37 do 40 min Teleći file minjon: 0,7 kg 17 do 21 min 33 do 38 min Rlovana teletina: 4 10 do 12 min x Tuna, odresci: 4 (0,7 kg) 5 do 6 min 7 do 9 min Zec (1,5 kg u komadima) 8 do 9 min 20 do 23 min
Napomena: Za modele od 5 litara i manje pazite da kolenice mesa i piletina ne prelaze oznaku na unutrasnjoj strani lonca. Odaberite kolenice mesa i piletinu visine 8 cm ili manje.
IHCTPYKlI3 TEXHIKN BE3NEKN
Ipeed BnKOpncTaHnM cKOpOBapKn yBaXHo 03NaHOMTeC8 3 ycima Bka3iBkAmi i 3aBXKn dOtpmMyTecb IHcTpkyuataii. HenpaBnIbHe BnKOpncTaHn MoKe npn3BeCTn Do NowkoJxHeB.
3aIy Baoi 6e3neKu eI npnaB iDIOBidae uHHm cTaHapTam i HopMaM:
-ДиpeKtNbi zuoO o6naHaHnry,Ke npaioe nID TnCKOM
- Bumoram zuo moatepiaiB, kio KOnTaKtyIOTb i3 xapuOBmnpOdyKTamn
-BmOram 0oO oxopoHn DOBkijll
ОБОВ'ЯЗКOBI
ПЕBEBIPKИ
ПЕPED
КоЖнIM
ВИКОПUCTAHN
ЯМ ПЕPEBIPE
При денистп, сбітлі, сьо отвір ддя вихочу пари He
Забівся - мал. 13.
Кульka започино клала на може рухатся - мал. 18
Ушільніювач кршки розмішени під кожніміз пазів
Кршки - мал. 15.
Чи правільно з akріпелeni ручки кастулі. Ручки
Кастулі с зaxисими DeТалямп. Нікові He замінійte
ixcamostійно. Зав?
ДOTРIMYstituteC
HABEDEHIX
BKA3IBOK I3
КILbKOCTI
IHГ佩DIЕHTIB He kорис'tуITEСССКOPOBAPКОЮ 6e3 рідини, сe може
празві beautсп до сьсіріоЗного пошкоженny. Під чac
празгOTуВань сідкuyіte 3a ТИМ, сьоб у скоровагц
6уlio doctatнbero рідини.
Мінім汞 250 мл - мал. 4.
Мakсим汞 2/3 Висоти Emnocti, Відmitka MAX 2 - мал.
5.
Під чac рінгOTуВань на пapi розукten в Кошніку He
MaJOТь KOHTAKTUВATи 3 BODOЛ - мал. 6 i7.
Мakсим汞 1/3 (MAX 1) дд'makapоннix виробів, які
3більшуюьсь в розмірax i/a60 рінгься під чac
Варінь, нашикад рис, бòobvi, сушени овочi,
фруktові пюpe, rap6уз, ka6aчkn, морква, karToPля,
рібne Фіе...
ПrodukTY,nomішени в Кошніді рінгOTуВаньна Na
парі, He міють перевицуВати рівень MAX 2 в Emnocti.
DOIПIDчAC PIPROTYBAHH
He 3aIIuIte dIeT e 6e3 Harny 6iI npauooyoi ckopOBapKn.
- Ckopobapka rotye nid TnCKOM. 3a HenpaBnIbHoro BnKOpncTaNHa MoXHa OTpMaTn OniK BiD Okpony. IpeD BnKOpncTaNHM nepekoHaTecr B TOMy, 1O cKopobapka HaleJHm YINHom 3aKpTuA. DnB. po3dIl «3aKpNBaHHra>.
KoHTpOIOHe, 06 nIac npnroTyBaHn IxKi KJanaH noCTiINHO npaIOBAB, 3aBXKn BnyncKaIOU npy. Jkso He BnXODITb DOCTaTHbO npu, BnynctITb TnCK i nepeBipTe HaABHicTB DOCTaTHboI KInbKOcTI pIDHH, a TaKoK uN He 3acmiueHn OTBIP BnXOy npu. Picna cux nepeBipok, Jkso npa I naI He BnXODITb, TPOXn 36ilbWitb TemnepaTpy.
He roTyIte npOdyKTn, kI MOKytb 3acMITNT OTBOPN 3axnCHnx DeTanei:
-яROДи;
- neploby kpyny;
-BIBCAnI nlaCTiBci;
-cyxnI ropox;
- JOKUHy, MaKApOHN, cnareTTi;
-peBihb;
CMOPOAnHy.
He BnKOpNCToBvIe cKOpOBapKy dIy npNroTyBaHnY CTpaB, DO CKJaDy kNX BXoINTb TBapINHHe MOnOKO.
-Дя скороварки 3 кастул eо 3 Нержавioо i Stani He BИКОпСТОВУМ Te KaM'Яну CINb, a ДODаВaIte CINь ДрибHoro NOMOЛY B KINci npriroTuBaHnry. TaKIM YINHom Bn yHInKHeTe NOЯВN «ПрOKOLiB», як MOrЛN 6 npuBecTи Do DeФOPMaцii ДHA скороварки.
He BnKOpNCToBvIe cKOpOBaPky dJa CmaKeHHa 3 BnKOpNCtAHHm OJIi.
BnKopncToByte cKOpOBapKy Iiwe 3a npn3HaueHHaM.
He cTaBte ckopoBapKy B po3irpiTy dYxOBky.
Hikon He knaiItb He3aKpinIeHy aIOMHiEBy fOJbry Ha KOsIK dI npiroToyBaHHa napi B cKOpOBapci.
Hikonn He knaitb nonietnneHOby nIbky B cKOpOBapKy
- Пари спирту ВоронебeзneчHi. Рерш Нix Зakрити Кршку, Доведы рдуну до кининя потгом 2хвлин. 3Верта осobиьу увагу настрави, до складу якnx BXODNTb спирт.
KopntyTeCnBapnIbHnMn NOBepxHnMn, Aki BiNIOBiaHO Tm, 0 Bka3aHi B IHCTpykci 3 BNKOpNCtAHn.
ПИСЛ
ПИГOTУBAHHЯ
Длma moDEne 3 aHTnnpurapHm NOKpTTaM: He BnKOpNCToBvIe BiHUnKn, MeTaNbN a6o roCTpn Nocyd. He BnINBaIte pIDHH 3 Nocdy, ydapauH Hm o6 KpaI KactpyJI, OckInbKn ce MoKe NOsKOJNTu II Ta npn3BeCTn Do npotikahHa.
-Пocуно BO NOBepHITb po6oH N KlaH (A), Bn6upaOuH NwNdke BnnyckaHH nap,do nIKtorpamM -MaI.10.RKIO npiD yac BnnyckaHH nap BN cnoCTepiraTe aHOMaIbHi BnKnID,3HOBy BCTaHOBiTb po6oH N KlaHaN (A)y no3nciIO npIrTOyBaHH BpeXmI cKOpOBapKn,notIM 3po6Itb WnndKe BnnyckaHH nap BN XoJOnHi BOJI -MaI.14.
- RaKIO 3aNo6ixHn KlaHaN (D) He onyckaetbca, nomictiBCKOpOBapKy B XoJIoNDHy BOdy - Man. 14.
Hikon He TnCHItb Ha 3anO6ixkHn KnaanaH.
- 3anobirtn onikam BiD okpony, nicra npirotoybaHHaM'ca, 0mictntb nobepxheBy nibky (hanpuknaad, naOBuHn a3nk), kha h6yxa e nid TnCKOM, He npokoiute ii B h6yxIomy cTahi. HamaraTeCn npokoiBaTu M'aco nepei npirotoybaHHaM.
ДлmaMaKapoHnX BnO6iB,як 36iNbIbIyIOTbcR B 06'Emi a60 nIHyTcN iD yac BapInHЯ,HaNPkIaNpC,6o6Obi,CyuSeHi OBOUi,ФpyKTOBI nIOpe,rap6y3,Ka6auchM,MPKBA,KapToJIa, Pn6He fIe...OCTyIDITb CkOpOBaPKy IpoTAROM KINbKOx XBUNH, a Notim nomictiB y XoJOnHy BOy.ObOB'zKOBO 3nerKa CTpyuYte CkOpOBaPKy Ipeed KOxHM BiIDKpNBaHNm, IpeEBipNBuH, uN 3anobixHHN KlaPAn OHyCTNBcA, 0o6 3anobirn po36pn3KyBaHNHIO, UO MoKe pnp3BeCTN Do onIKIB. Lc ocO6JIbNO BaxKnBO dJa WbNDKOro BnPyCKaHNr napn a6o nicna nepe6yBaHNB XoJOnHi BOi.
-Пересуваite ckopoоварку, соpeбуваe πiД ТИСКOM, 3 MaKcIMaJIbHOIO obepexHicTIO. He TopkaITeCra rapaUnx NOBepxOHB. KopnCTyIteCra рчKaМи Ta KHONKaMn. 3a notpe6N BIVKOpIcTOByIe npNXBaTkn.
-ДлгпрurotyBaHHcyniB peKOMeHdYcTBc3iINCHIOBaTN WbNKe BnPyCKaHHnapB XoJOnHiB0Di (DnBiTbcr po3di《3akihueHH npurotyBaHHBpeKmI cKOpOBapKn》).
-ipekeohntec, zo klanah nepe6ybae B noJoxeHHi BnynckaHH nap, nepw hix BiKpnBaTn cKOpOBapKy. 3anobxHnn klanah (D) ma e nepe6yBatn B HxHbomy noJoxeHHi.
Hikon He BdkpnaTe ckopOBapky uepe3 cnly. IpekoHaTecB TOMy, 0BHyTpiwHi TnCK y ckopOBapci BiCyTHi. 3an6ixHni Klanah (D) Mae nepe6yBatn B HxKhbOMy noloxeHHi. (INB. po3dIn «Cnstem 6e3neKn»).
36EPEKITb IIO IHCTPYKcIIO IJIa IODAJIbWoTO BnKOpNCTAHHЯ
OБCLSNYTOBYBAHNA ■якшо Ви ВиВВITE, сию бudь-якадеталь вашоі скороварки зламанаabo trichула,нВ вякову рази He npobuyite BVIDKpNTn II,якшо ВОна зakрпta,дайт eй nobhICTIO oxolohytn,першнипесати II,бilbше He BIVKOPNCTOBVByte II i BIDHeCITB B abTOpI3OBaHni cepBicnru centp TEFAL.■Повдьтесь i3 системами 6e3пеки 3 дOTPIMaHNM iNCTpykciŋ 3 очшени Та obcnyroBvBaHnry.■ВИКOPNCTOBVByte Лше opurighalNBi detaJI BIVo6HnztBa TEFAL,як BiДnobiДают bmodel i BAOoi skopOBapkn. HanolerglNbO peKOMeHdUeMo BIVKOPNCTOBVByatn kactpylnu ta Kpiushky TEFAL.3 MeToIO 3anobirahня пошcodженью кastpynl i He BIVKOPNCTOBVByte скороварку ДЯЗбэрань Кислих i coLoHnx npodukTiB.ОчstITb ta cnoLoschitb скороварку BIDpa3yЖпсяЯ BIVKOPNCTAHNry.Hikoli Ne CTABTe робочи Клалан (A), ушьнювач (I), таймер* (F) abO Kansasryu 3 aHTINprugarHm POKpTTam y nocydomnHy MaShInHy.Hikoli Ne nomiшaite taiMeR* (F) nD Body.He BIVKOPNCTOBVByte po3uzH xlopy Ta MInuoyi 3ac06n,шо мICTЯыхлор,як мokут bpoшKDUTn NOBepxHNo 3 hepxabioоi stani.He 3aIIshaite Кршку y Bodi Na TrpVBaIIiy quac.MiJaIte uşil6HouBauch pa3 Ha pIK abO oJpa3y,якшо на NbOMy 3'YBnInscy deΦeKTI.N.Pic74 10 pOKIB ekCplnyataцii Heobxidno 3diIChnTu texhniHni orIyad skopOBapkn B abTOpN3OBaHOMy cepBicnomy ueHtrpi TEFAL.DЯ 36epiraHnry скороварки:переверніть кршky Na KaSTpylIO,шo6УнКнуTNперEDuachHOrO 3HOCU yuzlbHIOBaua кршки.
Onnc
A. Póboùn kla nanopH
B. KaHaJI BiIBeDeHnI napI
C. Позначка Дя Встановленья КлараHa
D. 3anobixHHn ctpnxKeHb (INB. po3dIn «CncTeMn 6e3neKn>).
E. 3ano6ixhni KlaanaH
F. Taïmep*
G. Puyka Kpnwn
H. Kpnska
I. yuilbHIOBaU
J. Koшндя пиютуваши Ha napi*
K./L. TpHora*
M. Puyka Kactpyli
N. ΠознauкmaKcImmaJIbHOrO
HaIOBHeHHa
0. Kactpyra
O6OB'ЯЗКОВI nepeBipKn nepeД кoxнm BИКОРистаннam_
Ipebipka po6ofoKlanaHa

- IpekehauTecra, 10 BnXiHn OTBip po6oYoro KlaNaHa He 3acMieHo (INB. PO3dIn «3HATTA Ta BCTaHOBHeHHr po6oYoro KlaNaHa»).
Ipebipka 3ano6xHoro KlaanaHa

- IpekehaiTeC, 0 KylbKa 3anobixHoro KlaanaHa MoKe pyxatncs (BnKOpNCToByIe nannuKy).
BnKopncTaHn

BapiHnBpeKmI cKopOBapKn

PpuroToyBaHnB BpeXmI KaCTpyNi*

BunyckaHna napn
BidkpmbHn
- IpebeiB pyk Ky KpNkN 3 rOpN3OHTaIbHOro NIOJKeHHy BepTnKaIbHe-MaI. 3.Kpnka NOBepTaETbcra.
PiHimItb KpuKy.
Y pa3i BnHnKHeHHa TpydHouiB npn BiDkPnBaHHi npncTpoI: NOMictIb yuJIbHIOBAuPiBvOy, a NotIM Ha3aJy KpuShKy, He BNTnpaUOn - Man. 19, i nepekoHaItec, uO yuJIbHIOBaau do6pe npoxoDiNbPi d na3amN KpuShKn - Man. 15.
3aKpmbaHHa
- PpekoHaTecra, 00 pyka Kpnkni nepe6yBaE y BepTKaIbHomy noJoxeHHi.
■Помістів Кршky Ha Kactpylno, як пokаЗано HamaHIOHky 1, NOeДнавшппл actmacoby DeTalb i3 pyukamn Kactpyni.
CknaIbpyky KpnuKn 3 BeptnKaJbHOro NNoJoxKeHHa B TOpN3OHTaJIbMaJ.2
KpnuKa noBepTaetbca.
Jkso Bn He MoXKeTe 3aKpNTn KpnShky:
- IpebeipTe npabnIbHe noloxeHryuIbHIOBaayi npabnIbHe po3TaUyBaHHKpIshK.
Y pa3i BUNHKHeHn TpydHooiB npn 3aKpNBaHHi npncTpoI: NOMictb yuJIbHIOBaY niD BODY, a Notim Ha3ad y KpUkky, He BNTnpaOuy - man. 19, i nepekoHaTeCra, 10 yuihOBau do6pe npoxoHTb nd na3amn KpUkN - man. 15.
Першевскорецьнаня
-Дя модени 3 aHTинригарнм NOKpTTam: npOMnTe i 3JerKa 3MaCTiTb pocnHHIO OJIeIO BHyTpIshIO NOBepxHIO.
3anexho BID moedJI:
BcTaHOBIb TpHOry\*L) Ta Kowk\* (J) Ha dHo KaCTpyJI.
-ПпстебиТь Трногу\* (К)do Koшнka\* (J),notim noctabTe HaДно Каструл.
HANOBHITbKactpyIIO(O)BOIOHOHa2/3(MAX2)-MaI.5.
3akpiTe cKOpOBapKy.
BupiBnIte nIKTorpamy po6oymy knanahi (A)3a no3HaUKOIO NOJXeHHa (C)- man.9.


- ПocтавTe ckopoВapKy Ha BapиьHy NOBepxHIO i BnCTaTe MaKcImMaJIbHni piBeHb TempepaTpyi.
KoI npa noHne BnXoDHTu chepe3 Klaanah, 3MeHwiTb iHTeHCNBHicTB TeMnpaTyPn n 3auekaTe 20 XB.
Yepe3 20 XB BUMKHITb PINTV.
BupiBnIte nIKtorpamy Ha pO6Omy KlaNaHi (A) 3aNo3HaUoIO NOJKeHHKlaNaHa (C).
KoII 3aIO6IHHn KlaHn (D)OnyckaETbCra, CKOpOBapKa 6IbWe He nepe6yBaE II TnCKOM.
Bidkpinye ckopoBapKy- Man.3.
-ПомиTe II 3a DONOMORIO 3acO6y ДЯ MHTTЯ NOcydy.
MaKcImaJIbHe Ta MiHimaJIbHe HaIOBHeHHa
MiHimym 250 m (2 cKJnK) - Man.4.
MaKcHymM 2/3 BnCOTn KaCTpyJI, BiJIMtKa MAX-2man.5.
He BnKOpncToBvTe KaM'AnHy cInb, a DoJaBaIe CInb dpi6Horo NOMOy B KINcI PnTOTVBAHHa.
Дя Deякux npoуктib:
-Дя MaKapOHnX BInpO6iB,Яki 36iNbIbIyIOTbcR B O6'Emi a60 NiHrTbcR NiD Yac BapIHHa, TaKnx Jk Pnc, 6o6Obi, cyweHi
OBOUi, ppykTOBi nIOpe, rap6y3, Ka6auchn, MOpKBa, KapTOnJIa, Pn6He fIe... He HAnOBHouTe cKOpOBaPky 6IbIe HIX Ha 1/3 (no3HaUka MAX 1). OcTyDiTb CKOpOBaPKy npOTAROM KInbKOx XBnIHn, a NOTIM NOMICTITb y XoJIoNDHy BOy. O6OB'ra3KOBO 3JeRka CTrpyuYte cKOpOBaPKy nepeD KOxHM BiIDKpNBaHHM, nepeBipNBuN
3anobixn Klanah onyctnbca, 06 3anobirtnpo36pn3kyBaHHIO, 0 moKe np3BecTN do onikib.

OCO6JIbBO BaJINBO DЯI WBIaKOrO BInyckaHnA napu a6o nicna nepe6yBaHHaB XOJODHi BOi.ДЯ npIrTOyBaHHa CyniB peKOMeHdYcTBc 3diIChIOBaTH WBIaKe BInySCKaHHa napu B XOJODHi BOi (DnBiTbcra Po3dI IN «3aKiHueHHa npIrTOyBaHHa B peKIMI cKOpOBapKn>).
Викорпстанна Кочка за пиrotуванна на napi_
-HaJIyTe 750 Ml BOIN Ha IHO KaCTpyJI (O).
3aJIeXHo BID MoIeI:
BCTaHOBIb TpHOry\*L) Ta KoUHK\*J) Ha IHO KaCTpyJI.
- PnncTe6Hitb TpHOry\* (K)do Kowka\* (J), notim NOCTaBTE Ha dHO KaCTpyJI.


-Пд час пи�otуванг ha napi npodukTи B KOшИкY\* He MaHTb KOHTaKtTyBaTN 3 BOdoIO - Man.6i7.
Пюдукти,nomiшиВ кошн Дя пи涩ваньHa napi\*, He MaIOt b nepeBnUyBaTn pIBeHb MAX 2.
3нятгий Встановleteная робочero Кларана (A)
3нятг робочую клanaha ckopobapkn (A):
Cymictb na3 i3 BiIMiTkoIO NOJXeHHa KnaanHi (C),HaTnCHyBm Ha KInbue po6oYoro KnaanaA (A).
-Приберпь Кларан - Мал.11.
BctahOBlenHa po6oyoro KlananaHa:
BupiBnIte ToKy Ha po6Omy KlaanHi (A)-MaI.83a No3HaUKOIO NOLOXKeHHa (C)-INVB.pNcYHOK.

BCTaBTe po6oyn Klaan (A), 0o6 3aΦikCyBaTu NOrO Ha KlaanHi DnBnPyCKaHH Napu.
HaTnCHiTb Ha nIKTORpAMn Ha po6Oy My KlaNaHi (A) i NOBepHITb.

Taimep*
HikonHe BnKOpncToBvIe TaIMepypeXmI «Kactpyra».
Taimep npn3naeHn dIy toro, 06 donomortn Bam 3a6e3neuHTn pe3yntat npurotybaHH iKi, daoum 3Mory Kpaue KOHTPOIOBAtn cnoKINBaHH eheprii. BIn ABTomauHO noUHaE BiPaxOBByATn qac npuroTyBaHH nCJRAHHeHH TeMnpaTpyn, 0o BiNobidae pexmy npuroTyBaHH «CKopOBapKa
Дя роботи taiмера вин ма€ 6утни рпкрлени do ckopobарк.
KoHTpOJIouTe, 606 nIac npuROTuBaHn IxKi pOboUH Klaan (A) noctiInHO npaIIOBaB, nepioDnUHo BnUyckaIoun napy. JkIo He BnCTauae napu, TpoXn 36IbIitb TempepaTy BapnIbHOi NobepxHi, y npOTnLeXHOMy BnPaAdKy - 3MeHwiTb II.
1ДлЯ BBIMKHeHЯ TaMepa HaTnCHiTb KHOngKy.
2 HanaHTyIte yac npiroToYBaHHa (y XBnInHax).
■Kso BN NOMnllncs3 YacOM npiroToyBaHHa, noyeKaITe 4cekyHn, nOKN BOrHnK nepeCTaHe 6nMaTn, a NotIM HaTnCHiB i yTpmyte KHOkny dJa cKacyBaHHa
3 YbIMKHiTb BapnIbHy NOBepxHIO Ha MaKcImaJIbHy TemnepaTyPy.
4 Koln cokopOBapka doCraHne Tempeatypn BapiHHa, TaMep D3BeHntb i nouHae BiDlK yacy (unphi6nMaHOtB). 3MeHwITb Temnepaotypy BapnlbHoI nobepxHi.
5ПисязakihueHЯчacy npiroToyBaHHЯ TaMep 3aD3BeHnTb.
BIMKHyTN 3BIOHK TaMepa, HATNCHITb KHOKNy.
Bumkhitb nnty.
Довгим HaTиСКаHHЯн Ha KHONky MOЖHa cKacyBaTu HanaшТУВaHHЯ i BUMKHуTN TaIМep.
BctaHOBJIeHHa Ta 3HimaHHa TaMepa\*
Дя BCTaHOBJIeHЯ Taimepa (F) - maI. 12 cnoaTky BCTaBTe B MOdYb Ty qactnHy, De po3TaWObaHo KnaBiWi, a NOTIM HaTnCHiTb, 06 npNKpInn npOTnJeXHy CTOpOHy.
-ДяЗиманная таймера (F)пдимитб i 3himitb noro.

3amHa 6aTapeiKn B TaImepi*
Y Taimepi BnKOpNCToBc8 6aTapeNka-«rud3NK» po3mipy CR2032.
K3'ABnEbCnMBOaKnO HiO He BiO6paKaETbcHa ekpaHi, 3amHtB 6aTapeNky.


- Tepmin Cnyx6n 6aTapeiKN 3aIeXNTb BiD YacTOTN BHKOPNCtAHHra TaMepa.
BaTapeiKa TaIMepa MICTNtB DnMeTOKcneTaH No CAS 110-71-4. Lc
BIDNOBIDA€ EBponecBKM HopMaM. 3aJnBaWoI 6e3neKn I oxopoHIOBkll: He HamaTecb BiKpntu 6aTapeyKy, He niDaBaIte II dIIBNCOKnx Tempeatyp, He BnKaIaTe pa30m i3 nobytOBmN BiXoJaMNIOBepHiTb II B NyHKT 36npaHHra BIKOpncTaHx 6aTapeNoK.

3a6opohno nepezapkataH heakymyIaTOPhi 6aTapeKn.
-БатAPEйкpi3нix TUNIB,a TaKoЖ HOBI Ta BnKOpNCTaHI 6aTapeйк He cnid BnKOpNCTOByBaTN pa3OM.
BaTapeiKn Heo6xioB BCTaBnTn 3 DOpumHaHHm NoJrphocTi.
- Po3pIaJIeHi 6aTapeKn Heo6xIDHO BnHrTn 3 npJaNy Ta yTuJIi3yBaTn 6e3neuHO.
- RaKIo npucTpii 36epiraTumetbca H He BnKOpNCTOByBaTumetbca TpNBaIIN Yac, BnIMtB 6atapeeKn.
He 3aKopooyuTe KIeMn XNBLeHnR.
CTaBnTn npnaHneo6xidnoHa pibHy po6oy noBepxHIO
- Ⅲo6 BntaTn 6aTapeNk 3 TaMepa, BiKpnTe KpuNkY BiCiKy 3a DOnOMOrO MOHeTn (INB. PnCyHOK).
3amHITb 6aTapeiKy.
YcTaHOBITb 6aTapeKy Ha npn3NaueHe dJe Hei Micu.
- Po3miCtItb nIBMicraB Kpuu6aTapeHOro BiCiKy HABnPoTu NlBMicraHa TaIMepi.
AkypaTHo NOBepHITb KpUkky BiDciKy, 3JerKa HATnCKaOuN, POeHaBUn NIBMicAa KpUuCi 6aTapeHoro BiDciKy 3 NIBMicAeMa TaIMepi.
- Пюдовкуte Ha робочи поерхи, соб кршka 6уна po3taшоваHa ropn3oHTaJIbHo.
He 3actocobyTe cnny do Kpnu6aTapeHoro BiDcky niq 3akpmbHH. NiJ qac 3akpmbHH He 3akpyte Detani HADTO IIbHO.
- Y pa3i BTPaTN BN MOKeTe OTPMaTn HOBn TaIMep y BCix ABTOPN3OBaHnx cepBicHnx ueHTpax TEFAL.


Hikon He nomiuzaute Taimep\* iD BODy i He MInTe B nocydomnHi MaunHi.
Hikoli He BnKopncToBvIe TaMep y peXmI «KactpyIa».
PpeepnpnroTyBaHHaM
■Перед кожим викоростангам вдаліть робочй кларан (A) - мал. 11 i nepebipte Bi3yaalbHo пи DeHHOMy CBiTni CBiTni, со OTBip Дя випсkaHHЯ napn (B) He 3a6NBcra - мал. 13.
- IpekeohaTeC8, 30 3anobixHn KlaanpuyxInBn (nB. po3diN «OunueHHA
Ta «O6ob'zkoBi nepeBipKn nepeKD KoxHm BnKOpncTahHm») - mJ. 18.
-Доаай Te iHrpeiEHTa piDnHy.
3akpiTe cKOpOBapKy - MaI.2
-урази винкеня Трудноць пи за крпванhi пистою:nomictiTB yцilbновачпд bodу,а NOTIM habaу кршky, He BHTnpaIOUH - mal.19 i 15 inepekoHAITEcay, lo ушлнвовач do6pe npoxODNTb пid na3amn Kpnskn.
- YcTaHOBItb Ha Micue po6oyn KlaNaH (A) - Man. 8.

BapiHЯВpexuMi «CkopoBapka»
■Поверніт b робочи Кларан (A)В положеня Дя Варіня B peхимi «Сkopоварka» Man.9.
■Перд ВИКОРИСТАнгЯМ ИрЕКОHAйТecяВ TOMY,Ю СКОРOBAPka HaJIEXKHIM YHOM 3aKpNTa - МД.2
- ПocТаВTe ckopoВapКу Ha BapиьHy NOBepxHIO i BnCTaВTe MaKcImaJIbHni piBeHb TemNepaTypn.
-Длma moDEnei3 TaIMepOM\*: yCTaHOBITb yac npnroTyBaHHa, yka3aHm y peenti (DINB. po3dIn «BukopncTaHHa TaIMepa»).
-NotpickyBaHHi i dIMOK, 1o BnnyckaIOTbcra 3aIO6IXHM KlaHOM, - ce HOpMaJIbHe AINSe, BOHN DaIOTB 3MORY BnnyCTNTN NOBITpr nepeD nprirotyBaHHaM.
Пд час варинь рекиMi «Сkopоварka»
■Якшо робочи Кланан (A) Becb quac nponyckae napy, Buaioch noctiHn xapaKtepHni 3Byk (wym), 3MeHwiTb TempeaTypBapnlbHOi NOBepxHi.
-Почиайтевідраховырази часприготуваши, указашиу peцenti.
KoHTpOJIouTe, 06 nIac npnroTyBaHHa KlaHn noCTiHNO npaIOBaB, nepioDnUHO BnyncKaIOu npy. RaIO BnxOAnTb HeOCTaTHbo nap, TPOxN 36IbWITb TemnepaTypy BapInbHOIOBepxHi, y IpOTnJeXHOMy BnnaIky - 3MeHwITb II.
3aBepseHnBapiHnBpeKmI «CkopoBapKa»
BunyckaHnnapu:
KoIy BmKHeO, y Bac e Dba BapiaHTn:
-Пoc'tynobe BnynckaHna napi: NOBilbHO NOBepHitb po6ochn Klaan (A) i DOBeiTb Ioro Do nIKtorpaM - man.10.

- Wbndke BnnyckaHna napy xoJodni BoDi: HaniTe XOJODHy BDOy B paKOBnHy Ta 3aHypTe IHO CKOpOBapKn, DOKN 3aNo6iXhN KlaPaN He ONyCTNTbcra - man. 14. Konu 3anobixhN KlaPaN (D) onyckaTbcra, cKOpOBapKa 6Ibwe He nepe6yBae nID TnCKOM. PObepHITb po6oyn KlaPaN (A)B NOJoxeHH

Etan 1

Eran 2
Moxha BiDkPnTn ckopoBapKy - Man. 3.
Y pa3i BnHKHeHr TpydHOUIB npu BiKpNBaHHI npnaJy: NOMictb yuihIOBAu niD BOy, a Notim Ha3ad y KpuKny, He BuTnpauOuN -Ma1. 19, i nepekoHaTeC8, uO yuihBOaH do6pe npoxoHTb Ni d naam KpuKu -Ma1. 15.
Якwo πiD yac BnynycKaHnЯ napu Bn cnoctepirae taHOMaIbHi BnKnI, 3HOBy BCTaHOBItb po6oyn knanah (A) y no3nciio npriroTuBaHHa B pexmici ckopOBapkn , notim BnKoHaTe Wbndke BnyncKaHHa napu B xOJODHI BODi.
Якwo 3anobixhni Klaapan He onyckaetbca, HannTe XoIOnHy Bovy B paKOBInHy Ta 3aHypTe dHO cKOpOBapKn, DOKN 3anobixhni Klaapan He onyctntbca - Man.14.
Hikon He Tucitb Ha 3an06ixn KlaanaH.
Длma MaKapOHnX BInpO6iB,як 36IbIbIyIOIbCBA O6'Emi a60 nIHHbIcN iIacBapHnHa npnKnIaD pnc,6o6Obi, cyuHoi OBOUi,ФpyKTOBI nOpE,rap6y3,ka6aKnMopKBa,KapToIIa,pi6He fIe... He HAnOBHIOte cKOpOBAPKy 6IbIwe HIX Ha 1/3 (no3NaUka MAX 1).OCTyIDt b cKOpOBAPky npOTAROM KINbKOx XBnIHn, a Notim 3aHypte B XOLOdHy BOy.ObOB'3KOBO 3JERKa 3TpyUyTe cKOpOBAPKy nepeKDOKHM BiIDKPUBAHnM,nepeBipNBUn,yn 3anobixnKlanaHOnyCTNbCBs,io6 3ano6irtn po36pn3KvBaHHIO,Io MoKe npn3BeCTn Do onikIB. Lc oc6nBO BaXnBO DnA WBnDKORO BnYSCaHHa napu a60 nicra nepe6yBaHHa B XOLOdHi BOdi.ДЯ npnroTyBaHHa cyniB peKOMeHdyETbcra 3diChHOBatn WBNdKe BnPySCaHHa napu B XOLOdHi BOdi (DnBITbcr po3diN «3akHueHHa npnrOtuBaHHa BpeKIMi cKOpOBAPKn').

Пригоруваня в реки м «Каструл»*
■Pobephitb po6oyn Klaanah (A)B noJoxeHHn dIy BapiHn
Bpexmi «Kactpyna».ДЯцboro notpi6Ho 3aCTOCyBaTn DOCTaTHbO 3ycnIb, IO6 nepeiTu yepe3 na3 y NOLOXKeHHB BUNyCKaHHa napu.
-Перед ВИКОРИСТАНХМ NepekoHAntecьВ TOMY, StOCKOPOBAPKa HAneXHIM YInHom 3aKpNTa - Man.2
- NocTaBTe CkOpOBapKy Ha BapnIbHy NOBepxHIO, BBIMKHyBUn II Ha HeBeNkY TempepaTypy.
-Почнайт e BiДрховыВаТи уac ппгOTуВань, уka3aHи y peцenti.
-у ржимi «Каструл» в можete BiДкрптс ckopoВapky В 6удь-якн уас,шобпелемиуВати,стжпглза пиюТУВанья iЖI a6OdoJaВATи IHRpeDiEHTN.
y pa3i BnHKHeHn TpydHouiB npu BiKpNBaHHi npcTpoH: nomictb yunbHOBaay nd BDOy, a notim Ha3ad y KPNkU, He BHTpaOuy - Man. 19, i nepekoHaIteC, uo yunbHOBaay do6pe npoxoDntb nid naamn KpnkN - Man. 15.
Ko TEmnepaTypa Dyke BncoKa, CkopoBapKa MoKe 6ytu 3a6noKOBaHa (3anobixHnn Knaan (D)niHimaetbcra i 6NoKy e BiKpNBaHH), pyka KpuNko MoKe He NOBePtaTncr Hn He BiKpNBaTH cKOpoBapKy. Y TaKOMy pa3i 3MeHsiTb TemnepaTypy a6o BmKhItb BapNlbHy NOBepxHIO. Pn npnrOryBaHHi Ha eNeKtpnHi CNipalbHi HactIbHi nnlTI 3HIMtB cKOpoBapKy 3 BapNlbHOI nobepxHi. UK
-Дя моделен 3 aHTINpRapHm NOKpTTam: He 3aCTOCOByIe BiHUnKn Ta iHwe Metanebe a6o roCTpe npUaDЯ. He cTpyuYte peWtKn 3 npUaDЯ, CTyKaIOuH Nm NO KpaX KaCTpyNi, OckInbKn ue MOKe NOwKOdHTn ii Ta cPruHHITn npOTiKaHHa.
Hikon He Harpia Te Knp Do Bncoo TemnepaTypn. Bnapu Bi npuroBaHHia Xi MoKyb 3aWKoNTBapnHa, 0 MaOTb UyTINBy DnxAInbHy CnCTemy, HanpuknaI pTaXam. BlaChnKam nTaxiB He cnId TpImaTn ix Ha KyxHi.
CnCTeMn 6e3neKn
CkopoBapka ochauneHa 6araTbMa cnCTeMaMn 6e3neKn:
-Be3neka nID yac 3aKpNbBaHHa
-Яко Кршka noraHO BCTaHOBHeHa a6o BN 3a6yIn cKlaCTn pyuKy KpIshKn,napa BHXODITb 6iJa 3anobixHoro KlananaHa (D)ckopOBapKn i He MoKe CTBOpJBaTN TnCK.
-Be3neka nID yac BiDkPmbaHHa:
-Якшо скороварka поpe6уВа€ пд тиСКOM, залобжнй Кланан (D) поpe6уВа€ у Верхьому положенни i ручka BiДКрпTTя/ЗakрпTTя Кршки (G) He мacНатиCKATИСя.
- Hikon He Hamara Teca BiKpuBAtn CKOpOBapky uepe3 cnny.
-He Tnchitb Ha 3an06ixhnn Klanah (D).
-ПepekoHaITecB TOMy,иO BHyTpiiuHiN TnCK BnaB,пepeBipNBuN,чО nOуCTnBCa 3anobixHn KlaNaH (D)ВнжнспоJOKeHHa.
-Pyukn KactpyJI e 3axncHmN DeTaIaMn. HikoJI He 3amIHouTe ix camocTiHIO. HikoJI He BnKOpNCToBvIe iHsi MoJeni pyO.K.
-Якwo Bn noBepHyn pyuky BiKpnT8/3aKpnT8 KpnSkn (G) y BepTuKaIbHe nOJKeHH, KOJI cKOpOBapka 6yJa ige NiD TnCKOM, Bn He 3MoJKeTe BiKpNTi II. LcE rapaHTye DoDAtKOBy 6e3neKy.
-Поверніт b руч kу haba d y ropn3oHTaIbHe nolokhen i noyeKaITe,doKn 3anobixkHm KlaPah (D) He onyCTntbC B HIXHc nolokhenr.
■Дистеми зanobirahня haMipHomy TnCKy:
- Nepwa cncTeMa: 3ano6ixHn Klanan (F), 0o 3Hnxye Tmeman.20
-Дугасстema: ушьювач, до порунская napу чере з кршку - мал. 20
JaKo OJHa i3 cnCTem 3anO6irAHnHaMipHomy TnCKy He cnpaOboBye:
Bumkhitb nnty.
- Nobhicto oxoloditb ckopobapky.
Bikpnite.
■IpebipTe i ounctitb po6oyn Klaan (A), Kaan BIDBeHnnapn (B), 3ano6iKnn Klanan (E) i yuilbHOBaY (I)- man. 16, 17, 18. NVB. po3dInn «OunueHHra» Ta «O6ob'aykoBi nepeBipKn peed KOxHm BnKOpNCtAHnM»
- RaKuo nicra nepeBipkn my OunuHn npnaI npOnyckae npuy He npauoec, 3BepHiTbca do aBtOpn3ObaHoro cepBichoro ueHTpy TEFAL.
PekomehdaazioBnKOpncTaHHa
1 Iapa, 0o BnXoIbTb Chepe3 po6OuN KlaPAn, DyJxe rapya. OctepiraTeC8 BnKNDy napn.
2Пися toroяк занобixний клanan пдимetbс,Ви He 3moжete BIDKpTN cKOpOBapKy.
3Як iВ paazi 3actocyBaHnI INhux npnnaIb IЯ npnroTyBaHHaIXi, DOTpumMyuTecra npabnl Texhikn 6e3neKn, OcO6JIbBO JaKIo cKOpOBapKa BnKOpNCTOByETbcra TaM, De npuy nepe6yBaIOb dITn.
4 4o6 nepectabnTcKOpOBapKy, cKopncTaITeCyaKamN KacTpyni.
5 He 36epiraTe iKy B cKopOBapci. Hikonn He hocitb cKopOBapky 3a pyuky KpuiuKm.
6 He BnKOpncToByIe po3uH xIopy Ta MIOUcI 3aCObN, IIO MiCTaTb XIop, Aki MoKyTb NOWKOdHTN NOBepXHIO 3 HepXaBIIOOoi CTani.
7 He 3aIIwaIte KpIshky y Bodi Ha TpIBaIIy qac.
8 MInayTe yuilbHOBauch oOpoky, a6o kUO BIn nowkoJxHn.
9 OuHsEHHa ckopoBapKn 3diIChIOte, KOJI BOHa OxOJIoXeHa NOpOxHra.
10 Picra 10 pokiv ekcnnyatauii Heo6xidno 3diinTu texhiHn orna CKOpOBapKn B aBtOpN3ObaHomy cepbichomy uehtpi TEFAL.
OuHsEHHa
ДяЗабeзпeуннянадиюі роботсckopoваркndoTpmyntecra HabeDEHnx HxKpekOMeHdaцi3 OuNueHЯ Ta obcnyroByaHHn icJЯ KoxHoro BnKOpncTaHHn.
Почориня та подрашии, яко можут b 3'яВИТСЯ BHAслIDOK DOBROTPUBaIOrO BnKOpIcTahHЯ, He BnINBaIOTb Ha po6otу npuJaY.
3HOC 3OBHIshboro NOKpTTT (3aJexHo BiD moDeni), NOB'3aHn i3 KOHTaKTOM i3 KpuKoIO KaCTpyI, E HopMaJIbHM.
Для скороварок 3 aHTUNpUrpHm nOKpTTam (Залжно Вд мо徳и): nerki noordpaannn i noTeptOCTi, як moKytВ bHnKHyTu nID час вКорпстанн, He bPnNBaIbTb Ha aHTUNpUrpHi BlaactNBOcTi nOKpTTY.
■Пся Кхного ВИКОпСТаHHЯ МИTe CКОРOBAPky TeNIOTO BODIO 3ДОДaВHЯМ MInOuHx 3aCobIb ДЯ NOcUd. Koшн ДЯ пиROTuBaHHЯ Ha napi* MoЖHa OUnsCyBaTn TAK Camo.
He BnKOpncToBvIe po3uHIB xlopy a6o MmOuNx 3ac06iB, kKi miCTaTb Xlop.
He neperpibaTe KaCTpyIIO, KOJI BOHa npOxHra.
OuHsENHbHyTpihboi nobepxhi kactpyni 3 hepXabioo i cTani:
MnIte cneiaIbHOIO JOpCTKOIO r6KOIO 3 DoJaBaHHaM MIOUOro 3acO6y IJNA NOcydy.
■KaIHO Na NOBepxHi KaCTpyI 3 HepXaBIIOoI cTani E cnIiN 6pydy a6o 6iNyBaTI cIiIN HaKIny, OUnuYte ix 6iIM OcTOM. UK
Дя ouишени BHytriшньоі nobepxhi aniominiéBOoi kactpyni 3 aHTnPurapHm nokpTTam:
- ьрбдовшпдгдвногokopstahн, noro pekomedobahOMTNBpyHy.
MnTe M'koIO ry6KOIO Ta rapaOIO BOIO 3 OdaBaHHm MnOyoro 3acO6y InpocuIy.
He BnKOpncToBnyTe npoWok dIy uHneHH a6o a6pa3NBHI ry6Kn.
- RaKuo iXa NiDropina, HAnuTe B EMHicTb rapAyu Body i 3aNnUte BiIMOKaTu. Notim NOMuTe ii 3a DonOMoroO 3acO6y dIra MMTTn Nocdy.
OuHnHn3OBHiHbOi Nobepxhi Kactpyni
MnTe r6KoIO 3doBaHnM MIOOOrO 3acO6y IJRA NOcyIy.
KactpyIIO ta KoUnk i3 HepXaBIOOoi CTani MOxHa MNTN B NocydOmNHi MaunHi.
He mniTe kactpyIIO 3 aHTnnpnrapHm NOKpTTaJIeXHo BiM oIeJI B nocydomiHi MaunHi, OckInbKn MIOUci 3acO6N B Ta6NeTKaX MiTtB dyKe arpeCnBHi peuOBHH Ta cnpuHraOTb Kopo3IO aIOMiHiEBrNX deTaJe.
3a iHTeHcNBHO BnKOpNCtAHN KacTpyni 3 aHTuNPurapHM NOKpTTAM (3aJIexHb BiM MoJei) KOIp NOKpTTa MoKe He3HaUHO 3MiHNTuCA (NOXOBTiHH, PIAMu).
OuHneHHKpnKn:
MnIte KpnKy r6koIO 3doaBaHHm MIOOro 3acO6y IJI NOcyU.
JaTe cTeKTI pIDHi 3 KpUShKn y BepTnKaIbHomy nOJoxKeHHi, 0o6 BnDaJIHTN 3aIIuKn BOu MIX MeTaneBmM Ta PnactMaOBmM qAcTHHaMn KpUShKn.
OuHnHnY uIbHIOBaHa KpnKn:
■Пся Кожного пиготувань миTe yuINbHIOBaU (I) Ta NOrO BnIMKy.
-ДяВCTaHOBJIeHHЯ уцilbHOBaHa Ha Micce dINBMaI.15 i nepekoHaITecra, lo yuizbHIOBaUdo6pe npoxOJNbPiKoXHM na3OM KpNiUKn.
OuHsEHHa po6oYoro Klanana (A):
3Himitbpo6oynKnaanA)Ma1.11.
MnTe po6oyn Klanan (A) nID cTpymehm BOn 3 KpaHa - mAn.16.
- Ipepeipte noro pyxnbictb: nB. pncyHOK.
Пися зиманна робочу Клара (A), yшьновача (I) i taiмета\* (F) в можete MTи Кшику В посydомини машни.

Hikon He cTaBte po6oyn Klaan (A), yuilbHOBaU (I), taMep\* (F) a6o kactpyJIO 3 aHTUNpURapHM NOKpTTam y nocydomnHy maunHy.
OuHsEHHaHaNy BiDBeHeHHa napn (B), po3TaWoBaHo rHa KpIwz:
3HimItb Klaanah (A)- Man. 11.
-Прokонтюй Te Bi3yaJIbHо npn DeHHOMy CBiTJI, 90 KaHaJ BiДБeDEHЯ napn
чесгін i Крглін- МА. 13. 3a Heo6xIДHocTi npOuNCTiB 3y6OuNCTKOIO - MaI.
17 i npomnTe Ioro.
Ouichienna 3anobixkhoro klanana (E):
-ПомиTe BOIOU qaCTHy KOpNcy KlaNaHa,po3TaWOBaHOro BCEpeDnHi KpNiShKn.
- Ipebeipte Ioro po60Ty, cnIbHO HaTnCHyBUn BaTHOIO nauKoIO Ha KylbKy, kA Ma€ 6ytu pyxOMOIO - mAI. 18. DInB. po3dIN «O6ob'zKOBI nepeBipKn pepei KOxHIM BnKOpNCtAHHM'.
Ouichienn TaImepa\* (F):
BnKOpNCToByTe uNCTy, cyxu TkaHnHy.
He BnKOpncToBouyTe po3uHHNKn.
Hikon He nomiatae TaMep iD BODy i He MnTe B NocydomNHi MaunHi.
O6cnyroByBaHHa
3amHa yuilbHIOBaça cKOpOBapKN:
MiHnTe yuIbHOBauch CKOpOBapKn pa3 Ha pik, a6o JaKIo Ha HbOMy 3'YBUNCn deEeKtN.
3aBxDn BnKOpncToByTe opurihalbHn yuihnoBa Cnpo6HnTBA TEFAL, knniDxoDntb Do BaWoMoJe (DnB. po3di «AkcceCyapn»).
■ДяВCTaHOBHeHЯуиlbHIOBaHaДm.15i nepeKoHaTecra,OyuizlbHIOBaUdo6pe npoxOHTb NiKoKHIM Na3OM KpUshKn.
36epirahnrackopobapkn
-ПepeВернiTb Кршку Ha KaCTpyJI.
Mexahi3m BiikpmbaHHa/3akpmbaHHaCKOpOBapKn He notpe6ye JODHoro cneiaIbHoro 06cnyroByBaHHa, Kpim OunueneHHa.
Пися 10 рokів ekспnyataць Heo6хiДно ВнКоНТи Тхичну orлад ckороваркь в abTOpn3OBAHOMy cepВICHOMY ueHTpi TEFAL.
Akcecyapn TEFAL
Akcecyapn dnnckopOBapKn hABHb npoJxky:
Ак sceуари Apтимкун Ушільнювач 3/4/4,5/6 л: зовниώдiametр 24 см X1010008 5/7,5/9 л: зовниώдiametр 27 см X1010007 Кошп дlya\
ПригOTуВань\
на пapi* 3/4,5/4/6 л: дlya кастулідiametрom 22 см 792185 5/7,5/9 л: дlya кастулідiametрom 24 см 792654 Тринога* (L) 792691 Таймер* X1060007
-Дязамин iHux DeTalei 3BepTaItecdo abTopn3OBaHnx cepBicnX ueHtpiB TEFAL.
Bukopucobyute Inwe opurihalbhi deTani Bnpo6HnTba TEFAL, kbi BIDNOBiaotb moenl BaWoI cKOpOBapKn.
Texhichi xapaktepnctnkn
Дiametр Дна скороварк - xapaКтетнк
06'EM Дiametr
Каструли Дiametr
Дна Clipso
Minut'
Perfect / Easy Clipso
Minut'
Duo couleur Clipso
Minut'
Duo Gourmet Мaterial
Каструли 3 л22 cm15.5 cm P46205 -- Hepxabiiюа
Сталь 3 л22 cm18 cm -- P46605 4 л22 cm14 cm - P46042 - Алемпий i3
антуригnamm 4.5 l 22 cm 15.5 cm P46206 -- Hepxabiiюа
Сталь 5 л24 cm14 cm - P46051 - Алемпий i3
покрпTTM 5.2 l 24 cm20 cm -- P46654 Hepxabiiюа
Сталь 7.5 l 24 cm18 cm P46248 -- 9 л24 cm18 cm P46249 -- Ha6ip 5 l
7,5 l 24 cm 14 cm P46353 - 18 cm
MaTepiAJI KpIshKn: HepXkaBIOUca cTaJIb
Hopmatubhi XapaKTepuCTnku:
MaKcMaJIbHn pO6OuN TnCK: 65 KPa
MaKcImaJIbHn 6e3neuHn TnCK: 120 KPa
Джерета тени.
T43OBAIJIINTA EJEKTPNHAIJIINTA (HabyHHa KOHΦopKa)

CKIOKEPAMIHA IINTA

IHNYUKIMHAJIINTA EJEKTPNUHA
PINTA (CnpaBbKa KOHΦopka)


CkopoBapka MoKe BnKOpNCToByBaTnC3 Pi3HmN TnAmN BapnIbHnx NOBepxOHb, BKNIOUaOuH iNDyKciHi.
-При ВИКОРИСТАНHI eNEKТрОПЛNTN BИБИРаTe KOHФОрКу, со Meншe a6o ДорIBHIOE dIaMErpy dHa cKOpOBapKn.
- Y pa3i BnKOpncTaHHI pHTN 3i cKnOkepaMiuHOIO NOBepxHeIO nepekoHaTecra, IO dHO KaCTpyJI uNCTe.
-Пд час викорпостанна на ra3OBiй конфорци поум'я He Ma€ BuxoДNTn 3a Мжідiametpa Дна Качтул.
■Пд час викорисьд-якinx типг плт сдду Te, 606 ckopoВapka 6yana npabINbHO BCTaHOBJIeHa Ha BapINbHy NOBepxHIO.
TapaHTiA
3a yMOBn BnKOpNCTaHHa 3a npn3HaueHnM Kactpyna ckopoBapKn TEFAL 3 HepXkABIOOi cTani Ma rapaHTIO 10 pOKIB, kUHO HeCnPaBHICTb CTOCYETBCR:
-MetaneBoi ctpyKtyn KaCTpyJI cKOPOBapKN;
- nepeedachoro NOsKOJxHnO OCHOBnX MeTaJIeBnx KOHCTpyKzI.
Ha iHsi maTepiAni KactpyI i Bci iHsi yactuHn cKopOBapKn nou npOeTbcra rapaHTia Ha defeKTn Bnpo6HnTba a6o MaTepiAIB npotraom rapaHTiHoro TepmiHy, BN3HaueHOrO uHHm 3aKoHOaBCTBOM y kpaHi npnd6aHH, nouHaouN 3 DaTI NOKyn.
Lra rapaHTia 3a6e3neuYcTBc3a yMOBn nped'ABlenHna KacOBoro yeka a60 paxyHka-phiKtypn,aki 3acBiDyIOTb dAty npnd6aHHa.
BnuHrTKn 3 rapaHTii:
IopapnH i 3he6apBneHHape3 cTapiHHa,Ja KaCTpyb 3 aHTnpurapHM NOKpTTAM.
-Подраин BiД KOHTaКТу Кршк 3 KaCTpyNeI O 3 aHTINpRapHm NOKpTTam.
- rapaHTia He iie, kIIO CnCTeMaTuHi NOLOMKn npuJaHy NOB'aHI 3 HeIoTpmaHHaM IHCTpyKci 3 BnKOpNCtAHHa a6o HeiBaJIbBm CTaBHeHHaM Do npuJaY, a Came: -ydaH, naIHHa, KOpNCTyBaHHc CKOpOBapKOIO dIg PnIROTyBaHHjIXi BdyXOBci
Tilbkn aBtopn3OBaHi cepBicHi ceHTpn TEFAL maIb TnpaBO hAdaBaTn BaM rapaHTiInHe 06CnyroByBaHHra.
3aTeNeΦOHyIe 3a HOMepom rapyoi IiHii, zo6 i3HaTnca aDpeCy haN6JxUoro do BAC ABTOPu3OBaHOro cepBicHOro ueHTpy TEFAL.
Hopmatubhi no3haqkn
MapkyBaHЯ Po3TaUByBaanHЯ Товарни знak Ha кршци Рik Випуску та Homep napтii
Заз nauseени мodyелi
Мakсимально дочстимп рibeны тису (PS)
Найвиший рibeны робочого тису (PF) Ha кршци О6'ем Ha зobнішій стороні дна кастулі Поштова adjoiningся воробнika Ha зobнішій стороні дна кастулі
3axnauMo doBkijpa30m!

①Baw npnilad miCTntb ciHHi MaTepiAn, kKi niJaRaIOTb BTOpHHi nepepo6ci.
BiiDheCtB uei npnaHa nepepo6ky do ueHTpy npinyomy no6yTOBnx BiXoDiB.
TEFAL BiДnobiДа€ Ha BaWi 3aПТання
ПюбLEMп Реком endацii Якso Вaxko
Вidдрвати ta/a60
Зakрвати кршку: 3нимы ушьновач inomicitb myо рid Вody.
Вставе яого в кршку, He BNTIPAQUHmam.19. Якso Ви He moхete
Зakрчтп Кршку: П配电онайся, по ручка кршки nepe6byaec y
Вертукальному положенhi.
П配电оре розтуваань ушьновач (дИВ. рОздд
«Очишия ТА оБСУТВУВань»).
П配电онайся, по кршka BCTAHOBLeHa, як рOKAZANO ha
малюну - мal.1.
Помсгть ушьновач пid Вody, a NOTIM Ha3ad y кршку, H
Витраюч - мal.19, i pepekonai Teesca, по ушьновач
do6pe npoxodnTB пid пazamn КршКmam.15. Якso скороварka
нагрілася пid ТИСКOM
6e3 рідин
В进城уни: П配电оре ТЕХИЧΝД STAN SCOPOBAPKВ B AВTOPIN3OBAHOMU
цentri TEFAL. Якso зanobixний
Кланан Видаe
Клanzaня i димok: ЦеHopmaьно чрші кільka XВИЛIN: се дэс 3Могу ВИп-
СтITN NOBITРЯ песed р�ngOTyBaHNAM. Якso зanobixний
Кланан He пidнвся
i napa He BIXODnTB
чeredу робоч
Кланан пid чac
пригOTуВань: Тaka ситуаця дОпUCTIMA претягOM рechшix XВИЛIN.
Якso тaka tendechizя 3бepiraætbcry, п配电оре, ч:
- Варпьна пОBERXнЯ ДОCTAТнБО Harpita, В ИшOMу BIVnADKY
36iьшiTb Tempepatур;
- Кількість рідунь в Кастулі дОCTАТН;
- рбочny Кланан (A)Виставеленьу рпОжен;
- скороварka дОбpe зakрп;
- ушьнibusвач abo краій кастулі He поКODжeh;
- ушьнibusвач BCTAHOBLeHin правиьно. Якso зanobixний
Кланан пidнвся i
пд чac Вариня
нapа He BIXODnTB
чeredу клдан: Це Hopmaьно претягOM рechшix Kількох XВИЛIN.
Якso се явице He 3NHkae, налиteхолдну Вody в рakobov
Та занур trade nHO SCOPOBAPKIn, дOKи 3anobixнiy Klanpa(D) He
Опух?
Oчирпь рбочny Кланан (A)- mAL. 16 i kaнал BiDveDEHня
napi - mal. 17 i pepebipte чи күльka зanobixного Кланан
6e3пеки лergko рухаэтбя мAL.18. ПюбLEMи Реком endaцii Як soo пара винождь
навколо кршки,а
Крааанн пechебувае В
нжньому поождени,
пechерг:
Як soo кршka He Bvdkpn-
Ваetting:
Як soo iж несоварна
аоб niodropina,пech-
вір:
Як soo iж niodropina y
соковарци: ЧИ Кршka Добpe 3akрита;
ЧИ На мicsi ушьювач В кршци;
Стан ушьювач,за notpeби замиить яого;
ЧИСТOTУ Кршки, ушьювач та яого Виимки В кршци;
Стан краiv Кастул. Пechерг:
Як soo рcentын
Бадься:
Як soo iж.
Янбься:
Янбься:
Янбься:
Янбься:
Янбься:
Янбься:
Янбься:
Янбься:
Янбься:
Янбься:
Янбься:
Янбься:
Янбься:
Янбься:
Янбься:
Янбься:
Янбься:
Янбвая:
Одney:
Янбься:
Янбься:
Янбься:
Янбься:
Янбься:
Янбься:
Янбься:
Янбься:
Янбься:
Янбься:
Янбься:
Янбься:
Янбься:
Янбься:
Янбься:
Янбься:
Янсend:
Янбься:
Янбься:
Янбься:
Янбься:
Янбься:
Янбься:
Янбься:
Янбься:
Янбься:
Янбься:
Янбься:
Янбься:
Янбься:
Янбься:
Янбься:
Янбься:
Янвая:
Одney:
Янбься:
Янбься:
Янбься:
Янбься:
Янбься:
Янбься:
Янбься:
Янбься:
Янбься:
Янбься:
Янбься:
Янбься:
Янбься:
Янбься:
Янбься:
Янсend:
Янбвая:
Одney:
Янбься:
Янбься:
Янбься:
Янбься:
Янбься:
Янбься:
Янбься:
Янбься:
Янбься:
Янбься:
Янбься:
Янбься:
Янбься:
Янбься:
Янбьeria:
Янбься:
Янбьeria:
Янбьeria:
Янбьeria:
Янбьeria:
Янбьeria:
Янбьeria:
Янбьeria:
Янбьeria:
Янбьeria:
Янбьeria:
Янбьeria:
Янбьeria:
Янбьeria:
Янбьeria:
Янбьeria:
Янбьeria:
Янбьeria:
Янсend:
Янбься:
Одney:
Янбься:
Янбьeria:
Янбьeria:
Янбьeria:
Янбьeria:
Янбьeria:
Янбьeria:
Янбьeria:
Янбьeria:
Янбьeria:
Янбьeria:
Янбьeria:
Янбьeria:
Янбьeria:
Янбьeria:
Янбьeria:
Янсend:
Янбвая:
Одney:
Янбься:
Янбьeria:
Янбьeria:
Янбьeria:
Янбьeria:
Янбьeria:
Янбьeria:
Янбьeria:
Янбьeria:
Янбьeria:
Янбьeria:
Янбьeria:
Янбьeria:
Янбьeria:
Янбьeria:
Янбьiously:
Янсend:
Янбься:
Одney:
Янбься:
Янбьeria:
Янбьeria:
Янбьeria:
Янбьeria:
Янбьeria:
Янбьeria:
Янбьeria:
Янбьeria:
Янбьeria:
Янбьeria:
Янсend:
Янбься:
Одney:
Янбься:
Янбьeria:
Янбьeria:
Янбьeria
Янбьeria:
Янсend:
Янбься:
Одney:
Янбьeria:
Янбьeria:
Янбьeria:
Янбьeria:
Янсend:
Янбься:
Одney:
Янбьeria:
Янбьeria:
Янбьeria:
Янсend:
Янбься:
Одney:
Янбьeria:
Янбьeria:
Янсend:
Янбься:
Одney:
Янбьeria:
Янбьeria:
Янсend:
Янбься:
Одney:
Янбьeria:
Янбьeria:
Янсend:
Янбься:
Одney:
Янбьeria:
Янбьeria:
Янсend:
янбься:
Одney:
Янбьeria:
Янбьeria:
Янсend:
янбься:
Одney:
Янбьeria:
Янсend:
янбься:
Одney:
Янбьeria:
Янсend:
янбься:
Одney:
Янбьeria:
Янсend:
янбься:
Одney:
Янбьeria:
Янсend:
янбься:
Одney:
Янбьeria:
Янсend:
янбвая:
Одney:
Янбьeria:
Янсend:
янбься:
Одney:
Янбьeria:
Янсend:
янбься:
Одney:
Янбьeria:
Янсend:
янбься:
Одney:
Янбьeria:
Янсend:
янбься:
Одney:
Янбьeria:
Янсend: Як soo рcentы
Бадься:
Як soo iж
Бадься:
Як soo iж
Бадься:
Як soo iж
Бадься:
Як soo iж
Бадься:
Як soo iж
Бадься:
Як soo iж
Бадься:
Як soo iж
Бадься:
Як soo iж
Бадься:
Як soo iж
Бадься:
Як soo iж Вимкніль
Охлodіль
Скоровар;
Каллій
Залій
Досій
Залій
Залій
Залій
Залій
Залій
Залій
Залій
Залій
Залій
Залій
Залій
Залій
Залій
Залій
Залій
Залій
Залій
Залій
Залій
Залій
Зalam
Зalam
Зalam
Зalam
Зalam
Зalam
Зalam
Зalam
Зalam
Зalam
Зalam
Зalam
Зalam
Зalam
Зalam
Зalam
Зalam
Зalam
Зalam
Зalam
Зalam
Зalam
Зalam
Зalam
Зalam
Зalam
Зalam
Зalam
Зalam
Зalam
Зalam
Зalam
Зalam
Зalam
TAbnucy YACU PPnFGOTyBAHHa
Oboqi
OBOHI (CBIXI)
HA IAPI
IHRpeiEHTN B KOUHKy i 750 Mn BOIN Ha dHi cKOpOBapKn.


YBODI
InrpeiHtN 3aHypehi y Body 6e3 KOnKy.
IMПУЛьСНИ
PEЖКМ
YBOI
Be3KoWNkY.


Артышokи, 2 цilinx по 600 г кожен (у вodi) 30 - 35х. Баклaxан, 6e3 shkíрки, нараздени кльцям (3 мм),850 r (на пapi) 10 - 12хв. Болгарсыкий поець, роздени habли (550 r) (на пapi) 14 - 16хв. Бриюсельскыka калystа (на пapi) 10 - 12хв. Бурак, червони, роздени на четberстени (у вodi) 20 - 25хв.(бідповідно до розмір) Гарбуз, наразденишиаточкам (3 - 5 сm), 600 r (нa 13 - 18хв. Горох (нa пapi) 6 - 8хв. Гриби, рizанi, 800 r (у вodi) 4 - 5хв. Дрибнаструкова Квасола (600 r) (нa пapi) 10 - 12хв. Калystа, зелега нашаткован, 500 r (у вodi) 5 - 6хв. Картоля, роздени habли (950 r) (нa пapi) 20 - 25хв.(бідповідно do розмір) Квасола, сухena, 250 r (у вodi) 35 - 40хв. Луший торох, 250 r (у вodi) 18 - 20хв. Манговд, нараздени (2 сm), 700 r (нa пapi) 15 - 17хв. Мариновашиба (нa пapi) 7 - 8хв. Морква, нараздени крженькам (3 сm), 600 r (нa пapi) 17 - 19хв. РINA, рizана Кьшами (500 r) (нa пapi) 14 - 16хв. Селera, рizанa, 600 r (у вodi) 7 - 9хв. Сочев��я, селиena, 250 r (у вodi) 14 - 16хв. С nanopжа, бILA (нa пapi) 5 - 6хв. Сuzвittя бpokeолi, 600 r (нa пapi) 9 - 11хв. Сuzвittяartzithoii kansstn, 600 r (нa пapi) 10 - 12хв. Фechхел, пораздени сухжами (600 r) (нa пapi) 6 - 9хв. Цьбул порейь (ila, (ila, $ila) 9 - 11хв. Цникovi салатни, роздени habли (900 r) (нa пapi) 14 - 16хв. Цуkini, нараздени крженькам (3 сm), 600 r (нa пapi) 12 - 15хв. Шпунат (нa пapi) 3 - 4хв.
УВОДI
БeЗ кошκу. КИльбICTь BOДи КИльбICTь
РИСУ ЧАС ПИ-
ГOTУВА-
НХЯ 2 ПОПцIⅡ 400 ml / 2 сКлянки 150 r / 1 сКлянka 7-8XB. 4 ПОПцIⅡ 500 ml / 2,5 сКлянки 250 r / 2 сКлянки 6 ПОПцIⅡ 700 ml / 3,5 сКлянки 375 r / 3 сКлянки
M'Ясо/pn6a
СВИКI 3AMОPOJOKEHI Бараняча похka - 2ш. (0,95 кг) 40 - 45xb. 1 roД. 05 xВ. -1 roД. 15 xВ. Качka (1,8 кг) 45 - 47 xВ. 50 - 55xb. Кролк (1,5 кгшматочами) 8 - 9xb. 20 - 23xb. Курka (1,35 кг) 23 - 25xb. 1 roД. -1 roД. 10 xВ. Курca - 2ш. (1,3 кг) 23 - 25 xВ. 40 - 45xb. Перетілки - 4ш. 9 - 10xb. 18 - 20xb. Пор'е 3 телатин - 4ш. 10 - 12xb. x Ростбiф (1 кг, дiametrom 8-11 sm) 30 - 35 xB. 45 - 50xb. Свиная вирizka (0,8 кг, дiametrom 8-10 sm) 30 - 35 xB. 1 roД. 05 xВ. -1 roД. 15 xВ. Свиная сife-mиньон -2шатka по 350 r 13 - 15 xB. 26 - 29xb. Стой З locosя - 4ш. (0,8 кг) 5 - 6xb. 7 - 8 xB. Стой З тунця - 4ш. (0,7 кг) 5 - 6 xB. 7 - 9 xB. Теляа вирizka (0,8 кг, дiametrom 5-7 sm) 17 - 19 xB. 37 - 40xb. Теляе сife-Mиньон 0,7 кг 17 - 21 xB. 33 - 38xb. Фіile морською чорta (1 кг),шматочами по 75 r 5 - 6 xB. 7 - 8 xB.
Примитka.у моделях ob'емом 5 litрив i Meнше Шматok M'яс hoи Вирizн И пиця He MaIOb 6yTN BnUci 3a BiДmitKy BCEpeDinHi yaSi. ВибпайтЕ ВИрizKу n PTNUO He BnUe 3a 8 cm.
Kpaɪ ha rotbeheTo B pexkɪm „Teɪdʌkepa pod həlaɪraHe"
3a da n3nycheTe npapaTa:
Cne KaTO n3KIOUHTe TOIINHHNn I3TOUHN, IMaTe DBe Bb3MOXHOCTN: -Постенинизуckeны наразаю:завпгете постенино работни Кларан (A), дOKATO достигнелу до знaka на пiktогамат -Фur.10.  -Бьр30 NOHIXaBaHe Ha HAIraHTo B CTydeHa BOda: CInTe CTydeHa BOda B MNBkata N NOTOte DbHOTo HA TeHJxepaTa NOD HAIraHe, DOKaTO npedna3HnT UΦT Cne3e Ha DoJIHO NOLoxEHe Φur. 14. Korato npedna3HnT UΦ(D) Cne3e OTHOB O DOLHO NOLoxEHe, TeHJxepaTa Beue He e NOD HAIraHe. 3aBbptTe pa6OTHnA KlaPAnA(A) Do NOLoxEHe  Etan 1  Eran 2 Beue moxete da OTBOpTe TeHxepata noHaIraHn.3. Ako n3nntBaTe 3aTpydHeHne da OTBOpTe TeHJKePaTa, HAMOKpeTe yIbTHHeHneTo C Teuaa Boda n ro noCTaBeTe o6paTHo Ha KaNaKa, 6e3 da ro noCyuwaBAtur.19 KaTO ce cTpeMNTe da ro noCTaBtE npabuHNo od XJIe6ObTe Ha KaNaKur.15. Ako no Bpeme Ha n3nyckahe Ha napata 3a6eKeNte Heo6nuaHn npbckn, noctabete o6paTHo pa60THnKlanaH ( A) B noJoxeHne 3arOTBeHe B pexHM ,TeHxepa NoJ HnIraHe" , cIeD Koeto NOHNkTe 6bp3O HnIraHeTO B CtUdeHa BOda. Ako npedna3HnT uHfD) He cne3e, cnneTe cTydeHa Boda B MNBkata n NotoneTe DbHOTo Ha TeHdXepaTa NOI HAnraHe, DOkaTo npedna3HnT uHfT cne3e Ha DoIHO NpOJKeHne - fnr. 14.Hnkora He npednpemaiTe KaKbTo n da e oepaun nonpepa3nma u
3a npOyKIn, KOnto yBEnuBaT obema cn n/nnn o6pa3yBat nHa no BpeMe Ha rotBeHe, KaTo opn3, 6obOBn paCTeHnra, cySeHH 3eJeHcyU, pIoIOBn IIOpeTa, TIKBN, TIKBNUK, MOpKBn, KapTOHn, fHne ot pn6a n dp. He HAdBnuaBaIte 1/3 ot BmecTImocCTTa Ha TeHJKePaTa (MAX 1). Octabete TeHJKePaTa Da ce OxlaDi 3a HApKoNk MoHyTu, CNeDkoETo RaDOxHaTe IOd CTpya TeuAa StYeHa BOda. PpeiOTbapRHe BnHarn pa3KlauaIte Jeko TeHJKePaTa NOd HalaRaHe, CLeD KaTO cTe Ce yBepuIN, Ye PpeDnA3HnAT uHΦTe B DOJIHO NOLXeHne, 3a Da n36ErHeTe NOBaTa Ha Mexypn OT npa, KOnto 6nxMoIgN da BN n3rOprT. Ta3n ONEpaunr e Oco6eHo BaxHa npi 6bp30 n3nyckaHe Ha npaTa nn CneD oxJaKaHe B CTyeHa BOda. Korato PpIroTBATE CyIN, CbBeTBaMe BN da n3nyckate 6bp3O hJaRaHeTo B CTyeHa BOda (BVXTe pa3deJ , KpaH a roTBeHTo B peKIM , TeHJKePa NoD hJaRaHe"). TotbeHe B peXnM ,TpaIuNoHHa TeHxkepa\*\*
3abptete pa6oTHnA KlaNa(A)do nOIOKeHneTO 3a rOTBeHe BpeKIM ,TpaNtioHHa TeHJKepe .3a da HAnpaBnte TOBa, HaTNCHeTe IOCTaTBuHO CnIHO, 3a da 6bJe HaTNCbT NO-CnJe OTKOKOTO Ha NIOKeHneTO 3a CBaJIHe Ha HaNraHeTo. YBepTe ce, ye TeHxepaTa e npabnIHO 3aTBopeHur.2, npei Da 3anoHHe Ta rTbnte. - NocTaBete TeHxepaTa NOd HalaRaHe Bbpxy TOnnHeH n3TouHnK, perylnpaH Ha HnCKa MoUHOCt. OT To3n MOMeHT 3aNoUba Da Teue NocOueHOTO BpeIeNTaTa BpeMe Ha rotBeHe. BpeKIM,TeHJKepa noI HaJIraHe"MOKeTe NO BcAko BpeMe Da OTbaprTe TeHJKePaTa, 3a da pa36bPkateЯCTneTo,da CneIte rOtBeHeto IIN da DoabAte npOdykTn. Ako n3nntBaTe 3aTpydHeHne da OTBOpTe TeHxKePaTa, HAMOKpeTe yIbTHHeHneTo C Teuaa BODa I Go NoCTaBeTe o6paTHo Ha KanaKa, 6e3 Da ro NocCywaBaTnr.19 m 15, KaTO ce CTpeMITE da Ro NoCTaBtE npabINHO NOJ XJIe6ObTe Ha KanaKa. Ako TOnJIHHnT N3TOUHnK e npeKaJIeHO cnJeH, Bb3MOxHo e TeHJXepaTa NOI HAnraHe da ce 3aKnIOuN (npedna3HnT uD) ce noBnIra n 6loKnpa OTbopa), a DpbKkata da He MoKe Da ce 3abbpTN nn da He OTbOpn Kanaka. B TaKbB cnyaH HamaleTe nn N3KlIOUeTe TOnJIHHnR N3TOUHnK. B cnyaH na ChyryHeH eNeKtpnueckn KOTNoHn CBaneTe TeHJXepaTa OT TOnJIHHn R N3TOUHnK. 3a moJeIte c He3aJIenBaIoo nOKpITne: He n3nOJ3BaIe Te TL 3a pa36nBaHe nn MeTaNHN nn peKeu np6Opn. He ouEJaTe np6OpTe, KaTo rN ydpTe B pb6a Ha CbDa, TbN KaTO pNCKyBaTe Da ro NOBpeIte N da ce NoRBAr TteOBe. ■Hnkora He HarpBaIte Ma3HHn Do OBbrIbAhe. OTdJIaIte ce no BpeMe Ha rotBeHeTo napi Morat da ca OnaCHn 3a JINBOTHTe C yVBCTBNTHa dIXaTeHa cnCTema kato TTnIte. Co6CTBeHNtE Ha TTnIu Tp6Ba da rN IbpxkT daJeU ot KuxHraTa.Системп за 6еэозаочьт
Baata TeHxepa e cHa6deHa C HЯKoIko CnCTeMn 3a 6e3OpaCHOCT:Be3onacHocT Ha 3aTbapnHeTo:
- Ako KaNaKbTe He npabuHIO NOCTaBEN nIi 3a6paBNTe Da CBaNtE dpbXkata Ha KaNaKa, Ie n3n3a npapa OT npedna3HnT UnD) n HanaRaHeTO B Hea HMa Da Ce NOKaU.Be30nacHOCT Ha OTbaprHeTo:
-AKO TeHJKePaTa e noi HaIraHe, npedna3nrt uOCTaBa B rOpHo noloxeHne IdpbKkata Ha KaNaka 3a OTBapHe i 3aTBapHe Tp6Ba Da 6bJe 3aJeTcBaHa. - Hnkora He OTBapayte TeHxpepaT noi HaIraHe CbC cnila. -BnkaKbB cnyaH He npabete KaKBOTO n da e no npedna3HnA u(0). - YBepTe ce, Ye HaJIraHeTo e NaIHaNo, KaTO npOBepUte dAn NpeJna3HnT UDTe B DOJHO NOLOXKeHne. -Дрьжкnte Ha cbla cnykaT 3a obe30napcaBaHe Ha TeHJkepaTa. Hnkora He rncmeHnTe camn. Hnkora He n3no3BaIte npyrn moJeN dpbxxkN. -AKO CTe BdHann DpbKkata 3a OTBaprHe/3aTbaprHe (G) BBB BepTKaHNOJIOXKeHne, IDOKATO TeHJKePaTa BCE OSe e NOD HAnraHe, HMa Da MOKeTe da JOTBOpHTe. TOBa e DonbHnTeHa yHKcna 3a 6e3ONaCHOCT. - CbaIeTe OTHOBO IpbXkKaTa Ha KaIaKa B XOpI3OHTaJIHO NIOJKeHne N N3UkaKaiTe npEJa3HnT UΦ(D) Da cIe3e B DOJIHO NIOJKeHne.-ДBE cHCTeMn 3a 6e30nacHOCT 3a CBpbXHaIraHe:
-Пьрвсистema:празнгд(E)ocbo6kaBaHaJraHr.20 - Btopa cnCTema: ynpbTHeHneTo n3nycka npa Bbpxky kanaur.20При заideиствае на сдна OT снcte mte 3a 6e30naCHOCT 3a пpeiodTbpaTЯBaHe Na CBpbxHaIraHe:
N3KJIHcyTe TOJINHHNn N3TOUHNK. - Octabete TeHxepaTa NOd HnlaRe Ha n3CTnHe HanbJHo. -OTBopete. ■Проветeи постete pa6OTня клana(A), OTbopa 3a OTbeKdahe Ha napaT(B),празиня клanaH(E)и ультHeHneI -Фnr.16-17-18BuxTe naparpaΦnte „Почиствае"и „ЗадьжИтELHи проврkn пpeДИ BCЯka ynotpe6a Ako cnei Te3n npOBepKn n nouchTbaun onepaun OT ypea nMa Teu, nn aKO ToH pa60Tu, 3aHeceTe ro B oToPn3npaH OT TEFAL cepBn3.Ipenopbkn 3a ynoTpe6a
1 - Параза EMHOro ropeuza, korato n3n3a ot pa6OTnKlaan. Na3eTe ce ot napata. 2 - ΚΟΜΚΑΤ ΠρεπηλΗΝΙ T Ινότι Σ ευμίνη, Bευ Θ ΜΟχΕθε Ε Ε ΑβαρΑ Ε Ε Ε Ε Ε Ε Ε Ε Ε Ε Ε Ε Ε Ε Ε Ε Ε Ε Ε Ε Ε Ε Ε Ε Ε Ε Ε Ε Ε Ε Ε Ε Ε Ε Ε Ε Ε Ε Ε Ε Ε Ε Ε Ε Ε Ε Ε Ε Ε Ε ΜΟχΕθε Ε Ε ΑβαρΑ Ε Ε Αγλγαή. 3 -KaKTo npn BCnUKN KxHHeNCKn ypeu, He octaBnyTe TeHJKepaTa noi HaIraHe 6e3 Hau3Op B npncbCTBne Ha deca. 4-3aДа npemeCTIte TeHxKepaTa NOd HaNraHe, n3NoI3BaITe DBeTe IpBXKn Ha CbIa. 5-Hnkora He octabrai Te npodykTu Dblro BpeMe B TeHxkepaT noHaIraHe. Hnkora He MeCTe TeHxkepata 3a dpbxxkaTa Ha Kanaka. 6 - Hukora He n3noJ3BaIte 6eInHa nIIxNpHn npenapaTn, 3aOTo MoKe da BLOUHTe KaueCTBOTO Ha HepbXJaemTa CTOMaHa. 7 - He octabray Te kana Ka HauchHaT BbB Boda. 8-CmeHaiTe ynltHeHneTo BeHbK rOiuHo nIaKO e HanyKaHo. 9 - Почиствано на Teнджера на Налягане зальктугов Трава на ce n3Вьршв само korato Тя визчинана и пазна. 10-3aIbIxNtJHo 3aHeceTe TeHJKePaTa nOd HnJaRae 3a npoΦnlaKTnKa B OToPn3uPAH OT TEFAL cepBn3, cIeK kato cTe y nOJI3BaII 10 roDnHn.Почистванe
BG 3a da yHKcnoHnpa npabnlo TeHxepaTa nOd HanaRaHe, cna3BaIte Te3n npenopbKn 3a nouchTbaHe n POpdpbKka CLei BcKa ynotpe6a. NotbMHaHeTo nn npackOnHnte, knto mOraT da ce nOBaT cnei Dblro H3IO3BaHe, He npedCTabIbRaT np6IeM. I3HOCBaHeTo Ha BbHsHOTo NOKpne (B 3aBnCmOcT OT MoeJa) BCJeDCTBnE Ha KOHTaKTa Ha KaNaKa Cbc CbDa e HopMaJHo. При Teнджерпс с He3aJenBaшо nOKpHTne(B 3aBnCmOcT OT MOneJa): JekITE ДpackOTиHи Ил ПpoTpRuBaHe, KOnTO MoraT Da ce NOBaT C BpeMeTo, He BLOwabat KaueCTBaTa Ha He3aJenBaшоTO nOKpHTne. ■Измьайт TeHжepаТ noД haЯгHe cIeД BCЯka yNOrpe6a C xlaДka BODa n npenapat 3a cbdoBe. ПраВеTe cbIoTOи C KOWHnUcaTAt*. He n3noJ3BaIte 6eInHa nn XIoPn npenapaTn. He harpaBaiTe cba, KOrato e npa3eH.3a nouICTBaHe Ha BbTpewHocTtHa Cbda OT HepbXJaema CTomaHa:
-13MnIe C DOMaKINHcKa TeI n npenapaT 3a cbIOBe. Ako no BbTpewHOCTTa Ha Cbda OT HepbXJaema CTOMaHa IMa OcBeTeHn yUacTbCn nn 6ene3HnKabN Cnei (OTnaIaHe Ha MNHepaN), NOuNCTeTe r c 6Jr OeT.3a n3MnBaHe Ha BbTpewHocTTa Ha anyMnHneBna CbD c He3aJeNbaIo nokpntne:
3a da ydbknte knbota ha ypeia, npenopbuaMe Bn da mneTe cbda Ha pbka. -Изміnte cToIIa BODa, npenapat 3a CbdoBe n MeKa r6a. He n3no3BaIte a6pa3nBn npenapaTu nn Ib6n. Ako cte 3aropnI TeHxepaTa, HanbIHeTe Cbda C TOnla B0da N ro OCTaBeTe da KncHe. CneT TOBa rO n3MnIe C npenapat 3a cbdoBe.3a nouICTBaHe Ha BbHsHaTa yact Ha Cbda:
-Изміnteсгьбаипpenapat3a cbldoBe. Mokete da MneTe cba ot HepbKdaema CTomaHa N KOUHncaTa B CbDOMnHaHaMaHa. He MInTe CbDa C He3aIenBaIo nO KpNTme (B 3 aBnCmOcT OT MoJeNa) B CbDOMNIAH MaunHa, Tb N KaTo npeapatnte Ha TaOneTKn CbDbpKaT MHOro arpeCN BHN IKO pOBu BHN 3a anyMHHra CbCTaBKn. Ipn HHTeH3NBHa ynoTpe6a Ha cBda c He3aJIenBaIo nOKpNTne (B 3aBUNMOCT OT MOdeJa) CBeTbT Ha NOKpNTNeTO MoKe JIeK O da ce npome Hn (No XbTTHe, NoBaHaNETHa).3a nouictbaHe Ha kanaKa:
N3mInTe Kanaka C Tb6a n npenapaT 3a cbdoBe. I3eTeKanaKaBepTnKaJHo, DaOTc TpaHTeOCTaHaJaBa Boda MeKdMy MeTaHNTe I MaTMcOBtE qACTn Ha Ka Naka.3a nouicTbaHe Ha yNtBTHHeHMeTo Ha KanaKa:
CneBcRAKO rOtBeHe NOUInCTBaIte yNlTBHeHHe(B) n rHe3DoTo My. 3a noctabraye Ha ynlttheHneTo BuxTe Our. 15. CtapaiTe ce ynlbTheHneTo da e npabuHNO noctabeHo NOB BCEKN eINH OT XJIe6Obete Ha KanaKa.3a nouuctbahe Ha pa60THnKlana(A):
CbaIe pa6oTHnKlaNaH(A)-Pnr.11. I3mNte pa6OTnKJIaHaH (A) noT Teuaa Boda-Φnr.16. -Провере Te Дали ce DBuxn CBO6OДHо: BuxTe n3o6paXeHneTo Hacpeu. Cnei KaTo cBaInte pa6OTnHa Klaanah (A), yNtBHeHneto (I) n TaMepa\* (F), moKTe da n3MnTe KaNaKa B CbDOMnJaHa MaunHa.  Hrkora hemnTepa6oTHna Klaan (A),ynbTheHneTo(I),taMepa\*F) nncbda Che3 aJeBauo NOKPNTMe B CbdomnHa MaunHa.3a nouICTBaHe Ha OTBopa 3a n3nyckaHe Ha napata (B), pa3noJoxeH Bbpxy KanaKa:
CbaIeKlaHa(A) -Our.1.1 ■PpOBepeTe Bn3yauHNo Hn DaHHeBHa CBeTInHa DaIi OTBOpbT 3a OTBeXJaHe Ha npaTa e OTnyuWeH N KpbTbAn nr.13.Pn HuykDa rO noUcTeTe c KneUka 3a 3b60nr.17 n Iro n3nlaKHeTe.3a noumtbaHe Ha npedna3HnKlanan (E):
-Почисте ча Та на педпаЗня Клanaн, pa3положена OT ВьтpeшнаТа CTрана Ha KaNaKa, KaTO ГИЗМиTe по Teчаanza BODa. ■PpOBepeTe ro daJIpa6OTn npaBnIHo, KaTo HaTncHeTe cnHIO cbUMaTa (C NOMOHTa Ha KneUka 3a yUn), KoATo Tp8Ba Da ce DnKx CBO6Odr.18 BuxTe naparpaΦa "3aIbJNKeIeHNn npOBepKn ppei BcraKa ynotpe6a"3a nouuctbahe Ha TaMepa\* (F):
-ИзпалзВайтейся суха Кьрпа. He n3noJ3BaIte pa3TbOpnteJI. - HnKora He MmIe TaMepa NOD TeuAa BOda NIN B CbDOMnHa MaunHa.PoDpBxKka
BG3a cMaHa Ha yPbTHeHneTo Ha TeHJKepaTa NOd HaNraHe:
CmeHnTe ynnbTHHeHneTo Ha TeHdxepaTa BeHbX rOuNsho nn aKo e HanykaHo. Bunarnn3non3BaIte opuRnHaHNo ynnbTHeHne Ha TEFAL, cboTBetCTBaO Ha BaHmraMdoen (BnXTe pa3dien "Akcecoapn"). 3a noctabraye Ha ynlttheHneTo BuxTe Our. 15. CtapaiTe ce ynlbTheHneTo da e npabuHNO noctabeHo NOB BCEKN eINH OT XJIe6Obete Ha KaNaka.3a npi6upaHe Ha TeHxpepaT a oN HnlaTaHe:
-06bpeKeKaNaKa BbpxCycbda. MexaHn3MbT 3a OTBapAne/3aTBapAne Ha TeHJxepaTa NOd HaNraHe He N3NCKBa cNeuHaHa NOdpbXka OCBeH NOUcTbaHeTo. 3aIbIxHtEnHO 3aHeceTe TeHJKepaTa NOd HaNraHe 3a IpoΦnlaKTnKa B Odo6pen OT TEFAkepBn3, cIeD KaTO cTe J non3BaHn 10 roDnHn.Akecoapn TEFAL
B TbproBckata Mpeka ce npednaT cneHnTe akcecoapn 3a BaWata TeHxepa noHaIraHe:| Акесоари | Каталожни Homepa | |
| Улътенье на Караза | 3/4/4,5/6 л: външени диаметър на улътеньею: 24 см | X1010008 |
| 5/7,5/9 л: външени диаметър на улътеньею: 27 см | X1010007 | |
| Кошниça за готveе на пара* | 3/4,5/4/6 л: за сбд с диаметър 22 см | 792185 |
| 5/7,5/9 л: за сбд с диаметър 24 см 792 | 654 | |
| Поставka на Кошниçaта за готveе на пара* (L) | 792691 | |
| Таймер* | X1060007 | |
XapakTepnCTnKn
Диаметър Ha ДьНОТо Ha TeHДжЕраТa - KaTANOЖи Homepa| Вмechи-Mост | Ø CBД Ø Дьно | Clipso Minut' Perfect / Easy | Clipso Minut' Duo couleur | Clipso Minut' Duo Gourmet | Матерnam На сбда |
| 3л 22 | 22 cm 15.5 | 5 -- Инокс | |||
| 3л 22 | 22 cm 18 cm - | P46605 | Инокс | ||
| 4л | 22 cm 1 | 4 cm - P466042 | - Альунни | ||
| 4,5л | 22 cm 1 | 5.5 cm P466206 -- Инокс | |||
| 5л | 24 cm 1 | 4 cm - P466051 | - Альунни | ||
| 5,2л | 24 cm | 20 cm | - | P46654 | Инокс |
| 7,5л | 24 cm 1 | 8 cm | P46248 -- Инокс | ||
| 9л | 24 cm 1 | 8 cm | P46249 -- Инокс | ||
| Set 5л/7,5л | 24 cm | 14 cm | P46353 | - | Инокс |
| 18 cm |
HopmatNBHa nHΦopMaζη:
MaKcImaJIHo pa6OTHO HaJIraHe: 65 kPa MaKcImaJIHo dOnyCTmO HaJIraHe: 120 kPaCbBmCTMn TOJIHHN n3TOHn
TA3 ENEKTPNCHECTBO (угунн котони) ENEKTPNUCTBO (JbHCTNnnnCTbkNOKepaMnHH XaNoREHHKOTNOH) EJEKTPNUCTBO (CTbkIokepaMnHn HNDyKUHOHHN KOTNOH) ENKTPNUCTBO (Peotahn)      Baata TeHxepa noHaIraHe e CbBMeCTMa C BCnUKN TOJIINHHN N3TOUHN, BKIOHTeJHO INyKUNOHNI. -Приеелктуческпг КOTLOHи 3нОЛЗВайтс KOTLOH c paВeH nIIN NO-MaЛьК dImaMeTbp OT TO3N Ha ДьНOTO Ha TeHДжЕрatura. - Pn n3noJ3BaHe Bbpy CtbKnOKepaMnueH Nnot ce yBepTe, ye DbHOTo Ha Cbda e YNCTO. - Pn n3no3BaHe Ha ra3 nnambKbT He Tp6Ba Da n3JIn3a n3BbH DbHOTO Ha Cbda. -При BCNUKN TOJIINHHN N3TOUHnCneTe TeHKePaTa NOI HAIraHe da 6bde do6pe ceHTpnpaHa.Tapaanця
BG -Пи спаЗВаHe Ha yka3aHnЯТа 3a yINotpe6a Ha TOBa pБKOBOdCTBO CbДbT OTHEpbЖdaema CTOMaHa Ha HOBa TeHJKepa nOd hAJIraHe TEFAL e c 10-roMSHA rapaHnry cpeu: - TBCRAKBN DeΦeKTH, CBBp3aHn C MeTaHHaTc TpyKtypa Ha Cbda, - BCaKaBa npexKdEeBpeMeHHa NOpeHa OCHOBnMaTeJl. - OctaHaJIte MaTePnAJIH Na CbДa, KaKTo N dpyrIte Yactu Ha TeHJxepaTa NOd HalaRaHe ca rapaHTnpaHn CpeUy BCnUKN npOn3BODCTBeHn DeΦeKTN mN DeΦeKTNa Ha MaTePnAJa, KATO rapaHcNoHHnT nepNOd Ce onpeDEna OT DeiCTBaUTO 3aKOHoDaTeJIcTB0 B CTPaHATA Ha 3aKynyBaHe, CHTaHO OT DaTata Ha 3aKynyBaHe. Moxete da ce Bb3non3BaTe OT Ta3n rapaHcna npi npedCTabAHe Ha kacob 60h nn PhakTypa c daTata Ha 3akynyBaHe.TapaHcIyTa He nokpmba:
-ДpackOTINHITe И obe3uBETBAHETO,Дьлжаши ce Ha CTapeeHTo - 3a CbIOBTe C He3aJenBaIo NOKPITne. -ДpackOTINHTe,ДьЖаиceHa KOHTaKtaHa KaNaKa Cbc Cbda C He3aIenBaIo NOKpTne. ■ПовpeДITE,прчИнEHи OT HeCnA3BaHe Ha BaXHn ПpeДna3Hn МepKn IIn HEBHIMaTeJIHa ynoTpe6a,a IMeHHO: - Ynap, napaHe, n3nOJI3BaHe BbB fypHa,... - Camo otopn3npaHnte ot TEFAL cepBn3n ca onpaBOMOeHn da BN npedocTabr Ta3n rapaHn. -06aTe ce Ha nocouehnHaKpaHa TOBa pkoBODCTBO Homep, 3a da noyuHTe apeca Ha ha-6nn3kn OToPn3npaH OT cepBn33aДьЖИТЕЛнHa МарКИрOBka
| Марк neuropа Мecтоноожени | |
| Търравская марka Ha калaka | |
| Голина на позивodстwo и пapтuida Каталожен Homeр на морега Мakсимално дочустmo налаяганe (PS) Мakсимално paботно налаяганe (PF) | Ha калaka |
| Вмост immocst | Ha вьнша т сда на дьното на сда |
| Посеньки adjoiningся на позивodпейя | Ha вьнша т сда на дьното на сда |
- YuctBaIte B ONa3BaHeTo Ha OKoHaTa cpea!
 ① Baшсят урет сбдьрka MножеCTBO ONОЛЗOTВOPИМ Илиpeцикліреми MaTeрпал. Ппета Te B nyHKT 3a BTOpuHn CypOBuHn, KbTeTo Toi ue 6bIe TpeTnpaH.TEFAL OTROBAPRA Na BaшптЕ
| Hemзправноу. | Прени. Прени. Прени. Прени. Прени. Прени. Прени. Прени. Прени. Прени. Прени. Прени. Прени. Прени. Прени. Прени. Прени. Прени. Прени. Прени. Прени. Прени. Прени. Прени. Прени. Прени Прени. Прени Прени Прени Прени Прени Прени Прени Прени Прени Прени Прени Прени Прени Прени Прени Прени Прени Прени Прени Прени Прени Прени Прени Прени Прени Прени |
| Ако не можete дa Затворite кала: Ако не можete дa Затворite кала: Ако не можete дa Затворite кала: Ако не можete дa Затворite кала: Ако не можete дa Затворite кала: Ако не можete дa Затворite кала: Ако не mokete дa Затворite кала: Ако не мokete d Затворite кала: Ако не мokete d Затворite кала: Ако не мokete d Затворite кала: Ако не mokete d Затворite кала: Ако не mokete d Затворite кала: Ако не mokete d Затворite кала: Ако не mokete d Затворite кала: Ако не mokete d Затворite кала: Ако не mokete d Затворite k н. Н. Н. N. N N N N N N N N N N N N N N N N N N N N N N N N N N N N N N N N N N N N N N N N N N N N N N N N N N N | Прени. Прени. Прени. Прени. Прени. Прени Прени Прени Прени Прени Прени Прени Прени Прени Прени Прени Прени Прени Прени Прени Прени Прени Прени Прени Прени Прени Прени Прени Прени |
| Hизправною: | Прених. |
| Ако излида пара okолу калaka и праздамотцфт e в долно поожения, п探测ete дали: | Далу калakьт e добpe 3atbopen. Далу улльтэнcopeTo Ha Kалaka e npabnilho постaveno. Далу улльтэнcopeTo e B дobpo cьсторнe, кato р� нужда Г смени. Далу калakьt, улльтэнcopeTo и Гешито му в Калakka ca чicitny. Далу рьбьт на сьда e здраВ |
| Ако не мочete дa otворITE калaka: | Провете дали подамотцфт(D) e в долно ложения. В потувен сныаиизучete налганeto: сипete сту- дени вoda в мьката и поалote дьното на телдж; пая по лалоге, докато подамотцфт сизе н долно поожения. Нikora не подамотексвito и за e орашу п по подамотцфт(D). Завыртete пботня Кала(A)do поожения. |
| Ако подуktite не са с Bavарень ил akaо сиЗ- rogenу, поворete: | В体现在 на говен. Мошостта на толимня ИЗточник. Далу пботня Калан e на повilно поожения (A). Колчесъно т教职工. |
| Ако подуktite са излорейь в телджерatable по наляганe: | Нakисе сьда за иЗвесно Вөрeme, поду до Гиз- мене. Нikora не изллваiteSEEина илхорни прени- рати. |
| При за征ствае на една OT системп'te 3a 6 bezonaachaoust: | Излоче ТОПЛINНЯ ИЗTOUнIK. Оставе телджерatable по налгаге да с охлadiи бez дд я местпe. Изчakiite подамотцфт дд сизe В долно поожения и тога в OTворе. Провете и почесе пботня Калан (A), OTвора зду пьчSCан e на рада, подамотцду Калан и улль- нени.To. Уberete ce, че спазени на пьлне. Ако поблөмьт подамотцлжава, заесete телджерatura 3a прфлakтika в OTоризиран ot TEFAL сөрвiz. |
| Ако заелжитe следи OT okonsлаянe: | Излочьаго на Нерьждама CTOMаС CBISOKI Качесън ПOKаЗа teлди Н мoke дд порочи на палвata на okистявае в Екст permи сизч. Ако Замлжитe следи OT okистявае, OTстдане Г с заразимьнa Гьба, поду наизллвае OTHOBO Тeнджерatable по на_OKлганe. |
TAbJIuIa 3A IPIrOTBЯH E H XPAHnTE
3eIeHcyK
| 3EJIENHUYU (ПЕСHI) ПAPA Сьставka в КОшницата за задушаве на пара и 75 ml ВODа на дыното на тendжерatura по налаянe | ||
| Артышok, 2 цelin, 600 g всяк (notanянe) | 30 до 35 минутп | |
| Асpenжи, бени (napa) | 5 до 6 минутп | |
| Бриюкелско зelen (napa) | 10 до 12 минутп | |
| Градинска жлъчka, срелян наноловина (900 g) (napa) | 4 до 16 минутп | |
| Грах (napa) | 6 до 8 минутп | |
| Гъби, наразани 800 g (notanянe) | 4 до 5 минутп | |
| Див корьр, наразани на Ивици (600 g) (napa) | 6 до 9 минутп | |
| Зelen, наразани и зelenу, 500 g (notanянe) | 5 до 6 минутп | |
| Камби, наразани наноловина (550 g) (napa) | 14 до 16 минутп | |
| Картофи, наразани наноловина (950 g) (napa) | 20 до 25 минутп (cnope徳 размера) | |
| Леса, зelenа 250 g (notanянe) | 14 до 16 минутп | |
| Манголд, наразани (2 cm) 700 g (napa) | 15 до 17 минутп | |
| Маринован лук (napa) | 7 до 8 минутп | |
| Моркови, наразани на кръгли pezehen (3 mm) 600 g (napa) | 17 до 19 минутп | |
| Патладжани, обелени и наразани (3mm), 850 g (napa) | 10 до 12 минутп | |
| Праз, цел и сял 650 g (napa) | 9 до 11 минутп | |
| Ретички, наразани на кубоча (500 g) (napa) | 14 до 16 минутп | |
| Розчки божлons 600 g (napa) | 9 до 11 минутп | |
| Розчки karfoл 600 g (napa) | 10 до 12 минутп | |
| Спанak (napa) | 3 до 4 минутп | |
| Сухен и радцени на дve грах 250 g (notanянe) | 18 до 20 минутп | |
| Тиква, наразани на пароча (3 до 5 cm) 600 g (napa) | 13 до 18 минутп | |
| Тиквichiки на кръгли pezehen (3 mm) 600 g (napa) | 12 до 15 минутп | |
| Тьньк зелен phacun (600 g) (napa) | 10 до 12 минутп | |
| Фасул phaxkonole, сухen 250 g (notanянe) | 35 до 40 минутп | |
| Цвекло, черевно, наразани на чевыртунки (notanянe) | 20 до 25 минутп (cnope徳 размера) | |
| Цени, наразани (notanянe) 600 g | 7 до 9 минутп |
| ПOTAPЯНЕ БeЗ кошницата. MAX 1 | КOLINЧECTBO ВОДА | КOLINЧECTBO ОРИЗ | ВРЕМЕ 3A ПИ- ГOTВЯНЕ | |
| 2 ЛIЦА 400 ml/2 чаш 150 g/1 чаша | +7 до 8 мInHyТи4 ЛИЦА | |||
| 500 ml/2.5 чаш | 250 g/2 чаш | |||
| 6 ЛIЦА 700 ml/3.5 чаш | 375 g/3 чаш | |||
Meco/pn6a
| ПЕСИЗ 3AMPA3EHИ | ||
| Агнeshки джолан: 2 (0.95 kg) 40 до 45 минутп | 1 ча и 05 минутп до 1 ча и 15 минутп | |
| Брочери: 2 (1.3 kg) 23 до 25 минутп 40 до 45 минутп | ||
| Заек (1.5 kg на парчета) 6 до 9 минутп 20 до | 23 минутп | |
| Патиza (1.8 kg) 45 до 47 минутп 50 до 55 минутп | ||
| Пиile (1.35 kg) 23 до 25 минутп 1 ча до | 1 ча и 10 минутп | |
| Пьдпдьк: 4 | 9 до 10 минутп | 18 до 20 минутп |
| Свинска пileшka (0.8 kg, 8-10 cm диматур) | 30 до 35 минутп | 1 ча и 05 минутп до 1 ча и 15 минутп |
| Свинско сиile миньон: 2 парчета от по 350 g | 13 до 15 минутп | 26 до 29 минутп |
| Стек о риба тон: 4 (0.7 kg) | 5 до 6 минутп | 7 до 9 минутп |
| Стек о сьомра: 4 (0.8 kg) | 5 до 6 минутп | 7 до 8 минутп |
| Телешка пileшka (0.8 kg, 5-7 cm диматур) | 17 до 19 минутп | 35 до 40 минутп |
| Телешки рунадини: 4 | 10 до 12 минутп | x |
| Телешко пechени (1 kg, 8-11 cm диматур) | 30 до 35 минутп | 45 до 50 минутп |
| Телешко сиile миньон: 0.7 kg | 17 до 21 минутп | 38 до 38 минутп |
| Фиile оtmорскii давол (1 kg) на парчета от no 75 g | 5 до 6 минутп | 7 до 8 минутп |
VAŽNE MJERE OPREZA
Pije upotrebe vaseg ekspres lonca, odvojite vrijeme da procitate sve upute i uvijek koristite "Uputstvo za upotrebu". Posljedica nepravilnog korištenja mogu biti oštećenja proizvoda. Radi vase sigurnosti, ovaj aparat odgovara primjenjivim normama i propisima: - Direktiva o opremi pod pritiskom - Materijali u kontaktu sa namirnicama - Zivotna sredina| OBAVEZNE KONTROLE PRIJE SVAKE UPOTREBE | PROVJERITE • Svaki put vizuelno je li cjevčica za odvod pare začepljena - sl. 13. • je li kuglica sigurnosnog ventilaPokretna - sl. 18. • je li gumicaPoklopca namješena ispod svakog urezaPoklopca - sl. 15. • jesu li drške na posudi ispravno namješene. Drške posude su sigurnosni dijelovi. Nikada ih nemojte samostalno mistrnjati. |
| UVIJEK POSTUJTE SLJEDECE KOLICINE PUNJENJA | • Ne koristite vaš ekspres lonac bez tečnosti, to bi, naime, prouzrokovalo velika oštećenja. Osigurajte dovoljnu količinu tečnosti tokom kuhanja. • Minimalno 25 cl - sl. 4. • Maksimalno 2/3 visine lonca, oznaka MAX 2 - sl. 5. • Tokom kuhanja na pari, namirnice koje se nalaze u parnoj košari ne smiju biti u dodiru s vodom - sl. 6 i 7. • Maksimalno 1/3 (MAX 1) za kašaste namirnice koje se šire i/ili koje se pjene tokom kuhanja, kao što su riža, mahunarke, sušeno povrće, kompoti, bundeve, tikvice, mrkva, krompiri, riblji fileti, itd. • Namirnice stavljene u parnu košaru ne smiju prelaziti nivo MAX 2 posude. |
| PRIJE I TOKOM KUHANJA | • Ne pušajte djecu u blizinu ekspres lonca tokom upotrebe • Vaš ekspres lonac kuha pod pritiskom. Neprimjerena upotrebaedo prouzrokovati opekotine zbog pare. Provjerite da li je ekspres lonac adekvatno zativoren prije upotrebe. (Vidi odjeljak "Zatvaranje"). • Uobićajeno je da ventil neprestano pišti tokom kuhanja. Ako iz lonca ne izlazi dovoljno pare, napravite dekompresi proizvoda i provjerite ima li u posudi dovoljno tečnosti te je li cjevacica za odvod pare prohodna. Ako para još uvijek ne izlazi nakon tih provjera, malo pojačajte izvor toplote. • Nemojte kuhati hranu kod koje postoji opasnost od začepljenja sigurnosnih elemenata: - brusnice - ječam - zobene pahuljice - grašak - rezanci, makaroni, špagete - rabarbara - ribizle • Nikada ne kuhajte mliječna jela u ekspres loncu. • U slučaju upotrebe ekspres lonca s posudom od nehrdăjućeg Čelika, ne koristite krupnu sol, već dodajte sitnu sol na kraju kuhanja. Izbijećić eçete pojavu tačkica koje mogu promijeniti dno ekspres lonca. • Ne koristite vaš ekspres lonac za prženje na ulju pod pritiskom. • Ne koristite vaš ekspres lonac ni za koju drugu namjeru osim one za koju je predvižen. • Ne stavljaje vaš ekspres lonac u zagrijanu pećnicu. • U ekspres lonacnikad nemojte stavljati aluminijski foliju. • U ekspres lonacnikad nemojte stavljati plastićnul foliju. • Para alkohola je zapaljiva. Pustite da vrije približno 2 minut prije nego što namjestitePoklopac. Potreban je nadzor prilikom kuhanja jela sa alkoholom. • Koristite kompatibilan(e) izvor(e) toplote, koji je/su u sklad sa uputstvima za upotrebu |
NAKON KUHANJA...
- Za modele s neprijanjajućom oblogom: ne upotrebljavaje metlice ili metalni kuhnjski pribor ili kuhnjski pribor oštrih rubova. Ne cijedite svoj kuhnjski pribor laganim udaranjem o rub proizvoda, jer to要考虑 oštetiti proizvod i uzrokovati curenja. Postepeno okrenite radni ventil (A) odabiruci prema zeiji brzinu dekompresije takdo da se zaustavite na slikovnoj oznaci 10. Ako tokom ispustanja pare primijetite nepravilno prskanje, postavite radni ventil (A) u položaj kuhanja u režimu "Autocuiseur" (Ekspres lonac), a nakon toga izvršite brzu dekompresiju pod hladnom vodom. - 14. Ako se sigurnosni štapić (D) ne spušta, stavite ekspres Ionac pod hladnu vodu iz slavine - sl. 14. Nikada nemojte dirati sigurnosni stapić. - Prilikom kuhanja mesa koje sadrži kožu (npr. govedi jezik...), koja se pod pritiskom moze napuhati, ne probadajte meso sve dok je koža napuhana; moglo bi vas opariti. Izbodite meso prije kuhanja. - Za kasaste namirnice koje se sire ili koje se pjene tokom kuhanja, kao sto su riza, mahunarke, sušeno povrće, kompoti, bundeve, tikvice, mrkve, krompiri, riblj fileti, itd. ostavite ekspres lonac nekoliko minuta da se ohladi, a potom ga ohladite pod hladnom vodom. Ekspres lonac lagano i ujednačeno protresite nakon sto provjerite da li se sigurnosni štapić spustio kako biste sprijecili prskanje mjehurica pare koji bi vas mogli opeci. To je posebno važno pri brzom ispustanje pare ili nakon hladenja pod hladnom vodom. - Vaš ekspres Ionac odlažite vrlo pažljivo. Ne dodirujte vruče povrsine. Koristite drške i tipke. Po potrebi upotrijebite rukavice. - Kod pripremanja supra, naša je preporuka da izvršite brzu dekompresiju pod hladnom vodom (vidi odjeljak „Kraj kuhanja u režimu 'Autocuiseur' (Ekspres Ionac)"). - Pije nego što otvorite ekspres lonac, provjerite da li je ventil na položaju "dekompresija". Sigurnosni štapić (D) bi trebao biti u donjem položaju. Nikad ne otvarajte ekspres Ionac silom. Provjerite da nema pritiska u unutrašnjosti posude. Sigurnosni šapić (D) bi trebao biti u donjem položaju. (Vidi odjeljak "Sigurnost".)| ODRŽAVANJE | Ako primijetite da je neki dio vašeg ekspres lonca slomljeni napuknut, ni u kojem ga slučaju nemojte pokušavati otvoriti akо je zativoren. Ostavite ga da se potpuno ohlad prije pomicanja te ga više nemojte koristiti i odnesite ga u ovlăsteni servisni centar kompanije TEFAL. Ne vršite intervencije na sigurnosnom sistemu ni na koji način osim preporučenog načina Čišćenja i odžavanja. Koristite samo originalne TEFAL dijelove koji odgovaraju vašem modelu. Posebno koristite posudu iPoklopac kompanije TEFAL. Ne spremajte kisele ili slane namirnice u vašem ekspres loncu prije ili poslje kuhanja, jer na taj način možete oštetiti posudu. Svoj ekspres lonac očistite i isperite odmah nakon korišenja. U mašini za pranje suva nikad nemojte prati radni ventil (A), gumicu (I), indicator vremena* (F), ni posudu s neprijjanjajućim slojem. Indikator vremena* (F) nikada nemojte stavljati pod vodu. Nikad ne koristite sredstva zadezinfekcjju ili proizvode na bazi hlora, jer mogu oštetiti nehrdăjuci Čelik. Ne ostavljajePoklopac potopljen u vodi. Gumicu@mijenjaje Jednom godišnje ili odmah akо ima oštećenje. Poslje 10 godina upotrebe, obavezno morate odnjeti lonac na pregledu ovlašteni servisni centar kompanije TEFAL. Pri Čuvanju ekspres lonca:Poklopac stavite na obrutu stranu na posudu kako se gumicaPoklopca ne bi previštrošila. |
SACUVAJTE OVA UPUTSTVA
K部件 (vidi Opis proizvoda)
A. Radni ventil B. Cjevcica za odvod pare C. Oznaka za poziconiranje ventila D. Sigurnosni stapić (vidi odjeljak "Sigurnost") E. Sigurnosni ventil F. Indikator vremena* G. DrskaPoklopca H. Poklopac I. Gumica J. Parna košara* K./ L. Tronožni stalak* M. Drska posude N. Oznake maksimalnog O. PosudaObavezne kontrole prise svake upotrebe
Provjera radnog ventila
 - Pobrinite se da otvor za odvod na radnom ventilu-nine začepljen (vidi odjeljak "Uklanjanje i postavljanje radnog ventila").Provjerite sigurnosni ventil
 - Provjerite je li kuglica sigurnosnog ventilaPokretna (koristite stapić).Upotreba
 Kuhanje u režimu "Ekspres Ionac"  Kuhanje u režimu "Faitout"* (Lonac)  DekompresijaOtvaranje
- Nagnite dršku iz horizontalnog položaja u vertikalni položaj - sl. 3 Poklopac se okrece. - PodignitePoklopac. - U slučaju poteškoća s otvaranjem proizvoda: stavite gumicu pod vodu pa je stavite natrag na lonac bez brisanja - sl. 19 i pazite da je dobro postavite u urezePoklopa - sl. 15.Zatvaranje
Pazite da drskaPoklopca bude u vertikalnom položaju. - Poklopac stavite na posudu kako je prikazano na - sl. 1 tako da plastici ni dio poravnate s drskama lonca. - Preklopite drskuPoklopca iz vertikalnog polożaja u horizontalni polożaj -sl.2 - Poklopac se okreceAko ne možete zatvoritiPoklopac:
- Provjerite je li gumica ispravno postavljena iPoklopac pravilno namjesten. - U slučaju poteškoća sa zatvaranjem proizvoda: stavite gumicu pod vodu pa je stavite natrag na lonac bez brisanja - sl. 19 i pazite da je dobro postavite u urezePoklopca - sl. 15.Prva upotreba
- Za modele s neprijanjajućim slojem: operite i jestivim uljem lagano nauljite cijelu povrsinu unutrasnjeg sloja.Ovisno o modelu:
Stavite drsku lonca\* (L) i parnu kojaru\* (J) na dno posude. - Pričvrstite trONOžni stalak* (K) na parnu košaru* (J), zatim pomaknite set na dno posude. - Napunite 2/3 (MAX 2) posude (O) vodom - sl. 5. Zatvorite ekspres Ionac. - Poravnajte slikovnu oznaku radnog ventila (A) s oznakom položaja ventila (C) - sl. 9.   Stavite svoj ekspres lonac na izvor toplate te ga maksimalno pojačajte. - Kad para počne izlaziti kroz ventil, smanjite jačinu izvora toplote i podesite na 20 min. Kada protekne 20 min, ugase izvor toplote. - Poravnajte slikovnu oznaku radnog ventila (A) s oznakom položaja ventila (C). - Kada se sigurnosni štapić (D) ponovno spusti, vaš ekspres lonac višeicates不同程度 pod pritiskom. - Otvorite ekspres lonac - sl. 3. Ocistite ga sa deterdzentom.Minimalna i maksimalna napunjenost
Minimalno 25 cl (2 case)-sl.4. - Maksimalno 2/3 visine posude, oznaka MAX 2 - sl. 5. - Ne koristite krupnu sol u vašem ekspres loncu, već dodajte sitnu sol na kraju kuhanja.Za neke vrste hrane:
Za kasaste namirnice koje se sire i/ili koje se pjene tokom kuhanja, kao sto su riza, mahunarke, sušeno povrće, kompoti, bundeve, tikvice, mrkve, krompiri, riblj fileti, itd nemojte napuniti ekspres lonac iznad 1/3 (MAX 1) kapaciteta. Ostavite ekspres lonac nekoliko minuta da se ohladi, a potom ga ohladite pod hladnom vodom. Ekspres lonac lagano i ujectedeno protresite nakon sto provjerite da li se sigurnosni štapić spustio kako biste  sprijecili prskanje mjehurića pare koji bi vas mogli opeci. To je posebno važnoprì brzom ispustanje pare ili nakon hlačenja pod hladnom vodom. Kodpripremanja supra, naša je preporuka da izvršite brzu dekompresiju pod hladnom vodom (vidi odjeljak „Kraj kuhanja u režimu 'Autocuiseur' (Ekspreslonac)").Upotreba parne košare*
- Sipajte 75 cl vode na dno posude (O).Ovisno o modelu:
- Stavite dršku Ionca* (L) i parnu kosaru* (J) na dno posude. - Pričvrstite tronožni stalak* (K) na parnu kosaru* (J), a zatim pomaknite set na dno posude.    - Tokom kuhanja na pari, namirnice koje se nalaze u parnoj kosari ne smiju biti u dodiru s vodom - sl. 6 i 7. Namirnice st avljene u parnu kosaru* ne smiju prelaziti nivo MAX 2 posude.Skidanje i stavljanje radnog ventila (A)
Za ciścenje radnog ventilà (A):
- Poravnajte Žl Jeb s oznakom položaja ventila (C) i pritisnite prsten rad nog ventila (A). - Izvucite ga - sl. 11.Za podesavanje radnog ventila (A):
- Namjestite radni ventil (A) - sl. 8 tako da je tacka radnog ventila (A) poravnata s oznakom polożaja (C) - vidi suprotnu stranu.  Gurnite radni ventil (A) kako bi se uklopio u štapić za odvod pare. - Pritisnite piktograme radnog ventila (A) pa ga okrenite. Indikator vremena*
Indikator vremena nikada ne koristite u režimu rada "Faitout" (Lonac).
Indikator vremena osmišljen je da vam pomogne u postizanju Željenih rezultata kuhanja, što vam omogucava bolju prerilagodbu potrošnje energije. On automatski odbrojava vrijeme kuhanja do postizanja razine temperature koja odgovara kuhanju u režimu "Autocuiseur" (Ekspres Ionac)Indikator vremena mora pravilno uleci na ekspres lonac kako bi Funktionirao
Uobičajeno je da radni ventil (A) neprestano pišti tokom kuhanja. Ako nema dovoljno pare, lagano pojacaje izvor toplote, a u suprotnom slučaju smanjite izvor toplote. 1 Da biste uključili indicator vremena: pritisnite tipku. 2 Programirajte vrijeme kuhanja (u minutama). - Ako ste unijeli pogresno vrijeme kuhanja, pricekajte 4 sekunde da plamen prestane treperiti, a zatim dugo drzite pritisnitu tipku za resetirovanje. 3 Jačinu izvora toplote postavite na maksimalno. 4 Kad vaš ekspres Ionac dosegne temperaturu kuhanja, indicator vremena zazvoni i počinje odbrojavanje vremena (brojevi trepere). Smanjite jačinu izvora toplote. 5 Na kraju vremena kuhanja oglasi se indicator vremena. Da biste zaustavili alarm indicatora vremena pritisnite tipku. Ugasite izvor toplote.      Dugi pritisak tipke resetuju i isključuje indicator vremena.Postavljanje i skidanje indicatora vremena*
Da bistepostaviliindikatorvremena(F)-sl.12,najprije umetnite straznji dio na modul,a zatim ga pritisnite da bistezakacli drugu stranu. - Da biste skinuli indicator vremena (F), podignite ga i izvadite. Zamjena baterije indicatora vremena*
Baterija za indicator vremena je dugmasta baterija tipa CR2032. - Ako se pojavim symbol nakema nikakvog znaka, promijenite baterije. Zivotni vijek baterije ovisi o ucestalosti upotrebe indicatora vremena. Baterija indicatora vremena sadrži dimetoksietan, br. CAS 110-71-4. Usklaëna je sa evropskim propisima. Za vašu bezbjednosti i ocuvanjeŽivotne sredine: ne otvarajte bateriju, ne izlažite je visokim temperaturama, nemojte je odlagati zajedno sa kućnim oppadom,argo je vratite u centar previden za upotrijebljene baterije. Nepunjive baterije se ne smiju puniti. - Ne smiju se kombinirati razlicite vrste novih i upotrijebljenih baterija. Baterije je potrebno umetnuti u skladu s ispravnim polaritetom. - Isprażnjene baterije potrebno je izvaditi iz aparata i sigurno zbrinuti u OTPad. - Ako cete proizvod odlagati i ako ga necete upotrebljavati duze vrijeme, baterije je potrebno izvaditi iz proizvoda. - Prikljuci baterije ne smiju se kratko spajati. Postavite ga ravno na radnu povrsinu. - Da biste bateriju uklonili iz indicatora vremena, otvoritePoklopac baterije uz pomoć kovanice (pogledajte sliku ispod). Zamijenite bateriju. Gumicu vratite na njeno mjesto u kuciSTE. - Postavite polukrug Oklopca baterije nasuprot polukruga dindikatora vremena. - Pažljivo okrenitePoklopac baterije laganim pritiskom, poravnavajući polukrug klopca baterije s krugom indicatora vremena. - Postavite ga ravno na radnu povrsinu takdo ja jePoklopac u horizontalnom položaju. - Nemojte pokušavati silom zatvoritiPoklopac baterije. Nemojte ic izvan granicnika. - U slučaju gubitka možete nabaviti drugi indicator vremena u našim ovlastenim servisnim centrima kompanije TEFAL.     Indikator vremena* nikad nemojte staviti u vodu ili mašinu za pranje Juda. Indikator vremena nikada ne koristite u režimu rada "Faitout" (Lonac).Pijekuhanja
- Prije svake upotrebe skinite radni ventil (A) - sl. 11 i vizuelno provjerite na dnevnom svjetlu da cjevcica za odvod pare (B) nods zacepljena - sl. 13. - Provjerite je li sigurnosni ventil mobilan (vidi odjeljak "Čišćenje" i "Obavezne kontrole prije svake upotrebe") - sl. 18. Stavite sastojke i tekuci nu. Zatvorite ekspres Ionac - sl. 2 - U slučaju poteškoća sa zatvaranjem proizvoda: stavite gumicu pod vodu pa je stavite natrag na lonac bez brisanja - sl. 19 i pazite da je dobro postavite u urezePoklopa - sl. 15. - Namješanje radnog ventila (A) - sl. 8. Kuhanje u režimu
"Autocuiseur" (Ekspres Ionac)
- Radni ventil (A) okrenite na poziciju za kuhanje u režimu "Autocuiseur" (Ekspres Ionac) 9. Pazite da je vaš Ionac pravilno zatvoren prise upotrebe - sl. 3 Stavite svoj ekspres lonac na izvor toplote te ga maksimalno pojačajte. - Za modele opremljene indicatorom vremena : podesite vrijeme kuhanja navedeno u receptu (vidi odjeljak "Upotreba indicatora vremena"). - Klikajuci zvukovi i oblačići pare koje ispuste sigurnosni štapić su normalni, oni omogucavaju odvojenje zraka prije kuhanja.Tokom kuhanja u režimu "Autocuiseur" (Ekspres Ionac)
- Kada radni ventil (A) počne kontinuirano ispustati paru i emitirati ravnomjeran zvuk (PŠŠŠST), smanjite jacinu izvora toplote. - Podesite vrijeme kuhanja da bude kako je navedeno u receptu. - Uobicajeno je da ventil neprestano pišti tokom kuhanja. Ako nema dovoljno pare, lagano pojacaje izvor toplote, a u suprotnom slučaju ga smanjite.Kuhanje u režimu "Autocuiseur" (Ekspres Ionac)
Za ispustanje pare:
- Kada se izvor toplate ugasi, imate dvije mogucnosti: - Postupna dekompressija: postupno okrenite radni ventil (A) tako da se zaustavite na slikovnoj oznaci sl. 10.  - Brza dekompressija pod hladnom vodom: ulijte hladnu vodu u sudoper i u vodu uronite dno ekspres lonca kako bi se sigurnosni štapić spustio - sl. 14. Kada se sigurnosni štapić (D) ponovno spusti, vaš ekspres lonac višeicates je pod pritiskom. Radni ventil (A) okrenite na poziciju  1.korak  2.korak - Możete otvoriti ekspres lonac - sl. 3. - U slučaju poteškoća s otvaranjem proizvoda: stavite gumicu pod vodu pa je stavite natrag na lonac bez brisanja - sl. 19 i pazite da je dobro postavite u urezePoklopa - sl. 15. Ako tokom ispustanja pare primijetite nepravilno prskanje, postavite radni ventil (A) u položaj kuhanja u režimu "Autocuiseur" (Ekspres Ionac) a nakon toga izvršite brzu dekompresiju u hladnoj vodi. Ako se sigurnosni štapić (D) ne spušta, ulijte hladnu vodu u sudoper i u vodu uronite dno ekspres lonca kako bi se sigurnosni štapić spustio - sl. 14.Nikada nemojte dirati sigurnosni štapić.
- Za kašaste namirnice koje se šire i/ili koje se pjene tokom kuhanja, kao što su riza, mahunarke, sušeno povrće, kompoti, bundeve, tikvice, mrkve, krompiri, riblj fileti, itd., nemojte napuniti ekspres lonac iznad 1/3 (MAX 1) kapaciteta. Ostavite ekspres lonac nekoliko minuta da se ohladi, a potom ga ohladite pod hladnom vodom. Ekspres lonac lagano i u Jednačeno protresite nakon što provjerite da li se sigurnosni štapić spustio kako biste sprijecili prskanje mjahurica pare koji bi vas mogli opeci. To je posebno važno pri brzom ispustanje pare ili nakon hladenja pod hladnom vodom. Kod pripremanja supra, naša je preparuka da izvršite brzu dekompresiju pod hladnom vodom (vidi odjeljak „Kraj kuhanja u režimu 'Autocuiseur' (Ekspres lonac)"). Kuhanje u režimu "Faitout"* (Lonac)
- Radni ventil (A) okrenite na poziciju za kuhanje u režimu "Faitout" (Lonac) Za tu svrhu snažno ga pomaknite iza ureza u položaj za dekompresiju. - Provjerite da li je ekspres lonac adekvatno zativoren - sl. 2 prise upotrebe. - Stavite svoj ekspres Ionac na izvor toplote te gamaksimalno smanjite. - Podesite vrijeme kuhanja da bude kako je navedeno u receptu. - U režimu "Faitout" (Lonac) możete otvoriti svoj ekspres lonac da biste promiješali jelo, nadgledali kuhanje ili dodali sastojke. - U slučaju poteškoća s otvaranjem proizvoda: stavite gunicu pod vodu pa je stavite natrag na lonac bez brisanja - sl. 19 i pazite da je dobro postavite u urezePoklopa - sl. 15. - Ako je izvor toplote prejak, moze se dogoditi da se ekspres Ionac zakljuca (sigurnosni stapic (D) se podiže i blokira otvaranje), drskaPoklopca visije Operator bilna ili ne otvara Ionac. U tom slucaju smanjite ili iskljucite izvor toplote. U slucaju elektricnog stednjaka, skinite ekspres Ionac s izvora toplote. - Za modele s neprijanjajućom oblogom: ne upotrebljavajte metlice ili metalni ili oštar kuhinjski pribor. Nemojte otresati pribor o rub posude, jer postoji opasnost od ostećenja i kapanja. - Nikada nemojte zagrijavati masnoću do ugljenisanja. Pare od kuhanja mogu biti opasne zaŽivotinje s osjetljivim respiratornim systemom, kao što su ptice. Vlasnici ptica trebaju ih držati dalje od kuhinje.Sigurnost
Aparat ima nekoliko sigurnosnih problema:- Sigurnost pri zatvaranju:
- AkoPoklopac nije dobro postavljen ili akost zaboravili da preklopite drske Poklopca, para ce curiti na sigurnosnom stapiću (D) ekspresnog lonca, te se nece moci stvoriti pritisak.- Sigurnost pri otvaranju:
- Ako je vaš ekspres lonac bez pritiska, sigurnosni štapić (D) nalazi se u podignutom položaju, a drškePoklopca za otvaranje/zatvaranje (G) ne bi se trebale dirati. - Nikad ne otvarajte ekspres lonac silom. - Molimo nemojte dirati sigurnosni stapic (D). - Osigurajte da je unutrašnji pritisak pao takda provjerite da je sigurnost štapić (D) u donjem položaju. - Drške posude su sigurnosni rijelovi. Nikada ih nemojte samostalno mistrjenati. Nikad ne koristite druge modele drški. - Ako ste magnuli dršku za otvaranje/zatvaranje (G) u vertikalan položaj dok je ekspres lonac još uvijek bio pod pritiskom, necete ga moci otvoriti. Ova je funkcjija dodatna sigurnost. Vratite drškuPoklopca u horizontalni položaj i Čekajte da se sigurnost šapić (D)vrati u donji položaj. Dva sredstva za osiguranje od pretjeranog pritiska: - Prvo sredstvo: sigurnosni ventil (E) otpuša pritisak - sl. 20 - Drugo sredstvo: gumica propusta paru naPoklopcu -sl.20.Ako je aktiviran jegan od sigurnosnihystema:
- Ugasite izvor toplate. - Ostavite Ionac da se potpuno ohladi. - Otvorite. - Provjerite i očistite radni ventil (A), cjevacicu za odvod pare (B), sigurnosni ventil (E) i gumicu (I) - sl. 16 - 17- 18. Vidi odjeljke "Čišćenje" i "Obavezne kontrole prije svake upotrebe". - Ako i nakon tih provjera i cisćenja vaš proizvod bude i dalje ispustao paru ili ne bude radio, povjerite ga ovlastenom servisnom centru kompanije TEFAL.Preporuke za upotrebu
1 - Pri izlasku iz radnog ventila, para je vrlo vruca. Pazite na mlaz pare. 2 - Kada se sigurnosni štapić podigne, ne možete otvoriti ekspres lonac. 3 - Kao i kod svakog drugog aparata za kuhanje, potreban je nadzor prilikom korištenja, pogotovo ako vaš ekspres lonac koristite u blizini djece. 4 - Kad pomjerate lonac, uhvatite ga za obje drške. 5 - Ne ostavljate hranu u ekspres loncu. Ekspres lonac nikada ne prenosite držeci ga za drške. 6 - Nikad ne koristite sredstva zadezinfekciju ili proizvode na bazi hlora, jer mogu ošetiti nehrdajuciČelik. 7 - Ne ostavlajtePoklopac potopljenu vodi. 8 - Gumicu mistrajte jegnne ili ako ima pukotinu. 9 - Lonac se cisti samo kad je hladan i prazan. 10 - Poslje 10 godina upotrebe, obavezno morate odnjeti lonac na pregled u ovlasteni servisni centar kompanije TEFAL.Cisćenje
Za dobro funkcioniranje vaseg ekspres lonca, dužni ste držati se ovih preparuka za Čišćenje i održavanje nakon svake upotrebe. Tamne milje i ogrebotine koje se mogu pojaiti nakondugotrajne upotrebe ne smetajuspravnom Funktioniranju. Trošenje vanjskog sloja (ovisno o modelu) koji se nalazi na kontaktuPoklopca iposude je rnormalno. Za ekspres lance s neprij anjajućim slojem (ovisno o modelu): tokom upotrebe mogu se javiti lagane ogrebotine i abrazije, ali one znatno ne utiću na performanse neprijanjajućeg sloja. - Nakon svake upotrebe operite ekspres lonac vodom i sredstvom za pranje suta. Isto uradite i sa kosarom*. - Ne koristite izbjeljivač ili hlorirane proizvode. - Ne zagrijavajte Ionac kada je prazan.Cisćenje unutrażnjosti posude od nehrdajucęg Čelika:
- Operite spužvom za ribanje i proizvodom za pranje posuă. - Ukoliko u unutrasnjosti posude od nehrdajućeg Čelika primijetite sedefasti odsjaj ili bijele naslage (mineralne naslage), očistite je bijelim sircétom.Za ciścenje alumnijske posude s neprijanjajućim slojem:
Da bi produzili trajanje proizvoda, preporucujemo ručno pranje. Isperite toplom vodom, deterdzentom i mekanom spužvom. - Nemojte koristiti prasak za ribanje ili abrazivne spužvice. - Ako vam je hrana zagorjela, napunite posudu toplom vodom i ostavite da se namače. Zatim je očistite sa deterdžentom.Cisćenje vanjske povrsine posude:
- Operite spužvom za ribanje i sredstvom za pranje sut. Lonac od nehrdajuceg celika i kosaru mozete prati u masini za pranje posuda. Posudu s neprijanjajućim slojem (ovisno o modelu) nemojte stavljati u masinu za pranje sut, jer deterdženti u tabletama sadrže vrlo agresivne i korozivne aluminjske Čestice. Intenziv na upotreba posude s neprijanjajućim slojem (ovisno o modelu) neznatn o može promijeniti bo ju sloja (žuta bo ja, pojava mrija).CisćenjePoklopca:
- Poklopac operite spužvom i proizvodom za pranje posuă. IscijeditePoklopac vertikalno kakobi steuklonilipreostalu vodu izmeudumetalnih iplasticnih dij elovapoklopca.Za ciścenje gumicePoklopca:
Nakon svakog kuhanja očistite gumicu (I) i njezino kučiste. - Za zamjene gumice, pogledajte - sl. 15 i provjerite da li je gumica dobrosutisnuta u svaki urezPoklopca.Za ciścenje radnog ventilà (A):
- Izvucite radni ventil (A) -sl. 11. - Operite radni ventil (A) pod mlazom vode - sl. 16. - Provjerite njegovu mobilnost: prema slici u nastavku. Nakon uklanjanja radnog ventila (A), gumice (I) i indicatora vremena* (F),Poklopac mozete staviti u masinu za pranje sut.  U mašini za pranje posuža nikad nemojte prati radni ventil (A), gümicut (I), indikator vremena* (F), ni posudu s n eprijanja jućim slojem. Za ciścenje cjevacice za odvod pare (B) smještene naPoklopcu : - Izvadite ventil (A) - sl. 11. - Provjerite vizuelno i na dnevnoj svjetlosti je li cijev za odvod pare otpušena i okrugla - sl. 13. Po potrebi je očistite Čačkalicom - sl. 17 i isperite. Za ciścenje sigurnosnog ventila (E): - Očistite dio sigurnosnog ventilà smjesten unutarPoklopca takodag isperete vodom. - Provjerite da li dobro radi takto što cete snažno pritisnuti kuglicu ventilà (uz pomoc vatiranog šapica bez vate), koja mora bitiPokretna - sl. 18. Vidi odjeljak "Obavezne kontrole prije svake upotrebe". Za ciścenje indicatora vremena* (F): Koristite cistu, suhu krpu. - Ne koristite otapalo. - Nikada ne stavljajte indicator vremena u vodu ili u masinu za pranje posuda.Održavanje
Za zamjenu gumice vaseg ekspres lonca:
Gumicu vaseg ekspres lonca mistranjte jegnom godisnje ili ako ima pukotinu. - Uvijek kupujte gumicu kompanije TEFAL, onu koja odgovara vašem modelu (vidi odjeljak "Dodatna oprema"). - Za zamjene gumice, pogledajte - sl. 15 i provjerite da li je gumica dobrosutisnuta u svaki urezPoklopca. Za odlaganje vaseg ekspres lonca: - OkrenitePoklopac na posudi. - Mehanizam za otvaranje/zatvaranje ekspres lonca ne zahtijeva nikakvo posebno odrzavanje osim cisćenja. Poslje 10 godina upotrebe, obavezno morate odnjeti lonac na pregled u ovlasteni servisni centar kompanije TEFAL.Dodatna oprema TEFAL
Dodatna oprema za vaš ekspres lonac, koja se može nabaviti:| Dodatna oprema | Referentne oznake | |
| Gumica | 3/4/4,5/6 l: vanjski promjer gumice: 24 cm | X1010008 |
| 5/7,5/9 l: vanjski promjer gumice: 27 cm | X1010007 | |
| Parna košara* | 3/4,5/4/6 l: za posudu promjera 22 cm | 792185 |
| 5/7.5/9 l: za posudu promjera 24 cm | 792654 | |
| TrONOžni stalak* (L) | 792691 | |
| Indikator vremena* | X1060007 | |
Karakteristike
Promjer dna lonca - referentne oznake| Kapacitet | Ø posude | Ø dna | Clipso Minut® Perfect / Easy | Clipso Minut® Duo couleur | Clipso Minut® Duo Gourmet | Materijal posude |
| 3 L 22 cm | 15.5 cm | P46205 | -- | Nehrăjući Čelik | ||
| 3 L 22 cm | 18 cm | -- P46605 | ||||
| 4 L 22 cm | 14 cm | - P46042 | - | Obloženo aluminijem | ||
| 4.5 L 22 cm | 15.5 cm | cm P46206 | -- | Nehrăjući Čelik | ||
| 5 L 24 cm | 14 cm | - P46051 | - | Obloženo aluminijem | ||
| 5.2 L 24 cm | 20 cm | -- P46654 | Nehrăjući Čelik | |||
| 7.5 L 24 cm | 18 cm | P46248 | -- | |||
| 9 L 24 cm | 18 cm | P46249 | - | |||
| Set 5 L/7,5 L | 24 cm | 14 cm | P46353 | - | ||
| 18 cm | ||||||
Normativni podaci:
Najvisi radni pritisak: 65 kPa Maksimalni sigurnosni pritisak: 120 kPaKompatibilni izvori toplote
PLIN STRUJA  (Elektricna ploca)  STRUJA Halogena ploca iii staklokeramicka ploca)  STRUJA (Indukcijska ili staklokeramička ploca)  STRUJA (Spirali ngi grijaci element)  - Vas ekspres Ionac se koristi na svim povrsinama za kuhanje, uključujuci indukcijskim. - U slučaju elektricne ploće, koristite ploću jegnosjeg promjera od promjera dna lonca. U slucaju keramicke ili halogene ploce, provjerite da li je dno lonca cisto. U slucaju plinskog stednjaka, plamen ne smije biti siri od promjera posude. Kod svih izvora toplate vodite računa da lonac bude dobro centriran.Garancija
U okviru upotrebe kakva se preporucije u uputama za upotrebu, posuda od nehrdajuceg celika vaseg novog TEFAL ekspres lonca ima garanciju od 10 godina za sljedece slučajeve: -Bilo kakavnedostatak metalne konstrukcije posude, - Bilo kakvo preuranjeno propaganda metalnog dna. - Ostali materijali posude i svi drugi dijelovi vašeg ekspres lonca pod garancijom su za tvornicke greške ili nedostatke materijala, za vrijeme garantnog roka utvrdenog zakonom na snazi u zemlji kupovine i od Dana kupovine. - Ova garancija se ostvaruje uz podnosenje računa ili fakture koji dokazuju datum kupovine.Ova garancija isključuje:
- Ogrebotine i diskoloracije od starenja, za posude s neprijanjajućim slojem. - Ogrebotine zbog kontaktaPoklopca s posudom s neprijanjajućim slojem. - Ostecenja nastala usljed nepostivanja važnih mjera opreza ili nemarne upotrebe, a posebno zbog: - udaraca, padova, stavljanja u pećnicu. - Ovu garanciju moźete ostvariti samo u ovlastenim servisnim centrima kompanije TEFAL. - Molimo pozovite odgovarajuću sluzbu radi dobivanja adrese najblizeg ovlastenog servisnog centra kompanije TEFAL.Propisane oznake
| Oznaka Lokalizacja | |
| Zašitni znak NaPoklopcu | |
| Godina proizvodnje i šarža Oznaka modela Maksimalni sigurnosni pritisak: (SP) Najviši radni pritisak: (RP) | NaPoklopcu |
| Kapacitet Na dnu posude, s vanjske strane | |
| Poštanska adresa proizvořаča Na dnu posude, s vanjske strane |
- Mislite oŽivotnoj sredini!
 ① Aparat sadrži brojne materijale koji se mogu ponovo koristiti ili reciklirati. Odnesite ga sluzbi za prikupljanje kako bi se izvršila njegova obrada.TEFAL odgovara na vaša pitanja
| Problemi | Preporuke |
| U slučaju otežanog otvaranja i/ili zatvaranjaPoklopca: | ■ Skinite guniciu i isperite je pod vodom iz slavine, a zatem je vratite uPoklopac bez brisanja - sl. 19. |
| Ako ne možete zatvoritiPoklopac: | ■ Pazite da drškaPoklopca bude u vertikalnom položaju. ■ Provjerite je li gumica dobro postavljena (vidi odjeljak "Čišćenje i održavanje"). ■ Provjerite je li Poklopac dobro namjesten kako je prikazano na - sl. 1. ■ Stavite gunicu pod vodu pa je stavite natrag na lonac bez brisanja - sl. 19 i pazite da je dobro postavite u urezePoklopca - sl. 15. |
| Ako se vaš ekspres Ionac zagrijavao pod pritiskom bez tečnosti: | Ako se ova pojava nastavi, provjerite svoj ekspres lonac u ovlaštenom servisnom centru kompanije TEFAL. |
| Ako sigurnosni štapić ispustа klikajuće zvukove i oblačićpe pare: | To je normalno u prvih nekoliko minuta: to omogucava odvojenje vazduha prije kuhanja. |
| Ako se sigurnosni štapić nije podigao, te ništa ne izlazi iz ventilata tokom kuhanja: | Ovo je uobičajno tokom prvih nekoliko minuta. Ako ova pojava potraj, provjerite sljedeće: - Da li je izvor toplate dovoljno jak, te akо nije, pojačajt ga. - Da li je količina tečnosti u posudi dovoljna. - Radni ventil (A) postavljen je na - Da je vaš lonac pravilno zatvoren. - Da se gumica ili obod posude nisu istrošili. - Da li je gumica dobro namješena. |
| Ako se sigurnosni štapić podigao, te ništa ne izlazi iz ventilata tokom kuhanja: | Ovo je uobičajeno tokom prvih nekoliko minuta. Ako se to nastavi, ulijte hladnu vodu u sudoper i u vodu uronite dno ekspres lonca kako bi se sigurnosni štapić spustio. Očistite radni ventil (A) - sl. 16 i cjevacicu za odvod pare (C) - sl. 17 i provjerite sjeda li kuglica sigurnosnog vent (F) bez potěškoća - sl. 18. |
| Ako para izlazi okoPoklopca i akо je sigurnosni štapić u spuštenom položaju provjerite sljedeće: | Da li je Poklopac dobro zatvoren.Poziciju gumice u Poklopcu.Da li je gumica u dobrom stanju, po potrebi je zamijenite.Da li suPoklopac, gumica i njezino kućiste uPoklopcu Čisti.Stanje oboda posude. |
| Ako ne možete otvoritiPoklopac: | Provjerite je li sigurnosni štapić u (D) u donjempoložaju.Ako nilje, napravite dekompressiju: ulijte hladnu vodu u sudoper i u vodu uronite dno ekspres longkako bi se sigurnosni štapić spustio.Nikada nemojte dirati sigurnosni štapić (D).Okretenite radni ventil (A) u položaj |
| Ako je hrana nedovljno skuhana ili je za-gorena, provjerite sljedeće: | Vrijeme kuhanja.Jačinu izvora toplote.Da li je radni ventil (A) u ispravnom položaju.Količinu tečnosti. |
| Ako je hrana zagorjela u ekspres loncu: | Ostavite posudu da se nameće neko vrijeme prije nego što je operete.Nikada ne koristite izbjeljivač ili hlorirane proizvode. |
| Ako je aktiviran jeder od sigurnosnihistema: | Zaustavite izvor toplote.Bez premještanja ostavite ekspres lonac da se oh-ladi. Sačekajte da se sigurnosni štapić spusti pa otvorite.Provjerite i očistite radni ventil (A), cjevaciu za odvod pare, sigurnosni ventil i gumicu.Pobrinite se da su ispunjeni uslovi punjenja.Ako ova greška potraje, provjerite svoj aparat uovlaštenom servisnom centru kompanije TEFAL. |
| Ako primjetite pojavutragova oksidaciće: | Upotreba nehrdajuceg čelika visokih performansi ne sprečava povjavu oksidaciye u ekstremnim slučajevima. Ako primijetite tragove oksidaciye, uklonite ih trljanjem sa abrazivnim spužvom prije ponovne upotrebe ekspres lonca. |
LABELA ZA PRIPREMU HRANE
Povrçé
POVRCE (SVJEZE)
PARA
Sastojak u parnoj košarici i 750 ml vode na dnu ekspres lonca.  POTAPANJE
Sastojak u vodi i bez kosarice.MAHUNARKE POTAPANJE
Bez kosare.  | Mrkva narezana na okrugle ploške (3 mm) 600 g (para) | 17 do 19 min |
| Paprike babure narezane na polovice (550 g) (para) | 14 do 16 min |
| Patlidžan, oguljen i narezan na ploške (3 mm), 850 g (para) | 10 do 12 min |
| Praziluk, cijeli i bijeli 650 g (para) | 9 do 11 min |
| Prokelj (para) | 10 do 12 min |
| Rotkva, narezana na kockice (500 g) (para) | 14 do 16 min |
| Špargla, bijela (para) | 5 do 6 min |
| Špinat (para) | 3 do 4 min |
| Tikva, narezana na komade (3 do 5 cm) 600 g (para) | 13 do 18 min |
| Tikvice narezane na okrugle ploške (3 mm) 600 g (para) | 12 do 15 min |
| Zelene mahune, tanke (600 g) (para) | 10 do 12 min |
| POTAPANJE Bez košare. MAX 1 | KOLICINA VODE | KOLICINA RIŽE | VRIJEME PRIPREME | |
| 2 OSOBE 400 ml / 2 Žaše 150 g / 1 Žaša | 7 do 8 min4 OSOBE | |||
| 500 ml / 2,5 Žaše | 250 g / 2 Žaše | |||
| 6 OSOBA | 700 ml / 3,5 Žaše | 375 g / 3 Žaše | ||
Meso/riba
| SVJEŽE SMRZNUTO | |
| Goveča pečenica (1 kg, promjer 8–11 cm) 30 do 35 min 45 do 50 min | |
| Grdobina, fileti (1 kg) u komadima od 75 g 5 do 6 min 7 do 8 min | |
| Janjeća koljenica: 2 (0,95 kg) 40 do 45 min 1 h 05 do 1 h 15 | |
| Losos, odresci: 4 (0,8 kg) | 5 do 6 min 7 do 8 min |
| Pačetina (1,8 kg) | 45 do 47 min 50 do 55 min |
| Piletina (1,35 kg) | 23 do 25 min 1 h do 1 h 10 min |
| Pilići, mladi: 2 (1,3 kg) | 23 do 25 min 40 do 45 min |
| Prepelica: 4 | 9 do 10 min 18 do 20 min |
| Svinjska koljenica (0,8 kg, promjer 8–10 cm) | 30 do 35 min 1 h 05 do 1 h 15 |
| Svinjski filet mignon: | 13 do 15 min 26 do 29 min |
| Teleća koljenica (0,8 kg, promjer 5–7 cm) | 17 do 19 min 37 do 40 min |
| Teleći filet mignon: 0,7 kg | 17 do 21 min 33 do 38 min |
| Tuna, odresci: 4 (0,7 kg) | 5 do 6 min 7 do 9 min |
| Zec (1,5 kg u komadima) | 8 do 9 min 20 do 23 min |
DULEZITA UPOZORNENI
Před použitím svého tlakového hrnce věnujte Čas prostudováni všechPokynů a k námodu pro uživatele se v pripadě potřeby vracejte.
Pri nespravném používání mohou vznikat škody.
Pro zajisteni vaši bezpečnosti je tento prístroj v souladu s príslušnými normami a vyhlástkami: -se smernici pro tlaková zaízeni - se směrnici o materialech určenych pro styk s potravinami - se směrnici oživotním prostředí| NEZBYTNÉ NUTNÉ KONTROLY PRÉD KAŽDýM POUŽITÍM | ZKONTROLUJE ·vizuálné na Denním světle, zda odvod par není blokovár - obr. 13. ·zda je kulička pojistného ventilu pohyblívá - obr. 18. ·zda je těsněnéí ve víku umistěno v každém zářezu víka - obr. 15. ·zda jsou držadla nádoby Žádně upevněna. Držadla nádoby jsou bezpečnostními díly. Nikdy je nevyměñujte sami. |
| VŽDY DODRŽUJTE NÁSLEDUJÍCÍ MNOŽSTVI NAPLNÉNÍ | ·Nikdy nepoužívejte hrnec bez tekutiny, mohlo by DOJít k jeho vázznému poskození. Dbejte na to, aby během vařeni bylo v hrnci dostatečné množství tekutiny. ·Minimálné 25 cl - obr. 4. ·Maximálné 2/3 vyšky nádoby, značka MAX 2 - obr. 5. ·Privařeni v páře nesmějí byt potraviny umistěné v parním koši v kontaktu s vodou - obr. 6 a 7. ·Maximálné 1/3 (MAX 1) v prípadě pastovitích potravin, které se během vařeni rozpínají a / nebo vytvářejí pěnu, mezi které patří rýze, luštěniny, dehydratovaná zelenina kompoty, tykve, cukety, mrkev, brambory, rybí file ... ·Potraviny umistěné do parního koše nesmějí prěkročit úroven MAX 2 nádoby. |
| PřED VAřENÍM A V JEU PRÜBÉHU | Když používáte tlakový hrnc, nenechávejte ho v blízkosti děti. Tlakový hrnc vaři pod tlakem. Při nevhodném použití může dojít ke zraněné vlivem opařeni. Před použitím tlakového hrnc zkontrolujte, zda je rádně uzavřen. (Viz odstavec „Uzavíráni“). Během vařeni kontrolujte, zda ventil pravidelně sycí. Poku neuníká dostatečné množství páry, provedte dekompresi vyrobku a ujistěte se o tom, ze je v něm dostatečné množství kapaliny a rovněž o tom, ze odvod par není ucpáný. Pokud po tomto ověřeni pára stále neuníká, mírně zvedněte vykon tepelného zdroje. Nevařte potravy, u kterych existuje nebezpećí ucpání odvodů bezpečnostních součástek: - brusinky - krupky - ovesné vločky - lámaný hrácch - nudle, makarony, špagety - rebarboru - rybíz V tlakovém hrnci nikdy nepřipravujtePokrmy na bázi zhivočíšného mléka. V prípadě tlakového hrncs nádobou z nerezové ocelí v něm nepoužívejte hrubou sůl, na konci vařeni pridejte jemnou sůl. Tím zabránité „dúlkové korozí“, která by mohlzhorsit stav dna tlakového hrnc. Tlakový hrnc nepoužívejte pro smažení na oleji pod tlakem. Tlakový hrnc používejte pouze k účelům, ke kterám je určen. Nevkládejte tlakový hrnc do teplé trouby. Nevkládejte do tlakového hrncle list alobalu, který není upevněn na formě. Nikdy do tlakového hrnc nevkládejte plastovou folii Alkoholové páry jsou vznětlívy. Nechte vařit cca 2 minuty, než nasadíte víko. Pokud prípravujete recept obsahujíc alkohol, dohlížejte na hrnc. Používejte vchodný/é zdroj/e tepla v souladu s pokyny k používání. |
| PO VARENÍ... | U modelù s nepřilnavým povrchem: nepoužívejte šlehačé, ani kovové āostré nádobí. Nenechávejte náčiní odkapatPoklepáním na okraj nádoby, mohlo by DOJít k jejímuposkózení a to by mohlo zpùsobit netěsnost.Postupné otáčejte pracovním ventilem (A), pričemžsivyberte rychlost dekomprése podle svého úsudku, dokudnebude ryska naproti piktogramu 10. Pokudbehem uvolnováni páry zaznamenáte abnormálné Rozstrik,prepněte pracovní ventil (A) do režimu vařeni „tlakovýhrnec" a poté provedte rychlé uvolnéni páry podstudenou vodou - obr.14.Pokud nedojde kPoklesu bezpečnostné pojistky (D),umístěte tlakový hrnec pod studenou vodu - obr - obr.14.Nikdy nemanipulujte s bezpečnostné pojistkou.Po vařeni masa s kúží na povrchu (např. hoveží jazyk), kterése mûže pod tlakem nafouknout, nepropichujte maso,pokud kúže vypadá nafouknute; hroží opařné Propíchněte maso prěd vařením.V pripadě pastovitích potravin, které se během vařénirozpinají nebo vytváří pěnu, mezi které patrì rýžé,lustěniny, dehydratovaná zelenina, kompoty, tykve,cukety, mrkev, brambory, rybi filé ... nechte tlakový hrnecněkolik minut vychladnout a pak jej ochladte podstudenou vodou. Prěd otevřěním tlakový hrnecsystematický a mírně protřepejte, avšaknejprvesepresvěděcte, ze bezpečnostné pojistka je ve spodní poloze,aby nedoslo k prudkému vytrysknutí páry, cožby mohlozpùsobit popálení. Tento krok je zvlášť duležitý pri rychlémvypoustěné páry nebo po ochlazení pod studenou vodou.Priě premistování tlakového hrnce dbejte maximálnoopatrnosti. Nedotýkejte se teplych povrchú. Používejtedržadla a tlacítka. V pripadě potřeby používejte rukavice.V rámci prižravy polévek doporučujeme provádet rychléuvolnéni páry pod studenou vodou (viz odstavec „Konecvaßení v režimu tlakový hrnec").Prěd otevřěním hrnce se ujistěte, ze je ventil (A)v polozepro uvolnéni tlaku. Bezpečnostné pojistka (D)musi být ve spodní poloze.Nikdy se nepokoušejte otevirat tlakový hrnec silou.Zkontrolujte, zdaPoklesl vnitní tlak. Bezpečnostnépojistka (D) musí být ve spodní poloze.(Viz odstavec „Bezpečnostné prvky"). |
| ŚDfRZBA | • Pokud zjistîte, Že některá z Častí tlakového hrnce je Rozbitá nebo popraskaná, v Žádném prípadě se jej nepokoušejte otevřit,Pokud je zavřený,vyčkejte,až zcela vychladne prěd tím,než jej prěmístîte, nadále jej už nepoužívejte a prínestiège jej do autorizovaného servisniho střediska TEFAL na opravu. • Na bezpečnostnich systémech neprovádejte Žádné zákroky nad rámec tokynů pro Čištěné i ádržbu. • Používejte pouze originálí díly TEFAL odpovídajćí vašemu modelu. Předevíím nádoba a víko musí byt značky TEFAL. • Hrnec nepoužívejte ke skladoványí kyselých nebo sláných potravin prěd vařením a po něm,aby nedoslo k jeho poskození. • Tlakový hrnec bezprostředně vyčistěte a oplachněte po každém použití. • Nikdy nedávejte pracovní ventil (A),ani těsněné (I),ani Časovač* (F),ani nádobu s nepřilnavým povrchem do myčky na nádobí. • Nedávejte Časovač* (F)do vody. • Nikdy nepoužívejte louh nebo vyrobky na bázi chloru, které by mohly negativné ovlivnit kvalitu nerezavějúci oceli. • Nenechávejte víko máčet ve vodě. • Těsněné tlakového hrnce mlěnte káždý rok nebo tehy, pokud je prasklé. • Po 10 letech používányí je nutno nechat tlakový hrnec zkontrolovat v autorizovaném servisním středisku TEFAL. • Pro uskladněné tlakového hrnce: Obratte víko na nádobě tak, abyste zabránìlì prědčasněmu opotřebení těsněné víka. |
TYTO POKYNY SI USCHOVEJTE
Současti (viz Popisné schéma)
A. Pracovni ventil B. Odvod páry C. Ukazatel umistěnéventilu D. Bezpečnostní pojistka (viz odstavec „Bezpečnostní prvky"). E. Bezpečnostní ventil F. Časovac* G. Držadlo vika H. Viko I. Těsněné J. Parníkoš* K./L. Trojnožka* M. Držadlo nádoby N. Značky pro maximální plnéni O. NadobaNezbytné nutné kontroly préd kaźdymi použitím
Kontrola pracovniho ventilu
 Zkontrolujte, zda nedoslo k zablokovani vypousteciho otvoru pracovniho ventil (viz odstavec „Demontaz a montaz pracovniho ventilu").Kontrola bezpečnostního ventilu
 - Zkontrolujte, zda se kulička bezpečnostní pojistky může pohybovat (použijte týčku).Použití
 Vareni v režimu tlakový hrnec  Vareni v rezimu hrnec\*  DekompreseOtevíráni
- Naklopte držadlo vika z vodorovné polohy do svislé polohy - obr. 3 Viko se otáčí. Nadzyedněte víko. - Pokud nejde vyrobek snadno otevřit: proplachněte těsněné pod vodou a vložte jej do víka, aniž byeSTE jej otrěli - obr. 19 a pritom se ujistěte se, ze těsněné dobře zapadlo pod zářezy víka - obr. 15.Uzavirání
Ujistete se, ze drzadlo vika je ve svisle poloze. - Umistete viko na nadobu, jak je to ukazano na - obr. 1, priemž vyrovnejte plastovou枣庄 držadly nadoby. - Sklopte držadlo víka ze svislé polohy do vodorovné polohy - obr. 2 Viko se otaci.Pokud se vám nedarí uzavřit víko:
- Ověrte správné umistěné těsněné a rovněž správnou polohu víka. - Pokud nejde vyrobek snadno zavrít: proplachněte těsněné pod vodou a nasadte jej do víka, aniž BYSTE jej otřeli - obr. 19 a pritom se ujistěte se, Že těsněné dobře zapadlo pod zářezy víka - obr. 15.První použití
V pripadé modelu s neprilnavym povrchem: umyjte a lehce potrete olejem na vareteni celv vinitni upraveny povrch.V závislosti na modelu:
Vložte trojnožku\* (L)a kos\* (J)do spodni casti nadoby. - Upevněte trojnožku* (K) do koše* (J) a poté vložte soupravu do spodní Časti nádoby. - Naplnte nádobu (O) vodou do 2/3 (MAX 2) - obr. 5. Zavretetlakovyhrnec. Zarovnejte piktogram pracovniho ventilu (A)sukazatelem polohy ventilu (C)-obr.9.   Postavte tlakovy hrnec na tepelny zdroj a ten pustte na maximálni vykon. - Jakmile začne ventilemunikat pára, snižte vykon tepelného zdroje a vyčkejte 20 minut. - Po uplynuti 20 minut tepelny zdroj vypněte. - Zarovnejte piktogram pracovniho ventilu (A) sukazatelem polohy ventilu (C). - Jakmile bezpečnostní pojistka opět sestoupí (D), tlakový hrnec již není pod tlakem. - Otevřete tlakový hrnec - obr.2 Vycistete jej cisticim prostredkem.Minimálni a maximálni plnéni
- Minimálne 25 cl (2 sklenice) - obr.4. Maximánlé 2/3 výšky námoby, značka MAX 2 - obr.5. Do hrnce nedaveje hrubou sul, na konci vareni pridejte jemnou sul.V pripadě některychPokrmu:
V pripadé pastovitych potravin, které se během vařeni Rozpínaj nebo vytvářej penu, mezi které patri rýze, lusténiny, dehydratovaná zelenina, kompoty, tykve, cukety, mrkev, brambory, rybi filé apod., naplnte tlakový hrnec do maximálne 1/3 (MAX 1) kapacity. Nechte tlakový hrnec několik minut vychladnout a pak jej ochladte pod studenou vodou. Pred otevrenim tlakovy hrnec systematicicky a mirne protrepejte, avsak nejprove se presvedcte, ze bezpecnostni pojistka je ve spodni pola aby nedoslo k prudkemu vtyrskuti nary, coz by mob  Tento krok je zvlast dulezity pri rychlem vypousteni pary nebo po ochlazeni pod studenouvodou.V ramci pripravy polevek doporučujeme provadět rychlé uvolnéni pary pod studenouvodou (viz odstavec „Konec vařeni v režimu tlakový hrnec").Používání parniho koše*
- Nalijte na dno nádoby (O)75 cl vody.V závislosti na modelu:
Vložte trojnožku\* (L) a kos\* (J) do spodni Časti nádoby. - Upevněte trojnožku* (K)do koše* (J)a poté vložte soupravu do spodní Časti nádoby    - Pri vařeni v páře nesměji byt potraviny umistěné v parním kosi v kontaktu s vodou- obr. 6 a 7. Potraviny umistěné doparnihokoste nesměji prekročit uroven MAX 2.Vyjmutí a nasazení pracovniho ventilu (A)
Pro vyjmutí pracovniho ventilu (A):
- Zarovnejte dražku sukazatelem polohy ventilu (C), prićemž tlačte na kroužek pracovniho ventilu (A). Vytáhněte ventil - obr. 11.Pro nasazení pracovniho ventilu:
Umisteni pracovniho ventilu (A)-obr.8: zarovnejte spicku pracovniho ventilu do vyse polohové značky (C) -viz na opacné straně.  Zatlačte na pracovní ventil (A) tak, aby dosedl na pojistku pro odvádení páry. - Stisknéte piktogramy na pracovním ventilu (A) a otočte jím. Časovač*
V režimu „hrnec" nikdy nepoužívejte Časovac.
Smyslem Časovace je pomoci vám zajistit dokonalý vysledek vařeni tím,Že vám umožné co nejlépe upravit spotřebu energia. Automaticky odpočitáva dobu vařeni, jakmile je dosaženo teploty odpovidajíc vařeni v režimu „tlakový hrne Aby fungoval, musi byt czosovac priputy k tlakovemu hrnci. Během vařeni kontrolujte, zda pracovní ventil (A) pravidelně syci. Neuníka-li pára v dostatečné množstvi, zvyšte mirné vykon ohřevu, v opačné prípadě vykon snizte. 1 Pro zapnuti casovače: stisknéte tlacítko. 2 Naprogramujte dobu va'rení (v minutách). - Pokud jste se v době vařeni zmylili, vyčkejte 4 sekundy, aby světla neblikala, poté tlacitko dlouze stisknéte, abyste jej vynulovali. Spustte tepelny zdroj na maximálni vykon. 4 Jakmile tlakový hrnec dosáhne teploty varu, Časovač zapípá a odpočitávání nastavené doby začíná (čísla blikaji). Snižte vykon tepelného zdroje. 5 Na konci nastavené doby vařeni začne chasovač pipat. Pro vypnuti pipani casovače stisknéte tlacitko. Vypněte tepelný zdroj.Dlouhé stisknuti tlacitka vynulujea vypne casovač.
Nasazenía odejmutí Časovace*
- Pro nasazení Časováče (F) - obr. 12 vložte nejdríve Čast „strany, ktera se dotýká" do modulu a poté mirné zatlačte tak, abyste prichytili opacnou Čast. Pro odejmuti casovace (F)jej nadzvednete a vyjmete.Výměna baterie Časovace*
- Casovač je vybaven baterií knoflikového typu CR2032. - Pokud se objeví symbol n haPokud se nic nezobrazuje, vyměnte baterii.       Zivotnost baterie zavisina cetnosti pouzivani casova. Baterie tohoto zbozi obsahuje dimetoxyethan c. CAS 110-71-4. Baterie odpovida evropskym predpisum. Pro vlastni bezpecnost a ochranu zivotniho prostre: neotvirejte baterii, nevystavujte ji yvsokym teplotam, nevyhazujte ji s domovnim oppadem; odneste ji do strediska pro sber pouzitych baterii. - Jednorázové baterie nelze znovu nabíjet. - Nelze soucasne pouzit ruzné typy bateri, ani nové a pouzité baterie. - Pri vkladani baterii dbejte na spravnou polaritu. - Vybité baterie vyjměte ze zařizení a nechte je bezpečné zlikvidovat. - Chcete-li zařizení uskladnit na delsí dobu, aniž bye ste jej používali, vyjměte z nej baterie. Nezkratujte napajeci svorky. Postupujte podle pracovniho planu. - Pro vymenu baterie z czasovace otevrete kryt ulození baterie pomoci mince (viz obrázek na druhé straně). Vymente baterii. Umistete zpet tesneni na jeho misto. Umistete pulmésic krytu baterie naproti pulmésici casovače. Jemne otocte krytem ulozeni baterie, mirnym tlakem, priemz zarovnejte pulmesec kytu bateries mesicem casovace. Tyto ukony provadejte na kuchynske lince, aby byl kryt umisten radne vodorovne. - Pri zavirani netlacte na kryt baterie. Nepresahujte krajnif polohy. V pripadé ztraty muzete ziskat novy chasovac v kteremkoli našich autorizovanych servisnich stredisek TEFAL. Časovac* nikdy neumyvejte pod vodou ani v mycce. V režimu „hrnec" nikdy nepoužívejte Časovac. Pred va'rením
- Pred kazdym pouzitim odmontujte pracovni ventil (A) - obr. 11 a zkontrolujte pri Dennim světle, zda nedoslo k zablokovány odvodu par (B) - obr. 13. Zkontrolujte, zda je pojistny ventil pohyblivy (viz odstavce "Cisteni" a "Nezbytné nutné kontroly préd kaźdymi použitím") - obr. 18. Prideje ingredience a tekutinu. Zavretetlakovyhrnec-obr.2 V priadé obtízi pri uzavirání vyrobku: deje těsněné pod vodu a vratte jej do víka, aníž bye ste jej osušili - obr. 19 a 15 a ujistěte se, ze jej rádně umístîte do zářezů víka. - Namontujte pracovni ventil (A) - obr. 8. Vareni v režimu „tlakový hrnec"
- Otáčejte pracovním ventilem (A) až do polohy režimu vařeni „tlakový hrnec" 9. - Pred uvedenim hrnc do provozu zkontrolujte, zda je tlakovy hrnc radne uzavren - obr.2 Postavte tlakovy hrnec na tepelny zdroj a ten pustte na maximálni vykon. V pripadé modelu vybavenych casovačem : naprogramujte dobu vařeni uvedenou v receptu (viz odstavec „Používání casovačě"). - Klapání a vypoustěné páry bezpečnostní pojistkou jsou normální, umožnují unik vzduchu prešed vařením.Během vařeni v režimu „tlakový hrnec"
- Pokud z pracovniho ventilu (A) nepretržite unika pára s pravidelným sycením, snizte vykon tepelného zdroje. - Začnéte odměřovat dobu vařeni uvedenou v receptu. - Během vařeni kontrolujte, zda ventil pravidelné syci. Neuniká-li pára v dostatečné množstvi, zvyste mirné vykon tepelného zdroje, v opacnémpripadě vykon snizte.Záver va rení v režimu „tlakový hrnec".
Pro vypusteni páry:
- Po vypnutí tepelného zdroje mate dvě moznosti: - Postupná dekomprése: Postupné otáčejte pracovním ventilem (A), dokud nebude ryska naproti piktogramu obr. 10.  - Rychlé uvolnéni páry ve studenté vode: nalije studenou vodu do drezu a ponorte dno tlakového hrnce. Nechte jej ponořéný ve vode, dokud se bezpečnostní pojistka nedostane do spodní polohy - obr. 14. Jakmile bezpečnostní pojistka opět sestoupí (D), tlakový hrnec již není pod tlakem. Otačejte pracovím ventilem (A)až do polohy  Krok 1  Krok 2 Müzete tlakový hrnec otevřit - obr.3. - Pokudnejde vyrobek snadno otevrit: proplachnete tseseni pod vodou a nasadte jej do vika, aniž bye ste jej otreli - obr. 19 a pritom se ujistete se, ze tseseni dobře zapadlo pod zárezy vika - obr. 15. Pokud během uvolnování páry zaznamnéte abnormální Rozstřik, prépněte pracovní ventil (A) do režimu vařeni „tlakového hrncá a poté provedte rychlé uvolnéni páry pod studenouvodou. Pokud se bezpečnostní pojistka nepřesune do spodní polohy, nalije studenou vodu do dřezu a ponorte dno tlakového hrnce. Nechte jej ponořéný ve vode, dokud se bezpečnostní pojistka nedostane do spodní polohy - obr. 14.Nikdy nemanipulujte s bezpečnostné pojistkou.
V priadepastovitych potravin, které se behem vaeni rozpinajne bo vytvareji penu, mezi které patri rye, lusténiny, dehydratovaná zelenina, kompoty, tykve, cukety, mrkev, brambory, rybi filé apod., naplnte tlakovy hrnec do maximalne 1/3 (MAX 1) capacity. Nechte tlakovy hrnec nekolik minut vychladnout a pak jej ochladte ve studené vode. Pred otevrenim tlakovy hrnec systematicky a mirné protrepejte, avsak nejprve se presvedcte, ze bezpecnostni pojistka je ve spodni poloze, aby nedoslo k prudkému vytryskutí páry, coz by mohlo zpusobit popalení. Tento krok je zvlast dulezity pri rychlem vypousteni páry nebo po ochlazení ve studené vode. V ramci pripravy polévek doporučujeme provadet rychlé uvolnéni páry pod studenouvodou (viz odstavec „Konec vaeni v režimu tlakový hrnec"). Vařeni v režimu „hrnec“*
- Otáčejte pracovním ventilem (A)až do polohy režimu vařeni „hrnec". K tomu je zapotrebie vyvinout dostatečné usili, abyste ventil otočili ze stavajího zářezu do polohy pro uvolné páry. - Pred použitím hrnce zkontrolujte, zda je rádné uzavren - obr. 2. - Postavte tlakovy hrnec na tepelný zdroj pušěnény na snížený vykon. Zacne te odmeovat dobu vareni uvedenou v receptu. V režimu „hrnec" muzete tlakový hrnec otevřit kdykoliv tak, abyste mohli michat, dohlížet na vařeni nebo pridávat prisady. V priade obtizi pri otevirani vyrobku: dejte tesneni pod vodu a vratte jej do vika, aniž bye ste jej osušili - obr. 19 a 15 a ujistete se, ze jej rădné umistite do zárezù vika. ■ Pokud je tepelný zdroj prilis vykonny, muže dojit k tomu, ze se tlakový hrnec zablokuje (bezpečnostní pojistka (D)vystoupí nahoru a zabrańuje otevřeni) a ze s držadlem vika nelze hybat nebo otevřit tlakový hrnec. V tomto pripadě snižte vykon tepelného zdroje, nebo jej vypněte. V pripadě elektrickych litinovych desek odeberte tlakový hrnec z tepelného zdroje.  U modelu s neprilnavym povrchem: nepouzivejte slehace, ani kovove cis ostre nadobi. Neoklepavejte své naciníPoklepávanim o okraj nadoby, protoze tim vznika nebezpeci jeho poskození a vzniku dér. - Nikdy neohrivejte tuky až do zuhelnatěni. Výpary uvolnované pri vařeni mohou byt nebezpečné pro zviřata, ktera mají citlivé dychaci ustroji, napr. pro ptáky. Zákaznici, kteri v domácnosti chovaji ptáky, musí zamezit jejich pristupu do kuchyně.Bezpečnostní privky
Tento tlakový hrnec je vybaven několika bezpečnostními privky:Bezpečné zavirání:
- Pokud nedojde ke správnému umistěné vika Či pokud zapomenete sklopit rukojet vika, dochází k uniku páry v mistě bezpečnostní pojistky (D) tlakového hrnce, a tlak tak nemůže dosáhnout požadované urovně.- Bezpečné otevirání:
- Pokud je tlakový hrnec pod tlakem, bezpečnostní pojistka (D) je v horní poloze a držadlem víka pro otevřeni/zavřeni (G)se nesmí manipulovat. - Nikdy se nepokousejte otevirat tlakovy hrnec silou. - Zejména nemanipulujte s bezpečnostné pojistkou (D). - ZkontrolujtePokles vnitrního tlaku tak,Že overěřite,Že bezpečnostné pojistka (D)je ve spodné poloze. - Držadla nádoby jsou bezpečnostními díly. Nikdy je nevyměñujte sami. Nikdy nepoužívejte jiné modely držadel. - Pokud jste preklopili držadlo pro otevíráni/zavíráni (G) do svislé polohy, prčemž tlakový hrnec byl doposud pod tlakem, nebudete jej moci otevřit. Tato funkce je dodatečnám bezpečnostím privkem. - Překlopte držadlo do vodorovné polohy a vyčkejte, dokud bezpečnostní pojistka (D)nesestoupí do spodní polohy. Dva bezpečnostní privky proti pretlaku: - První zařizení: bezpečnostní ventil (E) uvolné je tlak - obr. 20 - Druhé zařizení: těsněné umozhůje pářeunikat u vika - obr. 20Pokud se spustí některy z bezpečnostních prvků proti pretlaku:
Vypněte tepelný zdroj. - Nechte tlakový hrnec zcela vychladnout. - Otevrete jej. - Zkontrolujte a vycistete pracovni ventil (A), odvod par (B), bezpečnostni ventil (E) a těsněni (I) - obr. 16 - 17- 18. Viz odstavce „Čistěné“ a „Nezbytně nutné kontroly prešed každým použitím". - Pokud po kontrole a cisteni neni vás vyrobek těsný, nebo vůbec nefunguje, odneste jej do autorizováného servisného střediska TEFAL.Doporucení pro použití
1 - Pára je prí vystupu z pracovního ventilu velmi horká. Pozor na proudly páry. 2 - Jakmile se bezpećnostné pojistka zvedne, nebudete již moci tlakový hrnec otevřit. 3 - Podobné jaku u vsech nastrojù na vařeni na tlakový hrnec pečlivé dohlížejte,Pokud jej používáte v blízkosti děti. 4 - Pri prenašeni tlakového hrnce používejte obě držadla nádoby. 5 - Nikdy nenecháveje potraviny v tlakovém hrnci po delsí dobu. Tlakový hrnec nikdy nepřenášejte za držadlo vika. 6 - Nikdy nepoužívejte louh nebo vyrobky na bázi chloru, které by mohly negativné ovlivnit kvalitu nerezové oceli. 7 - Nenecháveje víko máčet ve vode. 8 -Těsněnéí tlakového hrnce měnte každý rok nebo tehdy,Pokud je prasklé. 9 - Čišění tlakového hrnce je třeba provádet, když je studeny a prázdné. 10 - Po 10-ti letech používáni je nezbytně nutné nechat tlakový hrnec zkontrolovat v autorizovaném servisíním středisku TEFAL.Cisteni
Pro správné fungování tlakového hrnce dodržujte po každém použití tato doporučeni pro Čišěné a udržbu. Zahnědnutí a škrábnuti, kterémaohou objevt po douhém použiván, nejsou na závadu. Opotrebeni vnějsi strany povrchu (v závislostina modelu) v souvislosti s kontaktem vika s nádbou je normálni. V pripadé tlakovych hrncu s nepřilnavým povrchem (v závislosti na modelu): malé škrábance a oděrniny, které se mohou pri užívání objevt, nemají nepříznivý vliv na funkci nepřilnavosti povrchu. - Tlakový hrnec umyjte po každem použití vlžnouvodou se saponátem. Stejně postupujte v pripadé koše*. Nepoužívejte louh nebo produkty na bázi chloru. - Neprehrivejte nádobu, je-li prázdna.Pro Čišění vnitřiní strany nádoby z nerezové oceli:
- Myjte pomoci drateny a pripravku na nadobi. - Pokud se na vnitrni strané nadoby z nerezové oceli objeví duhove odrazy nebo bile usazeniny (nanos mineralú), vyčistěte je pomoci bileho octa.Pro vycisteni vnitrni strany nadoby z hliniku s neprilnavym povrchem:
- Abyste prodloužiliŽivotnost výrobku, doporučujeme jej myt ručné. - Myjte teplou vodou, pripravkem na mytí nádobí a mekkou houbou. Nepoužívejte Čistící prášek ani brusné houby. - Pokud se vám jidlo pripálilo, naplnte nádobu teplouvodou a nechte odmočit. Poté ji vyčistěte Čisticím prostředkem na nádobí.Pročistěnévnéjsistrany nádoby:
- Myjte houbickou a pripravkem na nádobí. Nádo bu tlakového hrnce z nerezové ocelia kos muzete myt v myce. Nemyjte nádobu s nepřilnavým povrchem (v závislosti na modelu) v myčce na nádobí, jelikož Čistić prostředky ve formě tablet ob sahuji velmi agresivné a korozivné látky pro součástk y z hliníku. Intenzivní používání nádoby s nepřilnavým pov rchem (v závislosti na modelu) můze mít mirné negativné vliv na barvu povrchu (zažloutnu tí, obarvení).Pročistění vika:
Viko myjte houbickou a pripravkem na nadobi. Nechte víko odka pat ve svislé poloze,čímž necháte odtéct zbyvajíci vo dumezi kovovými a pbstovými Častmivíka.Pročistění těsněné vika:
- Po kaźdem vařeni yčistěte těsněné vika (I) a misto, kam se nasazuje. - Pro opětovné nasazení těsněnéviz - obr. 15 a ujistěte se, ze je těsněné rádné vložné do kaźdé z dražek víka.Pročistěné pracovního ventilu (A):
Vyjměte pracovní ventil (A) - obr. 11. Vycistete provozní ventil (A) pod proudem tekouci vody - obr. 16. Zkontrolujte, zda je pohyblivy: nákres na protejsi straně. Po vyjmuti pracovniho ventilu (A), těsněné (I) a Časováče* (F) můžete myt víko v myčce.  Nikdy nedávejte pracovní ventil (A), ani těsněné (I), ani Časovac* (F), ani nádobu s nepřilnavým povrchem do myčky na nádobí.Pro Čišěné odvodu páry (B) na víku:
- Odmontujte ventil (A)- obr. 11. - Na Denním světle zkontrolujte, zda odvod par není blokován a zda je kulatý obr. 13. Podle potřeby jej vycistěte párátkem - obr. 17 a opláchněte jej.Čistěné bezpečnostního ventilu (E):
- Vycistete ccast bezpecnostniho ventilu na vnitrní strane vika tak, ze jej proplachnetevodou. Zkontrolujte jeho správnou funkci tak, ze silné zatlacite na kulicku (pomocivatové bavlněné tycinky bez vaty), ktera se musí pohybovat - obr. Viz odstavec „Nezbytně nutné kontroly prěd kaźdým použitím".Pročistěnécasovace\* (F):
- Použijte Čistý a suchý hadr. Nepoužívejte Rozpoustédla. - Casovač nikdy neumývejte pod proudem vody nebo v myčce.Udržba
Pro vymenu těsněné tlakového hrnce
Tesneni tlakového hrnce měnte kázdy rok nebo tehdy,Pokud je prasklé. Vždy používejte pouze originálné těsněné TEFAL odpovídajívašemu modelu (viz odstavec „Príslušenstvi"). - Pro opětovné nasazení těsněnéviz - obr. 15 a ujistěte se, ze je těsněné rádné vložné do každé z dražek vika.Pro uskladněni tlakového hrnce:
- Otočte víko na nádobě. - Mechanismus pro otevirani/zavirani tlakového hrnce nevyžaduje kromě Čištěnižadnou zvlástné udřžbu. Po 10 letech používání je nutno nechat tlakový hrnec zkontrolovat v autorizovaném servisím středisku TEFAL.Príslušenstvī TEFAL
K tlakovému hrnci lze dokoupit tato príslušenstvi:| Příslušenství Katalogové Č. | ||
| Těsněnéní | 3/4/4,5/6 l: vnější průměr těsněnéí: 24 cm | X1010008 |
| 5/7,5/9 l: vnější průměr těsněnéí: 27 cm | X1010007 | |
| Parní koš* | 3/4,5/4/6 l: pro nádobu o poloměru 22 cm | 792185 |
| 5/7,5/9 l: pro nádobu o poloměru 24 cm 792654 | 792654 | |
| Trojnožka* (L) | 792691 | |
| Časovač* | X1060007 | |
Vlastnosti
Prümér dna tlakového hrnce - reference| Objem | Ø Nádoby | Ø Dna | Clipso Minut' Perfect / Easy | Clipso Minut' Duo couleur | Clipso Minut' Duo Gourmet | Materiál nádoby |
| 3 L 22 cm 15.5 cm | P46205 | - - | Nerezová oce | |||
| 3 L 22 cm 18 cm | - | - | P46605 | |||
| 4 L 22 cm 14 cm | - P46042 | - | Potažený hliník | |||
| 4.5 L | 22 cm 15.5 cm | P46206 | - | Nerezová | ocel | |
| 5 L 24 cm 14 cm | - P46051 | - | Potažený hliník | |||
| 5.2 L | 24 cm 20 cm | - | - | P46654 | Nerezová oce | |
| 7.5 L | 24 cm 18 cm | P46248 | - - | |||
| 9 L 24 cm 18 cm | P462 | 49 | - - | |||
| Set 5 L 7,5 L | 24 cm | 14 cm | P46353 | - | ||
| 18 cm | ||||||
Normativni informace:
Maximálni provozní tlak: 65 kPa Maximálni bezpečné tlak: 120 kPaKompatibilni tepelné zdroje
PLYN ELEKTRINA (Litinová deska) ELEKTRINA (ndukcni deska nebo halogenová sklokeramická deska) ELEKTRINA (Indukncn deka nebo halogenova sklokeramicka deka) ELEKTRINA (Topnê têleso)      - Tlakový hrnec lze použit na všech tepelnych zdrojích, včetné indukčnich. - Na elektrické varné desce použijte plotnu o prüměru shodném ā mensím, než je prüměr dna tlakového hrnce. - Na sklokeramické desce zkontrolujte, zda je dno nádoby Čisté a suché. - Na plynovém hořáku nesmí plamen prěsahovat prěs prüměr nádoby. U vsech zpusobu ohrevu zkontrolujte, zda je tlakovy hrnc spravné vystredeny.Záruka
V priade pouzivani v souladu s navodem k pouziti se na nadobu z nerezové oceli vašeho tlakového hrnce TEFAL poskytuje 10-letá záruka na: -Vsechny vady souvisejici s kovovou konstrukci vaśnádoby, - Jakékoliv prečasné poskození kovu dna. - Na ostatni materiały nadoby a rovnęż na vsechny ostatni součástky tlakového hrnce se vztahuje záruka na jakoukoliv vadu zpracoványnebo materialu na záručné lhútu stanovenou platnymi právními predpisy v zemi nakupu a od data nakupu. - Tato smluvní záruka bude uznána po predloženiPokladniho dokladu nebo faktury suvedením data nákupu. - Do tete záruky nespadají: - Skrábance a barevné zmeny v dusledku starnutí v pripadě nádob s nepřilnavým povrchem. Oderky zpusobene kontaktem vika s nadobou s neprilnavym povrchem. Vady zpusobene nedodrzenim dulezitychPokynu nebo nedbalym pouzivanim,zejmena pak: -Nárazy, pády, používání v troubre,... - K uplatnéni tét o záruky je možno vyuzit pouze autorizovaná servisní střediska TEFAL. - Vyuzijte informacni Telefoni linky na adresenejblizsiho autorizovaneho servisniho strediska TEFAL.Zákonna značeni
| Značení Umistěné | |
| Obchodní značka Na víku | |
| Rok vyroby a vyrobní šarže Referencné císló modelu Maximální bezpečnostní tlak (PS) Maximální provozní tlak (PF) | Na víku |
| Objem Na vnější dnu nádoby. | |
| Poštovní adresa vyrobce Na vnější dnu nádoby. |
- Podílejme se na ochraněživotnéprostředí!
 ① Váš prístroj obsahuje Četné zpětné použitelné nebo recyklovatelné materialy. Na konciŽivotnosti jej proto odevzdejte na sběrném mistrěk recyklaci.Společnost TEFAL odpovída na vaše dota
| Problémy | Doporučení |
| V prípadě obtížného otevíránsá / nebo zavíránsí: | Sejměte těsněné/a propláchněte jej vodou.Těsněné neutírejte a nasad'te jej zpět do víka - obr. 19. |
| Pokud se vám nedaří uzavřit víko: | Zkontrolujte, zda je rukojeť víka ve svislé poloze.Zkontrolujte správnou pozici těsněné (viz odstavec „Čišěnéú a Údržba”).Zkontrolujte, ze je víko rádně umístěné, jak je to znázorněno na - obr. 1.Propláchněte těsněné pod vodou a nasad'te jej do víka aniž byste jej otrěli - obr. 19 a prítom se ujistěte se, ze těsněné dobře zapadlo pod zářezy víka - obr. 15. |
| Pokud se tlakový hrnec ohřival pod tlakem bez tekutiny uvnitř: | Nechte jej zkontrolovat v autorizovaném servisním středisku TEFAL. |
| Pokud bezpečnostné pojistka klape a vypoustí páru: | To je v průběhu prvních minut normálné: umožnéuje to únik vzduchu prěd vařením. |
| Pokud bezpečnostné pojistka nevystoupila a z ventilu během vařeni nic neuníká: | V prvních minutách je to bězné.Pokud stav prětrváva, zkontrolujte, zda:- Vykon tepelného zdroje je dostatečné silné, pokud nezvyě ste jej.- Množstvi tekutiny v nádobě je dostatečné.Provozní ventil (A)je umístěn na .- Je tlakový hrnec rádně zavřěné.- Těsněné nebo okraj nádoby nejsou poškozené.- Těsněné je správně umístěné. |
| Pokud bezpečnostné pojistka vystoupila a z ventilu během vařeni nic neuníká: | Během prvních několik minut se jegnó o bězný jev.Pokud problém prětrváva, naliJEte studenou vodu do dřezu a ponořte dno tlakového hrnce. Nechte jej ponořěny ve vodě, dokud se bezpečnostné pojistka (D)nedostane do spodní polohy.Vycižte provozní ventil (A) - obr. 16 a odvod páry - obr. 17 a zkontrolujte, zda lze bez obtíží zatlacit kulicku bezpečnostného ventilu - obr. 18. |
| Pokud pára uníká kolem víka a kolik je ve spodní poloze, zkontrolujte: | Správné uzavřěné víka. Polohu těsněné víka. Správný stav těsněné, prípadné je vyměné. Čistotu víka, těsněné a jeho uložéní ve víku. Správný stav okrajě námody. |
| Pokud se vám nedaří otevřít víko: | Zkontrolujte,Že bezpečnostné pojistka (D)je ve spodní poloze. Pokud se tak nestane, nalijte studenou vodu do dřezu a ponořte dno tlakového hrnce. Nechte jej ponořnéve vodě, dokud se bezpečnostné pojistk (D)nedostane do spodní polohy. K vypušťěné páry nikdy nepoužívejte bezpečnost pojistku (D). Otočte pracovní ventil (A)do holohy. |
| Pokud potraviny nej-sou uvařné nebo jsou naopak spálené, zkontrolujte: | Dobu vařeni. Vykon tepelného zdroje. Správnou polohu pracovního ventilu (A). Množství tekutiny. |
| Pokud se potraviny v tlakovém hrnci spálily: | Než námobu umyjeté, nechte ji nějakou dobu odmočit. Nikdy nepoužívejte louh nebo produktу na bázi chloru. |
| Pokud se spustí některý z bezpečnostnéch systémů: | Vypněte tepelný zdroj. Nechte tlakový hrnec vychladnout a nepřenášejte jej. Vyčkejte, dokud bezpečnostné pojistka nesestoupí, a otevřete. Zkontrolujte a včistěte pracovní ventil (A), odvod par, bezpečnostné ventil a těsněné. Zkontrolujte,Že jsou rádně dodrženy podmíky plnéné. Pokud porucha prětrévá, nechte vyrobek zkontrolovat v autorizovaném servisním středisku TEFAL. |
| Pokud zpozorujete výskyt stop oxidace: | V extrémních prípadech použití vysoce vykonné nerezové oceli nezabruǎuje výskytu oxidace. Pokud zpozorujete stopy oxidace, odstraťe je třením brusnou houbou prěd opětovním použitím tlakového hrnce. |
TABULKA PRO VARENÍ
Zelenina
ZELENINA (ČERSTVA))
NA PÁRE
Složka v parnim kosi a 750 ml vody na dně tlakového hrnce.  PONORENÍ
Složka ve vode a bez použití kõse.PULZY PONORENÍ
Bez kose.  | Papriky nakrajené na pólky (550 g) (na páře) | 14 až 16 minut |
| Pór, celý a tíly 650 g (na páře) | 9 až 11 minut |
| Pūlený hrách 250 g (ponořeni) | 18 až 20 minut |
| Rūžicková kapusta (na páře) | 10 až 12 minut |
| Rūžicky brokolice 600 g (na páře) | 9 až 11 minut |
| Rūžicky květák u 600 g (na páře) | 10 až 12 minut |
| Repá, Červéná, nakrajena na Čtvrtky (ponořeni) | 20 až 25 minut ( Podle velikosti) |
| Špenát (na páře) | 3 až 4 minut |
| Tuřín, krájený na kostický (500 g) (na páře) | 14 až 16 minut |
| Zelená Čočka 250 g (ponořeni) | 14 až 16 minut |
| PONOřENÍ Bez koše. MAX 1 | MNOŽSTVÍ VODY | MNOŽSTVÍ RYZE | DOBA VAŠRENÍ | |
| 2 OSOBY 40 | 0 ml / 2 sklenice 150 | g / 1 sklenice | 7 až 8 minut4 OSOBY | |
| 500 ml / 2,5sklenice | 250 g / 2 sklenice | |||
| 6 OSOB | 700 ml / 3,5sklenice | 375 g / 3 sklenice |
| ČERSTVÉ MRAŽENÉ | ||
| Filety z mořského d'asa (1 kg) každá o hmot-nosti 75 g | 5 až 6 minut 7 až | 8 minut |
| Hoveží pečeně (1 kg, průměr 8-11 cm) 30 až 35 minut 45 až 50 minut | ||
| Jehněčí kolína: 2 (0,95 kg) 40 až 45 minut | 1 hodina 5 minut až1 hodina 15 minut | |
| Králík (1,5 kg porcovany) 8 až 9 minut 20 až 23 minut | ||
| Křepelka: 4 | 9 až 10 minut | 18 až 20 minut |
| Kuřátka: 2 (1,3 kg) | 23 až 25 minut 40 | až 45 minut |
| Kuře (1,35 kg) | 23 až 25 minut | 1 hodina až 1 hodina 10 minut |
| Lososové steaky: 4 (0,8 kg) | 5 až 6 minut 7 až 8 minut | |
| Mladá kachna (1,8 kg) | 45 až 47 minut 50 | až 55 minut |
| Telecí panenka: 0,7 kg | 17 až 21 minut | 33 až 38 minut |
| Telecí koleno (0,8 kg, průměr 5-7 cm) | 17 až 19 minut 35 | až 40 minut |
| Telecí závitky: 4 | 10 až 12 minut | x |
| Tužákové steaky: 4 (0,7 kg) | 5 až 6 minut 7 až | 9 minut |
| Vepřová panenka: 2 kusy každý o hmotnosti350 g | 13 až 15 minut 26 | až 29 minut |
| Vepřové koleno (0,8 kg, průměr 8-10 cm) | 30 až 35 minut | 1 hodina 5 minut až1 hodina 15 minut |
VAŽNE MJERE OPREZA
Pije uporabe ekspres lonca pažljivo pročitajte sve upute i pomoc uvijek potražite u „Uputama za korisnika".
Uporabom koja nije u skladu s uputama moze doci do ostecenja.
Radi vase sigurnosti, urejad je izrajen sukladno odgovarajućim normama i pravilnicima: - Direktiva o tlačnoj opremi - Pravilnikom o materijalima koji dolaze u reposredan dodir s hranom - Zastita okolisa| OBAVEZNE PROVJERE PRIJE SVAKE UPORABE | PROVJERITI vizualno na danjem svjetlu, je li odvod za ispustanje par prohodan - sl. 13. moze li se kuglica sigurnosnog ventila micati - sl. 18. jesu li brte povlopca postavljene na svaki od utora za poklopce - sl. 15. jesu li ručke na posudi pravilno pričvršćene. Ručke posude su sigurnosni dijelovi. Nikada ih nemojte sami mijenjati. |
| UVIEK POSTUJTE SLJEDEĆ KOLICINE PRI PUNJENJU | Nikad ne koristite ekspres lonac bez tekućine jer se mož značajno ošetiti. Pripazite da tijekom kuhanja uvijek im dovoljno tekućine. Minimalno 25 cl - sl. 4. Maksimalno 2/3 visine posude, oznaka MAX 2 - sl. 5. Tijekom kuhanja na paru hrana u košari za paru ne smije biti u kontaktu s vodom - sl. 6 i 7. Maksimalno 1/3 (oznaka MAX 1) za kašaste namirnice koje se šire i/ili pjene tijekom kuhanja kao što su riža, mahunarke, sušeno povrće, kompoti, bundeve, tikvice, mrkva, krumbpir, riblji fileti... Namirnice koje se stavljaju u košaru za paru ne smiju premašivati razinu MAX 2 posude. |
| PRIJE I TIJEKOM KUHANJA | Nemojte dozvoliti djeci da se približavaju ekspres loncu tijekom uporabe. Vaš ekspres lonac kuha pod pritiskom. Zbog neodgovarajuće uporabe要考虑 doci do povreda izazvanih opeklinama. Prijce uporabe provjerite je li ekspres lonac odgovarajuće zatvoren. (Pogledajte odjeljak „Zatvaranje“). Provjeravajte tijekom kuhanja da li ventil stalno šiasti. Ako n izlazi dovoljno pare, smanjite tlak u proizvodu i provjerite ima li dovoljno tekuciće i je li odvod za ispustanje pare prohodan. Nakon ovih provjera, ako para i dalje ne izlazi, lagano pojacajte izvor topline. Nemojte kuhati namirnice koje bi mogle blokirati odvode sigurnosnih dijelova: - bobičasto VOCE - ječmena kaša - zobene pahuljice - sušeni grašak - rezanci, makaroni, špageti - rabarbara - ribizle U ekspres loncu nikad nemojte priremati recepte na baziŽivotinjskog mlijeka. Ako imate ekspres lonac Čija je posuda od nehrdăjućeg Čelika, ne stavljaje krupnu sol u ekspres lonac već dodajte sitnu sol na kraju kuhanja. Na taj način Čete izbjiće pojavu „mrljica“ koje bi mogle utjecati na dno Vašeg ekspres lonca. Ne upotrebljavaje ekspres lonac za prženje u ulju pod tlakom. Ekspres lonac koristite samo u svrhe za koje je namijenjen. Ne stavljaje ekspres lonac u ugrijanu pećnicu. Nikad u ekspres lonac ne stavljaje aluminijsku foliju koja{nije u kalupu. Nikad ne stavljaje plastičnu foliju u ekspres lonac Alkoholne su pare zapaljive. Prokuhajte otprilike 2 minute prije nego što stavitePoklopac. Nadzirite svoj urežaj u slučaju pripreme jela na osnovi alkohola. Sukladno uputama za uporabu, koristite jegan ili višekompatibilnih izvora topline. |
NAKON KUHANJA...
- Za modele s neprijanjajućem slojem: nemojte upotrebljavati kuhinjsku metlicu ili metalni, odn. oštri kuhinjski pribor. Ne cijedite svoj kuhinjski pribor udarajuči o rub posude jer je možete ostetiti i izazvati propustanja. Postepeno okrecite radni ventil (A) odabiruci po zeiji brzinu dekompresije, a zaustavite se na oznaci slikovnog prikaza sl. 10. Ako tijekom ispustanja pare primijetite nepravalno prskanje, vratite radni ventil (A) u položaj kuhanja „Ekspresni Ionac", a zatim izvrsite brzu dekompresiju u hladnoj vodi - sl. 14. Ako se sigurnosni štapić (D) ne spušta, stavite ekspresni Ionac u hladnu vodu - sl. 14. Nikad ne dirajte sigurnosni stapić. - Nakon kuhanja mesa prekrivenog slojem koze koja bi pod utjecajem pritiska mogla nabubriti (npr. goVEDi jezik...), ne režite meso dok god je koza nabubrena jer bi mogla puknuti i izazvati opekline. Pripazite da prise kuhanja izbodete meso. Za kasaste namirnice koje se sire i/ili pjene tijekom kuhanja kao sto su riza, mahunarke, sušeno povrće, kompoti, bundeve, tikvice, mrkva, krumpir, riblj fileti... Pustite ekspresni lonac nekoliko minuta da se ohladi, a zatim ga ohladite u hladnoj vodi. Ravnomjerno i lagano protresite ekspresni lonac prije svakog otvaranja, nakon sto ste provjerili da se sigurnosni štapić spustio, kako biste izbjegli izlaženje mjehurića pare koji bi vas mogli opeci. Ta je radnja osobito važna pri brzom ispustanje pare ili nakon hladenja u hladnoj vodi. Vrlo pažljivo premjestajte Vaš ekspres lonac dok je pod pritiskom. Ne dodirujte vruce povrsine. Rabite ručke i tipke. Rabite rukavice, ako je potrebno. - Kada se radi o juhama, savjetujemo vam da obavljate brzu dekompresiju u hladnoj vodi (pogledajte odlomak „Zavrsetak kuhanja na način „Ekspresni lonac"). - Pije Ngo što otvorite ekspres lonac, provjerite je li venti na položaju dekompresije. Sigurnosni štapić (D) mora biti u donjem položaju. Nikad nemojte nasilno otvarati ekspres Ionac. Budite sigurni da se unutarnji pritisak smanjio. Sigurnosni štapić (D) mora biti u donjem položaju. (Pogledajte odjeljak „Sigurnost").| ODRŽAVANJE | Ako zakljucite da je dio Vašeg ekspres lonca slomljen ili napuknut,nikako ga nemojte pokušavati otvoriti ako je zatvoren, pricekajte da se potpuno ohladi prise nego što ga premješate, nemojte ga više koristiti i odnesite ga u ovlăsteni servisni centar TEFAL na popravak. Ne obavljaje nikakve zahvate na sigurnosnim sustavima lonca osim Čišćenja i odžavanja. Koristite samo originalne dijelove TEFAL koji odgovaraju Vašem modelu. Osobito rabite posudu lonca iPoklopac TEFAL. Nemojte koristiti ekspres lonac za Čuvanje kiselih ili slanih namirnica prije i poslije kuhanja jer bi mogle ošteti vašu posudu. Očistite i operite svoj ekspresni lonac neposredno nakon svake uporabe. Nikad ne perite radni ventil (A), brtvu (I), tajmer* (F), ni posudu s neprijanjaućim slojem u perilici za posude. Nikad ne perite tajmer* (F) pod vodom. Nikad ne koristite izbjeljivač ili klorirane proizvode jer bi mogli izmijeniti svojstva nehrdăjućeg Čelika. Ne ostavljajePoklopac da se nameće u vodi. Brtvu zamijenite svake godine ili akо se na njoj pojav pukotine. Nakon 10 godina uporabe obvezno svoj ekspres lonac dajte provjeriti u ovlăstenom servisnom centru TEFAL. Kad pospremate ekspres lonac: obruto okrenitePoklopa na posudi kako biste izbjegli prijevremeno trošenje brtv peklopca. |
SACUVAJTE OVE UPUTE
Dijelovi (Vidjeti opisnu shemu)
A. Radni ventil B. Odvod za ispustanje pare C. IOznaka polożaja ventila D. Sigurnosni Štapić (pogledajte odjeljak „Sigurnost"). E. Sigurnosni ventil F. Tajmer* G. RučkaPoklopca H. Poklopac I. Brtva J. Kosarica za kuhanje na pari* K./ L. Tronožac* M. Rucka posude N. Oznake maksimalnog punjenja O. PosudaObavezne provjere prise svake uporabe
Provjera radnog ventila
 - Provjerite da je ispusni otvor radnog ventila slobodan (pogledajte odlomak „Skidanje i postavljanje radnog ventila").Provjera sigurnosnog ventila
 - Provjerite moze li se kuglica sigurnosnog ventila pomicati (upotrijebite stapić). Uporaba
 Kuhanje na način Ekspres Ionac  Kuhanje na način običnog lonca*  DekompresijaOtvaranje,
- Premjestite ručkuPoklopca iz vodoravnog u okomiti položaj -sl.3 Poklopac se okrece. - PodignitePoklopac. - U slučaju problema s otvaranjem proizvoda: stavite brtvu pod mlaz vode i ponovo je vratite naPoklopac bez brisanja - slika 19 te pripazite da je dobro postavite u utorePoklopca - slika 15.Zatvaranje
Budite sigurni da je ručkaPoklopca u okomitom položaju. - PostavitePoklopac na posudu kako je prikazano na -sl.1 takodaporavnate plasticni dio s ručkama posude. Vratite ručkuPoklopca iz okomitog u vodoravni položaj -sl.2 - Poklopac se okrece.Ako ne možete zatvoritiPoklopac:
- Provjerite je li brtva na mjestu i je liPoklopac dobro postavljen. - U slučaju problema sa zatvaranjem proizvoda: stavite brtvu pod mlaz vode i ponovo je vratite naPoklopac bez brisanja - slika 19 te pripazite da je dobro postavite u utorePoklopca - slika 15.Prva uporaba
- Za modele s neprijanjajućom podlogom: operite i cijelu unutarnju podlogu lagano premažite uljem za kuhanje.Ovisno o modelu:
Postavite tronožac\*L) i kosaru\*J) na dno posude. - Pričvrstite tronožac\*K) za kosaru\*J), zatim sve stavite na dno posude. - Napunite posudu (O) vodom do 2/3 (MAX 2) - sika 5. Zatvorite ekspres Ionac. - Poravnajte slikovni prikaz radag ventila (A) s indicatorom položaja ventila (C) - sl. 9.   Stavite ekspres Ionac na izvor topline koji zatim podesite na majvecu jačinu. - Kada para počne izlaziti iz ventilà smanjite jačinu izvora topline i PODESITE na 20 min. Kada protekne 20 min, ugase izvor topline. - Poravnajte slikovni prikaz radnog ventila (A) s indicatorom polożaja ventila (C). - Kad se sigurnosni štapić (D) ponovno spusti, Vaš ekspres lonac višeicates不同程度 pod pritiskom. - Otvorite ekspres Ionac - sl. 3 Ocistite ga sredstvom za pranje posuda.Minimalno i maksimalno punjenje
Najmanje 25 cl (2 caxe) - sl. 4. - Najvise 2/3 visine posude, oznaka MAX 2 - sl. 5. - Ne stavljajte krupnu sol u ekspres lonac vec dodajte sitnu sol na kraju kuhanja.Za odreëne namirnice:
Za kasaste namirnice koje se sire i/ili pjene tijekom kuhanja kao sto su riza, mahunarke, sušeno povrce, kompoti, bundeve, tikvice, mrkva, krumpir, riblji fileti... nemojte puniti ekspresni lonac iznad 1/3 (MAX 1) njegove zapremnine. Pustite ekspresni lonac nekoliko minuta da se ohladi, a zatim ga ohladite u hladnoj vodi. Ravnomjerno i lagano protresite ekspresni lonac prije svakog otvaranja, nakon sto ste provjerili da se  sigurnosni štapić spustio, kako biste izbjegli izlaženje mjehurića pare koji bi vas mogli opeci. Ta je radnja osobito važna pri brzom ispustanje pare ili nakon hladenja u hladnoj vodi. Kad se radi o juhama, savjetujemo vam da obavljate brzu dekompressiju u hladnoj vodi (pogledajte odlomak „Zavrsetak kuhanja na način „Ekspresni Ionac").Uporaba košarice za kuhanje na pari*
- Natočite 75 cl vode u dno posude (O).Ovisno o modelu:
- Postavite tronožac\*L i košaru\*J na dno posude. - Pričvrstite tronozac\*(K) za kosaru\*(J), zatim sve stavite na dno posude.    - Tijekom kuhanja na paru namirnice u kosari za kuhanje na pari ne smije biti u kontaktu s vodom - sl.6 i7. Namirnice koje se nalaze u košari za paru* ne smiju premašivati razinu MAX 2.Povlačenje i postavljanje radnog ventila (A)
Da biste izvukli radni ventil (A):
- Poravnajte otvor s indicatorom polożaja ventila (C) pritiskom na prsten radnog ventila (A). Izvucite ga - sl. 11.Za postavljanje radnog ventila:
- Postavite radni ventil (A) - slika 8 tako da poravnate utor radnog ventila s indicatorom položaja (C) vidi sliku pored.  - Umetnite radni ventil (A) takdo da se on spoji sa stapicem za ispustanje pare. - Pritisnite mjesta prikazana strelicama na radnom ventilu (A) i okrenite. Tajmer*
Nikada nemojte upotreblavati indicator vremena u načinu kuhanja „Faitout" (Lonac).
Mjerač vremena osmišljen je da vam pomogne postić rezultate kuhanja omogucujuci vam bolju prilagodbu potrošnje energije. On automatski odbrojava vrijeme kuhanja od postizanja temperature koja odgovara načinu kuhanja „Ekspres Ionac"Kako bi radio, tajmer mora biti prikopčan na ekspres lonac
Pripazite da tijekom kuhanja radni ventil (A) ujednačeno šišti. Ako nema dovoljno pare, lagano pojacte izvor topline, a u suprotnom slučaju, smanjite jačinu izvora topline.| 1 Kako bistepokrenuli tajmer:pritisnite tipku. |
| 2 Podesite vrijeme kuhanja(u minutama). |
| Ako ste pogrešno unijeli vrijeme kuhanja, pričekajte 4 sekunde da svjetlo prestane treperiti,a zatim dugo pritisnite tipku za ponovno postavljanje na nulu. |
| 3 Postavite izvor topline na maksimum. |
| 4 Kada je Vaš ekspres lonac postigao temperaturu kuhanja,tajmer zvoni i započinje odbrojavanje vremena (brojke trepere). Smanjite jačinu izvora topline. |
| 5 Kada vrijeme kuhanja istekne,tajmer zazvoni. Za zaustavljanje zvonjave tajmera,pritisnite tipku. Ugasite izvor topline. |
Dugi pritisak na tipku postavlja tajmer na nulu i gasi ga.
HRPostavljanje i uklanjanje tajmera*
- Kako bist e tajmer (F) postavili na mesto - sl. 12, prvo umetnite dio „strana s tipkom" na modulu, a zatim pritisnite kako bist prekopcali suprotnu stranu. - Kako biste uklonili tajmer (F), podignite ga i izvadite.Zamjena baterije tajmera*
 Baterija tajmera je plosnata mala okrugla baterija CR2032. Ako se oznaka ne oja ljuje ili zaslon ne radi, zamijenite bateriju. Vijek trajanja baterije ovisi o učestalosti uporabe tajmera. - Baterija tajmera sadržava dimetoksietan br. CAS 110-71-4. Ona je u skladu s europskim propisima. Zbog Vase sigurnosti i ochuvanja okoliša: ne otvarajte bateriju, ne izlažite je visokim temperaturama, ne bacajte je u kućanski OTPad; odnesite je u centar za prikupljanje rabljenih baterija. - Nepunjive baterije ne smiju se ponovo puniti. - Razlicite vrste baterije ili nove i korištene baterije ne smiju se miješati. Baterije se trebaju umetnuti s ispravno okrenutim polovima. - Isprażnjene baterije trebaju se izvaditi iz ureðaja i sigurno zbrinuti. - Ako se urejad treba spremiti tijekom dužeg razdoblja i neće se upotrebljavati, trebate izvaditi baterije. Strujni priključci ne smiju se katko spajati. Stavite uredj na ravno, na kuhinjsku radnu plocu. - Za uklanjanje baterije iz tajmera, otvoritePoklopac baterijepomocu kovanice (pogledati crtež). Zamijenite bateriju. Vratite brtvu na mjesto u lezieste. Postavite polumjesc poLopca baterije nasuprot. pomjesecu Jerača vremena. - Pažljivo okrenitePoklopac baterije, uz lagani pritisak, poravnavajući polumjesecoklopca baterije s krugom mjerača vremena. - Postavite ga ravno na radnu povrsinu takdo ja jePoklopac u vodoravnom položaju. - Nemojte pokušavati silom zatvoritiPoklopac baterije. Nemojte prelaziti grančnike. - U slučaju gubitka, drugi tajmer možete nabaviti u svim našim ovlastenim servisnim centrima TEFAL. Nikada ne stavljajte tajmeru vodu ni u perilicu posuda. Nikada nemojte upotreblavati indicator vremena u načinu kuhanja „Faitout" (Lonac).Prijekuhanja
- Prije svake uporabe, izvadite radni ventil (A) - sl. 11 i vizualno na danjem svjetlu provjerite je li odvod za ispustanje pare (B) prohodan - sl. 13. - Provjerite moze li se sigurnosni ventil micati (vidjeti odjeljke „Ciscenje" i „Obvezne provjere prise svake uporabe") - sl. 18. Dodajte svoje sastojke i tekuci nu.     Zatvorite ekspres Ionac - sl. 2 - U slučaju problema sa zatvaranjem proizvoda: stavite brtvu pod mlaz vode i ponovo je vratite naPoklopac bez brisanja - slika 19 te pripazite da je dobro postavite u utorePoklopca - slika 15. - Postavite radni ventil na njegovo mesto (A) - sl. 8. Kuhanje na način „Ekspres Ionac"
- Okrenite radni ventil (A) u položaj kuhanja na način „Ekspres Ionac" -sl. 9. - Budite sigurni da je ekspres lonac odgovarajuće zatvoren prise stavljanja u rad - sl. 2 Stavite ekspres Ionac na izvor topline koji zatim podesite na majvecu jačinu. - Za modele koji imaju tajmer*: postavite vrijeme kuhanja navedeno u receptu (vidjeti odjeljak „Uporaba tajmera"). - Zveckanje i parni oblačić koje proizvodi sigurnosni štapić su normalni, oni omogucavaju ispustanje zraka prije kuhanja.Tijekom kuhanja na način „Ekspres Ionac"
- Ako radni ventil (A) kontinuirano ispustavodenu paru, proizvodeci pritom ujednaceni zvuk (sisti), smanjite izvor topline. - Zapocnite odbrojavante vremena kuhanja navedenog u receptu. - Provjeravajte tijekom kuhanja da li ventil ispravno šisti. Ako ne izlazi dovoljno pare, lagano pojacajte izvor topline, a u suprotnom ga smanjite.Kraj kuhanja na način „Ekspres Ionac".
Za ispustanje pare:
- Kada se izvor topline ugasi, imate dvije mogucnosti: - Postepena dekompresija: postepeno okrecite radni ventil (A) i zaustavite ga na oznaci slikovnog prikaza sl. 10.   - Brza dekompressija u hladnoj vodi: napunite hladnu vodu u sudoper i u nju uronite dno vašeg ekspresnog Ionac sve dok se sigurnosni štapić ne spusti -sl. 14. Kad se sigurnosni štapić (D) ponovno spusti, Vaš ekspres Ionac više një pod pritiskom. Okrenite radni ventil (A) u položaj  Faza 1  Faza 2 - Możete otvoriti ekspres lonac - sl. 3. - U slučaju problema s otvaranjem proizvoda: stavite brtvu pod mlaz vode i ponovo je vratite naPoklopac bez brisanja - slika 19 te pripazite da je dobro postavite u utorePoklopca - slika 15. Ako tijekom ispustanja pare primijetite nepravilno prskanje, vratite radni ventil (A) u položaj kuhanja „Ekspresni Ionac" , a zatim izvršite brzu dekompresiju u hladnoj vodi. Ako se sigurnosni štapić (D) ne spusti, napunite hladnu vodu u sudoper i u nju uronite dno vašeg ekspresnog Ionac sve dok se sigurnosni štapić ne spusti - sl. 14.Nikad ne dirajte sigurnosni štapić.
- Za kašaste namirnice koje se šire i/ili pjene tijekom kuhanja kao što su riža, mahunarke, sušeno povrće, kompoti, bundeve, tikvice, mrkva, krumpir, riblj fileti...nemojte puniti ekspresni lonac iznad 1/3 (MAX 1) njegove zapremnine. Pustite ekspresni lonac nekoliko minuta da se ohladi, a zatim ga ohladite u hladnoj vodi. Ravnomjerno i lagano protresite ekspresni lonac prije svakog otvaranja, nakon što ste provjerili da se sigurnosni štapić spustio, kako biste izbjegli izlaženje mnejurica pare koji bi vas mogli opeci. Ta je radnja osobito važna pri brzom ispustanje pare ili nakon hladjenja u hladnoj vodi. Kada se radi o juhama, savjetujemo vam da obavljate brzu dekompresiju u hladnoj vodi (pogledajte odlomak „Zavrsetak kuhanja na način „Ekspresni lonac"). Kuhanje na način običnog lonca*
- Okrenite radni ventil (A) do položaja za kuhanje na način „Obicni Ionac" tu svrhu primijenite dovoljnu silu da biste prošli urez koji se nalazi u položaju dekompresije. - Budite sigurni da je ekspres lonac odgovarajuće zatvoren -sl. 2PRIJE stavljanu urad. - Stavite ekspres Ionac na izvor topline postavljen na malu jačinu. - Započnite odbrojavanje vremena kuhanja navenedenog u receptu. - Pri kuhanju na način „Obični Ionac", možete bilo kada otvoriti ekspres lonac kako bist promiješali, provjerili kako naproduje kuhanje ili dodali sastojke. - U slučaju problema s otvaranjem proizvoda: stavite brtvu pod mlaz vode i ponovo je vratite naPoklopac bezbrisanja - slika 19 te pripazite da je dobro postavite u utorePoklopca - slika 15. - Ako je izvor topline prejak, ekspres lonac bi se mogao zakljucati (sigurnosni stapić (D) se penje i blokira otvaranje) te se ručkaPoklopca u tom slučaju ne može pomaknuti ili ne otvara ekspres lonac. U tom slučaju smanjite ili isključite izvor topline. U slučaju da kuhate na klasičnim elektricnim pločama, uklonite ekspres lonac s izvora topline. - Za modele s neprijanjajućim slojem: nemojte upotreblavati kuhinjsku metlicu ili metalni, odn. oštri kuhinjski pribor. Ne cijedite kuhinjski pribor lupkanjem o rub posude jer biste je möglich ošteiti i prouzrokovati curenje. - Nikad nemojte masti zagrijavati dok se ne karboniziraju. Pare koje se ispustaju tijekom kuhanja mogu biti opasne zaŽivotinja s osjetljivim respiratornim sustavom kao što su ptice. Vlasnici ptica moraju ih premjestiti iz kuhinje.Sigurnost
Vas ekspres lonac opremljen je s više sigurnosnih mehanizama:■ Sigurno zatvaranje:
- AkoPoklopac nije dobros postavljen ila kote zaboravili preklopiti drske Poklopca, para ce izlaziti na sigurnosnom stapicu (D) ekspresnog lonca i nece se moci stvoriti pritisak.- Sigurnost kod otvaranja:
- Ako je Vaš ekspres Ionac pod tlakom, sigurnosni štapić (D) je u gornjem položaju i ručkaPoklopca za otvaranje/zatvaranje (G) ne moze se pomaknuti. - Nikad nemojte nasilno pokušavati otvoriti ekspres lonac.- Nikako nemojte dirati sigurnosni štapić (D).
- Budite sigurni da je unutarnji pritisak pao takdo provjerite je li sigurnosni stapić (D) u donjem položaju. - Ručke posude su sigurnosni dijelovi. Nikada ih nemojte sami mistrjenati. Nikada nemojte koristiti druge modele ručki. - Ako ste pomaknuli ručkuPoklopca za otvaranje/zatvaranje (G) u okomiti položaj, a ekspres lonac je još uvijek bio pod pritiskom, ne možete ga otvoriti. Ova funkcjija je dodatna sigurnosna mjera. - Vratite ručkuPoklopca u vodoravni položaj i pričekajte da se sigurnosni štapić (D) spusti u donji položaj.Dvije sigurnosne mjere od prekomjernog tlaka:
- Prvi mehanizam: sigurnosni ventil (E) otpuša pritisak - sl. 20 - Drugi mehanizam: brtva dopuša ispustanje pare izmeduPoklopca i posude -sl.20Ako se jeder od sigurnosnih sustava aktivira na povecanje tlaka:
- Ugasite izvor topline. - Pustite ekspres lonac da se potpuno ohladi. - Otvorite. - Provjerite i očistite radni ventil (A), odvod za ispustanje pare (B), sigurnosni ventil (E) i brtvu (I) - sl. 16 - 17- 18. Vidjeti odjeljke „Čišćenje" i „Obvezne provjere prije svake uporabe". - Ako nakon ovih provjera i cisćenja vaš proizvod propuša ili više ne radi, odnesite ga u ovlašeni servisni centar TEFAL.Preporuke za uporabu
1 - Vodena para je jako vruca pri izlasku iz radnog ventila. Pazite na mlaz pare. 2 - Kad se sigurnosni štapić digne više ne možete otvoriti ekspres lonac. 3 - Kao i kod svakog uredaja za kuhanje, budite vrlo pažljivi kod korištenja ekspres lonca u blizini djece. 4 - Za premješanje ekspres lonca poslužite se ručkama na posudi. 5 - Nemojte ostavljati hranu da stoji u ekspres loncu. Nikad nemojte prenositi ekspres lonac noseci ga za ručkuPoklopca. 6 - Nikad ne koristite izbjeljivač ili klorirane proizvode jer bi mogli izmijeniti svojstva nehrdajućeg Čelika. 7 - Ne ostavljajePoklopac da se namece u vodi. 8 - Brtvu zamijenite svake godine ili ako se na njoj pojave pukotine. 9 - Čišćenje Vaseg ekspres Ionca izvodi se obavezno dok je hladan i prazan. 10 - Nakon 10 godina uporabe obvezno svoj ekspres Ionac dajte provjeriti u ovlastenom servisnom centru TEFAL.Čišćenje
Za dobro funkcioniranje Vaseg ekspres lonca morate se držati ovih preporuka za cisćenje i održavanje nakon svake uporabe. Smeckasta boja ilpruge koje se mogu pojviti nakon duge uporabe ne predstavlaju problem. Trošenje vanjske obloge(ovisno o modelu) povezano s kontaktomPoklopca i posude je normala pojava. Za ekspres lance s neprijanjajućom podlogom (ovisno o modelu): mogu se pojaviti I agane pr uge i abrazij e koje ne utj eču na neprijanjajuća svojstva podloge. - Operite ekspres lonac nakon svake uporabe mlakom vodom uz dodatak sredstva za pranje posuda. Isto takoto postupite i s kosaricom*. - Ne koristite izbjeljivač ili klorirane proizvode. Nemojte zagrijavati posudu dok je prazna.Za ciścenje unutraśnjosti posude:
- Operite spužvicom i proizvodom za pranje posuda. - Ako na unutrasnjosti posude od nehrdajuceg celika postoje raznobojne mrlje ili bjelkasti tragovi, očistite je alkoholnim octom.Za ciścenje unutrażnjosti alumijske posude s neprijanjajućim slojem:
- Kako bist produljili trajanje Vašeg proizvoda, preporučujemo Vam ručno pranje. - Operite toplomvodom, proizvodom za pranje posuda i mekom spužvicom. - Nemojte koristiti praskasto sredstvo za cijscenje ni abrazivne spužvice. - Ako su Vam namirnice zagorile, napunite posudu toplom vodom i pustite da se namače. Zatim očistite sredstvom za pranje posuda.Za ciścenje vanjske povrsine posude:
- Operite spužvicom i proizvodom za pranje posuda. Posudu i kosaricumozete staviti u perilicu posuda. Posudu s neprijan jajućim sloj em (o visno o modelu) nemojte stavlj ati u perilicu posuă jer deter dženti u tab letama sadržavaju vrlo agresivne i korozivne tvari koje oštećuju aluminijske dijelove. Intenzivnom uporabom posude s neprijanjajućim slojem (ovisno o modelu)MZe doci do lagane promjene u boji neprijanjajućeg sloja (moze požutiti, dobiti mrlje).Za ciścenjePoklopca:
- Poklopac operite spužvicom i proizvodom za pranje posuda. SušitePoklopac u okomitompoložaju kako bi se preostala voda mogla ocijediti izmeu metalnih i plasticnih dijelovaPoklopca.Za ciścenje brte povklopca:
Nakon svakog kuhanja očistite brtvu (I) i njezino ležiste. - Za vraçanje brte na mesto, molimo pogledajte - sl. 15 i pazite da brtva dobro sjedne u svaki utorPoklopca.Za ciścenje radnog ventilà (A):
- Izvucite radni ventil (A) - sl. 11. - Očistite radni ventil (A) pod mlazom vode iz slavine -sl. 16. Provjerite moze li se micati: crtez sa strane. Nakon što ste uklonili radni ventil (A), brtvu (I) i tajmer* (F),Poklopac možete staviti u perilicu posuă.  Nikad ne perite radni ventil (A), brtvu (I), tajmer* (F), ni posudu s neprijanjajućim slojem u perilici za posude.Za ciścenje odvoda za ispustanje pare (B) smJEsTeNo g naPoklopcu:
Ukloniteventil(A)-sl.11. - Vizualno na danjem svjetlu prekontrolirajte je li odvod za ispustanje pare prohodan i okrugao - sl. 13. Ako je potrebno, ochistite cackalicom - sl. 17 i isperite.Za ciścenje sigurnosnog ventila (E):
- Očistite dio sigurnosnog ventilà smjesten unutarPoklopca takodag isperete vodom. - Provjerite radi li ispravno snažnim pritiskom na kuglicu (pomocuvatiranog stapica s kojeg ste uklonili vatu) koja mora bitiPokretna - sl. 18. Vidjeti odjeljak „Obvezne provjere prije svake uporabe".Za ciścenje tajmera* (F):
- Upotrijebite Čistu i suhu krpu. Nemojte koristiti otapalo. - Nikada ne stavljajte tajmer u vodu ili u perilicu posuda.Održavanje
Za zamjenu brte ekspres lonca:
- Brtvu ekspres lonca mistrajte svake godine ili ako se na njoj pojave pukotine. - Uvijek kupujte originalnu brtvu TEFAL koja odgovara Vašem modelu (vidjeti odjeljak „Nastavci"). - Za vraćanje brte na mesto, molimo pogledajte - sl. 15 i pazite da brtva dobro sjedne u svaki utorPoklopa.Zaspremanje ekspres lonca:
VratitePoklopac na posudu lonca. - Mehanizam otvaranja/zatvaranja ekspres lonca ne zahtijeva poTEFALno održavanje osim cisćenja. Nakon 10 godina uporabe obvezno svoj ekspres lonac dajte provjeriti u ovlastenom servisnom centru TEFAL.Dodatni pribor TEFAL
- Dodatni pribor za vaš ekspres lonac dostupan u trgovinama:| Dodatni pribor Reference | ||
| Brtva | 3/4/4.5/6 L: vanjski promjer brte: 24 cm | X1010008 |
| 5/7.5/9 L: vanjski promjer brte: 27 cm | X1010007 | |
| Košarica za kuhanje na pari* | 3/4.5/4/6 L: za posudu promjera 22 cm | 792185 |
| 5/7.5/9 L: za posudu promjera 24 cm 79 | 2654 | |
| Tronožac* (L) | 792691 | |
| Tajmer* | X1060007 | |
Karakteristike
Promjer dna Vaseg ekspres lonca - reference| Zapremina | Ø posude | Ø dna | Clipso Minut® Perfect / Easy | Clipso Minut® Duo couleur | Clipso Minut® Duo Gourmet | Materijal posude |
| 3 L 22 cm 15.5 cm | P46205 | - | Nehrdajuće Celik | |||
| 3 L 22 cm 18 cm | - | - | P46605 | |||
| 4 L 22 cm 14 cm | -P46042 | - | Obloženi aluminij | |||
| 4.5 L | 22 cm 1 | 5.5 cm P46206 | - | Nehrdajuće Celik | ||
| 5 L 24 cm 14 cm | -P46051 | - | Obloženi aluminij | |||
| 5.2 L | 24 cm 20 cm | - | P46654 | Nehrdajuće Celik | ||
| 7.5 L | 24 cm 18 cm | P46248 | - | |||
| 9 L 24 cm 18 cm | P46249 | - | ||||
| Set 5 L/7,5 L | 24 cm | 14 cm | P46353 | - | ||
| 18 cm | ||||||
Nazivni podaci:
Gornji radni tlak: 65 kPa Maksimalni sigurni tlak: 120 kPaKompatibilni izvori topline
 - Vas ekspres Ionac moze se koristi na svim vrstama kuhala, uključujuci i indukcijsko. - Na elektricnoj ploci promjer ploce treba biti isti ili manji od promjera dna vaseg ekspres lonca. - Na staklokeramičkoj ploci osigurajte da je dno posude uredno i Čisto. - Na plinu plamen ne bi trebao prelaziti promjer posude. - Na svim stednjacima pazite da vaš ekspres lonac bude dobro centriran.Jamstvo
U okviru uporabe preporucene uputama za uporabu, posuda od nehrdajuceg celika Vaseg novog ekspres lonca TEFAL ima jamstvo 10 godina za: - Sve nedostatke u metalnoj strukturi posude, - Svaku preuranjenu istrošenost temeljinog metala. - Drugi materijali posude i svi drugi dijelovi Vaseg ekspres lonca imaju jamstvo za sve nedostatke u proizvodnji ili materijalu, tijekom jamstvenog razdoblja utvrdenog zakonom koji je na snazi u državi u kojoj je kuplejen računajući od datuma kupnje. - Ovo_ce ugovorno jamstvo biti prihvaćeno po predočenju blagajničkog računa ili računa s datumom kupnje. Ova jamstva isključuju: - Pruge i boje nastale starenjem, za posude s neprijanjajućim slojem. - Pruge povezane s kontaktomPoklopca na posudi s neprijanjajućim slojem. - Ostecenja do kojih jeDoslo usljed nepostivanja važnih mjera opreza ili nemarnog koristenja, poTEFALice: - Udaraca, padova, stavljanja u pećnicu... - Samo ovlasteni servisni centri TEFAL osposobljeni su da Vam omoguce koriistenje ovog jamstva. - Molimo nazovite broj za potrošace kako biste doznali adresu najblizeg ovlastenog servisnog centra TEFAL.Propisno označavanje
| Oznaka Mesto | |
| Robna marka NaPoklopcu | |
| Godina i proizvodna serija Referenca modela Maksimalni sigurni tlak (ST) Gornji radni tlak (RT) | NaPoklopcu |
| Zapremina Na vanjskom dnu posude | |
| Poštanska adresa proizvoća Na vanjskom dnu posude |
- Sudjelujmo u zašiti okolíša!
 ① Urejad sadrži brojne materijale koji se mogu ponovno iskoristiti ili reciklirati. Molimo vas da ga odnesete u centar za reciklažni OTPad.TEFAL odgovara na vaša pitanja
| Problemi | Preporuke |
| Ako ne możete otvoriti i/ili zatvoritiPoklopac: | ■ Skinite brtvu i stavite je pod vodu. ■ Vratite je naPoklopac bez brisanja - slika 19. |
| Ako ne możete zatvoritiPoklopac: | ■ Provjerite je li ručkaPoklopca u okomitom položaju. ■ Provjerite je li brtva ispravno stavljena (pogledajte odjeljak „Čišćenje i održavanje"). ■ Provjerite je liPoklopac dobro postavljen kako je prikazano na - sl. 1. ■ Stavite brtvu pod mlaz vode i ponovo je vratite naPoklopac bez brisanja - slika 19 te pripazite da je dobro postavite u utorePoklopca - slika 15. |
| Ako se ekspres lonac zagrijao pod tlakom bez tekućine u posudi: | Dajte ekspres lonac na provjeru u ovlašteni servisni centar TEFAL. |
| Ako sigurnosni štapić zvecka i proizvodi parne oblačiće: | To je normalno tijekom prvih nekoliko minuta: time je omogućen izlazak zraka prije kuhanja. |
| Ako se sigurnosni štapić nije podigao i ništa ne izlazi iz ventilà tijekom kuhanja: | To je normalno tijekom prvih nekoliko minuta. Ako to ne prestane, provjerite: - Je li izvor topline dovoljno jak, a ako nije, pojačajte ga - Je li kolićina tekućine u posudi lonca dovoljna. - Je li radni ventil (A) u položaju - Je li ekspres lonac dobro zatvoren. - Jesu li brtva ili rub posude lonca oštećeni. - Je li brtva dobro postavljena. |
| Ako se sigurnosni štapić podigao i ništa ne izlazi iz ventilà tijekom kuhanja: | To je normalno u prvih nekoliko minuta. Ako se pojava nastavi, napunite hladnu vodu u sudope i u nju uronite dno vašeg ekspresnog lonac swe dok se sigurnosni štapić (D) ne spusti. Očistite radni ventil (A) - sl. 16 i odvod za ispustanje vodene pare - sl. 17 i provjerite može li se kuglica si-gurnosnog ventilà pritisnuti bez teškoća - sl. 18. |
| Ako para izlazi akaokopklopca, a štapić je u donjem položaju, provjerite: | Je liPoklopac dobroszavoren.Položaj brte pavoklopca.U kakvom je stanju brtvia i po potrebi je zamijenite ČistocuPoklopca, brtei njezinog ležista uPoklopcu.U kakvom je stanju rub posude. |
| Ako ne možete otvoritiPoklopac: | Provjerite je li sigurnosni štapić (D) u donjempoložaju.Ako njie, izvršite dekompresiju: napunite hladnu vodu u sudoper i u nju uronite dno vašeg ekspresnog lonac sve dok se sigurnosni štapić ne spusti.Nikad ne dirajte sigurnosni štapić (D).Radni ventil (A) okrenite do položaja |
| Ako namirnice nisu skuhane ili su zagorjele, provjerite: | Vrijeme kuhanja.Jačinu izvora topline.Ispravan položaj radnog ventila (A).Količinu tekućine. |
| Ako je hrana zagorjela u Vašem ekspresloncu: | Ostavite posudu da se namaće neko vrijeme prije no što je operete.Nikad nemojte koristiti izbjeljivač ili klorirane proizvode. |
| Ako se Juda od sigurnosnih sustavaaktivira: | Ugasite izvor topline.Ostavite ekspres lonac da se ohladi bez premještanja. Pricěkajte da se sigurnosni štapić spusti, a zatim otvorite.Provjerite i ocistite radni ventil (A), odvod za ispustanje vodene pare, sigurnosni ventil i brtvu.Osigurajte da je punjenje izvršeno u skladu s uputama.Ako je kvar i dalje prisutan, ekspres lonac dajte na provjeru u ovlašteni servisni centar TEFAL. |
| Ako uočite pojavutragova oksidiranja: | U ekstremnim slučajevima uporaba nehrdajucoğ celika ne jamči da neće doci do oksidiranja. Ako uočite tragove oksidiranja, uklonite ih trljanjem abrazivnom spužvicom prije ponovne uporabe ekspres lonca. |
TABLICA ZA KUHANJE
Povrçé
POVRCE (SVJEZE)
PARA
Sastojak u kosari za kuhanje na pari i 750 ml vode na dnu ekspres lonca.  POTAPANJE
Sastojak u vodi i bez kosare.MAHUNARKE
POTAPANJE
Bez kosare.   # 一 # 一 一 一 一 一 一 一 # 一 一 一 # # 一 一 一 一 一 一 一 一 12 = 一 一 12x - 1 > 0 一 一 一 一 12 = 12 = 一 一 一 一 一 # 一 一 一 12 = 一 一 一 一 # 一 # | Mrkva narezana na okrugle ploške (3 mm) 600 g (para) | 17 do 19 min |
| Paprike babure narezane na polovice (550 g) (para) | 14 do 16 min |
| Patlidžani, oguljeni i narezani na ploške (3 mm), 850 g (para) | 10 do 12 min |
| Poriluk, cijeli i bijeli 650 g (para) | 9 do 11 min |
| Prokulice (para) | 10 do 12 min |
| Repa, nasjeckana na kockice (500 g) (para) | 14 do 16 min |
| Šparoge, bijele (para) | 5 do 6 min |
| Špinat (para) | 3 do 4 min |
| Tikvice narezane na okrugle ploške (3 mm) 600 g (para) | 12 do 15 min |
| Zelene mahune, tanke (600 g) (para) | 10 do 12 min |
| POTAPANJE Bez košare. MAX 1 | KOLICINA VODE | KOLICINA RIŽE | VRIJEME KUHANJA | |
| 2 OSOBE | 400 ml / 2 še | 150 g / 1 ša | 7 do 8 min | |
| 4 OSOBE | 500 ml / 2,5 še | 250 g / 2 še | ||
| 6 LJUDI | 700 ml / 3,5 še | 375 g / 3 še |
Meso / riba
| SVJEŽE SMRZNUTO | |
| Goveča pečenica (1 kg, promjer 8–11 cm) 30 | do 35 min 45 do 50 min |
| Grdobina, fileti (1 kg) u komadima od 75 g 5 | do 6 min 7 do 8 min |
| Janjeća koljenica: 2 kom (0,95 kg) 40 do 45 min | 1 h 05 do 1 h 15 |
| Losos, odresci: 4 (0,8 kg) 5 do 6 min 7 do 8 min | |
| Pačetina (1,8 kg) 45 do 47 min 50 do 55 min | |
| Piletina (1,35 kg) 23 do 25 min 1 h do 1 h 10min | |
| Pilići, mladi: 2 (1,3 kg) 23 do 25 min 40 do 45 min | |
| Prepelica: 4 9 do 10 min 18 do 20 min | |
| Svinjska koljenica (0,8 kg, promjer 8–10 cm) | 30 do 35 min 1 h 05 do 1 h 15 |
| Svinjski filet mignon: 2 komada od 350 g 13 do 15 min 26 do 29 min | |
| Teleća koljenica (0,8 kg, promjer 5–7 cm) | 17 do 19 min |
| Teleći filet mignon: 0,7 kg | 17 do 21 min 33 do 38 min |
| Teleći paupiettes: 4 | 10 do 12 min |
| Tuna, odresci: 4 (0,7 kg) | 5 do 6 min 7 do 9 min |
| Zec (1,5 kg u komadima) | 8 do 9 min |
FONTOS 0VINTÉZKEDÉSEK
A kukta hasznalata elott forditson idot az osszes utasitas elolvasasara, es tajekozodjon a „Hasznalati utmutatobol". A nem rendeltetesszeru hasznalat kovetkezteten a keszülek károsodhat. Az On biztonsága érdekében a készülék megfelel a hatályban levő szabványoknak és előirásoknak: - Nyomás alatti készülékek irányelv - Éelemiszerekkel érintkező anyagok - Környezetvédelem| MINDEN EGYES HASZNÁLAT ELÖTT ELVÉGZENDÜ FONTOS ELLENÖRZÉSK | ELLENÖRIZZE ·naponta, szemrevételezésel, hogy a vizleeresztő vezeték nincs-e eltömödve - 13. ábra. ·hogy aBiztosítószelep golyója MOZog-e - 18. ábra. ·hogy a fedő tömítese illeszkedik-e a fedő minded egyes hornyába - 15. ábra. ·hogy a fazék fogantúyi megfeleloen vannak-e rögzítve. A fazék fogantúyi biztonsági alkatrészek. Soha ne cserélje ki ǒket önálloan. |
| MINDIG TARTSA BE A FELTÖLTÉSI MENNYISÉGEKRE VONATKOZÓ KÖVETKEZÜ SZABÁLYOKAT | ·A kuktát soha ne használja folyadék nélkül, mert súlyosan károsítja a készüléket. Bizonyosodjon meg rola hogy mindig van benne elegendő folyadék főzes közben. ·Minimum 25 cl - 4. ábra. ·Maximum az edény magasságának 2/3-a, MAX 2 jalólés -5. ábra ·Gőzolés során a párolókosárban lévő elelmiszer nem érintkezhet vizzel- 6. és 7. ábra. ·Maximum 1/3 (MAX 1) a főzés során kitáguló vagy felhabsz Pépes elelmiszerek, pédául rizs, Hüvelyesek, szárított zöld ségek, vagy kompólok, oriástok, cukkini, sárgarépa, burgonya, halfilé stb. eséténye. ·A párolókosárba helyezett elelmiszerek nem léphetik tú az edény MAX 2 szintjelzését. |
| FÖZÉS ELÖTT ÉS KÖZBEN | Ne engedje a gyermekeket a mühködésben lévo kukta bözelébe. A kukta nyomás alatt fž. A nem megfelelo használat forrázásos égési sérülèsek okozhat. Üzembe helyezés elött bizonyosodjon meg arról, hogy a kuktát megfeleloen lezárta. (Lásda "Lezárás" c. fejezetet). Fözés során ellenörizze, hogy a szelep folyamatos goźsugarat bocsát-e ki. Ha a gożkiáramlás nem elegndo, csökkentse a nyomást a készülékben, és ellenörizze, hogy a folyadék mennyisége megfelelo-e, valamint, hogy a gożvezéték nincs-e eltömõdve. Ha az ellenörzást követően meg mindig nincs gożkiáramlás, akkor kissé emelje fel a hóforrást. Ne fózzön olyan ételeket, amelyektól eltömõdhetnek a biztonsági részegységek gezetékei: - áfonya - arpagyöngy - zabpehely - sárgaborso - metéltészta, makaróni, spagetti - rebarbara - ribizli Soha ne készítsem allati tej alapú receptekat a kuktkászülékkel. Nemesacél kuktaban ne használjon darabos sós, a fžés végén adjon az etelhez finomsós. Igy elkerülheti a kukta aljan keletkező foltosodást. Ne használja a kuktát nyomás alatt történő olajban sütésre. A kuktát ne használja rendeltetésénék nem megfelelo célokra. A kuktát forró sütöbe tenni tilos. A kuktaba helyezett betétre soha ne tegyen rögzítés nélkül alufóliát. Soha ne helyezzen muányag fóliát a kuktaba Az alkoholgózök gyulékonyak. A fedő felhelyezese elött az alkoholtartalmú etelt forralja kb. 2 percig. Alkoholt tartalmazó receptek készítésekor tartsa felügyelet alatt a kuktát. Csak a készülékker kompatibilis, a használati utasításban megadott hóforrásokat használjon. |
A FÖZÉST
KÖVETÖEN... Ragadásgató bevonattal rendelkezó modelleknél: ne használjon habverôt, fémból keszült illetve éles eszközöket. Ne csepegtesse le az eszközöket a tál szélehez ütogetve, mert megserülhet és szivargás kelethezhet. - Az (A)üzemi szelep fokozatos forgatasával valassza ki a nyomáscsökkentés ütemét. A muveletet a szelep piktogramnál levő allásaban fejezbe be - 10. ábra. Ha a goz felszabadulása közben a normalistól elterő kilövellést tapasztal, allítsa vissza az (A) üzemi szelepet „Automikus fózes" fóző allásba, majd hideg viz alatt vegezzen gyors nyomáscsökkentest - 14. ábra. Ha a biztonsagi szár (D)nem ereszkedik le, tegye a kuktát hideg vizbe - 14.ábra - Soha ne manipulálja a biztonsági rudat. Olyan húsok esétén, amelyeket felső börreteg borít, amely a nyomás hatására felfujódhat (pl.: marhanyelv stb.) ne szurkalja meg a húst addig, amíg ránézésre megduzzadtnak látszik; ellenkező esetben forrázási sérüléseket szenvedhet. Fózés elött szurkalja meg a húst. A fozés során kitáguló vagy felhabzo pépes elelmiszerek, pédául rizs, húvelyesek, szaritott zöld ségek, kompôtok, oriástök, cukkini, sárgarepa, burgonya, halfilé stb. esetében. Hagyja a kuktát néhány percig hülni, majd hideg vizben végezze el a lehûtesét. Minden kinyitas elott Ellenörizzee, hogy a biztonsági szár leereszkedett majd konnyeden razza meg a kuktát, hogy ne törjenek fel esetleg égési serulést okozó gozbuborekok. Ez a muvelet kulönosen fontos a goz gyors kiengedesekor, vagy hideg vizben történô hûtest követöen. A nyomás alatt levő kukta mozgatasát a legnagyobb elővigyázatossággal végezze. Ne érjen a meleg felületekhez. Használja a fogantyúkat és gombokat. Szükség esétén használjon kesztyút. Javasoljuk, hogy levesek keszítékor hideg viz alatt végezzen gyors nyomáscsökkentest (lásd „A fozés befejezese automatikus fozés modban" címu bekezdétst). - A kukta kinyitasa elott ellenorizze, hogy a szeleponyomaszkento pozicioban van-e. ABiztonsagi szar (D)also allasban kell, hogy legyen. Soha ne nyissa ki eroltetve a kuktat. Bizonyosodjon meg arrol, hogy a belso nyomas a normal szintre csokkent. ABiztonsagi szar (D)also allasban kell, hogy legyen. Lasd a "Biztonsag" c. fejezetet.| KARBANTARTÁS | Ha azt tapasztalja, hovy a kukta valamely része töröttt vagy repedt, akkor a zárt kukṭát semmi esetre se nyissa ki, elmozdítás elótt mindenképpen teljesen hütse le, ne használjá tovabb, és vigyte el javításra valamelyik hivatalos TEFAL márkaszervizbe.Az elóirt tisztlétási és karbantartási műveleteken kívül ne végezzen semmilyen beavatkožást a biztonságirendszeren.Kizárólag a készülék modelljének megfelelo eredeti TEFAL alkatrészeket használjon. Különösképpen fontos, hovy TEFAL fazekat és fedőt használjon.Ne használjá a kukṭát savas vagy sós éelmiszerek elkészítés elótti vagy utáni párolásárea, mert azok károsíthatják a fazekat.Minden használat után azonnal tisztlitsa meg és öblitse le a kukṭát.Az üzemi szelepet (A), a tömítés (I), az időzítőt* (F), vagy a tapadásmentes bevonatu edényt soha ne mosogassa el mosogatógépen.Az időzítőt* (F)soha ne helyezze viz alá.Soha ne használjon hipót vagy klórtartalmú szereket, amelyek megrongálhatják a rozsdamentes acél minőssegét.Ne áztassa vizben hosszasan a kukta fedelét.Csérélje ki a tömítés evente, vagy ha sérülésst tapasztal rajta.10 év használat után kõtelezően vizsgaltassa át a kukṭat egy hivatalos TEFAL márkaszervizben.A kukta tárolása: Csavarja vissza a fedelet az edényre, hogy ne használódjon el idő elótt a fedél tōmtíse. |
ÖRIZZE MEG EZEKET AZ UTASİTÁSOKAT
Részegységek (lásd a leíró ábrát)
A. Üzemi szelep B. Gózelvezető cső C. Szeleppoziójelzó D. Biztonsági szár (lásda "Biztonság" c. fejezetet) E. Biztonsági szelep F. Idózító* G.Fedonyel H. Fedél I. Tominés J. Parolokosár* K./ L. Labazat* M. Edenyfogantyú N. Maximális feltöltési szintjelő O. EdényA minded egyes használat elöttt Alvégzendő fontos Ellenőrzések
Az üzemi szelep ellenörzese
 Ellenorizze, hogy az üzemi szelep gozkieresztó szelepe nincs-e eltömdve. (lásd „Az üzemi szelep elávolítása és behelysezé" bekezdés).Abiztonsagi szelep Ellenőrzése
 Ellenorizze, hogy aBiztonsagi szelep golyoja mozog-e (hasznaljon egy palcikat).Használat
 Fózes Automatikus fózés modban  A kukta hagyományos lábasként való használata*  NyomáscsökkentésNyitás
- Hajlitsa a fedő nyelét víszintes helyzeból fuggóleges helyzetbe - 3. ábra A fedél forog. - Emelie fel a fedelet. Ha a kukta nehezen nyithato: tegye a tomitest viz ala, es meg vizesen helyezze vissza a fedelre - 19. abra es ugyeljen arra, hogy pontosan illeszkedjen a fedel nyilasaba - 15. abra.Záras
- Ügyeljen arra, hogy a fedél nyele fuggoleges helyzetben legyen. - Helyezze a fedelet az edenye az 1. ábra szerint úgy, hogy a muányag részt az edeny nyeléhez igazítja. Hajlitsa a fedel nyelét fuggoleges helyzetbol vizszintes helyzetbe - 2. abra A fedel forog.Ha nem tudja lezární a fedelet:
Ellenorizze, hogy a tomites a helyen van-e, valamint a fedel megfeleloen van-e elhelyezve. Ha a kukta nehezen zarható le: tegye a tomitést viz alá, és meg vizesen helyezze vissza a fedére - 19.ábra és ügyeljen arra, hogy pontosan illeszkedjen a fedél nyilásába - 15.ábra.Elseő használat
- Tapadásmentes bevonatu modelelek eseteben: mossa meg és fózóolajjal vékonyan kenje be a teljes tapadásmentes belso felületet.Modelltol fuggoen:
Helyezze a labazatot\* (L) es a kosarat\* (J) az edeny aljara. - Pattintsa a lábazatot\*(K) a kosárhoz\*(J), majd helyezze el az együttest az edeny aljára. Töltsfel az edenyt (O)vizzel 2/3 részig (MAX 2) - 5. abra. Zárja le a kuktát. - Alítsa az üzemi szelep (A)piktogramját a szeleppozúcio jelzóvel egy vonalba (C)- 9. ábra   Helyezze a kuktat egy hoforrasra, majd allitsa azt maximalis teljesitmemyre. Amikor a szelepen keresztül goz kezd el tavozni, allitsa kisebb teljesitményre a hoforrast, majd varjon 20 percet. A 20 perc eltevel kapcsolja ki a hoforrast. - Allitsa az üzemi szelep (A) piktogramjat a szeleppozciojelzovel egy vonalba (C) Abiztonsagi szar (D) visszahuzodik, akkor a kuktaban megszunt anyomas. Nyissa ki a kuktat - 3. abra Tisztítsa meg mosogatószerrel.Minimális és maximális toltési szint
Minimum 25 cl (2 pohár) - 4. ábra Maximum az edeny magassaganagan 2/3-a, MAX 2 jelolés -5.5. abra - Ne használjon a kuktában darabos sót, a fózés végén adjon az etelhez finomsót.Egyes etelek esetében:
Olyan pépes éelemiszerek esetében, amelyek fozés során megduzzadnak, mint például rizs, hüvelyesek, szaritott zöldségek, kompótok, oriastok, cukkini, sargarepa, burgonya, halfile stb., a kuktat csak urtartalmának 1/3-äig (MAX 1) toltse meg. Hagyja a kuktat nehány percig hülni, majd hideg vizben végezze el a lehütését. Minden  kinyitas elott Ellenorizze, hogy a biztonsagi szar leereszkedett, majd konnyeden razza meg a kuktat, hovy ne törjenek fel esetleg égési serulést okozó gozbuborekok. Ez a muvelet különösen fontos a goz gyors kiengedesekor, vagy hideg vizben törtenô hütest kōvetöen. Jvasoljuk, hogy levesek keszítesekor hideg vizben vegezzen gyors nyomáscsök Kentest (lásd „A fozés befejezése automatikus fozés modban" címú bekezdét).A párolókosár* használata
Toltsön 75 cl vizet a fazék aljába (O).Modelltol fuggoen:
Helyezze a lábazatot\* (L) és a kosarat\* (J) az edeny aljára. Pattintsa a lábazatot\* (K) a kosárhoz\* (J), majd helyezze el az együttest az edeny aljára.(L) az edeny aljára.    Gózolés során a párolókosárban lévo élelmiszer nem érintkezhet vizzel - 6. és 7. abra. A párolókosárba* helyezettelelmiszerek nem léphetik tül az edény MAX 2 szintjelzését.Az üzemi szelep (A) eltávolítása és behelyezese
Az üzemi szelep (A) a következóköppen távolithato el:
- Allitsa a hornyot a szeleppozielóvel egy vonalba (C)úgy, hogy megnyomja az üzemi szelep gyürjét (A) Távolítsa el a szelepet - 11.ábraAz üzemi szelep behelyezése:
Helyezze be az üzemi szelepet (A)-8. ábra úgy, hogy egy vonalba állitja annak hegyét (A)a poziójelzóvel (C)az itt lathato modon.  Süllyessze be az üzemi szelepet (A)úgy, hogy a gozkieresztő szára illeszkedjen. - Nyomja le az üzemi szelep piktogramjait (A)és fordítsa el. Idózító*
Ne használja az idózítôt „Hagyományos lábas" üzemmodban.
Az idózító az energiafogyasztás jobb szabályozásával elosegiti a jó minóségú ételek keszítését. Automatikus fozés modban az etel fozési homér sékletenek elerésétól szamitva automatikusan méri a hátralevo fozési idôtAz idözítőCsak a kuktára rögzítve muködik.
Fózes során ellenőrizze, hogy az üzemi szelep egyenletes gozsugarat bocsát-e ki. Ha a goz mennyisége nem elegendo, állitsa nagyobb teljesítényre a hóforrást, Ellenkező esetben csökkentse a teljesítényt. 1 Az idóztó bekapcsolása: nyomja meg a gombot. 2 Allitsa be a fozési idot (percben). Ha teves erteket allitott be, varjon 4 masodpercet, es amikor a langok már nem villóznak, a gomb hosszan tartó megnyomásával allitsa az erteket nullára. 3 Inditsa el a melegitest maximalis teljesitménnyel. 4 Amikor a kukta elerte a fozesi homersekletet, az idoztio hangjelzest ad, es megkezdodik az ido visszaszamlalasa (a szamok villognak). Csökkentse a hóforrás teljesitményét. A fózési idǒ leteltekor az idózító hangjelzást ad. Az idozito hangjat a gomb megnyomasaval kapcsolhatja ki. Kapcsolja ki a hoforrast. A gomb hosszan tartó megnyomása lenullázza a számlálot és kikapcsolja az időzítól.     Az idózító behelysezé és eltávolítása*
Az idozito (F)behelyezessehz-12.abra eloszor az "erintkezesi oldal" resz t illessze be a modulba, majd nyomja meg, hogy az ellenkezo oldalba kapcsolodjon. - Az idózító eltávolítasa: (F)emelje fel és vegye le.Az idózító* elementek cseréje
Az idozito CR2032-es gombelemmel mukodik. Ha megjelenik az zimolum, vagy ha a kijelz o nem mukodik, akkor cserelje ki az element.  - Az element elettartama az idoztó hasznalati gyakoriságától fugg. - Az idoztó elemente dimetoxietant tartalmaz, CAS sz.: 110-71-4. Megfelel az europai elóirásoknak. A sjat biztonsága és a környezet védelme érdekében: ne nyissa fel az elemet, ne tegye ki magas hómer sékletnek, ne helyezze a háztartási hulladékba, adja le a használt elementek kezelésével foglalkozó szervezeteknél. Nem tölthető elementket nem szabad úratölteni. Kulönbozó típusu, uy és használt elementek nem szabad együtt használni. - Az elementeket a megfelelo polaritas szerint kell behelyezni. - A lemerült elementeket ki kell venni a keszülékból és biztonságos modon kell leselejtezni. Ha a keszüléket hosszabb ideig hasznalaton kivül tárolni kell, ki kell venni belóle az elementek. A polusokat nem szabad rovidre zarni. - Sima munkaasztalon végézze - Az idoztó elemének eltávolítasa: egy penzérme segítségevel nyissa fel az elemtartó (lásd a szemben levő rajzot). Cserelje ki az element. Helyezze vissza a tomitest. - Allitsa az elementartó félkörivét az idzitó félkörivevel szembe - Ovatosan, enyhe nyomással fordítsa el az elementartó úgy, hogy az elementartó félkörív egy vonalban kerüljön az idózító kör jelével - Sima felületen dolgozzon, hogy az elemtartó teljesen víszintes helyzetben legyen. Visszazáras után ne eróltesse az elementartót. Ne tolja a széleknél tovabb. - Az elveszett idozitot valamennyi hivatalos TEFAL markaszervizben potolhatja.     Sohane mossael az idözítôt* viz alatt vagy mosogatógépben. Ne használja az idözítöt „Hagyományos lábas" Üzemmodban.Fözes elött
- Minden hasznalat elott vegye ki az üzemi szelepet (A) - 11. ábra, és napfenyben, szemrevételezésel ellenorizze, hogy a gozelvezető cső (B) nincs-e eltömdve - 13. ábra. Ellenörizze, hogy a biztonsági szelep mozog-e (lásda „Tisztítas" és a „Fontos ellenörzések minded egyes használat elótt" című fejezetet) - 18. ábra. - Adja hozza az alapanyagokat és a folyadékot. Zárja le a kuktát - 2. ábra. Ha a kukta nehezen zarható le: tegye a tomitést viz alá, és meg vizesen helyezze vissza a fedébre - 19.ábra és ügyeljen arra, hogy pontosan illeszkedjen a fedél nyilásába - 15.ábra. - Tegye a helyere az üzemi szelepet (A)- 8. ábra. Fózés Automatikus fózés modban
- Forgassa el az üzemi szelepet(A)az Automatikus fózes pozićo haz - 9.ábra. - Üzembe helyezés elóttBizonyosodjon meg arról, hogy a kuktát megfeleloen lezárt -2.ábra. Helyezze a kuktat egy hoforrasra, majd allitsa azt maximalis teljesitményre. - Időzítővel felszerelts modellek esetében: állítsa be a recept szerinti főzési időt (lásd „Az időzítő használata" című fejezetet"). - ABiztonsagi szar altal kibocsatott hang es goz termeszetes jelenseg, lehetoveteszi, hogy fozés elott a levego eltávozzon.Automikus modba nortenfozés folyamata
- Amikor az üzemi szelepen(A) keresztül folyamatosan goz távozik, és közben folyamatos hang (sistergés) hallatszik, állitsa kisebb teljesitményre a hóforrást. - Kezdje el a fozesi ido visszaszamolasat, a recept utasitasainak megfeleloen. - Fózes során ellenőrizze, hogy a szelep egyenletes gozsugarat bocsát-e ki. Ha a távozó goz mennyisége nem elegendo, állitsa kissé nagyobb teljesítényre a hóforrást, Ellenkező esetben csökkentse annak teljesítényét.AutomATUS MODBAN TORTEN FÖZÉS VÉGE
A goz kiengedese :
A hóforras kikapcsolása után két lehetǒseg all rendelkezsère: - Fokozatos nyomáscsökkentés: forgassa fokozatosan az üzemi szelepet (A) a piktogramig 10. ábra.   - Gyors nyomáscsökentés hideg vizben: engedjen hideg vizet a mosogatóba és tegye bele a kuktát addig, amíg aBiztonsági szár leereszkedik - 14. ábra. Abiztonsági szár (D) visszahúzódik, akkor a kuktaban megszünt a nyomás. Forgassa el az üzemi szelepet (A) árasba.  1.szakasz  2.szakasz Ezután mar kinyithatja a kuktát - 3. ábra. Ha a kukta nehezen nyithato: tegye a tomitest viz ala, es meg vizesen helyezze vissza a fedelre - 19. abra, ügelve arra, hogy pontosan illeszkedjen a fedel nyilasaba - 15. abra. Ha a goz felszabadulasa kozben a normalistol eltero kilovellest tapasztal, allitsa vissza az(A) üzemi szelepet „Automikus fozés”, fozó allasba, majd hideg vizben vegezzen gyors nyomáscsökkentest. Ha aBiztonsagi szar (D) nem ereszkedik le, engedjen hideg vizet a mosogatoba es tegy bele a kuktat addig, amig a biztonsagi szar leereszkedik - 14. abra.Soha ne aBiztonsagi szarat mozgassa.
- Olyan pépes eleelmiszerek esetében, amelyek fozés során megduzzadnak, mint peldául rizs, hüvelyesek, szaritott zöld ségek, kompótok, oriástok, cukkini, sárgarépa, burgonya, halfilé stb., a kuktát csak urrtartalmának 1/3-aig (MAX 1) tölts meg. Hagyja a kuktát néhány percig hülni, majd hideg vizben végeze el a lehütését. Minden kinyitas elott Ellenörizze, hogy a biztonsági szár leereszkedett, majd konnyeden razza meg a kuktát, hogy ne törjenek fel esetleg égési sérülest okozó gozbuborekok. Ez a muvelet kulönosen fontos a goz gyors kiengedésekor, vagy hideg vizben történő hütest követően. Jvasoljuk, hovy levesek keszítésekor hideg vizben végezzen gyors nyomáscsökkest (lásd „A fozés befejezese automatikus fozés modban" című bekezdésst). A kukta hagyományos
lábasként való használata* - Forgassa el az üzemi szelepet (A)a „Hagyományos lábas" pozióhoz. Enhez eigendő erőt fejtsen ki ahhoz, hogy a nyomáscsökkentés helyzeten átfordítsa. - Üzembe helyezés elottBizonyosodjon meg arról, hogy a kuktát megfeleloen lezárta 2. ábra. Helyezze a kuktat egyCsokkentett teljesitmennyel üzemelo hoforrasra. - Kezdje el a fózési idó visszaszámolásat, a recept utasításainak megfeleloen. Hagyományos lábas' modban a kukta barmikor kinyithato, és az etel megkeverheto, a fozés figyelemmel kiserheto, illetve tovabbi hozzávalókkal egészithetők ki. Ha a kukta nehezen nyithato: tegye a tomitest viz ala, es még vizesen helyezze vissza a fedelre - 19. abra es ügyeljen arra, hogy pontosan illeszkedjen a fedel nyilasaba - 15. abra. Ha a hóforrás túl erós, akkor a kukta lezaródhat (a biztonsági szár (D) felemelkedik, és blokkolja a nyitást), valamint előfordulhat, hogy a fedél nyele nem működtethető vagy nem nyitja ki a kuktat. Ebben az esetben csökkentse a hóforrás teljesítányét vagy zárja el a hóforrást. Ha fémtalpu, elektramos fózólapot használ, vegye le a kuktat a hóforrásról. A tapadásgató bevonattal keszült modelleknél: ne használjon habverőt vagy fémból keszült, éles eszközöket. Ne csepegtesse le az eszközöket az edény  pereméhez való utögetéssel, mert ezzel károsodást és szivargást okozhat. - Soha ne égesse szénne a zsiradékokat. A sütés során keletkező goźok veszelyesek lehetnek az erzekeny legzöservú allatok - mint pédául a madarak - szamára. A madártulajdonosok ezert tartsák támol kedvenceiket a konyhától.Biztonság
A kukta tobbBiztonsagi berendezessel van felszerelve:Biztonsági zárendszer:
- Ha a fedél nincs a helyén, vagy a nyele nincs lehajtva, akkor a kukta biztonsági szára körül (D) gozszivárgás tapasztalható, és a kukta nem helyezhető nyomás alá.Biztonsagi nyitórendszer:
- Nyomás alatti allapotban a kukta biztonsági szára (D)felső allásban van, és a fedél nyitó/záró nyele (G)nem muködtethető. - Soha ne的概率是 12 除以 12-Abiztonsagi szarat semmikiéppen se mozgassa (D).
- Ellenőrizable, hogy a belso nyomás lecsökkent-e. Ezt a biztonsági szár (D)alsó helyzete jalzi. - A fazék fogantyúBiztonsági alkatrészek. Soha ne cserélje ki öket onalloan. Soha ne használjon más fogantyumodelleket. - Ha a fedél nyitó-/záronyelét (G)fuggoleges helyzetbe tolta amikor a kukta meg nyomás alatt volt, akkor nem tudja kinyitni. Ez egy kiegészítő biztonsági funkció. - Tolja vissza a fedél nyelét vizszintes helyzetbe, és varja meg, hogy a biztonsági szár (D)also állásba kerüljön.Kétféle tulnyomás elleni biztonság:
- ElőBiztonságieszköz: a biztonságiszelep (E) kiengedi nyomást - 20. abra. - Második biztonsági eszköz: a fedél tomitése kiengedi a gozt - 20. ábra.Ha aBiztonsagi berendezések egyike bekapsol:
Kapcsolja ki a hoforrast. Hagyja teljesen lehulni a kuktat. Nyissa ki. Ellenorizze es tiszittsa meg az üzemi szelepet (A), a gozelvezetocsövet (B), aBiztonsagi szelepet (E) es a tomitest (I) - 16., - 17- 18. abra Lásda "Tisztitás" es "A(AP) A(P) hasznalat elott elvégzendo fontos ellenorzesek" cimufejezeteket. Ha fenti ellenorzesek es tisztitas utan a keszulek szivargast mutat, vagy nem mukodik, vigye el egy hivatalos TEFAL markaszervizbe.Használati javaslatok
1 - Az üzemi szelepen keresztül távozó goz rendkivül forró. Ügyeljen a gozsugárra. 2 - Amint a biztonsági szár felemelkedik, a kukta nem nyithato. 3 - Mint minded fózóberendezs esétén, gyakoroljon szigoru felügyeletet, kūlönösen, ha a kuktat gyerekek kōzelében használja. 4 - A kuktát a fazék két fogantyújával mozgassa. 5 - Ne hagyja benne hosszan a keszételt a kuktában. A kuktát soha ne szállitsa a fedél nyelénél fogva. 6 - Soha ne használjon hipót vagy klórtartalmú szereket, amelyek megrongálhatják a rozsdamente n acel minoségét. 7 - Ne áztassa vizben hosszasan a kukta fedelét. 8 - Cserelje ki a tomitest evente, vagy ha serulest tapasztal rajta. 9 - A kuktát minded esetben kihúlt állapotban és üresen tiszítsa. 10 - 10 év használat után kõtelezöen vizsgaltassa át a kuktát egy hivatalos TEFAL margaszervizben.Tisztítás
A kukta megfelelo mukodese erdekében minded hasznalat utan tartsa be ezeket a tiszitasi es karbantartasi ajanolasokat. A hosszú használat után megjelenő elfeketedett részeknek és karcolásoknak nincs sem milyen negatív hatásuk. A külso bevonaton megjeleno a fedel és az edeny erintkezéséből eredő kopás(modelltolfuggóen) természetes jekenség. Tapadásmentes bevonatu ku kták esétében (modellól fuggöen): a hasznalat során esetleg megjelenő halvány csikok és kopások nem valtoztatják meg a bevonat tapadásmentes tulajdonságát. - Minden hasznalat utan mossa meg a kuktat mosogatoszeres langyos vizzel. A párolókosár* esétén ugyanígy jarjon el. - Ne használjon hipót, sem pedig klórtartalmú szereket. Soha ne hevitse fel az edenyt ures allapotban.A nemasacél edeny besejénk tisztitasa:
- Az edeny besejét surolószivaccsal és mosogatószerrel tisztítsa meg. Ha a rozsdamentes acel edeny besején szivárványszínü visszaveródest vagy fehéres nyomokat tapasztal (ásványlerakódás), tisztítsa meg ecettel. Tapadasmentes bevonatu aluminium edeny besejenek tisztitasa:
A termek elettartamának meghosszabbitasa végett javasoljuk a kezi mosogatast. A tiszit Ist meleg vizzel, mosogatoszerrel puha szivaccsal végezze. - Ne használjon surolóport és dörzhatásu szivacsot. Ha odaegette az etelt, toltse fel az edenyt meleg vizzel es hagyja azni. Ezt kovetoen tisztitsa meg mosogatoszerrel.Az edeny külsejenek tisztitasa:
A tisztítást szivaccsal és mosogatoszerreI végezze. A nemasacél edény és a kosár tisztitható mosogatógepben. A tapadásmentes bevonatu edényt (modellől fuggöen) ne mossa el mosogatógépben, mert a mosogatógépben alkam azott tabletták olyan anyagokat tartalm aznak, amelyek nagy mértékben károsítják az aluminium alkatrészeket. A tapadásmentes bevonatu edeny (modelltol fuggöen) intensív használata kov etkeztében a bevonat színe ki s mertékben megvaltozhat (sárgulás, foltosodás).A fedel tisztitása:
A fedot szivaccsal es mosogatoszerrel tiszittsa. Függó leges helyzetben csepegtesse le a fedelet, hogy a m aradélk viz eltávo zzon a fedélfém ésmuanyag részei kozül.A fedő tõmítésének tisztítása:
- Minden fozés után tisztītsa meg a tomitést (I)és annak helyét. - A tomités vissahelyezésének leirásat lásd: - 15. ábra, és ügyeljenarra, hogy a tomités pontosan illeszkedjen a fedél egyes hornyaiba.Az üzemi szelep (A) tisztitása:
Tavolitsa el az uzemi szelepet (A)- 11.abra. - Tisztítsa meg az üzemi szelepet (A)folyó csapviz alatt - 16.ábra. Ellenorizze, hogy mozog-e: a szemben levo abra. Az üzemi szelep (A), a tòmités (I) és az időzító* (I) eltávolításat követően a fedél mosogatógépben tisztithato.  Az üzemi szelepet (A), a tomitést (I), az idózítót* (F), vagy a tapadásmentes bevonatu edényt soha ne mosogassa el mosogatógépben.A fedél alatt elhelyezkedő gozelvezető cső (B) tiszítása:
Vegye le a szelepet (A)- 11.ábra. Nappal szemben, szemrevetelezesselBizonyosodjon meg arrol, hovy a gozelvezetocso nincs eldugulva es a formaja kerek-13.abra.Szukseg eseten tiszittsa meg egy fogpiszkaloval - 17.abra es oblitse at.Abiztonsági szelep (E) tisztitása:
A fedel belso reszén talalhatóBiztonsagi szelep alapjat folyo viz alá tartva mossa meg. A szelep golyojat egy vatta nélkūli vattas pálca segitségevel erösen lenyomvaBizonyosodjon meg a szelep megfelelo muködéséról, vagyis arról, hogymozog-e - 18.ábra.Lásd.A minded egyes hasznalat elott elvégzendó fontos Ellenörsezek" címü fejezetet.Az idoztio tisztitasa\* (F):
Tiszta, szaraz ronggyal végezze. - Ne használjon oldószert. Soha ne mossa el az idozitot viz alatt vagy mosogatogepen.Karbantartás
A kukta tomitésénék cseréje:
Cserelje ki a tomitest evente, vagy ha serulest tapasztal rajta. - Mindig a modelljének megfelelo eredeti TEFAL tomitést használjon (lásd a „Tartozék" fejezetet). - A tomités visszahelyezésénék leirásat lásd: - 15. ábra, és ügyeljen arra, hovy a tomités pontosan illeszkedjen a fedél egyes hornyaiba.A kukta tárolása:
Helyezze a fedelet leforditva a fazekra. - A kukta nyitó/záró szerkezete nem igényel különösebb karbantartást, a tisztitást kiveve. 10 év használat után kõtelezöen vizsgáltassa át a kuktát egy hivatalos SEB margaszervizben. TEFAL tartozék
- Kuktája kereskedelmi forgalomban kaphato tartozékai:| Tartozékok Hivatkozások | ||
| Tömítés | 3/4/4,5/6 liter: a tomtés külso átméröje: 24 cm | X1010008 |
| 5/7,5/9 liter: a tomtés külso átméröje: 27 cm | X1010007 | |
| Párolókosár* | 3/4,5/4/6 liter: 22 cm átméröjú edénynél | 792185 |
| 5/7,5/9 liter: 24 cm átméröjú edénynél 792654 | ||
| Lábazat* (L) | 792691 | |
| tisztlétásához* | X1060007 | |
Tulajdonságok
A kukta aljanak atmeroje - referenciak| Ártartalom | Edény 0 | Alj 0 | Clipso Minut® Perfect / Easy | Clipso Minut® Duo couleur | Clipso Minut® Duo Gourmet | Az edény anyaga |
| 3 L 22 cm 15.5 cm | P46205 | - | Nemesacél | |||
| 3 L 22 cm 18 cm | - | - | P46605 | |||
| 4 L 22 cm 14 cm | - | P46042 | - | Bevonatos aluminium | ||
| 4.5 L | 22 cm 1 | 5.5 cm P46206 | - | Nemesacél | ||
| 5 L 24 cm 14 cm | - | P46051 | - | Bevonatos aluminium | ||
| 5.2 L | 24 cm | 20 cm | - | - | P46654 | Nemesacél |
| 7.5 L | 24 cm 1 | 8 cm | P46248 | - | ||
| 9 L 24 cm 18 cm | P462 | 49 | - | |||
| Set 5 L/7,5 L | 24 cm | 14 cm | P46353 | - | ||
| 18 cm | ||||||
Kompatibilis hóforrások
GAZ ELEKTROMOS ARAM (Öntöttvas fozolap) ELEKTROMOS ARAM Hosugarz yago üvegkeramia halogen fozelap) ELEKTROMOS ARAM (Uvegkarmia indukcios fozolap) ELEKTROMOS ARAM (Spiralellenállás)      - Kuktaja minded típusu melegitési moddal hasznalhato, az indukciós fózolapot is beleertve. - Elektromos fózolapok eseten használjon a kukta aljanak atmérőjével egyenlo vagy annál kisebb atmérőjú lapot. - Üvegkerámia fózólapok esétén ügyeljen arra, hogy az edény alja tiszta legyen. Gaztuzhely eseten a lang nem csapodhat ki az edeny szelen. - Valamennyi melegitési mod mellett ügyeljen ra, hogy a kukta kózepen helyezkedjen el.Garancia
A hasznalati utasitasnak megfelelo hasznalat eseten az uy TEFAL kukta nemesacel edenyere a gyartó 10 eves garanciát vallal: - az edeny fémszerkezetenek összes hibajára, - az alap fémjének minded korai elhasznalódására. - Az edény tòbbi anyaga, valamint a kukta valamennyi tòbbi alkatrésze tekinteteben a garancia a vásárlás datumatól számított, a vásárlás helye szerinti országban hatályos törveny szerinti garancia-idószakra vonatkozoan minded gyártási vagy anyaghíba rakerjed. - A szerzódéses garancia a vásárlás idöpontjáról szólo pénztárbizonylat illetve számla felmutatasával érvényesithető. A garancia nem terjed ki a következókre: - A tapadasimentes bevonatu edeny elhasznalodas miatti csikossa valasa es elszinezódése. - Az edeny fedele és a tapadásmentes bevonat érintkezéséből eredő csikok. A fontos ovintezkedesek be nem tartasabol es a gondatlan hasznalatabol szarmazo meghibasodasok, nevezetesen: - Utesek, leesés, sutóbe helyezés, ... A garancia kizarolag hivatalos TEFAL markaszervizben ervényesitheto. - Az Onhöz legközelebb eső TEFAL margaszerviz megtalálásához kérjuk,hívja Kék számunkat.Jogszabályban előírt jelzések
| Jelzés Elhelyezés | |
| Kereskedelmi jelzés A fedélen | |
| A gyártás éve és a gyártási títeszám Modell megjelolés Maximális biztonsági nyomás (PS) Üzemi nyomás felső értéke (PF) | A fedélen |
| Ürtartalom A fazék külso részénynek alján. | |
| A gyártó postacíme A fazék külso részénynek alján. |
- Vegyünd részt a környezetvédelemben!
 ① Ez a keszülék számos visszanyerhétő vagy úrahasznositható anyagot tartalmaz. A megfelelo kezelés érdekében adja le valamelyik kijelölt gyüjtöhelyen.A TEFAL válaszol a kédésekre
| Problémák Ajánlások | |
| Ha a nyitás és/vagy zárás nehézzé válik: | Vegey ki a tömítés ét es engedjen rá vizet Tegye vissza még vizesen a fedélre - 19. ábra |
| Ha nem tudja lezárnìa fedőt: | Ellenőrizable, hogy a fedél nyele függőleges helyzetben van-e. Ellenőrizable, hogy a tömítés megfeleloên helyezkedik el (lásd a "Tisz tíás és karbantartás" fejezetet). Ellenőrizable, hogy a fedél az - 1. ábra szerint megfeleloên van-e elhelyezve. Ha a kukta nehezen nyitható: tegy a tömítés viz alá, és meg vizesen helyezze vissza a fedélre - 19. ábra, ügyelve arra, hogy pontosan illeszkedjen a fedél nyílásába - 15. ábra. |
| Ha a kuktát nyomás alatt melegítete úgy, hogy nem volt benne folyadék: | Vizsgáltassa át a kuktát hivatalos TEFAL Szervizközpont-ban. |
| Ha aBiztonsági szárkopog és gozöket bocsát ki: | Az elő percekben ez normális jelenség: igy a levegő el tud távozni a főzes előtt. |
| Ha aBiztonsági szár nem emelkedett fel, és főzes során semmi sem távozik a szelepen: | Ez a jelenség természetes az elő percekben. Ha a jelenség továbbra is fennáll, ellenőrizable, hogy: - A hóforrás teljesítíménye megfelelo–e, ha nem, akkor ál-litsa nagyobbra. - Az edényben léő folyadék mennyisége elégséges. - Az üzemi szelep (A)alában van-e. - A kukta valóban le van zárva. - A tömítés és az edény széle nem sérült meg. - A tömítés a helyén van-e. |
| Ha aBiztonsági szár felemelkedett, és főzes során semmi sem távozik a szelepen: | Az elő percekben ez normális jelenség. Ha a jelenség továbbra is fennáll, engedjen hideg vizet a mosogatóba és tegye bele a kuktát addig, amíg a biztonsági szár (D)lee-reszekedik. Tiszűtsa meg az üzemi szelepet (A)- 16. ábra és a goźel-vezető csövet, - 17. ábra majd ellenőrizable, hogy abiztonsági szelep golyója minded nehézség nélkül lenyomódik - 18. ábra |
| Problémák | Ajánlások |
| Ha a fedő körül goz távozik, és a biztonsági szár also helyzetben van, Ellenőrizza: | A fedő megfelelo zárását.A fedő tõmtésének elhelyezését.A tõmtés megfelelo állapotát; szükség esetén cserélje ki.A fedő, a tõmtés és a tõmtésnek a fedőben kialakított hely tisztaságát.Az edény szélének megfelelo állapotát. |
| Ha nem tudja kinyitni a fedőt: | Ellenőrizza, hogy a biztonsági szár (D) also állásba van-e.Ellenkező esetben csökkentse a nyomást, enged-jen hideg vizet a mosogatóba és tegye bele a kuk-tat addig, amíg aBiztonsági szár leereszkedik.Soha ne a biztonsági szárat (D) mozgassa.Forgass az üzemi szelepet (A) Helyzetig. |
| Ha az élelmiszerek nem fõttek meg vagy megétek, Ellenőrizza: | A főzési időt.A hóforrás teljesítményét.Az üzemi szelep (A) megfelelo elhelyezkedését.A folyadék mennyiságét. |
| Ha az ételek megétek a kuktában: | Elmosogatás előtt hagyja a fazekat ázni.Soha ne használjon hipól, sem pedig klórtartalmuszereket. |
| Ha a biztonságiberendez sék egyike bekapcsol: | Kapcsoljäki a hóforrást.Hagyjä kihúlni a kuktát, a készülék elmozdításnélkül. Várja meg amíg abiztonsági szárleereszkedik, és nyissa ki a kuktát.Ellenőrizza és tisz títsa meg az üzemi szelepet (A), a gőzelvezető csövet, a biztonsági szelepet és atömtés.Tügyeljen arra, hogy a készülék et alőirásoknak megfelelo Höen töl;tte fel.Ha a hiba továbbra is fennáll, Ellenőriztessekészülékét hivatalos TEFAL Szervizközpontban. |
| Ha oxidációra utaló jeleket észlé: | A nagy teljesítményű nemesacél használata nem akadályozza meg, hogy különleges esetekben oxidációs folyamat lépjen fel. Ha oxidáció jeleit észléli, akkor dörzhatású szivaccsal távolítsa el azokat, mielótt Újra használná a kuktát. |
Zöldség
| ZÖLDSEGEK (FRISS) PÁROLÁS Helyezze a hozzávaló t a párolókosárba és öntösön 750 ml vizet a kukta aljára. MAX 750 ml MERİTÉS Tegye a hozzávaló t a vizbe és a kosár nélkül. HÜVELYESEK MERİTÉS A kosár nélkül. 1/3 MAX 1 | ||
| Articsóka, 2 egész, egyenként 600 g (merítés) 30 - 35 perc | perc | |
| Borsó (párolás) 6 - 8 perc | ||
| Brokkoli rozsák 600 g (párolás) 9 - 11 perc | ||
| Cékla, piros, negyedekbe vágva (merítés) | 20 - 25 perc (mérétől fuggöen) | |
| Cukkini felkaríczva (3 mm) 600 g (párolás) 12 - 15 perc | perc | |
| Édescömény felcsíkozva (600 g) (párolás) 6 - 9 perc | ||
| Endívia félbevágva (900 g) (párolás) 14 - 16 perc | ||
| Flageolet bab, szárítva 250 g (merítés) 35 - 40 perc | ||
| Gomba, szeletelve 800 g (merítés) | 4 - 5 perc | |
| Hagyma savanyításhoz (párolás) | 7 - 8 perc | |
| Kaliforniapaprika félbevágva (550 g) (párolás) | 14 - 16 perc | |
| Káposztza, szeletelve, zöld, 500 g (merítés) | 5 - 6 perc | |
| Karfiol rozsák 600 g (párolás) | 10 - 12 perc | |
| Kelbimbó (párolás) | 10 - 12 perc | |
| Krumpli félbevágva (950 g) (párolás) | 20 - 25 perc (mérétől fuggöen) | |
| Lencse, zöld 250 g (merítés) | 14 - 16 perc | |
| Mángold, szeletelve (2 cm) 700 g (párolás) | 15 - 17 perc | |
| Padlizsán, hámozva és szeletelve (3 mm), 850 g (párolás) | 10 - 12 perc | |
| Porrehagyma, egészben, fehér 650 g (párolás) | 9 - 11 perc | |
| Sárgaborsó 250 g (merítés) | 18 - 20 perc | |
| Sárgarépa felkaríczva (3 mm) 600 g (párolás) | 17 - 19 perc | |
| Spárga, fehér (párolás) | 5 - 6 perc | |
| Spenót (párolás) | 3 - 4 perc | |
| Sütőtök, feldarabolva (3-5 cm) 600 g (párolás) | 13 - 18 perc | |
| Tarlórépa, felkockázva (500 g) (párolás) | 14 - 16 perc | |
| Zellergumó, szeletelve (merítés) 600 g | 7 - 9 perc | |
| Zöldbab (600 g) (párolás) | 10 - 12 perc |
Rizs
| MERİTÉS A kosár nélkül. MAX 1 | VIZMENNYISEG | RIZSMENY- NYISEG | FÖZÉSI IDÖ | |
| 2 SZEMÉLYRE 4 | 00 ml / 2 pohár 150 g / 1 pohár | 7 - 8 perc4 SZEΜÉLYRE | ||
| 500 ml / 2,5 pohár | 250 g / 2 pohár | |||
| 6 SZEMÉLYRE | 700 ml / 3,5 pohár | 375 g / 3 pohár | ||
Hús/ hal
| FRISS FAGYASZTOTT | |
| Báránycomb: 2 (0,95 kg) 40 - 45 perc 1 ára 5 perc | perc - 1 ára 15 perc |
| Borjú paupiette: 4 10 - 12 perc x | |
| Borjúhús (0,8 kg, 5 - 7 cm-es átmérő) 17 - 19 perc 37 - 40 perc | |
| Borjúszűz: 0,7 kg 17 - 21 perc 33 - 38 perc | |
| Csibe: 2 (1,3 kg) | 23 - 25 perc 40 - 45 perc |
| Cserke (1,35 kg) | 23 - 25 perc |
| Fiatal kacsa (1,8 kg) | 45 - 47 perc 50 - 55 perc |
| Fürj: 4 | 9 - 10 perc |
| Lazac steak: 4 (0,8 kg) | 5 - 6 perc |
| Marhahús (1 kg, 8 - 11 cm-es átmérő) | 30 - 35 perc 45 - 50 perc |
| Nyúl (1,5 kg darabolva) | 8 - 9 perc |
| Ördöghal-filefé (1 kg) 75 grammos darabokban | 5 - 6 perc |
| Sertéshús (0,8 kg, 8 - 10 cm-es átmérő) | 30 - 35 perc 1 ára 5 perc - 1 ára 15 perc |
| Sertésszűz: 2, 350 grammos darab | 13 - 15 perc 26 - 29 perc |
| Tonhal steak: 4 (0,7 kg) | 5 - 6 perc |
WAZNE ZALECENIA
Przed użyciem szybkowaru przyȩczytaj wszystkie zalecenia i zawsze postępuj zgodnia z „Instrukacja obstugi".
Nieprawidłowewuzytkowanie moze spowodowa szkody.
W celu zapewnienia bezpieczeniastwa urzadzenie jest zgodne z odpowiednimi normami i przyepisami prawnymi: -dyrektywa w sprawie urzadzen ciñnieniowych - materiały przyznaczone do kontaktu zźypwność - ochronaŚrodkowska| OBOWIAZKOWE WERYFIKACJE PRZED KAZDYM UZYCIEM | SPRAWDź • Sprawdź,czy przywość odpradowania pary (A)nie jest zatkany - rys. 13. •czy kulka zaworu bezpiecieństwa jest ruchoma - rys. 18 •czy uzczelka pokrywki jest umieszczona pod kaźdym rowkiemPokrywki - rys. 15, •czy uzychyty garnka są prawnłowowo zamocowane. Uchwyty garnka są czȩciami zabeepieczajacymi. Nigdy nie wymiemeniaj ich samodzielnie. |
| ZAWSZE PRZESTRZEGAJ NASTEPUJACYC ILOŚCI NAPEŁNIANIA | •Nigdy nie uzywaj szybkowaru bez pląnu, poniewaNIZE magne to doprowadzić do是我的gowaNego uszkodzenia. Upewnij są,że w czasie gotowania wewnatrz znajduje są wystarczajca ilość pląnu. •Minimum 250 ml - rys. 4. •Maksimum 2/3 wysokość garnka, oznaczenia MAX 2 - rys. 5. •Podczas gotowania na parze artykuły znajduje są w koszyku niie powinny dotycka wody - rys. 6 i 7. •Maksymalnie 1/3 (MAX 1) w przypadku artykułow出入境,(PCZniejiangych i/lub pieniacych są podczas gotowania, takich jak ryż, warzywa strȩczkowe, suszone warzywa,(PCZciery, dynia, cukinia, marchew, ziemniaki, filenty z ryb itp. •Produkty umieszczone w koszyku niie powinny wystawać powyȩj poziomu MAX 2 garnka. |
| • Nie zestawiaj daneci bez opieki w=Pobliwu pracujućego szybkowaru. • Szybkowar gotuje pod ciasnieniem. Nieprawidłowewu zȩtkowanie są opówodowej obrażeniaciała wywoły oparzeniami. Przed uruchomieniem szybkowaru upewnij sie,ź jest on węstatewie zamkniety. (Patrz rozdział „Zamykanie”). • W czasie gotowania zȩć uwangę,;czy zawór wcieść syczy. Jeźeli nie wydostaje są wystarczȩca ilość pary,obnią ciasnienie w produktie i sprawdź,ź jest w nim wystarczȩca ilość plynu orazź przywoód odpradowani pary nie jest zatkany. Jeźeli po sprawdzeniu para nadal są nie wydostaje,zwȩksz lekko zȩródlcno ciepta. • Nie gotuj artykułów grożych zatkaniem przywodów aparatury zabezpieczącej: - jagód - kaszy jejczmiennentje - platków owsianych - grochu luskanego - klusek, makaronów, spaghetti - rabarbaru - porzeczek | |
| PRZED GOTOWANIEM I PODCZAS GOTOWANIA | • Nigdy nie gotuj w szybkowarze potraw na bazie mleka. • W przypadku szybkowaru z sukrywkawe stali niedzewnej nie uzywaj gruboziarnistej soli, dodawaj drobnów pod koniec gotowania. Unikniesz w ten sposob pojawietenie „porów”, króre moglyby uszkodzić dno szybkowaru. • Nie uzywaj szybkowaru do smażenia pod ciasnieniem z użyciem oleju. • Niz uzywaj szybkowaru niedzgodnie z seinem przyeznaczeniaim • Niz umieszczaj szybkowaru w nagrzanym piekarniku. • Nigdy nie wskładaj do szybkowaru folii alumniewej bez umieszczzenia jej na formie do pieczenia. • Nigdy nie wskładaj do szybkowaru folii. • Opany alkoholu są latwopalne. Doprowadź do wrzenia przyze okło 2 minuty przydwź do wrozenia przechowo 2 minuty przydwź do wrozenia przechowo 2 minuty przydwź do wrozenia przechowo 2 minuty przydwź do wrozenia przechowo 2 minuty przydwź do wrozenia przechowo 2 minuty przydwź do wrozenia przechowo 2 minuty przydwź do wrozenia przechowo 2 minuty przydwź do wrozenia przechowo 2 minuty przy DWJ |
PO GOTOWANIU...
- Modele z powłoka zapobiegajęc przywieraniu: nieNSE wy uzywać trzechaczek do miksera lub innych metalowych lub ostrych przyborów kuchennych. NieNSE strzepywać wody z przyborów kuchennych przyeze stukanie nimi o brzeg garnka - groziłoby to uszkodzeniem igowstaniem nieszczelnosci. - Obracaj stopniowo zawór (A), wybierȩć w zaleźnosci od potrzeb prędkość dekompresji i konówność na oznaczenia i rys. 10. Jeźeli w trakcie upuszczania pary zaobserwujesz jakiekolwiek zabuszenia, umieszć zawór roboczy (A)ponownie w pozycji trybu gotłowania Szybkowar, a sątePNIE wykonaj szybką dekompresje w zimnej wodzie - rys. 14. - Jeźeli trzpień bezpieczędsta (D)nie opada, włód szybkowar do zimnej wody - rys. 14. - Nigdy nie manipuluj przy zaworze bezpiecznychstwa. - Po ugotowaniu.mięsaze skórq (np. ozór wolowy), ktore moze napęczniec pod wptywem ciśnienia, mięso naleźny nikłucz dopiero gdy nabrzemiała skóra opadnie; w przyciwnym przypadku zachodzi ryzyko oparzenia. Nikłuj.mięsoprz gotowaniem. - W przypadku artykułów mącznych,(PCZCZNIEJACYCH i/lub pieniacych sie podczas gotowania,takich jak ryz, warzywa straczkowe,suszone warzywa,przeciery,dynia,cukinia, marchew,ziemniaki,filey z ryb itp.Pozwól,aby szybkowar przy kila minut ostyg!,nastepnie ostudgo w zimnej wodzie.Przed kaźdym otwarciem,po upewnieniu sie,ze trzpień bezpieczenstwa opadl,zawsze delikatnie potrzasaj szybkowarem,aby nie dopuść do tryskania pary,co mogłowby spowodować oparzenia.Czynnosć ta jest szczególnie wąna przy szybkim upuszczaniu pary lub po ostudzeniu w zimnej wodzie. - Przenoszac szybkowar pod ciśnieniem, zachowanaj najwyźsa z ostrożnosc. Nie dotykaj gorących powierzchni. Korzystaj z uzychyęd i przyczisków. W razie potrzeby uzyj rękawic kuchennych. - W przypadku yupazolecamy wykonać szybką dekompresje w zimnej wodzie (patrz punkt „Zakończenie gotowania w trybie Szybkowar"). - Przed otwarciem szybkowaru upewnij sie, ze nawór znajduje sie w połozeniu dekompresji. Trzpien bezpieczędstwa (D) powinien opaść. - Nigdy nie uzywaj sily podczas otwierania szybkowaru. Upewnij sie, ze ciśnienie wewnatrix urzadzenia spadto. Trzpień bezpieczenstwa (D)powinien opaść. (Patrz rozdziaf „Zabezmieciecenia".)| KONSERWACJA | Jeźeli stwierdzisz, ze króraść szybkowaru jest złamań lub pękniąta, w sądnym przypadku nie przybuj jej otworzyć, sążeli jest zamkiȩta,&C心理咨询 je zęskaśczenia i zanieść do naprawy do autoryzowanego serwisu TEFAL. Nie manipuluj przy systemach zabezpiecznych, oprocz zalecen dotyczarcych czyszczenia i konserwacje. Uzywaj wyłączne oryginalnych czȩci TEFAL dostosowanych do zakupionego modelu. Pr绑定 wszymstkim uzywaj wyłączne garnka i pokrywki TEFAL. Nie uzywaj szybkowaru do przechowywnia kwaśnych lub slonych produktów przywnosciowych przygotawaniem ani po ugotawaniu, poniewaNczy uszkodzić garnek. Bezpośrednio po kaźdym uzyciu umyj i wypłucz szybkowar. Nigdy nie myj w zmywarce zaworu roboczesgo (A), uszczelki (I), minutnika* (F), ani garnka z powląkaweprzywierajność. Nigdy nie w��żaj minutnika* (F)pod wodę. Nigdy nie stosuj wybielacja ani produktów na bazie chloru, króre moga uszkodzić powierzchnie stali nierdzewnej. Nie pozostawiazij sukrywki zanurzonej w wodzie. Raz do roku wymieniaj uszczelkie lub zawsze kiedy nosi Ślady uszkodzen. Po 10 latach uzytkOWANIA szybkowaru naleZY sprawdzić w autoryzowanym serwisia TEFAL. Przechowywanie szybkowaru: Obrć psychywnie na garnku w celu uniknięcia przydwczesnego zuźycia uszczelkiPokrywki. |
ZACHOWAJ NINIEJSZA INSTRUKCJE
Częsci (patrz: Schemat)
A. Zawór roboczny B. Przewód odpradowazia pary C. Oznaczenia ustawienia zaworu D. Trzpien bezpiecznych (Patrz rozdziaf „Zabezmieczenia") E. Zawór bezpieczénstwa F. Minutnik* G. UchwytPokrywki H. Pokrywka I. Uszczelka J. Koszyk do gotowania na parze* K./L. Statyw* M. Uchwyt garnka N. Oznaczenia maksymalnego napelnienia O. GarnekSprawdź koniecznie przydym użyciem
Sprawdzanie zaworu roboczego
 - Sprawdz,czy otwor odpradowazia pary w zaworze roboczym nie jest zatkany (patrz punkt „Zdejmownik i zakladanie zaworu roboczego").Sprawdzanie zaworu bezpiecznychstwa
 Sprawdz,czy kulka zaworu bezpieczenstwa jest ruchoma (uzyj patyczka).Obstuga
 Gotowanie w trybie Szybkowar  Gotowanie w trybie Garnek*  DekompresaOtwieranie
- Przekć uchwytPokrywki z pozycji poziomej do pionowej - rys.3 PokrywkaOCRa csi UniesPokrywke. W przypadku trudnosci z otwarciem produktu:zmocz uszczelkę woda i załódź powrotem w pokrywce,Nie wycierajć jej - rys.19 i pilnujć,aby załozyć są dokladnie pod rowki pokrywki - rys.15.Zamykanie
- Upewnij sie, ze uchwytPokrywkiznajduje sie w pozycji pionowej. - Umieszek poukowyne na garnku, zgodnie z - rys. 1, dopasowujac plastikowa czesc do uchwytow garnka. - Przekrć uchwytPokrywki z pozycj pionowej do poziomej - rys.2 - Pokrywka obracsi.NieMZna zamknacPokrywki:
Sprawdź,czyuszczelkaiPokrywka sā prawidtowozatozone. W przypadku trudnosci z zamknieciem produktu:zmocz usczelke woda i załoz z powrotem w pokrywce, nie wycierajac jej - rys. 19 i pilnujac, aby załozyc są dokladnie pod rowki pokrywki - rys. 15.Pierwsze użycie
W przypadku modeli z nieprzywierajęc powlok: umyj icka powierzchnie powłoki wewétrznejlekko natłuść olejem spożywczym.W zależnosci od modelu:
Umiesz statyw\*L)ikoszyk\*Jna dnie garnka. - Przyczep statyw* (K) do koszyka* (J), a potem postaw calosci na dnie garnka. Napelnij garnek (O)woda do 2/3 wysokoisci (MAX 2)-rys.5 Zamknij szybkowar. Wyrownik piktogram na zaworze roboczym (A) z oznaczeniem ustawienia naworu (C)-rys.9.   Postaw szybkowar na zrodle ciepla i ustaw je na maksymalnag moc. Gdy para zacznie wydobywać sie przyez załór, zmniejsz mocźróda ciepla i zaczekaj 20 min. Po uplywie 20 minut wyłacz zródrlo ciepla. - Wyrównaj piktogram na zaworze roboczym (A) z oznaczeniem ustawienia zaworu (C). Gdy trzpień bezpieczenistä (D) opadnie, szybkowar nie jest juz pod ciñieniem. - Otwórz szybkowar - rys. 3 Umyj go plynem do mycia naczyn.Napelnianie minimalne i maksymalne
Minimum 250 ml (2 szklanki) - rys.4. - Maksimum 2/3 wysokość garnka, oznaczenia MAX 2 - rys. 5. - Nie uzywaj gruboziarnistej soli, dodawaj drobną sól pod koniec gotowania.W przypadku niedtórych produktów:
W przypadku artykułów mącznych,(PCzniejęcych i/lub pieniacych sie podczas gotowania,takich jak ryź, warzywa straczkowe,suszone warzywa,przeciery,dynia, cukinia,marchew,ziemniaki,filetzryb itp.nie naleźny napelniac szybkowaru wiszejni do 1/3 (MAX 1) pojemnosci.Pozwól,aby szybkowar przyze kilka minut ostygl,natestPNie OSTUDg go w zimnej wodzie.Przed kaczdym otwarciem,po upewnieniu sie,ze trzpien bezpieczenstwa opadl,zawsze delikatnie potrzaszaj  szybkowarem, aby nie dopuścić do tryskania pary, co mogłowby spowodować oparzenia. Czynnosć ta jest szczególnie wąźna przy szybkim upuszczaniu pary lub po ostudzeniu w zimnej wodzie. W przypadku yupazolecamy wykonac szybkędekompresje w zimnej wodzie (patrz punkt „Zakończenie gotłowania wtrybie Szybkowar").Korzystanie z koszyka do gotowania na parze*
Wlej 750 ml wody na dno garnka (O).W zależnosci od modelu:
Umiesz statyw\* (L) i koszyk\* (J) na dnie garnka. - Przychep statyw* (K) do koszyka* (J), a potem postaw calosci na dnie garnka.    - Podczas gotowania na parze artykuły znajdujece są w __koszyku* nie powinny dotykać wody - rys. 6 i 7. Produkty umieszczone w koszyku* nie powinny wystawać ponad poziom MAX 2.Zdejmownik i zak.§adanie zaworu roboczego (A)
Zdejmownikie zaworu roboczego (A):
- Wyrównaj rowek z oznaczeniem ustawietenia naworu (C), naczkidz pierScién zaworu roboczego (A). Zdejmij zawór - rys. 11.Zakladanie zaworu roboczego :
Nastaw zawór roboczny (A)- rys. 8 w taki sposób, aby punkt na zaworze znalazs ię na oznaczeniu pozycji (C) tzn. naprzeciw niedgo.  Wcisnij zawor roboczny (A)pak, aby zaczepi s o przyzwod odpradowazania pary. Nacijsnij piktogramy zaworu roboczego (A)i obrc. Minutnik*
Nigdy nie uzywaj minutnika w trybie Garnek.
Minutnik zostal stworzony po to, by zapewnic udane potrawy przy jak najmiejszym zużyciu energia. Automatyczne odlicza czas gotowania, sączawszy od osiagnęcia temperatury odpowiedniaj dla gotowania w trybie SzybkowarAby minutnik dział, powinien być przymocowej do szybkowaru
Zwroc uwage,czy w czasie gotowania zawór roboczny (A) regularnie syczy. Jeźeli ilosc pary jest niewystarczajęca, zȩksz lekko moc zródka ciepla, w odwrotnym przypadku zmiejejsz moc zródka ciepla. 1 Aby wączyc minutnik, naciśnij przyzycisk. 2 Ustaw czas gotowania (w minutach). W przypadku pomyński co do czasu gotowania odczekaj 4 sekundy do ustania migania plomieni, nastepnie nacijsnij i przytrzymaj przycisk w celu wyzerOWANIA. 3 Ponownie uruchom zródlo ciepla, ustawiajac maksymalnaj moc. 4 Gdy szybkowar nagrzeje sie do temperatury gotowania, minutnik dzwoni i zaczyna sie odliczanie czasu (cyfry migaja). Zmniejsz moc zródta ciepla. 5 Na koniec czasu gotowania minutnik dzwoni. - Aby wyłaczyc dzwonienie, nacijsnij przycisk. Wyłac zródko ciepla.Dlugie nacinie przycisku zeruje i wyłacza minutnik.
    Zakladanie i zdejmownik minutnika*
- Aby załość minutnik (F)- rys. 12, najpierw wcijsnij go od strony przycisku, a nastepnie docisnij, aby zamocować druga strone. - Aby zdjac minutnik (F), unies go i zdejmij.Wymiana baterii minutnika*
Bateria minutnika to bateria guzikowa CR2032. - Jeźeli pojawi są symbol n l do jejeli nic są nie wyświetla, wymiem baterie.   Trwałość baterii zaleź od czestotliwość uzytkowania minutnika. Bateria w tym artykule zawiera dimetoksyetan nr CAS 110-71-4. jest zgodna z przypisami europejskimi. Dla wlasnégo bezpiecz内分泌а oraz w celu ochrony srodowiska: nie otwieraj baterii, nie wystawiaj jej na dzialanie wysokich temperatur, po zuzyciu wrzuc do specjalné go povemnika na zuzyte baterie przyznaczone do recyclkingu. - Nie naleź doładowywać baterii jednorazowych. - Nie nalezy mieszac ze soba baterii rożnych rodzajów, ani uzywać jederoczesnie baterii nowych i uzywanych. Baterie nalezy zakładc zgodnie z oznaczeniami biegunów. - Rozladowane baterie nalezy wyjac z urzadzenia i w bezpieczny sposob zutylizować. - Jesli urzadzenie nie bedzie przyduszcy czas uzywane, nalezy wyjac z siego baterie. - Nie nalezy zwierac wyprowadzen zasilania. - Wszystkie czynnosci nalezy wykonywać na plaskim blacie do pracy. - Aby wyjac baterie z minutnika, otworz zatyczkezasobnika baterii, uzywajac monety (patrz rysunek). Wymien baterie. Wlóz uzczelke na.), Umiesz polskiego zatematyczki baterii na wprost polskiego zymi terima. - Delikatnie obrc zatyczkezasobnika baterii,lekko dociskajac, dopasowujac polksiezyc atyczki do księzyca tina. Czynnosci te wykonuj na plaskiej powierzchni, aby zatyczkazasobnika baterii zosta zaieszczona poziomo. - Nie naciskaj zbyt mocno na zatyczkezasobnika w chwili jej zamykania. Nie wychodź pozaograniczniki. W przypadku zagubienia nowy minutnikromatic nabyc w autoryzowanych serwisach TEFAL.     Nigdy nie wiktadaj minutnika* pod wode ani do zmywarki. Nigdy nie uzywaj minutnika w trybie Garnek.Przed gotowaniem
- Przed kaźdym użyciem wyjmij zawór roboczy (A) - rys. 11 i sprawędź, czy przyzewód odpradowazania pary (B)nie jest zatkany - rys. 13. Sprawdz,czyzaworbezpieczenstwa jest ruchomy (patrzrozdziay "Czyszczenie" i,Sprawdz koniecznie przed kaźdym użyciem")-rys.18. Wloz produkti nalej plynu. Zamknij szybkowar - rys. 2. W przypadku trudnosci z zamknieciem produktu:zmocz usczelke woda i załoz z powrotem w pokrywce, nie wycierajc jej - rys. 19 i pilnujac, aby załozyc są dokladnie pod rowki pokrywki - rys. 15. - Załoz zawór roboczny (A)- rys. 8. Gotowanie w trybie Szybkowar
- Obróc zawór roboczy (A)do ustawenia: gotowanie w trybie Szybkowar - rys. 9. - Przed uruchomieniem szybkowaru upewnij sie, ze jest on wąsciwie zamkniety - rys.2 - Postaw szybkowar na zródlc ciepla i ustaw je na maksymalnag moc. - W przypadku modeli z minutnikiem : zaprogramuj czas gotowania podany w przyopsisie (patrz rozdział „Uzywanie minutnika"). Stukanie i pykanie trzpienia bezpieczentwa jest normalnym zjawiskiem, uzmgliwa wydostanie sie powietrza przygotowaniem.W trakcie gotowania w trybie Szybkowar
Gdy z zaworu roboczego (A)stale wydobywa sie para, wydajac regularny dzwiek (PSZSZT),zmniejsz moc zrodla ciepla. - Odesto goemontu Rozpocznij odliczanie czasu gotowania podanego w przyopsisie. W czasie gotowania zwroc uwage,czy zawor regularnie syczy. Jeźeli ilosc wydostajacej sie pary jest niewystarczajca, zwiększ leuko moc zródla ciepla, w odwrotnym przypadku zmiejejsz moc zródla ciepla.Zakończenie gotowania w trybie Szybkowar
Uwolnienie pary:
- Po wyłaczeniu zródła ciepla istnieje dwie moziwość: - Stopniowa dekompressa: obracaj stopniowo zawór roboczny (A), koncząc na piktogramie rys. 10.  - Szybka dekompresja w zimnej wodzie: naje do zlewu zimnej wody i włód do niedn są szybkowaru aż opadnie trzpień bezpiecznychsta - rys. 14. Gdy trzpień bezpiecznychsta (D) opadnie, szybkowar nie jest juz pod ciasnieniem. Obróc zawór roboczny (A) do ustawenia  Etap 1  Etap 2 - Możesz otworzyc szybkowar - rys. 3. W przypadku trudnosci z otwarciem produktu:zmocz uszczelkę wodą i załoz z powrotem w pokrywce,Nie wycierajć jej - rys. 19 i pilnujć,aby załozyć ja dokladnie pod rowki pokrywki - rys. 15. Jeźeli w trakcie uwalniania pary zaobserwujesz jakiekolwiek zaburzenia, umieszć zawór roboczny (A) ponownie w pozycji Szybkowar, a战胜nie wykonaj szybką dekompresnej w zimnej wodzie. Jeżeli trzpień bezpiecznychsta (D) nie opada, naje do zlewu zimnej wody i włód do sądno szybkowaru aź opadnie trzpień bezpiecznychsta - rys. 14.Nigdy nie manipuluj przy trzpieniu bezpiecznychstwa.
W przypadku artykułów macznych,(PCZniews i/lub pieniacych sie podczas gotowania,takich jak rzy,warzywa straczkowe,suszone warzywa,przeciery,dynia, cukinia,marchew,ziemniaki,filety z ryb itp.nie nalezy napelniac szybkowaru wiecej niz do 1/3 (MAX 1) pojemnosci.Pozwol,aby szybkowar przy zikka minut ostygl, nastepnie ostudz go w zimnej wodzie.Przed kaźdym otwarciem,po upewnieniu sie,ze trzpień bezpieczewsstwa opadl,zawsze delikatnie potrzasaj szybkowarem, aby nie dopuSci do tryskania pary,co mogloby spowodowa oparzenia.Czynnosc ta jest szcegolnie wazna przy szybkim upuszczaniu pary lub po ostudzeniu w zimnej wodzie.W przypadku yupazolemy wykona szybka dekompresje w zimnej wodzie (patrz punkt „Zakończenia gotowania w trybie Szybkowar"). Gotowanie w trybie Garnek*
 - Obróc zawór roboczy (A) do ustawienia: gotowanie w trybie Garnek. W tym celu uzyj wystarczajacej sily, aby minac zagȩbienenie w poźycji dekompresji. - Przed uruchomieniem szybkowaru upewnij sie, ze jest on wąsciwie zamkniety - rys. 2. Postaw szybkowar na zrodle ciepta iustaw je na niewielkag moc. - Odesto go momentu Rozpocznijs odliczanie czasu gotowania podanego w przyopsisie. W trybie Garnek要去czw kaźdej chwili otworzyc szybkowar, aby wymieszac potrawe, sprawdzić stan gotowanicy dodać składniki. W przypadku trudnosci z otwarciem produktu:zmocz uszczelkę wodą i załódź powrotem w pokrywce,Nie wycierajć jej - rys.19 i pilnujć,aby załozyć są dokadnie pod rowki pokrywki - rys.15. - Ježeli zródo ciepla jest zbyt mocne, szybkowar要去 zablokować (trzpień bezpieczność wsta (D) unosi sie i blokuje otwarcie), przy co nie są za uchomic'u chwytuPokrywki lub nie są za otworzyc szybkowaru przy seinen uzyciu. W takim przypadku zmieje szubny zródo ciepla. W przypadku zeliwnych kuchenek elektrycznych, zdejmij szybkowar ze zródo ciepla. - Modele z powłoką zapobiegajęc przywieraniu: nie naleź y uzywać trzechaczek do miksera lub innych metalowych lub ostrych przyborów kuchennych. Nie osuszaj narȩdzi, pukajć w rant garnka,要去s go uszkodzic i spowodowej nieszczelność. - Nigdy nie Rozgrzewaj tłuszczów aź do ich zwęglenia. Opary z gotowania mogą byćNiebezpieczne dla zwierȩz o wraiżliwym ukleadzie oddechowym, np. dla ptaków. Ptaki naleź trzymać z dala od kuchni.Zabezpieczenia
Szybkowar jest wyposzaźony w kilka zabezpieczenia:Zabezpieczenia przy zamykaniu:
- Jeźeli pokrywka jest niewlasciwie załozona lub jejeli zapomnisz opuścić uchwyt pokrywki, przy eztrpiem bezpiecznychstwa (D) wydostaje są para i szybkowar nieMZe zwiększyc ciasnienia.Zabezpieczenie przy otwieraniu:
- Jeźeli szybkowar znejduje są pod ciñnieniem, trzpień bezpieczność (D) jest uniesiony, a uchwyt otwierajncy/zamykajncy pokrywkę (G) nie powinien być aktywny. - Nigdy nie przybuj otwierać szybkowaru na silę.- Przede wzystkim nie ruszaj trzpienia bezpiecznychsta (D).
- Upewnij sie, ze spadlo ciñnienie wewnétrzne, sprawdzajc,czy trzpić bezpieczenia stwa (D) opad. - Uchwyty garnka są czesciami zabezmieczajczymi. Nigdy nie wymieniaj ich samodzielnie. Nie uzywaj innych modeli uchwytów. - Jeźeli ustawiele uchwyt do otwierania/zamykania (E) pokrywki w pozycji pionowej w momencie gdy szybkowar był jestzsche pod ciñnieniem, nie;będzieszność go otworzyć. jest to dodatkowej zabezpieczenia. - Ustaw uchwyt Pokrywki ponownie w pozycji poziomej i poczekaj na opadnięcie trzpienia bezpieczność (D).Dwa zabezpieczenia przyd nadmiernym ciśnieniem:
- Pierwsze zabezpieczenia: nawór bezpieczędsta (E) uwalnia ciñnienie - rys. 20 - Drugie zabezpieczenia: uzeczelka umozliwia uwolnienie ciñnienia przy bezPokrywk - rys.20.Ježeli uruchomi są jeder z systemów zabezpieczązych przyzed zbyt wysokim ciasnieniem:
Wylacz zrodto ciepla. - Pozostaw szybkowar do calkowitego schłodzenia. - Otwórz. - Sprawdz i umyj zwór roboczny (A), przywód odpradowania pary (B), zwór bezpieczność (E) i uzciekę (I) - rys. 16 - 17- 18. Sprawdz w rozdziałach „Czyszczenie" i „Sprawdz koniecznie przydym użyciem". - Jeźeli po sprawdzeniu i umyciu urzadzenia nie jest szczelne lub nie działa, oddaj do autoryzowanego serwisu TEFAL.Zalecenia
1 - Para wydostajęca są przy czawó roboczy jest bardzo gorówn. Uwaźaj na strumien pary. 2 - Po uniesieniu są trzpienia bezpieczędsta nie要去źysz otwierać szybkowaru. 3 - Podobnie jak w przypadku innych urzadzen do gotowania, zapewnj pełny nadźur urzadzenia, zwłaszczaw przypadku gdy w połizu przybebywajcie. 4 - Do przynoszenia szybkowaru uzywaj obu uchwytów garnka. 5 - Nie przechowuj zywnosci w szybkillerze. Nigdy nie przyenos szybkilleru, trzymajac go za uchwytPokrywki. 6 - Nigdy nie stosuj wybielaczy ani produktów na bazie chloru, które mogą uszkodzić powierzchnie stali niedzewnej. 7 - Nie pozostawiaj Pokrywki zanurzonej w wodzie. 8 - Uszczelkę wymieniaj co roku lub jejeli nosi slady uszkodzen. 9 - Myj szybkowar wyłącznie po和他的 schłodzeniu i opróznieniu. 10 - Po 10 latach uzytkowania szybkowar nalezy obowych sprawdzić w autoryzowanym serwisie TEFAL.Czyszczenie
W celu zapewnienia prawidłowedo dziatania szybkowaru nalezy przystrzegać zalecen dotycznych和他的 mycia i konserwacje po kaźdym uzyciu. Zaciemnienia i zarysowania, które moga pojawic sie na skutek dlugotrwaideo uzytkowania nie stanowig wady produktu. Zużycie zȩwnętrznej powłok(w zależnosci od modelu) spowodOWANE stykaniem są polywi k i garnka jest normal#. W przypaka dku sz ybkowarów z powłok a nieprzywierajacja (w zależnosci od modelu): lekkie zarysOWania i otarcia, mogace pojawic sie w trakcie uzytkOWania,Nie pogarszaja wlasciwość antyadhezyjnych powłoki. - Po kaźdym uzyciu umyj szybkowar letnią wodź z plęnym do mycia naczn. Tak samo naleź wy postępowacz koszykiem*. - Nie uzywaj wybielczy ani produktów zawierajycch chlor. - Nie nagrzewaj mocno garnka, gdy jest pusty.Mycie wętrza garnka ze stali niedzewnej:
- Myj przy użyciu gąbki do szorOWANIA i płynu do mycia naczyn. - Jeźeli wętrze garnka ze stali niedzewnej nosi białaść (osad mineralny), wyczyść je octem.Mycie alumniowej wętrza garnka z powłok są przywierajuća:
W celu przydztuzenia okresu eksploataci produktu zaleca sie mycie reczne. - Myj ciepla woda przy uzyciu plynu do mycia naczyn i miękkiej gąbki. - Nie uzywaj detergentów ani gąbek do szorowania. W przypadku przypalenia potrawy wiej do garnka ciepla wode i odstaw do odomoczenia. Nastepnie umyj plynem do mycia naczyn.Mycie zewétrznych powierzchni garnka:
Do mycia uzywaj gabwei plynu do mycia naczyn. Garnek ze stali niedzewnej i koszyk przy na myc w zmywarce. Nie wiktadaj do zmywarki garnka z powtoka nieprzywierajuca (w zleznosci od modelu) poniewaz tabletki do zmywarki zwieraja bardzo agre swne substancje, powodujace koro zje alumiowych czeci. Intensywnie uzywanie garnka z powlok antyadhezyjn (w zaleznosci od modelu) moż e lekk o zmienić kolor powloki (źtknierie, plamy).MyciePokrywki:
- Do myciaPokrywki uzywaj gąbki i plynu do mycia naczyn. Aby usanagan wode pozostajag między czesciami metăgowymi i plastikowymiPokrywki,suszPokrywké pinowo.Mycie uszczelkiPokrywki:
- Po kaczdym gotowaniu umyj uszczelke (I)i jej gniazdo. - Aby włoźć uzczelkie z powrotem, postępuj zgodnia z - rys. 15 i upewnij sie, ze uzczelka znalazcta sie dokladnie pod kaźdym rowkiem pokrywki.Mycie zaworu roboczego (A):
Zdejmij zawór roboczny (A)- rys. 11. Umyj zawór roboczny (A) pod bierzacwoda - rys. 16. Sprawdz,czy jest ruchomy: wedlug rysunku. Po zdęciu zaworu roboczego (A), uszczelki (I) i minutnika* (F)要去z umyć Pokrywkę w zmywarce.  Nigdy nie myj w zmywarce zaworu roboczego (A), uszczelki (I), minut nika* (F), ani garnka z powłoką zapobiegajęc przywieraniu.Mycie przywcie:
Zdejmij zawór (A)- rys. 11. Sprawdz,czy przewod odprowadzenia pary jest drozny i ma okragly przyekrój -rys.13.W razie potrzeby wycyszec go wykałaczka-rys.17i przyeplucz.Mycie zaworu bezpieczestewa (E):
- Czeszaworu bezpieczentwa znajdujaca sie wewnatrz pokrywki umyj pod bierzaca woda. - Sprawdz,czy działa prawidłowo,naciskajc mocno kulke zaworu (patyczkiem kosmetycznym bez wacika),która powinna byc ruchoma -rys.18.Zobacz w rozdziale „Sprawdz koniecznie przydym użyciem".Czyszczenie minutnika* (F):
Uzywaj czystej iSuchej szmatki. - Nie stosuj Rozpusczalnika. - NigdyNie wiktadaj minutnika pod wode ani do zmywarki.Konserwacja
Wymiana usczelki szybkowaru:
Uszczelke nalezy wymieniac co roku oraz jeźeli nosi slady uszkodzen. - Zawsze stosuj oryginalne uszczelki TEFAL, zgodne z zakupionym modelem (patrz Rozdzial „Akcesoria"). - Aby włoźć uzczelkie z powrotem, postępuj zgodnia z - rys. 15 i upewnij sie, ze uzczelka znalazcta sie dokladnie pod kaźdym rowkiem pokrywki.Przechowywanie szybkowaru:
- ObroćPokrywkę na garnku. - Mechanizm otwierania/zamykania szybkowaru nie wymaga szczególnej konserwacci poza myciem. Po 10 latach uzytkowania szybkowar naleź y sprawdzić w autoryzowanym serwisie TEFAL.Akcesoria TEFAL
- Na rynku dostepne są nastepujuce akcesoria do szybkowaru:| Akcesoria | Numery katalogowe | |
| Uszczelka | 3/4/4.5/6 L: wewnietrzna Średnica uszczelki: 24 cm | X1010008 |
| 5/7.5/9 L: wewnietrzna Średnica uszczelki: 27 cm | X1010007 | |
| Koszyk do gotowania na parze* | 3/4.5/4/6 L: dla garnka o Średnicy 22 cm | 792185 |
| 5/7.5/9 L: dla garnka o Średnicy 24 cm 79 | 2654 | |
| Statyw* (L) | 792691 | |
| Minutnik* | X1060007 | |
Dane techniczne
Średnica dna szybkowaru - nr katalogowe| Pojemność | Ø garnka | Ø dna | Clipso Minut® Perfect / Easy | Clipso Minut® Duo couleur | Clipso Minut® Duo Gourmet | Material, z ktorego wykonany jest garnek |
| 3 L 22 | cm 15.5 | cm P4620 | 5 - - | Stal niedzewna | ||
| 3 L 22 | cm 18 cm | - - P4660 | 5 | |||
| 4 L 22 | cm 14 cm | - P46042 | - | Aluminium powlekane | ||
| 4.5 L 22 | cm 15.5 | cm P4620 | 6 - - | Stal niedzewna | ||
| 5 L 24 | cm 14 cm | - P46051 | - | Aluminium powlekane | ||
| 5.2 L 24 | cm 20 cm | - - P466 | 54 | Stal niedzewna | ||
| 7.5 L 24 | cm 18 cm | P46248 | - - | |||
| 9 L 24 | cm 18 cm | P46249 | - - | |||
| Set 5 L/7,5 L | 24 cm | 14 cm | P46353 | - | ||
| 18 cm | ||||||
Kompatabilne zródła ciepla
GAZ ENERGIA ELEKTRYCZNA Plya zeliwna ENERGIA ELEKTRYCZNA Plta grzewca lub halogenowa ceramiczna ENERGIA ELEKTRYCZNA Plyta ceramiczna indukcyjna) ENERGIA ELEKTRYCZNA Grzalka spiralna      - Szybkowar nadaje są do wsztkich rodzajów kuchenek, w tym rownikie indukcyjnych. - W przypadku pły elektrycznych uzywaj pola o srednicy mniejszej lub równej srednicy dna szybkowaru. - W przypadku płyter ceramicznych upewnij sie, ze dno garnka jest czyste i gladkie. W przypadku kuchenek gazowych plomien nie sąwatac poza srednicę garnka. We wzystkich przypadkach szybkowar nalezy ustawiać na sądku.Gwarancja
W przypadku uzytkowania zgodnego z instrukcja obstugi garnek ze stali nierdzewnej nowego szybkowaru TEFAL posiada 10-letnia gwarancje na: - wszelkie usterki zwiazane z konstrukcja metalowa garnka, - przydwczesne zniszczenia metalowej podstawy garnka. - Na pozostale materiały, z krórych wykonany jest garnek oraz na pozostale częsci szybkowaru obwiązuje gwarancja z tytułu rękojmi, obejmujacja wszelkie wady fabryczne i materiaływe, zgodnie z sprawem obwiązujacym w kraju zakupu i pouchystawzy od daty zakupu. - Z gwarançji umownej möglich skorzystać po przyedstawieniu paragonu lub faktury z data zakupu. Gwarancja i rkojmia nie obejmuja: Zarysowan i odbarwien spowodowanych starzeniem sie produktu, w przypadku garnków z powłoką zapobiegajęc przywieraniu. Zarysowan spowodowanych stykaniem siePokrywy i powloki antidhezyjnej. - Uszkodzen winikajacych z nieprzestrzegania waznychazolen lub nieprawidlowego uzytkowania, przyte wsystkim: - Uderzen, upadkow, uzytkowania w piekarniku itp. Z gwarancji要考虑 korzystac tylko w autoryzowanych serwisach TEFAL. - Zadzwon na numer infolinii w celu uzyskania adresu najblisztego autoryzowanego serwisu TEFAL.Oznaczenia prawne
| Oznakowanie Lokalizacja | |
| Znak handLOWy Na pokrywce | |
| Rok produktji i partia Numer katalogowy modelu Maksymalne ci内分泌ie bezpiecznych (PS) Maksymalne ci内分泌ie robocze (PF) | Na pewkrywce |
| Pojemnosć Na zewétrznej czymi dna garnka | |
| Adres pocztowy producenta Na zewétrznej | czymi dna garnka |
Aktywnie chronomyśrodkowisko!
 ① Wiele materiałów uzytych w urzadzeniu nadaje są do powtórnego wykorzystania lub recyklingeru. Oddaj swoje urzadzenie do punktu zbiórk, aby zosto prawidłowo zutylizowane.TEFAL odpowyada na pytania
| Problemy Zalecenia | |
| Ješli otwieranie i/lub zamykanie zaczyna być trudne: | Zdejmij uzczelkie opłucz pod bieść woda. Załoź uzczelkie w pokrywce bez suszenia jej- rys. 19. |
| NieMZna zamknącPokrywki: | Sprawdź, czy uchwyt Pokrywki znajduje są w pozycji pionowej. Sprawdź prawność ułożenie uzczelki, patrz rozdziaf „Mycie i konserwacja". Sprawdź, czy Pokrywka jest prawnȩwo ułożona, jak na - rys. 1. Zmocz uzczelkie woda i załoź powrotem w Pokrywce, nie wycierȩć jej- rys. 19 i pilnujuć, aby załoźć są dokadnie pod rowkiPokrywki- rys. 15. |
| Szybkowar zostal Rozgrzany pod ciasnieniem bez pląnu wew)ntrz: | Oddaj szybkowar do sprawdzenia w autoryzowanym serwisie TEFAL. |
| Trzpieńbezpiecieznstwa stuka i wypuszcza parę: | W pierwszych minutach jest to normalne: w ten sposób usu-wane jest powietrze przygotawaniem. |
| Trzpieńbezpiecieznstwa nie unosi są i nic nie wydostaje są przyżawó rzech wczasi gotowania: | Jest to normalne zjawisko w pierwszych minutach gotowania. Jeźeli zjawisko utrzymieme, sprawdź, czy: - zródló ciepla ma wystarczȩć moc, jeźeliNie, zwiéksz moc - ilość pląnu w garnku jest wystarczȩć, - zawó roboczy (A) jest ustawIONy na „ - szybkowar jest prawnȩwo zamkniety, - uszczelka lub krawędź garnkaNie są uszkodzone, - uszczelka jest prawnȩwo ułożona. |
| Trzpieńbezpiecieznstwa nie unosi są i nic nie wydostaje są przyżawó rzech goitaniania: | Jest to normalne zjawisko w pierwszych minutach gotowania Jeźeli zjawisko utrzymieme, sąe do zlewu zimnej wody i w do niedno szybkowaru aż opadnie trzpień bezpieciens(II) Wyczyść zawór roboczy (A)- rys. 16 i przyworć odpradowania pary - rys. 17 oraz sprawdź, czy kulkę zaworu bezpiecieznstwoMZNA wci)nac bez oporu - rys. 18. |
| Problemy | Zalecenia |
| Ješil wokół po krywki ucieka para, a trzpień znajduj es iew po zycji dolnej, spre awdź: | prawi dlówne zamkniecePokrywki, ułożenie u szcelki po krywki, prawidł owy stan uzczelki; w razi epotrzeby sąȩzy ja wymiennent; czystność po krywki, uszcze liki igniazdua szcelki w pokrywce, dobry st an krawędzi gar nka. |
| Nie można otwor zęc po- krywki: | Sprawdź cz ytrz pi en be zpiecieżstwa (D) op od t. Jeżelitak ni jest, o bniż dśnien ie:n alej do zlewu zimnej wo dyiw bź do nied no szybko waruaz op adniétrzpień bezpieczenia sta. NigdyNie manipuluj przytz pieniu bezpieczć n stwa (D). Przekrć zaw od roboczy (A) w poźycje |
| Jeżeli produkty nie są ugotowane lub są spa- lone, spreawdź: | czas got owania, moc zróda dep l. prawidłowe ustawienie zawodu robocze go (A) ilość plynu. |
| Jeżeli produkty przypaliyy są w szybkkowa rze: | przed umyciem gamk a od staw go na jakie czdo od możenia. NigdyNie uzywaj wybielaczy aniproduktów na bazie ch loru. |
| Jeżljednoz zabezpieczenia uruchom i sie: | Wydacz zródló dep l. Po zostaw szybcowar do schlodZenia bez przenoszen i go.Poczekaj ztrpienisbe zpiecz e n stwa opadNieiot wór z szybcowar. Sprawdź i umy j zwór roboczy (A) przywoźd od prowadzania pary, zawór bezpieczć stwai uszczech Upewnij sie, ze przystrzega z warunków doty cząych na pehnienia urzadzenia. Jeżeli problem wystę pu je rada l sprawdź urzadzenia w autory zo wany mserwisie TEFAL. |
| Jeżeli pojawie są Ślady utleniania: | Użcie wyto kiej jak scistali ni dzewnej nie zapobiega wystepowaniu utleniania w ekremal nych przymadkach Jeżli dostrze优惠政策 zŚlady utleniania, przyd ko lejnym użyciem szybko waru usń je gąbką do szorowa nia |
LABELA GOTOWANIA
Warzywa
WARZYWA (SWIEZE)
PARA
Skadni w koszyku dogotowania na parze i 750 ml wody na dnie szybkowara.  ZANURZENIE
Skladnik w wodzie bez koszyka.LEGUMES SECS ZANURZENIE
Bez koszyka.            - potov                                            PL| Bakłañzy, obrane i pokrojone w plastry (3 mm), 850 g (para) | 10 do 12 min. |
| Botwina, pokrojona (2 cm) 700 g (para) 15 do 17 min. | |
| Bób 250 g (zanurzenie) 18 do 20 min. | |
| Brokuły - rożyczki 600 g (para) 9 do 11 min. | |
| Brukselka (para) 10 do 12 min. | |
| Buraki, czerwone, pokrojone w kostenę (zanurzenie) | 20 do 25 min. |
| Cebula do peklowania (para) 7 do 8 min. | |
| Cukinia pokrojona w okrägle plastry (3 mm) 600 g (para) | 12 do 15 min. |
| Dynia, pokrojona w kawałki (3 do 5 cm) 600 g (para) | 13 do 18 min. |
| Endywia przyzekrojona na pól (900 g) (para) | 14 do 16 min. |
| Fasola, suszona 250 g (zanurzenie) | 35 do 40 min. |
| Groch (para) | 6 do 8 min. |
| Kalański - rożyszczki 600 g (para) | 10 do 12 min. |
| Kapusta biała, poszatkowana, 500 g (zanurzenie) | 5 do 6 min. |
| Karczochy, 2 calorie, 600 g kaźdy (zanurzenie) | 30 do 35 min. |
| Koper włoski pokrojony w sąpki (600 g) (para) | 6 do 9 min. |
| Marchew pokrojona w okrägle plastry (3 mm) 600 g (para) | 17 do 19 min. |
| Papryka - połowki (550 g) (para) | 14 do 16 min. |
| Pieczarki, pokrojone 800 g (zanurzenie) | 4 do 5 min. |
| Por, caly, biała czegość 650 g (para) | 9 do 11 min. |
| Rzepa, pokrojona w kostenę (500 g) (para) | 14 do 16 min. |
| Seler, pokrojony w plastry (zanurzenie) 600 g | 7 do 9 min. |
| Soczewica, zielona 250 g (zanurzenie) | 14 do 16 min. |
| Szparagi, biała (para) | 5 do 6 min. |
| Szpinak (para) | 3 do 4 min. |
| Zielony groszek (600 g) (para) | 10 do 12 min. |
| Ziemniaki przyzekrojone na pól (950 g) (para) | 20 do 25 min. (zależnosci od wielkość) |
| ZANURZENIE Bez koszyka. MAX 1° | ILOŚC WODY ILOŚC RYZU | CZAS PRZYGO- TOWANIA | |
| DLA 2 OSÓB | 400 ml / 2 szklanki | 150 g / 1 szklanka | |
| 500 ml / 2,5 szklanki | 250 g / 2 szklanki | ||
| DLA 6 OSÓB | 700 ml / 3,5 szklanki | 375 g / 3 szklanki |
| Świeść MROZONE | ||
| Ciełęcina (0,8 kg, srednica 5 – 7 cm) 17 do | 19 min. 37 do 40 min. | |
| Filety zabnicy (1 kg) w kawalkach po 75 g | 5 do 6 min. 7 do 8 min. | |
| Gicz jagnęca: 2 (0,95 kg) 40 do 45 min. | 1 godz. 5 min. do 1 godz. | 15 min. |
| Kaczka (1,8 kg) | 45 do 47 min. 50 | do 55 min. |
| Królik (1,5 kg w kawalku) | 8 do 9 min. | 20 do 23 min. |
| Kurczak (1,35 kg) | 23 do 25 min. | 1 godz. do 1 godz.10 min. |
| Kurczęta: 2 (1,3 kg) | 23 do 25 min. 40 | do 45 min. |
| Piecień wołowna (1 kg, srednica 8 – 11 cm) | 30 do 35 min. | 45 do 50 min. |
| Przepiörka: 4 | 9 do 10 min. | 18 do 20 min. |
| Schab (0,8 kg, srednica 8 – 10 cm) | 30 do 35 min. | 1 godz. 5 min. do 1 godz. 15 min. |
| Steki z lośosia: 4 (0,8 kg) | 5 do 6 min. 7 do 8 min. | |
| Steki z tuńczyka: 4 (0,7 kg) | 5 do 6 min. 7 do 9 min. | |
| Szyneel cieły: 0,7 kg | 17 do 21 min. 33 | do 38 min. |
| Szyneel wieprzowy:2 kawalki po 350 g | 13 do 15 min. 26 | do 29 min. |
| Zrazy ciełyce: 4 | 10 do 12 min. | x |
MÁSURI IMPORTANTE DE PRECAUTIE:
Inainte de a utilizes oala sub presiune, citi ci atentie toate instruciunile si consulta i ntotdeauna „Ghidul utilizatorului". Utilizarea neconforma poate produce daune. Pentru siguranta dumneavoastră, acest aparat este conform cu normele Şi reglementările aplicabile: - Directa privind echipamentele sub presiune - Materiale in contact cu alimente -Mediulinconjurator| VERIFICÄRIOBLIGATORIINAIANTE DEFIECAREUTILIZARE | A SE VERIFICA■vizual Şi la lumina zilei, dacă duza pentru evacuareaaburului nu este înfundata - fig. 13.■dacă bila supapei de siguranta este mobilă - fig. 18.■dacă garnitura capacului este fixată sub fiecarecrestătură a capacului - fig. 15.■dacă mankindere capacului sunt fixate în mod corect.Mânerele capacului au piesele de siguranta. Nu leschimbați niciodată singuri. Nu folosiți niciodată altmodel de capac. |
| RESPECTATIINTOTDEAUNAURMÁTOARELCANTITÂTÎ DEUMPLERE | ■Nu utilizesți niciodată oala sub presiune fãră lichid; acessetLucru duce la deteriorarea sa gravă. Niciodată nu utilizați oala sub presiune fãră lichid, deoarece acessest lucru ar pute duce la deteriorarea acsteia. Asigurți-vãcă existàintotdeauna suficient lichid în timpul gătirii.■Minimum 25 cl - fig. 4.■Maximum 2/3 din înalțimea oalei, indicator MAX 2 - fig 5.■In timpul gătitului la abur, coșul* pentru gătit la abur precum Şi alimentele situate în acesta, nu trebuie să intrecontact cuAPA - fig. 6 Şi 7.■Maxim 1/3 (MAX 1) pentru alimentele vâscoase care sedilă Şi/sau fac spumă în timpul gătitului, cum ar fi orezulleguminoasele, legumele uscate, compoturile, dovleacul,dovleceii, morcovii, cartofii, fileurile de pește...■Alimentele introduse în coșul pentru gătit la abur nu trebsădepășească nivelul MAX 2 din adâncimea vasului. |
| • Nu lasați copiii în apropietea oalei sub presiune atunci*cänd este,in curs de utilizesare. • Oala sub presiune gătește alimentele folosind presiunea. Outilizare inadecevata poate cauza răni provocate prin opărire. Asigurăți-vă că oala sub presiune este închisă corespunțătorinainte de punerea înfunctiune (A se vedea sectiunea „Inchidere”). • Asigurăți-vă că supapa șiieră permanent în timpul gătirii.Încazulîn care nu se eliberează sufficient abur, decomprimăti produsul Şiverificâti dacă există o cantitate suficientă de lichid Şi dacă duzapertreu evacuarea aburului nu este înfundă. Dacă, dupaeffectuarea acestor verificări, nu se eliberează în continuuresufficient abur, creșteți ușor puterea sursei de caldură. • Nu gătii alimente care riscașăș înfunde canalele dispositivelor de siguranta: - merișoare - arpacăs - fulgi de ovăz - mazăre uscată - tăieței, macaroane, spaghete - rubarbă - coacăze. • Nu gătii niciodata rețete pe bază de lapse în oala sub presiune(cum ar fi budincă de orez sau gritcu lapse). • In cazul unei oale sub presiune cu corpal din inox, nu utilizătsaregrunjoasă, ci adăugați sare finala sfârsitul gătirii. Astfel, veți evitaaparția petelor care ar putea deteriorora corpal oalei sub presiune. • Nu utilizăți oala sub presiune pentru prăjirea în uolei sub presiune. • Nu utilizăți oala sub presiune în alt scop decât cel pentru careeste prevăzută. • Nu introduciți oala sub presiune în cuptorul incins. • Nu introduciți niciodata în oala sub presiune folie de aluminiu care nu este securizată pe un recipient. Fixăți întotdeauna cu o sfoară. • Nu introduciți niciodata folie de plastic în oala sub presiune. • Vaporii de alcool sunt inflamabili. Aduceți la punctul de fierberecu aproximativ 2 minute îniate de a pune capacul.Supravegehati oala;când preparati rețete pe bază de alcool.Verificăți oala sub presiune în mod repetat dacă pregătiș rețetepe bază de alcool. • Utilizăți doar sursa (sursele) de caldură compatibilă (compatibile),conform instrucțiunilor de utilizesare. |
DUPÄ PREPARAREA ALIMENTELOR...
- Pentru modelele cu strat antiaderent: nu utiliziţi teluri sa instrumente metalice ori ascuţite. Nu loviţi ustensilele de muchia cuvei, deoarece riscaţi să o avariţiși să cauzati scurgeri. Rotiţi continuu supapa de functiònare (A) alegând după cum doriti viteza de decompressiune până ajungeti in dreptul pictogramei 10. In cazul care, la eliberarea aburului, observati improşcari anormale, readuceti supapa de functiònare (A) in poziţia de gătire in modul „Gătire sub presiune", iar apoi efectuati o decompressie rapidă in apă rece - fig. 14. Dacă indicatorul de siguranta (D) nu coboara, puneti oala sub presiune în apă recce - fig. 14. - Nu actionati niciodata asupra acestui indicator de siguranta. - După fierberea cărnii acoperite cu pielita (de exemplu, limbă de vita), care risca să se umfle sub efectul presiunii, nu ințepași carneia atăt timp CAT pielita prezinta un aspect umflat; riscași să va opăriti. Aveți grijă să ințepași carneia inainte de fierbere. - Pentru alimentele vâscoase care se expandează în timpul gătirii sau care produc spumă, cum ar fi orezul, leguminoasele, legumele uscate, compoturile, dovleacul, dovleceii, morcovii, cartofii, fileurile de pește...Lăsati oala sub presiune să se răceasca timp de câteva minute, apoi efectuți o răcire în apă rece. Inaintea fiecărei deschideri, scuturati oala sistematici și ușor, asigurându-vă în prealabil că indicatorul de siguranță este coborăt, pentru a evita orice improșcare cu bule de vapori, care risca să va arda. Această operție este deosebit de importante în cazul evacuării rapide a aburului sau după răcirea în apă rece. - Mutati oala sub presiune cu maxima atentie. Nu atingeti suprafetele fierbinti. Utilizati manerele si butoanele. Daca este necessitiesar, folosi ti manusi. - In cazul supelor, va recomandam sa efectuati o decompressie rapidă in apă rece (a se vedea sectiunea „ La finalul gătirii in modul«Oală sub presiune»"). - Inainte de a descide oala sub presiune, asiguraţi-vă că supapa este în poziţia de decompressie. Indicatorul de siguranta (D) trebuie să fie în poziţie coborăță. - Nu deschideți niciodata forṭat oala sub presiune. Asigurati-va cà presiunea din interior a fost eliberata. Indicatorul de siguranta (D) trebuie sā fie in poziţie coborătă. (A se vedea sectiunea „Siguranta".)| CURÂTARE Şİ INTREŞINERE | ·In cazul în care constatați că oala sub presiune este spartă sau fisurata, nu încați în niciun caz să o deschideți dacă este închiaș,ășteptași să răceasca Completionă năinte de a o muta. Nu o mai Utilizăți și ducței-o la un centru de service autorizat Tefal pentru reparăție. ·Nu intervenți asupra sistemelor de sigurantaș mai mult decât prevăd instrucțiunile de curățare și de înținere. ·Utilizați doar THESE originale Tefal care corespund modelului dumneavoastră. Utilizați exclusiv un corp și un capac Tefal. ·Nu utiliți oala sub presiune pentru deposizarea alimentelor acide sau sărate îniate și după fierbere, pentru că riscați și deterioratoriți corporul acesteia. ·Curăți și clătiți imediat oala dumneavoastră sub presiune după fiecare適用are. ·Nu spălați niciodata în mașina de spălat vase supapa de functiorare (A), garnitura (I), cronometrul* (F) sau oala cuÎveliș antiaderent. ·Nu introduței niciodatacronometrul* (F) în apă. ·Nu utiliți niciodata înălbitor sau produse care conțin clor, care pot deteriorora calitatea inoxului. ·Nu lăsați capacul la înmuiat în apă. ·Schimbați garnitura în fiecare an sau imediat, dacă prezintă vreо tăietură. ·După 10 ani de/utilizare, este necesar să ducței la verificat oala sub presiuneintr-un centru de service autorizat Tefal. ·Pentrudepozitarea oalei sub presiune:ășzați capacul invers pe cuva, pentru a evita uzura prematură a garniturii capacului. |
PÁSTRATI ACESTE INSTRUCTIONNI
Componente (a se vedea Schema descriptivă)
A. Supapă de fonctionare B. Duză pentru evacuarea aburului C. Indicator de poziţie a supapei D. Indicator de siguranta (a se vedea seciunea "Siguranta") E. Supapă de siguranta F. Cronometru detasabil G. Manerul capacului H. Capac I. Garnitură J. Cos pentru gătit la aburi* K./L. Trepied* M. Manerul corpului N. Indicator maxim de umplere O. Corpul oaleiVerificări obligatoriținainte de fiecare適用are
Verificarea supapei de fonctionare
 - Verificazioni da carea orificiul de evacuare al supapei de funzionare nu este infundat (a seVEDea seciunea „Retragerea si instalarea supapei de funzionare").Verificarea supapei de siguranta
 - Verificazioni dacà bila supapei de siguranta este mobilà (utilità un beşiga).Utilizare
 Gàtrein modul,Oalá sub presiune"  Gātire in modul „Gātire lenta"*  DecompresieDeschidere
- Deplasați manerul capacului din poziție orientala in poziție verticală - fig 3. Capacul se rotește. Ridicati capacul. In cazul ca intampinați dificultăți la desciderea produsului: tiniți garnitura sub apă, apoi introduciți-o in capac fara sa o stergeți - fig 19, având grijă sa o fixati corect sub crestăturile capacului - fig 15.Inchidere
Asigurat-vacamenerulcapaculuiesteinpositionverticala. - Asezati capacul pe corpul oalei, dupa cum se indica in - fig. 1, aliniind partea din plastic cu manerele corpului oalei. Rabatai manerul capacului din poziie verticala in poziie orizontala - fig. 2. Capacul seroteste.In cazul in care nu puteti inchide capacul:
- Verificati fixarea corectă a garnituriiși poziţionarea corespunzătoare a capacului. - In cazul in care intampinați dificultăți la desciderea produsului: tiniți garnitura sub apă, apoi introduciți-o in capac fara sa o stergeți - fig 19, având grijă sa o fixati corect sub crestăturile capacului - fig 15.Primautilizare
- Pentru modelele cu invelis antiaderent: spalaşi ungeci cu puţin ulei de gătit intreaga suprafata a invelisului interior.In functie de model :
- Asezati trepiedul\*L) si cosul\*J) pe fundul cuvei. - Prindeti trepiedul *(K) de ^*(J) , apoi depuneti ansamblul pe fundul cuvei. - Umpletei cuva (O) până la niveul de 2/3 (MAX 2) - fig 5. Inchideti oala sub presiune. Aliniati pictograma supapei de fonctionare (A) cu indicatorul de poziie a supapei (C) -fig.9.   - Asezati oala sub presiune pe o sursa de caldur, apoi reglate-i o la putere maxima. - Cánd aburul incepe să iasă prin supapă, reduceti sursa de caldurăși setați cronometrul pentru 20 de minute. Cand cele 20 de minute s-au scurs, opriti sursa de caldur. - Aliniati pictograma supapei de fonctionare (A) cu indicatorul de poziţie a supapei (C). Cand indicatorul de siguranta (D) coboara, oala nu mai este sub presiune. - Deschideti oala sub presiune - fig. 3. Curatai-o cu un produs de curatat vese.Nivel de ampliere minimi maxim
Minimum 25 cl/250 ml (2 pahare) - fig.4. Maximum 2/3 din inaltimea corpului oalei, indicator MAX 2 - fig. 5. - Nuutilizati sare grunjoasa in oala sub presiune, ci adaugati sare finala la sfarsitul gatirii.Pentru anumite alimente:
- Pentru alimentele váscoase, care se expandeazá sau care produc spumá pe durata gātirii, cum ar fi orezul, leguminoasele, legumele uscate, compoturile, dovleacul, dovleceii, morcovii, cartofii, fileurile de peşte...nu umpletj oala sub presiune peste 1/3 (MAX 1) din capacitatea sa. Lasa oala sub presiune sa se raceasca timp de cateva minute, apoi raciti-o in apa rece. Inaintea fiecarei  deschideri, scuturati oala systematici si uor pensu a evita improscarea cu vapori care risca sa va arda, dupa asigurarea prealabila ca indicatorul de siguranța este coborhat. Această operatiune este deosebit de importantă in cazul evacuării rapide a aburului sau dupa răcirea in apă rece. In cazul supapelor, va recomandam sa efectuți o decompressie rapidă in apă rece. (A seVEDea sectiunea „ La finalul gătirii in modul «Oala sub presiune»").Utilizarea coşului pentru gătit la abur*
- Turnaţi 75 cl/750 ml de apă pe fundul corpului oalei (O). In functie de model: - Asezati trepiedul\*L) si cosul\*J pe fundul cuvei. - Prindeti trepiedul\*K) de cos\*(J), apoi depuneti ansamlul pe fundul cuvei.    - In timpul gătitului la abur, alimententele din coşul pentru gătit la abur* nu trebuie să intre în contact cu apa - fig. 6 si 7. Alimentele introduse in coşul pentru gătit la abur* nu trebuie și depășeasca nivelul MAX2.Montarea si demontarea supapei de fonctionare (A)
Pentru indepartarea supapei de fonctionare (A):
- Aliniati canelura cu indicatorul de poziţie a supapei (C), apăsând pe inelul supapei de functionare (A). Indepartati-o - fig. 11.Pentru montarea supapei de fonctionare:
- Poiniţii supapa de fonctionare (A) - fig 8 aliniind canelura supapei de fonctionare cu indicatorul de poziţie (C) din ilustrata alăturata.  Impingeti supapa de fonctionare (A) pentru a o fixa pe duza pentru evacuarea aburului. - Apasati pe pictograme supapei de fonctionare (A) rotiti. Cronometrul*
Nuutiliati niciodata cronometrul in modul de, Gatire lenta".
Cronometrul este conceput pentru a va garanta prepararea corespunzătoare a alimentelor, cu un consumcate mai mic de energia. El cronometrează automat timpul de gâtire, după atingerea nivelului de temperatura corespunzător gătirii in modul „Oala sub presiune"Cronometrul trebuie fixat pe oala sub presiune pentru a functiona.
Asigurați-vă că supapa de functiONare (A) suieră in mod regulat in cursul gătirii. Dacă nu este suficient abur, creşteți ușor puterea sursei de caldură; în caz contrar, reduciți puterea sursei de caldură. 1 Pentru a porni cronometrul: apasaşi pe buton. 2 Programaţi tampul de gătire (in minute). Daca a ti introdus gresit timpul de gatire, astepta 4 sec. panacand flacarile nu se mai afseaza intermitent, iar apoi apasa t lung pe buton pentru readucerea la zero. 3 Pornişi sursa de caldură la putere maxima. 4 După ce oala sub presiune a atins temperatura de gâtire, cronometrul emite un semnal sonorși începe cronometrarea timpului (cîfrele se afșează intermitent). Reducți puterea sursei de caldură. La finalul timpului de gătire, cronometrul emite un semnal sonor. - Pentru a opri semnalul sonor al cronometrului, apasati pe buton. Oprijsursa de caldura. O apăsare lungă pe buton readuce cronometrul la zero și il oprește.Montarea Şi demontarea cronometrului*
- Pentru montarea cronometrului (F)-fig 12, introduci mai intai partea dinspre buton in modul, apoi apasați pentru a fixa. - Pentru demontarea cronometrului (F), ridicati-l si indepartati-l.Schimbarea bateriei cronometrului*
- Bateria cronometrului este o baterie de tip CR2032. - Daca se afiseaza simbolul au laca afisajul dispare comple, schimba ti bateria.        - Durata de viata a bateriei depinde de freventa de'utilize a cronometrului. Bateria cronometrului contine dimetoxietan nr. CAS 110-71-4. Aceasta este conforma cu reglementarile europene. Pentru siguranta dumneavoastra si pentru protectia mediului: nu desfaceti bateria, nu o expuneti la temperaturi ridicate, nu o aruncai impreunacu deseurile menajere; duceti-o la un centru de colectare a baterilor uzate.  Bateriile de unica folosinta nu trebuie incarcate. Diferitele tipuri de baterii sau bateriile noi si cele uzate nu trebuie amestecate. Bateriile trebuie introduse cu polaritatea corectă. Bateriile descarcate trebuie scoase din aparat 日 eliminate intr-un mod sigur. - Daca aparatul este depositat pentru un tampindhelungat, se recomanda scoaterea baterilor. - Nu scurtcircuitati bornele bateriilor. - Efectuati operatiunile in plan oriental, pe o suprafata de lucru. - Pentru a scoate bateria din cronometru, beschideti capacul locașului bateriei cu ajutorul unei monede (a se vedea figura alăturata). Inlocuţi bateria. Fixati garnitura in locasul sau. - Pozitiona ti semiluna de pe capacul locasului bateriei in fața semilunii de pe cronometru. - Rotiţi incet capacul locașului bateriei, apăsănd uşor, aliniind semiluna de pe capacul locașului bateriei cu luna dpe cronometru. - Efectuati operatiunea pe o suprafata plana pentru o positionare orientală corectă a capacului. - Nu foratai la inchidere capacul locasului bateriei. Nu depaşi marginile. - In caz de pierdre, va puteti procura alt cronometru de la oricare centru de service autorizat Tefal.    Nu introduci niciodata cronometrul* in apă sau in maşina de spălat vase. Nuutilaţi niciodata cronometrul in modul de „Gătire lenta".Inaintede gàtire
- Inainte de fiecare utiliser, indepartaşi supapa de fonctionare (A) - fig. 11 Şi verificati dacă duza pentru evacuarea aburului (B) nu este infundata - fig. 13. - Verificazioni da cacha supapa de siguranta este mobilă (a se vedea seciunile „Curătare"și „Verificatori obligatori i nainte de fiecare適用are“) - fig. 18. - Adaugati-va ingredientele si lichidul. Inchideti oala sub presiune - fig. 2. - In cazul in care intampinați dificultăți la desciderea produsului: tineți garnitura sub apă, apoi introduciți-o in capac fară sa o stergeți -fig 19, având grijă sa o fixați corect sub crestăturile capacului - fig 15. - Montatji supapa de fonctionare (A) - fig. 8. Gătire în modul „Oaală sub presiune"
- Rotiţi supapa de fonctionare (A) până la poziția de gătire în modul „Oala sub presiune" 9. - Asigurați-vă că oala sub presiune este închisia corespunzător îniate de punerea în functiune - fig. 3. - Asezaṭi oala sub presiune pe o sursa de caldur, apoi reglaṭi-o la putere maxima. - Pentru modelele dotate cu cronometru : programaşi timpul de gătire indicat în retetă (a se vedea sectiunea „Utilizarea cronometrului"). Zgomotul 山 aburul emise de indicatorul de siguranta sunt normale, datorandu-se eliberarii aerului inainte de gataire.In timpul gătirii in modul „Oală sub presiune"
- In momentul in care supapa de fonctionare (A)incepe sa elibereze abur in mod continuu, fãcãnd zgomotul obisnuit (suierat), reduciţi puterea sursei de caldură. - Incepeţi contorizarea timpului de gătire indicat in rețeta. - Asigurați-vă că supapa șiuiera în mod regulat în cursul gătirii. Daca nu se eliberează suficient abur, creşteți ușor puterea sursei de caldură; în caz contrar, reduceti puterea sursei de caldură.La finalul gătirii în modul „Oală sub presiune"
Pentru eliberarea aburului:
- După oprirea sursei de caldură, aveți două posibilități: - Decompressie progresiva: rotiti progresiv supapa de fonctionare (A) până ajunge în dreptul pictogramei fig 10.  - Decompressia rapidă in apă rece: turnați apă receive in chiuvetași scufundati in apă fundul oalei sub presiune până cand indicatorul de siguranta coboara - fig. 14. Cand indicatorul de siguranta (D) coboara, oala nu mai este sub presiune. Rotiti supapa de functiorare (A) pe poziția  Pasul 1  Pasul 2 Puteti descide oala sub presiune - fig. 3. - In caz ca intâmpinați dificultăți la desciderea produsului: tineți garnitura sub un jet de apă, apoi introduciți-o in capac fară să o stergeti - fig 19, având grijă să o fixați corect sub crestăturile capacului - fig 15. In cazul care, la eliberarea aburului, observați improșcări anormale, readuceți supapa de functiònonare (A) in poziția de gătire în modul „Gătire sub presiune" , iar apoi efectuși o decompressie rapidă în apă rece. Dacă indicatorul de siguranta (D) nu coboara, turnaşi apă rece in chiuvetăși scufundari fundul oalei sub presiune până la coborârea indicatorului de siguranta - fig 14.Nu actionaţi niciodătă asupra indicatorului de siguranta.
- Pentru alimentele care se expandează in timpul gătirii sau care produc spumă, cum ar fi orezul, leguminoasele, legumele uscate, compoturile, dovleacul, dovleceii, morcovii, cartofii, fileurile de pește...nu umpleți oala sub presiune peste 1/3 (MAX 1) din capacitatea sa. Lăsăti oala sub presiune să răceasca timp de câteva minute, apoi efectuți o răcire în apă rece. Inaintea fiecarei deschideri, scuturați oala sismatic și ușor, asigurându-vă în prealabil că indicatorul de siguranță este coborât, pentru a evita orice improșcare cu bule de vapori, care riscașă să va arda. Această operatie este deosebit de importante în cazul evacuării rapide a aburului sau după răcirea în apă rece.În cazul supelor, va recomandamș effectuți o decompressie rapidă în apă recce (a se vedea secțiunea „ La finalul gătirii în modul «Oala sub presiune»"). Gătire in modul „Gătire lenta“*
- Rotiti supapa de fonctionare (A) pānă la poziția de gātire in modul „Gātire lenta". In acest scop, apasați sufficient pentru a trece dincolo de poziția decompressie. - Asigurati-vá cã oala sub presiune este旨在isă corespunzător - fig. 2 - înainte de punerea în functiune. - Asezati oala sub presiune pe o sursa de caldură reglata la putere redusă. - Incepeţi cronometrarea timpului de gătire indicat in rețeta. - In modul „Gätire lenta“, puteti beschide oala in orice moment pentru a amesteca, a supraveghea prepararea alimentelor sau a adăugaingrediente. - In cazul ca intâmpinați dificultăți la desciderea produsului: tiniți garnitura sub apă, apoi introduciți-o in capac fară să o stergeți - fig 19, având grijă să o fixați corect sub crestăturile capacului - fig 15. - Daca sursa de caldură este prea puternica, este posibil ca oala să se blocheze (indicatorul de siguranta (D) urcași impiedica deschiderea), iar manerul capacului să nu poata fi actionat sau să nu deschidă oala. In acest caz, reduceti pau opruti sursa de caldură. In cazul plácilor de incalzire din fontă, luatl oala de pe sursa de caldură. - Pentru modelele cu strat antiaderent: nu utilizați teluri sau instrumente metalice ori ascuțite. Nu loviți ustensilele de marginea oalei, deoarece există riscul de a o deteriororași de a provoca scurgeri. - Nu incalzi ti niciodata grasimi pana la carbonizare. Vaporii degaja ti in urma gatirii pot fi periculo si pentru animalele care au un system respirator sensibil, cum ar fi paarile. Proprietarii de paarire trebuie sa le tina departe de bucataarie.Siguranta
Oala sub presiune este prevazută cu mai multe dispositive de siguranță:- Siguranta la inchidere:
- In cazul care capacul este poziptionat greşit sau dacă uitași să plaiți și manerul capacului, există o scurgere de vapori în dreptul indicatorului de siguranta (D) a oalei sub presiuneși presiunea acesteia nu poate crește.- Siguranta la descidere:
- Daca oala este sub presiune, indicatorul de siguranță (D) este in poziție ridicata, iar manerul de deschidere/inchidere a capacului (G) nu trebuie actionat. - Nu incercati niciodata să descideti forṭat oala sub presiune.- Nu actionaţi in niciun caz asupra indicatorului de siguranta (D).
- Asigurați-vă că presiunea interioară a scazut, verificandi dacă indicatorul de siguranta (D) este în poziție coborăță. - Manerele capacului sunt piese de siguranță. Nu le schimbați niciodataș singuri. Nu folosiți niciodataș alt model de capac. Nu Utilizăți niciodataș alte modele de manere. - Daca ați deplasat manerul de descidere/inchidere a capacului (G) in poziție verticală în timp ce oala era înca sub presiune, nu o veți putea descide. Această functie este o măsură de siguranta supplementară. - Readuceți manerul capacului în poziție ortonatalăși așteptați ca indicatorul de siguranta (D) să ajungă în poziție coborăță.- Două dispositive de siguranta impotrivă suprapresiunii:
- Primul dispositiv: supapa de siguranta (E) elibereazá presiunea - fig. 20. - Al doilea dispositiv: garnitura ce permite eliberarea aburului la nivelul capacului - fig. 20.In cazul in care se declanseaza unul+dentre sistemele de siguranța la suprapresiune:
Opriţi sursa de caldură. Lasa oala sa se raceasca complet. Deschidei. - Verificatișși curățași supapa de fonctionare (A), duza pentru evacuarea aburului (B), supapa de siguranta (E)și garnitura (I) - fig. 16 - 17 - 18. A seVEDea sectiunile „Curătare"și „Verificări obligatoriii îniate de fiecare適用are". - Daca dupa verificare si curătare produsul dumneavoastră curge sau nu mai functionează, duceti-l la un centru de service autorizat Tefal.Recomandári de utilizes
1 - Aburul este foarte fierbinte cánd iese prin supapa de fonctionare. Atentie la jetul de abur. 2 - După ce indicatorul de siguranță urca, nu mai puteți descide oala sub presiune. 3 - La fel ca in cazul oricarui aparat de gătit, asigurați o supraveghere strictă, dacă UTILIZATI oala sub presiune în preajma copiilor. 4 - Pentru a muta oala sub presiune, utilizați cele două manhere ale corpului oalei. 5 - Nu lasaşi alimentetele să stea prea mult in oala sub presiune. Nu transporteşi niciodataă oala sub presiune apucând-o de manerul capacului. 6 - Nu utilizati niciodata inalbitor Sau produse care contin clor, care pot altera calitatea inoxului. 7 - Nu lasati capacul la inmuiat in apă. 8 - Schimbați garnitura în fiecare an sau dacă prezinta vreo tăietură. 9 - Curățarea oalei se realizazeă în mod obligatoriu la rece,alandeste goală. 10 - După 10 ani de utilizes, este obligatoriu să duceți la verificat oala sub presiune la un centru de service autorizat Tefal.Curățare
Pentru buna functionare a oalei sub presiune, respectati aceste recomandari privind curata area si intreinerea dupa fiecare/utilizare. Innegrinea szgárieturile care potapárea n urma uneiutilizári indel ungate nu afecteazafunctionarea oalei sub presune. Uzura invelisului exterior (in functie de model) ca urmare a ontactului dintre capac si cuva este normala. Pentru oalele sub presiune cu invelis antiaderenfnctie de model) usoarele zgarieturi si abziuni care pot aparea in urma utilizarii nu afecteaz performantele antiaderente ale invelisului. - Spalati oala sub presiune dupa fiecare utilizes cu apa caldua si produse de curatat vase. Procedati la fel si in cazul cosului*. - Nu folosiţi inalbitor sau produse care contin clor. - Nu supraincalzi ti oala daca este goală.Pentru a curata interiorul oalei din inox:
- Spalati cu un burete aspru si cu un produs de curat vase. - Daca interiorul cuvei din inox prezinta reflexii irizate sau urme albicioase (depuneri de minerale), curata tci cu oet alb.Pentru a curata interiorul oalei din aluminiu cu invelis antiaderent:
- Pentru a prelungi durata de viață a produsului, va recomandam spălarea manuală. Spalati cu apacalda, cu un produs de curatat vase si cu un burete moale. - Nu folosiţi praf de curățat sau bureti abrazivi. - Daca s-a ars un aliment, umpleti oala cu apă caldași lasați-o la inmuiat. Apoi, curatați-o cu un produs de curatațat vase.Pentru a curăta exteriorul oalei:
Spalati cu un burete si cu un produs de curat vase. Puteşi spăla oala din inox Şi cosul in masina de spălat vase. Nu spalati oala cu invelis antiaderent (in functie de model) in masina de spalat vase, deoarece detergentii sub forma de tableta contin substante foarte agressive si corozive pentru pärtile din aluminiu. Utilizarea intensă a oalei cu inveliș antiaderent (in functie de model) poate duce la modifica rea ușoară a culorii invelișului (ingălbenire, pătare).Pentru acuratacapacul:
- Spalati capacul cu un burete si cu un produs de curatat vase. Scurgeşicapaculpe verticala pen tru a evacua aparam asintre pàrtile metalice sicele de plastic ale capacului.Pentru a cura garnitura capacului:
- După fiecare gătire, curățați garnitura (I)și locașul acisteia. - Pentru a monta la loc garnitura, consulati fig. 15 si avei grijă sa o fixati corect sub fiecare crestăture a capacului.Pentru curățarea supapei de fonctionare (A):
- Indepartatu supapa de fonctionare (A) -fig. 11. - Curățați supapa de functiònare (A) sub jetul de apă de la robinet - fig. 16. - Verificazioni mobilitatea acosteia: figura alaturata. După ce ați indepartat supapa de fonctionare (A), garnitura (I)și cronometrul* (F), puteti spăla capacul în mașina de spălat vase.  Nu spalati niciodata in masina de spalat vase supapa de fonctionare (A), garnitura (I), cronometrul* (F) sau oala cu invelisantiaderent.Pentru a curata duza pentru evacuarea aburului (B) de pe capac:
- Scoatei supapa (A) -fig. 11. - Verificati dacă duza pentru evacuarea aburului nu este infundatași rotundă - fig. 13. Daca este nevoie, curatați-o cu o scobitoare - fig. 17 -și clăti-i-o.Pentru a curata supapa de siguranta (E):
- Curățați partea supapei de siguranta situata in interiorul capacului, tecând capacul pe sub jet de apă. - Verificati buna sa functiionare apasand puternic pe bila (cu ajutorul unui beisor pentru urechi de pe care a i indepartat vata), care trebuie sa fie mobila - fig. 18. A se vedea sectiunea, "Verificari obligatori i inainte de ficare utilizare".Pentru a curata cronometrul* (F):
Utilizi o laveta curata si uscata. - Nuutilizati dizolvant. - Nu introduci niciodata cronometrul in apa sau in masina de spalat vase.Intretinere
Pentru schimbarea garniturii oalei sub presiune:
- Schimbaţi garnitura oalei sub presiune în fiecare an sau dacă prezinta vreotăietură. - Achizitionaţintotdeauna o garnitură originală Tefal, care corespunde modelului dumneavoastră (a se vedea sectiunea „Accesorii"). - Pentru a monta la loc garnitura, consulati - fig. 15 si avei grijă sa o fixati corect sub fiecare crestăture a capacului.Pentru depositarea oalei sub presiune:
- Asezati capacul invers pe corpul oalei. - Mechanismul de beschidere/inchidere al oalei sub presiune nu necessities intreinere speciala, in afar de curatare. După 10 ani de utiliser, este obligatoriu să duceti la verificat oala sub presiune la un centru de service autorizat Tefal.Accesorii Tefal
- Accesorile disponibile in comert pentru oala dumneavoastră sub presiune sunt:| Accesorii Referinţe | ||
| Garnitură | 3/4/4.5/6 L: diametrul exterior al garniturii: 24 cm | X1010008 |
| 5/7.5/9 L: diametrul exterior al garniturii: 27 cm | X1010007 | |
| Coș pentru gătit la abur* | 3/4.5/4/6 L: pentru cuvă cu diametrul de 22 cm | 792185 |
| 5/7.5/9 L: pentru cuvă cu diametrul de 24 cm | 792654 | |
| Trepied* (L) | 792691 | |
| Cronometru* | X1060007 | |
Characteristic
Diametrul fundului oalei sub presiune - referinte| Capacitate | Ø Oală | Bază | Clipso Minut® Perfect / Easy | Clipso Minut® Duo couleur | Clipso Minut® Duo Gourmet | Material oală |
| 3 L 22 | cm 15.5 | cm P46205 | -- Inox | |||
| 3 L 22 | cm 18 cm | -- | P46605 Inox | |||
| 4 L 22 | cm 14 cm | - P46042 | - | Alumniu acoperit | ||
| 4.5 L | 22 cm | 15.5 cm | P46206 | -- Inox | ||
| 5 L 24 | cm 14 cm | - P46051 | - | Alumniu acoperit | ||
| 5.2 L | 24 cm | 20 cm | - P46654 | Inox | ||
| 7.5 L | 24 cm | 18 cm | P46248 | -- Inox | ||
| 9 L 24 | cm 18 cm | P462 | 249 | -- Inox | ||
| Set 5 L/7,5 L | 24 cm | 14 cm | P46353 | - Inox | ||
| 18 cm | ||||||
Informatii privind normele:
Presiune superioara de fonctionare: 65 kPa Presiune maxima de siguranta: 120 kPaSurse de caldurà compatibile
GAZ ENERGIE ELECTRICA (Plita de fonta) ENERGIE ELECTRICA Plita vitroceramicac radianta sau cu halogen) ENERGIE ELECTRICA (Plta vitroceramicca cu inductie) ENERGIE ELECTRICA (Reistenzentspirala)      - Oala dumneavoastră sub presiune poate fi適用ata pe"Toate sursele de caldură, inclusiv cele cu inductie. In cazul plitei electrice, utilizi un ochi cu diametrul mai mic sau egal cu cel al bazei oalei sub presiune. In cazul plitei vitroceramicice, asiguraţi-vă ca baza oalei este curatași netedă. In cazul aragazului, flacara nu trebuie sa depaseasca diametrul oalei. - Pe toate sursele de caldură, asigurați-vă că oala sub presiune este centrata corect.Garantie
In cazul UTILIZARIi prevalzute de modul de utiliser, corporul din inox a noii dumneavoastrø oale sub presiune de la Tefal beneficiază de o garantție de 10 ani impotrivà: - oricărui defect legat de structura metaliţă a oalei; - oricärei degradāri premature a metalului de bază. Celelalte materiale ale corpului oalei, precum si toate celealtecies ale oalei dumneavoastra sunt garantate impotrivva oricarui defect de fabricatie Sau de material, pe perioada de garantie stabilita de legislata in vigoare din tara de cumparare si incepand de la data cumpararii. - Aceastagarantiecontractualasevaobtinepebaza prezentarii bonului dcasa sau a facturii de la data cumpararii.Acestegarantiiexclud:
Zgarieturile si decolorarea datorate uzuri, in cazul oalelor cu invelis antiaderent. Zgárieturile cauzate de contactul dentre capac Şi oala cu invelis antiaderent. - Degradarile datorate nerespectarii masurilor de precautie importante sau Utilizarilor negljente, in special: - lovituri, caderi, introducere in cuptor etc. - Numai centrele de service autorizate Tefal sunt abilitate să va ofere serviciile prevăzute in această garantiei. - Vă rugăm să sunați la numărul de Telefon albastru pentru a afla adresa centrului de service autorizat Tefal cel mai apropriat de dumneavoastră. ROMarcaje de reglementare
| Marcaj Localizare | |
| Marca commercia Pe capac | |
| An și lot de fabricațieReferinte modelPresiune maximă de siguranta (PS)Presiune superioară de funçionare (PF) | Pe capac |
| Capacitate Pe fundul exterior al corpului oalei | |
| Adresa poștală a produțatorului Pe fundul | exterior al corpului oalei |
- Să contribuim la proteția mediului în conjurător!
 ① Aparatul dumneavoastră conține numeroase materiale care pot fi valorificate sau reciclate. Predaşi-l la un punct de colectare a deşeurilor pentru a fi procesat în mod corespunzător.Tefal răspunde intrebărilor dumneavoa
| Probleme Recomandări | |
| Dacă deschiderea și inchiderea devin dificile: | Scoateți garnitura și treceți-o pe sub jet de apă.Repuneti-o la loc în capac fără să o ștergeti - fig 19. |
| În cazul în care nu puteți închide capacul: | Verificați dacăMZânerul capaculi se află în poziție verticalăVerificați poziționarea corespunzătoare a garnituri (a se vedea secțiunea „Curățare și intreținere").Verificați poziționarea corespunzătoare a capaculi, dupa cum se indică în - fig. 1.Tineți garnitura sub un jet de apă, apoi introducți-o încapac fără să o ștergeti- fig 19, având grijă să o fixați corectsub crestăturile capacului- fig 15. |
| În cazul în care oala a fost incălzită sub presiune fără săContințină lichid: | Duceți oala la verificat la un centru de service autorizat Tefal. |
| În cazul în care indicatorul de siguranta emite semnale sonore și abur: | Acest lucru este normal în primele minute: permite eliberare aerului înunte de gătire. |
| În cazul în care indicatorul de siguranta nu s-a ridicat și prin supapă nu iese nimic în timpul gătirii: | Acest lucru este normal în primele minute.Dacă fenomenul persistă, verificați dacă:- Puterea sursei de căldură este destul de mare; în caz contrar mariți-o.- Cantitatea de lichid din cuva este suficientă.- Supapa de functiorare (A) este pozițonata peO-Ala este bine înisă.- Garnitura sau marginea cuvei nu sunt deteriorate.- Garnitura este pozițonata corespunțător. |
| În cazul în care indicatorul de siguranta s-a ridicat și prin supapă nu iese nimic în timpul gătirii: | Acest lucru este normal în primele minute.Dacă fenomenul persistă, turnați apă rece în chiuvetă și scufundați fundul oalei sub presiune până cănd indicatorul de siguranta (D) coboarda.Curățați supapa de functiorare (A) -fig. 16 și duza pentru evacuarea aburului - fig. 17 și verificați dacă bila supapei de siguranta poate fi apăsataă fără dificultate - fig. 18. |
| Problème | Recomandári |
| Dacă vaporii ies prin jurulcapacului, iar indicatoruleste în poziție joasă,verificăți: | Înciderea corectă a capacului.Poziționarea garniturii în capac.Starea corespunzătoare a garniturii;Înlocuiți-o dacă estneecessar.Starea de curățenie a capacului, a garniturii și a locașulacesteia din capac.Starea corespunzătoare a marginii corpului oalei. |
| În cazul în care nu putețideschide capacul: | Verificăți dacă indicatorul de siguranta (D) este în pozcoborță.În caz contrar, effectuți decompressione:turnați apărece în chiuveta și scufundați fundul oalei sub presiunepână când indicatorul de siguranta coboara.Nu manipulăți niciodata tija de siguranta (D).Rotiți supapa de functiorare (A) până în poziție . |
| În cazul în carealimentele nu sunt fierteau daca sunt arse,verificăți: | Timpul de gătire.Puterea sursei de caldură.Poziționarea corectă a supapei de functiorare (A).Cantitatea de lichid. |
| În cazul în care s-auarsalmente în oală: | Lăsați corpul oalei laÎnmuiat un timpÎnainte de aospãla.Nu folosiți niciodataÎnălbitor sau produse care continclor. |
| În cazul în care sedeclansează unul+dentre sistemele de siguranta: | Opriți sursa de caldură.Lăsați oala că seracească fãră a o muta.ʌshteptați saskobare indicatorul de siguranta și dischideti capacul.Verificăți și curăței supapa de functiorare (A),duzapourte evacuarea aburului, supapa de siguranta și garnitura.Asigurați-vă că ati respectatÎntocmai condițile deumplere.Dacă defectul persistă,duceți oala la verificat la uncentru de service autorizat Tefal. |
| În cazul în care observațiaparotiția unor urme deoxidare: | Utilizarea inoxului pentruamță nu impiedicaparotiția oxidării în cazuri extreme.Dacă observati urme de oxidare,eliminăti-le prin frecarea cu un bureteabraziv,Înainte de autiliza din nou oala sub presiune. |
LABELUL DE GÄTIT
Legume
| LEGUME (PROASPETE) ABUR Se ADAUGă ingre- dientele în coșul pentru gătit la abur și 750 ml de apă pe fundul oalei sub presiune. MAX 750 ml INTRODUCERE IN APA Ingrediente în apă fără coș. IMPULSURI INTRODUCERE IN APA Fără coș. 1/3 MAX1 | ||
| Andive tăiate în jumătate (900 g) (la abur) 14 - 16 min | ||
| Anghinare, 2Întregi, 600 g fiecare (introducere în apă) 30 - 35 min | ||
| Ardei grași tăiați în jumătate (550 g) (la abur) 14 - 16 min | min | |
| Boabe de fasole flageolet uscate, 250 g (introducere în apă) 35 - 40 min | ||
| Boabe mici de fasole verde (600 g) (la abur) 10 - 12 min | ||
| Buchțeile de broccoli, 600 g (la abur) 9 - 11 min | ||
| Buchțeile de conopidă, 600 g (la abur) 10 - 12 min | ||
| Cartofi tăiați în jumătate (950 g) (la abur) | 20 - 25 min (in functie de dimensiune) | |
| Ceapă murataă (la abur) 7 - 8 min | ||
| Ciuperci feliate, 800 g (introducere în apă) | 4 - 5 min | |
| Dovleac tăiat bucăți (3 - 5 cm) 600 g (la abur) | 13 - 18 min | |
| Dovlecei tăiați rondele (3 mm), 600 g (la abur) | 12 - 15 min | |
| Fenicul tăiat fășii (600 g) (la abur) | 6 - 9 min | |
| Gulii tăiate cubulețe (500 g) (la abur) 14 - 16 min | ||
| Linte verde, 250 g (introducere în apă) | 14 - 16 min | |
| Mangold feliat (2 cm), 700 g (la abur) | 15 - 17 min | |
| Mazăre (la abur) | 6 - 8 min | |
| Mazăre jumătăți 250 g (introducere în apă) | 18 - 20 min | |
| Morcovi tăiați rondele (3 mm), 600 g (la abur) | 17 - 19 min | |
| Praz alb Întreg, 650 g (la abur) | 9 - 11 min | |
| Sfeclă roșie, tăiată în sferturi (introducere în apă) | 20 - 25 min (in functie de dimensiune) | |
| Spanac (la abur) | 3 - 4 min | |
| Sparanghel alb (la abur) | 5 - 6 min | |
| Telină feliată (introducere în apă), 600 g | 7 - 9 min | |
| Varză de Bruxelles (la abur) | 10 - 12 min | |
| Varză verde și feliataă, 500 g (introducere în apă) | 5 - 6 min | |
| Vinete decojite și feliate (3 mm), 850 g (la abur) | 10 - 12 min |
| INTRODUCERE İN APΑ Fără coș. MAX 1 | CANTITATEA DE APΑ | CANTITATEA DE OREZ | TIMPUL DE PREPARARE | |
| 2 PERSOANE | 400 ml / 2 pahare 15 | 0 g / 1 pahar | 7 -8 min4 PERSOANE | |
| 500 ml / 2,5 pahare | 250 g / 2 pahare | |||
| 6 PERSOANE | 700 ml / 3,5 pahare | 375 g / 3 pahare |
Carne/peşte
| PROASPETE CONGELATE | |
| Bucăți de mușchi de porc: 2 bucăți de 350 g 13 - 15 min 26 - 29 min | |
| Bucăți de mușchi de vita: 0,7 kg 17 - 21 min 33 - 38 min | |
| Cotlet de porc (0,8 kg, 8 - 10 cm diamétru) 30 - 35 min | 1 orăși 5 min - 1 orăși 15 min |
| Cotlet de vițel (0,8 kg, 5 - 7 cm diamétru) 17 - 19 min 37 - 40 min | |
| File de pește-undițar (1 kg) în bucăți de 75 g 5 - 6 min 7 - 8 min | |
| Fileuri de somon: 4 (0,8 kg) 5 - 6 min 7 - 8 min | |
| Fileuri de ton: 4 (0,7 kg) | 5 - 6 min |
| Friptură de vita (1 kg, 8 - 11 cm diamétru) | 30 - 35 min 45 - 50 min |
| Ilepure (1,5 kg în bucăți) | 8 - 9 min |
| Picioare de miel: 2 (0,95 kg) | 40 - 45 min |
| Prepeliță: 4 | 9 - 10 min |
| Pui (1,35 kg) | 23 - 25 min |
| Pui tineri: 2 (1,3 kg) | 23 - 25 min 40 - 45 min |
| Rață (1,8 kg) | 45 - 47 min 50 - 55 min |
| Rulouri de vițel: 4 | 10 - 12 min |
MEPbI 5E3OПАСHОCTN
Ipeed nCnoJb3ObaHnem cKOpOBapKn BHNMaTeNbHO 03HaKOMbTecb CO BCEMN INHCTpyKUmaM N BCeRda CneDyIte pyKOBOdCTBy NO 3KcPnyaTaun. HenpaBnIbHoe nCnoIb3OBaHne moKet npUBeCTN K nobpeXdEHNm. Дя Ваши 6e3oNaChOCTn HAcTOraIpyn npnbop COOTBeTCTByeT Bcem npIMeHmblm HopMaM n npaBnlaM: -Директibe Дяборудованя,разаюцero pod давленим; - Tpe6oBaHnI M K MaTePnaIam, KOHTaKTpyUOIm C NIIeBbIMN npOdyKTAMN; - Tpe6oBaHnI M IO OxpaHe OkpykaIOUeI cpebl.| ОБЯ3ATEЛьнblE ПОВЕРКПЕPEDКЖдыIMNCПОЛьЗOBAHИEM | ПОВЕРБTE ■При дnevом сбete, He 3a6илось Ли OTверстпдя Выхда па - рис. 13. ■шаркPrepoхсангову КлалаHa может Двигатьс - рис. 18. ■Прokладka Крblskи НхodITСя Рд КждыМ 3 п30В Крblskи - рис. 15. ■ручки EmKоCTN 3akpenlleHы праВильно. Ручки EmKоCTN YВЯЮТСя 3auntlbIMи DeТалям. Нкогда He 3amehayte ИХ самоctordельно. |
| ВСЕГДАПИДЕРЖИВАИTECSВСLEДУЮШУКAZAHПОКЛЧECTВДЛ3АПOLHEHNY | 3aирочаETСя ИСПОЛьЗОВATь SCOPOBAPКу 6e3 JИДКOSTNTOМOTМOTгпгпгпгпгпгпгпгпгпгпгпгпгпгпгпгпгпгпгпгпгпгпгпгпгпгпгпгпгпгпгпгпгпгпгпгпгпгпгпгпгпгпгпгпгпгпгпгпгпгпгNTMnMnMnMnMnMnMnMnMnMnMnMnMnMnMnMnMnMnMnMnMnMnMnMnMnMnMnMnMnMnMnMnMnMnMnMnMnMnMnMnMnMnMnMnMnMnMnMnMnMnMmMnMnMnMnMnMnMnMnMnMnMnMnMnMnMnMnMnMnMnMnMnMnMnMnMnMnMnMnMnMnMnMnMnMnMnMnMnMnMnMnMnMnMnMnMnMnMnMnMnMнMnMnMnMnMnMnMnMnMnMnMnMnMnMnMnMnMnMnMnMnMnMnMnMnMnMnMnMnMnMnMnMnMnMnMnMnMnMnMnMnMnMnMnMnMnMnMnMnMnMngTb MAX 2 B EMKOSTN. |
| ДО И BO BPEМ ПИГOTOBLEН IЯ | ■He octablaye detei no6n30ctn, korga ckopobapka nCNoIb3yETcra.■ПригOTOBLEнe PIIuB vCKOpOBAPke npOncxOJNT NOd dAbIeHnem. HeocToPoxKHOe nCNoIb3oBaHne moXet npINBeCT K OShnapIBaHnIO KInpTkom.пepeD BkIooHEnmckopOBAPK y6eIITecb,чTO oHa 3akpytda DoJxHbIM obpa3OM. Cm. pa3deN «3akpbivahne».■Bo BvEma prinotOBLeHnA 6blOda cIeInte 3a Tem,чTObI Kla Bcerda n3DaBaal rIyXoJ shum.Есин He BVixODHT DoCTaTOUHO r BvIpyCTte DabIeHnE i npOBepbTe hAnuHne DoCTaTOUHOro KOJIueCTBa JxIDKOCTn, a Tacke He 3acopeHо Ll OTBepCTne D BvIXOJa napa.Посл eTnx npOBepok, ecn napdo cIx npor Hb BVixODHT, hemHoro yBeJIuYbTe orOHB.■He rotOBbTe pOdyktb, kOTOpbIe MoryT 3acOpHTb OTBepCTn 3aIHTbIX Detalei: -Яrodu; -пeрIoBOvIky Kpyny; -OBcHbIe XIOnbBy; -cuxoI rOPOX; -lanluy, mAkapOHbI, cIaReTTI; -peBENb; -cMOpOdiHy.■Пri prinotOBLeHnI PIIuB v 3ToIckopOBAPke 3anpeuzaetc NcNoIb3OBAtB pezentbHa OCHOBE JxIBOTHOrO MOLOKa. -В сlyuae ckopOBAPKc C EMKoCTbU IN3 HepXaBeIOUe StaII N3Appe7aETcRA NcNoIb3OBAtB KpyHnyIO CoIb,do6aBbTe MeJIKy coIb B KOHcE prinotOBLeHnI PIIuN.ТakIM obpa3OM Bbl I36ExHte pOABLeHnA «PpOKoIbO», kOTOpbIe MOrIi 6bl PrINBeCTN K I3MeHEnIO DHa CKOpOBAPK.■He nCNoIb3yIte ckopOBAPKdIg JxAPKn IOd DabIeHnEM c pactiteIbHbIM MacIOM. 3aPere7aETcRA NcNoIb3OBAtB ckopOBAPKHe INo Ha3NaUeHnI 3aPere7aETcRA CTaBtB CKOpOBAPKBy B rOpyHuO dYxOBKy. HnkOrda He KlaIaIte He3aKpePllNeHHU OJIUMMHnEByU FOJIb NaФOPMOChy B CKOpOBAPKe. HnkOrda He KlaIaIte NoIIN3TnIeHOBuI PIIeHKn By CCKOpOBAPK ■Papb cInpTa leKo BOCnIaMeHmbl.пepeD 3aKpbIbAHnEM KpbIshKn DoBVeIte 6blIO DO KIneHnI B TeUeHne 2 MInHyT. Co6IouaIte OCTopOxHocTb ри prinotOBLeHnI 6blIod, coDeprXaIuX aIkoRoiB.■IcNoIb3yIte COOTBETCTBvIouIuI NCTOUYK TepNa corIaCHO IHCTpyKzIaM IO 3KcIpyaTaUuN. |
| ПОСLE ПРИROTOВЛЕ ИЯ... | ·Для модаел саHTипгарньIM NOКрыITием: He ИСПОЛБ3OBaTb ВЕнчики и дугnemetаJIIMueckneилOCTрьeПриборы. He пытайтесь удалNTь Вodyс prnборов NOCTykIBaHnEM NO 6oporty emKoCTN BO u36exJaHne NOBpeJdeHnE ee NOBepxHocTN i obpa3OBaHnY Teu. ·Постеенno NOВернite pa6ochny KIanah (A), Bbl6rab Wexelaemyu ckopocstdeKekOMPecCn, n DOBeNTe erO Do NIKTORpambl- pnc.10.Если рпвыделениnpapa Bbl 3aMeTniK KaKne-lIb6 OTKIOHENry OT HOpMbI, yCTaHOBnTE pa6ochny KIanah (A)В ПОLOЖЕнne prinrTOBLeHnY PIIuNlNDaBHeHnEM, a 3aTeM BblONHIne 6bICTpyU DEKOMPecCnB XOJOIDHO Bode-Pnc.14. ·Если prpeOxpaHntelbHbI SterpKeHb (D) He onyckaetcra, nomeCTte cKOPOBAPKy B xOJOIDHy BOy - pnc.14 ·НikOrda He OKa3bBaIte BO3dEINCTBnE Ha 3TOT prpeOxpaHntelbHbI SterpKeHb. ·Посте prinrTOBLeHnY 6bIod nI3 MЯca CnapyKHO KOKnuee (Hanprimep, roBaxkbero r3bika), KOtpora MoKTe NaIyTbcra NOD DAblenHem, He npokalbBaIte MЯco, KORda OHO HaxOДNTcR B HaIyTom COCTOAHN, Bbl MOKTe O6KYeBCa KINIaTKOM. PekomEndyETcRApoKOLOTb MAcO Do prinrTOBLeHnE PIIuNl. Дяп пASTOO6b43bIX ПИSeBbIX PrOdyKTOB, KOTopbIE pacShpiRyOTcR I/III INI PeHrTCBO BVPeM BApKn, TAKINX KaK pnc. 6O6OBbIe, cyseHbIe OBOUIN, ФркTOBbIe ПIOpe, TbIKBa, KabaKn, MOPKOBb, KapToΦeNb, pbIbHoe ΦIe... OCTaBbTe cKOPOBAPKy Ha HECKOJBKO MInHT DЯ NOXIAJDeHnA, a 3aTeM OXlaJdnte C POMOuBIO XOJOIDHO BOnbl. Y6eINIBuINCb, YTO prpeOxpaHntelbHbI CTePKeHb ONyCTINLcRA, CJIeRka B36aIbTaIBye cKOPOBAPKy NepeD KajxDbIM OTKpbIbAHnEM, YTObIb prpeOТВРаNTb pa36pbIzRbHAHnE py3bIPbKOB napa, KOTOpoe MOKTe prinbceTn K OXIGAM. 3TO OCO6EHNO BaxKHO prn 6bICTpOM BbIpycke napa IIN NoCle OXIAJDeHnA B XOJOIDHO Boe. ·СobIoJaTe MaKcIMaIbHnU OCTopoJXHOCTh Bprn nepeMeZeHn cKOPOBAPKn IOd DAblENHeM. He prnkacaiTeCB K ropayHm NoBepxHOCTbM. IcNoJIb3yIte puKn I KhoIKN. Prn Heo6XODIMOCTN PONb3yIteCB nepCuATKAMN. ·Prn prinrTOBLeHnN CyIOB peKOMeHdYeM IcNoJIb3OBAtB 6bICTpyU DeKOMPecCnIO IOd XOJOIDHO BDOJ (CM. pynKKT «3aBepSeHne prinrTOBLeHnR B pexiMe cKOPOBAPKn »). ·ПereD TemΚak OTKpbIb cKOPOBAPKy, y6eIITcB, qTO KJIaPahN HaxOДNTcR B NOLOJKeHnN DEKOMPecCn. PrpeOxpaHntelbHbI STERKHeB (D) DOJxHn HaxOДNTcR B HIXHem NOLOJKeHnN. ·Prn otKpbIbAHn cKOPOBAPKn He prnmeHnAte CINy. Y6eIITeCB В OTCYCTBm DaBNeHn BHyTpR cKOPOBAPKn. prpeOxpaHntelbHbI cTepKHeB (D) DOJxHn HaxOДNTcR B HIXHem NOLOJKeHn. (Cm. parZdEe «PpeOxpaHntelbHbIe yCTPOIcTBa»). |
| yXOD | •Есни ви ознаружinte, что кakая-lибо Deталь вашей скороварки слома на лл.Trecechуна, по в Koem слуае не побuyITE оTKpbITb ee,сяпona зakрыITA, дайеся полноctю OCTыТ, пекдучимпесмцаты, бolyшей поллпьзуITE ee и OTHEСITE B aВТОПИЗОВAHNBICервисны цentР TEFAL. •He совершайte Нкakinx маниуляши СпразохсангелыIMN uSTpoiCTBamN, КрOME tex, КOTOPbie уka3aHbI B peKOMeHДAZAIONY NOчNTKE ИУХOD. •ИспальзуITE тOLTКО opRUGHальные DeTANI TEFAL, COOTBEcTcByUOZne Baшey мodyел. В часточи, ИспальзуITE emKOCTb и КрБИШКу TEFAL. •He IncPONb3yITE skorobapky ДЯханеня КИСых лл. •Слегых SFLOДdo и ПОСLE р�И�OTВLEHNY, T.K. 3TO MOЖETпривешени K NOВPEJDEHNU OEMKOSTN. •ВыIMоITE и onoloschinte skorobapky cpa3y яж пол; •ИспальзOBAHNA. •Нikordа He CTabBsTe pa6ochni KlaanH (A), pOKlaidky (I), TaIMep* (F) лл emKocTb сANTINpRnIparHbIM NOKpbITNeB INOCYDOMOEHyU MaShInHy. •Hnkorda He Nomeeaite TaIMep* (F) по Bodу. •НВ КОЕ сLYuae He IncPONb3yITE obe33apaxKIBaIOZne JxIDKOCTN лл xLORCOdePkaZne BeSeCTBa, KOToPbIE MOryt yXudshTb KaYeCTBO HePjKabeIoUeI CTaII. •He 3amayuBaIte KpbIsshKуВ Вode. •ОсуессвяITE zamehу пoklaidkn ExeERODNo лл. •HemeДleHNO рri ee NOBpeKdEHN. •Прошectedун 10 лет ekCplnyatazni Heo6xOДИMO obЯstatelbHo пroBeprItb skorobapKyВ ceHTpe TexNueckoro obSclyKuBaHry TEFAL. •При xpanenHn skorobapkn: nepeBepHnTE KapkIshKу Na emKocTb,ЧТБыИЗБexKatb пекдeВpeMeHHORO ИЗHOca прOKладку КрБИшКи. |
COXPAHNTE 3TUYMHCTPYKUNIO
KOMNOHeTbI (cM. yCTpoiCtBO npu6opa)
A. Pa6oyn klaanaH H.Kpbilka B.ОтверстпдЯ Выисянaja napa I. Прокладka C. OTMeTka noJoxKeHnKlaNaHa J. Kop3nHaДЯ npuroTOBHeHna napy* D. Праздддддддддддддддддддддддддддддддддддддддддддддддддддддддддддддддддддддддддддддддддддддддддддддддддддд徴. (см. раздал «Празддддддддддддддддддд徴. устюпсь»). K./L. Tpehora* E.празхаHTeHbI KlaH M. Ручка emKKOCTN F. Taïmep* N. OTMeTKMaKcImMaJIbHOrO yPoBHa 3aNoJIHeHnI G.Pyka KpbIiKn O. EMKoCTbO6aTeIbHbIe npOBepKn nepei KaJdbIM nCpOJIb3OBaHnem
Поберka pa6oeryо klnanaHa
 - y6eIntecb, yTO BbIXoHoe OTBepCTne pa6oeryo KlaanaHa He 3acopeHo (cM. nyHKT «ChrTne uYctaHObKa pa6oeryo KlaanaHa»).Поберka пешохантыного КлanaHa
 - Y6eIntecb, yTo y wapika npedoxpaHntbHoro knaHa HeT npenrTCTBn dJa DBnHexnra (ncnoIb3yIte naOouky).Исpenb3OBaHne
 BapkaВpeximeckopobapkn  PpHroTOBHeHne BpeXmE KaCTpOJn\*  ДекомпессьOTKpbIbAHne
- IpebeiTe pyky KpbIshKn n3 rOpN3OHTaIbHOro nIoJKeHnB BeptIkaJIbHOe - pnc. 3.KpbIsha noBopauuBaetcra. -ПоднMuTe KpbIшКу. Bcnyae BO3HKnHOBeHnra TpydHocTe npn OTKpbBaHn yCTpoNCTBa: nomeCTnTe npoknaIky noD BOy, a 3aTeM o6paTHo B KpbIshKy, He BbITnpa- pnc.19. Y6eIntecb, UTO npoknaIka XopoIo npoxoNT noD na3amn KpbIshKn - pnc.15.3aKpbiBaHne
y6eintecb, yTo pyka KpbIshKn HaxoINTcB BepTKKaJbHOM NOLOKeHHN. IomeCTnTe KpbIshky Ha eMKoCTb, KaK NOKa3aHo Ha pncyHke 1, coBmecTnB nlaCTMaCCOByIO DeTaIb C pyuKaMn eMKoCTn. - IpepeBedeIte pyukky KpbIshKn IB BepTnKaIbHOro nOToXeHnB rOpN3OHTaJIbHoe - pWc.2. KpbIka NOBopaunBaetc.EcnBbl He MoXeTe 3aKpbItb KpbIshky:
- PpOBepe Te npaBnIbHoe nOIOxHe nPpOKnaIKn I npaBnIbHoe paCNOIOxKeHne KpbIuKn. B Cnyae BO3HnKHOBeHnra TpydHocTe npn 3aKpbBaHn: NomeCTnte npOKlaKy noD BOny, a 3aTeM o6paTHo B KpbIshKy, He BbITnpaR - pnc. 19. Y6eInTecb, YTO npOKlaKa XopoIo npoxOHT NOd Na3amN KpbIshKn - pnc. 15.Перboaецпользоване
-Дя модени саHTинригарныm NOKpbITnem: npOMOnTe n cnerka CmaXbTe pactNTeNbHbIM MacIOM BCE NOBepxHOCTN BHYTpEHReNo NOKpbITnA.B 3aBnMoCTn OT MoJeH:
YCTaHOBNTe NOCTaBky\* (L) IN KOp3nHy dIy npuROTOBHeHna napy\* (J) Ha dHO eMKoCTn. 3aKpeIte nOCTaBky\*K)Ha KOp3HHe\*J)N yCTaHOBNTe INxHa dHO eMKoCTn. 3anonHnTe emKoctb (O) BOIOJ MaKcIMyM Ha 2/3 o6beMa (MAX 2) -pnc.5. 3aKpoTe cKOpOBapKy. BbipOBHnTe nIKTOrpamMy pa6ooyem KlaNaHe (A) no OTMeTKe nOJxehn (C)-pnc.9.   - YcTaHOBnTe cKOpOBapKy Ha NCTOuHnK TeNla N BKJIouHTe ero Ha MaKcMmaIbHyIO MOUHOCTb. ■Iocne toro kaK uepe3 Klaanah Haunet BbIeJbCn nap, yMeHbWnte MOUHOCTb NCTouHnKa TeNJa H OCTaBbTe B TaKOM NOJoxeHN Ha 20 MNH. Yepe3 20 MmHyT BbIKJIOUHTe NCTOUYHK TENJa. BbipOBHnTe nIKtorpamMy Ha pa6oem Klaanahe (A) no OTMeTke noJoxeHna (C). Korda npedoxpaHntbHbI cTepeHb (D) onyckaetc, daBneHn B CKOpOBapKe 6oNbwe HeT. OtkpoTe cKOpOBapKy - pnc.3 - NOMOHTe ee c nOMOUsbIO CpeICTBa IJRA MblTBa NOcydbI.MnHmAlbHbI MaKcMaJIbHbI yPoBeHb 3aNoJIHeHna
MHHmym 250 mI (2 ctaKaHa)-pnc.4. MaKcHym 2/3 BbICOTbI eMKoCTn, OTMeTKa MAX 2 - pnc.5. 3a nppeaaeTcnaonb30BaTb KpynHyo coIb,do6aBbTe MeNkyo cOJIb B KOHce npuroTOBHeHnA nn.PpimeeHnno nncnoB3OBaHnIO HeKOTOpbIX npOdyKTOB nHTaHn:
Для nactOo6pa3HbIX nIuIeBbIX npOdyKTOB, KOtOpbie pacsnprTcra n/nnI neHrTcBA BpEmBaPkn, TaKnx KaK PNC, 606OBblie, cyuHbIe OBOUIN, fpyKTOBblie IIOpe, TbIKBa, Ka6aUKN, MopKOb, KapToΦeNB, pb6Hoe ΦnIe... He 3anONHnTe cKOpOBapKy 60nbIe Yem Ha 1/3 obbema (MAX 1). OctabIte cKOpOBapKy Ha HeCKoJIbKO MInHyT dIЯ OXJaXdEHHa, a 3aTeM OXJaIte C NOMOuBx OXIoJHOBbI. 1 y6eINBUnCb, UTO npEdoXpaHHTeNbHbI CTepXeHb ONyCTnICr, CJIeKa B36aNTbIBaIte cKOpOBapKy nepeD KaJDbIM OTKpbIBaHNEM, UTO6bl npEDoTbPaTITb  pa36pb3rNBaHne ny3bIPbKOB npapa, KOTOpoe MOxKET npNBecTn K OxKOram. 3To OC06eHNO BaxKHO pRn 6bICTpOM BblNyCke npapa NIN NOcNe OxJaXdEHN B XOJOnHOB OBe. Pn npriTOBHeHn CynOB peKOMeHdyem NcNoIb3OBA Tb 6bICTpyIO DeKOMPpeCCnIO B XOJOnHOB BoDe (CM. NyHKT «3aBepSeHne npriTOBHeHn B peKIMe CKOPOBAPKN»).Испобзовные КОрзIHы对于我们ПрИТОВленья на napу_
HaJeIeTe 750 Mn BOJb Ha dHO eMKoCTn (O).B 3abncmoctn OT moedn:
YcTaHOBnte NODCTaBky\* (L) IN KOp3nHy dIy npriROTOBHeHna napy\* (J) Ha dHO eMKoCTn. 3akpenite noctabky\*K) Ha Kop3nHe\*(J) n yctaHOBNTe INX Ha dHO EMKOCTN.    Bo BpemBaKn Ha napy npOdyKTbI B napOBoKop3uHe* He doJxHbI KOHTaKtIpOBaTb C BoD0i - pnc. 6 u 7. IpoodyKtbl, nomeueHHbIe B napOByIO KOp3uHy, He doJxHbI npEbbIaTb ypoBeHb MAX 2.Сятынистановka pa6oуero klaпана (A)
Дя сны рабочero Клана (A):
Cobmectte na3c OTMeKoI NOJKeHna KaIaNaHe (C), HaxaB Ha KOnbUO pa6Oyero KlaIaHa (A). - y6epnte klaanah - pnc.11.YctaHOBka pa6oeryo KlananaHa:
- YctaHOBnte pa6oHn KlaNa(A) - pnc.8COBMeCTNB MeTKy Ha pa6oHem KlaHaHe C OTMeTKoN NOJKeHN (C), cm. PNCyHOK PAnOM.  BCTaBbTe pa6oyn knanah (A), yTO6bl 3aΦnKcnpOBaTb erO ha cTepxKHe dIy Bblnycka npa. HaKMTe Ha nKTOrpaMMbI pa6Oyero KnaNaHa (A) n NOBepHnTe. Taimep*
He ncpnoj3yute TaMep B pexime 6e3 daBleHna.
Taimep npedHa3HaueH dIra TOrO, yTO6bl nOMoYb Bam oBecneuNb pe3yIbTaT npnroTOBHeHn IINs, N03BOJRA lyUwe perylnpoBaT noTppe6JIeHne 3Heprn. OH aBTOMaTnueCKn HauHaeT OTCHTbIBaT BpEmr npnroTOBHeHn PnN DOCTNXeHN TeMnepaTypbl, COOTBeTCTByUoSei peXIMy npnroTOBHeHn «CKOPOBapKaДля pa6otbl taMepa OHdoJKeH 6bITb npNKpePJIeN K cKOpOBapKe
Bo Bpem npiroToBneHn 6IIOda cneIte 3a Tem, qTo6bI pa6oHn Klaan (A) perynarpo H3daban rnyxoi wum. Ecn kOnueeCTBO napa HeOCTaTOUHO, Hemoro yBeJIuYbTe MoUHOCTb NcTouHnKa TeIIa, B o6paTHOM clyuae - yMeNbUHTe ee.| 1 | Для вklюочень taимера нажмITE кногку. |
| 2 | Установ ITE Вера пригоровения (В мину tax). |
| 3 | Еслы ошлincь co Вераимпригоровень. пожд ITE 4 скунда, рoka oronek посятама. Затем нажмITE и уdeckхиваite Кногку за сбра. |
| 4 | ВklючITE Источник Телка на Мakсимальнию мошиость harpeba. |
| 5 | Когда скороварka достигнет Temпepатурblьарки, taiМер зазвен't и начнет оtcuet Вераими (цифры магаю). УменьшITE мошиость Источник Телка. |
YctahOBka n ChrTne TaMepa\*
Дя установки таймера (F) - рис 12 сачana BCTаБTe B MOдуны Ту чаТь, Гд НхОдЯТСЯ Клавиши, a 3aTeM HaЖмITE, YTOбы ппкpenNTь пOTиВОноLOжHyю CTОрHy. -Дя сягся таймера (F) npионмITE n CHMITE erO. 3ameha 6aTapeiKn B Taimepe*
B TaImepe nCnoJb3yeTc8 6aTapeiKa-«Ta6NeTka» TInOpa3Mepa CR2032. - Ecnn noBnEeTc CmBOJ n nn cCnn HnUero He OTO6paKaeTcH a KpaHe, 3aMeHnte 6aTapeNky. Cpok cnjx6bl 6aTapeKn 3aBncnt OT yacTOTbl nCNoJb3ObaHna TaIMepa. BaTapeiKa 3TOrO TaIMepa CoepKNT DImeToKcN3TaH N@ CAS 110-71-4 3TO COOTBeTCTByET EBPoneNCKM HOpMaM. B cIeJx 6e3OnaCHOCTn I OXpAHy OkpykaIOUSeI CpeBb: He BCKpbBaIte 6aTapeiKy, He NOdBepraIe ee BO3DeNCTBNU BbICOKNX TEMpePaTyP, He Bbl6paCbBAIte BmecTe C 6blTOBbIMN OTXoDAmN; BepHInTe ee B pYHKT c6opa nCNoJIb3OBaHHbIX 6aTapeek.  He donyckaetc nepe3apkKaTb Hepe3apkKaemble 3JeMeHTbl NtHaHna. He cIeNyET nCNoIb3OBA Tb OJHOBpeMeHHO pa3nUHbI TUNbl 3JeMeHTOB NITAHN IIN60 HOBbie n pa3pXKeHHbI 3JeMeHTbl NITAHN. - ΘηmeHTbl ΠιTaHЯДΟЛЖНБI 6bITb BCTaBNeHbI C co6JIIOdeHHeM NOJApHOCTN. Pa3pJxHbI eJIeMeHTbl NITaHn cIeIyET n3BneYb n3 yCTpoiCTBa n yTINn3nPOBaTb 6e3OpanchbIM o6pa3OM. - Ecnn yctpoiCTBO xpaHNTcN He nCnOJIb3yETcB TeueHne dIInTeJbHO BpeMeHN, CNeDyeT N3BLeuB IN3 Hero əJIeMeHTbl PNTaHn. - BbIXOДнье KOHTaKTbI ПИТаHЯ He ДОЛЖНы 6ыITb KOPOTKO 3aMKHyTBI. Pa6oTaIte Ha poBHOJ NOBepxHOctn. - 4To6bl n3Bnueb 6aTapeNky n3 TaImepa, OTKpoTe KpbIshKy 6aTapeHoro OTceKa C NOMOuBIO MOHeTBI (CM. PNcyHOK). 3aMeHnTe 6aTapeKy. - YctaHOBnTe npOKJaKy Ha npedHa3HaueHHoe Jn Hee MeCTO. PacnoJoxKe TOnyMeCz a KpbIe 6aTapeHoro OTeKa HAnpOTnB NOnyMeCzHa TaMpe. AkkypaTHO NOBepHnTe KpbIshky 6aTapeHoro OTceKa, cnerKa Haxmam, COBmecTnB NOLyMeCau Ha KpbIshke 6aTapeHoro OTceKa C KpyromHa TaImepe. Pa6otaIte Ha poBHOJ NOBepXHOCTN, YTO6bl KpbIaKa 6blIpaCNoIoxKeHa ROpN3OHTaJIbHO. He npnilaraTe cnny K KpbIwe 6aTapeHoro OTceKa npn 3akpbIBAHnn. PpN 3akpbIBAHnn Do ynpa He npokpyuBaTe daJIbWe. Bcnyae yTepn Bbl MoKeTe npno6peCTn HObI TaIMep BO BCEx Haux aBTOpN3OBaHHbIX cepBnCHbIX ueHTpax TEFAL.  Hnkorda He nomeaate TaMep\* noD Body n He MoTe B nocydomoeuHou MaunHe. He nCnoIb3yIte TaIMeBpeXmE 6e3 daBJeHna.Ipeed npirotoBleHneM
-Перед Кадын Историяудате равочи Кларан (A)-psc.11и поверпгБИЗУАЛБНОИ на СВЕТУ,чTO OTВЕРСТЕ ДЯ BыИPSСКА па (B) He 3akynopeHo -psc.13. - Y6eI NTecb, yTO npEdoXpaHntBHyI KJIaNaH NOdBnKeH (CM. nyHKtBi «OuNCTKa») «Оьзателыпpoверки пе徳 кждьIM Использованem»)- рс 18. I06aBbTe nHrpeDneHTbI IN XnIDKOCTb. 3aKpoIte cKOpOBapKy - pnc.2 B clyuae Bo3HnKHOBeHn TpydHocTe npn 3aKpbBaHn: NomeCTIte npOKlaKy noD B0dy, a 3aTeM o6paTHo B KpbIshKy, He BbITnpaJ - pnc. 19. Y6eIntecb, yTO npOKlaKa XopoIo npoxOHT NOI Na3aMn KpbIshKn - pnc. 15. YctaHOBtTe Ha MeTo pa6OuN KlaPAnA (A) - pnc. 8.Bapka B peЖиMe ckopoВapКn
ПовернITE рабочи Кларан (A) в поожене за Варки в ржиме «Сkopоварка» - рис.9. Ipei BkHoueHnem cKOpOBapKn y6eINTeCb, YTO OHa 3aKpbIta DOJXHbIM o6pa3OM - pnc.2. YcTaHOBnTe cKOpOBapKy Ha nCTouHnK TePna N BkIIOHTe eRO Ha MaKcImaJIbHyIO MOUHOCTb. Дя модень с таймером : установпесь врем пригоровеня, ука занhoe в рецпесу (см. раздел «Исторбогане таймера}). IotppecknBaHne nDbIMOK, nCnyckaemble npeOxpaHntbHbIM CtepXHeM, -3TO HOpMaJIbHOe YBHeHne, OHN N03BOJIAOT BbInyCTNTb BO3dYx nepei npuROBHeHneM.Воверема варки в ржиме «Сkopоварка»
YMeHbIHTe MoUHOCb NCTOuHnKa TeNla, ecn n3 pa6oeryo KlaanaHa (A) HenpepbIBHO BbIXODNT nap, n3DaBaJ NOCTOAHhBm HINPAuN 3ByK. HaunhaIte OTCuHTbIBaTb BpeM npriTOBHeHn, yka3aHHoe B peCNTe. Bo Bpemn npiroTOBJeHn6JIIOa CJIeINTe 3a TeM, yTO6bl KJIaIaN peryIpaHO n3daBaI rIyXoI shm. Ecnn KOInueCTBO BbInyCKaEMO rapa HeIOCTaTOUHO, HEMHO yBeInuYbTe MOUHOCb INCTOuHNka TeNla, B O6paTHOM clyuae -ymHeBUnTe ee.3aBepseHne BapKn B peXnme cKOpOBapKn
Дя Вынунька па:
Iocne BbIKIOueHn IcTOUHnKa TePna CyuEcTByOT DBe BO3MOxHOCTN: -Постений д ekомпесь: постениноовернite paбочи Кларан (A) иdoesTe erdo NNKTORpaMMbl - pnc.10.  -БыICTpaЯ DeKOMPpeccn B XOJODHO Bode: ONyCTNte yCTpoiCTBO B paKOBHy C XOJODHO BOJ.ДерЖNTe DHO CKOPOBAPKN B BOJe, NOKa PpeOxpaHITeJIbHbI CTepXKeHb He onyCTNTcR - pnc.14 Korda npeOxpaHITeJIbHbI CTepXKeHb (D) ONyCKaETcR, DaBHeHnB B CKOPOBAPKe 6OJIbWe HET. NOBepHITe pa6OuH KlaHaH (A) B NOJIOKeHne  3tan1  3Tan2 - Nocne 3TORO Bbl MOXeTe OTKpbITb CKOpOBapKy - pnc. 3. B Cnyae BO3HnKHOBeHnra TpydHocTe npn OTkpbIBaHn yCTpoiCTBa: NomeCTnte npoknaIky nOJ BODy, a 3aTeM o6paTHo B KpbIuKy, He BblIupa - pnc. 19. Y6eIITecb, qTO npoknaIka XopoIo npoxoINT nOJ na3amN KpbIuKn - pnc. 15. Ecn npn BbIeHnn napa Bbl 3aMeTnIn KaKne-Jn6o OTKIOHeHn OTO HopMbI, yCTaHOBnTe pa6OuN KlaPAn (A) BV NOLOXeHne npuroTOBHeHn IOd daBNeHnEm , a 3aTeM BbINOJIHnTe 6bICTpyU DeKOMnPecCnIO BXOJODHO BODE. Ecn npedeoxpaHntbHbI cTepeXeHb (D) He onyckaetc, ocTydnte yctpoiCTBO B paKOBnHe C xOJOnHO BODo. DepeXte dHO cKOpOBapKn B BOde, noka npedeoxpaHntbHbI cTepeXeHb He onyCTNTc - pnc. 14.HnkOrda He OKa3bIbAitc Te Bo3dEiCTBnE Ha npeOxpa HnteIbHbI cTepeXeHb.
Для пастообразипшьix пишьix пpoуктob, кOTOpbie paCUnpIOTcN/NIN INI INI INI INI BO BpeMBAрК, TaKnx KaK pnc, 6o6OBbIe, cyWeHbIe OBOUIn, fpyKTOBbIe NIOpe, TbIKBa, Ka6auchn, MopKOBb, KapToΦeNB, pb6Hoe ΦHne... He 3anONHЯITE cKOpOBapKy 6OJIbWe Yem Ha 1/3 obema (MAX 1). OCTaBBte cKOpOBAPKy Ha HeCKOJBKO MNHT dJa OXJaXdEHHa, a 3aTeM OxJaNTe B XOJODHO BoJe. Y6eINBUnCb, yTO IpeDOxpaHITeNBbI CTepXeHb ONyCTINcR, Clerka B36aTbIBaIe TcKOpOBAPKy nepei KaJdbIM OTKpbIBaHNEM, YTObI IpeDOrTbPaTtB pa36pbI3rIBaHHe ny3bIPbKBOB npapa, KOTOpOE MoKET npINBeCTN K OXIGAM. 3TO OCO6EHNO BaxHOb npN 6bICTPOM BblYcKe npapa IIIN PocNe OXJaXdEHHa B xOJODHO BoJe. Iprn IprnoTobLeHm cyNob peKOMeHyem nCNoJb3OBAtB 6bICTpyH DeKOMnPecCSHb XOJODHO BoJe (CM. INHKT «3abepseHne npiroTOBleHnB PexKIme cKOpOBAPKn»). Пригоровские в реки м
кастюл\*  -Повернite pa6очий кларан (A)В поожене Дя ВаркиВ peKIMe KAcTPOJRA" .HIN 3OM CNeDyeT npNIOXHTb yCInne,doCTaTOUHoe,yTO6bl nepeBecn yKa3aTeIb 3a npEdebl OTMeTKn NOLOKeHn DEKOMPeccnn. -Перд Вкюченem ckopoВapКи y6eNTecb,ЧTO OHa 3aKpbIa DOJXHbIM 6pa30M - рс.3. - YCTaHOBInTe CKOpOBapKy Ha NCTOuHnK TeNla, BKJIouHb erO Ha He6oJbUyIO MOuHOCtB. HaunhaTe OTCuHTbIBaTb Bpem npuroToBneHn, yka3aHHoe BpeCNTe. BpeKnme «KacTpioJra» Bbl MoKeTe OTKpbItb CKOpOBapKy B IIO6oe Bpemr, TTo6bl nepemeunBaTb, CneiNTb 3a npiroTOBHeHne NIIu NIIu Do6abTb INHrpEIneHTbl. B clyuae BO3HnKHOBeHnra TpydHocTe, yTO6bl OTKpbItb yCTpOHTBO: NOMEcTHe npOKnAky nO B Ody, a 3aTeM o6paTHo B KpbIshKy, He BBITnpaR - pnc.19 n 15, n y6eINTEcb, yTO npOKnAka XopoWo npoxoINT nOd na3amN KpbIshKn. - Ecnn TemnepaTpa CnNkOM BbICOKA, CKOpOBapKa MoXeT 6bITb 3a6NknpoBaHa (PpeOxpanTeNbHbI cTePKeHb (D) NODHmaeTcN 6Lokpye OTKpbBaHne), pyka KpbIuKN MOXeT He NOBopauNBaTbcra NII He OTKpbBaTb CKOpOBapKy. B TaKOM cnyy MeHbWNTe MOUHOCTb NII BbIKIOUHTe NCTOHHK TeNa. Ecnn BblncNoB3yeTe 3NeKTpueckyIO PINTy C CyryHHbIM HarpeBaTeNbHbIM 3JeMeHToM, CHMUTe CKOpOBAPKy C NCTOHHKA Tenna. ■Дя moJeIe c aHTnnpurapHbIM NOKpbITHeM: He nCNoJIb3yIte BeHcIKN iDpyrHe MeTaNueckne IIN OCTpBle np6Opbl. He cTprXnBaIte np6Opbl, CTya IMN NO KpaAM EMKoCTN, TaK KaK 3TO MOKeT NobpeIITb ee IN npuBeCTN K npOTEKaHIO. Hnkorga He harpeBaIte Jnnp Oo obyrlBaanra. DbIM, o6pa3yUOuNc npn nprirotOBHeHnn Nnun, MoKeT npeCTabJIrTb ONaCHOCTb dJa XNBbIX OprAHN3MOB C OcO6O yBCTBHTbHOJ DbIXaTeHbHOJ CNCTeMOJ, TaKnx KaK PNTUcbl. BnaJeNbCaM PNTUc He cIeDyeT NyCKaTb INX B KYXHIO.IpeoXpaHnteIbHbIe yctpoIcTba
CkopoBapka oShaueHa HeckoJIbKIMn IpeOxpaHHTeJIbHbIMN yCTPOJCTBaMn:-ПпебхаHTeHoe yCTpoIcTBo npn 3aKpbBaHmN:
- Ecnn KpbIshka yctaHOBHeHa He npabINbHO nII Bbl 3a6bln CLOXHTb pyUKy KpbIshKn, nap 6yndet BbIXOHTb Ha ypOBHe ppeoXpaHntbHoro cTepxH(D), He dOnycka IOBbIseHn DaBHeHn.-ПпебхаHTeNbHoe yCTpoIcTBo npn OTKpbIBaHmN:
- Ecni cKopOBapKa HaxoNTcI NOI DaBHeHem, IpeOxpaHTeJIbHbI CTepXeHb (D) HaxoNTcIB B BepXHeM NIOJXeHn IN pyUka OTKpbIBaHn/3aKpbIBaHn KpbIShKn (G) He DOJXHa HAXIMaTbcra. - Hn B Koem cnyuae He nbItaTecb OTKpbITb CKOpOBapKy, npImeHra cnny. -Heoka3bBaIte Bo3dEiCTBnE Ha npedeoxpaHITbHbI CTepKeHb (D). -убeintecbВ TOM,чTO BHyTpEHHeeДaBHeHne ynaLo,пpoBepNB,ОиуctnIcRЯлnpedoxpaHnteHbI ChTepeXeHb (D)ВнжHee noloxHne. -PyuKn eMKoCTn yBnIOTc 3aunTHbIMn deTaNMy. HNKoTa He 3ameHnTe nx camocToTebHo. HNKoTa He nCnoB3yIne dpYrne Moden pyueK. - Ecni Bbl NOBepHynI pyk Ky OTKpbIBaHn/3aKpbIBaHn KpbIHKn (G) B BepTnKaJIbHOe IIOJKeHN, KOnda CKOpOBaPka 6bIJa eIe NOD daBHeHMe, Bbl He CMOXKeTe OTKpbITb ee. 3To o6ecneuBaET dOONHHTelbHyIO 6e3OnaCHOCTb. -Повернite ручky образно В горионтальhoe поожени и поождente, пoka\ празхашистов сөрөнь (D) He onуctүгсВ ���хkeeш. -Два пpeохсаньных устpoиства пи n36bITOчHom давлин: - PepBoe ycTpoIcTBO: npedeoxpaHntelbHbI KlaanE (E) cHmae TaBneHne - pnc. 20 - Btopoe yctpoicBo: npoklaika nponyckaet nap uepe3 KpbliKy - pnc. 20Ecn npca6aTbIbAeT OndHO n3 npedeoxpaHITebHbIX yCTpoiCTB n36bItoHoro DaBJIeHn:
BbIKIOUHTe NCTOCHK TeNla. -ДаиTe ckopoВapKe NOHOCtblO OCTblTb. - OtkpoTe ckopoBapKy. ■PpOBepeTe n ouHCTnTe pa6oyn Klaan (A), OTBepTne IJRA BblNycka npa (B), npedoxpaHnteHbI Klaan (E) n npoknaKy (I) - pnc. 16, 17, 18 Cm. pa3dJIbI «OuNcTKa» n «O6raTeHbIe npOBepKn nepei KaKdbIM nCNOlb3OBaHNEm - Ecni nocne TaKo npOBepKn uNcTKn np6Op co3daeT yTeuKy uNn He pa6OtaeT, OTHecnte erO b yNoHOMoehhbl ueHtp texo6cnyxBaHna TEFAL.Pekomehdaunno nCnOJb3OBaHNU
1 - nap, KOTopbI BblXoJNT uepe3 pa6OuN kIaNaH, oueHb rOpaH. BydbTe octOpOxKnbl CO cTpye napa. 2 -После тoro кak npedoxpaHntbHbI CTepXeHb NOHMMeTc, Bbl He cMOxKeTe OTKpbITb CKOpOBapKy. 3-CobioaTe octopoxhoctb npn pa6ote c 3Toi ckopoBapko, KaK n C pyrmm npnbopamn dIy npuroTOBneHn nn, eCnn Bbl nCnoJb3ye Te ee B6nn3n deTei. 4 - Перемаiteckopobapky3aДbepykneMkoCTn. 5-He xpaHnte B ckOpOBapKe npOdyKTbI nHTaHn. HnkOrda He hocnte ckOpOBapKy 3a pyUky KpbIshKn. 6 - Hn B Koem clyuae He nCnoIb3yIte 06e33apaxKNaIOUne XnDkoCTn nnXlopcOdepKaUne BeIecTBA, KOToPbIe MOryt yXyDIntb KaYeCTBOHepKaBeIOUe CTaII. 7-He 3amauNbaiTe KpbIshky B BoJe. 8 - OcyuaceTBJTe 3ameHy npokladkn ckopobapkn exeeroaHO nI npn ee nobpejdeHn. 9 -Чinctka скороварки осу戒指ваяется Толбков В OCTышем COCTОHMп ри пустов скороварke. 10 - По пошесън 10 leт Экплуатуин Heo6хоюmo 6ьнho npobepntb ckopobapky B ceHTpe TexHueckoro 6cnykBaHnЯ TEFAL.UncTka
Дянадпжашио Функционироваяня скороварк посе кадоу ee NCПОЛьЗOBAHЯ HeO6xODIMO co6IIOdaTb peKOMeHdaци NO qNCTke n yXoDy 3a Hei. IOTemHeHne n 4paHHbl, KOTOpBe MOryT Bo3HmKHyTb BOIEcCTBne dInTeJIbHOro NcNoJIbZBaHnA, He npEcdTaBIAJOT OBCHOCTN. I3HOC BHeUHrO NOKpbITMRA (B 3aBnCmOcTNOt MoeJI), CBa3aHHbI C KOHTaKTOM C KpbIshKOJ eMKoCTM, YBJIeTCa HOpMaJIbIM. Дя ckopoВарOK c aHTnnpurapHbIM NOKpbITHeM (B 3aBnCmOCTN OT MODEN): nerKne zuapanHbI N NOTepTOCTN, KOTOpbIe MOryT Bo3HnKHyTb npu NCNoJIb3OBaHn, He BnIAJOT OTPuCaTeNbHO Ha aHTnnpurapHbIe CBOIcTBa NOKpbITn. ■Iocne KaKdOrO nCnOJIb3OBaHnI npOMbIBaIte ckOpOBapKy TeNIOI BODoI Cdo6aBHeHem cpeIcTBA dIy MblbI pOcyIb. BblOnHJrTe TaKne Jke OepaunC KOp3INHOI IpNIroTOBHeHnHa napy*. He noIb3yIteCb De3HnHnCnpyUoUMn XnKocTAMn nn BeueCTBaMn C coepKaHnem Xlopa. He neperpeBaIte npcyTO eMKoCTb.Для чистkn BHyтpeн Hei nobepxHocTn emKoCTn n3 HepXkBeIoUeI CTaII:
- PpomOnTe C NOMOu YnCTauey6Kn n CpeCTBa dny Mblbry NocydbI. Bcnyae haHnue Ha BHytpenHei NOBepxHOCTn HepXaBeIOSeI emKoCTn paayKhbIX pa3BOIOB nn 6eNoBaTbIX CneIOB (MInHepaJIbHbIe OTIOKeHHa) OunchTe ee c Do6abIeHNem 6eNOrO yKcyca.Дя ounstkn BHytpenHei nobepxHocTn aniomnHneBOI emKoCTN c aHTnpurapHbIM nOKpbITnem:
YTo6bI yBEnuHTb cPOK cnJx6bI n3denn, peKOMeHdyETcMbITb erO BpyHyIO. - PpomOnTe C NOMOuMgKoRy6Kn, RopueB BObI n CpeCTBa IJMaMbITbnaocydbI. He nCnoB3yIte YnCTaIe NOpOoK nn a6pa3NBhIe r6Kn. - Ecni Niuia Nodrope, Hane Te B eMKoCTb ropuyIO BDOy I OCTaBbTe OTMOKaTb. 3aTeM NOMOIte ee C NOMOsbU CpeICTBa dJa MbITbI NOcydbl.Дя очinctи Вhecній NOBepxHOCTN emKoctn:
- PpomOnTe C nOMoU bIO r6Kn I cpeCTBa IJRA MblbI NOcybl. Emkoctb n Kop3nHy n3 HepXaBeoJe CtaJI MoxHO MbITb B nocydomDeHOn MaunHe. He moite eMKocb c aHTmnpnrapHbIM nOKpbItnem (B 3aBNCMOCtN o MOdei) B noydoMoE OI MauHHe,TaK KAK MOIOUne CpeTBA B TabTeKax Coepkat ou eHb ar pecCBHbIe BeueCTBa N B b13bIBaIOT KoppO3NIO anIOMHHeBbX DeAJIeN. При ИNTehCBHOM ИСПОЛьЗOBAHи EMKOCТИ с aHTINpRapHBIM NOKpbITnEM (В 3aBnCmOCTN OT MODeII) CBET NOKpbITMЯ MOXeT CJIeTKa n3MeHHTbCS (NoXeJIteHne, pIrHa).ДячNTККрblшк:
- PpomOnTe KpbIuKy C NOMOuBIO r6Kn I CpeDCTBa IJRA MbITbra NOCyDbI. PazmecHTe KpbIshky BepnkaIbHo, TIO6blaTb CTeybBOIaXoJaueiCmexdy MeTaJIInHeckIMN IN PIACTIKOBbIMN YCTaM N KpbIuK.ДячNTК npOKlaДК KpbIшк:
- Nocne KaKdoB BapKn OunchTe npoknaKy (I) n MeCTO ee yctaHOBKn. - YctaHOBNTe pOKnAky cm. - pnc.15 ny6eHntecb, TTo npOKnAka xopoIo npoxoIIT NOd KaXdbIM Na30M KpbIshKn.Дя чисткpa6оуero клanaHa (A):
13BneKeTe pa6oyn KnaanA(A)-pnc.11. OuHCTnTe pa6oyn Klaan (A) noD cTpye npToOH BODb -Pnc.16. PpOBepbTe erO NOBnXHOCtB: CM. pUCyHOK.  Pocne cHraTna pa6oeryo Klanana (A), npoklaKn (I) n taMepa\* (F) Bbl MoXeTe MbIb KpbIshky B noc ydomoeyHOn m aunHe. HnkOrda He cTaBbTe pa6oum Klaan (A),ynloTHnIeIb (I), TaMep\*F) nIeMKoCTb c aHTnPi rApHbIM NOKpbITnEM Bn OcyOmo eHyIO MaunHy.Дя чьки OTверстя за Бынуcka па (В), распожению по Крбшков:
-Симmate Кларан (A) - рис. 11. ■Ipeep KaKdbIM NcNoB3OBAHHeM IpOBepbTe BN3yaJbHO Ha CBety, YTO OTBepCTne IIN BbInycka npapa OTKpbIto IN ABJIeTc KpyrIbIM - pnc. 13. Pn Heo6xOdmoctn Ounchnte ero c NOMOuBIO 3y6OuNCTKn - pnc. 17 n IpomOnTe ere.Ynctka npedoxpaHntbHoro klanana (E):
OuHCTnTe YacTb IpeoXpaHntBHO KlaNaHa, paCNoJoxeHHyO BHyTpN KpbIiKn, onOIOCHyB ee BOIo. ■PpOBepbTe erO cyHKUHOHnpOBaHne, cnIbHo HaxKaB BaTHo nAIOUcKoHa shapNK, KOToPbIdoJXeH6bITb NODBnXhBIM - pnc. 18. Cm.pa3dEe «O6aTeJIbHbIe npOBepKnpePe KaJDbIM NCNoJIb3OBAHHeM»Дя оочтки таймера* (F):
IcnoNb3yIte YnCTyIO, cyXyIO TkaHb. He nCnoB3yIte pactBOpnteJI. Hnkorda He nomeaTe TaMep NOBdy HHe MoTBe B NocydomoeyHO MaunHe.yxo
3ameHa npokladkn ckopoBapKn:
OcyuEcTBnIe 3aMeHy npoknaIckopOBapKn exeRoIHO nnn npn ee NOBpeKdEHH. ■IcnoIb3yIe TOnbKO opuHaJIbHyIO npoklaKy TEFAL, COOTBeTCTByIOUOmoJeIN np6opa (cm. pa3dEIN «AKececcyapbl»). - YctahOBInTe npOKnAdKy cm. - pnc. 15 ny6eInTecb, YTO npOKnAdKa xopoWo npoxoINT NOd KaJdbIM Na3OM KpbIshKn.XpaHeHne cKOpOBapKn:
-ПометиTe Кршу Ha emKocb 6paTHoN CTopoHoiN. MexaHn3M OTKpbIBaHn/3aKpbIBaHn cKOpOBapKn He Tpe6yeT KaKOro-n60 cNeuaIbHorO 06cnyXuBaHn, Kpome YnCTKn. No npoosteBn 10 let kcnnyataun Heo6xOaMn 06a3aTeNbHO npOBepntb ckopOBapky B ceHTpe TexHnueckoro 6cnykBaEHAL.Akceccyapbl TEFAL
-ImeIOTcB npOaXe cIeIyUoIne aKceccCyapbl Ira ckOpOBapKn:| АкCEDСуары ApТИКУЛ | ||
| Прокладka | 3/4/4,5/6 Л: наpopжный диаметр\ празладки: 24 см | X1010008 |
| 5/7,5/9 Л: наpopжный диаметр\ празладки: 27 см | X1010007 | |
| КорзINA за\ Приноговленna\ на пapy* | 3/4,5/4/6 Л: ддя emковости диаметром 22 | см 792185 |
| 5/7,5/9 Л: ддя emковostи диаметром 24 см | 792654 | |
| ТренORA* (L) | 792691 | |
| Таимер* | X1060007 | |
XapakTepnCTnKn
Диаметр да скороварк — ХаразКерпстнк| Вмechи- Тeelьноctь | Ф смкости | Ф да | Clipso Minut* Perfect / Easy | Clipso Minut* Duo couleur | Clipso Minut* Duo Gourmet | Матерnam смкости |
| 3л | 22 cm 1 | 5.5 cm P46205 -- | Нерхавецочая Сталь | |||
| 3л | 22 cm 1 | 8 cm - | - | P46605 | ||
| 4л | 22 cm 1 | 4 cm - P46042 | - | Аліюиний с покрсытейем | ||
| 4.5л | 22 cm 1 | 5.5 cm P46206 -- | Нерхавецочая Сталь | |||
| 5л | 24 cm 1 | 4 cm - P46051 | - | Аліюиний с покрсытейем | ||
| 5.2л | 24 cm 2 | 20 cm - | - | P46654 | Нерхавецочая Сталь | |
| 7.5л | 24 cm 1 | 8 cm | P46248 -- | |||
| 9л | 24 cm 1 | 8 cm | P46249 -- | |||
| Set 5л 7,5л | 24 cm | 14 cm | P46353 | - | ||
| 18 cm | ||||||
TexHueckaMHΦopMaζη:
MaKcImaJIbHoe pa6ooyee daBJeHne: 65 KPa MaKcImaJIbHoe 6e3ONaChoe DaBHeHne: 120 KPaCobmecTmMbIe NCTOCHNKe Tepla
T3OBARIINTA 1NEKTPUHECKAR IINTA CTEKJIOKEPAMUHECKARIITTA INHUYKUHOHHARIITATA 3NEKTPUQECKARIINITA (CnpanbHnHarpeBaTeBnBn 3nEMENT)      - CkopOBapka MoXeT NcNoIb3OBAtbcra CO BcEMn HarpeBaTeIbHbIMn np6OpamN, B TOM YnCNe INdYKcIOHHbIMN. -Прн ИспОьВаHи ЭлЕКТрИчЕСКО ИИ ИНДуКУNOHΟИ ПИNTы ДИАМЕТР HarpeBaIOUSeI NOBepxHOCrДОЛжeH 6bITb paBEH IIN MeHbWe DnAmETpa DHaCKOPOBaPkn. Pn nCNOB3OBaHn CTeKNOKepaMuecko NITbI y6eNTecb, YTO dHO EMKOCTN uNCTOE. -Прии Исторбовань ra3OBbIX HarpeBaTeIbHbIX np6OpOB Памя He DoJIxHO BbIXOДNTb 3a Краз EMKOCtN. -При Исторьанни на BCex HarpeBaTeIbHbIX np6opax y6eIITecb,чTo ckopoBapka pacnoJoxeHa no ueHTpy nCTOuHnka TeIIa.TapaHTy
-При ИСЮЛБЗОВАнь В COOTBETCTBИ N C INHCTpyKцЯMu NO ᶈКСПУаТAUИ На EMKOCTb ckopoВapки TEFAL n3 HEPЖавeIOUSeI CTaII paCnpoCTpaHЯTcR rapaHTNcspOKOM 10 letВ cIvyae O6HApJxKeHnA: JIIO6bIX DeΦeKTOB, CBa3aHHbIX C MeTaJIInueCKOJ KOHCTpyKUneI emKOCTN; - lioboro npexdebpeMeHHoro pa3pyuweHna 6a3OBoro MeTalna. Ha octaJIbHbIe MaTePnaJIbI eMKoCTn I Bce dpyrme qacTn cKOpOBapKn paCnpocTpahReTcra rapaHTnA OTeΦeKTob N3ROTOBHeHn NII MaTePnaJIOB Ha npotjKeHn rapaHTmHoro Cpoka, ONpeDeIeHHoro DeiCTByIoUIm 3aKOHODaTeNbCTBOM B CTpaHepno6peTeHn, HauHnA C DaTbI NOKyNKn. -Данна rapaHTma MoKet 6bITb npeIoCTaBNeHa npn npeIbYBHeHm KaccOBOrO Чеки Счета, NOdTBepKdaIOUsoero Daty NOKynK. JaHHa rapaHTnHa HeJeicTBtEnbHa B CneNyUoxn Cnyuayx: - UapanHbI n oBecuBeuBaHne u3-3a cTapeHn, dIe emKocTec aHTnPurapHbIM NOKpbITnEM. LapannHbI OT KOHTaKaT KaBik C eMKoCTbIO c aHTnnpurapHbIM NOKpbITnEM. -При поврждених BCпсдгове Heco6лodeня BaxKьIx Мер пpeДОТОРЖHOCTNIIHHePpAunbHorO nCNoIb3OBaHnR, a IMeHHO: - ydaopoB, nadeHn, HaraepBaHnB DuyXOBOM uKafoy; ToIbKO yNoJHOMOeHHbI ueHTpbI Texo6cLyXnBaHnA TEFAL nMeIOT npaBO npedocTabHeHnra rapaHTn. -Просим обрацаься по телефону гораяй линь в ближайший упогимоуновский сизергдддддддддддддддддддддддддддддддддддддддддддддддддддддддддддддддддддддддддддддддддддддддддддддддддддд徴псггггггггггггггггггггггgHopmatNBHbIe OTMeTKn
| Оtmета PacnoLOжения | |
| Товарнызнak Ha Крышke | |
| Гор и пapлииотовлия Артыкун модали Мakсималъ窠 6еозапочь давлие (PS) Мakсималъ窠 рабочь давлие (PF) | Ha Крышke |
| Вмостителовость Ha наpopжном дne emkocstn | |
| Почтовий adrec поизвoditsя Ha наpopжном дne emkocstn |
Bhecem BknaB OxpaHy OkpykaIoUeI cpebl!
 ①Baш пибор содерхит цьий рад цEHьIX DeTaIeN, KOtOpbl MOrTy 6bITb NOBTOpHO INCNoIb3OBAHbl. OTHeCnTe ero Ha nepepa60Ky B nyHKT npHema 6bITOBbIX OTXODOB.TEFAL OTBeuaet Ha BaShn BOnpOcbl
| Helen�аадки Рекомен Даци | |
| Если Крьшka OTКрьВаеТСАЗрь ВаеТС Студом: | Снимпгппорokладу иnomecтITE eeВ Вody. Установпге eeHa MeCTо, He BvItupaR рnc. 19. |
| Если Вы He можete ЗakрьТь Крьшку: | П探测ыт, нахочтся лу рчka КрьшкВ в Бернкальног паложени. П探测ыр паслоожени поладк(см.раздел «Чиска ухд). Убechтесь, чTo Крьшka установке, кak пokaазно на псухнke- рис 1. Пометichte поладкВ Вody, a 3aTeM образно в Крьшк, He Бвтирая - рис. 19.Убechтесь, чTo поладka xopoш п探测пд по пазампрьшк рис. 15. |
| Если Skороварka нагрелась по давлием 6e3 Жидков STN BNYTPN Hee: | П探测ыт сокороваркВ уралногонунHom цentpe Тхоб- служваимя TEFAL. |
| Если п探测ханител新股ь исторжны Барки He Выделятca nap чeredesklanah: | Это Нормально перьгie Heckольк MOHуT: ЭTO ПОЗВOLЯET Вылчstпь BOZdux перд пригоровелейem. |
| Если п探测ханител新股ь исторжны Барки He Выделятca nap чeredesklanah: | В точенье перьгx Heckолькx МИуT ЭTO HOPмальhoe Явlene. Если Нчero He Meяется, п探测ыт: - Достаточа лу мошноctь Источиka Tepla.Если мошноctь Небочачona - увелочte ee; - ДостаточиLO ЛКOLИЧECTBO JИДКOSTNВ EMKOSTN; - Нхочters LA pabochy KMланA(B NOLOJENH) - ПLOTно лу зakрытс skopobarрka; - He Nobpeждега лу покладka пи Край EMKOSTN; - павиьно лу установела покладka. |
| Если п探测ханител新股ь исторжны Барки He Выделятca nap чeredesklanah: | В точенье перьгx Heckолькx МИуT ЭTO HOPмальhoe Явlene.Если ЭTO явлиеные He NCue3aET,oxlaДпte устюг; В рakOBиne похал'dоь ВODо.Держп'te Дно сокороваркВ Воide,пoka п探测ханител新股ь StperжED(D) He onyctITcR. ОчSENTе пбочи KMланA(A)- рис.16и OTberpctme Ду ВылчSCa пара - рис.17и убechтесь,чToшарк п探测ханител新股ь KMланa ВдавлinaBaETcR 6e3 3atprudheni - рис.18. |
| Helenonadkni | Рекомендаци |
| Если ИЗ-пов Крblшки Выхочт nap, a поедханителовский Ст装配ов нахочтся в Нжнem поожени, поеверные: | Надлесашие з akрыванные Крblшки. Порожени поковдддддддддддддддддддддддддддддддддддддддддддддддддддддддддддддддддддддддддддддддддддддддддддддддддддд徳. Надлесашие состаяп поковддддддддддддддддддддддддддддддддддддддддддддддддддддддддддддддддддддддддддддддддддддддддддддддддд徳 ЧИСТОТУ Крblшки, поковддддддддддддддддддддддддддддддддддддддддддддддддддддддддддддддддддддддддддддддддддддддддддддддддд德. Надлесашие состаяп поveyній и мeledэоуній в Крblшke. Надлесашие состаяп края emkoctи. |
| Если Вы He можete ot-Kрblть Крblшку: | Убадиесь, чTo поедханителовский Ст装配ов (D)Надлеся в Нжнem поveyній. В потуговом сныаe ВыpoлнITE Dekomпразссю: OCTудпite устристwo в рakobице схолонов Bodои. ДержITE дноckeportов в Bode, пoka поедханителовский Ст装配ов在他 onустя. He давпite на поедханителовский Ст装配ов (D). Поверни рабочи Клалан (A) в требуеме поожени. |
| Если поедукты He dove-deны до ratovostru fini noydropeи, поеверные: | Вревни рогotовеля. Мошноctь Incstouнka Teplа. Надлесашие раслоожени рабочero Клаланa(A). Колчесто в лindkoctи. |
| Если поедукты в скороварке погорουп: | Пereştem Кам Вимьть EMKOCTь, порузitsе gee на нековоторoe Вremя в Bodу. Нь в koem сныаe He пользуитесь обоззаржваюшmicи жidкостя'mи илорсODEржачшmicи BEseCTBamn. |
| Если срабatable вет odnoи з поедханителовьх устриств: | Выкlioочи Источник Телл. Даite скороварке остыть, He nepe'dvигая gee. Дождпесь, пoka поедханителовский Ст装配ов onуститсу, и оскроче скороварку. Проберные пооч_STITE рабочи Клалан hotbercente对于我们 Былуха пара, поедханителовский Клалани поковлдддддддддддддддддддддддддддддддддддддддддддддддддддддддддддддддддддддддддддддддддддддддддддддддддддdддддддддддддддддддддддддддддддддддддддддддддддддддддддддддддддддддддддддддддддддддддддддддддддддддд Убадиесь в ТOM, чTo указаня по Habоленю Выpoлнеши. При Невозможhoe STIN YSTPANENHЯ НEVCSNPAHOTN OBPATITCEB B UPOJHOMOUEHNY CEHTP TEXO6CNUKBAHNY TEFAL Деля поеварки рпбopa. |
| Если Вы замени появени Stedob OKисlenя: | Исплъзование Высокokаочевною Нержавець Stали He поедOTВрацаet появенип рпзнakов Okис- stenя в Крайнх Stclуая.Если Вы замени Stedby Okис- stenя уда当然是 появени Stclуая.Если Вы замени Stedby Okис- stenя уда当然是 появени Stclуая.Если Вы замени Stedby Okис- stenя уда当然是 появени Stclуая.Если Вы замени Stedby Okис- stenя уда当然是 появени Stclуая.Если Вы зamени Stedby Okис- stenя уда当然是 появени Stclуая.Если Вы зamени Stedby Okис- stenя уда当然是 появени Stclуая.Если Вы зamени Stedby Okис- stenя уда当然是 появени Stclуая.Если Вы зamени Stedby Okис- stenя уда当然是 noявени Stclуая.Если Вы зamени Stedby Okис- stenя уда当然是 noявени Stclуая.Если Вы зamени Stedby Okис- stenя уда当然是 noявени Stclуая.Если Вы зamени Stedby Okис- stenя уда当然是 noявени Stclуая.Если WbZStaMuTb3OBaTb CkoporOBapky ChOBA. |
TABJIUNCA BPEMEHN IPNIROTOBJEHN
Obou
OBOU (CBEXKNE)
HA NAPY
INHrpEneHTbI B KOp3nHKe-napOBapKe n 750 mI BObl Ha dHe cKOpOBapKn.  BBODE
HrpeIneHTbl norgyKeHbIBBODy6e3 KOp3nHKn.IMNpyIbCHbIPEKIM
B BOIDE
Бe3 kOp3nHKn.   1 1 # 1 1 # 1 1 # 1 1 # 1 1 # 1 1 # 1 1 # 1 1 # # 1 # 1 1 #| Артышоки, 2 цьых по 600 г кажды (В ВODE) 30 - 35 мин. | |
| Баклajжан, 6e3 shkpки, наразецянный ковцам (3 м), 850 r (на пapy) | 10 - 12 мин. |
| Болгарский поец,разразецянный поолam (550 r) (на пapy) | 14 - 16 мин. |
| Бриюssельская калуста (на пapy) 10 - 12 мин. | |
| Горox (на пapy) 6 - 8 мин. | |
| Грибы,разаные, 800 r (В ВODE) 4 - 5 мин. | |
| Калуста, зеленая нашинкованна, 500 r (В ВODE) | 5 - 6 мин. |
| Картофел,разразецянный поолam (950 r) (на пapy) | 20 - 25 мин. (В заразсимостп от размера) |
| Лун поей 6елы, цelenkom, 650 r (на пapy) | 9 - 11 мин. |
| Луненьий поух, 250 r (В ВODE) | 18 - 20 мин. |
| Манrolьд,разанны (2 с), 700 r (на пapy) | 15 - 17 мин. |
| Маринованный лук (на пapy) | 7 - 8 мин. |
| Мелкаяструковая phасль (600 r) (на пapy) | 10 - 12 мин. |
| Морковь, наразецянся кружочкам (3 м), 600 r (на пapy) | 17 - 19 мин. |
| Рара,разаная кubikам (500 r) (на пapy) | 14 - 16 мин. |
| Свекла, красаня,разразецянся на чевертунки (В ВODE) | 20 - 25 мин. (В заразсимостп от размера) |
| Сенида佩с,разаны, 600 r (В ВODE) | 7 - 9 мин. |
| Соцовая борожал, 600 r (на пapy) | 9 - 11 мин. |
| Соцовая цetной калусты, 600 r (нa пapy) | 10 - 12 мин. |
| Спаржа, селиа (нa пapy) | 5 - 6 мин. |
| Тыква,разаная кусочам (3 - 5 с), 600 r (нa пapy) | 13 - 18 мин. |
| Фасаль phяжole, сученя, 250 r (В ВODE) | 35 - 40 мин. |
| Фechхень, поpezанный полосам (600 r) (нa пapy) | 6 - 9 мин. |
| Цирорий салатный,разразецянный полам (900 r) (нa пapy) | 14 - 16 мин. |
| Чукуши, наразецянный кружочам (3 м), 600 r (нa пapy) | 12 - 15 мин. |
| Ч ueveица, селиеня, 250 r (В ВODE) | 14 - 16 мин. |
| Шпинат (нa пapy) | 3 - 4 мин. |
Pnc
| В ВОДЕ БeЗ корзий. MAX 1 | КOLичECTBO BОДы | KOЛичECTBO PИСА | ВРЕмя ПИГо- TOВ-ЛECHИ | |
| 2 ПОЦи | 400 м. / 2 стakaHA 15 | 0 r / 1 стakaH | 7 - 8 мIn.4 ПОЦи | |
| 500 м. / 2,5 стakaHA 2 | 50 r / 2 стakaHA | |||
| 6 ПОЦи | 700 м. / 3,5 стakaHA 3 | 75 r / 3 стakaHA |
MЯсо/pьба
| CBEXKHE 3AM | OPOXKEHHbIE | |
| Барань похka - 2ш. (0,95 кг) 40 - 45 мин. | 1ч.05 мин. - 1ч.15 мин. | |
| Кролк (1,5 кг кусочам) 8 - 9 мин. 20 - 23 мин. | ||
| Курпца (1,35 кг) 23 - 25 мин 1ч. - 1ч. 10 мин. | ||
| Перенька - 4ш. 9 - 10 мин. 18 - 20 мин. | ||
| Повьети з телатиные - 4ш. | 10 - 12 мин. | х |
| Росьф (1 кг, диметром 8-11 см) | 30 - 35 мин. | 45 - 50 мин. |
| Свиная виpeзka (0,8 кг, диметром 8-10 см) | 30 - 35 мин. | 1ч.05 мин. - 1ч.15 мин. |
| Свинoe Фи LE-MINьон -2 к уся по 350 r | 13 - 15 мин. | 26 - 29 мин. |
| Сөнүлөлөдөнү - 4ш. (0,8 кг) | 5 - 6 мин. | 7 - 8 мин. |
| Сөнүлөнү тунца - 4ш. (0,7 кг) | 5 - 6 мин. | 7 - 9 мин. |
| Телаяbbe Фи LE-MINьон 0,7 кг | 17 - 21 мин. | 33 - 38 мин. |
| Телаяbbe виpeзka (0,8 кг, диметром 5-7 см) | 17 - 19 мин. | 37 - 40 мин. |
| Утka (1,8 кг) | 45 - 47 мин. | 50 - 55 мин. |
| Фиille морского черта (1 кг), кусочам по 75 r | 5 - 6 мин. | 7 - 8 мин. |
| Цыленик - 2ш. (1,3 кг) | 23 - 25 мин. | 40 - 45 мин. |
DÔLEŽITÉ PREVENTÍVNE OPATRENIA
Dókladne si prečitajte vsetky pokyny a vždy postupujte podla "Používatelskej príručky". Nevhodné používaniemöze mat'za následok poškodenie zariadenia. Pre vašu bezpečnost je tento prístroj v súlade s platnými normami a predpismi: - Smernica o tlakovych zariadeniach - Smernica o materialoch, ktoré prichádzaju do styku s potravinami - Smernica oŽivotnom prostredi| NEVYHNUTNÉ KONTROLY PRED KAŽDYMPOUŽITÍM | SKONTROLUJTE vizuálne, Či kanálik na odvod pary nie je zanesený - obr. 13. Či je gulôčka bezpečnostného ventilu pohyblívá - obr. 18. Či je tesneniePokrievky vložené do všetkíchdražok naPokrievkě - obr. 15. Či su rúčky na námode správné pripevné. Rúčky na námode predstavujú bezpečnostné privky. Nikdy ichnevymieñajte sami. |
| VŽDY DODRŽIAVAJTENASLEDUJUCE MNOŽSTVÁ | Tlakový hrniec nikdy nepoužívajte bez tekutiny, mohlódǒjst' k vázznemu poškodeniu hrnca. Počas prižravy Jedlakontrolujte, Či vždy obsahuje dostatočné množstvo tekutiny. Minimálne množstvo 25 cl - obr. 4. Maximálne množstvo 2/3 výšky námody, značka MAX 2 - obr. 5. Počas prižravy jegál naparovaním potraviny vnaparovacom košiku nesmú príst' do kontaktu svodou - obr. 6 a 7. Maximálne množstvo v pripline džažlavých potravín, ktopočas varenia zväčsujú svoj objem alebo penia akonapiуza, strukoviny, sušená zelenina alebo kompóty, tekvičcukety, mrkvy, zemiaky, rybie filé..., je 1/3 (MAX 1). Potraviny, ktoré su položené v naparovacom košiku, niknésmú presiahnut úroven MAX 2 na námode. |
| PRED A PO VARENÍ | ·Počas používania tlakového hrnca nenechávanté deti v jeho blízkosti. ·V tlakovom hrnci sa varí pod tlakom. Nesprávné používaniemöze viest' k poraneniu oparením. Ubezpečte sa, ze tlakovýhrniec je správné zatvorený, až potom ho spustite. (Pozri odsek „Zatvorenie").Dbajte na to, aby ventil počas varenia stále syčal. Ak neuniká dostatok pary, vykonajte dekompressiu vyrobku a skontrolujte, āj je v šom dostatok kvapaliny a āc kanálik odvodu pary nie je zaneseny. Ak para neuníká ani po tychtokontroláché, mierne zvyšte teplotu zdroja tepla. ·Nepripravujte potraviny, ktoré by mohli zaniest' kanálikybezpečnostnéch prvkov: - brusnice - perlofé krúpy - ovsné vločky - lúpaný hrášok - rezance, makaróny, špagety - rebarbora - ribezle ·Vo svojom tlakovom hrnci nikdy nepripravujte recepty svyuzitím Živočíšneho mlieka. ·Ak máte tlakový hrniec s nádobou z nehrdzavejúcej ocele,nepoužívajte v šom hrubozrnú sol, pridávajte iba jemnú sol' na konci varenia. Zabrante výskytu „dierok" na dne tlakového hrnca, ktoré by ho mohli poškodit. ·Tlakový hrniec nepoužívajte na vyprážanie pod tlakom naoleji. ·Tlakový hrniec nepoužívajte na iné účely ako na tie, na ktoréje určený. ·Tlakový hrniec nikdy nedávajte do horúcej rúry na pečenie. ·Do tlakového hrnca nikdy nedávajte formu s hliníkovou fóliou. ·Do tlakového hrnca nikdy nevkladajte plastovú fóliu ·Alkoholové výpary sú horlavé. Nechajte majpriv prblížne 2 minúty vrieč, až potom založtePokrievku. Pri prižrave{jedána báze alkoholu dohliadajte na spotrebič. ·Používajte kompatibilný(é) tepelný(é) zdroj(e) na varenie v súlade s pokynmi na používanie. |
PO UVARENÍ...
Pre modely s nepril'navym povrchom: nepouzivaje slahace ani ostre ci kovove prislu'senstvo. Pristroj nevylievajte takym sposobom, ze budete klepat naradim na okraj nadoby, pretoze moze dojst' k poskodeniu a vzniku netesnosti. Postupne otáčajte prevadzkový ventil (A)a podla svojho uvaženia vyberte rychlost dekompresie, aby ste skončili oproti značke na piktograme - obr. 10. Ked' počas uvol'novania pary spozorujete nezvyčajné vystrekovanie, dajte prevadzkový ventil (A)do polohy varenia režimu „Tlakový hrniec", potom vykonajte rychlu dekompresiu v studenej vode - obr. 14. - Ak bezpečnostné rúrka (D)nezostupuje, tlakový hrniec umiestnite do studenej vody - obr. 14. S toutobezpečnostnou rurkou nikdy nemanipulujte. - Po uvarení māsa s tenkou kožou (napriklad hovadzí jazyk), ktorá by sa mohla vplyvom tlaku vydu't, maso neprepichujte, kym je koza nafúknutá, mohl by ste sa oparit. Maso pred varením poprepichujte. V priade mazlavych potravin, ktoré poças varenia zväčsujú svoj objem alebo penia ako napr. ryža, strukoviny, sušená zelenina, kompóty, tekvica, cukety, mrkvy, zemiaky, rybie filé... nenaplăjte hrniec na viac ako 1/3 (MAX 1) jeho objemovej kapacity. Nechajte tlakový hrniec vychladnút po dobu niedolkích minút a potom ho ochladte v studenej vode. Pred každým otvorením tlakového hrnca a po skontrolovani, ze bezpečnostné rurka celkom dostúpila, nim vždy zlahma potraste, aby ste zabránili prudkému uniku pary, ktorá by vás mohla popálit. Tento krok je obzvlást doležitý pri rychlom uniku pary alebo po ochladení tlakového hrnca v studenej vode. Tlakovy hrniec, ktory je pod tlakom, prenasajte s maximnou opatrnostou. Nedotykajte sa teplych casti. Pouzivajte rukovate a tlaclidla. Ak je to potrebne, pouzite rukavice na pecenie. V priade polievok vám odporúčame vykonat rychludekompresiu v studenej vode (pozri odsek „Koniec varenia" v režime „Tlakový hrniec"). - Ubezpečte sa, ze je ventil v polohe dekompresie, až potom možete hrniec otvorit. Bezpečnostná rúrka (D)musi byt' v dolnej polohe. Tlakovy hrniec nikdy neotvarajte{nasilu. Uistite sa, ci tlak vo vnutriPoklesol. Bezpecnostnárurka (D)musi byt'vdolnej polohe.Pozri odsek Bezpecnost".| UDRŽBA | Ak zistije,Že z vášho tlakového hrnca sa odlomila nejaká Čast alebo sa nanej vyskytuje puklina, vžiadnom pripe de sa nesnăžte otvorit'ho,ak je zatvorený. Počkajte, kým úplne nevychladne ažnásledne ho premiestnite. Viac ho nepoužívajte a nahláste opravu autorizovanému servisnému stredisku spoločnosti TEFAL. Nezasahujte do bezpečnostného systému,okrem ukonov, na ktoré sa vztahrjúPokyny na Čistenie a Údržbu. Používajte iba originálne náhradné diely spoločnosti TEFAL,vhodné pre prislušné model.Predovšetkým používajte nádobu ajPokrievku značky TEFAL. Nepoužívajte hrniec na skladovanie kyslých alebo slaních potravin pred alebo po varení,nádoba sa moze poškodit. Po každom použití tlakový hrniec ihned' umyte a opláchnite. Prevádkový ventil (A),tesnenie (I),časovač* (F) ani nádobu s neprilnavým povrchom nikdy nedávajte do umývačky riadu. Časovač* (F)nikdy nekladte pod vodu. Nikdy nepoužívajte bieliaci prostriedok ani chlóvané prostriedky, mohla by sa poškodit'kvalita nehrdzavejúcej ocele. Pokrievku nikdy nenechávajte namočenú vo vode. Tesnenie vymieñajte každý rok alebo hned',ked'sa na šon objaví prasklina. Po 10 rokoch používania je nevyhnutné nechat tlakový hrniec skontrolovat'v autorizovanom servisnom stredisku spoločnosti TEFAL. Ak chcete tlakový hrniec uskladnit:Pokrievku položte naspat' na nádobu,aby ste zabrànili predčasnému opotrebovanie tesnenia naPokrievke. |
TENTO NÁVOD SI USCHOVAJTE
Diely (pozričast' Popisné schéma)
A. Prevádkovy ventil B. Kanalik na odvod pary C. Index polohy ventilu D. Bezpečnostné rúrka (pozri odsek „Bezpečnost".) E. Bezpečnostnéventil F. Pocítadlo minút G. Rúčka naPokrievke H. Pokrievka I. Tesnenie J. Naparovaci kosik* K./L. Trojnožka* M. Rukovat nádoby N. Značky maximálneho množstva O. NadobaNevyhnutné kontroly pred každým použitím
Kontrola prevádkového ventilu
 - Skontrolujte, Či otvor na vypustenie prevadzkového ventilu nie je zaneseny (pozri odsek „Vybratie a nasadenie prevadzkového ventilu").Skontrolujte bezpečnostnéventil
 - Skontrolujte, Či je gulôčka bezpečnostného ventilu pohyblíva (použite paličku). SKPoužívanie
 Varenie v režime Tlakový hrniec  Varenie v režime Hrniec*  DekompresaOtvorenie
Zdvihnite ruckuPokrievky z vodorovnej do zvislej polohy - obr.3 Pokrievka sa otoci. ZdvihnitePokrievku. V priade problemov s otvorenim vyrobku: umiestnite tesnenie pod vodu a dajte ho naspat naPokrievku, ale neutrite ho - obr. 19 a opatrne ho vlozte do dražok naPokrievke - obr. 15.Zatvorenie
Uistite sa, ze ruckaPokrievky je vo zvislej polohe. - UložtePokrievku na nadobu tak,ako je to znázornene na obr.1 a zarovnajte pritom plastovú Čast's rúčkami na nadobe. Spustite ruckuPokrievky zo zvislej do vodorovnej polohy - obr.2 Pokrievka sa otoci.Ak nemožete zatvorit'Pokrievku:
skontrolujte, ci ste tesnenie spravne nasadili a ci jePokrievka spravne umiestnena. V pripe de problemov so zatvorenim vyrobku: umiestnite tesnenie pod vodu a dajte ho naspat naPokrievku, ale neutrite ho -OCR. 19 a opatrne ho umiestnite do dražok naPokrievke -OCR. 15.Prévopoužitie
V pripademodelov s neprilnavym povrchom: celvvnutorny povrch umyte a zlahka namazte olejom na varenie.V závislosti od modelu:
Položte trojnožku\* (L) a kosik\* (J) na dno nádoby. - Pripnite trojnožku* (K) do kosíka* (J), potom umiestnite dostavu na dno nádoby. - Naplnte nádobu (O) vodou z 2/3 (MAX 2) - obr. 5. Zatvorte tlakovy hrniec. - Zarovnajte piktogram dprevadzkového ventilu (A) s indexom polohy ventilu (C) - obr.9.   - Položte tlakový hrniec na zdroj tepla, potom nastavte na maximálny vykon. - Ked'z ventilu začne vychádžať para, znížte vykon zdroja tepla a varte 20 minút. - Po uplynuti 20 minút zdroj tepla vypnite. - Zarovnajte piktogram prévádkového ventilu (A) s indexom polohy ventilu (C). - Ked' bezpečnostná rurka (D) znovu klesne, tlakový hrniec už nie je pod tlakom. - Otvorte tlakovy hrniec - obr.3 Umyte ho cistiacim prostriedkom na riad.Minimáne a maximálne množstvo
- Minimálne 25 cl (2 poháre) - obr.4. Maximánlne množstvo 2/3 výšky námoby, značka MAX 2 - obr.5. Vtlakovom hrnci nepouzivaje hrubozrnnu sol, pridavajte iba jemnu sol na konci varenia.V pripadeniektorych potravin:
V priade mazl'avych potravin, ktoré poças varenia zvacchuju svoj objem alebo penia akopnpr. rya, strukoviny, sušena zelenina, kompóty, tekvica, cukety, mrkvy, zemiaky, rybie filé... nenaplnajte hrniec na viac ako 1/3 (MAX 1) jeho objemovej kapacity. Nechajte tlakový hrniec niedolko minut chladnut a potom ho ochladte v studenej vode. Pred každým otvorenímt tlakového hrnca a po skontrolovani, ze bezpečnostné  rúkacelkom dostúpila, ním vždy zláhma potraste, aby ste zabránili prudkému uniku pary, ktorá by vás mohla popálit. Tento krok je obzvlást dôležity pri rychlom uniku pary alebo po ochladení tlakového hrnca v studenej vode (pozri odsek „Koniec varenia v režime Tlakový hrniec").Použivanie naparovacieho košíka*
- Na dno nádoby naleje 75 cl vody (O).V závislosti od modelu:
- Položte trojnožku* (L) a kosík* (J) na dno nádoby. - Pripnite trojnožku* (K) do kosíka* (J), potom umiestnite zestavu na dno nádoby.    - Počas przypravy jegál naparovaním potraviny v naparovacom kosiku nesmú prist do kontaktu s vodou -obr. 6 a 7. Potraviny, ktoré su položené v naparovacom košiku, nikdy nesmú presiahnut'uproven MAX 2.Vybratie a nasadenie prevádkovéhoventilu (A)
Vybratie prevádkového ventilu (A):
- Zarovnajte dražku s indexom polohy ventilu (C)pak, ze stlačite krúžok na prevadzkovom ventil (A). - Vyberte ventil - obr. 11.Nasadenie prevádkového ventilu:
- Nasadte prevádkovy ventil (A) - obr. 8 tak, ze zarovnáte hrot prevádkového ventilu (A)sukazovatel'm polohy ventilu (C)-pozri oproti.  - Zatlačte prevádkový ventil (A), aby zapadol do rúrky na odvod pary. - Zatlačte na piktogramy na prevadzkovom ventile (A)a otočte ním. Počitadlo minút*
Nikdy nepoužívajte Časovač v režime „Hrniec".
Pocitadlo minut bolo navrhnute tak, aby vam pomáhalo pri dosahovani Želaného vysledku varenia co najlepsím nastavením spotreby energia. Automaticky odpočitava Čas varenia od momentu dosiahnutia urovne teploty zodpovedajúcej vareniu v režime „Tlakový hrniec" Počitadlo minút sa musí pripnú't na tlakový hrniec, aby mohlo fungovat. Dbajte na to, aby prevadzkovy ventil (A) pochas varenia pravidelnesycal. Ak nevychadza ziadna para, mierne zvyste vykon zdroja tepla; v opacnom priade znizte vykon zdroja tepla. 1 Zapnutie počitadla minút: stláčte tlacidlo. 2 Nastavte dobu varenia (v minútach). Ak ste nastavili chybny cas varenia, pockajte 4 sekundy, kym plamene neprestanu blikat, potom dlho stlacte tlacidlo, aby ste sa vratili spa' na nulu. 3 Nastavte vykon zdroja tepla na maximalu hodnotu. 4 Ked'tlakovy hrniec dosiahne teplotu varenia, počitadlo minút zazvoni a odpočitavanie Času sa spustí (čiselné hodnoty budú blikat). Zniżenie vykonu zdroja tepla. 5 Na konci varenia počitadlo minút zazvoní. Zvonenie počitadla minut zastavite stlačením tlacidla. Vypnite zdroj tepla.      Dlhe stlacerie tlacidla vrati hodnoty nulu a vypne poctadlominut.Montáž a demontáž počitadla minút*
- Pocitadlo minut (F)namontujete tak, ze najprv vlozite cast's tlaclidom na modul, potom stlacite pre uchytenie protilahlej casti - obr. 12. - Ak chcete počitadlo minút (F)odmontovat, zdvihnite ho a vytiahnite ho. Výmena batérié do počitadla minút*
Bateria do pocitadla minut je bateria gombikoveho typu CR2032. Ak sa symbol neuzaju alebo ak sa na displeji nic nezobrazije, batériu vymente. Zivotnost' baterie zavisio do toho, akocastopouzivate pocitadlo minut. Bateria obsahuje dimetoxymetán c. CAS 110-71-4. Je v sulade s europskou právnou upravou. Za učelom zaistenia vasej bezpečnosti a ochranyživotného prostredia: bateriu neotvarajte a nevystavujte ju vysokým teplotám, likvidujte ju a recyklujte dodrzanim postupu schvaleného pre likvidáciu použitych baterii.  - Nenabijatel'né baterie sa nesmu nabijat. Nemiesajte Rozdielne typy batérii alebo nové a použité batérié. Baterie vkladajte so spravnou polaritou. - Vybité batarie je potrebne zo zariadenia odstranit' a bezpečne zlikvidovat. Ak sa zariadenie nebude dlhsie pouzivat, je vchodne baterie odstraniit. - Napajacie svorky sa nesmú skratovat. Pokračujte na rovnej pracovnej ploche - Bateriu vyberiète potiahnutim za uzáver bâtérié pomocou mince (pozri obrázok oproti). Bateriu vymente. - Tesnenie nasad'te spat na svoje miesto. Dajte polmesiac uaveru baterie pred polmesiac pocitadla minut. Zatvorte uzáver batarie, jemne, mierne tlacte a zarovajte polmesiaczáveru batérié s mesiacom púitadla minút. - Položte celok naplocho na kuchynskú dosku, aby bol uzáver správné vodorovne umiestně. Netlačte silno na uzáver baterie, ked'ho zatvárate. Netlačte dalej za doraz. V pripe straty si mozete zaobstarat nové počitadlo minut vo vsetkých našich autorizovaných strediskách spolocnosti TEFAL.    Počitadlo minút* nedávajte nikdy pod vodu, ani neumývajte v umývačke riadu. Nikdy nepoužívajte Časováč v režime „Hrniec".Pred varením
Pred kaźdymi použitim zlożte prevadzkovy ventil (A) - obr. 11 zrakom skontrolujte,cki kanálik na odvod pary (B) nie je zaneseny - obr. 13. - Skontrolujte, cis je bezpečnostné ventil pohyblivy (pozri odseky „Čistenie" a „Nevyhnutné kontroly pred kaźdymi použitím") - obr. 18. Pridajte prisady a kvapalinu. Zatvortelakovyhrniec-obr.2 V pripe de problemov so zatvorenim vyrobku: umiestnite tesnenie pod vodu a dajte ho naspat naPokrievku, ale neutrite ho - obr. 19 a opatrne ho umiestnite do dražok naPokrievke - obr. 15. - Nasadenie prévádkového ventilu (A)- obr.8. Varenie v režime „Tlakový hrniec"
- Prevádkový ventil (A) otočte do polohy „Tlakový hrniec" - obr. 9. - Ubezpečte sa, ze tlakový hrniec je správné zatvorený, až potom ho spustite - obr.2 - Položte tlakový hrniec na zdroj tepla, potom nastavte na maximálny vykon. V priade modelov s počitadlom minút : nastavte dobu varenia uvedenú v recepte (pozri odsek „Použivanie počitadla minút"). - Klepot a chrlenie, ktoré vydáva bezpečnostrá rúrka su normálne - umožnujú unik vzduchu pred varením.Počas varenia v režime „Tlakový hrniec"
- Ked' z prevadzkového ventilu (A) vychádza plynulý prud pary a počut pravidelný zvuk (PŠŠST), znižte vykon zdroja tepla. - Začnite odpočitavat dobu varenia uvedenú v recepte. - Dbajte o to, aby ventil počas varenia pravidelne syčal. Ak vychádza málo pary, mierne zvyšte vykon zdroja tepla, v opačnom pripad eznížte vykon zdroja tepla.Ukončenie varenia v režime „Tlakový hrniec"
Vypustenie pary:
- Po vypnutí zdroja tepla máté dve moznosti: - Postupná dekompresa: Postupne otáčajte prevádkovy ventil (A), aby ste skončili oproti značke na piktograme. obr. 10.  Rychla dekompressia v studenej vode: nalejte do drezu studenú vodu a ponorte donej spodnú Čast tlakového hrnca,Pokym bezpečnostná rurka nezostúpi - obr.14.Ked' bezpečnostná rurka (D)znovu klesne, tlakový hrniec už nie je pod tlakom.Prevádkový ventil (A)otočte do polohy  Fáza 1  Fáza 2 - Tlakovy hrniec możete otvorit - obr. 3. V pripeade problemov s otvorenim vyrobku: umiestnite tesnenie pod vodu a dajte ho naspat naPokrievku, ale neutrite ho -OCR. 19 a opatrne ho vlozte do dražok naPokrievke -OCR. 15. Ked' pochas uvolnovania pary spozorujete nezvyčajné vystrekovanie, dajte prevádkový ventil (A) do polohy varenia režimu „Tlakový hrniec" potom vykonajte rychlu dekompressiu v studenej vode. Ak bezpečnostné rúrka (D) nezostupuje, najeje do drezu studenú vodu a ponorte donej spodné Čast tlakového hrnca,Pokým bezpečnostné rúrka nezostúpi - obr. 14.S bezpečnostnou rúrkou nikdy nemanipulujte.
V pripline mazlavych potravin, ktoré počas varenia zvacchuju svoj objem alebo penia, ako napr. ryža, strukoviny, sušena zelenina alebo kompóty, tekvica, cukety, mrkvy, zemiaky, rybie filé... nenaplănajte hrniec na viac aka 1/3 (MAX 1) jeho objemovej kapacity. Nechajte tlakový hrniec niekolko minút chladnú t a potom ho ochladte v studenej vode. Pred každým otvorením tlakového hrnca a pos skontrolovani, ze bezpečnostné rurka celkom dostúpila, nim vždy zlahma potraste, aby ste zabránili prudkému uniku pary, ktorá by vás mohla popálit. Tento krok je obzvlást doležity pri rychlom uniku pary alebo po ochladení tlakového hrnca v studenej vode. V pripline polievok vám odporucame vykonat rychl udekompresiu v studenej vode (pozri odsek „Koniec varenia" v režime „Tlakový hrniec"). Varenie v režime „Hrniec“*
- Prevadzkovy ventil (A)otocte do polohy „Hrniec". Na otocenie pouzite dostatochnu silu na presunutie aktualneho zarezu do polohy dekompressie. Ubezpečte sa, ze tlakový hrniec je správné zatvorený -obr. 2, až potom ho spustite. - Položte tlakový hrniec na zdroj tepla, potom nastavte na maximálny vykon. Zacnite odpoctavit dobu varenia uvedenv recepte. V režime „Hrniec" mözete tlakový hrniec kedykolvek otvorit za účelom mieszania, kontroly varenia alebo pridania prisad. V pripeade problemov s otvorenim vyrobku: umiestnite tesnenie pod vodu a dajte ho naspat naPokrievku, ale neutrite ho - obr. 19 a opatrne ho vlozte do dražok naPokrievke - obr. 15. Ak je zdroj tepla nastaveny na priliš vytoký vykon, moze sa stat, ze sa tlakový hrniec zablokuje (bezpečnostný ventil (D)vystúpi a zablokuje otvorenie) a rückou naPokrievke nebude mozné hybat ani tlakový hrniec sa nebude dat otvorit. V tomto priade znizte vykon zdroja tepla alebo ho vypnite. V priade liatinovych varnych dosiek, odstrante tlakový hrniec zo zdroja tepla. Pre modely s neprilnavym povrchom: nepoužívajte šlahače ani ostre Čkovové prislušenstvo. Nikdy neodkvapkávajte vase kuchynské náradie o okraj  nádoby, pretoze by mohlo dôjst' k obitiu okraja, co by mohlo viest' kunikaniu obsahu tlakového hrnca. - Nikdy nezohrievajte mastné potraviny až po ich zuholnatenie. Výpary z varenia možu byt nebezpečné pre zvierátá s citlivým dychacím systémom, akou su vtáky. Ak ste chovatel'om vtáka, zabrante jeho prístupu do kuchyne.Bezpečnost
Tento tlakový hrniec je vybavený niedolkými bezpečnostnými systémami:- Bezpečnost pri zatvárani:
- Ak jePokrievka nesprávne umiestné alebo ak zabadnete zložit rúčku naPokrievke, dojde k uniku pary na urovn bezpečnostnej rúrky (D) tlakového hrnca, co mu znemožni ziskat dostatočný tlak.- Bezpečnost' pri otvarani:
- Ak je tlakový hrniec pod tlakom, bezpečnostné rúrka (D) je v hornej polohe a rúčka naPokrievke na otvaranie/ zatvaranie (G) sa nesmie použit. -Tlakovy hrniec nikdy neotvarajte nihilu.Nikdy netlacte na bezpećnostné rúrku (D).
- Uistite sa, ze vnutorny tlak znovu klesol a skontrolujte, ci je bezpečnostná rúrka (D) v dolnej polohe. - Rúčky na nádobe predstavuju bezpečnostné privky. Nikdy ich nevymieñajte sami. Nikdy nepoužívajte iné modely rúčok. - Ak ste sklopili rúčku naPokrievke na otvaranie/zatvaranie (G) do zvislej polohy, kad'bol tlakový hrniec šte pod tlakom, nemóžete ho otvorit. Tato funkcia predstavuje dodatočné bezpečnostné prvok. - Znovu sklopte rúčku naPokrievke do vodorovnej polohy a počkajte, kým bezpečnostná rúrka (D) neprejde do dolnej polohy.Dva pretlakové bezpečnostné systémy:
- Préz zariadenie: bezpečnostné ventil (E) znižuje tlak - obr. 20 - Druhé zariadenie: tesnenie nechávaunikat paru pomedziPokrievku a nadobu - obr.20.V pripe, ze sa spusti jeder z pretlakovych bezpecnostnych systemov:
- vypnite zdroj tepla. Tlakovy hrniec nechajte uplne vychladnut. - Otvorte ho. - Skontrolujte a vycistite prevadzkovy ventil (A), kanálik na odvod pary (B), bezpečnostné ventil (E) a tesnenie (I) - obr. 16 - 17- 18. Pozri odseky „Cistenie" a „Nevyhnutné kontroly pred každým použitím". - Ak aj po vykonani tychto kontrolnych a Čistiacich ukonov dochodzak unikom alebo zariadenie nefunguje, zaneste ho do autorizovaného servisného strediska spolocnosti TEFAL.Odporučania týkajúce sa používania
1 - Para unikajuca z prevadzkového ventilu je horúca. Pozor na vystrekujúcu paru. 2 - Ak sa bezpečnostné rúrka raz zdvihne, tlakový hrniec už nemožete otvorit. 3 - Ako pri používani inych varních spotrebičov, aj pri používani tlakóho hrnca dávajte velký pozor, ak ho používate v blízkosti detí. 4 - Pri premiestnovani tlakového hrnca používajte obe rúčky na nádobe. 5 - Potraviny v tlakovom hrnci nenechavajte dlho. Tlakovy hrniec nikdy neprenášajte držaním za rúčku naPokrievke. 6 - Nikdy nepoužívajte bieliaci prostriedok ani chlórované prostriedky, mohla by sa poskodit kvalita nehrdzavejúcej ocele. 7 - Pokrievku nikdy nenechávajte namočenú vo vode. 8 - Tesnenie vymieñajte kaźdý rok alebo ked je prasknute. 9 - Tlakový hrniec Čistite vždy za studena a prázdny. 10 - Každych 10 rokov je nevyhnutné nechat tlakový hrniec skontrolová v autorizovanom servisnom stredisku spolocnosti TEFAL.Cistenie
Z dovodu zachovania správnéj prevalzky zariadenia po každom použití dodržte tieto pokyny týkajúce sa Čistenia a udžby. Zhnednutie a škrabance, ku ktoym moze dojst'v dosedku dlhodobého použivania, neovplynuñuju negávné prevadzku. Opotrebovanie vonkajšieho povrchu (v závislostiod modelu) v dosledku kontaktu sPokrevkou na nádobe je normálne. V pripline tlakovych hrncovs neprilnavym povrchom (v závislosti od modelu): jemné škrabance a odreniny v dosledku používania tlakového hrnca neovplyvnujú neprilnavé vastnosti povrchu. - Tlakový hrniec po každom použití umyte vlažnouvodou ačistiacim prostriedkom na riad. Rovnakým spó sobom postupujte aj pri Čistení kosíka*. - Nepoužívajte bieliaci prostriedok ani chlórované Čistiace prostriedky. - Nezohrievajte prázdnu námobu.Čistenie vnútra nádoby z nehrdzavejúcej ocele:
Vnutro umyte spongiou na riad a cistiacim prostriedkom na riad. - Ak sa na vnútornej strane nádoby z nehrdzavejúcej ocele nachádzaju duhové odrazy alebo biele stopy (mineralne usadeniny), nádobu umyte bielym octom.Čistenie vnútra nádoby z hliníka s neprilnavým povrchom:
Zivotnost'vyrobku predlzite jeho ručným umyvaním. - Umyte ho teplou vodou a chistiacim prostriedkom na riad. Nepoužívajte Čistiaci prášok ani špongie s drsným povrchom. - Ak ste pripalili nejaku potravinu, naplnte nadobu teplou vodou a nechajte odmočit. Potom ho umyte Čistiacim prostriedkom na riad.Čistenie vonkajšej strany nádoby:
- Umyte ju spongiou a cistiacim prostriedkom na riad. Nádobuz nehrdzavejúcej ocele a kosík možete umývat'v umývačke riadu. Nadobu s neprilhavym povrchom (v závislosti od modelu) nevkladajte do umyvačky riadu, pretože Čistiace prostriedky vo forme tabliet ob sahuju agresívné a korozívné látky, ktoré niesz uvhodné pre Časti vyrobené zhliníka. Intenzívne použí vanie nádoby s neprilna vym povrch om (v závislosti od modelu) moze mierne zmeni t'farbu p ovrchu (zažltnutie, skrwny).ČisteniePokrievky:
- Pokrievku umyte špongiou a Čistiacim prostriedkom na riad. Veko dajte do zvislej polohy pre odkvapkanie zvyšnejvo dy medzi kovovymi a plastovymičastami veka.Čistenie tesneniaPokrievky:
- Po každom varení očistite tesnenie (I) a jeho uloženie. - Ak chcete znovu nasadit tesnenie, pozrite si - obr. 15 a dbajte na to, aby tesnenie dobre zapadlo do každej dražky naPokrievke.Čistenie prevádkového ventilu (A):
- Odoberte prevádkovy ventil (A) - obr. 11. - Prevadzkovy ventil (A) umyte prudom vody z vodovodu - obr. 16. - Skontrolujte jeho pohyblivost: pozrite si ilustraciu oproti. Po zloženi prevádkového ventilu (A), tesnenia (I) a počitadla minút* (F) možetePokrievku umývat'v umývačke riadu.  Prevádkový ventil (A), tesnenie (I), Časovac* (F) ani nádobu s neprilnavý m povrchom nikdy nedávajte do umyvačky riadu. Čistenie kanálika na odvod pary (B) nachadzajúceho sa naPokrievke: Zložteventil(A)-obr.11. Zrakom skontrolujte, ci je kanalik na odvod pary uvolnény a okruhly - obr. 13.V priade potreby ho očistite šparadlom - obr. 17 a oplachnite ho. Čistenie bezpečnostného ventilu (E): - Cast bezpečnostného ventilu, ktorá sa nachadza na vnútornej stranePokrievky, umytevodou. - Skontrolujte jeho správnu prevádzku a vatovou tycinkou silno zatlačte na gulóčku, ktorá sa musí pohybovat' - obr. 18. Pozri odsek,"Nevyhnutné kontroly pred každým použitím". Cistenie počitadla minút* (F): - Používajte Čistú a suchú handricku. Nepoužívajte Rozpústadlo. - Počitadlo minút nedávajte nikdy pod vodu, ani neumývajte v umývačke riadu.Udrzba
Výmena tesnenia tlakového hrnca: Vymienejte tesnenie tlakového hrnca kázdy rok alebo ke'd'je prasknuté. Vždy používajte originálne tesnenie spolocnosti TEFAL vchodné pre príslušné model (pozri odsek „Príslušenstvo"). - Ak chcete znovu nasadit tesnenie, pozrite si - obr. 15 a dbajte na to, aby tesnenie dobre zapadlo do každej dražky naPokrievke. Odkladanie tlakového hrnca: - Pokrievku vratte spat na nadobu. - Mechanizmus otvorenia/zatvorenia tlakového hrnca si okrem Čistenia nevyžaduje osobitné udřžbu. Po 10 rokoch používania je nevyhnutné nechat tlakový hrniec skontrolováť v autorizovanom servisnom stredisku spolocnosti TEFAL.Príslušenstvo TEFAL
- Príslušenstvo k tlakovému hrncu, ktoré je dostupné v obchodoch:| Príslušenstvo Referencia | ||
| Tesnenie | 3/4/4,5/6 l: vonkajši priemer tesnenia: 24 cm | X1010008 |
| 5/7,5/9 l: vonkajši priemer tesnenia: 27 cm | X1010007 | |
| Naparovací košík* | 3/4,5/4/6 l: na nádobu s priemerom 22 cm | 792185 |
| 5/7,5/9 l: na nádobu s priemerom 24 cm | 792654 | |
| Trojnožka* (L) | 792691 | |
| Počítadlo minút* | X1060007 | |
Vlastnosti
Priemer dna tlakového hrnca - reference
| Objem | Ø nádoby | Ø dna | Clipso Minut' Perfect / Easy | Clipso Minut' Duo couleur | Clipso Minut' Duo Gourmet | Materiál nádoby |
| 3 L 22 cm 15.5 cm P46205 - - | Nehrdzavejú ca ocel' | |||||
| 3 L 22 cm 18 cm -- P46605 | ||||||
| 4 L 22 cm 14 cm - P46042 - | Hliníkový povrch | |||||
| 4.5 L 22 cm 15.5 cm P46206 - - | Nehrdzavejú ca ocel' | |||||
| 5 L 24 cm 14 cm - P46051 - | Hliníkový povrch | |||||
| 5.2 L 24 cm 20 cm - - P46654 | Nehrdzavejúc a ocel' | |||||
| 7.5 L 24 cm 18 cm P46248 - - | ||||||
| 9 L 24 cm 18 cm P46249 - - | ||||||
| Set 5 L 24 cm 14 cm P46353 | - | |||||
Normativne informácie:
Prevadzkovytlak:65 kPa Maximálny bezpečnostné tlak: 120 kPaKompatibilné zdroje tepla
PLYNELEKTRICKYPRUD (Liatinová doska) ELEKTRICKY PRUD sklokeramická salava ebo halogenová platna) ELEKTRICKY PRUD (Sklokeramicka indukcnak platna) ELEKTRICKY PRUD (Spiralovy varic)      - Tlakový hrniec možete používat na vsetkych tepelnych zdrojoch určenych na varenie, vrátane indukčnej platne. Pri elektrickej platni používajte platnu s rovnákym alebo s mensím priemerom ako je priemer tlakového hrnca. Pri sklokeramickej platni sa ubezpečte, Či je dno nádoby Čisté a suché. Pri plynovom sporaku plamene nsmu presahovat priemer nadoby. Pri všetkych druhoch sporákov dbajte na to, aby bol tlakový hrniec v strede.Záruka
V pripe, ze sa nadoba z nehrdzavejucej ocele noveho tlakovheho hrnca TEFAL pouziva na ucely uvedené v navode na obsluhu, poskytuje sa zaruka 10rokov na: -akukolvek chybu tykajucu sa kovovej konstrukcie nadoby, -akekolvek predcasne poskodenie zakladneho kovu. - Na vsetky ostatné materialy nádoby a diely tlakového hrnca sa vztáhuje záruka na vyrobné chyby a chyby materialu, a to počas záručnej doby definovanej zákonom, ktorý je v platnosti v krajine nakupo, od datumu nakupo. Tato zmluvná záruka platí odo dña nákupu po predloženiPokladnicného bločku alebo faktúry. Záruka nepokryva: - skrabance ani zmenu farby spôsobéne opotrebovaním - platí to pre nádoby s neprilnavým povrchom. - skrabance, ktoré vznikli následkom kontaktuPokrievky s nádobou s neprilnavym pourchom. - poskodenia, ku ktorym doslo v dosledku nedodrzania dolezitych pokynov aleb gKnedbalého použivania, majma: - náraz, pád, použivanie v rúre a pod. Tuto záruku možu poskytovat iba autorizované servisné strediská spolocnosti TFEAL. - Adresu najblizsieho autorizovaného servisného strediska spolocnosti TEFAL ziskate na bezplatnom cisle.Predpísané značenie
| Značenie Mesto | |
| Obchodná značka NaPokrievke | |
| Rok a vyrobná série Referenčný model Maximálny bezpečnostné tlak (PS) Prevádkový tlak (PF) | NaPokrievke |
| Objem Na vonkajšej strane dna nádoby. | |
| Poštová adresa vyrobcu Na vonkajšej strane dna nádoby. |
- Chráimeživotné prostredie!
 ①Vás prístroj obsahuje ve'la zhodnotitel'nych alebo recyklovatel'nych materialov. Likvidujte ho na zbernom mieste, aby doslo k jeho spravnemu spracovaniu.Odpovede spoločnosti TEFAL na vaše otázk
| Problémy | Odporúčania |
| Ak sa otváranie a/alebo zatváranie stane tăzkým: | • Vyberte tesnenie a opláchnite pod vodou. • Dajte ho naspăť naPokrievku, ale neutrite ho - obr. 19. |
| Ak nemóžete zatvorit'Pokrievku: | • Skontrolujte, ā je rúčka naPokrievke vo zvislej polohe. • Skontrolujte, ā je správné namontované tesnenie (pozri odsek „Čistenie a údržba”). • Skontrolujte, ā jePokrievka správné nasadená tak, jak je to uvedené na - obr. 1. • Umiestnite tesnenie pod vodu a dajte ho naspăť naPokrievku, ale neutrite ho - obr. 19 a opatrne ho vložte do drážok naPokrievke - obr. 15. |
| Ak sa tlakový hrniec zohrieval pod tlakom bez tekutiny: | Tlakový hrniec nechajte skontrolovat'v autorizovanom servisnom stredisku spoločnosti TEFAL. |
| Ak bezpečnostné rúrkavydáva klepot alebo chrlenie: | Počas pryích minút ide o normálny jav: umоžnéuje únik vzduchu pred varením. |
| Ak bezpečnostné rúrkavydúpila a ak počas varenia z ventilu nevychodzza ziadna para: | Počas pryích minút ide o normálny jav. V prípad, ĸe tento jav pretrváva, skontrolujte: - ā je zdroj tepla dostykonny, v opačnom prípad zvyšte vykon. - ā je v nádobe dostatočné množstvo tekutiny. - ā je preváždkový ventil (A) v polohe na doraz na - ā je tlakový hrniec dobre zatvorený. - ā nie je poskodené tesnenie alebo okraj nádoby. - ā je tesnenie správné umiestně. |
| Ak ukazovatel' prítomnosti tlaku nevystúpile a ak počas varenia z ventilu nevychodzza ziadna para: | Počas pryích minút ide o normálny jav. V prípad, ĸe tento jav pretrváva, najeje do drezu stu- denú vodu a ponorte donej spodné ĸast'tlakového hrnca, pokým bezpečnostné rúrká (D) nezostúpi. Vycistite preváždkový ventil (A) - obr. 15 a kanálik na odvod pary - obr. 17 a skontrolujte, ā gulôčka bezpečnostného ventilu hladko zapadá - obr. 16. |
| Ak para uniká po obvodePokrievky arurka je v spodnejpolohe, skontrolujte: | Či je veko správné zatvorené. Umiestnienie tesnenia naPokrievke. Či je tesnenie v bezchymbom stave a v pripadepotreby ho vyměne. Či je ČižtáPokrievka, tesnenie a priestor, do ktorého sa vkladá tesnenie doPokrievky. Či je okraj námody v dobrom stave. |
| AkPokrievkunemóžete otvorit: | Skontrolujte, Či je bezpečnostné rurka (D)v dolnejpolohe.Znižte tlak: najeje do drezu studenú vodu aponorte do nej spodné Čast tlakového hrnca,Pokým bezpečnostné rurka bezostúpi.S bezpečnostnéu rurkou nikdy nemanipulujte (D)Umiestnite tesnenie pod vodu a dajte ho naspatnaPokrievku, ale neutrite ho - obr. 19 a 15 opatrne ho vložte do drážok naPokrievkopevázskový ventil (A)otočte do polohy |
| Ak potraviny Nie suuvarené alebo ak su spálené, skontrolujte: | Dobu varenia.Výkon zdroja tepla.Správn fungčnost Čpreždzkového ventilu (A).Množstvo tekutiny. |
| Ak sa potraviny tllakovom hrnci spália: | Nádobu pred umývaním nechajte istý Časnamočenu.Nikdy nepoužívajte bieliaci prostriedok ani chlórované Čistace prostriedky. |
| Ak sa spustí jederzbepečnostnych systémov: | Vypnite zdroj tepla.Tlakový hrniec nepremiestnéjte a nechajte ho vychladnúť. Počkajte, kým bezpečnostné rurkaneklesne a potom ho otvorte.Skontrolujte a očistite preždzkový ventil (A), rurkna odvod pary, bezpečnostnéventil a tesnenie.Uistite sa, Že dodržiavate podmienky naplenia tlakového hrnca.Ak problém pretréváva, zariadenie nechajteskontrolováť v autorizovanom servisnom strediskTEFAL. |
| Ak objavité stopy pooxidáci: | Použitie nehrdzavejúcej ocele s vysokým výkononani vo výnimočných prípadoch nezabrání výskytu oxidácie. Ak spožorujete stopy po oxidáci, predopátovým použitím tlakového hrnca odstránteich pomocou špongie s abrazívnym povrchom. |
TABULKA S INFORMÁCIAMIO VARENÍ
Zelenina
Zelenina (ČERSTVÁ)
PARA
Ingrediencie vlozené do kosika na naparvanie so 750 ml vody na dnetlakoveho hrnca.  PONORENIE
Ingrediencie vlozené do vody bez kosika.STRUKOVINY PONORENIE
Bez kosika.  | Artićoky, 2 celé, každý 600 g (ponorenie) 30 až 35 minút | |
| Baklažány, osúpané a nakrájané na plátky (3 mm), 850 g (para) | 10 až 12 minút |
| Biela repa,Pokrájaná na kocky (500 g) (para) 14 až 16 minút | |
| Brokolica Rozobrata na ružicky 600 g (para) 9 až 11 minút | |
| Čakanka rozkrojená na polovicu (900 g) (para) 14 až | 16 minút |
| Červená repa, nakrájaná na štvrtiny (ponorenie) | 20 až 25 minút (podla velkosti) |
| Cibulky na nakladanie (para) 7 až 8 minút | |
| Cuketa nakrájaná na kolieska (3 mm) 600 g (para) 12 | až 15 minút |
| Fenikel nakrájaný na pásiky (600 g) (para) 6 až 9 minút | |
| Hlávková kapusta, nakrájaná, 500 g (ponorenie) | 5 až 6 minút |
| Hrach, lúpaný a polený 250 g (ponorenie) | 18 až 20 minút |
| Hrášok (para) | 6 až 8 minút |
| Huby, nakrájané na plátky 800 g (ponorenie) | 4 až 5 minút |
| Kapie Rozkrojené na polovice (550 g) (para) | 14 až 16 minút |
| Karfiol Rozobrátý na ružicky 600 g (para) 10 až 12 minút | |
| Mangold, nakrájaný (2 cm) 700 g (para) | 15 až 17 minút |
| Mladá zelená fazulka (600 g) (para) | 10 až 12 minút |
| Mrkva nakrájaná na kolieska (3 mm) 600 g (para) | 17 až 19 minút |
| Pór, biela Čast', vcelku 650 g (para) | 9 až 11 minút |
| Ružickový kel (para) | 10 až 12 minút |
| Šošovica, zelená 250 g (ponorenie) | 14 až 16 minút |
| Šparglă, biela (para) | 5 až 6 minút |
| Špenát (para) | 3 až 4 minúty |
| Suchá biela fazulă 250 g (ponorenie) | 35 až 40 minút |
| Tekvica, nakrájaná na kúsky (3 až 5 cm) 600 g (para) | 13 až 18 minút |
| Zeler, nakrájaný na plátky 600 g (ponorenie) | 7 až 9 minút |
| Zemiaky Rozkrojené na polovicu (950 g) (para) | 20 až 25 minút (podla velkosti) |
| PONORENIE Bez košíka. MAX 1 | MNOŽSTVO VODY | MNOŽSTVO RYŽE | ČAS VARENIA | |
| 2 OSOBY 400 ml/2 šáky 150 g/1 šálka | 7 až 8 minút4 OSOBY | |||
| 500 ml/2,5 šálky | 250 g/2 šálky | |||
| 6 OSÔB | 700 ml/3,5 šálky | 375 g/3 šálky | ||
Mäso/ryby
| ČERSTVÉ MRAZENÉ | |
| Bravčové karé (0,8 kg, priemer 8 – 10 cm) 30 až | 35 minút 1 h 5 minút |
| Bravčové rezne: 2 kúsky po 350 g 13 až 15 minút | 26 až 29 minút |
| Brojler: 2 (1,3 kg) 23 až 25 minút 40 až 45 minút | |
| Filé z morského Čerta (1 kg), kúsky s velkostou 75 g | 5 až 6 minút 7 až |
| Hovádzia rostenka (1 kg, priemer 8 – 11 cm) 30 | až 35 minút 45 až 50 minút |
| Jahřnatie lýtka: 2 (0,95 kg) 40 až 45 minút 1 h 5 | minút až 1 h 15 minút |
| Kačka (1,8 kg) | 45 až 47 minút 50 až 55 minút |
| Králik (1,5 kg, kúsky) | 8 až 9 minút |
| Kura (1,35 kg) | 23 až 25 minút |
| Prepelica: 4 | 9 až 10 minút |
| Steaky z lososa: 4 (0,8 kg) | 5 až 6 minút 7 až 8 minút |
| Steaky z tuniaka: 4 (0,7 kg) | 5 až 6 minút 7 až 9 minút |
| Telacie karé (0,8 kg, priemer 5 – 7 cm) | 17 až 19 minút |
| Telacie rezne: 0,7 kg | 17 až 21 minút 33 až 38 minút |
| Telacie závitky: 4 10 až 12 minút | x |
PoMeMBna oPozorila
Pred uporabo lonca na zvišan tlak skrbno preberite vsa navodila in vselej upoštevajte ta "Uputstvo za upotrebu".
Pri uporabi, ki ni skladna, lahko pride do poškodb.
Zaradi văs e varnosti je ta aparat v skladu z veljavnimi standardi in predpisi: - Direktiva o tlačni opremi - materiali, namenjeni za stik zŽivili - varovanje okolja.| OBVEZNA PREVERJANJA PRED VSAKO UPORABO | PREVERITE s prostim očesom na dnevni svetlobi preverite, da vodil za izpuh pare ni zamašeno - skica 13. ali jePoklopec varnostnega ventilapremićen - skica 18. ali je tesniloPokrova namešćeno pod vsako režo pokrova - skica 15. ali so ročaji na posodi pravilno namešćeni. Ročaji posod so varnostni deli. Nikoli jih ne zamenjujte sami. |
| VEDN0 UPOŠTEVAJTE NASLEDNJE KOLICINE POLNJENJA | Lonca na zvišan tlak nikoli ne uporabljajte brez tekočine saj ga lahko s tem huje poškodujete. Zagotovite zadostno količino tekočine v loncu med kuhanjem. Najmanj 25 cl - skica 4. Največ 2/3 višine posode, oznaka MAX 2 - skica 5. Med kuhanjem na paro Živila v košari za paro ne smejo biti v stiku z vodo - skica 6 in 7. Največ 1/3 (MAX 1) za mehka Živila, ki se med kuhanjem razširijo in/ali penijo, kot so riž, stročnice, dehidrirana zelenjava, kompoti, buče, bučke, korenje, krompir, fileji ribe ... Živila, ki se nahajao v posodi za kuhanje s paro, se ne smejo dotikati najvišje ravni MAX 2 posode. |
| PRED IN MED KUHANJEM | Ne dovolite otrokom, da se priblizajo loncu na zvišan tlak, ko ga uporabljate. Med kuhanjem je v loncu vzpostavljen zvišan tlak. Zaradi nepravilne uporabe lahko utrpite opekline. Prepričajte se, da je lonec na zvišan tlak primerno zaprt, preden pričnete s kuhanjem. (Glejte razdelek «Zapiranje«.) Med kuhanjem pazite, da ventil stalno šušlja. Če ni dovolj pare, ki izpareva, zmanjsajte tlak v loncu in preverite, ali je njem dovolj tekoviçine in ali je vodilo za izpuh pare zamašeno. Če po teh preverjanjih še vedno ne izhaja dovolj pare, rahlo povečajte moč toplotnega vira. Ne kuhanjem Živil, ki bi lahko povzrociila zamašitev vodil varnostnih sestavnih delov: - borovnice - ječmenček - ovseni kosmiči - grah - rezanci, makaroni, špageti - rabarbara - rdeće grozdičje V loncu na zvišan tlak nikoli ne kuhanjem mlečnih Jedi. V loncu na zvišan tlak iz nerjavecega jegla ne uporabljajte grobe soli, temveć ob koncu kuhanja dodajte fino sol. Tako preprečite pojav "poškodb", ki bi lahko spremenile dno lonca na zvišan tlak. Lonca na zvišan tlak ne uporabljajte za cvrtje v olju pod tlakom. Lonec na zvišan tlak uporabljajte le v namene, za katere je bil izdelan. Lonca na zvišan tlak ne postavljajte v ogreto pečico. Nikoli ne vstavljajte aluminijevega papirja za peko v model lonca na zvišan tlak. Nikoli ne vstavljajte plastičnega sloja v lonec na zvišan tlak. Alkoholni hlapi so vnetljivi. Preden namestitePokrov, maj alkohol vre priblizno dve minuti. Kadar vašе{jedi vsebumjo alkoho, lonec ves šas dobro nadzirajte. Uporabljajte ustrezno kuhališće, skladno z navodili za uporabo. |
| PO KUHANJU... | Za modele s premazom proti sprijemanju: ne uporabljaje kovinskih oz. abrazivnih kuhinjskih pripomočkov in metric. Kuhinjskih pripomočkov ne odcejaje tak, da z njimi trkate po robu posode, saj jo lahko s tem poškodujete in povzročite pušanje. Obratovalni ventil (A)postopoma obračajte in pri tem po vaši Želji izberite hitrost zmanješevanja tlaka vse do nastavitvene točke piktograma kica 10. Če opazite nenavadno uhajanje pare, obratovalni ventil (A)znova namestite v položaj ekonom lonec, nato pa tlak hitro zmanjšajte s pomočjo hladne vode - skica 14. Če se varnostni zativ (D)ne spusti postavite ekonom lonec v hladno vodo - skica 14. Nikoli ne posegajte v ta varnostni klin. Po kuhanju mesa, ki vsebujejo kožo (npr. goveji jezik) in lahko pod tlakom nabrekne, mesa ne zbadajte, dokler je koža napiihnjena, saj se lahko poparite. Pred kuhanjem meso prebodite. Za mehkaŽivila, ki se med kuhanjem razširijo in/ali penijo, kot so riz, stročnice, dehidrirana zelenjava, kompoti, buče, bučke, korenje, krompir, fileji ribe ... pustite lonec nekaj minut, da se ohladi, nato pa ga dodatno ohladite v hladni vodi. Lonec pred vsakim odpiranjem rahlo in previdno stresite, potem ko se prepričate, da se je varnostni zativ spustil. S tem se izognete uhajanju vroče pare.To je zlasti pomembno pri hitrem uhajanju pare ali po ohlajanju v hladni vodi. Kadar je lonec pod tlakom, ga premikajte izjemno pazljivo. Ne dotikajte se vročih povrsin. Uporabljaje ročaje in gumbe. Po potrebi uporabite rokavice. Pri kuhanju juh vam svetujemo, da tlak na hitro zmanjšate v hladni vodi (gleje poglavje "Zaključek kuhanja v načinu 'Ekonom lonec"). Prepričajte se, da je ventil v položaju za zmanjšanje tlaka, preden odprete lonec na zvišan tlak. Varnostni klin (D) mora biti v spušćenem položaju. Nikoli ne poskušajte lonca na zvišan tlak odpreti na silo. Prepričajte se, da je tlak v notranjosti lonca padel. Varnostni klin (D)mora biti v spušćenem položaju. (Oglejte si razdelek «Varnost»). |
| VZDRŽEVANJE | Če uzotovite, da je dolocen del lonca na zvišan tlak zlomljen ali razpokan, ga nikakor ne poskujaste odpreti, Če je zaprt, temveć počakajte, da se popolnoma ohladi, preden ga odomaknete, ne uporabljajte ga već in ga vrnite na pooblašćeni servis. Ne posegajte v varnostni system lonca, razen na način, ki je dolocen v navodilih za Čišćenje in vzdřževanje. Uporabljajte le originalne rezervne dele proizvajalca TEFAL, ki odgovarjazo vašemu modelu. Predvsem pa uporabljajte le posodo inPokrov proizvajalca TEFAL. Pred kuhanjem in po njem v loncu na zvišan tlak ne shranjujte kislih ali slanih Živil, sjag lahko na ta način poškodujete. Lonec po vsaki uporabi očistite in sperite. Obratovalnega ventilà (A), tesnila (I), Časovnika* (F), niti posode s prevalko proti prijemanju nikoli ne perite v pomivalnem stroju. Časovnika* (F)nikoli ne perite pod vodo. Nikoli ne uporabitedezinfekcijskh sredstev ali kloriranih proizvodov, sjahlo le-ti poškodujejo nerjaveće jeglo. Pokrova ne pušćajte namočenegа v vodo. Tesnilo zamenjaje vsako leto ali takoj, Če se na njem pojaví zareza. Po 10 letih uporabe je nujno potreben pregled lonca na zvišan tlak v enem izmed pooblašćenih servisov TEFAL. Če Želite shraniti lonec na zvišan tlak: ZavrtitePokrov na posodi, da preprečite prezgodnjo obrabo tesnilaPokrova. |
SHRANITE TA NAVODILA
Sestavni deli (gleje opisno shemo)
A. Obratovalni ventil B. Vodilo za izpuh pare C. Oznaka polożaja ventila D. Varnostni klin (oglejte si razdelek «Varnost«) E. Varnostni ventil F. Minutni stevec* G. RočajPokrova H. Pokrov I. Tesnilo J. Kosara za kuhanje s paro* K./ L. Trinožni podstavek* M. Ročaj posode N. Maksimalni nivo polnjenja O. PosodaObvezna preverjanja pred vsako uporabo
Preverjanje obratovalnega ventila
 - Prepričajte se, da odprtina na obratovalnem ventilu ni blokirana (glejte poglavje "Odstranitev in delovanje obratovalnega ventila").Preverjanje varnostega ventila
 Preverite, ali se lahko kroglica varnostega ventila premika (uporabite palicico).Uporaba
 Kuhanje v načinu lonec na zvišan tlak  Kuhanje v načinu litoželezne posode*  Znizanje tlakaOdpiranje
- Nagnite ročajPokrova iz vodoravnega položaja v navpični položaj - skica 3 Pokrov se obráča. DvignitePokrov. V primeru težav pri odpiranju izdelka tesnilo postavite pod vodo in ga ponomovno namestite naPokrov, ne da bi ga osušili -sl.19, pri tem pa pazite, da je pravilno namescen glede na zarezePokrova-sl.15.Zapiranje
- Prepričaite se, da je ročajPokrova v navpičnem položaju. - NamestitePokrov na posodo, kot je prikazano na skici 1, pri tem pa poravnaite plasticen del z rocaji posode. Ročaj posode potisnite navzdol iz navpičnega v yodorayni položai - skica 2 - Pokrov se obraca.Če ne morete zapretiPokrova:
Preverite, ali je tesnilo pravilno namesceno in ali jePokrov pravilno postavljen. V primeru težav pri zapiranju izdelka tesnilo postavite pod vodo in ga ponovno namestite naPokrov, ne da bi ga osusili -sl.19, pri tem pa pazite, da je pravlno namescen glede na zarezePokrova-sl.15.Prva uporaba
- Za modele s prevalko proti prijemanju: operite in celotno povrsino notranje prevalke rahlo naoljite z Jedilnim oljem.Odvisno od modela:
Stojalo\* (L)in kosaro\* (J)postavite na dno posode. - Stojalo\*K)pripnite na kosaro\*J), nato pa vse skupaj postavite na dno posode. Posodo (O) 2/3 (MAX 2) napolnite z vodo - sl. 5. Zaprite lonec na zvišan tlak. - Poravnajte oznako obratovalnega ventilila (A)z oznakopolożaja ventilila (C)- skica 9.   - Lonec na zvišan tlak postavite na toplotni vir in ga nastavite na najvisjo temperaturo. - Ko začne skozi ventil uhajati para, zmanjsajte moč toplotnega vira in počakajte 20 minut. - Po 20 minutah izkljucite toplotni vir. - Poravnajte piktogram obratovalnega ventila (A) z oznako položaja ventila (C). - Ko se varnostni klin (D)spusti, lonec na zvišan tlak ni več pod tlakom. - Odpritelonec na zviisan tlak - skica 3 - Očistite ga sredstvom za pomivanje posode.Minimalno in maksimalno polnjenje
Minimalno 25 cl (2kozarca)-skica4. Največ 2/3 višine posode, oznaka MAX 2 - skica 5. V Iloncu na zvi'an tlak ne uporabljaje grobe soli, temvec ob koncu kuhanja dodajte fino sol.Zadoločenaživila:
Za mehka zivila, ki se med kuhanjem razsrijo in/ali penijo, kot so riz, strocnice, dehidrirana zelenjava, kompoti, buce, bucke, korenje, krompir, fileji ribe ... lonca ne napolnite vec ko 1/3 (MAX 1). Pustite lonec nekaj minut, da se ohladi, nato pa ga dodatno ohladite v hladni vodi. Lonec pred vsakim odpiranjem rahlo in previdno stresite, potem ko se prepri cate, da se je varnostni zatic spustil, da se izognete uhajanju vroce  pare, ki vas lahko opeče. To je zlasti pomembno pri hitrem uhajanju pare ali po ohlajanju v hladni vodi. Pri kuhanju juh vam svetujemo, da tlak na hitro zmanjsate v hladni vodi (glejte poglavje "Zaključek kuhanja v načinu 'Ekonom lonec").Uporaba kosare za kuhanje s paro\*
- Na dno posode vlijte 75 cl vode (O).Odvisno od modela:
- Stojalo* (L) in kosaro* (J) postavite na dno posode. Stojalo\*K)pripnite na kosaro\*J), nato pa vse skupaj postavite na dno posode.   - Med kuhanjem na paroŽivila v kosari za paro ne smejo biti v stiku z vodo -skica 6 in 7. Živila, ki se nahajajo v posodi za kuhanje s paro*, se ne smejo dotikati najvisije ravni MAX 2.Odstranitev in namestitev obratovalnegaventila (A)
Kako izvlečemo obratovalni ventil (A):
- Poravnajte utor z oznako položaja ventila (C) s pritiskom na obroček obratovalnega ventila (A). - Izvycleventil - skica 11.Kako namestimo obratovalni ventil:
- Namestite obratovalni ventil (A)- skica 8, pri tem pa pazite, da je konica obratovalnega ventila poravnana z indicatorjem položaja (C) na drugi strani.  - Potiskajte obratovalni ventil (A), dokler ni pritrjen na vodilu za izpuh pare. - Pritisnite na simbole obratovalnega ventila (A)in ga obrnite. Minutni stevec*
Odstevalnika nikoli ne uporabljajte v načinu "Mešano".
Minutni stevec je zasnovan tak, da vam omogoča zagotavljanje rezultatov kuhanja, pri Čemer lahko porabo energije kar najbolje prisagodite. Samodejno odsteva Čas kuhanja vse od dosežene ravni temperature, ki ustreza kuhanju v načinu "Lonca na zvišan tlak" Za pravilno delovanje mora biti minutni stevec pripet na lonec na zvišan tlak. Medkuhanjem pazite, da obratovalni ventil (A) enakomerno šusija. Če ne izhaja dovolj pare, rahlo povečajtemoč toplotnega vra, v nasprotnem primeru pa jo zmanjsajte. 1 Za vklop minutnega stevca: pritisnite na tipko. 2 Programirajte cas kuhanja (v minutah). - Ce ste izbrali napačencas kuhanja, počakajte 4 sekunde, da plameni nehajo utripati, nato dolgo Časa pritiskajte na tipkoza ponastavitev na niclo. 3 Vklopite toplotni vir na maksimalno moč. 4 Ko lonec na zvišan tlak doseže temperaturo kuhanja, minutni stevec zazvoni in začne odševati Čas (stevilke utripajo). Zmanjsajte moctoplotnegavira. 5 Ob koncu kuhanja minutni stevec zazvoni. Za izklop zvonjenja minutnega stevca pritisnite na tipko. Izklopite toplotni vir. Če dalj Časapritiskate na tipko minutni stevec ponastavite na ničlo in gaugasnete.Namestitev in odstranitev minutega števca*
Za namestitev minutega (F) stevca - skica 12 vstavite Najprej del "pri tipki" na modulu, nato pritisnite, da zaskovi nasprotni del. Za odstranitev minutega stevca (F)ga dvignite in odstranite.      Changement de la pile du minuteur*
Baterija minutega stevca je gumbasta celica CR2032. - Če se pojavi simbol n aln več nobenega prikaza, zamenjaje baterijo. - Ziviljenjska doba baterije je odvisna od pogostosti uporabe minutnega stevca. Baterija minutega stevca vsebuje dimetoksietan st. CAS 110-71-4. Baterija je v skladu z evropskimi predpisi. Za va so varnost in ochrinite okolja: baterije ne odpirajte, ne izpostavljaje je visokim temperaturam, ne mecite je med gospodinjske oepadke; odlozite jo v zbirnem centru za oepadne baterije. - Ne polnite ponovno baterij, ki niso temu namenjene. Vedno uporabljajte le nove baterije iste znamke. Pri vstavljanju baterij bodite pozorni na polariteto. - Izrabljene baterije odstranite iz naprave in varno zavrzite. - Če naprave dlje Časa ne boste uporabljali, odstranite baterije. Pazite, da na vticu ne pride do katkega stika. Postavite na ravno delovno povrsino. - Za odstranitev baterije iz minutnega števca odprite gumb baterije s pomoćjo kovanca (glejte prikaz na nasprotni strani). Zamenjaje baterijo. - Tesnilo ponovno namestite na svoje mesto. - Simbol polmeseca 12 gumba laterije namestite nasproti simbola polmeseca 12 asovnika. - Z rahlim pritiskom zaprite gumb in pri tem simbol polmeseca 1 / 2 gumba baterije poravnajte s simbolom meseca casovnika. Postavite na ravno delovno povrsino, da cep pravlno namestite v vodoravni položaj. Pri zapiranjne pritiskajte s silo na gumb baterije. Pritisniteismo do skrajnega konca. - Če minutni stevec izgubite, si lahko nadomestega priskrbite v vseh nasih pooblasčenih servisih TEFAL.     Števca* nikoli ne Čistite pod vodo ali v pomivalnem stroju. Odstevalnika nikoli ne uporabljaje v načinu "Mešano".Pred kuhanjem
Pred vsako uporabo odstranite obratovalni ventil (A) - skica 11 in s prostim ocesom preverite, da vodilo za izpuh pare(B) ni zamašeno - skica 13. - Preverite, ali je varnostni ventil premičen (gleje odstavka "Čišćenje" in "Obvezna preverjanja pred vsako uporabo") - skica 18. Dodajte sestavine in tekočino. Zaprite lonec na zvi'an tlak - skica 2 V primeru težav pri zapiranju izdelka tesnilo postavite pod vodo in ga ponomovno namestite naPokrov, ne da bi ga osusili -sl.19, pri tem pa pazite, da je pravilno namescen glede na zarezePokrova- sl. 15. - Kako namestimo obratovalni ventil (A)- skica 8. Kuhanje v načinu lonec na zvišan tlak
- Zavrtite obratovalni ventil (A) do položaja kuhanja v načinu "Lonec na zvišan tlak" 3kica 9. - Prepričajte se, da je lonec na zvišan tlak primerno zaprt, preden pričnete s kuhanjem - skica 2. - Lonec na zvišan tlak postavite na toplotni vir in ga nastavite na najvisjo temperaturo. - Za modele, opremljene s šcasovnikom : programirajte šas kuhanja, navedene v receptu (gleje odstavek "Uporaba šcasovnika"). - Šumenje in izparevanja, ki jih oddaja varnostni zatic, so normalna, saj omogocajo izpuh zraka pred kuhanjem.Med kuhanjem v načinu "Lonec na zvišan zrak"
- Ko skozi obratovalni ventil (A)enakomerno uhaja para in pri tem slisite enakomeren zvok (PŠŠŠT), zmanjsajte moč toplotnega vira. - Začnite odševati Čas kuhanja, kot je navedeno v knjigi receptov. - Med kuhanjem pazite, da ventil enakomerno šušlja. Če ne izhaja dovolj pare, rahlo povečajte moč toplotnega vira, v nasprotnem primeru pa jo zmanjsajte.Kuhanje v načinu "Lonec na zvišan tlak"
Za izpust pare:
- Ko ste izključili toplotni vir, imate dve možnosti: - Postopno zniževanje tlaka: postopoma vrtite obratovalni ventil (A) vse do nastavitvene točke piktograma skica 10.  - Hitro zniževanje tlaka v hladni vodi: odprite vodo v kuhinjskem koritu in vanjo postavite dno posode, dokler se varnostni zaticne spusti - skica 14. Ko se varnostni zatic (D)spusti, lonec na zvišan tlak ni več pod tlakom. Zavrtite obratovalni ventil (A)do položaja  Korak 1  Korak 2 Lonec na zvišan tlak lahko odprete - skica 3. V primeru težav pri odpiranju izdelka tesnilo postavite pod vodo in ga ponovno namestite naPokrov, ne da bi ga osusili -sl.19, pri tem pa pazite, da je pravlno namescen glede na zarezePokrova-sl.15. Če opazite nenavadno uhajanje pare, obratovalni ventil (A) znova namestite v položaj ekonom lonec , nato pa tlak hitro zmanjsajte s pomočjo hladne vode. Če se varnostni zatic (D) ne spusti, odprite vodo v kuhinjskem koritu in vanjo postavite dno posode, dokler se varostni zatic ne spusti - sl. 14. Nikoli ne posegajte v varnostni klin. - Za mehkaŽivila,ki se med kuhanjem razsrijo in/ali penijo,kot so riz,strocnice, dehidrirana zelenjava, kompoti,buce,bucek,e korenje,,krompir,fileji ribe...,lonca ne napolnite več kot do 1/3 (MAX 1).Pustite lonec nekaj minut,da se ohladi, nato pa ga dodatno ohladite v hladni vodi.Lonec pred vsakim odpiranjem rahlo in previdno stresite,potem ko se prepričate,da se je varnostni zatic spustil,da se izognete uhajanju vroce pare,ki vas lahko opeče.To je zlasti pomembno pri hitrem uhajanju pare ali po ohlajanju v hladni vodi.Pri kuhanju juh vam svetujemo,da tlak na hitro zmanjsate v hladni vodi (glejte poglavje "Zakljucek kuhanja v načinu 'Ekonom lonec"" Kuhanje v načinu litoželezne posode*
- Zavrtite obratovalni ventil (A) do položaja v načinu kuhanja "litoželezna posoda". To storite tak, da nanj pritisnete dovolj, da se premakne mimo zareze na položaju za zniževanje tlaka. - Prepričajte se, da je lonec na zvišan tlak primerno zaprt -skica 2, preden pričnete s kuhanjem. - Lonec na zvisan tlak postavite na toplotni vir, nastavljen na najvisjo temperaturo. - Začnite odševati Čas kuhanja, kot je navedeno v knjigi receptov. V načinu "litoželezna posoda" lahko kadarkoli odprete lonec na zvišan tlak, nadzorujte kuhanje in dodajte sestavine. V primeru težav pri odpiranju izdelka tesnilo postavite pod vodo in ga ponomovno namestite naPokrov, ne da bi ga osusili -sl.19, pri tem pa pazite, da je pravilno namescen glede na zarezePokrova- sl.15. - Če je toplotni vir premočen, se lahko lonec na zvišan tlak zaskovi (varnostni klin (D)vzdigne in blokira odprtino) in ročajaPokrova ni mogоće vklopiti ali pa se lonec na zvišan tlak ne odpre. V tem primerus zmanjsajte ali ugasnite toplotni vir. V primeru litoželeznih elektricnih plošć odomaknite lonec na zvišan tlak stran od toplotnega vira. - Za modele s premazom proti sprijemanju: ne uporabljajte kovinskih oziroma abrazivnih kuhinjskh pripomočkov in metric. Ne odcedite kuhinjske posode takto, da udarjate po robovih posode, ker lahko s tem povzročite poskodbe ali pušćanja. - Nikoli ne segrevajte mascobe do oglenitve. Dim, ki ga lonec oddaja med kuhanjem, je lahko nevaren za zivali z obctljivim dihalnim sistemom, kot so ptice. Lastniki morajo svoje ptice umakniti iz kuhinje.Varnost
Vas lonec na zvišan tlak je opremljen z več varnostimi napravami:Varnost pri zapiranju:
- Če jePokrov slabo namescen ali Če pozabite potegniti ročicoPokrova,lahko pride do uhajanja pare pri varnostnem zaticu (D) na loncu,tlak pa ne bo mogel narasti.Varnost pri odpiranju:
- Če je vaš lonec pod tlakom, je varnostni klin (D) v zgornjem položaju, ročajaPokrova za odpiranje/zapiranje (G) pa ne smete vklopiti. - Nikoli ne poskušajte lonca na zvišan tlak odpreti na silo.- Nikoli ne posegaje v varnostni klin (D).
- Prepričajte se, da je notranji tlak padel, pri Čemer preverite, ali je varnostni klin (D) v nizkem položaju. - Ročaji posode so varnostni deli. Nikoli jih ne zamenjujte sami. Nikoli ne uporabljajte drugih modelov ročajev. - Če ste ročajPokrova za odpiranje/zapiranje (G) nagnili v navpićen položaj, medtem ko je bil lonec na zvišan tlak še vedno pod pritiskom, ga ne boste mogli odpreti. Ta funkcjija zagotavlja dodatno varnost. - Ponovno namestite ročajPokrova v vodoraven položaj in počakajte, dokler varnostni klin (D) ni v spodnjem položaju.Dve varnostni napravi proti previsokemu pritisku:
- Prva naprava: obratovalni ventil (E) sprošca pritisk - skica 20 - Druga naprava: tesnilo omogovi uhajanje pare naPokrovu - skica 20.V primeru, da se sproži eden izmed teh dveh varnostnih sistemov proti previsokemu pritisku:
- Izklopite toplotni vir. Pustite, da se lonec na zvišan tlak popolnama ohladi. - Odprite. - Preverite in očistite obratovalni ventil (A), vodilo za izpuh pare (B), varnosti ventil (E) in tesnilo (I) - skica 16 - 17- 18. Glejte poglavje "Čišćenje" in "Obvezna preverjanja pred vsako uporabo". - Če po teh preverjanjih in cisćenju vaš aparat še vedno pusća oziroma ne deluje vec, ga pripeljite na enega izmed pooblasćenih servisov TEFAL.Priporočila za uporabo
1 - Para je v trenutku, ko izhaja iz obratovalnega ventila, zelo vroča. Pazite na uhajanje pare. 2 - Ko se varnostni klin dvigne, Ionca na zvišan tlak ne morete vec dvigniti. 3 - Kot vsak drug aparat za pripravo Jedi tudi lonec na zvišan tlak med uporabo nadzirajte, Če izdelek uporabljate v blizini其中之一. 4 - Ko premikate lonec na zvišan tlaka, ga vedno primite za oba ročaja. 5 - Lonec na zvišan tlak ni namenjen shranjevanju Živil. Lonca na zvišan tlak nikoli ne poskušajte premikati tak, da držite le ročajPokrova. 6 - Nikoli ne uporabitedezinfekcijskh sredstev ali kloriranih proizvodov,saj lahko le-ti poskodujejo nerjavece jeglo. 7 - Pokrova ne pušćajte namočenega v vodo. 8 - Tesnilo zamenjaje vsako leto ali ce se na njem pojavizareza. 9 - Lonec na zvišan tlak lahko Čistite le takrat, ko je hladen in prazen. 10 - Po 10 letih uporabe je nujen pregled lonca na zvišan tlak v enam izmed pooblaščenih servisov TEFAL.Čiščenje
Da bo vaš lonec na zvišan tlak pravilno deloval, upoštevajte ta priporocila za Čišćenje in vždrževanje po vsaki uporabi. Porjavite in praske, kise lahko pojavijo kot posdica dolgotrajne uporabe Iocca, niso problematične. Obraba zumanje prevleke (odvisno od modela), ki je v stiku sPokrovom na posodi, je obiajna. Za lance na zvišan tlak s pavleko proti prijemanju (odvisno od modela) majhne praske in okrušenje, ki se lahko pojavijo ob uporabi, ne vplivajo na značlnostizmogljivosti prevlekeproti prijemanju. - Lonec na zvišan tlak po vsaki uporabi očistite z mlačno vodo, ki ste ji dodali sredstvo za pomivanje posode. Enako storite s kosaro za kuhanje s paro*. - Ne uporabljaje bezinfekcijskih sredstev ali kloriranih izdelkov. - Nikoli ne segrevajte posode, ko je le-ta prazna.Kako očistiti notranjost posode iz nerjavečega jekla:
Ocistite jo s cistilno gobico in s sredstvom za pomivanje posode. - Ce se na nerjavečem jeklu v notranjosti posode pojavijo bele pike (odlaganje mineralov) ali mavricni odsev, jih očistite z belim kisom.Kako očistiti notranjost posode iz aluminija s prevalko proti prijemanju:
- Za podaljšanjeŽivljenjske dobe proizvoda vam priporočamo, da lonec perete ročno. - Izdelek Čistite z vročo vodo, sredstvom za Čišcenje posode in mehko gobico. - Ne uporabljajte Čistilnega prăška niti abrazivnih gobic. - Če se vam je hrana zažgala, v posodo natočite vročo vodo in jo pustite namočeno. Nato jo očistite sredstvom za pomivanje posode.Kako očistiti zunanjost posode:
- Očistite jo z gobico in s sredstvom za pomivanje posode. Posodo in košaro za kuhanje s paro la hko perete v pomivalnem stroju. Posode s prevleko proti prijemanju (odvisno od modela) ne perite v pralnem str oju, ker tab lete za pom ivalni str oj vseb ujej o zelo agresivne in korozivne snovi za dele iz aluminija. Če posodo s prevleko proti prijem anju (odvisno od modela) prepogosto uporabljate, lahko to rahlo v pliva na bar vo prevleke (p oumenelost, madeži).ČiščenjePokrova:
- Pokrov očistite z gobico in s sredstvom za pomivanje posode. Pokrovnavpicno odcedite, da zagotovite odtekanje o stanka vode med kovinskimi in plastičnimi deli pokro va.Cisjenje tesnilaPokrova:
- Po vsakem kuhanju očistite tesnilo (I) in njegovo ležišće. - Pri ponovni namestitvi tesnila glejte - skico 15 in pazite, da je tesnilo namesceno pod vsako rezoPokrova.Ciscenje obratovalega ventila (A):
- Snemite obratovalni ventil (A) - skica 10 - 11. - Operite obratovalni ventil (A) pod tekočo vodo -skica 16. Preverite, ali se premika: prikaz na nasprotni smeri. Potem ko odstranite obratovalni ventil (A), tesnilo (I) in asovnik\* (F), lahkoPokrov perete v pomivalnem stroju.  Obratovalnega ventila (A), tesnila (I), chasovnika* (F), niti posode s prevleko proti prijemanju nikoli ne perite v pomivalnem stroju.Čišćenje vodila za izpuh pare (B), namesčelenega naPokrovu:
Snemiteventil(A)-skica11. - Pri dobri dnevni svetlobi preverite, ali je vodilo za izpuh pare odmašeno in okrogle oblike - skica 13. Če je potrebno, ga očistite z zobotrebcem - skica 17 in sperite.Cischenje varnostega ventila (E):
- Del varnostega ventila, ki se nahaja na notranji straniPokrova, očistite pod tekoco vodo. - Pravilno delovanje varnostega ventila preverite tak, da s pomocjo palicice moćno pritisnete naPoklopec (s pomocjo palicice za ušesa brez vate), ki mora biti premićen - skica 18. Glejte poglavje "Obvezna preverjanja pred vsako uporabo".Cischenje minutega stevca* (F):
- Uporabite Čistó in suho krpo. Ne uporabljajte topil. Stevca nikoli ne cistite pod vodo ali v pomivalnem stroju.Vzdrževanje
Menjava tesnila pri loncu na zvišan tlak:
- Tesnilo na loncu na zvisan tlak zamenjaje vsako leto ali ce se na njem pojavizareza. - Vedno uporabljajte originalna tesnila TEFAL, ki ustrezajo vašemu modelu (glejte odstavek "Pripomočki"). - Pri ponovni namestitvi tesnila glejte - skico 15 in pazite, da je tesnilo namesceno pod vsako rezoPokrova.Hramba vašega lonca na zvišan tlak:
- ObrnitePokrov na posodi. - Mehanizem za odpiranje/zapiranje lonca na zvišan tlak ne zahteva posebnega vzdhrževanja razen cisćenja. Po 10 letih uporabe je nujno potreben pregled lonca na zvišan tlak v enam izmed pooblaščenih servisov TEFAL.Dodatki TEFAL
Dodatki, ki so na voljo za lonec na zvišan tlak:| Dodatki Reference | ||
| Tesnilo | 3/4/4.5/6 L: zunanji premer tesnila: 24 cm | X1010008 |
| 5/7.5/9 L: zunanji premer tesnila: 27 cm | X1010007 | |
| Košara za kuhanje s paro* | 3/4.5/4/6 L: za posodo s premerom 22 cm | 792185 |
| 5/7.5/9 L: za posodo s premerom 24 cm 792654 | ||
| Trinožni podstavek* (L) | 792691 | |
| Minutni števec* | X1060007 | |
Lastnosti
Premer dna lonca na zvišan tlak - reference| Prostor-nina | Ø posode | Ø dna | Clipso Minut® Perfect / Easy | Clipso Minut® Duo couleur | Clipso Minut® Duo Gourmet | Material posode |
| 3 L 22 cm 15.5 cm P46205 - - | Nerjavno jeklo | |||||
| 3 L 22 cm 18 cm - - P46605 | ||||||
| 4 L 22 cm 14 cm - P46042 - | Prevlečeni aluminij | |||||
| 4.5 L 22 cm 15.5 cm P46206 - - | Nerjavno jeklo | |||||
| 5 L 24 cm 14 cm - P46051 - | Prevlečeni aluminij | |||||
| 5.2 L 24 cm 20 cm - - P46654 | Nerjavno jeklo | |||||
| 7.5 L 24 cm 18 cm P46248 - - | ||||||
| 9 L 24 cm 18 cm P46249 - - | ||||||
| Set 5 L 7,5 L | 24 cm | 14 cm | P46353 | - | ||
| 18 cm | ||||||
Kompatibilni toplotni viri
| PLIN ELEKTRIKA (Litoželeznaploška) | ELEKTRIKA (Halogenska steklokeramična ploška) | ELEKTRIKA (Indukcijska steklokeramična ploška) | ELEKTRIKA (Grelna spirala) |
Garancija
V okviru uporabe, ki je v skladu z navodili za uporabo, ima nerjaveca posoda vašega lonca na zvišan tlak TEFAL 10-letno garancijo za: - Vse napake, povezane s kovinski strukturo posode, - Vsako prezgodnje propadanje kovinske osnove. - Drugi materiali posode in drugi deli lonca na zvišan tlak imajo garancijo za vsako tovarnísko napako ali napako materiala za odobje veljavnosti garancije, ki ga doloca veljavni zakon v državi nakupa in ki velja od datumama nakupa. - Pogodbeno garancijo pridobite ob predložitvi potrdila o placilu ali računa z vidnim datumom nakupa. Garancija ne velja za: - Praske in razbarvanje zaradi staranja, za posode s prevlekoproti prijemanju. - Praske, nastale zaradi stikaPokrova posode s prevleko proti prijemanju. Zaporedne poskodbe, ki so posledica neupoštevanja pomembnih previdnostnih ukrepov ali nepraviln e uporabe, kot so na primer: - udarci, padci, uporaba v pečici... Garancijo lahko uveljavljate le na pooblaščenih servisih TEFAL, ki so usposobljeni za tovrstna popravila. - Poklicite nas in napotili vas bomo v najblizji pooblaščeni servis TEFAL.označitev v skladu s predpisi
| Oznaka Mesto | |
| Blagovna znamka NaPokrovu | |
| Leto in serija proizvodnje Oznaka modela Najvisji varnostni tlak (VT) Najvisji obratovalni tlak (OT) | NaPokrovu |
| Prostornina Na dnu zunanje strani posode | |
| Poštni naslov proizvajalca Na dnu zunanje strani posode |
Sodelujmo pri varovanju okolja!
 ① Vaš aparat vsebuje stevilne materiale, ki so primerni za ponovno uporabo ali recikliranje. Prosimo, odnesite ga v center za reciklazo, kjer bo ustrezno predelan.TEFAL odgovarja na vaša vprašanja
| Težave Priporočila | |
| V primeru težjega odpiranja/zapiranja: | • Odstranite tesnilo in ga postavite pod vodo • Ponomvno namestite tesnilo, ne da bi ga osušili - sl. 19. |
| Če ne morete zapretiPokrova: | • Preverite, ali je ročaj Pokrova v navpičempoložaju. • Preverite ali je tesnilo pravilno vstavljeno (glejte ods-tavek "Čišćenje in vzdřevanje"). • Preverite, ali je Pokrov pravilno namešćen, kot je pri- kazano na - skico 1. • Tesnilo postavite pod vodo in ga ponovno namestite naPokrov, ne da bi ga osušili - sl. 19, pri tem pa pa-zite, da je pravilno namešćen glede na zareze po- krova - sl. 15. |
| Če se je lonec na zvišan tlak segreval pod pritiskom brez tekovičine v notranjosti: | Naj ga pregledajo na pooblašćenem servisu TEFAL. |
| Če varnostni klin Žvenketa in se slisi izparevanje: | Prvih nekaj minut je to normalno: to omogoća izpuh zraka pred kuhanjem. |
| Če se varostni klin ni dvignil in para med kuhanjem ne uhaja skozi ventil: | Prvih nekaj minut je to normalno. Če se povav nadaljuje, preverite: - Ali je toplotni vir dovolj močan, Če ni, povečajte njegovović. - Ali je v posodi dovolj tekovićine. - Obratovalni ventil (A)je namešćen na. - Ali je lonec na zvišan tlak dobro zaprt. - Ali nista tesnilo ali rob posode morda poškodovana. - Ali je tesnilo je pravilno namešćeno. |
| Če se je varostni klin dvignil in para med kuhanjem ne uhaja skozi ventil: | To je povsem normalno za prvih nekaj minut. Če ne mine, odprite vodo v kuhinjskem koritu in vanjo postavite dno posode, dokler se varnostni zatićne spusti. Očistite obratovalni ventil (A) - skica 16 in vodilo za izpuh pare - skica 17 in preverite, ali sePoklopec varnostnegа ventila zhlahka poda - skica 18. |
| Težave | Priporočila |
| Če okoliPokrova uhaja para, varnostni zatič pa je spušćen, preverite naslednje : | Ali je lonec pravilnoPokrit sPokrovom.Položaj tesnilaPokrova.Dobro stanje tesnila,po potrebi ga zamenjaje.C IstocoPokrova,tesnila in ležišča tesnila vPokrovu.Dobro stanje roba posode. |
| Če ne morete odpreti po-krova: | Preverite,ali je varnostni klin (D)v spušćenempoložaju.V nasprotnem primeru znižajte tlak: odprite vodo v kuhinjskem koritu in vanjo postavite dno posode, dokler se varnostni zatične spusti.Nikoli se ne dotikajte varnostnega zatiča (D).Obratovalni ventil (A) obrnite v pravi položaj |
| Če{jedi niso skuhane ali so zažgane,preverite: | Čas kuhanja.Moč toplotnegavira.Pravilen položaj obratovalnegaventila (A).Količino tekovičine. |
| Če so se{jedi v loncu na zvišan tlak zažgale: | Posodo namočite, preden jo pomijete.Nikoli ne uporabljajtedezinfekcijskih sredstev ali klo riranih izdelkov. |
| Če se je sprežil eden od varnostnih/systemov: | Izklopite toplotni vir.Ne da bi lonec na zvišan tlak premikali,pustite,da se ohladi.Počakajte,da se varnostni klin zniža in ga odprite.Preverite in očistite obratovalni ventil (A),vodilo za izpuh pare,varnostni ventil in tesnilo.Prepričajte se,da so pogoji za polnjenje izpoljeni.Če napake s tem niste odpravili,naj aparat pregleda na pooblašćenem servisu TEFAL. |
| Če opazite sledi oksidacije: | Uporaba visokozmogljivega nerjavecěga jekla ne prepreci pojava oksidacije v teh ekstremnih priterihČe opazite sledi oksidacije,jih odstranite takot,dajih pred novo uporabo lonca na zvišan tlak otrete z abrazivno gobico. |
PreGleDniCa za KUHanJe
Zelenjava
ZELENJAVA (SVEZA)
KUHANJE NA PARI
Sestavine v parni kosari in 750 ml vode na dnu posode na pritisk.  KUHANJE V VODI
Sestavine v vodi, brez kosare.STROCNICE
KUHANJE V VODI
Brez kosare.  | Artićoke, 2 celi, 600 g vsaka (kuhanje v vodi) od 30 do 35 min | |
| Blitva, narezana (2 cm), 700 g (kuhanje na pari) od 15 do 17 min | |
| Brstićni ohrovt (kuhanje na pari) od 10 do 12 min | |
| Buča, narezana na kosće (od 3 do 5 mm), 600 g (kuhanje na pari) | od 13 do 18 min |
| Bučke, narezane na kolobarje (3 mm), 600 g (kuhanje na pari) | od 12 do 15 min |
| Čebula za vlaganje (kuhanje na pari) od 7 do 8 min | |
| Endivija, razrezana na pol (900 g), (kuhanje na pari) od 14 do 16 min | |
| Glave brokolija, 600 g (kuhanje na pari) od 9 do 11 min | |
| Glave cvetače, 600 g (kuhanje na pari) | od 10 do 12 min |
| Gobe, narezane, 800 g (kuhanje v vodi) | od 4 do 5 min |
| Grah (kuhanje na pari) | od 6 do 8 min |
| Grah v polovicah, 250 g (kuhanje v vodi) | od 18 do 20 min |
| Jajčevci, oluplejeni in narezani (3 mm), 850 g (kuhanje na pari) | od 10 do 12 min |
| Korenje, narezano na kolobarje (3 mm), 600 g (kuhanje na pari) | od 17 do 19 min |
| Koromač, narezan na trakove (600 g), (kuhanje na pari) od 6 do 9 min | |
| Krompir, narezan na polovice (950 g) (kuhanje na pari) | od 20 do 25 min (odvisno od velikosti) |
| Leča, zelena, 250 g (kuhanje v vodi) | od 14 do 16 min |
| Navadni fižol, surov, 250 g (kuhanje v vodi) | od 35 do 40 min |
| Paprika, narezana na polovice (559 g) (kuhanje na pari) od 14 do 16 min | |
| Pesa, rdeča, narezana na Četrnine (kuhanje v vodi) | od 20 do 25 min (odvisno od velikosti) |
| Por, beli, cel, 650 g (kuhanje na pari) od 9 do 11 min | |
| Repá, narezana na kocke (500 g) (kuhanje na pari) | od 14 do 16 min |
| Šparglji, beli (kuhanje na pari) | od 5 do 6 min |
| Špinača (kuhanje na pari) | od 3 do 4 min |
| Stroćji fižol (600 g) (kuhanje na pari) | od 10 do 12 min |
| Zelena, narezana, 600 g (kuhanje v vodi) | od 7 do 9 min |
| Zelje, zeleno, narezano, 500 g (kuhanje v vodi) | od 5 do 6 min |
| KUHANJE V VODI Brez košare. 1/3 MAX 1 | KOLICINA VODE | KOLICINA RIŽA | ČAS KUHANJA | |
| 2 OSEBI 400 ml/2 kozarca 150 g/1 kozarec | od 7 do 8 min4 OSEBE | |||
| 500 ml/2,5 kozarca | 250 g/2 kozarca | |||
| 6 OSEB | 700 ml/3,5 kozarca | 375 g/3 kozarci | ||
Meso/ribe
| SVEŽE ZAMRZNJENO | |
| Fileji morske spake (1 kg) v kosih po 75 g od | 5 do 6 min od 7 do 8 min |
| Jagnjeće stegno: 2 kosa (0,95 kg) od 40 do 45 min | od 1 h 5 min do 1 h 15 min |
| Lososovi zrezki: 4 kosi (0,8 kg) od 5 do 6 min | od 7 do 8 min |
| Mlad pišćanec: 2 kosa (1,3 kg) od 23 do 25 m | od 40 do 45 min |
| Pišćanec (1,35 kg) od 23 do 25 min | |
| Prepelica: 4 od 9 do 10 min od 18 | od 20 min |
| Raca (1,8 kg) | od 45 do 47 min od 50 do 55 min |
| Rostbif (1 kg, 8-11 cm v premeru) | od 30 do 35 min od 45 do 50 min |
| Svinjska ribica: 2 kosa po 350 g | od 13 do 15 min od 26 do 29 min |
| Svinjsko stegno (0,8 kg, 8-10 cm v premeru) | od 30 do 35 min od 1 h 5 min do 1 h 15 min |
| Telečja ribica: 0,7 kg | od 17 do 21 min od 33 do 38 min |
| Telečje stegno (0,8 kg, 5-7 cm v premeru) | od 17 do 19 min od 37 do 40 min |
| Telečji Žepki (Paupiettes de veau): 4 kosi | od 10 do 12 min x |
| Tunovi zrezki: 4 kosi (0,7 kg) | od 5 do 6 min od 7 do 9 min |
| Zajec (1,5 kg, v kosih) | od 8 do 9 min od 20 do 23 min |
VAŽNE MERE PREDOSTROŽNOSTI
Pre upotrebe ekspres lonca, pažljivo pročitajte i uvek se pridržavajte "Uputstva za upotrebu"
Nepravilno rukovanje moze dovesti do kvara. Zbog Vase bezbednosti, proizvod je napravljen u skladu sa vazećim standardima i normama: - Direktiva za opremu pod pritiskom - Materijali u kontaktu sa namirnicama - Okrużenje| OBAVEZNE PROVERE PRE SVAKE UPOTREBE | PROVERITE vizuelseni na dnevnoj svetosti da je cev za odvod pare prohodna - sl. 13. da li je bezbednosni ventilPokretan - sl. 18. da li je dihtung postavljen ispod svakog zareza na poklopcu - sl. 15. da li su ručke posude dobro pričvršcene. Ručke predstavljau bezbednosne delove posude. Nikada ih ne menajte sami. |
| UVEK SE PRIDRžAVAJTE SLEDEĆIH PREPORUKA ZA KOLICINE | Nikada ne koristite ekspres lonac bez tečnosti, to bi dovelo do ozbiljnog oštećenja. Uvek proverite da li ima dovoljno tečnosti tokom kuvanja. Minimum 25 cl - sl. 4. Maksimum 2/3 visine posude, oznaka za punjenje MAX 2 - sl. 5. Tokom kuvanja, namirnice koje se nalaze u korpi za paru ne smeju doci ukontakt sa vodom -sl. 6 i 7. Maksimalno 1/3 (MAX 1) za namirnice koje dobijaju na zapremini ili stvaraju penu tokom kuvanja, kao što su pirinjač, mahunarke, sušeno povrće, kompoti, bundeva, tikvice, šargarepa, krompiri, riblji fileti, itd. Namirnice koje se nalaze u korpi za paru ne smeju da predu nivo MAX 2 koji je označen na posudi. |
| PRE I ZA VREME KUVANJA | Ne pušajte decu blizu ekspres lonca tokom njegovog korićenja. Vaš ekspres lonac radi pod pritiskom. Nepravilno rukovanje može dovesti do opekotina. Pre pušanja ekspres lonca u rad, proverite da li je dobro zatvoren. (Pogledajte odeljak "Zatvaranje"). Tokom kuvanja vodite računa da ventil uvek šišti. Ako nemo dovoljno pare, smanjite pritisak u posudi i proverite da li ima dovoljno tečnosti i da li je cev za odvod pare optušena. Ukoliko i nakon ovih provera nema pare, lagano pojacajte jaćinu izvora toplote. Ne kuvajte namirnice koje mogu zapušiti cevi bezbednosnih delova: - brusnice - ječam - ovsene pahuljice - grašak - rezanci, makaroni, špageti - rabarbara - ribizle U ekspres loncu nikada ne pravite jela na baziŽivotinjskog mleka. Ukoliko imate ekspres lonac saPoklopcem od neržajućeg Želika, nemojte koristiti krupnu so već na kraju kuvanja dodajte finu so. Takoće izbegavajte oštre namirnice koje mogu oštetiti dno Vašeg ekspres lonca. Ne koristite ekspres lonac za prženje na ulju pod pritiskom. Ne koristite ekspres lonac u druge svrhe osim za ono Čemu je namenjen. Ne stavljaje ekspres lonac u zagrejanu rennu. Nikada ne stavljaje aluminijumski foliju u Vaš ekspres lonac. Nikada ne stavljaje foliju od plastike u Vaš ekspres lonac. Alkoholna isparenja su zapaljiva. Pustite da kljućaju oko 2 minuta pre nego što stavitePoklopac. Nadgledajte lonac sve vreme ukolico priprémate jela na bazi alkohola. Koristite kompatibilni izvor (kompatibilne izvore) toplote, u skladu sa instrukcjama za upotrebu. |
| PO ZAVRŠETKU KUVANJA... | Za modele sa nelepljivom oblogom: nemojte da upotrebljavate metlice ili metalni kuhinjski pribor ili kuhinjski pribor oštrih ivica. Nemojte da cedite svoj kuhinjski pribor laganim udaranjem o ivicu uredaj, jer to要考虑 da ošteti uredaj i prouzrokuje curenja. Postepeno okreceite radni ventil (A) prema odabranoj brzini smanjenja pritiska, dok ne bude naspram oznake sa ikonicom 10. Ukoliko para prilikom oslobadanja izlazi na neuobičajen način, ponovo postavite radni venti (A) u poziciju za kuvanje na režimu "Ekspres lonac", a zat izvršite brzo otpušanje pritiska pod hladnom vodom.-sl. 14. Ukoliko se sigurnosna cev (D) ne spušta, stavite Vaš ekspres lonac pod hladnu vodu iz slavine -sl. 14. Nikada ne preduzimajte radnje na sigurnosnoj cevi. Nakon kuvanja mesa koje ima povrsinsku kožicu (npr. govedi jezik) koja pod dejstvom pritiska要考虑 da nabubri nemojte bosti meso dok je kožica naduvena, jer postoji opasnost da se opečete. Pre kuvanja proverite da li je meso izbockano. Za namirnice koje dobijaju na zapremini ili stvaraju penu tokom kuvanja, kao što su pirinač, mahunarke, sušeno povrće, kompoti, bundeva, tikvice, šargarepa, krompiri, riblj fileti, itd., ostavite Vaš ekspres lonac nikoliko minuta da se ohladi, a zatim ga ohladite pod hladnom vodom. Prsvakog otvaranja lagano protresite ekspres lonac nakon što proverite da li se sigurnosna cev spustila kako biste izbegli udar pare koji要考虑 dovesti do opekotina. Ova procedura je posebno važna prilikom brzog otpušanjepare ili nakon rashlaživanja lonca pod hladnom vodom. Veoma pažljivo pomerajte ekspres lonac kada je pod pritiskom. Ne dodirujte vruće povrsine. Koristite ručke i tastere. Po potrebi koristite rukavice. Ukoliko pripremate supu, preporučujemo Vam da izvršite brzo smanjenje pritiska pod hladnom vodom (pogledajte odeljak "Po završetku kuvanja u režimu 'Ekspres lonac')". Pre otvaranja ekspres lonca proverite da li je ventil u položaju za otpušanje pritiska. Sigurnosna cev (D) mora biti u donjem položaju. Nikada ne otvarajte ekspres lonac silom. Proverite da li je unutrašnji pritisak opao. Sigurnosna cev (D) mora biti u donjem položaju. (Pogledajte poglavlje "Bezbednost"). |
| ODRŽAVANJE | • Ukoliko primetite da je neki deo Vašeg ekspres lonca polomljen ili oštećen, nipošto ne pokušavajte da ga otvorite ako je zativoren, sačekajte da se u potpunosti ohladi pre nego što ga pomerite, nemojte ga više koristiti i obratite se ovlašćenom servisu za popravku. • Ne preduzimajte nikakve radnje na sistemima za bezbednost koje nisu navedene u uputstvu za Čišćenje i održavanje. • Koristite samo originalne TEFAL delove koji odgovaraju Vašem modelu. Naročito, posudu iPoklopac TEFAL. • Ne koristite ekspres lonac za Čuvanje kiselih ili slanih namirnica pre i posle kuvanja, jer postoji opasnost da se ošteti posuda. • Posle svake upotrebe odmah očistite i isperite Vaš ekspres lonac. • Nikada ne perite radni ventil (A), dihtung (I), tajmer* (F), ili posudu sa nelepljivom oblogom u mašini za sudove. • Nikada ne stavljajte tajmer* (F) pod vodu. • Nikada ne koristite sredstva zadezinfekcjju ili proizvode na bazi hlora, oni mogu uticati na kvalitet nerădućeg Čelika. • Ne ostavljajtePoklopac potopljen u vodi. • Jednom godišnje menjaje dihtung na loncu. Ukoliko pukne odmah ga zamenite. • Nakon 10 godina korišćenja, obavezno odnesite Vaš ekspres lonac na servisiranje u ovlašćeni TEFAL servis. • Odlaganje lonca: OkretenitePoklopac na posudi kako bistie izbegli habanje dihtunga. |
SACUVAJTE OVA UPUTSTVA
Delovi (pogledajte Opis)
A. Radni ventil B. Cev za odvod pare C. Pokazatelj položaja ventila D. Sigurnosna cev (pogledajte poglavlje "Bezbednost"). E. Sigurnosni ventil F. Tajmer za kuvanje* G. RuchkaPoklopca H. Poklopac I. Dihtung J. Korpa za kuvanje na pari* K./ L. Tronožni stalak* M. Ručka posude N. Maksimalna granica punjenja O. PosudaObavezne provere pre svake upotrebe
Provera radnog ventila
 - Proverite da odvod radnog ventilaijke napuosen (pogledajte odeljak "Skidanje i postavljanje radnog ventila").Provera sigurnosnog ventila
 Proverite da li je sigurnosni ventilPokretan (upotrebite cackalicu).Upotreba
 Kuvanje u režimu Ekspres Ionac  Kuvanje u režimu Šerpa*  Ispust pareOtvaranje
- Dignite ručkuPoklopca iz horizontalnog u vertikalni položaj -sl.3 Poklopac se okrece. - PodignitePoklopac. - Ako ne możete da otvorite proizvod, operite dihtung pod mlazom vode a zatim ga ponovo vratite naPoklopac bez prethodnog brisanja - sl. 19 i uverite se da je ispravno postavljen ispod zareza naPoklopcu - sl. 15.Zatvaranje
Proverite da li je ručkaPoklopca u vertikalnompoložaju. - PostavitePoklopac na posudu takodaplasticni deo bude uravni sarukkama posude, kao sto je prikazano na -sl.1. Spustite ručkuPoklopca iz vertikalnog u horizontalni položaj -sl.2 - Poklopac se okrece.Ako ne možete da zatvoritePoklopac:
Proverite da li su dihtung iPoklopac pravilno postavljeni. - Ako ne możete da zatvorite proizvod, operite dihtung pod mlazom vode a zatim ga ponovo vratite naPoklopac bez prethodnog brisanja - sl. 19 i uverite se da je ispravno postavljen ispod zareza naPoklopcu - sl. 15.Prvo korišćenje
- Za modele sa nelepljivom oblogom: operite lonac a zatim u tankom sloju premažite unutrašnjost nelepljive obloge uljem za kuvanje.U zavisnosti od modela:
Stavite ručku posude* (L) i korpu za kuvanje na pari* (J) na dno posude. - Pričvrstite trONOžni stalak* (K) na korpu za kuvanje na pari* (J), zatim pomaknite set na dno posude. - Napunite posudu (O) sa najviše 2/3 vode (MAX 2) - sl. 5. Zatvorite ekspres Ionac. - Poravnajte piktog ventila (A) sa   pokazateljem polożaja ventila (C) -sl.9. Stavite ekspres Ionac na izvor toplate podesen na maksimalnu jacinu. - Kada para počne da izlazi kroz ventil, smanjite jačinu izvora toplote i ostavite ga 20 minuta. Nakon 20 minuta, iskljucite izvor toplote. - Izravnajte piktogram radnog ventila (A) saPokazateljem polożaja ventila (C). Kada se sigurnosna cev (D) spusti, Ionac vise nije pod pritiskom. - Otvorite ekspres Ionac - sl. 3 - Operite ga deterdžentom za pranje sudova.Minimalno i maksimalno punjenje
- Minimalna količina je 25 cl (2Čaše) - sl. 4. - Maksimum 2/3 visine posude, oznaka za punjenje MAX 2 - sl. 5. - Ukoliko imate ekspres Ionac saPoklopcem od neradajuceg celika, nemojte koristiti krupnu so vec po zavrsetku kuvanja dodajte finu so.Za odreëne namirnice:
- za namirnice koje dobijaju na zapremini ili stvaraju penu tokom kuvanja, kao sto su pirinač, mahunarke, sušeno povrće, kompoti, bundeva, tikvice, šargarepa, krompiri, riblji fileti, itd., ne punite vise od 1/3 (MAX 1) kapaciteta ekspres lonca. Ostavite ekspres lonac nekoliko minuta da se ohladi, a zatim ga stavite pod mlaz hladne vode. Pre svakog otvaranja lagano protresite ekspres lonac nakon sto proverite da li se sigurnosna cev spustila kako biste  izbegli udar pare koji moze dovesti do opekotina. Ova procedura je posebno važna prilikom brzog otpušanja pare ili nakon rashlačivanja lonca pod hladnom vodom. Ukoliko pripremate supu, preporucujemo Vam da izvršite brzo smanjenje pritiska pod hladnom vodom (pogledajte odeljak "Po završetku kuvanja u režimu 'Ekspres Ionac'").Koriscenje korpe za kuvanje na pari*
- Sipajte 75 cl vode na dno posude (O).U zavisnosti od modela:
- Stavite ručku posude* (L) i korpu za kuvanje na pari* (1) na dno posude. - Pričvrstite tronozni stalak* (K) na korpu za kuvanje na pari* (J), zatim pomaknite set na dno posude.    SR - Tokom kuvanja, namirnice koje se nalaze u korpi za kuvanje na pari ne smeju doci ukontakt savodom - sl.6 i7. Namir nice koje se nalaze u korpi za kuvanje na pari ne bi trebalo da predu nivo MAX 2.Skidanje i postavljanje radnog ventila (A)
Skidanje radnog ventila (A):
- Poravnajte Žleb saPokazateljem položaja ventila (C) pritiskajuci prsten radnog ventila (A). - Skinite ga -sl. 11.Postavljanje radnog ventila:
- Postavite radni ventil (A) -sl.8 tako da tacka radnog ventila (A) bude u ravni sa pokazateljem polozaja (C); pogledajte suprotnu stranu.  Stavite radni ventil (A) takdo sa zakauci na cev za odvod pare. - Pritisnite piktograme radnog ventila (A) i okrenite ga. Tajmer za kuvanje*
Nemojte nikada da koristite tajmer u režimu rada "Šerpa".
Tajmer za kuvanje osmišljen je takdo Va m pomogne u postizanju dobrih rezultata kuvanja i omoguci racionalu potrošnju energije. Tajmer automatiski odbrojava vreme kuvanja Čim dostigne odgovarajuci nivo temperature koja odgovara kuvanju u režimu "Ekspres Ionac" Tajmer mora biti povezan na Vaš ekspres lonac da bi radio. Tokom kuvanja vodite računa da radni ventil (A) pravilno šišti. Ako nema dovoljno pare malo pojacaje jačinu izvora toplote, u suprotnom smanjite. 1 Da uključite tajmer: pritisnite dugme. 2 Podesite vreme kuvanja (u minutima). - Ako ste uneli pogresno vreme, sačekajte 4 sekunde da plamen prestane da treperi, a zatim pritisnite i držite taster da biste vratili vreme na nulu. 3 Upalite izvor toplate na maksimalnu jačinu. 4 Cim se dostigne odgovarajuci nivo temperature, tajmer zvoni i poacinje da odbrojava vreme (serija zvučnih signala). Smanjite jačinu izvora toplote. 5 Kada je kuvanje završeno, tajmer zvoni. Za prekid zvuka, pritisnite dugme na tajmeru. Smanjite jacinu izvora toplate. Dugim pritiskom na dugme tajmer sevraçana nulu i gasi.Postavljanje i skidanje tajmera*
Da bistepostavili tajmer (F) na mesto -sl.12, prvo stavite deo prednji deo na modul, a zatim ga pritisnite da bistezakacli zadnju stranu. Da biste skinuli tajmer (F), podignite ga i povucite.Zamena baterije na tajmeru*
Tajmer imadugme bateriju tip CR2032. - Ukoliko se na ekranu pojaviznak n se a njemu nista ne prikazuje, zamenite bateriju.       - Trajanje baterije zavisi od toga koliko se Često koristi tajmer. Baterija tajmera sadrži Dimetoksietan o CAS 110-71-4. Odgovara evropskim propisima. Radi Vase zašite i zašiteŽivotne sredine: ne otvarajte bateriju, ne izlažite je visokim temperaturama, ne bacajte je sa ostalim smecem; odnesite je u centar za prikupljanje iskorišćenih baterija. - Nepunjive baterije ne smeju da se pune. Razlicite vrste novih i upotrebljenih baterija ne smeju da se kombinuju. - Baterije je potrebno umetnuti u skladu sa pravilnim polom. - Isprañnjene baterije je potrebno izvaditi iz ureðaja i bezbedno odložiti u OTPad. - Ako cete uredaj skladistiti duze vreme i ako ga necete upotreblavati duze vreme, baterije je potrebno izvaditi iz uredaja. - Priključci baterije ne smeju da se kratko spajaju. Postavite ga ravno na radnu povrsinu. - Da uklonite bateriju, otvorite dugme uz pomoć novčica (pogledajte sliku). Zamenite bateriju. Vratite dihtung u kuciiste. Postavite 1 / 2 prednjeg klopca baterije na 1 / 2 prednje straneajmera. Lagano okrenitePoklopac baterije,i blago ga pritiskajte kakobi se poravnao 1 / 2 a prednjom stranom tajera. - Postavite ga ravno na radnu povrsinu takdo daPoklopac bude u horizontalnom položaju. - Ne pritiskajte jakoPoklopac baterije kada ga zatvarate. Ne idite preko ivica. U slučaju da ga izgubite, možete poručiti drugi tajmer u ovlášćenim TEFAL servisima. Nikada ne stavljajte tajmer u vodu ili mašinu za sudove. Nemojte nikada da koristite tajmer u režimu rada "Šerpa".Pre kuvanja
- Pre svake upotrebe, skinite radni ventil (A) - sl. 11 i pogledajte na dnevnom svetlu da cev za odvod pare (B)不同程度 of the respiratory system (A). - Proverite da li je sigurnosni ventilPokretan (pogledajte paragraf "Ciscenje" i "Obavezne provere pre svake upotrebe") - sl. 18. Dodajte sastojke i tecnost. Zatvorite ekspres Ionac - sl. 2 - Ako ne možete da zatvorite proizvod, operite dihtung pod mlazom vode a zatim ga ponovo vratite naPoklopac bez prethodnog brisanja - sl. 19 i uverite se da je ispravno postavljen ispod zareza naPoklopcu - sl. 15. - Postavljanje radnog ventila (A) -sl 8. Kuvanje u režimu "Ekspres Ionac"
- Okrenite radni ventil (A) do polożaja za kuvanje u režimu "Ekspres Ionac" -sl. 9. Pre puštanja ekspres lonca u rad, proverite da li je dobro zatvoren - sl. 3 Stavite ekspres Ionac na izvor toplote podesen na maksimalnu jačinu. - Za modele koji su opreumljeni tajmerom: podesite vreme kuvanja koje je naznačeno na receptu (pogledajte paragraf "Upotreba tajmera za kuvanje"). - Zveckanje i para koju emituje sigurnosna cev su normalna pojava, oni omogucavaju ispustanje vazduha pre kuvanja.Za vreme kuvanja u režimu "Ekspres lonac"
- Kada radni ventil (A) ispustaru neprekidno uz pravilan zvuk (PŠŠST), smanjite jačinu izvora toplote. - Započnite odbrojavanje vremena kuvanja koje je naznačeno u receptu. - Tokom kuvanja vodite računa da ventil pravilno šišti. Ako nema dovoljno pare malo pojacajte jačinu izvora toplote, u suprotnom smanjite.Kuvanje u režimu "Ekspres Ionac"
Za oslobačanje pare :
- Kada uzase izvor toplate, imate dve mogucnosti: - Postepeno ispustanje pritiska: okrenite radni venti (A) dok ne bude naspram oznake sa ikonicom sl. 10.  - Brz ispust pare pod mlazom hladne vode: sipajte hladnu vodu u sudoperu i potopite dno ekspres lonca u vodu kako bi se sigurnosna cev spustila - sl. 14. Kada se sigurnosna cev (D) spusti, Ionac više nilje pod pritiskom. Okrenite radni ventil (A) do položaja.  Etape 1  Etape 2 - Możete da otvorite ekspres Ionac - sl. 2. - Ako ne możete da otvorite proizvod, operite dihtung pod mlazom vode a zatim ga ponovo vratite naPoklopac bez prethodnog brisanja - sl. 19 i uverite se da je ispravno postavljen ispod zareza naPoklopcu - sl. 15. Ukoliko prilikom oslobažanja pare primetite da para izlazi na neuobicajen način, ponovo postavite radni ventil (A) u poziciju za kuvanje na režimu "Ekspres lonac" őž, a zatim izvršite brzo otpušanje pritiska u hladnoj vodi. Ukoliko se sigurnosna cev (D) ne spušta, uspite hladnu vodu u sudoperu i potopite dno ekspres lonca u vodu kako bi se sigurnosna cev spustila - sl. 14.Nikada ne preduzimajte radnje na sigurnosnoj cevi.
- Za namirnice koje dobijaju na zapremini ili stvaraju penu tokom kuvanja, kao sto su pirinač, mahunarke, sušeno povrće, kompoti, bundeva, tikvice, šargarepa, krompiri, riblj fileti, itd., ne punite više od 1/3 (MAX 1) kapaciteta ekspres lonca. Ostavite ekspres lonac nekoliko minuta da se ohladi, a zatim ga stavite pod hladnu vodu. Pre svakog otvaranja lagano protresite ekspres lonac nakon sto proverite da li se sigurnosna cev spustila kako biste izbegli udar pare koji može dovesti do opekotina. Ova procedura je posebno važna prilikom brzog otpušanja pare ili nakon rashlaživanja lonca pod hladnom vodom. Ukoliko pripretate supu, preporucujemo Vam da izvršite brzo smanjenje pritiska pod hladnom vodom (pogledajte odeljak "Po završetku kuvanja u režimu 'Ekspres lonac"). Kuvanje u režimu "Šerpa" *
- Okrenite radni ventil (A) do položaja za kuvanje u režimu "Šerpa". Za tu svrhu snažno ga gurnite izaŽleba u položaj za ispust pare. - Pre puštanja ekspres lonca u rad, proverite da li je dobro zatvoren - sl. 2. - Stavite ekspres lonac na izvor toplote podesen na smanjenu jačinu. - Započnite odbrojavanje vremena kuvanja koje je naznačeno u receptu. - U režimu "Šerpa", u svakom trenutku možete otvoriti ekspres Ionac da promešate, kontrolišete kuvanje ili dodate sastojke. - Ako ne możete da otvorite proizvod, operite dihtung pod mlazom vode a zatim ga ponovo vratite naPoklopac bez prethodnog brisanja -sl. 19 i uverite se da je ispravno postavljen ispod zareza naPoklopcu -sl. 15. - Ako je izvor toplote prejak, moze doci do zakljucavanja ekspres lonca (sigurnosna cev (D) se podiže i blokira otvaranje), ručkaPoklopca više nije operativna ili ne otvara lonac. Ukoliko do toga dode, smanjite ili potpunougasite izvor toplote. Ako se radi o elektricnoj ringli od livenog gvožda, skinite lonac sa izvora toplote.  - Za modele sa nelepljivom oblogom: nemojte da upotrebljavate metlice ili metalni ili ošar kuhinjski pribor. Ne otresajte kuhinjski pribor o ivicu posude zbog rizika od oštećenja i zbog kapanja. - Nikada ne zagrevajte ulja i mast do ugljenisanja. Isparenja od kuvanja mogu biti opasna zaŽivotinje sa osetljivim respiratornim systemom, kao što su ptice. Vlasnici ptica bi trebalo da ih udalje iz prostorije u kojoj se kuva.Bezbednost
Ekspres lonac poseduje nekoliko sigurnosnih sistema:Bezbednost pri zatvaranju:
- UkolikoPoklopac nije pravilno postavljen ili ste zaboravili da spustite ručkuPoklopca,para ce izlaziti na sigurnosnoj cevi (D) ekspresnog lonca i pritisak nece moci da se podigne.- Bezbednost pri otvaranju:
- Ako je lonac pod pritiskom, sigurnosna cev (D) je podignuta a ručkaPoklopca za otvaranje/zatvaranje (G) ne sme da se koristi. - Nikada ne otvarajte ekspres Ionac silom. - Ni u kom slučaju nemojte delovati na sigurnosnu cev(D). - Uverite se da se unutrasnji pritisak spustio tak o sto cete proveriti da li je sigurnosna cev (D) u donjem položaju. - Ručke predstavljaju bezbednosne delove posude. Nikada ih ne menjajte sami. Nikada ne koristite druge modele ručki. - Ako ste stavili ručkuPoklopca za otvaranje/zatvaranje (G) u vertikalan položaj, sve dok je lonac pod pritiskom, ne možete ga otvoriti. Ova funkcjja predstavlja dodatni sigurnosni system. - Stavite ručkuPoklopca u horizontalan položaj i sačekajte da se sigurnosna cev (D)vrati u početni položaj. Dva sigurnosna systemdu slucaju prevelikog pritiska: - Prvi urejadaj: sigurnosni ventil (E) oslobada pritisak - sl. 20. - Drugi urejad: dihtungPoklopca pu sta paru da izlazi -sl.20.Ukoliko se aktivira"One dan od sigurnosnih systemdu slučaju prevelikog pritiska:
- Isključite izvor toplote. - Ostavite Ionac da se potpuno ohladi. - Otvorite ga. - Proverite i očistite radni ventil (A), cev za odvod pare (B), sigurnosni ventil (E) i dihtung (I) - sl. 16 - 17- 18. Pogledajte paragraf "Čišćenje" i "Obavezne provere pre svake upotrebe". - Ukoliko posle ovih provera i cisćenja Vaš ekspres lonac ispustā ili više ne radi, odnesite ga u ovlašćeni TEFAL servis.Preporuke prilikom upotrebe
1 - Para koja izlazi iz radnog ventila je previše vruća. Pazite na mlaz pare. 2 - Čim se sigurnosna cev podigne, ne možete više da otvorite lonac. 3 - Kao i za svaki aparat za kuvanje, obezbedite stalni nadzor ako koristite ekspres lonac u blizini dece. 4 - Kad pomerate lonac, koristite ručke na posudi. 5 - Ne ostavljajte hranu u ekspres loncu. Nikada ne prenosite ekspres Ionac drzejeci ručkuPoklopca. 6 - Nikada ne koristite sredstva zadezinfekciju ili proizvode na bazi hlora, jer bi mogli da ošetite nerăjuciČelik. 7 - Ne ostavljajePoklopac potopljenu vodi. 8 - Jednom godišnje menjaje dihtung. Ukoliko pukne odmah gazamenite. 9 - Čistite Ionac isključivo kada je potpuno hladan, i prazan. 10 - Nakon 10 godina korišćenja, obavezno odnesite Vaš ekspres Ionac u ovlášćeni TEFAL servis.Čišćenje
Da bi ekspres lonac uspešno radio, posle svake upotrebe sledite preparuke za cisćenje i održavanje. Tamnjenje i grebotine koje se mogu pojaviti nakon dugotraje upotrebe ne predstavlaju smetje za ispran rad. Habanje spoljnje obloge(uzavisnosti modda) usled kontaktaPoklopca i posude je normalna pojava. Kod ekspres Ionaca sa nelepljivom oblogom (u zavisnosti od modela): blage o grebotine i abraz ije koje mogu nastati tokom korišćenja, ne utiću na njen kvalitet. - Operite Ionac posle svake upotrebe mlakom vodom i deterdžentom za sudove. Na isti način postupite i sa korpom za kuvanje na pari*. - Ne koristite izbeljivač niti hlorisane proizvode. - Ne grejte Ionac kada je prazan.Cisćenje unutrażnjosti posude od nerăjućegČelika:
- Operite je sunderom i deterdžentom za sudove. - Ukoliko u unutrasnjosti posude od neradajućeg Čelika primetite sedefasti odsjaj ili bele tragove (ostatke minerala), ochistje je sirćetom.Cisćenje unutrašnjosti posude od aluminijuma sa nelepljivom oblogom:
- Da biste produktivi vek trajanja posude, preparučujemo Vam da je perete ručno. - Operite je toplom vodom, deterdžentom za pranje sudova i mekim sunderom. Ne koristite deterdzent u prahu i abrazivne sundere. - Ako su namirnice zagorele, napunite posudu toplom vodom i ostavite je neko vreme. Zatim je operite deterdžentom za pranje sudova.Cisćenje speljasnosti posude:
- Operite je sunderom i deterdžentom za pranje sudova. Posudu od nerăjúçeg Čelika ikorpu za kuvanje na parimozete prati umašini za sudove. Ne perite posudu sa nelepljivom oblogom (uzavisnosti od modela) u masini za sudove, zato sto deterdženti u formi tabletse sadrže veoma agresivne i korozivne supstan ce za delove od alum inijuma. Intenzivno korišćenje posude sa nelepljivom oblogom (u zavisnosti od modela)要去 dove sti do blag e promene boje (požuteti, prebojiti se).CisćenjePoklopca:
- Operite ga sunderom i deterdzentom za pranje sudova. Isced ite poki opac vertikal no kako biste uklonili preos talu vodu izme edu metalnih i plasticnih delova po klopca.Ciscenje dihtungPoklopca:
Posle svakog kuvanja, operite dihtung (I) i leziiste. - Za vraćanje dihtunga na mesto, pogledajte - sl. 15 i vodite računa da je dihtung ispravno postavljen ispod svakog zareza naPoklopcu.Ciscenje radnog ventila (A):
- Skinite radni ventil (A) -sl. 11. - Operite radni ventil (A) pod mlazom tekucié vode -sl. 16. Proverite njegovuPokretljivost:pogledajte sliku. Nakon što ste skinuli radni ventil (A), dihtung (I) i tajmer* (F),Poklopac mozete oprati u masini za sudove.  Nikada ne perite radni ventil(A), dihtung (I), tajmer (F), ili posudu u masini za sud ove. Cisćenje cevi radnog ventila (B) koja se nalazi podPoklopcem: - Skiniteventil(A)-sl.11. - Proverite vizuelno i na dnevnoj svetlosti da je cev za odvod pare otpušena -sl. 13. Po potrebi je očistite Čačkalicom - sl. 17 i isperite. Ciscenje sigurnosnog ventila (E): - Operite deo sigurnosnog ventila koji se nalazi unutarPoklopca taksto cete stavitiPoklopac pod mlaz vode. - Proverite da li dobro radi taksto sto cete jak pritisnuti stapićem za uši loptu ventila koja mora bitiPokretna -sl.18.Pogledajte paragraf "Cisćenje" i "Obavezne provere pre svake upotrebe". Cisćenje tajmera* (F): - Obrisite ga cistom suvom krpom. Nemojte koristiti sredstvo za ciscenje. - Nikada ne stavljajte tajmer u vodu i masinu za sudove.ODRZAVANJE
Zamena dihtunga na ekspres loncu: - Menjalte dihtung jegisnje ili kada se na njemu pojavi ostecenje. - Uvek koristite originalan TEFAL dihtung koji odgovara Vašem modelu (pogledajte paragraf "Dodaci"). - Za vraćanje dihtunga na mesto, pogledajte - sl. 15 ivodite računa da dihtung dobro ulegne ispod svakog udubljenja naPoklopcu. Odlaganje ekspres lonca: - OkrenitePoklopac na posudi. - Mehanizam za otvaranje/zatvaranje lonca ne zahteva posebno održavanje osim cisćenja. Nakon 10 godina korišćenja, obavezno odnesite Vaš ekspres Ionac na servisiranje u TEFAL ovlăšćeni servis.TEFAL Dodaci
Dodaci za ekspres lonac koji su dostupni u prodaji:| Dodaci Reference | ||
| Dihtung | 3/4/4.5/6 L: speljašnji prečnik dihtunga: 24 cm | X1010008 |
| 5/7.5/9 L: speljašnji prečnik dihtunga: 27 cm | X1010007 | |
| Korpa za kuvanje na pari* | 3/4.5/4/6 L: za prečnik posude od 22 cm | 792185 |
| 5/7.5/9 L: za prečnik posude od 24 cm 79 | 2654 | |
| TrONOžni stalak* (L) | 792691 | |
| Tajmer za kuvanje* | X1060007 | |
Karakteristike
Prečnik dna posude lonca - reference
| Zapremina | Ø Posuda | Ø Dno posude | Clipso Minut* Perfect / Easy | Clipso Minut* Duo couleur | Clipso Minut* Duo Gourmet | Materijal posude |
| 3 L 22 cm 15.5 cm | P46205 | - | Nerăjući Čelik | |||
| 3 L 22 cm 18 cm | - | P46605 | ||||
| 4 L 22 cm 14 cm | - P46042 | - | Obloga od aluminijuma | |||
| 4.5 L | 22 cm 15.5 cm | P46206 | - | Nerăjući Čelik | ||
| 5 L 24 cm 14 cm | - P46051 | - | Obloga od aluminijuma | |||
| 5.2 L | 24 cm 20 cm | - | P46654 | Nerăjući Čelik | ||
| 7.5 L | 24 cm 18 cm | P46248 | - | |||
| 9 L 24 cm 18 cm | P46249 | - | ||||
| Set 5 L/7,5 L | 24 cm | 14 cm | P46353 | - | ||
| 18 cm | ||||||
Normativne informacije:
Gornji pritisak pri radu: 65 kPa Maksimalni bezbednosni pritisak: 120 kPKompatibilni izvori toplote
GAS STRUJA  (Elektricna ploca)  STRUJA (Vitrokeramicka ploca)  STRUJA (Indukciona keramicka ploča)  STRUJA (Spiralna elektricka, ringla)  - Vaš ekspres Ionac se upotrebljava na svim izvorima toplate, uključujuci indukcjju. - Na elektricnoj ringli, koristite ringlu jeg manjeg precnika dna lonca. - Na vitrokeramičkoj ploci, proverite da li je dno lonca Čisto. - Na plinu, plamen ne sme da premašuje prečnik posude. - Na svim izvorima toplote, vodite računa da lonac bude dobro centriran.Garancija
U okviru preporucene upotrebe shodno datim instrukcijama, posuda od nerăjućeg Čelika na Vašem novom TEFAL ekspres Ioncu ima 10 godina garancije za: -Svako ostecenje metalne struktur posude lonca, - Svako preuranjeno ostecenje metalne baze. - Za ostale materijale posude i druge delove Vaseg ekspres lonca, garancija za svaku fabričku grešku ili nepravilnost, definisana je važecim zakonima zemplje u kojoj je proizvod kupljen i datumom kupovine. - Ova ugovorna garancija se ostvaruje uz podnosenje računa ili fakture sa datumom kupovine. Garancija nePokriva: - Ogrebotine i promenu boje usled starenja, za posude sa nelepljivom oblogom. - Ogrebotine nastale prilikom stavljanjaPoklopca na posudu sa nelepljivom oblogom. - Ostecenja nastala kao posledica nepostovanja važnih mera opreza ili nemarne upotrebe, narocito: - Udarci, padovi, stavljanje u rernu, ... - Samo u TEFAL ovlasćenim servisima moźete iskoristiti ovu garanciju. - Pozovite broj obelezen plavom bojom da biste se informisali o adresi najblizeg ovlascenog servisa.Regulatorne oznake
| Oznaka Lokalizacja | |
| Komercijalna oznaka NaPoklopcu | |
| Godina i serija proizvodnje Referenca modela Maksimalni bezbednosni pritisak (PS) Gornji pritisak pri radu: (PF) | NaPoklopcu |
| Zapremina Na speljnjem dnuPoklopca | |
| Poštanska adresa proizvodaća Na speljnjem dnuPoklopca |
Učestvovanje u zašitiživotne sredine!
 ① Vaš aparat sadrži brojne materijale koji se mogu reciklirati. Odnesite ga u centar za reciklažu.TEFAL odgovara na Vaša pitanja
| Problemi | Preporuke |
| U slučaju otežanog otvaranja i/ili zatvaranjaPoklopca: | ■ Skinite dihtung i isperite ga pod vodom ■ iz slavine, a zatim ga vratite uPoklopac bez brisanja -sl. 19. |
| Ako ne možete da zatvoritePoklopac: | ■ Proverite da li je ručkaPoklopca pravilnom vertikalno položaju. ■ Proverite da li je dihtung pravilno postavljen (pogledajte paragraf "Čišćenje i održavanje"). ■ Proverite da li jePoklopac postavljen kao što je pri Kazakhstan na -sl. 1. ■ Isperite dihtung pod vodom iz slavine, a zatim ga vra uPoklopac bez brisanja - sl. 19. i uverite se da je ispravno postavljen ispod zareza naPoklopcu -sl. 15. |
| Ako se lonac zagrejao pod pritiskom bez tečnosti unutra: | Odnesite lonac u TEFAL ovlasćeni servis. |
| Ako sigurnosna cev zvecka i ispušta paru: | To je uobićajeno u prvim minutima kuvanja: time se omogućava ispustanje vizduha pre kuvanja. |
| Ako se sigurnosna cev:no podigla i ništa ne izlazi iz ventilàtokom kuvanja: | To je uobićajeno u prvim minutima kuvanja. Ako se to nastavi, proverite da li je: - Izvor toplote dovoljno jak, akо nije, pojačajte ga. - Količina tečnosti u posudi dovoljna. - Radni ventil (A) postavljen na - Ekspres lonac dobro zatvoren. - Dihtung ili ivica posude oštećena. - Dihtung dobro postavljen. |
| Ako se sigurnosna cev:no podigla i ništa ne izlazi iz ventilàtokom kuvanja: | To je normalno tokom prvih nekoliko minuta. Ako se to nastavi, uspite hladnu vodu u sudoperu i poṭopite dno ekspres lonca u vodu kako bi se sigurnosna cev (D) spustila. Očistite radni ventil (A) -sl. 16 i cev za odvod pare -sl. 17 i proverite da li možete da stavite loptu ventilà bez potěškoća -sl. 18. |
| Ako para izlazi okayPoklopca i ako je sigurnosna cev u spuštenom položaju, proverite: | Da li je Poklopac dobro zatvoren.Položaj dihtunga uPoklopcu.Da li je dihtung u dobrom stanju, ako je potrebnozamenite ga.Da li suPoklopac, dihtung i ležište dihtunga naPoklopcu Čisti.Da li su ivice posude u dobrom stanju. |
| Ako ne možete da otvo-ritePoklopac: | Proverite da li je sigurnosna cev (D) u donjempoložaju.Ako:noj, ispustite paru: uspite hladnu vodu u sudoperu i potopite dno ekspres lonca u vodu kako bi se sigurnosna cev spustila. Nikada ne delujte na sigurnosnu cev (D).Okrenite radni ventil (A) do položaja za. |
| Ako namirnice nisu ku-vane ili su zagorele, proverite: | Vreme kuvanja.Jačinu izvora toplote.Položaj radnog ventilla (A).Količinu tečnosti. |
| Ako su namirnice uloncu izgorele: | Ostavite Ionac neko vreme potopljen pre nego što ga operete.Ne koristite izbeljivač niti hlorisane proizvode. |
| Ukoliko se aktivira{jelan od sigurnosnihistema: | Isključite izvor toplote.Pustite lonac da se ohladi i ne pomerajte ga.Sačekajte da se sigurnosna cev spusti i otvorite.Proverite i očistite radni ventil (A), cev za odvodpare, sigurnosni ventil i dihtung.Uvek sledite uslove punjenja.Ukoliko problem i dalje postoji, odnesite lonac uovlašćeni TEFAL servis. |
| Ukoliko primetitetragove oksidacije: | Upotreba neržajućeg Čelika izuzetnih performansne要考虑 sprećiti povjavu oksidaciJE u ekstremnimsituacijama. Ako primetite tragove oksidaciJE, očistite ih abrazivnim sunderom pre narednueupotrebe ekspres lonca. |
LABELA KUVANJA
Povrçé
POVRCE (SVEZE)
PARA
Sastojak u korpi za kuvanje na pari i 750 ml vode na dnu ekspres Ionca.  POTAPANJE
Sastojak u vodi i bez korpe.MAHUNARKE
POTAPANJE
Bezkorpe.   m - 1 0 ;| Artićoke, 2 cele, 600 g svaka (potapanje) 30 do 35 min | |
| Blitva, isečena (2 cm) 700 g (para) 15 do 17 min | |
| Boranija, zelena, tanka (600 g) (para) 10 do 12 min | |
| Brokoli, cvetovi 600 g (para) 9 do 11 min | |
| Bundeva, isečena na komade (3 do 5 cm) 600 g (para) | 13 do 18 min |
| Celer, isečeni (potapanje) 600 g 7 do 9 min | |
| Cvekla, crvena, isečena na Četvrtine (potapanje) | 20 do 25 min (prema velicini) |
| Endivija isečena na pola (900 g) (para) | 14 do 16 min |
| Grašak (para) | 6 do 8 min |
| Grašak razdvojen na polovice 250 g (potapanje) | 18 do 20 min |
| Karfiol, cvetovi 600 g (para) | 10 do 12 min |
| Krompir isečen na pola (950 g) (para) | 20 do 25 min (prema velicini) |
| Kupus, isečeni i zeleni, 500 g (potapanje) | 5 do 6 min |
| Luk za kiseljenje (para) | 7 do 8 min |
| Morač isečen na trake (600 g) (para) | 6 do 9 min |
| Paprike babure presečene na pola (550 g) (para) | 14 do 16 min |
| Pasulj, suvi, 250 g (potapanje) | 35 do 40 min |
| Patlidžani, oguljeni i isečeni (3 mm), 850 g (para) | 10 do 12 min |
| Pečurke, isečene 800 g (potapanje) | 4 do 5 min |
| Praziluk, celi i beli 650 g (para) | 9 do 11 min |
| Prokelj (para) | 10 do 12 min |
| Repa, isečen na kockice (500 g) (para) | 14 do 16 min |
| Šargarepe isečene na okrugle kriške (3 mm) 600 g (para) | 17 do 19 min |
| Sočivo, zeleno 250 g (potapanje) | 14 do 16 min |
| Spanać (para) | 3 do 4 min |
| Špargla, bela (para) | 5 do 6 min |
| Tikvice isečene na okrugle kriške (3 mm) 600 g (para) | 12 do 15 min |
Pirinač
| POTAPANJE Bez korpe. MAX 1 | KOLICINA VODE | KOLICINA PIRINÇA | VREME KUVANJA | |
| 2 OSOBE 400 ml / 2 CPA 150 g / 1 | çaşa | 7 do 8 min4 | OSOBE | |
| 500 ml / 2,5 CPA | 250 g / 2 CPA | |||
| 6 OSOBA 700 ml / 3,5 CPA | 375 g / 3 CPA |
Meso/riba
| SVEŽE SMRZNUTO | |
| Goveča pečenica (1 kg, promer 8–11 cm) 30 do 35 min 45 do 50 min | |
| Grdobina, fileti (1 kg) u komadima od 75 g 5 do 6 min 7 do 8 min | |
| Jagnjeća kolenica: 2 (0,95 kg) 40 do 45 min 1 h 05 do 1 h 15 | |
| Losos, odresci: 4 (0,8 kg) 5 do 6 min 7 do 8 min | |
| Pačetina (1,8 kg) 45 do 47 min 50 do 55 min | |
| Piletina (1,35 kg) | 23 do 25 min 1 h do 1 h 10 min |
| Pilići, mladi: 2 (1,3 kg) | 23 do 25 min 40 do 45 min |
| Prepelica: 4 | 9 do 10 min 18 do 20 min |
| Svinjska kolenica (0,8 kg, promer 8–10 cm) | 30 do 35 min 1 h 05 do 1 h 15 |
| Svinjski file minjon: 2 komada od 350 g | 13 do 15 min 26 do 29 min |
| Teleća kolenica (0,8 kg, promer 5–7 cm) 17 do 19 min 37 do 40 min | |
| Teleći file minjon: 0,7 kg | 17 do 21 min 33 do 38 min |
| Rlovana teletina: 4 | 10 do 12 min x |
| Tuna, odresci: 4 (0,7 kg) | 5 do 6 min 7 do 9 min |
| Zec (1,5 kg u komadima) | 8 do 9 min 20 do 23 min |
IHCTPYKlI3 TEXHIKN BE3NEKN
Ipeed BnKOpncTaHnM cKOpOBapKn yBaXHo 03NaHOMTeC8 3 ycima Bka3iBkAmi i 3aBXKn dOtpmMyTecb IHcTpkyuataii. HenpaBnIbHe BnKOpncTaHn MoKe npn3BeCTn Do NowkoJxHeB. 3aIy Baoi 6e3neKu eI npnaB iDIOBidae uHHm cTaHapTam i HopMaM: -ДиpeKtNbi zuoO o6naHaHnry,Ke npaioe nID TnCKOM - Bumoram zuo moatepiaiB, kio KOnTaKtyIOTb i3 xapuOBmnpOdyKTamn -BmOram 0oO oxopoHn DOBkijll| ОБОВ'ЯЗКOBI ПЕBEBIPKИ ПЕPED КоЖнIM ВИКОПUCTAHN ЯМ | ПЕPEBIPE При денистп, сбітлі, сьо отвір ддя вихочу пари He Забівся - мал. 13. Кульka започино клала на може рухатся - мал. 18 Ушільніювач кршки розмішени під кожніміз пазів Кршки - мал. 15. Чи правільно з akріпелeni ручки кастулі. Ручки Кастулі с зaxисими DeТалямп. Нікові He замінійte ixcamostійно. |
| Зав? ДOTРIMYstituteC HABEDEHIX BKA3IBOK I3 КILbKOCTI IHГ佩DIЕHTIB | He kорис'tуITEСССКOPOBAPКОЮ 6e3 рідини, сe може празві beautсп до сьсіріоЗного пошкоженny. Під чac празгOTуВань сідкuyіte 3a ТИМ, сьоб у скоровагц 6уlio doctatнbero рідини. Мінім汞 250 мл - мал. 4. Мakсим汞 2/3 Висоти Emnocti, Відmitka MAX 2 - мал. 5. Під чac рінгOTуВань на пapi розукten в Кошніку He MaJOТь KOHTAKTUВATи 3 BODOЛ - мал. 6 i7. Мakсим汞 1/3 (MAX 1) дд'makapоннix виробів, які 3більшуюьсь в розмірax i/a60 рінгься під чac Варінь, нашикад рис, бòobvi, сушени овочi, фруktові пюpe, rap6уз, ka6aчkn, морква, karToPля, рібne Фіе... ПrodukTY,nomішени в Кошніді рінгOTуВаньна Na парі, He міють перевицуВати рівень MAX 2 в Emnocti. |
DOIПIDчAC PIPROTYBAHH
He 3aIIuIte dIeT e 6e3 Harny 6iI npauooyoi ckopOBapKn. - Ckopobapka rotye nid TnCKOM. 3a HenpaBnIbHoro BnKOpncTaNHa MoXHa OTpMaTn OniK BiD Okpony. IpeD BnKOpncTaNHM nepekoHaTecr B TOMy, 1O cKopobapka HaleJHm YINHom 3aKpTuA. DnB. po3dIl «3aKpNBaHHra>. KoHTpOIOHe, 06 nIac npnroTyBaHn IxKi KJanaH noCTiINHO npaIOBAB, 3aBXKn BnyncKaIOU npy. Jkso He BnXODITb DOCTaTHbO npu, BnynctITb TnCK i nepeBipTe HaABHicTB DOCTaTHboI KInbKOcTI pIDHH, a TaKoK uN He 3acmiueHn OTBIP BnXOy npu. Picna cux nepeBipok, Jkso npa I naI He BnXODITb, TPOXn 36ilbWitb TemnepaTpy. He roTyIte npOdyKTn, kI MOKytb 3acMITNT OTBOPN 3axnCHnx DeTanei: -яROДи; - neploby kpyny; -BIBCAnI nlaCTiBci; -cyxnI ropox; - JOKUHy, MaKApOHN, cnareTTi; -peBihb; CMOPOAnHy. He BnKOpNCToBvIe cKOpOBapKy dIy npNroTyBaHnY CTpaB, DO CKJaDy kNX BXoINTb TBapINHHe MOnOKO. -Дя скороварки 3 кастул eо 3 Нержавioо i Stani He BИКОпСТОВУМ Te KaM'Яну CINb, a ДODаВaIte CINь ДрибHoro NOMOЛY B KINci npriroTuBaHnry. TaKIM YINHom Bn yHInKHeTe NOЯВN «ПрOKOLiB», як MOrЛN 6 npuBecTи Do DeФOPMaцii ДHA скороварки. He BnKOpNCToBvIe cKOpOBaPky dJa CmaKeHHa 3 BnKOpNCtAHHm OJIi. BnKopncToByte cKOpOBapKy Iiwe 3a npn3HaueHHaM. He cTaBte ckopoBapKy B po3irpiTy dYxOBky. Hikon He knaiItb He3aKpinIeHy aIOMHiEBy fOJbry Ha KOsIK dI npiroToyBaHHa napi B cKOpOBapci. Hikonn He knaitb nonietnneHOby nIbky B cKOpOBapKy - Пари спирту ВоронебeзneчHi. Рерш Нix Зakрити Кршку, Доведы рдуну до кининя потгом 2хвлин. 3Верта осobиьу увагу настрави, до складу якnx BXODNTb спирт. KopntyTeCnBapnIbHnMn NOBepxHnMn, Aki BiNIOBiaHO Tm, 0 Bka3aHi B IHCTpykci 3 BNKOpNCtAHn.ПИСЛ
ПИГOTУBAHHЯ Длma moDEne 3 aHTnnpurapHm NOKpTTaM: He BnKOpNCToBvIe BiHUnKn, MeTaNbN a6o roCTpn Nocyd. He BnINBaIte pIDHH 3 Nocdy, ydapauH Hm o6 KpaI KactpyJI, OckInbKn ce MoKe NOsKOJNTu II Ta npn3BeCTn Do npotikahHa. -Пocуно BO NOBepHITb po6oH N KlaH (A), Bn6upaOuH NwNdke BnnyckaHH nap,do nIKtorpamM -MaI.10.RKIO npiD yac BnnyckaHH nap BN cnoCTepiraTe aHOMaIbHi BnKnID,3HOBy BCTaHOBiTb po6oH N KlaHaN (A)y no3nciIO npIrTOyBaHH BpeXmI cKOpOBapKn,notIM 3po6Itb WnndKe BnnyckaHH nap BN XoJOnHi BOJI -MaI.14. - RaKIO 3aNo6ixHn KlaHaN (D) He onyckaetbca, nomictiBCKOpOBapKy B XoJIoNDHy BOdy - Man. 14. Hikon He TnCHItb Ha 3anO6ixkHn KnaanaH. - 3anobirtn onikam BiD okpony, nicra npirotoybaHHaM'ca, 0mictntb nobepxheBy nibky (hanpuknaad, naOBuHn a3nk), kha h6yxa e nid TnCKOM, He npokoiute ii B h6yxIomy cTahi. HamaraTeCn npokoiBaTu M'aco nepei npirotoybaHHaM. ДлmaMaKapoHnX BnO6iB,як 36iNbIbIyIOTbcR B 06'Emi a60 nIHyTcN iD yac BapInHЯ,HaNPkIaNpC,6o6Obi,CyuSeHi OBOUi,ФpyKTOBI nIOpe,rap6y3,Ka6auchM,MPKBA,KapToJIa, Pn6He fIe...OCTyIDITb CkOpOBaPKy IpoTAROM KINbKOx XBUNH, a Notim nomictiB y XoJOnHy BOy.ObOB'zKOBO 3nerKa CTpyuYte CkOpOBaPKy Ipeed KOxHM BiIDKpNBaHNm, IpeEBipNBuH, uN 3anobixHHN KlaPAn OHyCTNBcA, 0o6 3anobirn po36pn3KyBaHNHIO, UO MoKe pnp3BeCTN Do onIKIB. Lc ocO6JIbNO BaxKnBO dJa WbNDKOro BnPyCKaHNr napn a6o nicna nepe6yBaHNB XoJOnHi BOi. -Пересуваite ckopoоварку, соpeбуваe πiД ТИСКOM, 3 MaKcIMaJIbHOIO obepexHicTIO. He TopkaITeCra rapaUnx NOBepxOHB. KopnCTyIteCra рчKaМи Ta KHONKaMn. 3a notpe6N BIVKOpIcTOByIe npNXBaTkn. -ДлгпрurotyBaHHcyniB peKOMeHdYcTBc3iINCHIOBaTN WbNKe BnPyCKaHHnapB XoJOnHiB0Di (DnBiTbcr po3di《3akihueHH npurotyBaHHBpeKmI cKOpOBapKn》). -ipekeohntec, zo klanah nepe6ybae B noJoxeHHi BnynckaHH nap, nepw hix BiKpnBaTn cKOpOBapKy. 3anobxHnn klanah (D) ma e nepe6yBatn B HxHbomy noJoxeHHi. Hikon He BdkpnaTe ckopOBapky uepe3 cnly. IpekoHaTecB TOMy, 0BHyTpiwHi TnCK y ckopOBapci BiCyTHi. 3an6ixHni Klanah (D) Mae nepe6yBatn B HxKhbOMy noloxeHHi. (INB. po3dIn «Cnstem 6e3neKn»). 36EPEKITb IIO IHCTPYKcIIO IJIa IODAJIbWoTO BnKOpNCTAHHЯ| OБCLSNYTOBYBAHNA | ■якшо Ви ВиВВITE, сию бudь-якадеталь вашоі скороварки зламанаabo trichула,нВ вякову рази He npobuyite BVIDKpNTn II,якшо ВОна зakрпta,дайт eй nobhICTIO oxolohytn,першнипесати II,бilbше He BIVKOPNCTOBVByte II i BIDHeCITB B abTOpI3OBaHni cepBicnru centp TEFAL.■Повдьтесь i3 системами 6e3пеки 3 дOTPIMaHNM iNCTpykciŋ 3 очшени Та obcnyroBvBaHnry.■ВИКOPNCTOBVByte Лше opurighalNBi detaJI BIVo6HnztBa TEFAL,як BiДnobiДают bmodel i BAOoi skopOBapkn. HanolerglNbO peKOMeHdUeMo BIVKOPNCTOBVByatn kactpylnu ta Kpiushky TEFAL.3 MeToIO 3anobirahня пошcodженью кastpynl i He BIVKOPNCTOBVByte скороварку ДЯЗбэрань Кислих i coLoHnx npodukTiB.ОчstITb ta cnoLoschitb скороварку BIDpa3yЖпсяЯ BIVKOPNCTAHNry.Hikoli Ne CTABTe робочи Клалан (A), ушьнювач (I), таймер* (F) abO Kansasryu 3 aHTINprugarHm POKpTTam y nocydomnHy MaShInHy.Hikoli Ne nomiшaite taiMeR* (F) nD Body.He BIVKOPNCTOBVByte po3uzH xlopy Ta MInuoyi 3ac06n,шо мICTЯыхлор,як мokут bpoшKDUTn NOBepxHNo 3 hepxabioоi stani.He 3aIIshaite Кршку y Bodi Na TrpVBaIIiy quac.MiJaIte uşil6HouBauch pa3 Ha pIK abO oJpa3y,якшо на NbOMy 3'YBnInscy deΦeKTI.N.Pic74 10 pOKIB ekCplnyataцii Heobxidno 3diIChnTu texhniHni orIyad skopOBapkn B abTOpN3OBaHOMy cepBicnomy ueHtrpi TEFAL.DЯ 36epiraHnry скороварки:переверніть кршky Na KaSTpylIO,шo6УнКнуTNперEDuachHOrO 3HOCU yuzlbHIOBaua кршки. |
Onnc
A. Póboùn kla nanopH B. KaHaJI BiIBeDeHnI napI C. Позначка Дя Встановленья КлараHa D. 3anobixHHn ctpnxKeHb (INB. po3dIn «CncTeMn 6e3neKn>). E. 3ano6ixhni KlaanaH F. Taïmep* G. Puyka Kpnwn H. Kpnska I. yuilbHIOBaU J. Koшндя пиютуваши Ha napi* K./L. TpHora* M. Puyka Kactpyli N. ΠознauкmaKcImmaJIbHOrO HaIOBHeHHa 0. KactpyraO6OB'ЯЗКОВI nepeBipKn nepeД кoxнm BИКОРистаннam_
Ipebipka po6ofoKlanaHa
 - IpekehauTecra, 10 BnXiHn OTBip po6oYoro KlaNaHa He 3acMieHo (INB. PO3dIn «3HATTA Ta BCTaHOBHeHHr po6oYoro KlaNaHa»).Ipebipka 3ano6xHoro KlaanaHa
 - IpekehaiTeC, 0 KylbKa 3anobixHoro KlaanaHa MoKe pyxatncs (BnKOpNCToByIe nannuKy).BnKopncTaHn
 BapiHnBpeKmI cKopOBapKn  PpuroToyBaHnB BpeXmI KaCTpyNi*  BunyckaHna napnBidkpmbHn
- IpebeiB pyk Ky KpNkN 3 rOpN3OHTaIbHOro NIOJKeHHy BepTnKaIbHe-MaI. 3.Kpnka NOBepTaETbcra. PiHimItb KpuKy. Y pa3i BnHnKHeHHa TpydHouiB npn BiDkPnBaHHi npncTpoI: NOMictIb yuJIbHIOBAuPiBvOy, a NotIM Ha3aJy KpuShKy, He BNTnpaUOn - Man. 19, i nepekoHaItec, uO yuJIbHIOBaau do6pe npoxoDiNbPi d na3amN KpuShKn - Man. 15.3aKpmbaHHa
- PpekoHaTecra, 00 pyka Kpnkni nepe6yBaE y BepTKaIbHomy noJoxeHHi. ■Помістів Кршky Ha Kactpylno, як пokаЗано HamaHIOHky 1, NOeДнавшппл actmacoby DeTalb i3 pyukamn Kactpyni. CknaIbpyky KpnuKn 3 BeptnKaJbHOro NNoJoxKeHHa B TOpN3OHTaJIbMaJ.2 KpnuKa noBepTaetbca.Jkso Bn He MoXKeTe 3aKpNTn KpnShky:
- IpebeipTe npabnIbHe noloxeHryuIbHIOBaayi npabnIbHe po3TaUyBaHHKpIshK. Y pa3i BUNHKHeHn TpydHooiB npn 3aKpNBaHHi npncTpoI: NOMictb yuJIbHIOBaY niD BODY, a Notim Ha3ad y KpUkky, He BNTnpaOuy - man. 19, i nepekoHaTeCra, 10 yuihOBau do6pe npoxoHTb nd na3amn KpUkN - man. 15.Першевскорецьнаня
-Дя модени 3 aHTинригарнм NOKpTTam: npOMnTe i 3JerKa 3MaCTiTb pocnHHIO OJIeIO BHyTpIshIO NOBepxHIO.3anexho BID moedJI:
BcTaHOBIb TpHOry\*L) Ta Kowk\* (J) Ha dHo KaCTpyJI. -ПпстебиТь Трногу\* (К)do Koшнka\* (J),notim noctabTe HaДно Каструл. HANOBHITbKactpyIIO(O)BOIOHOHa2/3(MAX2)-MaI.5. 3akpiTe cKOpOBapKy. BupiBnIte nIKTorpamy po6oymy knanahi (A)3a no3HaUKOIO NOJXeHHa (C)- man.9.   - ПocтавTe ckopoВapKy Ha BapиьHy NOBepxHIO i BnCTaTe MaKcImMaJIbHni piBeHb TempepaTpyi. KoI npa noHne BnXoDHTu chepe3 Klaanah, 3MeHwiTb iHTeHCNBHicTB TeMnpaTyPn n 3auekaTe 20 XB. Yepe3 20 XB BUMKHITb PINTV. BupiBnIte nIKtorpamy Ha pO6Omy KlaNaHi (A) 3aNo3HaUoIO NOJKeHHKlaNaHa (C). KoII 3aIO6IHHn KlaHn (D)OnyckaETbCra, CKOpOBapKa 6IbWe He nepe6yBaE II TnCKOM. Bidkpinye ckopoBapKy- Man.3. -ПомиTe II 3a DONOMORIO 3acO6y ДЯ MHTTЯ NOcydy.MaKcImaJIbHe Ta MiHimaJIbHe HaIOBHeHHa
MiHimym 250 m (2 cKJnK) - Man.4. MaKcHymM 2/3 BnCOTn KaCTpyJI, BiJIMtKa MAX-2man.5. He BnKOpncToBvTe KaM'AnHy cInb, a DoJaBaIe CInb dpi6Horo NOMOy B KINcI PnTOTVBAHHa.Дя Deякux npoуктib:
-Дя MaKapOHnX BInpO6iB,Яki 36iNbIbIyIOTbcR B O6'Emi a60 NiHrTbcR NiD Yac BapIHHa, TaKnx Jk Pnc, 6o6Obi, cyweHi OBOUi, ppykTOBi nIOpe, rap6y3, Ka6auchn, MOpKBa, KapTOnJIa, Pn6He fIe... He HAnOBHouTe cKOpOBaPky 6IbIe HIX Ha 1/3 (no3HaUka MAX 1). OcTyDiTb CKOpOBaPKy npOTAROM KInbKOx XBnIHn, a NOTIM NOMICTITb y XoJIoNDHy BOy. O6OB'ra3KOBO 3JeRka CTrpyuYte cKOpOBaPKy nepeD KOxHM BiIDKpNBaHHM, nepeBipNBuN 3anobixn Klanah onyctnbca, 06 3anobirtnpo36pn3kyBaHHIO, 0 moKe np3BecTN do onikib.  OCO6JIbBO BaJINBO DЯI WBIaKOrO BInyckaHnA napu a6o nicna nepe6yBaHHaB XOJODHi BOi.ДЯ npIrTOyBaHHa CyniB peKOMeHdYcTBc 3diIChIOBaTH WBIaKe BInySCKaHHa napu B XOJODHi BOi (DnBiTbcra Po3dI IN «3aKiHueHHa npIrTOyBaHHa B peKIMI cKOpOBapKn>).Викорпстанна Кочка за пиrotуванна на napi_
-HaJIyTe 750 Ml BOIN Ha IHO KaCTpyJI (O).3aJIeXHo BID MoIeI:
BCTaHOBIb TpHOry\*L) Ta KoUHK\*J) Ha IHO KaCTpyJI. - PnncTe6Hitb TpHOry\* (K)do Kowka\* (J), notim NOCTaBTE Ha dHO KaCTpyJI.    -Пд час пи�otуванг ha napi npodukTи B KOшИкY\* He MaHTb KOHTaKtTyBaTN 3 BOdoIO - Man.6i7. Пюдукти,nomiшиВ кошн Дя пи涩ваньHa napi\*, He MaIOt b nepeBnUyBaTn pIBeHb MAX 2.3нятгий Встановleteная робочero Кларана (A)
3нятг робочую клanaha ckopobapkn (A):
Cymictb na3 i3 BiIMiTkoIO NOJXeHHa KnaanHi (C),HaTnCHyBm Ha KInbue po6oYoro KnaanaA (A). -Приберпь Кларан - Мал.11.BctahOBlenHa po6oyoro KlananaHa:
BupiBnIte ToKy Ha po6Omy KlaanHi (A)-MaI.83a No3HaUKOIO NOLOXKeHHa (C)-INVB.pNcYHOK.  BCTaBTe po6oyn Klaan (A), 0o6 3aΦikCyBaTu NOrO Ha KlaanHi DnBnPyCKaHH Napu. HaTnCHiTb Ha nIKTORpAMn Ha po6Oy My KlaNaHi (A) i NOBepHITb. Taimep*
HikonHe BnKOpncToBvIe TaIMepypeXmI «Kactpyra».
Taimep npn3naeHn dIy toro, 06 donomortn Bam 3a6e3neuHTn pe3yntat npurotybaHH iKi, daoum 3Mory Kpaue KOHTPOIOBAtn cnoKINBaHH eheprii. BIn ABTomauHO noUHaE BiPaxOBByATn qac npuroTyBaHH nCJRAHHeHH TeMnpaTpyn, 0o BiNobidae pexmy npuroTyBaHH «CKopOBapKa Дя роботи taiмера вин ма€ 6утни рпкрлени do ckopobарк. KoHTpOJIouTe, 606 nIac npuROTuBaHn IxKi pOboUH Klaan (A) noctiInHO npaIIOBaB, nepioDnUHo BnUyckaIoun napy. JkIo He BnCTauae napu, TpoXn 36IbIitb TempepaTy BapnIbHOi NobepxHi, y npOTnLeXHOMy BnPaAdKy - 3MeHwiTb II. 1ДлЯ BBIMKHeHЯ TaMepa HaTnCHiTb KHOngKy. 2 HanaHTyIte yac npiroToYBaHHa (y XBnInHax). ■Kso BN NOMnllncs3 YacOM npiroToyBaHHa, noyeKaITe 4cekyHn, nOKN BOrHnK nepeCTaHe 6nMaTn, a NotIM HaTnCHiB i yTpmyte KHOkny dJa cKacyBaHHa 3 YbIMKHiTb BapnIbHy NOBepxHIO Ha MaKcImaJIbHy TemnepaTyPy. 4 Koln cokopOBapka doCraHne Tempeatypn BapiHHa, TaMep D3BeHntb i nouHae BiDlK yacy (unphi6nMaHOtB). 3MeHwITb Temnepaotypy BapnlbHoI nobepxHi. 5ПисязakihueHЯчacy npiroToyBaHHЯ TaMep 3aD3BeHnTb. BIMKHyTN 3BIOHK TaMepa, HATNCHITb KHOKNy. Bumkhitb nnty. Довгим HaTиСКаHHЯн Ha KHONky MOЖHa cKacyBaTu HanaшТУВaHHЯ i BUMKHуTN TaIМep.BctaHOBJIeHHa Ta 3HimaHHa TaMepa\*
Дя BCTaHOBJIeHЯ Taimepa (F) - maI. 12 cnoaTky BCTaBTe B MOdYb Ty qactnHy, De po3TaWObaHo KnaBiWi, a NOTIM HaTnCHiTb, 06 npNKpInn npOTnJeXHy CTOpOHy. -ДяЗиманная таймера (F)пдимитб i 3himitb noro. 3amHa 6aTapeiKn B TaImepi*
Y Taimepi BnKOpNCToBc8 6aTapeNka-«rud3NK» po3mipy CR2032. K3'ABnEbCnMBOaKnO HiO He BiO6paKaETbcHa ekpaHi, 3amHtB 6aTapeNky.      - Tepmin Cnyx6n 6aTapeiKN 3aIeXNTb BiD YacTOTN BHKOPNCtAHHra TaMepa. BaTapeiKa TaIMepa MICTNtB DnMeTOKcneTaH No CAS 110-71-4. Lc BIDNOBIDA€ EBponecBKM HopMaM. 3aJnBaWoI 6e3neKn I oxopoHIOBkll: He HamaTecb BiKpntu 6aTapeyKy, He niDaBaIte II dIIBNCOKnx Tempeatyp, He BnKaIaTe pa30m i3 nobytOBmN BiXoJaMNIOBepHiTb II B NyHKT 36npaHHra BIKOpncTaHx 6aTapeNoK.  3a6opohno nepezapkataH heakymyIaTOPhi 6aTapeKn. -БатAPEйкpi3нix TUNIB,a TaKoЖ HOBI Ta BnKOpNCTaHI 6aTapeйк He cnid BnKOpNCTOByBaTN pa3OM. BaTapeiKn Heo6xioB BCTaBnTn 3 DOpumHaHHm NoJrphocTi. - Po3pIaJIeHi 6aTapeKn Heo6xIDHO BnHrTn 3 npJaNy Ta yTuJIi3yBaTn 6e3neuHO. - RaKIo npucTpii 36epiraTumetbca H He BnKOpNCTOByBaTumetbca TpNBaIIN Yac, BnIMtB 6atapeeKn. He 3aKopooyuTe KIeMn XNBLeHnR. CTaBnTn npnaHneo6xidnoHa pibHy po6oy noBepxHIO - Ⅲo6 BntaTn 6aTapeNk 3 TaMepa, BiKpnTe KpuNkY BiCiKy 3a DOnOMOrO MOHeTn (INB. PnCyHOK). 3amHITb 6aTapeiKy. YcTaHOBITb 6aTapeKy Ha npn3NaueHe dJe Hei Micu. - Po3miCtItb nIBMicraB Kpuu6aTapeHOro BiCiKy HABnPoTu NlBMicraHa TaIMepi. AkypaTHo NOBepHITb KpUkky BiDciKy, 3JerKa HATnCKaOuN, POeHaBUn NIBMicAa KpUuCi 6aTapeHoro BiDciKy 3 NIBMicAeMa TaIMepi. - Пюдовкуte Ha робочи поерхи, соб кршka 6уна po3taшоваHa ropn3oHTaJIbHo. He 3actocobyTe cnny do Kpnu6aTapeHoro BiDcky niq 3akpmbHH. NiJ qac 3akpmbHH He 3akpyte Detani HADTO IIbHO. - Y pa3i BTPaTN BN MOKeTe OTPMaTn HOBn TaIMep y BCix ABTOPN3OBaHnx cepBicHnx ueHTpax TEFAL.    Hikon He nomiuzaute Taimep\* iD BODy i He MInTe B nocydomnHi MaunHi. Hikoli He BnKopncToBvIe TaMep y peXmI «KactpyIa».PpeepnpnroTyBaHHaM
■Перед кожим викоростангам вдаліть робочй кларан (A) - мал. 11 i nepebipte Bi3yaalbHo пи DeHHOMy CBiTni CBiTni, со OTBip Дя випсkaHHЯ napn (B) He 3a6NBcra - мал. 13. - IpekeohaTeC8, 30 3anobixHn KlaanpuyxInBn (nB. po3diN «OunueHHA Ta «O6ob'zkoBi nepeBipKn nepeKD KoxHm BnKOpncTahHm») - mJ. 18. -Доаай Te iHrpeiEHTa piDnHy. 3akpiTe cKOpOBapKy - MaI.2 -урази винкеня Трудноць пи за крпванhi пистою:nomictiTB yцilbновачпд bodу,а NOTIM habaу кршky, He BHTnpaIOUH - mal.19 i 15 inepekoHAITEcay, lo ушлнвовач do6pe npoxODNTb пid na3amn Kpnskn. - YcTaHOBItb Ha Micue po6oyn KlaNaH (A) - Man. 8. BapiHЯВpexuMi «CkopoBapka»
■Поверніт b робочи Кларан (A)В положеня Дя Варіня B peхимi «Сkopоварka» Man.9. ■Перд ВИКОРИСТАнгЯМ ИрЕКОHAйТecяВ TOMY,Ю СКОРOBAPka HaJIEXKHIM YHOM 3aKpNTa - МД.2 - ПocТаВTe ckopoВapКу Ha BapиьHy NOBepxHIO i BnCTaВTe MaKcImaJIbHni piBeHb TemNepaTypn. -Длma moDEnei3 TaIMepOM\*: yCTaHOBITb yac npnroTyBaHHa, yka3aHm y peenti (DINB. po3dIn «BukopncTaHHa TaIMepa»). -NotpickyBaHHi i dIMOK, 1o BnnyckaIOTbcra 3aIO6IXHM KlaHOM, - ce HOpMaJIbHe AINSe, BOHN DaIOTB 3MORY BnnyCTNTN NOBITpr nepeD nprirotyBaHHaM.Пд час варинь рекиMi «Сkopоварka»
■Якшо робочи Кланан (A) Becb quac nponyckae napy, Buaioch noctiHn xapaKtepHni 3Byk (wym), 3MeHwiTb TempeaTypBapnlbHOi NOBepxHi. -Почиайтевідраховырази часприготуваши, указашиу peцenti. KoHTpOJIouTe, 06 nIac npnroTyBaHHa KlaHn noCTiHNO npaIOBaB, nepioDnUHO BnyncKaIOu npy. RaIO BnxOAnTb HeOCTaTHbo nap, TPOxN 36IbWITb TemnepaTypy BapInbHOIOBepxHi, y IpOTnJeXHOMy BnnaIky - 3MeHwITb II.3aBepseHnBapiHnBpeKmI «CkopoBapKa»
BunyckaHnnapu:
KoIy BmKHeO, y Bac e Dba BapiaHTn: -Пoc'tynobe BnynckaHna napi: NOBilbHO NOBepHitb po6ochn Klaan (A) i DOBeiTb Ioro Do nIKtorpaM - man.10.  - Wbndke BnnyckaHna napy xoJodni BoDi: HaniTe XOJODHy BDOy B paKOBnHy Ta 3aHypTe IHO CKOpOBapKn, DOKN 3aNo6iXhN KlaPaN He ONyCTNTbcra - man. 14. Konu 3anobixhN KlaPaN (D) onyckaTbcra, cKOpOBapKa 6Ibwe He nepe6yBae nID TnCKOM. PObepHITb po6oyn KlaPaN (A)B NOJoxeHH  Etan 1  Eran 2 Moxha BiDkPnTn ckopoBapKy - Man. 3. Y pa3i BnHKHeHr TpydHOUIB npu BiKpNBaHHI npnaJy: NOMictb yuihIOBAu niD BOy, a Notim Ha3ad y KpuKny, He BuTnpauOuN -Ma1. 19, i nepekoHaTeC8, uO yuihBOaH do6pe npoxoHTb Ni d naam KpuKu -Ma1. 15. Якwo πiD yac BnynycKaHnЯ napu Bn cnoctepirae taHOMaIbHi BnKnI, 3HOBy BCTaHOBItb po6oyn knanah (A) y no3nciio npriroTuBaHHa B pexmici ckopOBapkn , notim BnKoHaTe Wbndke BnyncKaHHa napu B xOJODHI BODi. Якwo 3anobixhni Klaapan He onyckaetbca, HannTe XoIOnHy Bovy B paKOBInHy Ta 3aHypTe dHO cKOpOBapKn, DOKN 3anobixhni Klaapan He onyctntbca - Man.14.Hikon He Tucitb Ha 3an06ixn KlaanaH.
Длma MaKapOHnX BInpO6iB,як 36IbIbIyIOIbCBA O6'Emi a60 nIHHbIcN iIacBapHnHa npnKnIaD pnc,6o6Obi, cyuHoi OBOUi,ФpyKTOBI nOpE,rap6y3,ka6aKnMopKBa,KapToIIa,pi6He fIe... He HAnOBHIOte cKOpOBAPKy 6IbIwe HIX Ha 1/3 (no3NaUka MAX 1).OCTyIDt b cKOpOBAPky npOTAROM KINbKOx XBnIHn, a Notim 3aHypte B XOLOdHy BOy.ObOB'3KOBO 3JERKa 3TpyUyTe cKOpOBAPKy nepeKDOKHM BiIDKPUBAHnM,nepeBipNBUn,yn 3anobixnKlanaHOnyCTNbCBs,io6 3ano6irtn po36pn3KvBaHHIO,Io MoKe npn3BeCTn Do onikIB. Lc oc6nBO BaXnBO DnA WBnDKORO BnYSCaHHa napu a60 nicra nepe6yBaHHa B XOLOdHi BOdi.ДЯ npnroTyBaHHa cyniB peKOMeHdyETbcra 3diChHOBatn WBNdKe BnPySCaHHa napu B XOLOdHi BOdi (DnBITbcr po3diN «3akHueHHa npnrOtuBaHHa BpeKIMi cKOpOBAPKn'). Пригоруваня в реки м «Каструл»*
■Pobephitb po6oyn Klaanah (A)B noJoxeHHn dIy BapiHn Bpexmi «Kactpyna».ДЯцboro notpi6Ho 3aCTOCyBaTn DOCTaTHbO 3ycnIb, IO6 nepeiTu yepe3 na3 y NOLOXKeHHB BUNyCKaHHa napu. -Перед ВИКОРИСТАНХМ NepekoHAntecьВ TOMY, StOCKOPOBAPKa HAneXHIM YInHom 3aKpNTa - Man.2 - NocTaBTe CkOpOBapKy Ha BapnIbHy NOBepxHIO, BBIMKHyBUn II Ha HeBeNkY TempepaTypy. -Почнайт e BiДрховыВаТи уac ппгOTуВань, уka3aHи y peцenti. -у ржимi «Каструл» в можete BiДкрптс ckopoВapky В 6удь-якн уас,шобпелемиуВати,стжпглза пиюТУВанья iЖI a6OdoJaВATи IHRpeDiEHTN. y pa3i BnHKHeHn TpydHouiB npu BiKpNBaHHi npcTpoH: nomictb yunbHOBaay nd BDOy, a notim Ha3ad y KPNkU, He BHTpaOuy - Man. 19, i nepekoHaIteC, uo yunbHOBaay do6pe npoxoDntb nid naamn KpnkN - Man. 15. Ko TEmnepaTypa Dyke BncoKa, CkopoBapKa MoKe 6ytu 3a6noKOBaHa (3anobixHnn Knaan (D)niHimaetbcra i 6NoKy e BiKpNBaHH), pyka KpuNko MoKe He NOBePtaTncr Hn He BiKpNBaTH cKOpoBapKy. Y TaKOMy pa3i 3MeHsiTb TemnepaTypy a6o BmKhItb BapNlbHy NOBepxHIO. Pn npnrOryBaHHi Ha eNeKtpnHi CNipalbHi HactIbHi nnlTI 3HIMtB cKOpoBapKy 3 BapNlbHOI nobepxHi. UK -Дя моделен 3 aHTINpRapHm NOKpTTam: He 3aCTOCOByIe BiHUnKn Ta iHwe Metanebe a6o roCTpe npUaDЯ. He cTpyuYte peWtKn 3 npUaDЯ, CTyKaIOuH Nm NO KpaX KaCTpyNi, OckInbKn ue MOKe NOwKOdHTn ii Ta cPruHHITn npOTiKaHHa. Hikon He Harpia Te Knp Do Bncoo TemnepaTypn. Bnapu Bi npuroBaHHia Xi MoKyb 3aWKoNTBapnHa, 0 MaOTb UyTINBy DnxAInbHy CnCTemy, HanpuknaI pTaXam. BlaChnKam nTaxiB He cnId TpImaTn ix Ha KyxHi.CnCTeMn 6e3neKn
CkopoBapka ochauneHa 6araTbMa cnCTeMaMn 6e3neKn:-Be3neka nID yac 3aKpNbBaHHa
-Яко Кршka noraHO BCTaHOBHeHa a6o BN 3a6yIn cKlaCTn pyuKy KpIshKn,napa BHXODITb 6iJa 3anobixHoro KlananaHa (D)ckopOBapKn i He MoKe CTBOpJBaTN TnCK.-Be3neka nID yac BiDkPmbaHHa:
-Якшо скороварka поpe6уВа€ пд тиСКOM, залобжнй Кланан (D) поpe6уВа€ у Верхьому положенни i ручka BiДКрпTTя/ЗakрпTTя Кршки (G) He мacНатиCKATИСя. - Hikon He Hamara Teca BiKpuBAtn CKOpOBapky uepe3 cnny.-He Tnchitb Ha 3an06ixhnn Klanah (D).
-ПepekoHaITecB TOMy,иO BHyTpiiuHiN TnCK BnaB,пepeBipNBuN,чО nOуCTnBCa 3anobixHn KlaNaH (D)ВнжнспоJOKeHHa. -Pyukn KactpyJI e 3axncHmN DeTaIaMn. HikoJI He 3amIHouTe ix camocTiHIO. HikoJI He BnKOpNCToBvIe iHsi MoJeni pyO.K. -Якwo Bn noBepHyn pyuky BiKpnT8/3aKpnT8 KpnSkn (G) y BepTuKaIbHe nOJKeHH, KOJI cKOpOBapka 6yJa ige NiD TnCKOM, Bn He 3MoJKeTe BiKpNTi II. LcE rapaHTye DoDAtKOBy 6e3neKy. -Поверніт b руч kу haba d y ropn3oHTaIbHe nolokhen i noyeKaITe,doKn 3anobixkHm KlaPah (D) He onyCTntbC B HIXHc nolokhenr.■Дистеми зanobirahня haMipHomy TnCKy:
- Nepwa cncTeMa: 3ano6ixHn Klanan (F), 0o 3Hnxye Tmeman.20 -Дугасстema: ушьювач, до порунская napу чере з кршку - мал. 20JaKo OJHa i3 cnCTem 3anO6irAHnHaMipHomy TnCKy He cnpaOboBye:
Bumkhitb nnty. - Nobhicto oxoloditb ckopobapky. Bikpnite. ■IpebipTe i ounctitb po6oyn Klaan (A), Kaan BIDBeHnnapn (B), 3ano6iKnn Klanan (E) i yuilbHOBaY (I)- man. 16, 17, 18. NVB. po3dInn «OunueHHra» Ta «O6ob'aykoBi nepeBipKn peed KOxHm BnKOpNCtAHnM» - RaKuo nicra nepeBipkn my OunuHn npnaI npOnyckae npuy He npauoec, 3BepHiTbca do aBtOpn3ObaHoro cepBichoro ueHTpy TEFAL.PekomehdaazioBnKOpncTaHHa
1 Iapa, 0o BnXoIbTb Chepe3 po6OuN KlaPAn, DyJxe rapya. OctepiraTeC8 BnKNDy napn. 2Пися toroяк занобixний клanan пдимetbс,Ви He 3moжete BIDKpTN cKOpOBapKy. 3Як iВ paazi 3actocyBaHnI INhux npnnaIb IЯ npnroTyBaHHaIXi, DOTpumMyuTecra npabnl Texhikn 6e3neKn, OcO6JIbBO JaKIo cKOpOBapKa BnKOpNCTOByETbcra TaM, De npuy nepe6yBaIOb dITn. 4 4o6 nepectabnTcKOpOBapKy, cKopncTaITeCyaKamN KacTpyni. 5 He 36epiraTe iKy B cKopOBapci. Hikonn He hocitb cKopOBapky 3a pyuky KpuiuKm. 6 He BnKOpncToByIe po3uH xIopy Ta MIOUcI 3aCObN, IIO MiCTaTb XIop, Aki MoKyTb NOWKOdHTN NOBepXHIO 3 HepXaBIIOOoi CTani. 7 He 3aIIwaIte KpIshky y Bodi Ha TpIBaIIy qac. 8 MInayTe yuilbHOBauch oOpoky, a6o kUO BIn nowkoJxHn. 9 OuHsEHHa ckopoBapKn 3diIChIOte, KOJI BOHa OxOJIoXeHa NOpOxHra. 10 Picra 10 pokiv ekcnnyatauii Heo6xidno 3diinTu texhiHn orna CKOpOBapKn B aBtOpN3ObaHomy cepbichomy uehtpi TEFAL.OuHsEHHa
ДяЗабeзпeуннянадиюі роботсckopoваркndoTpmyntecra HabeDEHnx HxKpekOMeHdaцi3 OuNueHЯ Ta obcnyroByaHHn icJЯ KoxHoro BnKOpncTaHHn. Почориня та подрашии, яко можут b 3'яВИТСЯ BHAслIDOK DOBROTPUBaIOrO BnKOpIcTahHЯ, He BnINBaIOTb Ha po6otу npuJaY. 3HOC 3OBHIshboro NOKpTTT (3aJexHo BiD moDeni), NOB'3aHn i3 KOHTaKTOM i3 KpuKoIO KaCTpyI, E HopMaJIbHM. Для скороварок 3 aHTUNpUrpHm nOKpTTam (Залжно Вд мо徳и): nerki noordpaannn i noTeptOCTi, як moKytВ bHnKHyTu nID час вКорпстанн, He bPnNBaIbTb Ha aHTUNpUrpHi BlaactNBOcTi nOKpTTY. ■Пся Кхного ВИКОпСТаHHЯ МИTe CКОРOBAPky TeNIOTO BODIO 3ДОДaВHЯМ MInOuHx 3aCobIb ДЯ NOcUd. Koшн ДЯ пиROTuBaHHЯ Ha napi* MoЖHa OUnsCyBaTn TAK Camo. He BnKOpncToBvIe po3uHIB xlopy a6o MmOuNx 3ac06iB, kKi miCTaTb Xlop. He neperpibaTe KaCTpyIIO, KOJI BOHa npOxHra.OuHsENHbHyTpihboi nobepxhi kactpyni 3 hepXabioo i cTani:
MnIte cneiaIbHOIO JOpCTKOIO r6KOIO 3 DoJaBaHHaM MIOUOro 3acO6y IJNA NOcydy. ■KaIHO Na NOBepxHi KaCTpyI 3 HepXaBIIOoI cTani E cnIiN 6pydy a6o 6iNyBaTI cIiIN HaKIny, OUnuYte ix 6iIM OcTOM. UKДя ouишени BHytriшньоі nobepxhi aniominiéBOoi kactpyni 3 aHTnPurapHm nokpTTam:
- ьрбдовшпдгдвногokopstahн, noro pekomedobahOMTNBpyHy. MnTe M'koIO ry6KOIO Ta rapaOIO BOIO 3 OdaBaHHm MnOyoro 3acO6y InpocuIy. He BnKOpncToBnyTe npoWok dIy uHneHH a6o a6pa3NBHI ry6Kn. - RaKuo iXa NiDropina, HAnuTe B EMHicTb rapAyu Body i 3aNnUte BiIMOKaTu. Notim NOMuTe ii 3a DonOMoroO 3acO6y dIra MMTTn Nocdy.OuHnHn3OBHiHbOi Nobepxhi Kactpyni
MnTe r6KoIO 3doBaHnM MIOOOrO 3acO6y IJRA NOcyIy. KactpyIIO ta KoUnk i3 HepXaBIOOoi CTani MOxHa MNTN B NocydOmNHi MaunHi. He mniTe kactpyIIO 3 aHTnnpnrapHm NOKpTTaJIeXHo BiM oIeJI B nocydomiHi MaunHi, OckInbKn MIOUci 3acO6N B Ta6NeTKaX MiTtB dyKe arpeCnBHi peuOBHH Ta cnpuHraOTb Kopo3IO aIOMiHiEBrNX deTaJe. 3a iHTeHcNBHO BnKOpNCtAHN KacTpyni 3 aHTuNPurapHM NOKpTTAM (3aJIexHb BiM MoJei) KOIp NOKpTTa MoKe He3HaUHO 3MiHNTuCA (NOXOBTiHH, PIAMu).OuHneHHKpnKn:
MnIte KpnKy r6koIO 3doaBaHHm MIOOro 3acO6y IJI NOcyU. JaTe cTeKTI pIDHi 3 KpUShKn y BepTnKaIbHomy nOJoxKeHHi, 0o6 BnDaJIHTN 3aIIuKn BOu MIX MeTaneBmM Ta PnactMaOBmM qAcTHHaMn KpUShKn.OuHnHnY uIbHIOBaHa KpnKn:
■Пся Кожного пиготувань миTe yuINbHIOBaU (I) Ta NOrO BnIMKy. -ДяВCTaHOBJIeHHЯ уцilbHOBaHa Ha Micce dINBMaI.15 i nepekoHaITecra, lo yuizbHIOBaUdo6pe npoxOJNbPiKoXHM na3OM KpNiUKn.OuHsEHHa po6oYoro Klanana (A):
3Himitbpo6oynKnaanA)Ma1.11. MnTe po6oyn Klanan (A) nID cTpymehm BOn 3 KpaHa - mAn.16. - Ipepeipte noro pyxnbictb: nB. pncyHOK. Пися зиманна робочу Клара (A), yшьновача (I) i taiмета\* (F) в можete MTи Кшику В посydомини машни.  Hikon He cTaBte po6oyn Klaan (A), yuilbHOBaU (I), taMep\* (F) a6o kactpyJIO 3 aHTUNpURapHM NOKpTTam y nocydomnHy maunHy. OuHsEHHaHaNy BiDBeHeHHa napn (B), po3TaWoBaHo rHa KpIwz: 3HimItb Klaanah (A)- Man. 11. -Прokонтюй Te Bi3yaJIbHо npn DeHHOMy CBiTJI, 90 KaHaJ BiДБeDEHЯ napn чесгін i Крглін- МА. 13. 3a Heo6xIДHocTi npOuNCTiB 3y6OuNCTKOIO - MaI. 17 i npomnTe Ioro. Ouichienna 3anobixkhoro klanana (E): -ПомиTe BOIOU qaCTHy KOpNcy KlaNaHa,po3TaWOBaHOro BCEpeDnHi KpNiShKn. - Ipebeipte Ioro po60Ty, cnIbHO HaTnCHyBUn BaTHOIO nauKoIO Ha KylbKy, kA Ma€ 6ytu pyxOMOIO - mAI. 18. DInB. po3dIN «O6ob'zKOBI nepeBipKn pepei KOxHIM BnKOpNCtAHHM'. Ouichienn TaImepa\* (F): BnKOpNCToByTe uNCTy, cyxu TkaHnHy. He BnKOpncToBouyTe po3uHHNKn. Hikon He nomiatae TaMep iD BODy i He MnTe B NocydomNHi MaunHi.O6cnyroByBaHHa
3amHa yuilbHIOBaça cKOpOBapKN:
MiHnTe yuIbHOBauch CKOpOBapKn pa3 Ha pik, a6o JaKIo Ha HbOMy 3'YBUNCn deEeKtN. 3aBxDn BnKOpncToByTe opurihalbHn yuihnoBa Cnpo6HnTBA TEFAL, knniDxoDntb Do BaWoMoJe (DnB. po3di «AkcceCyapn»). ■ДяВCTaHOBHeHЯуиlbHIOBaHaДm.15i nepeKoHaTecra,OyuizlbHIOBaUdo6pe npoxOHTb NiKoKHIM Na3OM KpUshKn.36epirahnrackopobapkn
-ПepeВернiTb Кршку Ha KaCTpyJI. Mexahi3m BiikpmbaHHa/3akpmbaHHaCKOpOBapKn He notpe6ye JODHoro cneiaIbHoro 06cnyroByBaHHa, Kpim OunueneHHa. Пися 10 рokів ekспnyataць Heo6хiДно ВнКоНТи Тхичну orлад ckороваркь в abTOpn3OBAHOMy cepВICHOMY ueHTpi TEFAL.Akcecyapn TEFAL
Akcecyapn dnnckopOBapKn hABHb npoJxky:| Ак sceуари Apтимкун | ||
| Ушільнювач | 3/4/4,5/6 л: зовниώдiametр 24 см X1010008 | |
| 5/7,5/9 л: зовниώдiametр 27 см | X1010007 | |
| Кошп дlya\ ПригOTуВань\ на пapi* | 3/4,5/4/6 л: дlya кастулідiametрom 22 см 792185 | |
| 5/7,5/9 л: дlya кастулідiametрom 24 см 792654 | ||
| Тринога* (L) | 792691 | |
| Таймер* | X1060007 | |
Texhichi xapaktepnctnkn
Дiametр Дна скороварк - xapaКтетнк| 06'EM | Дiametr Каструли | Дiametr Дна | Clipso Minut' Perfect / Easy | Clipso Minut' Duo couleur | Clipso Minut' Duo Gourmet | Мaterial Каструли |
| 3 л22 cm15.5 cm | P46205 -- | Hepxabiiюа Сталь | ||||
| 3 л22 cm18 cm | -- P46605 | |||||
| 4 л22 cm14 cm | - P46042 - | Алемпий i3 антуригnamm | ||||
| 4.5 l | 22 cm | 15.5 cm | P46206 -- | Hepxabiiюа Сталь | ||
| 5 л24 cm14 cm | - P46051 - | Алемпий i3 покрпTTM | ||||
| 5.2 l | 24 cm20 cm | -- P46654 | Hepxabiiюа Сталь | |||
| 7.5 l | 24 cm18 cm | P46248 -- | ||||
| 9 л24 cm18 cm | P46249 -- | |||||
| Ha6ip 5 l 7,5 l | 24 cm | 14 cm | P46353 | - | ||
| 18 cm | ||||||
Hopmatubhi XapaKTepuCTnku:
MaKcMaJIbHn pO6OuN TnCK: 65 KPa MaKcImaJIbHn 6e3neuHn TnCK: 120 KPaДжерета тени.
T43OBAIJIINTA EJEKTPNHAIJIINTA (HabyHHa KOHΦopKa)  CKIOKEPAMIHA IINTA  IHNYUKIMHAJIINTA EJEKTPNUHA PINTA (CnpaBbKa KOHΦopka)   CkopoBapka MoKe BnKOpNCToByBaTnC3 Pi3HmN TnAmN BapnIbHnx NOBepxOHb, BKNIOUaOuH iNDyKciHi. -При ВИКОРИСТАНHI eNEKТрОПЛNTN BИБИРаTe KOHФОрКу, со Meншe a6o ДорIBHIOE dIaMErpy dHa cKOpOBapKn. - Y pa3i BnKOpncTaHHI pHTN 3i cKnOkepaMiuHOIO NOBepxHeIO nepekoHaTecra, IO dHO KaCTpyJI uNCTe. -Пд час викорпостанна на ra3OBiй конфорци поум'я He Ma€ BuxoДNTn 3a Мжідiametpa Дна Качтул. ■Пд час викорисьд-якinx типг плт сдду Te, 606 ckopoВapka 6yana npabINbHO BCTaHOBJIeHa Ha BapINbHy NOBepxHIO.TapaHTiA
3a yMOBn BnKOpNCTaHHa 3a npn3HaueHnM Kactpyna ckopoBapKn TEFAL 3 HepXkABIOOi cTani Ma rapaHTIO 10 pOKIB, kUHO HeCnPaBHICTb CTOCYETBCR: -MetaneBoi ctpyKtyn KaCTpyJI cKOPOBapKN; - nepeedachoro NOsKOJxHnO OCHOBnX MeTaJIeBnx KOHCTpyKzI. Ha iHsi maTepiAni KactpyI i Bci iHsi yactuHn cKopOBapKn nou npOeTbcra rapaHTia Ha defeKTn Bnpo6HnTba a6o MaTepiAIB npotraom rapaHTiHoro TepmiHy, BN3HaueHOrO uHHm 3aKoHOaBCTBOM y kpaHi npnd6aHH, nouHaouN 3 DaTI NOKyn. Lra rapaHTia 3a6e3neuYcTBc3a yMOBn nped'ABlenHna KacOBoro yeka a60 paxyHka-phiKtypn,aki 3acBiDyIOTb dAty npnd6aHHa. BnuHrTKn 3 rapaHTii: IopapnH i 3he6apBneHHape3 cTapiHHa,Ja KaCTpyb 3 aHTnpurapHM NOKpTTAM. -Подраин BiД KOHTaКТу Кршк 3 KaCTpyNeI O 3 aHTINpRapHm NOKpTTam. - rapaHTia He iie, kIIO CnCTeMaTuHi NOLOMKn npuJaHy NOB'aHI 3 HeIoTpmaHHaM IHCTpyKci 3 BnKOpNCtAHHa a6o HeiBaJIbBm CTaBHeHHaM Do npuJaY, a Came: -ydaH, naIHHa, KOpNCTyBaHHc CKOpOBapKOIO dIg PnIROTyBaHHjIXi BdyXOBci Tilbkn aBtopn3OBaHi cepBicHi ceHTpn TEFAL maIb TnpaBO hAdaBaTn BaM rapaHTiInHe 06CnyroByBaHHra. 3aTeNeΦOHyIe 3a HOMepom rapyoi IiHii, zo6 i3HaTnca aDpeCy haN6JxUoro do BAC ABTOPu3OBaHOro cepBicHOro ueHTpy TEFAL.Hopmatubhi no3haqkn
| MapkyBaHЯ Po3TaUByBaanHЯ | |
| Товарни знak Ha кршци | |
| Рik Випуску та Homep napтii Заз nauseени мodyелi Мakсимально дочстимп рibeны тису (PS) Найвиший рibeны робочого тису (PF) | Ha кршци |
| О6'ем | Ha зobнішій стороні дна кастулі |
| Поштова adjoiningся воробнika | Ha зobнішій стороні дна кастулі |
3axnauMo doBkijpa30m!
 ①Baw npnilad miCTntb ciHHi MaTepiAn, kKi niJaRaIOTb BTOpHHi nepepo6ci. BiiDheCtB uei npnaHa nepepo6ky do ueHTpy npinyomy no6yTOBnx BiXoDiB.TEFAL BiДnobiДа€ Ha BaWi 3aПТання
| ПюбLEMп Реком endацii | |
| Якso Вaxko Вidдрвати ta/a60 Зakрвати кршку: | 3нимы ушьновач inomicitb myо рid Вody. Вставе яого в кршку, He BNTIPAQUHmam.19. |
| Якso Ви He moхete Зakрчтп Кршку: | П配电онайся, по ручка кршки nepe6byaec y Вертукальному положенhi. П配电оре розтуваань ушьновач (дИВ. рОздд «Очишия ТА оБСУТВУВань»). П配电онайся, по кршka BCTAHOBLeHa, як рOKAZANO ha малюну - мal.1. Помсгть ушьновач пid Вody, a NOTIM Ha3ad y кршку, H Витраюч - мal.19, i pepekonai Teesca, по ушьновач do6pe npoxodnTB пid пazamn КршКmam.15. |
| Якso скороварka нагрілася пid ТИСКOM 6e3 рідин В进城уни: | П配电оре ТЕХИЧΝД STAN SCOPOBAPKВ B AВTOPIN3OBAHOMU цentri TEFAL. |
| Якso зanobixний Кланан Видаe Клanzaня i димok: | ЦеHopmaьно чрші кільka XВИЛIN: се дэс 3Могу ВИп- СтITN NOBITРЯ песed р�ngOTyBaHNAM. |
| Якso зanobixний Кланан He пidнвся i napa He BIXODnTB чeredу робоч Кланан пid чac пригOTуВань: | Тaka ситуаця дОпUCTIMA претягOM рechшix XВИЛIN. Якso тaka tendechizя 3бepiraætbcry, п配电оре, ч: - Варпьна пОBERXнЯ ДОCTAТнБО Harpita, В ИшOMу BIVnADKY 36iьшiTb Tempepatур; - Кількість рідунь в Кастулі дОCTАТН; - рбочny Кланан (A)Виставеленьу рпОжен; - скороварka дОбpe зakрп; - ушьнibusвач abo краій кастулі He поКODжeh; - ушьнibusвач BCTAHOBLeHin правиьно. |
| Якso зanobixний Кланан пidнвся i пд чac Вариня нapа He BIXODnTB чeredу клдан: | Це Hopmaьно претягOM рechшix Kількох XВИЛIN. Якso се явице He 3NHkae, налиteхолдну Вody в рakobov Та занур trade nHO SCOPOBAPKIn, дOKи 3anobixнiy Klanpa(D) He Опух? Oчирпь рбочny Кланан (A)- mAL. 16 i kaнал BiDveDEHня napi - mal. 17 i pepebipte чи күльka зanobixного Кланан 6e3пеки лergko рухаэтбя мAL.18. |
| ПюбLEMи | Реком endaцii |
| Як soo пара винождь навколо кршки,а Крааанн пechебувае В нжньому поождени, пechерг: Як soo кршka He Bvdkpn- Ваetting: Як soo iж несоварна аоб niodropina,пech- вір: Як soo iж niodropina y соковарци: | ЧИ Кршka Добpe 3akрита; ЧИ На мicsi ушьювач В кршци; Стан ушьювач,за notpeби замиить яого; ЧИСТOTУ Кршки, ушьювач та яого Виимки В кршци; Стан краiv Кастул. |
| Пechерг: Як soo рcentын Бадься: Як soo iж. Янбься: Янбься: Янбься: Янбься: Янбься: Янбься: Янбься: Янбься: Янбься: Янбься: Янбься: Янбься: Янбься: Янбься: Янбься: Янбься: Янбься: Янбвая: Одney: Янбься: Янбься: Янбься: Янбься: Янбься: Янбься: Янбься: Янбься: Янбься: Янбься: Янбься: Янбься: Янбься: Янбься: Янбься: Янбься: Янсend: Янбься: Янбься: Янбься: Янбься: Янбься: Янбься: Янбься: Янбься: Янбься: Янбься: Янбься: Янбься: Янбься: Янбься: Янбься: Янбься: Янвая: Одney: Янбься: Янбься: Янбься: Янбься: Янбься: Янбься: Янбься: Янбься: Янбься: Янбься: Янбься: Янбься: Янбься: Янбься: Янбься: Янсend: Янбвая: Одney: Янбься: Янбься: Янбься: Янбься: Янбься: Янбься: Янбься: Янбься: Янбься: Янбься: Янбься: Янбься: Янбься: Янбься: Янбьeria: Янбься: Янбьeria: Янбьeria: Янбьeria: Янбьeria: Янбьeria: Янбьeria: Янбьeria: Янбьeria: Янбьeria: Янбьeria: Янбьeria: Янбьeria: Янбьeria: Янбьeria: Янбьeria: Янбьeria: Янбьeria: Янсend: Янбься: Одney: Янбься: Янбьeria: Янбьeria: Янбьeria: Янбьeria: Янбьeria: Янбьeria: Янбьeria: Янбьeria: Янбьeria: Янбьeria: Янбьeria: Янбьeria: Янбьeria: Янбьeria: Янбьeria: Янсend: Янбвая: Одney: Янбься: Янбьeria: Янбьeria: Янбьeria: Янбьeria: Янбьeria: Янбьeria: Янбьeria: Янбьeria: Янбьeria: Янбьeria: Янбьeria: Янбьeria: Янбьeria: Янбьeria: Янбьiously: Янсend: Янбься: Одney: Янбься: Янбьeria: Янбьeria: Янбьeria: Янбьeria: Янбьeria: Янбьeria: Янбьeria: Янбьeria: Янбьeria: Янбьeria: Янсend: Янбься: Одney: Янбься: Янбьeria: Янбьeria: Янбьeria Янбьeria: Янсend: Янбься: Одney: Янбьeria: Янбьeria: Янбьeria: Янбьeria: Янсend: Янбься: Одney: Янбьeria: Янбьeria: Янбьeria: Янсend: Янбься: Одney: Янбьeria: Янбьeria: Янсend: Янбься: Одney: Янбьeria: Янбьeria: Янсend: Янбься: Одney: Янбьeria: Янбьeria: Янсend: Янбься: Одney: Янбьeria: Янбьeria: Янсend: янбься: Одney: Янбьeria: Янбьeria: Янсend: янбься: Одney: Янбьeria: Янсend: янбься: Одney: Янбьeria: Янсend: янбься: Одney: Янбьeria: Янсend: янбься: Одney: Янбьeria: Янсend: янбься: Одney: Янбьeria: Янсend: янбвая: Одney: Янбьeria: Янсend: янбься: Одney: Янбьeria: Янсend: янбься: Одney: Янбьeria: Янсend: янбься: Одney: Янбьeria: Янсend: янбься: Одney: Янбьeria: Янсend: | |
| Як soo рcentы Бадься: Як soo iж Бадься: Як soo iж Бадься: Як soo iж Бадься: Як soo iж Бадься: Як soo iж Бадься: Як soo iж Бадься: Як soo iж Бадься: Як soo iж Бадься: Як soo iж Бадься: Як soo iж | Вимкніль Охлodіль Скоровар; Каллій Залій Досій Залій Залій Залій Залій Залій Залій Залій Залій Залій Залій Залій Залій Залій Залій Залій Залій Залій Залій Залій Залій Зalam Зalam Зalam Зalam Зalam Зalam Зalam Зalam Зalam Зalam Зalam Зalam Зalam Зalam Зalam Зalam Зalam Зalam Зalam Зalam Зalam Зalam Зalam Зalam Зalam Зalam Зalam Зalam Зalam Зalam Зalam Зalam Зalam Зalam |
TAbnucy YACU PPnFGOTyBAHHa
Oboqi
OBOHI (CBIXI)
HA IAPI
IHRpeiEHTN B KOUHKy i 750 Mn BOIN Ha dHi cKOpOBapKn.  YBODI
InrpeiHtN 3aHypehi y Body 6e3 KOnKy.IMПУЛьСНИ
PEЖКМYBOI
Be3KoWNkY.  | Артышokи, 2 цilinx по 600 г кожен (у вodi) 30 - 35х. | |
| Баклaxан, 6e3 shkíрки, нараздени кльцям (3 мм),850 r (на пapi) | 10 - 12хв. |
| Болгарсыкий поець, роздени habли (550 r) (на пapi) | 14 - 16хв. |
| Бриюсельскыka калystа (на пapi) 10 - 12хв. | |
| Бурак, червони, роздени на четberстени (у вodi) | 20 - 25хв.(бідповідно до розмір) |
| Гарбуз, наразденишиаточкам (3 - 5 сm), 600 r (нa | 13 - 18хв. |
| Горох (нa пapi) 6 - 8хв. | |
| Гриби, рizанi, 800 r (у вodi) | 4 - 5хв. |
| Дрибнаструкова Квасола (600 r) (нa пapi) | 10 - 12хв. |
| Калystа, зелега нашаткован, 500 r (у вodi) | 5 - 6хв. |
| Картоля, роздени habли (950 r) (нa пapi) | 20 - 25хв.(бідповідно do розмір) |
| Квасола, сухena, 250 r (у вodi) | 35 - 40хв. |
| Луший торох, 250 r (у вodi) | 18 - 20хв. |
| Манговд, нараздени (2 сm), 700 r (нa пapi) | 15 - 17хв. |
| Мариновашиба (нa пapi) | 7 - 8хв. |
| Морква, нараздени крженькам (3 сm), 600 r (нa пapi) | 17 - 19хв. |
| РINA, рizана Кьшами (500 r) (нa пapi) | 14 - 16хв. |
| Селera, рizанa, 600 r (у вodi) | 7 - 9хв. |
| Сочев��я, селиena, 250 r (у вodi) | 14 - 16хв. |
| С nanopжа, бILA (нa пapi) | 5 - 6хв. |
| Сuzвittя бpokeолi, 600 r (нa пapi) | 9 - 11хв. |
| Сuzвittяartzithoii kansstn, 600 r (нa пapi) | 10 - 12хв. |
| Фechхел, пораздени сухжами (600 r) (нa пapi) | 6 - 9хв. |
| Цьбул порейь (ila, (ila, $ila) | 9 - 11хв. |
| Цникovi салатни, роздени habли (900 r) (нa пapi) | 14 - 16хв. |
| Цуkini, нараздени крженькам (3 сm), 600 r (нa пapi) | 12 - 15хв. |
| Шпунат (нa пapi) | 3 - 4хв. |
| УВОДI БeЗ кошκу. | КИльбICTь BOДи | КИльбICTь РИСУ | ЧАС ПИ- ГOTУВА- НХЯ | |
| 2 ПОПцIⅡ 400 ml / 2 сКлянки 150 | r / 1 сКлянka | 7-8XB. | ||
| 4 ПОПцIⅡ | 500 ml / 2,5 сКлянки | 250 r / 2 сКлянки | ||
| 6 ПОПцIⅡ | 700 ml / 3,5 сКлянки | 375 r / 3 сКлянки |
M'Ясо/pn6a
| СВИКI 3AMОPOJOKEHI | ||
| Бараняча похka - 2ш. (0,95 кг) 40 - 45xb. | 1 roД. 05 xВ. -1 roД. 15 xВ. | |
| Качka (1,8 кг) 45 - 47 xВ. 50 - 55xb. | ||
| Кролк (1,5 кгшматочами) 8 - 9xb. | 20 - 23xb. | |
| Курka (1,35 кг) | 23 - 25xb. | 1 roД. -1 roД. 10 xВ. |
| Курca - 2ш. (1,3 кг) | 23 - 25 xВ. 40 - 45xb. | |
| Перетілки - 4ш. | 9 - 10xb. | 18 - 20xb. |
| Пор'е 3 телатин - 4ш. | 10 - 12xb. | x |
| Ростбiф (1 кг, дiametrom 8-11 sm) | 30 - 35 xB. 45 - 50xb. | |
| Свиная вирizka (0,8 кг, дiametrom 8-10 sm) | 30 - 35 xB. | 1 roД. 05 xВ. -1 roД. 15 xВ. |
| Свиная сife-mиньон -2шатka по 350 r | 13 - 15 xB. 26 - 29xb. | |
| Стой З locosя - 4ш. (0,8 кг) 5 - 6xb. | 7 - 8 xB. | |
| Стой З тунця - 4ш. (0,7 кг) | 5 - 6 xB. | 7 - 9 xB. |
| Теляа вирizka (0,8 кг, дiametrom 5-7 sm) | 17 - 19 xB. 37 - 40xb. | |
| Теляе сife-Mиньон 0,7 кг | 17 - 21 xB. 33 - 38xb. | |
| Фіile морською чорta (1 кг),шматочами по 75 r | 5 - 6 xB. | 7 - 8 xB. |

- IMPORTANT PRECAUTIONS
- KEEP THESE INSTRUCTIONS
- Description of diagram
- Compulsory checks before each use_
- Checking the operating valve
- Checking the safety valve
- Features
- Compatible heat sources
- Use
- Opening
- Closing
- If you are unable to close the lid:
- Using for the first time
- Depending on the model:
- Minimum and maximum fill level
- For some foods:
- Using the steam basket*
- Fitting and removal of the
- Operating valve (A)
- To remove the operating valve (A):
- To fit the operating valve:
- Timer*
- Fitting and removing the timer*
- Changing the timer* battery
- Before cooking
- Cooking with "Pressure Cooking"
- During cooking with "Pressure Cooking"
- End of cooking with "Pressure Cooking"
- To release the steam:
- Never interfere with the pressure indicator.
- Cooking with the "Stewpot"*
- Safety
- If one of the overpressure safety systems is triggered:
- Recommendations for use
- Cleaning
- To clean the inside of the aluminium pot with a non stick coating:
- To clean the outside of the pot:
- To clean the lid:
- To clean the gasket:
- To clean the operating valve (A):
- Maintenance
- TEFAL Accessories
- Guarantee
- These guarantees exclude:
- Regulatory markings
- Think of the environment!
- Troubleshooting
- [when pressure cooking]
- Golden rules when pressure cooking (for UK Consumers)
- For 5 Litre and 5.2 Litre models only.
- Australian - NZ warranty COOKWARE, BAKeware AND PRESSURE COOKERS Limited Replacement Guarantee
- COOKING TABLE
- Vegetable
- VEGETABLES (FRESH)
- STEAM
- IMMERSION
- PULSES
- Meat/ fish
- PRECAUTIONS IMPORTANTES
- Anbefalinger for drug
- Under tillagning i laget "Tryckkokare"
- BAJHIN PPEДПА3HN MEPKN
- B 3aBnCmOCT OT Modena:
- CbaJHe n noCTaBJeHa pa6OTnJaIaN (A)
- 3a da cbaNTe pa60THnKlaNaHA):
- 3a da noctabute pa60THnKlaanH:
- Taimep*.
- HmKora He n3noJ3BaIe TaIMepa B peXIM ,TpaIuOHa TeHIXepa".
- Noctabraye n cbaJrHe Ha TaMepa\*
- Ppei rOTbeHe.
- TotbeHe B peKm ,TeHJKepa noHaJaRaHe"
- Пов
- 3a da n3nycheTe npapaTa:
- Hnkora He npednpemaiTe KaKbTo n da e oepaun nonpepa3nma u
- TotbeHe B peXnM ,TpaIuNoHHa TeHxkepa\*\*
- Системп за 6еэозаочьт
- Be3onacHocT Ha 3aTbapnHeTo:
- Be30nacHOCT Ha OTbaprHeTo:
- -ДBE cHCTeMn 3a 6e30nacHOCT 3a CBpbXHaIraHe:
- При заideиствае на сдна OT снcte mte 3a 6e30naCHOCT 3a пpeiodTbpaTЯBaHe Na CBpbxHaIraHe:
- Ipenopbkn 3a ynoTpe6a
- Почистванe
- 3a nouICTBaHe Ha BbTpewHocTtHa Cbda OT HepbXJaema CTomaHa:
- 3a n3MnBaHe Ha BbTpewHocTTa Ha anyMnHneBna CbD c He3aJeNbaIo nokpntne:
- 3a nouICTBaHe Ha BbHsHaTa yact Ha Cbda:
- 3a nouictbaHe Ha kanaKa:
- 3a nouicTbaHe Ha yNtBTHHeHMeTo Ha KanaKa:
- 3a nouuctbahe Ha pa60THnKlana(A):
- 3a nouICTBaHe Ha OTBopa 3a n3nyckaHe Ha napata (B), pa3noJoxeH Bbpxy KanaKa:
- 3a noumtbaHe Ha npedna3HnKlanan (E):
- 3a nouuctbahe Ha TaMepa\* (F):
- PoDpBxKka
- 3a cMaHa Ha yPbTHeHneTo Ha TeHJKepaTa NOd HaNraHe:
- 3a npi6upaHe Ha TeHxpepaT a oN HnlaTaHe:
- Akecoapn TEFAL
- XapakTepnCTnKn
- HopmatNBHa nHΦopMaζη:
- CbBmCTMn TOJIHHN n3TOHn
- Tapaanця
- TapaHcIyTa He nokpmba:
- 3aДьЖИТЕЛнHa МарКИрOBka
- - YuctBaIte B ONa3BaHeTo Ha OKoHaTa cpea!
- TEFAL OTROBAPRA Na BaшптЕ
- TAbJIuIa 3A IPIrOTBЯH E H XPAHnTE
- 3eIeHcyK
- Meco/pn6a
- VAŽNE MJERE OPREZA
- NAKON KUHANJA...
- SACUVAJTE OVA UPUTSTVA
- K部件 (vidi Opis proizvoda)
- Obavezne kontrole prise svake upotrebe
- Provjera radnog ventila
- Provjerite sigurnosni ventil
- Upotreba
- Otvaranje
- Zatvaranje
- Ako ne možete zatvoritiPoklopac:
- Prva upotreba
- Ovisno o modelu:
- Minimalna i maksimalna napunjenost
- Za neke vrste hrane:
- Upotreba parne košare*
- Skidanje i stavljanje radnog ventila (A)
- Za ciścenje radnog ventilà (A):
- Za podesavanje radnog ventila (A):
- Indikator vremena*
- Indikator vremena nikada ne koristite u režimu rada "Faitout" (Lonac).
- Indikator vremena mora pravilno uleci na ekspres lonac kako bi Funktionirao
- Postavljanje i skidanje indicatora vremena*
- Zamjena baterije indicatora vremena*
- Pijekuhanja
- Kuhanje u režimu
- "Autocuiseur" (Ekspres Ionac)
- Tokom kuhanja u režimu "Autocuiseur" (Ekspres Ionac)
- Kuhanje u režimu "Autocuiseur" (Ekspres Ionac)
- Za ispustanje pare:
- Nikada nemojte dirati sigurnosni štapić.
- Kuhanje u režimu "Faitout"* (Lonac)
- Sigurnost
- - Sigurnost pri zatvaranju:
- - Sigurnost pri otvaranju:
- Ako je aktiviran jegan od sigurnosnihystema:
- Preporuke za upotrebu
- Cisćenje
- Cisćenje unutrażnjosti posude od nehrdajucęg Čelika:
- Za ciścenje alumnijske posude s neprijanjajućim slojem:
- Cisćenje vanjske povrsine posude:
- CisćenjePoklopca:
- Za ciścenje gumicePoklopca:
- Održavanje
- Za zamjenu gumice vaseg ekspres lonca:
- Dodatna oprema TEFAL
- Karakteristike
- Normativni podaci:
- Kompatibilni izvori toplote
- Garancija
- Ova garancija isključuje:
- Propisane oznake
- - Mislite oŽivotnoj sredini!
- TEFAL odgovara na vaša pitanja
- LABELA ZA PRIPREMU HRANE
- Povrçé
- POVRCE (SVJEZE)
- PARA
- POTAPANJE
- MAHUNARKE POTAPANJE
- Meso/riba
- DULEZITA UPOZORNENI
- Před použitím svého tlakového hrnce věnujte Čas prostudováni všechPokynů a k námodu pro uživatele se v pripadě potřeby vracejte.
- Pri nespravném používání mohou vznikat škody.
- TYTO POKYNY SI USCHOVEJTE
- Současti (viz Popisné schéma)
- Nezbytné nutné kontroly préd kaźdymi použitím
- Kontrola pracovniho ventilu
- Kontrola bezpečnostního ventilu
- Použití
- Otevíráni
- Uzavirání
- Pokud se vám nedarí uzavřit víko:
- První použití
- V závislosti na modelu:
- Minimálni a maximálni plnéni
- V pripadě některychPokrmu:
- Používání parniho koše*
- Vyjmutí a nasazení pracovniho ventilu (A)
- Pro vyjmutí pracovniho ventilu (A):
- Pro nasazení pracovniho ventilu:
- Časovač*
- V režimu „hrnec" nikdy nepoužívejte Časovac.
- Dlouhé stisknuti tlacitka vynulujea vypne casovač.
- Nasazenía odejmutí Časovace*
- Výměna baterie Časovace*
- Pred va'rením
- Vareni v režimu „tlakový hrnec"
- Během vařeni v režimu „tlakový hrnec"
- Záver va rení v režimu „tlakový hrnec".
- Pro vypusteni páry:
- Nikdy nemanipulujte s bezpečnostné pojistkou.
- Vařeni v režimu „hrnec“*
- Bezpečnostní privky
- Bezpečné zavirání:
- - Bezpečné otevirání:
- Pokud se spustí některy z bezpečnostních prvků proti pretlaku:
- Doporucení pro použití
- Cisteni
- Pro Čišění vnitřiní strany nádoby z nerezové oceli:
- Pro vycisteni vnitrni strany nadoby z hliniku s neprilnavym povrchem:
- Pročistěnévnéjsistrany nádoby:
- Pročistění vika:
- Pročistění těsněné vika:
- Pročistěné pracovního ventilu (A):
- Pro Čišěné odvodu páry (B) na víku:
- Čistěné bezpečnostního ventilu (E):
- Pročistěnécasovace\* (F):
- Udržba
- Pro vymenu těsněné tlakového hrnce
- Pro uskladněni tlakového hrnce:
- Príslušenstvī TEFAL
- Vlastnosti
- Normativni informace:
- Kompatibilni tepelné zdroje
- Záruka
- Zákonna značeni
- - Podílejme se na ochraněživotnéprostředí!
- Společnost TEFAL odpovída na vaše dota
- TABULKA PRO VARENÍ
- Zelenina
- ZELENINA (ČERSTVA))
- NA PÁRE
- PONORENÍ
- PULZY PONORENÍ
- Pije uporabe ekspres lonca pažljivo pročitajte sve upute i pomoc uvijek potražite u „Uputama za korisnika".
- Uporabom koja nije u skladu s uputama moze doci do ostecenja.
- SACUVAJTE OVE UPUTE
- Dijelovi (Vidjeti opisnu shemu)
- Obavezne provjere prise svake uporabe
- Provjera sigurnosnog ventila
- Uporaba
- Otvaranje,
- Prva uporaba
- Minimalno i maksimalno punjenje
- Za odreëne namirnice:
- Uporaba košarice za kuhanje na pari*
- Povlačenje i postavljanje radnog ventila (A)
- Da biste izvukli radni ventil (A):
- Za postavljanje radnog ventila:
- Tajmer*
- Nikada nemojte upotreblavati indicator vremena u načinu kuhanja „Faitout" (Lonac).
- Kako bi radio, tajmer mora biti prikopčan na ekspres lonac
- Dugi pritisak na tipku postavlja tajmer na nulu i gasi ga.
- Postavljanje i uklanjanje tajmera*
- Zamjena baterije tajmera*
- Prijekuhanja
- Kuhanje na način „Ekspres Ionac"
- Tijekom kuhanja na način „Ekspres Ionac"
- Kraj kuhanja na način „Ekspres Ionac".
- Nikad ne dirajte sigurnosni štapić.
- Kuhanje na način običnog lonca*
- ■ Sigurno zatvaranje:
- - Sigurnost kod otvaranja:
- - Nikako nemojte dirati sigurnosni štapić (D).
- Dvije sigurnosne mjere od prekomjernog tlaka:
- Ako se jeder od sigurnosnih sustava aktivira na povecanje tlaka:
- Preporuke za uporabu
- Čišćenje
- Za ciścenje unutraśnjosti posude:
- Za ciścenje unutrażnjosti alumijske posude s neprijanjajućim slojem:
- Za ciścenje vanjske povrsine posude:
- Za ciścenjePoklopca:
- Za ciścenje brte povklopca:
- Za ciścenje odvoda za ispustanje pare (B) smJEsTeNo g naPoklopcu:
- Za ciścenje sigurnosnog ventila (E):
- Za ciścenje tajmera* (F):
- Za zamjenu brte ekspres lonca:
- Zaspremanje ekspres lonca:
- Dodatni pribor TEFAL
- Nazivni podaci:
- Kompatibilni izvori topline
- Jamstvo
- Propisno označavanje
- - Sudjelujmo u zašiti okolíša!
- TABLICA ZA KUHANJE
- MAHUNARKE
- Meso / riba
- FONTOS 0VINTÉZKEDÉSEK
- A FÖZÉST
- ÖRIZZE MEG EZEKET AZ UTASİTÁSOKAT
- Részegységek (lásd a leíró ábrát)
- A minded egyes használat elöttt Alvégzendő fontos Ellenőrzések
- Az üzemi szelep ellenörzese
- Abiztonsagi szelep Ellenőrzése
- Használat
- Nyitás
- Záras
- Ha nem tudja lezární a fedelet:
- Elseő használat
- Modelltol fuggoen:
- Minimális és maximális toltési szint
- Egyes etelek esetében:
- A párolókosár* használata
- Az üzemi szelep (A) eltávolítása és behelyezese
- Az üzemi szelep (A) a következóköppen távolithato el:
- Az üzemi szelep behelyezése:
- Idózító*
- Ne használja az idózítôt „Hagyományos lábas" üzemmodban.
- Az idözítőCsak a kuktára rögzítve muködik.
- Az idózító behelysezé és eltávolítása*
- Az idózító* elementek cseréje
- Fözes elött
- Fózés Automatikus fózés modban
- Automikus modba nortenfozés folyamata
- AutomATUS MODBAN TORTEN FÖZÉS VÉGE
- A goz kiengedese :
- Soha ne aBiztonsagi szarat mozgassa.
- A kukta hagyományos
- Biztonság
- Biztonsági zárendszer:
- Biztonsagi nyitórendszer:
- -Abiztonsagi szarat semmikiéppen se mozgassa (D).
- Kétféle tulnyomás elleni biztonság:
- Ha aBiztonsagi berendezések egyike bekapsol:
- Használati javaslatok
- Tisztítás
- A nemasacél edeny besejénk tisztitasa:
- Tapadasmentes bevonatu aluminium edeny besejenek tisztitasa:
- Az edeny külsejenek tisztitasa:
- A fedel tisztitása:
- A fedő tõmítésének tisztítása:
- Az üzemi szelep (A) tisztitása:
- A fedél alatt elhelyezkedő gozelvezető cső (B) tiszítása:
- Abiztonsági szelep (E) tisztitása:
- Az idoztio tisztitasa\* (F):
- Karbantartás
- A kukta tomitésénék cseréje:
- A kukta tárolása:
- TEFAL tartozék
- Tulajdonságok
- Kompatibilis hóforrások
- Garancia
- Jogszabályban előírt jelzések
- - Vegyünd részt a környezetvédelemben!
- A TEFAL válaszol a kédésekre
- Zöldség
- Rizs
- Hús/ hal
- WAZNE ZALECENIA
- Przed użyciem szybkowaru przyȩczytaj wszystkie zalecenia i zawsze postępuj zgodnia z „Instrukacja obstugi".
- Nieprawidłowewuzytkowanie moze spowodowa szkody.
- PO GOTOWANIU...
- ZACHOWAJ NINIEJSZA INSTRUKCJE
- Częsci (patrz: Schemat)
- Sprawdź koniecznie przydym użyciem
- Sprawdzanie zaworu roboczego
- Sprawdzanie zaworu bezpiecznychstwa
- Obstuga
- Otwieranie
- Zamykanie
- NieMZna zamknacPokrywki:
- Pierwsze użycie
- W zależnosci od modelu:
- Napelnianie minimalne i maksymalne
- W przypadku niedtórych produktów:
- Korzystanie z koszyka do gotowania na parze*
- Zdejmownik i zak.§adanie zaworu roboczego (A)
- Zdejmownikie zaworu roboczego (A):
- Zakladanie zaworu roboczego :
- Minutnik*
- Nigdy nie uzywaj minutnika w trybie Garnek.
- Aby minutnik dział, powinien być przymocowej do szybkowaru
- Dlugie nacinie przycisku zeruje i wyłacza minutnik.
- Zakladanie i zdejmownik minutnika*
- Wymiana baterii minutnika*
- Przed gotowaniem
- Gotowanie w trybie Szybkowar
- W trakcie gotowania w trybie Szybkowar
- Zakończenie gotowania w trybie Szybkowar
- Uwolnienie pary:
- Nigdy nie manipuluj przy trzpieniu bezpiecznychstwa.
- Gotowanie w trybie Garnek*
- Zabezpieczenia
- Zabezpieczenia przy zamykaniu:
- Zabezpieczenie przy otwieraniu:
- - Przede wzystkim nie ruszaj trzpienia bezpiecznychsta (D).
- Dwa zabezpieczenia przyd nadmiernym ciśnieniem:
- Ježeli uruchomi są jeder z systemów zabezpieczązych przyzed zbyt wysokim ciasnieniem:
- Zalecenia
- Czyszczenie
- Mycie wętrza garnka ze stali niedzewnej:
- Mycie alumniowej wętrza garnka z powłok są przywierajuća:
- Mycie zewétrznych powierzchni garnka:
- MyciePokrywki:
- Mycie uszczelkiPokrywki:
- Mycie zaworu roboczego (A):
- Mycie przywcie:
- Mycie zaworu bezpieczestewa (E):
- Czyszczenie minutnika* (F):
- Konserwacja
- Wymiana usczelki szybkowaru:
- Przechowywanie szybkowaru:
- Akcesoria TEFAL
- Dane techniczne
- Kompatabilne zródła ciepla
- Gwarancja
- Oznaczenia prawne
- Aktywnie chronomyśrodkowisko!
- TEFAL odpowyada na pytania
- LABELA GOTOWANIA
- Warzywa
- WARZYWA (SWIEZE)
- ZANURZENIE
- LEGUMES SECS ZANURZENIE
- MÁSURI IMPORTANTE DE PRECAUTIE:
- DUPÄ PREPARAREA ALIMENTELOR...
- PÁSTRATI ACESTE INSTRUCTIONNI
- Componente (a se vedea Schema descriptivă)
- Verificări obligatoriținainte de fiecare適用are
- Verificarea supapei de fonctionare
- Verificarea supapei de siguranta
- Utilizare
- Deschidere
- Inchidere
- In cazul in care nu puteti inchide capacul:
- Primautilizare
- In functie de model :
- Nivel de ampliere minimi maxim
- Pentru anumite alimente:
- Utilizarea coşului pentru gătit la abur*
- Montarea si demontarea supapei de fonctionare (A)
- Pentru indepartarea supapei de fonctionare (A):
- Pentru montarea supapei de fonctionare:
- Cronometrul*
- Nuutiliati niciodata cronometrul in modul de, Gatire lenta".
- Cronometrul trebuie fixat pe oala sub presiune pentru a functiona.
- Montarea Şi demontarea cronometrului*
- Schimbarea bateriei cronometrului*
- Inaintede gàtire
- Gătire în modul „Oaală sub presiune"
- In timpul gătirii in modul „Oală sub presiune"
- La finalul gătirii în modul „Oală sub presiune"
- Pentru eliberarea aburului:
- Nu actionaţi niciodătă asupra indicatorului de siguranta.
- Gătire in modul „Gătire lenta“*
- Siguranta
- - Siguranta la inchidere:
- - Siguranta la descidere:
- - Nu actionaţi in niciun caz asupra indicatorului de siguranta (D).
- - Două dispositive de siguranta impotrivă suprapresiunii:
- In cazul in care se declanseaza unul+dentre sistemele de siguranța la suprapresiune:
- Recomandári de utilizes
- Curățare
- Pentru a curata interiorul oalei din inox:
- Pentru a curata interiorul oalei din aluminiu cu invelis antiaderent:
- Pentru a curăta exteriorul oalei:
- Pentru acuratacapacul:
- Pentru a cura garnitura capacului:
- Pentru curățarea supapei de fonctionare (A):
- Pentru a curata duza pentru evacuarea aburului (B) de pe capac:
- Pentru a curata supapa de siguranta (E):
- Pentru a curata cronometrul* (F):
- Intretinere
- Pentru schimbarea garniturii oalei sub presiune:
- Pentru depositarea oalei sub presiune:
- Accesorii Tefal
- Characteristic
- Informatii privind normele:
- Surse de caldurà compatibile
- Garantie
- Acestegarantiiexclud:
- Marcaje de reglementare
- - Să contribuim la proteția mediului în conjurător!
- Tefal răspunde intrebărilor dumneavoa
- LABELUL DE GÄTIT
- Legume
- Carne/peşte
- MEPbI 5E3OПАСHОCTN
- COXPAHNTE 3TUYMHCTPYKUNIO
- KOMNOHeTbI (cM. yCTpoiCtBO npu6opa)
- O6aTeIbHbIe npOBepKn nepei KaJdbIM nCpOJIb3OBaHnem
- Поберka pa6oeryо klnanaHa
- Поберka пешохантыного КлanaHa
- Исpenb3OBaHne
- OTKpbIbAHne
- 3aKpbiBaHne
- EcnBbl He MoXeTe 3aKpbItb KpbIshky:
- Перboaецпользоване
- B 3aBnMoCTn OT MoJeH:
- MnHmAlbHbI MaKcMaJIbHbI yPoBeHb 3aNoJIHeHna
- PpimeeHnno nncnoB3OBaHnIO HeKOTOpbIX npOdyKTOB nHTaHn:
- Испобзовные КОрзIHы对于我们ПрИТОВленья на napу_
- B 3abncmoctn OT moedn:
- Сятынистановka pa6oуero klaпана (A)
- Дя сны рабочero Клана (A):
- YctaHOBka pa6oeryo KlananaHa:
- Taimep*
- He ncpnoj3yute TaMep B pexime 6e3 daBleHna.
- Для pa6otbl taMepa OHdoJKeH 6bITb npNKpePJIeN K cKOpOBapKe
- YctahOBka n ChrTne TaMepa\*
- 3ameha 6aTapeiKn B Taimepe*
- Ipeed npirotoBleHneM
- Bapka B peЖиMe ckopoВapКn
- Воверема варки в ржиме «Сkopоварка»
- 3aBepseHne BapKn B peXnme cKOpOBapKn
- Дя Вынунька па:
- HnkOrda He OKa3bIbAitc Te Bo3dEiCTBnE Ha npeOxpa HnteIbHbI cTepeXeHb.
- Пригоровские в реки м
- IpeoXpaHnteIbHbIe yctpoIcTba
- -ПпебхаHTeHoe yCTpoIcTBo npn 3aKpbBaHmN:
- -ПпебхаHTeNbHoe yCTpoIcTBo npn OTKpbIBaHmN:
- Ecn npca6aTbIbAeT OndHO n3 npedeoxpaHITebHbIX yCTpoiCTB n36bItoHoro DaBJIeHn:
- Pekomehdaunno nCnOJb3OBaHNU
- UncTka
- Для чистkn BHyтpeн Hei nobepxHocTn emKoCTn n3 HepXkBeIoUeI CTaII:
- Дя ounstkn BHytpenHei nobepxHocTn aniomnHneBOI emKoCTN c aHTnpurapHbIM nOKpbITnem:
- Дя очinctи Вhecній NOBepxHOCTN emKoctn:
- ДячNTККрblшк:
- ДячNTК npOKlaДК KpbIшк:
- Дя чисткpa6оуero клanaHa (A):
- Дя чьки OTверстя за Бынуcka па (В), распожению по Крбшков:
- Ynctka npedoxpaHntbHoro klanana (E):
- Дя оочтки таймера* (F):
- yxo
- 3ameHa npokladkn ckopoBapKn:
- XpaHeHne cKOpOBapKn:
- Akceccyapbl TEFAL
- TexHueckaMHΦopMaζη:
- CobmecTmMbIe NCTOCHNKe Tepla
- TapaHTy
- HopmatNBHbIe OTMeTKn
- Bhecem BknaB OxpaHy OkpykaIoUeI cpebl!
- TEFAL OTBeuaet Ha BaShn BOnpOcbl
- TABJIUNCA BPEMEHN IPNIROTOBJEHN
- Obou
- OBOU (CBEXKNE)
- HA NAPY
- BBODE
- IMNpyIbCHbIPEKIM
- B BOIDE
- Pnc
- MЯсо/pьба
- DÔLEŽITÉ PREVENTÍVNE OPATRENIA
- PO UVARENÍ...
- TENTO NÁVOD SI USCHOVAJTE
- Diely (pozričast' Popisné schéma)
- Nevyhnutné kontroly pred každým použitím
- Kontrola prevádkového ventilu
- Skontrolujte bezpečnostnéventil
- Používanie
- Otvorenie
- Zatvorenie
- Ak nemožete zatvorit'Pokrievku:
- Prévopoužitie
- V závislosti od modelu:
- Minimáne a maximálne množstvo
- V pripadeniektorych potravin:
- Použivanie naparovacieho košíka*
- Vybratie a nasadenie prevádkovéhoventilu (A)
- Vybratie prevádkového ventilu (A):
- Nasadenie prevádkového ventilu:
- Počitadlo minút*
- Nikdy nepoužívajte Časovač v režime „Hrniec".
- Montáž a demontáž počitadla minút*
- Výmena batérié do počitadla minút*
- Pred varením
- Varenie v režime „Tlakový hrniec"
- Počas varenia v režime „Tlakový hrniec"
- Ukončenie varenia v režime „Tlakový hrniec"
- Vypustenie pary:
- S bezpečnostnou rúrkou nikdy nemanipulujte.
- Varenie v režime „Hrniec“*
- Bezpečnost
- - Bezpečnost pri zatvárani:
- - Bezpečnost' pri otvarani:
- Nikdy netlacte na bezpećnostné rúrku (D).
- Dva pretlakové bezpečnostné systémy:
- V pripe, ze sa spusti jeder z pretlakovych bezpecnostnych systemov:
- Odporučania týkajúce sa používania
- Cistenie
- Čistenie vnútra nádoby z nehrdzavejúcej ocele:
- Čistenie vnútra nádoby z hliníka s neprilnavým povrchom:
- Čistenie vonkajšej strany nádoby:
- ČisteniePokrievky:
- Čistenie tesneniaPokrievky:
- Čistenie prevádkového ventilu (A):
- Udrzba
- Príslušenstvo TEFAL
- Priemer dna tlakového hrnca - reference
- Normativne informácie:
- Kompatibilné zdroje tepla
- Predpísané značenie
- - Chráimeživotné prostredie!
- Odpovede spoločnosti TEFAL na vaše otázk
- TABULKA S INFORMÁCIAMIO VARENÍ
- Zelenina (ČERSTVÁ)
- PONORENIE
- STRUKOVINY PONORENIE
- Mäso/ryby
- PoMeMBna oPozorila
- Pred uporabo lonca na zvišan tlak skrbno preberite vsa navodila in vselej upoštevajte ta "Uputstvo za upotrebu".
- Pri uporabi, ki ni skladna, lahko pride do poškodb.
- SHRANITE TA NAVODILA
- Sestavni deli (gleje opisno shemo)
- Obvezna preverjanja pred vsako uporabo
- Preverjanje obratovalnega ventila
- Preverjanje varnostega ventila
- Odpiranje
- Zapiranje
- Če ne morete zapretiPokrova:
- Odvisno od modela:
- Minimalno in maksimalno polnjenje
- Zadoločenaživila:
- Uporaba kosare za kuhanje s paro\*
- Odstranitev in namestitev obratovalnegaventila (A)
- Kako izvlečemo obratovalni ventil (A):
- Kako namestimo obratovalni ventil:
- Minutni stevec*
- Odstevalnika nikoli ne uporabljajte v načinu "Mešano".
- Namestitev in odstranitev minutega števca*
- Changement de la pile du minuteur*
- Pred kuhanjem
- Kuhanje v načinu lonec na zvišan tlak
- Med kuhanjem v načinu "Lonec na zvišan zrak"
- Kuhanje v načinu "Lonec na zvišan tlak"
- Za izpust pare:
- Kuhanje v načinu litoželezne posode*
- Varnost
- Varnost pri zapiranju:
- Varnost pri odpiranju:
- - Nikoli ne posegaje v varnostni klin (D).
- Dve varnostni napravi proti previsokemu pritisku:
- V primeru, da se sproži eden izmed teh dveh varnostnih sistemov proti previsokemu pritisku:
- Priporočila za uporabo
- Čiščenje
- Kako očistiti notranjost posode iz nerjavečega jekla:
- Kako očistiti notranjost posode iz aluminija s prevalko proti prijemanju:
- Kako očistiti zunanjost posode:
- ČiščenjePokrova:
- Cisjenje tesnilaPokrova:
- Ciscenje obratovalega ventila (A):
- Čišćenje vodila za izpuh pare (B), namesčelenega naPokrovu:
- Cischenje varnostega ventila (E):
- Cischenje minutega stevca* (F):
- Vzdrževanje
- Menjava tesnila pri loncu na zvišan tlak:
- Hramba vašega lonca na zvišan tlak:
- Dodatki TEFAL
- Lastnosti
- Kompatibilni toplotni viri
- označitev v skladu s predpisi
- Sodelujmo pri varovanju okolja!
- TEFAL odgovarja na vaša vprašanja
- PreGleDniCa za KUHanJe
- Zelenjava
- ZELENJAVA (SVEZA)
- KUHANJE NA PARI
- KUHANJE V VODI
- STROCNICE
- Meso/ribe
- VAŽNE MERE PREDOSTROŽNOSTI
- Pre upotrebe ekspres lonca, pažljivo pročitajte i uvek se pridržavajte "Uputstva za upotrebu"
- Delovi (pogledajte Opis)
- Obavezne provere pre svake upotrebe
- Provera radnog ventila
- Provera sigurnosnog ventila
- Ako ne možete da zatvoritePoklopac:
- Prvo korišćenje
- U zavisnosti od modela:
- Koriscenje korpe za kuvanje na pari*
- Skidanje i postavljanje radnog ventila (A)
- Skidanje radnog ventila (A):
- Postavljanje radnog ventila:
- Tajmer za kuvanje*
- Nemojte nikada da koristite tajmer u režimu rada "Šerpa".
- Postavljanje i skidanje tajmera*
- Zamena baterije na tajmeru*
- Pre kuvanja
- Kuvanje u režimu "Ekspres Ionac"
- Za vreme kuvanja u režimu "Ekspres lonac"
- Za oslobačanje pare :
- Nikada ne preduzimajte radnje na sigurnosnoj cevi.
- Kuvanje u režimu "Šerpa" *
- Bezbednost
- Bezbednost pri zatvaranju:
- - Bezbednost pri otvaranju:
- Ukoliko se aktivira"One dan od sigurnosnih systemdu slučaju prevelikog pritiska:
- Preporuke prilikom upotrebe
- Cisćenje unutrażnjosti posude od nerăjućegČelika:
- Cisćenje unutrašnjosti posude od aluminijuma sa nelepljivom oblogom:
- Cisćenje speljasnosti posude:
- Ciscenje dihtungPoklopca:
- Ciscenje radnog ventila (A):
- ODRZAVANJE
- TEFAL Dodaci
- Prečnik dna posude lonca - reference
- Normativne informacije:
- Regulatorne oznake
- Učestvovanje u zašitiživotne sredine!
- LABELA KUVANJA
- POVRCE (SVEZE)
- Pirinač
- IHCTPYKlI3 TEXHIKN BE3NEKN
- DOIПIDчAC PIPROTYBAHH
- ПИСЛ
- Onnc
- O6OB'ЯЗКОВI nepeBipKn nepeД кoxнm BИКОРистаннam_
- Ipebipka po6ofoKlanaHa
- Ipebipka 3ano6xHoro KlaanaHa
- BnKopncTaHn
- BidkpmbHn
- 3aKpmbaHHa
- Jkso Bn He MoXKeTe 3aKpNTn KpnShky:
- Першевскорецьнаня
- 3anexho BID moedJI:
- MaKcImaJIbHe Ta MiHimaJIbHe HaIOBHeHHa
- Дя Deякux npoуктib:
- Викорпстанна Кочка за пиrotуванна на napi_
- 3aJIeXHo BID MoIeI:
- 3нятгий Встановleteная робочero Кларана (A)
- 3нятг робочую клanaha ckopobapkn (A):
- BctahOBlenHa po6oyoro KlananaHa:
- HikonHe BnKOpncToBvIe TaIMepypeXmI «Kactpyra».
- BctaHOBJIeHHa Ta 3HimaHHa TaMepa\*
- 3amHa 6aTapeiKn B TaImepi*
- PpeepnpnroTyBaHHaM
- BapiHЯВpexuMi «CkopoBapka»
- Пд час варинь рекиMi «Сkopоварka»
- 3aBepseHnBapiHnBpeKmI «CkopoBapKa»
- BunyckaHnnapu:
- Hikon He Tucitb Ha 3an06ixn KlaanaH.
- Пригоруваня в реки м «Каструл»*
- CnCTeMn 6e3neKn
- -Be3neka nID yac 3aKpNbBaHHa
- -Be3neka nID yac BiDkPmbaHHa:
- -He Tnchitb Ha 3an06ixhnn Klanah (D).
- ■Дистеми зanobirahня haMipHomy TnCKy:
- JaKo OJHa i3 cnCTem 3anO6irAHnHaMipHomy TnCKy He cnpaOboBye:
- PekomehdaazioBnKOpncTaHHa
- OuHsEHHa
- OuHsENHbHyTpihboi nobepxhi kactpyni 3 hepXabioo i cTani:
- Дя ouишени BHytriшньоі nobepxhi aniominiéBOoi kactpyni 3 aHTnPurapHm nokpTTam:
- OuHnHn3OBHiHbOi Nobepxhi Kactpyni
- OuHneHHKpnKn:
- OuHnHnY uIbHIOBaHa KpnKn:
- OuHsEHHa po6oYoro Klanana (A):
- O6cnyroByBaHHa
- 3amHa yuilbHIOBaça cKOpOBapKN:
- 36epirahnrackopobapkn
- Akcecyapn TEFAL
- Texhichi xapaktepnctnkn
- Hopmatubhi XapaKTepuCTnku:
- Джерета тени.
- TapaHTiA
- Hopmatubhi no3haqkn
- 3axnauMo doBkijpa30m!
- TEFAL BiДnobiДа€ Ha BaWi 3aПТання
- TAbnucy YACU PPnFGOTyBAHHa
- Oboqi
- OBOHI (CBIXI)
- HA IAPI
- YBODI
- IMПУЛьСНИ
- YBOI
- M'Ясо/pn6a
Brand : TEFAL
Model : Clipsominut' Easy P46207
Category : Saucepan