
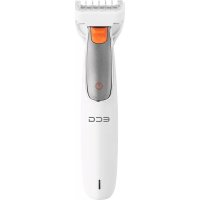
ZS 08 - Beard trimmer ECG - Free user manual and instructions
Find the device manual for free ZS 08 ECG in PDF.
| Product type | Beard and hair trimmer |
| Brand | ECG |
| Model | ZS 08 |
| Power source | Rechargeable Ni-MH battery 300 mAh, voltage 2.4–3 V DC |
| Power adapter | Input 220–240 V~ 50/60 Hz, output 3 V DC, 0.3 A |
| Runtime | Approximately 50 minutes of continuous operation |
| Charging time | 6 to 8 hours (first charge: 12 hours) |
| Included comb attachments | 2 dual-sided comb attachments: 3/6 mm and 9/12 mm |
| Blades | Moving blades (upper) and fixed blades (lower) |
| Charging indicator | Yes (LED indicator) |
| Cordless use | Yes, on battery |
| Corded use | Yes, by plugging in the adapter |
| Lubrication | Lubrication oil included, apply after each use |
| Cleaning | Cleaning brush included; comb attachments washable with water |
| Safety | Do not use near water, unplug before cleaning, do not immerse |
| Charging temperature | +5°C to +35°C |
| Power consumption | 2.5 W |
| Included accessories | 2 comb attachments, power adapter, cleaning brush, lubrication oil |
Frequently Asked Questions - ZS 08 ECG
User questions about ZS 08 ECG
0 question about this device. Answer the ones you know or ask your own.
Ask a new question about this device
Download the instructions for your Beard trimmer in PDF format for free! Find your manual ZS 08 - ECG and take your electronic device back in hand. On this page are published all the documents necessary for the use of your device. ZS 08 by ECG.
USER MANUAL ZS 08 ECG
natural_image
Red and white ECG hairpin with a screwdriver handle (no text or symbols visible)ZS 08
ZASTŘIHOVAČ VLASŮ
NÁVOD K OBSLUZE
ZASTRIHÁVAČ VLASOV
NÁVOD NA OBSLUHU
CZ
- Connector for the AC adapter
- Power on / charging indicator
- On/Off switch
- Body of the clipper
- Moveable (upper) blades
- Stationary (bottom) blades
- Reversible attachment 3 or 6 mm
- Reversible attachment 9 or 12 mm
- Power adapter
- Cleaning brush
- Lubricating oil
HR/BIH
- Konektor za spajanje adaptera za punjenje
- Pokazivač napajanja/napunjenosti
- Prekidač
- Tijelo aparata
- Pomični (gornji) nož
- Nepomični (donji) nož
- Dvostrani nastavak od 3 ili 6 mm
- Dvostrani nastavak od 9 ili 12 mm
- Adapter za punjenje
- Četka za čišćenje
- Ulje za podmazivanje
SI
Read carefully and save for future use!
Warning: The safety measures and instructions, contained in this manual, do not include all conditions and situations possible. The user must understand that common sense, caution and care are factors that cannot be integrated into any product. Therefore, these factors shall be ensured by the user/s using and operating this appliance. We are not liable for damages caused during shipping, by incorrect use, voltage fluctuation or the modification or adjustment of any part of the appliance.
To protect against a risk of fire or electric shock, basic precautions shall be taken while using electrical appliances, including the following:
- Before you first connect the clipper to the network and start charging the battery, make sure your voltage corresponds to the voltage of the power adapter. The electrical outlet must be installed in accordance with applicable safety regulations.
- It is recommended that to install residual current protection (RCD) for better protection with nominal tripping current not exceeding 30 mA in the bathroom electrical circuit. Ask your electrician for advice.
- Use only the power adapter and accessories included with the clipper.
- Do not use the clipper in places with high temperature and relative humidity exceeding 80%.
- Charge batteries at temperatures from +5 °C to +35 °C.
- If the attachments or blades are damaged, do not use the clipper under any circumstances.
- Do not use the clipper to trim the fur of pets.
- Keep the blades clean and lubricated.
- Never leave clipper connected to power unattended.
- Always turn off the clipper when you pause cutting.
- The adapter power cable must not touch hot objects and hot surfaces, must not be immersed in water, must not run over sharp edges and must not be used to carry the appliance.
- When disconnecting the adapter from the outlet never pull it by the cable, always grasp the adapter and disconnect it carefully from the outlet.
- Do not immerse the clipper, power adapter and power cord in water or other liquids.
- Do not touch the power adapter with wet hands.
- Do not leave unsupervised children near the hair clipper, children must not play with the device.
- Keep packaging materials (polyethylene bags) out of reach of children. Do not allow children to play with polyethylene bags and packaging foil. Danger of suffocation!
- Never use the clipper if the power adapter or its cable are damaged, if the clipper does not work normally or if the clipper or power adapter were dropped.
- Do not disassemble the device and do not attempt to repair it by yourself. In case of any defect or if you drop the device, find and authorized service.
- This appliance can be used by children ages 8 and older and by the physically and mentally impaired or by individuals with insufficient experience and knowledge, if supervised or trained to use the appliance in a safe manner and understand potential dangers. Children shall not play with the appliance. Cleaning and maintenance operations performed by the user shall not be carried out by children, if they are not older than 8 years and under supervision. Children under the age of 8 shall keep away from the appliance and its power supply.
- Use the appliance only in accordance with the instructions given in this manual. This hair clipper is designed for domestic use only. The manufacturer is not liable for damages caused by improper use.
WARNING: Do not use the device close to bathtubs, showers, sinks or other vessels containing water.
WARNING: Disconnect the hand held part from the power supply before cleaning.
WARNING: Keep the device dry
USING THE APPLIANCE
Before fi rst use
• After transportation or storage in cold conditions it is necessary to let the device warm up at least 2 hours at room temperature.
Battery charging
- Make sure that the switch ③ is in position "0".
- Insert the charging connector of the adapter ⑩ into the charging connector of the clipper ①.
- Insert the charging adapter ⑩ in the wall outlet and the indicator will light up ②.
- Charge the battery for 12 hours before first use.
- After you finish charging the battery disconnect the charging adapter ⑩ from the outlet and disconnect the connector of the power cable from the charging connector of the hair clipper ①.
Notes:
- The next battery charging should last 6 to 8 hours.
- Fully charged battery allows about 50 minutes of continuous operation.
- If the movement of the blades will slow down and you need to continue using the clipper, you should let the battery charge for at least 1 hour, or connect the AC adapter and use the clipper in power cord mode.
- Charge the battery in temperature from +5^ to +35^ .
- Never leave the device connected to the outlet unattended.
- If you did not use the clipper for longer period of time (more than 2 months), perform before using it the complete 12-hour battery charge.
Lubricating oil
To keep the clipper in continuous good condition you should lubricate the blades after each use (⑤ and ⑥).
Attention! Use only the lubricating oil ⑫ included with the device. DO NOT USE vegetable oil, fat or mixture of oil and solvents to lubricate the blades. The solvents evaporate and leave a thick layer of grease, which can slow down the movement of the blades ⑤.
Using the hair clipper
Attaching and removing attachments
- When attaching the attachment ⑦ or ⑧ insert the tab on one side of the attachment in the groove on the body of the clipper ④ and push on the other side of the attachment so that the tab on the other side of the attachment will fall in its place. The attachments are reversible, when you turn it you change the length of the cut (3 / 6 mm or 9 / 12 mm).
- When removing the attachment, push the projecting part of the attachment away from the body of the clipper and remove the attachment.
Using the clipper
- Charge the battery fully for cordless use.
Note: When using with power cord, connect the adapter cable ⑩ to the clipper connector ① and insert the power adapter to the wall outlet. - Before you start cutting hair, turn the clipper on by turning the switch ③ to position "1" and make sure that the device is working properly and the blades move smoothly. If there is too much lubricate on the blades, switch the clipper off and remove the excess grease using dry cloth from antipiling fabric.
- Turn the clipper off using switch ③.
- When attaching the adapter, observe the lengths of the hair marked on the attachments.
- Turn the clipper on by pushing the switch ③ to position "1" and start cutting.
- Turn the clipper off after use by pushing the switch to position "0".
Notes:
• Always turn off the clipper when you pause cutting.
- Turn the clipper off before changing an attachment and if you are using it with power cord, disconnect also the power adapter ⑩ from the outlet.
Cutting hair
- Make sure before you start cutting hair that the hair is clean and dry. You will achieve the best results with dry, not wet hair.
- Sit the person, whose hair you are cutting so that her head is at your eye level, cover her shoulders with a towel and style her hair using a comb.
- Always start haircut from the back side of the head.
- You can cut hair along or against the direction of the growth, but keep in mind that when cutting against the direction of hair growth it will be shorter than when cut along the growth direction.
- To let your hair longer, take a strand of hair between the fingers and cut the hair using the clipper.
- Cur only a small amount of hair at a time you can return to the trimmed place later and possibly cut more.
- Comb through hair to uncover unevenly trimmed strands.
- You can lift the hair using comb and cut it along the comb.
- Even the haircut using scissors.
- You will learn over time to model a perfect desired hairstyle.
Haircut examples
GB
Note: When using attachments (⑦, ⑧) observe the hair lengths markings on the attachments.
Step 1
Put on attachment "3/6mm". Turn on the clipper using switch ③. Hold the clipper with blades upward. Begin cutting from the place where hair starts growing. Go slowly with the clipper upward. Cut this way the back part of the head around the neck and around the ears.
Step 2
Turn the clipper off and put on the attachment "9/12mm". Turn the clipper on and continue tu cut toward the top of the head.
Step 3 – cutting temples
Turn off the clipper and put on the attachment "3/6mm" ⑦. Cut the hair on the temples. Then put on the attachment "9–12mm" ⑧ and continue cutting towards the top of the head.
Step 4 – cutting the top of the head
Using attachment "9/12mm" ⑧ cut the hair from the top of the head towards the sides and cut against the direction of the growth.
Step 5 – fi nal part
Remove the attachment from the clipper (⑦ or ⑧), turn the clipper toward the hair and carefully trim the hair on the temples and on the neck. Do not push on the clipper with force since you could risk injury or cut in case the open blades would come into contact with skin.
Cone-shaped cut
Put on the necessary attachment (⑦ or ⑧) and start cutting from the neck toward the top of the head. Cut against the growth of the hair from the forehead to the top of the head and on the sides. To achieve a flat cut on the top of the head use comb: always lift a strand of the hair and trim it along the comb. Comb the hair to uncover unevenly cut strands.
CLEANING AND MAINTENANCE
WARNING: Disconnect the hand held part from the power supply before cleaning it.
- Immediately after finishing using the clipper turn the switch ③ to position "0". If you are using power adapter ⑩, disconnect it from the wall outlet and then disconnect the power cable from the connector ①.
- Remove the attachment (⑦ or ⑧) and using cleaning brush clean the inside of the attachment from the hair remnant.
- You can rinse the attachments under running water. Then dry them thoroughly.
- Clean the body of the clipper ④ using lightly wet cloth and then wipe it dry.
- Never immerse in water or other liquids the body of the clipper ④ and the adapter ⑩!
- Do not use solvents or cleaning products with abrasives to clean the clipper ④ and the attachments (⑦ and ⑧).
Blade care
Lubricate the blades regularly ⑫.
- Turn the clipper off by pushing the switch ③ to position "0" and if you are using it with the power cord, disconnect the power adapter ⑩ from the wall outlet and then from the clipper.
- Remove the attachment (⑦ or ⑧).
- Press the blade edges ⑤ in the same time from both sides away from the clipper ④ to remove the clipping unit.
• Use brush ⑪ to clean the inside part of the clipper and the clipping part from the hair remnants. - Apply one or two drops of oil ⑫ on the tooth blades and the rear support part of the upper blades ⑤.
- Insert the tab on the bottom part of the clipping unit to the groove on the body of the clipper ④ and push from the outside on the stationary blades ⑥ so that the clipping unit is locked in its place. Proper lock is signalled by a click.
- Turn the clipper on and make sure that the blades are moving smoothly.
- Turn the clipper off and using dry cloth from antipiling material remove excess lubricant from the blades (⑤, ⑥).
Storing
Before storing the hair clipper clean it and lubricate the blades (⑤, ⑥) with oil ⑫.
Store the clipper in a dry and cool place out of the reach of children.
TECHNICAL SPECIFICATIONS
Power adapter
Input adapter voltage: 220–240 V \~ 50/60Hz
Input voltage: 3 V DC, 0,3 A
Hair clipper
Ni-Mh battery 300 mAh
Voltage
2,4-3
V DC
Power consumption 2.5 W
NOTE: The following situations void the warranty:
Incorrect or inappropriate handling of the device, failure to observe safety measures applicable to the device, the use of force, alterations or repairs made by a party other than authorized service center.
Parts subject to normal wear and tear (with batteries, it is especially the loss of capacity, battery life is at least 6 months from the date of sale) are not covered under warranty.
USE AND DISPOSAL OF WASTE
Wrapping paper and corrugated paperboard – deliver to scrapyard. Packing foil, PE bags, plastic elements – throw into plastic recycling containers.
DISPOSAL OF PRODUCTS AT THE END OF LIFETIME
Disposal of electric and electronic equipment (valid in EU member countries and other European countries with an implemented recycling system)
The represented symbol on the product or package means the product shall not be treated as domestic waste. Hand over the product to the specified location for recycling electric and electronic equipment. Prevent negative impacts on human health and the environment by properly recycling your product.
Recycling contributes to preserving natural resources. For more information on the recycling of this product, refer to your local authority, domestic waste processing organization or store, where you purchased the product. NiMH battery used in this device must not be disposed of in regular household waste. The battery must be disposed of properly. For more information, please contact the distributors of batteries or collection points for waste disposal.
Ni-Mh
This product complies with EU directive requirements on electromagnetic compatibility and electrical safety.
The instruction manual is available at website www.ecg-electro.eu.
Changes in text and technical parameters reserved.

SIGURNOSNE UPUTE
PEČAT I POTPIS PRODAVATELJA
PROIZVAJALEC ali DAJALEC GARANCIJE:
K+B Progres, a.s. ; MBS: 61860123
250 69 Klíčany, Czech Rep. e-post: ECG@kbexpert.cz
K+B Progres, a.s.
U Expertu 91 tel.: +420 272 122 111
250 69 Klíčany, Czech Rep. el. paštas: ECG@kbexpert.cz
K+B Progres, a.s.
U Expertu 91 tel.: +420 272 122 111
250 69 Klíčany, Czech Rep. e-pasts: ECG@kbexpert.cz
CZ
SK
PL
HU
DE
HR/BIH
SI
SR/MNE
FR
IT
ES
ET
LT
LV
Dovozce neruči za tiskové chyby obsažené v návodu k použití výrobku. Dovozca neruči za tlačové chyby obsiahnuté v návode na použitie výrobku. Importer nie ponosi odpowiedzialności za błędy drukarskie w instrukcji obsługi do produktu. Az importör nem felel a termék használati útmutatójában fellelhető nyomdahibákért. Der Importeur haftet nicht für Druckfehler in der Bedienungsanleitung des Produkts. The importer takes no responsibility for printing errors contained in the product's user's manual. Uvoznik ne snosi odgovornost za tiskarske greške u uputama. Uvoznik ne jamči za morebitne tiskovne napake v navodilih za uporabo izdelka. Uvoznik ne preuzima nikakvu odgovornost za štamparske greške sadržane u uputstvu za upotrebu proizvoda. Le fournisseur ne peut être tenu responsable des erreurs d'impression contenues dans le mode d'emploi du produit. L'importatore non sarà ritenuto responsabile per eventuali errori di stampa contenuti nel manuale dell'utente del prodotto. El importador no asume ninguna responsabilidad por errores de impresión en el manual del usuario del producto. Importija ei vastuta toote kasutusjuhendis leiduvate trükivigade eest. Importuotojas neapsiima atsakomybès del spausdinimo klaidy, pasitaikančiu gaminio naudotojo vadove. Ražotájs neuznemas atbildíbu par drukas klūdām ierices rokasgrāmatā. © GVS.cz 2016


- ZS 08
- ZASTŘIHOVAČ VLASŮ
- ZASTRIHÁVAČ VLASOV
- CZ
- HR/BIH
- SI
- Read carefully and save for future use!
- USING THE APPLIANCE
- Before fi rst use
- Battery charging
- Notes:
- Lubricating oil
- Using the hair clipper
- Attaching and removing attachments
- Using the clipper
- Cutting hair
- Haircut examples
- GB
- Step 1
- Step 2
- Step 3 – cutting temples
- Step 4 – cutting the top of the head
- Step 5 – fi nal part
- Cone-shaped cut
- CLEANING AND MAINTENANCE
- WARNING: Disconnect the hand held part from the power supply before cleaning it.
- Blade care
- Storing
- TECHNICAL SPECIFICATIONS
- Power adapter
- Hair clipper
- NOTE: The following situations void the warranty:
- USE AND DISPOSAL OF WASTE
- DISPOSAL OF PRODUCTS AT THE END OF LIFETIME
- SIGURNOSNE UPUTE
- PEČAT I POTPIS PRODAVATELJA
Brand : ECG
Model : ZS 08
Category : Beard trimmer