UNI_POOLS_16 - Pool Uniprodo - Free user manual and instructions
Find the device manual for free UNI_POOLS_16 Uniprodo in PDF.
User questions about UNI_POOLS_16 Uniprodo
0 question about this device. Answer the ones you know or ask your own.
Ask a new question about this device
Download the instructions for your Pool in PDF format for free! Find your manual UNI_POOLS_16 - Uniprodo and take your electronic device back in hand. On this page are published all the documents necessary for the use of your device. UNI_POOLS_16 by Uniprodo.
USER MANUAL UNI_POOLS_16 Uniprodo
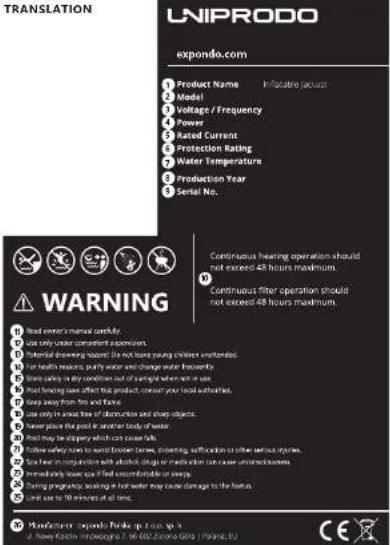
| Parameter description Parameter value | |||
| Product name Inflatable Jacuzzi | |||
| Model UNI_ | POOLS14 | UNI POOLS15 | UNI POOLS16 |
| Rated voltage [V-]/Frequency [Hz] | 230/50 | ||
| Rated power [W] 2400 | |||
| Rated Current [A] 10.4 (7.9+2.5) | |||
| Rated heating power [W] 1800 | |||
| Rated heating power [W] 600 | |||
| Rated power of the massage air pump [W] | 30 | ||
| The rated voltage of the filter pump [V] | 12 | ||
| Protection rating IP /IPXS | |||
| Protection class I | |||
| Number of seats 6 4 6 | |||
| Capacity [L] 886* | 952 | 520*558 | 841*900 |
| Number of nozzles 130 | 110 130 | ||
| Maximum water temperature [°C] | 42 | ||
| Water temperature rise rate [°C/h] | 1-2 | ||
| Filter dimensions (height x inner/outer diameter) [mm] | 78x58x100 | ||
| Internal dimensions [m] | ∅1,6x0,65 | ∅1,1x1,10,65 | ∅1,5x1,50,65 |
| Dimensions [m] | ∅2,0x0,65 | 1,45x1,45x0,65 | 1,85x1,85x0,65 |
| Weight [kg] | 30.24 | ||
| Product name Inflatable Jacuzzi | |||
| Model UNI_ | POOLS17 | UNI POOLS18 | UNI POOLS19 |
| Rated voltage [V-]/Frequency [Hz] | 230/50 | ||
| Rated power [W] 2400 | |||
| Rated Current [A] 10.4 (7.9+2.5) | |||
| Rated heating power [W] 1800 | |||
| Rated heating power [W] 600 | |||
| Rated power of the massage air pump [W] | 36 30 | ||
| The rated voltage of the filter pump [V] | 12 | |
| Protection rating IP IPX5 | ||
| Protection class I | ||
| Number of seats | 6 | |
| Capacity [L] 1000 | 841+900 | |
| Number of nozzles 130 | 130 | |
| Maximum water temperature [°C] | 40 | |
| Water temperature rise rate [°C/m] | 1,5-2 | 1-2 |
| Filter dimensions Height x inner/outer diameter [mm] | 78x58x100 | |
| Internal dimensions [m] | ∅1.60 | ∅1.5x1.50.65 |
| Dimensions [m] | ∅2.08 x0.65 | 1.85x1.85 x0.65 |
| Weight [kg] 37.3 | 24 | |
- GENERAL DESCRIPTION
The user manual is designed to assist in the safe and trouble-free use of the device. The product is designed and manufactured in accordance with strict technical guidelines, using state-of-the-art technologies and components. Additionally, it is produced in compliance with the most stringent quality standards.
DO NOT USE THE DEVICE UNLESS YOU HAVE
THOROUGHLY READ AND UNDERSTOOD THIS USER MANUAL
To increase the product life of the device and to ensure a trouble-free operation, use it in accordance with this user manual and regularly perform the maintenance tasks. The technical data and specifications in this user manual are up to date. The manufacturer reserves the right to make changes associated with quality improvement.
LEGEND
| The product satisfies the relevant safety standards. |
| Read instructions before use. |
| The product must be recycled. |
| WARNING OR CAUTION OR REMEMBER! Applicable to the given situation (general warning sign). |
| ATTENTION: Electric shock warning! |
| No Jumping into the water. |
| No diving. |
| Always use the Jacuzzi in the presence of another person. Do not leave children unattended in water. |

Hygiene principles should be strictly observed before entering the jacuzzi.

Keep the device away from sources of fire and heat.

PLEASE NOTE! Drawings in this manual are for illustration purposes only and in some detail may not be used.
The original operation manual is in German. Other language versions are translations from German.
2. USAGE SAFETY
ATTENTION! Read all safety warnings and all instructions. Failure to follow the warnings and instructions may result in an electric shock, fire and/or serious injury or even death.
Whenever "device" or "product" are used in the warnings and instructions, it shall mean
2.1. ELECTRICAL SAFETY
a) The plug has to fit the socket. Do not modify the plug in any way. Using original plugs and matching sockets reduces the risk of electric shock.
b) Avoid touching earthed elements such as pipes, heaters, boilers and fridges. There is an increased risk of electric shock if the earthed device is exposed to rain, in direct contact with a wet surface or operating in a humid environment. Water ingression into the device increases the risk of damage to the device and of electric shock.
c) Do not touch the device with wet or damp hands.
d) Use the cable only in accordance with its designated use. Never use it to carry the device or other items, such as cables, cables, and cables. Keep the cable away from hot sources, oil, sharae edges or moving parts. Damaged or tangled cables increase the risk of electric shock.
e) If using the device in a humid environment cannot be avoided, a residual current device (RCD) should be applied. The use of an RCD reduces the risk of electric shock.
f) Before each use, check that the residual-current device (RCD) is functional.
g) It is forbidden to use the device with a damaged power source. The original power cord with the residual-current device
h live parts and power sources except for parts and sources of 12V must be out of the reach of people in the water.
Live elements must be protected so that they cannot fall into the water.
3) To avoid electric shock, do not use extension cords to connect the product to power.
x) It is forbidden to use the product during rainfall or during a storm or when there is a risk of their
It is forbidden to use electrical devices while in the water and when the user's body is wet.
m). It is forbidden to bury the power cord or locate it in places where it may be accidentally damaged.
2.2.SAFETYAT THE WORKPLACE
a) Make sure the workplace is orderly and well lit. A messy or poorly lit workplace may lead to
accidents. Try to anticipate what may happen, observe what is going on and use common sense when working with the device.
b) If there are any doubts as to the correct operation of the device, contact the manufacturer's support group.
c) Only the manufacturer's service point may repair the device. Do not attempt any repairs independently!
d) If a fire starts, use solely powder or carbon dioxide (CO_2) fire extinguishers suitable for use on live devices to put it out.
e) Regularly inspect the condition of the safety labels. If the labels are flammable, they must be replaced with a new one.
f) Please keep this manual available for future reference. If this device is passed on to third parties, please use the following form:
g) Use the product away from sources of fire and spieces.
h) The device should be assembled and disassembled only by adults
2.3.PERSONAL SAFETY
a) Do not use the device when tired, ill or under the influence of alcohol, narcotics or medication which can significantly impair the ability to operate the device.
b) The device is not designed to be handled by persons (including children) with limited mental and sensory functions or persons lacking relevant experience and/or knowledge unless they are supervised by a person responsible for their safety or they have received instructions on how to operate the device.
c) To prevent the device from accidentally switching on, make sure the switch is on the OFF position before connecting to a power source.
d) The device is not a toy. Children should be supervised so that they will not play with the device.
e) Caution Risk of drowning. Do not leave children unattended.
When using the product, follow the safety rules to avoid fractures, suffocation, drowning and other life-threatening situations.
g) It is forbidden to use the bath after consuming alcohol, drugs or medicines. A warm bath in this case may even cause unconsciousness. Using the jacuzzi after consuming the above substances increases the risk of hyperthermia, the symptoms of which include drowsiness, dizziness and a lack of feeling of excessive heat and fainting.
h) If you feel unwell, feel drowsy or uncomfortable, you should immediately get out of the jacuzzi.
i) Secure the product against access by children.
j) People with heart disease, cardiovascular disease, hypertension or low blood pressure, diabetes, cancer, liver disease, kidney disease, and other diseases.
must consult a doctor before using the product. It is forbidden for people with skin diseases and
those suffering from infectious diseases to use the device.
1) During pregnancy, staying in hot water can cause foetal damage. You should limit the one-time use of the product to 10 minutes.
m) Do not allow children to use the product, except when they are under the supervision of an adult.
n) Prolonged use of the device may be harmful to your health.
o) Do not use the device when fatigued.
p) Do not use the bath alone. Ensure the presence of another person.
2.4.SAFE DEVICE USE
a) Do not use the device if the ON/OFF switch does not function properly (does not switch the device on and off). Devices which cannot be switched on or off are classified as "off", and should be replaced. Devices that should not be operated and have to be repaired.
b) When not in use, store in a safe place away from children and people not familiar with the device, who have not read the user manual. The device may pose a hazard in the hands of inexperienced users.
c) Maintain the device in a good technical state. Before each use check for general damage and especially check for cracked parts or elements and for any other conditions which may impact the safe operation of the device. If damage is discovered, hand over the device for repair before use.
d) Device repair or maintenance should be carried out by qualified persons, only using original spare parts. This will ensure safe use.
e) To ensure the operational integrity of the device, during the operation of the factory leased guards and do not loosen any screws.
Do not touch articulated parts or accessories, unless the device has been disconnected from a power source.
g) It is forbidden to move, adjusting and rotating the device in the course of work.
h) Clean the device regularly to avoid a durable extrusion of dirt.
i) The device is not a toy, Cleaning and maintenance may not be carried out by children without supervision by an adult person.
j) The time of continuous heating or filtering of water should not exceed 48 hours.
k) For health reasons, it is necessary to clean and exchange water in jacuzzi regularly.
The product may be slippery, which may cause falls.
m] It is forbidden to start the product if the suction parts are damaged. The suction fittings should be replaced only with exactly the same type of parts, it is forbidden to use parts with different parameters.
1) After each use, secure the product with a lid to avoid accidental falling into the water.
o) Regularly check the condition of the lid. If forbidden to use a damaged cover.
p) It is forbidden to switch the device on if it is likely that the water is frozen or heavily polluted.
a) NOTE: To speed up the heating process it is acceptable to turn on the heating while the cover is on. If the device does not turn on the filter system and/or air filters when the cover is on an oil device.
r) Ensure that animals are not able to enter the product.
s) The water in the jacuzzi during the bath should not exceed 40^ . A temperature between 38 and
40^ is considered safe for a healthy adult. For children and when using the device for more than 10 minutes, set the water temperature to a lower level.
t. It is forbidden to start the pump if the water is below the minimum level, as it will damage the pump.
u) The product is subject to the rules for swimming pool fencing, please consult your local authorities. v) This product is not intended for children.
w) it is forbidden to place the product in another water tank.
x) Place the product only on a surface that will withstand its weight when filled with water and air.
y) Never add water to chemicals that clean water, always add chemicals to water. Adding water to chemicals will cause them to atomise and lead to strong chemical reactions.
2) The device cannot be used at a temperature below 4^ .
aa) It is not recommended to expose the product to long-lasting sunlight.
bb) It is forbidden to add bath salts, fragrance oils, cleansing liquids, etc. to the water.
td) Do not pour water above 40^ into the device.
dd) It is forbidden to move the pool along the ground surface. In order to transport the device for a short distance, disconnect it from the power supply and then carry it when two people holding the handles to the right place.
ee) Do not carry a pool filled with water.

ATTENTION! Despite the safe design of the device and its protection facilities and despite the use of additional elements protecting the operator, there is still a slight risk of an accident or injury when using the device. When using the device stay alert and use common sense.
- USE GUIDELINES
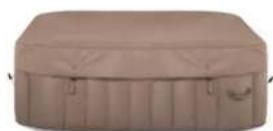
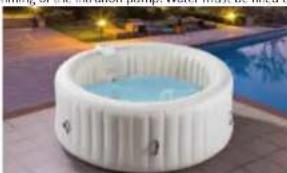
The device is designed for a relaxing bath in water with the possibility of heating the water and massage with air bubbles. The product is intended for home use only and not intended for commercial use. Image resulting from nonintended use of the device.
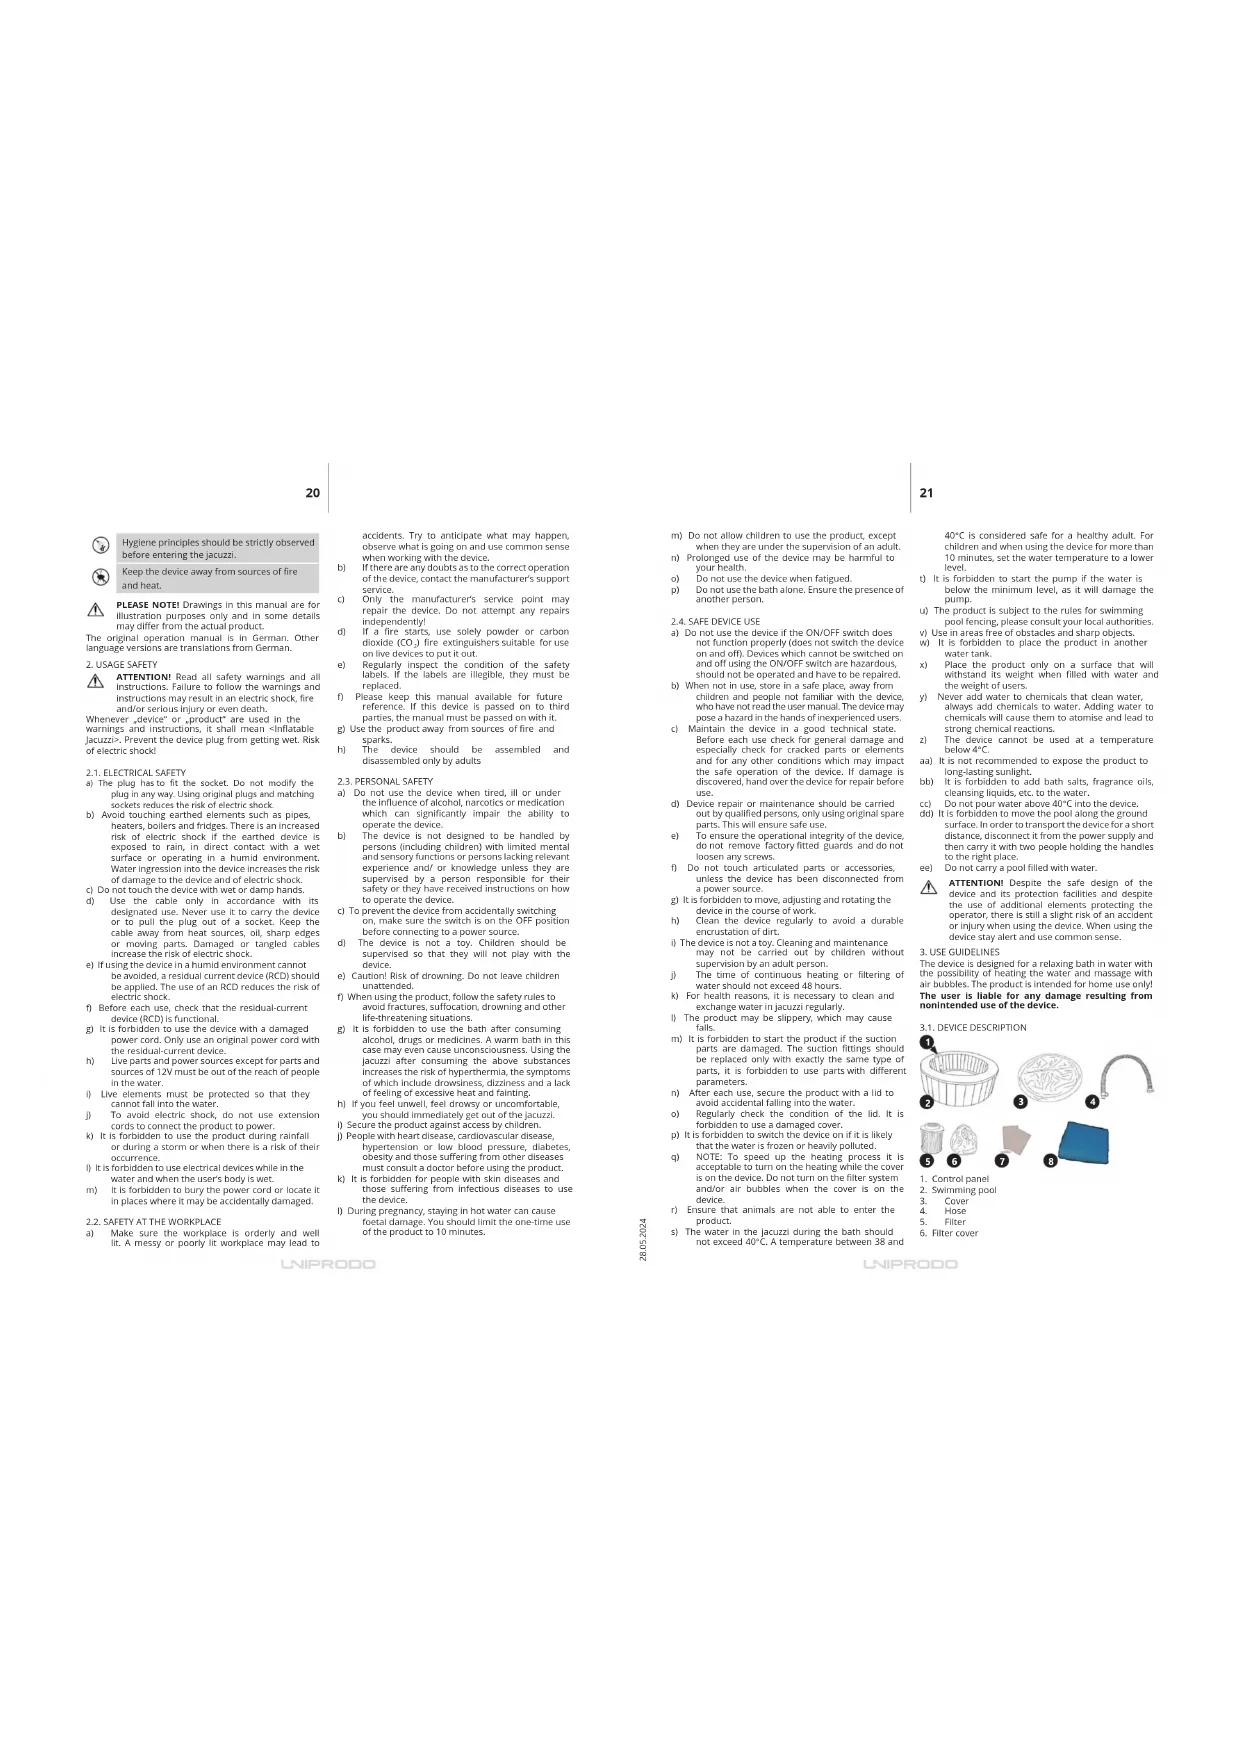
3.1.DEVICE DESCRIPTION
-
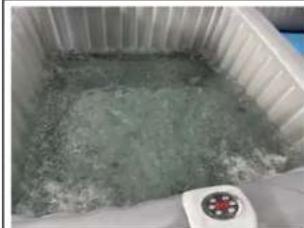
Control panel
-
Swimming pool
- Cover
4.Hose 5. -
File
b. Filter cover -
Repair Kit 8. Tarpaui
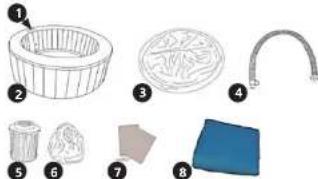
A. Temperature increase button
B. Filtering system ON/OFF button
C. All doublets On/Off Bion
D. Hearing Water On/Off button
E. Temperature decrease button
F. Enty butcon in temperatior settngs G. Display
For informational purposes only:
Ambient temperature and initial water temperature are the factors for heating duration. Current water temperature will be displayed after filter system has been running for at least one minute.
| Ambient Temperature | Water Temperature | Set Temperature | Heating Duration |
| 50°F (10°C) 50°F (10°C) | 104°F (40°C) 23h | ||
| 59°F (15°C) 59°F (15°C) | 104°F (40°C) 18h | ||
| 68°F (20°C) 68°F (20°C) | 104°F (40°C) 14h | ||
| 77°F (25°C) 77°F (25°C) | 104°F (40°C) 11h | ||
| 86°F (30°C) 86°F (30°C) | 104°F (40°C) 8h |
3.2. PREPARING FOR USE
APPLIANCE LOCATION
The temperature of environment must not be higher than 40^ and the relative humidity should be less than 85% . Keep the device away from hot surfaces. Operate the device on flat, stable, clean, refractory and dry surfaces out of the reach of children and people with mental disabilities. The surface should be free of dirt and sharp edges, and able to resist the weight of the mass of the device filled with water and users. The area around the device should have drainage in order to easily drain the spilled water. The surface around the device should be slip-resistant.
Always place the device on properly unfolded tarpaulin.
When installing the device inside a building, additional requirements should be met, i.e.:
- no hazards due to increased humidity in the room.
ensure adequate ventilation,
the floor must withstand the weight of the device with water and users.
it is not recommended to install the device on upper floors because of the risk of flooding the rooms below with water.
- the drainage of water to the sewage system should be ensured.
- it is forbidden to place the device on rugs or other materials susceptible to moisture.
The power cord connected to the appliance must be properly grounded and correspond to the technical details!
INSTALLING THE APPLIANCE
-
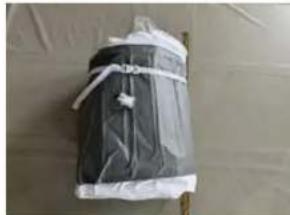
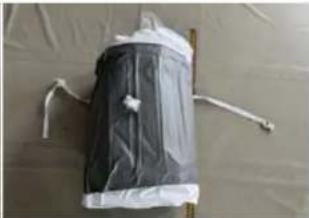
Take the product out of the packaging. Spread it out and make sure that the pool and cover are properly placed.
-
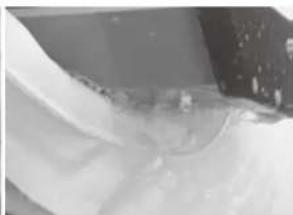
Open the air outlet from the pool and screw on one of the hose ends.
- Open the air valve and attach the other end of the hose to the valve.
Connect the device to the power supply.
Press the ON/Off bubble button on the control panel. Wait for the pool to inflate, taking care not only of the pressure but also of the temperature.
Press the On/Off bubble button to stop the filling process.
- Unstrew the hose from the outlet and air valve, close the inlet and close the valve.
- Screw the filter to the pool wall by turning it clockwise.
- Fill the pool with water to a point between the
maximum and the minimum level. Cover the jacuzzi pool with a cover.
PLEASE NOTE: If you want to pump up the water-filled pool, turn the nozzles on for 2-3 minutes by pressing the On/Off button for the bubbles and remove the air filter, and then follow the steps described above.
CAUTION: After the first pumping, it is natural that the material may stretch. Reinflation is needed to get the correct pressure.
3.3.DEVICEUSE
Powering the device
The device is equipped with a power cord with a residual-current device (circuit breaker). The circuit breaker should be tested regularly. For this purpose, reset the switch by pressing the Reset button. Start any of the jacuzzi functions, e.g., air bubbles, and then press the TEST button. The switch should cut off the power supply from the device. Press the RESET button again to return to the normal operating mode.
PLEASE NOTE: If, after pressing the TEST button, the switch does not cut off the power supply from the device, immediately stop using the jacuzzi and contact the manufacturer's service department.
Water filtration function
- Press the filtration On/OH button. The device will begin to filter, the diode will light on the button.
- Pressing the filtration On/OH button again will begin to filter, the processing process, the LED on the button will go off.
- When the filter pump runs exceeds 168 hours, FC^ will appear on the display and a signal will be displayed. This will be information about the need to replace or clean the filter. The LED on the filter button will be lit, but the filtering itself will be turned off. Other device systems will also not work. To turn off the message, press the filtration On/Off button, the current water temperature will appear on the display. To restore the filtration system activity, replace or clean the filter.
Massage function with air bubbles
- Press the Go/Off button for the air bubbles. The device will start to spray air bubbles from the front surface, then the bubbles will light up on the bubbles.
- Do not activate the function if a cover is placed on the goal.
- Pressing the bubbles On/Off button again will turn off the bubble release process, the LED on the button will go off.
- The nozzle system automatically stops working after 20 minutes. To restart the function, wait 15 minutes.
For the first 15 minutes of the function it can be turned off and turned on without interruption. After the time of 15 minutes has elapsed after switching off the air bubble function, wait 10 minutes before turning it on again.
Water heating function
- Press the On/Off button to heat the water. The device will start to heat up the water, the diode will light on the button. It will also light up the diode and the water will be cooled down. The device will also start filtering the water.
After reaching the set water temperature (temperature setting is described in the following point) +1^ the heating will be automatically switched off, but the filtering will continue to function. The control clodes for heating and filtering will light up constantly, even after the set water temperature has been reached.
- if the water temperature drops 2^ , below the set value, the heating system switches on again (the filter will continue to run).
- During the warming process, pressing the warming button again will switch off the warming function and its control diode, but filtering will continue to work for 2 minutes and during this time the control diode for filtering will light up in pulses.
Setting the water temperature
Press the entry button to set the temperature, the display will flash.
- Use the buttons to increase or decrease the
temperature value to set the preferred value. Press the input button again to set the
temperature to confirm the entered value.

The water heating process depends on the initial water temperature and external conditions and it takes around 12 - 24h . For a water with temperature of 15^ (tap water), in ideal conditions, heating time will take 15h to increase the water temperature up to 30^ .
2. The heater is mainly used to maintain the water temperature, and it recommends filling the heater with warm water.
3. The product with clear signs of use, water or dirt residues is not subject to return.
Keeping water clean
- In order to keep the device in good condition and not to expose yourself and other users to health problems, you should regularly clean the water in the pool.
- Water should be periodically cleaned with chemicals or replaced with fresh water. It is important to keep the water free from contamination.
- When using chemicals, follow the manufacturer's recommendations and instructions for use, and consult with local authorities regarding the permissible use of these products.
- Replace and clean the filter regularly. It is recommended to clean the filter after every 72-120 h of use. The filter should be replaced once a month depending on the intensity of use.
- The pH of the water should be maintained at 7.2-7.8, total alkalinity between 80 and 120 ppm, free chlorine between 3 and 5 ppm. It is recommended to use special costs to check the water status. Tests should be used in accordance with the recommendations and instructions of their manufacturer.
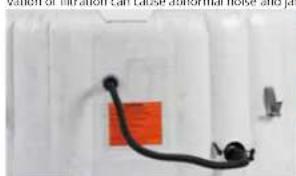
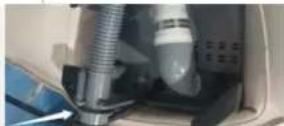
Cleaning the filter
- Disconnect the device from the power supply
- Uncrew the filter from the pool wall.
- Remove the filter cover.
The filter should be rinsed with water, e.g. from a garden hose, and it can be re-installed in the device, if the filter is discoloured or has dirt that cannot be removed, replace it with a new one.
-
cannot be removed. Replace it with a new one. - Put the cover on the filter.
-
Screw the filter to the pool wall.
Draining the water
- Disconnect the device from the power supply.
Make sure that the hole in the floor on the inside of the pool is closed.
- Open the water outlet on the outside of the pool.
Connect one end of the nose. Open the hole plug on the inside of the pool, the
water will flow out through the nose.
After draining all the water, activate the air bubbles release function for about 2-3 minutes to get rid of water from the tubes in the device.
- When finished, disconnect the nose and close the holes with the plugs.
Storage
- Completely drain the pool water. Remove the filter.
After draining the water, dry the pool with a dry cloth and leave it to dry for 24 hours until it is completely dry. - Release the air from the pool by opening the outlet and air valve, then fold it into the box.
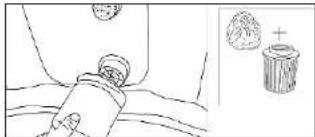
Using the repair kit - if the product gets torn or breaks, use the provided repair kit.
- Clean and dry the area of damage. Cut out the patch.
- Apply the adhesive to the patch, then gently fascial it to the damaged area.
- Smooth the surface to remove air bubbles.
3.4.CLEANING AND MAINTENANCE
a) Before each cleaning, adjustment replacement of accessories and if the device is not used, it is necessary to pull out the mains plug.
b) Use cleaners without corrosive substances to clean each surface.
c) Contaminants may be deposited on the walls of the pool. To clean them, use a mild soap and water.
a) After cleaning the device, all parts should be dried before resuing it.
e) Store the unit in a dry, cool place, free from moisture and direct exposure to sunlight.
Regular inspections of the device must be carried out in terms of its technical efficiency and any damages.
g) Use a soft cloth for cleaning.
| Problems Cause Solution | ||
| The display does not respond /does not switch on | The safety switch is deactivated Perform a reset | |
| The water temperature is above 116.6°F (47°C) | Wait until the water temperature has dropped below 104°F (40°C) and press the "manual reset button" | |
| Air jet system not working Overheating of the air fan motor Wait until the motor has cooled down, then press the bubble but ton to activate the function | ||
| Problem with the filter/air and massage jets/heater unit | Disconnect the power supply, wait 10 minutes before switching the power back on | |
| Massage jet system not working | Overheating of the massage jet motor | Wait until the motor has cooled down, then press the JET button to activate the function |
| Problem with the filter/air and massage jets/heater unit | Disconnect the power supply, wait 10 minutes before switching the power back on | |
| Heater not working | Temperature set too low | Set a higher temperature 68°F -104°F (20-40°C) |
| The water temperature is still within the tolerance range of the temperature sensor +/-35.6°F (2°C) | Once the set water temperature reached, the heater will stop work- ing until the water temperature drops 35.6°F (2°C) below the set temperature. In this case just wait for a few minutes and the heater will start working automatically. | |
| Spa is not covered | Attach the cover | |
| The filter cartridge is dirty | Replace the filter cartridge | |
| Water level too low | Top up the water | |
| Problem with the filter/air and massage jets/heater unit | Disconnect the power supply, wait 10 minutes before switching the power back on | |
| Dirt deposits inside the motor block (heating pipe with dirt, Filter pump blocked, Plugged filter cartridges) | Remove the filter cartridge and flush the motor block using a water hose by placing the water hose at the water outlet and collecting par- ticles of dirt at the filter connection using a cloth bag | |
| Filter system not working | The filter cartridge is dirty | Replace the filter cartridge |
| Water level too low | Top up the water | |
| Problems Cause Solution | ||
| Problem with the filter/air and massage jets/heater unit | Disconnect the power supply, wait 10 minutes before switching the power back on | |
| Filter pump running too loud | The filter cartridge is dirty. Replace the filter cartridge | |
| Water level too low. Top up the water | ||
| Dirty cover (on filter cartridge) | Clean the cover | |
| Problem with the filter/air and massage jets/heater unit | Power voltage too low or incorrect frequency | Contact a qualified electrician |
| Fault in the filter/air and massage jets/ heater unit | Disconnect the power supply, wait 10 minutes before switching the power back on | |
| The stub has a strange shape | Additional air pressure due to strong sunlight | Check the air pressure (using barometer, the pointer points to the green range) and let some |
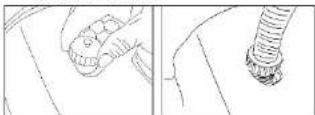
| The SPA is losing air pressure | Air valve cap is too loose | Using soapy water, cover the air valve to check if air is leaking, if so, use the provided wrench to fasten the air valve following these steps 1. Derlate the spa. 2. With one hand, hold the backside of the air valve from the inner side of the spa wall and turn the wrench clockwise. |
| Tear (seam) or spot damage | Perform a test to locate the affected area | |
| Ambient temperature drops drastically | It is a normal that the air shrinks in low temperature environment. Fill more air into the spa | |
| The SPA is losing water | The sealing plug of the heater drain at the bottom of the SPA is loose | Press the drainage hung tightly |
| Spa is torn or punctured | Use provided repair patch. (Pui liquid soap and water in a squirt bottle and spray on seams. If there is a leak, it will bubble. After you find the leak, clean and dry the leaking area, then apply the repair patch that comes with your spa) | |
| The water is not clean | Insufficient filtering time | Increase the filtering time |
| The filter cartridge is dirty | Replace the filter cartridge | |
| Poor or insufficient water treatment | Read the instructions of the chemicals manufacturer | |
ERROR MESSAGES
| Error code Cause Solution | ||
| SL The water temperature | s 41°F (5°C) or less | Wait until the water temperature is >41°F (5°C) or add a certain amount of hot water to keep the water temperature up before starting the heating. |
| SH Malfunction of the circuit board or the temperature sensor. Heating tube overheating Perform a reset | After unplugging the power, wait 30 minutes to start up again. | |
| Replace the display and/or the motor block. | ||
| HL Malfunction of the filter pump Check the water level | ||
| FC (with sound warning) The filtration and heating have been in operation for 168 hours. Before replacing the filter cartridge, neither the filtration pump nor the heater is ready for operation. | Replace the filter cartridge and press the HEA-TER button to restart the filtration and heater | |
| OC Malfunction of the temperature sensor | Replace the temperature control probe | |
| FP Wrong operation into FP mode Press "temperature" button, P | press the "up" button, Panel show 68°F (20°C), then the spa returns to the normal state. | |
If you continue to experience difficulty, please contact our Consumer Service Department for assistance.
28
TIPS
Leaking water
When installing the spa, both the water plug and drainage sealing cover must be tightened. Looking air:
Both the gray and black parts of the one-way valve need to be tightened.
About heating

Every time the spa is reused after a power off, the temperature needs to be reset, otherwise the spa can only be heated to 100 (1), the spa cover needs to be covered during heating and the lock button needs to be inserted. Adding floor mat to the spa will provide better heating and insulation effects.
29
-
When using BUBBLE in the pool, it is normal for the temperature to drop quickly because the heat dissipation is faster when using BUBBLE.
-
After opening BUBBLE for 20 minutes, it will stop blowing for 10 minutes to protect the motor. If you forcibly use BUBBLE, you can power off and restart it before use.
Long time use will lead to slight expansion of SPA, which is a normal phenomenon and looks like air leakage. We just need to restart the connecting inflation nose to inflate. It is a normal phenomenon that bubbles will emerge from the airway hole in the pool during inflation.
If there is no water in the pool, filtration and heating cannot be turned on. If there is no water in it, prolonged activation of filtration can cause abnormal noise and jamming of the filtration pump. Water must be filled before use.
After using the spa, you can use a bandage to quickly store the pool, reducing its size and saving space.
IMPORTANT INFORMATION ON PROBLEMS
A. Loss of air
Inflatable spas, by design, may lose air after a period of time, especially when exposed to cold temperatures.
This is a normal phenomenon and does not mean that the spa has a defective area where air is leaking.
Step 1
Check the tightness of the air valve screw connection (black/grey). This valve has a double function, i.e. to inflate and deflate air.
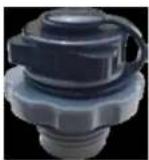
Note: After inflating the SPA, it is possible that the lower screw connection has loosened during the inflation process. After inflation, the following must therefore be done to prevent air leaks:
Air inlet (black): screw the screw cap back on hand tight.
Air outlet (grey): tighten the lower part of the screw connection hand tight.
Step 2
If air continues to leak after step 1, perform the following test to locate the affected area:
Spray scapy water on the PVC body of the spa. Bubbles will form on the leaky area
-
The SPA was not inflated in the place of use. After Inflation, the SPA was moved to the place of use, thereby damaged the PVC body.
-
Surface not even and stable.
-
The SPA has been overinflated.
Only inflate the SPA to the point where the upper edge can still be pressed in approx. 1.57-1.97 inches with the palm of your hand.
The air inside expands further in the sun, which can lead to damage to the PVC shall if the SPA is inflated too much.
If the spa is filled with too much air, this can cause both deformation and over-stretching of the PVC cover.
Over-stretching of the PVC shell is the main cause of irreparable tearing of the welding seams.
B. Loss of water
Before filling the SPA with water, the water outlets inside / outside the SPA should be checked again for their watertight seal.
-
In the SPA
-
Check both connections of the filter cartridge and the water outlet and if necessary, tighten the connections using the tools provided. 2. Outside the SPA
-
Check the screw cap to make sure the sealing ring is inserted properly and that it is tightened hand tight.
FILTER SYSTEM
Pumping noise
The whole noise is less than 85 dB. An increasing noise level of the pump is usually caused by an insufficient water flow or a pump problem itself. The following procedure should be followed to identify and solve the noise problem.
-
Check the water level and top up the water if necessary (check the min./max. level)
-
Unscrew the filter cartridge and check the pump noise (without filter cartridge)
-
After 15-20 minutes, screw on a new or cleaned filter cartridge
No filtering
If there is the Impression that the filtering does not work properly or at all, the following procedure should be followed:
View the indicator light of control panel to check on the display that the filtering is switched on.
-
Check the filter cartridge for contamination. If dirty, clean or replace the filter cartridge
-
Check the water flow. For this, unscrew the filter cartridge and use your hand to:
*feel whether the filter pump is drawing water at the water inlet.
- feel whether water is coming out of the water outlet
If no water flow may be the fault of the filter pump, clean the filter and replace the filter pump.
HEATING SYSTEM
Problems with the heating are generally:
- Insufficient water flow due to a low water level or a dirty filter cartridge.
If not enough water flows through the heater, the temperature sensor cannot determine the current water temperature and the water cannot be heated properly.
How to judge whether the water flow is sufficient?
Low water flow will cause the water temperature to rise rapidly, but the actual temperature does not rise. Measures:
-
Check the water level and top up the water if necessary (observe the min./max.)
-
Unscrew the filter cartridge and replace it with a new or cleaned one
-
Wrong or incomplete programming of the desired water temperature
Programming of required temperature:
-
Ensure that the heating system (HEATER) is switched on.
-
Press the TEMPERATURE button (the numbers on the control panel now flash continuously)
-
Use the arrow buttons TEMP UP / TEMP DOWN to select the required water temperature.
-
When the desired temperature is displayed on the control panel, press the TEMPERATURE button again. The temperature is now set and programmed.
-
Press the HEATER button to start the heating system. On the display, a red LED new lights up next to HEATER and FILTER: The system now starts automatically with water circulation.
-
When the preset temperature is reached, the heating element switches off while the red LED for the heater (HEATER) remains illuminated. The filter pump does not switch off automatically. If the water temperature drops below the preset temperature, the heating system starts to work again. If the heating system is not to restart automatically, both the heating system and the filter pump must be switched off by pressing the HEATER and FILTER buttons.
Note: The integrated temperature sensor works with an accuracy of +/- 35.6°F[2°C]. Depending on the set water temperature, it may therefore be the case that the heater / pump does not switch on immediately but with a delay. This is not a malfunction.
Note: In cold weather, it takes between 12 and 24 hours to heat the water to the desired temperature. The ambient temperature and the temperature of the mains water affect how long it takes for the water to heat up. The water temperature drops every time the heater is switched off on the SPA. Wait until the water has heated up before using the SPA again.
- The ambient temperature is too low
If the ambient temperature is below 50^ (10°C), the heater works slower than normal.
Note: It is advisable to use the SPA indoors in low ambient temperatures.
4.Winter mode
All SPA functions are blocked at an ambient temperature below 32^ (0°C). Operating the heating system or other functions at sub-zero temperatures can cause irreversible damage to water pipes and electrical components inside the motor block.
LEAKAGE DUE TO A CRACK/-hole
To repair minor cracks or leaks on the inside or outside of your spa, you will find a repair kit included.
This consists of a white patch for the inside of your spa and a patch matching the corresponding colour of the outside.
To repair the damaged area, we recommend that you use a 2-component adhesive, which is not included in the scope of delivery.
After you have repaired the leakage area in accordance with A. AIR LEAK and have a suitable adhesive available, proceed as follows:
-
Remove the water from the spa.
-
Release the air from the spa.
-
Fit the patch to the damaged area by allowing the patch to extend about 1.18-1.57 inches in all directions beyond the damaged area and cut it accordingly.
-
Place the patch over the damaged area and mark all 4 corners, or a circular shape of the patch on the spa.
-
Make sure the area to be patched is free of dirt and moisture.
-
Apply tape or electrical tape outside the marked area in order to concentrate the adhesive on the location of the patch. Make sure that the area to be patched is 0.12 inches - 0.2 inches larger than the damaged area actually is.
-
Now apply the adhesive according to the manufacturer's instructions.
-
Apply the patch.
-
Allow the adhesive to dry according to the manufacturer's instructions.
-
Inflate the spa according to the installation instructions.
-
Observe the patch over a period of 30 minutes to see if the leak has been repaired.
-
If air is no longer leaking, proceed in accordance with the installation instructions.
DEFORMATION
Make sure that you install the spa properly according to instructions.
Spas Installed outdoors may Inflate due to partial or full solar radiation and cause Irreversible deformation.
Make sure that the spa tub is not exposed to direct sunlight in outdoor areas.
INSTRUKCJA OBSLUGI
DANE TECHNICZNE
| Opis parametru Wartosc parametu | |||
| Nazwa produktu jakuzzi nadmUCHiWane | |||
| Model UNI_ | POOLS14 | UNI POOLS15 | UNI POOLS16 |
| Napiętie [V-]/czestotlwość zasilania [H2] | 230/50 | ||
| Moc znamionowa [W] 2400 | |||
| Poid znamionowy [A] 10,4 (7,9+2,5) | |||
| Moc znamionowa grzania [W] | 1800 | ||
| Moc znamionowa pomyj powiatra do masaju [W] | 600 | ||
| Moc znamionowa pomyj filtra [W] | 30 | ||
| Napiȩcie znamionowe pomyj filtra [V] | 12 | ||
| Klasa ochrony IP IPX5 | |||
| Klasa ochromnosci I | |||
| Iliść mielsc 6 4 6 | |||
| Pojemnosc [II] 885+ | 952 | 520+558 | 841+900 |
| Iliść dysz 130 110 130 | |||
| Maksymalna temperatura wody [°C] | 42 | ||
| Szykosciwysto wiedu [°C/m] | 1-2 | ||
| Wymiary filtra wysokość x sądnika wewegrtna ziewegrtna [mm] | 78x58x100 | ||
| Wymiary wewegrtnze [m] | Ø1,5x0,65 | Ø1,1x1,0,65 | Ø1,5x1,0,65 |
| Wymiary [m] | Ø2,08x0,65 | 1,45x1,45x0,65 | 1,85x1,85x0,65 |
| Ciezar [kg] | 30 | 24 | |
| Nazwa produktu jakuzzi nadmUCHiWane | |||
| Model UNI_ | POOLS17 | UNI POOLS18 | UNI POOLS19 |
| Napiȩcie [V-]/czestotlwość zasilania [H2] | 230/50 | ||
| Moc znamionowa [W] 2400 | |||
| Prájd znanionowy [A] 10,4 (7,9+2,5) | ||
| Moc znanionowa grzania [W] | 1800 | |
| Moc znanionowa pomyp powietrza do maszyny [W] | 600 | |
| Moc znanionowa pomyp filtra [W] | 36 | 30 |
| Napićec znanionowe pomyp filtra [V] | 12 | |
| Klasa ochrony IP IPXS | ||
| Klasa ochromnoski | ||
| Iosic milejsc | 6 | |
| Pojemnošć [I] 1000 | 841+900 | |
| Iosic dysz. 130 | 130 | |
| Maksymilna temperature wody [°C] | 40 | |
| Szybkosc wrostu temperatury wody [°C/h] | 1,5-2 | 1-2 |
| Wymiary filtra (wysankost x srednica wewneznita/zwenezneta) [mm] | 78x58x100 | |
| Wymiary wewneze [m] | ∅1,60 | ∅1,5x1,50,65 |
| Wymiary [m] | ∅2,08 x0,65 | 1,85x1,85 x0,65 |
| Ciezar [kg] | 37,324 | |
- OGOLNY OPIS
A title of information:
2.2.SIKKERHED PA ARBEIDSPLADSEN
erg for, at arabijspladen s er volerdnct and gout oplyst. En redet est dafriigt oplyst arabijspladen kan fere l uykken.Prex at furadus, hwd der k ane 1000000000000000000000000000000000000000000000000000000000000000000000000
Rennergang at filteret
- Abyd enhanced bra streamforsyningen
- Skru filteret of fra poolvagger.
Boug of reparationsactet
Hvls produkt bilver revet I stykser etter garr I stykeer, skal du bruge det meefalgende
- Rengar og tər odmäd, hnr skaden er sket, Kip kampen ud.
Pater klebemidct pla staler, og fastgert det fragmentat met dat berkardinera prado.
F
3.4.RENGORINGOGVEDLIGEHOLDELSE
a) Her liver regnaring, justing, usdskifting at tibiofuer. b) The patient's skin is so red that the diet nevendigt at tuskike skikket und stukornakien.
b) Brug rongaringsmoller unden sctende stoffer til at tengere heit enkeit overfide.
c) Forunendoc storer aan alcores pa oolons vaegge. Du kon nropee dam med mila eao on yed.
d) När apparentet er rengjort, skal alle dele tarrs, for det symphons.
0
onurlndirekte udsrtsefor sows
f) Der skal foretages regelmassig kontrat of anordningen mod hensyn til dens teknske effektivitet on eventuale skader.
g) Brug en blad kld til renngering.
- ALGEMENE BESCHRIVING
Hot product moet worden gerecycled.

WAARSCHUWING! of LET OPI of
HERRINERINGI van tocc passing op die geveen
situate (algeerna wamschuwingsdorf).

Niet in hst water springen

Nietduiker

-
Non temperature regulation
-
Interpckn in temperature instilling
G. Wessgrays
3.2.VOORBEREIDEN VOOR GEBRUK
APPARAATLOCATIE
The two men had begun to "let them wake" a veigge hot fire. Dora did not know what the camera's hot water would go on stropped.
NAMEPLATE TRANSLATION
TRANSLATION
| 1 3 4 5 | ● | ● | ● | ● | |
| DE | Produktname | Model | Spannung/Frequenz | Leistung | Nennstrom |
| EN | Product Name | Model | Voltage/Frequency | Power | Rated Current |
| PL | Nazwa Produktu | Model | Napiécle/Czestodlowskić | Moc | Prad znamianowy |
| CZ | Název vyroblu | Model | Napié/Czostowcy | Jemovity vykon | Jemovity proud |
| FR | Nom du produit | Modèle | Tension/Frequency | Pulsance | Courant nominal |
| IT | Nombre del produit | Modelllo | Tension/Frequency | Potenza | Corrente nominale |
| ES | Nombre del produit | Modello | Voltaje/Frequency | Potenza | Corrente nominal |
| 6° | 8 | 9° | |||
| DE | Schutzart | Wassertemperature | Produktionsjahr | Ordnungssumme | |
| EN | Protection Rating | Water Temperature | Production year | Serial No. | |
| PL | Klasse ochryny | Temperatura wody | Rok produktji | Numero seri | |
| CZ | Super ochrany | Teplata wody | Rok vyrosty | Sénéve cisla | |
| FR | Classe de protection | Temperatura de l'eau | Année de production | Numero de série | |
| IT | Classe di protezione | Temperatura dell'acqua | Anno di produzione | Numero di系列产品 | |
| ES | Classe de protezione | Temperatura de agua | Anio de produzione | Numero de系列产品 | |
28.05.2024
155154
| 10 11 12 13 14 15 | ● | ● | ● | ● | ● | |
| DE | Die Dauer der kontinuierlichen Erwährung oder Filtration des Wassers darf 48 Stunden nicht überschnitten. | Gebrachte anreisung beachten. | Sich im Wasser unter der Aufsicht einer andere- ren Person aufhalten. | Es besteth die Gefähr des Er- trinkens, Kinder ne unteraufschnittigt leisen. | Aus gesundheit- lichen Gründen regelmäßig das Wasser im Wind- pool reingen und wechseln. | Bewahrenen Sie das Gerät an einem trockenden, kühlen, vor Feuchtigkeit und direkter Samenereinschaltung geschütztem Ort auf. |
| EN | Continuous heating operation should not exceed 48 hours maximum.Continuous Filter operation should not exceed 48 hours maximum. | Read owner's manual carefully. | Use only under competent supervision. | Potential drowning hazard Do not leave young children unattended. | For health reasons, purify water and change water frequently. | Store safely in dry condition out of sunlight when not in use. |
| PL | Czas piagego podgrzewania lub filtrwnia wody nie pouwen przekraczad 48 gadzin. | Przed uzyem nalezy zaporzanoś są instruktja. | Przebywać w odstawie pod kontrola进展情况 osoby. | Umagat Istniego ryzycko utropyania. Nie pozostawiar三点 bez apieki. | Ze wędędow zdrówotnych nałycki zȩco zȩco zȩco zȩco zȩco zȩco zȩco zȩco zȩco zȩco zȩco zȩco zȩco zȩco zȩco zȩco zȩco zȩco zȩco zȩco zȩco zȩco zȩco zȩco zȩco zȩco zȩco zȩco zȩco zȩco zȩco zȩco zȩco zȩco ZI | Urzadzenia nałyzy przechowstaw w sujmach i chydromy miopia jczyk chroniony prsed wlgocj i bezosodrnoim promienianion slonocznym. |
| CZ | Doba nepotrzȩho obievne nebo filtrwni yedny nemyresni pirekrodit 48 hodin. | Pried použilin se szannte s návidem. | Ve vodé se zdziurje pod dohledem jiže osoby. | Pozar! Existuje rizko utolnji. Niekly nonenochavojte三点 bez dohchodu. | S othelcem na zdravotni aspieczto zȩco zȩco zȩco zȩco zȩco zȩco zȩco zȩco zȩco zȩco zȩco zȩco zȩco zȩco zȩco zȩco zȩco zȩco zȩco zȩco zȩco zȩco zȩco zȩco zȩco zȩco zȩco zȩco zȩco zȩco zȩco zȩco zȩcoZI | Zaftzeni skladujte naSuchem a childernm mistle, chanrnem proti whiksto a přimemu slunocimi svitu. |
| FR | La durée de chauflage ou de filtration continues de l'eau ne doit pas dépasser 48 heures. | Respectez les consignes du manuel. | Nutilisz jamais le produit lorsque vous étés seul. | Risque de noyade. Ne laissiez jamais les enfants sans surveillance. | Pour des raisons de santé, il est nécessaire de nettoyer le jacuzzi et d'en changier l'earu régulément. | Conserve l'apparci dans un endroit frais et ste, a Fabri de l'humidité et des rayons du soliloil. |
| ES | Il tempo di riscadamento o filtraggio continuo dell'acqua non delve supare le 48 ore. | Loggere attentamente le struzioni. | Rumanero in acquaerto il controllo di un'altra persona. | Attenzione! Rischio di annegamento. Non lascanti I bambini incusstodii. | Per motivi di salute, pulire regolamenti e sostiture I acqua nella via da romassaggio. | Ienero l'appareccio in un luogo ascutto, freso, protetto dall'umidità e alla lucre direta del sole. |
| Jatendione! Risso de ahogamento. No doit a los niños sin supervision. | Por razones do salute, limpie freccomento y remplace el agua en el jacuzzi. | Guardo di aparato en un lugar seco, freso y protoggio de la humedà y la radiación solar directa. |
157156
| 16 17 18 19 20 21 | ● | ● | ● | ● | ● | |
| DE | Das Produkt un-terlagt den Regel für das Umzahlen von Schimmibädem.itte wendenSie sich an ihreorblichen Behörden. | Geräte von Feuer- und War-meguenfernhalten. | Es ist inReichen ohneHinderisse und scharfGegenstände zu verwenden. | Es ist ver-bollen, dasProdukt in-einen anderenWasserbehälter zu stellen. | Das Produktkannrutschigsein, wass zu Stürzenfuhen kann. | Beim Produktgebrauchimmer Sicherheitsvor-kehungen trefen, um Brüche, Erstücken, Ertin-ken und andere lebensbe-drahliche Situoren zuvermeiden. |
| EN | Pool fencing laws affect this product, consult your local authorities. | Keep away from fire and flame. | Use only in areas free of obstruction and sharp objects. | Never place the pool in another body of water. | Pool may be slippery which can cause falls. | Follow safety rules to avoid broken bones, drowning, suffocation or other serious injuries. |
| PL | Produkt plelega przemipam dotyzayym ogrodochen basoenowchen, naely skonsutowac sie z klokarniyni wiedzani. | Trzymań urzoprzemia zda do zrobodognia i plepla. | Utykowad u mięszychawychycki odrozskod i strorych odśrodki prędmiotów. | Zabrania sie uminszynyania produktu wimym zbiorniku wodnym. | Produkt mozeby sliski, co moze powodowac upaski. | Podzaz uzytkowania produktu naley przesterzegazaz bezpieczneconstazy, aby uniknaj ziamar, uoluszenia, utoniecie i mych yagrazajczych ziorowski i zycu sytuqi. |
| FR | Vyrobo se vztahuji prédipsi tykajci zse bazovnoe hrazeni konzultugeuto problematicu s mistrimi nitady. | Uchrujte zalizoni mimo zolraj ochné a tepla. | Pouziljev mistech bez preakaek o astrych preydmetu. | Neumustufje vroborek do jiže vodni nátrze. | Vrobok muzeby klukzy, hoqzi nizko podu. | Prl pouzivani vroboku odrozdu zbocepostnoi opatieni, ay medso lo kzmimeninam, uduzeni, utunat jinym zdzary ochrozijcim situacir. |
| Le produit est souris aux regles applicables aux clôtures de piscine. Vouillée consultier les autorites locales. | Gardozle le produit à l'ecart des sources de fou et du chaleur. | Utilisez le produit dans des endroits ne presentant aucune obstacle ni object tranchant. | Il est interetid de place le produit dans un autre réservoir d'eau. | Le produit peut être glissant risque de chutes. | Lorsque vous utilisez le produit, respectez les régles de sécurité pour réduire les risques de fractures, de suffocation, de moyade et toute autre situation mettant la vie en danger. | |
| IT | Il produits est sujoçu alle regule per applicablees aux clôtures recintate, consultare le autorite locale. | Tenere dispositivi lontano da fonti di fucco e calore. | Utilizzare la piscina in luoghi liberi de ostacoli e oggetti taglienti. | É vietato posizionare il produit in un alto serbatibo dell'acqua. | Il prodotto potrebble essere scivoloso, il che potrebble causare caduts. | Utilizzando il prodotto, seguire le regole di sicurezza per evitare rotture, socfomento, annegamento e altre situazioni potenzialmente letali. |
| El produit estásujeto a la nominativa sobre las varillas de piscina, consulta à las autoridades locales. | Mantenga el dispositivo alajeado de fuentes de fuego o calor. | Utilicoel en lugares libres de obstruccione u objectos affliados. | Se prohibe colocal cat el produzione dentro de others depositos de agua. | El producto puisce ser robaladizo, lo que puce provocar caldas. | Al utilizez el producto, lorme las precautiones oc seguidad para evaporar fructares, asfixia, ahogamento u或者其他 situaciones que pongan en peligro la salute y la vida. |
| 22 23 24 25 26 | ● | ● | ● | ● | |
| DE | Es ist verboten, nach dem Konservum von Alkohol. Dingen oder Medikanten im Bad zu erhöhen. In dieser Fall kann ein warmes Bad soccer zur Bewusstlosigkeit führen. | Unwohl-, Schäfrigkeits- oder Untertaglich-keitsgleitfehme deuten auf das solftrige Verlassen des Jacuzzihin. | Während der Schwangschaft kann helles Wasser dem Fühus Schaden zufugen. | Die Nutzung ist auf 10 Minten begrenzern. | Hersteller |
| FN | Spa heat in conjunction with alcohol, drugs or medication can cause unconsciousness. | Immediately leave spa if feel uncomfortable or sleepy. | During pregnancy, soaking in hot water may cause damage to the foetus. | Limit use to 10 minutes at all time. | Manufacturer |
| PI | Zabraria sie korzystania z kapieli po spaziyku alkohalu, narkotyów lub kékow. Ciepla kapieli w takim przypadku mozej spowowac naawet utrzej przytomnosci. | W przypadku zrego samopoczyciu, uzucia sennodzi lub dyskomfortu naleyt natychmistowo wyjsć z jakuzzi. | Podczas(Clagy prebywniz w goracej wodzie moree bye przyczyns uzkodzenia plodu. | Nalezy organiczne jestnorazowe korzystanie z produktu do 10 minut. | Producent |
| CZ | Nepoulijevejla lazej po pohlit alkohalu, kék le no beug droj. Tepi koupel mûzé v takovem piropad zpužobit i ztratu védomil. | Pokud se nettle doble, jste aspali nebo počitujete nevovlini, vifkuk okaméti opusfte. | Během tólotoentvi mûzé polyt v horke vóde zpužobit poskozeni plodu. | Omezte jestnorazowe pouziti vyrobu na 10 minut. | Vyrobice |
| FR | Il est interdi de pendure un bain après avoir bu de falcool pris des drogues ou des médicaments. Dans ce cas, un bain chaud fait peut<meme cause une perte de conscience. | Si vous ne vous sentez pas bien, devenez sommorent au rassenté un malaise, sortez immediatement du spa. | Pendant la grossesse, restor dans l'eau chaude pouc causer des dommages au foctus. | Ne doivent utiliser le produit pour une durée maximaile de 10 minutes. | Fabricant |
| IT | Il vivotato fare il bagno dupo aver assunto alcoïdi, droge o medicinali. Il bagno caldo in quello caso pudà ancho causare perdita di consocenza. | In caso di massezero, sommölenza o disaggio abbandonate immediatamente l'idromassaggio. | Durante la gravidenza, un bagno in acqua calda potub causare dannai il fosso. | Necessario limitare la durata a 10 minut. | Produzione |
| ES | Se problimo banarse afterwards del consumo de alcohol, drogas o medicamentos. En este caso, un banco caliente能把 provocar incluso inconsciencia. | En caso de malestar general, sommolencia o incomodità, abandone di jacuzzi immediatamente. | Durante el embarazo, ol agua caliente pode causar daños al fosso. | Limite el uso unico del producto hasta 10 minutos. | Fabricante |
159158
NOTES/NOTIZENNOTES/NOTIZEN
28.05.2024
UNIPRODO
UNIPRODO
For the disposal of the device please consider and act according to the national and local rules and regulations.
CONTACT
expondo Polska sp. z o.o. sp. k.