RC_WMS_12 - Waffle Maker Royal Catering - Free user manual and instructions
Find the device manual for free RC_WMS_12 Royal Catering in PDF.
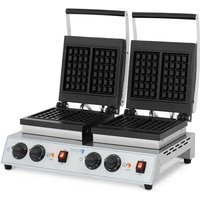
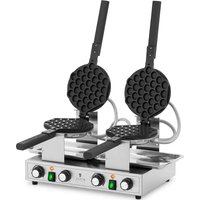
| Product type | Ice cream cone machine / Professional waffle maker |
| Brand | Royal Catering |
| Model | RC_WMS_12 |
| Supply voltage | 230 V ~ / 50 Hz |
| Rated power | 1500 W |
| Protection class | I |
| IP protection rating | IPX0 |
| Dimensions (W x D x H) | 400 x 300 x 650 mm |
| Weight | 45 kg |
| Number of cones per cycle | 2 |
| Baking time per batch | Approximately 60 to 120 seconds |
| Maximum temperature upper mold | 250 °C |
| Maximum temperature lower mold | 240 °C |
| Housing material | Stainless steel |
| Main functions | Baking ice cream cones, independent temperature control, heating indicator lamps |
| Included accessories | Dough applicator, spatula, spare heating element |
| Safety | Grounding, overheating protection |
| Maintenance and cleaning | Clean after each use with mild products, do not immerse, lubricate moving parts with food-grade grease |
| Intended use | Commercial |
| Warranty | 2 years (parts and labor) |
Frequently Asked Questions - RC_WMS_12 Royal Catering
User questions about RC_WMS_12 Royal Catering
0 question about this device. Answer the ones you know or ask your own.
Ask a new question about this device
Download the instructions for your Waffle Maker in PDF format for free! Find your manual RC_WMS_12 - Royal Catering and take your electronic device back in hand. On this page are published all the documents necessary for the use of your device. RC_WMS_12 by Royal Catering.
USER MANUAL RC_WMS_12 Royal Catering
This User Manual has been translated for your convenience using machine translation. Reasonable efforts have been made to provide an accurate translation; however, no automated translation is perfect nor is it intended to replace human translators. The official User Manual is the English version. Any discrepancies or differences created in the translation are not binding and have no legal effect for compliance or enforcement purposes. If any questions arise related to the accuracy of the information contained in the User Manual, please refer to the English version of those contents which is the official version.
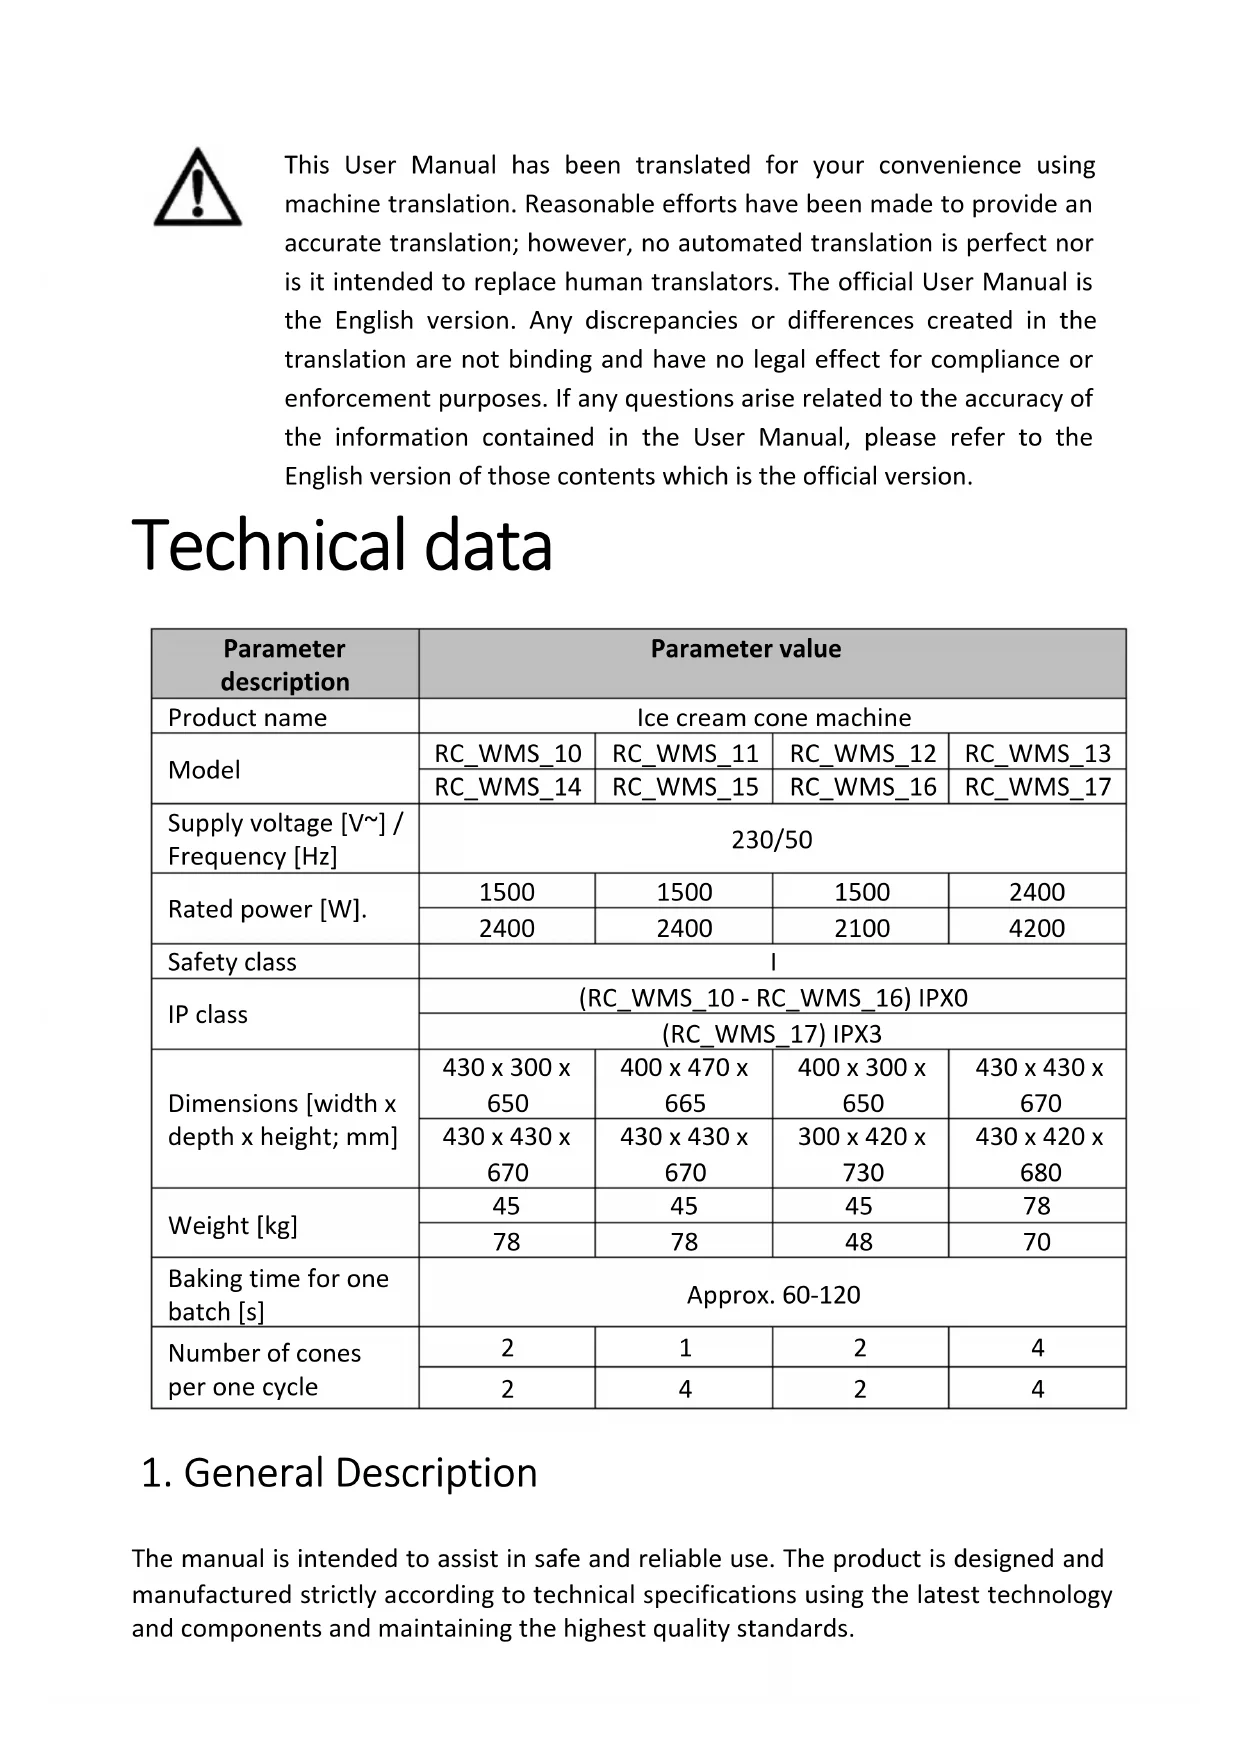
Technical data
| Parameter description | Parameter value | |||
| Product name | Ice cream cone machine | |||
| Model | RC_WMS_10 | RC_WMS_11 | RC_WMS_12 | RC_WMS_13 |
| RC_WMS_14 | RC_WMS_15 | RC_WMS_16 | RC_WMS_17 | |
| Supply voltage [V~] / Frequency [Hz] | 230/50 | |||
| Rated power [W]. | 1500 | 1500 | 1500 | 2400 |
| 2400 | 2400 | 2100 | 4200 | |
| Safety class | 1 | |||
| IP class | (RC_WMS_10 - RC_WMS_16) IPX0 | |||
| (RC_WMS_17) IPX3 | ||||
| Dimensions [width x depth x height; mm] | 430 x 300 x 650 | 400 x 470 x 665 | 400 x 300 x 650 | 430 x 430 x 670 |
| 430 x 430 x 670 | 430 x 430 x 670 | 300 x 420 x 730 | 430 x 420 x 680 | |
| Weight [kg] | 45 | 45 | 45 | 78 |
| 78 | 78 | 48 | 70 | |
| Baking time for one batch [s] | Approx. 60-120 | |||
| Number of cones per one cycle | 2 | 1 | 2 | 4 |
| 2 | 4 | 2 | 4 | |
1. General Description
The manual is intended to assist in safe and reliable use. The product is designed and manufactured strictly according to technical specifications using the latest technology and components and maintaining the highest quality standards.
CAREFULLY READ AND UNDERSTAND THIS MANUAL BEFORE STARTING THE WORK.
To ensure the long and reliable operation of the device, make sure to operate and maintain it properly following the guidelines in this instruction manual. The technical data and specifications in this manual are up-to-date. The manufacturer reserves the right to make changes to improve the quality. Taking the technical progress and the possibility of reducing noise into account, the unit is designed and built in such a way that risks resulting from noise emissions are reduced to the lowest possible level.
Explanation of symbols
| CE | The product complies with applicable safety standards. |
| Read the manual before use. | |
| Recyclable product. | |
| CAUTION! or WARNING! or REMEMBER! describing a situation (general warning sign). | |
| Wear protective gloves. | |
| CAUTION! Risk of electric shock! | |
| CAUTION! Danger of crushing your hand!! | |
| Don't touch! | |
| Caution! Hot surface can cause burns! |
For indoor use only.

CAUTION! The figures in this manual are illustrative only and may vary in some details from the actual appearance of the product.
2. Safety of use
CAUTION! Read all safety warnings and instructions. Failure to follow the warnings and instructions may result in electric shock, fire, and/or serious injury or death.
The term "device" or "product" in the warnings and the description of the instructions refers to: Ice cream cone machine.
2.1. Electrical safety
a) The plug of this device must fit into the outlet. Do not modify the plug in any way. Original plugs and matching outlets reduce the risk of electric shock.
b) Avoid touching grounded parts, such as pipes, heaters, ovens, and refrigerators. There is an increased risk of electric shock if your body is grounded and touches the device while exposed to direct rain, wet pavement, or while working in a damp environment. If water enters the device, there is an increased risk of damage to the unit and electric shock.
c) Do not touch the device with wet or damp hands.
d) Do not use the cord in an unintended manner. Never use it to carry the device or to pull the plug out of the socket. Keep the cord away from heat sources, oil, sharp edges, or moving parts. Damaged or tangled cords increase the risk of electric shock.
e) I f you cannot avoid using the product in a wet environment, use a residual current device (RCD) to connect it to electrical mains. Using an RCD reduces the risk of electric shock.
f) D o not use the device if the power cord is damaged or shows signs of wear. A damaged power cord should be replaced by a qualified electrician or the manufacturer's service department.
g) To avoid electric shock, do not immerse the cable, plug, or the device itself in water or other liquid. Do not use the appliance on wet surfaces.
h) CAUTION - DANGER TO LIFE! When cleaning or using the appliance, never immerse it in water or other liquids.
i) Do not allow the machine to get wet. Risk of electric shock!
2.2. Safety in the workplace
a) Keep the work area tidy and well-lit. Disorder or poor lighting can lead to accidents. Be foresighted, watch what you are doing, and use common sense when using the unit.
b) Do not use the unit in an explosive area, for example in the presence of flammable liquids, gases, or dust.
c) If in doubt as to whether the product is working properly or found to be damaged, contact the manufacturer's technical service.
d) Repairs to the device may only be carried out by the manufacturer's service. Do not attempt to repair the product on your own!
e) In case of open flames or fire, use only dry powder or snow (CO2) fire extinguishers to extinguish the live equipment.
f) No children or unauthorized persons are allowed in the work area.
g) Use the product in a well-ventilated area.
h) Keep this manual for future reference. If the product is to be handed over to a third party, hand it over with this user manual.
i) Keep packaging components and small installation parts out of the reach of children.
j) Keep the device away from children and animals.
k) When using this product together with other devices, also follow the other instructions for use.

Remember! Keep children and other bystanders safe while operating the equipment.
2.3. Personal safety
a) Do not operate this device if you are tired, ill, or under the influence of alcohol, drugs, or medication that could impair your ability to operate the device.
b) The device is not intended to be used by persons (including children) with reduced mental, sensory, or intellectual functions or persons who lack experience and/or knowledge unless they are supervised or have been
instructed by a person responsible for their safety on how to operate the device.
c) The unit may be operated by persons who are physically fit, capable of operating it, and appropriately trained, and who have read this instruction manual and have been trained in occupational safety and health.
d) Use caution and common sense when operating this unit. A moment's inattention during the operation may result in serious personal injury.
e) Use personal protective equipment as required when operating the unit as specified in Section 1 of the explanation of symbols. The use of appropriate, approved personal protective equipment reduces the risk of injury.
f) D o not wear loose clothing or jewelry. Keep hair, clothing, and gloves away from moving parts. Loose clothing, jewelry, or long hair can be caught in moving parts.
g) T he product is not a toy. Children should be watched to ensure that they do not play with the product.
h) Do not place your hands or any objects inside the running device!
2.4. Safe use of the device
a) D o not overload the device. Use tools that are suitable for the application. A correctly selected product will do a better and safer job for which it was designed.
b) Di sconnect the device from the power supply before adjusting, cleaning, or servicing. This precaution reduces the risk of accidental start-up.
c) K eep unused product out of the reach of children and anyone unfamiliar with the device or this manual. Products are dangerous when used by inexperienced users.
d) K eep the product in good working order. Check before each use for general damage or damage to moving parts (cracks in parts and components or any other condition that may affect the safe operation of the device). If damaged, return the device for repair before use.
e) K eep the product out of the reach of children.
f) Re pairs and maintenance should be carried out by qualified personnel using only original spare parts. This will ensure the safety of use.
g) T o ensure the designed operational integrity of the device, do not remove factory-installed covers or loosen screws.
h) When transporting or moving the unit from storage to the place of use, observe the health and safety rules for manual handling applicable in the country where the unit is used.
i) Do n not move, shift, or rotate the machine while in operation.
j) Do not leave the device switched on unattended.
k) Clean the device regularly to prevent permanent dirt build-up.
I) The product is not a toy. Cleaning and maintenance must not be performed by children without adult supervision.
m) Do not tamper with the device to alter its performance or design.
n) K eep the unit away from sources of fire and heat.
o) Do not overload the device.
p) Do not block the ventilation openings of the unit!

CAUTION! Although the product has been designed to be safe and has adequate safeguards and despite the additional safety features provided to the user, there is still a slight risk of accident or injury when handling the product. Caution and common sense are advised when using the product.
3. Instructions for use
The product is intended for baking ice cream cones.
The product is intended for commercial use.
The user is responsible for any damage resulting from misuse.
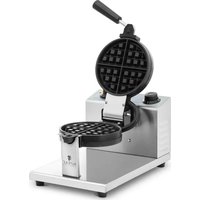
3.1. Product overview
RC_WMS_11 (other similar)
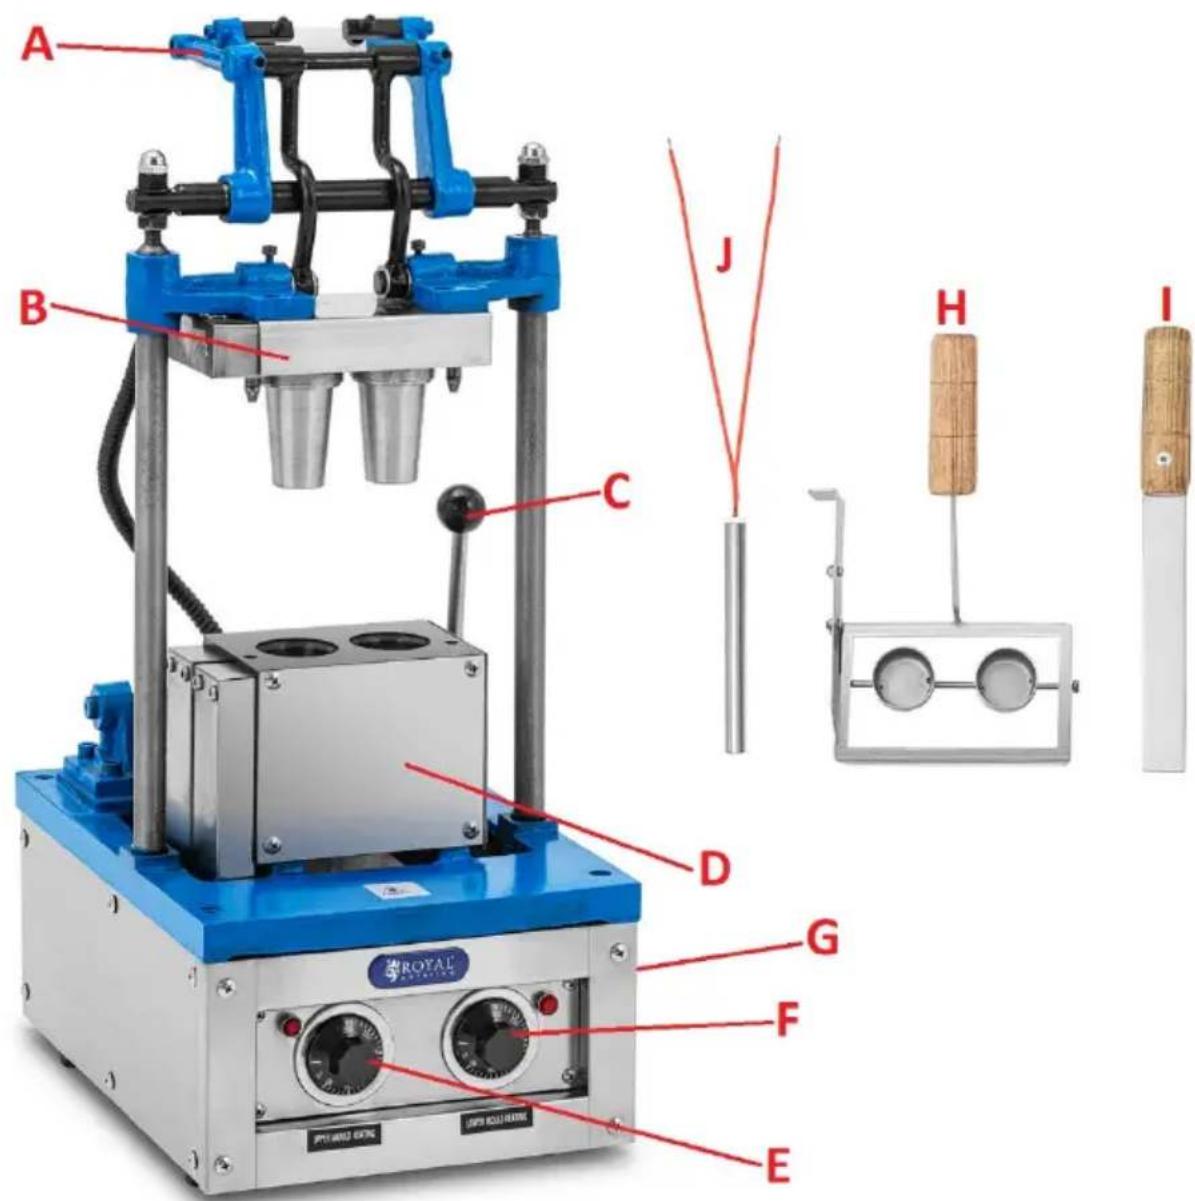
A. Internal form clamping lever
B. Internal form
C. External form clamping levers
D. External form
E. Internal form temperature control knob with heating control lamp
F. External form temperature control knob with heating control lamp
G. Ready cone outlet
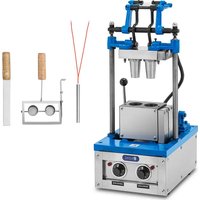
H. Dough application device
I. Spatula
J. Spare heater
3.2. Preparation for operation
POSITIONING OF THE UNIT
The ambient temperature must not exceed 40^ and ambient humidity should not exceed 85% . Place the unit in a way that ensures good air circulation. Maintain a minimum clearance of 20~cm from any wall of the unit. Keep the unit away from any hot surfaces. Always use the appliance on an even, stable, clean, fireproof and dry surface and out of the reach of children and persons with reduced mental, sensory and intellectual functions. Place the unit in such a way that the mains plug can be reached at any time. Ensure that the power supply to the unit corresponds to that specified on the identification plate! Level the machine on the surface on which it will operate. Check the tightness of all screws before working with the machine.
Before first use, carefully wash machine parts that come into contact with food. Next, check the operation of the mechanisms when empty and without electricity. First of all, check the smoothness of the inner form movement and the adjustment of both forms to each other. Movable parts of the column, etc. can be lubricated with a special lubricant intended for devices that come into contact with food (e.g. lard oil - stearin).
3.3. Working with the device
3.3.1 Before first use
Before first use, join the elements of the lower and upper form, then turn on the device by setting both temperature control knobs to 200^ . At first, the unit may emit smoke and an unpleasant odor, which will pass over time - these are residues of preservative oil, thermal paint, etc. - this is completely normal. After reaching the set temperature (approx. 30-40 minutes after starting), the indicator light next to the knob of the form will turn off. If the unpleasant smell and smoke disappear, the device is ready for use - before using it again after cooling down, clean the parts that come into contact with food.
3.3.2 Trial baking
Before you start baking ice cream cones, you should first conduct a trial baking to adjust the temperature, time and consistency of the cones to your own needs and test the recipe for the dough.
There are many different recipes for ice cream cone dough, so be sure to test your own and choose the one that best suits your needs. In general, the basic ingredients of cone dough are: flour (finely ground, high-quality), eggs, vegetable oil, baking powder and, if desired, sugar, milk, spices (e.g. cinnamon, vanilla) or edible flavors and dyes.
-
Place a tray or other dish for ice cream cones next to the baking outlet.
-
Lift the upper form and put the two lower halves together and lock them so that they are tightly closed.
- Lubricate (e.g. with a brush) with a little vegetable oil the cavities of the lower and upper forms so that the cone will not stick to the form.
- Load the dough into the lower form using the attached device, i.e. place it evenly on the lower form and hold it with one hand, with the other tilt the levers to apply the dough portion exactly into the cutouts of the lower form.
- Press the upper form against the lower one and after approx. 90 seconds raise it to check the appearance of the cone: if it is still raw (undercooked), extend the baking time or increase the temperature of both forms; if it is too brown (burnt), the time should be properly shortened or the temperature of both forms should be slightly lowered. On the other hand, when the upper part of the cone is baked, while the lower part is undercooked or the inner part is baked and the outer part is raw (or vice versa), the temperature of the upper or lower form should be increased or decreased, depending on the situation.
- For every change in temperature and time, the time jump should not be by more than 5-10 seconds.
- Do not exceed the temperature value of 250^ for the upper form, and 240^ for the lower form.
- Immediately remove any leftover dough residues from or on the pan (e.g. with the help of the included spatula) to avoid spilling the dough or deforming the baked product.
- The optimal work cycle between baking and the reheating break is 2-2.5 minutes.
After determining the optimal parameters, you can start baking properly...
3.3.3 Proper baking
The procedure for normal baking is as follows:
- Join the two parts of the lower form together and locking them.
- Apply the dough to the form(s) using the attached device.
- Press the upper form against the lower one - smoothly without rushing. When pressing the upper form to the lower one, do not do it as far as it will go on the first try, but repeat the movement 2-4 times, i.e. about 2 - 3cm before the final positioning, let go to spread the dough better in the form and free the rest of the air from it. Only then should the upper form be locked in the lower one.
-
Raise the top form.
-
If necessary, use the included spatula to remove any remaining dough from the form.
- Slide the lower form apart and remove the baked goods through the outlet.
- NOTE: during baking, the temperature of the forms may drop slightly and this is normal, so in this case it should be increased by 10^ for each of the forms. If the temperature cannot reach the set temperature, stop baking temporarily until the appliance reaches the set temperature.
- If the baked goods stick to the form, it should be lubricated with vegetable oil before each application of the dough.
3.4. Cleaning and maintenance
a) Clean the device after each use.
b) P -ull the mains plug and let the unit cool down completely before cleaning, adjusting or replacing accessories and when the unit is not in use.
c) Only mild detergents designed for cleaning food contact surfaces may be used to clean the unit.
d) A after each cleaning, all the parts should be dried well before the unit is used again. Clean the entire unit except the moving parts - these should be lubricated for smooth operation with grease/oil approved for use in the food industry.
e) S tore the unit in a dry and cool place protected from moisture and direct sunlight.
f) D o not spray the unit with a stream of water or immerse it in water.
g) Make sure that no water enters through the ventilation openings in the casing.
h) C lean the ventilation openings with a brush and compressed air.
i) Perform regular inspections of the unit checking technical fitness and any damages.
j) U se a soft, damp cloth for cleaning.
k) Do not use sharp and/or metal objects (e.g. wire brush or metal spatula) for cleaning as they may damage the surface of the appliance material.
I) Do not clean the device with acidic substances, medical products, thinners, fuel, oil, or other chemicals as this may damage the device.
DISPOSAL OF WASTE APPLIANCES
At the end of its useful life, this product should not be disposed of with normal household waste but should be taken to a collection point for the recycling of electrical and electronic equipment. This is indicated by the symbol on the product, operating instructions, or packaging. The materials used in this appliance are recyclable according to their marking. By reusing, recycling, or applying other
forms of use of waste machines, you make a significant contribution to the protection of our environment.
Your local administration will provide you with information about the appropriate disposal point for used appliances.

APPARATETS PLACERING
For the disposal of the device please consider and act according to the national and local rules and regulations.
CONTACT
expondo Polska sp. z o.o. sp. k.