
ST60 - Hi-fi system ARCAM - Free user manual and instructions
Find the device manual for free ST60 ARCAM in PDF.
| Product Type | Hi-Fi Network Streamer |
| Brand | Arcam |
| Model | ST60 |
| Dimensions (W x H x D) | 433 x 102 x 306 mm |
| Net Weight | 5.5 kg |
| Power Supply | 110-240 V, 50-60 Hz |
| Maximum Power Consumption | 10 W |
| Standby Power Consumption | 0.5 W |
| Network Standby Power Consumption | 2 W |
| Digital-to-Analog Converter | ESS9038 32-bit/192 kHz Delta-Sigma |
| Supported Audio Formats | Stereo PCM, MQA, FLAC, MP3, etc. |
| Network Connectivity | Ethernet 10/100 Mbps, Wi-Fi 802.11 b/g/n |
| Wireless Streaming | AirPlay 2, Built-in Chromecast |
| Digital Inputs | 2 Optical, 2 Coaxial (2-channel PCM) |
| Analog Outputs | Unbalanced (RCA) and Balanced (XLR) |
| Digital Outputs | Optical and Coaxial (Stereo PCM) |
| USB Port | USB Type-A for playback and updates |
| Home Automation Control | RS232 and IP |
| Selectable DAC Filters | 6 filters: Brick Wall, Corrected Minimum Phase, Apodizing, Minimum Phase Slow/Fast Roll Off, Linear Phase Slow/Fast Roll Off |
| International Warranty | 5 years parts and labor (3 years for disc players) |
| Included Accessories | Power cord, remote control, 2 AAA batteries, manual, 2 Wi-Fi antennas |
Frequently Asked Questions - ST60 ARCAM
User questions about ST60 ARCAM
0 question about this device. Answer the ones you know or ask your own.
Ask a new question about this device
Download the instructions for your Hi-fi system in PDF format for free! Find your manual ST60 - ARCAM and take your electronic device back in hand. On this page are published all the documents necessary for the use of your device. ST60 by ARCAM.
USER MANUAL ST60 ARCAM
Important Safety Instructions
- Read these instructions.
- Keep these instructions
- Heed all warnings
- Follow all instructions.
- Do not use this apparatus near water.
- Clean only with dry cloth
- Do not block any ventilation openings. Install in accordance with the manufacturer's instructions.
- Do not install near any heat sources such as radiators, heat registers, sieves, or other apparatus (including amplifiers) that produce heat.
- Do not defeat the safety purpose of the polarized or grounding-type plug.
A polarized plug has two blades with one wider than the other. A grounding type plug has two blades and a third grounding prong. The wide blade or the third prong are provided for your safety. If the provided plug does not fit into your outlet, consult an electrician for replacement of the obsolete outlet.
- Project the power cord from being walked on or pinched particularly at plugs, convenience receptacles, and the point where they exit from the apparatus.
- Only use attachments/accessories specified by the manufacturer.
- Use only with the carl, stand, tripod, brackets, or table specified by the manufacturer, or sold with the apparatus.
When a cart is used, use caution when moving the cart/apparatus combination to avoid injury from tio-over.
-
Unplug this apparatus during lightning storms or when unused for long periods of time.
-
Referral servicing to qualified service personnel
Servicing is required when the apparatus has been damaged in any way, such as power-supply cord or plug is damaged, liquid has been spilled or objects have fallen into the apparatus, the apparatus has been exposed to rain or moisture, does not operate normally, or has been dropped.
- Object or liquid entry
WARNING - Take care that objects do not fall and liquids are not spilled into the enclosure through any openings. The equipment shall not be exposed to dripping or splashing. Liquid filled objects such as vases should not be placed on the equipment.
- Climate
The equipment has been designed for use in moderate climates and in domestic situations.
- Cleaning
Unplug the unit from the mains supply before cleaning.
The case should normally only require a wipe with a soft, lint-free cloth. Do not use chemical solvents for cleaning.
We do not advise the use of furniture clearing sprays or polishes as they can cause permanent white marks.
- Power sources
Only connect the equipment to a power supply of the type described in the operating instructions or as marked on the equipment.
The primary method of isolating the equipment from the mains supply is to remove the mains plug. The equipment must be installed in a manner that makes disconnection possible.
- Abnormal smell
If an abnormal smell or smoke is detected from the equipment, turn the power off immediately and unplug the equipment from the wall out of. Contact your dealer and do not reconnect the equipment.
- Damage requiring service
The equipment should be serviced by qualified service personnel when:
A. The power-supply cord or the plug has been damaged, or
3. Objects have fallen, or liquid has spilled into the equipment, or
C. The equipment has been exposed to rain, or
D. The equipment does not appear to operate normally or exhibits a marked change in performance, or
- The equipment has been dropped or the enclosure damaged.

CAUTION: To reduce the risk of electric shock, do not remove cover (or back). No user serviceable parts inside. Refer servicing to qualified service personnel.
WARNING: To reduce the risk of fire or electric shock, do not expose this apparatus to rain or moisture.
The lightning flash with an arrowhead symbol within an equilateral triangle, is intended to alert the user to the presence of uninsulated 'dangerous voltage' within the product's enclosure that may be of sufficient magnitude to constitute a risk of electric shock to persons.
The exclamation point within an equilateral triangle is intended to alert the user to the presence of important operating and maintenance (servicing) instructions in the literature accompanying the product.
CAUTION: In Canada and the USA, to prevent electric shock, match the wide blade of the plug to the wide slot in the socket and insert the plug fully into the socket.
Class II product
This equipment is a Class II or double insulated electrical appliance. It has been designed in such a way that it does not require a safety connection to electrical earth ("ground" in the U.S.)
Warning
Mains plug/appliance coupler is used to disconnect device and it shall remain readily operable.
Safety Compliance
This equipment has been designed to meet the IEC/EN 62368-1 international electrical safety standard.
This device complies with Part 15 of the FCC Rules. Operation is subject to the following two conditions:
- This device may not cause harmful interference, and
- This device must accept any interference received, including interference that may cause undesired operation.
The building installation shall be regarded as providing protection in accordance with the rating of the wall socket outlet.
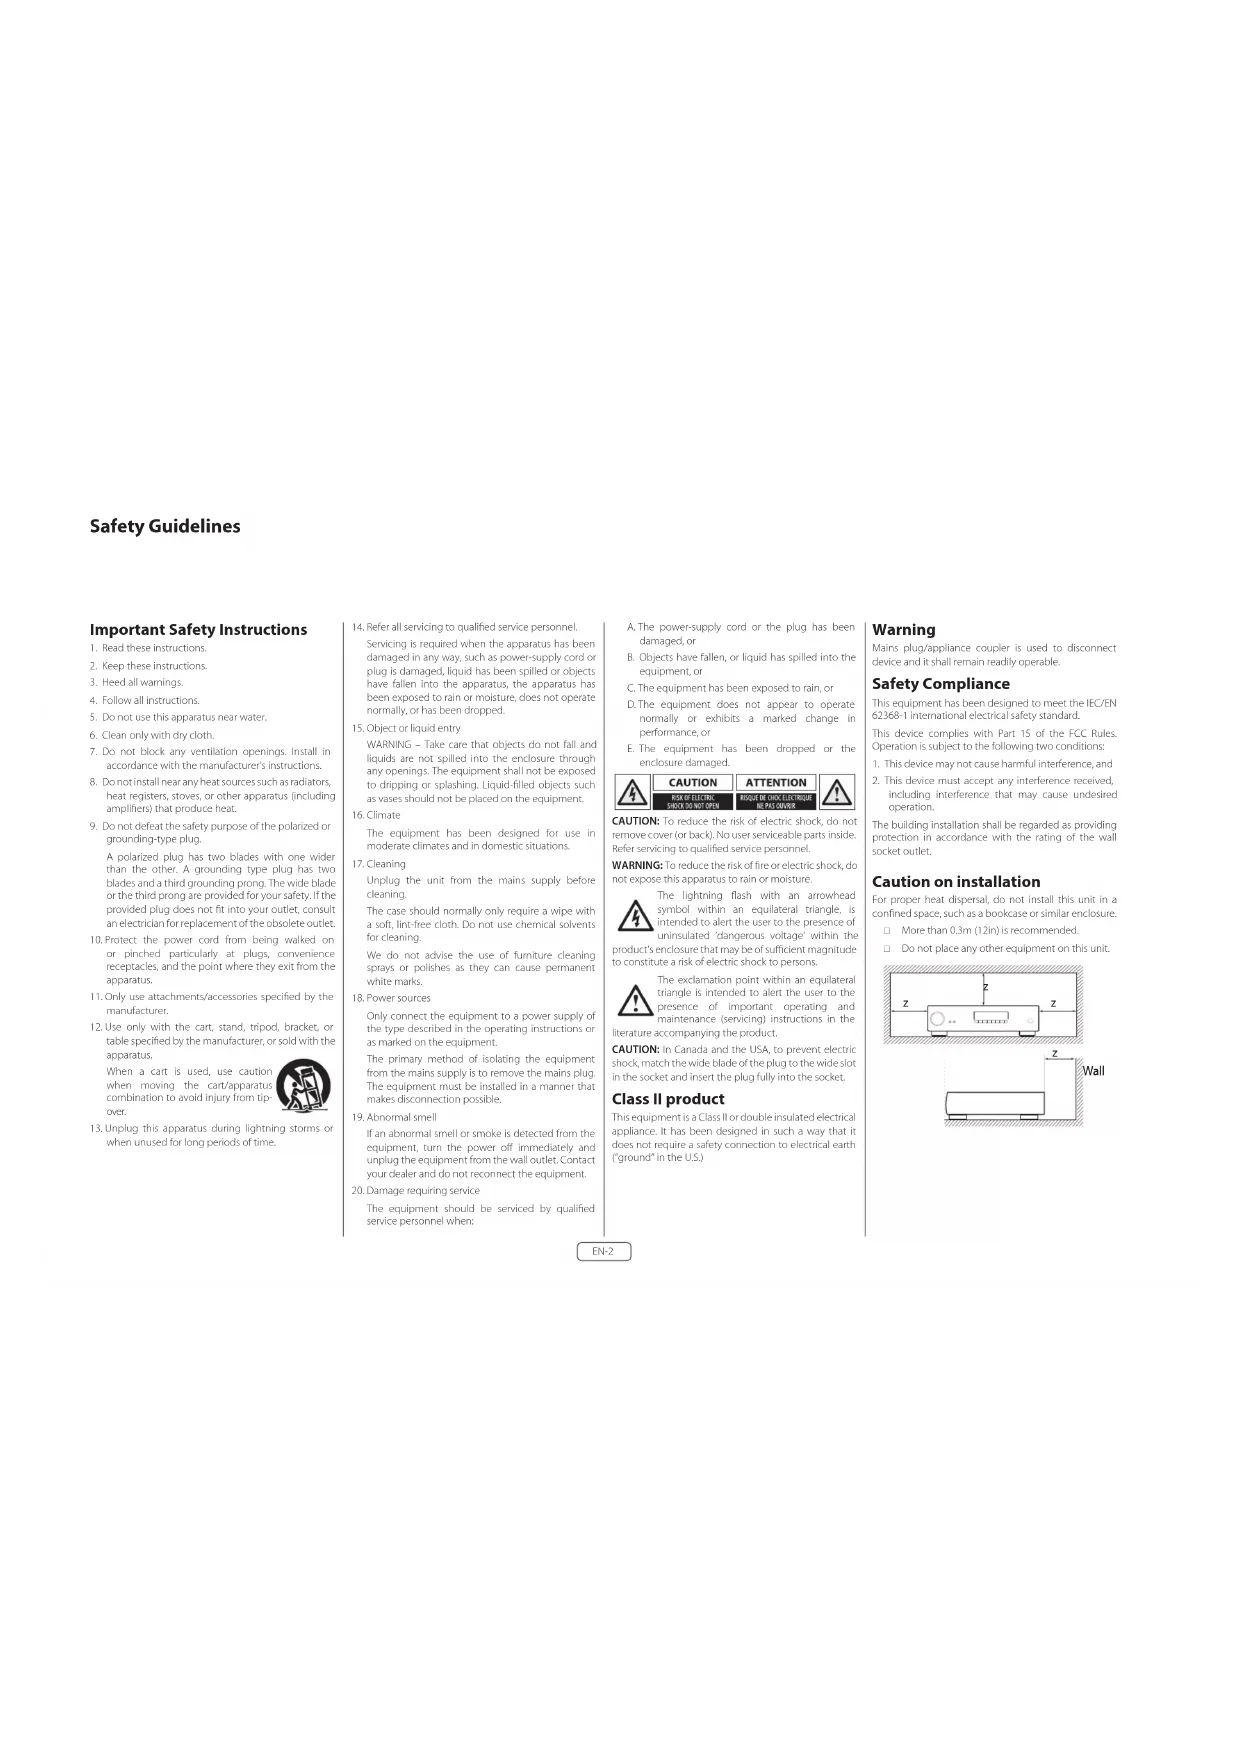
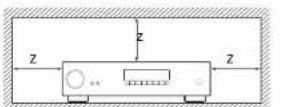
Caution on installation
For proper heat dispersal, do not install this unit in a confined space, such as a bookcase or similar enclosure.
☐ More than 0.3m (12in) is recommended.
☐ Do not place any other equipment on this unit.
FCC Information (for US customers)
PRODUCT
This product complies with Part 15 of the FCC Rules. Operation is subject to the following two conditions:
- This device may not cause harmful interference, and
- This device must accept any interference received, including interference that may cause undesired operation.
IMPORTANT NOTICE: DO NOT MODIFY THIS PRODUCT
This product, when installed as indicated in the instructions contained in this manual, meets FCC requirements. Modification not expressly approved by ARCAM may void your authority, granted by the FCC, to use the product.
NOTE
This product has been tested and found to comply with the limits for a Class B digital device, pursuant to Part 15 of the FCC Rules. These limits are designed to provide reasonable protection against harmful interference in a residential installation.
This product generates, uses and can radiate radio frequency energy and, if not installed and used in accordance with the instructions, may cause harmful interference to radio communications. However, there is no guarantee that interference will not occur in a particular installation. If this product does cause harmful interference to radio or television reception, which can be determined by turning the product O + H and ON_2 the user is encouraged to try to correct the interference by one or more of the following measures:
□ Reorient or relocate the receiving antenna.
☐ Increase the separation between the equipment and receiver.
□ Connect the product into an outlet on a circuit different from that to which the receiver is connected.
Consult the local retailer authorized to distribute this type of product or an experienced radio/TV technician for help
Safety Information (for European customers)
□ Avoid high temperatures. Allow for sufficient he dispersion when installed in a rack.
☐ Handle the power cord carefully. Hold the plug who unplugging the cord.
- Keep the unit free from moisture, water, and dust.
□ Unplug the power cord when not using the unit f long periods of time.
☐ Do not obstruct the ventilation holes.
Do not let foreign objects into the unit.
☐ Do not let insecticides, benzene, and thinner come contact with the unit.
1 Never disassemble or modify the unit in any way.
1. Ventilation should not be impeded by covering its ventilation openings with items, such as newspapers, tablecloths or curtains.
□ Naked flame sources such as lighted canoles should not be placed on the unit.
□ Observe and follow local regulations regarding battery disposal.
☐ Do not expose the unit to dripping or splash fluids.
- Do not place objects filled with liquids, such as vase on the unit.
Do not handle the mains cord with wet hands.
□ When the switch is in the OFF position, the equipment is not completely switched off from MAINS.
The equipment shall be insulated near the power supply so that the power supply is easily accessible.
A note about recycling
This product's packaging materials are recyclable and can be reused. Please dispose of any materials in accordance with the local recycling regulations.
When discarding the unit, comply with local rules or regulations.
Batteries should never be thrown away or incinerated but disposed of in accordance with the local regulations concerning battery disposal.
This product and the supplied accessories, excluding the batteries, constitute the applicable product according to the WHF directive
Correct disposal of this product
These markings indicate that this product should not be disposed with other household waste throughout the 2011.


to prevent possible harm to the environment or human health from uncontrolled waste disposal and to conserve material resources, this product should be recycled responsibly.
To dispose of your product, please use your local return and collection systems or contact the retailer where the product was purchased.
Welcome
Thank you and congratulations...
...for purchasing your Arcam ST60 network streamer.
Arcam has been producing specialist audio products of remarkable quality for over four decades and the new ST60 network streamer is the latest in a long line of award-winning HII-FL. The design of the I-DA range draws upon all of Arcam's experience as one of the UK's most respected audio companies, to produce Arcam's best performing range of audio products yet – designed and built to give you years of listening enjoyment.
This handbook is a guide to installing and using the streamer and includes information on its more advanced features. Use the contents list on the next page to guide you to the section of interest.
We hope that your product will give you years of trouble-free operation. In the unlikely event of any fault, or if you simply require further information about Arcam products, our network of dealers will be happy to help you. Further information can also be found on the Arcam website at www.arcam.co.uk.
Your ST60 development team
Contents
Safety Guidelines EN-2
Welcome
Overview
Trademark Acknowledgments EN-7
Front Panel Connections and Controls EN-8
Rear Panel Connections EN-9
Operation
Switching On EN-10
Auto Standby EN-10
Display EN-10
Selecting An Audio Source EN-10
Digital Audio Outputs EN-10
Analogue Audio Outputs EN-10
Listening EN-10
Navigating Network or USB Media EN-10
Home Automation Control EN-10
Connecting to a Network EN-11
AirPlay Setup
Chromecast built-in Setup
EN-4
EN-6
EN-10
EN-11
EN-11
Remote Control
Setup Menu
System Settings
System Info
Audio Settings
Standby Settings
ST60 DAC Digital Filters
Troubleshooting
ST60 Specifications
Worldwide Guarantee
EN-12
EN-13
EN-13
EN-13
EN-13
EN-13
EN-14
EN-15
EN-16
EN-17
Overview
Arcam's ST60 Network player
Arcam's S160 network player provides class leading sound quality for the best reproduction of your music from digital Hi-Fi separates and the various internet streaming services that are on offer.
Drawing on the many years of audio design experience at Arcam, this product uses the best quality components and engineering practice to produce a product that will give many years of musical pleasure and reliable service.
The S160 is designed to produce a level of performance that will truly bring your music to life.
Placing The Unit
Place the \$160 on a level, firm surface, avoiding dirt sunlight and sources of heat or damp.
☐ Do not place the ST60 on top of a power amplifier, other source of heat.
□ Make sure the remote-control receiver to the right of the front panel display's unobstructed, otherwise this will impair the use of the remote-control.
☐ Do not place your record deck on top of the unit. Record decks are very sensitive to the noise generated by mains power supplies which will be heard as a background 'hum' if the record deck is too close.
☐ The normal function of the unit may be disturbed by strong electromagnetic interference. If this occurs, simply resees the unit with the power button, or move the unit to another location.
Power
at the SI50 is supplied with a moulded mains plug already fitted to the lead. Check that the plug supplied fits your supply – should you require a new mains lead, please contact your Arcam dealer.
If your mains supply voltage or mains plug is different, please contact your Arcam dealer immediately
Push the IEC plug end of the power cable into the power socket on the back of the ST60, making sure that it is pushed in firmly. Plug the other end of the cable into your mains socket and switch the socket on.
2.3
Interconnect Cables
We recommend the use of high quality screened cables that are designed for the particular application. Other cables will have different impedance characteristics that will degrade the performance of your system (for example, do not use cabling intended for video use to carry audio signals). All cables should be kept as short as its practically possible
It is good practice when connecting your equipment to make sure that the mains power supply cabling is kept as far away as possible from your audio cables. Failure to do so may result in unwanted noise in the audio signals,
Trademark Acknowledgments
EN
Apple AirPlay

Apple, AirPlay and the AirPlay logo, iPod, Phone and iPad are trademarks of Apple Inc., registered in the U.S. and other countries. App Store is a service mark of Apple Inc.
AirPlay 2 works with iPhone, iPad, and iPod touch with iOS 11.4 or later, Mac with OS X Mountain Lion or later, and PC with iTunes 10.2.2 or later.
The WI-HCH-1HHD logo is certification marks of the WI-H Alliance.

Google, Google Play, Chromecast built-in, and other related marks are trademarks of Google LLC. The Google Assistant requires an internet connection and is not available in certain countries and languages. Availability of certain features and services are service, service, and network dependent and may not be available in all areas. Controlling certain devices in your home requires compatible smart devices. Subscriptions for services and applications may be required and conditional terms, conditions and/or charges may apply.
MF3
VPEG Layer-3 audio decoding technology licensed from Hatunhofer IIS and Thomson multimedia.
FLAC FLAC Dec
oder Copyright © 2000, 2001. 2002, 2003, 2004, 2005, 2006, 2007. 2008 Josh Coalson
Redistribution and use in source and binary forms, with or without modification, are permitted provided that the following conditions are met
- Redistributions of source code must retain the above copyright notice, this is of conditions and the following disclaimer.
-Redistributions in binary form must reproduce the above copyright notice, this list of conditions and the following disclaimer in the documentation and/or other materials provided with the distribution.
-Neither the name of the Xiphong Foundation nor the names of its contributors may be used to endorse or promote products derived from this software without specific prior written permission.
FLAC cont. TH
SOFTWARE IS PROVIDED BY THE COPYRIGHT HOLDERS AND CONTRIBUTORS' AS IS AND ANY EXPRESS OR IMPLIED WARRANTIES, INCLUDING, BUT NOT LIMITED TO, THE IMPLIED WARRANTIES OF MERCHANTABILITY AND FITNESS FOR A PARTICULAR PURPOSE AND DISCLAIMED. IN NO EVENT SHALL THE FOUNDATION OR CONTRIBUTORS BE LIABLE FOR ANY DIRECT, INDIRECT, NGOHIAI, SPECIAL, EX-MPIARY, OR CONSEQUENTIAL DAMAGES INCLUDING, BUT NOT LIMITED TO, PROCURRIMANT O SUBSTITUT GOODS OR SERVICES LOSS OF USE, DATA, OR PROFITS; OR BUSINESS INTERRUPTION) HOWEVER CAUSED AND ON ANY THEORY OF LIABILITY WHETHER IN CONTRACT, STRICT LIABILITY, OR TORT INCLUDING NEGLIGENCE OR OTHERWISE ARISING IN ANY WAY OUT OF THE USE OF THIS SOFTWARE, EVEN E ADMISHED OF THE POSSIBILITY OF SUCH DAMAGE.

MOA and the Sound Wave Device are registered trade marks of MOA Limited © 2016
MQA (Master Quality Authenticated).
MQA is an award-winning British technology that delivers the sound of the original master recording. The master MQA file is fully authenticated and is small enough to stream or download.
Visit mqa.co.uk for more information.
The S150 includes MQA technology, which enables you to play back MQA audio files and streams, delivering the sound of the original master recording.
MQA or MQA Studio indicates that the product is decoding and playing an MDA stream or file, and denotes provenance to ensure that the sound is identical to that of the source material.
MQA Studio indicates it is playing an MQA Studio file, which has either been approved in the studio by the artist/producer or has been verified by the copyright owner.
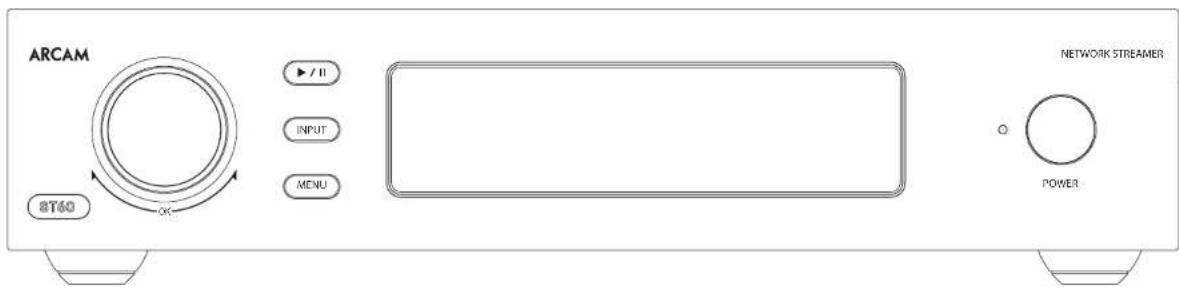
Front Panel Connections and Controls

| FRONT PANEL KEYS | |
| Play and pauses network audio. | |
| Selects Input for listening. See "Selecting An Audio Source" on page EN-10. | |
| Opens the setup menu and navigates network media. See "Setup Menu" on page EN-13 and "Navigating Network or USB Media" on page EN-10. | |
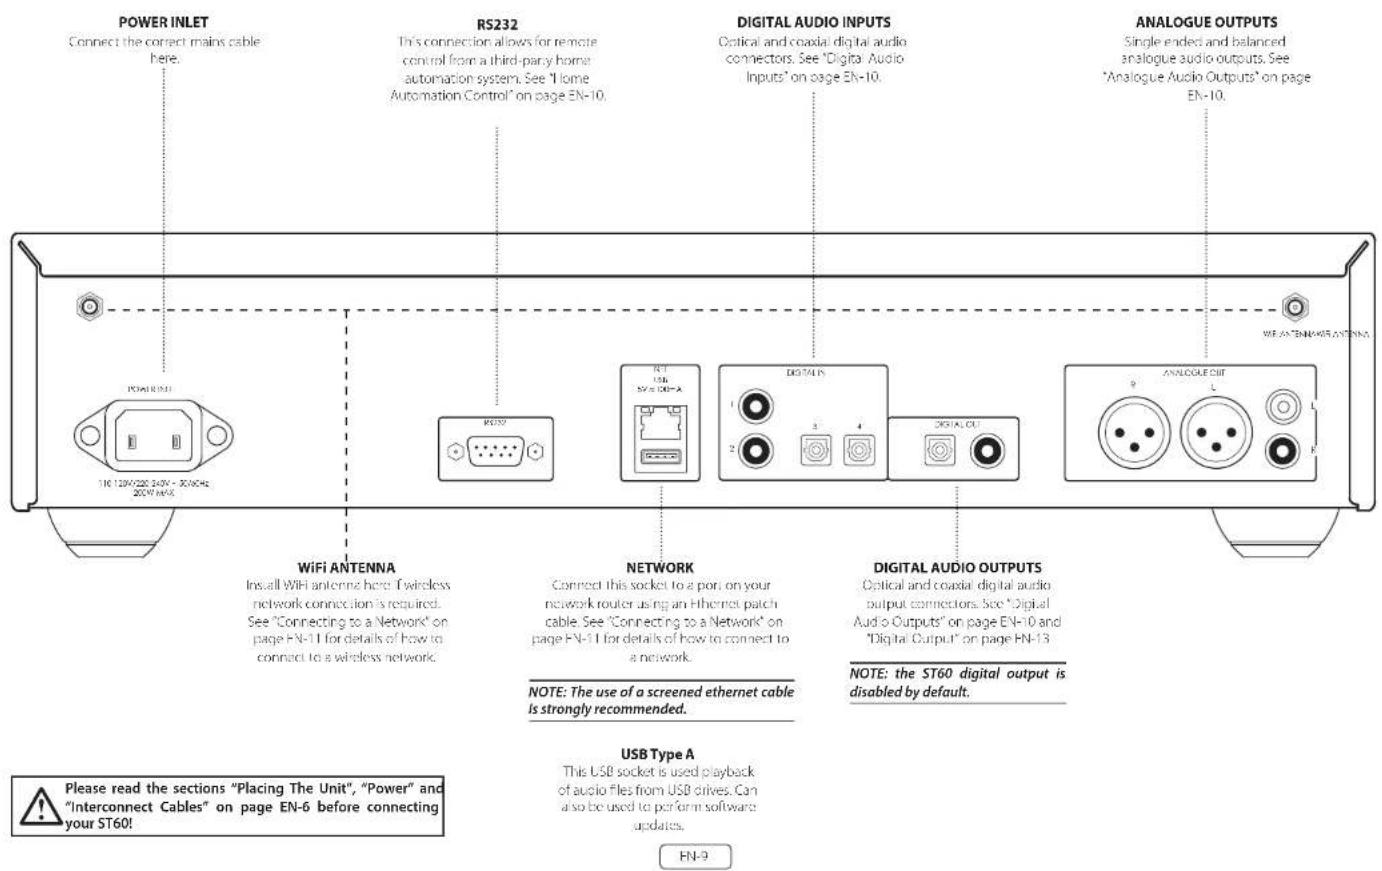
Rear Panel Connections
EN
Operation
Switching On
The POWER button switches the unit on and off. The status indicator I HD indicates the state of the S160: it changes from red to white when mains power is connected and the unit is switched on.
Auto Standby
In order to comply with international regulations for consumer products, this unit is designed to enter a low power standby mode if no user interaction and no audio input signal are detected for an extended period of time (default time is 20 minutes). The unit can be brought out of standby by either turning the control knob on the front panel in either direction or by pressing the POWER key on the remote control.
The amount of time before the unit enters standby is configurable in the setup menu. See "Timeout" on page EN-13 for details.
NOTE: If the standby time-out is set to OFF, the standby feature will be disabled.
Display
To adjust the brightness of the front panel display press the DISPLAY button on the remote control or use the setup menu.
If the ST60 is powered off with the display brightness set to 'OFF', the display will momentarily resume to full brightness then turn off when the unit is powered back on.
Selecting An Audio Source
Audio sources can be selected either using the INPUT button on the front panel or with the remote control, by pressing the required button, labelled as DIG 1, DIG 2, DIG 3, DIG 4, USB or NET. In each case, the source is selected from the input sockets with the corresponding name.
Digital Audio Inputs
The S150 features two coaxial and two optical digital inputs, which can be connected to the respective digital audio output of your source equipment.
Digital inputs can renamed to suit the connected source. See "Input Names" on page EN-13 for details.
WARNING: The ST60 only supports two channel PCM audio input. Do not attempt to send multichannel audio of any type as this could result in serious damage to any connected amplifier and speakers.
USB
This input is for playback of audio files from a USB pen drive or similar device. Simply plug in the USB stick and use the remote control or front panel to browse.
Network Audio
In order to use the network audio capability of the S160 please refer to "Connecting to a Network" on page FN-11 to allow you to use AirPlay, Chromecast built in or playback from a NAS drive using the Arcam Music Life app.


MusicLife


Digital Audio Outputs
Connect one of the digital audio outputs (optical or coaxial) to the digital input of your device.
NOTE: the ST60 digital output is disabled by default.
See "Digital Output" on page EN-13 for information on configuring the outputs to work with your device.
NOTE: the ST60 digital outputs provide a fixed level PCM stereo output only.
Analogue Audio Outputs
The ST60 features both balanced and unbalanced outputs.
Using cables of suitable length, connect the left/right outputs to the left/right inputs on your amplifier, respectively.
NOTE: The analogue outputs will be disabled when the digital output is enabled.
Listening
Volume Control
During playback, use the control knob, or the buttons on the remote control, to change the volume.
Fixed Volume
If this feature has been enabled in the setup menu, the output level will be set to full volume and all volume control inputs will be ignored by the ST60.
Muting The Output
The output of the ST60 can be silenced by pressing the MUTE button on the remote control or pressing the control knob during playback. Press again to cancel the mute.
Navigating Network or USB
Media
Selecting the NET or USB input will open the media browsing screen.
- Navigate up and down using the UP and DOWN buttons on the remote control or by turning the control knob.
☐ Select a location or file with the OK button on the remote control or by pressing the control knob.
☐ To go back use the BACK button on the remote control or the MENU button on the front panel.
☐ To return to the top level use the HOME button on the remote control or long press the MENU button the front panel.
L. To skip quickly through a list of tracks use the LEFT or RIGHT button on the remote control.
Home Automation Control
When connected to a network the ST60 can be controlled and monitored remotely using dedicated home automation software. See "Connecting to a Network" on page EN-11 for details on how to connect the ST60 to your network.
The same controls are also available via the RS237 input. Various third party systems are available providing sophisticated control over all your entertainment devices. Contact your dealer or installer for details. The technical details of the remote control protocol are available upon request, by contacting Arcam at luxurysupport@harman.com.
For details of the available controls please refer to the control document which can be found at www.arcam.co.uk for further information.
Connecting to a Network
EN
In order to use the AirPlay and Chromecast built-in functionality of the ST60, you will need to connect it to your home network via a wireless or wired connection.
The following sections detail how to do this.
NOTE: Before attempting to setup a wireless connection ensure the supplied wireless antennas are fitted to the antenna sockets on the rear of the ST60
NOTE: When the wired connection is used the wireless connection is automatically disabled.
NOTE: The use of a screened ethernet cable is strongly recommended.
AirPlay Setup
Wired Connection
Power up and connect an ethernet cable to the ST60. To listen to audio via AirPlay on your ST60, ensure your Apple device is connected to the same network as the ST60 and simply select the ST60 as the AirPlay audio playback device.
Note: By default the 5160 will appear as 5160 xxxxx in the AirPlay speaker menu, where xxxxx is the last 5 digits of the units wired MAC address.
Wireless Connection
Ensure your Apple device is connected to the wireless network you wish to connect the ST60 to.
Install the Wi-Fi antennas and power up the ST60 Open the Wi-Fi settings menu on the Apple device and select the ST60 from the "Set up new AirPlay speaker" menu.
Follow the instructions on screen.
To listen to audio via AirPlay on your ST60, ensure your Apple device is connected to the same network as the ST60 and simply select the ST60 as the AirPlay audio playback device.
Note: By default the ST60 will appear as ST60-xxxx in the AirPlay speaker setup menu, where xxxxx is the last 5 digits of the unit's wired MAC address.
Chromecast built-in Setup
Wired Connection
Power up and connect an ethernet cable to the ST60. Select the NET input.
Download and open the Google Home application.


You should be prompted that there is a device available for setup. If not, simply tap 'Add' followed by 'Setup a Device'.
Select the ST60 and follow the instructions on screen.
To cast audio from any supported application on your ST60, ensure your device is connected to the same network as the 5-60. Lap the Chromecast built-in icon from within the application and select the ST60 as the playback device.
Note: By default the ST60 will appear as ST60-xxxxx, where xxxxx is the last 6 digits of the unit's wired MAC address.
Wireless Connection
Instal the Wi-Fi antennas and power up the ST60. Select the NETinput.
Download and open the Google Home application


You should be prompted that there is a device available for setup. If not, simply tan "Add" followed by "Setup a Device".
Select the ST60 and to low the instructions on screen.
To cast audio from any supported application on your ST60, ensure your device is connected to the same network as the ST60. Tap the Chromecast built-in icon from within the application and select the ST60 as the playback device.
Note: By default the S160 will appear as S160-xxxxx, where xxxxx is the last 6 digits of the unit's wired MAC address.
Remote Control
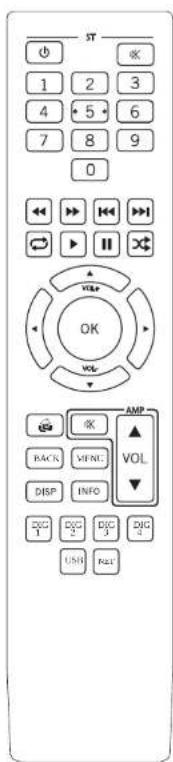
| Toggles power between standby and on. | |
| Toggles the output mute of the ST60. | |
| 0...9 The | number keys can be used for direct entry of numeric values. |
| Play, pause, stop, skip forward, skip backward, fast forward, rewind, repeat and shuffle. | |
| Navigates the setup menu or files on the Network or USB drive.During playback UP and DOWN control the volume of the ST60. | |
| Returns navigation to the top level of the network client menus (Home | |
| Controls the volume and mute functions of any Arcam amplifier or AVR. | |
| BACK Go back one level when in menus or media browsing. | |
| MHNU Enfers the setup menu. | |
| DISP Cycles through the front panel display's brightness options. | |
| INFO Info cycles through the information displayed on the lower portion of the front panel display when on NET and USB Inputs. | |
| DIGL4 Selects digital input L4 | |
| USB Selects USB input. | |
| NET Selects network (NET) input. | |
Make sure the two AAA batteries (supplied) are installed before attempting to use the remote control.
- Open the battery compartment on the back of the handset. To do this, press the catch on the battery cover as indicated by the arrow on the catch and remove the battery cover.
- Insert two 'AAA' batteries, as indicated in the battery compartment.
- Replace the battery cover. To do this, locate the lug on the battery cover into the corresponding hole on the short edge of the battery compartment. Now press the opposite end of the battery cover (with the catch) down so that the cover is flush with the main body of the remote and the catch clicks.
The remote control requires a clear line of sight to the front panel of the SI60 to ensure reliable operation.
Low voltage indicator
When the batteries are running down, the backlight flashes briefly whenever you press a button.
If this happens, it two new AAA alkaline batteries as soon as possible.
Notes on batteries:
Incorrect use of batteries can result in hazards such as leakage and bursing.
Do not mix old and new batteries together.
Do not use non-identical batteries together – although they may look similar, different batteries may have different voltages.
Ensure the plus (-) and minus (-) ends of each battery match the direction indicated in the battery compartment.
Remove batteries from equipment that is not going to be used for a month or more.
When disposing of used batteries, please comply with governmental or local regulations that apply in your country or area.
The remote complies with Part 15 of the FCC rules
This equipment has been tested and found to comply with the limits for a class B digital device, pursuant to part 15 of the FCC Rules. These limits are designed to provide a reasonable protection against harmful interference in a residential installation. This equipment generates, uses, and can radiated radio frequency energy and if not installed and used in accordance with the instructions, may cause harmful interference to radio communications. However, there is no guarantee that interference will not occur in a particular installation. If this equipment does cause harmful interference to radio or television reception, which can be determined by turning the equipment off and on, the user is encouraged to try to correct the interference by one or more of the following measures:
Reorient or relocate the receiving antenna.
Increase the separation between the equipment and receiver.
Connect the equipment into an outlet or a circuit different from that to which the receiver is connected.
Consult the dealer or an experienced radio/TV technician for help.
Setup Menu
EN
Navigating The Setup Menu
The setup menu can be navigated by using the remote control navigation and OK keys, or using the control knob and MENU key on the front panel.
When using the front panel turn the control knob to navigate and press to select a menu option.
To exit a menu press the MENU key.
System Settings
Display
Allows the brightness of the front panel display to be changed.
Dark Mode
Turns front panel display and status LED off.
Input Names
Change the input names of the digital inputs to suit the connected source.
Use the control knob or up/down remote keys to change the character.
Use the INPUT button on the front panel or right remove key to move to the next character.
Use the PLAY/PAUSE key on the front panel to move to the previous character.
To save exit the menu using the MENU or BACK key.
Network Reset
Resets the network module to factory settings.
System Reset
Restores the ST60 to its factory default settings.
OTA Upgrades
If enabled the S168 will update automatically if left powers on overnight or in network standby. If disabled any software updates will need to be manually installed. Refer to the software release instruction for more details available at www.arcam.co.uk.
USB Upgrade
Allows the ST60, to be updated via a USB stick. Refer to the software release instruction for more details available at: www.arcam.co.uk.
Control 4
Enables Control 4 discovery function and enables the sending of a discovery beacon.
System Info
Displays various system parameters including software version numbers, IP address, Friendly name, Googlecast name and serial number.
Audio Settings
Fixed Volume
Fixes the analogue output level to full output level. When enabled all volume commands will be ignored by the S160. The default setting is OFF.
Maximum On Volume
Limits the maximum volume when the 5160 is switched on or comes out of standby. The 5160 comes on at this volume setting if the last used volume exceeds this value. It is stored in memory and recalled each time the unit is powered up.
NOTE: This setting is not used when volume is set to fixed.
Maximum Volume
Limits the maximum volume setting the ST60 can be turned up to for external inputs. This is a useful feature to prevent accidental overdriving of low power-handling speakers. It is stored in memory and recalled each time the unit is powered up.
NOTE: This setting is not used when volume is set to fixed.
Maximum Network Volume
Limits the maximum volume setting the ST60 can be turned up to for network audio content, this is a useful feature to prevent accidental overdriving of low power-handling speakers, or to prevent volume being accidentally set to maximum using streaming app volume sliders. It is stored in memory and recalled each time the unit is powered up.
NOTE: This setting is not used when volume is set to fixed.
DAC Filter
Specify which digital filter is used in the DAC
See "ST60 DAC Digital Filters" on page EN-14 for more explanation on the differences between the filters.
Digital Output
Enables or disables the digital output and selects the MQA output stream type.
Off
Coaxial and optical outputs are disabled.
MQA Bitstream (Passthrough)
For use with MQA enabled devices.
MQA Core
For use with external MOA renderers or non MOA enabled devices.
NOTE: The analogue outputs will be disabled when the digital output is enabled.
Standby Settings
Timeout
This option allows you to choose the length of idle time before the unit goes into standby. The default setting is 20 minutes.
NOTE: If the standby time-out is set to OFF, the standby feature will be disabled.
Network Standby
Enables or disables the network control of the ST60 while the unit is in standby. The default setting is OFF.
NOTE: The unit can still be controlled via RS232 commands, even when network standby is disabled.
RS232 Standby
Enables or disables the RS232 control of the ST60, while the unit is in standby. The default setting is OFF.
ST60 DAC Digital Filters
The ST60 allows the listener to choose between a number of digital filters for use in the audio DAC. Digital filters are required to minimise unwanted antialiasing distortion in the audio band but no digital filter is perfect, all are a compromise between various parameters. These include:
Frequency response — Audio level with respect to frequency. Ideally this should not vary significantly between 70Hz and 70kHz.
Phase - The time delay introduced between reproducing different frequencies within the pass band of the filter. Ideally this would be as low as possible (linear phase).
Pre ringing – Additional audio artefacts that precede the original audio impulse. These are sometimes thought to be bad as this phenomenon does not exist in the natural world, so ideally this should be as low level and last for as short a time as possible.
Post ringing - Additional audio artifacts that follow the original audio impulse. Ideally these should be as low in level and last for as short a time as possible.
Aliasing - Additional audio artifacts introduced into the audio band from high frequency signals.
We have chosen our default filter through a combination of careful measurement and listening tests and we believe they are the best compromise to achieve the best listening experience. However, all of the filters sacrifice performance of one parameter to improve another. Therefore, dependant on your choice of listening material and personal preference, you may wish to choose one of the other options. There is no universal right or wrong choice. Note that any audible differences are most likely to be heard with sample rates of 484 Hz and below.
Hybrid Filters
Brick Wall
No phase shift, but introduces both pre and post ringing artefacts.
Corrected Minimum Phase
Low pre-ringing and the phase response varies at higher frequencies. There is more post ringing compared with linear phase and apodizing filters.
Apodizing (default)
A compromise between phase, frequency response and ringing. Its main advantage is that it removes most of the ringing that has been inreduced upstream in the recording process when the original material was recorded and mastered.
Minimum Phase Filters
Minimum Phase Slow Roll Off
No pre-ringing artefacts but can introduce phase shifts at higher frequencies. It has less post ringing than the Minimum Phase Fast Roll Off, but this is still higher than the Linear phase filter options. Very high frequencies in the last half octave of the filter pass band will be slightly attenuated.
Minimum Phase Fast Roll Off
No pre-ringing and the phase response varies at higher frequencies. There are significantly higher amounts of post ringing compared with the linear phase filter options.
Linear Phase Filters
Linear Phase Slow Roll Off
Low and equal levels of pre and post ringing. No phase shifts but can introduce high frequency aliasing at a higher level than linear phase fast roll off. Very high frequencies will be slightly attenuated.
Linear Phase Fast Roll Off
Higher and equal levels of pre and post ringing compared with linear phase slow roll off. No phase shifts and with minimal high frequency aliasing compared with slow roll off.
Troubleshooting
| Problem Check the following | |
| No sound □ The ST90 is correctly plugged in and switched on.□ Your audio source is correctly connected, the correct input is selected and it is not muted.□ Check output is enabled. See "Digital Output" on page EN-13 | |
| The unit responds orally or not at all to the remote control | □ Remote batteries are not running out. See "Low voltage indicator" on page EN-12□ The front panel window is visible and you are pointing the remote control towards it. |
| The front panel display is blank | □ The display hasn't been turned off. See "Display" on page EN-13.□ Dark mode is enabled. See "Dark Mode" on page -EN-13. |
| Cannot control the volume | □ Fixed volume mode is enabled. See "Fixed Volume" on page EN-13□ Digital output is enabled. |
ST60 Specifications
| Analogou Outputs | |
| Digital to Analogue Conversion ES59038 32-bit | 192kHz De ta-Sigma DAC |
| Signal/Noise Ratio (Avid) 118dB unbalanced, 172dB balanced | |
| Harmonic Distortion (1kHz) <0.0008% | |
| Frequency response 10Hz 20kHz ± 0.5dB | |
| Output Level (Fixed) 2.2Vrms unbalanced, 4.5Vrms balanced | |
| Output Impedance 47Ω unbalanced, 600Ω balanced | |
| Minimum Recommended Load 5kΩ | |
| RMS Jitter < 20 psec | |
| Digital Inputs | |
| SPDF Receiver AKM4113 | |
| Supported sample rates Optical 32kHz, 44.1kHz, 48kHz, 88.2kHz, 96kHz | |
| 6bit depth 16-bit - 32-bit | |
| Digital Interfaces | |
| USB: USB 2.0 High Speed (480Mbps) | |
| Ethernet 10/100Mbps | |
| Wireless | 802.11b/g/n |
| General | |
| Mains voltage | 110-240V, 50-60Hz |
| Maximum power consumption 10W | |
| Low power standby consumption | 0.5W |
| Network standby consumption 2W | |
| Dimensions W x H x D (including feet and control knob) | 433x102x306mm |
| Weight (net) | 5.5kg |
| Weight (gross) | 7.9kg |
| Supplied accessories Mains leads | Remote control2 x AAA batteriesUser Manual2 x WIFI Antenna |
All specification values are typical unless otherwise stated. Arcam has a policy of continuous improvement for its products. This means that designs and specifications are subject to change without notice. E&OE.
Worldwide Guarantee
This entitles you to have the unit repaired free of charge, during the first five years after purchase, provided that it was originally purchased from an authorised Ateam dealer. The Ateam dealer is responsible for all after sales service. The manufacturer can take no responsibility for defects arising from accident, misuse, abuse, wear and wear, requires or through unauthorized adjustment and/or repair, neither can they accept responsibility for damage or loss occurring during transit to or from the person claiming under the guarantee.
The warranty covers:
Parts (excluding disc drives) and labour costs for five years from the purchase date (see below for additional terms and conditions). After five years you must pay for both parts and labour costs.
Disc drives (of any type) are covered under this warranty for three years from the purchase date.
The warranty does not cover battery replacement at any time.
The warranty does not cover transportation costs at any time.
Claims under guarantee
This equipment should be packed in the original packing and returned to the dealer from whom it was purchased. It should be sent cardlage prepaid by a reputable carrier – not by post. No responsibility can be accepted for the unit whilst in transit to the dealer or distributor and customers are therefore advised to insure the unit against loss or damage whilst in transit.
For further details contact Arcam at luxurysupport@harman.com.
Problems?
If your Arcam dealer is unable to answer any query regarding this or any other Arcam product please contact Arcam Customer Support at the above address and we will do our best to help you.
On-line registration
You can register your product online at www.arcam.co.uk.
HANDBOOK
FR(CA)
ARCAM | HDA
LECTURE EN RÉSEAU
ST60
Bienvenue
Domoticabediening NL-8
Airplay-instelling NL-9
Standby Settings (Stand-by-instelling)
ST60 Digitale DAC-filters NL-12
Probleemoplossing NL-13
ST60 Specifications NL-14
USB Upgrade (USB-upgrade)
OTA Upgrades (OTA upgrade)
Control 4 (Control 4)
MQA Bitstream (pass-through)
Standby Settings (Stand-by-instelling)
Timeout (Time-out)
Minimale fasefilters
Minimum Phase Slow Roll Off (Minimale fase traag afrollen)
Control 4 (Control 4)
Control 4 (Control 4)
Control 4 (Control 4)
Linear Phase Slow Roll Off (Roll-off lento a fase lineare)
Chromecast built-in 설정 KO-9
KO-5
KO-6
KO-7
KO-8
KO-8
KO-8
KO-8
KO-8
리모컨 KO-10
설정 메뉴 KO-11
Chromecast built-in 설정
유선 연결
Control 4 (Control 4)
Apodizing (아포다이징(기본값))
THE WEST WING, STIRLING HOUSE
WATERBEACH, CAMBRIDGESHIRE, CB25 9PB
+44 (0) 1223 203200SH308 ISSUE B

- Important Safety Instructions
- Class II product
- Warning
- Safety Compliance
- Caution on installation
- FCC Information (for US customers)
- PRODUCT
- IMPORTANT NOTICE: DO NOT MODIFY THIS PRODUCT
- NOTE
- Safety Information (for European customers)
- A note about recycling
- Correct disposal of this product
- Welcome
- Thank you and congratulations...
- Your ST60 development team
- Contents
- Overview
- Arcam's ST60 Network player
- Placing The Unit
- Power
- Interconnect Cables
- Trademark Acknowledgments
- Front Panel Connections and Controls
- Rear Panel Connections
- Operation
- Switching On
- Auto Standby
- Display
- Selecting An Audio Source
- Digital Audio Inputs
- USB
- Network Audio
- Digital Audio Outputs
- Analogue Audio Outputs
- Listening
- Volume Control
- Fixed Volume
- Muting The Output
- Navigating Network or USB
- Media
- Home Automation Control
- Connecting to a Network
- AirPlay Setup
- Wired Connection
- Wireless Connection
- Chromecast built-in Setup
- Remote Control
- Low voltage indicator
- Notes on batteries:
- The remote complies with Part 15 of the FCC rules
- Setup Menu
- Navigating The Setup Menu
- System Settings
- Dark Mode
- Input Names
- Network Reset
- System Reset
- OTA Upgrades
- USB Upgrade
- Control 4
- System Info
- Audio Settings
- Maximum On Volume
- Maximum Volume
- Maximum Network Volume
- DAC Filter
- Digital Output
- Off
- MQA Bitstream (Passthrough)
- MQA Core
- Standby Settings
- Timeout
- Network Standby
- RS232 Standby
- ST60 DAC Digital Filters
- Hybrid Filters
- Brick Wall
- Corrected Minimum Phase
- Apodizing (default)
- Minimum Phase Filters
- Minimum Phase Slow Roll Off
- Minimum Phase Fast Roll Off
- Linear Phase Filters
- Linear Phase Slow Roll Off
- Linear Phase Fast Roll Off
- Troubleshooting
- ST60 Specifications
- Worldwide Guarantee
- The warranty covers:
- Claims under guarantee
- Problems?
- On-line registration
- ARCAM | HDA
- Bienvenue
- USB Upgrade (USB-upgrade)
- OTA Upgrades (OTA upgrade)
- Control 4 (Control 4)
- MQA Bitstream (pass-through)
- Standby Settings (Stand-by-instelling)
- Timeout (Time-out)
- Minimale fasefilters
- Minimum Phase Slow Roll Off (Minimale fase traag afrollen)
- Linear Phase Slow Roll Off (Roll-off lento a fase lineare)
- Chromecast built-in 설정
- 유선 연결
- Apodizing (아포다이징(기본값))
Brand : ARCAM
Model : ST60
Category : Hi-fi system