
CL 6044 CB - Air Conditioning BOMANN - Free user manual and instructions
Find the device manual for free CL 6044 CB BOMANN in PDF.
| Product type | Split air conditioner (indoor unit + outdoor unit) |
| Brand | Bomann |
| Model | CL 6044 CB |
| Cooling capacity | 9000 BTU/h (approx. 2.6 kW) |
| Heating capacity | 9000 BTU/h (approx. 2.6 kW) |
| Power consumption (cooling) | 800 W |
| Power consumption (heating) | 699 W |
| Power supply | 220-240 V ~ 50 Hz |
| Refrigerant | R32 (flammable) |
| Net weight (indoor unit) | approx. 6.5 kg |
| Net weight (outdoor unit) | approx. 24 kg |
| Operating modes | Cooling (COOL), Heating (HEAT), Dehumidification (DRY), Fan (FAN), Auto (AUTO) |
| Special functions | Energy saving (ECO), Turbo, Sleep (SLEEP), Timer (TIMER), Anti-mold cleaning (MILDEW), Automatic temperature measurement (I FEEL) |
| Remote control | Yes, with AAA 1.5 V batteries (included) |
| Air filter | Washable, clean regularly |
| Fan speed | Multiple adjustable speeds |
| Airflow direction | Vertically adjustable flap (remote control), manual horizontal deflectors |
| Standard refrigerant pipe length | 5 m |
| Maximum distance between units | 15 m |
| Protection class | I |
| Maintenance and cleaning | Clean filter with warm water, clean units with a damp cloth, do not use abrasive products |
| Safety | Child lock, surge protection, automatic shutdown in case of error |
| Max operating pressure | Pressure side: 3.7 MPa, suction side: 1.2 MPa |
Frequently Asked Questions - CL 6044 CB BOMANN
User questions about CL 6044 CB BOMANN
0 question about this device. Answer the ones you know or ask your own.
Ask a new question about this device
Download the instructions for your Air Conditioning in PDF format for free! Find your manual CL 6044 CB - BOMANN and take your electronic device back in hand. On this page are published all the documents necessary for the use of your device. CL 6044 CB by BOMANN.
USER MANUAL CL 6044 CB BOMANN
WAARSCHUWING: Brandgevaar!
ATTENTION: Risque de surchauffe!
Thank you for choosing our product. We hope you will enjoy using the appliance.
Symbols in this Instruction Manual
Important information for your safety is specially marked. It is essential to comply with these instructions in order to avoid accidents and prevent damage to the appliance:

WARNING:
This warns you of dangers to your health and indicates possible injury risks.

CAUTION:
This refers to possible hazards to the appliance or other objects.

NOTE:
This highlights tips and information.
General Notes
Read the operating instructions carefully before putting the appliance into operation and keep the instructions including the warranty, the receipt and, if possible, the box with the internal packing. If you give this appliance to other people, please also pass on the operating instructions.
- The appliance is designed exclusively for private use and for the envisaged purpose. This appliance is not fit for commercial use.
- Do not use it outdoors. Keep it away from sources of heat, direct sunlight, humidity (never dip it into any liquid) and sharp edges. Do not use the appliance with wet hands.
- The appliance and the mains lead have to be checked regularly for signs of damage. If damage is found the appliance must not be used.
- Use only original spare parts.
- In order to ensure your children's safety, please keep all packaging (plastic bags, boxes, polystyrene etc.) out of their reach.

WARNING:
Do not allow small children to play with the plastic foil. There is a danger of suffocation!
Special Safety Precautions for this Appliance
On the products you will find symbols that indicate warnings or provide information:

Read the instructions!

WARNING: Fire hazard!
The appliance contains a flammable refrigerant!
- Do not use any objects other than those permitted by the manufacturer to accelerate the defrosting process.
- The appliance should only be stored in rooms without a permanent source of ignition (e.g. open flames, an activated gas appliance or electric heater).
- Do not drill or burn the appliance.
- Remember that refrigerants are odourless.
The service manual is available at the following web address: www.sli24.de
In the "Downloads" area, please enter the model name CL 6044 QC CB.
- Any person who is involved with working on or breaking into a refrigerant circuit should hold a current valid certificate from an industry-accredited assessment authority, which authorises their competence to handle refrigerants safely in accordance with an industry recognised assessment specification.
Servicing shall only be performed as recommended by the equipment manufacturer. Maintenance and repair requiring the assistance of other skilled personnel shall be carried out under the supervision of the person competent in the use of flammable refrigerants.

CAUTION: Risk of overheating!
- Keep the ventilation slots free!
- Do not cover the appliance!

CAUTION:
Improper installation and operation without verification (e.g. certificate) from a specialist company shall cause the warranty to expire in accordance with EU 517 / 2014 Chapter II Art. 3.

WARNING:
-
Do not use and store the appliance at the following locations:
-
Near a fire source.
- An area, where water or oil can splash.
- An area exposed to direct sunlight.
-
In the bathroom, the laundry room or next to a swimming pool.
-
Do not touch the appliance when you are barefoot or when parts of your body are wet or damp.
-
During installation of the appliance by a certified specialist company, secure the surrounding area to avoid accidents. Children and unauthorized persons should not be permitted entry.
- Make sure that the socket for the outdoor facility has been installed in sufficiently secure fashion.
- Make sure no air can get into the refrigerant system and check for leaking cooling agents when you move the air-conditioning system. Remember that cooling agents are odourless.
- Following installation of the air-conditioning system, do a test-run and check the operating data.
- The fuses installed in the built-in control unit have a rated value of T 5A/250V. Make sure the interior appliance is always protected using a fuse possessing sufficient capacity for the maximum input current, or with the aid of another overload protection device.
- The appliance must remain disconnected from the mains supply network during installation, which shows all-pole contact separation, which makes complete separation possible in accordance with the conditions of over voltage category III. These must be integrated into the permanent cabling in accordance with the safety regulations. All electrical work must only be performed by a professional electrician or specialist company dealing with electric work. The air-conditioning unit must only be installed by a certified specialist company.
- Do not place the appliance near flammable substances (alcohol, etc.) or pressurized containers (e.g. spray cans, gas cylinders, etc.). Please maintain a distance of at least 50~cm between the appliance and any such substances.
- If the appliance is used in areas without ventilation facilities, then precautions must be undertaken in order to avoid the fire hazard associated with the leakage of refrigerant gas.
- Please observe the national connection standards. The cabling must comply with the applicable national regulations.
- Before touching the connecting clamps, all electrical circuits must be disconnected from the power supply.
- This appliance can be used by children over the age of eight (8) years as well as by persons with reduced physical, sensory or mental capabilities or lack of experience and knowledge if they are supervised or provided with instruction concerning the safe use of the appliance and understand the hazards involved therewith.
Children may not play with the appliance. - Do not repair the appliance yourself, but always contact an authorized technician.
- Cleaning and maintenance must be performed by qualified personnel. In any event, always disconnect the appliance from the power supply before performing cleaning or maintenance tasks.
- This appliance was not developed to provide air conditioning in living space/quarters and may not be used for other purposes such as e.g. drying clothes, refrigeration of foodstuffs, etc.
- Only use the appliance with the air filter installed. Use of the air conditioning appliance without the air filter can lead to an excessive accumulation of dust or contamination of the internal parts of the appliance and cause damage and / or malfunction.
- The user is therefore responsible for ensuring installation of the appliance by a qualified technician. The qualified technician must verify whether the appliance has been grounded in accordance with applicable statutory provisions and guidelines, as well as ensure that the appliance is equipped with a thermomagnetic circuit breaker.
-
Never permit the appliance to be directly exposed to a cold air current for a prolonged period of time. Prolonged direct exposure to a cold air current can be injurious to health. Particular caution is recommended with regard to children, elderly persons or persons with an illness.
-
If the appliance is giving off smoke or a burning odour is detected, immediately disconnect the power supply and consult your service technician. Use of the appliance under such circumstances and/or in this condition can cause fire or electrical shock.
- Use the button to switch off the appliance if you are not using it for an extended period of time.
- Make sure the air flow direction is correctly installed. The valves must point downwards during heating mode and upwards during cooling mode.
- By avoiding extreme fluctuations in temperature settings, damage to the appliance can be avoided.
- Do not bend, pull or crush the power cable as it can become damaged thereby. A damaged power cable can cause electric shocks as well as fires. Only specialized technical staff must be permitted to replace a damaged power cable.
- Do not block the air inlet or outlet of the interior appliance or of the exterior appliance. Blocking or plugging these openings will lead to reduced cooling capacity and can cause malfunctions or damage. Do not perform any unauthorized or improper changes or alternations on the appliance.
- Do not place any heavy or hot objects on the appliance.
- Do not leave windows or doors open for long periods of time when the air conditioning unit is in use.
- Do not point the air current at plants or animals. Long periods of direct exposure to cold currents of air can have a negative impact on plants and animals.
- Do not climb on the external appliance and do not place any objects on top of it.
- Never insert a rod, bar or pole or similar object into the appliance. This can cause personal injury as well as material damage.
- Be sure to use an appropriate, specifically-designed tool for the laying and bending of the cooling pipes. For safety reasons, any buckling of the delicate cables must be avoided at all costs. All work must be performed by a certified company and correspondingly documented and determined in accordance with the equipment attached to the appliance.

CAUTION:
All technical modifications to the cooling pipes must be carried out by a certified specialist company. Improper alterations or modifications shall result in expiry of the warranty.
- Check to ensure that all pipes and cables are impermeable to prevent the formation of liquids, water vapour or condensate and e.g. to prevent their penetration of the interior walling of the appliance. This will prevent the accumulation of moisture as well as the formation of mildew.
Handling Batteries

WARNING:
- Do not expose batteries to excessive heat such as sunlight, fire or similar. There is a risk of explosion!
- Batteries are not toys. Keep away from children.
- Do not open batteries by force.
- Avoid contact with metal objects (rings, nails, screws, etc.). There is a risk of short circuit!
- A short circuit could cause the battery to heat up excessively or even to catch fire, resulting in injuries.
- For your own safety, cover the battery terminals with adhesive tape during transport.
- In case of battery leakage, make sure not to rub the liquid into your eyes or mucous membranes. In case of contact, wash your hands and rinse your eyes with clear water. Seek medical attention if any discomfort persists.
- Non-rechargeable batteries are not to be recharged.
- Ensure correct polarity when inserting the battery / batteries.

CAUTION:
- When not using the remote control for a long period of time, remove the batteries in order to prevent "leakage" of battery acid.
- Different battery types or new and used batteries must not be used together.
- Do not dispose of batteries along with domestic waste. Return used batteries to the relevant collection facilities or your retailer.
Unpacking the Appliance
- Remove the appliance from its packaging.
- Remove all packaging materials such as foils, filling materials and cardboard packaging.
- Check the appliance for possible transport damage to prevent hazards.
- If damage occurs, do not operate the appliance. Contact your distributor.
Scope of Delivery
Interior Unit
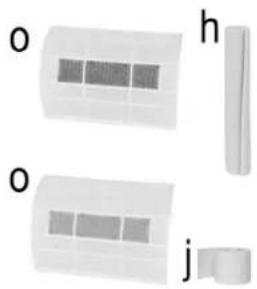
a) 6 × screw
b) 6 × dowel
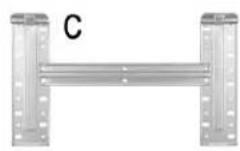
c) 1 × wall mount
Exterior Unit
d) 1 × support for the condensate channelling system
e) 4× stand for the exterior unit
Connection Accessories
f) 1 × Connecting cable for the exterior unit
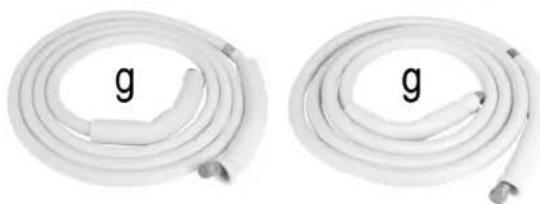
g) 2× cooling pipe (red and blue) including insulation
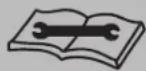
h) 1 × insulation material (spare)
i) 2 × condensate water pipe
j) 1 × vinyl tape
k) 1 × hole cover
Accessories
m) 1× remote control
n) 2 × R03 "AAA" 1.5 V battery
o) 2× filter

Overview of the Components
Page 3
Appliance Unit for Indoor Areas
1 Front panel
2 Filter cartridge with filter
3 LED display
4 Type plate (position may differ)
5 Circuit diagram
6 Electric connection unit
7 button(on/off)
8 Air deflector
9 Signal receiver
0 Air flap
1 Remote control
Appliance Unit for Outdoor Areas
12 Type plate for outdoor area (position may differ)
13 Connector cover
14 Coolant valve a+b
15 Air outlet
Remote control
i NOTE:
Should your model lack one of these functions, you will nevertheless hear a beep when you press down on the button.
Buttons on the Remote Control
| No. | Button Meaning | |
| 1 | Switch on / off | |
| 2 | OPTION | Selection button |
| 3 | ▲ | Settings / selection button |
| 4 | ▼ | Settings / selection button |
| 5 | ECO | Activate/deactivate ECO function |
| 6 | TURBO | Activation/deactivation of the Turbo function |
| 7 | Mode | Selection button operating mode |
| 8 | Fan | Adjust air speed |
| 9 | Adjust air flap | |
| 10 | Adjust air deflector (not available; must be adjusted manually) |
Remote Control Display
| Child lock | |
| AUTO | Automatic mode |
| COOL | Cool mode |
| DRY | Air dehumidification mode |
| HEAT | Heating mode |
| FAN | Fan mode |
| ECO | Energy-saving mode |
| Ventilation speed display | |
| Fan / ventilator off | |
| Maximum temperature and speed | |
| Air flap display | |
| Air deflector display (not available) | |
| Snoopze mode | |
| Automatic on / off switch | |
| IFEEL | Automatic temperature calculation |
| MILDEW | Self-cleaning for mildew |
| HEALTH | Health feature (not available) |
| 8°C H | Not available |
Installation
Interior Unit (a)
- Mount the interior unit on a solid wall which is not exposed to any vibrations.
- None of the openings on the appliance must be blocked so that the air can flow into the entire room.
- Do not mount the appliance close to heat sources, vapours or flammable gases.
- Do not mount the appliance in a location where it will be exposed to direct sunlight for long periods of time.
- Select a location in which condensate can easily drain and from which the interior unit can be easily connected to the exterior unit.
- Check regularly to ensure proper functioning of the appliance and always observe the guidelines regarding minimum distances and/or keep these spaces clear. Select a location from which the filter can be easily reached.
- Do not install the appliance in humid rooms such as bathrooms, laundry rooms, etc.
- For optimum results, installation should be performed as high above the floor as possible.
The minimum distances (in mm) are marked in the illustration.

CAUTION:
- The purchaser must ensure that persons / firms / companies which install, maintain or repair these air conditioning units possess sufficient qualifications and experience working with refrigerating agents.
- Improper installation and operation without verification (e.g. certificate) from a specialist company shall cause the warranty to expire in accordance with (EU) 517 / 2014 Chapter II Art. 3.
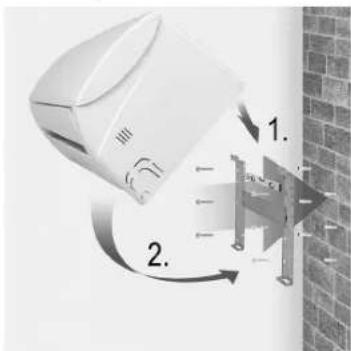
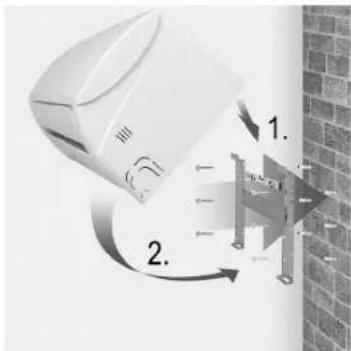
Installing the Wall Mount

CAUTION:
Before you install the wall mount, make sure you have found the precise spot at which you are going to drill the hole for the pipes! See the chapter entitled "Installation of the Interior Unit and Wall Bushing to the Outside".
- Loosen the wall mount at the locking clips.
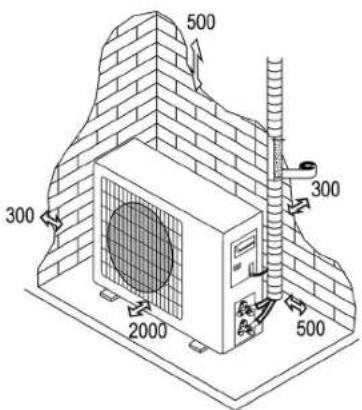
Exterior Unit (b)
- Do not mount the exterior unit close to heat sources, vapour or flammable gases.
- Do not set up the appliance in locations which are overly dusty.
- Install the appliance in an area in which nobody will be disturbed by the operating noise and which is not frequented by many persons. If necessary, make an arrangement with your next-door neighbours. Consult the German Federal Emissions Protection Directive in this regard, if necessary.
- Do not install the appliance in an area in which it will be exposed to direct sunlight or severe weather conditions or use sun protection of a kind which will not adversely affect air flow.
- Always observe the minimum distances depicted in the illustration below and/or keep the space within this distance clear during installation and operation.
- Install the exterior unit in a stable location.
- If the exterior unit is exposed to vibrations, use rubber bumpers on the floor to counteract the influence of the vibrations.
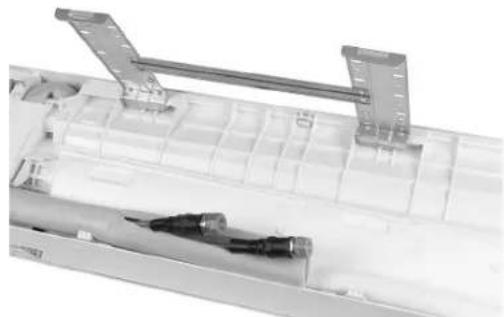
2. Fold the wall mount upward.
- Remove the wall mount by releasing it from the holder.
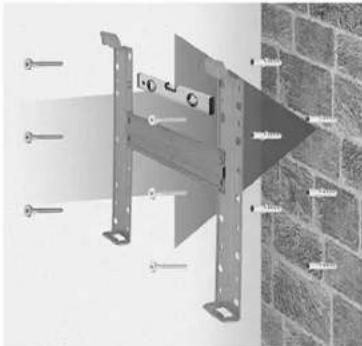
- Drill holes at least 32mm deep in a solid wall in order to fasten the plate.
- Place the plastic dowels in the hole.
- Fasten the mounting plate to the wall using the screws included.
- Ensure that the mounting plate is screwed firmly in place.
Alignment of the Cooling Pipes

CAUTION:
The air conditioning unit must be installed and connected by a certified refrigeration and air conditioning company. Improper installation shall result in expiry of the warranty.
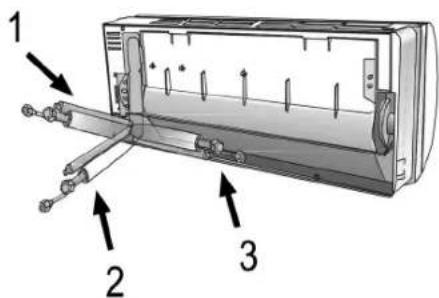
The cooling pipes can be laid in 3 directions as depicted in accordance with the numbers in the illustration. If the piping is placed in accordance with options 1 or 3, then you must use a cutter to carefully cut a notch in the side of the interior unit along the seam.
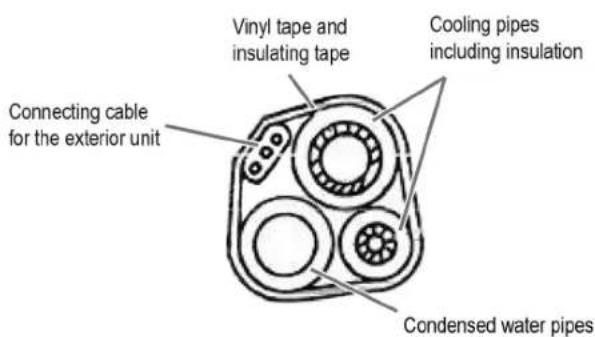
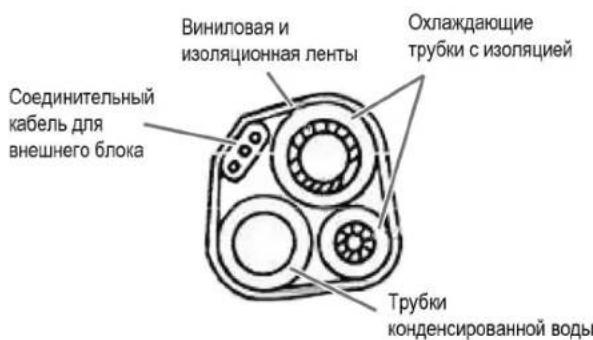
Guide the connection pipes in the direction of the opening in the wall and bind the cooling pipes, the condensed water piping and the power cable together using vinyl tape and always ensure impermeable insulation so that no liquids, water vapour or condensate are permitted to form and e. g. penetrate the wall. This will prevent the accumulation of moisture as well as the formation of mildew. Ensure that the condensed water pipe is placed on a gentle incline so that the water flow is not obstructed.

CAUTION:
Ensure that the pipes are impermeably sealed to avoid moisture damage and mildew build-up in the walling.
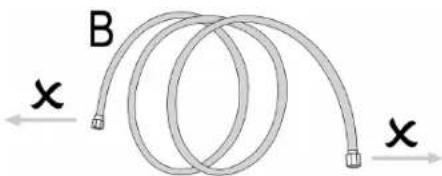
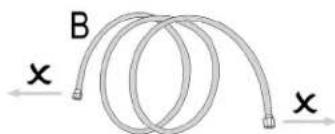
Unrolling the Cooling Pipes
- If the pipes are bent or pulled too frequently, they will become rigid. Do not bend the pipes more than three times.
- Carefully unroll the pipes as shown in diagram A. Avoid buckling.


CAUTION:
Do not pull the pipe apart as shown in diagram B. Instead, unroll it carefully.
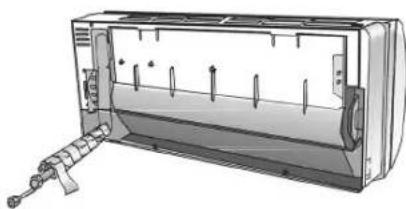
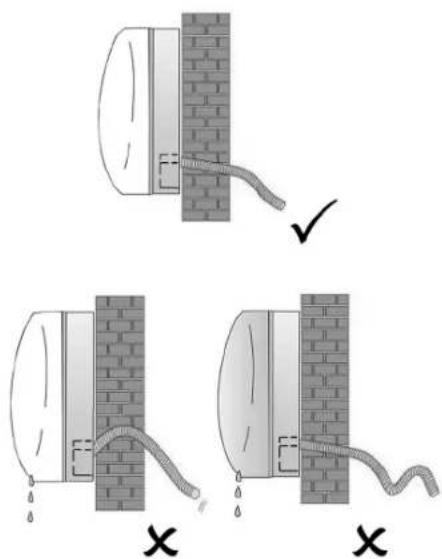
Connecting the Condensed Water Pipe for the Interior Unit
It is extremely important that the condensed water pipe for the interior unit be installed in correct fashion.
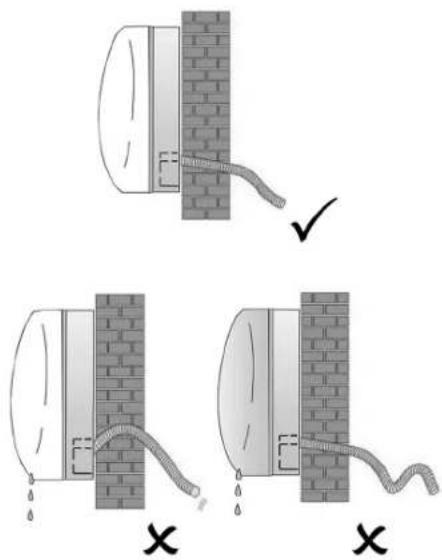
- Lay the drain hose below the pipe and make sure there are no dips or recesses.
- The drain hose must be inclined downwards in order to facilitate the flow of the condensed water.
- Do not bend or twist the drain hose. Do not allow it to protrude. Do not immerse the end in water. If the pipe is connected to an extension, ensure the connection when inserting it into the interior unit.
- If the cooling pipes are laid as shown at No. 3 in the chapter entitled "Alignment of the Cooling Pipes", then the pipes, the connecting cable for the exterior unit and the drain pipe for condensed water must be secured to the rear side of the appliance using pipe couplings.
- Insert the pipe connector in the corresponding appliance.
- Press the connecting pipe down firmly into the air conditioning unit and make sure the connection is tight.

CAUTION:
Avoid buckling during positioning and only permit these tasks to be performed by a certified specialist companies!
Installation of the Interior Unit and Wall Bushing to the Outside
- Using extreme care, lay the pipes, the connecting cable for the exterior unit and the condensed water pipe towards the spot where they are to be led through the wall to the outside.
- Bind the condensed water pipes, the connecting cable for the exterior unit and the condensed water pipe together using vinyl tape and then cover everything tightly using insulating tape (not included in delivery).

CAUTION:
- Ensure that the pipes are impermeably sealed to avoid moisture damage and mildew build-up in the walling.
- Make sure all exposed tubular parts have been sufficiently isolated.
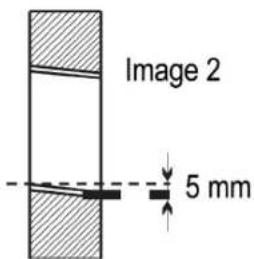
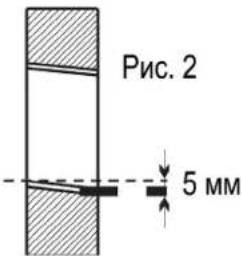
- Drill a hole with a diameter of 57mm and an incline / gradient of 5-7 mm.(Image 2)

NOTE:
Drill this with a slight incline of 5 - 7 mm toward the outside, to ensure that the condensed water is able to drain. In any case, make sure that there is an incline over the entire length of the condensed water pipe in the direction of the opening in the wall.
- Insert the hole-cover.
- Guide the insulated pipes, the connecting cable for the exterior unit and the condensed water pipes through the opening in the wall.

NOTE:
After installing the pipes, seal the hole in the wall through which the pipes have been passed so that it is airtight as well as watertight.
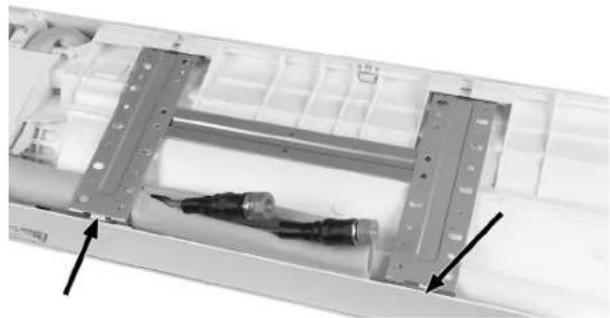
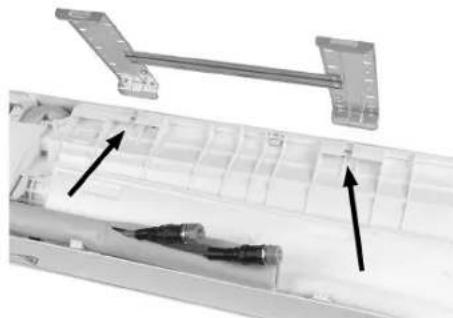
- Fasten the interior unit securely to the upper part of the wall mounting plate.
- Press the lower part of the interior unit firmly against the wall mounting plate until it rests firmly.
Installation of the Exterior Unit
- Before connecting the pipes, decide where you want to place the exterior unit and take care to ensure that there is enough room in the location you have chosen for maintenance work to be performed at a later time. (Observe the minimum distances)
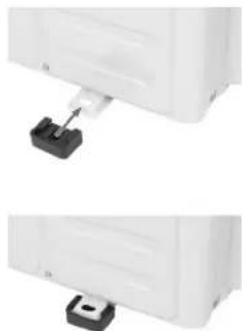
- Put the protective caps (included in delivery) on the stand and fasten these in the appropriate places.
- Use exceptionally sturdy screws / bolt anchors and bear in mind also the weight of the appliance, in order to prevent vibrations caused by operation from loosening the connection over time. The unit must be installed in accordance with the applicable safety regulations.
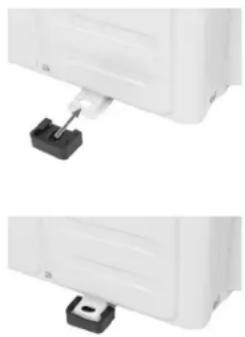
Condensed Water Drain Pipe for the Exterior Unit
Condensed water and ice which build up in the exterior unit due to heat generation can be drained by means of the condensed water pipe.
- Fasten the supports for the condensed water drain pipe in the 25mm opening designed therefor.
- Connect the supports for the condensed water drain pipe to the condensed water pipe and ensure the flow is properly controlled in order to avoid moisture damage.
Electrical Connection (Exterior Unit)
Remove the connector cover (15) on the right side of the appliance. The associated diagram can be found on the rear side. See diagram.
- Connect the power supply cable for the interior unit to the terminal strip.
- Carefully attach the power supply cable for the exterior unit using the cable connecting clamps.
- Make sure that the cables have been properly attached. Be sure that the grounding has been correctly installed.
- Place the protective cover back on the appliance.

CAUTION:
All electrical works must be performed by a certified professional electrician or specialist electronics company. Improper installation shall result in expiry of the warranty.
Connection, Filling and Start-up Procedure
The coolant pipes are not filled, and this must be done before use. The filling procedure may only be carried out by a certified specialist company. For any further installation requirements, please contact the appropriate specialist company.

CAUTION:
- The air conditioning unit must be installed and connected by a certified refrigeration and air conditioning company. Improper installation shall result in expiry of the warranty.
- Operating the appliance without filling with coolant can cause damage!
Testing the Interior Unit
- Is the power switch functioning properly?
- Does the ventilator work?
- Do the operating modes function normally?
- Can temperature and time be accurately adjusted?
- Do all lamps light up in normal fashion?
- Are the airflow flaps functioning properly?
- Is the condensed water pipe functioning normally?

CAUTION:
All of the steps described above must be performed by a certified refrigeration and air conditioning company. Improper implementation shall result in expiry of the warranty.
Testing the Exterior Unit
- Can unusual noises or vibrations be detected during operation?
Is the cooling agent leaking?

NOTE:
The electronic control system will only start the compressor three minutes after the unit is switched on.

CAUTION:
All of the steps described above must be performed by a certified refrigeration and air conditioning company. Improper implementation shall result in expiry of the warranty.
Installation Information
| Installation Instructions - Installation Information | |||
| Design model / Cooling capacity (Btu / h) 9k 12k 15/18k | |||
| Cooling pipe diameter a) 1/4" 6 1/4" 6 1/4" 6 | |||
| Cooling pipe diameter b) 3/8" 9,52 1/2" 12 1/2" 12 | |||
| Standard cooling pipe length | 5m | 5m | 5m |
| Maximum distance between interior and exterior unit | 15m | 15m | 15m |
| Additional refrigerant charge | 20g/m | 20g/m | 30g/m |
| Maximum distance between interior and exterior unit | 5m (15m) | 5m (15m) | 5m (15m) |
| Cooling agent * | R32 | R32 | R32 |
*) Additional information can be found on the information plate on the exterior unit.
Tightening Torque for Protective Caps and Flange Connections
| Cooling pipe Tightening torque (N × m) | Corresponding load use: 20 cm wrench) | Tightening torque (N × m) | |
| 1 / 4" 6 15 - 20 Tight / hand-tight Service-connecting nut 7 - 9 | |||
| 3 / 8" 9,52 31 - 35 Tight Protective caps 25 - 30 | |||
| 1 / 2" 12 35 - 45 Tight | |||
| 5 / 8" 15,88 75 - 80 Tight | |||
Cable Specifications
| Installation Instructions - Information for the Installer | ||||
| Model | Cooling agent (Btu/h) | 9k | 12k | 15/18k |
| Power cable | N | 1.0 mm² AWG18 | 1.0 mm² (1.5 mm²) AWG18 (AWG16) | 1.5 mm² AWG16 |
| L | 1.0 mm² AWG18 | 1.0 mm² (1.5 mm²) AWG18 (AWG16) | 1.5 mm² AWG16 | |
| E | 1.0 mm² AWG18 | 1.0 mm² (1.5 mm²) AWG18 (AWG16) | 1.5 mm² AWG16 | |
| Connecting cable | N | 1.0 mm² | 1.0 mm² (1.5 mm²) | 1.5 mm² |
| L | 1.0 mm² | 1.0 mm² (1.5 mm²) | 1.5 mm² | |
| 1 | 1.0 mm² | 1.0 mm² (1.5 mm²) | 1.5 mm² | |
| 2 | 0.75 mm² | 0.75 mm² | 0.75 mm² | |
| 3 | 0.75 mm² | 0.75 mm² | 0.75 mm² | |
| Installation Instructions - Installation Information | ||||
| Voltage transformer | 9k | 12k | 18/22k | |
| Model | Cooling agent (Btu/h) | Cross section | ||
| Power cable | N | 1.0 mm² (1.5 mm²)AWG18 (AWG16) | 1.0 mm² (1.5 mm²)AWG18 (AWG16) | 1.5 mm²AWG16 |
| L | 1.0 mm² (1.5 mm²)AWG18 (AWG16) | 1.0 mm² (1.5 mm²)AWG18 (AWG16) | 1.5 mm²AWG16 | |
| E | 1.0 mm² (1.5 mm²)AWG18 (AWG16) | 1.0 mm² (1.5 mm²)AWG18 (AWG16) | 1.5 mm²AWG16 | |
| Connecting cable | N | 1.0 mm² (1.5 mm²) | 1.0 mm² (1.5 mm²) | 1.5 mm² |
| L | 1.0 mm² (1.5 mm²) | 1.0 mm² (1.5 mm²) | 1.5 mm² | |
| 1 | 1.0 mm² (1.5 mm²) | 1.0 mm² (1.5 mm²) | 1.5 mm² | |
At 220V 7K,9K,12K,15K,16K,18K,22K,24K,30K,the backup value for the air conditioning interior unit is: 50T, 3.15A
At 110V 7K, 9K, 12K, the backup value for the air conditioning interior unit is: 50T, 3.15A
125V 7K, 9K, 12K the backup value for the air conditioning exterior unit is: 61T, 15A
250V 18K, 22K, 24K the backup value for the air conditioning exterior unit is: 65T, 25A!
Circuit Diagram
The circuit diagram may vary for different models. Please observe the circuit diagrams on the interior and exterior units.
For the interior unit, you will find the circuit diagram (7) under the front panel (1).
For the exterior unit, you will find the circuit diagram stuck to the reverse side of the connector cover (15).
NOTE:
For some models, the cables have been connected by the manufacturer to the main circuit board of the interior unit without terminal strips.
Operation
Tableside Control
If the remote control is not functioning or maintenance is required, proceed as follows:
- Open the front cover and lift it upwards until you reach the button.
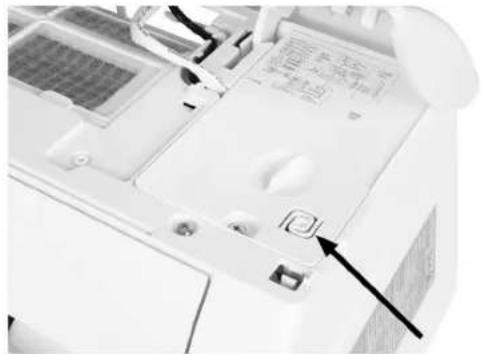
- Pressing the button will cause the cooling function to start. (You will hear a beep)
- Pressing the button within 3 seconds will cause the heating function to start. (You will hear two beeps.)
- To switch it off, press the button again. (You will hear a long beep.)
i NOTE:
The external static pressure for the water pump on all models is 0Pa
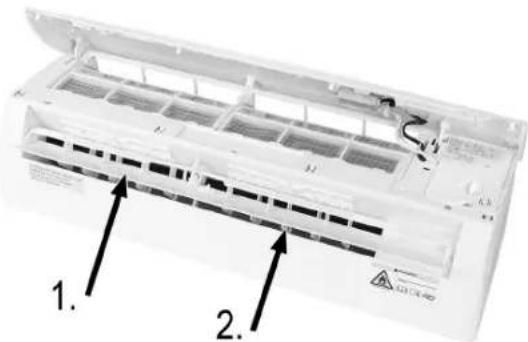
Adjusting the Air Flow
The air flow will be evenly distributed as it escapes into the room. Options are available for optimization of the flow direction.
The button activates the air directing flap (1). The air flow is directed from above to below to guarantee even distribution of the air throughout the room. The air deflectors (2) must be positioned manually and are located under the air directing flaps. These make it possible to direct the air flow towards the right or the left.
Remote Control
- Open the battery compartment cover on the rear side of the remote control by pushing it in the direction of the arrow.
- Insert 2 × R03 "AAA" 1.5 V batteries. Please ensure that the polarity is correct. (See the bottom of the battery compartment)
NOTE:
- Child Safety Lock: Press the and buttons down at the same time to activate the child safety lock.
-
Turn the display on/off: Press and hold the ECO button
-
Point the remote control at the air conditioning unit.
i NOTE:
- Make sure there are no objects / obstructions located in the space between the remote control and the signal receiver in the interior unit.
- Never leave the remote control exposed to direct sunlight for long periods of time.
- Use and store the remote control at a distance of at least one meter from the television set or other electrical appliances.
Switch On/Off
Press the button to switch off the appliance.
Press the button again to switch the appliance on again.
CAUTION:
- Orientation of the air deflector must occur while the appliance is switched off.
- Never position the air directing flaps manually (i.e. by hand). This can result in serious damage.
- Never insert fingers, sticks or other objects into the air inlet/outlet openings. This can result in material damage and personal injury.
i NOTE:
- Please note that for design reasons, not all features can be viewed in the remote control display in each operating mode. By pressing the OPTION button, you can discover which features are available for individual operating modes.
- MODE button Select an operating mode
- OPTION button Select a feature
Cooling Mode (COOL)
Cooling mode permits simultaneous cooling of the room and reduction of air humidity.
- To activate cooling mode, press the MODE button until "COOL" appears in the remote control display. The cooling function will activate if the temperature selected is lower than the temperature in the room. (Selection using the and buttons.)
- To optimize the air conditioning feature, adjust the temperature, the speed and the air flow direction by pressing the appropriate buttons.
Heating Mode (HEAT)
Heating mode makes it possible to heat the room.
- To activate heating mode, press the MODE button until "HEAT" appears in the remote control display. The heating function will activate if the temperature selected is higher than the temperature in the room. (Selection using the and buttons.)
- To optimize the heating feature, adjust the temperature, the speed and the air flow direction by pressing the appropriate buttons.
i NOTE:
- If the appliance is equipped with an electric heater, then this will delay activation of the application for a few minutes.
- An automatic thawing function may activate during heating mode. This thawing function is indispensable for the cleaning of the appliance. Frost residue on the condenser is removed in order to restore its full heat exchange capacity. This procedure normally takes 2 - 10 minutes. The fan will stop operating during defrosting. After defrosting, the appliance will automatically revert to heating mode.
Switching the Appliance on Automatically (TIMER)
To program the appliance to switch on automatically, the appliance must be turned off.
- Press the OPTION button.
- Use the arrow buttons to select and until "Toppars on the remote control display.
- Press the OPTION button again and use the arrow buttons and to adjust the desired time.
- Confirm your selection using the OPTION button.
NOTE:
- To interrupt the adjusted function, repeat the steps described above.
The Timer feature can be adjusted for 30-minute intervals
Switching the Appliance Off Automatically (TIMER)
To program the appliance to switch off automatically, the appliance must be turned on.
- Press the OPTION button.
- Use the arrow buttons to select and until "T appears on the remote control display.
- Press the OPTION button again and use the arrow buttons and to adjust the desired time.
- Confirm your selection using the OPTION button.
i NOTE:
- To interrupt the adjusted function, repeat the steps described above.
- The Timer feature can be adjusted for 30-minute intervals.
Fan Mode (FAN)
To activate the fan mode, press the MODE button until "FAN" appears in the remote control display.
By pressing the FAN button, you can adjust the fan speed, in the following order:
off(%)
LOW (■)
MEDIUM
- HIGH (
- Turbo (
- automatic
Air Dehumidification Mode (DRY)
This feature permits the reduction of air humidity as well as improved air quality in the room.
To switch on air dehumidification mode, press the MODE button until "DRY" appears in the remote control display. The fan will activate with a variable cooling cycle.
Automatic Mode (AUTO)
To activate automatic mode, press the MODE button until "AUTO" appears in the remote control display.
The fan speed and the temperature will be automatically controlled, irrespective of the temperature in the room.
| Ambient Temperature Operating mode | |
| <20°C Heat | |
| 20°C ~ 26°C Dehumidify | |
| >26°C Cool | |
Snooze Mode (SLEEP)
The SLEEP feature automatically adjusts the temperature in order to render the air in the room especially pleasant during the night. While operating in cool / dehumidification mode, the adjusted temperature will be automatically increased by 1^ until a temperature increase of 2^ has been attained within a period of 2 hours.
- To activate snooze mode, press the OPTION button.
- Use the arrow buttons to select and until "SLEEP" appears on the remote control display.
- Confirm your selection using the OPTION button.
- Use the OPTION button to switch off the "SLEEP" function.
During heating mode, the temperature is reduced by 2^ during the first 2 hours.
After 10 hours in snooze mode, the appliance with automatically switch off.
Energy Saving Mode (ECO)
Pressing the ECO button activates or deactivates the Eco feature. The appliance will enter the energy saving mode. The adjusted temperature is automatically, gradually increased without compromising climatic comfort. This will result in low energy consumption.
Pressing and holding down the ECO button allows you to switch off the display for the interior unit.
Maximum Temperature and Speed (
Pressing the TURBO button activates or deactivates the Turbo function. This allows the adjusted temperature to be attained as quickly as possible.
Mildew/ Self-cleaning (MILDEW)
- To activate self-cleaning mode, press the OPTION button.
- Use the arrow buttons to select and until "Happens on the remote control display.
- Confirm your selection using the OPTION button.
4.Use the OPTION button to switch off the "MIPPROXON
Automatic Temperature Calculation (FEEL)
Automatic temperature calculation my means of a sensor in the remote control. Ensure that the remote control is not exposed to sources of heat such e.g.lamps.
- To activate "TFEEL" press the OPTION button.
- Use the arrow buttons to select and until "..." on the remote control display.
- Confirm your selection using the OPTION button.
- Press the OPTION button again to switch off the "TFEEL" function.
Cleaning and Maintenance
WARNING:
Make sure no water penetrates the openings on the appliance during cleaning. Danger of electric shock or fire.
CAUTION:
- Maintain your appliance regularly to ensure its safe and efficient operation.
- All cleaning and maintenance work must be performed by a certified refrigeration and air conditioning company. Improper application shall result in expiry of the warranty.
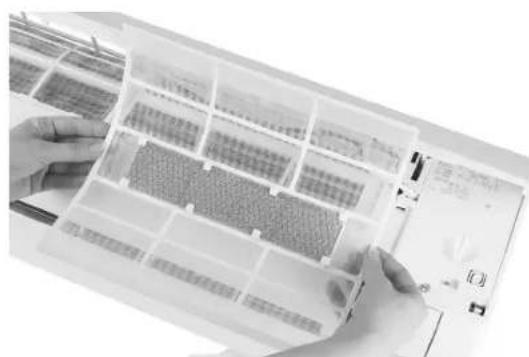
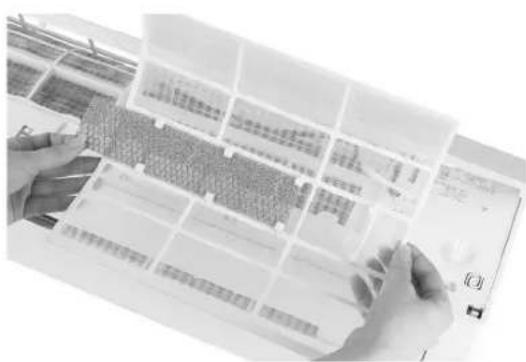
Cleaning and Exchanging the Filter
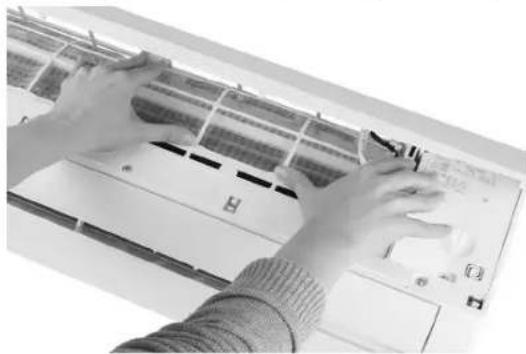
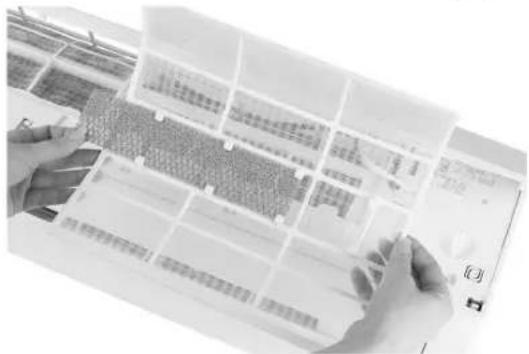
- Open the front panel in the direction of the arrow.
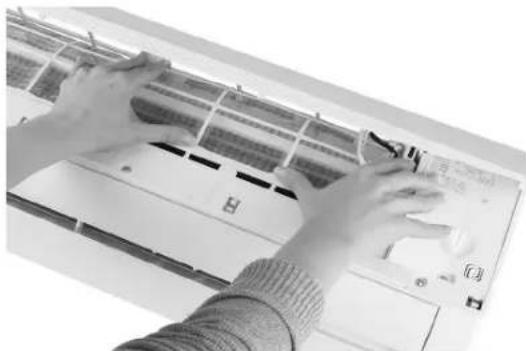
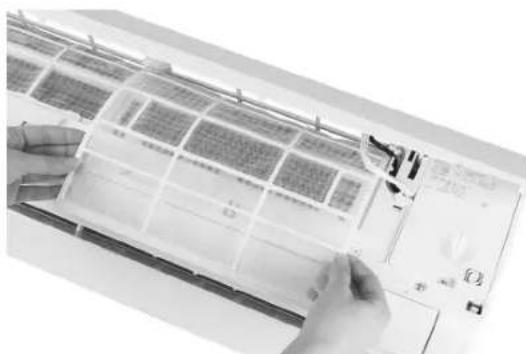
- Raise the front cover with one hand, use the other hand to remove the dust filter.
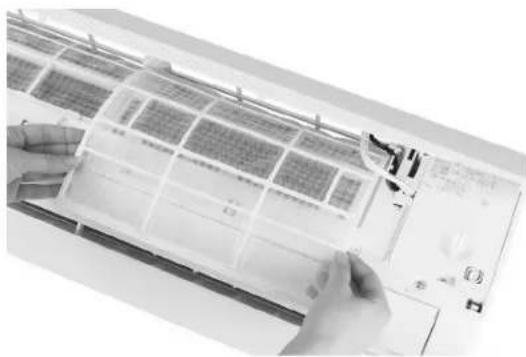
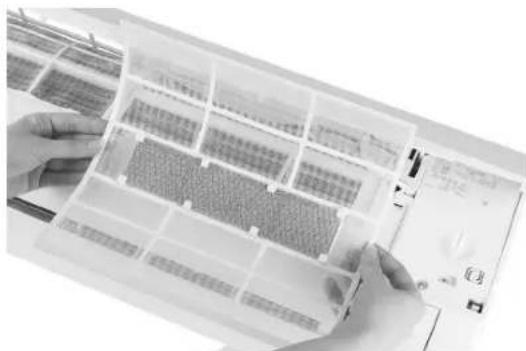
- Clean the filter with water. If heavily soiled, use warm water to clean (not above 45^ ). Then leave the filter to dry.
- Reinsert the air filter.
- Close the compartment cover.

Cleaning the Interior Unit
- Open the front plate of the appliance and remove the hinges to facilitate cleaning.
- Clean the interior unit using a cloth and water (not warmer than 40^ ).

CAUTION:
- Do not spray cleaning agents on the appliance.
- Do not immerse the appliance in water; the electronic components can be damaged.
- Do not use a wire brush or any abrasive items.
Cleaning the Exterior Unit
If the air inlet on the exterior unit is blocked, remove any leaves or other waste material present and then remove any remaining dust using compressed air or a little water.
Changing the Battery

OTE:
Use only new batteries. Only remove the batteries from the remote control when the air conditioning unit is switched off.
If:
- You no longer hear a confirmation beep from the interior unit.
- The display is no longer functioning correctly.
How:
- Open the rear cover.
- Insert new batteries. Please ensure that the polarity is correct.
Troubleshooting
| Malfunction / Breakdown Possible Cause | ||
| The appliance is not working. Power failure / | plug pulled out | |
| Damaged fan motor on the interior unit or on the exterior unit. | ||
| Thermomagnetic switch on the compressor is broken. | ||
| Protective device broken or defective or fuses blown | ||
| Loose connections or plug pulled out | ||
| Operational interruption for protection / preservation of the product | ||
| Voltage too high or too low | ||
| Function “TIMER” is activated (automatic switching on of the appliance) | ||
| Damage to the electronic control board | ||
| Usual odour Air filters soiled or dirty | ||
| Sound of water Liquid backflow in the refrigerant circuit | ||
| Fine mist is leaking from the air outlet | This occurs when the air in the room becomes very cold, for example in the "COOL" or "DRY" modes. | |
| Unusual noises Noises can occur due to extension or contraction caused by thermal fluctuations in the front panel. The occurrence of these noises does not mean that the appliance is defective or broken. | ||
| Undesired air flow (hot or cold) Improper or unsuitable temperature adjustments | ||
| The air inlet or outlet is blocked on either the interior unit or on the exterior unit. | ||
| The air filter is blocked. | ||
| Fan speed adjusted to minimum setting | ||
| Other heat sources in the room | ||
| Missing cooling agent(s) | ||
| The appliance is not responding to signals / entries. | The remote control is not close enough to the receiver for the interior unit. | |
| There is insufficient voltage remaining in the batteries for the remote control. | ||
| Obstacles placed between the remote control and the receiver | ||
| The display is switched off. Activated LED function | function | |
| Voltage error | ||
| The ECO function is activated (see chapter on servicing) "Energy saving mode (ECO)" | ||
| Functions or features are absent from the display | Not all functions or features are shown for each operating mode (see chapter "Operation") | |
| In this case, switch the appliance off immediately and disconnect the power supply: | ||
| Unusual noises during operation | ||
| Error in the control board | ||
| Blown fuses or broken switch | ||
| Spray water or objects in the system | ||
| Overheating / burnt cable or plug | ||
| Strong odor emanating from the appliance | ||
| Error codes in the display | ||
| If an error occurs, the following error codes will appear in the display of the interior unit: | ||
| Lamp lights Description of error | ||
| E1 | Blinks once | Indoor temperature sensor error |
| E2 | Blinks twice | Outdoor temperature sensor error |
| E6 | Blinks six times | The motor for the interior fan is malfunctioning |
NOTE:
Additional error codes can be found in the service manual.
Technical Data
Model: CL 6044 QC CB
Net weight of interior unit: approx. 6,5kg
Net weight of exterior unit: approx. 24 kg
Power/voltage supply: 220-240V\~, 50Hz
Power input during cooling: 800 W
Power input during heating: 699 W
Power input during integrated standby operation: 5.0 W
Protection class: I
Refrigeration capacity: 9000 BTU (2600 kW/h)
Thermal output: 9000BTU (2610kW/h)
Cooling agent(s): R32
Maximum permissible operating pressure:
Pressure side: 3,7 MPa
Suction side: 1.2MPa
The right to make technical and design modifications in the course of continuous product development remains reserved.
Notice of Directive Conformity
Hereby, Clatronic International GmbH declares that the radio equipment type CL 6044 QC CB is in compliance with Directive 2014 / 53 / EU.
Furthermore, the appliance is in compliance with the requirements of the RoHS directive 2011/65/EC & (EU) 2015/863.
The full text of the EU declaration of conformity is available at the following internet address: www.sli24.de
In the "Download" area, please enter the model name CL 6044 QC CB.
Tested for operation in Great Britain.
Disposal
Battery Disposal

As a consumer you are obliged by law to return old batteries / accumulators.
Remove the batteries from the remote control before disposing of the appliance.
Return the batteries to a collection facility for the collection of old batteries or hazardous waste. Contact your local authority for more information.
Meaning of the "Dustbin" Symbol
Protect our environment: do not dispose of electrical equipment in the domestic waste.
Please return any electrical equipment that you will no longer use to the collection points provided for their disposal.
This helps avoid the potential effects of incorrect disposal on environment and human health.
This will contribute to the recycling and other forms of re-utilisation of electrical and electronic equipment.
Information concerning where the equipment can be disposed of can be obtained from your local authority.
Instrukcja obslugi
CTC Clatronic Sp. z o.o
Ul. Brzeska 1
45-960 Opole
Usuwanie
Usuwanie baterii
Ventilator uzemmod (FAN)
Yka3bIbaeT Ha BO3MOxHyOOnaHOCtB IJIa N3dEInn I Dpynx OkpyXaHOuNX PpeMeTOB.

ПРIMEЧАнЯ:
Jaet CoBtI INHOpMaunIO.
Omba Hhopmaun
Ipeed Hauanom 3Kcnnyataun npmbopa BHMaTeJbHo npouHTaTe npnlaraeMyIO IHCTpyKUIO NO 3KcnIyataun IN coxpaHIne ee B HaDeXHom MecTe, BmecTe C rapaTHnHbIM TaHOHOM, KaccOBbIM YekOM N, NO BO3MOXHOCn, KAPTOHHo Kopo6kOcN cynakOBouHbIM MaTePnAOnOM. Ecnn daete Komy- nloNoonl30BaTc npmbopom, O63aTeJIbHO daTe B pndaHy daHHyo IHCTpyKUIO NO 3KcnIyataun.
-ПользуITEcBпиборOMToIbKOчaCTHBIMОБразOMиNoHa3HauHnIO.Пибор Heп徳нэЗанeнДЯКOMМерpeckOrOИСПЛьзOBa-HNIA.
He npb3yntecb np60pom nOd OTkpbltIm He6OM. PpeoxpaHnre np6opOTJapbl, pRmblx COInHeuHbI Jyuei, BnaxHoCTN (HnB Koem clyuae He norpykaite ero B Bod) u yapob 6 ocTpbie yIbI. He npkacaTecb K np60pby BlaXKnblm pykam.
- Pn6bop n Ka6eIb cTeBOro nHTaHna Heo6xOIMo peryJrpho 6CNEIOBaT Ha HAnuHne CNeIOB NOpeKdEHH. Pn o6hApyKeHHN NOpeKdEHn NoIb3OBaTbCp IN6bOpom 3anpeuaetc.
IcnoB3yTeToJbKOOpunHaJIbHbIe 3aHaactn.
- Ⅲ coobpaxhen 6e3oanachoctn nIaTeJe He octabnIte nekaTb ynaKOBky (PiactNKOBbie MeWK, KapTOH, NeHONPiact N T.D.) 6e3 npuCMOTpa.

IPEJUYIPEXJEHNE:
He no3BOJnIe TeTAM nIpaTb C nOINaTIneHOBOn PJIeHKoN. OnacHOCTb ydyub!
Oco6bIe yka3aHnI no TexHnke 6e30nacHOCTn Ira DaHHoro ycTPOcTBA
Ha n3dennm MOXHO yBnTeB cIMBOIbI, o6o3NaHaoUOne npdeynpeKdEHHn daIOUne HOpMaunio:
PouHTe HcTpyKuHo no 3KnIyatauN!

PENyPEXKDEHNE:OnacHocTb noxapa!
YcTpoIcTBO coOpJNT roHouN xHaadareHT!
-Дя усореня поцета Incnoьу Te ToIbko pa3peшпье npoIMBoIDHTeJIem cpeIcTba.
- Pnp6op cneyet xpaHnTB B NOMEeHNB BdAIN OT NCTOCHKOB BOCPNaMeHeHNA (HaNPmep, OTKpbTbI OROh, BKIOHnhI ra30bI np6op nII eNkTPOo6orpeBaTeIb).
3anpeaetcBepntbByctpoCTBeOTBepCTnIINBO3deNCTBOBaTbHa HeroOrhem.
- POMHHTe, YTO XlaJaIaReHr He IMeet 3aIaxa.
PykoBoCTBO no nCnoJIb3OBAHnIO DocTyHNO Ha Be6-caIte: www. sli24. de
B pa3dene «Downloads» (CkaunBaHne) BBeNTe Ha3BaHne MoJeN CL 6044 QC CB.
Kpa6oTe c KOHTypom OXnaJdeHnI dOnyckaIOTc TOnbKO CneuaJIncTbIC DeIeCTByUOIm CepTuΦkaTOM, BbIaHHbIM COOTBeTCTByIOUm OTpacJIeBbIM OpraHOM cepTuΦkaUIN, KOTOpbI NODTBePjKaJeT ypoBeHb KBaJIuΦkaUIN, Heo6xOIMbI dIg 6e30NaChOH pa6oTbIC OXnaJdaUOUM cpeDCTBaMn.
- IcnoIb3oBaTb yctpoiCTBO CneIyET B COOTBeTCTBm C peKOMeHdaIaIMyn npOn3BOJnteJI. Pa6OtBI NO o6CnyXKBaHNIO pEmOHTy, Tpe6yUoIe yuactn KBaIIINΦuNpOBaHHbIX cOTpydHKNOB, DOJIxHbI pOBoDITbcra NOD KOHTPOJeM CneIuaJINTa no pa6Ote C rOpOChM XlaJaDAreHTAmN.

BHIMAHHE: Puck neperpeBa!
- He 3aKpbBaIte cNoTb I BeHTnJIaIcN!
- He hakpbBaIte npi6op!

BHIMAHHE:
HenpaBnIbHa yTaHOBka n pa6Ota cneuaJIn3npoBaHHoK omnaHm 6e3 noTBePxJeHn (HaPIMep, 6e3 cepTnΦnkata) npBedeT K OT3bBy rapaHTm coIacHo EU 517 / 2014, rnaBa II, naparpaФ 3.
I PENEYPEXKDEHNE:
He cneyuET nCnOJb3OBAt b nn XpaHnT yCTpOHTBO B cneDyUoInx MeCTax:
- PяДOMСИСТОУнКAMU OГЯ.
-B MeCTax, rIe Bo3MOxHO pa36pbI3rHbAHne BOIbI IIN MacJa. - PnnpMbIM COJIHeYHbIM CBETOM.
B BaHHbIX KOMHaTAX, B npaueHbIX nIIN pRdOM C IJIbaTaTeIbHbIM 6accSeHOM.
He npikacaiTecb K np6opy, k0rda cOnTe 6ocikom, nI6o KoIgA IIO6a YacTB Tea BlaxHna nn Cbipra.
- Bo Bpem yctaHOBKn np6bopa ceTnФuNcnpoBaHHo CneuaN3npoBaHHo KOMpaHne oBeceYeTe 6e3onac-HocTB B OKpykaHoue Oblactn dIy IpeDoTbpaueHn IHUdEHTOB. He donyckaetc np6JnxKeHne deTei nNoctopoHHnx liu.
- Y6eIntecb, yTo po3eTka IJnHapyXHOrO npImHeHnY yCTaHOBJIeHa C co6JIHOdeHnEM BcEx Mep 6e3OnacHOctN.
- Pocne IepemueHn CNTeMbI KOHNIOHPOBaHn BO3Dyxa IPOBepbTe, YTO B XOIOINbHyTO CNTeMy He NOCTynaET BO3DyX, a TAKKe Ha yTeKv XnaIaReHToB. 3anOMHIne, YTO XnaIaReHtbl He IMeOt 3anaXa.
- После установки системы кондцноювая возуха влелнгт ectobьй погон и поверп te paбочeme xapakтетростник.
- PpeoxpanTeH, yCTAHOBHeHHbIe BO BCTPOeHHbI 6JOK ynpaBHeHn, IMeOT HOMHaJIbHyO BeINuHHT5A/250B. PpOBepbTe, YTO BHyTpEHHN 6JOK np6opBa Bcerda 3aUuHEN PpeoxpanTeHem C doCTaToHbIM HOMHaIOM dIy MaKcMaJIbHO BxOHO TOKa IIN INHbIM yCTPOiCTBOM 3aUHTbl OT npepy3Kn.
Bo Bpem yctaHOBNP6Op DOJxHcOCTaBaTbCg OTKIOUeHHbIM OT CTeH 3NEKTPoNTaHn, YTO IOITBepXdaETcpa3MbIKaHnEM BCEx KOHTaKTbIX NOLOCOB, T.e. NOHBIM OTKIOUeHHnEM COJIaCHO HOPMaM IO MAKcIMaNbHOMy HnprjxEHNIO Kateropm III. 3To DOKHO 6bIb peAIN3OBAHO B NOCToHHo Ka6JIbHO INPOBOdKe COJIaCHO npaBnAM 3NEKTPo6e3OanachocTN. Bce 3NEKTPuueckne paobToBdoJHKHO pNOBODtBC TOJbKO pOpeCCHOANbHIMN 3NEKTPkAMN IIN COtpyDnKAMN KOMNaHn, CneuaIIN3npUoJeCSB ObnactN 3NEKTPuuecknx pa60f. BLOK BO3dyHoro KOHNIOHPOBaHnO DOJxHcYCTaHaBnBaTbcra ToJbKO COTpyDnKAMN CNeuaIIN3npoBaHHo cepTnΦiupoBaHHo KOMNaHn. - He pa3meuatae np6op p4om C ropouhmm MaepnaJamn (Cnpt n T.d.) nn cocydamn noD daBneHnem (Ha-npimep, paTbIInTeJIbHbIe 6aJIIOHnIK, ra3ObIe cIIINHdpbl n T.I.). Ioxaanycta, octabte pacctoHne He Mehee 50 cm MeKdy np6obopm N IIO6bIM TaKIM npedMeTom.
- EcIn npi6op 3KcPnyaTnpyETcB NOMEuHn 6e3 CNCTeMbI BeHTnJauCn, CNeDuYe T ppeDpHnA TB CneuaNbHbIe Mepbl PpeIOCTOPOXHOCTN DII PpeIoTbpaUeHn ONaCHOCTN BO3rOpaHn I3-3a BO3MOxHOn yTeKn rA30o6pa3-Horo XnaDaReHtA.
- PtoKanyIcTa, co6nIOaIte HaUHOHaIbHbIe cTaNdApTbI NODKIOUeHINr 3NeKTPuYeCKOrO o6OpyDoBaHn. Ka6JIb-Ha IPOBODka DOJXHa OTBeuAtb BCEM PrIMeHIMbIM HaUHOHaIbHbIM HOpMaM.
- Do BO3MOXHOrO pRnKoCHOBeHnK CoeINHHTeHbHIM 3aJIMAM CneIyET OTKIIOUHTb BCE 3JIeKTPuYeCKHe ZcEIn OT NCTOUYHkA 3JIeKTPoNTaHn.
-
PpH6Op MoKET NcIOnb3OBAtBcRA DeTbMn CTapSe BOCbMn (8) JET N IIODbMn C NOHIXeHHbIMN cN3UeCKIMN, CEHCOPHbIMN INI YMCCTBeHHbIMN CNOcO6HOCTaMn INI C HeIOCTaTKOM ONbITa N 3HaHm, ecIN OH NaxoJrTCa NOD INPNCMOTpOM INI INPOUJI INHCTpykTAX NO 6e3ONaCHOMY INCIOJIb3OBAHnO pPi6Opa IN OOHMaHT CBra3aHHbIE C HIM ONaCHOCTN.
-ДетамзарпеценьИрраТспибором.
3anpeuaeTcpeMOHTnpoBaT np6op camocToeBHO - 06paTntecb K yIIOHOMOeHHOMy Ha 3TO CneuaJIACTy.
OuNTka n Texo6cnyKINBAHne doJXHbI npOBODTbcra KBaJIncpOBAHHbIM nepcoHaJOM. Bo BceX clyaax npoBe-DeHnpaB0 T NO OuncTke n Texo6cnyKINBAHIO ppeDbapnteJIbHO OTKJIIOHTe npi6op OT NCTOCHNkA 3JIeKTPoITaHn. -
Pnp6op He npedHa3Hueh DnKoHdNIOHPOBaHn B03DyXa B KInbIX NOMEeHnX/ KBapTnpax I He DoJIKeH nCpOJIb3OBaTbcraBnHbIX cIeJx, HApPIMep DnC cyuKn ODeJbl, OxJaXeHn IpoDyKTOB nITaHn I T.D.
- IcnoIb3yIte np6op TOnbKO C yCTaHOBHeHHbIM BO3dyuHbIM 0nIbTpOM. PpImeHne np6opa BO3dyuHoro KOHNIOHIOBAHn 6e3 BO3dyuHoro 0nIbTpAmoKET npUBecT N n36bIToOHMy HAKOJIeHNO PbINn Ipr3n Ha BHyIpeHHnx Yactrx np6opa C NOcNeDuOzMM NOBpeJdeHMeN / nINn HeNCpPaBHOCTbIO.
IIO3OMy IONb3OBaTeNb Hecet NOnHyO OTBETCTBENHOCTb 3a yCTaHOBky np6opa TOnbKO KBaInuPnUPOBaHHbIM TexHnikom. KBaINuPnUPOBaHHbIMTexHnik o63an npOBepuTb 3a3eMJIeHne np6opa corlacho DeiCTBYUOM npIMeHMblm HopMaM n npabUJaM, a TAKKe rapaHTnpoBaTb OCHaUeHne np6opa TepMOMarHHTbIM aBTOMaTIueCKIM BbIKNoUaTeJeM.
HeOnyckaIte dInTeHbHO rPnMOro BO3dEiCTBnXoNODHOBO3dyxa n3 np6opa. dInTeHbOe npmoe BO3-DeiCTBne XoIOdHoro BO3dyxa OnaCHO nIg 3DopOBb. B YactHOCTn, 3TO OcObeHNO peKOMeHdyETcB OTHouEHn DeTey, noxnlbIX IIOde N 6OblbIX. - Ecπι Μι πριδορα BbIXODι ΑbIM ΑΠΙ Απαλ έρεπΟ, HemeДπΕΗΟ OTΚΙΟΥΝΙΕ ΚΤΟΥΗΚ ΕηΕΚΤρΟΝΙΑΝΗ Ι ΜβρατιTECBΚΤΕΝΗΚ ΚερΒΙΝΟ Σγχδυ. ΒποЛьЗΟΑΗΝΕ πριδορα B TAKOM COCTÖΓΗΝΙ / ΑΠΙ B TAKNX yCπOBΙΑΧ MÖKεT CΤΑΤ ΠρινΗΝΑ ΒΟβΓΟΡΑΗΝΑ ΑΠΙ Φι ΔΑρα ΘηΕΚΤρΥΕΝΕΜΤΟΚΟ.
- NcnoJIb3yIe KhoNky DnIa BbIKHueHna np6opa, KOtOpBn He 6yJeT nCNoJIb3OBAtbcra IpOdoJnxTeIbHoe BpeM.
- Pocne MoNTaJa y6eHntecb B npabHbHom HnnpaBHeHn BO3dyuHoro nToKa. KnaHaHb IdoJxHbI bItb HapabJIeHbI BHN3 BpeKIme obOrpeBa N BBepx - BO BpeM OXJaXdEHHa.
3a cuet Heonuue Hn Bicokx KonebaHn npn HactpoKe TempeatypbIO MoxHO pepotbpaTb NOBpeJeHne npibopa.
He cHbte, He TaHTe H He daHTe Ha KaBeIb 3JekTpOnITaHnry, YTObI He NOBpeDITb erO. NOBpeKdEHHbIKabeJIb 3JekTpOnITaHnry MOKeT CTaTb PnUHOr yDapa 3JekTpCneCKm TOKOM, a TAKKe BO3rOpAHnry. ToIbKO CNeuHaN3IpOBaHHbI TexHnueckn nepcoHAn DoNYckaetcR K 3aMeHe NOBpeKdEHORo Ka6JIa 3JekTpOnITaHnry.
He nepekpblBaIte Bnyck n Bblnyck BO3dyxa Ha BHyTpeHHem n HapyKHom 6IOke npnbopa. JIoKIpOBaHne nnn nepekpblTne 3TNX OTBepCTn npNBedT K CHNXeHIO OXJaxDaIOUe CNOcObHOCTn mOKe TB3BaTb HeNCnPabHocTb nIN NOBpeXdHne. He npBOAnTe HNKAKHX HecOrlancoBaHHbIX nIN HeNpaBnIbHbIX N3MeHeHn INIMoDnΦkauzni npnbopa.
He knaIte Ha np6op Tae IIN Iopnne npedMeTbI.
He octabnIte Ha dIITbHbIM cPOK OTKpbITbIMN OKHa IIN DBepN, KOrda NcNoJIb3yETc8bOK BO3dUHoro KOHN DUNOHUPOBAHIA.
He HaprabIte BO3dyuHbI NOtOK Ha paCTeHn I XNBOTbIX. DInTeIbHOe npraMOe BO3deIcTBne XOIOHOBO3dyuHoro NOTOKa HeraTINBHO BnIeT Ha paCTeHn I XNBOTbIX. - He B36ipauTecb Ha BHeuHm 6JIOK npIbopa n He KnaIte Ha Hero NoCTOpOHnme PpeDMeTbI.
- He BCTaBnIe BHyTpB npu6opa cTepkHn, npTyb, noIocbl nII INhIe noIO6HbIe npedMebl. 3To moKet npuBeCTN K BaWe TpaBMe IIN NOBpeXdHIO npedMeta.
- 063aTeIbHo nCOnb3yIte CneuAIBHbIe npncocObeHn I NcTpyMeHTbI npn npoknaKe n 3rnbAHn OXJaK daIOxN Tpy6ok. IopnuHAm 6e3oNaChOCTn CneIyET o63aTeIbHO yCTpaHNTb npOBuCAHne YyBCTBnTeHBIX K n3r6y Ka6enei. Bce pa6oTbI DoJHXbI npBODITbcraepTnФpOBAHHo kOMNAHne COrraCHO COOTBeTCTBYIOUzIM HopMaTHBbIM DOKymeHTam, yka3aHHbIM B DOKymeHTaUN IOKNIOUaEMORO K np6bopy obopyoBaHn.

BHIMAHNE:
Bce texnueckne n3mehenia oxnaaiox npbok DOJXHbI npoBOnTb TOnbKO cneuaJIbHaer cepTnOpuBaHHa KOMNaHn. HenpaBnIbHoe n3mehenie nIM MoDnKauN MOrY npuBeCTN K OT3bIBy rapaHTnn.
- Поберп Te Ha He npOnucaemocb (repeMtnHocb) BCE Tpy6kn N KabeN, YTO6bl N36exaTb fOpMnpoBaHnI npOnHKOBehn BHytpb Kopnyca npi6opa JxndKoCTe, BOJHoro npapa NIN KOHeHCata. 3To npedeOTbpaTnT hakoIIJIeHne BlaxHOCTn, a TaKke fOpMnpoBAHne pIceHn.
Kakobpaatabcsc6bataeikamn

IPEDYNIPEXKDEHNE:
He noDBepraTe 6aTapeKn BO3eHCTBmO CunbHoro Tena, KaHanpMep, COINHeHbIe Iyu, OROH N.T.D. Pnck B3pbBa!
- Baataréni He irpyuška. Depejnte nix BdaJIOn ot detei.
- He pa3bupaiTe 6aTaapeKn.
-36eTKeHTaCMeTALINueCKMnIpeMeTAMN(KoJIbua, TBO3H, BONTBnT.D).PcK KOpOTKOrO 3amBikAHnI
KopoTkoe 3ambikahne MoKET pNpBeCTn K npepeBy n daJe BOCnnameHenno 6aTaapeek, YTO MOKET pNpBeCTn K TpaBMam.
-ДяBaшewбezonacHocTn3akpoNTe KOtAKTbI 6aTapeJINNKOJIENTOIIpI TpaHCnOpTIpOBKe.
Bcnyae BbIeKaHn3NeKtpOnuT,ocTepeaItecb nonaHaHn KcNtObI b rna3a H a cIn3nctbIe. Bcnyae nonaHaHn, npomTe 1CToBdoi.O6paNTecb K Bpaue Bcnyae coxpaHeHn DnCKOM-ΦoTa.
- Henepesaprajaemble 6aataeKHe noDnEkaT nobTopHO3apdke.

PENEYIPPEXDEHME:
He TnHrTe Tpy6ky B npOTnBONoXhIe CTOpOHbI, KaK Noka3aHO Ha CXEME B.
IopKIOueHHe Tpy6Kn KOHNDeHCnpoBaHHo BOnb K BHyTppeHEmy 6NOKy
OueHb BaxHo npabnHbYo yctaHOBnT b Tpy6ky KOHeHCPOBaHHo BObI DnBHYtpHeHrero 6noka.
- IpoIoxNTE CINBHOH UJANH TnXe Tpy6Ku N y6eIITcB B OTCYTCTBNIPOBACHH NIMUBAHNA
2.CmBHOI JUAnr DOnKeH 6bTb HAKNoHEH Bn3, YTO6bI OeCneHTb CINB KOHNCHPOBAHH BObl.
3.He crnbaiTe Hne nepekpyuBaIte CnBHOJ uAnr. He donyckaite ero BbInpapanHr. He norpykaTe KOHeC B Body. EcnT py6Ka coeHHeCA yDNIHHTeMe, COxpaHnTe CEIOCTHOCTb TAKORO coeHNHeHIN Pm BCTABKE BO BVHTDEHHM 6POK.
4.Ecnioxnaxkaioiue Tpy6kn nponoxeHb cornacho BapnAHTy 3B rnaBe《BbipabHHBaHne OxnaKdaIOuix Tpy60》,TO Tpy6Kn,coeHNHtBnKa6eNb DnBHeIhro 6Loka n CnBnHaar Tpy6Ka KOHeCHPOBAHOBOdi DOJKNb 6bl3aKpenNeHb Ha 3aHHe CTOpOHe PNO6oA Tpy6bIMn CoeHNHTeJIAM.
5.BCTaBbTe Tpy6hbl CoeHNHTeB B COOTBETCTBYUOuM EMy pN6Op.
6.AkkypaTHO HAKMITE COEHNHTeBHyTO Tpy6KY BnH3 B 6NOK BO3DyHORO KOHNMOHPOBAHNA VbEINTEcB HADEXHOCTN COEHNHEHA.
BHIMAHHE:
BoBpMaIpOKnHeDOnyckaTeKopo6NeHnI npoBOAnTe COOTBeCTByOuNpepaObToTOnbKO CnJaMnCneuaNbHOeCepTnHnUPOBaHHoKOMNaHm!
YcTaHOBka BHyTpHHeRo 6Ioka N CTeHOBBIX BKnadBiWe HApKy
1.C NOBbIeHHoH OCTOPOXHOCTbIO npOIOXnTe Tpy6Kn, CoeINHITeNBbIKa6eNb BHeuHero 6nOKa I Tpy6Ky KOHeHCPOBaHHoBdoJI KMeCTy. Ite OHN PNOUY HAPVky CKBO3 CTEHV.
2.CBAXKTE BMECTE BHHIOBOI NEHToI Tpy6Kn, CoeINHTeJIbHbIM Ka6eNb BHeuHrero 6noka I Tpy6Ky KOHNCHNPOBaHHo BOdy, YTO6Bi CO3aTb PNOTHyIO NO BCEN DnHHe O6OOnOky N3M0JNAHOHHo JNeHTb (HE BXODNT B KOMNNEKT NOCTABKN).
BHUMAHNE:
Obecnehe Henpomokaemyu 130nauu Tpy6ok, uTo6bI npedotBpatNTb NOBPEKHeHNE CTehb I3-3a BnaxHOCTN INpeCHM.
Y6eNTecb BIOCTaTOHNO H0TnBcEx BbICTyNaOux Yactey Tpv6 N Ka6EJ.
3.Посверпге OTВерстнe ДИАМЕТРС 57 MM C HAKLOHOM / KpyTN3H0N 5-7 MM (pUC.2).
ITPIMEYAHNA:
CbePNTe C He6oBbMM HAKIOHOM B 5-7 MM HApyyK, YTO6bl oBeCNeHTb CNMB KOHNCHNPOBAHHO B0bl. Bo BCex CNYaayx y6eINTEcB, YTO HAKIOH OBeCNeHEN NO BcEi DnHtpy6KN KOHNCHPOBAHHO B0bl B HAnpABNeHm OTBepCTnB CTHe.
- Bctabte KpbliuKy OTBepCTNA.
5.Прлбкгte n30нлрованьурбк, coeMHNTeNBHk Ka6eJIb BHeuHero 6Iko n Tpy6ky KOHdEHCnpoBaHHo BObl uepe3 OTBepCTne BCThe.
IIPIMEAYAHIA:
Iocne moTataK Tpy60k n3OInpyuTe OTBepCTHe B CTHe, Ype3 KOtopoE npoxoJAT Tpy6K, UTO6bI DObntbcRe pEmTuHOCn K IPOHOKNBOHEHIO BO3dyxa N BObl.
6.AkkypatHO 3aKpeNTe BHTpeHHHn 6NOK HA BEPxHeY cactn CTehOBo MOHTaxHOH pactnbl.
7.AkkypaTHo HaxMITE Ha HIXHIO Yoacb BHTpeHrero 6Noka B HanpaBJIeHN CTeHOBO MOHTaXHOI JIactnHb I Do HAnExKHO 3aue- PJIeHn.
YCTAHOBKa BHeWHeRo 6JIOka
- Pénép noknouehnem Tpy60k BbI6epnte Mecto pa3meuHnBHeuHero 6noka, rde 6ydt DocatoHNO pOcTpaHCTBa Ira pa6OT tex6CnyxmbAHnB BdyuEe (coBnDaaTe MmHmMaNbHbIe pacCTOHHa).
-ПОLOЖNTe 3aUNTHbIe KONNAUKN (ИЗ KOMNJIeKTA NOCTABKN) Ha onopy n 3aKpeNITe IN HA COOTBETCTBYOUX MECTAX.
IcnoIb3yIteOeHb npOHbIe AHKeHbIe BnHTb/60JIb, yHITb1BAR TaIOke BEc np6Opa, YTObI npEDOTbPATNbBbpaHIO 3-3aOCJAbENHc CO BpemEHm COeHNHeNHO Bpempa6OtBJ.5JOK HeoXoIMo yCTaHaBnBaTb B COBTBeTcBm C pImeHMbIMn IHCTpyKUINM NO 6e3oNaCHOCTN.
CnBna Tpyka KOHcHcnpoBaHHO BObI DnBHeuHero 6Joka
KoHdEHCnPOBaHHa BODa n JIeI, fOpMnpyUOuNEcR BO BHeUHem 6Noke H3-3a paccenBaHHa TEPNa, MOrY 6bITb CInTb Upe3 Tpy6Ky KOHdEHCnPOBaHHo BObl.
1.3akpeHnTe onOpbl Tpy6kn CnBa KOHehCnPoBaHHo B0bI B CO3daHHom 3apaHee OTBepCTM 25 MM.
2.Пикрпente 3TN onopbl K Tpy6ke CnBa KOHdeHcpoBaHHO B0bI N npOBepbTe, YTO NOTOK Teet npaBnIbHO, YTO6bl PpeDToBpATNtB NOBpeXdHne OT BlaxKHOCTN.
3NeKtpnueckoe noDkIIOHeHne (BHeuHn6NoK)
CHIMITE KpIiKU CoeHINHTeJIa (15) Ha npaBcTcPOHe npb6pa. COOTBeCTByIOUa CXema HaxOHTcRa Ha 3aDHe cTcPOHe.CM. CXemy.
1.Плдкючпс сиюов Кабел 3лжгрптань KКнемног Клдк
Вунтугенero 6лoka.
2.AkkypaTHo NOcOeINHITe CnIOBoi Ka6eJIb 3NEKTpOniTaHnBHeuHero 6Noka,BOCNOJb3OBaBUBNCb COeINHITeJIbHbIMN Ka6eJIbHbIMN 3aXIMAMN.
3.Y6eNTecb,HTO Ka6eIN NOKIIIOHeHbI npabINbHO.IpOBepTe KoppekTHoCTb MOHTaKa 3a3EMnEHHa.
4. IocTabBe 3aunTHyO KpbIky O6paTHo Ha npi6op.
BHIMAHINE:
Bce 3neKtpnueckne paobToI doJnxHO npoBOaNTbC TaTbKO ceTpHcNipObaHHbIMnpocceccNOHaJIbHbIMN 3neKtpnKaMn Nm COtpyHnKaMn 3neKtpnueckon KOMnaHm. HenpaBnBaHay yCTaHOBka MoXeT npuBeCTn KOT3bIBY rapaHTnn.
HCTpykunn dny 6bictporo coyneHenra
BbICTPOCOUHeHReMbIM CoeHNHTeRnM yOboHO NIOKNIOHTB BHTpeH H N BHEUH N 60Km CNTeMbI BO3DyHoro KOHNIOHNPoBaH.N. BcCTpA IN pOCTa IPOCeDpya PpeINOLaraET npOBeDEHe BCex paobT CNEuHaN3IPoBaHHO KOMNaH, YTObI COxpaHt Nbapo Ha NIObIe rapaHTnHbIe npTeH3NI.
BHIMAHINE:
OxJaXdaIOUne Tpy6Kn H3 KOMnIeKTA NOCTaBKn YyKe 3aONHeHbIXnaIaIeHTOM BO BpEMr N3ROTOBHeHnHa 3aBOe.
- 3TN Tpy6kn HEnb3y yDnHrtb nNt NObpe3aTb.
PoiocoeHHHeHne,3aIOJIHeHne n 3anyck
Ipeed nCnoB3OBAHnEM Heo6xOJIMMo 3aONHTb Tpy6Kn XnaDareHToM. IpoeDpy 3anpaBkn DOnyckaAETc npOBoNTb TOIbKO B CepTmPunPOBaHHo CNEuAnIm3PBOAAHO KOMnAHIN. IIO BonpocAM O Tpe6oBAHNK YcTAHOBKe ObaaIteB K CneuaJIInCTAm COOTBetCTByIOUeN CNEuAnIm3PBOAAHO KOMnAHIN.
BHIMAHHE:
BLOK BO3dyuHORO KOHNIOHNOHPOBAHNA DOJKeH 6bIb yCTaHOBJIEN NOIKNUOHeH KOMNaHnei, IMeUeI cePTnΦnKaT Ha pa60tblc XJaAareHTOM N CNTeMaMNI BO3dyuHORO KOHNIOHNOHPOBAHNA. HenpaBnIbHa YcTaHOBka MoKeT npNBecTN K OT3bIBy rapaHTMN.
3KcNpytaun yctpoctBa 6e3 3aONHeHn XnaIaReHTOM MoKeT CTaTB npuHHoN NOBpeJeHn!
TeTnpoBaHne BHyTppeHHeRo 6Ioka
-ПepeknIOuATEJIb nITaHnIra pa6OtaeI npabINbHo?
-ДиEcTByETЛNBEHTnIaTOp?
HopmaIbHo IIN DeIcTByIO TpaOoupeKIMbI?
- MoXHo JIN TOHOb HAcTpOntb TEMpePaTyP IN BpEmr?
- TogopTINBCE NaMnOuKN KaK O6bIHyo?
-Правильно Лп рбotaю ВОДушье зacLOнк?
KoppeTKHOJI NDeIeCTByET Tpy6Ka KOHdEHCnPOBaHHo BObI?
BHIMAHINE:
Bce paccmOTpeHHbIe BbIe Oepaun DIOKNbI BbINONHrTbcg KOMnHaHe, IMeIoUe CepTNpKAt Ha pa6oTbI c XnaIaReHTom N CNTeMaMn BO3dyuHoro KOHNiuHOHPOBaHn. HenpaBnHoe npoBeDeHne pa60 MoKeT npuBecTu K OT3bIBy rapaHTm.
TeTnpoBaHne BHeuHero 6JIOka
Pekm o6orpeBa (HEAT)
PexmOBorpeBaNo3BOJnT NobicHT Tempeatpy B NOMEeHIM.
1.ДЯakTBAcHmpeKIMaO6OrpeBa HaxMnTe KJIaBnUy MODEdo NOBHeHr «HEAT»Ha DCNnEe DnCTaHNoHHOr Yo npabNeHr. ΦHKuIg o6OrpeBa 6yDenA kTUBHa, noka BbIbpaHnA TEmpeAtypa BblSe TemepaTypbB NOMeUeHN (BblOp BeMNHHb KJIaBnUAMn
2.ДЯ ONTUMN3aMnФyHKmO6OrpeBa HAcToIe TEmnepatypy, CKOpocTb N HApPaBHeHne BO3DyUHOro NtOKa,HaKaB COOTBeTCTByIOuNe KNaBnHn.
I IPIMEEAHNA:
- Ecn np6op ochaue HneKtpuyeckm HarpeBaTeem, noBntcra 3aepka aKtNAUIN npnIOKeHna HeeKoJIbKO MHyT.
-Функию abTomatuheckoro pa3mopaknBaHnma MoKHO aKTHBnPoBaTb BO Bpempekima oborpba.3aФyHKUma He3aMeHIMaДЯ ONUCTKN pIn6bopa.BydY ydaIeHbI ZAMep3Wne OTNOKeHINKaONHeHCATA, YTO6bI BOCCTAHOBITNoIHyIO cnoocbHcTb TENIOobMeHa.Ppouepya obuHNO 3aHMaet 2 -10MHyt.Bo Bpempa3mopaknBaHnna Ipekpauaetcpa6ota BeHTnIaTopa.NoCJIpe pa3mopaknBaHnna pIn6bp aBtOMatuheckn BepHeTcB peKIMOborpeba.
ABTOMATNUeCKOE BKNIOUeHne npn6opa(TIMER)
IporpammnpoBaTb abTomatueeckoe BKNIOUeHne MOXHO TOnbKO Ha BBkIOUeHHOM np6ope.
- HaxMMTe KhoNky OPTION.
2.KnabuamcnoctpekamnAHepeynteK<nnnee nctaHNOHOrO ynpabneHn.
3. CHOBA HAXMITE KHOKNY OPTION, 3aTeM KnaBnAAMn CO CTrpeKAMN △HactpoTe HxKHO Bpemr.
4. NpOITBepDnTe 3aDaHbB BapNaHT KhoNkoI OPTION.
I PIPMEUHNAI:
YTO6bI npeBaTb FyHKnIO HAcTpOKn, NOBtOpTe paccMOrHbIe Bblue WArN.
- ΦyHKUra TaMepa DOnyckaet HactpoKy c 30-MHHTbIMn INHTepBaJIaMn.
ABTomaTnueeCKoe BbIKIouHeHne np60pa(TIMER)
IporpamMPOBAbT abTomatueeCKoe BbIKIOeHHe MOXHO TOnbKO Ha BKIOeHHOM np6ope.
- HaxMMTe KhoNky OPTION.
2.KnabuamcnoctpekamnAHepeynteK<11
3.CHOBa HaxMnTe KhoNky OPTION, 3aTeM KnaBnAmu Co CtpeKamn △HactpoTe HxJHoe Bpemr.
4.NoTBePnte3aDaHHbBapnAHTKHOHKnOIONPTION
I PIMMEAHIA:
YTO6bI npeBaTb cyHKnIO HAcTpOKn, NOBtOpTe paccmOTpeH BHe BBWe WAn.
- ΦyHKUra TaMepa DOnyCKaET HAcTpOy C 30-MnHyTHbIMn INHTepBAJIaMn.
Pexim BENTJITopa (FAN)
ДяakTBAuIMpeXIMAbEHTNITOPaHaxMITEKIABNUYMODEdo NOBHeHRA《FAN》HaDcPnee DaCTaHIOHOHOrOynpaBNeHn.
HaxaTneM KJIABUN FAN MOKHO HAcPTOpTb CKOPoCTb BEHTNJIATopa B cJeNyOuE MnpRKe:
BbIKHueH(%)
LOW(■)-HIM3KARCKOPOCTb
MEDIUM(CpeDnAckoocTb
- HIGH ( - - - - - - - - - - - - - - - - - - - - - - - - - - - - - - - - - - - - - - - - - - - - - - - - - - - -
Turbo(Typ6opexKIM
- ABTomATnueckn
PeximocuwenBo3dyxa (DRY)
3Ta cyHKnIa NO3BOJrE TymHbIMTB BnAkhOcTb BO3dyxa, YTO6bl yNyUHTb KAcCTBO BO3DyxA B NOMeJeHN.
Дявкючehнpeхмma ocyuhenBaO3dyxa HaxMITE KhoNky MODEdo noBnEHH «DRY»Ha nCnIee DnCTaHNoHOro ynpabHeHH. BehTINrTop 6yETakTNbPOBaHcPeyuNPyEmblmKlKlOM OxNaJxHeHH.
ABTomatnueckn pekm (AUTO)
IaKtBaun ABToMaTHeCKOro peXnMa HauKMITE KHOKNy MODE nOraBHeHrA AUTO>Ha DCnnee DnCTaHmOHOrO ynpabHeHn.
Ckopoctb BeHTnIaTOpia n Tempepatya 6ydyT KOHTPOIpOBaTcB aB- TOMATUHeCKN BHE 3aBNCIMOCtN OT TempepatbyB NOMEueHIN.
| Наржная Temпература Робочий рек imm |
| <20°C Oбогрев |
| 20°C ~ 26°C Oсушениe |
| >26°C Oхлajдениe |
PexMM KopoTkoCHOHa(5Eeep)
FyHKnSA LEEP aBOMaTneckn HAcTpaNbaET TempePaTy DnA C03 DaHnB N OmeueHN BOdyxa, HAnbOone NoXoDjaero DnA HoCHoro BpemEH cyToK. KOrda np6op paboTaet B peXmme OxnaJxHeHr /ocyHeHn, 3aDaHHa TEmpePaTy 6yDet ABOtOMaTneckn yBeJIuHBaTbcra Ha 1 ^ do DOCTnxKeHn NObIeHnHa 2 ^ 3a nepmoB 2 Yaca.
1.ДЯakTBAcaUNpeKIMa KopoTkoRO cHa HAKMnTe KhoNkY OPTION.
2.KnabuamcnoctpekamnAHepeynTeK< 4ncnnnee nctaHIOHHOYnpaBneHn.
3.ПоТВерпдTe 3аДань ВариТКнКОI OPTION
4.МспоьзуITEКЛавишу OPTIONДЯВБИКПОЕнЯФУHKUIM «SLEEP》.
Bo BpempeKIMa oBorpeBa TemnepaTpa ChxkaeTcHa 2 ^ C 3a nepBbIe 2 yaca.
Iocne 10 yacOB B pexIMe KopoTkoRo CHa np6op aBToMaTuYeckn BbIKIOHTcR.
3heproscbeperaoi npexm (ECO)
Haxatne KhoNk ECO AKTNBpyET NIN DeAKTNBpyET yHKUHO ECO.
Pnp6op nepeIeT B pekm 3heproc6pekeHn. Hactpoehna TEmpeaTpya ABOMATueckn IN PAnbHO YEJIUMBaTeC 6e3 HApUeHnKOMΦoPTHORO KImata. B pe3yIbTaTE ChIXKaetcnoTpe6JIHeHne 3Heprn.
Haxatne UyepKBaHne KhoNk ECO NOBnEeBbIKIOHTb DInCpNeiDnBHYPeHrero 6noka.
MakcmaJIbHaTempePaTyu ckOpoCTb ()
Haxatne KhoNturBO aKTHBpyeT INI DeakTNBpyeT yHKUHO Turbo (typ6o). 3To no3BoJraT Hau6Oonee 6bICTpo DoCTHy 3aDaHHo TEMpepaTybl.
YdaneHne nIeceHn / camooOuHcTka (MILDEW)
1.ДЯakTINBaCIMpeKIMAMcOoHcNtKnHakMInTe KhONk OPTION.
2.Knabuama co tpeikamn n HepeunTe K HbDEW, Dncnnee ductaHNOHHO ynpabneHn.
3. PodTBePdIte 3aDaHbB BapMaHT KhoNkoIPTION
4. IVonb3yTe KlaBnUy OPTION ⅡB BbIKIOHeHna FyHKUIN
ABTOMATNueckoe BbIHCNEHnTe TmpeaTypbI (FEEL)
ABTomatneckoe BByHcneHne TemepaTpyb IpOn3BODITcno DaTHKBYNCTAHUHOHOM ynpabHeHn. Y6eNTecb,TOHa NCTAHUHOHoe ynpabHeHne He BO3eIcTByIOT NCTOHHKn TENIIa, HApPmep IAMNbIOCEHn.
1.ДЯ AKTINBAUNI《FEEL》HAKMITE KHOKNKY OPTION.
2.Knabuama co ctpekamn ▲n nepeinyte K « [FEEL» Ha nncnnnee ductaHMOHHO ynpabneHn.
3.Плдевпгетаадань ВариANT кногков OPTION.
4. IVcnoJIb3yIe KJIaBnIy OPTION CHOBA IIN BbIKHueHry FyHKUIN
OuInCTka N Texo6cnyxuBaHne
I PENEYIPEJKDEHNE:
Y6eHITecb, YTO BO Bpemr NcTKn BOa He Noctynaetpe3 OTBepCTn np6opa. OnacHocTb Bo3ropaHnIyDapa 3JIeKTPuYeCKM TOKOM.
BHIMAHHE:
Peynpno 06nykmbte yctpoictBOI o6ecneHn6e3onacHOH u 9
Bce onepaunn ouhctkn nTexobcnykmbahna DOnjkbbl BbInonHrbcKOMnHaHe, IMeIOuee ceptuikat Ha pa6oTbI c XnaadereHtOMn CNTeMaMn BO3dyUHOrO KOHNuOHNPoBaHna. HenpaBnHoe npoBeDeHne pa60 moket npnbectn KOT3bBy rapaHTm.
Ouictka n 3aMeHa qnltpa
- OtkpoTe nepeHNO naneB H npapBHeHn, yka3aHHOM cTpeKoM.
Ondno pyko noHMMTe nepednHO naHEnb, a npyro-n3BNEKHTe nIbeoFmIbTp.
- OuICTME qINbT BDOI. PnCINbHOM 3aRpa3HeHN NcNOJIb3yTe DIAOCTK INIyIO BDOY (He BBIe 45 ^ C ). 3aTe mIae FInbTpBbICOXHYTb.
3.BcTaBbTe Bo3DyUHbI ΦmNbTp o6paTHO.
4.3akpoTe Kpbiluky Oteka.
OuCTKa BHTpeHHeRo 6noka
1.OTKpoTe nepeHIOI naHEnb np6opa n3BnKeTne nTn DnBbINOHENQHCTKN
2. OHTTE BHTpeHHN 6nK MOKPO TpAKnO (c TemnepatypoH He BbIe 40°C).
BHIMAHINE:
- He paçnbíraIte Ha npúbóp yučtěaùne cpeáctBa.
He nCnONb3yIe MetaJIINueCKyIO UeTKy IIN a6pa3NBbIe cpeCTBa. - He nCnoIb3yIte CnIbHbIe IuIu capanaKUJIne YIcTReIe cpeCTBa.
OuHCTKa BHeuHero 6Joka
Ecn6IbnKpOBaH Bnck Bo3Dyxa BHeHrero 6Ioka, ydaJIte BCE IMeIOUmeCRA OTNOXeHn I Dpyryo rpa3b, 3aTEM ydaJIte ocTabuOcR nbIb CkA TbIM BO3DyXOM HIN He6OJIbUHM KOINHECTBOM BObl.
3aMeHa 6aTapeKn
I PIPMEUHNAI:
IcnoB3yTe ToIbKO HOBBe 6aTapeKn. N3BNeKeTte 6aTapeKn n3 DnCTaHIOHO rYnpabHeHrNrToIbKO npn BbIKIOeHHOM 6nOke BO3- dyHoro KOHNIOHPOBaHn.
Korda:
Bonbhe He cnblwe HnoTBePkaUoHryDOK OT BHyTpHeHero 6noka.
-ПереталКорpeктноразытьдипл.
Kak:
- OtkpoiTe 3aDHHO KpbIuKy.
BCTaBtE HOBbIe 6aTapeKn. IoxKaJyNcTa, npOBepbTe co6JIIOJeHne NOJARPHOCr
DnarHocTnka
| Heincpapabnoctb / noIomka Bo3moxhna | pruynha |
| Прибор He pa6oTaet. Heincpabnabnoctb ane | Ктрочипя / n3BNeueHa BnIka n3 po3eTkn |
| ПовсpendenMotop BeHTINJATOpA BO BHyTpEnHem Ili BHeuHem 6IIOke | |
| Сnomан ТермогнIHbI nepeKJIQUaTeNь KOMPpeccopa | |
| СлOMAnO uCTpoIcTB OBO 3aUInbI Ili DeΦeKTHbI / nepeRopeBbIM npeDOxpaHITelb | |
| Ослбпeньы coeDiHENHЯ Ili N3BVeHema BnIka n3 po3eTkn | |
| Ра6очe NepeRbIaHne Ili 3aUInbI / npeDOxpaHEnHЯ obOpudOBaHЯ | |
| СлИшКOM Hn3KOE Ili BvICOKOE NaPRAJKeHeme | |
| АкТВИрОваHA ФунКДЯ « TlER » (AByOMaTNUeCKe BkIQUeHeme npi6bopa) | |
| ПовсpendенЗлЕТрОннЯ ПЛATA ynpabVNeHЯ | |
| HeobHybIy 3anax 3aPr8a3HEnb Ili 3aIbIy | ФИпсь Bo3dUshbIe ΦIbItpbI |
| 3ByK Bo3bI ObpaTHbI NOtOK XnIDKoCTN B KOHType xHaJaReHtA | ФИпсь Bo3dUshB Ili CnIDKoCTN B KOHType xHaJaReHtA |
| Лeгкд IbIM BvIXODIT n3 BvIpyCa Bo3- dUxa | Bo3HnKaeT, kOgda Bo3dUx B nOmeuHem StaHOBITcR oUeH b XoIodNbIbIM, HaprimeRb B peximax «COOL» Ili «DRY». |
| HeobHybIy 7uMbI MoryT NOrBtbcR a3-3a | УdINHHeHЯ Ili SChaTЯ NepeDHe NaiEHI prN KoJeBaHmX TeMpepaTpybl. 3Tu 7uMbI He O3NaHaOT, YTO prNbop DeΦeKTHbI Ili HeuCpabHbI. |
| HejElaTeIbHbI Bo3dUshbIy nOToK (torpAun Ili XoIodNbI) | HeprabInlbHaj Ili HeNDoxOJaZaH NactPoHa TEmpepaTpybl |
| ПовсpendenMotop BeHTINJATOpA BO BHyTpEnHem Ili BHeuHem 6IIOke | |
| ПepeKpbIb T Bo3dUshbI yIbTp | |
| СлОрocTb BeHTINJATOpa HAcTPOHa Ha MInHMaIbHbUy BeliuHHy | |
| В поMuSeHIM ecTb ДуTne NcSTOHHK INeTIIa | |
| ОТсуTCTbYET XHaJaReHt | |
| Прибор He otKlnkaeTcR ha CnHaNbI / DeiCTBnI | ДиStaHuzioHoe UypaBLeHne DanoKe OT pRnEMnHa Ka H ByTrpeHem 6IIOke |
| HedOCTaToCHoe HApRjaKHeH eT 6bAteeK B DiSTaHzIOHOM ynpabVNeHm | |
| ПрелTCTBnI MEXdY DiSTaHzIOHbIM ynpaBLeHem I pRnEMnKOM | |
| Henisopravhoscby / lolomka Bozmoхная | причина |
| Выкноев диспей Актувироча Функua | Я LED |
| Ошибka по наразожения | |
| Актувироча Функua в салу вином обс neuropовни «Дерrocберегаший реким (ECO)») | |
| Функции пли средва оtcустbvот на дисп lee | He С 达 Функции и средва Вьiodятся за кас dogo raбочero рекима (с. лаву o «Работа») |
| В зто мскуче не medленив Быкночite ррибор и OTКночite заektрочи: Hesobychile shumby bo brempa paobtbi | |
| Ошибka паты ураленяя | |
| Пeregeropelп рededхсангел пли салoman пerekknuchatelb | |
| Расныlenhoe bo'dу пли посторонne рapedmetы в систeme | |
| Пeregerob / рeregoropel kaобель пли вилka | |
| Из ррибор постуаet сальные зах | |
| Колы ошибok на дисп lee | |
| При Возноковнио ошибки на диспей вnettrene Блoks Кы Вьiodятся се dedушеме колы ошибok: | |
| Состаяне памочки Опесане ошибки | |
| E i | Однокразное мигане Oшибka Datчка Tempepatурь вnomeшени |
| E2 | Miraet двajды Oшибka Datчka hapyxнoi Tempepatурь |
| E6 | Miraet Шость раз Нецprabhoctь motopa Вnettrelуога вентrelуога |
I IPIIMEUYAHNA:
IOnonHnTeIbHbIe KoDbI OUnbok yka3aHbI B pykoBODCTBE NO cepBNC-HOMy 06cIyKbBaHHO.
TexHnueckne daHHbIe
MoeB: CL 6044 QC CB
Bec HETTO BHYTPENHero 6noka: npn6n. 6,5K
Bec HETTO BHEUHero 6noka: npn6n.24 K
Bxodnag MoHocb B CTaHapTHOM dExyphom pexime: 5,0 BT
CTeeneb 3aunTbI: I
Cnocobnoctb oxlanxckdeHn: 9000 BTU (2600 kBt/aca)
TeTNOBbYbIXoD: 9000BTU(2610KBr/aca
Xnadaent: R32
MHHMaJIbNo donyctmmoe paOoee daBNeHne:
CTOPoHa HndyBa: 3,7MPa
CTOPOHa BCacbBaHn: 1,2MPa
CoxpaheNo npaBO Ha TexHnueckne IN KOHCTpyKUHOHHbIe N3MeHeHnB B pAMkAs npoDoJIkaHouSeIcpeApaPboSTKNpOdykTa.
DaHHoe ycTPOIcTBo COO TBeTcTByeT BcEM TeKyIIM M IpuKeTbAm CE, TaKIM KaK 3JIeKTPomarHHTHAR CoBMeCTUMOCt b Hn3KOE HaNPJxHeHne; OHO IPOIN3BeDEHO B COOTBcTbM C HOBeIshmN IpabINaM N TexHnK 6be3onacHocTn.
YTNIN3aun
Yttnn3aunnaHcnoIb3oBaHHo6aTaapeiKn
KaK nokyntenB, bIOpnDnueckn 063aHbB03BpaAaTb NCnOJIb3OBaHHbe 6aTaapeKn / aKKMyJrTOpbl.
Ipepe ytnnnaeep np6opa n3BneKeTe 6aTapeKn n3 nybTa Dy.
BepHnTe 6ataeKny Ha nyKt c6opa cTapbIX 6ataeek nIIN OnaChbIX OTXoIOB. O6paauTecb K MeCThBM BnactrM dIy IOnyuEHHa BoJee npDp6HOH INOpmaun.
jgljj no jalil
aBbJnJal
yjyjy jyjy jno aodcui lo oolglipg plo cil gdo
jolal no jolal l 13 10000000000000000000000000000000000000000000000000000000000000
"zolaljgulio" jor jiro
aaii iaii iaii aie aiie aiie aiie aiie aiie aiie aiie aiie aiie aiie aiie aiie aiie aiie aiie aiie aiie aiie aiie aiie aiie aiie aiie aiie aiie aiie aiie aiie aiie aiie aiie aiie aiie aiie aiie aiie aiie aiie aiie aiie aiie aiie aiie aiie aiie aiie aiie aiie aiie aiie
1 1 1 1 1 1 1 1 1 1 1 1 1 1 1 1 1 1 1 1 1 1 1 1
Jla Jaaal 1a Jaaal 1s gill sloal abaleb clogle Jgaoall J
abgolo
ai = 12( ai - 1 + ai - 1) + ·s + 12( a1 + a_0)
aai
CL6044QC CB
yoo6.5
24.
j50,240 220
1800.
b699.
alj 5,0
I. :aowd a
(aLw/1bgl2600)aJ>aaJaaJoo9000.
(aclw/1bglgS2610) aJ> aillaa 9000.
R32.
4.2 g a mbo Juaaill biai (g) 1001
JSCWb 3,7
JSCwIbwo1,2
JISU 3.0
sla sgl
b/g/n 802.11 :
18,0 2
j2.8 2.4
13-1
WPA 2/WPA.
Laiy jay yjg 3 aagaa g aie jy jy
aaiy 1 aaiy 1 1 1 1 1 1 1 1 1 1 1 1 1 1 1 1 1 1 1 1 1 1 1
lg = x0 或 lgx = 0
| Jusssy | Jusssy |
| (1) | Jusssy |
| (2) | Jusssy |
| (3) | Jusssy |
| (4) | Jusssy |
| (5) | Jusssy |
| (6) | Jusssy |
| (7) | Jusssy |
| (8) | Jusssy |
| (9) | Jusssy |
| (10) | Jusssy |
| (11) | Jusssy |
| (12) | Jusssy |
| (13) | Jusssy |
| (14) | Jusssy |
| (15) | Jusssy |
| (16) | Jusssy |
| (17) | Jusssy |
| (18) | Jusssy |
| (19) | Jusssy |
| (20) | Jusssy |
| (21) | Jusssy |
| (22) | Jusssy |
| (23) | Jusssy |
| (24) | Jusssy |
| (25) | Jusssy |
| (26) | Jusssy |
| (27) | Jusssy |
| (28) | Jusssy |
| (29) | Jusssy |
| (30) | Jusssy |
| (31) | Jusssy |
| (32) | Jusssy |
| (33) | Jusssy |
| (34) | Jusssy |
| (35) | Jusssy |
| (36) | Jusssy |
| (37) | Jusssy |
| (38) | Jusssy |
| (39) | Jusssy |
| (40) | Jusssy |
| (41) | Jusssy |
| (42) | Jusssy |
| (43) | Jusssy |
| (44) | Jusssy |
| (45) | Jusssy |
| (46) | Jusssy |
| (47) | Jusssy |
| (48) | Jusssy |
| (49) | Jusssy |
| (50) | Jusssy |
| (51) | Jusssy |
| (52) | Jusssy |
| (53) | Jusssy |
| (54) | Jusssy |
| (55) | Jusssy |
| (56) | Jusssy |
| (57) | Jusssy |
| (58) | Jusssy |
| (59) | Jusssy |
| (60) | Jusssy |
| (61) | Jusssy |
| (62) | Jusssy |
| (63) | Jusssy |
| (64) | Jusssy |
| (65) | Jusssy |
| (66) | Jusssy |
| (67) | Jusssy |
| (68) | Jusssy |
| (69) | Jusssy |
| (70) | Jusssy |
| (71) | Jusssy |
| (72) | Jusssy |
| (73) | Jusssy |
| (74) | Jusssy |
| (75) | Jusssy |
| (76) | Jusssy |
| (77) | Jusssy |
| (78) | Jusssy |
| (79) | Jusssy |
| (80) | Jusssy |
| (81) | Jusssy |
| (82) | Jusssy |
| (83) | Jusssy |
| (84) | Jusssy |
| (85) | Jusssy |
| (86) | Jusssy |

a0j y) 1111111111111111111111111111111111111
a#
L 1
(a)
:
jlll 10000000000000000000000000000
L 1
alolgo slwolj pluul
a
g 100 g 100 g 100 g 100 g 100 g 100 g 100 g 100 g
auiu
abdo i
aee aee eae ae aee aee aee aee aee
16 ②
aill ooll joull olao elw pae
Jus JalalJas pue
a + b = 1
aall 400000000000000000000000000000
(MADVEWb/
OPTION jll de haoi jilu uui gog bui
MILDEW) 1986 2005 2. pScill jiee 24
OPTION 13.3
MILDEW, 1234567890 OPTION 4..
FEELJALOJALQ
pue jy 56.12e j pseolj gj 3 jiaowll jgel gwlq qilall ojell y
jolab jio ojololab 0j gol jg j
OPTION jie fae "FEEL" 1
IFEL" 296b yu▼gA uWy pWy gJzIa pIa12. Jx PwJlJz
.
OPTION j11 p11100000000000000000000000000000000
FEEL aagbgl jaiy gjg 0oPTION 14.
aai
y = - ( x - 2) ^2 + 9 = - x^2 + 4x + 5
jssll jbs. aalil oolgl lbcis 0l61 gdo po Jo s
a
4
Jusll jusll aaljul alal yjle
a 100000000000000000000000000000000000000000
Jaaal 1000
A
golololololololololololololololololololololololololololololololololololololololololololololololololol

(DRY) 1ggl a1g2a11j g0g2a1g2a11j g0g
a#
0000 0000 0000 0000
(AUTO)
jlaa aaa JAOTOOJ 10 MODE jlaa Jao
a#
gglalglaagb jaoafoafofofofofofofofofofofofofofofofofofofofofofofofofofofofofofofofofofofofofofofofofofofofofofofofofofofofofofo
COOL"job mode 1. jzda
a0 1000000000000000000000000000000000000000000
(cabla bclbplalw yjll).
0g 10000000000000000000000000000000000000000000
auiiui iuiiui de biaiu
(HEAT)
a 1000
HEAT"gab jod (gog)MODE gao la bai jiai 1.
pIyol yIyol aI cyI 1] jxuill aIbgb huiu uua Jueaull jlaa dlt
(▼ctlalb ▲ctlalplusuilyuayill)ddjoll 3yolalldo joo
61T,15A aalalal alalalalalalalK12.K9.K7j,jg 125
165T,25A: 1000000000000000000000000000000000000000000000000000000000000000
().
()
(a) (a) (a) (a) (a) (a) (a) (a) (a) (a) (a) (a) (a) (a) (a) (a) (a) (a) (a) (a)
:abdo
J5uoy jao jolg aolj dok yjoll slll ad
(15)logl 1a 100000000000000000000000000000000000000
:abgdol
a yll 8yll aagly yuill uuyiy 2yall cial jall jay
yaiyaiyaiyaiyaiyaiyaiyaiyaiyaiyaiyaiyaiyaiyaiyaiyaiyaiyaiyaiyaiyaiyaiyaiyaiyaiyaiyaiyaiyaiyaiyaiyaiyaiyaiyaiyaiyaiyaiyaiyaiyaiyaiyaiyaiyaiyaiyaiyaiyaiy
yjwuyu wul Jolc Joo

10 10
3.2011.

jLw.00000000000000000000000000000000000000000000000
aalal aol alal lalal
a#1110wogllj
Poou Jsw Joa aiball piao
Juaa yagill wagil Joo
aaii iaiy aai yaiy aaiy aaiy aaiy aaiy aaiy aaiy
aolol oogll
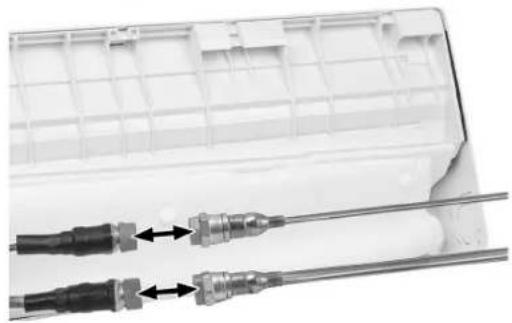
:aui
gj 100000000000000000000000000000000000000000000000000000000
山
a 10000000000000000000000000000000000000000000000000000000000
(2jgall).plo7-5juaeJuaol/Juaog plo 57 jbaa Jaa .3
aagaa aaiy aaii w oogu waiy gaiy j yaiw qai
- 3glo 3g
- d3s6b1ol6b1
230111 111 111 111 111 111 111
j531 151 101 102 j00 j00 j00 j00 j00
111 111 111 111 111 111 111
11 3 4 5
a a a a a a a a a a a a a a a a a a a a
y
5...yldj jg0d
algoi ploj no 15gog algoi oio gao jao Jaoo jaooi 6
:
a a 15 j 8000 y i 10000 10000 10000 10000
15200
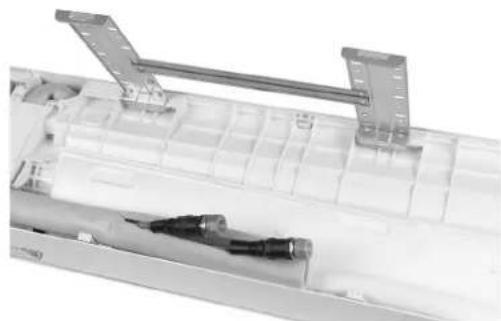
gbl 2.1d5y bala Jol .(plo)
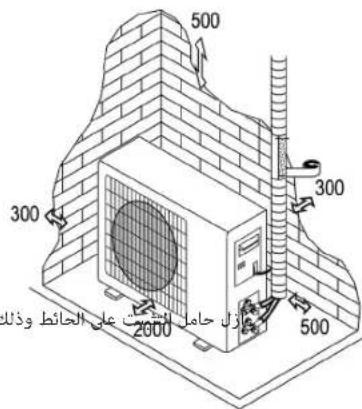
3...Jolall o o ooyou cuyg bailld
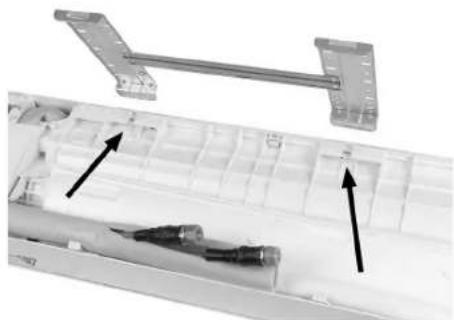
aagll Cai 10 Jg jBjIe 32 gaa 4
. aai 3 aayu uuiy yu 6
. aai 11 piauauu baild de ayu jy 6
. ais 3 aui jy cui pao 7

Jololololololololololololololololololololololololololololololololololololololololololololololololololololololol
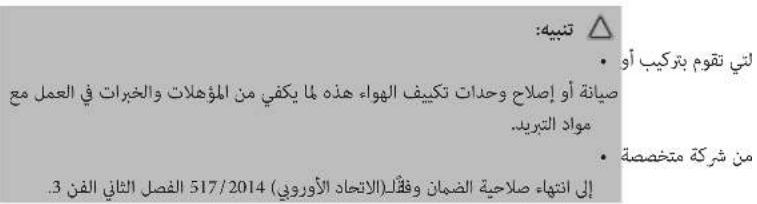
4
1...Jaiu duiu uus
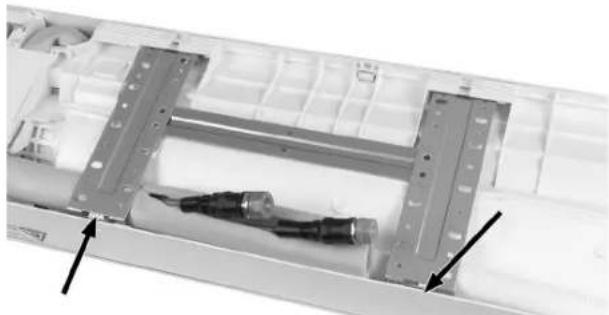
aJolol oogol 5ji

SjI 1e jyag aJzalll sJgall gag yj yj uJ Sb1 0o oJygi J
. 3y Cg f IaLus pJ aiWALL Joo 4j 5j 6j 7j 8j 9j 10j 11j 12
J 10000000000000000000000000000000000000000000000000000
jaiy aaii jiy jaiy gai jaiy gai jaiy gai jaiy gai jaiy gai jaiy
1sall jssll 5g ygbj 5j g
:4
"swi wai cui jll uji dui jbi jia jiu pi a
.
gla aalaaaalaaalaaalaaalaaalaaalaaalaaalaaalaaalaaalaaalaaalaaalaaalaaalaaalaaalaaalaaalaaalaaalaaalaaalaaalaaalaaalaaalaaalaaalaaalaa
a 1
ogall ygao xgyai
a1 + a2 + a_3 = 6 .
gblblllglgallalgo gglalj jw jyag a jyag .2
1
jblal gai jali tai u a 10 10 10 10
Lgjyj 1. jglal Jaaay y aB o
Ujuljulj ge Jolal
jao jao zie (toeg g yllg, solubly, cial) 2o061 pluoyy 2xoxo sot
:
S OBC = S AOB + S_ BOC
1.
Baa. aai Cuiy jll .jll j
.
1
S_ OBC = 12 · BO · CD = 12 × BO × CD = 14
.
Jauu
.
jai 13! aalb alle lal. gai ale ulaiaa aaiy Jauai aaioo all
dol1100000000
.
yusjibai
i
0
h

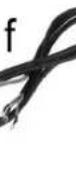
m
K

i
9
0
j
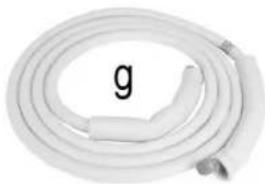
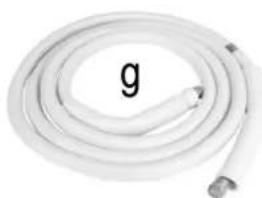
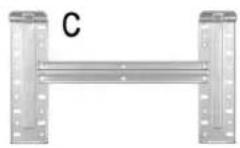
a.1111 10
16x6(a
6(b
b10x1(
zjglw
1525400g p0.002x1d
a0jlaol aogjU Jala × 4 e
Juaiyi Lda
aJdUdUdUdUdUdUdUdUdUdUdUdUdUdUdUdUdUdUdUdUdUdUdUdUdUdUdUdUdUdUdUdUdUdUdUdUdUdUdUdUdUdUdUdUdUdUdUdUdUdUd
Jgallal(jg)Ug2(g
(abl)aJb0s1(h
(\omega \omega \omega \omega \omega \omega \omega \omega \omega \omega \omega \omega \omega \omega \omega \omega \omega \omega \omega \omega \omega \omega \omega \omega \omega \omega \omega \omega \omega \omega \omega \omega \omega \omega \omega \omega \omega \omega \omega \omega \omega \omega \omega \omega \omega \omega \omega \omega \omega \omega \omega
- 12 10 1
a11b×1(k
sds sds jgsjg×1(m
"AAA 1.5,2R03×2 (n
20x2(0
(gola)LaaS
aagaii iaiu aie gao jia jia jia jia jia jia jia jia jia jia jia jia jia jia jia jia jia jia jia jia jia jia jia jia jia jia jia jia jia jia jia jia jia jia jia jia jia
a 23
aayly jyj yll algb cial yll algill jy j kgs jy j yal g b oai yll algill jy j yj
yj yab jolal j jlll jilbly lgs jk jnjj
/ g jgbl oio jio jgljgl plaiu w gdo ddooll g prwlg yall glaal l aol alal g jgl jgl jgl jgl
a 1000000000000000000000000000000000
gll gglb jai dai kuiy y cui 1j qaii lai y jil pui
jlll l 100
cnaa aaaeaaeeaaeeaaeeaaeeaaeeaaeeaaeeaaeeaaeeaaeeaaeeaaeeaaeeaaeeaaeeaaeeaaeeaaeeaaeeaaeeaaeeaaeeaaeeaaeeaaeeaaeeaaeeaaeeaaeeaaeeaaeeaaeeaaeeaaeeaaeeaaeeaaeeaaeeaaeeaaeeaaeeaaeeaaeeaaeeaaeeaaeeaaeeaaeeaaeeaaeeaa
ailll lalll Jls Jllw b aaiabil jaiabgall
g 112
jlae aaoa xg jy Caa xg y g
jgldeaiLgglalglg y
a 1 a 1 a 1 a 1 a 1 a 1 a 1 a 1 a 1 a 1 a 1 a 1 a 1 a 1 a 1 a 1 a 1 a 1 a 1 a 1 a 1 a 1 a 1 a 1 a 1 a 1 a 1 a 1 a 1 a 1 a 1 a 1 a 1 a 1 a
g 1
aai 1
solo 1005g aagaae aol 1000 1000 g 1000 g 1000 g 1000 g 1000 g
J 1
jaiy jia 1
gaiil gaii 10000000000000000000000000000000000000000
jgllll jaiolil aoxlul oolse
:clogzpaai g jyjdo jyjgojla
1


- WAARSCHUWING: Brandgevaar!
- ATTENTION: Risque de surchauffe!
- Symbols in this Instruction Manual
- WARNING:
- CAUTION:
- NOTE:
- General Notes
- Special Safety Precautions for this Appliance
- Read the instructions!
- WARNING: Fire hazard!
- The service manual is available at the following web address: www.sli24.de
- CAUTION: Risk of overheating!
- Handling Batteries
- Unpacking the Appliance
- Scope of Delivery
- Interior Unit
- Exterior Unit
- Connection Accessories
- Accessories
- Overview of the Components
- Page 3
- Appliance Unit for Indoor Areas
- Appliance Unit for Outdoor Areas
- Remote control
- Installation
- Interior Unit (a)
- Installing the Wall Mount
- Exterior Unit (b)
- Alignment of the Cooling Pipes
- Unrolling the Cooling Pipes
- Connecting the Condensed Water Pipe for the Interior Unit
- Installation of the Interior Unit and Wall Bushing to the Outside
- Installation of the Exterior Unit
- Condensed Water Drain Pipe for the Exterior Unit
- Electrical Connection (Exterior Unit)
- Connection, Filling and Start-up Procedure
- Testing the Interior Unit
- Testing the Exterior Unit
- Circuit Diagram
- Operation
- Tableside Control
- Adjusting the Air Flow
- Switch On/Off
- i NOTE:
- Cooling Mode (COOL)
- Heating Mode (HEAT)
- Switching the Appliance on Automatically (TIMER)
- Switching the Appliance Off Automatically (TIMER)
- Fan Mode (FAN)
- Air Dehumidification Mode (DRY)
- Automatic Mode (AUTO)
- Snooze Mode (SLEEP)
- Energy Saving Mode (ECO)
- Maximum Temperature and Speed (
- Mildew/ Self-cleaning (MILDEW)
- Automatic Temperature Calculation (FEEL)
- Cleaning and Maintenance
- WARNING:
- Cleaning and Exchanging the Filter
- Cleaning the Interior Unit
- Cleaning the Exterior Unit
- Changing the Battery
- OTE:
- Technical Data
- Notice of Directive Conformity
- Disposal
- Battery Disposal
- Meaning of the "Dustbin" Symbol
- Instrukcja obslugi
- Usuwanie
- Usuwanie baterii
- Ventilator uzemmod (FAN)
- ПРIMEЧАнЯ:
- Omba Hhopmaun
- IPEJUYIPEXJEHNE:
- Oco6bIe yka3aHnI no TexHnke 6e30nacHOCTn Ira DaHHoro ycTPOcTBA
- PouHTe HcTpyKuHo no 3KnIyatauN!
- PENyPEXKDEHNE:OnacHocTb noxapa!
- PykoBoCTBO no nCnoJIb3OBAHnIO DocTyHNO Ha Be6-caIte: www. sli24. de
- BHIMAHHE: Puck neperpeBa!
- BHIMAHHE:
- I PENEYPEXKDEHNE:
- BHIMAHNE:
- Kakobpaatabcsc6bataeikamn
- IPEDYNIPEXKDEHNE:
- PENEYIPPEXDEHME:
- IopKIOueHHe Tpy6Kn KOHNDeHCnpoBaHHo BOnb K BHyTppeHEmy 6NOKy
- YcTaHOBka BHyTpHHeRo 6Ioka N CTeHOBBIX BKnadBiWe HApKy
- BHUMAHNE:
- ITPIMEYAHNA:
- IIPIMEAYAHIA:
- YCTAHOBKa BHeWHeRo 6JIOka
- CnBna Tpyka KOHcHcnpoBaHHO BObI DnBHeuHero 6Joka
- 3NeKtpnueckoe noDkIIOHeHne (BHeuHn6NoK)
- BHIMAHINE:
- HCTpykunn dny 6bictporo coyneHenra
- PoiocoeHHHeHne,3aIOJIHeHne n 3anyck
- TeTnpoBaHne BHyTppeHHeRo 6Ioka
- TeTnpoBaHne BHeuHero 6JIOka
- Pekm o6orpeBa (HEAT)
- I IPIMEEAHNA:
- ABTOMATNUeCKOE BKNIOUeHne npn6opa(TIMER)
- I PIPMEUHNAI:
- ABTomaTnueeCKoe BbIKIouHeHne np60pa(TIMER)
- I PIMMEAHIA:
- Pexim BENTJITopa (FAN)
- PeximocuwenBo3dyxa (DRY)
- ABTomatnueckn pekm (AUTO)
- PexMM KopoTkoCHOHa(5Eeep)
- 3heproscbeperaoi npexm (ECO)
- MakcmaJIbHaTempePaTyu ckOpoCTb ()
- YdaneHne nIeceHn / camooOuHcTka (MILDEW)
- ABTOMATNueckoe BbIHCNEHnTe TmpeaTypbI (FEEL)
- OuInCTka N Texo6cnyxuBaHne
- I PENEYIPEJKDEHNE:
- Ouictka n 3aMeHa qnltpa
- OuCTKa BHTpeHHeRo 6noka
- OuHCTKa BHeuHero 6Joka
- 3aMeHa 6aTapeKn
- Korda:
- Kak:
- I IPIIMEUYAHNA:
- TexHnueckne daHHbIe
- YTNIN3aun
- Yttnn3aunnaHcnoIb3oBaHHo6aTaapeiKn
- jgljj no jalil
- aai
- a#1110wogllj
- aolol oogll
- 山
- aJolol oogol 5ji
- ogall ygao xgyai
- yusjibai
- jgllll jaiolil aoxlul oolse
Brand : BOMANN
Model : CL 6044 CB
Category : Air Conditioning