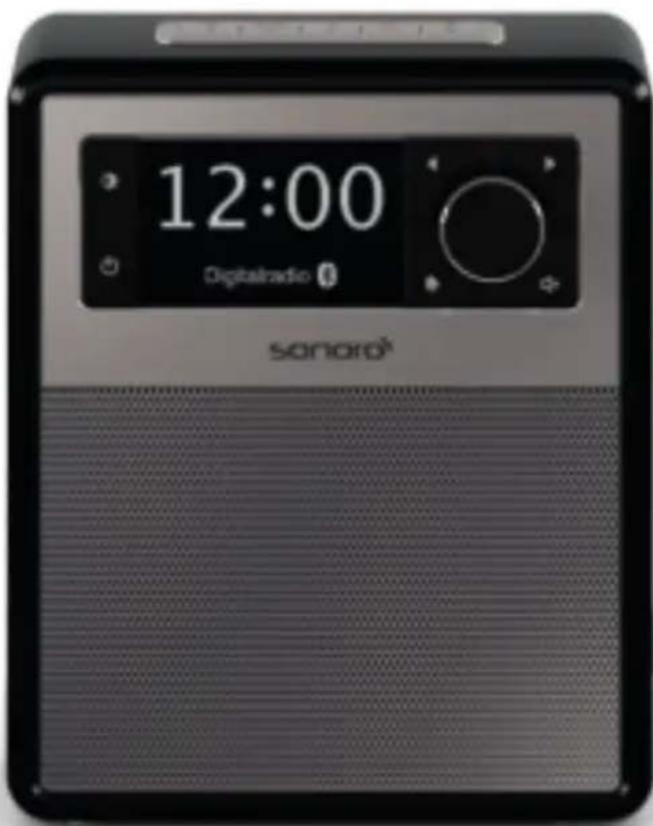
Easy SO120 - Hi-fi system SONORO - Free user manual and instructions
Find the device manual for free Easy SO120 SONORO in PDF.
| Product type | Portable radio hi-fi system |
| Brand | Sonoro |
| Model | Easy SO120 |
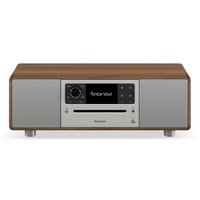
| Dimensions (W × D × H) | Approx. 156 × 118 × 186 mm |
| Weight | Approx. 1.6 kg |
| Mains power supply | 12V/2.5A adapter (model AS360-120-AD250) |
| Battery power | 6 AA/LR6 alkaline batteries or 6 Ni-MH HR6 rechargeable batteries |
| Display | 2.4-inch TFT colour display |
| FM radio | 87.50 – 108.00 MHz |
| DAB/DAB+ radio | Band III (174.928 – 239.200 MHz) and cable (174.928 – 260.640 MHz) |
| Bluetooth | Version 4.1, profiles AVRCP 1.5 and A2DP 1.2, range ~10 m |
| AUX input | 3.5 mm jack, sensitivity 300 mV |
| USB port | Charging only (5V/2.1A output with mains adapter) |
| Main functions | FM/DAB+ radio, Bluetooth, AUX, alarm, sleep timer, 5 presets, LED nightlight, equalizer (bass, treble, loudness) |
| Cleaning | Soft dry cloth; do not use abrasive products |
| Operating temperature | 0 °C to +45 °C |
| Included accessories | Mains adapter with universal plug adapters, instruction manual, safety manual |
Frequently Asked Questions - Easy SO120 SONORO
User questions about Easy SO120 SONORO
0 question about this device. Answer the ones you know or ask your own.
Ask a new question about this device
Download the instructions for your Hi-fi system in PDF format for free! Find your manual Easy SO120 - SONORO and take your electronic device back in hand. On this page are published all the documents necessary for the use of your device. Easy SO120 by SONORO.
USER MANUAL Easy SO120 SONORO
FM Radio [FM]
DAB Radio [DAB]
- Summer [Buzzer]
- Programm [Preset]
13.2. [Default power on source]
13.6. [Preset stations lock setting]
2. Getting to know your EASY 41
2.1 Scope of delivery 41
2.2 Controls and ports 42
2.3 Technical data 46
2.4 Marks of approval and certificates 46
3. Getting started 47
3.1 Unpacking EASY 47
3.2 Connecting the power supply 47
3.3 Battery operating using alkaline batteries 48
3.4 Battery operating using Ni-MH rechargeable batteries 49
3.5 Using the antenna 50
3.6 First time using the radio 51
4. Basic operations 52
5. Display icons 53
6. FM Radio mode 54
6.1 Operation 54
8.1 Pairing 56
8.2 Operation 56
9. AUX In mode 57
9.1 Operation 57
10. Alarm 58
10.1 Setting alarm 58
10.2 Turning the alarms on or off 59
10.3 Deactivating a sounding alarm 59
10.4 Snooze 59
11. Sleep timer 59
12. Settings 60
12.1 Time/date 60
12.2 Equalizer 60
12.3 Display dimmer 61
12.4 Night lamp 61
13. Special System Settings 62
13.1 Time/Date setting 62
13.2 Default power on source 62
13.3 Set minimum volume level 62
13.4 Set maximum volume level 62
13.5 Set power on volume level 62
13.6 Preset stations lock setting 63
13.7 Set Bluetooth auto-connecting 63
13.8 Inactive standby 63
13.9 Factory reset 63
14. Troubleshooting 64
15. Cleaning 66
16. Warranty 67
1. Introduction
Thank you for purchasing EASY. This operating manual and the safety manual provide all the information required for trouble-free and safe operation of EASY.
- Read the operating manual and the safety manual in their entirety before using EASY.
- Keep the operating manual and safety manual for future reference.
- If you pass EASY on to a third party, please provide them with the operating manual and safety manual as well.
- Failure to follow the operating manual and safety manual can result in serious injury or damage to EASY.
- We assume no liability for damage resulting from failure to observe the instructions in this operating manual and safety manual.
The images in this operating manual are intended to illustrate the actions necessary to operate EASY.
Enjoy your EASY!
1.1 Contact data
| Adresse sonoro au | dio GmbH, Nordkanalallee 94, D-41464 Neuss, Germany |
| Telefon +49 2131 | 8834-141 |
| Fax +49 2131 7517 | -599 |
| E-Mail support@sonoro.de | |
| Internet www.sonoro.de | |
1.2 Intended use
EASY is intended for personal use only. It is not intended for industrial use. EASY is solely intended for the following tasks:
- Playback of FM/DAB+ radio.
- Audio playback from external devices connected via AUX In.
- Audio playback from Bluetooth-enabled devices (e.g. mobile phones).
- Charging of external devices that are connected via the USB port while external adapter is connected.
Any other use is considered improper use and is prohibited. We assume no liability for damages resulting from improper use.
2. Getting to know your EASY
2.1 Scope of delivery
In addition to the EASY itself, the following accessories are also included in the scope of delivery:
- AC adapter with universal adapter (VDE and UK)
- Operating manual
- Safety manual
2.2 Controls and ports
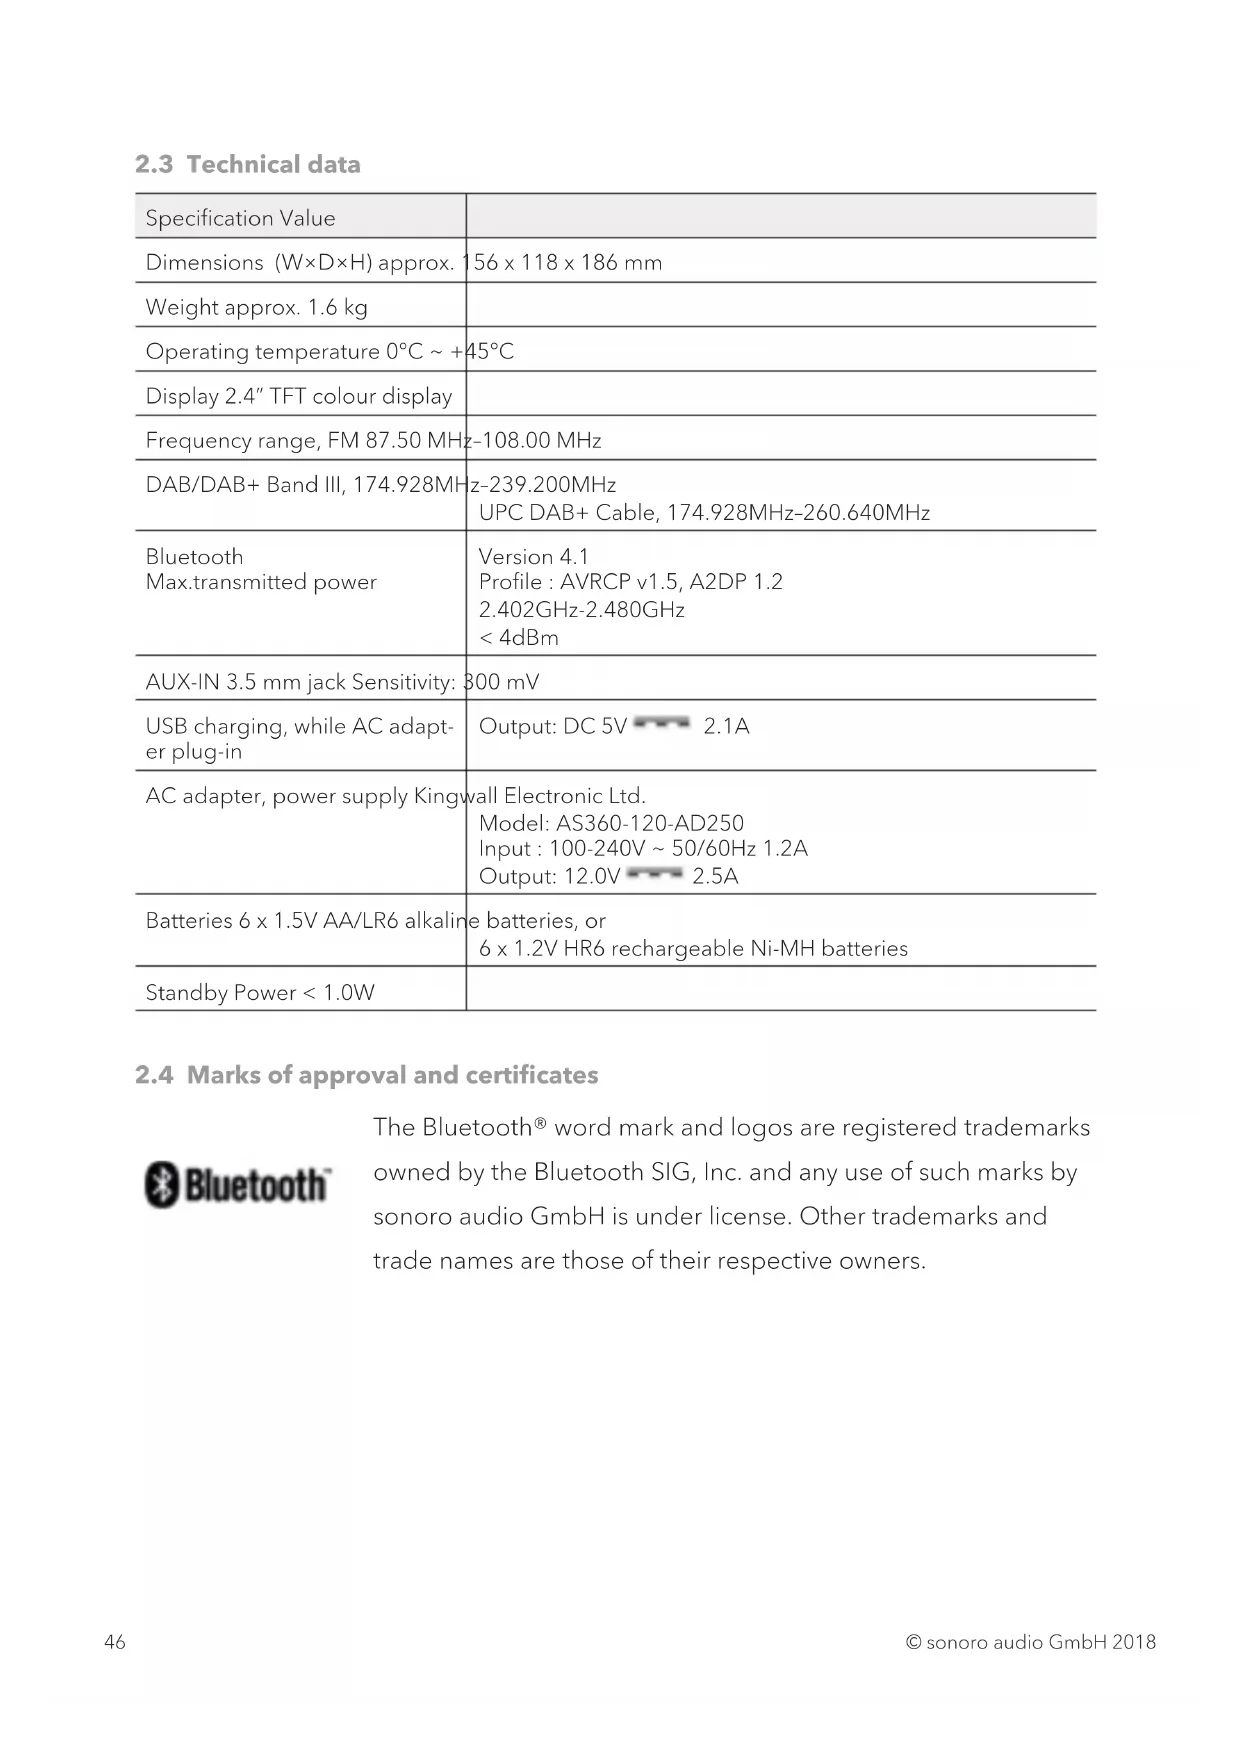
Front view
- Display
- Dimmer button (
- Standby button (
4.Left button,skip previous ( - Right button, skip next ( )
- Volume knob, OK button (press the knob)
- MUTE button (
- Alarm button ( )
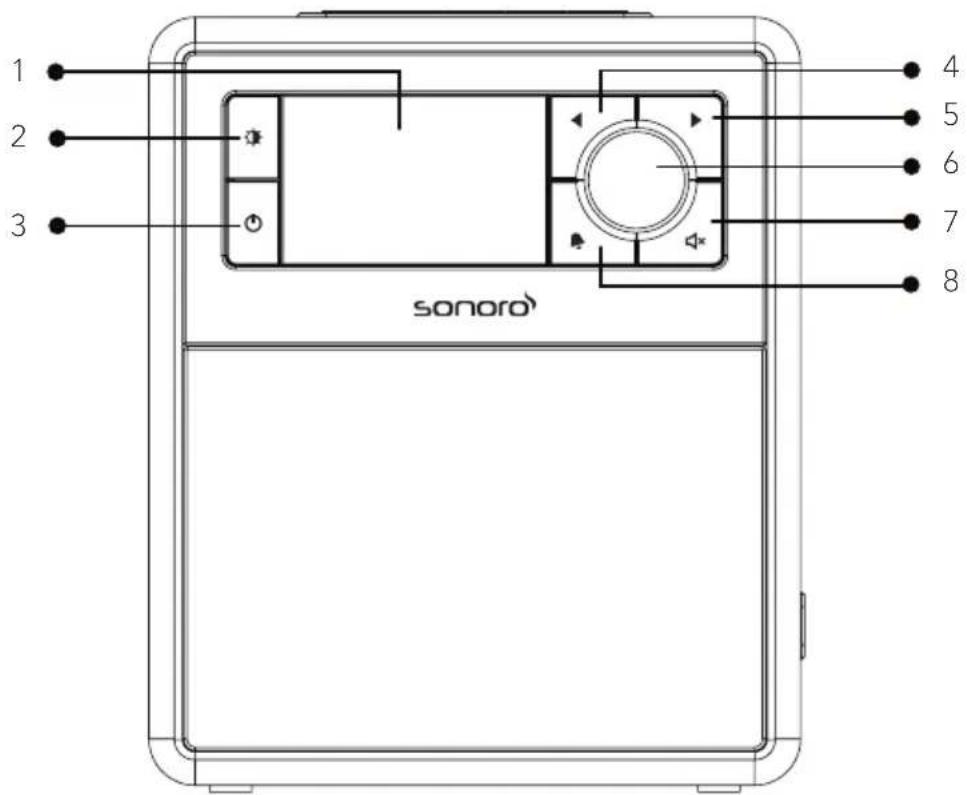
Top view
- FM Radio (
- DAB radio mode (
- Bluetooth mode (X)
- Auxiliary input mode ( AUX)
- Night lamp on/off button (
- Night lamp indicator
- Favorite button 1
- Favorite button 2
- Favorite button 3
- Favorite button 4
- Favorite button 5
Side view
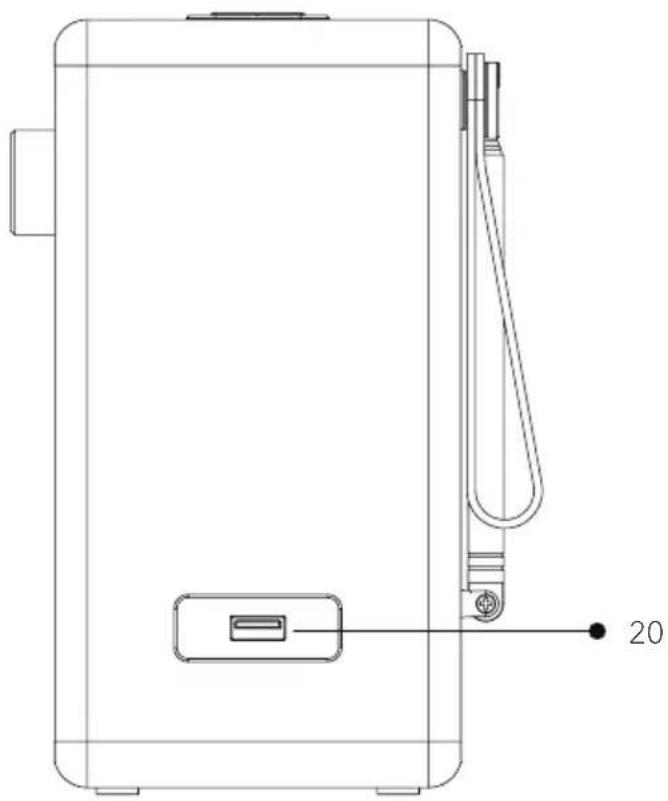
- USB port for charging only
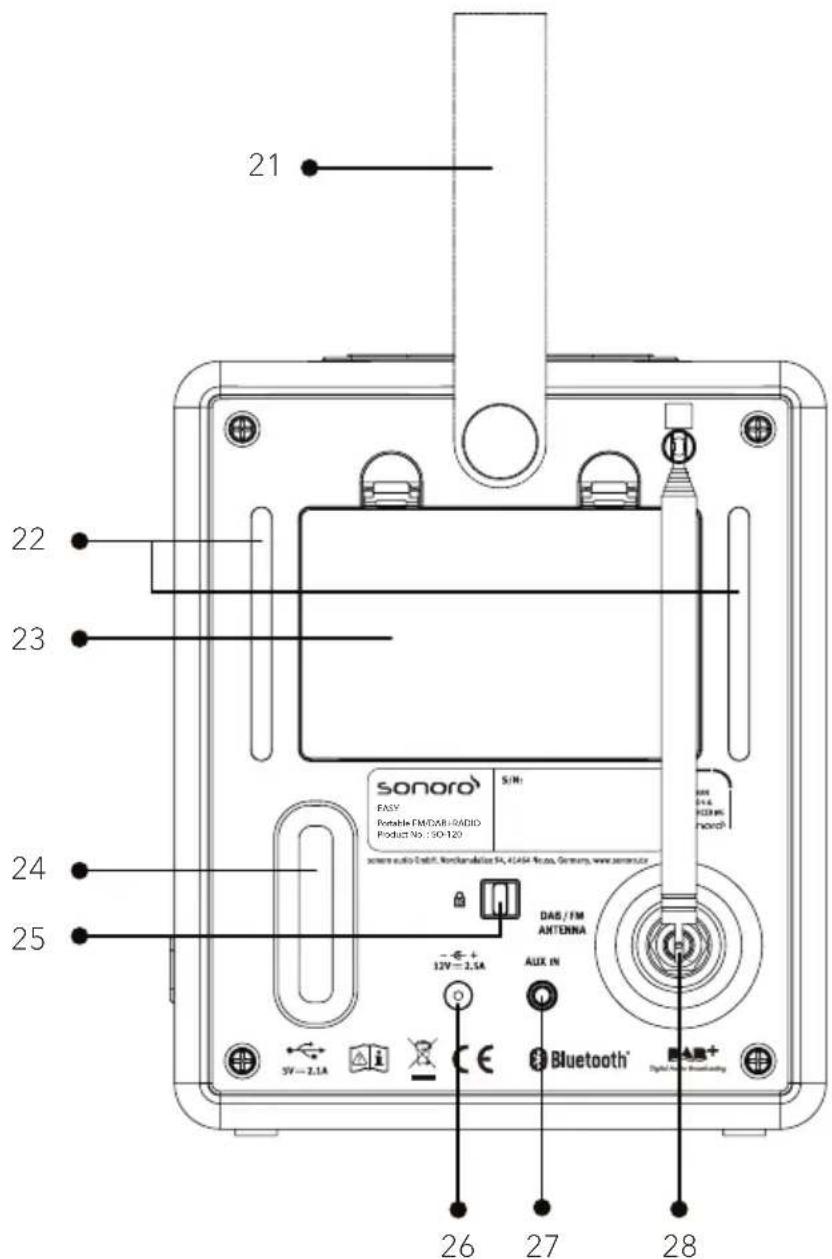
- Carrying strap
- LED night lamps
- Battery compartment
- Bass reflex opening
- Keylock (anti-theft protection)
- DC power input jack
- Auxiliary input (3.5mm)
- FM/DAB antenna
2.3 Technical data
| Specification Value | |
| Dimensions (W×D×H) approx. | 156 x 118 x 186 mm |
| Weight approx. 1.6 kg | |
| Operating temperature 0°C ~ +45°C | |
| Display 2.4" TFT colour display | |
| Frequency range, FM 87.50 MHz | -108.00 MHz |
| DAB/DAB+ Band III, 174.928MHz | z-239.200MHz UPC DAB+ Cable, 174.928MHz-260.640MHz |
| Bluetooth Max.transmitted power | Version 4.1 Profile: AVRCP v1.5, A2DP 1.2 2.402GHz-2.480GHz < 4dBm |
| AUX-IN 3.5 mm jack Sensitivity: | 300 mV |
| USB charging, while AC adaptor plug-in | Output: DC 5V 2.1A |
| AC adapter, power supply Kingwall Electronic Ltd. Model: AS360-120-AD250 Input: 100-240V ~ 50/60Hz 1.2A Output: 12.0V 2.5A | |
| Batteries 6 x 1.5V AA/LR6 alkaline batteries, or 6 x 1.2V HR6 rechargeable Ni-MH batteries | |
| Standby Power < 1.0W | |
2.4 Marks of approval and certificates

Bluetooth
The Bluetooth® word mark and logos are registered trademarks owned by the Bluetooth SIG, Inc. and any use of such marks by sonoro audio GmbH is under license. Other trademarks and trade names are those of their respective owners.
3. Getting started
3.1 Unpacking EASY
- Take EASY out of the packaging and check whether EASY or the individual parts exhibit damages. If this is the case, do not use EASY. Should you detect any damage, contact your dealer or sonoro audio GmbH customer support immediately.
- Check to make sure that the delivery is complete (see chapter "Scope of delivery").
- Place EASY in a suitable location.
- Remove the protective film from the display.
3.2 Connecting the power supply
- Insert the top end of the adapter into the upper slot of the power supply.
- Click the bottom end of the adapter in to lock it into place.
- To remove, first pull back the tab on the power supply.
- Pull the adapter upwards to remove it.
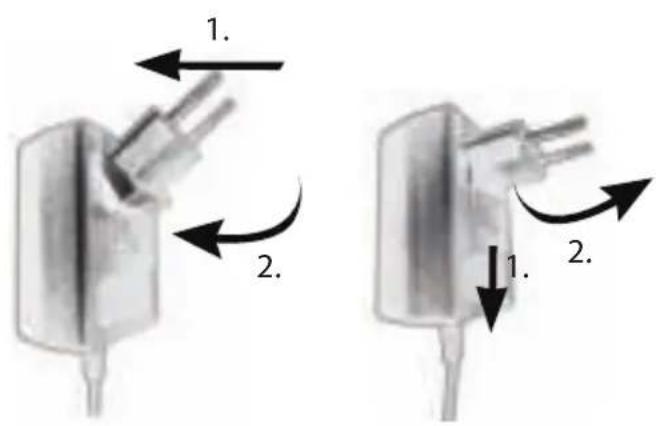
- Insert the connector of the power adapter into the DC power input jack on the back of EASY.
- Insert the power plug into a wall socket. EASY is ready to turn on.
3.3 Battery operating using alkaline batteries
EASY can be powered via alkaline batteries.
- Remove the battery cover on the back of EASY by pushing the catch down and lifting the cover off.
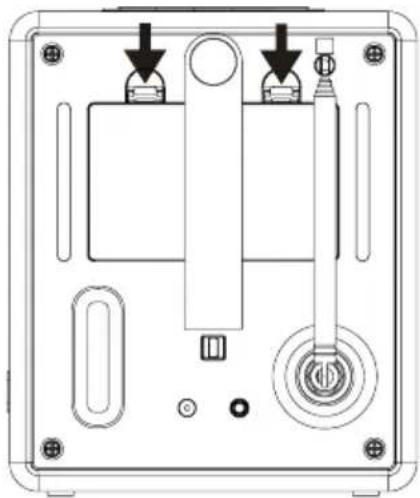
- Install 6 pieces of 1.5V LR6 or AA alkaline batteries into the battery compartment.
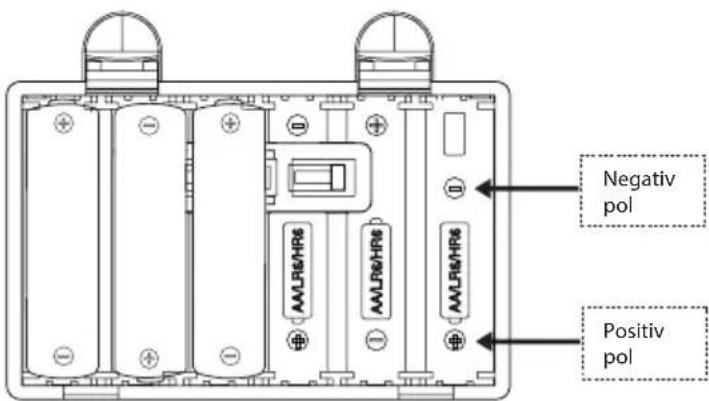

Make sure that all batteries are inserted with the correct polarity as shown on the battery compartment.

If EASY is not to be used for any extended period of time, it is recommended to remove the batteries from the radio.
- The battery indicator on the display shows the current state of charge of the batteries.

If EASY is operating with batteries, it is not recommend to connect any mobile devices to the USB port for charging in order to extend batteries operating time. Please plug-in the AC adapter to have the USB port charging function.

If EASY is operating with batteries, the display will automatic switch off after 60 second in order to save the power and extend the batteries operating time.
3.4 Battery operating using Ni-MH rechargeable batteries
EASY is designed with a Ni-MH battery charger.
- For rechargeable batteries, it is vital that one battery jack is peeled off by 1cm at the negative pole and installed in the right side of the battery slot. You will find a small metal contact that needs to be connected directly to the battery metal jack.
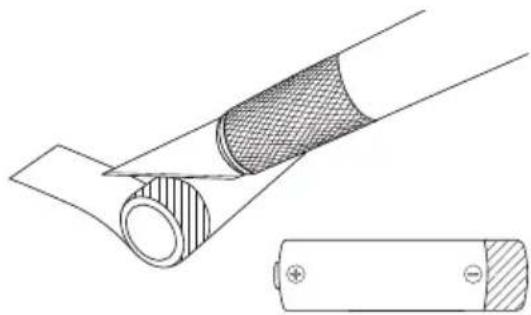
- It uses an extra pin for this charging function. The pin is located in the right side of the inside of the battery compartment.
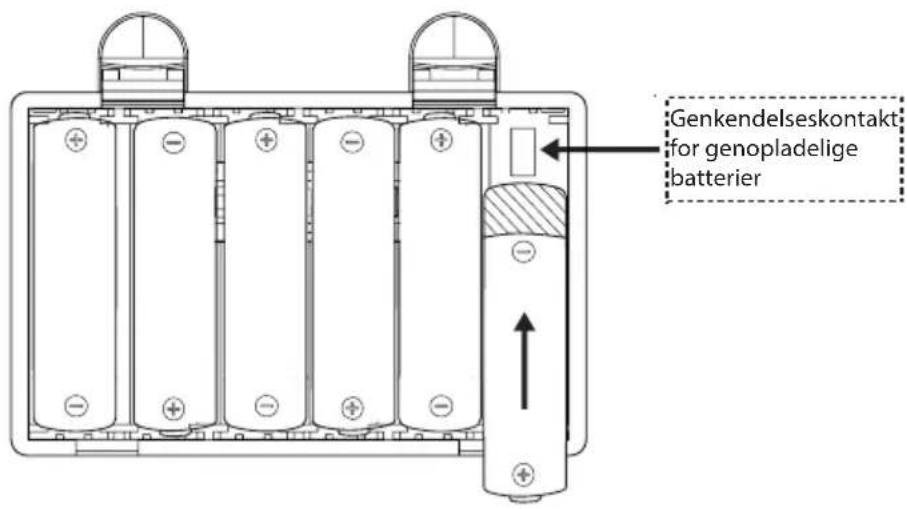

Make sure that all batteries are nickel-metal hydride (Ni-MH) batteries and do not mix them with alkaline batteries.
- Plug the connecting plug of the adaptor into EASY into the DC power input jack on the back of the device.
- Plug the power adapter into the AC main socket.
- The battery charging indicator ( ) is showing on the display.
3.5 Using the antenna
- EASY is pre-installed with the rod antenna located on the back.
- Pull the rods of the antenna apart and align the antenna so that you have the best possible reception.

For a better reception, connect EASY to a suitable house antenna, screwing the external antenna to the EASY's FM/DAB socket.
3.6 First time using the radio
When EASY is powered on for the first time, the radio is automatically going to DAB mode. In order to get the DAB data to set the clock and date time automatically, please follow the procedure:
- Extend the rod antenna.
- Press ( ) button on EASY. EASY will automatically start scanning for a DAB radio signal. After a short time, the current time will appear on the display.
- Alternatively, you can press (FM) button on EASY and press and hold (▶) to tune a good and strong FM station with the RDS signal broadcasting. Wait for a while, the current time will appear on the display.

If no signal is found, it may be necessary to reposition EASY in order to get a better reception.
4. Basic operations
| To turn on, Press . | EASY starts the operation from the last selected playback mode. |
| To turn off (standby mode), | Press Ⓞ. The time and date (if set) are displayed. EASY will automatically turn off without playback and operation after 15 minutes. |
| To select a playback mode, | Press one of the buttons on EASY (FM, AAS) switch from one operation mode to the other. |
| To control the volume, Rotate the volume knob on EASY. | |
| To mute or restore the sound output, | Press (▲) on EASY. |
| To set the sleep timer At any operating mode, press and hold ( Ⓞ), then select the desired duration by volume the volume knob, and then press down the knob to validate your choice. | |
| To change the display brightness level | Press the (▲) button continuously to choose between the 5 different display brightness levels. Alternatively you can use the (▲) volume knob and then confirm by pressing the knob. |
5. Display icons
Please refer to the table below for the symbols shown in the display.
| Alarm is activated. | |
| Sleep timer is active. | |
| A Bluetooth device is connected. | |
| Playback is paused. | |
| Music is playing. | |
| Radio signal is being received (with signal strength). | |
| No radio signal is being received. | |
| The radio station is saved in the favorite list. | |
| Sound output is muted. | |
| Battery is empty. | |
| Battery charged at a level of approx. 25%. | |
| Battery charged at a level of approx. 50%. | |
| Battery charged at a level of approx. 75%. | |
| Battery is mostly fully charged. | |
| Battery is charging. |
GB
6. FM Radio mode
6.1 Operation
| To access the FM radio mode | Press the (FM) button on the EASY. |
| To manually tune the frequency | Press the <or> button. Or, press and hold the volume knob to activate the manual tune. |
| To automatically tune to the next available station | Press and hold <or>. Or, press the volume knob to start the automatic tuning. |
| To store a radio station in the favorite list | A maximum of 5 radio stations can be stored. Tune to a station and then press and hold a favorite station (1-5) button during approx 3 seconds to directly store it in the preset list. |
| To recall a radio station in the favorite list | Press a favorite station button (1-5) to access a stored preset station. |
| To browse the radio station information (if available) | Press the (FM) button repeatedly. |
7. DAB-Radio mode
7.1 Operation
| To access the DAB Radio mode | Press the button on the EASY. |
| To search for DAB radio stations | The first time you select the DAB mode, or if the station list is empty, EASY will automatically perform a full scan and store all available stations in the station list. |
| To tune to a station Press | or to select the available stations. Use the volume knob to select the desired station from the list and confirm by pressing the knob. |
| To manually tune the DAB frequency | Press and hold the volume knob to select the DAB frequency. |
| To prune invalid stations and full scan | Press and hold or. |
| To store a radio station in the favorite list | A maximum of 5 radio stations can be stored.Tune to a station and then press and hold a preset station button (1-5) during approx. 3 sec. to directly store it in the favorite list. |
| To recall a radio station in the favorite list | Press a favorite station button (1-5) to access a stored favorite station. |
| To browse the radio station information* (if available) | Press repeatedly. |
| To zoom in slide show photo (if available) | Press and hold the button. |
*DAB information (if available) includes: Station name, Dynamic Label Segment (DLS), Signal strength, Program type (PTY), Ensemble Name, Frequency, Signal error rate, Bit rate and audio status, Codec, and Time and date.
8. Bluetooth mode
EASY can connect to Bluetooth-enabled players (e.g. mobile phone) within a range of approximately 10 meters (30 feet).
8.1 Pairing
- Press button on EASY.
The small Bluetooth icon _B s blinking, indicating that EASY is ready for pairing. - On your Bluetooth-enabled player, turn on the Bluetooth function and search for available Bluetooth devices.
- Select "EASY" in the list of available Bluetooth devices to start pairing.
- The Bluetooth icon stops blinking when pairing is complete.
8.2 Operation
| To access the Bluetooth audio mode, | Press the ➔ button on the EASY. |
| To start playback, Select an audio file from your Bluetooth-enabled player and start playback. | |
| To pause or resume playback, | Press the volume knob. |
| To skip to the previous or next audio file, | Pressor. |
| To quickly search backward or forward within an audio file, | During playback, press and hold ➔. |
| To disconnect the Bluetooth connection, | Switch to another playback mode, or press and hold ➔. |
| To browse the information (if available) of the audio file, | Press the ➔ button repeatedly. |
9. AUX In mode
9.1 Operation
Your external player (e.g. mp3 player) must be connected to the auxiliary input jack of EASY with an audio cable (with 3.5mm connector, not supplied).
| To access the auxiliary input mode, | Press the AUX button on the EASY. |
| To start and control playback, | Perform all playback operations on the external player. |
10. Alarm
10.1 Setting alarm
You can set the alarm.
- Press and hold the to access to the alarm setting mode.
You may also access to the alarm setting mode when EASY is in standby (off) mode. To do so, press and hold the button
- The following options show how to set the alarm. Rotate the volume knob or press the navigation buttons to perform the settings:
[Time]
To set the alarm time.
- [Mode]
To select the alarm sound source. The following options are available:
[FM radio]
- [DAB radio]
[Buzzer]
- [Preset]
To select the last listened station or a preset station as the alarm sound source. This is only showed when DAB or FM is selected in [Mode].
- [Volume]
To set the volume of the alarm sound.
- [Save]
To save the current settings.
Once [Save] is selected, the alarm settings will be stored. If an alarm is activated, the alarm icon ( ) will appear.
10.2 Turning the alarms on or off
- When EASY is in operation mode or in the standby (off) mode, press repeatedly to switch on or off the alarm.
- When an alarm is turned on, the alarm icon (C) will appear.
10.3 Deactivating a sounding alarm
- Press the or O button, to stop a sounding alarm.
10.4 Snooze
- To temporarily disable (default 10 min.) an audible alarm, press the volume knob.
- Rotate the volume knob to change the snooze period (5, 10, 15 or 30 min).
- During the snooze period, the alarm icon will blink and the remaining snooze time will appear.
To cancel the snooze function, press O.
11. Sleep timer
The sleep timer sets the duration of time before EASY turns off automatically.
- Press and hold in any playback mode.
- Rotate the turning knob to select a sleep timer from 5 minutes to 120 minutes with 5 minutes interval.
- Press the volume knob to confirm the selection.
When the sleep timer is activated, the sleep timer icon (C) will appear. To cancel the sleep timer, select [Sleep OFF].
12. Settings
12.1 Time/date
When EASY is in standby mode, press and hold the volume knob to select the option.
- [Set Time/Date]
To set time and date.
[Auto Update]
To select a source (Radio (FM/DAB), or no update) for automatic time update.
- [Set time format]
To set 12 or 24-hour time format.
- [Set date format]
To set three different date formats.
- [DDD dd.mm/yyyy]: Current day, day month, year
- [DDD mm.dd/yyyy]: Current day, month, day, year
- [DDD Mmm dd,yyyy] : Current day, month (in words), day, year
12.2 Equalizer
When EASY is in any operating mode, press and hold the × button to select one of the sound equalizer options to adjust the sound according to your taste.
[Bass]
Adjust the bass level to tailor the sound of the audio playback.
[Treble]
Adjust the treble level to tailor the sound of the audio playback.
- [Loudness]
Loudness on, it adapts the treble and bass levels to suit the current volume, so that delicate sounds can still be heard clearly when you listen to your music quietly.
12.3. Display dimmer
To select 5 different brightness levels of the display.
- Press the button continuously to toggle bewteen high level, medium high level, medium level, medium low level and low level.
- Alternatively, tune the volume knob to select different brightness settings and then press the knob to confirm.

If it is operating with batteries, the display will automatic switch off after 60 seconds in order to save the power and extend the batteries' life.
In that case, press any function buttons, it will activate the radio to its corresponding function.
12.4. Night lamp
To turn the night lamp on or off.
- Press the button to turn on or off the night lamp.

If it is operating with batteries, the night lamp indicator is off.
13. Special System Settings
To enter the EASY advanced system settings menu, switch it to standby mode. Press and hold the button for about 2 seconds, then press favorite button 5.
The Special System Settings are meant to prevent unintentional changes of personal settings.
13.1. Time/Date lock setting
- This option sets the time/date access availability in standby mode.
[No]: To allow time/date setting.
[Yes]: To disable time/date setting.
13.2. Default power on source
-
This option allows you to set the next time startup operating mode.
-
[Last listened]: To set the last operating mode as next time startup.
[FM radio]: To set the FM radio mode as next time startup. - [DAB radio]: To set the DAB radio mode as next time startup.
- [Bluetooth] : To set the Bluetooth mode as next time startup.
[AUX in]: To set the AUX In mode as next time startup.
13.3. Set minimum volume level
- This option allows you to set EASY with the minimum volume level output in operating modes and alarm volume setting.
13.4. Set maximum volume level
- This option allows you to set EASY with the maximum volume level output in operating modes and alarm volume setting.
13.5. Set power on volume level
- This option allows you to set EASY with your desired volume level when it is power on.
13.6. Preset stations lock setting
- This option allows you to enable or disable the FM/DAB preset storing function by overwriting the existing ones.
[Yes]: Disable FM/DAB preset storing function.
- [No]: Enable preset storing function.
13.7. Set Bluetooth auto-connecting
-
This option allows you to enable or disable the Bluetooth automatic re-connections function.
-
[Yes]: EASY will automatically establish the connection with the last used Bluetooth device.
- [No]: EASY will not automatically reconnect with the last used Bluetooth device.
13.8. Inactive standby
- This option sets the duration of time before EASY turns off automatically. Options include: Off, 2, 4, 5 and 6 hours.
13.9. [Factory reset]
- This option clears all user-defined settings and replaces them with the original default settings.
14. Troubleshooting
Malfunctions can occur with any electrical equipment. This is not necessarily due to an EASY defect. As such, you should check the following table to see if you can eliminate the problem by yourself.
| Malfunction Possible cause | Solution | |
| The device does not switch on. | Power adapter is not properly connected. | Connect the power adapter properly. |
| Batteries are empty. Exchange are inserted in wrong polarity. | Exchange new batteries. | |
| Batteries are inserted in wrong polarity. | Insert the batteries in correct polarity. | |
| No response from EASY. There is an error in EASY. | There is an error in EASY. | Disconnect and reconnect the power plug. Then turn EASY on again. |
| No sound or poor sound. Sound is turned off. Adjust the volume. | ||
| Volume is set to minimum. | Increase the volume. | |
| EASY is not set to the correct playback mode. | Select another playback mode. | |
| FM/DAB reception is poor. | Extend/adjust the FM/DAB antenna. | |
| There is radio interference. | Keep EASY away from other electronic devices. | |
| No or faulty Bluetooth connection. | Interference caused by other radio transmitter or devices. | Increase the distance between the EASY and the other electronic devices. |
| Malfunction Malfunction | Solution | |
| Alarm does not work. Alarm | is not switched on. | Switch the alarm on. |
| Alarm volume is set to minimum. | Increase the alarm volume level. | |
| USB device does not work. | USB device is not charging. | Check the USB cable. |
| Plug-in the provided power adapter. | ||
GB
15. Cleaning

NOTICE!
Material damage due to improper cleaning!
Improper cleaning can result in damage to EASY or cause certain functions to stop working.
- Never use abrasive or solvent-based cleaning agents, as these may damage the surface of EASY.
- Never use hot or compressed air to dry EASY.
Cleaning off fingerprints and light soiling
- Clean EASY only from the outside with a soft, dry cloth.
Cleaning off heavy soiling
- Clean EASY only from the outside with a slightly damp cloth and then dry EASY with a soft, dry cloth.
16. Warranty
When submitting warranty claims, the following applies without restricting your legal rights:
- Warranty claims can only be asserted within a period of max. 2 years (1 year in North America and Australia), calculated from the date of purchase.
- sonoro audio GmbH shall, at its own discretion, repair or replace EASY free of charge any defects caused by material or manufacturing defects within the warranty period.
- In case of a complaint, please contact our customer service department. You can find contact details under "Contact data" or at www.sonoro.de.
- No new warranty period begins following repair or replacement of EASY. The warranty period of 2 years (1 year in North America and Australia) from date of purchase remains applicable.
- Excluded from the warranty are batteries, damage caused by improper use, normal wear and tear, as well as defects which only minimally affect the value or usability of EASY. The warranty also expires in case of any modifications not made by our authorised service centre.
EASY
SO-120
RADIO FM/DAB+ AVEC BLUETOOTH®
Bedienungsanleitung
Operating manual
Mode d'emploi
Manuale operativo
- Radio FM [FM]
-
Radio DAB [DAB]
-
[Preset]
13.2. Default power on source
13.6. Preset stations lock setting
FM Radio [FM]
DAB Radio [DAB]
Cicalina [Buzzer]
Programma [Preset]
13.2. [Default power on source]
13.6. Preset stations lock setting
FM Radio [FM]
DAB Radio [DAB]
- Zoemer [Buzzer]
13.2. [Default power on source]
13.6. Preset stations lock setting
11. Dvalefungtion (Sleeptimer) 187
12. Systemindstlinger 188
12.1 Klokkeslaet/dato 188
12.2 Modforvranger 188
12.3 Skarmlysstyrke 189
12.4 Natlampe 189
13. Udvidede systemindstlinger 190
13.1 [Time/Date lock setting] 190
13.2 [Default power on source] 190
13.3 [Set minimum volume level] 190
13.4 [Set maximum volume level] 190
13.5 [Set power on volume level] 191
13.6 [Preset stations lock setting] 191
13.7 [Set Bluetooth auto-connecting] 191
13.8 [Inactive standby] 191
13.9 [Factory reset] 191
14. Afhjaelpning af fejl 192
15. Rengoring 194
16. Garanti 195
1. Indledning
FM Radio [FM]
DAB Radio [DAB]
- Alarmtone [Buzzer]
11. Dvalefungtion (Sleeptimer)
Med dvalefungtionen (Sleeptimer) angiver du den tid, der gär, for EASY slukker automatisk.
13.2. [Default power on source]
13.6. Preset stations lock setting
- Medienne Funktion kan du aktivere eller deaktivere gemmefunktionen for FM-/ DAB-presents.
At sonoro we are putting the utmost effort in to developing state-of-the-art products with impeccable quality standards. It is very important to us that you stay satisfied with your sonoro product for the lifetime of the unit. If for any reason you need assistance or have a warranty claim, please do not hesitate to get in touch with our Service Team.