Maestro SO1000 - Hi-fi system SONORO - Free user manual and instructions
Find the device manual for free Maestro SO1000 SONORO in PDF.

| Product Type | Hi-Fi system |
| Brand | Sonoro |
| Model | Maestro SO1000 |
| Dimensions (W x D x H) | 432 x 277 x 120 mm |
| Weight | 6.0 kg |
| Power Supply | AC 230 V, 50 Hz |
| Rated Output Power | 170 W x 2 (at 4 Ω), 100 W x 2 (at 8 Ω) |
| Speaker Impedance | 4 to 16 Ω |
| Radio | FM, DAB/DAB+, Internet |
| Connectivity | Bluetooth 3.0, Wi-Fi 2.4/5 GHz, Ethernet |
| CD Player | CD-DA, CD-R/RW, MP3, WMA |
| Audio Inputs | AUX 1 (RCA), AUX 2 (3.5 mm), optical (TOSLINK), coaxial (S/PDIF), phono (MM) |
| Streaming | Spotify, TIDAL, Napster, Deezer, Qobuz, Amazon Music, DLNA/UPnP |
| USB Port | Charging (5 V, 2.1 A) and playback (FAT16/32) |
| Display | 2.8-inch TFT color display |
| Remote Control | Yes, with CR2032 battery included |
| Additional Functions | Sleep timer, equalizer, room correction via iOS app, UNDOK app |
| Maintenance and Cleaning | Clean the exterior with a soft, dry cloth. Do not use abrasive or solvent-based products. |
| Safety | Do not block ventilation openings. Disconnect before connecting speakers. Use only speakers with 4 to 16 Ω impedance. |
| Spare Parts and Repairability | Remote control, antennas, power cord available. For repair, contact Sonoro customer service. |
| General Information | 2-year warranty (1 year North America/Australia). Shipping weight including accessories. |
Frequently Asked Questions - Maestro SO1000 SONORO
User questions about Maestro SO1000 SONORO
0 question about this device. Answer the ones you know or ask your own.
Ask a new question about this device
Download the instructions for your Hi-fi system in PDF format for free! Find your manual Maestro SO1000 - SONORO and take your electronic device back in hand. On this page are published all the documents necessary for the use of your device. Maestro SO1000 by SONORO.
USER MANUAL Maestro SO1000 SONORO
natural_image
Technical line drawing of a device rear panel with four circular holes and a rectangular slot, labeled with number 41 (no text or symbols on the diagram itself)natural_image
Hand pressing a button on a smartphone (no text or symbols visible)
natural_image
Line drawing of a mechanical component with a threaded bolt inserted, showing assembly or repair (no text or symbols)natural_image
Technical line drawings of two T-shaped pipe fittings labeled A and B, showing different connection configurations (no text or symbols beyond labels)!
text_image
Diagram of an electronic device rear panel with labeled ports and connectors, showing internal components and directional arrows.text_image
LXR SUBWOOFERtext_image
Select your Audio System Please select your audio system from the list below. Scanning...text_image
MAESTRO APP ROOM CORRECTION Before After BEGIN CORRECTION DEVICE NAME MAESTRO App FIRMWARE V1.03text_image
SCANNING THE ROOM "Room Correction" Would Like to Access the Microphone This app needs to record sound via microphone. You can change this options in the system settings. Don't Allow OK from several positions. The process last about 30 seconds.text_image
PLAYING TEST TONE Device is playing test tone for 4 seconds, please confirm whether you are able to hear the test tone. RETRY NEXTtext_image
SCANNING THE ROOM Device is scanning the room. Please walk around the room with the phone in your hand so it can listen from several positions. The process last about 50 seconds.text_image
ROOM CORRECTION CORRECTING THE ROOM Device is correcting the room according to the room's raw scan.text_image
ROOM CORRECTION WELL DONE! Device has completed the room correction, let's rock! Writing data... 4/4 REDO OK1. Introduction....78
1.1 Contact data 78
1.2 Intended use....79
2. GETTING TO KNOW YOUR MAESTRO....79
2.1 Scope of delivery....79
2.2 Controls and ports....80
2.3 Technical data....85
2.4 Marks of approval and certificates....87
3. GETTING STARTED....88
3.1 Unpacking MAESTRO....88
3.2 Inserting the battery in the remote control....88
3.3 Using the antennas....89
3.4 Speaker connections....90
3.5 Connecting PRE OUT jacks / 2.1 system....92
3.6 Connecting a record player....93
3.7 Connecting the power cord 94
3.8 Performing initial setup....95
4. BASIC OPERATION....97
5. USING THE MENUS 99
6. DISPLAY ICONS....100
7. FM RADIO MODE.... 101
7.1 Operation....101
7.2 Setup menu....102
8. DAB RADIO MODE.... 103
8.1 Operation.... 103
8.1 Setup menu.... 104
74 © sonoro audio GmbH 2020
TABLE OF CONTENTS
9. INTERNET RADIO MODE....105
9.1 Operation.... 105
9.2 Setup menu....106
9.3 Station List 106
9.4 Using the web portal 107
10. BLUETOOTH MODE 108
10.1 Pairing.... 108
10.2 Operation.... 109
10.3 Setup menu.... 109
11. AUX IN 1 MODE 110
11.1 Operation....110
11.2 Setup menu....110
12. AUX IN 2 MODE ....111
12.1 Operation....111
12.2 Setup menu....111
13. OPTICAL MODE 112
13.1 Operation 112
13.2 Setup menu....112
14. COAXIAL MODE.... 113
14.1 Operation....113
14.2 Setup menu....113
15. CD MODE.... 114
15.1 Operation....114
15.2 Setup menu....115
TABLE OF CONTENTS
16. PHONO MODE.... 116
16.1 Operation....116
16.2 Setup menu....116
17. STREAMING SERVICES....117
17.1 Operation....118
17.2 Setup menu....119
18. MY MUSIC MODE.... 120
18.1 Operation....120
18.2 Setup menu....122
19. SLEEP TIMER.... 123
20. SYSTEM SETTINGS.... 124
20.1 Accessing the system settings....124
20.2 Equalizer....124
20.3 Network....125
20.4 Time/date 125
20.5 Inactive standby....125
20.6 Language....126
20.7 Factory Reset 126
20.8 Software update....126
20.9 Setup Wizard 126
20.10 Info....126
20.11 Privacy policy 126
20.12 Backlight....126
21. USING UNDOK™ APP TO CONTROL MAESTRO 127
22. ROOM CORRECTION APP 129
TABLE OF CONTENTS
- TROUBLESHOOTING.... 133
- CLEANING.... 136
- WARRANTY 137
GB
1. INTRODUCTION
Thank you for purchasing MAESTRO. This operating manual and the safety manual provide all the information required for trouble-free and safe operation of MAESTRO.
- Read the operating manual and the safety manual in their entirety before using MAESTRO.
- Keep the operating manual and safety manual for future reference.
- If you pass MAESTRO on to a third party, please provide them with the operating manual and safety manual as well.
- Failure to follow the operating manual and safety manual can result in serious injury or damage to MAESTRO.
- We assume no liability for damage resulting from failure to observe the instructions in this operating manual and safety manual.
The images in this operating manual are intended to illustrate the actions necessary to operate MAESTRO.
Enjoy your MAESTRO!
1.1 CONTACT DATA
| Address | sonoro audio GmbH,Nordkanalallee 94, D-41464 Neuss, Deutschland |
| Phone | +49 2131 8834-141 |
| Fax | +49 2131 7517-599 |
| support@sonoro.de | |
| Internet | www.sonoro.de |
1.2 INTENDED USE
MAESTRO is intended for personal use only. It is not intended for commercial use. MAESTRO is solely intended for the following tasks:
• Operation of external speakers with an impedance of 4 16 .
- Playback of FM/DAB+/Internet radio and music streaming services.
- Playback of 12 cm audio CD and MP3/WMA CD disc.
- Audio playback from external devices connected via AUX In, USB port phono input, optical input or coaxial input.
- Audio playback from Bluetooth-enabled devices (e.g. mobile phones).
• Music stream to Bluetooth headphone devices.
- Charging of external devices that are connected via the USB port.
Any other use is considered improper use and is prohibited. We assume no liability for damages resulting from improper use.
2. GETTING TO KNOW YOUR MAESTRO
2.1 SCOPE OF DELIVERY
In addition to the MAESTRO itself, the following accessories are also included in the scope of delivery:
- Remote control
• One button cell (CR2032, 3 V) - Power cable
• FM/DAB cable antenna
• FM/DAB telescopic antenna - External WiFi antenna
- Quick start guide
- Operating manual
- Safety manual
- Greeting card
• sonoro audio collection flyer - Gloves
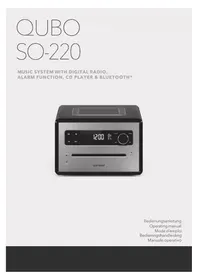
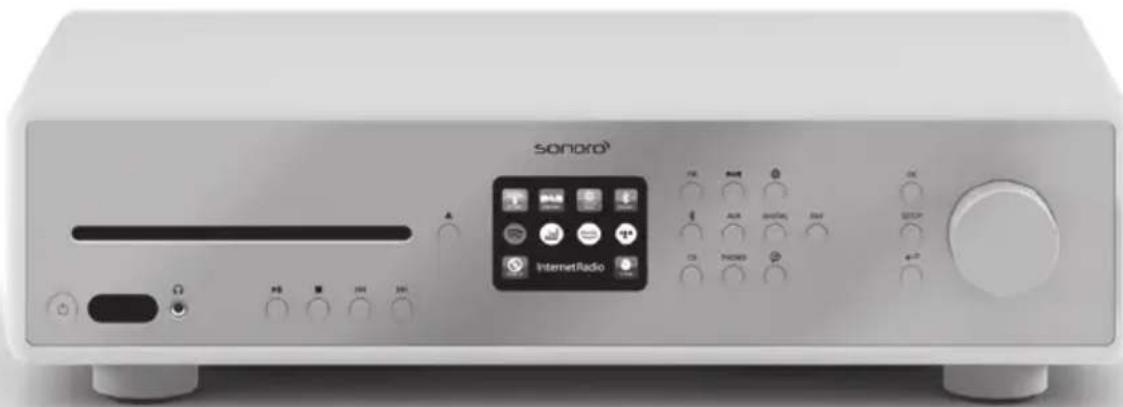
2.2 CONTROLS AND PORTS
FRONT VIEW
text_image
12 13 14 15 16 18 20 22 23 24 sonord 1 2 3 4 5 6 7 8 9 10 11 OX PND DIGENL HV SETUP- Standby button ( ) ⏻
- Infra-red sensor & light sensor
- Headphone jack( )
- Play/pause button()
- Stop button ( )
- Left button, skip previous ( )
- Right button, skip next( )
- CD mode (CD)
- Phono mode (PHONO)
- Music streaming services ( )
- Back button ( )
- CD slot
-
CD eject button ( ▲)
-
Display
- FM radio mode (FM)
- Bluetooth mode (✗)
- DAB radio mode ( DAB)
- Auxiliary input 1/2 mode(AUX)
- Internet radio mode (
- Optical/coaxial input mode (DIGITAL)
- Favourite button (FAV)
- Setup button (SETUP)
- Select button (OK)
- Volume knob, navigation knob
GB
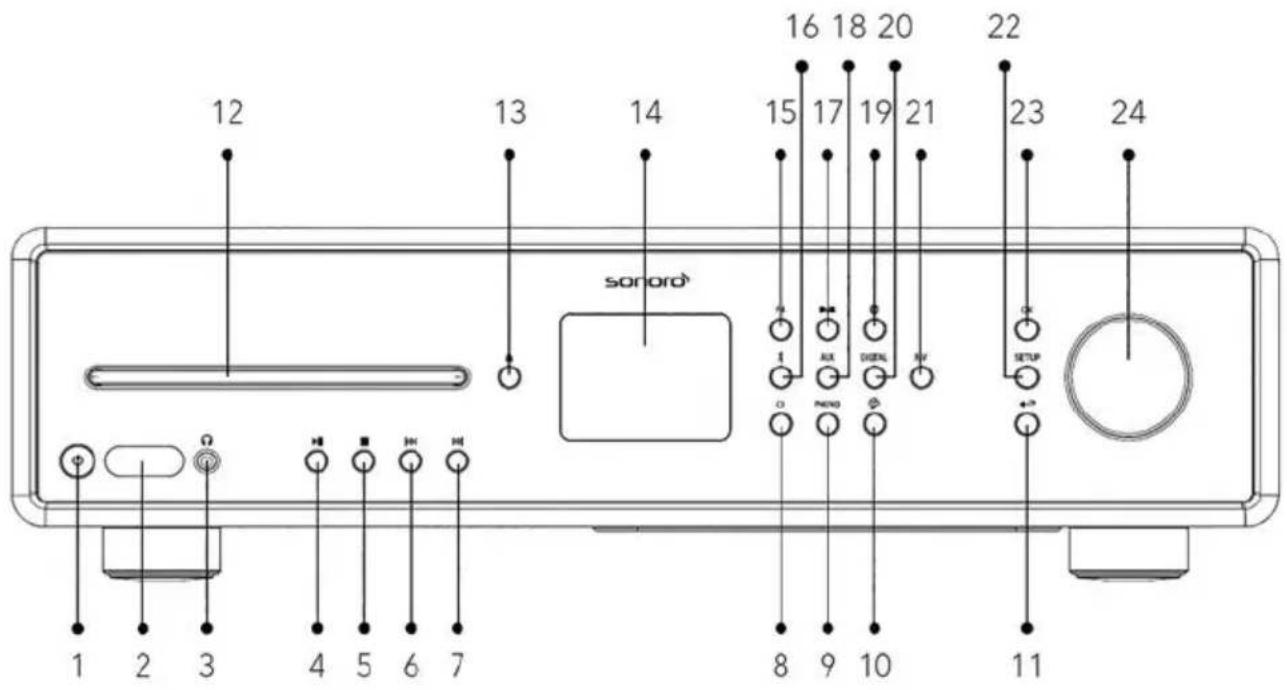
text_image
37 38 39 40 2526272829303132333435 36- AC socket
- Heatsink
- Speaker output terminals
- Pre-amplifier output
- Auxiliary input 1 (RCA)
- Auxiliary input 2 (3.5mm)
- Phono Ground (GND)
-
Phono input
-
Optical input
- Coaxial input
- USB port
- LAN RJ45 jack
- Mains ON/OFF switch
- External WiFi antenna jack
- Rear panel ventilation holes
- DAB/FM antenna jack
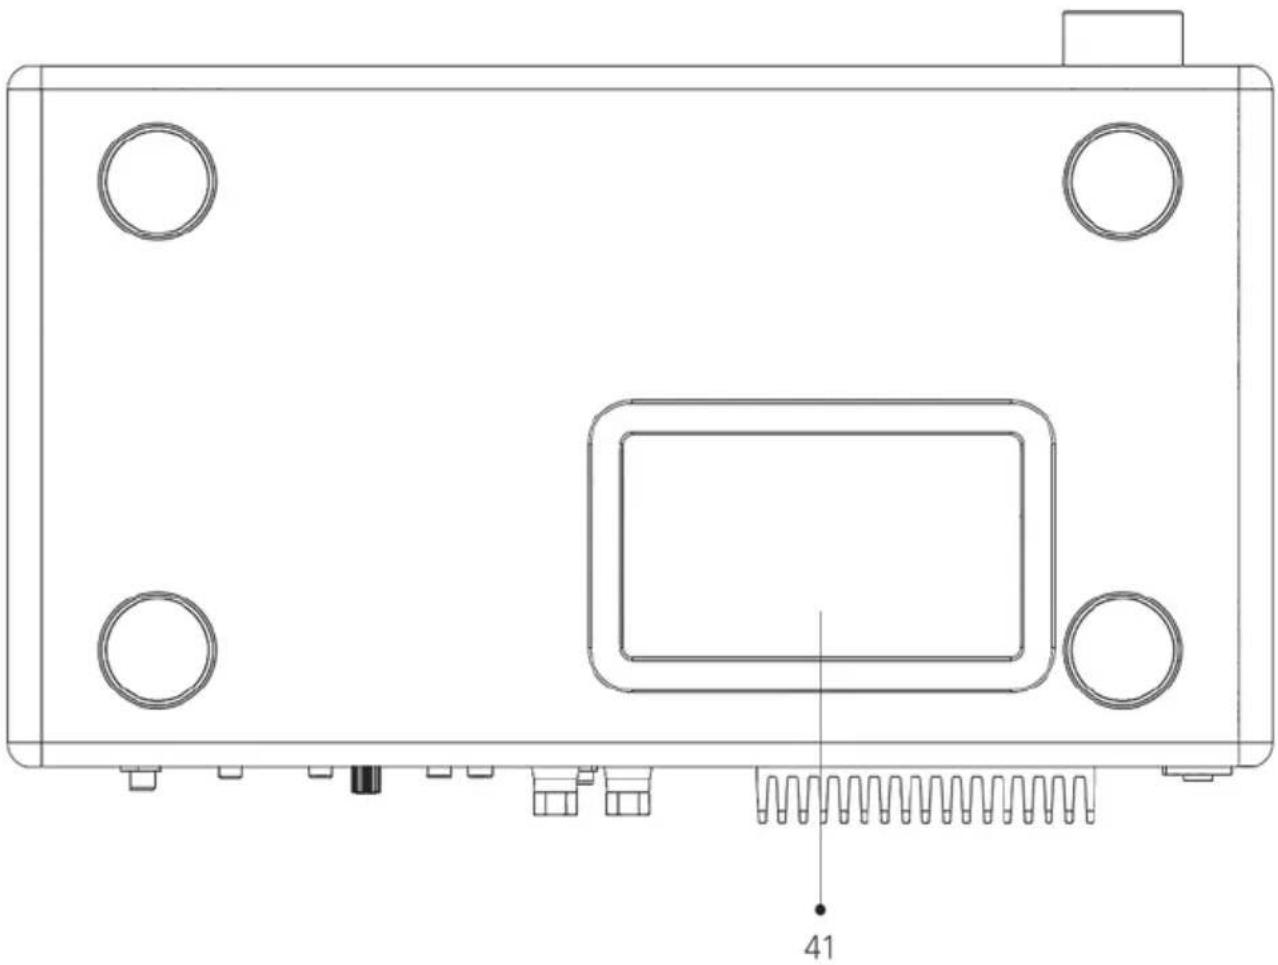
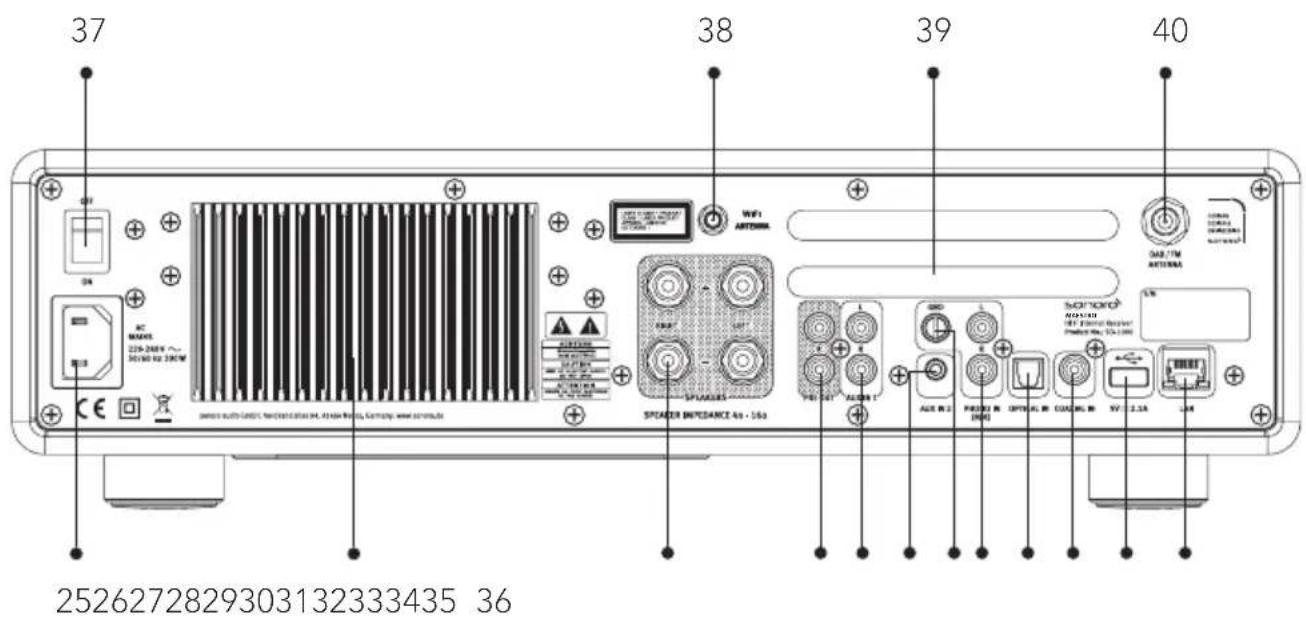
natural_image
Technical line drawing of a device rear panel with four circular holes and a rectangular slot, labeled with number 41 (no text or symbols on the diagram itself)- Bottom ventilation holes

NOTICE!
Risk of damage!
Do not block the rear panel and bottom ventilation holes.
text_image
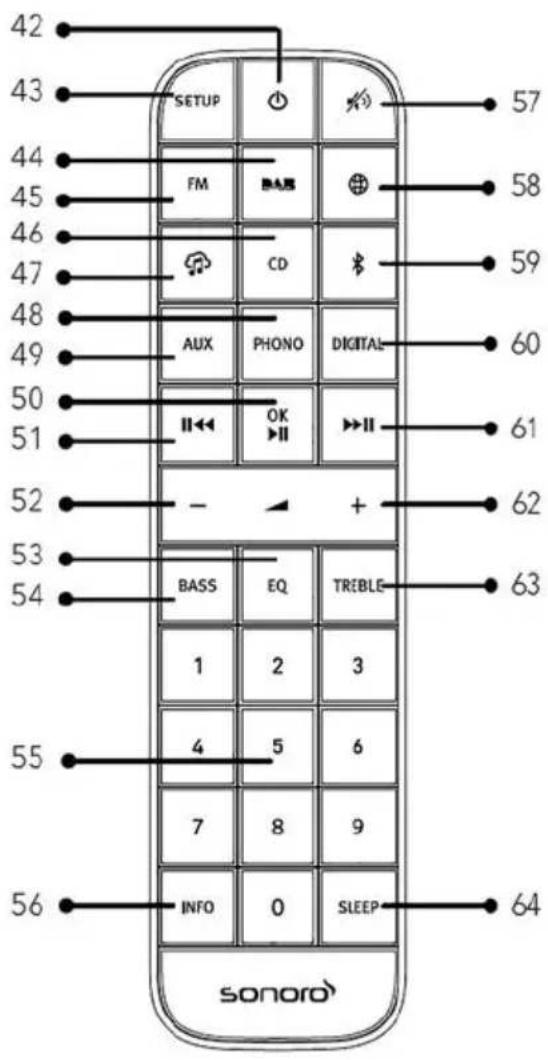
42 43 SETUP FM CD AUX PHONO DIGITAL II← OK II + BASS EQ TREBLE 1 2 3 4 5 6 7 8 9 INFO 0 SLEEP sonoro 57 58 59 60 61 62 63 64- Standby button ( )
- Setup button (SETUP)
- DAB radio mode()
- FM radio mode (FM)
- CD mode (CD)
- Music streaming services ( )
- Phono mode (PHONO)
- Auxiliary input 1/2 mode (AUX)
- Play/pause button (▶II)
OK button
text_image
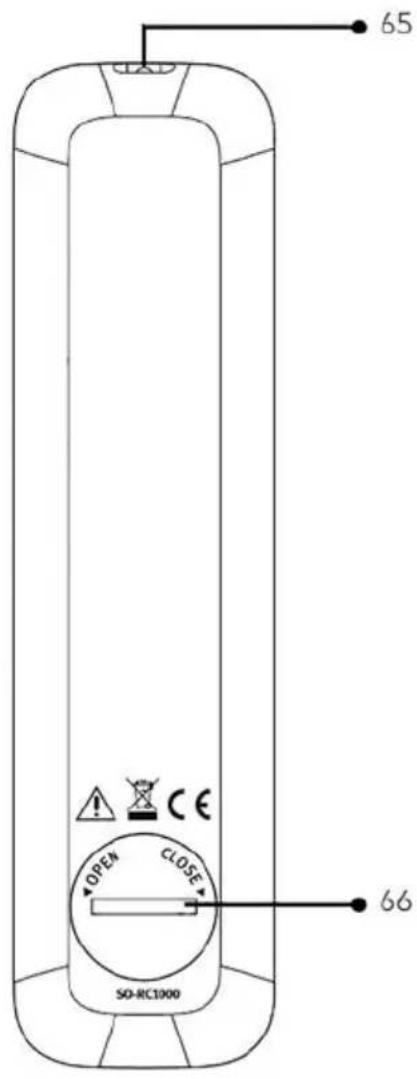
65 OPEN CLOSE SO-RC1000 66- Left button, skip previous ( )
- Volume down button (-)^*
- Equalizer setting button (EQ)
- Bass setting button (BASS)
- Preset station buttons (0-9)
- Information button (INFO)
- Mute button ( )
- Internet radio mode()
-
Bluetooth mode ( )
-
Optical/coaxial input mode (DIGITAL)
- Right button, skip next ( )▶II
- Volume up button (+)*
- TREBLE setting button (TREBLE)
- Sleeper timer button (SLEEP)
- Infra-red transmitter
- Battery compartment
*Navigation buttons (+,-)
2.3 TECHNICAL DATA
GB
| Specification Value | |
| Dimensions (W×D×H) approx. 432 x 277 x 120 mm | |
| Weight approx. 6.0 kg | |
| Operating temperature 0°C ~ +40°C | |
| Load impedance 4-16 Ω | |
| Rated output power1KHz, THD+N <0.1%(AES17) | 170 W x 2 @ 4Ω100 W x 2 @ 8Ω |
| Frequency response 20 Hz ~ 20 KHz | |
| Display 2.8" TFT colour display | |
| Frequency range, FM 87.50 MHz-108.00 MHz | |
| DAB/DAB+ Band III, 174.928 MHz-239.200 MHz | |
| Internet radio More than 25,000 stations worldwide | |
| Station presets | 10 for each FM | DAB/DAB+ | Internet radio | Spotify8 for each TIDAL | Napster | Deezer | Qobuz | Amazon Music |
| CD support formats | CD-DA (12cm), CD-R*, CD-RW*Audio CD, MPEG 1 Layer 3 (MP3), Windows Media Audio(WMA, DRM not supported)Sampling rate 16KHz~48KHz, bit rate max. 320kbps(*Playback dependent on quality of recording and medium) |
| USB charging Output: DC 5V 2.1A --- | |
| USB playback | Compatibility system: FAT 16, FAT 32 (not compatible with NTFS or other systems) |
| AUX-IN | Port 1 : RCA jack sensitivity: 1000 mVPort 2 : 3.5 mm jack sensitivity: 300 mV |
| OPTICAL-IN (TOSLINK),COAXIAL-IN (S/PDIF) | Supports linear PCMSample rate: 28 KHz-216 KHz, Channel: Stereo 16 bit, 24 bit |
| Phono in | For Moving Magnet (MM) pickup systemInput sensitivity: 5 mV / 47 KΩ |
| Pre-amplifier output 2 Vrms / 1.5 KΩ | |
| Streaming | Bluetooth | Spotify | TIDAL | Napster | Deezer | Qobuz | Amazon Music | DLNA | UPnP |
| Network supported | IEEE 802.11 a/b/g/n, 2.4 & 5GHz bands, Ethernet 2.412GHz-2.472GHz / 5.18GHz - 5.32GHz / 5.50GHz-5.70GHz |
| Max. transmitted power < | 20 dBm |
| Encrypted key WEP, WPA, | WPA2 (PSK), WPS |
| Bluetooth | Version 3.0, Profile : AVRCP v1.4, A2DP 1.2, HSP v1.2 2.402GHz-2.480GHz |
| Max. transmitted power < | 10 dBm |
| My music support media formats | Codec Maximum supported bit rateAAC (LC, HE, HEv2) 320 kbits/secFLAC(1) 1.5 Mbits/secLPCM(2) 1.536 Mbits/secMP3 320 kbits/secWAV 1.536 Mbits/secWMA(3) 320 kbits/secAll codecs support 2 channels coded files only.All codecs support smaple rate up to 48 Hz(include 32 and 44.1 Hz).Files which have Digital Rights Management (DRM) protection applied will not be playable on MAESTRO.(1) 16 and 24 bit samples are supported in FLAC files.(2) The maximum supported bit-rate is for 48 kHz sampling, 2 channels and 16-bits per sample.(3) WMA Lossless, WMA Voice, WMA 10 Professional, and files which have DRM protection are not supported. |
| Battery CR2032 (remote control) | |
| Standby Power < 1.0 W | |
| Network Standby | < 2.0 W |
2.4 MARKS OF APPROVAL AND CERTIFICATES

Bluetooth®
The Bluetooth® word mark and logos are registered trademarks owned by the Bluetooth SIG, Inc. and any use of such marks by sonoro audio GmbH is under license. Other trademarks and trade names are those of their respective owners.

UPnP ^TM is a trademark of the UPnP ^TM Forum.

Spotify®
The Spotify software is subject to third party licenses found here: http://www.spotify.com/connect/third-party-licenses

napster
Napster and Napster logo are registered trademarks of Rhapsody International Inc registered in the United States and other countries.

TIDAL
TIDAL and TIDAL logo are registered trademark of Aspiro AB in the European Union and other countries.

deezer
Deezer and Deezer logo are international trademarks of Deezer S.A., registered in France and other countries.

qobuz
Qobuz and its logo are registered trademarks of Xandrie S.A.
amazon music
Amazon, Amazon Music Unlimited and all related logos are trademarks of Amazon.com, Inc. or its affiliates.
GB
3. GETTING STARTED
3.1 UNPACKING MAESTRO
-
Take MAESTRO out of the packaging and check whether MAESTRO or the individual parts exhibit damages. If this is the case, do not use MAESTRO. Should you detect any damage, contact your dealer or sonoro audio GmbH customer support immediately.
-
Check to make sure that the delivery is complete (see chapter "Scope of delivery").
-
Place MAESTRO at a suitable location. If you want to put your MAESTRO on a natural wood surface, please make sure that it is suitable. On oiled and waxed surfaces, stains may occur.
-
Remove the protective film from the display.
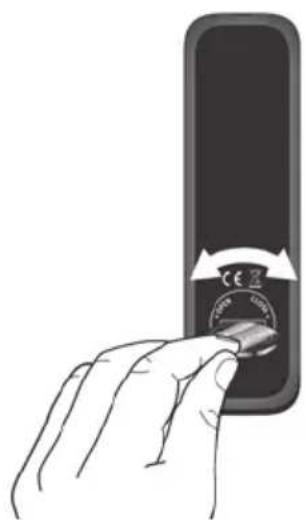
3.2 INSERTING THE BATTERY IN THE REMOTE CONTROL
-
Open the battery compartment cover on the back of the remote control by turning it anticlockwise using a small coin.
-
Insert the supplied batteries (CR2032, 3 V) with the label (+) side up.
-
Replace and close the battery compartment cover by turning the cover clockwise using a small coin.
natural_image
Hand pressing a button on a smartphone (no text or symbols visible)
Do not block the infra-red sensor on the MAESTRO and the infra-red transmitter on the remote control during use.
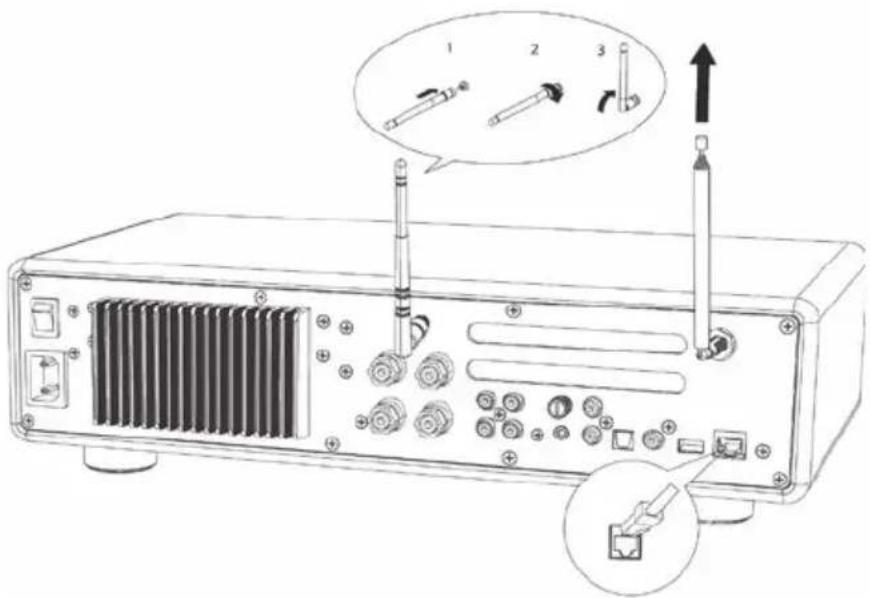
3.3 USING THE ANTENNAS
- The scope of supply contains a cable antenna and a rod antenna.
For optimum radio reception, one of the two antennas must be used. - Screw the desired antenna located on the back of MAESTRO to the FM/DAB antenna connector.

natural_image
Line drawing of a mechanical component with a threaded bolt inserted, showing assembly or repair (no text or symbols)- If you are using the cable antenna, unfold the cable antenna and align the antenna so that you have the best possible reception.
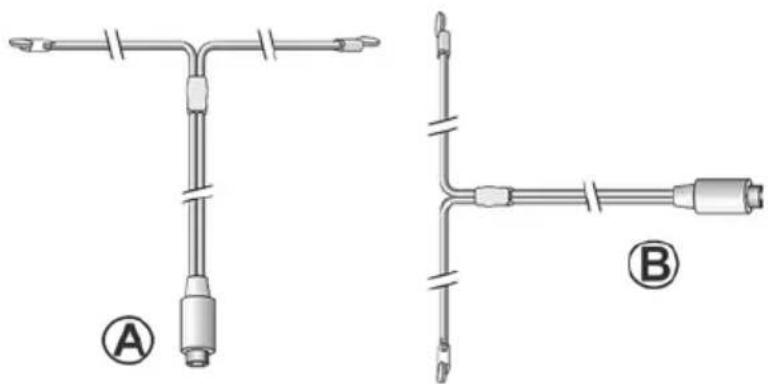
natural_image
Technical line drawings of two T-shaped pipe fittings labeled A and B, showing different connection configurations (no text or symbols beyond labels)
For good FM/DAB radio reception, the two ends of the cable antenna should form a ,T' (dipole) with the connection cable.
A: Recommended alignment for FM
B: Recommended alignment for DAB
For even better reception, connect MAESTRO to a suitable house antenna.
- If you are using the rod antenna, pull the rod of antenna apart and align the antenna so that you have the best possible reception.
- Screw the desired Wi-Fi antenna located on the back of MAESTRO to the WiFi antenna connector. Lift Wi-Fi antenna upwards.
- If you want to connect MAESTRO to your network using an Ethernet cable, connect an Ethernet cable from LAN port on the back of MAESTRO to your router.
text_image
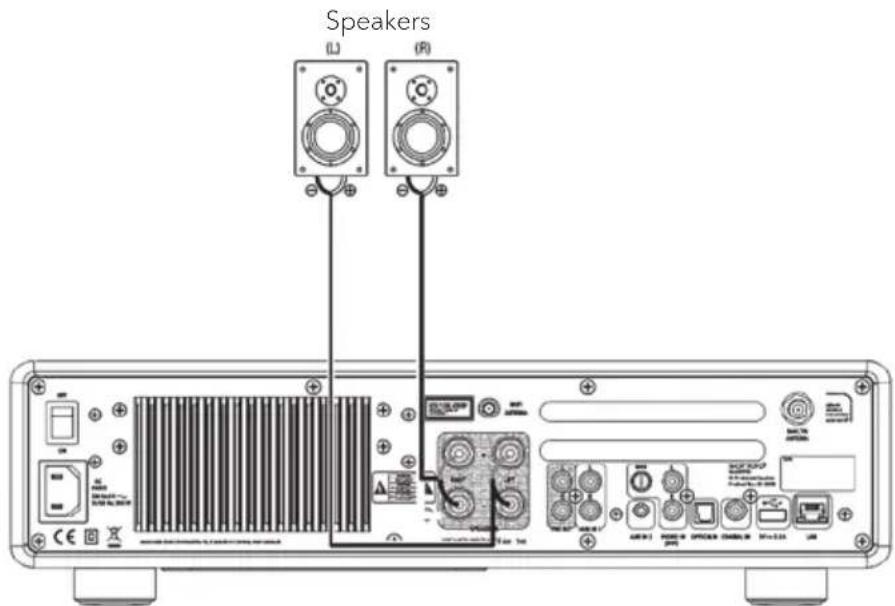
Diagram of an electronic device rear panel with labeled ports and connectors, showing internal components and directional arrows.3.4 SPEAKER CONNECTIONS
NOTICE!
Risk of damage!

- Disconnect the power plug from the power outlet before connecting the speakers.
- Never touch the speaker terminals while the power cord is connected. Doing so could result in electric shock.
- Use speakers with an impedance of 4 - 16 Ω.
Speakers can be connected to MAESTRO as shown below.
text_image
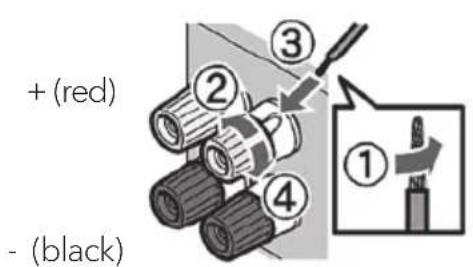
Speakers (L) (R)Connecting the speaker cables
-
Remove approximately 10 mm of insulation from the end of each speaker cable. Then, twist the bare wires of the cable firmly together.
-
Unscrew the knob.
-
Insert one bare wire into the hole in the side of each terminal.
-
Tighten the knob to secure the wire.
text_image
+ (red) - (black)
When connecting the speaker cable, take notice of the followings:
- Do not let the bare wires of the speaker cable touch one another.
- Do not let the bare wires of the speaker cable come into contact with MAESTRO's rear panel and screws.
Using a banana plug
- Tighten the knob.
- Insert the banana plug into the end of the terminal.
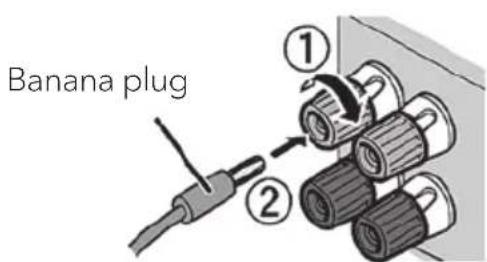
text_image
Banana plug ① ②3.5 CONNECTING PRE OUT JACKS / 2.1 SYSTEM
The pre-outs allow you to connect active subwoofers, another power amplifier, mixer, recorder, etc.
The following illustration shows how to connect an active subwoofer to MAESTRO.
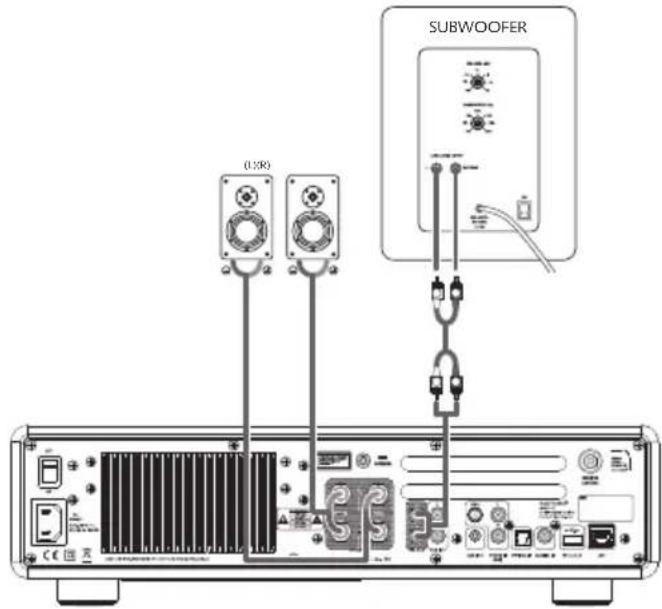
text_image
(1:38) SUBWOOFERSelect the option 2.1 System in the EQUALIZER menu. Then choose at MAESTRO the same crossover frequency as on your active subwoofer.
MAESTRO allows you to select the following crossover frequencies: 60Hz, 70Hz, 80Hz, 90Hz, 100Hz, 110Hz, 120Hz, 140Hz, 160Hz and 180Hz.
Choose a low frequency, e.g. 60Hz, for very large subwoofers and higher frequencies for smaller subwoofers. Follow the instructions and recommendations of your subwoofer.
Select one of the crossover frequencies and confirm with the „OK“ button. The speakers connected to the MAESTRO (L and R) are then operated via a Linkwitz high pass filter 2nd order.
This has the advantage that the L and R speakers are relieved of low tones, and the entire 2.1 system gains dynamic and maximum volume.
The volume knob on the active subwoofer adjusts the desired bass volume. Ideally you start with a very low volume and then increase slowly, until the subwoofer is just heard.

Adjusting the volume, loudness and tone on MAESTRO has effect on the PRE OUT jacks.
3.6 CONNECTING A RECORD PLAYER
Record players with MM cartridge can be connected directly to MAESTRO. Please connect as shown below.

text_image
GND L RRecord player (MM cartridge)

NOTICE!
Risk of damage!
The GND terminal of PHONO is not a safety ground connection. Connect the ground cable of your record player here to reduce hum and noise.

If input source is set to "PHONO" without having a record player connected, you may hear a hum noise from the speakers.

Depending on the turntable, connecting the ground terminal may have the reverse effect of increasing noise. In this case, it is not necessary to connect the ground terminal.
3.7 CONNECTING THE POWER CORD
Hi-Fi audiophiles know that the polarity of the power supply can affect the sound quality.
MAESTRO contains a power plug with a mark of the phase. (see picture below).

text_image
Neutral Pin Live Pin Red colorThe AC mains socket can check for the live pin by using AC mains phase detectors or a tester screwdriver.

text_image
Live pin socket
NOTICE!
Risk of electrical shock!
Read and follow all safety instructions and instructions of your AC phase detector. In case of doubt, contact a specialist!
- After complete all the connections, insert the power plug into the power outlet with correct phase.
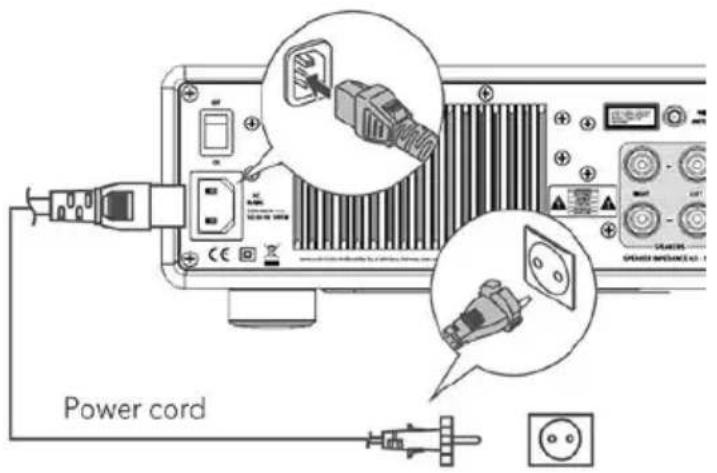
text_image
Power cordTo household power outlet (AC 230V, 50/60Hz)
- Switch on the mains power switch on MAESTRO.
3.8 PERFORMING INITIAL SETUP
When MAESTRO is powered on for the first time, selected the "Language" (to be used in the display) and press OK to confirm the privacy policy statement.
Then, the "Setup wizard" appears on the display. Follow the instructions below to configure some basic settings.
-
When the "Setup Wizard" is displayed, press + or - on the remote control (or rotate the navigation knob) to select "YES" and then press OK to start the setup.
-
You are then prompted to select:

text_image
Setup wizard Start now? YES NO• Time format (12 or 24-hour),
- Source of auto update (Update from Radio, Internet or no update).
- Depending on the selection you have made, follow the instructions on the display to further set up date and time, time zone, daylight saving or wireless network. Rotate the navigation knob on MAESTRO or press the OK button on the remote control to make selections and then press OK to confirm (see chapter "Using the menus").
When update from Internet is selected, Wi-Fi connection must be first established. When entering the key of your wireless network, rotate the navigation knob on MAESTRO or press the OK button on the remote control to select a character and then press OK to confirm. To delete the last entry, select [BKSP]. To cancel entering the key, select [CANCEL]. To confirm the entered key, select [OK].
- When "Setup wizard completed" appears, press OK to exit the setting.
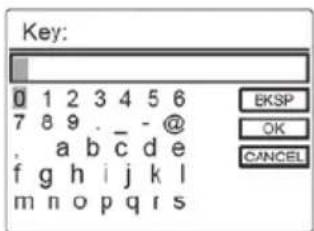
text_image
Key: 0 1 2 3 4 5 6 7 8 9 . - @ . a b c d e f g h i j k l m n o p q r s EKSP OK CANCEL- Alternatively, use the Ethernet (LAN) connection to your router (with automatic configuration), select the [Wired] menu item in the available network.
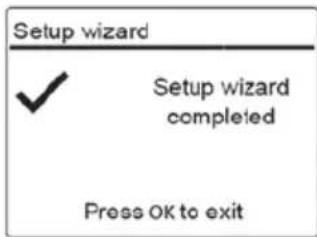
text_image
Setup wizard ✓ Setup wizard completed Press OK to exit
To run the setup wizard again, go to [System Settings] and then select [Setup Wizard] (See chapter "System Settings").
4. BASIC OPERATION
GB
| To turn on | Press ⏻MAESTRO starts operation from the last selected playback mode. |
| To turn off (standby mode) | Press ⏻.The time and date (if set) are displayed.MAESTRO will automatically turn off without playback and operation after 15 minutes. |
| To directly select a playback mode | Press the direct operation mode key on the remote control or the front panel to directly switching from one operation mode to the other. |
| To playback a CD | Insert CD disc in CD slot and MAESTRO starts playing the CD. |
| To control the volume | Press + or - on the remote control or rotate the volume knob on MAESTRO. |
| Pairing with a Bluetooth headphone for the first time | In all operation modes except the Bluetooth mode, press and hold ➕ key on MAESTRO or remote control. Or, press SETUP once, then + or - (or rotate the navigation knob) to select [Bluetooth headphone], then select [Bluetooth pairing], then [Available devices], and then press OK to confirm. Wait for a while, your Bluetooth device name is shown in the display, and then select press OK to select it. |
| The small Bluetooth headphone icon 📁 is blinking and indicating that MAESTRO is in pairing mode. The Bluetooth headphone icon 📋 stops blinking when the pairing is completed. The paired Bluetooth headphone device name is temporarily shown in the display.Note: Make sure that your Bluetooth headphone is already in discovery mode and ready for pairing. For more details, please refer to your Bluetooth device instruction manual. | |
| Connecting with a paired Bluetooth headphone, | In all operation modes except the Bluetooth mode, press and hold ✝ key on MAESTRO or remote control. Or, press SETUP once, then + or - (or rotate the navigation knob) to select [Bluetooth headphone], then select [Bluetooth pairing], then [Paired devices], and then press OK to confirm. Your paired Bluetooth device names are shown in the display. Select your device and press OK to confirm.The small Bluetooth headphone icon 📁 is blinking and indicates that MAESTRO is in pairing mode. The Bluetooth headphone icon 🌐 stops blinking when the pairing is completed. The paired Bluetooth headphone device name is temporarily shown in the display.Note: Make sure that your Bluetooth headphone is already in pairing mode, for more details, please refers to your Bluetooth device instruction manual. |
| To disconnect a paired Bluetooth headphone, | Press SETUP once, then + or - (or rotate the navigation knob) to select [Bluetooth headphone], then select [Bluetooth disconnect] and then press OK to confirm. |
5. USING THE MENUS
There are three types of menus in MAESTRO.
- Setup menu (For specific settings in a playback mode, e.g. [FM Auto Search] in FM mode)
- System Settings (For general settings, e.g. time/date, language etc.)
- Main menu (For accessing the playback modes and sleep time)
| To access the menus, | PressSETUP.Contents of the menus may differ in different playback modes. |
| To select an option in the menus, | Rotate the navigation knob on MAESTRO or press+ or – on the remote control. |
| To confirm a selection in the menus, | PressOK. |
| To go back one level in the menu, | Press←. |
6. DISPLAY ICONS
Refer to the table below for the meanings of the display icons when they show on the display.
| [0340] | Wi-Fi connection is established (with signal strength). |
| [8038] | Wi-Fi connection is disconnected. |
 | LAN connection is established. |
 | LAN connection is unplugged. |
| [K552] | A Bluetooth device is connected. |
| [HK80] | A Bluetooth headphone is connected. |
| [Y3CS] | The radio station is in the preset list. |
 | FM RDS information is received. |
| [0C30] | Radio signal is being received (with signal strength). |
| [4HW0] | Repeat all playback mode is active. |
| [2286] | Repeat one playback mode is active. |
 | Repeat folder playback mode is active. |
 | Shuffle playback mode is active. |
| [872D] | Repeat all and shuffle playback mode is active. |
| [305W] | Sleep timer is active. |
 | Stereo sound broadcast is available. |
| [KS82] | Sound output is muted. |
| [6084] | A USB device is connected. |
| [9HY6] | Playback is paused. |
7. FM RADIO MODE
7.1 OPERATION
GB
| To access the FM Radio mode | Press the FM key on MAESTRO or remote control. | |
| To manually tune the frequency | Press ||◀◀ or ▶▶▶▶▶▶▶▶▶▶▶▶▶▶▶▶▶▶▶▶▶▶▶▶▶▶▶▶▶▶▶▶▶▶▶▶▶▶▶▶▶▶▶▶▶▶▶▶▶▶▶▶▶▶▶▶▶▶▶▶▶▶▶▶▶▶▶▶▶▶▶▶▶▶▶▶▶▶▶▶▶▶▶▶▶▶▶▶▶▶▶▶▶▶▶▶▶▶▶▶▶>▶▶▶▶▶▶▶▶▶▶▶▶▶▶▶▶▶▶▶▶▶▶▶▶▶▶▶▶▶▶▶▶▶▶▶▶▶▶▶▶▶▶▶▶▶▶▶▶▶▶▶▶▶▶▶▶▶▶▶▶▶▶▶▶▶▶▶▶▶▶▶▶▶▶▶▶▶▶▶▶▶▶▶▶▶▶▶▶▶▶▶▶▶▶▶▶▶▶▶▲▶▶▶▶▶▶▶▶▶▶▶▶▶▶▶▶▶▶▶▶▶▶▶▶▶▶▶▶▶▶▶▶▶▶▶▶▶▶▶▶▶▶▶▶▶▶▶▶▶▶▶▶▶▶▶▶▶▶▶▶▶▶▶▶▶▶▶▶▶▶▶▶▶▶▶▶▶▶▶▶▶▶▶▶▶▶▶▶▶▶▶▶▶▶▶▶▶▶▶-▶▶▶▶▶▶▶▶▶▶▶▶▶▶▶▶▶▶▶▶▶▶▶▶▶▶▶▶▶▶▶▶▶▶▶▶▶▶▶▶▶▶▶▶▶▶▶▶▶▶▶▶▶▶▶▶▶▶▶▶▶▶▶▶▶▶▶▶▶▶▶▶▶▶▶▶▶▶▶▶▶▶▶▶▶▶▶▶▶▶▶▶▶▶▶▶▶▶▶ | |
| To automatically tune to the next available station, | Press and hold ||◀◀ . ▶▶▶▶▶▶▶▶▶▶▶▶▶▶▶▶▶▶▶▶▶▶▶▶▶▶▶▶▶▶▶▶▶▶▶▶▶▶▶▶▶▶▶▶▶▶▶▶▶▶▶▶▶▶▶▶▶▶▶▶▶▶▶▶▶▶▶▶▶▶▶▶▶▶▶▶▶▶▶▶▶▶▶▶▶▶▶▶▶▶▶▶▶▶▶▶▶▶>▶>▶>▶>▶>▶>▶>▶>▶>▶>▶>▶>▶>▶>▶>▶>▶>▶>▶>▶>▶>▶>▶>▶>▶>▶>▶>▶>▶>▶>▶>▶>▶>▶>▶>▶>▶>▶>▶>▶>▶>▶>▶>▶>▶>▶>▶>▶>▶>▶>▶ | A maximum of 10 radio stations can be stored.1. Press and hold the FAV key on MAESTRO until the preset list is shown.2. Press + or - (or rotate the navigation knob) to select a preset station number and then press OK to confirm. |
| To store a radio station in the preset list | ||
| To directly store a radio station in the preset list | Tune to a station and then press and hold a preset station button (0-9) to directly store it in the preset list. | |
| To recall a radio station in the preset list | 1. Press FAV2. Press + or - (or rotate the navigation knob) to select a radio station in the preset list and then press OK to confirm.Or, press preset station button (0-9) to access a stored preset station (1-10). | |
| To browse the radio station information (if available) | Press INFO repeatedly. | |
| To mute or restore the sound output | Press ▶▶▶▶▶▶▶▶▶▶▶▶▶▶▶▶▶▶▶▶▶▶▶▶▶▶▶▶▶▶▶▶▶▶▶▶▶▶▶▶▶▶▶▶▶▶▶▶▶▶▶▶▶▶▶▶▶▶▶▶▶▶▶▶▶▶▶▶▶▶▶▶▶▶▶▶▶▶▶▶▶▶▶▶▶▶▶▶▶▶▶▶▶▶▶▶▶▶ |
7.2 SETUP MENU
Press SETUP in the FM mode to access the setup menu (see chapter "Using the menus"). The following options are available and the current settings (if applicable) are marked with an asterisk (*).
• [FM Auto Search]
To auto store all available radio stations in the preset list.*
* All existing preset stations will be erased.
• [FM Scan Setting]
To decide if only stations with strong signals are scanned when performing automatic tuning.
• [FM Reception Setting]
To listen radio in stereo or mono sound output.
- [Bluetooth headphone]
To connect or disconnect with a Bluetooth headphone, see chapter "Basic operation".
- [System Settings]
See chapter "System Settings".
- [Main menu]
To access other playback modes or sleep timer.
8. DAB RADIO MODE
8.1 OPERATION
GB
| To access the DAB radio mode | Press the ▶▲▼ key on MAESTRO or remote control. |
| To search for DAB radio stations, | The first time you select the DAB mode, or if the station list is empty, MAESTRO will automatically perform a full scan and store all available stations in the station list. |
| To tune to a station Press | ■◀◀ or ▶▶▶▶ |
| To store a radio station in the preset list | A maximum of 10 radio stations can be stored.1. Press and hold theFAVkey on MAESTRO until the preset list is shown.2. Press + or - (or rotate the navigation knob) to select a preset station number and then pressOKto confirm. |
| To directly store a radio station in the preset list | Tune to a station and then press and hold a preset station button (0-9) to directly store it in the preset list. |
| To recall a radio station in the preset list | 1. PressFAV2. Press + or - (or rotate the navigation knob) to select a radio station in the preset list and then pressOKto confirm.Or, press preset station button (0-9) to access a stored preset station (1-10). |
| To browse the radio station information* (if available) | PressINFOrepeatedly. |
| To mute or restore the sound output | Press◀◀ or ▶▶▶▶▶▶▶▶▶▶▶▶▶▶▶▶▶▶▶▶▶▶▶▶▶▶▶▶▶▶▶▶▶▶▶▶▶▶▶▶▶▶▶▶▶▶▶▶▶▶▶▶▶▶▶▶▶▶▶▶▶▶▶▶▶▶▶▶▶▶▶▶▶▶▶▶▶▶▶▶▶▶▶▶▶▶▶▶▶▶▶▶▶▶▶▶▶▶▶▶▶> |
* DAB information (if available) includes: Station name, Dynamic Label Segment (DLS), Signal strength, Program type (PTY), Ensemble Name, Frequency, Signal error rate, Bit rate and audio status, Codec, and Time and date.
8.2 SETUP MENU
Press SETUP in the DAB mode to access the setup menu (see chapter "Using the menus"). The following options are available and the current settings (if applicable) are marked with an asterisk (*).
• [Station List]
To display all available stations.
- [Scan]
To scan and store all available stations.
- [Manual Tune]
To manually tune the frequency. The list of available digital radio ensembles is shown.
• [Prune invalid Stations]
To remove all invalid stations from the station list.
• [DRC]
Some DAB broadcasts offer dynamic range compression (DRC). Compressing the dynamic range of a radio signal can increase the volume of quiet sounds and reduce the volume of loud sounds. You can select high, low or off level. High level is recommended for noisy environment.
- [Station Order]
To define how the stations are listed when browsing the station list. Options are:
• [Alphanumeric]: Arrange the stations in alphabetical order,
- [Ensemble]: List groups of stations that are broadcast together on the same ensemble.
- [Valid]: List valid stations first, then off-air stations.
- [Bluetooth headphone]
To connect or disconnect with a Bluetooth headphone, see chapter "Basic operation".
- [System Settings]
See chapter "System Settings".
- [Main menu]
To access other playback modes or sleep timer.
9. INTERNET RADIO MODE
9.1 OPERATION
Wi-Fi or Ethernet Internet connection must be established first to use the Internet radio (see chapters "Performing initial setup" and "Network").
| To access the Internet Radio mode, | Press the Ⓕ key on MAESTRO or remote control key. |
| To tune to a radio station or podcast, | See chapter "Station List". |
| To store a radio station in the preset list, | A maximum of 10 radio stations can be stored.1. Press and hold the FAV key on MAESTRO until the preset list is shown.2. Press + or - (or rotate the navigation knob) to select a preset station number and then press OK to confirm. |
| To directly store a radio station in the preset list, | Tune to a station and then press and hold a preset station button (0-9) to directly store it in the preset list. |
| To recall a radio station in the preset list, | 1. Press FAV key.2. Press + or - (or rotate the navigation knob) to select a radio station in the preset list and then press OK to confirm.Or, press preset station button (0-9) to access a stored preset station (1-10). |
| To browse the station information* (if available), | Press INFO repeatedly. |
| To mute or restore the sound output, | Press ✗ button. |
* Station information (if available) includes: Artist and track name, Station description, Station genre and location, Signal reliability, Codec and sampling rate, Playback buffer, and Date.
9.2 SETUP MENU
Press SETUP in the Internet Radio mode to access the setup menu (see chapter "Using the menus"). The following options are available and the current settings (if applicable) are marked with an asterisk (*).
- [Last listened]
To tune to your last listened radio stations.
• [Station List]
To tune to any available Internet radio stations (See chapter "Station list").
- [Bluetooth headphone]
To connect or disconnect with a Bluetooth headphone, see chapter "Basic operation".
- [System Settings]
See chapter "System Settings".
- [Main menu]
To access other playback modes or sleep timer.
9.3 STATION LIST
The following menus and sub-menus are available in the [Station List]:
•[MyFavourites]
To browse and tune to the radio stations that you have added to "My Favourites" on the web portal (See chapter "Using the web portal")
After registration, press and hold OK key to add the existing station to "My Favourites".
- [Local (name of your location)]
To browse and tune to any radio stations available in your area. The stations are grouped into several categories.
• [Stations]
- [Location]: To browse and tune to radio stations by location.
- [Genre]: To browse and tune to radio stations by genre.
- [Search stations]: To search for any available radio stations by entering
- [Popular stations]: To browse and tune to the most popular Internet radio stations.
- [New stations]: To browse and tune to the latest Internet radio stations.
• [Podcasts]
- [Location]: To browse and tune to podcasts by location.
• [Genre]: To browse and tune to podcasts by genre. - [Search podcasts]: To search for any available podcasts by entering keywords.
• [My Added Stations]
To browse and tune to the radio stations that you have added to "My added stations" on the web portal (See chapter "Using the web portal").
• [Help]
- To get help when the Internet radio does not work properly.
- To get the access code of MAESTRO for register.
9.4 USING THE WEB PORTAL
The Frontier Silicon Internet Radio portal website allows you to organise your "My favourites" and add new Internet radio stations on a computer. To do so, you need to first register at the web portal.
- In the Internet Radio mode, press SETUP and then go to [Station List] > [Help]. Write down the access code.
- Go to http://nuvola.link/sr on the web browser of your computer.
- Register a new account with the access code.
- Following the instructions in the web portal, use the "Manage Favourites" and "My added stations" features to add radio stations.
The added stations in "My favourites" can be accessed through [My favourites] in the Internet Radio mode of MAESTRO.
The added stations in "My added stations" can be accessed through [My added stations] in the Internet Radio mode of MAESTRO.
10. BLUETOOTH MODE
MAESTRO can connect to Bluetooth-enabled players (e.g. mobile phone) within a range of approximately 10 meters (30 feet).
10.1 PAIRING
- Press ✦ key on MAESTRO or remote control.
The small Bluetooth icon 📋 is blinking, indicating that MAESTRO is ready for pairing. - On your Bluetooth-enabled player, turn on the Bluetooth function and search for available Bluetooth devices.
- Select "MAESTRO" in the list of available Bluetooth devices to start pairing. The Bluetooth icon stops blinking when pairing is complete.
10.2 OPERATION
GB
| To access the Bluetooth audio mode, | Press the ✝ key on MAESTRO or remote control. |
| To start playback, | Select an audio file from your Bluetooth- enabled player and start playback. |
| To pause or resume playback, | Press ▶II . |
| To skip to the previous or next audio file, | Press ||◀◀ or▶▶II |
| To quickly search backward or forward within an audio file, | During playback, press and hold ||◀◀ or▶▶II |
| To disconnect the Bluetooth connection, | Switch to another playback mode, or Select [BT disconnect] from the setup menu, or Press and hold ✝. |
| To browse the information (if available) of the audio file, | Press INFO repeatedly. |
| Muting or restoring sound | Press ⚙ button. |
10.3 SETUP MENU
Press SETUP in the Bluetooth audio mode to access the setup menu (see chapter "Using the menus"). The following options are available and the current settings (if applicable) are marked with an asterisk (*).
- [Bluetooth disconnect]
To disconnect the Bluetooth connection.
• [View Details]
- [Bluetooth Info]: To get the existing Bluetooth connection status.
• [Connected Device]: To get the existing connected Bluetooth device name.
- [Bluetooth Info]: To get the existing Bluetooth connection status. - [Connected Device]: To get the existing connected Bluetooth device name.
- [System Settings]
See chapter "System Settings".
- [Main menu]
To access other playback modes or sleep timer.
11. AUX IN 1
11.1 OPERATION
Your external player (e.g. mp3 player) must be connected to the auxiliary input jack 1 of MAESTRO with an audio cable (with RCA connector, not supplied).
| To access the Auxiliary In 1 mode, | Press AUX key on MAESTRO or remote control to toggle to AUX In 1 mode. |
| To start and control playback, | Perform all playback operations on the external player. |
| To mute or restore the sound output, | Press 🏠 or ▶ button. |
11.2 SETUP MENU
Press SETUP in the AUX In 1 mode to access the setup menu (see chapter "Using the menus"). The following options are available and the current settings (if applicable) are marked with an asterisk (*).
- [Bluetooth headphone]
To connect or disconnect with a Bluetooth headphone, see chapter "Basic operation". - [System Settings]
See chapter "System Settings". - [Main menu]
To access other playback modes or sleep timer.
12. AUX IN 2
12.1 OPERATION
GB
Your external player (e.g. mp3 player) must be connected to the auxiliary input jack 2 of MAESTRO with an audio cable (with 3.5 mm connector, not supplied).
| To access the Auxiliary In 2 mode | Press AUX key on MAESTRO or remote control to toggle to AUX In 2 mode. |
| To start and control playback, | Perform all playback operations on the external player. |
| To mute or restore the sound output, | Press ▶ or ▶ button. |
12.2 SETUP MENU
Press SETUP in the AUX In 2 mode to access the setup menu (see chapter "Using the menus"). The following options are available and the current settings (if applicable) are marked with an asterisk (*).
- [Bluetooth headphone]
To connect or disconnect with a Bluetooth headphone, see chapter "Basic operation". - [System Settings]
See chapter "System Settings". - [Main menu]
To access other playback modes or sleep timer.
13. OPTICAL MODE
13.1 OPERATION
Your external player (e.g. TV, audio amplifier) must be connected to the optical input jack of MAESTRO with optical (TOSLINK) cable (not supplied).
| To access the optical mode | Press DIGITAL key on MAESTRO or the remote control to toggle to optical mode. |
| To start and control playback | Perform all playback operations on the external player. |
| To mute or restore the sound output | Press ▶ or ▶ button. |
13.2 SETUP MENU
Press SETUP in the optical input mode to access the setup menu (see chapter "Using the menus"). The following options are available and the current settings (if applicable) are marked with an asterisk (*).
- [Bluetooth headphone]
To connect or disconnect with a Bluetooth headphone, see chapter "Basic operation". - [System Settings]
See chapter "System Settings". - [Main menu]
To access other playback modes or sleep timer.

The optical input is only supporting for the linear PCM, 2 channels 16 bit or 24 bit music source.
14. COAXIAL MODE
14.1 OPERATION
GB
Your external player (e.g. TV, Blu-ray and DVD player) must be connected to the coaxial input jack of MAESTRO with a coaxial (RCA) cable (not supplied).
| To access the coaxial mode | Press DIGITAL key on MAESTRO or the remote control to toggle to coaxial mode. |
| To start and control playback, | Perform all playback operations on the external player. |
| To mute or restore the sound output, | Press 🏠 or ▶ button. |
14.2 SETUP MENU
In the coaxial input mode, press SETUP to access the setup menu (see chapter "Using the menus"). The following options are available and the current settings (if applicable) are marked with an asterisk (*).
- [Bluetooth headphone]
To connect or disconnect with a Bluetooth headphone, see chapter "Basic operation". - [System Settings]
See chapter "System Settings". - [Main menu]
To access other playback modes or sleep timer.

The coaxial input is only supporting for the linear PCM, 2 channels 16 bit or 24 bit music source.
15. CD MODE
NOTICE!
Risk of damage!

Improper handling of the MAESTRO may cause damage.
Do not insert any mini-CD or not supporting format disc to the MAESTRO.
15.1 OPERATION
MAESTRO can playback audio files stored on an audio CD, CD-R and CD-RW.
The playback is also depending on the disc quality.
| To access the CD mode | Press CD key on MAESTRO or the remote control to toggle to Coaxial mode. |
| To pause or resume playback | Press ▶II . |
| To stop playback, Press | ■ . |
| To skip to the previous or next audio file | Press ||or . ▶▶II |
| To quickly search backward or forward within an audio file | During playback, press and hold ||◀◀ or ▶▶II |
| To select a playback mode | Press FAV repeatedly.● = Repeat all● = Repeat one● = Shuffle |
| To browse the information (if available) of the audio file | Press INFO repeatedly. |
| To mute or restore the sound output | Press ↗ button. |
15.2 SETUP MENU
Press SETUP in the CD mode to access the setup menu (see chapter "Using the menus"). The following options are available and the current settings (if applicable) are marked with an asterisk (*).
- [Resume setting]
The CD will resume playback from the last played position, even if you have switched modes or switch the device to Standby mode. This function is terminated when you eject the CD. This function is intended for audio books, for example.
- [Bluetooth headphone]
To connect or disconnect with a Bluetooth headphone, see chapter "Basic operation".
- [System Settings]
See chapter "System Settings".
- [Main menu]
To access other playback modes or sleep timer.
16. PHONO MODE
16.1 OPERATION
Your record player must be connected to the phono input jack of MAESTRO with an audio cable (not supplied).
| To access phono mode | Press PHONO key on MAESTRO or the remote control to toggle to coaxial mode. |
| To start and control playback, | Perform all playback operations on the external player. |
| To mute or restore the sound output, | Press 🎨 or ▶Button. |
16.2 SETUP MENU
Press SETUP in the Phono input mode to access the setup menu (see chapter "Using the menus"). The following options are available and the current settings (if applicable) are marked with an asterisk (*).
- [Phono noise reduction] Turn on "Phono bypass playback" to reduce the hum and noise artifacts. Phono input will bypass DSP and goes to volume control directly.
- [Bluetooth headphone] To connect or disconnect with a Bluetooth headphone, see chapter "Basic operation".
- [System Settings] See chapter "System Settings".
• [Main menu] To access other playback modes or sleep timer.

The equalizer setting is not active when noise reduction is activated.
17. STREAMING SERVICES
Your MAESTRO can play content from the following streaming services:
GB

Spotify®


napster


TIDAL


deezer


qobuz

amazon music

You will also find the symbols of these services in the display of your MAESTRO.
We recommend that you first install the UNDOK ^TM app on the device that you want to use to control your MAESTRO (this can be a smartphone or tablet, for example).

Please note: The use of streaming services requires contracts with the streaming providers; these may cause costs. In particular, free offers often contain advertising. Changes are in the responsibility of the streaming services. Please inform yourself on the homepages of the providers.

This device (eg. smartphone) must be in the same network as your MAESTRO!
For hints how to deal with the UNDOK ^TM app please refer to chapter 21.

Occasionally, the services can also be operated directly with the providers app or the MAESTRO itself. Please check with the provider.
17.1 OPERATION
The procedures described below applies analogously to all available streaming services.
| Selection of a streaming service | Press the ( ) key on MAESTRO or remote control and go to the selection of desired streaming service. The symbols of the services listed above will appear accordingly in the display of your MAESTRO.Then press, MENU once, then II or III rotate the navigation knob) to select the desired streaming service and then press OK to confirm. |
| Log in a streaming account (TIDAL, Napster, Qobuz, Amazon Music), | To use a streaming service on your masterpiece, sign in to MAESTRO or the UNDOKTM app installed on your mobile device with your account. Follow the instructions on the screen. |
| How to use Spotify Connect, | Use your phone, tablet or computer as a remote control for Spotify. Go to spotify.com/connect to learn how. |
| To pause or resume playback, | Press ▶II . |
GB
| To skip to the previous or next playback item, | Press ||◀◀. ▶▶▶ |
| To store a playback item in the preset list, | A maximum of 8 playback items can be stored (10 for Spotify).1. PressSETUPuntil the save to preset is shown then pressOKto confirm.2. Press + or – (or rotate the navigation knob) to select a preset item number and then pressOKto confirm. |
| To directly store a playback item in the preset list, | Select a playback item and then press and hold a preset station button to directly store it in the preset list. |
| To recall a playback item in the preset list, | 1. Press FAV key.2. Press + or – (or rotate the navigation knob) to select a playback item in the preset list and then pressOKto confirm.Or, press preset station buttons to directly access a preset playback item. |
| To browse the information (if available) of the playback item, | PressINFOrepeatedly. |
17.2 SETUP MENU
Press SETUP in the Music streaming services to access the setup menu (see chapter "Using the menus"). The following options are available and the current settings (if applicable) are marked with an asterisk (*).
- [Bluetooth headphone] To connect or disconnect with a Bluetooth headphone, see chapter "Basic operation".
- [System Settings]
See chapter "System Settings".
• [Main menu] To access other playback modes or sleep timer.
18. MY MUSIC MODE
NOTICE!
Risk of damage!

Improper handling of the MAESTRO may cause damage.
Do not connect the MAESTRO directly to the USB port of a computer or other external storage media such as external hard disk..

My Music mode can play back audio files stored on a connected USB memory stick or from a media server (UPnP) sharing the same Wi-Fi network with the MAESTRO.
18.1 OPERATION
| To access the streaming services mode | Press (💡) key on MAESTRO or remote control and select My Music. |
| To play back audio files stored on a USB memory stick | Connect the USB memory stick to the USB port of MAESTRO. Then pressSETUPand select [USB Playback] from the setup menu (see chapter “Setup menu” on next page). |
| To pause or resume playback | Press ▶II . |
| To stop playback Press . | ■ |
| To skip to the previous or next audio file | Press ||or . ▶▶▶ |
GB
| To quickly search backward or forward within an audio file,, | During playback, press and hold ||<<. ▶▶|| |
| To add an audio file to "My Playlist", | Press and hold ▶ll or the navigation knob when the file is highlighted in the selection menu. |
| To select a playback mode, | Press FAV repeatedly.● = Repeat all● = Repeat one● = Shuffle● = Repeat all and shuffle |
| To browse the information (if available) of the audio file, | Press INFO repeatedly. |
| Muting or restoring sound | Press ↗ button. |
18.2 SETUP MENU
Press SETUP in the My Music mode to access the setup menu (see chapter "Using the menus"). The following options are available and the current settings (if applicable) are marked with an asterisk (*).
- [Shared Media]
To search for audio files on the Wi-Fi or Ethernet network.
Once a media server has been found, a selection menu will show for selection of audio files for playback from MAESTRO.
- [USB Playback]
To search for audio files on the connected USB memory stick.
Once a USB memory stick has been found, a selection menu will show for selection of audio files for playback from MAESTRO.
• [My Playlist]
To browse and play back audio files stored in "My playlist".
• [Repeat]
To turn on or off the repeat playback mode of the current folder/ playlist.
- [Shuffle]
To turn on or off the shuffle playback mode of the current folder/ playlist.
• [Clear My Playlist]
To clear entries from "My Playlist".
- [Prune Servers]
If this setting is set to "YES", inactive media servers will be displayed. You can then select a media server and "wake it up" (WOL "wake on LAN" function) in order to play back audio files from MAESTRO.
- [Bluetooth headphone]
To connect or disconnect with a Bluetooth headphone, see chapter "Basic operation".
- [System Settings]
See chapter "System Settings".
- [Main menu]
To access other playback modes or sleep timer.
19. SLEEP TIMER
The sleep timer sets the duration of time before MAESTRO turns off automatically.
- Press SETUP in any playback mode and then select [Main menu] and then [Sleep].
- Or, direct press SLEEP button to turn the sleep timer on or off.
- Press + or - (or rotate the navigation knob) to select a sleep timer (15, 30, 45, 60 or 90 min).
- Press OK to confirm the selection.
When the sleep timer is active, the sleep timer icon ( ) and the remaining time will be shown. To cancel the sleep timer, select [Sleep OFF].
GB
20. SYSTEM SETTINGS
20.1 ACCESSING THE SYSTEM SETTINGS
- Press SETUP in any playback mode and then select [System Settings]
• Refer to the chapters below for details of each setting option.
The current settings (if applicable) are marked with an asterisk (*).
- See chapter "Using the menus" for browsing and making selections in the system settings.
20.2 EQUALIZER
Select one of the sound equalizer options to adjust the sound according to your taste.
• [Loudness]
Loudness on, it adapts the treble and bass levels to suit the current volume, so that delicate sounds can still be heard clearly when you listen to your music quietly.
•[Bass]
Adjust the bass level to tailor the sound of the audio playback.
•[Treble]
Adjust the treble level to tailor the sound of the audio playback.
•[Speakers]
Select the connected speakers size to match with MAESTRO.
•[Max.Power]
Suitable for large speakers with high power capability (full frequency response; no limiter)
•[MediumPower]
Suitable for speakers with medium power capability (full frequency response; limited to 100W@4Ohm or 50W@8Ohm)
•[2.1 System]
Suitable for 2.1 sound systems (the amplifiers of MAESTRO are operated with Linkwitz 2nd order high pass filter; no power limiter).
- [Crossover frequency] Select the desired crossover frequency (80Hz are default). See also chapter 3.5.
• [Room correction EQ]
With this function, the room correction can be switched on or off. For more details, see Chapter 22.
GB
• [Network wizard]
To establish network connection.
- [WPS WLAN Setup]
Select this option if your wireless router supports both WPS and PBC setup methods.
• [View Settings]
To view the current network information.
- [WLAN Region]
To select a WLAN region.
- [Manual Settings]
Under the [Wireless] option, select [DHCP enable] to allocate IP address automatically or [DHCP disable] to do it manually.
• [NetRemote PIN setup]
To set up a NetRemote PIN.
• [Network Profile]
To display a list of networks saved by MAESTRO.
• [Clear Network Setting]
To clear all network settings.
- [Keep Network Connected]
To keep the WiFi network connected or not. If [YES] is selected, this allows you to wake MAESTRO from standby using a remote app. If [NO] is selected, this will switch OFF the WiFi network connection in standby mode.
20.4 TIME/DATE
- [Set Time/Date]
To set time and date.
• [Auto Update]
To select a source (Radio, Internet network or no update) for automatic time update.
If you are updating time from a source (Radio - FM/DAB), the daylight saving setting has no effect.
If you are updating time from the Internet network, set your time zone.
- Set Format]
To set 12 or 24-hour time format.
- [Set Timezone]
To set a time zone.
• [Daylight Savings]
To enable or disable daylight saving time.
20.5 INACTIVE STANDBY
- This option sets the duration of time before MAESTRO turns off automatically. Options include: Off, 2, 4, 5 and 6 hours.
20.6 LANGUAGE
- This option sets the menu language. Options include: English, German, Danish, Spanish, French, Italian, Dutch, Norwegian, Polish, Portuguese, Finnish, Swedish and Turkish.
20.7 FACTORY RESET
- This option clears all user-defined settings and replaces them with the original default settings.
20.8 SOFTWARE UPDATE
• [Auto check]
To set to periodically check for update.
- [Check now]
To check for update immediately.
If a new software is available, MAESTRO will ask if you want to proceed with an update.
Before software upgrade, make sure that MAESTRO is connected to a stable power connection. Disconnecting power during a software update may damage MAESTRO.
20.9 SETUP WIZARD
- To perform initial setup (see chapter "Performing initial setup").
20.10 INFO
- This shows the current software version, spotify version, radio ID and friendly name.
20.11 PRIVACY POLICY
- Please visit the following page on a PC or mobile device. www.frontiersmart.com/privacy
20.12 BACKLIGHT
To choose the brightness of the display: By the sensor in the front of MAESTRO, the display brightness is automatically adjusted to the ambient light. You can adjust your settings for bright lightning conditions as well as for low lightning conditions for example in your bedroom.
• [High Ambience]
Level 8 to 15
• [Dark Ambience]
Level 1 to 8
21. USING UNDOK™ APP TO CONTROL MAESTRO
MAESTRO is compatible with the Frontier Silicon's UNDOK™ app. The app offers comprehensive remote control functionality for FS based audio modules with an iOS or Android smart device.
To install and use the UNDOK™ app:
- Download the UNDOK™ app from "App Store" or "Google play" and install it on your iOS or Android smart device.

-
Connect your smart device to the same Wi-Fi network as MAESTRO.
-
Launch the UNDOK™ app on your smart device. The app will search for compatible audio systems. You may also tap on "Set up audio system" to start searching for audio systems.
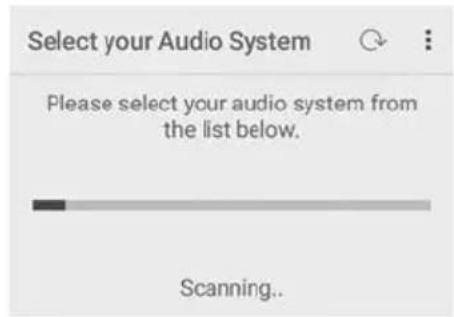
text_image
Select your Audio System Please select your audio system from the list below. Scanning...- Select "MAESTRO" from the list of available audio systems.
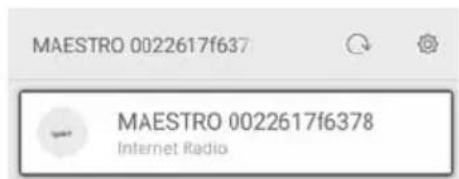
text_image
MAESTRO 0022617f637 MAESTRO 0022617f6378 Internet Radio5. Control MAESTRO through the UNDOK™ app.
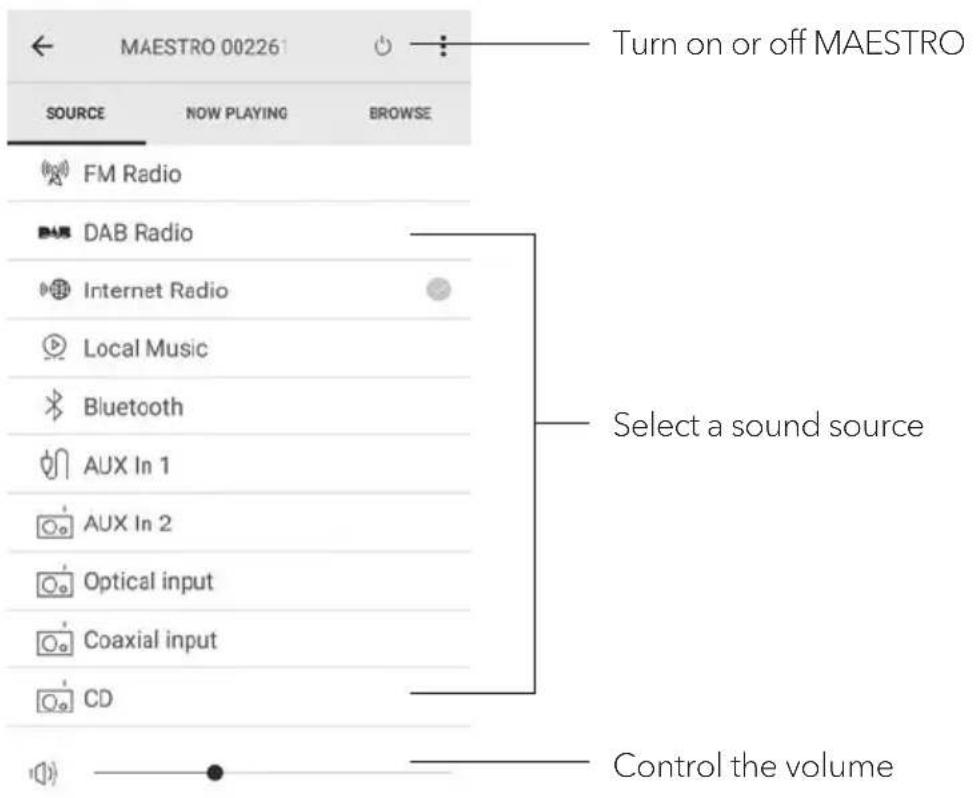
text_image
MAESTRO 00226 SOURCE NOW PLAYING BROWSE FM Radio DAB Radio Internet Radio Local Music Bluetooth AUX In 1 AUX In 2 Optical input Coaxial input CD Turn on or off MAESTRO Select a sound source Control the volume22. ROOM CORRECTION APP
MAESTRO is introducing the room correction function, a process where digital filters are used to correct room aberrations. sonoro's room correction application will guide you and handles all the processings.
To install and use sonoro Room Correction app:
- Download sonoro Room Correction app from "App Store" and install it on your iOS smart device.


The sonoro Room Correction app is only available for smartphones with iOS operating system and from iPhone 6s.
-
Switch on MAESTRO and switch to Bluetooth operating mode.
-
MAESTRO should not be connected with any other smart devices. Small Bluetooth icon 📁 is blinking.
-
Launch the Room correction app on your iOS smart device. The app will search for compatible audio systems. You must turn on Bluetooth function in your smart device.
-
Select 'MAESTRO' from the available devices list.

text_image
AVAILABLE DEVICES MAESTRO- Afterwards the main operating screen is shown. Please select „BEGIN CORRECTION“
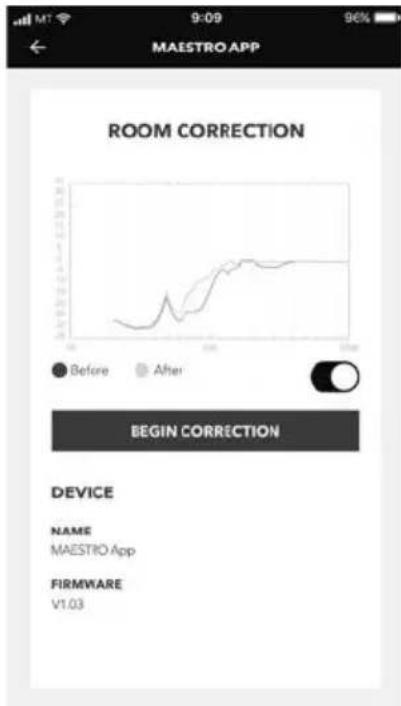
text_image
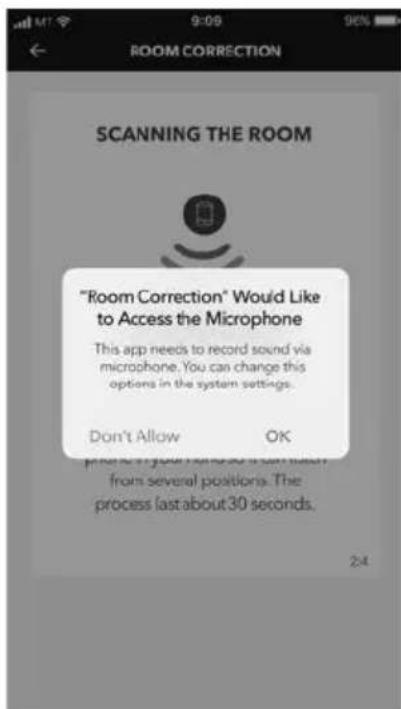
MAESTRO APP ROOM CORRECTION Before After BEGIN CORRECTION DEVICE NAME MAESTRO App FIRMWARE V1.03- Follow the application information and select „OK“ to allow access to the microphone of your iOS device.
text_image
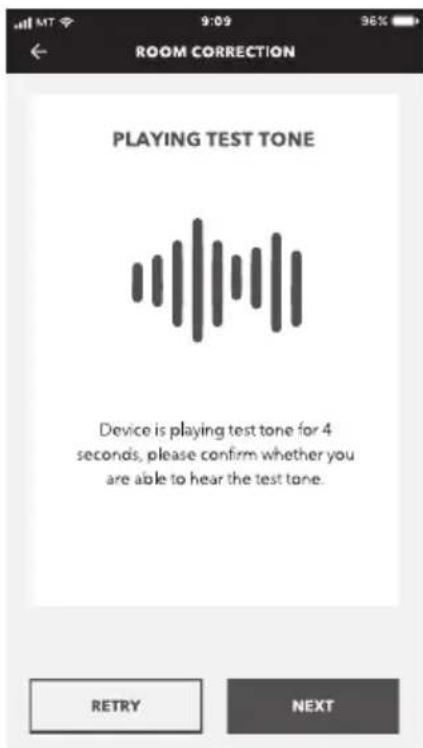
SCANNING THE ROOM "Room Correction" Would Like to Access the Microphone This app needs to record sound via microphone. You can change this options in the system settings. Don't Allow OK from several positions. The process last about 30 seconds.- Step 1, you should hear a short while of test tone. Press 'NEXT' to continue.
text_image
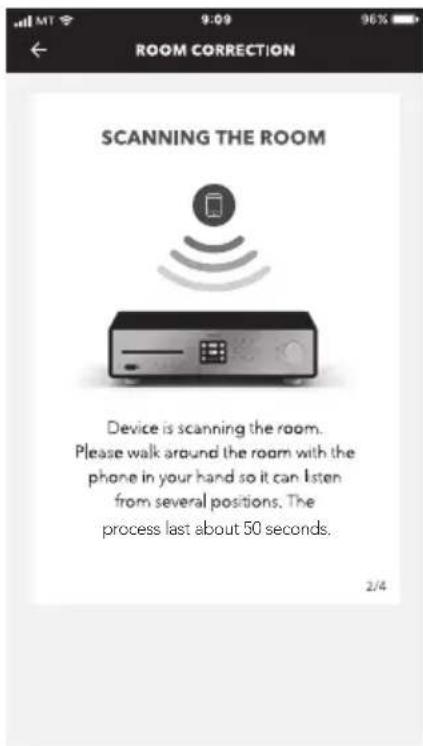
PLAYING TEST TONE Device is playing test tone for 4 seconds, please confirm whether you are able to hear the test tone. RETRY NEXT- In step 2, the test tone is played continuously for 50 seconds.
For the best result, we recommend walking around the room with the iPhone in your hand to record the sound from multiple positions.
text_image
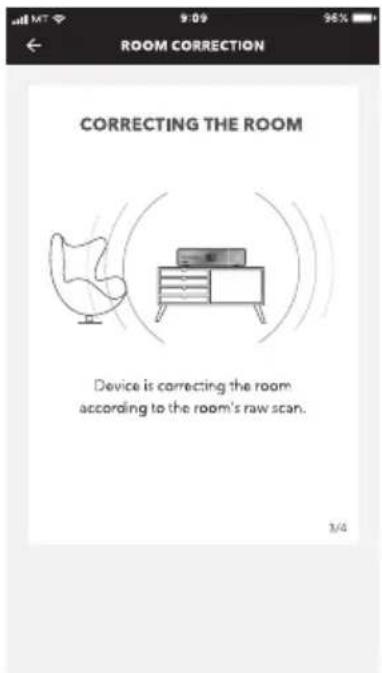
SCANNING THE ROOM Device is scanning the room. Please walk around the room with the phone in your hand so it can listen from several positions. The process last about 50 seconds. 2/4- Step 3: The application will correct the signal of your MAESTRO based on the recorded data to improve the acoustic performance in the room.
text_image
CORRECTING THE ROOM Device is correcting the room according to the room's raw scan.- In step 4, the application displays the optimized green curve and applies the new filter setting automatically on MAESTRO. Press "OK" to continue.

text_image
WELL DONE! Device has completed the room correction, let's rock! Writing data... 4/4 REDO OKThe app returns to the main operation screen. There are frequency responses displayed for your room before and after the correction.
23. TROUBLESHOOTING
Malfunctions can occur with any electrical equipment. This is not necessarily due to MAESTRO defect. As such, you should check the following table to see if you can eliminate the problem yourself.
| Malfunction Possible cause | Solution | |
| No power | Power cable is not properly connected. | Connect the power cable properly. |
| Switch the mains switch to ON position. | Switch the mains switch to ON position. | |
| No response from MAESTRO | There is an error in MAESTRO. | Disconnect and reconnect the power plug.Then turn MAESTRO on again. |
| MAESTRO enters standby mode automatically | Sleep timer activated. | Turn on MAESTRO and start playback again. |
| The idle standby function is active because MAESTRO was not used for the specified time. | To disable the inactive standby function. | |
| The impedance of the connected speakers is incorrect. | Connect speakers with specific impedance range 4Ω - 16Ω. | |
| The protection circuitry has been activated because of a short circuit. | Twist the bare wires of each speaker cable firmly and reconnect to MAESTRO and speakers. | |
| Remote control does not work, or only works sporadically | Distance to MAESTRO is too large. | Reduce the distance between the remote control and MAESTRO. |
| Battery is empty. Replace the battery. | ||
| Malfunction Possible cause | Use Solution | |
| No sound or poor sound | Sound is turned off. Adjust the volume. | |
| External speakers are not properly connected. | Check the speaker wires connection and polarity. | |
| MAESTRO is not set to the correct playback mode. | Select another playback mode. | |
| Headset is plugged in. | Pull the headset out of the jack. | |
| FM/DAB or Internet reception is poor. | Extend/adjust the FM/DAB antenna or check the Wi-Fi connection. | |
| There is radio interference. | Keep MAESTRO away from other electronic devices. | |
| Optical or coaxial input has no sound. | Select PCM as output source i in the external device. | |
| Due to the overload the protection circuit is activated. | Turn the MAESTRO off and on again to reset the protection circuit. | |
| Insufficient Wi-Fi signal strength | The router is too far or blocked. | Place MAESTRO closer to the router or adjust the position of the Wi-Fi antenna. |
| Cannot connect to your Wi-Fi network | Router is not switched on or working properly. | Switch on your router or check the router conditions. |
| Setup method is incorrect. | Check if your router supports WPS and uses he correct setup method (PBC or PIN). | |
| Configure the Wi-Fi settings again. | ||
GB
| Malfunction Possible cause | Solution | |
| Internet radio station does not work sometimes. | Some stations only support a limited number of listeners. | Try again later. |
| Station is not broadcasting. Try again later. | ||
| Some Internet radio stations disappear from the station list.. | The station is removed from the list when it stops broadcasting. | Check again later.If the station broadcasts again, it will be brought back to the list. |
| CD playback does not start. | CD format is not supported. | Insert correct CD format in the CD slot. |
| CD is dirty. Clean the CD. | ||
| CD is damaged. | Insert a different CD in the CD slot. | |
| USB device does not work. | USB playback is not supported. | Check the files and file system on the USB device. |
| Hidden files on USB device. | Remove hidden files on the USB device. | |
| USB device is not charging. Check the USB cable. | ||
| Loud humming and noise in Phono Mode. Too low maximum volume in Phono Mode. | GND cable is not connected. | Connect phono GND properly in MAESTRO and connect the ground cable. |
| Using wrong phono cartridge. | Use an MM (Moving Magnet) pickup. | |
| Record player and speakers are too close together. | Move the record player and speakers as far apart as possible. | |

NOTICE!
Material damage due to improper cleaning!
Improper cleaning can result in damage to MAESTRO or cause certain functions to stop working.
- Never use abrasive or solvent-based cleaning agents, as these may damage the surface of MAESTRO.
- Never use hot or compressed air to dry MAESTRO.
- The edges and corners of MAESTRO are vulnerable to pressure. Protect these areas to prevent them from being subjected to excessive pressure.
Cleaning off fingerprints and light soiling
- Clean MAESTRO only from the outside with a soft, dry cloth.
Cleaning off heavy soiling
- Clean MAESTRO only from the outside with a slightly damp cloth and then dry MAESTRO with a soft, dry cloth.
25. WARRANTY
When submitting warranty claims, the following applies without restricting your legal rights:
- Warranty claims can only be asserted within a period of max. 2 years (1 year in North America and Australia), calculated from the date of purchase.
- sonoro audio GmbH shall, at its own discretion, repair or replace MAESTRO free of charge any defects caused by material or manufacturing defects within the warranty period.
- In case of a complaint, please contact our customer service department.
You can find contact details under "Contact data" or at www.sonoro.de. - No new warranty period begins following repair or replacement of MAESTRO.
The warranty period of 2 years (1 year in North America and Australia) from date of purchase remains applicable. - Excluded from the warranty are batteries, damage caused by improper use, normal wear and tear, as well as defects which only minimally affect the value or usability of MAESTRO. The warranty also expires in case of any modifications not made by our authorised service centre.
MAESTRO
SO-1000
FR
RÉCEPTEUR INTERNET HIFI AVEC AMPLIFICATEURS DE PUISSANCE NUMÉRIQUE, LECTEUR CD, PRÉAMPLIFICATEUR PHONO, DAB+ & BLUETOOTH®
text_image
sonoro® InternetRadioMode d'emploi
TABLE DES MATIÈRES
1. INTRODUCTION.... 144
1.1 DONNÉES DE CONTACT
| Adresse | sonoro audio GmbH,Nordkanalallee 94, D-41464 Neuss, Deutschland |
| Téléphone | +49 2131 8834-141 |
| Fax | +49 2131 7517-599 |
| support@sonoro.de | |
| Site Internet | www.sonoro.de |
1.2 UTILISATION PRÉVUE
natural_image
Technical line drawing of a device rear panel with four circular holes and a rectangular slot, labeled with number 41 (no text or symbols on the diagram itself)natural_image
Hand inserting a small circular component into a mobile phone (no text or symbols visible)
natural_image
Technical line drawing of a bolt and nut assembly (no text or symbols)natural_image
Technical line drawings of two T-shaped pipe fittings labeled A and B, showing different connection configurations (no text or symbols beyond labels)
text_image
Diagram of an electronic device rear panel with labeled ports and connectors, showing internal components and directional arrows.3.4 CONNECTION DES HAUT-PARLEURS

AVERTISSEMENT!
Risque de dommages!
natural_image
Hand using a power tool to install an electrical socket (no text or symbols visible)text_image
Select your Audio System Please select your audio system from the list below. Scanning...text_image
MAESTRO APP ROOM CORRECTION Before After BEGIN CORRECTION DEVICE NAME MAESTRO App FIRMWARE V1.03text_image
SCANNING THE ROOM "Room Correction" Would Like to Access the Microphone This app needs to record sound via microphone. You can change this options in the system settings. Don't Allow OK from several portions. The process last about 30 seconds.text_image
PLAYING TEST TONE Device is playing test tone for 4 seconds, please confirm whether you are able to hear the test tone. RETRY NEXT
text_image
SCANNING THE ROOM Device is scanning the room. Please walk around the room with the phone in your hand so it can listen from several positions. The process last about 50 seconds.text_image
CORRECTING THE ROOM Device is correcting the room according to the room's raw scan.text_image
ROOM CORRECTION WELL DONE! Device has completed the room correction, let's rock! Writing data... 4/4 REDO OKnatural_image
Front view of a Sonora audio amplifier device with control knobs and buttons (no readable text beyond brand name)INDHOLDSFORTEGNELSE
1. INDLEDNING......210
1.1 KONTAKTOPLYSNINGER....210
1.2 NORMAL BRUG....211
2. LÆR DIN MAESTRO AT KENDE 211
2.1 LEVERINGSOMFANG....211
2.2 BETJENINGSELEMENTER OG KNAPPER SET FORFRA 212
2.3 TEKNISKE SPECIFICATIONER....217
2.4 VAREMÆRKER OG CERTIFIKATER 219
3. SÅDAN KOMMER DU I GANG....220
3.1 PAK MAESTRO UD 220
3.2 ISÄETNING AF BATTERIET I FJERNBETJENINGEN.... 220
3.3 ANVENDELSE AF ANTENNERNE 221
3.4 H∅JTTALERSTIK....222
3.5 FORFORSTAERKERUDGANG/TILSLUTNING AF PRE-OUT/2.1-SYSTEM ..... 224
3.6 TILSLUTNING AF PLADESPILLER 225
3.7 TILSLUTNING AF NETKABLET 226
3.8 F∅RSTE OPSÆTNING....227
4. GENERELLE FUNKTIONER....229
5. MENUOVERSIGT....231
6. INDIKATORSYMBOLER 232
7. FM-RADIO 233
7.1 ANVENDELSE 233
7.2 OPSÄETNINGSMENU 234
8. DAB-RADIO 235
8.1 ANVENDELSE 235
8.2 OPSÄETNINGSMENU 236
INDHOLDSFORTEGNELSE
9. INTERNETRADIO 237
9.1 ANVENDELSE 237
9.2 OPSÄETNINGSMENU 238
9.3 KANALLISTE 238
9.4 ANVENDELSE AF WEBPORTALEN 239
10. BLUETOOTH....239
10.1 FORBINDELSE 239
10.2 ANVENDELSE 240
10.3 OPSÄETNINGSMENU 240
11. AUX IN 1....241
11.1 ANVENDELSE 241
11.2 OPSÄETNINGSMENU....241
12. AUX IN 2....242
12.1 ANVENDELSE 242
12.2 OPSÄETNINGSMENU....242
13. OPTISK TILSTAND......243
13.1 ANVENDELSE 243
13.2 OPSÄETNINGSMENU 243
14. KOAKSIAL INDGANGSTILSTAND 244
14.1 ANVENDELSE 244
14.2 OPSÄETNINGSMENU 244
15. CD-TILSTAND 245
15.1 ANVENDELSE 245
15.2 OPSÄETNINGSMENU 246
INDHOLDSFORTEGNELSE
natural_image
Technical line drawing of a device rear panel with four circular holes and a rectangular slot, labeled with number 41 (no text or symbols on the diagram itself)- Ventilationsåbninger, underside

OBS!
Fare for beskadigelse!
* Navigationsknapper (+,-)
2.3 TEKNISKE SPECIFIKATIONER
| Emne Oplysninger | |
| Mål (B x D x H) ca. 432 x 277 x 120 mm | |
| Vægt ca. 6,0 kg | |
| Omgivelsestemperatur 0 °C til +40 °C | |
| Belastningsimpedans 4-16 Ω | |
| Nominel effekt1 KHz, THD+N <0,1 %(AES17) | 170 W x 2 ved 4 Ω100 W x 2 ved 8 Ω |
| Transmissionsområde 20 Hz ~ 20 KHz | |
| Skærm 2,8» TFT-farvedisplay | |
| Frekvensområde, FM 87,50 MHz-108,00 MHz | |
| DAB/DAB+ Bånd III, 174,928 MHz-239,200 MHz | |
| Internetradio Mere end 25.000 kanaler globalt | |
| Favoritter | 10 til FM | DAB/DAB+ | Internetradio | Spotify8 til TIDAL | Napster | Deezer | Qobuz | Amazon Music |
| Understøttede CD-formater | CD-DA (12 cm), CD-R*, CD-RW*Audio CD, MPEG 1 Layer 3 (MP3), Windows Media Audio (WMA, DRM ikke understøttet)Samplingsfrekvens 16 KHz~48 KHz, bit-Rate maks. 320 kbps (* Afspilning alt efter kvaliteten af optagelsen og mediet) |
| USB-opladning | Udgangseffekt: 5 V jævnstrøm, 2,1 A |
| USB-afspilning | Kompatibilitetssystem: FAT 16, FAT 32 (ikke kompatibel med NTFS eller andre systemer) |
| AUX-IN | Port 1: RCA-stikdåse, følsomhed: 1000 mV Port 2: 3,5 mm stikdåse, følsomhed: 300 mV |
| Optisk indg. (TOSLINK), koaksial indg. (S/PDIF) | Understøtter lineær PCMSamplingsfrekvens: 28 KHz-216 KHz,kanal: Stereo 16 bit, 24 bit |
DK
natural_image
Hand inserting a small circular component into a mobile phone (no text or symbols visible)
natural_image
Technical line drawing of a mechanical assembly showing a bolt inserted into a nut (no text or symbols)natural_image
Two technical diagrams labeled A and B showing T-shaped pipe fittings with connectors (no text or symbols beyond labels)
text_image
Diagram of an electronic device rear panel with labeled ports and connectors, showing internal components and directional arrows.3.4 H∅JTTALERSTIK

OBS!
Fare for beskadigelse!
natural_image
Technical line drawing of a mechanical component labeled 'Nulleder' (no other text or symbols)Fase Rød marking
natural_image
Hand using a screwdriver to install an electrical socket (no text or symbols visible)Fase

OBS!
Elektrisk stød!
text_image
Select your Audio System Please select your audio system from the list below. Scanning...text_image
MAESTRO APP ROOM CORRECTION Before After BEGIN CORRECTION DEVICE NAME MAESTRO.App FIRMWARE V1.03text_image
SCANNING THE ROOM "Room Correction" Would Like to Access the Microphone This app needs to record sound via microphone. You can change this options in the system settings. Don't Allow OK phone is your phone to get much from several poations. The process last about 30 seconds.text_image
PLAYING TEST TONE Device is playing test tone for 4 seconds, please confirm whether you are able to hear the test tone. RETRY NEXT
text_image
SCANNING THE ROOM Device is scanning the room. Please walk around the room with the phone in your hand so it can listen from several positions. The process last about 50 seconds.text_image
ROOM CORRECTION CORRECTING THE ROOM Device is correcting the room according to the room's raw scan.text_image
WELL DONE! Device has completed the room correction, let's rock! Writing data... 4/4 REDO OKnatural_image
Technical line drawing of a device rear panel with four circular holes and a rectangular slot, labeled with number 41 (no text or symbols on the diagram itself)natural_image
Hand pressing a button on a smartphone (no text or symbols visible)
natural_image
Line drawing of a mechanical component with a threaded bolt inserted, showing assembly or repair (no text or symbols)IT
natural_image
Technical line drawings of two T-shaped pipe fittings labeled A and B, showing different connection configurations (no text or symbols beyond labels)!
text_image
Diagram of an electronic device rear panel with labeled ports and connectors, showing internal components and directional arrows.3.4 ATTACCHI PER ALTOPARLANTI

NOTA!
Rischio di danni!
text_image
USB SUBWOOFER•[Bluetoothscollegato]
text_image
Select your Audio System Please select your audio system from the list below. Scanning...text_image
MAESTRO APP ROOM CORRECTION Before After BEGIN CORRECTION DEVICE NAME MAESTRO App FIRMWARE V1.03IT
text_image
SCANNING THE ROOM "Room Correction" Would Like to Access the Microphone This app needs to record sound via microphone. You can change this options in the system settings. Don't Allow OK from several positions. The process last about 30 seconds.text_image
PLAYING TEST TONE Device is playing test tone for 4 seconds, please confirm whether you are able to hear the test tone. RETRY NEXTtext_image
SCANNING THE ROOM Device is scanning the room. Please walk around the room with the phone in your hand so it can listen from several positions. The process last about 50 seconds. 2/4text_image
CORRECTING THE ROOM Device is correcting the room according to the room's raw scan.
text_image
WELL DONE! Device has completed the room correction, let's rock! Writing data... 4/4 REDO OK1. INTRODUCTIE....346
1.1 CONTACTGEGEVENS....346
1.2 BEOOGD GEBRUIK 347
2. MAAK KENNIS MET UW MAESTRO.... 347
2.1 INDEDOOS....347
2.2 BEDIENINGSELEMENTEN EN AANSLUITINGEN VOORAANZICHT......348
2.3 TECHNISCHE GEGEVENS 353
2.4 KEURMERKEN EN CERTIFICATEN 355
natural_image
Technical line drawing of a device rear panel with four circular holes and a rectangular slot, labeled with number 41 (no text or symbols on the diagram itself)natural_image
Hand holding a small knob with a circular dial labeled 'CE' and 'T200', no text or symbols on the knob itself
natural_image
Line drawing of a mechanical component with a threaded bolt inserted, showing assembly or repair (no text or symbols)natural_image
Technical line drawings of two T-shaped pipe fittings labeled A and B, showing different connection configurations (no text or symbols beyond labels)
text_image
Diagram of an electronic device rear panel with labeled ports and connectors, showing internal components and directional arrows.3.4 LUIDSPREKERAANSLUITINGEN
LET OP!
text_image
3.00V SUBWOOFERtext_image
Select your Audio System Please select your audio system from the list below. Scanning...text_image
SCANNING THE ROOM "Room Correction" Would Like to Access the Microphone This app needs to record sound via microphone. You can change this options in the system settings. Don't Allow OK from several positions. The process last about 30 seconds.text_image
PLAYING TEST TONE Device is playing test tone for 4 seconds, please confirm whether you are able to hear the test tone. RETRY NEXTtext_image
SCANNING THE ROOM Device is scanning the room. Please walk around the room with the phone in your hand so it can listen from several positions. The process last about 50 seconds.text_image
ROOM CORRECTION CORRECTING THE ROOM Device is correcting the room according to the room's raw scan.
text_image
ROOM CORRECTION WELL DONE! Device has completed the room correction, let's rock! Writing data... 4/4 REDO OKAt sonoro we are putting the utmost effort in to developing state-of-the-art products with impeccable quality standards. It is very important to us that you stay satisfied with your sonoro product for the lifetime of the unit. If for any reason you need assistance or have a warranty claim, please do not hesitate to get in touch with our Service Team.